When I got my first iPod Touch several years ago, I excitedly opened the App Store and started downloading the first ten games from the Top Charts. It wasn’t long before I came to the sad realization that my iPod storage wasn’t infinite: the alert telling me I didn’t have enough storage to download all the apps quashed my youthful enthusiasm.
iOS 9 and tvOS introduced On-Demand Resources (ODR) as a way to manage the size of your apps. The idea behind ODR is that your app only retrieves the resources it needs when they’re required. If the app needs additional resources, it downloads them on-demand.
There are two main reasons to take advantage of ODR in your apps:
- Faster initial download: The faster the user can download the app, the faster they can start falling in love with it.
- Smaller app size: When storage is limited, the biggest apps are usually the first ones that users will delete. You want to keep your app’s storage footprint well under the radar!
Time to size things up — and dive right into adding ODR to an existing app.
Getting Started
Open the starter project named RWHomeTheater; this is the same app you developed in the two video playback chapters, with a few changes added in.
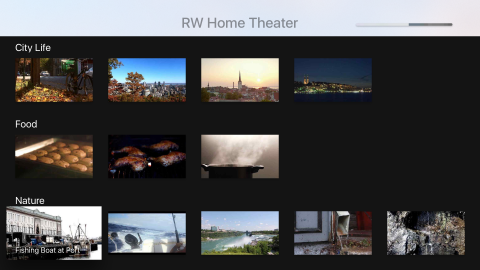
In case you haven’t gone through the video playback chapters, RWHomeTheater lets you pick from a collection of remarkable, entertaining videos that range from a cow eating grass to water boiling. The app has 14 videos, which take up nearly 200 MB by themselves.
Run the app in the tvOS Simulator; you’ll see the main difference from the video playback chapters is the lack of a Play All option in the app. All classes and collection view cells for Play All have been removed from the project.
In Xcode, open Main.storyboard and zoom in on the top-right of the RW Home Theater Scene. There’s a UIProgressView that’s hidden by default; later on, you’ll use this to show the user the status of their downloads.
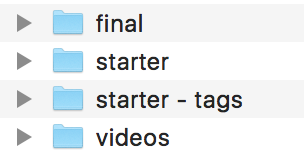
If you haven’t already downloaded the videos for the video playback chapters, you need to download them from this location: http://bit.ly/22obxJJ. Now that you have these files on your computer, you need to copy them into the directory alongside starter, starter-tags, and final.
Your directory should now look like this:
NSBundleResourceRequest and Tags
To work with ODR, you’ll need a basic understanding of Bundles and how they handles files.
A Bundle represents a group of files on the device. In the case of ODR, these files will include resources such as videos, images, sounds, 3D models, and shaders; the main exception is that you can’t include Swift, Objective-C or C++ source code in ODR.
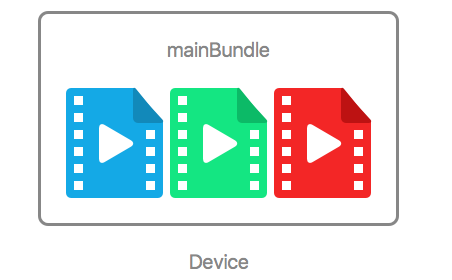
Most of the time, you’ll use Bundle.main as your main bundle. By default, all the resources downloaded in your app are included in the main bundle.
Think of the main bundle as a big box that holds all of your app’s “stuff”.
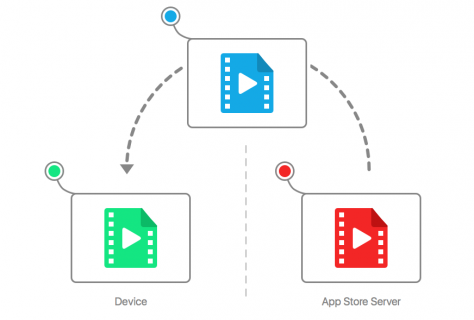
However, when you use ODR, the resources you download aren’t in the main bundle; instead, they’re in a separate bundle that contains all the resources of a given tag. The OS only downloads a tag’s resources when needed.
When you request a tag, the OS downloads all resources for that tag and stores it in a Bundle. Then, instead of using the main bundle to find the resource, you simply look inside this alternative bundle.
You request a tag using an instance of NSBundleResourceRequest. This resource request takes strings that represent the tags as parameters and lets you know when your resources are available. Once the resource has been loaded, you can use the resource request’s bundle property to access the files in the bundle.
Once you’re done with an NSBundleResourceRequest, you can call endAccessingResources() on the request and let it deallocate. This lets the system know you’re done with the resources and that it can delete them if necessary.
Now that you understand the foundations of ODR, you can get started on the coding!
Adding Tags
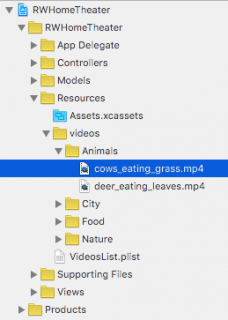
In the project navigator, expand the videos group and the Animals subgroup under the Resources folder and select cows_eating_grass.mp4:
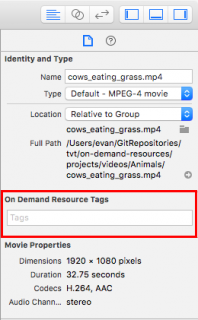
Show the File Inspector using the Utilities menu. Notice the section named On Demand Resource Tags:
To add a tag to a file, you simply type the name of the tag in this text box and press Enter.
In order to make things easier to discern from code, you’ll add the video’s name as its tag.
Be careful — if you don’t name the tag exactly the same as the video, then ODR won’t work properly.
For cows_eating_grass.mp4, add “cows_eating_grass” to the On Demand Resource Tags text field and press Enter:
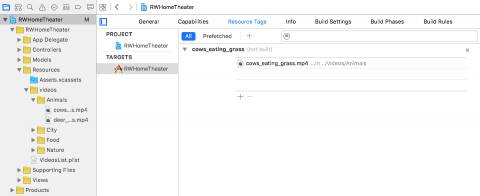
Select the project in the project navigator, select the target, and go into the Resource Tags tab; you’ll see the Resource Tags menu.
The app has a tag named “cows_eating_grass” with a single associated file:
Next up — adding the tags for every single video file. Oh, come on, it’ll be fun! :]
If you don’t want to go through the laborious task of adding these tags — good news! You can simply open the project from this chapter’s folder named starter – tags.
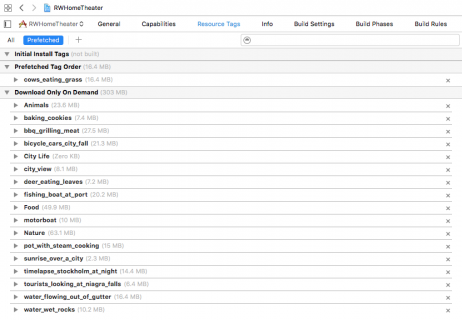
Once you’ve added all of the tags, whichever way you chose to do it, the Resource Tags menu should look like the following:
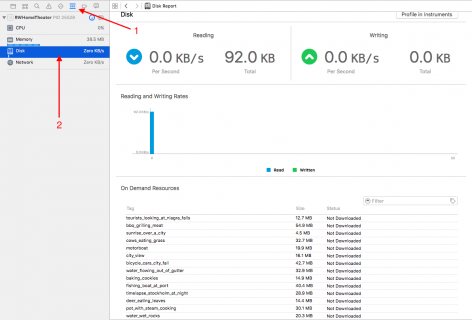
Build and run your app; when the app loads, open the debug navigator in Xcode and select Disk. This will show you the status of all tags in the app:
The app won’t work at the moment since you haven’t downloaded the files to the Apple TV yet: every tag says “Not Downloaded”. Time to fix that problem!
Resource Utility Class
In order to keep all your ODR code organized, you’ll create a class to manage your on-demand resources. Select File\New\File\Swift File, and name it ResourceManager.
Add the following class declaration to the file:
class ResourceManager { static let shared = ResourceManager() } |
This code creates a new class named ResourceManager and creates a class variable for a shared instance.
Now, add the following code to ResourceManager:
// 1 func requestVideoWith(tag: String, onSuccess: @escaping () -> Void, onFailure: @escaping (Error) -> Void) -> NSBundleResourceRequest { // 2 let videoRequest = NSBundleResourceRequest(tags: [tag]) videoRequest.loadingPriority = NSBundleResourceRequestLoadingPriorityUrgent // 3 videoRequest.beginAccessingResources { error in OperationQueue.main.addOperation { if let error = error { onFailure(error) } else { onSuccess() } } } // 4 return videoRequest } |
There’s a lot of new stuff going on here, so taking it piece by piece:
- Create a method to easily request a new video in your app. This method takes the tag name as a parameter, as well as two closures: one to call if the download succeeds, and one to call if the download fails.
-
Instantiate a new
NSBundleResourceRequestwith the given tag. By settingloadingPriorityof the request toNSBundleResourceRequestLoadingPriorityUrgent, the system knows that the user is waiting for the content to load and that it should download it as soon as possible.
-
To start loading the resources, call
beginAccessingResources. The completion handler is called on a background thread, so you add an operation to the main queue to respond to the download’s result. If there is an error, theonFailureclosure is called; otherwise,onSuccessis called. - Return the bundle request so that the requester can access the bundle’s contents after the download finishes.
Before you can add this to the project, you need to make a small change to the video struct. Open Video.swift and find the current declaration of videoURL:
var videoURL: URL { return url(forResource: videoName, withExtension: "mp4")! } |
Replace that declaration with the following:
var videoURL: URL! |
Also, change the implementation of video(fromDictionary:) to match the following:
static func videoFrom(dictionary: [String: String]) -> Video { let previewImageName = dictionary["previewImageName"]! let title = dictionary["videoTitle"]! let videoName = dictionary["videoName"]! return Video(previewImageName: previewImageName, title: title, videoName: videoName, videoURL: nil) } |
In the original code, videoURL pointed to a location in the main bundle for the file. However, since you’re now using ODR, the resource is now in a different bundle. You’ll set the video’s URL once the video is loaded — and once you know where the video is located.
Requesting Tags on Selection
Open VideoListViewController.swift and add the following property to VideoListViewController:
var currentVideoResourceRequest: NSBundleResourceRequest? |
This property will store the NSBundleResourceRequest for the most recently requested video.
Next, you’ll need to request this video when the user selects one of the videos in the collection view.
Find didSelectVideoAt(_:) and replace its implementation with the following:
func didSelectVideoAt(_ indexPath: IndexPath) { // 1 currentVideoResourceRequest?.progress.cancel() // 2 guard var video = collectionViewDataSource .videoFor(indexPath: indexPath), let videoCategory = collectionViewDataSource .videoCategoryFor(indexPath: indexPath) else { return } // 3 currentVideoResourceRequest = ResourceManager.shared .requestVideoWith(tag: video.videoName, onSuccess: { [weak self] in }, onFailure: { [weak self] error in } ) } |
The code breaks down as follows:
- If there’s a video request in progress, cancel that resource request and let the new video request take priority.
-
This is the same code from
didSelectVideoAt(_:); it’s how you find the video and category of the selected cell. -
Set
currentVideoResourceRequestequal to a newNSBundleResourceRequestcreated byResourceManager. The resource tag passed as a parameter is the name of the video; this is why you followed that strict naming scheme earlier.
The next step is to handle the failure case. Add the following method to the VideoListViewController extension:
func handleDownloadingError(_ error: NSError) { switch error.code{ case NSBundleOnDemandResourceOutOfSpaceError: let message = "You don't have enough storage left to download this resource." let alert = UIAlertController(title: "Not Enough Space", message: message, preferredStyle: .alert) alert.addAction(UIAlertAction(title: "OK", style: .cancel, handler: nil)) present(alert, animated: true, completion: nil) case NSBundleOnDemandResourceExceededMaximumSizeError: assert(false, "The bundle resource was too large.") case NSBundleOnDemandResourceInvalidTagError: assert(false, "The requested tag(s) (\(currentVideoResourceRequest?.tags ?? [""])) does not exist.") default: assert(false, error.description) } } |
handleDownloadingError(_:) handles all the possible errors from a resource request.
The main three error cases occur when either the device is out of storage, the resource is too large, or you’ve requested an invalid tag. If the device is out of storage, you alert the user of the problem. You’ll need to catch the other two issues before you deploy your app; at that point, it’s too late to make changes. So that they don’t go unnoticed in your testing phase (you are testing, right?), you crash the app with an error message.
The default assertion catches any other errors that could occur, such as network loss.
Now, call your new method in the onFailure(_:) closure:
self?.handleDownloadingError(error as NSError) |
In the onSuccess closure, add the following code to handle the successful download:
guard let currentVideoResourceRequest = self?.currentVideoResourceRequest else { return } video.videoURL = currentVideoResourceRequest.bundle .url(forResource: video.videoName, withExtension: "mp4") let viewController = PlayVideoViewController .instanceWith(video: video, videoCategory: videoCategory) self?.navigationController?.pushViewController(viewController, animated: true) |
Here you set the URL of the selected video to the downloaded resource within the requested bundle. Then, you present a new instance of PlayVideoViewController with the video as a parameter.
Run your app; select video to play and you’ll notice there’s a bit of a delay before the video starts. This is because the video is being downloaded from the server — or in this case, from your computer.
To check that your app is using the on-demand bundle, open the debug navigator and select Disk; the Status column of your chosen video will now show “In Use”.
If you press Menu on your remote, you’ll notice the tag still shows as “In Use”. That’s not quite right, is it? The resource should change to “Downloaded” since you’re no longer using the resource. You’ll fix this in the next section.
Purging Content
Responsible management of your resources includes releasing them when you’re done. This takes two steps:
-
Call
endAccessingResources()on theNSBundleResourceRequest. - Let the resource request deallocate.
The best time to let ODR know you no longer need the video is once the user’s finished watching the video. This happens when you dismiss PlayVideoViewController and VideoListViewController reappears on-screen.
Add the following method to VideoListViewController.swift:
override func viewWillAppear(_ animated: Bool) { super.viewWillAppear(animated) currentVideoResourceRequest?.endAccessingResources() currentVideoResourceRequest = nil } |
This code first checks that VideoListViewController reappears once you’ve dismissed a different view controller from the navigation stack. It then calls endAccessingResources() on the resource request and sets the property to nil, which lets the resource request deallocate.
Build and run your app; watch the Resource Tags menu as you play a video, then press Menu to go back. The Resource Tags menu now shows the requested resource as “Downloaded”. Perfect! You won’t delete the resource until the system needs the space. As long as the device has room, the resources will remain in storage.
Progress Reporting
At present, the user has no way to see the progress of the download. Is the video almost completely downloaded? Or is it not downloading at all?
In order to indicate the progress of the download, you’ll use a progress bar to observe the progress of the NSBundleResourceRequest.
Back in VideoListViewController.swift, add the following line to the beginning of didSelectVideoAt(_:):
progressView.isHidden = false |
At the beginning of both the onSuccess and onFailure closures, add the following line — which does the exact opposite as the previous line:
self?.progressView.isHidden = true |
This code shows the progress bar when the download begins, and hides it when the download ends.
Key-Value Observing
To connect the progress bar with the NSBundleResourceRequest, you need to use Key-Value Observing.
Open ResourceManager.swift and add the following to the top of the file, above the class declaration:
let progressObservingContext: UnsafeMutableRawPointer? = nil |
Next, you need to change requestVideoWith(tag:onSuccess:onFailure:) to accept the progress observer as a parameter.
Replace the declaration of requestVideoWith(tag:onSuccess:onFailure:) with the following:
func requestVideoWith(tag: String, progressObserver: NSObject?, onSuccess: () -> Void, onFailure: (NSError) -> Void) -> NSBundleResourceRequest { |
This method now has a new progressObserver parameter that will make it easier to use KVO with your custom view controller and progress bar.
Within this method, add the following code before the return statement:
if let progressObserver = progressObserver { videoRequest.progress.addObserver(progressObserver, forKeyPath: "fractionCompleted", options: [.new, .initial], context: progressObservingContext) } |
Here, you add the argument as an observer to the request’s progress.
Just like you added the observer before the resource was loaded, you’ll need to remove the observer once it’s loaded. Add the code below to the beginning of the OperationQueue.main.addOperation block:
if let progressObserver = progressObserver { videoRequest.progress.removeObserver(progressObserver, forKeyPath: "fractionCompleted") } |
Xcode will respond with an error in VideoListViewController; this is because you changed the method signature of requestVideoWith(tag:onSuccess:onFailure) to requestVideoWith(tag:progressObserver:onSuccess:onFailure).
Open VideoListViewController.swift and change the line with the error to the following:
currentVideoResourceRequest = ResourceManager.shared .requestVideoWith(tag: video.videoName, progressObserver: self, onSuccess: { [weak self] in ... }, onFailure: { [weak self] error in ... } ) |
The only change here is that you added the progressObserver parameter and passed self as the observer.
In order to respond to changes as the download progresses, you’ll need to implement observeValue(forKeyPath:of:change:context:) in the view controller — your observer.
Add the following method to VideoListViewController:
override func observeValue(forKeyPath keyPath: String?, of object: Any?, change: [NSKeyValueChangeKey : Any]?, context: UnsafeMutablePointer?) { if context == progressObservingContext && keyPath == "fractionCompleted" { OperationQueue.main.addOperation { self.progressView.progress = Float((object as! Progress).fractionCompleted) } } } |
When the value of the download’s progress changes, you reflect this change in the progress bar on the main thread.
Build and run your app; select a video to watch and you’ll see the progress bar at the top-right corner of the screen. Once the progress bar has filled, it will disappear and the video will play:
Anticipating User Action
The biggest challenge with ODR is delivering resources in a timely fashion. You can’t read your user’s mind, but you can preemptively download resources related to the selected video to make it look like you read their mind! :]
Once again, you’ll use tags, but instead of using the video name as the tag, you’ll use the video category. When the user selects a video, you’ll download all files in that category, as the user is likely to watch other videos in that category.
Select cows_eating_grass.mp4 and go to the Inspector where the resource’s tags are located. In the tags field, add Animals. The Inspector should now look like this:
Perform the same action for each file’s respective category name. When you’re done, you should have two Animal tags, four City Life tags, three Food tags, and five Nature tags in the Resource Tags menu.
Your Resource Tags menu should look like this:
Just as you used ResourceManager to help create the video resource request, you’re going to write a method to help create this category resource request.
Add the following method to ResourceManager:
func requestCategoryWith(tag: String) -> NSBundleResourceRequest { let currentCategoryBundleRequest = NSBundleResourceRequest(tags: [tag]) currentCategoryBundleRequest.loadingPriority = 0.5 currentCategoryBundleRequest .beginAccessingResources { error in } return currentCategoryBundleRequest } |
There are two particularly interesting parts of this method: the loading priority and the completion handler.
The loading priority was chosen arbitrarily. When you request the individual video, you set the priority to NSBundleResourceRequestLoadingPriorityUrgent. If you don’t use this constant, the priority must be between 0.0 and 1.0.
You’ll notice the completion handler is empty. There’s no immediate action to take once the download completes; it’s purely a preemptive gesture.
Open VideoListViewController.swift and add these two properties to the class:
var selectedIndexPath: IndexPath? var currentCategoryResourceRequest: NSBundleResourceRequest? |
selectedIndexPath helps you track the last video selected. currentCategoryResourceRequest makes it easy to control the deallocation of the request, just as you did before with currentVideoResourceRequest.
Add the following line to the beginning of didSelectVideoAt(_:):
selectedIndexPath = indexPath |
This simply stores the most recent selection in selectedIndexPath.
At the end of didSelectVideoAt(_:), add the following code to use your ResourceManager:
currentCategoryResourceRequest?.endAccessingResources() currentCategoryResourceRequest = ResourceManager .shared.requestCategoryWith(tag: videoCategory.name) |
If there’s a category resource request in progress, you call endAccessingResources() so that the system knows you don’t need those resources anymore. You then pass in the name of the new video category as the tag. The video category name in this method matches the tags added to all the videos.
Finally, add the following code to the bottom of viewWillAppear(_:):
if let selectedIndexPath = selectedIndexPath, selectedIndexPath.item + 1 == collectionView .numberOfItems(inSection: selectedIndexPath.section) { currentCategoryResourceRequest?.endAccessingResources() currentCategoryResourceRequest = nil } |
This code checks if the most recent video was the last one in the category. If so, you alert the resource request that you’re done using it so it can be deallocated.
Build and run your app. When you select a video in a category for the first time, it will take a bit of time to load. When you select the next video in the category, it will load almost instantly because the app downloaded it in anticipation of your actions.
Different Types of Tags
In ODR, there are three types of resource tags:
-
Initial Install Tags: These resources are downloaded with the rest of the app, but can be purged when no longer needed.
One possible use of initial install tags is for resources that you need during the app introduction.
- Prefetch Tag Order: These resources are downloaded in the order that they are arranged after the app finishes downloading.
- Download On Demand: This is the same type you’ve been using all along in this chapter; they’re only downloaded when you request them.
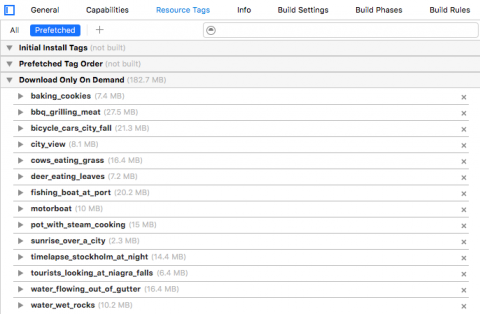
Select the project’s target and open the Resource Tags interface. There’s one section for each of the three types of resource tags.
Currently, only the Download On Demand section has tags, as tags are added automatically to this category.
When the user first downloads the app, they’re most likely to watch the first video they see.
In the case of RWHomeTheater, the first video is cows_eating_grass.mp4, and the tag for that video is, unsurprisingly, cows_eating_grass.
To make this video available to the user as soon as possible after the app download has completed, you’ll need to make cows_eating_grass a prefetched tag.
In the Resource Tags menu, drag the cows_eating_grass tag into the Prefetch Tag Order category.
Your menu should now look like this:
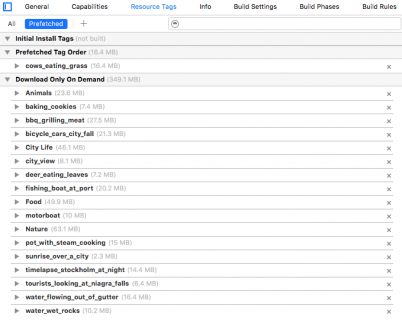
Currently, there is no way to test the initial install or prefetched tags in the iOS Simulator. Make sure to use TestFlight Beta Testing to test these changes in your app.
Where to Go From Here?
You now know everything you need to bring On-Demand Resources into your tvOS apps. ODR lets you create large, resource-intensive apps that fit within the 200MB initial download requirement.
To learn more about best practices for working with On-Demand Resources, check out the On-Demand Resources Guide (http://apple.co/1Ol7VSC).
 This tutorial was taken from Chapter 17 of tvOS Apprentice, Second Edition. You also might enjoy the other 27 chapters and 500+ pages in the book! :]
The book has been completely updated to work with Swift 3, tvOS 10 and Xcode 8. Check out the book and let us know what you think!
The post On-Demand Resources in tvOS Tutorial appeared first on Ray Wenderlich.
