
Learn how to build custom presentations with UIPresentationController.
View controller presentation has been an integral part of every iOS developer’s toolkit since the early days of iOS. You’ve probably used present(_:animated:completion:) before, but if you’re like a lot of developers, you’ve stayed with the default transition styles shipped with iOS. In this UIPresentationController tutorial you’ll learn how to present view controllers with custom transitions and custom presentation styles. No longer will you be limited to full-screen or popover presentations and the standard transition animations. You’ll start with some drab, lifeless view controller presentations and you’ll bring them to life. By the time you finish, you’ll learn:
- How to create a
UIPresentationControllersubclass. - How to use a
UIPresentationControllerfor slick custom presentations; the presented view controller doesn’t even have to know it’s there. - How to reuse a
UIPresentationControllerfor various controllers where you’ve tweaked presentation parameters. - How to make adaptive presentations that support any screen size your app might encounter.
Prequisites: This tutorial requires Xcode 8.0 or newer in order to be compatible with the latest Swift syntax.
This iOS tutorial also assumes you are familiar with Swift and the iOS SDK. If you’re new to these, try starting out with our written iOS tutorials and Swift tutorials. Make sure you catch some of the video tutorials too!
Getting Started
The scenario: With the 2016 summer games all done, a client hires you to create an app that tallies the medal count for international sporting events where athletes and nations earn various medals.
While the functional requirements are pretty simple, your sponsor asked for a rather cool looking slide-in transition to present the list of games.
At first, you feel a bit of panic but then realize you do have transition-building tools at your fingertips. You even put down the paper bag!
Download the starter project and open it.
Take a moment to familiarize your with the project and the following elements:
- MainViewController.swift: the main controller of this project from which all presentations start. This will be the only existing file in the project that you’ll modify.
- GamesTableViewController.swift: displays a list of Games the user can select.
- MedalCountViewController.swift: displays the medal count for the selected sporting event.
- GamesDataStore.swift: represents the model layer in the project. It’s responsible for creating and storing model objects.
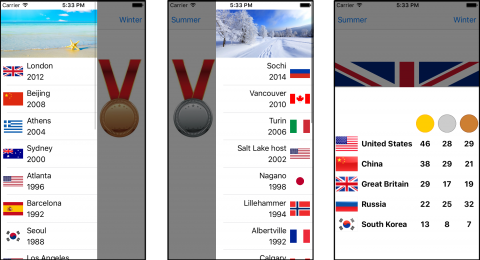
Before you start changing things around, build and run the app to see what it does. You’ll see the following screen:

First, tap the Summer button to bring up the GamesTableViewController summer menu.

Notice the menu is presented the default way, which is from the bottom; the client wants to see a sleek slide-in instead.
Next, select the London 2012 games to dismiss the menu and return to the main screen. This time, you’ll see an updated logo.

Finally, tap the Medal Count button to bring up the MedalCountViewController for the 2012 games.

As you see, the old bottom-up default is used to present this controller too. Tap the screen to dismiss it.
Now that you’ve seen the app you’ll upgrade, it’s time to turn your attention to some core concepts and theory for UIPresentationController.
Core Concepts for iOS Transition
When you call present(_:animated:completion:), iOS does two things.
First, it instantiates a UIPresentationController. Second, it attaches the presented view controller to itself then presents it using one of the built-in modal presentation styles.
You have the power to override this mechanism and provide your own UIPresentationController subclass for a custom presentation.
Understanding these key components is mandatory if you want to build sweet presentations in your apps:
- The presented view controller has a transitioning delegate that’s responsible for loading the
UIPresentationControllerand the presentation/dismissal animation controllers. That delegate is an object that conforms toUIViewControllerTransitioningDelegate. - The
UIPresentationControllersubclass is an object that has many presentation-customizing methods, as you’ll see later in the tutorial. - The animation controller object is responsible for the presentation and dismissal animations. It conforms to
UIViewControllerAnimatedTransitioning. Note that some use cases warrant two controllers: one for presentation and one for dismissal. - A presentation controller’s delegate tells the presentation controller what to do when its trait collection changes. For the sake of adaptivity, the delegate must be an object that conforms to
UIAdaptivePresentationControllerDelegate.
That’s all you need to know before you dive in!
Creating the Transitioning Delegate
A transitioningDelegate object inherits from NSObject and conforms to UIViewControllerTransitioningDelegate.
UIViewControllerTransitioningDelegate protocol, as its name hints, declares five optional methods for managing transitions.
You’ll work with these three methods quite a bit in this tutorial.
Set up the Framework
Go to File\New\File…, choose iOS\Source\Cocoa Touch Class, and click Next. Set the name to SlideInPresentationManager, make it a subclass of NSObject and set the language to Swift.
Click Next and set the group to Presentation then click Create.
SlideInPresentationManager to be an NSObject subclass because UIViewController‘s transitioningDelegate must conform to the NSObjectProtocol.Open SlideInPresentationManager and add the following extension:
// MARK: - UIViewControllerTransitioningDelegate extension SlideInPresentationManager: UIViewControllerTransitioningDelegate { } |
Here you make SlideInPresentationManager conform to the UIViewControllerTransitioningDelegate protocol.
In MainViewController you have buttons for both seasons: Summer on the left and Winter on the right. There’s also a Medal Count button on the bottom.
To make the presentations fit each button’s context, you’ll add a direction property to SlideInPresentationManager. Later, you’ll pass this property to the presentation and animation controllers.
Add the following to the top of SlideInPresentationManager.swift:
enum PresentationDirection { case left case top case right case bottom } |
Here you declare a simple enum to represent the presentation’s direction.
Next, add the following property to SlideInPresentationManager:
var direction = PresentationDirection.left |
Here you’re adding a direction property and giving it a default value of left.
Now to assign an instance of SlideInPresentationManager as the transitioningDelegate property for every controller you present.
Open MainViewController.swift and add the following above the dataStore property definition:
lazy var slideInTransitioningDelegate = SlideInPresentationManager() |
You might ask yourself why you’re adding this as a property on MainViewController. There are two reasons:
transitioningDelegateis a weak property, so you must keep a strong reference to the delegate somewhere.- However, you don’t to keep this reference on the presented controller itself because you might want to re-use it on different presentation styles.
- Adding it to
MainViewControllerkeeps the strong reference on the presenting controller. - Deciding the type of presentation to use is now the presenting controller’s task.
Next, locate prepare(for:sender:), and replace it with the following:
override func prepare(for segue: UIStoryboardSegue, sender: Any?) { if let controller = segue.destination as? GamesTableViewController { if segue.identifier == "SummerSegue" { controller.gamesArray = dataStore.summer //1 slideInTransitioningDelegate.direction = .left } else if segue.identifier == "WinterSegue" { controller.gamesArray = dataStore.winter //2 slideInTransitioningDelegate.direction = .right } controller.delegate = self //3 controller.transitioningDelegate = slideInTransitioningDelegate //4 controller.modalPresentationStyle = .custom } else if let controller = segue.destination as? MedalCountViewController { controller.medalCount = presentedGames?.medalCount //5 slideInTransitioningDelegate.direction = .bottom controller.transitioningDelegate = slideInTransitioningDelegate controller.modalPresentationStyle = .custom } } |
Here’s a section-by-section explanation of what you’ve set up:
- Presentation direction of the summer games menu is .left.
- Presentation direction of the winter games menu is .right.
-
The games controller’s
transitioningDelegateis now theslideInTransitioningDelegatedeclared earlier. -
The
modalPresentationStyleis .custom to make the presented controller expect a custom presentation instead of an iOS default presentation. -
Presentation direction of the
MedalCountViewControlleris now .bottom and thetransitioningDelegateandmodalPresentationStyleare set as you did in Steps 3 and 4.
You’ve reached the end of the section and have set yourself up with the groundwork necessary for the next big thing coming at you: the UIPresentationController subclass.
Creating the UIPresentationController
Sit back and picture this for a moment: the presented controller will take up two-thirds of the screen and remaining third will show as dimmed. To dismiss the controller, you just tap on the dimmed portion. Can you picture it?
Okay, clear your head and come back to the project. In this part, you’ll take care of three critical pieces: subclass, dimming view and customizing the transition.
Creating and Initializing a UIPresentationController Subclass
Go to File\New\File…, choose iOS\Source\Cocoa Touch Class, and click Next. Set the name to SlideInPresentationController, make it a subclass of UIPresentationController and set the language to Swift.
Click Next and set the Group to Presentation.
Click Create to make your new file and add the following code to SlideInPresentationController.swift:
//1 // MARK: - Properties private var direction: PresentationDirection //2 init(presentedViewController: UIViewController, presenting presentingViewController: UIViewController?, direction: PresentationDirection) { self.direction = direction //3 super.init(presentedViewController: presentedViewController, presenting: presentingViewController) } |
Here’s what this does:
-
Declares a
directionproperty to represent the direction of the presentation. - Declares an initializer that accepts the presented and presenting view controllers, as well as the presentation direction.
-
Calls the designated initializer for
UIPresentationController, and then passes it to the presented and presenting view controllers.
Setting up the Dimming View
As mentioned previously, the presentation controller will have a dimmed background. Add the following to SlideInPresentationController, just above the direction property:
fileprivate var dimmingView: UIView! |
Next, add the following extension:
// MARK: - Private private extension SlideInPresentationController { func setupDimmingView() { dimmingView = UIView() dimmingView.translatesAutoresizingMaskIntoConstraints = false dimmingView.backgroundColor = UIColor(white: 0.0, alpha: 0.5) dimmingView.alpha = 0.0 } } |
Here you create the dimming view, prepare it for Auto Layout, and set its background color. Notice you don’t add it to a superview yet. You’ll do that when the presentation transition starts, as you’ll see later in this section.
That presented controller needs to make itself scarce when you tap the dimmed view. Add the following beneath setupDimmingView() to make that happen:
dynamic func handleTap(recognizer: UITapGestureRecognizer) { presentingViewController.dismiss(animated: true) } |
Here you create a UITapGestureRecognizer handler that dismisses the controller.
Of course, you’ll need to write that UITapGestureRecognizer, so add the following to the bottom of setupDimmingView():
let recognizer = UITapGestureRecognizer(target: self, action: #selector(handleTap(recognizer:))) dimmingView.addGestureRecognizer(recognizer) |
This adds a tap gesture to the dimming view and links it to the action method you just added.
Finally, add a call to setupDimmingView() at the end of init(presentedViewController:presenting:direction:):
setupDimmingView() |
Override Presentation Controller Methods
Before you can start customizing the transition, you have to override four methods and a property from UIPresentationController. The default methods don’t do anything, so there’s no need to call super.
First, for a smooth transition, override presentationTransitionWillBegin() to make the dimming view fade in along with the presentation. Add the following code to the main class definition inside of SlideInPresentationController.swift:
override func presentationTransitionWillBegin() { // 1 containerView?.insertSubview(dimmingView, at: 0) // 2 NSLayoutConstraint.activate( NSLayoutConstraint.constraints(withVisualFormat: "V:|[dimmingView]|", options: [], metrics: nil, views: ["dimmingView": dimmingView])) NSLayoutConstraint.activate( NSLayoutConstraint.constraints(withVisualFormat: "H:|[dimmingView]|", options: [], metrics: nil, views: ["dimmingView": dimmingView])) //3 guard let coordinator = presentedViewController.transitionCoordinator else { dimmingView.alpha = 1.0 return } coordinator.animate(alongsideTransition: { _ in self.dimmingView.alpha = 1.0 }) } |
Let’s go over this code:
-
UIPresentationControllerhas a property namedcontainerView. It holds the view hierarchy of the presentation and presented controllers. This section is where you insert thedimmingViewinto the back of the view hierarchy. - Next, you constrain the dimming view to the edges of the container view so that it fills the entire screen.
-
UIPresentationController‘stransitionCoordinatorhas a very cool method to animate things during the transition. In this section, you set the dimming view’salphaproperty to 1.0 along the presentation transition.
Now you’ll hide the dimming view when the presented controller is dismissed, which requires an override of dismissalTransitionWillBegin(). Add this code after the previous overridden method:
override func dismissalTransitionWillBegin() { guard let coordinator = presentedViewController.transitionCoordinator else { dimmingView.alpha = 0.0 return } coordinator.animate(alongsideTransition: { _ in self.dimmingView.alpha = 0.0 }) } |
Similar to presentationTransitionWillBegin(), you set the dimming view’s alpha property to 0.0 alongside the dismissal transition, which has the effect of fading the dimming view.
This next override will respond to layout changes in the presentation controller’s containerView. Add this code after the previous overridden method:
override func containerViewWillLayoutSubviews() { presentedView?.frame = frameOfPresentedViewInContainerView } |
Here you reset the presented view’s frame to fit any changes to the containerView frame.
Next, you’ll give the size of the presented view controller’s content to the presentation controller. Add this code after the previous overridden method:
override func size(forChildContentContainer container: UIContentContainer, withParentContainerSize parentSize: CGSize) -> CGSize { switch direction { case .left, .right: return CGSize(width: parentSize.width*(2.0/3.0), height: parentSize.height) case .bottom, .top: return CGSize(width: parentSize.width, height: parentSize.height*(2.0/3.0)) } } |
This method receives the content container and parent view’s size, and then it calculates the size for the presented content. In this code, you restrict the presented view to 2/3 of the screen by returning 2/3 the width for horizontal and 2/3 the height for vertical presentations.
In addition to calculating the size of the presented view, you need to return its full frame. To do this you’ll override the frameOfPresentedViewInContainerView property. Below the properties at the top of the class definition, add the following:
override var frameOfPresentedViewInContainerView: CGRect { //1 var frame: CGRect = .zero frame.size = size(forChildContentContainer: presentedViewController, withParentContainerSize: containerView!.bounds.size) //2 switch direction { case .right: frame.origin.x = containerView!.frame.width*(1.0/3.0) case .bottom: frame.origin.y = containerView!.frame.height*(1.0/3.0) default: frame.origin = .zero } return frame } |
Have a look at this code section-by-section:
-
You declare a frame and give it the size calculated in
size(forChildContentContainer:withParentContainerSize:). - For .right and .bottom directions, you adjust the origin by moving the x origin (.right) and y origin (.bottom) 1/3 of the width or height.
With all the overrides done, you’re ready to put finishing touches on the transitions!
Implement the Presentation Styles
Remember in the previous section how you created the transitioningDelegate? Well, it’s there but not doing much at the moment. It’s badly in need of some additional implementation.
Open SlideInPresentationManager.swift, locate the UIViewControllerTransitioningDelegate extension and add the following to it:
func presentationController(forPresented presented: UIViewController, presenting: UIViewController?, source: UIViewController) -> UIPresentationController? { let presentationController = SlideInPresentationController(presentedViewController: presented, presenting: presenting, direction: direction) return presentationController } |
Here you instantiate a SlideInPresentationController with the direction from SlideInPresentationManager, and then you return it to use for the presentation.
Now you’re making things happen! Build and run the app. Tap the Summer, Winter and Medal Count buttons to see your fancy new presentation styles in action.
Quite a difference, don’t you think? The new presentation styles look sharp, but all the presented views still slide in from the bottom.

The client wants the Summer and Winter menus to slide in from the side. You’ll need to flex your animation muscles to make this happen.
Creating the Animation Controller
To add a custom animation transition, you’ll create an NSObject subclass that conforms to UIViewControllerAnimatedTransitioning.
For complex animations where presentation is remarkably different than dismissal, you’d usually create two controllers: one for presentation and one for dismissal. In the case of this app, dismissal mirrors presentation, so you only need one animation controller.
Go to File\New\File…, choose iOS\Source\Cocoa Touch Class, and click Next. Set the name to SlideInPresentationAnimator, make it a subclass of NSObject and set the language to Swift.
Click Next and set the Group to Presentation, and then click Create to make your new file. Open SlideInPresentationAnimator.swift and replace its contents with the following:
import UIKit final class SlideInPresentationAnimator: NSObject { // 1 // MARK: - Properties let direction: PresentationDirection //2 let isPresentation: Bool //3 // MARK: - Initializers init(direction: PresentationDirection, isPresentation: Bool) { self.direction = direction self.isPresentation = isPresentation super.init() } } |
Here’s what you do in there:
-
Declare a
directionproperty that tells the animation controller the direction from which it should animate the view controller’s view. - Declare an isPresentation property to tell the animation controller whether to present or dismiss the view controller.
- Declare an initializer that accepts the two declared values above.
Next, add conformance to the UIViewControllerAnimatedTransitioning protocol by adding the following extension:
// MARK: - UIViewControllerAnimatedTransitioning extension SlideInPresentationAnimator: UIViewControllerAnimatedTransitioning { func transitionDuration( using transitionContext: UIViewControllerContextTransitioning?) -> TimeInterval { return 0.3 } func animateTransition(using transitionContext: UIViewControllerContextTransitioning) { } } |
The protocol has two required methods – one to define how long the transition takes (0.3 seconds in this case), and one to perform the animations. The animation method is a stub to keep the compiler happy.
Replace the animateTransition(using:) stub with the following:
func animateTransition(using transitionContext: UIViewControllerContextTransitioning) { // 1 let key = isPresentation ? UITransitionContextViewControllerKey.to : UITransitionContextViewControllerKey.from let controller = transitionContext.viewController(forKey: key)! // 2 if isPresentation { transitionContext.containerView.addSubview(controller.view) } // 3 let presentedFrame = transitionContext.finalFrame(for: controller) var dismissedFrame = presentedFrame switch direction { case .left: dismissedFrame.origin.x = -presentedFrame.width case .right: dismissedFrame.origin.x = transitionContext.containerView.frame.size.width case .top: dismissedFrame.origin.y = -presentedFrame.height case .bottom: dismissedFrame.origin.y = transitionContext.containerView.frame.size.height } // 4 let initialFrame = isPresentation ? dismissedFrame : presentedFrame let finalFrame = isPresentation ? presentedFrame : dismissedFrame // 5 let animationDuration = transitionDuration(using: transitionContext) controller.view.frame = initialFrame UIView.animate(withDuration: animationDuration, animations: { controller.view.frame = finalFrame }) { finished in transitionContext.completeTransition(finished) } } |
I did say this one does the heavy lifting! Here’s what each section does:
- If this is a presentation, the method asks the
transitionContextfor the view controller associated with the.tokey, aka the view controller you’re moving to. If dismissal, it asks thetransitionContextfor the view controller associated with the.from, aka the view controller you’re moving from. - If the action is a presentation, your code adds the view controller’s view to the view hierarchy; this code uses the
transitionContextto get the container view. -
Calculate the frames you’re animating from and to. The first line asks the
transitionContextfor the view’s frame when it’s presented. The rest of the section tackles the trickier task of calculating the view’s frame when it’s dismissed. This section sets the frame’s origin so it’s just outside the visible area based on the presentation direction. - Determine the transition’s initial and final frames. When presenting the view controller, it moves from the dismissed frame to the presented frame — vice versa when dismissing.
-
Lastly, this method animates the view from initial to final frame. Note that it calls
completeTransition(_:)on thetransitionContextto show the transition has finished.
Wire Up the Animation Controller
You’re at the last step of building the transition: hooking up the animation controller!
Open SlideInPresentationManager.swift and add the following two methods to the end of the UIViewControllerTransitioningDelegate extension:
func animationController(forPresented presented: UIViewController, presenting: UIViewController, source: UIViewController) -> UIViewControllerAnimatedTransitioning? { return SlideInPresentationAnimator(direction: direction, isPresentation: true) } func animationController(forDismissed dismissed: UIViewController) -> UIViewControllerAnimatedTransitioning? { return SlideInPresentationAnimator(direction: direction, isPresentation: false) } |
The first method returns the animation controller for presenting the view controller; the second returns the animation controller for dismissing the view controller. Both are instances of SlideInPresentationAnimator, but they have different isPresentation values.
Build and run the app. Check out those transitions! You should see a smooth slide-in animation from the left when you tap Summer. For Winter, it comes from the right, and Medal Count comes from the bottom.
Your result is exactly what you set out to do!
It works great…as long as the device is on Portrait mode. Try rotating to Landscape.

Adaptivity
The good news is that you’ve done the hardest part! The transitions work perfectly. In this section, you’ll make the effect work beautifully on all devices and both orientations.
Build and run the app again, but this time run it on an iPhone 5/5s/SE — you can use the simulator if you don’t have the actual device. Try opening the Summer menu in Landscape. See anything wrong here?

Well, no. This actually looks great! Take a victory lap around your desk.
But what happens when you try to bring up the medal count? Select a year from the menu and tap the Medal Count button. You should see the following screen:

SlideInPresentationController restricts the view to 2/3 of the screen, leaving little space to show the medal count view. If you ship the app like this, you’re sure to hear complaints.
Luckily for you, Adaptivity is a thing. The iPhone has a Regular height size class in Portrait, and a Compact height size class in Landscape. All you have to do is make a few alterations to the presentation to make use of this feature!
UIPresentationController has a delegate property that conforms to UIAdaptivePresentationControllerDelegate, and it defines several methods to support adaptivity. You’ll use two of them in a moment.
First, you’ll make SlideInPresentationManager the delegate of SlideInPresentationController. This is the best option because the controller you choose to present determines whether the app should support compact height or not.
For example, GamesTableViewController looks correct in compact height, so there’s no need to limit its presentation. However, you do want to adjust the presentation for MedalCountViewController.
Open SlideInPresentationManager.swift and add the following below the direction property:
var disableCompactHeight = false |
Here you add the disableCompactHeight property to indicate if the presentation supports compact height.
Next, you need an extension that conforms to UIAdaptivePresentationControllerDelegate and implements adaptivePresentationStyle(for:traitCollection:) as follows:
// MARK: - UIAdaptivePresentationControllerDelegate extension SlideInPresentationManager: UIAdaptivePresentationControllerDelegate { func adaptivePresentationStyle(for controller: UIPresentationController, traitCollection: UITraitCollection) -> UIModalPresentationStyle { if traitCollection.verticalSizeClass == .compact && disableCompactHeight { return .overFullScreen } else { return .none } } } |
This method accepts a UIPresentationController and a UITraitCollection, and then returns the desired UIModalPresentationStyle.
Next, it checks if verticalSizeClass equals .compact and if compact height is disabled for this presentation.
- If yes, it returns a presentation style of
.overFullScreenso the presented view will cover the entire screen — not just 2/3 as defined inSlideInPresentationController. - If no, it returns
.none, to stay with the implementation ofUIPresentationController.
Find presentationController(forPresented:presenting:source:).
Set SlideInPresentationManager as the presentation controller’s delegate by adding the following line above the return statement:
presentationController.delegate = self |
Finally, you’ll tell SlideInPresentationManager when to disable compact height.
Open MainViewController.swift and locate prepare(for:sender:). Find where the segue’s destination view controller is GamesTableViewController, and then add the following line to the if block:
slideInTransitioningDelegate.disableCompactHeight = false |
Find where the segue’s destination view controller is MedalCountViewController and add the following to the if block:
slideInTransitioningDelegate.disableCompactHeight = true |
Build and run the app, bring up a medal count and rotate the device to Landscape. The view should now take the entire screen, as shown below:

This works great!
There’s still a niggly bit for the use case where you’d have a view that can only show in regular height. Maybe there’s something on there that’s just too tall to fit in a compact height.UIAdaptivePresentationControllerDelegate can help you.
Set it up by opening SlideInPresentationManager.swift and adding the following method to the UIAdaptivePresentationControllerDelegate extension:
func presentationController(_ controller: UIPresentationController, viewControllerForAdaptivePresentationStyle style: UIModalPresentationStyle) -> UIViewController? { guard style == .overFullScreen else { return nil } return UIStoryboard(name: "Main", bundle: nil) .instantiateViewController(withIdentifier: "RotateViewController") } |
This method accepts a UIPresentationController and a UIModalPresentationStyle. It returns a view controller that overrides the original controller to present, or nil if the original view controller should be presented.
If the presentation style is .overFullScreen it creates and returns a different view controller controller. This new controller is just a simple UIViewController with an image that tells the user to rotate the screen to Portrait.
Build and run the app, bring up the medal count, and rotate the device to Landscape. You should see the message:
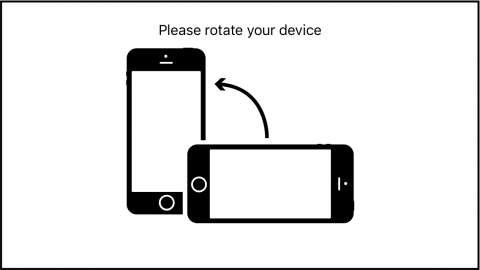
Rotate the device back to Portrait to view the medal count again.
Where To Go From Here?
Congratulations! You made it through a world-class athletic journey (for your brain) and built a custom UIPresentationController.
You can download the completed project here.
You’ve covered quite a bit! You learned how to customize and reuse a UIPresentationController to create neat slide-in effects from any direction.
You also learned how to adapt presentations for various devices and both orientations, as well as how to handle cases where the device can’t handle landscape orientation.
I’m sure you can come up with many more creative ideas for presentations in your app, and I encourage you to try them out based on what you’ve learned in this tutorial.
To delve deeper into custom transitions, check out this UIViewController Transitions tutorial by József Vesza. You’ll find some interesting videos about Beginning with iOS Animation by Marin Todorov.
For more on Adaptive Layouts, check out this adaptive layout in iOS tutorial by Sam Davies, or these adaptive layout video tutorials by Jerry Beers.
For more information on UIPresentationController, check out Apple’s documentation.
This iOS tutorial was a lot of fun to put together, and I’m keen to hear how it went for you. Bring your questions, blockers and discoveries to the forums below and let’s talk presentations! :]
The post UIPresentationController Tutorial: Getting Started appeared first on Ray Wenderlich.