The Swift Algorithm Club is an open source project to implement popular algorithms and data structures in Swift.
Every month, Chris Pilcher and I feature a cool data structure or algorithm from the club in a tutorial on this site. If your want to learn more about algorithms and data structures, follow along with us!
In this tutorial, you’ll learn how to implement a Swift Trie data structure. No, this is not “Tree” spelled wrong; this is actually a different data structure!
This algorithm was first implemented by Christian Encarnacion, and is now refactored for tutorial format.
Getting Started
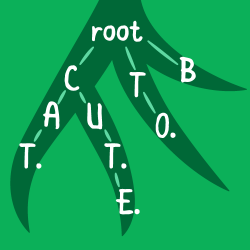
Tries are n-ary trees in which characters are stored at each node. In addition to being a popular topic amongst interview questions, Tries are also a key data structure that facilitates efficient prefix matching for the English language:

Example of “Cat”, “Cut”, “Cute”, “To”, “B” strings stored in a Trie.
Why a Trie?
Tries are very useful for certain situations. In addition to be great for storing the English language, a Trie can also be a substitute for a hash table, with the following advantages:
- Looking up values typically have a better worst-case time complexity.
- Unlike a hash table, a Trie does not need to worry about key collisions.
- Doesn’t require a hashing algorithm to guarantee a unique path to elements.
- Trie structures can be alphabetically ordered.
In this tutorial, you’ll focus on Trie’s application for storing the English language.
Trie Implementation
Just like other trees, a Trie is made up of nodes. Your implementation will consist of a TrieNode class and a Trie class. Each TrieNode will represent a character of a word. For instance, the word “cute” will be represented by the following series of nodes: c -> u -> t -> e. The Trie class will manage the insertion logic and keep a hold of the nodes.
Open up a Swift playground to begin!
TrieNode
You’ll start off by implementing a simple TrieNode class. Write the following into the playground:
class TrieNode<T: Hashable> { var value: T? weak var parent: TrieNode? var children: [T: TrieNode] = [:] init(value: T? = nil, parent: TrieNode? = nil) { self.value = value self.parent = parent } } |
This is a generic TrieNode class. It stores a value (i.e. the character) and has a reference to its parent and children. There are two things to point out:
- The
parentproperty isweakto prevent reference cycles. Having a reference to the parent is necessary forremoveoperations on the Trie. - The value stored in
TrieNodemust conform to theHashableprotocol. This is because you will be using the value as a key in thechildrendictionary – and anything that is a key in a Swift dictionary must conform toHashable. You will be usingCharacterfor the value, which conforms toHashable, so you are set.
To facilitate the adding of new nodes, add the following method inside the Node class:
func add(child: T) { // 1 guard children[child] == nil else { return } // 2 children[child] = TrieNode(value: child, parent: self) } |
Adding a child is a 2-stage process:
- Make sure the child does not already exist in the dictionary of children. If it does, return.
- Create a new node for the new value, and add it to the children dictionary of the current node.
With that, you’ve got a fairly familiar node object common to many trees. It’s still missing a component to be useful for a Trie, but you’ll handle that later :]
Trie
Your Trie class will be managing the nodes. Write the following at the bottom of your playground file:
class Trie { fileprivate let root: TrieNode<Character> init() { root = TrieNode<Character>() } } |
This sets the foundation for your Trie. You declare a root property that keeps a hold of the root node of your Trie. Since you’re implementing a Trie for the English language, you’ll use nodes of type Character. The init method simply initializes the root property with an empty TrieNode.
Typealiasing
Before continuing on with implementing the rest of the Trie, update the Trie class to the following:
class Trie { typealias Node = TrieNode<Character> fileprivate let root: Node init() { root = Node() } } |
You’ve added a Node typealias. While this is functionally identical to your previous version, this allows you to refer to the TrieNode types as Node. In additional shortening the syntax, you also make the code more robust; If you ever wanted the node to represent something else other than a Character, changing just the typealias would propagate the type to everything else!
With that done, it’s time to implement the methods that make up the Trie.
Insertion
The Trie class manages the operations on the Trie. When implementing the insertion method, remember that a Trie is efficient because it always tries (pun intended) to reuse existing nodes to complete a sequence.

As an example, the two words “Cut” and “Cute” should be represented using 4 nodes, since both words share the same “Cut” prefix.
Add the following code below the Trie class:
extension Trie { func insert(word: String) { // 1 guard !word.isEmpty else { return } // 2 var currentNode = root // 3 let characters = Array(word.lowercased().characters) var currentIndex = 0 // ... more to come! } } |
You’ve implemented the insert method in an extension. Here’s what you’ve written so far:
- Check if the string is empty. If it is, there’s nothing to insert!
- Create a reference to the root node. You’ll use this to iterate through the Trie nodes.
- A word in the Trie is represented by a chain of nodes, where each node represents a character of the word (Ex:
c -> u -> t -> efor “cute”). Since you’ll be inserting character by character, turning the word into an array will easily allow you to keep track of the characters during insertion.
Now that you’ve got the pieces ready, you’re ready to perform some pointer arithmetic! Add the following to the end of the insert method:
while currentIndex < characters.count { // 1 let character = characters[currentIndex] // 2 if let child = currentNode.children[character] { currentNode = child } else { // 3 currentNode.add(child: character) currentNode = currentNode.children[character]! } // 4 currentIndex += 1 // more to come! } |
This code is relatively straight forward:
- Get ahold of the character you need to insert into the Trie.
- Check if the character you’re trying to insert exists within the current node’s
childrendictionary. If it exists, you’ll simply move thecurrentNodereference to the next node. There’s no need to insert the character because it’s already there! - If execution proceeds to the else block, it means the character needs to be inserted. You’ll add the character into the current
childrendictionary. Afterwards, you’ll move thecurrentNodereference to the new node. - Add 1 to the
currentIndexproperty to keep track of the next character you need to insert.
Terminating Nodes
At this point, the insert method will correctly go through the word you want to insert and create new nodes as necessary. You might have noticed something though. For example, if you inserted the word “cute”, how do can you tell if “cut” has been inserted or not?

Without some sort of indicator, you can’t be sure. Head back to your TrieNode class. Update the class with a new property:
var isTerminating = false |
The isTerminating property will be responsible for indicating the end of a word. Back to the previous example, if you insert the word “cute” into the Trie, you’ll want to use isTerminating like this:

The last letter of “cute” is marked, indicating it’s the end of the word. If you insert “cut” into the Trie, all you want to do is mark the “t” with as a terminating node:

Pretty easy? Try it out!
Challenge
At the end of the method, implement the logic to mark the last node as the terminating node.
Contains
Now that you’ve got insertion set up, it’s time to deal with the contains method. This method is responsible for checking if a word exists. Write the following into the extension:
func contains(word: String) -> Bool { guard !word.isEmpty else { return false } var currentNode = root let characters = Array(word.lowercased().characters) var currentIndex = 0 // more to come } |
So far, the code you’ve just written is nearly identical to the insert method. Add the following to the bottom of the contains method:
// 1 while currentIndex < characters.count, let child = currentNode.children[characters[currentIndex]] { // 2 currentIndex += 1 currentNode = child } |
This part will try to iterate through the nodes of the Trie based on the word you’re trying to find:
- You create a
whileloop with the condition that thecurrentIndexhasn’t reached the end of the word. You also try to bind the children dictionary’s value into achildproperty. - If the
whileloop succeeds, you movecurrentIndexandcurrentNodeto look for the next matching letter.
Iterating through the word is now taken care of. Finally, it’s time to implement the logic that either returns true or false, depending on whether the word is inside the Trie. Write the following at the bottom of the contains method:
if currentIndex == characters.count && currentNode.isTerminating { return true } else { return false } |
If the currentIndex variable reaches to the end of the characters array, it means the while loop has successfully gone through all the letters and the corresponding nodes. You’ll also check if this last node is the terminating node. If both these conditions are true, then the word is in the Trie. If one of these conditions is false, then the word is not in the Trie.
Try it Out!
Write the following at the end of the playground:
let trie = Trie() trie.insert(word: "cute") trie.contains(word: "cute") // true trie.contains(word: "cut") // false trie.insert(word: "cut") trie.contains(word: "cut") // true |
With that, you’re well on your way to mastering the art of the Trie!

Where To Go From Here?
I hope you enjoyed this tutorial on making a Swift Trie data structure!
Here is a Swift Playground with the above code. You can also find the original implementation and further discussion in the Swift Trie section of the Swift Algorithm Club repository.
This was just one of the many algorithm clubs focused on the Swift Algorithm Club repository. If you’re interested in more, check out the repo.
It’s in your best interest to know about algorithms and data structures – they’re solutions to many real world problems, and are frequently asked as interview questions. Plus it’s fun!
So stay tuned for many more tutorials from the Swift Algorithm club in the future. In the meantime, if you have any questions on implementing trees in Swift, please join the forum discussion below!
The post Swift Algorithm Club: Swift Trie Data Structure appeared first on Ray Wenderlich.