
Kookie Kiosk is one sweet waiting game.
In this SpriteKit tutorial, you’ll learn how to make your very own waiting game — just like Farmville — with SpriteKit and Swift.
Popular “waiting games” like Clash of Clans and Farmville are played in short, frequent bursts, punctuated by periods of waiting — plant a crop in seconds, then check back at a later time to reap what you’ve sown.
While every game is different, most are built around the following basic concepts:
- State machines
- Timed events
- Local notifications
With this SpriteKit tutorial, you’ll dive right into these concepts, as you continue to build out Kookie Kiosk – a simple waiting game where players vie for riches by buying and selling tasty treats. Yum!
Note: This tutorial assumes you have working knowledge of SpriteKit and Swift. If you’re new to SpriteKit, check out our SpriteKit Swift Tutorial for Beginners or our full book, 2D Apple Games by Tutorials. For an introduction to Swift, check out this beginner Swift tutorial here.
Getting Started
Download the template project, then open the KookieKiosk-Swift.xcproject project file with Xcode.
Build and run the app in the iPad Air 2 simulator:

This is what you should see when you run the template. What a mess!
Don’t worry — you’ll soon clean shop.
Take a quick look at the files in this project:
- GameScene.swift: Contains the core logic for the game. It maintains a list of all items in the kiosk and how much money you have. At startup, all on-screen elements are added to
GameScene. This class also loads and saves a .plist file containing important data about the items available in the kiosk. Finally, but most importantly, it responds to changes in the game state. - StockItem.swift: Represents a single item in the kiosk. It stores important properties of the item like type, flavor and amount. There’s also a few constants like the maximum amount the player can have of an item, the position on the screen, prices for restocking, selling the item and even the speed at which the item is stocked and sold. The class contains two helper methods which draw the price label and the timer while the item is stocking.
- Customer.swift: Draws a customer on-screen and stores the item the customer wants to buy.
- GameDelegate.swift: Defines methods that StockItem.swift will call to perform game logic.
- Constants.swift: The enum
ZPositionensures game layers are drawn in the correct order.TimeScalecontrols game speed. - AppDelegate.swift: The only change to the default AppDelegate is a preload of two sound files.
- GameViewController.swift: Loads the initial scene.
Implementing the State Machine
Kookie Kiosk players earn money by selling cookies and shakes. But they can’t sell something they don’t own (out-of-cookies exception), nor restock a loaded platter (cookie-overflow exception). Keep things running smoothly with a state machine to define states and transitions between those states. Kookie Kiosk’s state machine can be represented by the following diagram:

States of an item in the Kiosk and transitions between states
Each item can be in one of four states:
- Empty: This item is out-of-stock. Players can buy more by tapping the item.
- Stocking: Once the player buys more, the item will begin stocking.
- Stocked: Ready to sell.
- Selling: Once stocked, the player taps an item to start selling. When an item is sold out, it returns to Empty.
Here are images that correspond to each state:

Enough background — it’s time to code.
Add the following to the bottom of Constants.swift:
enum State: Int { case empty case stocking case stocked case selling } |
This defines an enum with a value for each of the four states.
Next, add the following property at the end of the list of properties in StockItem.swift:
var state: State |
And add the following lines to init(stockItemData:stockItemConfiguration:gameDelegate:) just before super.init():
let stateAsObject: AnyObject? = stockItemData["state"] let stateAsInt = stateAsObject as! Int state = State(rawValue: stateAsInt)! |
In the code above you retrieve the state from the dictionary stockItemData, which contains all information about the stock item loaded from gamedata.plist shown below:

In the code above, you retrieve the value from stockItemData stored under the key “state” and then cast it to an Int. Then, you map the value of the Int to the corresponding value of the enum State and assign the result to the state.
Now that you can load the state of the item, make sure the state can be saved.
Add the following line to data() in StockItem.swift, right before the return statement:
data["state"] = state.rawValue |
This line sets the value for the key “state” to the raw Int value of the state for the stock item.
That takes care of loading and storing the states. Next, you’ll add code for displaying the state changes.
Cleaning up the Interface
Add the following method to StockItem.swift:
func switchTo(state: State) { self.state = state switch state { case .empty: stockingTimer.isHidden = true sellButton.isHidden = true priceTag.isHidden = false case .stocking: stockingTimer.isHidden = false sellButton.isHidden = true priceTag.isHidden = true case .stocked: stockingTimer.isHidden = true sellButton.isHidden = false priceTag.isHidden = true progressBar.setProgress(percentage: 1) case .selling: stockingTimer.isHidden = true sellButton.isHidden = true priceTag.isHidden = true } } |
This method contains a switch statement that distinguishes between the four states of your stock item. For each state, it sets isHidden appropriately for the stocking timer, sell button and price tag.
For example, when the price tag is visible in the empty state; you hide the stocking timer and the sell button. The other states follows the same logic.
Add the following line to the end of init(stockItemData:stockItemConfiguration:gameDelegate:):
switchTo(state: state) |
This will initialize the stock item to the state loaded from gamedata.plist.
Build and run your project. All stock items should now start off in the empty state. They should also now display their price tag, ready and waiting for the player to act:

Bringing order to the chaos is really satisfying!
Switching States
Add the following method to StockItem.swift:
override func touchesBegan(_ touches: Set<UITouch>, with event: UIEvent?) { switch state { case .empty: let bought = gameDelegate.updateMoney(by: -stockingPrice * maxAmount) if bought { switchTo(state: .stocking) } else { let playSound = SKAction.playSoundFileNamed("hit.wav", waitForCompletion: true) run(playSound) let rotateLeft = SKAction.rotate(byAngle: 0.2, duration: 0.1) let rotateRight = rotateLeft.reversed() let shakeAction = SKAction.sequence([rotateLeft, rotateRight]) let repeatAction = SKAction.repeat(shakeAction, count: 3) priceTag.run(repeatAction) } case .stocked: switchTo(state: .selling) default: break } } |
This method operates on the two states that allow user interaction: empty and stocked.
When empty, you first attempt to update the player’s money through gameDelegate. If the player has enough money to make the purchase, you then call switchTo(state:) to change the item’s state to stocking. If the player is short on funds, you let the player know by playing a sound effect and shaking the price tag.
To handle stocked, you simply call switchTo(state:) with the selling state. There are no additional conditions that need to be met for this transition, and this puts the item in a state where it will update over time.
Updating States Over Time
To update an item over time, you’ll first need to know the last time the state changed to calculate how much time has passed and how far along the stocking or selling process should be.
Add the following property to StockItem.swift, right after the state property:
private var lastStateSwitchTime: CFAbsoluteTime |
You’ll use CFAbsoluteTime to refer to a specific point in time. Even if the player restarts the game you still need to know exactly when that event happened in order to update stock properly.
Add the following line to init(stockItemData:stockItemConfiguration:gameDelegate:) just before super.init(), to load the time of the last state change:
lastStateSwitchTime = stockItemData["lastStateSwitchTime"] as AnyObject? as! CFAbsoluteTime |
And add the following line to data(), right before the return statement:
data["lastStateSwitchTime"] = lastStateSwitchTime |
This line adds an entry for the last state-switch time to the data dictionary stored in gamedata.plist.
Now you need to make sure that lastStateSwitchTime is assigned the proper value while the game is running.
Add the following line of code to the beginning of switchTo(state:):
if self.state != state { lastStateSwitchTime = CFAbsoluteTimeGetCurrent() } |
This ensures that you’ve actually changed states. If so, then update lastStateSwitchTime to the current time. You can always get the current time using the ever-helpful CFAbsoluteTimeGetCurrent().
Stocking Your Items
You can use the absolute time of the last state-switch to show some progress indicators to your player. Start by updating the countdown that shows the player how long they need to wait for a purchased item to complete stocking.
Add the following method to StockItem.swift:
func updateStockingTimerText() { let stockingTimeTotal = CFTimeInterval(Float(maxAmount) * stockingSpeed) let currentTime = CFAbsoluteTimeGetCurrent() let timePassed = currentTime - lastStateSwitchTime let stockingTimeLeft = stockingTimeTotal - timePassed stockingTimer.text = String(format: "%.0f", stockingTimeLeft) } |
In this method, you set the text of the stockingTimer to the time remaining until stocking is complete. To get this value, you first calculate the amount of time it takes to fully stock the item. You do so by multiplying stockingSpeed and the maximal amount of the stock item and then cast it to CFTimeInterval. Next, you store the current time in a temporary variable to calculate how much time has passed since the last state change.
The time to restock the item is now simply the total time minus the time that has passed to this point:

This time bar shows you the different intervals and absolute times you are using.
Finally, you set the text to the remaining time, so the user can see when the item will be fully stocked. Since you only want to display whole seconds to your player you use the format specifier %.0f, which tells Swift to display a float variable with zero digits after the decimal.
Add the following method to StockItem.swift to update the display of the item during stocking and selling:
func update() { let currentTimeAbsolute = CFAbsoluteTimeGetCurrent() let timePassed = currentTimeAbsolute - lastStateSwitchTime switch state { case .stocking: updateStockingTimerText() amount = min(Int(Float(timePassed) / stockingSpeed), maxAmount) if amount == maxAmount { switchTo(state: .stocked) } default: break } } |
First, calculate how much time has passed since the last state-switch. If the item’s current state is stocking, you call the helper method updateStockingTimerText().
Next, you update the item amount which is simply the time elapsed divided by the stocking speed. Of course, the player can never stock more items than maxAmount, so you use min to limit the amount to maxAmount. Finally, you check whether the new amount is equal to maxAmount. If so, then change the state to stocked.
The only thing left to do is call update() for every stock item.
Add the following method override in GameScene.swift at the bottom of GameScene class as follows:
override func update(_ currentTime: TimeInterval) { for stockItem in stockItems { stockItem.update() } } |
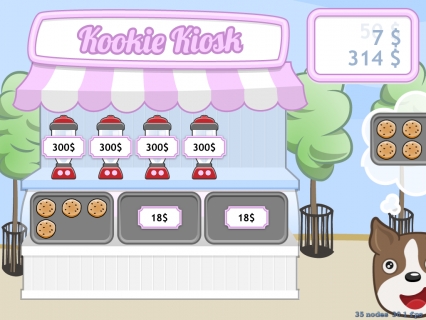
Build and run your project. Tap on a stock item and you’ll see the timer count down to zero. Then the item switches to the stocked state. That coin in front of the cookies indicates that they are ready to be sold.

Selling Items
As soon as an item is fully stocked, players can start selling it. Add the following code to update() in StockItem.swift, inside the case statement right before the default case:
case .selling: let previousAmount = amount amount = maxAmount - min(maxAmount, Int(Float(timePassed) / sellingSpeed)) let amountSold = previousAmount - amount if amountSold >= 1 { let _ = gameDelegate.updateMoney(by: sellingPrice * amountSold) progressBar.setProgress(percentage: Float(amount) / Float(maxAmount)) if amount <= 0 { switchTo(state: .empty) } } |
First, you store the current amount of the item in previousAmount. You then calculate the new amount by subtracting the quotient of timePassed and sellingSpeed from maxAmount. Again, you need to limit the number of items that can be sold to maxAmount. Now, the number of items sold is simply the difference between the previous amount and the new amount.
In order to limit the number of calls to progressBar and gameDelegate, you check whether at least one item has been sold since the last call to update. If so, notify gameDelegate about the change in the player’s funds, then set the progress bar to the value of the amount sold divided by the maximum amount available. This change in money will always be positive, so you can ignore the result of updateMoney(by:) here.
Finally, you check whether the stock item sold out by comparing the amount remaining to 0. When the item is sold out, set the state back to empty. Your state machine is now complete.
Build, run and buy some cookies! Click on the coin to start selling. You’ll see your cookies sell over time, fattening your wallet:

w00t I sold a cookie — I’m rich!
Introducing Customers
Many waiting games have events that trigger at random points. In Tiny Towers, specialists make the occasional appearance to dramatically boost progress. In Kookie Kiosk, your player will have to serve demanding customers who randomly appear.
Add the following property to GameScene.swift, right below the moneyLabel property:
var customer: Customer? |
This stores the current customer using the Customer class already implemented in the starter project. For the moment you’ll only serve one customer at a time.
Now you need to handle the timing of your customers’ arrivals.
Add the following properties to GameScene.swift, right below the customer property:
var timeOfLastCustomer: CFAbsoluteTime = CFAbsoluteTimeGetCurrent() var timeTillNextCustomer: CFTimeInterval! |
Then add the following method:
func determineTimeTillNextCustomer() { timeTillNextCustomer = CFTimeInterval(Float((arc4random_uniform(UInt32(15)) + 15)) * TimeScale) } |
And call it at the bottom of didMove(to:):
determineTimeTillNextCustomer() |
The time the last customer appeared will initially be the startup time of the app since no customers have appeared yet. You also store a time interval that indicates how many seconds it will take for the next customer to appear. For this, you use a random value between 15 and 30 seconds. You then multiply this interval by TimeScale so you can control the rate at which customers appear.
Add the following code to the end of update() in GameScene.swift:
// 1 let currentTimeAbsolute = CFAbsoluteTimeGetCurrent() if customer == nil && currentTimeAbsolute - timeOfLastCustomer > timeTillNextCustomer { // 2 var potentialWishes: [StockItem] = [] for stockItem in stockItems { if stockItem.state == .selling || stockItem.state == .stocked { potentialWishes.append(stockItem) } } // 3 if potentialWishes.count > 0 { let random = arc4random_uniform(UInt32(potentialWishes.count)) let randomStockItem = potentialWishes[Int(random)] customer = Customer(type: randomStockItem.type, flavor: randomStockItem.flavor) customer!.position = CGPoint(x: frame.size.width + customer!.calculateAccumulatedFrame().size.width / 2, y: customer! .calculateAccumulatedFrame().size.height / 2) // 4 let moveLeft = SKAction.move(by: CGVector(dx: -customer!.calculateAccumulatedFrame().size.width, dy: 0), duration: 1) customer?.run(moveLeft) addChild(customer!) } } |
This is a lot of code, but the logic is straightforward:
- First check how much time has passed since the last customer appeared. If it’s greater than the generated time interval, it’s time to spawn a new customer.
- Customer’s wishes are limited to the types and flavors of items currently in-stock and not sold out. Add all items that match this criteria to the list of potential wishes.
- Select a random index from the list of potential wishes, then create a new customer that wishes for the type and flavor of the randomly selected item.
- Finally, make the customer appear from the right border of the screen. Using a simple
SKActionyou move it from the outside of the screen just until it’s entirely on screen.
Build and run your app. When you have items available, a customer will appear randomly and place an order at your kiosk.

Serve me, serve me NOOOOOOW!
Next, you’ll add code to serve the customer.
Declare the following method in GameDelegate.swift:
func serveCustomerWithItemOfType(type: String, flavor: String) |
This changes the protocol and every class conforming to it should now complain that they no longer conform to the protocol. You should see an error in Xcode stating that Type ‘GameScene’ does not conform to protocol ‘GameDelegate’.
To fix the error, implement the missing method inside the extension at the bottom of GameScene.swift as follows:
func serveCustomerWithItemOfType(type: String, flavor: String) { // 1 if customer?.type == type && customer?.flavor == flavor { let _ = updateMoney(by: 50) let playSound = SKAction.playSoundFileNamed("coin.wav", waitForCompletion: true) run(playSound) } else { let playSound = SKAction.playSoundFileNamed("hit.wav", waitForCompletion: true) run(playSound) } if customer != nil { // 2 let moveRight = SKAction.move(by: CGVector(dx: customer!.calculateAccumulatedFrame().size.width, dy: 0), duration: 1) customer!.run(moveRight, completion: { self.customer?.removeFromParent() self.customer = nil }) // 3 timeOfLastCustomer = CFAbsoluteTimeGetCurrent() determineTimeTillNextCustomer() } } |
Take a look at what happens here:
- First check if the type and the flavor of the item correspond to what the customer desires. If so, add $50 to the player’s funds and play a sound effect. Otherwise, play a sound effect indicating that you haven’t satisfied this customer’s wish. That sound will also play if there’s no customer at the current time.
- Next, remove the customer sprite using an instance of
SKActionthat moves the customer off to the right and off the screen. As soon as the customer sprite is off the screen, remove the sprite from the scene and set it tonil. - As soon as the customer leaves the scene you also need to schedule the time when the next customer will arrive. Set the time of the last customer to the current time, and determine how long it will be until the next customer appears.
All that’s left to do is to call the new method from touchesBegan(_:with:) in StockItem.swift like so (add this inside the case statement right before the default case):
case .selling: gameDelegate.serveCustomerWithItemOfType(type: type, flavor: flavor) |
To try this out, build and run and buy some cookies. When a customer arrives, tap the cookies once to start selling, and then again to give a cookie to the customer.
Serving your customers quickly is the key to success!
Sending User Notifications
Your game now looks and plays great, but eventually the player will leave the game. Enticing the player with a one-liner notification should lure them back to your game:
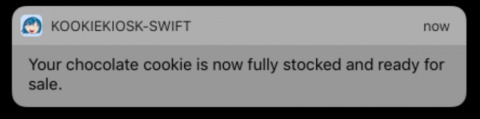
Receiving a notification
Players can see a list of missed notifications by pulling down the context menu from the top:
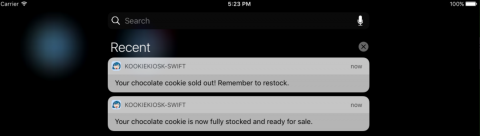
Hey you missed something!
You can also update the badge icon:
Pick me!
Local vs. Remote Notifications
There are two different ways to inform players about background changes in an app: local notifications and remote notifications.
While both look and sound the same, there are major differences from the viewpoint of a developer:
- Local Notifications are triggered directly on the device and are easy to implement.
- Remote Notifications are triggered by a remote server, and are more complicated.
Local notifications will work just fine for Kookie Kiosk.
Asking for User Permission
The first step is to ask the player to authorize your app to use notifications. Open AppDelegate.swift and add the following to the import statements at the top of the file:
import UserNotifications |
Then add the following to application(_:didFinishLaunchingWithOptions:):
UNUserNotificationCenter.current().requestAuthorization(options: [.alert, .sound, .badge]) { (granted, error) in if granted { print("notifications granted") } else { print(error?.localizedDescription) } } |
The UserNotifications framework is new in iOS 10, replacing previous platform-specific interfaces for local and remote notifications. Using UNUserNotificationCenter, you ask for permission to send an alert, play a sound and add a badge number to the Kookie Kiosk app icon. The print statements are just for debugging purposes.
Build and run, and you’ll see the following dialog:

Tap OK to allow notifications. (If you tap Don’t Allow, notifications will not appear).
Note that after the first run, this dialog won’t show up again. Instead, the app will use the value stored in the Settings app.
Scheduling Notifications
Since most of your notifications will be similar in structure, you’ll create a small helper method to schedule a notification.
Open GameScene.swift and add another import statement:
import UserNotifications |
Then add the following method:
func scheduleNotificationWith(body: String, intervalInSeconds: TimeInterval, badgeNumber: Int) { // 1 let localNotification = UNMutableNotificationContent() // 2 localNotification.body = body localNotification.sound = UNNotificationSound.default() localNotification.badge = badgeNumber as NSNumber? // 3 let trigger = UNTimeIntervalNotificationTrigger.init(timeInterval: intervalInSeconds, repeats: false) let request = UNNotificationRequest.init(identifier: body, content: localNotification, trigger: trigger) // 4 let center = UNUserNotificationCenter.current() center.add(request) } |
The above method builds the notification from a message, a time interval, and the updated badge number as follows:
- First, you create an empty notification using
UNMutableNotificationContent(). - Then, set the properties of your notification, which in this tutorial, means the body text, a sound alert and badge number. (You could also include a title, subtitle and media if so inclined.)
- Define a trigger for your notification based on the
timeInterval. - Finally, you can schedule the notification!
Calling your new scheduleNotificationWith(body:intervalInSeconds:badgeNumber:) method lets you easily schedule a single local notification. However, you’ll want to schedule a notification for the state change of every stock item.
For this, you’ll need two things: notification text and the time to show the notification.
Add the following method to StockItem.swift:
func notificationMessage() -> String? { switch state { case .selling: return String(format: "Your %@ %@ sold out! Remember to restock.", flavor, type) case .stocking: return String(format: "Your %@ %@ is now fully stocked and ready for sale.", flavor, type) default: return nil } } |
In the above method, you implement a switch on the state of the stock item. Then for each state you formulate a message that gives details about the current state and includes the flavor and type of the item.
Although there are four states in your app, only two of them — selling and stocking — are dependent on time. The other two states depend on user interaction, so they don’t need scheduled notifications.
Now add the following method to calculate the time until the next state-switch:
func notificationTime() -> TimeInterval { switch state { case .selling: return TimeInterval(sellingSpeed * Float(amount)) case .stocking: let stockingTimeRequired = stockingSpeed * Float(maxAmount - amount) return TimeInterval(stockingTimeRequired) default: return -1 } } |
In this method, you determine how long it takes to complete selling or stocking an item. You can now schedule a notification for every stock item.
Add the following method to GameScene.swift:
func scheduleNotifications() { let itemsSortedByNotificationTime = stockItems.sorted(by: { $0.notificationTime() < $1.notificationTime() }) var count = 1 for stockItem in itemsSortedByNotificationTime { let notificationMessage = stockItem.notificationMessage() if notificationMessage != nil { scheduleNotificationWith(body: notificationMessage!, intervalInSeconds: stockItem.notificationTime(), badgeNumber: count) count += 1 } } } |
First, you sort the notifications by their notificationTime. Why is the order relevant? You can use it to manage the badge number, since this doesn’t happen automatically. Next you iterate over the list of stock items, and for each item you retrieve the appropriate notification message. If the message is not nil, then schedule the notification. With every notification you send, increase the count of the badge number accordingly.
This finishes off the method that schedules a notification for every stock item. You still need a way to call it when the app enters the background. There is only one tiny problem here: only the AppDelegate knows that your app is entering the background, and it doesn’t know about your GameScene.
A great solution for this problem is to use NotificationCenter, which provides you with a mechanism to broadcast information within your app.
Open AppDelegate.swift and add the following code to applicationDidEnterBackground(_:):
NotificationCenter.default.post(name: NSNotification.Name(rawValue: "scheduleNotifications"), object: nil) |
This will broadcast out a notification through the NotificationCenter when your app enters the background state. All you need to do now is listen for this notification.
Open GameScene.swift and add the following code to the end of didMove(to:):
NotificationCenter.default.addObserver(self, selector: #selector(scheduleNotifications), name: NSNotification.Name(rawValue: "scheduleNotifications"), object: nil) |
This registers the GameScene as an observer — you tell NotificationCenter to call scheduleNotifications() when an event with the name “scheduleNotifications” triggers.
Build and run, start making some cookies, and hit Command-L a couple times (if using the simulator) to go to the lock screen. When the cookies finish baking, you should see a notification appear on the screen:

You can swipe the notification to return to the app, and see your finished cookies!

Resetting the App Badge
You’re nearly done — all that’s left to do is cancel all notifications and set the number of the badge to zero when the player resumes their game. You don’t want to pester the player with the same information twice.
Open AppDelegate.swift and add the following lines of code to applicationDidBecomeActive(_:):
let center = UNUserNotificationCenter.current() center.removeAllPendingNotificationRequests() UIApplication.shared.applicationIconBadgeNumber = 0 |
First, we need a reference to UNUserNotificationsCenter, then we can clear old notifications. The last line sets applicationIconBadgeNumber to zero.
And that’s it — your kiosk game is complete!
Where to Go From Here?
You can download the completed project for this tutorial here.
This game provides a great foundation for waiting games. It also scratches the surface of state machines and user notifications. For more on those topics, you can:
- Dive into GameplayKit and
GKStateMachine - Learn about the new User Notifications capabilities in iOS 10
- Learn how to monetize your game with (clever) In-App Purchases
Or you can stick with what you already learned and add fun features to the game, such as:
- Charge the player rent on the kiosk.
- Add more types and flavors of tasty snacks…
- … but have them spoil if they sit around too long before going on sale.
- Add patience levels to your customers — leave them hanging for too long they’re liable to storm off and leave catty Yelp reviews! :[
If you have any questions or comments about this tutorial, please join the forum discussion below!
The post How to Make a Waiting Game Like Farmville with SpriteKit and Swift appeared first on Ray Wenderlich.