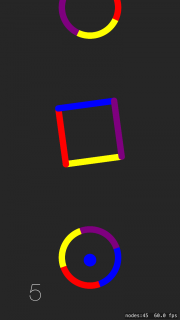
A common obstacle when starting a game project is the lack of art to use for game sprites. One way to make things easier is to pick an art style that uses very simple or stylized graphics.
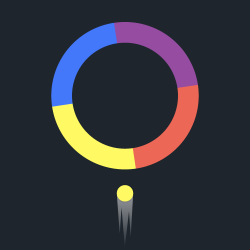
For example, the popular game Color Switch (with over 125 million downloads worldwide) creates fun and attractive visuals using only simple shapes such as circles, lines, and squares that are brightly colored.
In this tutorial, you will make a game where the goal is to move a colored dot up the screen and past multi-colored obstacles — similar to Color Switch. The dot can safely pass through shapes that match its own color, but will fall back to the beginning if it contacts any shape with a different color.
You will learn how to use:
SKShapeNodes with custom paths,SKActions and radians for rotating nodes indefinitely,- Category and collision bit masks for keeping track of interactions,
- The
SKCameraCodefor conveniently following the player as the game progress, - And more…
Note: You’ll use SpriteKit to build this game. If you are new to SpriteKit, you might want to start with an introduction to sprites and the physics system.
Getting Started
Download the starter project for this tutorial. There are only minor changes from the default Xcode template to ensure everything works on both iPhone and iPad.
Build and run the project, and you should see a black screen. Unlike many games, this one is played in portrait mode, since the player movement is up and down.
The Obstacles
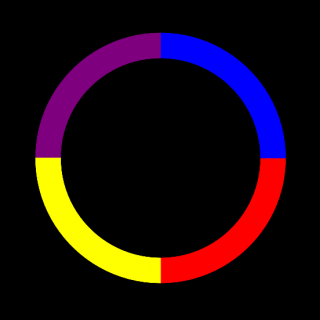
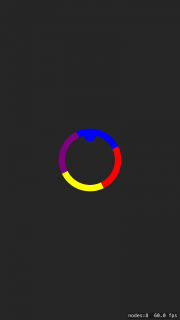
The stars of the show are the multi-colored obstacles that you have to bypass to score points in this game. There are many shapes you can use as obstacles, but creating a circle is a good place to start. The end result will look like this.
Since the obstacles are made up of geometric shapes, you’re going to build them up using the SpriteKit class SKShapeNode. To create a custom SKShapeNode, you can define its path. The simplest way to define a path is to use the UIBezierPath class.
UIBezierPath provides several initializers for simple shapes:
init(rect: CGRect): Creates and returns a rectangle of a given size.init(ovalIn: CGRect): Creates and returns an oval (or circle) that fits in a given rectangle.init(roundedRect: CGRect, cornerRadius: CGFloat): Creates and returns a rectangle with rounded corners. The larger thecornerRadius, the more rounded the corners are.
It might seem like init(ovalIn:) would be what you want to make your circle obstacle, but this method gives you a complete circle, and you need it separated into four sections. That way each section can have its own color. Thankfully, UIBezierPath provides additional methods for generic path drawing.
Your First SKShapeNode
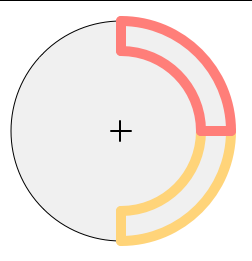
A good starting point is to make a node for the yellow section at the bottom-right of the circle. You’ll do this by drawing the outline of the shape.
In GameScene.swift, add the following methods below didMove(to:):
func setupPlayerAndObstacles() { addObstacle() } func addObstacle() { addCircleObstacle() } func addCircleObstacle() { // 1 let path = UIBezierPath() // 2 path.move(to: CGPoint(x: 0, y: -200)) // 3 path.addLine(to: CGPoint(x: 0, y: -160)) // 4 path.addArc(withCenter: CGPoint.zero, radius: 160, startAngle: CGFloat(3.0 * M_PI_2), endAngle: CGFloat(0), clockwise: true) // 5 path.addLine(to: CGPoint(x: 200, y: 0)) path.addArc(withCenter: CGPoint.zero, radius: 200, startAngle: CGFloat(0.0), endAngle: CGFloat(3.0 * M_PI_2), clockwise: false) } |
and add this to didMove(to:):
setupPlayerAndObstacles() |
With this code you create one circle obstacle when the game starts. Inside addCircleObstacle(), you:
- Create and return a blank path.
- Call
move(to: CGPoint), which moves to the given point, but does not draw a path. This method is generally used to move to the starting point of your shape, which you do here. - Add a line from the previous point to the given one. This completes the first line of your path, which is the vertical line that starts on the bottom-left corner of the shape.
- This method is a bit of a mouthful, but here you add a curved line from the current point. I generally find that some trial and error is necessary to get the combination of
startAngle,endAngle, andclockwiseto work the way you want it to. - You then add the horizontal line to the outer edge of the circle and complete the path with another arc.
When defining a path, make sure to pay attention to which direction you are moving. If you leave a gap, or if a side has the wrong direction, you will get a strange shape.
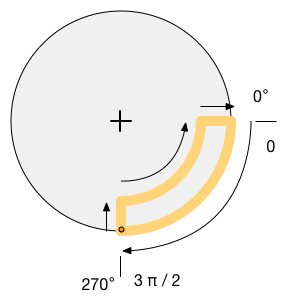
The start and end angle values are in a unit called radians. A complete circle is 2π radians, and the values for other major angles are shown on the diagram. There are constants defined for several common angle values:
M_PIis π radians, or 180°M_PI_2is π/2 radians, or 90°M_PI_4is π/4 radians, or 45°
Note: The values for clockwise seem to be backward from what they should be. This is due the coordinate system for UIBezierPath being different from that used in SpriteKit. UIBezierPath, along with all of UIKit, uses the +y direction as down. SpriteKit, and other OpenGL systems, have the +y direction as up.
Now that you have a path, you can create and display an SKShapeNode. Add this to the end of your addCircleObstacle() method:
let section = SKShapeNode(path: path.cgPath) section.position = CGPoint(x: size.width/2, y: size.height/2) section.fillColor = .yellow section.strokeColor = .yellow addChild(section) |
The initializer for SKShapeNode uses a CGPath, but UIBezierPath will do that conversion for you with the cgPath property. You could have generated a CGPath directly, but UIBezierPath is often easier to work with. Then you set the position and color properties of the node, and add it to the scene to display it.
You set the strokeColor in addition to the fillColor, because the stroke outline defaults to a thin white line, and you do not want any outline on the shape.
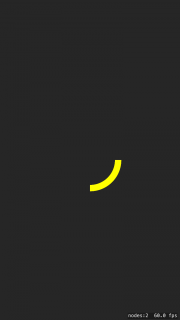
Build and run the project to make sure everything worked.
Note: If you get a strange looking shape, double check your path numbers, especially the order of steps and the signs of numbers. If any of those are moved around, the shape will not be what you are expecting.
Take a look at the position of this shape on the screen. Notice how it is in the lower right quadrant of the screen? You might have expected this shape to appear more centered.
The reason is that the path you drew in the first part of this method is drawn relative to a central point, so the shape itself is offset from that central point. Setting the position of the SKShapeNode changes the position of this central point, which lets you move the shape around.
The Rest of the Circle
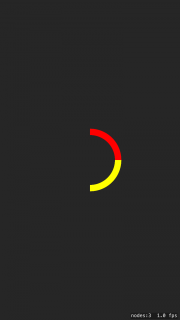
You could add the other parts of the circle by plotting out the points and angles like you did for the first section, but it turns out there is a shortcut. The center of the first SKShapeNode is at the center of the screen. That means that all you have to do is rotate it 90°, or π/2 radians for it to match up as the upper-right quarter of the circle.
Add the following to the end of addCircleObstacle() in GameScene.swift:
let section2 = SKShapeNode(path: path.cgPath) section2.position = CGPoint(x: size.width/2, y: size.height/2) section2.fillColor = .red section2.strokeColor = .red section2.zRotation = CGFloat(M_PI_2); addChild(section2) |
You already have the path built, so you just need another SKShapeNode set to a different color, rotated by changing the zRotation property.
Build and run the project to verify your progress. You’re halfway there!
Avoiding Code Duplication
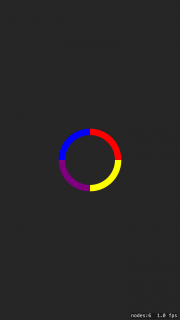
There is some repeated code used to create these two sections of the circle, which will only get worse if you draw the rest of the circle this way. To avoid this duplication, you’ll write a method that takes in a path that defines a quarter-section of an obstacle, and duplicates the path four times around with different colors.
First, add a property at the top of GameScene.swift, inside the class, but before the didMove(to:) method:
let colors = [SKColor.yellow, SKColor.red, SKColor.blue, SKColor.purple] |
This array defines the colors that will be used in the four sections of an obstacle.
Next, add the new method after the closing brace of addCircleObstacle():
func obstacleByDuplicatingPath(_ path: UIBezierPath, clockwise: Bool) -> SKNode { let container = SKNode() var rotationFactor = CGFloat(M_PI_2) if !clockwise { rotationFactor *= -1 } for i in 0...3 { let section = SKShapeNode(path: path.cgPath) section.fillColor = colors[i] section.strokeColor = colors[i] section.zRotation = rotationFactor * CGFloat(i); container.addChild(section) } return container } |
This method uses a for loop to repeat the SKShapeNode creation four times, rotating 90° each time. Each of the different sections are added to a blank container node; that way you’ll be able to perform actions on the container and have it act on all the child nodes at the same time.
Now, clean up addCircleObstacle() by using this new function. It should look like this:
func addCircleObstacle() { let path = UIBezierPath() path.move(to: CGPoint(x: 0, y: -200)) path.addLine(to: CGPoint(x: 0, y: -160)) path.addArc(withCenter: CGPoint.zero, radius: 160, startAngle: CGFloat(3.0 * M_PI_2), endAngle: CGFloat(0), clockwise: true) path.addLine(to: CGPoint(x: 200, y: 0)) path.addArc(withCenter: CGPoint.zero, radius: 200, startAngle: CGFloat(0.0), endAngle: CGFloat(3.0 * M_PI_2), clockwise: false) let obstacle = obstacleByDuplicatingPath(path, clockwise: true) obstacle.position = CGPoint(x: size.width/2, y: size.height/2) addChild(obstacle) } |
obstacleByDuplicatingPath(_:clockwise) returns a container node containing the four sections of the obstacle. The obstacle is then positioned in the center of the screen and added to the scene.
Container nodes are a great way to organize related nodes so you can position, hide, or animate them as a single entity.
Build and run the project to see the completed circle.
Rotating the Obstacle
SKActions are a very common and powerful way to move and animate nodes in SpriteKit. Add this to the end of addCircleObstacle()
let rotateAction = SKAction.rotate(byAngle: 2.0 * CGFloat(M_PI), duration: 8.0) obstacle.run(SKAction.repeatForever(rotateAction)) |
Make sure you use the rotate(byAngle:duration) method, and not rotate(toAngle:duration). The first one rotates the node by the given angle, regardless of the current orientation. The second rotates until the angle matches the given angle, then stops. You are rotating the node by 2π, which is a full rotation. Repeating this action makes the node rotate continuously.
Shorter durations will make the circle rotate faster, but be careful as that will make the game more challenging.
Build and run the project to test out the rotation.
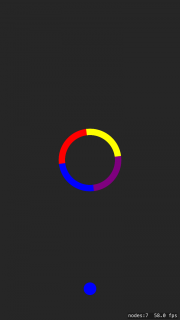
Add the Player
It’s not much of a game without a player, so that’s a good next step. Add this property to the top of GameScene.swift, just after colors:
let player = SKShapeNode(circleOfRadius: 40) |
Next, add the following method after setupPlayerAndObstacles():
func addPlayer() { player.fillColor = .blue player.strokeColor = player.fillColor player.position = CGPoint(x: size.width/2, y: 200) addChild(player) } |
Finally, add a line to call the new method to the beginning of setupPlayerAndObstacles()
addPlayer() |
Build and run to see the new player node. Next, it’s time to make it move.
Adding Physics
Player movement in this game comes in two parts. The player moves upward when the screen is tapped, and drops back down due to gravity between taps. You’ll add these parts now.
First, add this struct to the top of GameScene.swift above the properties:
struct PhysicsCategory { static let Player: UInt32 = 1 static let Obstacle: UInt32 = 2 static let Edge: UInt32 = 4 } |
And add the following code to the end of didMove(to:):
let playerBody = SKPhysicsBody(circleOfRadius: 30) playerBody.mass = 1.5 playerBody.categoryBitMask = PhysicsCategory.Player playerBody.collisionBitMask = 4 player.physicsBody = playerBody let ledge = SKNode() ledge.position = CGPoint(x: size.width/2, y: 160) let ledgeBody = SKPhysicsBody(rectangleOf: CGSize(width: 200, height: 10)) ledgeBody.isDynamic = false ledgeBody.categoryBitMask = PhysicsCategory.Edge ledge.physicsBody = ledgeBody addChild(ledge) |
The categoryBitMask values identify different types of objects, so that you can specify which objects interact with each other, and which do not. You define these categories, so using a struct with constant values helps keep things consistent and easier to maintain.
The collisionBitMask determines which objects are solid to the player. The player node needs to collide with the ledge so that the player doesn’t drop off the bottom of the screen. You don’t want the player to collide with the obstacle, since it needs to be able to pass through unharmed if the colors match.
You set the isDynamic property of the ledge to false to make it a static object, that way it will not move due to gravity nor when the player collides with it.
Next, add this method to GameScene.swift:
override func touchesBegan(_ touches: Set<UITouch>, with event: UIEvent?) { player.physicsBody?.velocity.dy = 800.0 } |
When the screen is tapped, you want the player to jump up, and then start to fall back down due to gravity. You achieve the jump by setting the dy component of the player’s velocity.
Physics bodies already have gravity by default, but the current value is a bit weak for this object and gameplay. Make it stronger by adding this line at the bottom of didMove(to:):
physicsWorld.gravity.dy = -22 |
Some trial and error is required to get the motion to feel and work right for your games.
Build and run the project. Try moving the player node around the screen.
Getting Through the Obstacle
The player node happens to pass harmlessly through the obstacle node. You only want the player to pass through if its color matches the section of the obstacle it crosses. This is a different type of interaction than collisions, which SpriteKit calls contact.
To make this work, you first need to add physics bodies to the circle sections. Add the following to the for loop section of obstacleByDuplicatingPath(_:clockwise), just before the container.addChild(section) line:
let sectionBody = SKPhysicsBody(polygonFrom: path.cgPath) sectionBody.categoryBitMask = PhysicsCategory.Obstacle sectionBody.collisionBitMask = 0 sectionBody.contactTestBitMask = PhysicsCategory.Player sectionBody.affectedByGravity = false section.physicsBody = sectionBody |
This creates a physics body with the same shape as the section node, reusing the same path. The categoryBitMask defines this is as a different type of object from the other physics bodies in the game. The collisionBitMask set to 0 means this body should not collide with any other bodies, since you want the player to be able to pass through.
Don’t forget to turn off gravity for these objects, or they will fall to the bottom of the screen.
The main new part here is the contactTestBitMask, which says that you want to be notified when an object with category PhysicsCategory.Player is in contact with this section of the obstacle. SpriteKit allows you to set a delegate that will receive these notifications.
First, add a method to call when the player makes contact with a section of the wrong color:
func dieAndRestart() { print("boom") player.physicsBody?.velocity.dy = 0 player.removeFromParent() // TODO: Remove obstacles setupPlayerAndObstacles() } |
This will simply reset the player’s velocity, remove it from the scene and recreate the game objects. You’ll add more later.
Next, add the following extension to make GameScene conform to the SKPhysicsContactDelegate protocol, at the very bottom of GameScene.swift, outside of the closing brace for the class:
extension GameScene: SKPhysicsContactDelegate { func didBegin(_ contact: SKPhysicsContact) { if let nodeA = contact.bodyA.node as? SKShapeNode, let nodeB = contact.bodyB.node as? SKShapeNode { if nodeA.fillColor != nodeB.fillColor { dieAndRestart() } } } } |
Finally, add this line to the end of didMove(to:)
physicsWorld.contactDelegate = self |
Since you set GameScene as the contactDelegate of the physicsWorld, didBegin(_:) will be called whenever the player node is overlapping one of the obstacle sections. The if let line checks to make sure both physics bodies have an attached SKShapeNode. You then check the fillColor of the two nodes. If the colors don’t match, you remove the player and reset it to the starting position.
Build and run and give it a shot. Can you get past the obstacle?
Note that when the game restarts, the circle obstacle does not get removed and a new one is stacked on top. You’ll fix this soon.
Add More Obstacles
It’s time to add some more obstacles. There are a couple of changes needed to make this happen. Add two more properties to the top of GameScene.swift:
var obstacles: [SKNode] = [] let obstacleSpacing: CGFloat = 800 |
Note that the array doesn’t hold SKShapeNodes; instead, it holds SKNodes as these are the container nodes for the obstacles.
Next, find the line in addCircleObstacle() that sets the position of the obstacle node and replace it with:
obstacles.append(obstacle) obstacle.position = CGPoint(x: size.width/2, y: obstacleSpacing * CGFloat(obstacles.count)) |
Here you add the newly created obstacle node to the obstacles tracking array, and use the count of obstacles to set the position of the container for the new obstacle.
The current obstacles need to be removed when the player dies, so replace the // TODO: Remove obstacles line in dieAndRestart() with:
for node in obstacles { node.removeFromParent() } obstacles.removeAll() |
These two parts may seem redundant, but clearing the obstacles array doesn’t stop displaying the existing obstacle nodes. Removing the nodes from their parent — the scene — clears them from the screen.
Finally, add this to the end of setupPlayerAndObstacles():
addObstacle() addObstacle() |
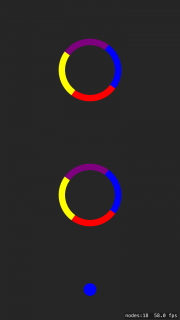
There should now be three calls to addObstacle(). Build and run the project. Even though there are three obstacles, you can only see two of them on the screen. Adjusting the view as the player moves up the screen is your next task.
Scrolling the Screen
SpriteKit provides a built-in solution to deal with scrolling a scene that doesn’t fit on a single screen — an SKCameraNode. By setting the position of the camera, the other nodes in the scene are moved automatically. Add a property to the top of GameScene.swift:
let cameraNode = SKCameraNode() |
Then, add this to the end of didMove(to:):
addChild(cameraNode) camera = cameraNode cameraNode.position = CGPoint(x: size.width/2, y: size.height/2) |
This creates an instance of SKCameraNode, positions it in the center of the screen, and sets it as the camera property for the scene. Now, changing the position of the camera will move everything else in the opposite direction. To actually adjust the camera position, you need to periodically check on the player’s position. Add the following method after touchesBegan(_:with):
override func update(_ currentTime: TimeInterval) { if player.position.y > obstacleSpacing * CGFloat(obstacles.count - 2) { print("score") // TODO: Update score addObstacle() } let playerPositionInCamera = cameraNode.convert(player.position, from: self) if playerPositionInCamera.y > 0 && !cameraNode.hasActions() { cameraNode.position.y = player.position.y } if playerPositionInCamera.y < -size.height/2 { dieAndRestart() } } |
SpriteKit calls update(_:) each frame of the game, so it is a nice place to put code that needs to continually check for certain conditions. In this case, there are three things you are looking for.
First, if the player advances past an obstacle, you need to add a new obstacle to the scene. You check against obstacles.count - 2, because you start with three obstacles: one just above the player, one at the top of the screen, and one more offscreen above that.
Each time the player passes an obstacle, a new one will be created, so there will always be three obstacles already added to the scene above the player. The extra obstacle offscreen is so that the new obstacle does not suddenly appear when the camera position changes.
The second condition is to see if the player node is in the top half of the screen. You convert the player position into the coordinates of the camera node, and the zero point of a node is in its center. When the player moves into the top half of the screen, you move the camera up.
Finally, the player dies if they drop the screen on the bottom. This can’t happen at the beginning because of the ledge you added, but can happen once you start scrolling up.
To reset the camera, add the following line to the end of dieAndRestart():
cameraNode.position = CGPoint(x: size.width/2, y: size.height/2) |
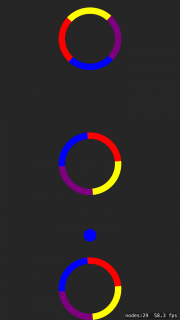
Build and run the project. You should have an endless series of circle obstacles to navigate.
Add a Different Obstacle
It would be a more interesting game with more than one type of obstacle. There are many different things you can add, but a square is simple to build.
Add a new method to GameScene.swift below addCircleObstacle():
func addSquareObstacle() { let path = UIBezierPath(roundedRect: CGRect(x: -200, y: -200, width: 400, height: 40), cornerRadius: 20) let obstacle = obstacleByDuplicatingPath(path, clockwise: false) obstacles.append(obstacle) obstacle.position = CGPoint(x: size.width/2, y: obstacleSpacing * CGFloat(obstacles.count)) addChild(obstacle) let rotateAction = SKAction.rotate(byAngle: -2.0 * CGFloat(M_PI), duration: 7.0) obstacle.run(SKAction.repeatForever(rotateAction)) } |
Building the square obstacle is very similar to building the circle. You create a path for the bottom section of the square, then rotate it around to create the other three sections. Note that this shape copies around counterclockwise, and rotates at a different speed so that its behavior is different than the circle obstacle.
Next, replace addObstacle() with the following:
func addObstacle() { let choice = Int(arc4random_uniform(2)) switch choice { case 0: addCircleObstacle() case 1: addSquareObstacle() default: print("something went wrong") } } |
Here, you generate a random integer that is either 0 or 1, and use that result to decide which obstacle to build.
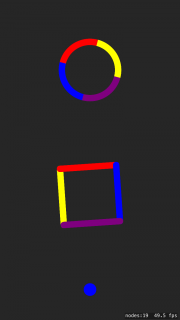
Build and run the project. You may have to pass several obstacles, or die a few times, to see both types due to the nature of random numbers.
Scoring
A game is much more fun when you can brag to your friends about beating their high scores. To add scores to your game, start by adding properties to the top of GameScene.swift:
let scoreLabel = SKLabelNode() var score = 0 |
Next, set up the label at the end of didMove(to:):
scoreLabel.position = CGPoint(x: -350, y: -900) scoreLabel.fontColor = .white scoreLabel.fontSize = 150 scoreLabel.text = String(score) cameraNode.addChild(scoreLabel) |
Note that you add the label to cameraNode, not the scene itself, so that the label doesn’t scroll off the screen when the player moves up.
Then, replace the // TODO: Update score line in update(_:) with:
score += 1 scoreLabel.text = String(score) |
Finally, add the following to the end of dieAndRestart():
score = 0 scoreLabel.text = String(score) |
With these pieces of code, you update the score each time the player passes an obstacle, and reset it to 0 when the player dies.
Build and run to see the new score counter.
Where to Go From Here?
Sometimes simple mechanics can make for fun little games. You can download the completed project here.
Now that you’ve got a complete game, you may want to spruce it up a bit. One thing you could add is more randomness. For example, the player could start as a random color, and the obstacles could rotate in a random direction, at random speeds.
There are also many different obstacles you could add, such as circles inside circles or plus signs. Be creative — and if you create a new obstacle, post a screenshot in the forum. I’d love to see it!
For more on SpriteKit, check out the 2D Apple Games by Tutorials book or some of our other Apple Game Frameworks tutorials. We hope you enjoyed this tutorial!
The post How To Make A Game Like Color Switch with SpriteKit and Swift appeared first on Ray Wenderlich.
