 Since Siri was introduced in iOS 5, people have been asking when they’d be able to use it in their apps. Just five short years later, here it is. Er, well, sort of. And only for some types of apps.
It turns out that integrating natural language processing into an app is quite a tricky problem to solve. You can’t just take whatever text Siri has decoded from the user’s speech, pass it as a string to the app and presto — you’re done! Well, you could, but imagine the number of possible ways your users around the world could talk to your app. Would you really want to write that code?
Think about the times you’ve used Siri. There’s usually a little conversation that happens between you and Siri; sometimes that conversation goes well, and sometimes it doesn’t. Either way, there’s a lot of first-party support work happening behind the scenes.
Before you start this SiriKit tutorial, some warnings: if you’ve ever been frustrated with Siri, how would you feel having to use Siri for every build and run? Then imagine that debugging was incredibly hard because you’re running in an app extension, and because Siri times out if you pause the debugger for too long. Also, imagine you have to build using a device, because Siri isn’t available on the simulator.
If that hasn’t scared you off, then:
“It’s time to get started.”
I’m not sure I understand.
“Start the tutorial.”
OK, here’s what I found on the web:
I’m just getting you warmed up. You’ll be seeing that sort of thing a lot.
Getting Started
SiriKit works using a set of domains, which represent related areas of functionality, such as Messaging.
Within each domain is a set of intents, which represent the specific tasks that the user can achieve using Siri. For example, within the Messaging domain, there are intents for sending a message, searching for messages and setting attributes on a message.
Each intent is represented by an INIntent subclass, and has associated with it a handler protocol and a specific INIntentResponse subclass for you to talk back to SiriKit.
Language processing in your app boils down to SiriKit deciding which intent and app the user is asking for, and your code checking that what the user is asking makes sense or can be done, and then doing it.
Would You Like to Ride in my Beautiful Balloon?
First, download the starter sample project here. The sample project for this SiriKit tutorial is WenderLoon, a ride-booking app like no other. The members of the Razeware team are floating above London in hot air balloons, waiting to (eventually) pick up passengers and take them to… well, wherever the wind is blowing. It’s not the most practical way to get around, but the journey is very relaxing. Unless Mic is driving. :]
Open up the sample project. Before you can start, you’ll need to amend the bundle identifier of the project so that Xcode can sort out your provisioning profiles. Using Siri needs entitlements, and you need to run it on a device, which means you need your own bundle ID.
Select the WenderLoon project in the project navigator, then select the WenderLoon target. Change the Bundle identifier from com.razeware.WenderLoon to something unique; I’d suggest replacing razeware with something random.
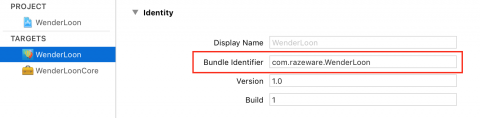
In the Signing section choose a development team.
Select the WenderLoonCore framework target and change the bundle identifier and select a development team there as well.
Connect a device running iOS 10 and build and run to confirm that everything is working:

You’ll see some balloons drifting somewhere over London. The app doesn’t do very much else — in fact, you’ll be doing the rest of your work in an extension.
Add a new target using the plus button at the bottom of the target list, or by choosing File\New\Target….
Choose the iOS/Application Extension/Intents Extension template.
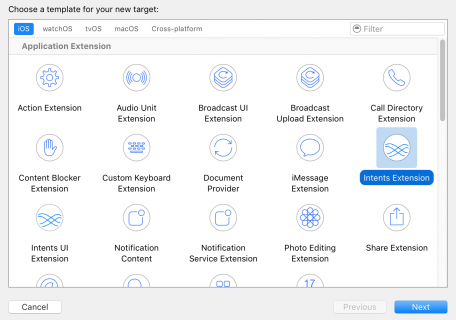
On the next screen, enter RideRequestExtension for the product name. Don’t check the Include UI Extension box. If you’re prompted to activate a new scheme, say yes.
A new target and group have been added to your project. Find IntentHandler.swift in the RideRequestExtension group and replace the entire contents of the file with this:
import Intents

class IntentHandler: INExtension {

}
Like a lot of Apple template code, there’s a blizzard of nonsense in there that stops you from really understanding each piece. INExtension is the entry point for an Intents extension. It only has one job, which is to provide a handler object for the intent or intents that your app supports.
As mentioned earlier, each intent has an associated handler protocol which defines the methods needed for dealing with that particular intent.
Select the RideRequestExtension scheme then add a new file using File\NewFile…. Choose the Swift File template, name the file RideRequestHandler.swift and make sure it is in the RideRequestExtension group and RideRequestExtension target.
Add the following code to the new file:
import Intents

class RideRequestHandler:
  NSObject, INRequestRideIntentHandling {

}
INRequestRideIntentHandling is the protocol for handling the — you’ve guessed it — ride request intent. It only has one required method.
Add the following code:
func handle(requestRide intent: INRequestRideIntent,
            completion: @escaping (INRequestRideIntentResponse) -> Void) {
  let response = INRequestRideIntentResponse(
    code: .failureRequiringAppLaunchNoServiceInArea,
    userActivity: .none)
  completion(response)
}
This method fires when the user gets to the point where they are ready to book the ride. That’s a little ahead of where the rest of your code is, so at the moment it just returns a response with a failure code.
Switch back to IntentHandler.swift and add the following method:
override func handler(for intent: INIntent) -> Any? {
  if intent is INRequestRideIntent {
    return RideRequestHandler()
  }
  return .none
}
Here, you’re returning your new request handler object if the intent is of the correct type. The only type of intent you’ll be dealing with is the INRequestRideIntent. This has to be declared in another place as well, so that Siri knows it can direct requests to your app.
Open Info.plist inside the RideRequestExtension group and find the NSExtension dictionary. Inside there is an NSExtensionAttributes dictionary which contains an IntentsSupported array. The template is for a messages extension, which means the array contains some messaging intents which you don’t support.
Delete those intents and add in an INRequestRideIntent line:

There are a few more hoops to jump through before you can use Siri. First, you need to ask the user’s permission. Open AppDelegate.swift in the main WenderLoon group, and you’ll see a stub method called requestAuthorisation().
At the top of the file, import the Intents framework:
import Intents
Then replace the //TODO comment with this code:
INPreferences.requestSiriAuthorization { status in
  if status == .authorized {
    print("Hey, Siri!")
  } else {
    print("Nay, Siri!")
  }
}
Permission requests now come with usage strings which are displayed to the user when the dialog displays. Open Info.plist from the WenderLoon group and find the Privacy – Location… entry.
Add a new entry there, for Privacy – Siri Usage Description (it should autocomplete) and enter a usage string:

Finally, you need to add the Siri entitlement to the app. Select the project, then the WenderLoon target, then the Capabilities tab. Switch on Siri:

Here’s a summary of the steps required to add Siri to your app:
- Add an Intents extension
- Create appropriate handler objects
-
Return the handler objects in your
INExtensionsubclass - Declare the supported intents in the Info.plist of the extension
- Request the user’s permission to use Siri
- Add a Siri usage description to the app’s Info.plist
- Add the Siri entitlement to the app
After all that, select the WenderLoon scheme (not the extension) and build and run. You’ll get asked to enable Siri:

After all that effort, you really want to make sure you tap OK. If all works well, you should see “Hey, Siri!” printed in the console.
Now the real fun begins. Back in Xcode, change to the RideRequestExtension scheme. Build and run, and choose Siri from the list of applications. Siri will start on your device and you can start having the first of many fun conversations.
Try saying “Book a ride using WenderLoon from Heathrow airport”, and if Siri can understand you, you should see something like the following:

That’s the basic setup complete. Remember, at the moment you’re always returning a response saying that there’s no service in the area, which is what you can see above. In the next sections you’ll work through the detail of handling an intent properly.
99 (passengers in) Red Balloons
Handling an intent is a three-stage process. The first stage is called Resolution. In this stage, your extension has to confirm that all of the information it needs about the intent is present. If there is information missing, Siri can ask the user additional questions.
The information varies depending on the particular intent. For the ride request intent, there are the following parameters:
- Pickup location
- Drop-off location
- Party size
- Ride option
- Payment method
Each parameter comes with a related method in the handler protocol. Remember that you’re using the INRequestRideIntentHandling for handling intents in this app. That protocol has methods for resolving each of the parameters above. Each one receives a ride request intent as a parameter and has a completion block, which you call when you’ve processed the intent. The completion block takes an INIntentResolutionResult subclass as a parameter.
The resolution result tells Siri what to do next, or if everything is OK, it moves on to the next parameter.
That all sounds a little abstract, so here’s a diagram:

Open RideRequestHandler.swift and add the following method:
func resolvePickupLocation(forRequestRide intent: INRequestRideIntent, with completion: @escaping (INPlacemarkResolutionResult) -> Void) {
  if let pickup = intent.pickupLocation {
    completion(.success(with: pickup))
  } else {
    completion(.needsValue())
  }
}
This method resolves the pickup location. The completion block takes a INPlacemarkResolutionResult parameter, which is the specific subclass for dealing with location values in the Intents framework. Here you accept any pickup location that arrives with the intent. If there is no pickup location, you tell Siri that a value is required.
Build and run the app, and ask Siri to book you a ride using WenderLoon, giving no extra information.

You supplied no pickup information in the original intent, so the resolution method tells Siri to ask for more data. If you then say a location, the resolution method is called again. The resolution method will get called multiple times until you end up with a success or a failure.
However, the handler object is initialized from scratch for each separate interaction with Siri. A different instance of RideRequestHandler deals with each interaction, which means you cannot use any state information on the handler when dealing with intents.
Back in Xcode, add another resolution method, this time for the drop-off location:
func resolveDropOffLocation(forRequestRide intent: INRequestRideIntent, with completion: @escaping (INPlacemarkResolutionResult) -> Void) {
  if let dropOff = intent.dropOffLocation {
    completion(.success(with: dropOff))
  } else {
    completion(.notRequired())
  }
}
Here you’re allowing a ride with no drop-off location to go ahead. This is actually quite sensible, considering you have absolutely no control over where a hot air balloon will take you. If you build and run, Siri will use a drop-off location that you supply, but it won’t try and fill in the gaps if there isn’t one present.
As well as simply accepting any value that’s passed in as an intent parameter, you can also perform a bit of business logic in there. In many cases, this will involve the same logic used in the main app. Apple recommends that you put code such as this in a separate framework that can be shared between your extension and the main app.
That’s why the sample project contains the WenderLoonCore framework. Bring that framework into the extension by adding the following statement to the top of RideRequestHandler.swift:
import WenderLoonCore
Then add the following property and initializer to RideRequestHandler:
let simulator: WenderLoonSimulator

init(simulator: WenderLoonSimulator) {
  self.simulator = simulator
  super.init()
}
WenderLoonSimulator is an object which contains the business logic for the app. Open IntentHandler.swift and add the following to the top of the file:
import WenderLoonCore

let simulator = WenderLoonSimulator(renderer: nil)
Then replace the line where the request handler is created (it will have an error on it) with the following:
return RideRequestHandler(simulator: simulator)
Now your request handler will be able to access the business logic from the rest of the app.
Back in RideRequestHandler.swift, add the following method for resolving the number of passengers:
func resolvePartySize(forRequestRide intent: INRequestRideIntent, with completion: @escaping (INIntegerResolutionResult) -> Void) {
  switch intent.partySize {
  case .none:
    completion(.needsValue())
  case let .some(p) where simulator.checkNumberOfPassengers(p):
    completion(.success(with: p))
  default:
    completion(.unsupported())
  }
}
This will ask for a number of passengers if the intent doesn’t already contain that information. If the number of passengers is known, it is validated against the rules held in the WenderLoonSimulator object. The maximum number of passengers is four. Build and run and see what happens with different party sizes:

You’ve seen that the resolution stage works by dealing with a single parameter at a time. In the next stage, you can handle the final intent with all of the parameters resolved.
The Confirmation stage of intent handling happens after all of the parameters have been resolved. As with resolution, there are delegate methods specific to each intent. The delegate method has a similar signature to the resolution methods, but there is only one per intent.
Add the following to RideRequestHandler.swift:
func confirm(requestRide intent: INRequestRideIntent, completion: @escaping (INRequestRideIntentResponse) -> Void) {
  let responseCode: INRequestRideIntentResponseCode
  if let location = intent.pickupLocation?.location,
    simulator.pickupWithinRange(location) {
    responseCode = .ready
  } else {
    responseCode = .failureRequiringAppLaunchNoServiceInArea
  }
  let response = INRequestRideIntentResponse(code: responseCode, userActivity: nil)
  completion(response)
}
Here you use a method from the simulator to check that the pickup location is in range. If not, you fail with the “no service in area“ response code.
Sure, you could have performed this check when resolving the pickup location. But then you wouldn’t have seen any implementation at all! :] You can also use this method to ensure that you had connectivity to your services, so the booking could go ahead. This method is called just before the confirmation dialog is shown to the user.
Try to book a ride with a pickup location more than 50 km away from London, and you’ll receive an error telling you there is no service in the area.
pickupWithinRange(_:) and add a few more zeros to the radius.
You’ve dealt with the first two phases of a Siri interaction: resolution and confirmation. The final phase is where you actually take that intent and convert it into something actionable.
You Can’t Handle the Truth
You implemented a handler way back in the first section of the SiriKit tutorial. All it did was return a failure code, saying there was no service in the area. Now, you’re armed with a fully populated intent so you can perform more useful work.
After the user has seen the confirmation dialog and has requested the ride, Siri shows another dialog with the details of the ride that has been booked. The details of this dialog will differ between the different intents, but in each case you must supply certain relevant details. Each intent actually has its own data model subset, so you need to translate the relevant part of your app’s data model to the standardized models used by the Intents framework.
Switch schemes to the WenderLoonCore framework, add a new Swift file to the Extensions group and name it IntentsModels.swift. Replace the contents with the following:
import Intents

// 1
public extension UIImage {
  public var inImage: INImage {
    return INImage(imageData: UIImagePNGRepresentation(self)!)
  }
}

// 2
public extension Driver {
  public var rideIntentDriver: INRideDriver {
    return INRideDriver(
      personHandle: INPersonHandle(value: name, type: .unknown),
      nameComponents: .none,
      displayName: name,
      image: picture.inImage,
      rating: rating.toString,
      phoneNumber: .none)
  }
}
Here’s what each method does:
-
The Intents framework, for some reason, uses its own image class
INImage. ThisUIImageextension gives you a handy way to create anINImage. -
INRideDriverrepresents a driver in the Intents framework. Here you pass across the relevant values from theDriverobject in use in the rest of the app.
Unfortunately there’s no INBalloon. The Intents framework has a boring old INRideVehicle instead. Add this extension to create one:
public extension Balloon {
  public var rideIntentVehicle: INRideVehicle {
    let vehicle = INRideVehicle()
    vehicle.location = location
    vehicle.manufacturer = "Hot Air Balloon"
    vehicle.registrationPlate = "B4LL 00N"
    vehicle.mapAnnotationImage = image.inImage
    return vehicle
  }
}
This creates a vehicle based on the balloon’s properties.
With that bit of model work in place you can build the framework (press Command-B to do that) then switch back to the ride request extension scheme.
Open RideRequestHandler.swift and replace the implementation of handle(intent:completion:) with the following:
// 1
guard let pickup = intent.pickupLocation?.location else {
  let response = INRequestRideIntentResponse(code: .failure,
    userActivity: .none)
  completion(response)
  return
}

// 2
let dropoff = intent.dropOffLocation?.location ??
  pickup.randomPointWithin(radius: 10_000)

// 3
let response: INRequestRideIntentResponse
// 4
if let balloon = simulator.requestRide(pickup: pickup, dropoff: dropoff) {
  // 5
  let status = INRideStatus()
  status.rideIdentifier = balloon.driver.name
  status.phase = .confirmed
  status.vehicle = balloon.rideIntentVehicle
  status.driver = balloon.driver.rideIntentDriver
  status.estimatedPickupDate = balloon.etaAtNextDestination
  status.pickupLocation = intent.pickupLocation
  status.dropOffLocation = intent.dropOffLocation

  response = INRequestRideIntentResponse(code: .success, userActivity: .none)
  response.rideStatus = status
} else {
  response = INRequestRideIntentResponse(code: .failureRequiringAppLaunchNoServiceInArea, userActivity: .none)
}

completion(response)
Here’s the breakdown:
- Theoretically, it should be impossible to reach this method without having resolved a pickup location, but hey, Siri…
- We’ve decided to embrace the randomness of hot air balloons by not forcing a dropoff location, but the balloon simulator still needs somewhere to drift to.
-
The
INRequestRideIntentResponseobject will encapsulate all of the information concerning the ride. - This method checks that a balloon is available and within range, and returns it if so. This means the ride booking can go ahead. If not, you return a failure.
-
INRideStatuscontains information about the ride itself. You populate this object with the Intents versions of the app’s model classes. Then, you attach the ride status to the response object and return it.
Build and run; book a ride for three passengers, pickup somewhere in London, then confirm the request. You’ll see the final screen:

Hmmm. That’s quite lovely, but it isn’t very balloon-ish. In the final part, you’ll create custom UI for this stage!
Making a Balloon Animal, er, UI
To make your own UI for Siri, you need to add another extension to the app. Go to File\New\Target… and choose the Intents UI Extension template from the Application Extension group.
Enter LoonUIExtension for the Product Name and click Finish. Activate the scheme if you are prompted to do so. You’ll see a new group in the project navigator, LoonUIExtension.
A UI extension consists of a view controller, a storyboard and an Info.plist file. Open the Info.plist file and, the same as you did with the Intents extension, change the NSExtension/NSExtensionAttributes/IntentsSupported array to contain INRequestRideIntent.
Each Intents UI extension must only contain one view controller, but that view controller can support multiple intents.
Open MainInterface.storyboard. You’re going to do some quick and dirty Interface Builder work here, since the actual layout isn’t super-important.
Drag in an image view, pin it to the top, left and bottom edges of the container and set width to 0.25x the container width. Set the Content Mode to Aspect Fit.
Drag in a second image view and pin it to the top, right and bottom edges of the container and set the same width constraint and Content Mode.
Drag in a label, pin it to the horizontal and vertical center of the view controller and set the font to System Thin 20.0 and the text to WenderLoon.
Drag in another label, positioned the standard distance underneath the first. Set the text to subtitle. Add a constraint for the vertical spacing to the original label and another to pin it to the horizontal center.
Make the background an attractive blue color.
This is what you’re aiming for:

Open the assistant editor and create the following outlets:
- The left image view, called balloonImageView
- The right image view, called driverImageView
- The subtitle label, called subtitleLabel
In IntentViewController.swift, import the core app framework:
import WenderLoonCore
You configure the view controller in the configure(with: context: completion:) method. Replace the template code with this:
// 1
guard let response = interaction.intentResponse as? INRequestRideIntentResponse
  else {
    driverImageView.image = nil
    balloonImageView.image = nil
    subtitleLabel.text = ""
    completion?(self.desiredSize)
    return
}

// 2
if let driver = response.rideStatus?.driver {
  let name = driver.displayName
  driverImageView.image = WenderLoonSimulator.imageForDriver(name: name)
  balloonImageView.image = WenderLoonSimulator.imageForBallon(driverName: name)
  subtitleLabel.text = "\(name) will arrive soon!"
} else {
// 3
  driverImageView.image = nil
  balloonImageView.image = nil
  subtitleLabel.text = "Preparing..."
}

// 4
completion?(self.desiredSize)
Here’s the breakdown:
- You could receive any of the listed intents that your extension handles at this point, so you must check which type you’re actually getting. This extension only handles a single intent.
- The extension will be called twice. Once for the confirmation dialog and once for the final handled dialog. When the request has been handled, a driver will have been assigned, so you can create the appropriate UI.
- If the booking is at the confirmation stage, you don’t have as much to present.
-
Finally, you call the completion block that has been passed in. You can vary the size of your view controller and pass in a calculated size. However, the size must be between the maximum and minimum allowed sizes specified by the
extensionContextproperty.desiredSizeis a calculated variable added as part of the template that simply gives you the largest allowed size.
Build and run and request a valid ride. Your new UI appears in the Siri interface at the confirmation and handle stages:

Notice that your new stuff is sandwiched in between all of the existing Siri stuff. There isn’t a huge amount you can do about that. If your view controller implements the INUIHostedViewSiriProviding protocol then you can tell Siri not to display maps (which would turn off the map in the confirm step), messages (which only affects extensions in the Messages domain) or payment transactions.
Where to Go From Here?
Download the final project here. This SiriKit tutorial has been all about ride booking, but the principles should cover all of the different intents and domains. Take a look at the documentation to find out what’s possible for your app. If your app isn’t covered by the existing domains and intents, try mapping out the intents, parameters, responses and model objects and file a radar. Maybe your app can add Siri next year!
If you’ve followed along with this SiriKit tutorial, you might also want to take a trip to the Apple store to replace the devices you smashed in a fit of rage when Siri didn’t understand you. You’ve been warned! :]
But if you haven’t smashed your device, come join the forum discussion below!
 This SiriKit tutorial was taken from Chapter 6 of iOS 10 by Tutorials, which also covers the new changes in Swift 3, source editor extensions, Core Data updates, photography updates, search integration and all the other new, shiny APIs in iOS 10.
You’ll definitely enjoy the other 13 chapters and 300+ pages in the book. Check it out in our store and let us know what you think!
The post SiriKit Tutorial for iOS appeared first on Ray Wenderlich.