
Maps are ubiquitous in modern apps. Maps provide locations of nearby points of interest, help users navigate a town or park, find nearby friends, track progress on a journey, or provide context for an augmented reality game.
Unfortunately, this means most maps look the same from app to app. Booooooring!
This tutorial covers how to include hand-drawn maps, instead of programmatically-generated ones, like the ones in Pokemon Go.
Hand-drawing a map is a significant effort. Given the size of the planet, it’s only practical for a well-defined, geographically small area. If you have a well-defined area in mind for your map, then a custom map can add a ton of sizzle to your app.
Getting Started
Download the starter project here.
MapQuest is the start of a fun adventure game. The hero runs around Central Park, NYC in real life, but embarks on adventures, fights monsters, and collects treasure in an alternate reality. It has a cute, childish design to make players feel comfortable and to indicate the game isn’t that serious.
The game has several Points of Interest (POI) that define locations where the player can interact with the game. These can be quests, monsters, stores, or other game elements. Entering a 10-meter zone around a POI starts the encounter. For the sake of this tutorial, the actual gameplay is secondary to the map rendering.
There are two heavy-lifting files in the project:
- MapViewController.swift: Manages the map view and handles the user interaction logic and state changes.
- Game.swift: Contains the game logic, as well as manages the coordinates of some game objects.
The main view of the game is a MKMapView. MapKit uses tiles at various zoom levels to fill its view and provide information about geographic features, roads, etc.
The map view can display either a traditional road map or satellite imagery. This is useful for navigating around the city, but rather useless for imagining you’re adventuring around a medieval world. However, MapKit lets you supply your own map art to customize the aesthetic and presented information.
A map view is made up of many tiles that are loaded dynamically as you pan around the view. The tiles are 256 pixels by 256 pixels and are arranged in a grid that corresponds to a Mercator map projection.
To see the map in action, build and run the app.

Wow! What a pretty town. The game’s primary interface is location, which means there’s nothing to see or do without visiting Central Park.
Testing Out Location
Contrary to other tutorials, MapQuest is a functional app right out of the gate! But, unless you live in New York City, you’re a little out of luck. Fortunately, XCode comes with at least two ways of simulating location.
Simulating a Location
With the app still running in the iPhone Simulator, set the user’s location.
Go to Debug\Location\Custom Location….
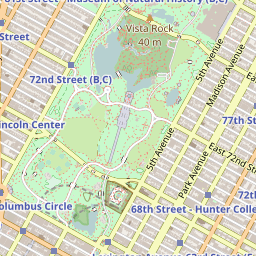
Set the Latitude to 40.767769 and Longitude to -73.971870. This will activate the blue user location dot and focus the map on the Central Park Zoo. This is where a wild goblin lives; you’ll be forced to fight it, and then collect its treasure.

After beating up on the helpless goblin, you’ll be placed in the zoo (Note the blue dot).

Simulating an Adventure
A static location is pretty useful for testing out many location-based apps. However, this game requires visiting multiple locations as part of the adventure. The Simulator can simulate changing locations for a run, bike ride, and a drive. These pre-included trips are for Cupertino, but MapQuest only has encounters in New York.
Occasions such as these call for simulation location with a GPX file (GPS Exchange Format). This file specifies many waypoints, and the Simulator will interpolate a route between them.
Creating this file is outside the scope of this tutorial, but the sample project includes a test GPX file for your use.
Open the scheme editor in XCode by selecting Product\Scheme\Edit Scheme….
Select Run in the left pane, and then the Options tab on the right. In the Core Location section, click the check mark for Allow Location Simulation. In the Default Location drop-down choose Game Test.

This means the app will simulate moving between the waypoints specified in Game Test.gpx.
Build and run.

The simulator will now walk from the 5th Avenue subway to the Central Park Zoo where you’ll have to fight the goblin again. After that, it’s on to your favorite fruit company’s flagship store to buy an upgraded sword. Once the loop is complete, the adventure will start over.
Replace the Tiles with OpenStreetMap
OpenStreetMap is a community-supported open database of map data. That data can be used to generate the same kind of map tiles used by Apple Maps. The Open Street Map community provides more than basic road maps, such as specialized maps for topography, biking, and artistic rendering.
Note: The Open Street Map tile policy has strict requirements about data usage, attribution, and API access. This is fine for use in a tutorial, but check for compliance before using the tiles in a production application.
Creating a New Overlay
Replacing the map tiles requires using a MKTileOverlay to display new tiles on top of the default Apple Maps.
Open MapViewController.swift, and replace setupTileRenderer() with the following:
func setupTileRenderer() {
  // 1
  let template = "https://tile.openstreetmap.org/{z}/{x}/{y}.png"

  // 2
  let overlay = MKTileOverlay(urlTemplate: template)

  // 3
  overlay.canReplaceMapContent = true

  // 4
  mapView.add(overlay, level: .aboveLabels)

  //5
  tileRenderer = MKTileOverlayRenderer(tileOverlay: overlay)
}
By default, MKTileOverlay supports loading tiles by URL templated to take a tile path.
- This is Open Street Map’s API for fetching a map tile. The
{x},{y}, and{z}are replaced at runtime by an individual tile’s coordinate. The z-coordinate, or zoom-level is specified by how much the user has zoomed in the map. The x and y are the index of the tile given the section of the Earth shown. A tile needs to be supplied for every x and y for each zoom level supported. - Creates the overlay.
- Indicates the tiles are opaque and replace the default map tiles.
- Adds the overlay to the
mapView. Custom tiles can either be above the roads or above the labels (like road and place names). Open street map tiles come prelabeled, so they should go above Apple’s labels. - Creates a tile renderer which handles the drawing of the tiles.
Before the tiles will show up, the tile renderer has to be set up with the MKMapView in order for the tiles to be drawn.
At the bottom of viewDidLoad() add the following line:
mapView.delegate = self
This sets the MapViewController to be the delegate of its mapView.
Next, in the MapView Delegate extension, add the following method:
func mapView(_ mapView: MKMapView, rendererFor overlay: MKOverlay) -> MKOverlayRenderer {
  return tileRenderer
}
An overlay renderer tells the map view how to draw an overlay. The tile renderer is a special subclass for loading and drawing map tiles.
That’s it! Build and run to see the standard Apple map replaced with Open Street Map.

At this point, you can really see the difference between the open source maps and Apple Maps!
Dividing up the Earth
The magic of the tile overlay is the ability to translate from a tile path to a specific image asset. The tile’s path is represented by there coordinates: x, y, and z. The x and y correspond to indices on the map’s surface, with 0,0 being the upper left tile. The z-coordinate is for the zoom level and determines how many tiles make up the whole map.
At zoom-level 0, the whole world is represented by a 1-by-1 grid, requiring one tile:

At zoom-level 1, the whole world is divided into a 2-by-2 grid. This requires four tiles:

At level 2, the number of rows and columns doubles again, requiring sixteen tiles:

This pattern continues, quadrupling both the level of detail and number of tiles at each zoom level. Each zoom level requires 22*z tiles, all the way down to zoom level 19 requiring 274,877,906,944 tiles!
Creating Custom Tiles
Since the map view is set to follow the user’s location, the default zoom level is set to 16, which shows a good level of detail to give the user the context of where they are. Zoom level 16 would require 4,294,967,296 tiles for the whole planet! It would take more than a lifetime to hand-draw these tiles.
Having a smaller bounded area like a town or park makes it possible to create custom artwork. For a larger range of locations, the tiles can be procedurally generated from source data.
Since the tiles for this game are prerendered and included in the resource bundle, you simply need to load them. Unfortunately, a generic URL template is not enough, since it’s better to fail gracefully if the renderer requests one of the billions of tiles not included with the application.
To do that, you’ll need a custom MKTileOverlay subclass. Open AdventureMapOverlay.swift and add the following code:
class AdventureMapOverlay: MKTileOverlay {

  override func url(forTilePath path: MKTileOverlayPath) -> URL {
    let tileUrl = "https://tile.openstreetmap.org/\(path.z)/\(path.x)/\(path.y).png"
    return URL(string: tileUrl)!
  }
}
This sets up the subclass, and replaces the basic class using a template URL with a specialized URL generator.
Keep the Open Street Map tiles for now in order to test out the custom overlay.
Open MapViewController.swift, and replace setupTileRenderer() with the following:
func setupTileRenderer() {
  let overlay = AdventureMapOverlay()

  overlay.canReplaceMapContent = true
  mapView.add(overlay, level: .aboveLabels)
  tileRenderer = MKTileOverlayRenderer(tileOverlay: overlay)
}
This swaps in the custom subclass.
Build and run again. If all goes well, the game should look exactly the same as before. Yay!

Loading the Prerendered Tiles
Now comes the fun part. Open AdventureMapOverlay.swift, and replace url(forTilePath:) with the following:
override func url(forTilePath path: MKTileOverlayPath) -> URL {

  // 1
  let tilePath = Bundle.main.url(
    forResource: "\(path.y)",
    withExtension: "png",
    subdirectory: "tiles/\(path.z)/\(path.x)",
    localization: nil)

  guard let tile = tilePath else {

    // 2
    return Bundle.main.url(
      forResource: "parchment",
      withExtension: "png",
      subdirectory: "tiles",
      localization: nil)!
  }
  return tile
}
This code loads the custom tiles for the game.
- First, try to locate a matching tile in the resource bundle using a known naming scheme.
- If a tile is not provided, it’s replaced by a parchment pattern that gives the map a fantasy medieval feel. This also obviates the need to supply a unique asset for every tile path.
Build and run again. Now the custom map is shown.

Try zooming in and out to see different levels of detail.

Bounding the Zoom Level
Don’t zoom too far in or out, or you’ll lose the map altogether.

Fortunately this is an easy fix. Open MapViewController.swift, add the following lines to the bottom of setupTileRenderer():
overlay.minimumZ = 13
overlay.maximumZ = 16
This informs the mapView that tiles are only provided between those zoom levels. Changing the zoom beyond that scales the tile images provided in the app. No additional detail is supplied, but at least the image shown now matches the scale.

Creating Tiles
This next section is optional, as it covers how to draw specific tiles. To skip to more MapKit techniques, jump ahead to the “Fancifying the Map” section.
The hardest part of this whole maneuver is creating the tiles of the right size and lining them up properly. To draw your own custom tiles, you’ll need a data source and an image editor.
Open up the project folder and take a look at MapQuest/tiles/14/4825/6156.png. This tile shows the bottom part of Central Park at zoom level 14. The app contains dozens of these little images to form the map of New York City where the game takes place, and each one was drawn by hand using pretty rudimentary skills and tools.

What Tiles Do You Need?
The first step is to figure out what tiles you’ll need to draw. You can download the source data from Open Street Map and use a tool like MapNik to generate tile images from it. Unfortunately, the source is a 57GB download! And the tools are a little obscure and out of the scope of this tutorial.
For a bounded region like Central Park, there’s an easier workaround.
In AdventureMapOverlay.swift add the following line to url(forTilePath:):
print("requested tile\tz:\(path.z)\tx:\(path.x)\ty:\(path.y)")
Build and run. Now as you zoom and pan around the map, the tile paths are displayed in the console output.

Next it’s a matter of getting a source tile then customizing it. You can reuse the URL scheme from before to get an open street map tile.
The following terminal command will grab and store it locally. You can change the URL, replacing the x, y, and z with a particular map path.
curl --create-dirs -o z/x/y.png https://tile.openstreetmap.org/z/x/y.png
For the south section of Central Park, try:
curl --create-dirs -o 14/4825/6156.png https://tile.openstreetmap.org/14/4825/6156.png
This directory structure of zoom-level/x-coordinate/y-coordinate makes it easier to find and use the tiles later.
Customizing Appearances
The next step is to use the base image as a starting point for customization. Open the tile in your favorite image editor. For example, this is what it looks like in Pixelmator:
![]()
Now you can use the brush or pencil tools to draw roads, paths, or interesting features.

If your tool supports layers, drawing different features on separate layers will allow you to adjust them to give the best look. Using layers makes the drawing a little more forgiving, as you can cover up messy lines beneath other features.


Now repeat this process for all the tiles in the set, and you’re good to go. As you can see, this will be a little bit of a time investment.
You can make the process a little easier:
- Combine all the tiles for a whole layer together first.
- Draw the custom map.
- Split the map back into tiles.

Where to Put the Tiles
After creating your new tiles, put them back in the tiles/zoom-level/x-coordinate/y-coordinate folder structure in the project. This keeps things organized and easily accessible.
This means you can access them easily, as you did in the code you added for url(forTilePath:).
let tilePath = Bundle.main.url(
    forResource: "\(path.y)",
    withExtension: "png",
    subdirectory: "tiles/\(path.z)/\(path.x)",
    localization: nil)
That’s it. Now you’re ready to go forth and draw some beautiful maps!
Fancifying the Map
The map looks great and fits the aesthetic of the game. But there’s so much more to customize!
Your hero is not well represented by a blue dot, but you can replace the current location annotation with some custom art.
The User Annotation
Open MapViewController.swift and add the following method to the MapView Delegate extension:
func mapView(_ mapView: MKMapView, viewFor annotation: MKAnnotation) -> MKAnnotationView? {
  switch annotation {

  // 1
  case let user as MKUserLocation:

    // 2
    let view = mapView.dequeueReusableAnnotationView(withIdentifier: "user")
      ?? MKAnnotationView(annotation: user, reuseIdentifier: "user")

    // 3
    view.image = #imageLiteral(resourceName: "user")
    return view

  default:
    return nil
  }
}
This code creates a custom view for the user annotation.
- The user’s location is annotated with a
MKUserLocation. - MapViews maintain a pool of reusable annotation views for improved performance. This will create a new one if there’s none to dequeue.
- A standard
MKAnnotationViewis pretty flexible, but it’s only used to represent the adventurer with just an image.
Build and run. Instead of the blue dot, there will now be a little stick figure wandering around.

Annotations for Specific Locations
MKMapView also allows you to mark up your own locations of interest. MapQuest plays along with the NYC subway, treating the subways system as a great big warp network.
Add some markers to the map for nearby subway stations. Open MapViewController.swift, add the following line at the end of viewDidLoad():
mapView.addAnnotations(Game.shared.warps)
Build and run, and a selection of subways stations are now represented as pins.

Like the user location blue dot, these standard pins don’t really match the game’s aesthetic. Custom annotations can come to the rescue.
In mapView(_:viewFor:) add the following case to the switch statement above the default case:
case let warp as WarpZone:
  let view = mapView.dequeueReusableAnnotationView(withIdentifier: WarpAnnotationView.identifier)
    ?? WarpAnnotationView(annotation: warp, reuseIdentifier: WarpAnnotationView.identifier)
  view.annotation = warp
  return view
Build and run again. The custom annotation view will uses a template image and color it for the specific subway line.

If only the subway were an instantaneous warp in real life!
Custom Overlay Rendering
MapKit has lots of ways to spruce up the map for the game. Next, use a MKPolygonRenderer to draw a gradient-based shimmer effect on the reservoir.
Replace setupLakeOverlay() with:
func setupLakeOverlay() {

 // 1
 let lake = MKPolygon(coordinates: &Game.shared.reservoir, count: Game.shared.reservoir.count)
 mapView.add(lake)

 // 2
 shimmerRenderer = ShimmerRenderer(overlay: lake)
 shimmerRenderer.fillColor = #colorLiteral(red: 0.2431372549, green: 0.5803921569, blue: 0.9764705882, alpha: 1)

 // 3
 Timer.scheduledTimer(withTimeInterval: 0.1, repeats: true) { [weak self] _ in
   self?.shimmerRenderer.updateLocations()
   self?.shimmerRenderer.setNeedsDisplay()
 }
}
This sets up a new overlay by:
- Creating a
MKPolygonannotation that’s the same shape as the reservoir. These coordinates are pre-programmed in Game.swift. - Setting up a custom renderer to draw the polygon with the special effect.
- Since overlay renderers are not meant to be animated, this sets up a 100ms timer to update the overlay.
Next, replace mapView(_:rendererFor:) with:
func mapView(_ mapView: MKMapView, rendererFor overlay: MKOverlay) -> MKOverlayRenderer {
  if overlay is AdventureMapOverlay {
    return tileRenderer
  } else {
    return shimmerRenderer
  }
}
This will select the right renderer for each of the two overlays.
Build and run, again. Then pan over to the reservoir to see the Shimmering Sea!

Where to Go From Here?
You can download the final project for the tutorial here.
Creating hand-drawn map tiles is time consuming, but using them can give an app a distinct and immersive feel. Apart from creating the assets, using them is pretty straightforward.
In addition to the basic tiles, Open Street Map has a list of specialized tile providers for things like cycling and terrain. Open Street Map also provides data you can use if you want to design your own tiles programmatically.
If you want a custom but realistic map appearance, without hand-drawing everything, take a look at third-party tools such as MapBox. It allows you to customize the appearance of a map with good tools at a modest price.
For more information on custom overlays and annotations, check out this other tutorial.
If you have any questions or comments on this tutorial, feel free to join in the discussion below!
Open Street Map data and images are © OpenStreetMap contributors.
The post Advanced MapKit Tutorial: Custom Tiles appeared first on Ray Wenderlich.