
Build a Memory Game App with ReSwift!
As the size of iOS apps continues to grow, MVC is slowly losing its stronghold as the “go-to” architectural pattern of choice.
There are more scalable architectural patterns available to iOS developers, such as MVVM, VIPER and Riblets. They all look quite different, but they have a common goal: to divide the code into blocks with single responsibility with multidirectional data flow. In a multidirectional flow, the data moves in many directions between the various modules.
Sometimes, you don’t want (or need) multidirectional data flow — instead, you want the data to flow in one direction: that’s unidirectional data flow. In this ReSwift tutorial, you’ll veer off the beaten path and learn how to use the ReSwift framework to implement unidirectional data flow in a state-heavy Memory Game app named MemoryTunes.
But first – what is ReSwift?
Introducing ReSwift
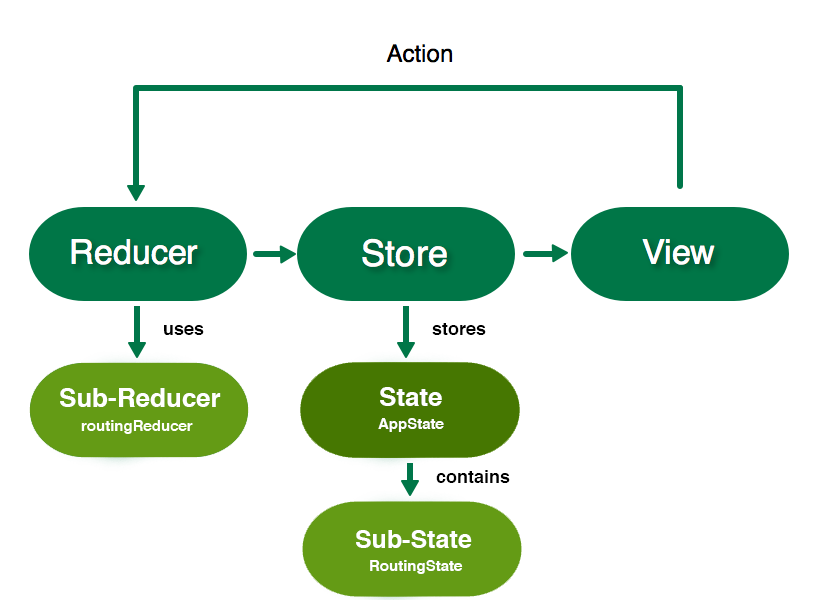
ReSwift is a small framework that helps you to create Redux-like architectures in Swift.
ReSwift has four major components:
- Views: React to Store changes and display them on screen. Views send Actions.
- Actions: Initiate a state change in the app. An Action is handled by a Reducer.
- Reducers: Directly change the application state, which is stored in the Store.
- Store: Stores the current value of the application state. Other modules like Views can subscribe and react to its changes.
ReSwift presents many interesting advantages:
- Very strong constraints: It’s so tempting to place little bits of code in a convenient location where they don’t really belong. ReSwift prevents that by setting very strong constraints on what happens and where that happens.
- Unidirectional data flow: Apps that implement multidirectional data flow can be very hard to read and debug. One change can lead to a cascade of events that send data around the program. Unidirectional flow is more predictable and greatly reduces the cognitive load needed to read the code.
- Easy to test: Most of the logic is contained in the Reducers, which are pure functions.
- Platform independent: All elements of ReSwift — Stores, Reducers, and Actions — are platform independent. You can easily reuse them on iOS, macOS or tvOS.
Multidirectional vs. Unidirectional Flow
To show what I mean about data flow, take the following example. An app architechted with VIPER supports multidirectional data flow between its components:
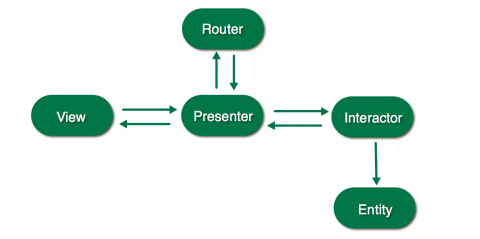
VIPER – Multidirectional data flow
Compare that with the unidirectional data flow in an app built on ReSwift:
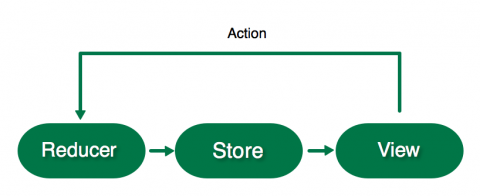
ReSwift – Unidirectional data flow
Since data can only flow in one direction, it’s much easier to visually follow along with the code and track down any issues in your app.
Getting Started
Start by downloading the starter project here which currently contains some skeleton code and frameworks, including ReSwift, that you’ll learn more about as you go.
First, you’ll need to set up the wiring of ReSwift. You’ll begin by setting up the core of the application: its state.
Open AppState.swift and create an AppState structure that conforms to StateType.:
import ReSwift

struct AppState: StateType {

}
This structure will define the entire state of the app.
Before you can create a Store that will contain the AppState value you have to create the main Reducer.

Reducers are the only blocks that can directly change the current value of the AppState held by the Store. Only Actions can initiate a Reducer to start changing the current application state. The Reducer changes the current value of AppState depending on the type of Action it receives.
Create the main app reducer function in AppReducer.swift:
import ReSwift

func appReducer(action: Action, state: AppState?) -> AppState {
  return AppState()
}
appReducer is a function that takes an Action and returns the changed AppState. state is the current state of the app; this function should change it accordingly depending on the type of action received. Right now it simply creates a new AppState value — you’ll return to this once you have a Store configured.
It’s time to create the Store so the reducer has a state, something to act upon.

The Store contains the current state of your whole app: this is the value of your AppState structure. Open AppDelegate.swift and replace import UIKit with the following:
import ReSwift

var store = Store<AppState>(reducer: appReducer, state: nil)
This creates a store global variable initialized by the appReducer. appReducer is the Store’s main Reducer, which contains instructions on how the store should change when it receives an Action. Because this is the initial creation, rather than an iterative change, you pass a nil state.
Build and run the app to ensure it compiles:

It’s not very exciting… But at least it works :]
App Routing
It’s time to create the first actual state in your app. You’ll start with interface navigation, or routing.
App routing is a challenge in every architecture, not just ReSwift. You’re going to use a very simple approach in MemoryTunes, where you’ll define all the destinations in an enum, and your AppState will hold the current destination value. AppRouter will react to changes in that value and show the current destination on screen.
Open AppRouter.swift and replace import UIKit with the following:
import ReSwift

enum RoutingDestination: String {
  case menu = "MenuTableViewController"
  case categories = "CategoriesTableViewController"
  case game = "GameViewController"
}
This enum represents all of the view controllers in your app.
Finally! You have something to store in the app’s State. There’s only one main state structure (AppState in this case), but you can divide the state of the app into sub-states referenced in the main state.
Because it’s good practice, you’ll group state variables into sub-state structures. Open RoutingState.swift and add the following sub-state structure for routing:
import ReSwift

struct RoutingState: StateType {
  var navigationState: RoutingDestination

  init(navigationState: RoutingDestination = .menu) {
    self.navigationState = navigationState
  }
}
RoutingState contains navigationState, which represents the current destination on screen.
menu is the default value of navigationState. It implicitly makes it the default value of the application state at start if you don’t indicate otherwise while initializing RoutingState.
In AppState.swift, add the following inside the struct:
let routingState: RoutingState
AppState now contains the RoutingState sub-state.
Build and run, and you’ll notice a problem:

Oops…
appReducer no longer compiles! This is because you added routingState to AppState, but didn’t pass it anything in the default initializer call. To create the routingState, you need a reducer.
There’s only one main Reducer function, but just as with state, reducers should be divided between sub-reducers.
Sub-State and Sub-Reducers
Add the following Reducer for routing in RoutingReducer.swift:
import ReSwift

func routingReducer(action: Action, state: RoutingState?) -> RoutingState {
  let state = state ?? RoutingState()
  return state
}
Similar to the main Reducer, routingReducer changes the state depending on the action it receives, then returns it. You don’t have any actions yet, so this creates a new RoutingState if state is nil and returns it.
Sub-reducers are responsible for initializing the start values of their corresponding sub-states.
Go back to AppReducer.swift to fix the compiler warning. Modify the contents of appReducer to match the following:
return AppState(routingState: routingReducer(action: action, state: state?.routingState))
This adds the routingState argument to the AppState initializer. action and state from the main reducer are passed to routingReducer to determine the new state. Get used to this routine, because you’ll have to repeat it for each sub-state and sub-reducer you create.
Subscribing
Remember that default menu value in RoutingState? That’s actually the current state of your app! You’re just not subscribing to it anywhere.
Any class can subscribe to the Store, not just Views. When a class subscribes to the Store, it gets informed of every change that happens in the current state or sub-state. You’ll want to do this on AppRouter so it can change the current screen in the UINavigationController when the routingState changes.
Open AppRouter.swift and replace AppRouter with the following:
final class AppRouter {

  let navigationController: UINavigationController

  init(window: UIWindow) {
    navigationController = UINavigationController()
    window.rootViewController = navigationController
    // 1
    store.subscribe(self) {
      $0.select {
        $0.routingState
      }
    }
  }

  // 2
  fileprivate func pushViewController(identifier: String, animated: Bool) {
    let viewController = instantiateViewController(identifier: identifier)
    navigationController.pushViewController(viewController, animated: animated)
  }

  private func instantiateViewController(identifier: String) -> UIViewController {
    let storyboard = UIStoryboard(name: "Main", bundle: nil)
    return storyboard.instantiateViewController(withIdentifier: identifier)
  }
}

// MARK: - StoreSubscriber
// 3
extension AppRouter: StoreSubscriber {
  func newState(state: RoutingState) {
    // 4
    let shouldAnimate = navigationController.topViewController != nil
    // 5
    pushViewController(identifier: state.navigationState.rawValue, animated: shouldAnimate)
  }
}
In the code above, you updated AppRouter and added an extension. Here’s a closer look at what this does:
AppStatenow subscribes to the globalstore. In the closure,selectindicates you are specifically subscribing to changes in theroutingState.pushViewControllerwill be used to instantiate and push a given view controller onto the navigation stack. It usesinstantiateViewController, which loads the view controller based on the passedidentifier.- Make the
AppRouterconform toStoreSubscriberto getnewStatecallbacks wheneverroutingStatechanges. - You don’t want to animate the root view controller, so check if the current destination to push is the root.
- When the state changes, you push the new destination onto the
UINavigationControllerusing therawValueofstate.navigationState, which is the name of the view controller.
AppRouter will now react to the initial menu value and push the MenuTableViewController on the navigation controller.
Build and run the app to check it out:

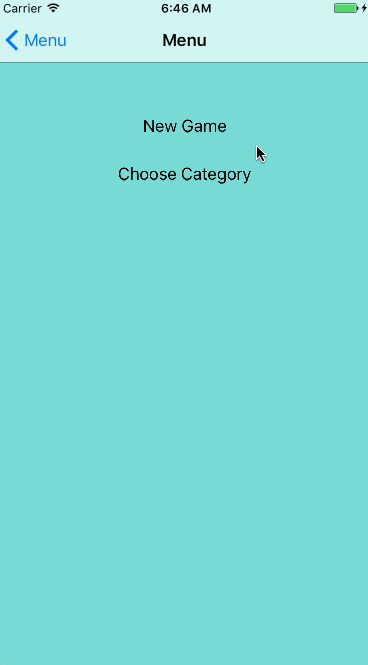
Your app displays MenuTableViewController, which is empty. You’ll populate it with menu options that will route to other screens in the next section.
The View

Anything can be a StoreSubscriber, but most of the time it will be a view reacting to state changes. Your objective is to make MenuTableViewController show two different menu options. It’s time for your State/Reducer routine!
Go to MenuState.swift and create a state for the menu with the following:
import ReSwift

struct MenuState: StateType {
  var menuTitles: [String]

  init() {
    menuTitles = ["New Game", "Choose Category"]
  }
}
MenuState consists of menuTitles, which you initialize with titles to be displayed in the table view.
In MenuReducer.swift, create a Reducer for this state with the following code:
import ReSwift

func menuReducer(action: Action, state: MenuState?) -> MenuState {
  return MenuState()
}
Because MenuState is static, you don’t need to worry about handling state changes. So this simply returns a new MenuState.
Back in AppState.swift, add MenuState to the bottom of AppState.
let menuState: MenuState
It won’t compile because you’ve modified the default initializer once again. In AppReducer.swift, modify the AppState initializer as follows:
return AppState(
  routingState: routingReducer(action: action, state: state?.routingState),
  menuState: menuReducer(action: action, state: state?.menuState))
Now that you have the MenuState, it’s time to subscribe to it and use it when rendering the menu view.
Open MenuTableViewController.swift and replace the placeholder code with the following:
import ReSwift

final class MenuTableViewController: UITableViewController {

  // 1
  var tableDataSource: TableDataSource<UITableViewCell, String>?

  override func viewWillAppear(_ animated: Bool) {
    super.viewWillAppear(animated)
    // 2
    store.subscribe(self) {
      $0.select {
        $0.menuState
      }
    }
  }

  override func viewWillDisappear(_ animated: Bool) {
    super.viewWillDisappear(animated)
    // 3
    store.unsubscribe(self)
  }
}

// MARK: - StoreSubscriber
extension MenuTableViewController: StoreSubscriber {

  func newState(state: MenuState) {
    // 4
    tableDataSource = TableDataSource(cellIdentifier:"TitleCell", models: state.menuTitles) {cell, model in
      cell.textLabel?.text = model
      cell.textLabel?.textAlignment = .center
      return cell
    }

    tableView.dataSource = tableDataSource
    tableView.reloadData()
  }
}
The controller now subscribes to MenuState changes and renders the state in the UI declaratively.
TableDataSourceis included in the starter and acts as a declarative data source forUITableView.- Subscribe to the
menuStateonviewWillAppear. Now you’ll get callbacks innewStateevery timemenuStatechanges. - Unsubscribe, when needed.
- This is the declarative part. It’s where you populate the
UITableView. You can clearly see in code how state is transformed into view.
The newState callback defined in StoreSubscriber passes state changes. You might be tempted to capture the value of the state in a property, like this:
final class MenuTableViewController: UITableViewController {
  var currentMenuTitlesState: [String]
  ...
But writing declarative UI code that clearly shows how state is transformed into view is cleaner and much easier to follow. The problem in this example is that UITableView doesn’t have a declarative API. That’s why I created TableDataSource to bridge the gap. If you’re interested in the details, take a look at TableDataSource.swift.
Build and run, and you should now see the menu items:

Actions

Now that you have menu items, it would be awesome if they opened new screens. It’s time to write your first Action.
Actions initiate a change in the Store. An Action is a simple structure that can contain variables: the Action’s parameters. A Reducer handles a dispatched Action and changes the state of the app depending on the type of the action and its parameters.
Create an action in RoutingAction.swift:
import ReSwift

struct RoutingAction: Action {
  let destination: RoutingDestination
}
RoutingAction changes the current routing destination.
Now you’re going to dispatch RoutingAction when a menu item gets selected.
Open MenuTableViewController.swift and add the following in MenuTableViewController:
override func tableView(_ tableView: UITableView, didSelectRowAt indexPath: IndexPath) {
  var routeDestination: RoutingDestination = .categories
  switch(indexPath.row) {
  case 0: routeDestination = .game
  case 1: routeDestination = .categories
  default: break
  }

  store.dispatch(RoutingAction(destination: routeDestination))
}
This sets routeDestination based on the row selected. It then uses dispatch to pass the RoutingAction to the Store.
The Action is getting dispatched, but it’s not supported by any reducer yet. Go to RoutingReducer.swift and replace the contents of routingReducer with the following code that updates the state:
var state = state ?? RoutingState()

switch action {
case let routingAction as RoutingAction:
  state.navigationState = routingAction.destination
default: break
}

return state
The switch checks if the passed action is a RoutingAction. If so, it uses its destination to change the RoutingState, then returns it.
Build and run. Now when you tap on menu items, the corresponding view controllers will be pushed on top of the navigation controller.

Updating the State
You may have noticed a flaw with the current navigation implementation. When you tap on the New Game menu item, the navigationState of RoutingState gets changed from menu to game. But when you use the navigation controller’s back arrow to go back to the menu, nothing is updating the navigationState!
In ReSwift, it’s important to keep the state synchronized with the current UI state. It’s easy to forget about it when something is managed completely by UIKit, like the navigation back arrow or user typing something into a UITextField.
Fix this by updating the navigationState when MenuTableViewController appears.
In MenuTableViewController.swift, add this line at the bottom of viewWillAppear:
store.dispatch(RoutingAction(destination: .menu))
This updates the store manually if the navigation back arrow was used.
Run the app and test the navigation again. Aaaaand… now the navigation is completely broken. Nothing ever appears to get fully pushed on, and you may see a crash.
Open AppRouter.swift; you’ll recall that pushViewController is called each time a new navigationState is received. This means that you respond to the menu RoutingDestination update by…pushing the menu on again!
You have to dynamically check if the MenuViewController isn’t already visible before pushing. Replace the contents of pushViewController with:
let viewController = instantiateViewController(identifier: identifier)
let newViewControllerType = type(of: viewController)
if let currentVc = navigationController.topViewController {
  let currentViewControllerType = type(of: currentVc)
  if currentViewControllerType == newViewControllerType {
    return
  }
}

navigationController.pushViewController(viewController, animated: animated)
You call type(of:) against the current top view controller and compare it to the new one being pushed on. If they match, you return without pushing on the controller in duplicate.
Build and run, and navigation should work normally again, with the menu state being properly set when you pop the stack.
Updating state with UI actions and checking the current state dynamically is often complex. It’s one of the challenges you’ll have to overcome when dealing with ReSwift. Fortunately it shouldn’t happen very often.
Categories
Now you’ll go a step further and implement a more complex screen: CategoriesTableViewController. You need to allow the user to choose the category of music, so they can enjoy the game of Memory with their favorite bands. Start by adding the state in CategoriesState.swift:
import ReSwift

enum Category: String {
  case pop = "Pop"
  case electronic = "Electronic"
  case rock = "Rock"
  case metal = "Metal"
  case rap = "Rap"
}

struct CategoriesState: StateType {
  let categories: [Category]
  var currentCategorySelected: Category

  init(currentCategory: Category) {
    categories = [ .pop, .electronic, .rock, .metal, .rap]
    currentCategorySelected = currentCategory
  }
}
The enum defines several music categories. CategoriesState contains an array of available categories as well as the currentCategorySelected for tracking state.
In ChangeCategoryAction.swift, add the following:
import ReSwift

struct ChangeCategoryAction: Action {
  let categoryIndex: Int
}
This creates an Action that can change CategoriesState, using categoryIndex to reference music categories.
Now you need to implement a Reducer that accepts the ChangeCategoryAction and stores the updated state. Open CategoriesReducer.swift and add the following:
import ReSwift

private struct CategoriesReducerConstants {
  static let userDefaultsCategoryKey = "currentCategoryKey"
}

private typealias C = CategoriesReducerConstants

func categoriesReducer(action: Action, state: CategoriesState?) -> CategoriesState {
  var currentCategory: Category = .pop
  // 1
  if let loadedCategory = getCurrentCategoryStateFromUserDefaults() {
    currentCategory = loadedCategory
  }
  var state = state ?? CategoriesState(currentCategory: currentCategory)

  switch action {
  case let changeCategoryAction as ChangeCategoryAction:
    // 2
    let newCategory = state.categories[changeCategoryAction.categoryIndex]
    state.currentCategorySelected = newCategory
    saveCurrentCategoryStateToUserDefaults(category: newCategory)

  default: break
  }

  return state
}

// 3
private func getCurrentCategoryStateFromUserDefaults() -> Category? {
  let userDefaults = UserDefaults.standard
  let rawValue = userDefaults.string(forKey: C.userDefaultsCategoryKey)
  if let rawValue = rawValue {
    return Category(rawValue: rawValue)
  } else {
    return nil
  }
}

// 4
private func saveCurrentCategoryStateToUserDefaults(category: Category) {
  let userDefaults = UserDefaults.standard
  userDefaults.set(category.rawValue, forKey: C.userDefaultsCategoryKey)
  userDefaults.synchronize()
}
Just as with the other reducers, this implements a method to complete state updates from actions. In this case, you’re also persisting the selected category to UserDefaults. Here’s a closer look at what it does:
- Loads the current category from
UserDefaultsif available, and uses it to instantiateCategoriesStateif it doesn’t already exist. - Reacts to
ChangeCategoryActionby updating thestateand saving the new category toUserDefaults. getCurrentCategoryStateFromUserDefaultsis a helper function that loads the category fromUserDefaults.saveCurrentCategoryStateToUserDefaultsis a helper function that saves the category toUserDefaults.
The helper functions are also pure global functions. You could put them in a class, or a structure, but they should always remain pure.
Naturally, you have to update the AppState with the new state. Open AppState.swift and add the following to the end of the struct:
let categoriesState: CategoriesState
categoriesState is now part of the AppState. You’re getting the hang of this!
Open AppReducer.swift and modify the returned value to match this:
return AppState(
  routingState: routingReducer(action: action, state: state?.routingState),
  menuState: menuReducer(action: action, state: state?.menuState),
  categoriesState: categoriesReducer(action:action, state: state?.categoriesState))
Here you’ve added categoriesState to appReducer passing the action and categoriesState.
Now you need to create the categories screen, similarly to MenuTableViewController. You’ll make it subscribe to the Store and use TableDataSource.
Open CategoriesTableViewController.swift and replace the contents with the following:
import ReSwift

final class CategoriesTableViewController: UITableViewController {

  var tableDataSource: TableDataSource<UITableViewCell, Category>?

  override func viewWillAppear(_ animated: Bool) {
    super.viewWillAppear(animated)
    // 1
    store.subscribe(self) {
      $0.select {
        $0.categoriesState
      }
    }
  }

  override func viewWillDisappear(_ animated: Bool) {
    super.viewWillDisappear(animated)
    store.unsubscribe(self)
  }

  override func tableView(_ tableView: UITableView, didSelectRowAt indexPath: IndexPath) {
    // 2
    store.dispatch(ChangeCategoryAction(categoryIndex: indexPath.row))
  }
}

// MARK: - StoreSubscriber
extension CategoriesTableViewController: StoreSubscriber {
  func newState(state: CategoriesState) {
    tableDataSource = TableDataSource(cellIdentifier:"CategoryCell", models: state.categories) {cell, model in
      cell.textLabel?.text = model.rawValue
      // 3
      cell.accessoryType = (state.currentCategorySelected == model) ? .checkmark : .none
      return cell
    }

    self.tableView.dataSource = tableDataSource
    self.tableView.reloadData()
  }
}
This should look pretty similar to MenuTableViewController. Here are some highlights:
- Subscribe to
categoriesStatechanges onviewWillAppearand unsubscribe onviewWillDisappear. - Dispatch the
ChangeCategoryActionwhen user selects a cell. - On
newState, mark the cell for the currently selected category with a checkmark.
Everything’s set. Now you can choose the category. Build and run the app, and select Choose Category to see for yourself.

Asynchronous Tasks
Asynchronous programming is hard, huh? Well, not in ReSwift.
You’ll fetch the images for Memory cards from the iTunes API. First, you’ll have to create a game state, reducer and associated action.
Open GameState.swift, and you’ll see a MemoryCard struct that represents a game card. It includes the imageUrl to be displayed on the card. isFlipped identifies if the front of the card is visible and isAlreadyGuessed indicates if the card was already matched.
You’ll add game state to this file. Start by importing ReSwift at the top:
import ReSwift
Now add the following to the bottom of the file:
struct GameState: StateType {
  var memoryCards: [MemoryCard]
  // 1
  var showLoading: Bool
  // 2
  var gameFinished: Bool
}
These define the state of the game. In addition to containing the array of available memoryCards, the properties here indicate if:
- the loading indicator is visible or not
- the game is finished
Add a game Reducer in GameReducer.swift:
import ReSwift

func gameReducer(action: Action, state: GameState?) -> GameState {
    let state = state ?? GameState(memoryCards: [], showLoading: false, gameFinished: false)

    return state
}
This currently just creates a new GameState. You’ll circle back to this later.
In AppState.swift, add gameState to the bottom of AppState:
let gameState: GameState
In AppReducer.swift, update the initializer for the last time:
return AppState(
  routingState: routingReducer(action: action, state: state?.routingState),
  menuState: menuReducer(action: action, state: state?.menuState),
  categoriesState: categoriesReducer(action:action, state: state?.categoriesState),
  gameState: gameReducer(action: action, state: state?.gameState))
Now define an action for updating cards by adding the following in SetCardsAction.swift:
import ReSwift

struct SetCardsAction: Action {
  let cardImageUrls: [String]
}
This Action sets the image URLs for cards in the GameState
Now you’re ready to create your first asynchronous action. In FetchTunesAction.swift, add the following:
import ReSwift

func fetchTunes(state: AppState, store: Store<AppState>) -> FetchTunesAction {

  iTunesAPI.searchFor(category: state.categoriesState.currentCategorySelected.rawValue) { imageUrls in
    store.dispatch(SetCardsAction(cardImageUrls: imageUrls))
  }

  return FetchTunesAction()
}

struct FetchTunesAction: Action {
}
fetchTunes fetches the images using iTunesAPI (included with the starter). In the closure you’re dispatching a SetCardsAction with the result. Asynchronous tasks in ReSwift are that simple: just dispatch an action later in time, when complete. That’s it.
fetchTunes returns FetchTunesAction which will be used to signify the fetch has kicked off.
Open GameReducer.swift and add support for the two new actions. Replace the contents of gameReducer with the following:
var state = state ?? GameState(memoryCards: [], showLoading: false, gameFinished: false)

switch(action) {
// 1
case _ as FetchTunesAction:
  state = GameState(memoryCards: [], showLoading: true, gameFinished: false)
// 2
case let setCardsAction as SetCardsAction:
  state.memoryCards = generateNewCards(with: setCardsAction.cardImageUrls)
  state.showLoading = false
default: break
}

return state
You changed state to be a constant, and then implemented an action switch that does the following:
- On
FetchTunesAction, this setsshowLoadingtotrue. - On
SetCardsAction, this randomizes the cards and setsshowLoadingtofalse.generateNewCardscan be found in MemoryGameLogic.swift, which is included with the starter.
It’s time to draw the cards in the GameViewController. Start with setting up the cell.
Open CardCollectionViewCell.swift and add the following method to the bottom of CardCollectionViewCell:
func configureCell(with cardState: MemoryCard) {
  let url = URL(string: cardState.imageUrl)
  // 1
  cardImageView.kf.setImage(with: url)
  // 2
  cardImageView.alpha = cardState.isAlreadyGuessed || cardState.isFlipped ? 1 : 0
}
configureCell does the following:
- Uses the awesome Kingfisher library to cache images.
- Shows the card image when a card is already guessed or the card is flipped.
Next you will implement the collection view that displays the cards. Just as there is for table views, there is a declarative wrapper for UICollectionView named CollectionDataSource included in the starter that you’ll leverage.
Open GameViewController.swift and first replace the UIKit import with:
import ReSwift
In GameViewController, add the following just above showGameFinishedAlert:
var collectionDataSource: CollectionDataSource<CardCollectionViewCell, MemoryCard>?

override func viewWillAppear(_ animated: Bool) {
  super.viewWillAppear(animated)
  store.subscribe(self) {
    $0.select {
      $0.gameState
    }
  }
}

override func viewWillDisappear(_ animated: Bool) {
  super.viewWillDisappear(animated)
  store.unsubscribe(self)
}

override func viewDidLoad() {
  // 1
  store.dispatch(fetchTunes)
  collectionView.delegate = self
  loadingIndicator.hidesWhenStopped = true

  // 2
  collectionDataSource = CollectionDataSource(cellIdentifier: "CardCell", models: [], configureCell: { (cell, model) -> CardCollectionViewCell in
    cell.configureCell(with: model)
    return cell
  })
  collectionView.dataSource = collectionDataSource
}
Note this will result in a few compiler warnings until you adopt StoreSubscriber in a moment. The view subscribes to gameState on viewWillAppear and unsubscribes on viewWillDisappear. In viewDidLoad it does the following:
- Dispatches
fetchTunesto start fetching the images from iTunes API. - Configures cells using
CollectionDataSourcewhich gets the appropriatemodeltoconfigureCell.
Now you need to add an extension to adhere to StoreSubscriber. Add the following to the bottom of the file:
// MARK: - StoreSubscriber
extension GameViewController: StoreSubscriber {
  func newState(state: GameState) {

    collectionDataSource?.models = state.memoryCards
    collectionView.reloadData()

    // 1
    state.showLoading ? loadingIndicator.startAnimating() : loadingIndicator.stopAnimating()

    // 2
    if state.gameFinished {
      showGameFinishedAlert()
      store.dispatch(fetchTunes)
    }
  }
}
This implements newState to handle state changes. It updates the datasource as well as:
- Updating the loading indicator status depending on the state.
- Restarting the game and showing an alert when the game has been finished.
Build and run the game, select New Game, and you’ll now be able to see the memory cards.

Playing The Game
The logic of the game allows the user to flip two cards, If they’re the same, they remain uncovered; if not, they get hidden again. The player’s objective is to uncover all cards with the fewest steps possible.
To do this, you’ll need a flip action. Open FlipCardAction.swift and add the following:
import ReSwift

struct FlipCardAction: Action {
  let cardIndexToFlip: Int
}
FlipCardAction will use cardIndexToFlip to update GameState when a card is flipped.
Change gameReducer to support FlipCardAction and perform the game algorithm magic. Open GameReducer.swift and add the following case, just before default:
case let flipCardAction as FlipCardAction:
  state.memoryCards = flipCard(index: flipCardAction.cardIndexToFlip, memoryCards: state.memoryCards)
  state.gameFinished = hasFinishedGame(cards: state.memoryCards)
For a FlipCardAction, flipCard changes the state of the memory cards based on the cardIndexToFlip and other game logic. hasFinishedGame is called to determine if the game has finished and update the state accordingly. Both functions can be found in MemoryGameLogic.swift.
The final piece of the puzzle is to send a flip action when a card is selected. This will kick off the game logic and make associated state changes.
In GameViewController.swift, find the UICollectionViewDelegate extension. Add the following to collectionView(_:didSelectItemAt:):
store.dispatch(FlipCardAction(cardIndexToFlip: indexPath.row))
When a card is selected in the collection view, the associated indexPath.row is sent with FlipCardAction.
Run the game and now you can play it. Come back when you’re done having fun! :]

Where to Go From Here?
You can download the final MemoryTunes project here.
There’s still a lot to learn about ReSwift.
- Middleware: There isn’t currently a good way to handle Cross Cutting Concerns in Swift. In ReSwift, you get it for free! You can implement all sorts of concerns using ReSwift’s Middleware feature. It allows you to easily wrap up actions with concerns (logging, statistics, caching).
- Routing: You implemented your own routing for the MemoryTunes app. You could also use a more general solution like ReSwift-Router. It’s still an open problem – maybe you will be the one that solves it? :]
- Testing: ReSwift is probably the easiest architecture out there to create tests for. Reducers contain the code you need to test, and they’re pure functions. Pure functions always give the same output for the same input, don’t rely on the state of the app and have no side effects.
- Debugging: With ReSwift’s state defined in one structure and unidirectional flow, debugging is much easier. You can even record steps of state leading to a crash.
- Persistence: Because all the state of your app is in one place, you can easily serialize and persist it. Caching content for offline mode is a hard architectural problem, but not with ReSwift – you almost get it for free.
- Other Implementations: Redux-like architecture is not a library: it’s a paradigm. You can implement it yourself, use ReSwift or other libraries like Katana or ReduxKit.
If you want to expand your knowledge on the subject, listen to this ReSwift talk by Benjamin Encz, the creator of ReSwift.
ReSwift’s repo also has a lot of interesting example projects. And finally, Christian Tietze’s blog has a lot of interesting advanced ReSwift topics.
If you have any questions, comments or ideas, come join the discussion in the forums below!
The post ReSwift Tutorial: Memory Game App appeared first on Ray Wenderlich.