
The typical Mac user interacts with their computer using a Graphical User Interface (GUI). GUIs, as the name implies, are based on the user visually interacting with the computer via input devices such as the mouse by selecting or operating on screen elements such as menus, buttons etc.
Not so long ago, before the advent of the GUI, command-line interfaces (CLI) were the primary method for interacting with computers. CLIs are text-based interfaces, where the user types in the program name to execute, optionally followed by arguments.
Despite the prevalence of GUIs, command-line programs still have an important role in today’s computing world. Command-line programs such as ImageMagick or ffmpeg are important in the server world. In fact, the majority of the servers that form the Internet run only command-line programs.
Even Xcode uses command-line programs! When Xcode builds your project, it calls xcodebuild, which does the actual building. If the building process was baked-in to the Xcode product, continuous integration solutions would be hard to achieve, if not impossible!
In this Command Line Programs on macOS tutorial, you will write a command-line utilty named Panagram. Depending on the options passed in, it will detect if a given input is a palindrome or anagram. It can be started with predefined arguments, or run in interactive mode where the user is prompted to enter the required values.
Typically, command-line programs are launched from a shell (like the bash shell in macOS) embedded in a utility application like Terminal in macOS. For the sake of simplicity and ease of learning, in this tutorial, most of the time you will use Xcode to launch Panagram. At the end of the tutorial you will learn how to launch Panagram from the terminal.
Getting Started
Swift seems like an odd choice for creating a command-line program since languages like C, Perl, Ruby or Java are the more traditional choice. But there are some great reasons to choose Swift for your command-line needs:
- Swift can be used as an interpreted scripting language, as well as a compiled language. This gives you the advantages of scripting languages, such as zero compile times and ease of maintenance, along with the choice of compiling your app to improve execution time or to bundle it for sale to the public.
- You don’t need to switch languages. Many people say that a programmer should learn one new language every year. This is not a bad idea, but if you are already used to Swift and its standard library, you can reduce the time investment by sticking with Swift.
For this tutorial, you’ll create a classic compiled project.
Open Xcode and go to File/New/Project. Find the macOS group, select Application/Command Line Tool and click Next:

For Product Name, enter Panagram. Make sure that Language is set to Swift, then click Next.

Choose a location on your disk to save your project and click Create.
In the Project Navigator area you will now see the main.swift file that was created by the Xcode Command Line Tool template.

Many C-like languages have a main function that serves as the entry point — i.e. the code that the operating system will call when the program is executed. This means the program execution starts with the first line of this function. Swift doesn’t have a main function; instead, it has a main file.
When you run your project, the first line inside the main file that isn’t a method or class declaration is the first one to be executed. It’s a good idea to keep your main.swift file as clean as possible and put all your classes and structs in their own files. This keeps things streamlined and helps you to understand the main execution path.
The Output Stream
In most command-line programs, you’d like to print some messages for the user. For example, a program that converts video files into different formats could print the current progress or some error message if something went wrong.
Unix-based systems such as macOS define two different output streams:
- The standard output stream (or
stdout) is normally attached to the display and should be used to display messages to the user. - The standard error stream (or
stderr) is normally used to display status and error messages. This is normally attached to the display, but can be redirected to a file.
stdout and stderr are the same and messages for both are written to the console. It is a common practice to redirect stderr to a file so error messages scrolled off the screen can be viewed later. Also this can make debugging of a shipped application much easier by hiding information the user doesn’t need to see, but still keep the error messages for later inspection.
With the Panagram group selected in the Project navigator, press Cmd + N to create a new file. Under macOS, select Source/Swift File and press Next:

Save the file as ConsoleIO.swift. You’ll wrap all the input and output elements in a small, handy class named ConsoleIO.
Add the following code to the end of ConsoleIO.swift:
class ConsoleIO {
}
Your next task is to change Panagram to use the two output streams.
In ConsoleIO.swift add the following enum at the top of the file, above the ConsoleIO class implementation and below the import line:
enum OutputType {
  case error
  case standard
}
This defines the output stream to use when writing messages.
Next, add the following method to the ConsoleIO class (between the curly braces for the class implementation):
func writeMessage(_ message: String, to: OutputType = .standard) {
  switch to {
  case .standard:
    print("\(message)")
  case .error:
    fputs("Error: \(message)\n", stderr)
  }
}
This method has two parameters; the first is the actual message to print, and the second is the destination. The second parameter defaults to .standard.
The code for the .standard option uses print, which by default writes to stdout. The .error case uses the C function fputs to write to stderr, which is a global variable and points to the standard error stream.
Add the following code to the end of the ConsoleIO class:
func printUsage() {

  let executableName = (CommandLine.arguments[0] as NSString).lastPathComponent

  writeMessage("usage:")
  writeMessage("\(executableName) -a string1 string2")
  writeMessage("or")
  writeMessage("\(executableName) -p string")
  writeMessage("or")
  writeMessage("\(executableName) -h to show usage information")
  writeMessage("Type \(executableName) without an option to enter interactive mode.")
}
This code defines the printUsage() method that prints usage information to the console. Every time you run a program, the path to the executable is implicitly passed as argument[0] and accessible through the global CommandLine enum. CommandLine is a small wrapper in the Swift Standard Library around the argc and argv arguments you may know from C-like languages.
Create another new Swift file named Panagram.swift (following the same steps as before) and add the following code to it:
class Panagram {

  let consoleIO = ConsoleIO()

  func staticMode() {
    consoleIO.printUsage()
  }

}
This defines a Panagram class that has one method. The class will handle the program logic, with staticMode() representing non-interactive mode — i.e. when you provide all data through command line arguments. For now, it simply prints the usage information.
Now, open main.swift and replace the print statement with the following code:
let panagram = Panagram()
panagram.staticMode()
Build and run your project; you’ll see the following output in Xcode’s Console:
usage:
Panagram -a string1 string2
or
Panagram -p string
or
Panagram -h to show usage information
Type Panagram without an option to enter interactive mode.
Program ended with exit code: 0
So far, you’ve learned what a command-line tool is, where the execution starts, how to send messages to stdout and stderr and how you can split your code into logical units to keep main.swift organized.
In the next section, you’ll handle command-line arguments and complete the static mode of Panagram.
Command-Line Arguments
When you start a command-line program, everything you type after the name is passed as an argument to the program. Arguments can be separated with whitespace characters. Usually, you’ll run into two kind of arguments: options and strings.
Options start with a dash followed by a character, or two dashes followed by a word. For example, many programs have the option -h or --help, the first being simply a shortcut for the second. To keep things simple, Panagram will only support the short version of options.
Open Panagram.swift and add the following enum at the top of the file, outside the scope of the Panagram class:
enum OptionType: String {
  case palindrome = "p"
  case anagram = "a"
  case help = "h"
  case unknown

  init(value: String) {
    switch value {
    case "a": self = .anagram
    case "p": self = .palindrome
    case "h": self = .help
    default: self = .unknown
    }
  }
}
This defines an enum with String as its base type so you can pass the option argument directly to init(_:). Panagram has three options: -p to detect palindromes, -a for anagrams and -h to show the usage information. Everything else will be handled as an error.
Next, add the following method to the Panagram class:
func getOption(_ option: String) -> (option:OptionType, value: String) {
  return (OptionType(value: option), option)
}
The above method accepts an option argument as a String and returns a tuple of OptionType and String.
In the Panagram, class replace the contents of staticMode() with the following:
//1
let argCount = CommandLine.argc
//2
let argument = CommandLine.arguments[1]
//3
let (option, value) = getOption(argument.substring(from: argument.index(argument.startIndex, offsetBy: 1)))
//4
consoleIO.writeMessage("Argument count: \(argCount) Option: \(option) value: \(value)")
Here’s what’s going on in the code above:
- You first get the number of arguments passed to the program. Since the executable path is always passed in (as
CommandLine.arguments[0]), the count value will always be greater than or equal to 1. - Next, take the first “real” argument (the option argument) from the
argumentsarray. - Then you parse the argument and convert it to an
OptionType. Theindex(_:offsetBy:)method is simply skipping the first character in the argument’s string, which in this case is the hyphen (`-`) character before the option. - Finally, you log the parsing results to the Console.
In main.swift, replace the line panagram.staticMode() with the following:
if CommandLine.argc < 2 {
  //TODO: Handle interactive mode
} else {
  panagram.staticMode()
}
If your program is invoked with fewer than 2 arguments, then you're going to start interactive mode - you'll do this part later. Otherwise, you use the non-interactive static mode.
You now need to figure out how to pass arguments to your command-line tool from within Xcode. To do this, click on the Scheme named Panagram in the Toolbar:

Select Edit Scheme... from the menu that appears:

Ensure Run is selected in the left pane, click the Arguments tab, then click the + sign under Arguments Passed On Launch. Add -p as argument and click Close:

Now build and run, and you'll see the following output in the Console:
Argument count: 2 Option: Palindrome value: p
Program ended with exit code: 0
So far, you've added a basic option system to your tool, learned how to handle command-line arguments and how to pass arguments from within Xcode.
Next up, you'll build the main functionality of Panagram.
Anagrams and Palindromes
Before you can write any code to detect palindromes or anagrams, you should be clear on what they are!
Palindromes are words or sentences that read the same backwards and forwards. Here are some examples:
- level
- noon
- A man, a plan, a canal - Panama!
As you can see, capitalization and punctuation are often ignored. To keep things simple, Panagram will ignore capitalization and white spaces, but will not handle punctuation.
Anagrams are words or sentences that are built using the characters of other words or sentences. Some examples are:
- silent <-> listen
- Bolivia <-> Lobivia (it's a cactus from Bolivia)
You'll encapsulate the detection logic inside a small extension to String.
Create a new file named StringExtension.swift and add the following code to it:
extension String {
}
Time for a bit of design work. First, how to detect an anagram:
- Ignore capitalization and whitespace for both strings.
- Check that both strings contain the same characters, and that all characters appear the same number of times.
Add the following method to StringExtension.swift:
func isAnagramOf(_ s: String) -> Bool {
  //1
  let lowerSelf = self.lowercased().replacingOccurrences(of: " ", with: "")
  let lowerOther = s.lowercased().replacingOccurrences(of: " ", with: "")
  //2
  return lowerSelf.sorted() == lowerOther.sorted()
}
Taking a closer look at the algorithm above:
- First, you remove capitalization and whitespace from both Strings.
- Then you sort and compare the characters.
Detecting palindromes is simple as well:
- Ignore all capitalization and whitespace.
- Reverse the string and compare; if it's the same, then you have a palindrome.
Add the following method to detect palindromes:
func isPalindrome() -> Bool {
  //1
  let f = self.lowercased().replacingOccurrences(of: " ", with: "")
  //2
  let s = String(f.reversed())
  //3
  return  f == s
}
The logic here is quite straightforward:
- Remove capitalization and whitespace.
- Create a second string with the reversed characters.
- If they are equal, it is a palindrome.
Time to pull this all together and help Panagram do its job.
Open Panagram.swift and replace the call to writeMessage(_:to:) in staticMode() with the following:
//1
switch option {
case .anagram:
    //2
    if argCount != 4 {
        if argCount > 4 {
            consoleIO.writeMessage("Too many arguments for option \(option.rawValue)", to: .error)
        } else {
            consoleIO.writeMessage("Too few arguments for option \(option.rawValue)", to: .error)
        }
        consoleIO.printUsage()
    } else {
        //3
        let first = CommandLine.arguments[2]
        let second = CommandLine.arguments[3]

        if first.isAnagramOf(second) {
            consoleIO.writeMessage("\(second) is an anagram of \(first)")
        } else {
            consoleIO.writeMessage("\(second) is not an anagram of \(first)")
        }
    }
case .palindrome:
    //4
    if argCount != 3 {
        if argCount > 3 {
            consoleIO.writeMessage("Too many arguments for option \(option.rawValue)", to: .error)
        } else {
            consoleIO.writeMessage("Too few arguments for option \(option.rawValue)", to: .error)
        }
        consoleIO.printUsage()
    } else {
        //5
        let s = CommandLine.arguments[2]
        let isPalindrome = s.isPalindrome()
        consoleIO.writeMessage("\(s) is \(isPalindrome ? "" : "not ")a palindrome")
    }
//6
case .help:
    consoleIO.printUsage()
case .unknown:
    //7
    consoleIO.writeMessage("Unknown option \(value)")
    consoleIO.printUsage()
}
Going through the above code step-by-step:
- First, switch based on what argument you were passed, to determine what operation will be performed.
- In the case of an anagram, there must be four command-line arguments passed in. The first is the executable path, the second the
-aoption and finally the two strings to check. If you don't have four arguments, then print an error message. - If the argument count is good, store the two strings in local variables, check them to see if they are anagrams of each other, and print the result.
- In the case of a palindrome, you must have three arguments. The first is the executable path, the second is the
-poption and finally the string to check. If you don't have three arguments, then print an error message. - Check the string to see if it is a palindrome and print the result.
- If the
-hoption was passed in, then print the usage information. - If an unknown option is passed, print the usage information.
Now, modify the arguments inside the scheme. For example, to use the -p option you must pass two arguments (in addition to the first argument, the executable's path, which is always passed implicitly).
Select Edit Scheme... from the Set Active Scheme toolbar item, and add a second argument with the value "level" as shown below:

Build and run, and you'll see the following output in the console:
level is a palindrome
Program ended with exit code: 0
Handle Input Interactively
Now that you have a basic version of Panagram working, you can make it even more useful by adding the ability to type in the arguments interactively via the input stream.
In this section, you will add code so when Panagram is started without arguments, it will open in interactive mode and prompt the user for the input it needs.
First, you need a way to get input from the keyboard. stdin is attached to the keyboard and is therefore a way for you to collect input from users interactively.
Open ConsoleIO.swift and add the following method to the class:
func getInput() -> String {
  // 1
  let keyboard = FileHandle.standardInput
  // 2
  let inputData = keyboard.availableData
  // 3
  let strData = String(data: inputData, encoding: String.Encoding.utf8)!
  // 4
  return strData.trimmingCharacters(in: CharacterSet.newlines)
}
Taking each numbered section in turn:
- First, grab a handle to
stdin. - Next, read any data on the stream.
- Convert the data to a string.
- Finally, remove any newline characters and return the string.
Next, open Panagram.swift and add the following method to the class:
func interactiveMode() {
  //1
  consoleIO.writeMessage("Welcome to Panagram. This program checks if an input string is an anagram or palindrome.")
  //2
  var shouldQuit = false
  while !shouldQuit {
    //3
    consoleIO.writeMessage("Type 'a' to check for anagrams or 'p' for palindromes type 'q' to quit.")
    let (option, value) = getOption(consoleIO.getInput())

    switch option {
    case .anagram:
      //4
      consoleIO.writeMessage("Type the first string:")
      let first = consoleIO.getInput()
      consoleIO.writeMessage("Type the second string:")
      let second = consoleIO.getInput()

      //5
      if first.isAnagramOf(second) {
        consoleIO.writeMessage("\(second) is an anagram of \(first)")
      } else {
        consoleIO.writeMessage("\(second) is not an anagram of \(first)")
      }
    case .palindrome:
      consoleIO.writeMessage("Type a word or sentence:")
      let s = consoleIO.getInput()
      let isPalindrome = s.isPalindrome()
      consoleIO.writeMessage("\(s) is \(isPalindrome ? "" : "not ")a palindrome")
    default:
      //6
      consoleIO.writeMessage("Unknown option \(value)", to: .error)
    }
  }
}
Taking a look at what's going on above:
- First, print a welcome message.
shouldQuitbreaks the infinite loop that is started in the next line.- Prompt the user for input and convert it to one of the two options, if possible.
- If the option was for anagrams, prompt the user for the two strings to compare.
- Write the result out. The same logic flow applies to the palindrome option.
- If the user enters an unknown option, print an error and start the loop again.
At the moment, you have no way to interrupt the while loop. In Panagram.swift add the following line to the OptionType enum:
case quit = "q"
Next, add the following line to the enum's init(_:):
case "q": self = .quit
In the same file, add a .quit case to the switch statement inside interactiveMode():
case .quit:
  shouldQuit = true
Then, change the .unknown case definition inside staticMode() as follows:
case .unknown, .quit:
Open main.swift and replace the comment //TODO: Handle interactive mode with the following:
panagram.interactiveMode()
To test interactive mode, you must not have any arguments defined in the Scheme.
So, remove the two arguments you defined earlier. Select Edit Scheme... from the toolbar menu. Select each argument and then click the - sign under Arguments Passed On Launch. Once all arguments are deleted, click Close:

Build and run, and you'll see the following output in the Console:
Welcome to Panagram. This program checks if an input string is an anagram or palindrome.
Type 'a' to check for anagrams or 'p' for palindromes type 'q' to quit.
Try out the different options. Type an option letter (do not prefix with a hyphen) followed by Return. You will be prompted for the arguments. Enter each value followed by Return. In the Console you should see something similar to this:
a
Type the first string:
silent
Type the second string:
listen
listen is an anagram of silent
Type 'a' to check for anagrams or 'p' for palindromes type 'q' to quit.
p
Type a word or sentence:
level
level is a palindrome
Type 'a' to check for anagrams or 'p' for palindromes type 'q' to quit.
f
Error: Unknown option f
Type 'a' to check for anagrams or 'p' for palindromes type 'q' to quit.
q
Program ended with exit code: 0
Launching Outside Xcode
Normally, a command-line program is launched from a shell utility like Terminal (vs. launching it from an IDE like Xcode). The following section walks you through launching your app in Terminal.
There are different ways to launch your program via Terminal. You could find the compiled binary using the Finder and start it directly via Terminal. Or, you could be lazy and tell Xcode to do this for you. First, you'll learn the lazy way.
Launch your app in Terminal from Xcode
Create a new scheme that will open Terminal and launch Panagram in the Terminal window. Click on the scheme named Panagram in the toolbar and select New Scheme:

Name the new scheme Panagram on Terminal:

Ensure the Panagram on Terminal scheme is selected as the active scheme. Click the scheme and select Edit Scheme... in the popover.
Ensure that the Info tab is selected and then click on the Executable drop down and select Other. Now, find the Terminal.app in your Applications/Utilities folder and click Choose. Now that Terminal is your executable, uncheck Debug executable.
Your Panagram on Terminal scheme's Info tab should look like this:

Next, select the Arguments tab, then add one new argument:
${BUILT_PRODUCTS_DIR}/${FULL_PRODUCT_NAME}

Finally, click Close.
Now, make sure you have the scheme Panagram on Terminal selected, then build and run your project. Xcode will open Terminal and pass through the path to your program. Terminal will then launch your program as you'd expect.

Launch your app directly from Terminal
Open Terminal from your Applications/Utilities folder.
In the Project Navigator select your product under the Products group. Copy your debug folder's Full Path from Xcode's Utility area as shown below (do not include "Panagram"):

Open a Finder window and select the Go/Go to Folder... menu item and paste the full path you copied in the previous step into the dialog's text field:

Click Go and Finder navigates to the folder containing the Panagram executable:

Drag the Panagram executable from Finder to the Terminal window and drop it there. Switch to the Terminal window and hit Return on the keyboard. Terminal launches Panagram in interactive mode since no arguments were specified:
Displaying Errors
Finally, you will add some code to display error messages in red.
Open ConsoleIO.swift and in writeMessage(_:to:), replace the two case statements with the following:
    case .standard:
      // 1
      print("\u{001B}[;m\(message)")
    case .error:
      // 2
      fputs("\u{001B}[0;31m\(message)\n", stderr)
Taking each numbered line in turn:
- The sequence
\u{001B}[;mis used in the standard case to reset the terminal's text color back to the default. - The sequence
\u{001B}[0;31mare control characters that cause Terminal to change the color of the following text strings to red.
[;m at the beginning of the output might look a bit awkward. That's because the Xcode Console doesn't support using control characters to colorize text output.
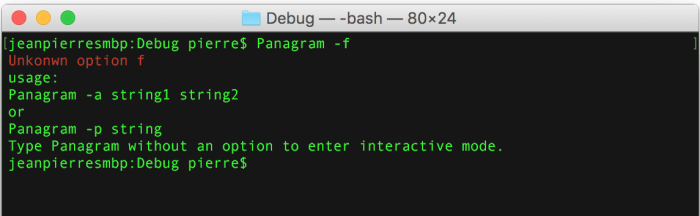
Build and run, this will launch Panagram in Terminal. Type f for option, the Unknown option f error message will display in red:
Where to Go From Here?
You can download the final project for this tutorial here.
If you want to write more command-line programs in the future, take a look at how to redirect stderr to a log file and also look at ncurses, which is a C library for writing "GUI-style" programs for the terminal.
You can also check out the article Scripting in Swift is pretty awesome if you're interested in Swift for scripting.
I hope you enjoyed this Command Line Programs on macOS tutorial; if you have any questions or comments, feel free to join the forum discussion below!
The post Command Line Programs on macOS Tutorial appeared first on Ray Wenderlich.