
Update Note: This tutorial has been updated for Swift 4, Xcode 9 and iOS 11 by Ted Bendixson. The original tutorial was written by Ernesto García.
Welcome back to our HealthKit tutorial series!
In the first part of the series, you learned the basics of working with HealthKit: reading and writing data.
In this second and final part of the series, you will learn how to work with a more complex type of data: workouts.
This project picks up where the previous HealthKit tutorial left off. If you don’t have the project already, you can
download it here.
Get ready to take another rep in your HealthKit workout! :]
Getting Started
In your day to day life, a workout is a really simple thing. It’s some period of time where you increase physical exertion doing some sort of activity.
Most workouts have one more of the following attributes:
- Activity type (running, cycling, prancercising, etc.)
- Distance
- Start and end time
- Duration
- Energy burned
HealthKit thinks of workouts in much the same way. A workout is a container for these types of information, taken as a collection of samples. A given workout might contain heart rate samples, distance samples, and an activity type to categorize them.
Continuing from the previous article, you are going to track a special kind of workout: Prancercise.
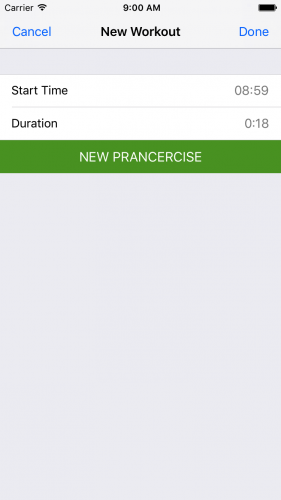
The starter project already contains a view controller that gives you a place to track your Prancercise workouts. To see it, navigate to Workouts and then tap the + button.

This view contains a button that starts a Prancercise workout. If you tap the button once, the app will start to track your Prancercise session, showing you the start date and duration.
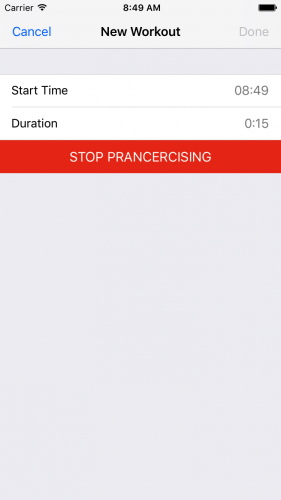
If you tap the button a second time, the current Prancercise session will stop. You can tap done to record the workout, or tap the New Prancercise button to start a new workout session (be aware this erases the old one).
Saving Workouts
For the moment, the app doesn’t actually do anything when you tap Done to save your workout. You are going to change that.
First, a little bit of context. Open Workout.swift and take a look around. You should see a struct named PrancerciseWorkout.
struct PrancerciseWorkout {

  var start: Date
  var end: Date

  init(start: Date, end: Date) {
    self.start = start
    self.end = end
  }

  var duration: TimeInterval {
    return end.timeIntervalSince(start)
  }

  var totalEnergyBurned: Double {

    let prancerciseCaloriesPerHour: Double = 450

    let hours: Double = duration/3600

    let totalCalories = prancerciseCaloriesPerHour*hours

    return totalCalories
  }
}
A PrancerciseWorkout is a model the app uses to store information related to a workout. It gets created every time you tap the done button after finishing your Prancercise session.
Each PrancerciseWorkout object keeps track of its:
- Start and end time
- Duration
- Total calories burned
These values are then fed into HealthKit when your workout is saved.
Note: we are assuming a somewhat intense Prancercise pace with aggressive ankle weights and loud fist pumping musical accompaniment. Hence the workout burns 450 Calories per hour. Eat it, Zumba!
Now that you understand what is stored in a PrancerciseWorkout object, let’s save one.
Open WorkoutDataStore.swift and take a look at the save(prancerciseWorkout:completion:) method. This is what you will use to save your Prancercise workout to HealthKit.
Paste the following lines of code into that method:
//1. Setup the Calorie Quantity for total energy burned
let calorieQuantity = HKQuantity(unit: HKUnit.kilocalorie(),
                                 doubleValue: prancerciseWorkout.totalEnergyBurned)

//2. Build the workout using data from your Prancercise workout
let workout = HKWorkout(activityType: .other,
                        start: prancerciseWorkout.start,
                        end: prancerciseWorkout.end,
                        duration: prancerciseWorkout.duration,
                        totalEnergyBurned: calorieQuantity,
                        totalDistance: nil,
                        device: HKDevice.local(),
                        metadata: nil)

//3. Save your workout to HealthKit
let healthStore = HKHealthStore()

healthStore.save(workout) { (success, error) in
  completion(success, error)
}
You probably remember HKQuantity from the earlier HealthKit tutorial. You used it to read and write your user’s height, weight, and body mass index.
HealthKit interacts with HKWorkout in similar fashion. In this case, you can see that your HKWorkout tracks the start time, end time, duration, and total energy burned. All of these attributes get taken from the PrancerciseWorkout entity that gets passed in.
Quite fittingly, a Prancercise Workout is an activity that can only be categorized as Other, but you can pick from any number of supported activity types if you like :].
You may have also noticed that you can tell HealthKit which device the workout was recorded on. This can be useful when querying data later.
The rest of this code is fairly self-explanatory. Just like you did in the last HealthKit tutorial, you use HKHealthStore to save workouts. Once finished, you call the completion handler.
Querying Workouts
Now you can save a workout, but you also need a way to load workouts from HealthKit. Let’s add a new method to WorkoutDataStore to do that.
Paste the following method after the save(prancerciseWorkout:completion:) method in WorkoutDataStore:
class func loadPrancerciseWorkouts(completion: @escaping (([HKWorkout]?, Error?) -> Swift.Void)){

  //1. Get all workouts with the "Other" activity type.
  let workoutPredicate = HKQuery.predicateForWorkouts(with: .other)

  //2. Get all workouts that only came from this app.
  let sourcePredicate = HKQuery.predicateForObjects(from: HKSource.default())

  //3. Combine the predicates into a single predicate.
  let compound = NSCompoundPredicate(andPredicateWithSubpredicates: [workoutPredicate,
                                                                     sourcePredicate])

  let sortDescriptor = NSSortDescriptor(key: HKSampleSortIdentifierEndDate,
                                        ascending: true)

  let query = HKSampleQuery(sampleType: HKObjectType.workoutType(),
                            predicate: compound,
                            limit: 0,
                            sortDescriptors: [sortDescriptor]) { (query, samples, error) in

    DispatchQueue.main.async {

      //4. Cast the samples as HKWorkout
      guard let samples = samples as? [HKWorkout],
            error == nil else {
          completion(nil, error)
          return
      }

      completion(samples, nil)
    }
  }

  HKHealthStore().execute(query)
}
If you followed the previous HealthKit tutorial, much of this code will look familiar. The predicates determine what types of HeathKit data you are looking for, and the sort descriptor tells HeathKit how to sort the samples you get back.
HKQuery.predicateForWorkouts(with:)is a special method that gives you a predicate for workouts with a certain activity type. In this case, you are loading any type of workout where the activity type is Other (all Prancercise workouts use the Other activity type).HKSourcedenotes the application that provided the workout data to HealthKit. Whenever you callHKSource.default(), you are basically saying “this app.” ThesourcePredicategets all workouts where the source is, you guessed it, this app.- Those of you with Core Data experience may also be familiar with
NSCompoundPredicate. It provides a way to bring one or more filters together. The final result is a query that gets you all workouts with Other as the activity type and Prancercise Tracker as the source app. - In the completion handler, the samples get unwrapped as an array of
HKWorkoutobjects. That’s becauseHKSampleQueryreturns an array ofHKSampleby default, and you need to cast them toHKWorkoutto get all of the useful properties like start time, end time, duration, and energy burned.
Loading Workouts Into The User Interface
You just wrote a method that loads workouts from HealthKit. Now it’s time to take those workouts and use them to populate a table view. Thankfully, I’ve done all the setup for you!
Open WorkoutsTableViewController.swift and take a look around. You will see a few things.
- There is an optional array called
workoutsfor storing workouts. Those are what you will load using theloadPrancerciseWorkouts(completion:)method. - There is a method named
reloadWorkouts(). It gets called whenever the view for this screen appears. Every time you navigate to this screen the workouts get refreshed.
To populate the user interface with data, you just need to load the workouts and hook up the UITableView’s datasource.
Paste the following lines of code into the reloadWorkouts() method in WorkoutsTableViewController.swift:
WorkoutDataStore.loadPrancerciseWorkouts { (workouts, error) in
  self.workouts = workouts
  self.tableView.reloadData()
}
This code loads workouts using the method you just wrote. When the workouts are loaded, it assigns them to the local workouts property on WorkoutsTableViewController. Then it reloads the table view with the new data.
At this point you may have noticed there is still no way to get the data from the workouts to the UITableView. We need to implement the table view’s datasource.
Paste these lines of code beneath the reloadWorkouts() method:
//MARK: UITableView DataSource
override func numberOfSections(in tableView: UITableView) -> Int {
  return 1
}

override func tableView(_ tableView: UITableView, numberOfRowsInSection section: Int) -> Int {

  guard let workouts = workouts else {
    return 0
  }

  return workouts.count
}
This just says you want one section in the table view, and you want the rows to correspond to the number of workouts you have loaded from HealthKit. Also, if you haven’t loaded any workouts from HealthKit, no rows are shown and the table view will appear empty.
Note: You might be used to seeing these methods without the override keyword in front of them. The reason you need to use override here is because WorkoutsTableViewController is a subclass of UITableViewController.
UITableViewController already implements all of the functions associated with UITableViewDatasource. To get custom behavior, you need to override those default implementations.
Now let’s tell the cells what to display. Paste this method after the two datasource methods:
override func tableView(_ tableView: UITableView, cellForRowAt indexPath: IndexPath) -> UITableViewCell {

  guard let workouts = workouts else {
    fatalError("CellForRowAtIndexPath should never get called if there are no workouts")
  }

  //1. Get a cell to display the workout in.
  let cell = tableView.dequeueReusableCell(withIdentifier: prancerciseWorkoutCellID,
                                           for: indexPath)

  //2. Get the workout corresponding to this row.
  let workout = workouts[indexPath.row]

  //3. Show the workout's start date in the label.
  cell.textLabel?.text = dateFormatter.string(from: workout.startDate)

  //4. Show the Calorie burn in the lower label.
  if let caloriesBurned = workout.totalEnergyBurned?.doubleValue(for: HKUnit.kilocalorie()) {
    let formattedCalories = String(format: "CaloriesBurned: %.2f", caloriesBurned)
    cell.detailTextLabel?.text = formattedCalories
  } else {
    cell.detailTextLabel?.text = nil
  }

  return cell
}
Alright! This is where the magic happens. You dequeue a cell from the table view, and then you populate it with data related to a workout.
Most of this should be familiar from the previous HealthKit tutorial. The only new thing is the unit conversion for Calories burned.
If a workout has its total energy burned set to something, then it gets converted to a double using Kilocalories as the conversion. The string gets formatted and shows up in the cell’s detail label.
Build and run the app. Go to Prancercise Workouts, tap the + button, track a short Prancercise workout, tap Done, and take a look at the table view.
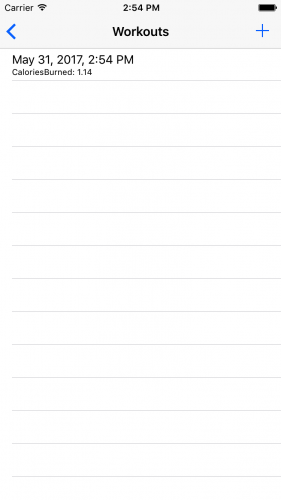
It’s a short workout, but boy can I feel the burn. This new workout routine gives Crossfit a run for its money.
Adding Samples to Workouts
Up to this point, we have assumed that a Prancercise workout is composed of a single workout session. But if you are like me, and you find Prancercise a little too intense, you might want to break it into a few short intervals.
With samples, you can record multiple exercise intervals under the same workout. It’s a way to give HealthKit a more detailed view of what you did during your workout routine.
You can add all kinds of samples to a workout. If you want, you can add distance, calories burned, heart rate, and more.
Because Prancercise is more of a dance routine, this HealthKit tutorial will focus on calorie burn samples.
Modifying The Model
This is a totally new way of thinking about Prancercise workouts, and that means it is time to change the model.
Instead of using a single Prancercise workout model, there should be some concept of a workout interval representing a short session. That way, a single PrancerciseWorkout becomes a wrapper or container for the workout intervals that store the starts and stops you took during your routine.
Open Workout.swift. Rename PrancerciseWorkout to PrancerciseWorkoutInterval so it looks like this:
struct PrancerciseWorkoutInterval {

  var start: Date
  var end: Date

  var duration: TimeInterval {
    return end.timeIntervalSince(start)
  }

  var totalEnergyBurned: Double {

    let prancerciseCaloriesPerHour: Double = 450

    let hours: Double = duration/3600

    let totalCalories = prancerciseCaloriesPerHour*hours

    return totalCalories
  }

}
You can see that nothing else has changed. What was once an entire workout is now a piece of a workout.
Paste the following code beneath the struct declaration for PrancerciseWorkoutInterval:
struct PrancerciseWorkout {

  var start: Date
  var end: Date

  var intervals: [PrancerciseWorkoutInterval]

  init(with intervals: [PrancerciseWorkoutInterval]) {
    self.start = intervals.first!.start
    self.end = intervals.last!.end
    self.intervals = intervals
  }
}
Now a full PrancerciseWorkout is composed of an array of PrancerciseWorkoutInterval objects. The workout starts when the first item in the array starts, and it ends when the last item in the array ends.
This is a nice way of representing a workout as something composed of time intervals, but it’s still missing a concept of duration and total energy burned. The code won’t compile until you have defined those.
Functional programming comes to the rescue here. You can use the reduce method to sum up the duration and total energy burned properties on PrancerciseWorkoutInterval.
Paste the following computed properties below the init(with:) constructor in PrancerciseWorkout:
var totalEnergyBurned: Double {
  return intervals.reduce(0, { (result, interval) -> Double in
    return result+interval.totalEnergyBurned
  })
}

var duration: TimeInterval {
  return intervals.reduce(0, { (result, interval) -> TimeInterval in
    return result+interval.duration
  })
}
Reduce takes a starting value (in this case zero) and a closure that takes in the result of the previous computation. It does this for each item in the array.
To calculate the total energy burned, reduce starts at zero and adds zero to the first energy burn value in the array. Then it takes the result and adds it to the next value in the array, and so on. Once it has hit the end of the array, you get a sum total of all energy burned throughout your workout.
Reduce is a handy function for neatly summing up arrays. If you would like to read more about functional programming and its awesomeness, check out this article.
Workout Sessions
You are almost finished upgrading the models. Open WorkoutSession.swift and take a look.
WorkoutSession is used to store data related to the current PrancerciseWorkout being tracked. Since you just added in this concept of workout intervals to PrancerciseWorkout, WorkoutSession needs to add new intervals each time you start and end a Prancercise session.
Inside of the WorkoutSession class, locate the line just below the state variable. It looks like this:
var state: WorkoutSessionState = .notStarted
Add a new line declaring an array of PrancerciseWorkoutInterval objects:
var intervals = [PrancerciseWorkoutInterval]()
When you finish a Prancercise session, a new interval will get added to this array. Let’s add a function to do that.
Paste the following method below the clear() method in WorkoutSession:
private func addNewInterval() {
  let interval = PrancerciseWorkoutInterval(start: startDate,
                                            end: endDate)
  intervals.append(interval)
}
This method takes the start and end dates from the workout session, and it creates a PrancerciseWorkoutInterval from them. Note that the start and end dates get reset every time a Prancercise session begins and ends.
You now have a way to add a PrancericseWorkoutInterval. You just need to use it.
Replace the end() method in WorkoutSession with this:
func end() {
  endDate = Date()
  addNewInterval()
  state = .finished
}
You can see that right after you set the end date for the session, you add a new interval to the array of PrancerciseWorkoutInterval objects.
It is also important to clear out the array whenever the workout session needs to get cleared.
Locate the end of the clear() method and add this line:
intervals.removeAll()
removeAll() does exactly what it says :].
There’s just one more modification. The completeWorkout property needs to use the intervals to create a new PrancerciseWorkout object.
Replace the completeWorkout variable with this:
var completeWorkout: PrancerciseWorkout? {
  get {

    guard state == .finished,
          intervals.count > 0 else {
          return nil
    }

    return PrancerciseWorkout(with: intervals)
  }
}
There you have it. Since this property is optional, you only want it to return a full PrancerciseWorkout when the WorkoutSession is finished and you have recorded at least one interval.
If you have followed along, your WorkoutSession class should look like this:
class WorkoutSession {

  private (set) var startDate: Date!
  private (set) var endDate: Date!

  var state: WorkoutSessionState = .notStarted

  var intervals = [PrancerciseWorkoutInterval]()

  func start() {
    startDate = Date()
    state = .active
  }

  func end() {
    endDate = Date()
    addNewInterval()
    state = .finished
  }

  func clear() {
    startDate = nil
    endDate = nil
    state = .notStarted
    intervals.removeAll()
  }

  private func addNewInterval() {
    let interval = PrancerciseWorkoutInterval(start: startDate,
                                              end: endDate)
    intervals.append(interval)
  }

  var completeWorkout: PrancerciseWorkout? {

    get {

      guard state == .finished,
            intervals.count > 0 else {
            return nil
      }

      return PrancerciseWorkout(with: intervals)
    }
  }
}
You can see that every time the stop() method gets called, a new PrancerciseWorkoutInterval with the current start and stop dates gets added to the list. Once the user taps the Done button to save the workout, this code generates a full-blown PrancerciseWorkout entity using the intervals recorded during the multiple sessions.
There’s no need to change the code in CreateWorkoutViewController. The button actions call the same start(), end(), and clear() methods. The only difference is that instead of working with a single time interval, WorkoutSession generates and stores multiple.
Adding Samples While Saving A Workout
If you were to build and run the app right now, it would still record accurate Prancercise workouts to HealthKit. There just wouldn’t be any samples attached. You need a way to convert the PrancerciseWorkoutInterval objects into samples.
Open WorkoutDataStore.swift and paste this new method right after the save(prancerciseWorkout:completion:) method:
private class func samples(for workout: PrancerciseWorkout) -> [HKSample] {

  var samples = [HKSample]()

  //1. Verify that the energy quantity type is still available to HealthKit.
  guard let energyQuantityType = HKSampleType
                                 .quantityType(forIdentifier:HKQuantityTypeIdentifier
                                                            .activeEnergyBurned) else {
    fatalError("*** Energy Burned Type Not Available ***")
  }

  //2. Create a sample for each PrancerciseWorkoutInterval
  for interval in workout.intervals {

    let calorieQuantity = HKQuantity(unit: HKUnit.kilocalorie(),
                                     doubleValue: interval.totalEnergyBurned)

    let sample = HKQuantitySample(type: energyQuantityType,
                                  quantity: calorieQuantity,
                                  start: interval.start,
                                  end: interval.end)

    samples.append(sample)
  }

  return samples
}
Hey you’ve seen this before! It’s the same thing you did when submitting a body mass index sample in the previous HealthKit tutorial. You’re just doing it inside of a loop, creating a sample for each PrancerciseWorkoutInterval associated with your PrancerciseWorkout.
Now you just need to make a few adjustments to the save(prancerciseWorkout:completion:) method to attach the samples to your workout.
Find the lines below the line where you declare:
let healthStore = HKHealthStore()
And replace them with this:
let samples = self.samples(for: prancerciseWorkout)

healthStore.save(workout) { (success, error) in

  guard error == nil else {
    completion(false, error)
    return
  }

  healthStore.add(samples,
                  to: workout,
                  completion: { (samples, error) in

      guard error == nil else {
        completion(false, error)
        return
      }

      completion(true, nil)
  })

}
This code prepares a list of samples using your Prancercise workout. Then it attempts to save the workout to HealthKit just as you’ve done before. Once the workout has been successfully saved, it adds the samples.
Viewing Workout Samples In The Health App
Build and run the app. Tap on Prancerise Workouts. Then tap the + button to track a new Prancercise workout. Record a few Prancercise sessions and tap Done to save them to HealthKit as a single Prancercise workout.
You aren’t going to see anything new in the Prancercise Tracker’s user interface, but trust me there’s loads of data in your Health app to peruse.
Open the Health app. Tap on Activity. You should see a breakdown of your workouts for the day.
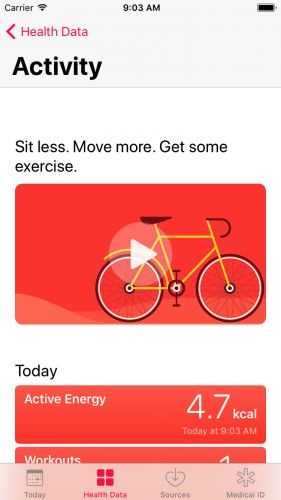
I’ve recorded a few very short Prancercise sessions, so Activity says I have spent one minute exercising. That’s fine. We have already established the relative intensity of the Prancercise regimen, so it ought to be enough physical exertion for a day :].
Tap Workouts. The next screen will give you a breakdown of your workouts for the day. In your case, you want to see where all of those data points came from.
Tap Show All Data. This will take you to a screen that displays all of your workouts for the day, along with their source app.
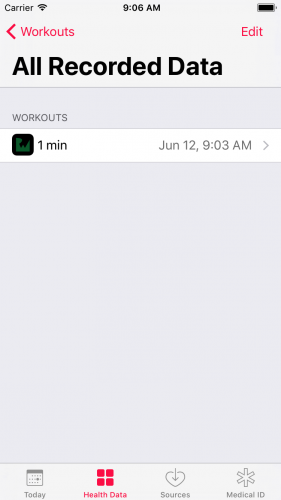
Neat. The RW Logo clearly shows that the workouts came from Prancercise Tracker.
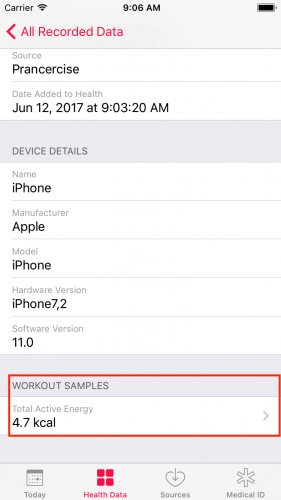
Tap on a workout to view its details, scroll down to the Workout Samples section, and then tap on the cell displaying the total active energy.
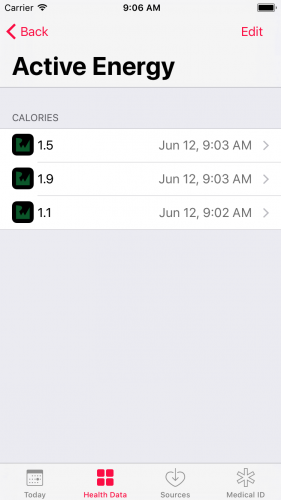
At this point, you should see a list of active energy samples associated with the Prancercise workout you just tracked.
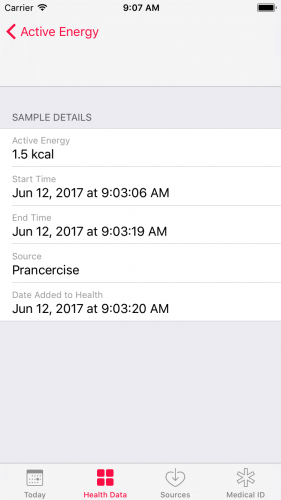
Tap on a sample, and you can see when your short Prancercise session started and finished.
Awesome. You’ve just built an app that not only tracks a workout but also tracks interval training within that workout.
Where To Go From Here?
Here you can download the project that contains all the code from this HealthKit tutorial.
Hopefully this HealthKit tutorial has given you some insight into the basic concepts of HealthKit and how to use them in your own apps. In order to know more about HealthKit, these are the most relevant sources:
- HealthKit Framework Reference.
- WWDC 2014 Session Video: App Store Review Guidelines related to HealthKit. You need to make sure that your app complies with those guidelines.
After going through those documents and videos, you’ll be ready to dig into some more advanced aspects on HealthKit and add improvements to this app. For instance, you could add new types of samples or workouts, calculate Statistics using HKStatisticsQuery, or observe changes in the store information with HKObserverQuery.
I hope you enjoyed this HealthKit tutorial, and as always if you have any questions or comments please join the forum discussion below!
The post HealthKit Tutorial with Swift: Workouts appeared first on Ray Wenderlich.