
Grappling hooks add a fun and interesting mechanic to your games. You can use them to traverse levels, fight in arenas, or even retrieve items. But despite looking easy, the physics of handling ropes and making them behave realistically can put you at the end of your rope!
In part one of this two-part tutorial series, you’ll implement your own 2D grappling hook system and learn the following:
- Create an aiming system.
- Use a line renderer and distance joint to create a rope.
- Make the rope wrap around objects in your game.
- Calculate an angle for swinging on a rope and add force in that direction.
Note: This tutorial is intended for an intermediate to advanced audience, and won’t cover things such as adding components, creating new GameObjects scripts or the syntax of C#. If you need to level up your Unity skills, work through our tutorials on Getting Started with Unity and Introduction to Unity Scripting first. As this tutorial is also based around the DistanceJoint2D you might want to review Physics Joints in Unity 2D as well and then return to this tutorial.
Getting Started
Download the starter project for this tutorial and open it up in the Unity editor. Make sure you’re running Unity 2017.1 or newer.
Open the Game scene from the Scenes folder and take a look at what you’ll soon begin “hooking” up:

Right now, there is a basic player character (the slug) and some rocks floating about.
The notable components the Player GameObject has right now are a capsule collider and a rigidbody which allow it to interact with physical objects in the level. There’s also a simple movement script (PlayerMovement) attached that lets your slippery character slide along the ground and perform basic jumps.
Click the Play button in the editor to start the game and try out the controls to see how they feel. A or D will move you left or right, and space will perform jumps. Be careful not to slip and fall off the rocks or you’ll die!
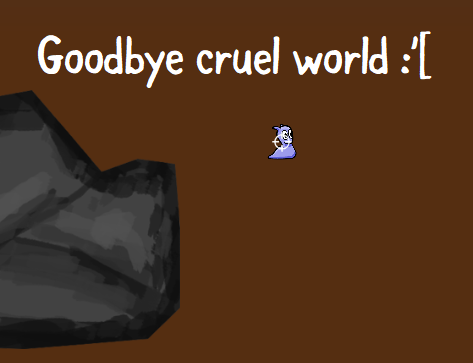
Goodbye cruel world!
The basic controls are implemented, but the biggest concern right now is the lack of grappling hooks.
Creating the Hooks and Rope
A grappling hooks system sounds fairly simple at first, but there are a number of things you’ll need in order to make it work well. Here are some of the main requirements for a 2D grappling hook mechanic:
- A Line Renderer which will show the rope. When the rope wraps around things, you can add more segments to the line renderer and position the vertices appropriately around the edges the rope wraps.
- A DistanceJoint2D. This can be used to attach to the grappling hook’s current anchor point, and lets the slug swing. It’ll also allow for configuration of the distance, which can be used to rappel up and down the rope.
- A child GameObject with a RigidBody2D that can be moved around depending on the current location of the hook’s anchor point. This will essentially be the rope hinge / anchor point.
- A raycast for firing the hook and attaching to objects.
Select Player in the Hierarchy and add a new child GameObject to the Player named RopeHingeAnchor. This GameObject will be used to position the hinge / anchor point of the grappling hook wherever it should be during gameplay.
Add a SpriteRenderer and RigidBody2D component to RopeHingeAnchor.
On the SpriteRenderer, set the Sprite property to use UISprite and change the Order in Layer to 2. Disable the component by unchecking the box next to its name.
On the RigidBody2D component, set the Body Type property to Kinematic. This point will not move around with the physics engine but by code.
Set the layer to Rope and set the X and Y scale values to 4 on the Transform component.

Select Player again and attach a new DistanceJoint2D component.
Drag and drop the RopeHingeAnchor from the Hierarchy onto the Connected Rigid Body property on the DistanceJoint2D component and disable Auto Configure Distance.

Create a new C# script called RopeSystem in the Scripts project folder and open it with your code editor.
Remove the Update method.
At the top of the script, inside the RopeSystem class declaration, add the following variables as well as an Awake() method, and a new Update method:
// 1
public GameObject ropeHingeAnchor;
public DistanceJoint2D ropeJoint;
public Transform crosshair;
public SpriteRenderer crosshairSprite;
public PlayerMovement playerMovement;
private bool ropeAttached;
private Vector2 playerPosition;
private Rigidbody2D ropeHingeAnchorRb;
private SpriteRenderer ropeHingeAnchorSprite;

void Awake()
{
    // 2
    ropeJoint.enabled = false;
    playerPosition = transform.position;
    ropeHingeAnchorRb = ropeHingeAnchor.GetComponent<Rigidbody2D>();
    ropeHingeAnchorSprite = ropeHingeAnchor.GetComponent<SpriteRenderer>();
}

void Update()
{
    // 3
    var worldMousePosition =
        Camera.main.ScreenToWorldPoint(new Vector3(Input.mousePosition.x, Input.mousePosition.y, 0f));
    var facingDirection = worldMousePosition - transform.position;
    var aimAngle = Mathf.Atan2(facingDirection.y, facingDirection.x);
    if (aimAngle < 0f)
    {
        aimAngle = Mathf.PI * 2 + aimAngle;
    }

    // 4
    var aimDirection = Quaternion.Euler(0, 0, aimAngle * Mathf.Rad2Deg) * Vector2.right;
    // 5
    playerPosition = transform.position;

    // 6
    if (!ropeAttached)
    {
    }
    else
    {
    }
}
Taking each section in turn:
- You’ll use these variables to keep track of the different components the RopeSystem script will interact with.
- The
Awakemethod will run when the game starts and disables theropeJoint(DistanceJoint2D component). It'll also setplayerPositionto the current position of the Player. - This is the most important part of your main
Update()loop. First, you capture the world position of the mouse cursor using the camera'sScreenToWorldPointmethod. You then calculate the facing direction by subtracting the player's position from the mouse position in the world. You then use this to createaimAngle, which is a representation of the aiming angle of the mouse cursor. The value is kept positive in the if-statement. - The
aimDirectionis a rotation for later use. You're only interested in the Z value, as you're using a 2D camera, and this is the only relevant axis. You pass in theaimAngle * Mathf.Rad2Degwhich converts the radian angle to an angle in degrees. - The player position is tracked using a convenient variable to save you from referring to
transform.Positionall the time. - Lastly, this is an
if..elsestatement you'll soon use to determine if the rope is attached to an anchor point.
Save the script and return to the editor.
Attach a RopeSystem component to the Player and hook up the various components to the public fields you created in the RopeSystem script. Drag the Player, Crosshair and RopeHingeAnchor to the various fields like this:
- Rope Hinge Anchor: RopeHingeAnchor
- Rope Joint: Player
- Crosshair: Crosshair
- Crosshair Sprite: Crosshair
- Player Movement: Player

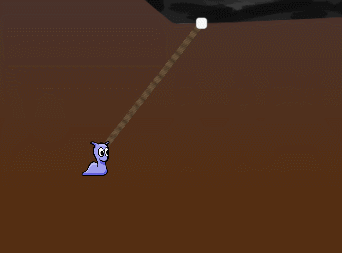
Right now, you're doing all those fancy calculations for aiming, but there’s no visual candy to show off all that work. Not to worry though, you'll tackle that next.
Open the RopeSystem script and add a new method to it:
private void SetCrosshairPosition(float aimAngle)
{
    if (!crosshairSprite.enabled)
    {
        crosshairSprite.enabled = true;
    }

    var x = transform.position.x + 1f * Mathf.Cos(aimAngle);
    var y = transform.position.y + 1f * Mathf.Sin(aimAngle);

    var crossHairPosition = new Vector3(x, y, 0);
    crosshair.transform.position = crossHairPosition;
}
This method will position the crosshair based on the aimAngle that you pass in (a float value you calculated in Update()) in a way that it circles around you in a radius of 1 unit. It'll also ensure the crosshair sprite is enabled if it isn’t already.
In Update(), change the if..else statement that checks for !ropeAttached to look like this:
if (!ropeAttached)
{
	SetCrosshairPosition(aimAngle);
}
else
{
	crosshairSprite.enabled = false;
}
Save your script, and run the game. Your slug should now have the ability to aim with a crosshair.

The next bit of logic you'll need to implement is a way to fire the grappling hook. You already have your aiming direction worked out, so you'll need a method to take this in as a parameter.
Add the following variables below the others in the RopeSystem script:
public LineRenderer ropeRenderer;
public LayerMask ropeLayerMask;
private float ropeMaxCastDistance = 20f;
private List<Vector2> ropePositions = new List<Vector2>();
The LineRenderer will hold a reference to the line renderer that will display the rope. The LayerMask will allow you to customize which physics layers the grappling hook's raycast will be able to interact with and potentially hit. The ropeMaxCastDistance value will set a maximum distance the raycast can fire.
Finally, the list of Vector2 positions will be used to track the rope wrapping points when you get a little further in this tutorial.
Add the following new methods:
// 1
private void HandleInput(Vector2 aimDirection)
{
    if (Input.GetMouseButton(0))
    {
        // 2
        if (ropeAttached) return;
        ropeRenderer.enabled = true;

        var hit = Physics2D.Raycast(playerPosition, aimDirection, ropeMaxCastDistance, ropeLayerMask);

        // 3
        if (hit.collider != null)
        {
            ropeAttached = true;
            if (!ropePositions.Contains(hit.point))
            {
            	// 4
                // Jump slightly to distance the player a little from the ground after grappling to something.
                transform.GetComponent<Rigidbody2D>().AddForce(new Vector2(0f, 2f), ForceMode2D.Impulse);
                ropePositions.Add(hit.point);
                ropeJoint.distance = Vector2.Distance(playerPosition, hit.point);
                ropeJoint.enabled = true;
                ropeHingeAnchorSprite.enabled = true;
            }
        }
        // 5
        else
        {
            ropeRenderer.enabled = false;
            ropeAttached = false;
            ropeJoint.enabled = false;
        }
    }

    if (Input.GetMouseButton(1))
    {
        ResetRope();
    }
}

// 6
private void ResetRope()
{
    ropeJoint.enabled = false;
    ropeAttached = false;
    playerMovement.isSwinging = false;
    ropeRenderer.positionCount = 2;
    ropeRenderer.SetPosition(0, transform.position);
    ropeRenderer.SetPosition(1, transform.position);
    ropePositions.Clear();
    ropeHingeAnchorSprite.enabled = false;
}
Here is an explanation of what the above code does:
- HandleInput is called from the
Update()loop, and simply polls for input from the left and right mouse buttons. - When a left mouse click is registered, the rope line renderer is enabled and a 2D raycast is fired out from the player position in the aiming direction. A maximum distance is specified so that the grappling hook can't be fired in infinite distance, and a custom mask is applied so that you can specify which physics layers the raycast is able to hit.
- If a valid raycast hit is found,
ropeAttachedis set totrue, and a check is done on the list of rope vertex positions to make sure the point hit isn't in there already. - Provided the above check is true, then a small impulse force is added to the slug to hop him up off the ground, and the
ropeJoint(DistanceJoint2D) is enabled, and set with a distance equal to the distance between the slug and the raycast hitpoint. The anchor sprite is also enabled. - If the raycast doesn't hit anything, then the rope line renderer and rope joint are disabled, and the
ropeAttachedflag is set to false. - If the right mouse button is clicked, the
ResetRope()method is called, which will disable and reset all rope/grappling hook related parameters to what they should be when the grappling hook is not being used.
At the very bottom of your existing Update method, add a call to the new HandleInput() method, and pass in the aimDirection value:
HandleInput(aimDirection);
Save your changes to RopeSystem.cs and switch back to the editor.
Adding Rope
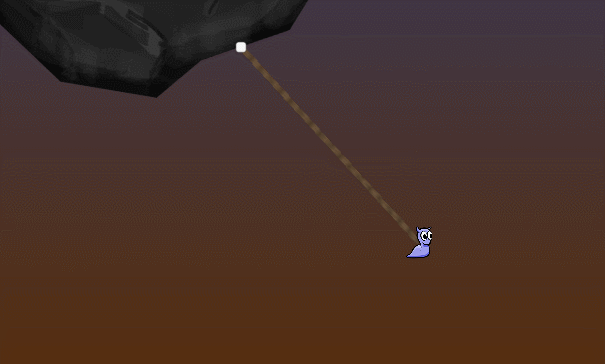
That slug isn't going to get airborne without a rope, so now would be a good time to give him something that visually represents a rope, and also has the ability to “wrap” around angles.
A line renderer is perfect for this, because it allows you to provide the amount of points and their positions in world space.
The idea here is that you'll always keep the rope's first vertex (0) on the player's position, and all other vertices will be positioned dynamically wherever the rope needs to wrap around, including the current pivot position that is the next point down the rope from the player.
Select Player and add a LineRenderer component to it. Set the Width to 0.075. Expand the Materials rollout and for Element 0, choose the RopeMaterial material, included in the project's Materials folder. Lastly for the Line Renderer, select Distribute Per Segment under the Texture Mode selection.

Drag the Line Renderer component to Rope System's Rope Renderer field.
Click the Rope Layer Mask drop down, and choose Default, Rope, and Pivot as the layers that the raycast can interact with. This will ensure that when the raycast is made, it'll only collide with these layers, and not with other things such as the player.

If you run the game now, you may notice some strange behavior. Aiming above the slug at the rock overhead and firing the grappling hook results in a small hop upwards, followed by our slippery fellow acting rather erratically.

The distance joint's distance is not being set, and the line renderer vertices are not being configured either. Therefore, you don't see a rope and because the distance joint is sitting right on top of the slug's position, the current distance joint distance value pushes him down into the rocks below.
Not to worry though, you'll sort that out now.
In the RopeSystem.cs script, add a new using statement at the top of the class:
using System.Linq;
This enables you to use LINQ queries, which in your case will simply allow you to easily find the first or last item in the ropePositions list.
Add a new private bool variable called distanceSet below the other variables:
private bool distanceSet;
You'll use this as a flag to let the script know that the rope's distance (for the point between the player and the current pivot where the grappling hook is attached) has been set correctly.
Now add a new method that you'll use to set the rope vertex positions on the line renderer, and configure the distance joint's distance based on the stored list of rope positions you'll be maintaining (ropePositions):
private void UpdateRopePositions()
{
    // 1
    if (!ropeAttached)
    {
        return;
    }

    // 2
    ropeRenderer.positionCount = ropePositions.Count + 1;

    // 3
    for (var i = ropeRenderer.positionCount - 1; i >= 0; i--)
    {
        if (i != ropeRenderer.positionCount - 1) // if not the Last point of line renderer
        {
            ropeRenderer.SetPosition(i, ropePositions[i]);

            // 4
            if (i == ropePositions.Count - 1 || ropePositions.Count == 1)
            {
                var ropePosition = ropePositions[ropePositions.Count - 1];
                if (ropePositions.Count == 1)
                {
                    ropeHingeAnchorRb.transform.position = ropePosition;
                    if (!distanceSet)
                    {
                        ropeJoint.distance = Vector2.Distance(transform.position, ropePosition);
                        distanceSet = true;
                    }
                }
                else
                {
                    ropeHingeAnchorRb.transform.position = ropePosition;
                    if (!distanceSet)
                    {
                        ropeJoint.distance = Vector2.Distance(transform.position, ropePosition);
                        distanceSet = true;
                    }
                }
            }
            // 5
            else if (i - 1 == ropePositions.IndexOf(ropePositions.Last()))
            {
                var ropePosition = ropePositions.Last();
                ropeHingeAnchorRb.transform.position = ropePosition;
                if (!distanceSet)
                {
                    ropeJoint.distance = Vector2.Distance(transform.position, ropePosition);
                    distanceSet = true;
                }
            }
        }
        else
        {
            // 6
            ropeRenderer.SetPosition(i, transform.position);
        }
    }
}
Explaining the above code:
- Return out of this method if the rope isn't actually attached.
- Set the rope's line renderer vertex count (positions) to whatever number of positions are stored in
ropePositions, plus 1 more (for the player's position). - Loop backwards through the
ropePositionslist, and for every position (except the last position), set the line renderer vertex position to the Vector2 position stored at the current index being looped through inropePositions. - Set the rope anchor to the second-to-last rope position where the current hinge/anchor should be, or if there is only one rope position, then set that one to be the anchor point. This configures the
ropeJointdistance to the distance between the player and the current rope position being looped over. - This if-statement handles the case where the rope position being looped over is the second-to-last one; that is, the point at which the rope connects to an object, a.k.a. the current hinge/anchor point.
- This
elseblock handles setting the rope's last vertex position to the player's current position.
Don't forget to add a call to UpdateRopePositions() at the bottom of Update():
UpdateRopePositions();
Save the changes to your script and run the game again. Make a little jump with space bar, while aiming and firing at the rock above you. You can now admire the fruits of your labor as you watch the slug dangle peacefully above the rocks.

You can also switch to the scene view, select the Player, use the move tool (W by default) to move him around and watch how the rope line renderer's two vertices follows the grapple position and the player's position to draw the rope. Letting go of the player while moving him will result in the DistanceJoint2D re-configuring the distance correctly, and the slug will continue swinging by the connected joint.

Handling Wrap Points
A dangling slug game is about as useful as a waterproof towel, so you'll definitely need to build on what you've got so far.

The good news is that the method you just added to handle rope positions is future proof. You're currently only using two rope positions. One connected to the player's position, and one to the current grapple pivot position when you fire the grappling hook out.
The only problem is you're not yet tracking all rope potential rope positions, and you'll need to do a little bit of work to get there.
In order to detect positions on the rocks where the rope should wrap around and add a new vertex position to the line renderer, you'll need a system to determine if a collider vertex point lies in between a straight line between the slug's current position, and the current rope hinge/anchor point.
Sounds like a job for the good old raycast once again!

First, you'll need to build a method that can find the closest point in a collider based on the hit location of a raycast and the edges of the collider.
In your RopeSystem.cs script, add this new method:
// 1
private Vector2 GetClosestColliderPointFromRaycastHit(RaycastHit2D hit, PolygonCollider2D polyCollider)
{
    // 2
    var distanceDictionary = polyCollider.points.ToDictionary<Vector2, float, Vector2>(
        position => Vector2.Distance(hit.point, polyCollider.transform.TransformPoint(position)),
        position => polyCollider.transform.TransformPoint(position));

    // 3
    var orderedDictionary = distanceDictionary.OrderBy(e => e.Key);
    return orderedDictionary.Any() ? orderedDictionary.First().Value : Vector2.zero;
}
If you’re not a LINQ query whiz, this may look like some whimsical magical C# wizardry to you.

If that's the case, don't be too scared. LINQ is doing a lot of stuff under the hood for you:
- This method takes in two parameters, a RaycastHit2D object, and a PolygonCollider2D. All the rocks in the level have PolygonCollider2D colliders, so this will work well as long as you're always using PolygonCollider2D shapes.
- Here be LINQ query magic! This converts the polygon collider's collection of points, into a dictionary of Vector2 positions (the value of each dictionary entry is the position itself), and the key of each entry, is set to the distance that this point is to the player's position (float value). Something else happens here: the resulting position is transformed into world space (by default a collider's vertex positions are stored in local space - i.e. local to the object the collider sits on, and we want the world space positions).
- The dictionary is ordered by key. In other words, the distance closest to the player's current position, and the closest one is returned, meaning that whichever point is returned from this method, is the point on the collider between the player and the current hinge point on the rope!
Back in your RopeSystem.cs script, add a new private field variable to the top:
private Dictionary<Vector2, int> wrapPointsLookup = new Dictionary<Vector2, int>();
You'll use this to track the positions that the rope should be wrapping around.
In Update(), locate the else statement you left near the bottom containing the crosshairSprite.enabled = false; statement and add the following:
// 1
if (ropePositions.Count > 0)
{
    // 2
    var lastRopePoint = ropePositions.Last();
    var playerToCurrentNextHit = Physics2D.Raycast(playerPosition, (lastRopePoint - playerPosition).normalized, Vector2.Distance(playerPosition, lastRopePoint) - 0.1f, ropeLayerMask);

    // 3
    if (playerToCurrentNextHit)
    {
        var colliderWithVertices = playerToCurrentNextHit.collider as PolygonCollider2D;
        if (colliderWithVertices != null)
        {
            var closestPointToHit = GetClosestColliderPointFromRaycastHit(playerToCurrentNextHit, colliderWithVertices);

            // 4
            if (wrapPointsLookup.ContainsKey(closestPointToHit))
            {
                ResetRope();
                return;
            }

            // 5
            ropePositions.Add(closestPointToHit);
            wrapPointsLookup.Add(closestPointToHit, 0);
            distanceSet = false;
        }
    }
}
Explaining the above chunk of code:
- If the
ropePositionslist has any positions stored, then... - Fire a raycast out from the player's position, in the direction of the player looking at the last rope position in the list — the pivot point where the grappling hook is hooked into the rock — with a raycast distance set to the distance between the player and rope pivot position.
- If the raycast hits something, then that hit object's collider is safe cast to a PolygonCollider2D. As long as it's a real PolygonCollider2D, then the closest vertex position on that collider is returned as a Vector2, using that handy-dandy method you wrote earlier.
- The
wrapPointsLookupis checked to make sure the same position is not being wrapped again. If it is, then it'll reset the rope and cut it, dropping the player. - The
ropePositionslist is now updated, adding the position the rope should wrap around, and thewrapPointsLookupdictionary is also updated. Lastly thedistanceSetflag is disabled, so thatUpdateRopePositions()method can re-configure the rope's distances to take into account the new rope length and segments.
In ResetRope(), add this to clear the wrapPointsLookup dictionary each time the player disconnects the rope:
wrapPointsLookup.Clear();
Save and run the game. Fire the grappling hook at the rock above, and use the Move tool in the Scene view to move the slug past a few rocky outcrops.

And that is how you get a slug and a rope to wrap!
Adding the Swing Ability
That slug is still pretty static on the rope. To fix it, you can add the ability to swing when on the rope.
To do this, you'll want to work out a position perpendicular to the slug's forward (side) swinging position, no matter what angle he is facing.
Open PlayerMovement.cs and add the following two public variables to the top of the script:
public Vector2 ropeHook;
public float swingForce = 4f;
The ropeHook variable will be set to whichever position the rope grappling anchor is currently at, and swingForce is a value to be used to add to the swing motion.
Replace the FixedUpdate() method with this new one:
void FixedUpdate()
{
    if (horizontalInput < 0f || horizontalInput > 0f)
    {
        animator.SetFloat("Speed", Mathf.Abs(horizontalInput));
        playerSprite.flipX = horizontalInput < 0f;
        if (isSwinging)
        {
            animator.SetBool("IsSwinging", true);

            // 1 - Get a normalized direction vector from the player to the hook point
            var playerToHookDirection = (ropeHook - (Vector2)transform.position).normalized;

            // 2 - Inverse the direction to get a perpendicular direction
            Vector2 perpendicularDirection;
            if (horizontalInput < 0)
            {
                perpendicularDirection = new Vector2(-playerToHookDirection.y, playerToHookDirection.x);
                var leftPerpPos = (Vector2)transform.position - perpendicularDirection * -2f;
                Debug.DrawLine(transform.position, leftPerpPos, Color.green, 0f);
            }
            else
            {
                perpendicularDirection = new Vector2(playerToHookDirection.y, -playerToHookDirection.x);
                var rightPerpPos = (Vector2)transform.position + perpendicularDirection * 2f;
                Debug.DrawLine(transform.position, rightPerpPos, Color.green, 0f);
            }

            var force = perpendicularDirection * swingForce;
            rBody.AddForce(force, ForceMode2D.Force);
        }
        else
        {
            animator.SetBool("IsSwinging", false);
            if (groundCheck)
            {
                var groundForce = speed * 2f;
                rBody.AddForce(new Vector2((horizontalInput * groundForce - rBody.velocity.x) * groundForce, 0));
                rBody.velocity = new Vector2(rBody.velocity.x, rBody.velocity.y);
            }
        }
    }
    else
    {
        animator.SetBool("IsSwinging", false);
        animator.SetFloat("Speed", 0f);
    }

    if (!isSwinging)
    {
        if (!groundCheck) return;

        isJumping = jumpInput > 0f;
        if (isJumping)
        {
            rBody.velocity = new Vector2(rBody.velocity.x, jumpSpeed);
        }
    }
}
The main changes here are that an isSwinging flag is checked first for actions that should only happen while on the rope, and that you are now adding for perpendicular to the slug's angle pointing up to his current pivot/anchor point at the top of the rope, but perpendicular in the direction he is swinging.
- Get a normalized direction vector from the player to the grappling anchor point.
- Depending on whether the slug is swinging left or right, a perpendicular direction is calculated using the
playerToHookDirection. A debug draw call is also added so you can see this in the editor if you like.
Open RopeSystem.cs and in Update(), at the top of the else block for the if(!ropeAttached) statement, add:
playerMovement.isSwinging = true;
playerMovement.ropeHook = ropePositions.Last();
For the if block of the same if(!ropeAttached) statement above, add:
playerMovement.isSwinging = false;
This just tells the PlayerMovement script when the player is swinging, and what the last (excluding the player position) rope position is — in other words, the anchor rope position. This is required for the perpendicular angle calculation you just added to the PlayerMovement script.
Here's how this looks if you enable gizmos with the game running and press A or D to swing left or right while hooked:

Adding Rappeling
Right now there is no way to move up and down the rope. While it's true that a slug would never be able to pull himself up or down a rope this easily, this is a game, and that means anything can happen right?
In the RopeSystem script, add two new field variables to the top of the script:
public float climbSpeed = 3f;
private bool isColliding;
The climbSpeed will set the speed at which the slug can go up and down the rope and isColliding will be used as a flag to determine whether or not the rope's distance joint distance property can be increased or decreased.
Add this new method:
private void HandleRopeLength()
{
	// 1
    if (Input.GetAxis("Vertical") >= 1f && ropeAttached && !isColliding)
    {
        ropeJoint.distance -= Time.deltaTime * climbSpeed;
    }
    else if (Input.GetAxis("Vertical") < 0f && ropeAttached)
    {
        ropeJoint.distance += Time.deltaTime * climbSpeed;
    }
}
This if..elseif block looks for vertical axis input (up/down or W/S on the keyboard), and depending on the ropeAttached iscColliding flags will either increase or decrease the ropeJoint distance, having the effect of lengthening or shortening the rope.
Hook this method up by adding a call to it at the bottom of Update():
HandleRopeLength();
You'll also need a way of setting the isColliding flag.
Add these two methods to the bottom of the script:
void OnTriggerStay2D(Collider2D colliderStay)
{
    isColliding = true;
}

private void OnTriggerExit2D(Collider2D colliderOnExit)
{
    isColliding = false;
}
These two methods are native to the MonoBehaviour base script class.
If a Collider is currently touching another physics object in the game, the OnTriggerStay2D method will continuously fire, setting the isColliding flag to true. This means whenever the slug is touching a rock, the isColliding flag is being set to true.
The OnTriggerExit2D method will fire when one collider leaves another's collider area, setting the flag to false.
Just be warned: the OnTriggerStay2D method can be very performance-intensive, so be careful with its use.
Where to Go From Here?
Run the game again, and this time use your arrow or W/S keys to move up or down on the rope.
Here's a link to the completed project for this tutorial.
You've come a long way from having a sluggish slug with no swing, to an acrobatic shell-less gastropod mollusk!
You've learned how to create an aiming system that can fire a grappling hook at any object covered by a collider, attach to it, and swing about on it, wrapping a dynamic rope around the edges at the same time! Great job.
There is a missing piece though, the rope does not 'unwind' or 'unwrap' when it should.
Stay tuned for part two of this tutorial series, where you'll tackle that next.
If you're feeling adventurous, why not give it a go yourself? You can use the Dictionary wrapPointsLookup to help you along.
The Unity team has created a book, Unity Games By Tutorials. Have you checked it out yet? The book will teach you to create four complete games from scratch:
- A twin-stick shooter
- A first-person shooter
- A tower defense game (with VR support!)
- A 2D platformer
By the end of this book, you’ll be ready to make your own games for Windows, macOS, iOS, and more!
This book is for complete beginners to Unity, as well as for those who’d like to bring their Unity skills to a professional level. The book assumes you have some prior programming experience (in a language of your choice).
If you have any questions or comments on this tutorial, please join the discussion below!
The post Make a 2D Grappling Hook Game in Unity – Part 1 appeared first on Ray Wenderlich.