
Let’s be honest. We, the human race, will eventually create robots that will take over the world, right? One thing that will be super important to our eventual robot masters will be good depth perception. Without it, how will they know if it’s really a human or just a cardboard cutout of a human that they have imprisoned? One way in which they can possibly do this, is by using depth maps.
But before robots can do this, they will first need to be programmed that way, and that’s where you come in! In this tutorial, you will learn about the APIs Apple provides for image depth maps. You will:
- Learn how the iPhone generates depth information.
- Read depth data from images.
- Combine this depth data with filters to create neat effects.
So what are you waiting for? Your iPhone wants to start seeing in 3D!
Getting Started
Before you begin, you need to make sure you are running Xcode 9 or later. Additionally, I highly recommend running this tutorial on a device directly. This means you need an iPhone running iOS 11 or later. As of this writing, the simulator is excruciatingly slow.
Download and explore the starter project. The bundled images include depth information to use with the tutorial.
If you prefer and you have a dual camera iPhone, you can take your own images to use with this tutorial. To take pictures that include depth data, the iPhone needs to be running iOS 11 or later. And don’t forget to use Portrait mode in the Camera app.
You will see three warnings in the starter project. Don’t worry about them as you will fix them during the course of the tutorial.
Build and run the project. You should see this:
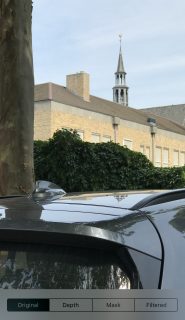
Tapping on the image cycles to the next one. If you add your own pictures, you need to follow the naming convention test##.jpg. The numbers start at 00 and increment sequentially.
In this tutorial, you will fill in the functionality of the Depth, Mask, and Filtered segments.
If you look through the starter project, you will also see some code that only runs in the simulator. It turns out, when it comes to depth data, the device and the simulator behave differently. This is to handle that situation. Just ignore it.
Reading Depth Data
The most important class for depth data is AVDepthData.
Different image formats store the depth data slightly differently. In HEICs, it’s stored as metadata. But in JPGs, it’s stored as a second image within the JPG.
You generally use AVDepthData to extract this auxiliary data from an image, so that’s the first step. Open DepthReader.swift and add the following method to DepthReader:
func depthDataMap() -> CVPixelBuffer? {

  // 1
  guard let fileURL = Bundle.main.url(forResource: name, withExtension: ext) as CFURL? else {
    return nil
  }

  // 2
  guard let source = CGImageSourceCreateWithURL(fileURL, nil) else {
    return nil
  }

  // 3
  guard let auxDataInfo = CGImageSourceCopyAuxiliaryDataInfoAtIndex(source, 0,
      kCGImageAuxiliaryDataTypeDisparity) as? [AnyHashable : Any] else {
    return nil
  }

  // 4
  var depthData: AVDepthData

  do {
    // 5
    depthData = try AVDepthData(fromDictionaryRepresentation: auxDataInfo)

  } catch {
    return nil
  }

  // 6
  if depthData.depthDataType != kCVPixelFormatType_DisparityFloat32 {
    depthData = depthData.converting(toDepthDataType: kCVPixelFormatType_DisparityFloat32)
  }

  // 7
  return depthData.depthDataMap
}
OK, that was quite a bit of code, but here’s what you did:
- First, you get a URL for an image file and safely type cast it to a
CFURL. - You then create a
CGImageSourcefrom this file. - From the image source at index 0, you copy the disparity data (more on what that means later, but you can think of it as depth data for now) from its auxiliary data. The index is 0 because there is only one image in the image source. iOS knows how to extract the data from JPGs and HEIC files alike, but unfortunately this doesn’t work in the simulator.
- You prepare a property for the depth data. As previously mentioned, you use
AVDepthDatato extract the auxiliary data from an image. - You create an
AVDepthDataentity from the auxiliary data you read in. - You ensure the depth data is the the format you need: 32-bit floating point disparity information.
- Finally, you return this depth data map.
Now before you can run this, you need to update DepthImageViewController.swift.
Find loadCurrent(image:withExtension:) and add the follow lines of code to the beginning:
// 1
let depthReader = DepthReader(name: name, ext: ext)

// 2
let depthDataMap = depthReader.depthDataMap()

// 3
depthDataMap?.normalize()

// 4
let ciImage = CIImage(cvPixelBuffer: depthDataMap)
depthDataMapImage = UIImage(ciImage: ciImage)
With this code:
- You create a
DepthReaderentity using the current image. - Using your new
depthDataMapmethod, you read the depth data into aCVPixelBuffer. - You then normalize the depth data using a provided extension to
CVPixelBuffer. This makes sure all the pixels are between 0.0 and 1.0, where 0.0 are the furthest pixels and 1.0 are the nearest pixels. - You then convert the depth data to a
CIImageand then aUIImageand save it to a property.
If you’re interested in how the normalize method works, take a look in CVPixelBufferExtension.swift. It loops through every value in the 2D array and keeps track of the minimum and maximum values seen. It then loops through all the values again and uses the min and max values to calculate a new value that is between 0.0 and 1.0.
Build and run the project and tap on the Depth segment of the segmented control at the bottom.

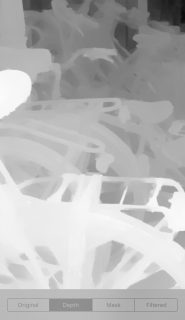
Awesome! Remember when you normalized the depth data? This is the visual representation of that. The whiter the pixel, the closer it is, the darker the pixel, the further away it is.
Great job!
How Does the iPhone Do This?
In a nutshell, the iPhone’s dual cameras are imitating stereoscopic vision.
Try this. Hold your index finger closely in front of your nose and pointing upward. Close your left eye. Without moving your finger or head, simultaneously open your left eye and close your right eye.
Now quickly switch back and forth closing one eye and opening the other. Pay attention to the relative location of your finger to objects in the background. See how your finger seems to make large jumps left and right compared to objects further away?


The closer an object is to your eyes, the larger the change in its relative position compared to the background. Does this sound familiar? It’s a parallax effect!
The iPhone’s dual cameras are like its eyes, looking at two images taken at a slight offset from one another. It corresponds features in the two images and calculates how many pixels they have moved. This change in pixels is called disparity.

Depth vs Disparity
So far, we’ve mostly used the term depth data, but in your code, you requested kCGImageAuxiliaryDataTypeDisparity data. What gives? Depth and disparity are essentially inversely proportional.

The further away an object is, the larger the depth. But distance between the pixels of these objects get closer and approach zero. If you played around with the starter project you might have noticed a slider at the bottom of the screen that is visible when selecting the Mask and Filter segments.
You’re going to use this slider, along with the depth data, to make a mask for the image at a certain depth. Then you’ll use this mask to filter the original image and create some neat effects!
Creating a Mask
Open up DepthImageFilters.swift and find createMask(for:withFocus:andScale:). Then add the following code to the top of it:
let s1 = MaskParams.slope
let s2 = -MaskParams.slope
let filterWidth =  2 / MaskParams.slope + MaskParams.width
let b1 = -s1 * (focus - filterWidth / 2)
let b2 = -s2 * (focus + filterWidth / 2)
These constants are going to define how we want to convert the depth data into an image mask.
Think of the depth data map as the following function:

The pixel value of your depth map image is equal to the normalized disparity. Remember, that a pixel value of 1.0 is white and a disparity value of 1.0 is the closest to the camera. On the other side of the scale, a pixel value of 0.0 is black and a disparity value of 0.0 is furthest from the camera.
When you create a mask from the depth data, you’re going to change this function to be something much more interesting.
Using a slope of 4.0, a width of 0.1, and 0.75 as the focal point, createMask(for:withFocus:andScale:) will use the following function when you’re done with it:

This means that the whitest pixels (value 1.0) will be those with a disparity of 0.75 ± 0.05 (focal point ± width / 2). The pixels will then quickly fade to black for disparity values above and below this range. The larger the slope, the faster they will fade to black.
After the constants add this line:
let mask0 = depthImage
  .applyingFilter("CIColorMatrix", parameters: [
    "inputRVector": CIVector(x: s1, y: 0, z: 0, w: 0),
    "inputGVector": CIVector(x: 0, y: s1, z: 0, w: 0),
    "inputBVector": CIVector(x: 0, y: 0, z: s1, w: 0),
    "inputBiasVector": CIVector(x: b1, y: b1, z: b1, w: 0)])
  .applyingFilter("CIColorClamp")
This filter multiplies all the pixels by the slope s1. Since the mask is greyscale, you need to make sure that all color channels have the same value. After using CIColorClamp to clamp the values to be between 0.0 and 1.0, this filter will apply the following function:

The larger s1 is, the steeper the slope of the line will be. The constant b1 moves the line left or right.
To take care of the other side of the mask function, add the following:
let mask1 = depthImage
  .applyingFilter("CIColorMatrix", parameters: [
    "inputRVector": CIVector(x: s2, y: 0, z: 0, w: 0),
    "inputGVector": CIVector(x: 0, y: s2, z: 0, w: 0),
    "inputBVector": CIVector(x: 0, y: 0, z: s2, w: 0),
    "inputBiasVector": CIVector(x: b2, y: b2, z: b2, w: 0)])
  .applyingFilter("CIColorClamp")
Since the slope s2 is negative, the filter applies the following function:

Now, put the two masks together:
let combinedMask = mask0.applyingFilter("CIDarkenBlendMode", parameters: ["inputBackgroundImage" : mask1])

let mask = combinedMask.applyingFilter("CIBicubicScaleTransform", parameters: ["inputScale": scale])
You combine the masks by using the CIDarkenBlendMode filter, which chooses the lower of the two values of the input masks.
Then you scale the mask to match the image size.
Finally, replace the return line with:
return mask
Build and run your project. Tap on the Mask segment and play with the slider.
WARNING: If you’re running in the simulator, this will be unbearably slow. If you would like to see this improved, please duplicate this open radar on bugreport.apple.com.
You should see something like this:
Your First Depth-Inspired Filter
Next, you’re going to create a filter that somewhat mimics a spotlight. The “spotlight” will shine on objects at a chosen depth and fade to black from there.
And because you already put in the hard work reading in the depth data and creating the mask, it’s going to be super simple.
Open DepthImageFilters.swift and add the following:
func spotlightHighlight(image: CIImage, mask: CIImage, orientation: UIImageOrientation = .up) -> UIImage? {

  // 1
  let output = image.applyingFilter("CIBlendWithMask", parameters: ["inputMaskImage": mask])

  // 2
  guard let cgImage = context.createCGImage(output, from: output.extent) else {
    return nil
  }

  // 3
  return UIImage(cgImage: cgImage, scale: 1.0, orientation: orientation)
}
Here’s what you did in these three lines:
- You used the
CIBlendWithMaskfilter and passed in the mask you created in the previous section. The filter essentially sets the alpha value of a pixel to the corresponding mask pixel value. So when the mask pixel value is 1.0, the image pixel is completely opaque and when the mask pixel value is 0.0, the image pixel is completely transparent. Since theUIViewbehind theUIImageViewhas a black color, black is what you see coming from behind the image. - You create a
CGImageusing theCIContextfor efficiency - You then create a
UIImageand return it.
To see this filter in action, you first need to tell DepthImageViewController to call this method when appropriate.
Open DepthImageViewController.swift and go to updateImageView. Inside the .filtered case of the main switch statement, you’ll find a nested switch statement for the selectedFilter.
Replace the code for the .spotlight case to be:
finalImage = depthFilters?.spotlightHighlight(image: filterImage, mask: mask, orientation: orientation)
Build and run your project! Tap the Filtered segment and ensure that you select Spotlight at the top. Play with the slider. You should see something like this:
Congratulations! You’ve written your first depth-inspired image filter.
But you’re just getting warmed up. You want to write another one, right? I thought so!
Color Highlight Filter
Open DepthImageFilters.swift and below spotlightHighlight(image:mask:orientation:) you just wrote, add the following new method:
func colorHighlight(image: CIImage, mask: CIImage, orientation: UIImageOrientation = .up) -> UIImage? {

  let greyscale = image.applyingFilter("CIPhotoEffectMono")
  let output = image.applyingFilter("CIBlendWithMask", parameters: ["inputBackgroundImage" : greyscale,
                                                                    "inputMaskImage": mask])

  guard let cgImage = context.createCGImage(output, from: output.extent) else {
    return nil
  }

  return UIImage(cgImage: cgImage, scale: 1.0, orientation: orientation)
}
This should look familiar. It’s almost exactly the same as the spotlightHighlight(image:mask:orientation:) filter you just wrote. The one difference is that this time you set the background image to be a greyscale version of the original image.
This filter will show full color at the focal point based on the slider position and fade to grey from there.
Open DepthImageViewController.swift and in the same switch statement for selectedFilter, replace the code for the .color case to with:
finalImage = depthFilters?.colorHighlight(image: filterImage, mask: mask, orientation: orientation)
This calls your new filter method and displays the result.
Build and run to see the magic:
Don’t you hate it when you take a picture only to discover later that the camera focused on the wrong object? What if you could change the focus after the fact?
That’s exactly the depth-inspired filter you’ll be writing next!
Change the Focal Length
Under your colorHightlight(image:mask:orientation:) method in DepthImageFilters.swift, add:
func blur(image: CIImage, mask: CIImage, orientation: UIImageOrientation = .up) -> UIImage? {

  // 1
  let invertedMask = mask.applyingFilter("CIColorInvert")

  // 2
  let output = image.applyingFilter("CIMaskedVariableBlur", parameters: ["inputMask" : invertedMask,
                                                                         "inputRadius": 15.0])

  // 3
  guard let cgImage = context.createCGImage(output, from: output.extent) else {
    return nil
  }

  // 4
  return UIImage(cgImage: cgImage, scale: 1.0, orientation: orientation)
}
This filter is a little different than the other two.
- First, you invert the mask.
- Then you apply the
CIMaskedVariableBlurfilter, which is new with iOS 11. This filter will blur using a radius equal to theinputRadius*mask pixel value. So when the mask pixel value is 1.0, the blur is at its max, which is why you needed to invert the mask first. - Once again, you generate a
CGImageusing theCIContextfor efficiency… - …and use it to create a
UIImageand return it.
Note: If you have performance issues, you can try to decrease the inputRadius. Gaussian blurs are computationally expensive and the bigger the blur radius, the more computations need to occur.
Before you can run, you need to once again update the selectedFilter switch statement. To use your shiny new method, change the code under the .blur case to be:
finalImage = depthFilters?.blur(image: filterImage, mask: mask, orientation: orientation)
Build and run:

It’s… so… beautiful!

More About AVDepthData
You remember how you had to scale the mask in createMask(for:withFocus:andScale:)? The reason is that the depth data captured by the iPhone is a lower resolution than the sensor resolution. It’s closer to 0.5 megapixels vs the 12 megapixels the camera can take.
Another important thing to know is the data can be filtered or unfiltered. Unfiltered data may have holes represented by NaN (Not a Number — a possible value in floating point data types). If the phone can’t correlate two pixels or if something obscures just one of the cameras, it will result in these NaN values for disparity.
Pixels with a value of NaN will be displayed as black. Since multiplying by NaN is always going to be NaN, these black pixels will propagate to your final image. They will literally look like holes in the image.
As this can be a pain to deal with, Apple gives you filtered data, when available, to fill in these gaps and smooth out the data.
If you’re unsure, you should always check the isDepthDataFiltered property to find out if you’re dealing with filtered or unfiltered data.
Where to Go From Here?
You can download the final project from this tutorial here.
There are tons more Core Image filters available. Check here for a complete list. Many of these filters could create interesting effects when combined with depth data.
Additionally, you can capture depth data with video, too! Think of the possibilities.
I hope you had fun building some of these image filters. If you have any questions or comments, please join the forum discussion below!
The post Image Depth Maps Tutorial for iOS: Getting Started appeared first on Ray Wenderlich.