You’ve undoubtedly seen OCR before… It’s used to process everything from scanned documents, to handwritten scribbles, to the Word Lens technology in Google’s Translate app. And today you’ll learn to use it in your very own iPhone app with the help of Tesseract! Pretty neat, huh?
So… what is it?
Optical Character Recognition (OCR) is the process of extracting digital text from images. Once extracted, a user may then use the text for document editing, free-text searches, compression, etc.
In this tutorial, you’ll use OCR to woo your true heart’s desire. You’ll create an app called Love In A Snap using Tesseract, an open-source OCR engine maintained by Google. With Love In A Snap, you can take a picture of a love poem and “make it your own” by replacing the name of the original poet’s muse with the object of your affection. Brilliant! Get ready to impress.
Getting Started
Download the starter package here and extract it to a convenient location.
The archive contains the following folders:
- LoveInASnap: The Xcode starter project.
- Images: Images of a love poem.
- tessdata: The Tesseract language data.
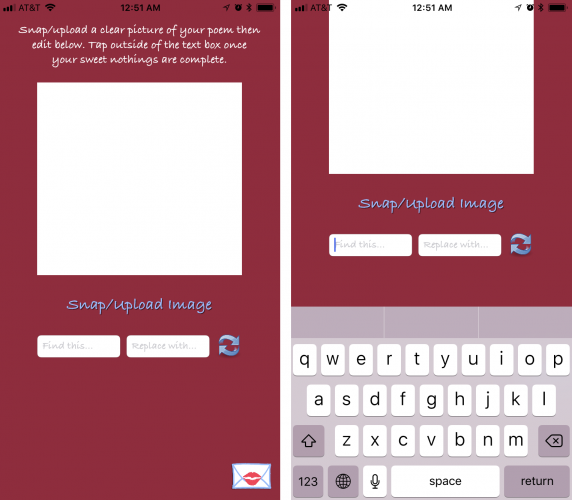
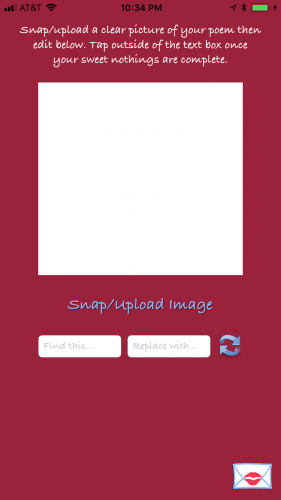
Open LoveInASnap\LoveinASnap.xcodeproj, build, run, tap around, and get a feel for the UI. The current app does very little, but you’ll notice the view shifts up and down when selecting and deselecting the text fields. It does this to prevent the keyboard from blocking necessary text fields, buttons, etc.
Starter Code
Open ViewController.swift to check out the starter code. You’ll notice a few @IBOutlets and @IBAction functions that link the view controller to its pre-made Main.storyboard interface. Within most of those @IBActions, view.endEditing(true) resigns the keyboard. It’s omitted in sharePoem(_:) since the share button will never be visible while the keyboard is visible.
After those @IBAction functions, you’ll see performImageRecognition(_:). This is where Tesseract will eventually perform its image recognition.
Below that are two functions which shift the view up and down:
func moveViewUp() {
  if topMarginConstraint.constant != originalTopMargin {
    return
  }
  topMarginConstraint.constant -= 135
  UIView.animate(withDuration: 0.3) {
    self.view.layoutIfNeeded()
  }
}

func moveViewDown() {
  if topMarginConstraint.constant == originalTopMargin {
    return
  }
  topMarginConstraint.constant = originalTopMargin
  UIView.animate(withDuration: 0.3) {
    self.view.layoutIfNeeded()
  }
}
moveViewUp animates the view controller’s view’s top constraint up when the keyboard shows. moveViewDown animates the view controller’s view’s top constraint back down when the keyboard hides.
Within the storyboard, the UITextFields’ delegates were set to ViewController. Take a look at the methods in the UITextFieldDelegate extension:
// MARK: - UITextFieldDelegate
extension ViewController: UITextFieldDelegate {
  func textFieldDidBeginEditing(_ textField: UITextField) {
    moveViewUp()
  }

  func textFieldDidEndEditing(_ textField: UITextField) {
    moveViewDown()
  }
}
When a user begins editing a text field, call moveViewUp. When a user finishes editing a text field, call moveViewDown.
Although important to the app’s UX, the above functions are the least relevant to this tutorial. Since they’re pre-coded, we can get into the fun coding nitty-gritty right away.
Tesseract Limitations
Tesseract OCR is quite powerful, but does have the following limitations:
- Unlike some OCR engines (like those used by the U.S. Postal Service to sort mail), Tesseract is unable to recognize handwriting. In fact, it’s limited to about 64 fonts in total.
- Tesseract’s performance can improve with image pre-processing. You may need to scale images, increase color contrast, and horizontally-align the text for optimal results.
- Finally, Tesseract OCR only works on Linux, Windows, and Mac OS X.
Uh oh…Linux, Windows, and Mac OS X… How are you going to use this in iOS? Luckily, there’s an Objective-C wrapper for Tesseract OCR written by gali8 which you can use in Swift and iOS.
Phew! :]
Installing Tesseract
As described in Joshua Greene’s great tutorial, How to Use CocoaPods with Swift, you can install CocoaPods and the Tesseract framework using the following steps.
To install CocoaPods, open Terminal and execute the following command:
sudo gem install cocoapods
Enter your computer’s password when requested.
To install Tesseract in the project, navigate to the LoveInASnap starter project folder using the cd command. For example, if the starter folder is on your desktop, enter:
cd ~/Desktop/OCR_Tutorial_Resources/LoveInASnap
Next, create a Podfile for your project in this location by running:
pod init
Next, open the Podfile using a text editor and replace all of its current text with the following:
use_frameworks!
platform :ios, '11.0'

target 'LoveInASnap' do
  use_frameworks!
  pod 'TesseractOCRiOS'
end
This tells CocoaPods that you want to include the TesseractOCRiOS framework as a dependency for your project. Finally, save and close Podfile, then in Terminal, within the same directory to which you navigated earlier, type the following:
pod install
That’s it! As the log output states, “Please close any current Xcode sessions and use ‘LoveInASnap.xcworkspace’ for this project from now on.” Close LoveinASnap.xcodeproj and open OCR_Tutorial_Resources\LoveInASnap\LoveinASnap.xcworkspace in Xcode.
Preparing Xcode for Tesseract
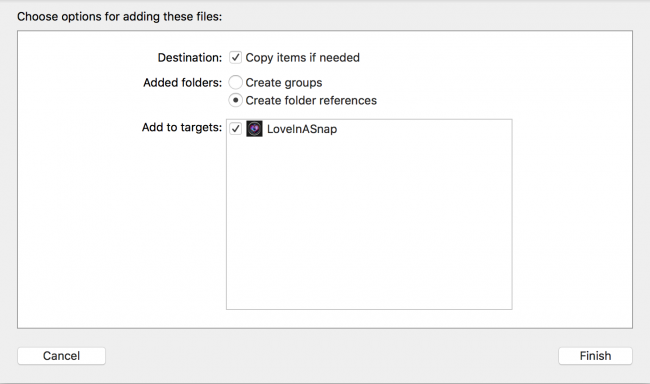
Drag tessdata, i.e. Tesseract language data, from the Finder to the Supporting Files group in the Xcode project navigator. Make sure Copy items if needed is checked, the Added Folders option is set to Create folder references, and LoveInASnap is checked before selecting Finish.
Note: Make sure tessdata is placed in the Copy Bundle Resources under Build Phases otherwise you’ll receive a cryptic error when running stating the TESSDATA_PREFIX environment variable is not set to the parent directory of your tessdata directory.
Back in the project navigator, click the LoveInASnap project file. In the Targets section, click LoveInASnap, go to the General tab, and scroll down to Linked Frameworks and Libraries.
There should be only one file here: Pods_LoveInASnap.framework, i.e. the pods you just added. Click the + button below the table then add libstdc++.dylib, CoreImage.framework, and TesseractOCR.framework to your project.
After you’ve done this, your Linked Frameworks and Libraries section should look something like this:
Almost there! A few small steps before you can dive into the code…
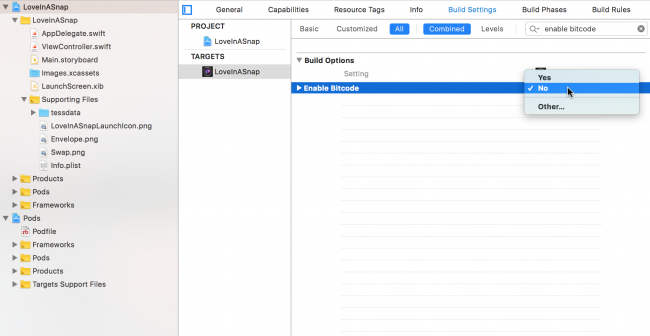
In the LoveInASnap target’s Build Settings tab, find C++ Standard Library and make sure it’s set to Compiler Default. Then find Enable Bitcode and set it to No.
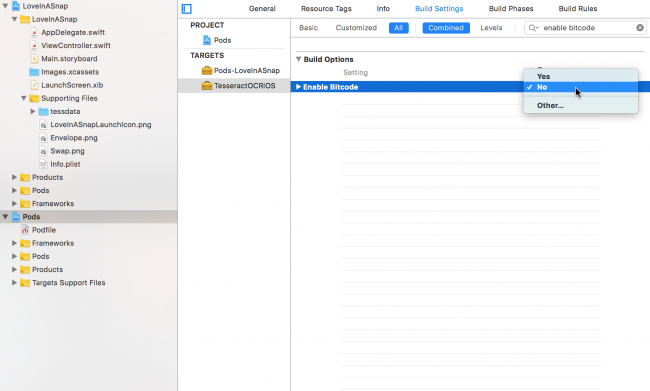
Similarly, back in the left-hand project navigator, select the Pods project and go to the TesseractOCRiOS target’s Build Settings, find C++ Standard Library and make sure it’s set to Compiler Default. Then find Enable Bitcode and set it to No.
That’s it! Build and run your project to make sure everything compiles. You’ll see warnings in the left-hand issue navigator, but don’t worry too much about them.
All good? Now you can get started with the fun stuff!
Creating the Image Picker
Open ViewController.swift and add the following extension at the bottom under your class definition:
// 1
// MARK: - UINavigationControllerDelegate
extension ViewController: UINavigationControllerDelegate {
}

// MARK: - UIImagePickerControllerDelegate
extension ViewController: UIImagePickerControllerDelegate {
  func presentImagePicker() {
    // 2
    let imagePickerActionSheet = UIAlertController(title: "Snap/Upload Image",
                                                   message: nil, preferredStyle: .actionSheet)
    // 3
    if UIImagePickerController.isSourceTypeAvailable(.camera) {
      let cameraButton = UIAlertAction(title: "Take Photo",
                                       style: .default) { (alert) -> Void in
                                        let imagePicker = UIImagePickerController()
                                        imagePicker.delegate = self
                                        imagePicker.sourceType = .camera
                                        self.present(imagePicker, animated: true)
      }
      imagePickerActionSheet.addAction(cameraButton)
    }
    // Insert here
  }
}
Here’s what’s going on in more detail:
- Set
ViewControlleras the delegate forUINavigationControllerDelegateandUIImagePickerController, since it must conform to both when using aUIImagePickerController. - Inside
presentImagePicker(), create aUIAlertControlleraction sheet to present a set of capture options to the user. - If the device has a camera, add a Take Photo button to
imagePickerActionSheet. Take Photo creates and presents an instance ofUIImagePickerControllerwith asourceTypeof.camera.
To finish off this function, replace // Insert here with:
// 1
let libraryButton = UIAlertAction(title: "Choose Existing",
  style: .default) { (alert) -> Void in
    let imagePicker = UIImagePickerController()
    imagePicker.delegate = self
    imagePicker.sourceType = .photoLibrary
    self.present(imagePicker, animated: true)
}
imagePickerActionSheet.addAction(libraryButton)
// 2
let cancelButton = UIAlertAction(title: "Cancel", style: .cancel)
imagePickerActionSheet.addAction(cancelButton)
// 3
present(imagePickerActionSheet, animated: true)
Here you do the following:
- Add a Choose Existing button to
imagePickerActionSheet. Choose Existing creates and presents an instance ofUIImagePickerControllerwith asourceTypeof.photoLibrary. - Add a cancel button to
imagePickerActionSheet. - Present your instance of
UIAlertController.
Finally find takePhoto(_:) and add the following:
presentImagePicker()
This makes sure to present the image picker when you tap Snap/Upload Image.
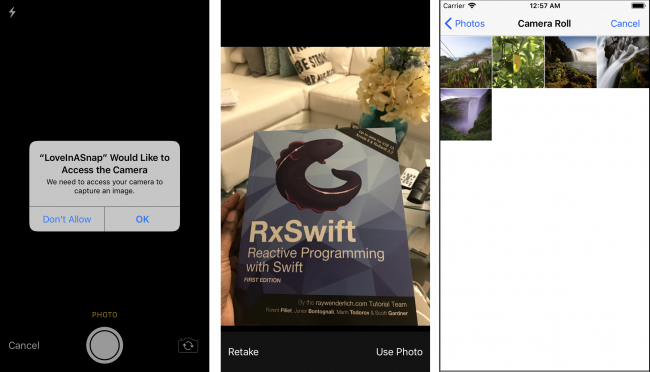
If you’re using your device, build, run and try to take a picture. Chances are your app will crash. That’s because the app hasn’t asked for permission to access your camera; so you’ll add the relevant permission requests next.
Request Permission to Access Images
In the project navigator, navigate to LoveInASnap‘s Info.plist located in Supporting Files. Hover over the Information Property List header and tap + to add Privacy – Photo Library Usage Description and Privacy – Camera Usage Description keys to the table. Set their values to the text you’d like to display to the user alongside the app’s photo library usage and camera usage requests.
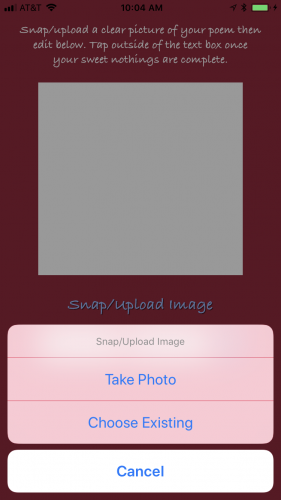
Build and run your project, tap Snap/Upload Image and you should see your new UIAlertController like so:
Note: If you’re using the simulator, there’s no physical camera available so you won’t see the Take Photo option.
If you tap Take Photo and grant the app permission to access the camera if prompted, you should now be able to take a picture. If you tap Choose Existing and grant the app permission to access the photo library if prompted, you should now be able to select an image.
Choose an image though, and your app will currently do nothing with it. You’ll need to do some more prep before Tesseract is ready to process it.
As mentioned in the list of Tesseract’s limitations, images must be within certain size constraints for optimal OCR results. If an image is too big or too small, Tesseract may return bad results or even crash the entire program with an EXC_BAD_ACCESS error.
So you’ll need to create a method to resize the image without altering its aspect ratio.
Scaling Images to Preserve Aspect Ratio
The aspect ratio of an image is the proportional relationship between its width and height. Therefore, to reduce the size of the original image without affecting the aspect ratio, you must keep the width to height ratio constant.
When you know both the height and width of the original image, and you know either the desired height or width of the final image, you can rearrange the aspect ratio equation as follows:
So height2 = Height1/Width1 * width2 and, conversely, width2 = Width1/Height1 * height2. You’ll use these formulas to maintain the image’s aspect ratio in your scaling method.
Open ViewController.swift and add the following helper method within a UIImage extension at the bottom of the file:
// MARK: - UIImage extension
extension UIImage {
  func scaleImage(_ maxDimension: CGFloat) -> UIImage? {

    var scaledSize = CGSize(width: maxDimension, height: maxDimension)

    if size.width > size.height {
      let scaleFactor = size.height / size.width
      scaledSize.height = scaledSize.width * scaleFactor
    } else {
      let scaleFactor = size.width / size.height
      scaledSize.width = scaledSize.height * scaleFactor
    }

    UIGraphicsBeginImageContext(scaledSize)
    draw(in: CGRect(origin: .zero, size: scaledSize))
    let scaledImage = UIGraphicsGetImageFromCurrentImageContext()
    UIGraphicsEndImageContext()

    return scaledImage
  }
}
In scaleImage(_:), take the height or width of the image — whichever is greater — and set that dimension equal to the maxDimension argument. Next, to maintain the image’s aspect ratio, scale the other dimension accordingly. Next, redraw the original image into the new frame. Finally, return the scaled image back to the calling function.
Whew! </math>
Now you’ll need to create a way to find out which image the user selected.
Fetching the Image
Within the UIImagePickerControllerDelegate extension, add the following below presentImagePicker():
// 1
func imagePickerController(_ picker: UIImagePickerController,
  didFinishPickingMediaWithInfo info: [String : Any]) {
  // 2
  if let selectedPhoto = info[UIImagePickerControllerOriginalImage] as? UIImage,
    let scaledImage = selectedPhoto.scaleImage(640) {
    // 3
    activityIndicator.startAnimating()
    // 4
    dismiss(animated: true, completion: {
      self.performImageRecognition(scaledImage)
    })
  }
}
Here’s what’s happening:
imagePickerController(_:didFinishPickingMediaWithInfo:)is aUIImagePickerControllerDelegatefunction. When the user selects an image, this method returns the image information in aninfodictionary object.- Unwrap the image contained within the
infodictionary with the keyUIImagePickerControllerOriginalImage. Then resize that image so that its width and height are less than 640. (640 points since it returned the best results through our trial and error experimentation.) Unwrap that scaled image as well. - Start animating the activity indicator to show that Tesseract is at work.
- Dismiss the
UIImagePickerand pass the image toperformImageRecognitionfor processing.
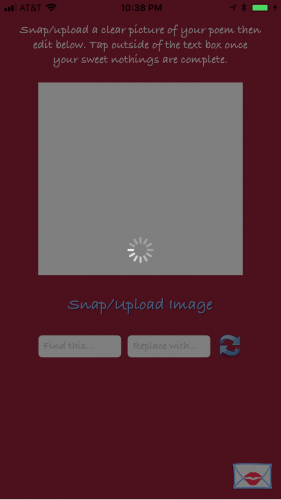
Build, run, tap Snap/Upload Image and select any image from your camera roll. The activity indicator should now appear and animate indefinitely.
You’ve now triggered the activity indicator, but how about the activity it’s supposed to indicate? Without further ado (…drumroll please…) you can finally start using Tesseract OCR!
Using Tesseract OCR
Open ViewController.swift and immediately below import UIKit, add the following:
import TesseractOCR
This will import the Tesseract framework allowing objects within the file to utilize it.
Next, add the following code to the top of performImageRecognition(_:):
// 1
if let tesseract = G8Tesseract(language: "eng+fra") {
  // 2
  tesseract.engineMode = .tesseractCubeCombined
  // 3
  tesseract.pageSegmentationMode = .auto
  // 4
  tesseract.image = image.g8_blackAndWhite()
  // 5
  tesseract.recognize()
  // 6
  textView.text = tesseract.recognizedText
}
// 7
activityIndicator.stopAnimating()
This is where the OCR magic happens! Here’s a detailed look at each part of the code:
- Initialize a new
G8Tesseractobject with eng+fra, i.e. the English and French data. The sample poem you’ll be using for this tutorial contains a bit of French (Très romantique!), so adding the French data will help Tesseract recognize French vocabulary and output accented characters. - There are three OCR engine modes:
.tesseractOnlyis the fastest, but least accurate..cubeOnly, is slower but more accurate since it uses more artificial intelligence..tesseractCubeCombinedruns both.tesseractOnlyand.cubeOnly; and thus it’s the slowest mode of the three. For this tutorial, you’ll use.tesseractCubeCombinedsince it’s the most accurate. - Tesseract assumes by default that it’s processing a uniform block of text. Since your sample poem has paragraph breaks though, it’s not uniform. Set
pageSegmentationModeto.autoso Tesseract can automatically recognize paragraph breaks. - The more contrast there is between the text and the background, the better the results. Use Tesseract’s built-in
g8_blackAndWhitefilter to desaturate, increase the contrast, and reduce the exposure oftesseract‘s image. - Perform the optical character recognition.
- Put the recognized text into
textView. - Remove the activity indicator to signal that OCR is complete.
Now it’s time to test this first batch of code and see what happens!
Processing Your First Image
Here’s the sample image for this tutorial as found in OCR_Tutorial_Resources\Images\Lenore.png:
Lenore.png contains an image of a love poem addressed to a “Lenore”, but with a few edits, it’s sure to capture the attention of the one you desire! :]
If you’re running the app from a device with a camera, you could snap a picture of the poem to perform the OCR. But for the sake of this tutorial, add the image to your device’s camera roll so you can upload it from there. This way, you can avoid lighting inconsistencies, skewed text, flawed printing, etc.
Note: If you’re using a simulator, drag and drop the image file onto the simulated device to add it to your camera roll.
Build and run your app. Select Snap/Upload Image then select Choose Existing. Allow the app to access your photos if prompted, then choose the sample image from your photo library.
And… Voila! The deciphered text should appear in the text view after a few seconds.
But if the apple of your eye isn’t named “Lenore”, he or she may not appreciate this poem as is. And considering “Lenore” appears quite often in the text, customizing the poem to your tootsie’s liking is going to take a bit of work…
What’s that, you say? Yes, you COULD add a function to find and replace these words. Brilliant idea! The next section shows you how to do just that.
Finding and Replacing Text
Now the OCR engine has turned the image into text, you can treat it as you would any other string.
As you’ll recall, ViewController.swift already contains a swapText function triggered by the app’s swap button. How convenient. :]
Find swapText(_:), and add the following code below view.endEditing(true):
// 1
guard let text = textView.text,
  let findText = findTextField.text,
  let replaceText = replaceTextField.text else {
    return
}

// 2
textView.text =
  text.replacingOccurrences(of: findText, with: replaceText)
// 3
findTextField.text = nil
replaceTextField.text = nil
The above code is pretty straightforward, but take a moment to walk through it step-by-step:
- Only execute the swap code if
textView,findTextField, andreplaceTextFieldaren’tnil. - Within the text view, replace all occurances of
findTextField‘s text withreplaceTextField‘s text. - Erase the values in
findTextFieldandreplaceTextFieldonce the replacements are complete.
Build and run your app, upload the sample image again and let Tesseract do its thing. Once the text appears, enter Lenore in the Find this… field and enter your true love’s name in the Replace with… field. (Note that find and replace are case-sensitive.) Tap the swap button to complete the switch-a-roo.
Presto chango — you’ve created a love poem custom-tailored to your sweetheart.
Swap other words as desired to add your own artistic flare.
Bravo! Such artistic creativity and bravery shouldn’t live on your device alone. You’ll need some way to share your masterpiece with the world.
Sharing The Final Result
To make your poem shareable, add the following within sharePoem():
// 1
if textView.text.isEmpty {
  return
}
// 2
let activityViewController = UIActivityViewController(activityItems:
  [textView.text], applicationActivities: nil)
// 3
let excludeActivities:[UIActivityType] = [
  .assignToContact,
  .saveToCameraRoll,
  .addToReadingList,
  .postToFlickr,
  .postToVimeo]
activityViewController.excludedActivityTypes = excludeActivities
// 4
present(activityViewController, animated: true)
Taking each numbered comment in turn:
- If
textViewis empty, don’t share anything. - Otherwise, initialize a new
UIActivityViewControllerwith the text view’s text. UIActivityViewControllerhas a long list of built-in activity types. Here you’ve excluded the ones that are irrelevant in this context.- Present your
UIActivityViewControllerto allow the user to share their creation in the manner they wish.
Once more, build and run the app. Upload and process the sample image. Find and replace text as desired. Then when you’re happy with your poem, tap the envelope to view your share options and send your ode via whatever channel you see fit.
That’s it! Your Love In A Snap app is complete — and sure to win over the heart of the one you adore.
Or if you’re anything like me, you’ll replace Lenore’s name with your own, send that poem to your inbox through a burner account, stay in alone, have a glass of wine, get a bit bleary-eyed, then pretend that email you received is from the Queen of England for an especially classy and sophisticated evening full of romance, comfort, mystery, and intrigue… But maybe that’s just me…
Where to Go From Here?
Download the final version of the project here.
You can find the iOS wrapper for Tesseract on GitHub at https://github.com/gali8/Tesseract-OCR-iOS. You can download more language data from Google’s Tesseract OCR site. (Use language data versions 3.02 or higher to guarantee compatibility with the current framework.)

Examples of potentially problematic image inputs you can correct for improved results. Source: Google’s Tesseract OCR site
As you further explore OCR, remember: “Garbage In, Garbage Out”. The easiest way to improve the quality of the output is to improve the quality of the input, for example:
- Add image pre-processing.
- Run your image through multiple filters then compare the results to determine the most accurate output.
- Create your own artificial intelligence logic, such as neural networks.
- Use Tesseract’s own training tools to help your program learn from its errors and improve its success rate over time.
Chances are you’ll get the best results by combining strategies, so try different approaches and see what works best.
As always, if you have comments or questions on this tutorial, Tesseract, or OCR strategies, feel free to join the discussion below!
The post Tesseract OCR Tutorial for iOS appeared first on Ray Wenderlich.


