 On an app running on the iPad, it rarely makes sense to have a full-screen table view like you do so often on iPhone – there’s just too much space. To better use that space,
 UISplitViewController comes to the rescue.
The split view lets you carve up the screen into two sections and display a view controller on each side. It’s typically used to display navigation on the left hand side, and a detail view on the right hand side. Since iOS 8, the split view controller works on both iPad and iPhone.
In this UISplitViewController tutorial, you’ll make a universal app from scratch that makes use of a split view controller to display a list of monsters from Math Ninja, one of the games developed by the team here at Razeware. You’ll use a split view controller to handle the navigation and display, which will adapt to work on both iPhone and iPad.
This UISplitViewController tutorial focuses on split view controllers; you should already be familiar with the basics of Auto Layout and storyboards before continuing.
Getting Started
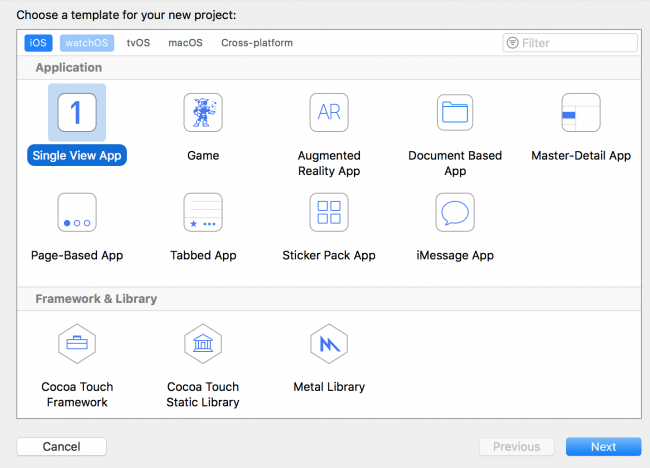
Create a new Project in Xcode, and choose the iOS\Application\Single View App template.
Name the project MathMonsters. Leave language as Swift. Uncheck all the checkboxes. Then click on Next to finish creating the project.
Although you could use the Master-Detail App template as a starting point, you are going to start from scratch with the Single View App template. This is so you can get a better understanding of exactly how the UISplitViewController works. This knowledge will be helpful as you continue to use UISplitViewController in future projects.
Open Main.storyboard.
Delete the initial View Controller that is placed there by default in the storyboard. Delete ViewController.swift.
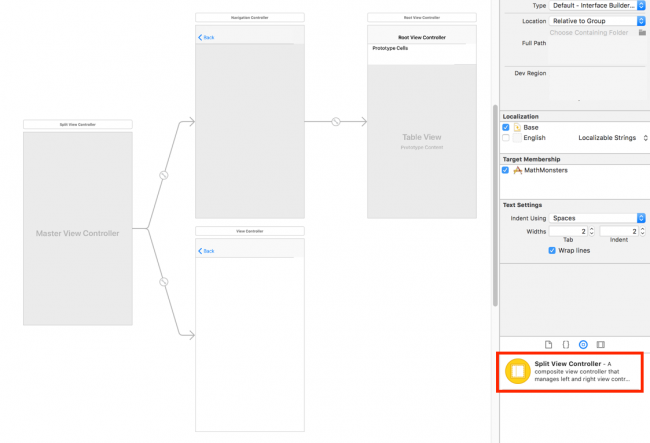
Drag a Split View Controller into the empty storyboard:
This will add several elements to your storyboard:
- A Split View Controller. This is the root view of your application – the split view that will contain the entire rest of the app.
- A Navigation Controller. This represents the
UINavigationControllerthat will be the root view of your master view controller (ie, the left pane of the split view when on iPad or Landscape iPhone 8 Plus). If you look in the split view controller, you’ll see the navigation controller has a relationship segue of master view controller. This allows you to create an entire navigation hierarchy in the master view controller without needing to affect the detail view controller at all. - A View Controller. This will eventually display all the details of the monsters. If you look in the split view controller, you will see the view controller has a relationship segue of detail view controller:
- A Table View Controller. This is the root view controller of the master
UINavigationController. This will eventually display the list of monsters.
Since you deleted the default initial view controller from the storyboard, you need to tell the storyboard that you want your split view controller to be the initial view controller.
Select the Split View Controller and open the Attributes inspector. Check the Is Initial View Controller option.
You will see an arrow to the left of the split view controller, which tells you it is the initial view controller of this storyboard.
Build and run the app on an iPad simulator, and rotate your simulator to landscape.
You should see an empty split view controller:
Now run it on an iPhone simulator (any of them except a plus-sized phone, which is large enough that it will act just like the iPad version) and you will see that it starts off showing the detail view in full screen. It will also allows you to tap the back button on the navigation bar to pop back to the master view controller:
On iPhones other than an iPhone Plus in landscape, a split view controller will act just like a traditional master-detail app with a navigation controller pushing and popping back and forth. This functionality is built-in and requires very little extra configuration from you, the developer. Hooray!
You’re going to want to have your own view controllers shown instead of these default ones, so let’s get started creating those.
Creating Custom View Controllers
The storyboard has the view controller hierarchy set up – split view controller with its master and detail view controllers. Now you’ll need to implement the code side of things to get some data to show up.
Go to File\New\File… and choose the iOS\Source\Cocoa Touch Class template. Name the class MasterViewController, make it a subclass of UITableViewController, make sure the Also create XIB file checkbox is unchecked, and Language is set to Swift. Click Next and then Create.
Open MasterViewController.swift.
Scroll down to numberOfSections(in:). Delete this method. This method is not needed when only ever one section is returned.
Next, find tableView(_:numberOfRowsInSection:) and replace the implementation with the following:
override func tableView(_ tableView: UITableView, numberOfRowsInSection section: Int) -> Int {
  return 10
}
Finally, uncomment tableView(_:cellForRowAt:) and replace its implementation with the following:
override func tableView(_ tableView: UITableView, cellForRowAt indexPath: IndexPath) -> UITableViewCell {
  let cell = tableView.dequeueReusableCell(withIdentifier: "Cell", for: indexPath)
  return cell
}
This way, you’ll just have 10 empty rows to look at when you test this thing out later.
Open Main.storyboard. Select the Root View Controller. Click on the Identity inspector. Change the class to MasterViewController.
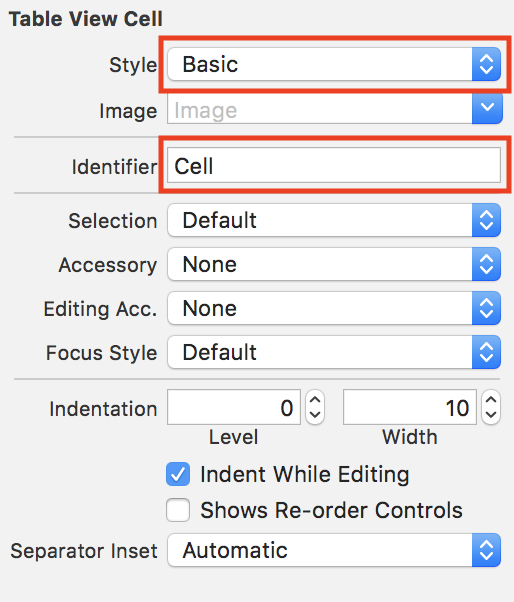
In addition, you need to make sure the prototype cell in the table view is given a reuse identifier, or it will cause a crash when the storyboard tries to load.
Within the Master View Controller, select the Prototype Cell. Change the Identifier to Cell. Change the cell Style to Basic.
Now, you’ll create the view controller for the detail side.
Go to File\New\File… and choose the iOS\Source\Cocoa Touch Class template. Name the class DetailViewController, make it a subclass of UIViewController, and make sure the Also create XIB file checkbox is unchecked and the Language is set to Swift. Click Next and then Create.
Open Main.storyboard, and select the view controller in the View Controller Scene. Click on the Identity inspector. Change the Class to DetailViewController.
Then drag a label into the middle of the detail view controller. Pin the label to the horizontal and vertical centers of the container with Auto Layout.

Double-click the label to change its text to say Hello, World! so you will know it’s working when you test it out later.
Build and run. At this point you should see your custom view controllers.
On iPad:
On iPhone:
Making Your Model
The next thing you need to do is define a model for the data you want to display. You don’t want to complicate things while learning the basics of split view controllers, so you’re going with a simple model with no data persistence.
First, make a class representing the monsters you want to display. Go to File\New\File…, select the iOS\Source\Swift File template, and click Next. Name the file Monster and click Create.
You’re just going to create a simple class with some attribute properties about each monster you want to display, and a couple of methods for creating new monsters and accessing the image for the weapon each monster has.
Replace the contents of Monster.swift with the following:
import UIKit

enum Weapon {
  case blowgun, ninjaStar, fire, sword, smoke
}

class Monster {
  let name: String
  let description: String
  let iconName: String
  let weapon: Weapon

  init(name: String, description: String, iconName: String, weapon: Weapon) {
    self.name = name
    self.description = description
    self.iconName = iconName
    self.weapon = weapon
  }

  var weaponImage: UIImage {
    switch weapon {
    case .blowgun:
      return UIImage(named: "blowgun.png")!
    case .fire:
      return UIImage(named: "fire.png")!
    case .ninjaStar:
      return UIImage(named: "ninjastar.png")!
    case .smoke:
      return UIImage(named: "smoke.png")!
    case .sword:
      return UIImage(named: "sword.png")!
    }
  }

  var icon: UIImage? {
    return UIImage(named: iconName)
  }
}
This file defines an enumeration to track the different kinds of weapons, and then a class to hold the monster information. There’s a simple initializer to create Monster instances, and a convenience method to get an image corresponding to the monster’s weapon.
That’s it for defining the model – so next let’s hook it up to your master view!
Displaying the Monster List
Open up MasterViewController.swift and add a new property to the class:
let monsters = [
  Monster(name: "Cat-Bot", description: "MEE-OW",
          iconName: "meetcatbot", weapon: .sword),
  Monster(name: "Dog-Bot", description: "BOW-WOW",
          iconName: "meetdogbot", weapon: .blowgun),
  Monster(name: "Explode-Bot", description: "BOOM!",
          iconName: "meetexplodebot", weapon: .smoke),
  Monster(name: "Fire-Bot", description: "Will Make You Steamed",
          iconName: "meetfirebot", weapon: .ninjaStar),
  Monster(name: "Ice-Bot", description: "Has A Chilling Effect",
          iconName: "meeticebot", weapon: .fire),
  Monster(name: "Mini-Tomato-Bot", description: "Extremely Handsome",
          iconName: "meetminitomatobot", weapon: .ninjaStar)
]
This holds the array of monsters to populate the table view.
Find tableView(_:numberOfRowsInSection:) and replace the return statement with the following:
return monsters.count
This will return the number of monsters based on the size of the array.
Next, find tableView(_:cellForRowAtIndexPath:) and add the following code before the final return statement:
let monster = monsters[indexPath.row]
cell.textLabel?.text = monster.name
This will configure the cell based on the correct monster. That’s it for the table view, which will simply show each monster’s name.
Download and unzip this art pack. Drag the folder containing those images into Assets.xcassets in Xcode.
Build and run the app.
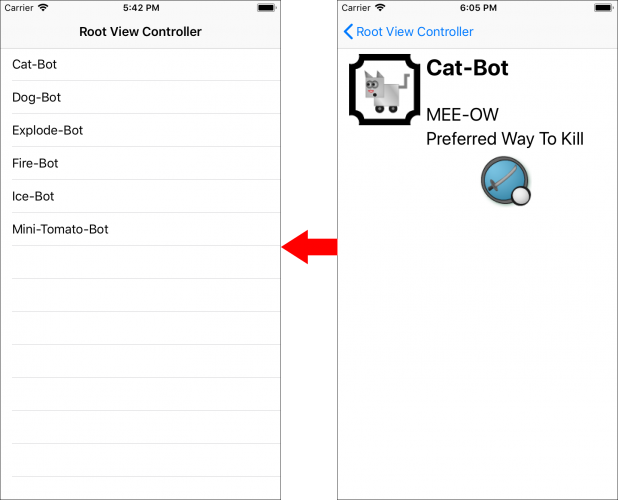
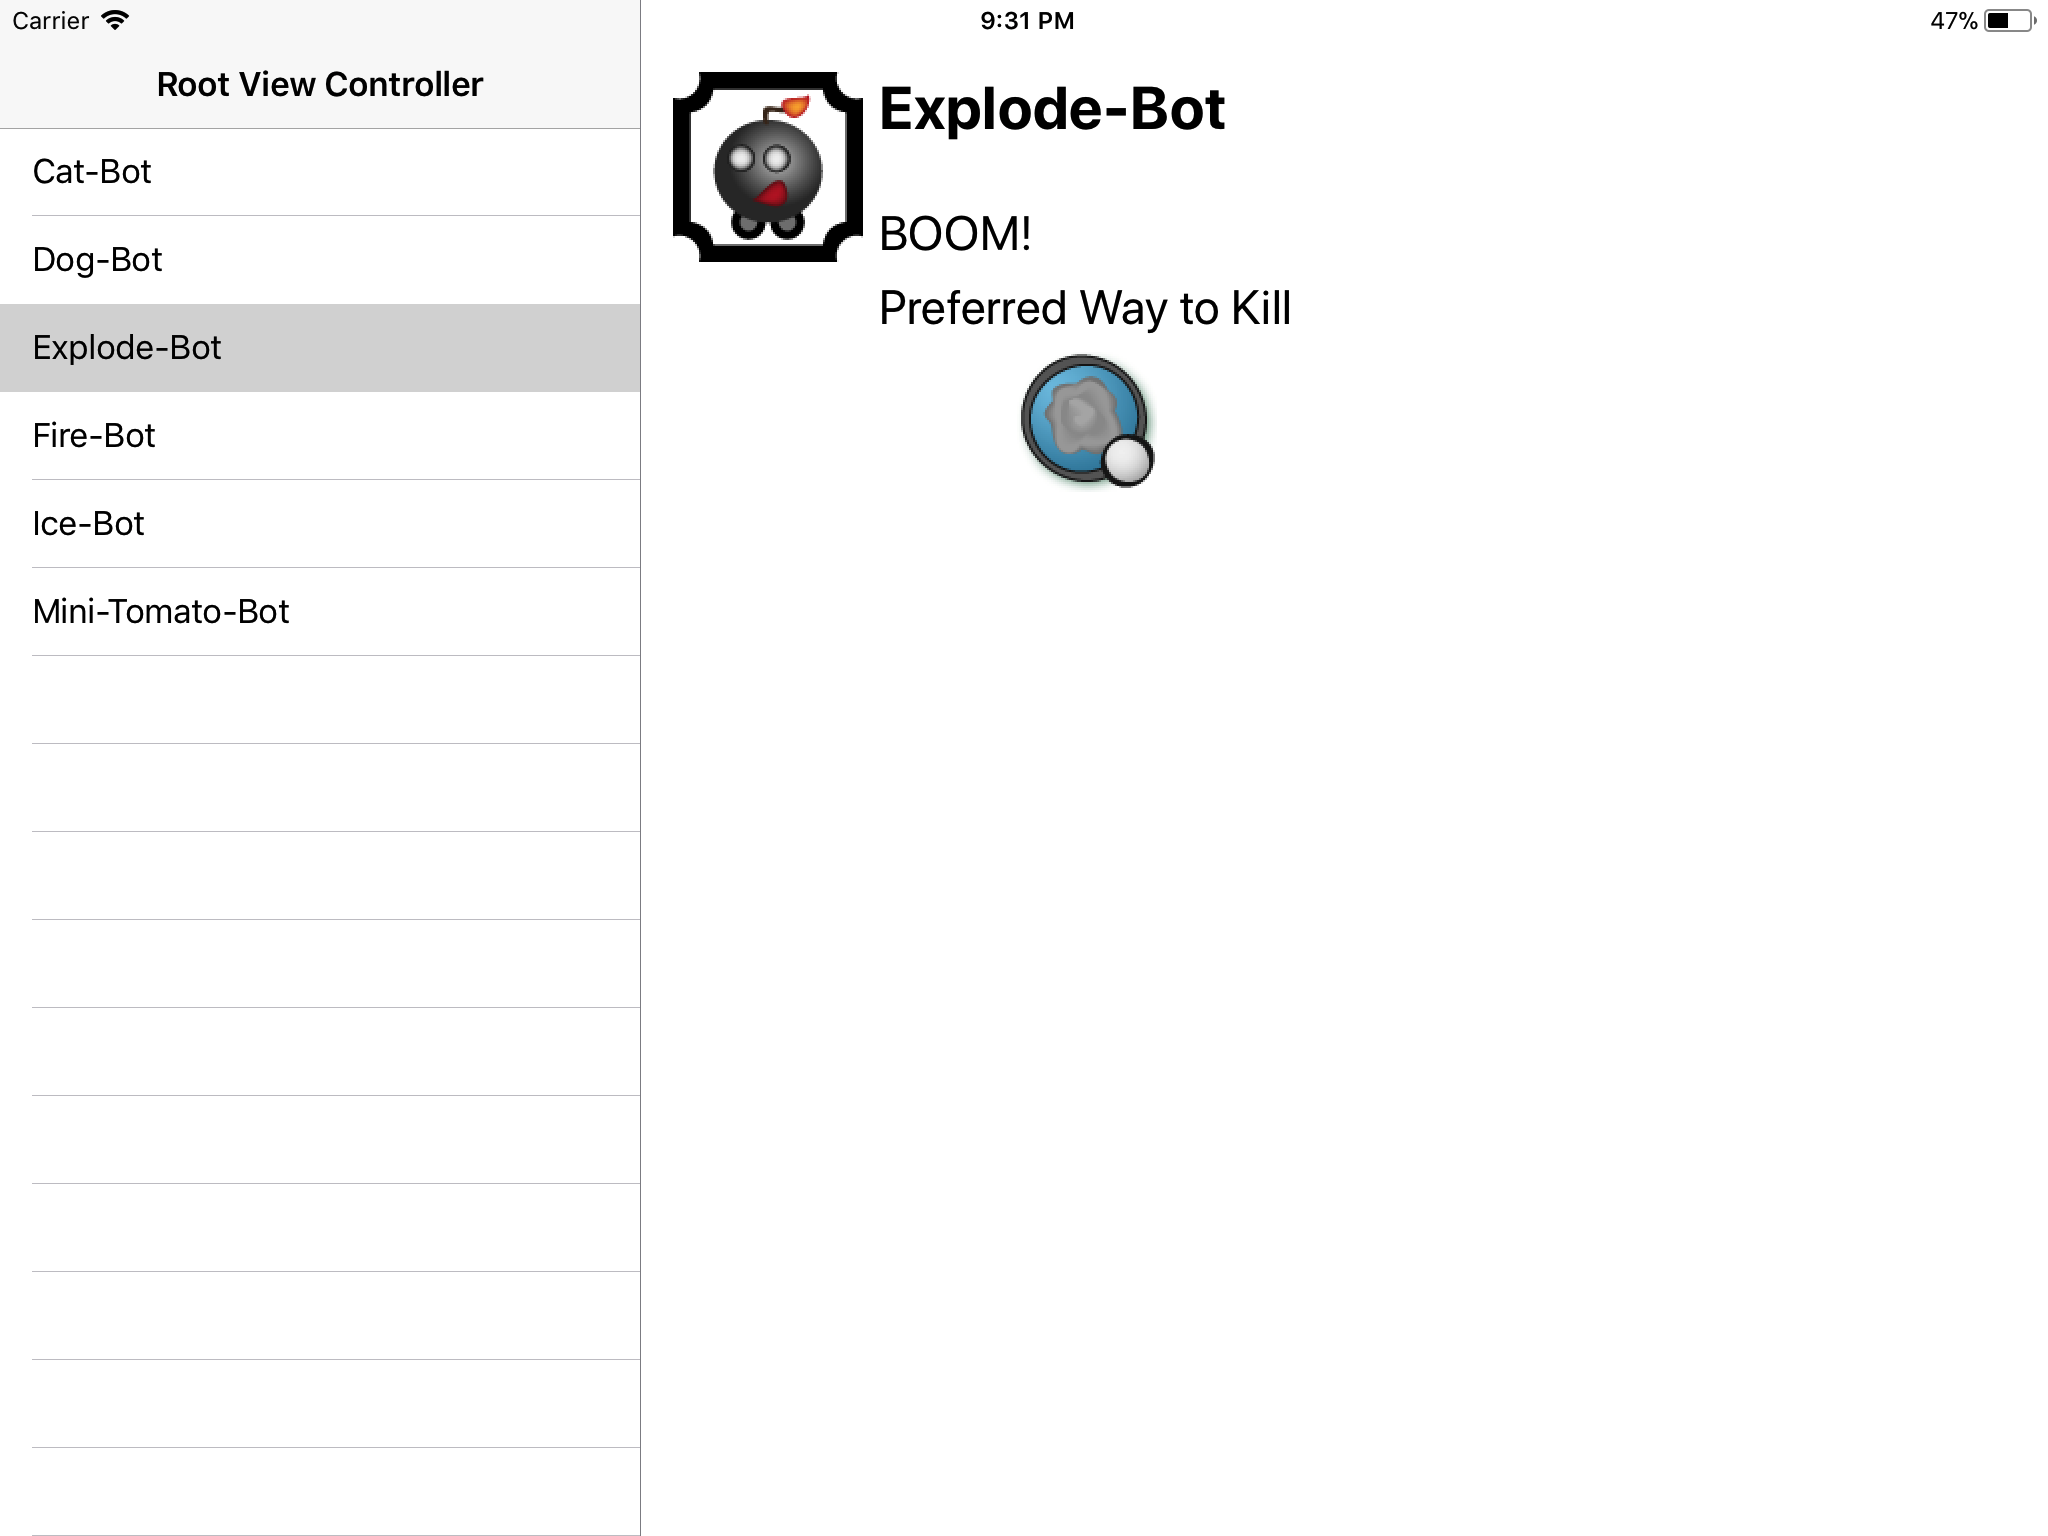
You should see the list of monster bots on the left hand side on landscape iPad:
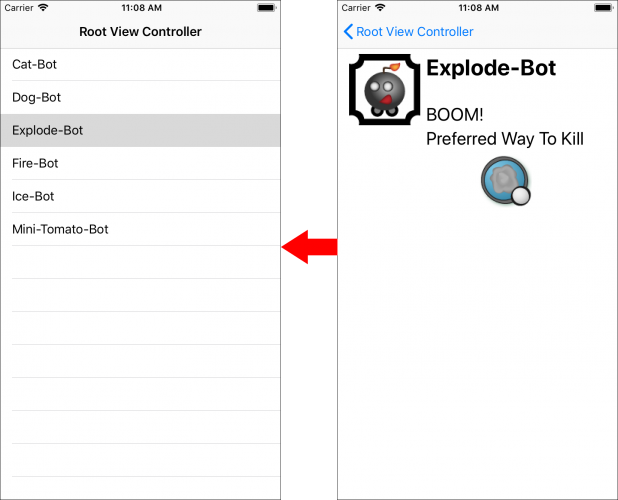
On iPhone:
Remember that on a compact-width iPhone, you start one level deep already in the navigation stack on the detail screen. You can tap the back button to see the table view.
Displaying Bot Details
Now that the table view is showing the list of monsters, it’s time to get the detail view in order.
Open Main.storyboard, select Detail View Controller and delete the label you put down earlier.
Using the screenshot below as a guide, drag the following controls into the DetailViewController’s view:
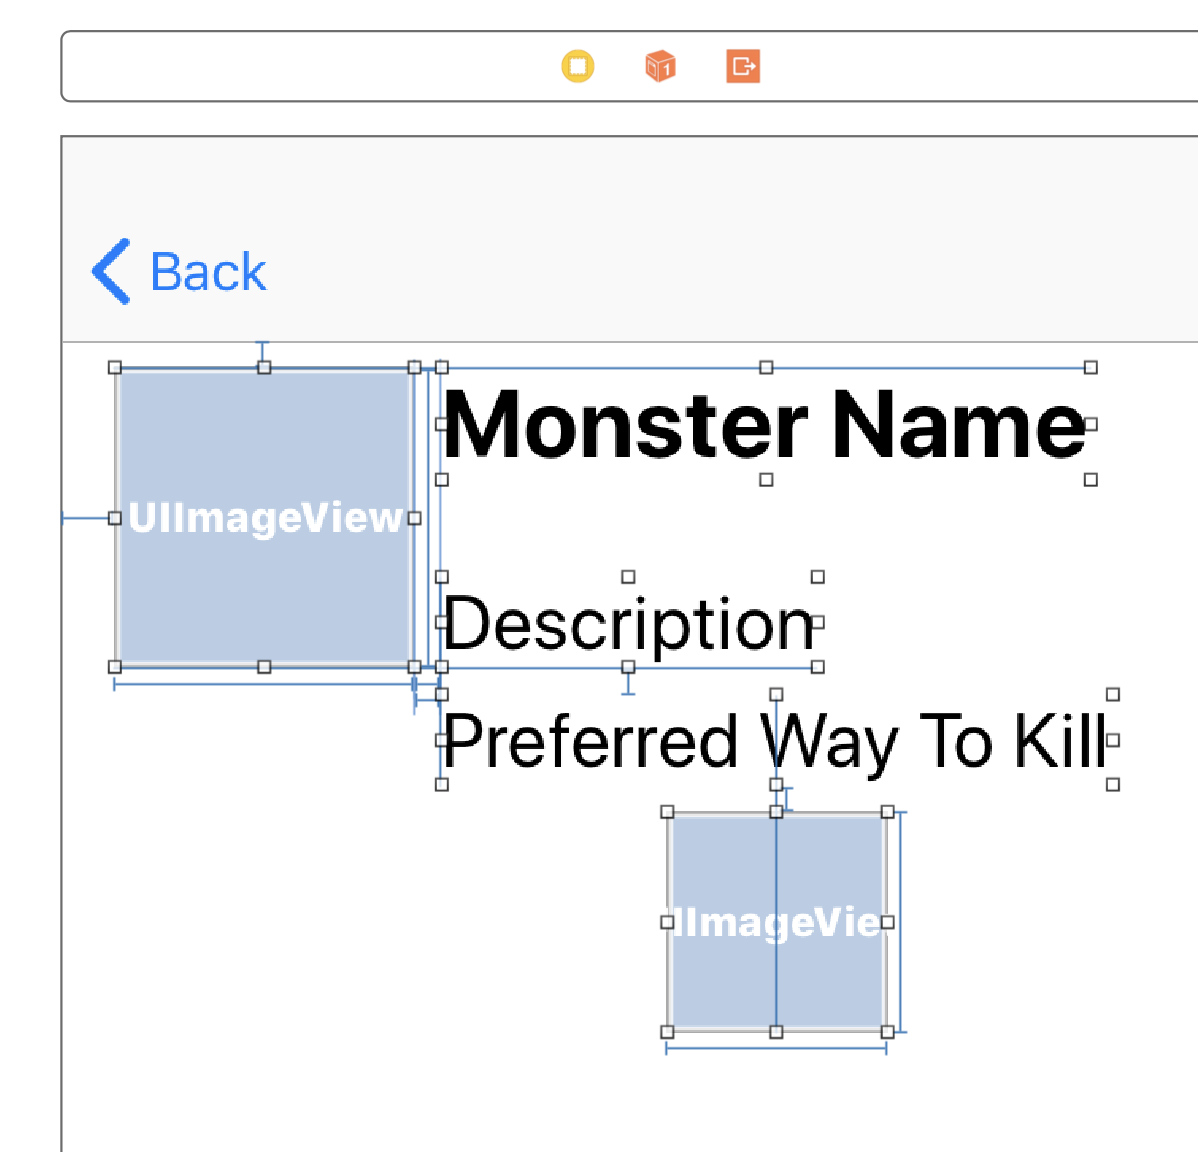
- A 95×95 image view for displaying the monster’s image in the upper left hand corner.
- A label aligned with the top of the image view with font System Bold, size 30, and with the text “Monster Name”
- Two labels underneath, with font System, size 24. One label should be bottom aligned with the image view; the other label should be below the first label. They should have their left edges aligned, and titles “Description” and “Preferred Way To Kill”
- A 70×70 image view for displaying the weapon image, horizontally center aligned with the “Preferred way to Kill” label.
Need some more hints? Open the spoilers below for the set of constraints I used to make the layout.
Getting Auto Layout to use the proper constraints is especially important since this app is universal, and Auto Layout is what ensures the layout adapts well to both iPad and iPhone.
That’s it for Auto Layout for now. Next, you will need to hook these views up to some outlets.
Open DetailViewController.swift and add the following properties to the top of the class:
@IBOutlet weak var nameLabel: UILabel!
@IBOutlet weak var descriptionLabel: UILabel!
@IBOutlet weak var iconImageView: UIImageView!
@IBOutlet weak var weaponImageView: UIImageView!

var monster: Monster? {
  didSet {
    refreshUI()
  }
}
Here you added properties for the various UI elements you just added which need to dynamically change. You also added a property for the Monster object this view controller should display.
Next, add the following helper method to the class:
func refreshUI() {
  loadViewIfNeeded()
  nameLabel.text = monster?.name
  descriptionLabel.text = monster?.description
  iconImageView.image = monster?.icon
  weaponImageView.image = monster?.weaponImage
}
Whenever you switch the monster, you’ll want the UI to refresh itself and update the details displayed in the outlets. It’s possible that you’ll change monster and trigger the method even before the view has loaded, so you call loadViewIfNeeded() to guarantee that the view is loaded and its outlets are connected.
Now, go open up Main.storyboard. Right-click the Detail View Controller object from the Document Outline to display the list of outlets. Drag from the circle at the right of each item to the view to hook up the outlets.
Remember, the icon image view is the big image view in the top left, while the weapon image view is the smaller one underneath the “Preferred Way To Kill” label.
Go to to AppDelegate.swift and replace the implementation of application(_:didFinishLaunchingWithOptions:) with the following:
guard let splitViewController = window?.rootViewController as? UISplitViewController,
  let leftNavController = splitViewController.viewControllers.first as? UINavigationController,
  let masterViewController = leftNavController.topViewController as? MasterViewController,
  let detailViewController = splitViewController.viewControllers.last as? DetailViewController
  else { fatalError() }

let firstMonster = masterViewController.monsters.first
detailViewController.monster = firstMonster

return true
A split view controller has an array property viewControllers that has the master and detail view controllers inside. The master view controller in your case is actually a navigation controller, so you get the top view controller from that to get your MasterViewController instance. From there, you can set the current monster to the first one in the list.
Build and run the app, and if all goes well you should see some monster details on the right.
On iPad Landscape:
and iPhone:
Note that selecting a monster on the MasterViewController does nothing yet and you’re stuck with Cat-Bot forever. That’s what you’ll work on next!
Hooking Up The Master With the Detail
There are many different strategies for how to best communicate between these two view controllers. In the Master-Detail App template, the master view controller has a reference to the detail view controller. That means the master view controller can set a property on the detail view controller when a row gets selected.
That works fine for simple applications where you only ever have one view controller in the detail pane, but you’re going to follow the approach suggested in the UISplitViewController class reference for more complex apps and use a delegate.
Open MasterViewController.swift and add the following protocol definition above the MasterViewController class definition:
protocol MonsterSelectionDelegate: class {
  func monsterSelected(_ newMonster: Monster)
}
This defines a protocol with a single method, monsterSelected(_:). The detail view controller will implement this method, and the master view controller will message it when a monster is selected.
Next, update MasterViewController to add a property for an object conforming to the delegate protocol:
weak var delegate: MonsterSelectionDelegate?
Basically, this means that the delegate property is required to be an object that has monsterSelected(_:) implemented. That object will be responsible for handling what needs to happen within its view after the monster was selected.
weak to avoid a retain cycle. To learn more about retain cycles in Swift, check out the Memory Management video in our Intermediate Swift video tutorial series.Since you want DetailViewController to update when the monster is selected, you need to implement the delegate.
Open up DetailViewController.swift and add a class extension to the very end of the file:
extension DetailViewController: MonsterSelectionDelegate {
  func monsterSelected(_ newMonster: Monster) {
    monster = newMonster
  }
}
Class extensions are great for separating out delegate protocols and grouping the methods together. In this extension, you are saying DetailViewController conforms to MonsterSelectionDelegate and then you implement the one required method.
Now that the delegate method is ready, you need to call it from the master side.
Open MasterViewController.swift and add the following method:
override func tableView(_ tableView: UITableView, didSelectRowAt indexPath: IndexPath) {
  let selectedMonster = monsters[indexPath.row]
  delegate?.monsterSelected(selectedMonster)
}
Implementing tableView(_:didSelectRowAt:) means you’ll be notified whenever the user selects a row in the table view. All you need to do is notify the monster selection delegate of the new monster.
Finally, open AppDelegate.swift. In application(_:didFinishLaunchingWithOptions:), add the following code just before the final return statement:
masterViewController.delegate = detailViewController
That’s the final connection between the two view controllers.
Build and run the app on iPad, and you should now be able to select between the monsters like the following:
So far so good with split views! Except there’s one problem left – if you run it on iPhone, selecting monsters from the master table view does not show the detail view controller. You now need to add make a small modification to make sure that the split view works on iPhone, in addition to iPad.
Open up MasterViewController.swift. Find tableView(_:didSelectRowAt:) and add the following to the end of the method:
if let detailViewController = delegate as? DetailViewController {
  splitViewController?.showDetailViewController(detailViewController, sender: nil)
}
First, you need to make sure the delegate is set and that it is a DetailViewController instance as you expect. You then call showDetailViewController(_:sender:) on the split view controller and pass in the detail view controller. Every subclass of UIViewController has an inherited property splitViewController, which will refer to it’s containing view controller, if one exists.
This new code only changes the behavior of the app on iPhone, causing the navigation controller to push the detail controller onto the stack when you select a new monster. It does not alter the behavior of the iPad implementation, since on iPad the detail view controller is always visible.
After making this change, run it on iPhone and it should now behave properly. Adding just a few lines of code got you a fully functioning split view controller on both iPad and iPhone. Not bad!
Split View Controller in iPad Portrait
Run the app in iPad in portrait mode. At first it appears there is no way to get to the left menu, but try swiping from the left side of the screen. Pretty cool huh? Tap anywhere outside of the menu to hide it.
That built in swipe functionality is pretty cool, but what if you want to have a navigation bar up top with a button that will display the menu, similar to how it behaves on the iPhone? To do that, you will need to make a few more small modifications to the app.
First, open Main.storyboard and embed the Detail View Controller into a Navigation Controller. You can do this by selecting the Detail View Controller and then selecting Editor/Embed In/Navigation Controller.
Your storyboard will now look like this:
Now open MasterViewController.swift and find tableView(_:didSelectRowAt:). Change the if block with the call to showDetailViewController(_:sender:) to the following:
if let detailViewController = delegate as? DetailViewController,
  let detailNavigationController = detailViewController.navigationController {
  splitViewController?.showDetailViewController(detailNavigationController, sender: nil)
}
Instead of showing the detail view controller, you’re now showing the detail view controller’s navigation controller. The navigation controller’s root is the detail view controller anyway, so you’ll still see the same content as before, just wrapped in a navigation controller.
There are two final changes to make before you run the app.
First, in AppDelegate.swift update application(_:didFinishLaunchingWithOptions:) by replacing the single line initializing detailViewController with the following two lines:
let rightNavController = splitViewController.viewControllers.last as? UINavigationController,
let detailViewController = rightNavController.topViewController as? DetailViewController
Since the detail view controller is wrapped in a navigation controller, there are now two steps to access it.
Finally, add the following lines just before the final return statement:
detailViewController.navigationItem.leftItemsSupplementBackButton = true
detailViewController.navigationItem.leftBarButtonItem = splitViewController.displayModeButtonItem
This tells the detail view controller to replace its left navigation item with a button that will toggle the display mode of the split view controller. It won’t change anything when running on iPhone, but on iPad you will get a button in the top left to toggle the table view display. Run the app on iPad portrait and check it out:
Where To Go From Here?
Here’s an archive of the final project with all of the code you’ve developed so far.
For new apps, you’re likely just to use the Master-Detail template to save time, which gives you a split view controller to start. But now you’ve seen how to use UISplitViewController from the ground up and have a much better idea of how it works. Since you’ve seen how easy it is to get the master-detail pattern into your universal apps, go forth and apply what you’ve learned!
Check out our short video tutorial series on split view controllers if you’re interested in some more details on split view controllers across devices.
If you have any questions or comments, please join the forum discussion below!
The post UISplitViewController Tutorial: Getting Started appeared first on Ray Wenderlich.

