Update Note: This Dagger 2 tutorial is now up to date with the latest version of Android Studio, version 3.0.1, and uses Kotlin for app development. Update by Dario Coletto. Original tutorial by Joe Howard.
 The cry of “You must do dependency injection!” is heard throughout modern software development teams. With such an imposing name, Dependency Injection (or DI for short) can put a fright into any software developer.
It turns out that Dependency Injection is nowhere near as complex as its name implies. And it is a key tool for building software systems that are maintainable and testable. In the end, relying on dependency injection will simplify your code quite a bit and also allow for a clearer path to writing testable code.
In this tutorial, you’ll update an existing app named DroidWiki to use DI. The DroidWiki app is a simple wikipedia client for android, based on Dagger 2 and OkHttp 3. The Wikipedia API is based on MediaWiki, and you can find the documentation here. These API are public and there is no need to get API keys or other stuff. But you should definitely check out MediaWiki Etiquette.
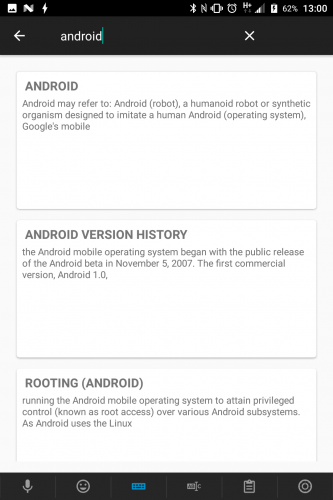
Here’s a quick peek at the search result screen in DroidWiki:
Introduction
Before we begin, if you don’t know what Dependency Injection is, here’s some great news: you’re probably already using it without knowing it!
What is Dependency Injection?
First, what is a dependency? Any non-trivial software program is going to contain components that pass information and send message calls back and forth between one another.
For example, when using an Object Oriented Programming language (such as Java/Kotlin on Android), objects will call methods on other objects that they have references to. A dependency is when one of the objects depends on the concrete implementation of another object.
Practical example of Dependency Injection
Consider a practical example in Kotlin code. You can identify a dependency in your code whenever you instantiate an object within another. In such a case, you are responsible for creating and configuring the object that is being created. For example, consider the following class Parent:
class Parent {
    private val child = Child()
}
A Parent instance creates its child field when it’s instantiated. The Parent instance is dependent on the concrete implementation of Child and on configuring the child field to use it.
This presents a coupling or dependency of the Parent class on the Child class. If the setup of a Child object is complex, all that complexity will be reflected within the Parent class as well. You will need to edit Parent to configure a Child object.
If the Child class itself depends on a class C, which in turn depends on class D, then all that complexity will propagate throughout the code base and hence result in a tight coupling between the components of the application.
Dependency Injection is the term used to describe the technique of loosening the coupling just described. In the simple example above, only one tiny change is needed:
class Parent(private val child: Child)
Voilà — that’s dependency injection at its core!
Rather than creating the child object inside the Parent class, the child object is passed into or injected into Parent‘s constructor. The responsibility for configuring child is elsewhere, and the Parent class is a consumer of the Child class.
The Dependency Inversion Principle
Dependency injection is often discussed in conjunction with one of the five SOLID principles of Object-Oriented Design: the Dependency Inversion principle. For a great introduction to the SOLID principles, particularly on Android, check out this post from Realm on Dependency Inversion.
The gist of the Dependency Inversion principle is that it is important to depend on abstractions rather than concrete implementations.
In the simple example above, this means changing Child to a Kotlin interface rather than a Kotlin class. With this change, many different types of concrete Child type objects that adhere to the Child interface can be passed into the Parent constructor. This presents several key benefits:
- Allows for the
Parentclass to be tested with various kinds ofChildobjects. - Mock
Childobjects can be used as needed in certain test scenarios. - Testing of
Parentis independent of the implementation ofChild.
How can Dagger 2 help with DI
Dagger 2 is the result of a collaboration between the team behind Guice (developed by Google) and Dagger (the predecessor of Dagger 2, created by Square).
They fixed a lot of problems from their previous work, and Dagger 2 is the faster framework for DI (since it works at compile time rather than at runtime with reflection).
Note: Dagger 2 is written in Java, but it works with Kotlin without any modification. However, the code generated by the annotation processor will be Java code (that is 100% interoperable with Kotlin).
The name “Dagger” is inspired in part by the nature of dependencies in software development. The web of dependencies that occur between objects such as Parent, Child, OtherClass, etc., create a structure called a Directed Acyclic Graph. Dagger 2 is used to simplify the creation of such graphs in your Java and Android projects.
Enough theory! Time to start writing some code.
Getting Started
Download the starter project here.
Open the starter app in Android Studio 3.0.1 or greater and if it prompts you to update your gradle version, go ahead and do so. Run the starter app in either an emulator or on a device, and you should see a screen like the following:

The app consists of three screens. The first one is just a splashscreen.
In the second one you’ll see an HTML version of the Wikipedia homepage, obtained through the WikiMedia API. The Toolbar at the top of the page contains a magnifier that, when tapped, will lead you to the third screen.
From there, you can type something to search on Wikipedia and press the search button to run a query. Results will be displayed as a list of CardViews inside a RecyclerView.
Examine the app project structure and existing classes. You’ll see that the app uses the Model-View-Presenter (MVP) pattern to structure the code. Besides Dagger 2, the app uses common Android libraries such as:
- OkHttp 3
- RecyclerView
- Kotlin synthetic properties
The subpackages in the main package are application, model, network, ui and utils. If you explore the ui package, you’ll see subpackages for the three screens. Except for the splashscreen, each other package has classes for the view and presenter classes for the screen.

By examining the app build.gradle file, you’ll also see that the app applies the plugin kotlin-android-extensions. It is used to implement view binding and kotlin-kapt for annotation processing.
MVP
In case you’re unfamiliar with the MVP pattern, there are many good online resources for getting started.
MVP is similar to other structural patterns for implementing separation of concerns. Examples are Model-View-Controller and Model-View-ViewModel. In MVP on Android, your activities and fragments typically act as the view objects. They do so by implementing a view interface and handling interaction of the app with the user.
The view passes on user actions to the presenter, which handles the business logic and interaction with data repositories, such as a server API or database. The model layer consists of the objects that make up the content of the app.
In the case of DroidWiki, the HomepageActivity class implements the HomepageView interface. HomepageActivity has a reference to a HomepagePresenter interface. This controls access to model objects of type Homepage
The use of OkHttp 3 is found in the WikiApi class in the network package. This class defines the interface to the WikiMedia API required by the app. There are two calls of type GET defined and the JSONObject will let you parse the obtained responses. The parsing will be executed in the HomepageResult and the SearchResult classes. And you will get a WikiHomepage object and a list of Entry objects.
Note: Since Kotlin doesn’t need you to write getters and setters, you can replace POJO classes with a data class. For more information, see the official kotlin data classes documentation.
Dependencies in DroidWiki
Open the HomepageActivity class in the ui.homepage package. In its onCreate() method, there are several calls to configure a HomepagePresenter:
private val presenter: HomepagePresenter = HomepagePresenterImpl()
...
presenter.setView(this)
presenter.loadHomepage()
Here, you create a concrete implementation of a HomepagePresenter when the activity is instantiated.
Open HomepagePresenterImpl.kt and take a look at loadHomepage(). Both an OkHttpClient object and a WikiApi object are created and configured in the loadHomepage() method. The same happens for the SearchActivity with an EntryPresenter and a list of EntryView.
This creation of dependencies couple the model, view, and presenter layers too tightly. Swapping in a mock presenter for the view is impossible as written without updating the view code. The code for creating the OkHttpClient and WikiApi objects is repeated between the two presenter implementations in the app: HomepagePresenterImpl and EntryPresenterImpl.
Finally, it’s time to start writing some code to remove code duplication and some coupling between layers!

Configure the Project With Dagger 2
Configuring Dagger with Kotlin is a little bit different from how you may have done with Java.
Dagger requires an annotation processor, and thus the main difference is which one you are going to use. In fact with Java you used the Groovy methods apt or the newer annotationProcessor, while with Kotlin you need to use kapt.
By default kapt is not enabled in Kotlin, and to enable it you must apply its plugin to your app build.gradle, so add the line apply plugin: 'kotlin-kapt':
apply plugin: 'com.android.application'
apply plugin: 'kotlin-android'
// Add this line to enable kapt
apply plugin: 'kotlin-kapt'
...
Then add these dependencies to actually “install” dagger
dependencies {
  ...
  implementation 'com.google.dagger:dagger:2.11'
  kapt 'com.google.dagger:dagger-compiler:2.11'
  provided 'javax.annotation:jsr250-api:1.0'
  ...
}
Here we’re using Dagger 2.11, you can check the latest version in the Maven repository.
Android Studio will prompt you to sync your gradle files on this change, so please go ahead and do so to ensure that you’re including Dagger correctly. Notice that you are including an annotation library from javax, because many of the features of Dagger are provided by Java annotations.
Dagger 2 public APIs
Dagger 2 can seem complex at the beginning, but it’s really not so hard. In fact, the complete public API of Dagger is composed by less than 30 lines of code. And from these lines you can remove a pair of interfaces that are rarely used (Lazy and MapKey), so the most used public APIs are composed of 3 annotations:
public @interface Component {
  Class<?> [] modules() default {};
  Class<?> [] dependencies() default {};
}
public @interface Module {
  Class<?> [] includes() default {};
}
public @interface Provides {}
Now let’s see how these annotations are used to bring dependency injection to your projects!
Module
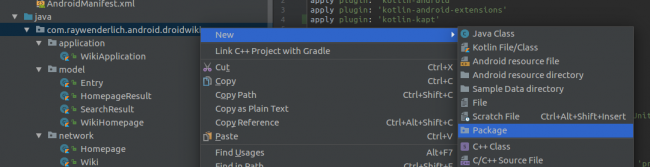
The first annotation you’ll use is the @Module annotation. Start by creating a new package named dagger under the app main package, by right-clicking the main package and selecting New/Package:
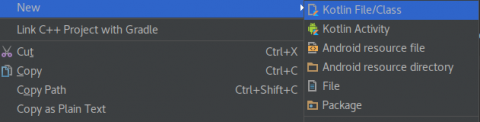
Next, create a new file in the dagger package. Right-click dagger and select New/Kotlin File/Class. Name the class AppModule.
Add the following empty class to the new file:
@Module
class AppModule {
}
Here, you’ve created a class named AppModule and annotated it with the Dagger @Module annotation. Android Studio should automatically create any necessary import statements for you. But if not, hit option+return on Mac or Alt+Enter on PC to create them as needed.
The @Module annotation tells Dagger that the AppModule class will provide dependencies for a part of the application. It is normal to have multiple Dagger modules in a project, and it is typical for one of them to provide app-wide dependencies.
Add that capability now by inserting the following code within the body of the AppModule class:
@Module
class AppModule(private val app: Application) {
  @Provides
  @Singleton
  fun provideContext(): Context = app
}
You’ve added a private field to hold a reference to the app object, a constructor to configure app, and a provideContext() method that returns the app object. Notice that there are two more Dagger annotations on that method: @Provides and @Singleton.
@Provides and @Singleton
The @Provides annotation tells Dagger that the method provides a certain type of dependency, in this case, a Context object. When a part of the app requests that Dagger inject a Context, the @Provides annotation tells Dagger where to find it.
Note: The method names for the providers, such as provideContext(), are not important and can be named anything you like. Dagger only looks at the return type. Using provide as a prefix is a common convention.
The @Singleton annotation is not part of the Dagger API. It’s contained inside the javax package you added to your build.gradle at the beginning. It tells Dagger that there should only be a single instance of that dependency. So when generating the code Dagger will handle all the logic for you, and you won’t write all the boilerplate code to check if another instance of the object is already available.
Component
Now that you have a Dagger module that contains a dependency that can be injected, how do you use it?
That requires the use of another Dagger annotation, @Component. As you’ve done for the AppModule, create a new Kotlin file in the dagger package and name it AppComponent.
Add the following code to the file:
@Singleton
@Component(modules = [AppModule::class])
interface AppComponent
You’ve told Dagger that AppComponent is a singleton component interface for the app. The @Component annotation takes a list of modules as an input. You’re using the literal array syntax available in Kotlin, [AppModule::class].
The component is used to connect objects to their dependencies, typically by use of overridden inject() methods. In order to use the component, it must be accessible from the parts of the app that need injection. Typically, that will happen from the app Application subclass, as follows.
First, add the following field to WikiApplication:
lateinit var wikiComponent: AppComponent
Now, you must initialize AppComponent. Do so by adding the following method to WikiApplication:
private fun initDagger(app: WikiApplication): AppComponent =
      DaggerAppComponent.builder()
          .appModule(AppModule(app))
          .build()
You’ll likely notice an error called out by Android Studio on DaggerAppComponent. Click Make Module ‘app’ from the Android Studio Build menu. This will generate a new file, called DaggerAppComponent.java
Import the generated DaggerAppComponent to clear the compile errors. Ignore the deprecation warning on the appModule() method; that will be fixed shortly.
Finally, update onCreate() in WikiApplication to read as follows:
override fun onCreate() {
    super.onCreate()
    wikiComponent = initDagger(this)
  }
This initializes the wikiComponent field when the application first starts up.

Your first (dependency) injection
Add the following method declaration within the AppComponent interface:
fun inject(target: HomepageActivity)
Here, you’ve specified that the HomepageActivity class will require injection from AppComponent.
Create a new class in the dagger package and name it PresenterModule. Add the following code into PresenterModule:
@Module
class PresenterModule {
  @Provides
  @Singleton
  fun provideHomepagePresenter(): HomepagePresenter = HomepagePresenterImpl()
}
You’re specifying that a HomepagePresenter will be provided, and that the presenter returned will be the concrete implementation HomepagePresenterImpl.
Next, wire up PresenterModule with AppComponent by updating the @Component annotation in AppComponent to read:
@Component(modules = [AppModule::class, PresenterModule::class])
Update HomepageActivity
Finally, open up the HomepageActivity class in the ui.homepage package.
You need to update the presenter field with the following changes:
- remove the private modifier (Dagger can’t inject private fields)
- add the
@Injectannotation - add the lateinit modifier
- replace val with var
- remove the initialization
When you’re done, the presenter declaration looks like this:
@Inject lateinit var presenter: HomepagePresenter
Again, the @Inject annotation is not part of Dagger; it belongs to javax annotations.
The @Inject annotation tells Dagger that you want it to do an injection of the presenter field.
Update onCreate() by adding the call to AppComponent.inject() as follows:
override fun onCreate(savedInstanceState: Bundle?) {
    super.onCreate(savedInstanceState)
    setContentView(R.layout.activity_homepage)

    (application as WikiApplication).wikiComponent.inject(this)
    ...
  }
You are getting the AppComponent from WikiApplication and asking it to inject all known dependencies into HomepageActivity. Since you annotated presenter with @Inject, Dagger will inject a concrete HomepagePresenter object into HomepageActivity.
Dagger knows that you defined provideHomepagePresenter() in the PresenterModule class, and uses it to create the injected HomepagePresenter object.
Build and run your app now. It should behave exactly as before, and you’ve avoided the exception. You’ve just finished your first dependency injection with Dagger 2!
The General Pattern
There is a general pattern that emerges based on the previous code changes. Think about the steps just taken to use Dagger dependency injection with HomepageActivity:
- Add
inject()inAppComponentwithHomepageActivityargument. - Add
provideHomepagePresenter()inPresenterModule. - Add
@Injectannotation toHomepagePresenter presenterinHomepageActivity. - Add
WikiApplication.wikiComponent.inject(this)inonCreate()inHomepageActivity.
If you consider HomepageActivity as the target class, and HomepagePresenter as the source interface to be injected, then the above steps can be generalized as follows for any target class requiring source interfaces to be injected:
- Add
inject()inAppComponentwithTargetclass argument. - Add
@Providesannotated method inPresenterModulefor each source object to be injected. - Add
@Injectannotation to eachSourcemember variable inTargetclass. - Add
WikiApplication.wikiComponent.inject(this)inonCreate()inTargetclass.
As a challenge, see if you can perform an injection of the EntryPresenter detail screen into SearchActivity. This will include removing the following line of code:
private val presenter: EntryPresenter = EntryPresenterImpl()
The steps are just the same as above for HomepageActivity. Use the pattern, and if you get stuck, check out the final project code at the end of this tutorial.
Injecting the Network Graph
In the app as written currently, both the list screen and detail screen presenters create their own network dependencies. In a typical app that uses Dagger 2 and OkHttp 3 together, OkHttp will be provided by dependency injection.
Here you will see some of the many advantages of using dependency injection and Dagger 2, including:
- Eliminating code duplication.
- Eliminating the need for dependency configuration.
- Automatic construction of a dependency graph.
NetworkModule
Start by creating a new file in the dagger package, this time named NetworkModule, which starts off as follows:
@Module
class NetworkModule {
}
What you’re looking to do here is to inject a WikiApi object into the app’s presenter implementations, so that the presenters can call the API.
For example, if you look at the current HomepagePresenterImpl, you see that WikiApi depends on a OkHttpClient object, and if you need some complex setup for the HTTP client, you will need to configure the OkHttpClient every time (for example if you want to enable logging with a LoggingInterceptor).
Moreover the WikiApi requires 3 Strings that represents:
- the protocol for the request (HTTP or HTTPS)
- the language of Wikipedia you are querying.
- the rest of the base URL for the Wikipedia API (wikipedia.org/w/api.php)
Simplifying API builder
For the sake of simplicity you’re going to merge all these 3 Strings in a single provider.

Start by adding this method into NetworkModule along with a constant string:
companion object {
  private const val NAME_BASE_URL = "NAME_BASE_URL"
}

@Provides
@Named(NAME_BASE_URL)
fun provideBaseUrlString() = "${Const.PROTOCOL}://${Const.LANGUAGE}.${Const.BASE_URL}"
Here you can see the @Named annotation, that again, is not part of Dagger, but it’s provided by javax.
You are injecting a String object, and since String is such a common type to use in an Android app, you’ve taken advantage of the @Named annotation to specify a specific string to be provided. This same technique can be used for your own types if you need multiple variations injected.
Now that you have the String representing the base URL, add the following to the bottom of NetworkModule:
@Provides
@Singleton
fun provideHttpClient() = OkHttpClient()

@Provides
@Singleton
fun provideRequestBuilder(@Named(NAME_BASE_URL) baseUrl: String) =
    HttpUrl.parse(baseUrl)?.newBuilder()

@Provides
@Singleton
fun provideWikiApi(client: OkHttpClient, requestBuilder: HttpUrl.Builder?) = WikiApi(client, requestBuilder)
You’re providing an HTTP client, a request builder, and a WikiApi.
WikiModule
Next, create a new file in the dagger package called WikiModule, and add provide methods for the API:
@Module
class WikiModule {
  @Provides
  @Singleton
  fun provideHomepage(api: WikiApi) = Homepage(api)

  @Provides
  @Singleton
  fun provideWiki(api: WikiApi) = Wiki(api)
}
In the NetworkModule you’ve added the provides methods for an OkHttpClient object, an HttpUrl.Builder object, and a WikiApi object. Then in the WikiModule you’ve added the methods for a Homepage and Wiki objects, requesting dependencies from the previous methods.
This allows Dagger to construct a dependency graph, so that, for example, when an object asks for a Wiki object to be injected, Dagger will first provide a WikiApi and then OkHttpClient and HttpUrl.Builder objects starting from provideWiki(api: WikiApi).
Dagger will then continue walking up the graph to find a baseUrl for provideRequestBuilder(@Named(NAME_BASE_URL) baseUrl: String).
By using the @Singleton annotations, only one instance of the WikiApi and OkHttpClient objects will be created and shared between both activities in the app.
Add your NetworkModule and WikiModule to AppComponent by updating the @Component annotation to the following:
@Component(modules = [
  AppModule::class,
  PresenterModule::class,
  NetworkModule::class,
  WikiModule::class])
Update PresenterModule
Next, update the PresenterModule provide methods so that the Context is passed as a constructor argument:
@Provides
@Singleton
fun provideHomepagePresenter(homepage: Homepage): HomepagePresenter = HomepagePresenterImpl(homepage)

@Provides
@Singleton
fun provideEntryPresenter(wiki: Wiki): EntryPresenter = EntryPresenterImpl(wiki)
And of course update the HomepagePresenterImpl and EntryPresenterImpl constructors:
class HomepagePresenterImpl @Inject constructor(private val homepage: Homepage) : HomepagePresenter {
  ...
}
class EntryPresenterImpl @Inject constructor(private val wiki: Wiki) : EntryPresenter {
  ...
}
Homepage/Wiki constructors require a WikiApi parameter, but we don’t need to provide it anymore as Dagger will inject it since it’s present in its graph. At this point you can remove the initialization:
private val client: OkHttpClient = OkHttpClient()
private val api: WikiApi = WikiApi(client)
private val homepage: Homepage = Homepage(api)
private val client: OkHttpClient = OkHttpClient()
private val api: WikiApi = WikiApi(client)
private val wiki: Wiki = Wiki(api)
You’ve injected the WikiApi dependency into the presenters. This allowed you to remove the duplicated creation of the OkHttpClient and WikiApi objects.
Update WikiApi
As a last step, the WikiApi class needs a constructor with an injected parameter, so you must update it:
class WikiApi @Inject constructor(private val client: OkHttpClient, private val requestBuilder: HttpUrl.Builder?) {
...
}
Now you don’t need to create an HttpUrl.Builder each time anymore, so you can update the methods getHomepage()/search(query: String):
val urlBuilder = requestBuilder
      ?.addQueryParameter(...)
      ...
Now everything should be ready to go. Build and run the app, and bask in the glory of decoupled, injected code!
Where to Go From Here?
You can download the final project here.
A lot of developers asks themselves if all the changes you’ve applied to the DroidWiki app are useful or not. Especially since everything was already working before implementing dependency injection. The utility of dependency injection and a framework like Dagger 2 become most evident in real-world production apps, where the dependency graph can get very complex.
Dagger 2 and dependency injection become especially useful when implementing proper testing into your app, allowing mock implementations of back-end APIs and data repositories to be used in testing.
There’s much more to learn about in Dagger 2 and its usage, including:
- Scopes
- Subcomponents
- Testing with Mockito
There are many great resources out there on the interwebs to dive into these topics and one I must suggest is a talk by Jake Wharton at DevOxx, where you can get some more information about the history of DI on Android, some theory and some nice examples. As you do, happy injecting!
If you have any questions or comments, please join the discussion below!
The post Dependency Injection in Android with Dagger 2 and Kotlin appeared first on Ray Wenderlich.