One of these options might have a dramatic effect on your business. So choose wisely…
We’ve all heard stories about how some developer changed the label of a button or the flow of their welcome screens, and suddenly found their retention rate or their in-app purchase rate increased by some crazy amount.
Maybe somewhere on your to-do list, you have an “experiment with my purchase button” item still there, waiting to be checked off because you discovered running these experiments correctly is actually a lot of work.
In Firebase Remote Config Tutorial for iOS we showed you how to use Remote Config to update certain parts of your app on the fly and deliver customized content to users in particular countries.
This follow-up tutorial will explore how to use Firebase Remote Config to conduct A/B testing by experimenting with different values and viewing the results to find out which sets of values work better. We’ll follow this up with a quick lesson how to perform even more advanced customization based on user properties.
Getting Started
Download the Planet Tour 2 Starter app. Even if you have the project from the previous Remote Config tutorial, it will be better to start with the new Starter project as it has been updated for iOS 11, Swift 4, and Firebase 4. The necessary libraries, packaged as CocoaPods, are included in the starter project.
Open the project in Xcode, remembering to open the .xcworkspace file instead of the .xcodeproj file.
You’ll need to create a Firebase project for the app and download a GoogleServices-info.plist file from the console, which you can do by following these directions:
- Go to console.firebase.google.com
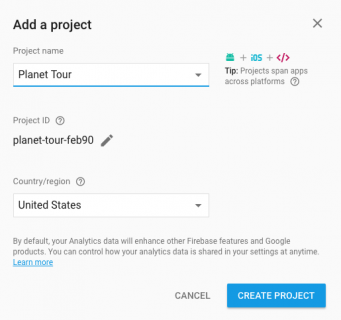
- Click on Add project.
- Name your project Planet Tour, make sure your region is selected, then click CREATE PROJECT.
![Creating a new project]()
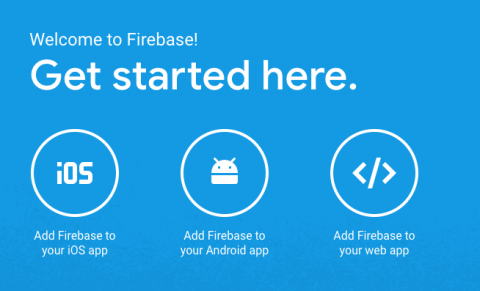
- Click on Add Firebase to your iOS app.
![Add to your iOS App]()
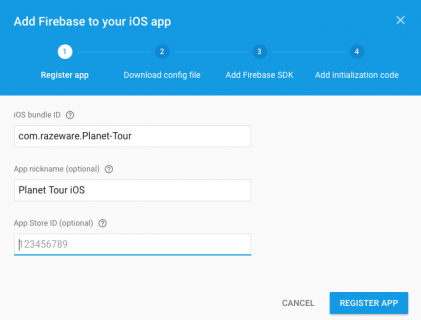
- Add the bundle ID of your project (
com.razeware.Planet-Tour), give it a fun nickname, leave the App Store ID field blank, then click REGISTER APP.
![Configuring your iOS app]()
- At this point, your browser will allow you to download a GoogleServices-info.plist file for you.
- Open Planet Tour.xcworkspace in Xcode, and drag this file into the Planet Tour project (select Copy Items if Needed).
- Then you can just click CONTINUE through the next few steps of the setup wizard. We’ve already done those for you.
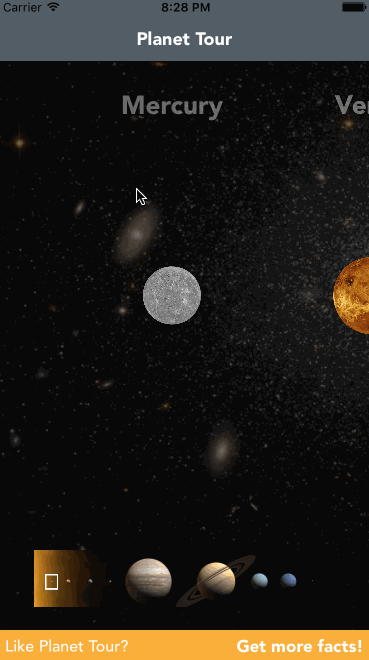
Build and run your app; you should see a lovely tour of our solar system. Click on a few planets to see details about them.
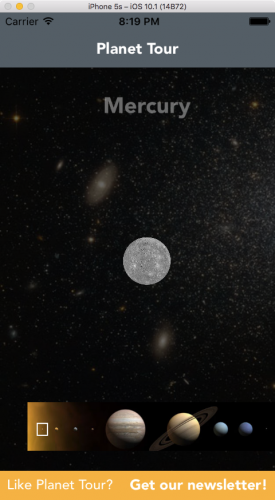
If you’re new to the project, review RCValues.swift to understand how we’re using Remote Config within the project. Then go back to the main screen and check out the banner at the bottom where the app is asking you to sign up for the newsletter.
An Introduction to iOS A/B testing
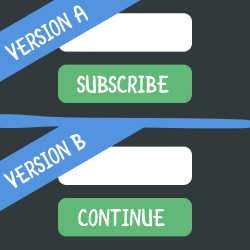
The higher-ups at Planet Tour, Inc. are concerned there aren’t enough people subscribing to the Planet Tour newsletter. After all, how can you build a successful business if you’re not able to email people about exciting new Planet Tour offers?
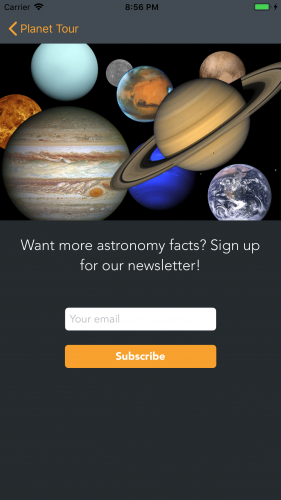
Any way we can make this Subscribe button more enticing?
The folks from marketing have a theory. You might be able to get more subscribers if you change the label of the Subscribe button to Continue. While you’re at it, maybe you should try changing the text of the banner from Get our newsletter to Get more facts.
These are easy changes to make now that your app is wired up to use Remote Config. It would just be a few seconds of work publishing these new values in the Firebase console. Then after a week, you could see if you get more newsletter subscribers. Simple, right?
Well, hang on. How would you know the changes you made are directly responsible for the results you’re seeing? What happens if some influential blogger mentions your app’s newsletter in their latest post? Or you end up running an ad campaign in another app’s newsletter, thereby bringing in an audience more inclined to subscribe to newsletters in the first place?
These are factors you can’t really control, and they might lead you to draw the wrong conclusions.

Ideally, you’d want to release two versions of your app simultaneously. One random group of users gets to see the new newsletter labels, and the other group gets to see the current ones. So long as these two groups are unbiased, you can compare the results between them and feel reasonably confident the differences are due to the changes you made, and not some external factor.

Well, that’s exactly what A/B testing is, and it’s a very common way to run these kinds of experiments. Many larger companies have built up their own infrastructure to run and measure these tests, but with Firebase Remote Config, you can do it on top of the infrastructure Firebase has already created.
Adding Analytics to your App
One of the main steps in creating an A/B test is telling Firebase what the goal of your experiment is. Sometimes it might be a high-level goal, such as increasing retention (how many of your users return after a few days) or user engagement (how much time your users spend with your app each day). But other times it might be a very specific goal, like increasing the number of users who visit your in-app store or, in our case, increasing the number of users who sign up for the Planet Tour newsletter.
Of course, the only way Firebase knows whether or not your user has signed up for your newsletter is if you tell it, and that’s something you can do using Google Analytics for Firebase (the product formerly known as Firebase Analytics.) If you’re not familiar with the concept of mobile analytics, there’s a great tutorial on the subject here.
So before you start creating an A/B test in your app, let’s add some analytics to your app, so you have a few goals you can start working towards.
Adding Events
Google Analytics for Firebase, like most other mobile analytics solutions, is an event-based model. As users perform actions in your app, Analytics sends events to its servers. Sometime later, these servers process those events and turn them into meaningful graphs for you to analyze.
Open ContainerViewController.swift. Add the following to the top of the file:
import Firebase
Next, add the following to the end of viewDidLoad():
Analytics.logEvent("mainPageLoaded", parameters: nil)
This will send off an event named mainPageLoaded when your user first starts up the app and makes it to your main screen. The parameters argument is a dictionary of optional key/value pairs associated with this event. You don’t need any here, so this is left as nil.
Next, open GetNewsletterViewController.swift. Add the following to the top of the file:
import Firebase
Add the following to the end of viewDidLoad():
Analytics.logEvent("newsletterPageLoaded", parameters: nil)
Finally, add the following to the end of submitButtonWasPressed(_:):
Analytics.logEvent("newsletterSubscribed", parameters: nil)
Your app will now trigger events when users first visit the main page, the newsletter page, and when they click the Submit button to sign up for the newsletter.
Before you build and run, you’ll want to turn on Firebase Analytics debug mode, which lets you see the results of all these analytics calls in the console.
To do this, select Product\Scheme\Edit Scheme. Within the Run scheme, select Arguments. Within Arguments Passed On Launch, click the + symbol and enter the argument -FIRAnalyticsDebugEnabled. Make sure you include the dash at the beginning.
When you’re done, you should have something like the following:

Close the dialog and build and run. There will be much more output in the console. You should see entries similar to the following:
[Firebase/Analytics][I-ACS023051] Logging event: origin, name, params: app, mainPageLoaded, {
    firebase_event_origin (_o) = app;
    firebase_screen_class (_sc) = WaitingViewController;
    firebase_screen_id (_si) = -5666061486001356881;
}
When you tap the Get our newsletter! (or Get more facts!) button, this will also be logged to your console:
[Firebase/Analytics][I-ACS023051] Logging event: origin, name, params: app, newsletterPageLoaded, {
    firebase_event_origin (_o) = app;
    firebase_screen_class (_sc) = ContainerViewController;
    firebase_screen_id (_si) = 8191694734847900543;
}
A similar event will be logged when you tap the Subscribe button.
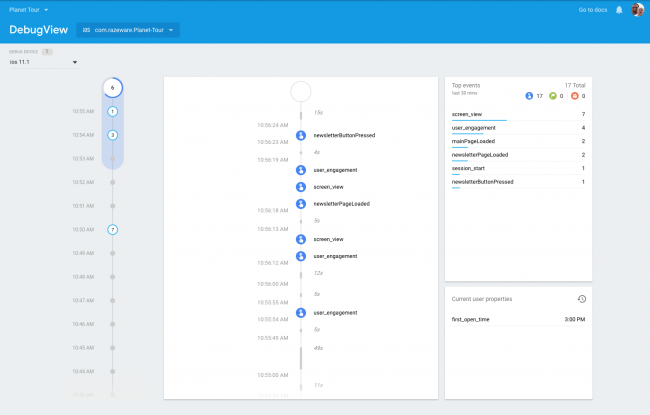
You should also be able to see these results trickle in in almost-real time by going to the DebugView section of the Firebase console. This will let you know about any events Firebase receives from devices that have debug mode enabled.
Because you’ve turned on debug mode, Firebase Analytics is very aggressive about sending data to its servers. It sends a batch either when it has data that’s more than 10 seconds old, or when your app moves into the background. In a production app, this behavior would probably kill your phone’s battery life. Therefore, when you don’t have debug mode turned on, Firebase Analytics sends data either when it has data that’s more than an hour old, or when your app goes into the background.
Incidentally, this debug setting does persist. So if you want to turn off Analytics debug mode (because, say, you want to stress test your app’s battery performance), you either disable the flag and then delete and reinstall the app, or explicitly turn off debug mode by changing the flag to -noFIRAnalyticsDebugEnabled
At this point, it takes about 24 hours for the events that you created to propagate to the A/B testing system. You can still continue the tutorial without waiting that long; just keep in mind you might need to pick a different goal than one of these events.
Creating Your First A/B Test
Head over to the Remote Config section of the Firebase console. If you’re prompted to select a project, pick the Planet Tour project you created.
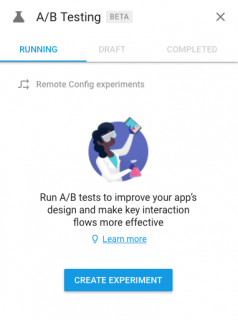
Instead of creating a new parameter at this point, click the A/B Testing tab on the right side of the page. Next, click the CREATE EXPERIMENT button on the panel that appears.
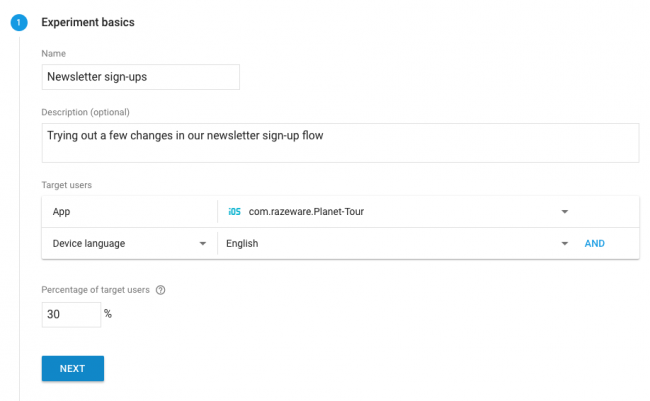
You’ll see a form to create a new experiment. The first few fields should be pretty easy to fill out. Give your experiment a name like, Newsletter sign-ups and whatever description you want.
For target users, make sure you select your iOS app from the drop-down list. You don’t have an Android app, but even if you did, it makes sense to experiment on them separately, since your app — or your users — might behave quite differently on different platforms.
Since you’re experimenting with text labels, it probably makes sense to limit your experiment to English-speaking users. Click the AND button, select Device language, and then select English from the second drop-down list.

Finally, you can decide what percentage of users to put into this experiment. The more users in your experiment, the more confident your results will end up being. But if you’re trying something risky that could anger your community or throw your in-app economy into chaos, it might make sense to keep this population small.
Since your changes seem pretty safe, you could probably afford to make this percentage larger. 30 seems like a good percentage to start with.
When you’re all done, the first part of your experiment panel should look like this.
Click NEXT. You’re now going to assign different Remote Config values to the different groups of people (also known as Variants) who are placed into your experiment.
Let’s start by trying different variations of the text that appears in the little banner at the bottom of your main screen. This value is set by the Remote Config variable subscribeBannerButton.
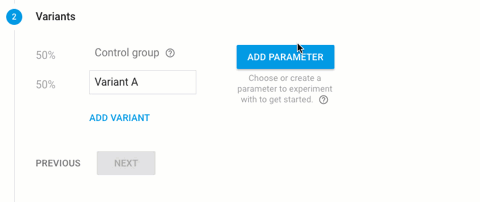
Click ADD PARAMETER. If you used this app in the previous Remote Config tutorial, you will probably see the names of those parameters in a drop-down list, but you don’t have to use those; you can also create new ones, too! So enter subscribeBannerButton and select the Create parameter option.
You now have the option to add different values of subscribeBannerButton for the different variants in your experiment.
For your control group, leave this value as the default value of (no value). This will tell Remote Config to use whatever value it would otherwise use if the user weren’t in your experiment. In your case, this will be the default value of “Get our newsletter!” as set in RCValues.swift. As a general rule, it’s best if you keep your control group values set to (no value) — that’s the best way to compare your changes against whatever’s currently running in your app.
For the next variant, give the subscribeBannerButton a value of Get more facts!.
Your panel should now look something like this.
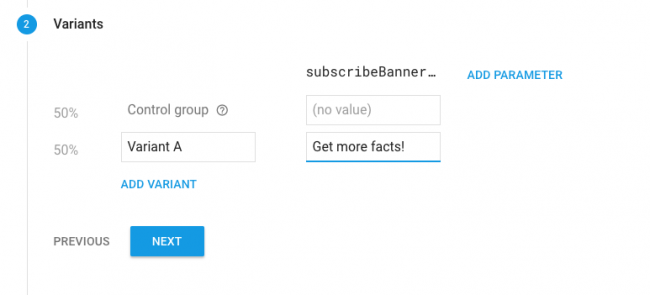
You also want to experiment with the button that appears in your GetNewsletterViewController — this is the parameter called subscribeVCButton. Click the ADD PARAMETER link and create a new parameter with that name.
You could make this change in Variant A…

…but this leaves you with a problem. Suppose you found out that Variant A did better than your control group. How would you know if the change was due to the Get more facts! button on the front page, or because you renamed the Subscribe button to Continue? You really wouldn’t know. In fact, there’s always a chance Variant A would have done even better if you hadn’t changed the Subscribe button.
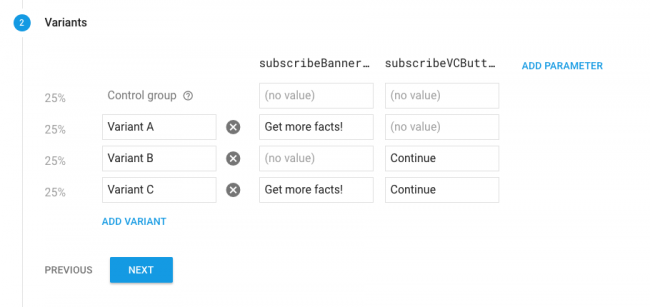
So a better option would be to try all the different combinations in several different variants — this a technique called multi-variant testing and you’re going to perform a simple version of that now. Leave subscribeVCButton set to (no value) in Variant A.
Click Add Variant, and this time, leave subscribeBannerButton set to the default and give subscribeVCButton a value of Continue. Then click Add Variant one more time, give subscribeBannerButton a value of Get more facts! and subscribeVCButton a value of Continue.
Your experiment panel should now look like this:
Click NEXT and you’re on to the last step of your experiment, defining a goal. This is the thing you’re looking to maximize within your app. In your case, you’re looking to increase the occurrence of the newsletterSubscribed event that you created in the previous section.
Assuming enough time has gone by that the events you created in the previous section have made it into the A/B testing system, you should see newsletterSubscribed listed as one of your goals in the drop-down list. If it’s there, select it. If it’s not there yet, you might need to wait a day or two for the events to propagate into the system. If you don’t feel like waiting that long, feel free to pick another goal like Retention (1 day).
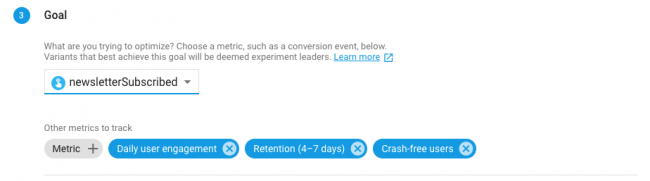
Firebase has already included a number of other secondary goals to measure along with your main goal. These extra goals are useful in getting the “big picture” view of your experiment, and making sure that you don’t accidentally, say, hurt your app’s retention because you’re too focused on improving your newsletter subscriptions.
You’re done creating your experiment! Click REVIEW.
Testing Your Experiment
You probably want to test your experiment before you push it out to the world. Luckily, Firebase makes it easy to try out all of your experiment variations on a single device. To do this, you’re going to need your Instance ID token, which is a unique identifier assigned to every instance of your app.
To fetch it, go back to Planet Tour and open AppDelegate.swift. Then add the following right after the call to FirebaseApp.configure():
let idToken = InstanceID.instanceID().token()
print ("Your instance ID token is \(idToken ?? "n/a")")
Build and run your app. You should see a line like the following somewhere in your Xcode console.

If you get n/a as your instance ID token, just wait a few seconds and then try again. (Fetching an instance ID token is asynchronous. I’m simplifying the process by assuming that your app already fetched and cached one of these tokens in a previous session.)
Go back to your experiment in the Firebase Console and expand the Details section of your experiment. Then click on Manage test devices. In the dialog that appears, copy and paste the big instance ID token string from your Xcode console. Then select a variant from the drop-down list — I like trying Option C because you can test both your changes at once.
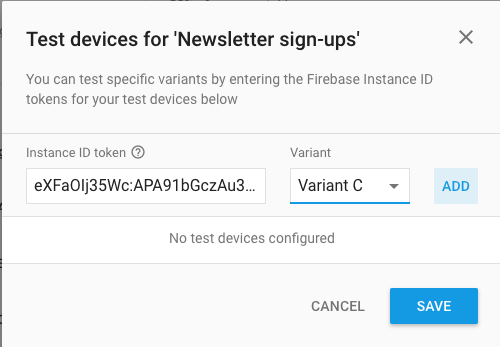
Click ADD. Then click SAVE.
Quit and restart your app. Because your app explicitly has a Remote Config cache time set to zero (see the previous tutorial if you need a refresher on this), you should see your new values right away.
Feel free to try out your other variations, too. Just revisit your Manage test devices dialog, select a different variant from the drop-down list, click Save, and you should see the different variant on your test device.
Launching an Experiment
When you’ve tested out all of your variants and you’re happy with how each one looks on your test devices, you can start the experiment for real. Back in the Firebase A/B test console, click the START EXPERIMENT button, and then click START.
At this point, 30 percent of your English-speaking audience will be randomly selected to be placed into one of your four different variants. A/B testing will measure their progress, note how many of them reach your final goal of subscribing to the newsletter, and will tell you in the end which variant appeared to do best in guiding your users towards that goal.
Understanding Your Experiment Results
Firebase A/B testing doesn’t just tell you what variant had the highest “user subscribed to newsletter” rate. It also uses some fancy math known as Bayesian statistics to let you know if these differences are due to the changes you made to your app, and not just random chance. This is what people usually mean when they use the phrase, “statistically significant”.
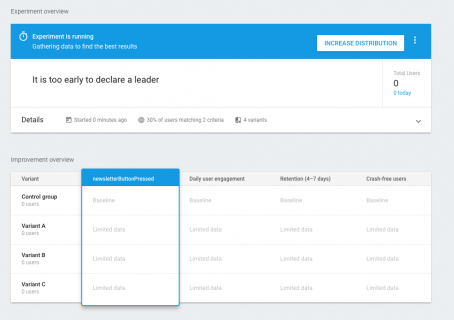
For this math to work, Firebase needs to try out these different variants in front of a fairly large number of users. And while Planet Tour sure is a lovely app, it’s still a test app with a total user count of one. This means that for this tutorial, Firebase A/B testing won’t be able to gather enough data to give you any meaningful results, and you’ll probably be left with a screen that looks like this:
Luckily through the power of imagination (and some Photoshop), we can picture what some actual results might look like.
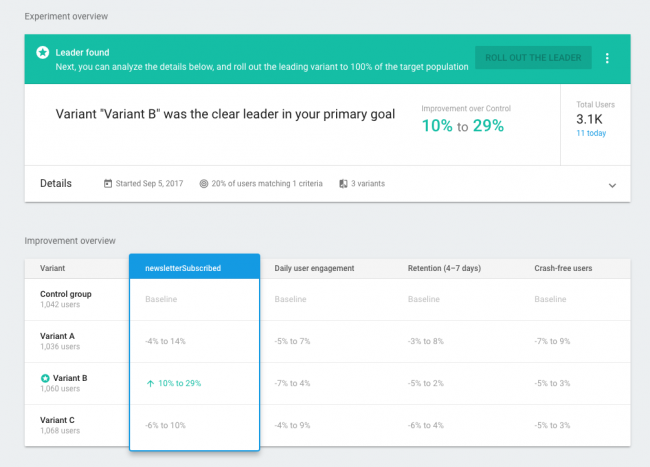
There are a lot of statistics here, but let’s cover the important ones.

This giant label on top gives you the executive summary of your experiment. In this case, it’s telling you that Variant B did the best in reaching your primary goal of getting users to subscribe to your newsletter.
Below that you’ll see how each variant compares to your control group as a general improvement range in each of the goals that you’re measuring.
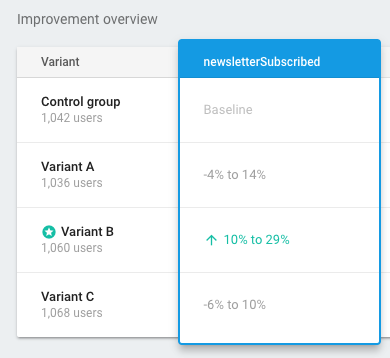
For example, you can see that it’s predicting that Variant A would do somewhere between 4 percent worse and 14 percent better than the control group in driving newsletterSubscribed events. Since this is a fairly wide range, it can’t say for sure it’s a change for the better, so it’s presented in this light gray color.
Variant B on the other hand, is predicted to do somewhere between 10% and 29% better than the control group for getting people to subscribe to your newsletter. Since this is definitely a change for the better, it’s presented in a strong green color with an upward-facing arrow.
Further down, you can see more details about the goal you’re measuring. You can see both whether A/B testing thinks each variant will do better than the control group, and which variant A/B testing thinks will perform best out of all of them. So while all variants seem to work better than our control group, very clearly Variant B is the best out of all of three.
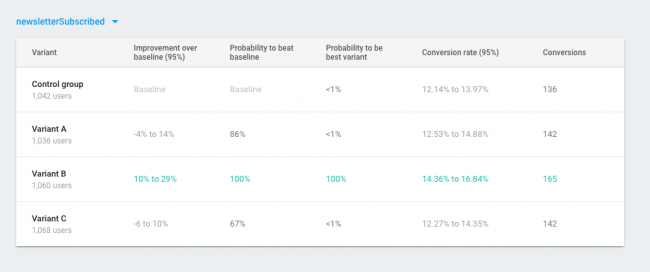
The two columns on the right measure more of the raw data of the experiment. They’re usually interesting to look at, but I tend to not get anything actionable out of them.
Rolling Out an Experiment
Depending on the results of your experiment, you might want to take one of your variants and push that out to the rest of the world. If your experiment has a clear winner, you should see a button that says “ROLL OUT THE LEADER”.

Clicking this button will stop the experiment and present you with a dialog that allows you to publish all the variables from the winning variant into Remote Config as the new default values for everybody. And just like that, your new newsletter options are available to the world!
Advanced User Targeting with User Properties
Or, “Pluto Returns!”
Let’s change gears to investigate what else we can do with Firebase Remote Config outside of an A/B test.
In our previous tutorial, you avoided an international crisis by setting shouldWeIncludePluto to true for your users in Scandinavia. It turns out, however, setting this by country wasn’t enough. The choice of whether or not Pluto is a planet is a deeply personal one, and many individuals from around the world feel strongly about Pluto’s planetary status. How can we customize Planet Tour for all of them?
Well, rather than just altering this value by country, you’re going to add in much more fine-grained control by changing this setting based on a user property.
User Properties in Analytics
A user property in Google Analytics for Firebase is simply a property associated with a particular user.
Some examples of user properties are premium users within your app, user fitness goals in your exercise app, or any other user-associated data you might want to filter your event data by.
In your case, you’ll record a likesSmallRocks property to record how the user feels about small, cold rocks in the outskirts of our solar system. You’ll then use this property in conjunction with Remote Config to deliver a custom experience to users based on this value.
While there are different ways to determine if a user is a fan of small, remote, rocks in space, the easiest way is to just ask them.
At the top of PlanetsCollectionViewController.swift, add this line:
import Firebase
Next, add the following above the reuseIdentifier definition:
private let takenSurveyKey = "takenSurvey"
Finally, add the following inside the extension with the MARK: - Internal line, just above the addFancyBackground() function.
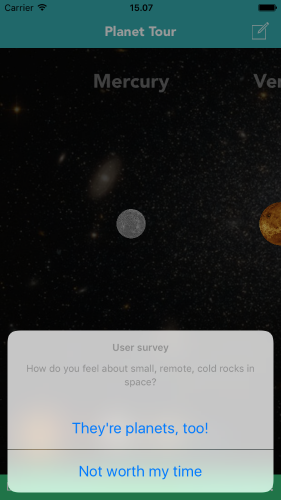
@objc func runUserSurvey() {
  let alertController = UIAlertController(title: "User survey",
    message: "How do you feel about small, remote, cold rocks in space?",
    preferredStyle: .actionSheet)

  let fanOfPluto = UIAlertAction(title: "They're planets, too!", style: .default) { _ in
      Analytics.setUserProperty("true", forName: "likesSmallRocks")
  }

  let notAFan = UIAlertAction(title: "Not worth my time", style: .default) { _ in
      Analytics.setUserProperty("false", forName: "likesSmallRocks")
  }

  alertController.addAction(fanOfPluto)
  alertController.addAction(notAFan)
  navigationController?.present(alertController, animated: true)

  UserDefaults.standard.set(true, forKey: takenSurveyKey)
}
Two things you should note with the survey you added: First, after you get a response back from the user, you’re recording this in a new user property called likesSmallRocks. Second, you’re making a note in UserDefaults this user has taken the survey, so they don’t get asked every visit.
Now that you’ve set your user property in code, you need to perform the second step, which is letting the Firebase console know that this property exists, so that it can start generating reports based on it. It’s best to get into the habit of adding a user property in the Firebase console the same time you add it in code. Open the Firebase console and select Analytics, then User Properties.
Now be careful in this next step — the Firebase console doesn’t let you edit or delete user properties once you create them! Select NEW USER PROPERTY and create a new one called likesSmallRocks. I recommend copying-and-pasting the name to make sure it matches exactly. Give it any description you’d like. Then click CREATE.

Go back to PlanetsCollectionViewController.swift, and at the end of viewDidAppear(_:), add these lines to make sure you only ask this once per app install:
if !UserDefaults.standard.bool(forKey: takenSurveyKey) {
  runUserSurvey()
}
If you want to make testing a little easier, add this code to viewWillAppear(_:) above customizeNavigationBar(), which will add a button to the navigation bar to run the survey at any time, bypassing the check if we’ve already seen it:
let retakeSurveyButton = UIBarButtonItem(barButtonSystemItem: .compose,
                                         target: self,
                                         action: #selector(runUserSurvey))
parent?.navigationItem.rightBarButtonItem = retakeSurveyButton
Build and run your app. You’ll now get asked how you feel about small rocks in space. Feel free to answer honestly.
Customizing Your App
Now you can start adjusting Remote Config values based on this value. Open the Firebase console and select Remote Config. If you completed the previous tutorial, you should still see your entry for shouldWeIncludePluto. And if you didn’t, go ahead and create one.
If you need to create one, first click on ADD YOUR FIRST PARAMETER. Then enter shouldWeIncludePluto for the Parameter key and keep the Default value blank. Then click ADD PARAMETER.
Click the pencil icon next to the shouldWeIncludePluto entry to edit it, then select Add value for condition > Define new condition. Name the new condition Small rock fans, and state this condition applies if User property > likesSmallRocks | exactly matches | true.

Click CREATE CONDITION, then set this value to true and the default value to false.
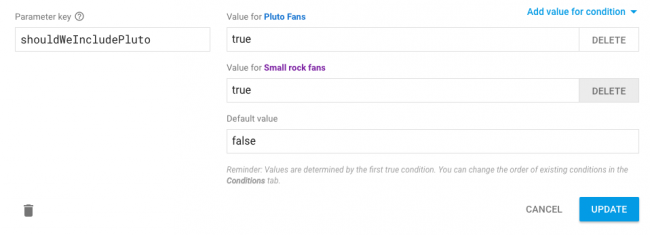
condition here. That’s ok!
Click UPDATE, then PUBLISH CHANGES.
Now build and run your app again.
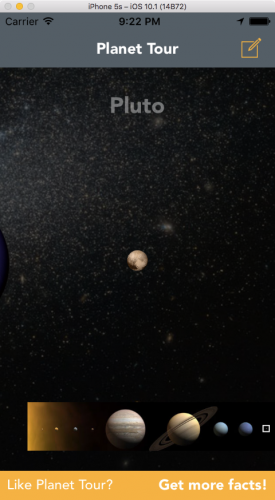
If you said you’re a fan of small remote rocks, you should now see Pluto listed among your planets. If you didn’t, you won’t see Pluto…unless your device thinks it’s in a Scandinavian country, in which case Pluto is still there (assuming you went through the previous tutorial and have that condition set up).
If you want to see what your app looks like for people who answered the user survey differently, click the bar button item on top to retake the survey, then quit and re-run your app.
How about making some more subtle changes to appeal to your Pluto fans? There’s a variable in your app — planetImageScaleFactor — that determines how closely the size of the planet images match the actual size of their corresponding planet.
At a value of 1.0, they’re perfectly to scale, so planets like Pluto are barely a pixel large. At a value of 0.0, all planets are the same size. Right now, this variable has a default value of 0.33, which gives you a sense of the planets’ relative size, while still making the smaller ones easy to see.
You’re going to make this value slightly lower for fans of small rocks, so the smaller planets like Pluto and Mercury show up bigger than they would otherwise.
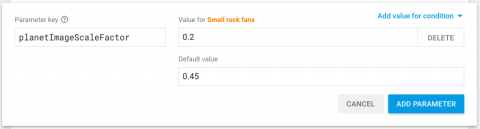
Go back to Remote Config in the Firebase console, and create a new entry for planetImageScaleFactor. Give it a value of 0.2 for users in the Small rock fans condition and a default value of 0.45. Click UPDATE, then PUBLISH CHANGES.
Build and run Planet Tour again. Depending on how you feel about small remote rocks, planets like Mars or Pluto should look proportionately larger or smaller.
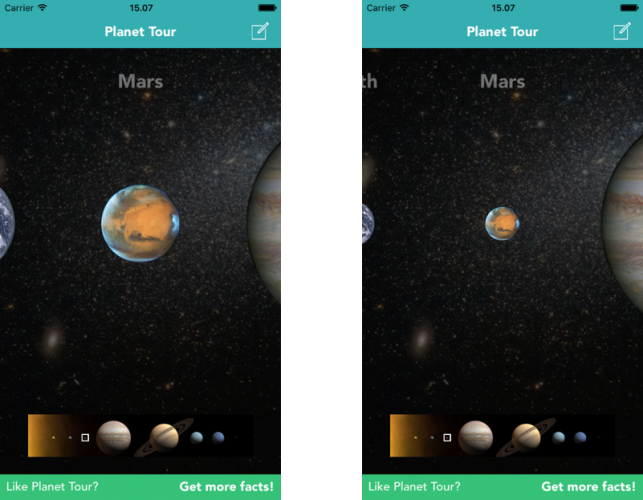
Mars has been looking so svelte, ever since it went on that “no carbon-based life-forms” diet.
While this might seem like a fun but inconsequential change, these types of customizations can be quite powerful. As you learn more about your users and the parts of your app they prefer, you can start to deliver a truly customized experience to your users, making sure the elements that appeal to them are always front and center.
And, you could do some A/B testing on these parameters to see what makes users of your app the most happy!
Where To Go From Here?
You can download the fully completed Planet Tour 2 project for this Firebase iOS A/B Testing tutorial. Please note, however, you still need to create a project in the Firebase Console and drag in your GoogleServices-info.plist file for the project to work.
There’s plenty more you can do with Firebase Analytics and Remote Config, and you can always read the documentation for more information.
In the meantime, think about elements of your app you’ve always wanted to experiment with. Try running one of them through iOS A/B testing, and let us know what you discovered in the comments below!
The post Firebase Tutorial: iOS A/B Testing appeared first on Ray Wenderlich.