Dependency Injection improves code testability and architecture.
In this tutorial, you’ll explore Dependency Injection (DI) through Swinject, a Dependency Injection framework written in Swift. You’ll do so by improving a small iOS application named Bitcoin Adventurer which displays the current price of Bitcoin. As you go through this tutorial, you’ll refactor the app and add unit tests along the way.
Dependency Injection is an approach to organizing code so that its dependencies are provided by a different object, instead of by itself. Arranging code like this leads to a codebase of loosely-coupled components that can be tested and refactored.
While you can implement Dependency Injection without a third-party library, Swinject uses a popular pattern among DI frameworks: a Dependency Injection (DI) Container. This type of pattern keeps the resolution of your dependencies simple, even as code complexity increases.

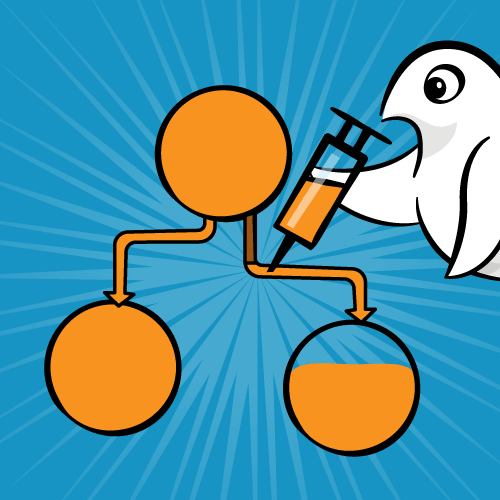
Don’t worry, it’s gonna be less painful than this type of injection :]
Why Dependency Injection?
Dependency Injection relies on a principle called Inversion of Control. The main idea is that a piece of code that requires some dependencies won’t create them for itself, rather the control over providing these dependencies is deferred to some higher abstraction. These dependencies are typically passed into an object’s initializer. This is the opposite approach — an inverted approach — to the typical cascade of object creation: Object A creating Object B, creating Object C, and so on.
From a practical perspective, the main benefit of Inversion of Control is that code changes remain isolated. A Dependency Injection Container supports the Inversion of Control principal by providing an object that knows how to provide the dependencies for an object. All you need to do is ask the container for the object you need, and voilà… it’s ready!
Getting Started
Start by downloading the starter project; you can find a link at the top and bottom of this Swinject tutorial. Open Bitcoin Adventurer.xcworkspace. Press Command-R to build and run the app.
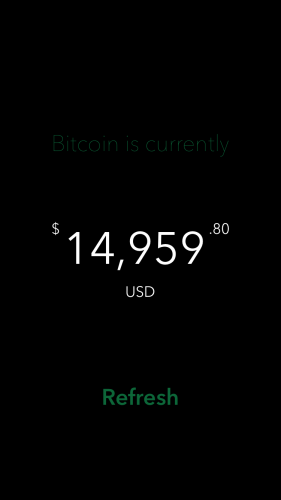
Bitcoin Adventurer – the application you will refactor in this tutorial.
When the app launches, you’ll see the current price of a Bitcoin displayed on the screen. Tapping Refresh makes an HTTP request to retrieve the latest data, which is logged to the Xcode console. Bitcoin is a volatile cryptocurrency whose value fluctuates frequently, therefore, the Coinbase API has a new Bitcoin price available about every 30 seconds.
You may have also noticed an error logged to the console. You can ignore this for now because you’ll address it later in the tutorial.
Go back to Xcode and inspect the project:
-
The app contains a single
UIViewController,BitcoinViewController, that’s backed by the storyboard, Main.storyboard. -
All of the networking and parsing logic lives in BitcoinViewController.swift. As the code stands now, it’s difficult to test the logic independently of the
UIViewControllerlifecycle because the view layer is highly coupled to its underlying logic and dependencies. - We already took care of adding Swinject as a dependency for you, via CocoaPods. It’s currently not being used in any of your Swift files, but that’s about to change! :]
DI and Coupling – Oh my!
Earlier, a dependency was defined as a piece of code needed by another object to do its job, preferably one that can be supplied — or “injected” — by a separate object.
Explore further the dependencies in the Bitcoin Adventurer code.
The code in BitcoinViewController.swift has three main responsibilities: Networking, Parsing and Formatting.
Networking and Parsing
Most of the networking happens in a single method, requestPrice():
private func requestPrice()  {
  let bitcoin = Coinbase.bitcoin.path

  // 1. Make URL request
  guard let url = URL(string: bitcoin) else { return }
  var request = URLRequest(url: url)
  request.cachePolicy = .reloadIgnoringCacheData

  // 2. Make networking request
  let task = URLSession.shared.dataTask(with: request) { data, _, error in

    // 3. Check for errors
    if let error = error {
      print("Error received requesting Bitcoin price: \(error.localizedDescription)")
      return
    }

    // 4. Parse the returned information
    let decoder = JSONDecoder()

    guard let data = data,
          let response = try? decoder.decode(PriceResponse.self,
                                             from: data) else { return }

    print("Price returned: \(response.data.amount)")

    // 5. Update the UI with the parsed PriceResponse
    DispatchQueue.main.async { [weak self] in
      self?.updateLabel(price: response.data)
    }
  }

  task.resume()
}
Here’s the breakdown:
- Create a
URLRequestwith the Coinbase Bitcoin spot price URL. - Create a
URLSessionDataTaskusing this newrequest, then run it by callingtask.resume(). This fires an HTTP request to retrieve the price of a Bitcoin.If the HTTP request is successful, it returns a JSON response in the following format:
{ "data": { "base": "BTC", "currency": "USD", "amount": "15840.01" } } - When a response is returned, check for errors and print them out if they exist.
- If things are error free, use a
JSONDecoderto map the JSON response to aPriceResponsemodel object. - The model object is passed to
updateLabel(price:), which is explicitly dispatched to the main thread because UI updates must be done on the main thread.
Formatting
updateLabel(price:) on BitcoinViewController uses multiple formatter objects to ensure the Bitcoin price returned from the API is correctly split into dollars and cents so it’s display-ready.
private func updateLabel(price: Price) {
  guard let dollars = price.components().dollars,
        let cents = price.components().cents,
        let dollarAmount = standardFormatter.number(from: dollars) else { return }

  primary.text = dollarsDisplayFormatter.string(from: dollarAmount)
  partial.text = ".\(cents)"
}
This is quite a lot of logic forced into a single UIViewController. The Networking, Parsing and Formatting functionality is tightly coupled here. It’s difficult to test any portion of it independently of the entire BitcoinViewController object, or reuse the same logic somewhere else.

That doesn’t sound good – can we fix this?
The alternative to tightly coupled components involves creating objects that can be easily linked and unlinked from one another — objects that are loosely coupled.
It’s time to refactor BitcoinViewController so it creates separate objects for the Networking and Parsing responsibilities. When that’s done, you’ll adjust their usage to achieve truly decoupled components, using Swinject.
Extracting Dependencies
Start by creating a new folder named Dependencies. This will hold all of the various logic pieces you’ll be extracting throughout the rest of this tutorial.
Right-click on the Bitcoin Adventurer folder and select New Group. Then set its name to Dependencies.

Are you ready to start extracting the different logic pieces and make the code testable, robust and beautiful? Thought so! :]
Extracting Networking Logic
While the Dependencies folder is selected, go to File\New\File and create a Swift file named HTTPNetworking.swift. Make sure the Bitcoin Adventurer target is selected.
Now, add the following code to the newly created file:
// 1.
protocol Networking {
  typealias CompletionHandler = (Data?, Swift.Error?) -> Void

  func request(from: Endpoint, completion: @escaping CompletionHandler)
}

// 2.
struct HTTPNetworking: Networking {
  // 3.
  func request(from: Endpoint, completion: @escaping CompletionHandler) {
    guard let url = URL(string: from.path) else { return }
    let request = createRequest(from: url)
    let task = createDataTask(from: request, completion: completion)
    task.resume()
  }

  // 4.
  private func createRequest(from url: URL) -> URLRequest {
    var request = URLRequest(url: url)
    request.cachePolicy = .reloadIgnoringCacheData
    return request
  }

  // 5.
  private func createDataTask(from request: URLRequest,
                              completion: @escaping CompletionHandler) -> URLSessionDataTask {
    return URLSession.shared.dataTask(with: request) { data, httpResponse, error in
      completion(data, error)
    }
  }
}
Time to review the code you just added:
-
This defines a
Networkingprotocol that has one method:
request(from:completion:). Itscompletionblock returns either aDataobject representing the body of the response, or anErrorobject. -
You then create a concrete implementation of this protocol, named
HTTPNetworking. -
request(from:completion:)creates aURLfrom the providedEndpoint. It uses thisURLto create aURLRequest, which is then used to create aURLSessionDataTask(phew!). This task is then executed, firing an HTTP request and returning its result via the providedCompletionHandler. -
createRequest(from:)is called from withinrequest(from:completion:). It takes aURLand returns aURLRequest. -
createDataTask(from:completion:)is called bycreateRequest(from:). It takes aURLRequestand returns aURLSessionDataTask.
Does this logic ring any bells?
If you said “yes” that’s because it’s similar to the first half of requestPrice() in BitcoinViewController.
OK, time to adjust that code so it uses the shiny new HTTPNetworking class instead. Add the following to the top of BitcoinViewController, below the three IBOutlets:
let networking = HTTPNetworking()
Finally, refactor requestPrice() by replacing its entire contents with:
networking.request(from: Coinbase.bitcoin) { data, error in
  // 1. Check for errors
  if let error = error {
    print("Error received requesting Bitcoin price: \(error.localizedDescription)")
    return
  }

  // 2. Parse the returned information
  let decoder = JSONDecoder()
  guard let data = data,
        let response = try? decoder.decode(PriceResponse.self, from: data)
  else { return }

  print("Price returned: \(response.data.amount)")

  // 3. Update the UI with the parsed PriceResponse
  DispatchQueue.main.async { [weak self] in
    self?.updateLabel(price: response.data)
  }
}
Press Command-R to build and run the app; things should work just as they did before, but now the networking is more contained and decoupled than it was before.
Excellent! You successfully moved logic out of BitcoinViewController and into a more cohesive HTTPNetworking object. However, to achieve proper Dependency Injection, more decoupling is required.
Extracting Parsing Logic
Under the same Dependencies folder, go to File\New\File and create a new Swift file named BitcoinPriceFetcher.swift. Give it the following implementation:
protocol PriceFetcher {
  func fetch(response: @escaping (PriceResponse?) -> Void)
}

struct BitcoinPriceFetcher: PriceFetcher {
  let networking: Networking

  // 1. Initialize the fetcher with a networking object
  init(networking: Networking) {
    self.networking = networking
  }

  // 2. Fetch data, returning a PriceResponse object if successful
  func fetch(response: @escaping (PriceResponse?) -> Void) {
    networking.request(from: Coinbase.bitcoin) { data, error in
      // Log errors if we receive any, and abort.
      if let error = error {
        print("Error received requesting Bitcoin price: \(error.localizedDescription)")
        response(nil)
      }

      // Parse data into a model object.
      let decoded = self.decodeJSON(type: PriceResponse.self, from: data)
      if let decoded = decoded {
        print("Price returned: \(decoded.data.amount)")
      }
      response(decoded)
    }
  }

  // 3. Decode JSON into an object of type 'T'
  private func decodeJSON<T: Decodable>(type: T.Type, from: Data?) -> T? {
    let decoder = JSONDecoder()
    guard let data = from,
          let response = try? decoder.decode(type.self, from: data) else { return nil }

    return response
  }
}
PriceFetcher protocol defines a single method: one that performs a fetch and returns a PriceResponse object. This “fetch” can occur from any data source, not necessarily an HTTP request. This will become an important characteristic of this protocol when you get to writing the unit tests. This fetcher makes use of the newly-created Networking protocol.
You now have an even more specific abstraction to fetch Bitcoin prices that, itself, uses the Networking protocol internally. It’s time to refactor BitcoinViewController once more to use it.
Replace:
let networking = HTTPNetworking()
With:
let fetcher = BitcoinPriceFetcher(networking: HTTPNetworking())
Then, completely replace requestPrice() with:
private func requestPrice() {
  fetcher.fetch { response in
    guard let response = response else { return }

    DispatchQueue.main.async { [weak self] in
      self?.updateLabel(price: response.data)
    }
  }
}
The code is now more readable and concise! It uses the bare minimum boilerplate code, while the external BitcoinPriceFetcher dependency does the “heavy lifting”.
Finally, build and run using Command-R to make sure the app continues to operate correctly.
Congratulations, you just improved the quality of your code! You now have it using Dependency Injection: the HTTPNetworking dependency is provided to BitcoinPriceFetcher upon initialization. Shorty, you’ll replace this with a Swinject-based approach.
Next, you’ll look at unit testing, and then you’ll return to Bitcoin Adventurer to further decouple the code.
Testing Bitcoin Adventurer
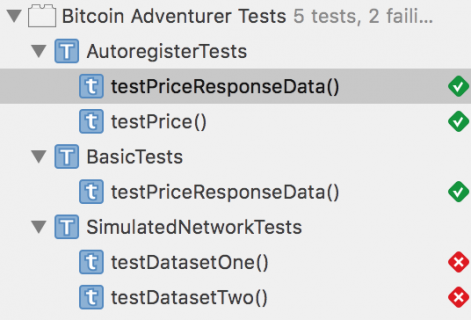
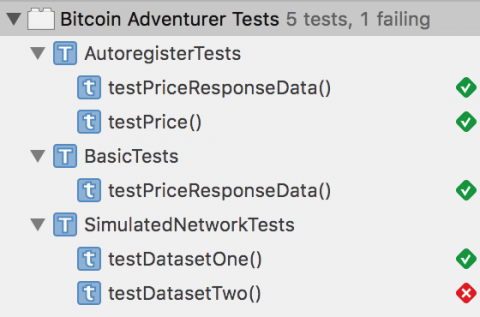
Some unit tests have already been set up for you in the Bitcoin Adventurer Tests target and are ready for you to fill in. Run them by pressing Command-U. Look at the Test navigator; all of the tests have failed:

Press Command-Shift-O and search for the file named BasicTests.swift. Note that Swinject was aleady imported at the top of this file.
Prior to Writing the Tests
Swinject relies on the use of a Container object, which maps all of the object’s dependencies when it’s tested. Prior to the test suite being run, dependencies will be registered within the container, and then resolved from the container as needed. This becomes especially useful where many different object types are required, or dependencies between objects are complex.
A container has been provided at the top of the BasicTests class, ready for use in this test suite.
At the end of setUp(), add the following lines to define the relationships between PriceResponse, Price, Currency and Cryptocurrency:
// 1
container.register(Currency.self) { _ in .USD }
container.register(CryptoCurrency.self) { _ in .BTC }

// 2
container.register(Price.self) { resolver in
  let crypto = resolver.resolve(CryptoCurrency.self)!
  let currency = resolver.resolve(Currency.self)!
  return Price(base: crypto, amount: "999456", currency: currency)
}

// 3
container.register(PriceResponse.self) { resolver in
  let price = resolver.resolve(Price.self)!
  return PriceResponse(data: price, warnings: nil)
}
This piece of code uses the container’s register() method to register how specific dependencies are created for this unit test. It accepts the expected type as an argument and a closure with a single argument — a resolver — that creates an instance of that type. Later, when your container is asked to “resolve” these dependencies, it will use these registrations to create them as needed.
Time to go through your first-ever Swinject code:
- You register the
Currencytype to always returnUSD - You register the
CryptoCurrencytype to always returnBTC - This is where things get interesting: you register the
Pricetype which in itself has two dependencies. To create these dependencies, ask the providedresolverto create them by usingresolve(_:). - Similarly to the previous registration, you register the
PriceResponsetype and resolve aPricedependency needed to create it.
At this point, your tests will still fail, but your testable dependencies are now correctly registered in the Swinject Container.
Writing Your First Swinject Test
To write your first Swinject test, replace the XCTFail() statement in testPriceResponseData() with the following:
let response = container.resolve(PriceResponse.self)!
XCTAssertEqual(response.data.amount, "999456")
This checks that the PriceResponse object is correctly created (i.e., resolved) by inspecting the amount on one of its corresponding sub-objects, Price. Build and run the tests again using Command-U:

Congratulations, you have successfully performed Dependency Injection using Swinject! One down, four to go.

Improving Tests with Autoregister
In the previous example, you required a lot of setup code before writing a single unit test. Swinject has a less verbose method for this called autoregister, which is provided by a separate library in the Swinject organization named SwinjectAutoregistration. In this section of the tutorial, you’ll use it to write a second set of tests for the PriceResponse object.
autoregister in the official Swinject autoregistration documentation.Press Command-Shift-O within Xcode and search for AutoregisterTests.swift. Hit Return to open it.
At the top of the file there are two extensions:
extension PriceResponse {
  init(data: Price) {
    self.init(data: data, warnings: nil)
  }
}

extension Price {
  init(amount: String) {
    self.init(base: .BTC, amount: amount, currency: .USD)
  }
}
These extensions provide an initializer for each of the Price and PriceResponse objects. Although Swinject works nicely in most cases, autoregister does not currently work if a property uses a failable initializer. These extensions avoid this by always returning a non-optional result.
Prior to Writing the Tests
To use autoregister on the Price and PriceResponseData objects, completely replace setUp() with:
override func setUp() {
  super.setUp()
  container.autoregister(Price.self,
                         argument: String.self,
                         initializer: Price.init(amount:))

  container.autoregister(PriceResponse.self,
                         argument: Price.self,
                         initializer: PriceResponse.init(data:))
}
This code autoregisters the dependencies to use the provided initializer to create the correct dependency whenever you ask the container to resolve it.
Note that, unlike the previous example, you haven’t yet specified any property values. Soon, you’ll add them as part of the tests, which is much better than relying on ‘magic numbers’ in the registration code.
Autoregistered Tests
Add the following logic to testPriceResponseData(), in place of the XCTFail call:
let price = container ~> (Price.self, argument: "789654")
let response = container ~> (PriceResponse.self, argument: price)
XCTAssertEqual(response.data.amount, "789654")
Note the use of the ~> operator here; this is part of the SwinjectAutoregistration library and further simplifies your code.
let price = container ~> (Price.self, argument: "789654")
is equivalent to
let price = container.resolve(Price.self, argument: "789654")!
However, the former produces much tidier code and has the nice effect of removing the need for force-unwrapping.
Finish up your test suite by replacing the contents of testPrice() with the following:
let price = container ~> (Price.self, argument: "999456")
XCTAssertEqual(price.amount, "999456")
Once more, build and run the tests using Command-U. Make sure the Autoregister tests pass.
Almost there… :]
In this section, you saw how using autoregister(_:argument:initializer:) and the ~> operator can produce simpler and more readable code when using Swinject to resolve your dependencies. Use this approach wherever possible to improve the readability and maintainability of your code.
Clean and readable code will be a nice surprise to future-you :]
Simulating Networking in Tests
Next, you’ll write tests for a more complex test scenario where HTTP response mocking is required.
Press Command-Shift-O within Xcode and search for SimulatedNetworkTests.swift. Hit Return to open it.
Notice the DataSet enum at the top of the file. This enum represents two different JSON files that contain valid data returned by the Coinbase API: dataset-one.json and dataset-two.json. Open each and familiarize yourself with their contents.
Prior to Writing the Tests
Return to SimulatedNetworkTests.swift. To use the JSON files as simulated or mocked HTTP responses, you’ll need to use a new struct implementing the Networking protocol you defined earlier in this tutorial. Add the following code above the DataSet enumeration:
struct SimulatedNetworking: Networking {
  let filename: String

  func request(from: Endpoint, completion: @escaping CompletionHandler) {
    let data = readJSON(name: filename)
    completion(data, nil)
  }

  private func readJSON(name: String) -> Data? {
    let bundle = Bundle(for: SimulatedNetworkTests.self)
    guard let url = bundle.url(forResource: name, withExtension: "json") else { return nil }

    do {
      return try Data(contentsOf: url, options: .mappedIfSafe)
    }
    catch {
      XCTFail("Error occurred parsing test data")
      return nil
    }
  }
}
All this does is create a specific implementation of Networking that returns a response from disk instead of using an HTTP request.
Now, it’s time to register the mocked networking struct so its used by BitcoinPriceFetcher. Add the following to setUp(), after the call to super.setUp():
container.autoregister(Networking.self,
                       argument: String.self,
                       initializer: SimulatedNetworking.init)

DataSet.all.forEach { dataSet in
  container.register(BitcoinPriceFetcher.self, name: dataSet.name) { resolver in
    let networking = resolver ~> (Networking.self, argument: dataSet.filename)
    return BitcoinPriceFetcher(networking: networking)
  }
}
This code registers two instances of BitcoinPriceFetcher, one for each of the available data sets. Inside the registration closure, the Networking dependency for each BitcoinPriceFetcher is provided using the provided resolver and resolved using the ~> operator introduced earlier. The different instances are named so they can be retrieved independently. Each instance gets its mocked results from its relevant JSON file included in the project.
Writing Your First Complex Test
Finally, it’s time to write some tests for BitcoinPriceFetcher!
While still in SimulatedNetworkTests.swift, replace the contents of testDatasetOne() with the following:
let fetcher = container ~> (BitcoinPriceFetcher.self, name: DataSet.one.name)
let expectation = XCTestExpectation(description: "Fetch Bitcoin price from dataset one")

fetcher.fetch { response in
  XCTAssertEqual("100000.01", response!.data.amount)
  expectation.fulfill()
}

wait(for: [expectation], timeout: 1.0)
In this code, you resolve an instance of BitcoinPriceFetcher that uses the first JSON dataset; this works because you previously registered a named container. You then use its fetch method, and assert the results to ensure that the value of data.amount matches the data in the dataset-one.json file.
Because fetch is asynchronous, you use XCTestExpectation to wait for the response before ending the test.
Press Command-U to build and run the Unit Tests. Confirm testDatasetOne() succeeds:
Only one more to go!
The Final Test
You’re finally at your final test for this tutorial that confirms you can retrieve and use the BitcoinPriceFetcher associated with the second JSON dataset.
Replace the contents of testDatasetTwo() with:
let fetcher = container ~> (BitcoinPriceFetcher.self, name: DataSet.two.name)
let expectation = XCTestExpectation(description: "Fetch Bitcoin price from dataset two")

fetcher.fetch { response in
  XCTAssertEqual("9999999.76", response!.data.amount)
  expectation.fulfill()
}

wait(for: [expectation], timeout: 1.0)
Getting a sense of déjà vu? Except for the name used to resolve the BitcoinPriceFetcher, and the different amount value you’re checking for, this code is practically identical to the code provided for testDatasetOne().
For the last time, press Command-U to build and run the Unit Tests. Confirm they all pass by waiting for the “Test Succeeded” message to appear.

Congratulations, you now have unit tests correctly using Dependency Injection, where the tests are getting their dependencies resolved by a DI Container while keeping concerns separated and modularized. Excellent work, kudos to you! :]
Dependency Injection Outside of Tests
You can also use Dependency injection outside of tests. In the final section of this tutorial, you will return to the main app to further decouple objects.
Go back to BitcoinViewController.swift using Command-Shift-O, and note that the BitcoinViewController is still providing its own instance of the PriceFetcher object. To become truly decoupled, you need to inject this into the view controller from a different object.
When Bitcoin Adventurer is launched, iOS looks into Info.plist to determine on which storyboard the app starts. Main.storyboard is listed and contains a reference to BitcoinViewController which indicates it should be the entry point for that storyboard.
To inject anything into BitcoinViewController, you’ll need to intercept this UIViewController prior to it being presented. This functionality is provided by a separate library alongside Swinject, called SwinjectStoryboard.
Extending SwinjectStoryboard
To use SwinjectStoryboard, you need to extend it within your own code. Create a new file for your extension by going to File\New\File. Name the file SwinjectStoryboard+Extension.swift. Before clicking Create, verify the Bitcoin Adventurer target is selected.
In the newly created file, add the following import statements so you can use Swinject and the other libraries:
import Swinject
import SwinjectStoryboard
import SwinjectAutoregistration
The next stepis to extend SwinjectStoryboard and provide a static setup() method to correctly register the required dependencies of BitcoinViewController. Add the following code:
extension SwinjectStoryboard {
   @objc class func setup() {
     defaultContainer.autoregister(Networking.self, initializer: HTTPNetworking.init)
     defaultContainer.autoregister(PriceFetcher.self, initializer: BitcoinPriceFetcher.init)
   }
}
This code uses autoregister(_:initializer:) so that every time a Networking protocol is requested, a resolved instance of HTTPNetworking is returned. The same goes for the PriceFetcher protocol and a resolved instance of BitcoinPriceFetcher.
Swinject & BitcoinViewController
By default, SwinjectStoryboard provides a defaultContainer variable that can be used for resolving dependencies.
Navigate to BitcoinViewController.swift and change:
let fetcher = BitcoinPriceFetcher(networking: HTTPNetworking())
to
var fetcher: PriceFetcher?
The reason you made fetcher an optional var is so that Swinject can properly inject the required dependency to it externally. Since storyboards don’t support custom initializers very well, this is the best practice of providing external dependencies using a storyboard.
If you try build the application now, you will get errors because fetcher is now an optional.
Return to SwinjectStoryboard+Extension.swift to provide this mapping, adding the following to setup():
defaultContainer.storyboardInitCompleted(BitcoinViewController.self) { resolver, controller in
  controller.fetcher = resolver ~> PriceFetcher.self
}
This code gets executed just before the BitcoinViewController is displayed and resolves the registered dependency conforming to PriceFetcher, i.e., a BitcoinPriceFetcher.
One final change before running the final project. Since your fetcher is now optional, add the following line of code at the beginning of requestPrice() in BitcoinViewController.swift:
guard let fetcher = fetcher else { fatalError("Missing dependencies") }
Build and run the project one final time by using the Command-R key combination. The app should correctly work as it did up until now, even though you have no instantiation of dependencies happening inside your BitcoinViewController; instead, those are injected externally by the Swinject setup you just worked on.

Doesn’t this all just seem like magic?
You may already have some ideas for how you can expand on these ideas by refactoring BitcoinViewController to be a more generic CryptoCurrencyViewController, while mapping other instances of PriceFetcher (e.g. EthereumPriceFetcher) to further enhance the functionality of your application.
While there’s been no change to the functionality provided by this application throughout this tutorial, your changes have significantly improved the quality of the code contained within it thanks to refactoring and decoupling objects with Swinject.

Coin-gratulations on a job well done!
Where to Go From Here?
You can download the finished project using the link and the top and bottom of this tutorial with all of the code you’ve adjusted to make use of Dependency Injection with Swinject.
There’s a lot more to Swinject then covered in this tutorial, so I recommend you check out Swinject’s Documentation on Github.
Below are some excellent resources to learn more about Dependency Injection with Swift:
- Ash Furrow – Dependency Injection in Swift
- Natasha The Robot – Unit Testing In Swift: Dependency Injection
You may also wish to look at Cleanse by Square, or Typhoon by AppsQuickly. Both libraries are alternatives to Swinject.
Thanks for reading! If you have any questions or comments about this tutorial, please join the forum discussion below!
The post Swinject Tutorial for iOS: Getting Started appeared first on Ray Wenderlich.