Update Note: This tutorial is now up to date with the latest version of Android Studio version 3.1.2, and uses Kotlin for app development. Update by Fuad Kamal. Original tutorial by Eunice Obugyei.

Networking has played a critical role in Android apps since the very beginning of Android development. Most apps don’t work in isolation; rather, they connect to an online service to retrieve data or perform other networking functions.
In this Android networking tutorial, you will create a simple app which connects to the GitHub API to retrieve and display a list of repositories.
In the process, you will learn about the following:
- How to check your network connection status.
- How to perform network operations.
- How to leverage open source libraries to perform network operations.
- How to profile the network performance of your app.
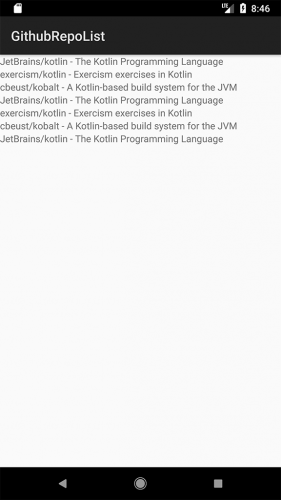
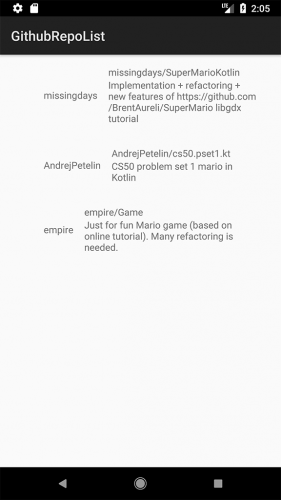
By the end of this tutorial, you will have built the GitHubRepoList app that runs a search query against the GithHub API and displays the results:
Beginning Android Development tutorials to familiarize yourself with the basics.
Getting Started
Download the materials for this tutorial and unzip the projects. Open the starter project in Android Studio 3.1.2 or greater by selecting Open an existing Android Studio project from the Welcome to Android Studio window:
You can also use File > Open in Android Studio. Navigate to and select the starter project folder.
Open MainActivity.kt from the ui.activities package and look inside; the app is using a simple RecyclerView named repoList and populating it with a hard-coded list of repository names.
Build and run the project to see what you have to work with:
Required Permissions
To perform network operations in Android, your application must include certain permissions. Open manifests/AndroidManifest.xml, and add the following permissions before the application tag:
<uses-permission android:name="android.permission.ACCESS_NETWORK_STATE"/>
<uses-permission android:name="android.permission.INTERNET" />
The ACCESS_NETWORK_STATE permission is required for your application to check the network state of the device, while the INTERNET permission is required for your application to access the Internet.
Before adding any Kotlin code, you’ll need to configure Android Studio to automatically insert import statements to save you from having to add each one manually.
Go to Android Studio > Preferences on macOS or File > Settings on PC, then go to Editor > General > Auto Import, select the Add unambiguous imports on the fly and Optimize imports on the fly (for current project) checkboxes and click OK.
Making a Network Request
MainActivity.kt defines a value url that contains the first network request you will make, but up until now you haven’t used it. The url value is a search using the Github API, for repositories containing the term “mario” written in Kotlin. You want to start with a narrow search so you aren’t overwhelmed with too much data at a first. Add the following code to the end of onCreate():
doAsync {
  Request(url).run()
  uiThread { longToast("Request performed") }
}
Request is a placeholder class provided in the starter project, inside the data package.
Network requests are not allowed on the app main thread, also called the UI thread. Blocking the main thread would not only make for a bad user experience, but also the Android system would cause your app to throw an exception. doAsync() is part of a Domain Specfic Language or DSL provided by the Kotlin library Anko which provides a simple way to execute code on a thread other than the main thread, with the option to return to the main thread by calling uiThread().
Open Request.kt and replace the TODO comment in the run() function with the following two lines of code:
val repoListJsonStr = URL(url).readText()
Log.d(javaClass.simpleName, repoListJsonStr)
That’s it! The readText() command makes the network request. The Log.d() call writes the network response to Logcat.
In one line of Kotlin you’ve managed to do what used to take a lot of complicated Java code. That’s one of the many benefits of Kotlin. It’s very concise and avoids a lot of the boilerplate code you used to have to write in Java.
readText() does have an internal limit of 2 GB file size. This should be fine in most cases, but if you are anticipating a huge response that will exceed that limit, there are many other extensions you can use, such as BufferedReader.forEachLine(), or you can use a third party networking library, as discussed later in this tutorial.
Build and run. The UI hasn’t changed at all in the emulator – it’s still showing the hard-coded list from before.
In Android Studio, click on the Logcat tab at the bottom of the screen, and you should see a bunch of JSON received in response to the network request you made. Tap the Use Soft Wraps button on the left toolbar to better see the JSON response.
Congratulations! You’ve already made your first network request with Android and Kotlin.
Checking the Network Connection
To provide a good user experience, you should be checking whether the user has a network connection before making the request. Add the following method to MainActivity:
private fun isNetworkConnected(): Boolean {
  val connectivityManager = getSystemService(Context.CONNECTIVITY_SERVICE) as ConnectivityManager //1
  val networkInfo = connectivityManager.activeNetworkInfo //2
  return networkInfo != null && networkInfo.isConnected //3
}
isNetworkConnected() checks that the device has an active Internet connection as follows:
- Retrieves an instance of the ConnectivityManager class from the current application context.
- Retrieves an instance of the NetworkInfo class that represents the current network connection. This will be null if no network is available.
- Check if there is an available network connection and the device is connected.
Now replace the doAsync{…} code in the onCreate() method with the following:
if (isNetworkConnected()) {
  doAsync {
    Request(url).run()
    uiThread { longToast("Request performed") }
  }
} else {
  AlertDialog.Builder(this).setTitle("No Internet Connection")
      .setMessage("Please check your internet connection and try again")
      .setPositiveButton(android.R.string.ok) { _, _ -> }
      .setIcon(android.R.drawable.ic_dialog_alert).show()
}
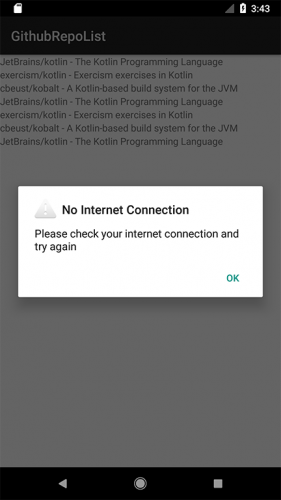
This code first checks to see if there is a network connection. If there is one, the app makes the network request, otherwise it displays an alert to the user instead.
Set a breakpoint on the if expression and be sure to debug (not just run) your app by pressing the icon in Android Studio that looks like a little bug with a play button on it.
Android Studio will build and run your app, and then pause execution at the if statement. Now you can “step over” the code by pressing the step over button in the debug pane. If your emulator has a network connection, again the doAsync block should execute and you will see the resulting JSON response in the Logcat tab.
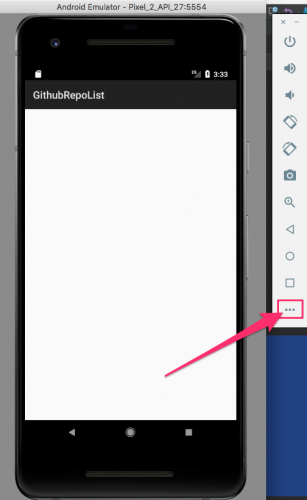
In the emulator, turn off WiFi if it’s on by swiping down from the top and toggling WiFi off. Then press the ... button at the bottom of the list of controls to open up the Extended controls window.
Click on the Cellular tab. To emulate no connection, set Data status to Denied. The Network Type and Signal Strength settings do not matter in this case.
Debug your app again. This time, when you step over your code, it should go into the else clause and an alert should show up on the emulator:
Be sure to set the Data status back to ‘Home’ for the rest of this tutorial. :]
Updating the UI
Now that you’re successfully making a network request when the user’s device has connectivity, you will update the UI so you can see the results on screen.
First, you need to define a data model that makes some sense of the JSON you are getting back from your response.
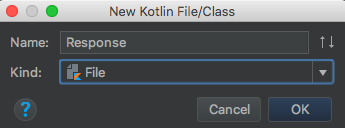
Right-click on the data package in the project, and from the context menu select New > Kotlin File/Class.
In the dialogue, name it Response and choose File for the type.
The file Response.kt will open. Enter the following code:
data class RepoResult(val items: List<Item>)

data class Item(
    val id: Long?,
    val name: String?,
    val full_name: String?,
    val owner: Owner,
    val private: Boolean,
    val html_url: String?,
    val description: String?)

data class Owner(val login: String?, val id: Long?, val avatar_url: String?)
In Kotlin, a data class is a convenient way to express a value object.
Now that you have a RepoResult, which in turn is a list of Item objects from your JSON response, you need to also modify the Adapter for your RecyclerView to accept this more complex object instead of the list of hard coded strings you were sending it before.
Open RepoListAdapter.kt and replace the contents below the package statement with the following:
import android.support.v7.widget.RecyclerView
import android.view.LayoutInflater
import android.view.View
import android.view.ViewGroup
import com.raywenderlich.githubrepolist.R
import com.raywenderlich.githubrepolist.data.Item
import com.raywenderlich.githubrepolist.data.RepoResult
import com.raywenderlich.githubrepolist.extensions.ctx
import kotlinx.android.synthetic.main.item_repo.view.* //1

class RepoListAdapter(private val repoList: RepoResult) : RecyclerView.Adapter<RepoListAdapter.ViewHolder>() {

  override fun onCreateViewHolder(parent: ViewGroup, viewType: Int): ViewHolder {
    val view = LayoutInflater.from(parent.ctx).inflate(R.layout.item_repo, parent, false) //2
    return ViewHolder(view)
  }


  override fun onBindViewHolder(holder: ViewHolder, position: Int) {
    holder.bindRepo(repoList.items[position]) //3
  }

  override fun getItemCount(): Int = repoList.items.size //4

  class ViewHolder(view: View) : RecyclerView.ViewHolder(view) {
    fun bindRepo(repo: Item) { //5
      with(repo) {
        itemView.username.text = repo.owner.login.orEmpty() //6
        itemView.repoName.text = repo.full_name.orEmpty() //7
        itemView.repoDescription.text = repo.description.orEmpty()
      }
    }
  }
}
Here’s what’s going on in the updated class:
- You are able to reference view components from the XML layout directly from your Kotlin code. This is because you are making use of Kotlin Android Extensions with this import statement.
R.layout.item_repois the layout defined in item_repo.xml- You reference your position in the list of
Items rather than the the position in the hardcoded list. - Likewise your list size is now set by the response rather than the hardcoded list.
- You are passing in the
Itemtype you defined earlier in your data class. - You populate the username text defined in item_repo.xml with the
Owner.logindefined in your data class definitions. An important best practice when dealing with JSON responses from an API is not to assume that every value will always be non-empty. So, if there is no value for the field, you just make it an empty string. This also illustrates some of the safety features of Kotlin; your app won’t be crashing because it tried to access a null value. - Likewise, you populate the name of the repository and the repository description.
Next, open the build.gradle file of the app module and add the following to the list of dependencies:
implementation 'com.google.code.gson:gson:2.8.2'
This will let you use the GSON library in your code.
Click the Make Project button at the top of Android Studio.
Open Request.kt and replace the entire class definition of Request with the following:
class Request() {

  companion object { //1
    private val URL = "https://api.github.com/search/repositories"
    private val SEARCH = "q=mario+language:kotlin&sort=stars&order=desc"
    private val COMPLETE_URL = "$URL?$SEARCH"
  }

  fun run(): RepoResult { //2
    val repoListJsonStr = URL(COMPLETE_URL).readText() //3
    return Gson().fromJson(repoListJsonStr, RepoResult::class.java) //4
  }
}
Here:
- You define a companion object to hold the API endpoint (URL), a search term, and then the combined API endpoint + search term. You could populate these from user input fields in the UI later if you want to.
- The
run()method now returns a data structureRepoResultwhich you defined in Response.kt. - Again, you execute the actual request using
readText(). - You use the GSON library to parse the JSON into your data structure.
Open MainActivity and in onCreate() remove setting the repoList.adapter near the top of the method. Then update the code inside the first block of the if expression with the following:
doAsync {
  val result = Request().run()
  uiThread {
    repoList.adapter = RepoListAdapter(result)
  }
}
You have replaced the toast message with a single line of code that updates the Recycler View with the response from your network call.
You can also delete the declaration for the items property, as you are no longer using the hard-coded list.
Build and run. You should now see a list of repositories from GitHub in your UI:
Cool – your app connected to the GitHub API and retrieved a list of repositories for your perusal!
A Longer Search Result
Logcat itself has a limit, so if you had a very big search result earlier, you wouldn’t have been able to see the entire JSON result there.
Now that you are populating the UI with your actual search result, you are no longer concerned with dealing with a huge JSON result. The longer the result, the more you can see and scroll in your UI. So, why not have a look at all the Kotlin repositories on Github!
Open the Request class and replace the search parameter with the following:
private val SEARCH = "q=language:kotlin&sort=stars&order=desc"
Build and run. You should now see a much longer search result:
Go ahead and scroll the screen. Enjoy that silky smooth motion.
Actually, at the time of this writing, there aren’t that many Kotlin repositories. Which is great news for you because it means you are learning a brand-new language that is still somewhat niche and can earn you big bucks.
Open Source To The Rescue
Back in the Java days, performing network operations on Android used to be tedious. But with Kotlin, it’s super simple.
Yet there are still occasions where you might want to use a third party networking library. Next up, you will update your app to use the most popular of these libraries, Retrofit from Square, and as a bonus pretty up the UI with some images.
Retrofit
Retrofit is an Android and Java library which is great at retrieving and uploading structured data such as JSON and XML. Retrofit makes HTTP requests using another library from Square, OkHttp.
OkHttp is an efficient HTTP client which supports synchronous and asynchronous calls. It handles the opening and closing of connections along with InputStream-to-string conversion. It’s compatible with Android 2.3 and above.
Retrofit also lets you specify any of the following libraries for the data conversion:
To use Retrofit, add the following dependencies to build.gradle of the app module and resync your Gradle files:
implementation 'com.squareup.retrofit2:retrofit:2.3.0'
implementation 'com.squareup.retrofit2:converter-gson:2.3.0'
Also, delete the GSON dependency you added earlier (implementation 'com.google.code.gson:gson:2.8.2'); you’ll no longer need it since the parsing will be handled by the libraries specified with Retrofit.
Finally, for all these dependencies, the version numbers above are what was available at the time this tutorial was written. You should check what the current versions are and use those in your build.gradle file.
Click the Make Project button at the top of Android Studio.
Next, create a new package in your app called api by right-clicking on the root package and picking New > Package.
Right-click on the api package and from the context menu select New > Kotlin File/Class. Give it the name GithubService and for Kind select Interface:
Replace the contents of GithubService.kt below the package statement with the following:
import com.raywenderlich.githubrepolist.data.RepoResult
import retrofit2.Call
import retrofit2.http.GET

interface GithubService {
  @GET("/repositories")
  fun retrieveRepositories(): Call<RepoResult>

  @GET("/search/repositories?q=language:kotlin&sort=stars&order=desc") //sample search
  fun searchRepositories(): Call<RepoResult>
}
You’ve create an interface for use with Retrofit to connect to the GitHub api. You’ve added two methods to the interface with @GET annotations that specify the GitHub endpoints to make GET requests to.
Now make a second file in the api package, but for the Kind select Class, and name it RepositoryRetriever. Replace the empty class with the following:
class RepositoryRetriever {
  private val service: GithubService

  companion object {
    const val BASE_URL = "https://api.github.com/"  //1
  }

  init {
    // 2
    val retrofit = Retrofit.Builder()
        .baseUrl(BASE_URL) //1
        .addConverterFactory(GsonConverterFactory.create()) //3
        .build()
    service = retrofit.create(GithubService::class.java) //4
  }

  fun getRepositories(callback: Callback<RepoResult>) { //5
    val call = service.searchRepositories()
    call.enqueue(callback)
  }
}
Be sure to use the Retrofit import for the Callback:
import retrofit2.Callback
RepositoryRetriever does the following:
- Specifies the base URL
- Creates a Retrofit object
- Specifies
GsonConverterFactoryas the converter which uses Gson for its JSON deserialization. - Generates an implementation of the GithubService interface using the Retrofit object
- Has a method to create a Retrofit
Callobject on which youenqueue()a network call, passing in a Retrofit callback. A successful response body type is set toRepoResult
The Retrofit enqueue() method will perform your network call off the main thread.
Finally, you need to modify MainActivity to use Retrofit for making the network request and handling the response.
First, add the following to properties at the top of MainActivity:
private val repoRetriever = RepositoryRetriever() // 1

// 2
private val callback = object : Callback<RepoResult> {
  override fun onFailure(call: Call<RepoResult>?, t: Throwable?) {
    Log.e("MainActivity", "Problem calling Github API", t)
  }

  override fun onResponse(call: Call<RepoResult>?, response: Response<RepoResult>?) {
    response?.isSuccessful.let {
      val resultList = RepoResult(response?.body()?.items ?: emptyList())
      repoList.adapter = RepoListAdapter(resultList)
    }
  }
}
Your two properties are:
- A
RepositoryRetriever. - A Retrofit
Callbackobject that has two overrides,
onFailure()onResponse().
In the success callback method, you update the RecyclerView adapter with the items in the response.
Update onCreate() method to delete the doAsync{…} block and replace it with a call to the RepositoryRetriever:
override fun onCreate(savedInstanceState: Bundle?) {
  super.onCreate(savedInstanceState)
  setContentView(R.layout.activity_main)

  repoList.layoutManager = LinearLayoutManager(this)

  if (isNetworkConnected()) {
    repoRetriever.getRepositories(callback)
  } else {
    AlertDialog.Builder(this).setTitle("No Internet Connection")
        .setMessage("Please check your internet connection and try again")
        .setPositiveButton(android.R.string.ok) { _, _ -> }
        .setIcon(android.R.drawable.ic_dialog_alert).show()
  }
}
If Android Studio has trouble with generating the imports, add the following three imports get added to the class:
import retrofit2.Call
import retrofit2.Callback
import retrofit2.Response
Build and run to verify everything still works. Your app should look the same. But now you’re using Retrofit to handle networking under the hood.
Network Profiling
OkHttp contains a logging interceptor that you could use to log network requests and responses that you make with Retrofit, which can help wih debugging your network calls. However, Android Studio 3.0 introduced the Android Network Profiler, which replaces the need for the logging interceptor.
Instead of running or debugging your app, click the Android Profiler icon at the top right corner in Android Studio:
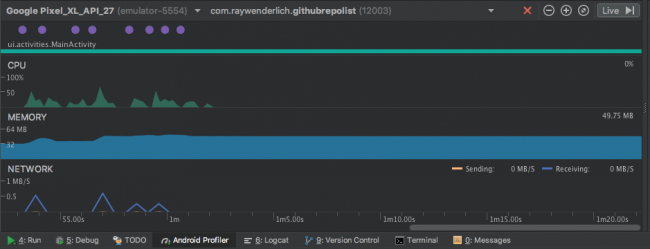
Your app will build and run like before, but now the Android Profiler tab will also open:
The profiler displays real time data of your app’s performance. You can toggle the real-time feedback by pressing the “Live” button in the Profiler. What you see here is a shared timeline which includes data for the CPU, memory, and network usage.
To access the detailed profiling tools, such as the Network Profiler, click on the corresponding graph. Click on the Network graph and you will see detailed performance information from when your app made the network request and received the response:
The profiler sometimes has trouble when a network call happens when your app first starts up. Let’s add a refresh button so we can refresh the data and make a second call after the app starts up.
Open the file res/layout/activity_main.xml and update the content as follows:
<?xml version="1.0" encoding="utf-8"?>
<LinearLayout xmlns:android="http://schemas.android.com/apk/res/android"
  android:layout_width="match_parent"
  android:layout_height="match_parent"
  android:orientation="vertical">

  <android.support.v7.widget.RecyclerView
    android:id="@+id/repoList"
    android:layout_width="match_parent"
    android:layout_height="0dp"
    android:layout_weight="1" />

  <Button
    android:id="@+id/refreshButton"
    android:layout_width="match_parent"
    android:layout_height="wrap_content"
    android:text="Refresh" />

</LinearLayout>
You’ve converted to a LinearLayout and added a button to refresh the screen.
Back in onCreate(), add the following button on click listener at the end of the method:
refreshButton.setOnClickListener {
  repoRetriever.getRepositories(callback)
}
Now build and run the app using the prfile button. After the app starts up, tap the refresh button, and you’ll get a second network call to the GitHub API.
Click inside the network profiler, and then drag to select the second network call. A panel will open with a Connection View tab for the selected network call. Select the network call in the list, and another panel will open with Overview, Response, Request, and Call Stack tabs:
The various tabs give you the information you need to debug any issues that occur when calling a back-end API.
Adding Images to the Mix
Time to spice things up! Complete your app by bringing in the icons for each repository as well.
You can do this using the Picasso library, also from Square. You need to modify the app build.gradle file to use Picasso by adding the following dependency:
implementation 'com.squareup.picasso:picasso:2.71828'
Now open ReposListAdapter and populate the icon using the following statement at the end of the with block inside the bindRepo() method of the view holder:
Picasso.get().load(repo.owner.avatar_url).into(itemView.icon)
Build and run and your app. It should look similar to this:
Where to Go From Here?
You’ve explored (and survived!) a crash-course on network operations in Android. :] You can download the final project using the button at the top or bottom of the tutorial.
For more details on the open source projects used in this Android networking tutorial, check out the Retrofit and Picasso pages on Square’s GitHub pages.
You can also check out the Android Profiler page on the Android developer site, and techniques for reducing device battery drain by optimizing your app’s network activity: Reducing Network Battery Drain.
For a deeper dive into Android networking and Retrofit, check out our
Android Networking video course.
I hope you enjoyed this tutorial; if you have any questions or comments, please join the forum discussion below!
The post Android Networking Tutorial: Getting Started appeared first on Ray Wenderlich.


