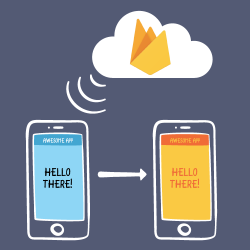
With Remote Config, you can update the look of your app whenever you want!
Yeah, me neither.
Being a successful app developer usually means making frequent changes to your app. Sometimes, these changes are new features or bug fixes. But, sometimes, the most impactful updates are one-line changes to your code, like adjusting a line of text or nerfing a powerful unit in a tower defense game.
While these kinds of changes are easy to make, publishing them is still a multi-day process. Wouldn’t it be nice if you could make some of these tweaks without having to go through that whole process?
Firebase Remote Config gives you that power. Throughout the course of this Firebase Remote Config tutorial for iOS, you’ll use the Planet Tour sample app to learn how you can change text, colors and other behavior without having to publish new builds! Once mastered, you’ll cover the more powerful feature of delivering different sets of content to different users.
Getting Started
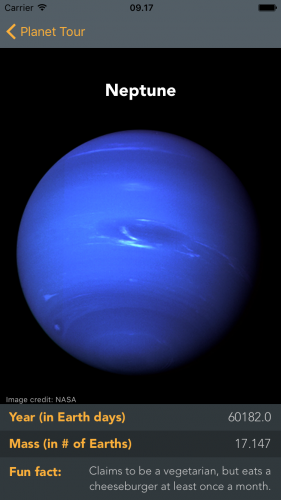
Get started in this Firebase Remote Config tutorial for iOS by downloading the materials via the Download Materials link at the top or bottom of this tutorial. Unzip and run the starter project app. You can scroll to view different planets, tapping on each to get some (mostly accurate) extra information.
The app you’ve just downloaded is made by Planet Tour Apps, Inc., where things are going great until, one day, Greg from marketing decides Planet Tour should switch to a green color scheme in celebration of Earth Day.
It’s an easy enough fix — if you look in AppConstants.swift, there’s an appPrimaryColor variable you can change, which will affect many of your text label colors. Pushing this change out to your users would involve publishing a new build, submitting it to the App Store, getting it approved and then hoping all of your users download it before Earth Day. You’d have to do the whole process again to revert the change once Earth Day was over.
Wouldn’t it be nice if you could just alter these values… from the cloud?
Installing the Remote Config Library
To get started using Remote Config instead of the hard-coded values currently in AppConstants, you’ll need to create a project in the Firebase Console, associate it with the Planet Tour app, and then install the Firebase Remote Config library.
One step at a time:
- Open firebase.google.com/console
- Click Create New Project.
- Name your project Planet Tour, make sure your region is selected, and then click Create Project.
![Firebase Remote Config Tutorial for iOS]()
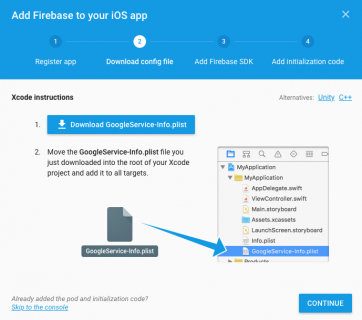
- Next, click Add Firebase to your iOS app:
![Firebase Remote Config tutorial for iOS]()
- Add the bundle ID of your project — com.razeware.Planet-Tour — leave the App Store ID field blank, and then click Register App:
![Firebase Remote Config tutorial for iOS]()
- Click the Download button to download a GoogleServices-info.plist file:
- At this point, your browser will download a GoogleServices-info.plist file for you. Drag this file into your Xcode project. Be sure to select Copy Items if Needed.
- Click Continue through the remaining few steps in the setup wizard. Don’t worry; you’ll walk through those instructions next.
- Close Planet Tour in Xcode.
- Open a terminal window, navigate to your project and type
pod initto create a basic Podfile. - Edit your Podfile in your favorite text editor, replacing its contents with the following:
# Uncomment the next line to define a global platform for your project
platform :ios, '9.0'

target 'Planet Tour' do
  # Comment the next line if you're not using Swift and don't want to use dynamic frameworks
  use_frameworks!

  # Pods for Planet Tour
  pod 'Firebase/Core'
  pod 'Firebase/RemoteConfig'
end
- Run pod install, then open Planet Tour.xcworkspace in Xcode.
- Open AppDelegate.swift. Add the following below
import UIKit:import Firebase
Next, add the following to
application(_:didFinishLaunchingWithOptions:)above thereturnstatement:FirebaseApp.configure()
This method reviews the libraries you already have installed and initializes them using the constants provided to your project when you added the GoogleServices-info.plist file. The Remote Config library now knows the proper place to look on the internet to find new values.


Build and run your app, again. The app should look as it did previously except that you’ll see debug information in your console output that you didn’t see before.
Congratulations! You’ve installed Remote Config! Now you can use it in the rest of this Firebase Remote Config tutorial for iOS.
How Remote Config Works
Oversimplified, Remote Config works similarly to a [String: Any?] dictionary living in the cloud. When your app starts, it grabs any new values it might need from the cloud, then applies them on top of any old values you may have specified as defaults.
The general process for using Remote Config looks like this:
- Provide Remote Config with defaults for any value you may possibly change in the future.
- Fetch any new values from the cloud. These are kept in a cached holding pattern on your device.
- “Activate” those fetched values. When this happens, this applies those fetched values on top of your existing default values.
- Query Remote Config for values. Remote Config will either give you a value from the cloud, if it found one, or a default value based on the provided key.
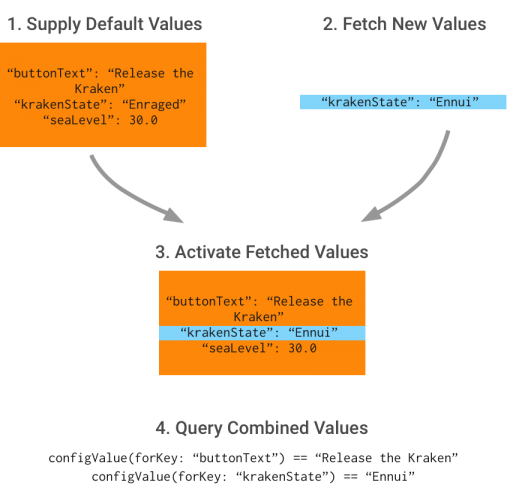
One important thing to note is that these new values you fetch are generally a subset of the default values that you supply. You can take nearly any hard-coded string, number or Boolean in your app, and wire it up to use Remote Config. This gives you the flexibility to change many aspects of your app later, while still keeping your actual network calls nice and small.
Enough theory. Time to put this into practice!
Using Remote Config
First, open your Utilities folder in the Planet Tour Xcode project and right-click to create a new file. Select Swift file. Name it RCValues.swift, and create it in the default folder suggested by Xcode.
Add the following to the end of the file:
import Firebase

class RCValues {

  static let sharedInstance = RCValues()

  private init() {
    loadDefaultValues()
  }

  func loadDefaultValues() {
    let appDefaults: [String: Any?] = [
      "appPrimaryColor" : "#FBB03B"
    ]
    RemoteConfig.remoteConfig().setDefaults(appDefaults as? [String: NSObject])
  }
}
Here, you use the Singleton pattern for RCValues. Inside loadDefaultValues(), you’re passing along a set of keys and values to Remote Config as defaults. Right now, you’re only suppling one value but don’t worry, you’ll add more later.
Next, you need to ask Remote Config to fetch new values from the cloud. Add the following method below loadDefaultValues() to fetch these values:
func fetchCloudValues() {
  // 1
  // WARNING: Don't actually do this in production!
  let fetchDuration: TimeInterval = 0
  RemoteConfig.remoteConfig().fetch(withExpirationDuration: fetchDuration) { status, error in

    if let error = error {
      print("Uh-oh. Got an error fetching remote values \(error)")
      return
    }

    // 2
    RemoteConfig.remoteConfig().activateFetched()
    print("Retrieved values from the cloud!")
  }
}
Let’s go over what you did here:
1. By default, Remote Config will cache any values it retrieves from the cloud for about 12 hours. In a production app, this is probably just fine. But when you’re doing development — or following a Firebase Remote Config tutorial for iOS online — this can make it really tough to test out new values. So, instead, you’re specifying a fetchDuration of 0 to ensure you never use the cached data.
2. In the completion handler, you activate these fetched values immediately — i.e., you’re telling Remote Config to apply these newer values on top of any older ones it might have.
Add the following to the end of init() to call your new method:
fetchCloudValues()
Troubleshooting throttle
The code you added at the beginning has some issues. The Remote Config library has a client-side throttle to ensure that you don’t ping the service too frequently. By setting your fetchDuration to 0, you’ll hit this throttle and your library will stop fetching values.
You can get around this by enabling developer mode. Add the following method below fetchCloudValues():
func activateDebugMode() {
  if let debugSettings = RemoteConfigSettings(developerModeEnabled: true) {
    RemoteConfig.remoteConfig().configSettings = debugSettings
  }
}
By setting developer mode to true, you’re telling Remote Config to bypass the client-side throttle. For development purposes, or testing with your 10 person team, this is fine. But if you launch this app to the public with your millions of adoring fans, you’re going to hit the server-side throttle pretty quickly, and Remote Config will stop working. This is the whole reason you have a client-side throttle in the first place.
Before you launch this app for real, make sure you disable developer mode and set your fetchDuration to something a little more reasonable, like 43200> — that’s 12 hours to you and me.
Finally, add the following right after you declare fetchDuration:
activateDebugMode()
The above will activate debug mode and you’ll no longer hit the server-side throttling issue.
Running Your Code
Open AppDelegate.swift, add the following to application(_:didFinishLaunchingWithOptions:), below FirebaseApp.configure():
let _ = RCValues.sharedInstance
Build and run your app, and you should see the following line in your debug console:
Retrieved values from the cloud!
Using Remote Config Values
Now that you’re downloading these values, try printing them to the console. Open RCValues.swift. Then, add the following to fetchCloudValues(), right after the “Retrieved values from the cloud” line:
print("Our app's primary color is \(RemoteConfig.remoteConfig().configValue(forKey: "appPrimaryColor"))")
The above code will grab the appropriate value for your appPrimaryColor key.
Build and run your app. You’ll see a line like this:
Our app's primary color is <FIRRemoteConfigValue: 0x61000003ece0>
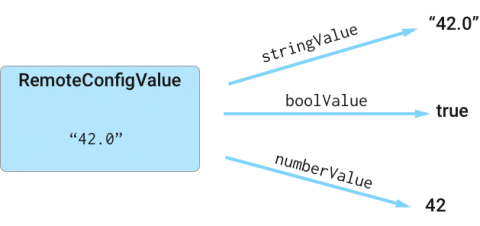
Well, that’s somewhat helpful, but you’re kind of hoping for a string value.
Remote Config retrieves values as RemoteConfigValue objects, which you can think of as wrappers around the underlying data, which is represented internally as a UTF8-encoded string. You’ll almost never use this object directly. Instead, you’ll call a helper method like numberValue or boolValue to retrieve the actual value you want.
Replace the line you just added with:
let appPrimaryColorString = RemoteConfig.remoteConfig()
                                                 .configValue(forKey: "appPrimaryColor")
                                                 .stringValue ?? "undefined"
print("Our app's primary color is \(appPrimaryColorString)")
Build and run your app. This time you’ll see:
Our app's primary color is #FBB03B
That’s more like it. Remote Config provides you the default value that you supplied earlier.
Updating Values From the Cloud
Now that you’re getting proper values from Remote Config, try supplying new values from the cloud.
Open the Firebase Console and click on the Remote Config header on the left (under the Grow header). Click Add your first parameter. In the form, enter appPrimaryColor for the key and Greg from Marketing’s favorite new green — #36C278 — for the value.
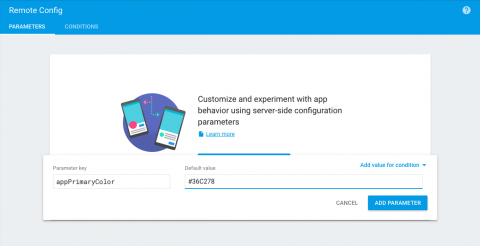
Click Add Parameter, then click Publish Changes (twice) to update the changes.
Build and run your app.
See what’s in the console now:
Our app’s primary color is #36C278
Hooray! You’re updating values from the cloud!
Changing Your App’s Look and Feel
Now, it’s time hook up your app to use this new value.
First, you’ll add an enum to represent your keys. Using raw strings for key names is a recipe for disaster — or at least you’ll spend an afternoon hunting down a mystery bug because you mistyped a key name. By using an enum, Xcode can catch errors at compile time instead of runtime.
Open RCValues.swift and add the following above the class definition:
enum ValueKey: String {
  case appPrimaryColor
}
Next, update loadDefaultValues() to use this enum instead of the raw string:
let appDefaults: [String: Any?] = [
  ValueKey.appPrimaryColor.rawValue : "#FBB03B"
]
Next, add the following helper method to RCValues, which takes in a ValueKey and returns a UIColor based on the string from Remote Config.
func color(forKey key: ValueKey) -> UIColor {
  let colorAsHexString = RemoteConfig.remoteConfig()[key.rawValue].stringValue ?? "#FFFFFF"
  let convertedColor = UIColor(colorAsHexString)
  return convertedColor
}
Finally, change the places in your app using the old AppConstants value to use this new RCValues helper method instead.
You’ll do this in three locations:
1. Open ContainerViewController.swift and change the following inside updateBanner():
bannerView.backgroundColor = AppConstants.appPrimaryColor
to this:
bannerView.backgroundColor = RCValues.sharedInstance.color(forKey: .appPrimaryColor)
2. Open GetNewsletterViewController.swift and change the following inside updateSubmitButton():
submitButton.backgroundColor = AppConstants.appPrimaryColor
to this:
submitButton.backgroundColor = RCValues.sharedInstance.color(forKey: .appPrimaryColor)
3. Open PlanetDetailViewController.swift and change the following inside updateLabelColors():
nextLabel.textColor = AppConstants.appPrimaryColor
to this:
nextLabel.textColor = RCValues.sharedInstance.color(forKey: .appPrimaryColor)
To be thorough, open AppConstants.swift and delete the following:
static let appPrimaryColor = UIColor(rgba: "#FBB03B")
See ya later, hard-coded value…
Now, build and run your app. You should see the new green throughout the app:
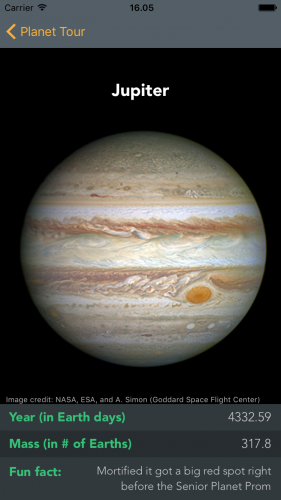
You don’t have a lot of control as to when these new values get applied. The first time you ran the app, you probably saw the default orange on the main menu but then the new green on the planet detail screens once your new values were loaded from the cloud.
This can be confusing to your users. In this case, you’re only changing some label colors, but it can be quite confusing if your app changes text or values affecting its behavior while your user is in the middle of using it.
There are numerous ways you can deal with this issue, but perhaps the easiest might be to create a loading screen. In this tutorial, there’s already one partially set up for you.

Hooking Up a Loading Screen
First, make the loading screen the inital view controller of your app. Open Main.storyboard and Control-drag from your Navigation Controller to the Waiting View Controller — it’s the view controller with the black background, although it might be easier to do this Control-dragging in your storyboard outline. Select root view controller from the pop-up: this will make your loading screen the initial screen when your app loads.

Now, you’ll add the logic to transition to the main menu when Remote Config is finished loading.
Open RCValues.swift, add the following below your sharedInstance property:
var loadingDoneCallback: (() -> Void)?
var fetchComplete = false
Next, replace fetchCloudValues() with the following:
func fetchCloudValues() {
  // WARNING: Don't actually do this in production!
  let fetchDuration: TimeInterval = 0
  activateDebugMode()

  RemoteConfig.remoteConfig().fetch(withExpirationDuration: fetchDuration) { [weak self] status, error in

    if let error = error {
      print ("Uh-oh. Got an error fetching remote values \(error)")
      return
    }

    RemoteConfig.remoteConfig().activateFetched()
    print ("Retrieved values from the cloud!")
    let appPrimaryColorString = RemoteConfig.remoteConfig()
                                            .configValue(forKey: "appPrimaryColor")
                                            .stringValue ?? "undefined"
    print("Our app's primary color is \(appPrimaryColorString)")

    self?.fetchComplete = true
    self?.loadingDoneCallback?()
  }
}
Here, you set fetchComplete to true indicating fetching is complete. Finally, you call the optional callback to inform the listener the Remote Config values have finished loading. This could be used to tell a loading screen to dismiss itself.
Open WaitingViewController.swift and add the following method:
func startAppForReal() {
  performSegue(withIdentifier: "loadingDoneSegue", sender: self)
}
Next, replace viewDidLoad() with the following:
override func viewDidLoad() {
  super.viewDidLoad()

  if RCValues.sharedInstance.fetchComplete {
    startAppForReal()
  }

  RCValues.sharedInstance.loadingDoneCallback = startAppForReal
}
Here, you’re making startAppForReal() the method RCValues calls when all of its values are done loading. You’re also adding a check just in case RCValues somehow manages to finish its network call before the waiting screen is done loading. This should never happen, but it never hurts to code defensively!
Build and run your app. You’ll see the waiting screen appear for a short while, depending on your network speed, before jumping into the rest of your app. If you change the value of your app’s primary color in the Firebase console and restart your app, the new color will properly appear everywhere in your app. Remember to click Publish Changes in the Firebase console.

Hook Up the Rest of Your App
Now that you’ve converted one value from AppConstants to RCValues, you can now convert the rest! Open RCValues.swift and replace ValueKey with the following:
enum ValueKey: String {
  case bigLabelColor
  case appPrimaryColor
  case navBarBackground
  case navTintColor
  case detailTitleColor
  case detailInfoColor
  case subscribeBannerText
  case subscribeBannerButton
  case subscribeVCText
  case subscribeVCButton
  case shouldWeIncludePluto
  case experimentGroup
  case planetImageScaleFactor
}
Next, replace loadDefaultValues() with the following:
func loadDefaultValues() {
  let appDefaults: [String: Any?] = [
    ValueKey.bigLabelColor.rawValue: "#FFFFFF66",
    ValueKey.appPrimaryColor.rawValue: "#FBB03B",
    ValueKey.navBarBackground.rawValue: "#535E66",
    ValueKey.navTintColor.rawValue: "#FBB03B",
    ValueKey.detailTitleColor.rawValue: "#FFFFFF",
    ValueKey.detailInfoColor.rawValue: "#CCCCCC",
    ValueKey.subscribeBannerText.rawValue: "Like Planet Tour?",
    ValueKey.subscribeBannerButton.rawValue: "Get our newsletter!",
    ValueKey.subscribeVCText.rawValue: "Want more astronomy facts? Sign up for our newsletter!",
    ValueKey.subscribeVCButton.rawValue: "Subscribe",
    ValueKey.shouldWeIncludePluto.rawValue: false,
    ValueKey.experimentGroup.rawValue: "default",
    ValueKey.planetImageScaleFactor.rawValue: 0.33
  ]
  RemoteConfig.remoteConfig().setDefaults(appDefaults as? [String: NSObject])
}
Next, add three helper methods at the end to allow retrieving values other than colors:
func bool(forKey key: ValueKey) -> Bool {
  return RemoteConfig.remoteConfig()[key.rawValue].boolValue
}

func string(forKey key: ValueKey) -> String {
  return RemoteConfig.remoteConfig()[key.rawValue].stringValue ?? ""
}

func double(forKey key: ValueKey) -> Double {
  if let numberValue = RemoteConfig.remoteConfig()[key.rawValue].numberValue {
    return numberValue.doubleValue
  } else {
    return 0.0
  }
}
Next, replace every part of your app that uses AppConstants with the corresponding call to RCValues.
You’ll make nine changes throughout your app:
1. Open ContainerViewController.swift and replace updateNavigationColors() with the following:
func updateNavigationColors() {
  navigationController?.navigationBar.tintColor = RCValues.sharedInstance.color(forKey: .navTintColor)
}
2. Replace updateBanner() with the following:
func updateBanner() {
  bannerView.backgroundColor = RCValues.sharedInstance.color(forKey: .appPrimaryColor)
  bannerLabel.text = RCValues.sharedInstance.string(forKey: .subscribeBannerText)
  getNewsletterButton.setTitle(RCValues.sharedInstance.string(forKey: .subscribeBannerButton), for: .normal)
}
3. Open GetNewsletterViewController.swift and replace updateText() with the following:
func updateText() {
  instructionLabel.text = RCValues.sharedInstance.string(forKey: .subscribeVCText)
  submitButton.setTitle(RCValues.sharedInstance.string(forKey: .subscribeVCButton), for: .normal)
}
4. Open PlanetDetailViewController.swift and in updateLabelColors(), replace the line:
nextLabel.textColor = AppConstants.detailInfoColor
with
nextLabel.textColor = RCValues.sharedInstance.color(forKey: .detailInfoColor)
5. Replace the line
planetNameLabel.textColor = AppConstants.detailTitleColor
with
planetNameLabel.textColor = RCValues.sharedInstance.color(forKey: .detailTitleColor)
6. Open PlanetsCollectionViewController.swift, and inside customizeNavigationBar(), replace the line:
navBar.barTintColor = AppConstants.navBarBackground
with
navBar.barTintColor = RCValues.sharedInstance.color(forKey: .navBarBackground)
7. Inside collectionView(_:cellForItemAt:), replace the line:
cell.nameLabel.textColor = AppConstants.bigLabelColor
with
cell.nameLabel.textColor = RCValues.sharedInstance.color(forKey: .bigLabelColor)
8. Open SolarSystem.swift and, inside init(), replace the line:
if AppConstants.shouldWeIncludePluto {
with
if RCValues.sharedInstance.bool(forKey: .shouldWeIncludePluto) {
9. Finally, inside calculatePlanetScales(), replace the line:
scaleFactors[i] = pow(ratio, AppConstants.planetImageScaleFactor)
with the line
scaleFactors[i] = pow(ratio, RCValues.sharedInstance.double(forKey: .planetImageScaleFactor))
Whew! That was a lot of changes, but now you should have your entire app switched over. If you want to be sure, do a search in your app for “AppConstants” — you should only have one result left, which is defining the struct itself:

If you want to be really sure, delete your AppConstants file. Your app should continue to build and run without any errors.
Now that your app is fully wired up to Remote Config, you can make other changes in addition to the green color that Greg likes so much.
Additional Changes to Your App
Open the Firebase Console. Make sure you’re in the Remote Config section, then click Add Parameter. Choose navBarBackground for the key and #35AEB1 for the new value, then click Add Parameter. Then do the same thing to set navTintColor to #FFFFFF. Click Publish Changes to publish these changes to your app.
When you’re finished, your console should look like this:

Publish the changes and then build and run the app.
Your app should look like this:
Feel free to play around! Change some other values. Mess around with the text. See what kind of stylish… or gaudy… color combinations you can come up with.
But when you’re finished, come on back to this Firebase Remote Config tutorial for iOS because you have an international crisis to deal with!
Bringing Back Pluto
Things are rotten in the state of Denmark! While most of the world has begrudgingly accepted that Pluto isn’t a planet, the Scandinavian Society for Preserving Pluto, a totally not-made-up society of rabid Pluto fans, has lobbied hard for Pluto to be a planet and hence, worthy of inclusion in the Planet Tour app. The protests are mounting in the streets of Copenhagen! Whatever can be done?
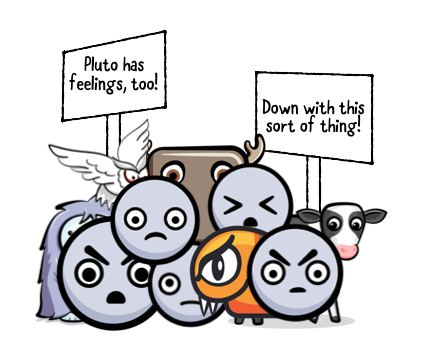
Another app release, another angry mob…
This seems like a simple job for Remote Config! You could set shouldWeIncludePluto to true. But hang on — that will change this setting for all of your users, not just those in Scandinavia. How can you deliver different settings just to residents of different countries?
Conditions to the Rescue!
Remote Config’s ability to deliver different sets of data to different users is what makes it more sophisticated than just a simple dictionary in the cloud. You’ll take advantage of this feature in order to make Pluto a planet again for your Scandinavian users.
First, open the Firebase Console, make sure you’re in the Remote Config panel and click Add Parameter to add a new parameter.
Enter shouldWeIncludePluto as the parameter key.
Next, click the dropdown next to the value field labelled Add value for condition.
Next, select Define New Condition:

In the dialog, give the new condition a name of Pluto Fans.
In the drop-down underneath, select Country/Region.
From the countries list, select Denmark, Finland, Iceland, Norway and Sweden:
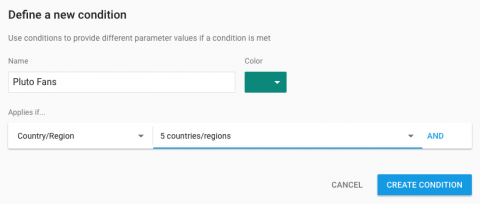
Click Create Condition.
Next, add a value of true in the Value for Pluto Fans field, and a value of false as your default value:
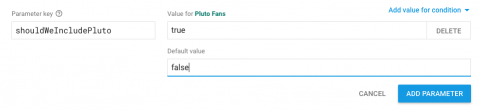
Finally, click Add Parameter and then click Publish Changes to push these changes to the world.
Build and run your app to see the results.
If you don’t live in one of these northernly countries, you won’t see Pluto in your list of planets. If you want to test the experience for your Scandinavian users, I recommend booking a flight to Copenhagen, getting yourself a new Danish iPhone and then running your app on it — perhaps while enjoying a smoked salmon, open-faced sandwich.

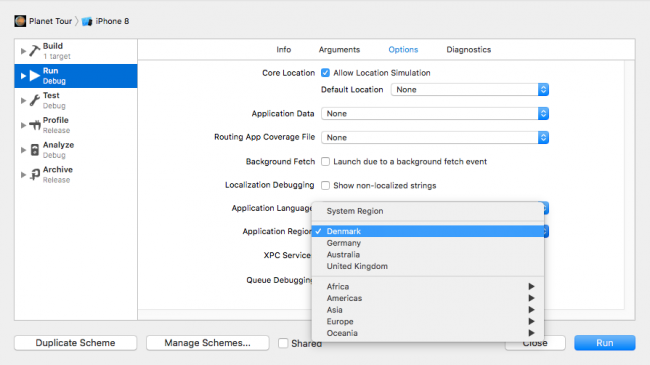
A slightly more economical option (potentially involving less jet lag) is to open the Settings app on your device or simulator. Select General > Language & Region > Region > Denmark — or whatever your favorite Scandinavian country is:

It’s slightly cheaper than a trip to Copenhagen, but also less fun.
Now, build and run your app. This time, you should see Pluto back where it belongs, among the other planets. International crisis averted!

Welcome back, Pluto. We missed you!
Where to Go From Here?
You can download the completed project for this tutorial using the Download Materials link at the top or bottom of this tutorial. Please note, however, that you still need to create a project in the Firebase Console and drag in your GoogleServices-info.plist file for the project to work.
There are more features you haven’t touched on in this tutorial, too. For example, by delivering values to random groups of users, you can use Remote Config to run A/B tests, or gradually roll out new features. You can also deliver different data sets to specific groups of people you’ve identified in Firebase Analytics, which gives you some nice customization features. If you want to learn more than what you’ve covered, here, you can check out the documentation or the next tutorial on this topic!
Now that you have the foundations, there’s a lot more you can do with Remote Config. If you’re developing any kind of game, for example, it can be a great way to tweak your gameplay if your players are finding it too easy or too hard. It’s also an easy way to create a “Message of the Day” kind of feature. Or you might just use it to experiment with different button or label text to see what your users react to best. Try it out in your favorite app and see what you can change on the fly!
As always, if you have any questions or comments about this tutorial — or favorite Planet Tour color schemes — please join the forum discussion below!
The post Firebase Remote Config Tutorial for iOS appeared first on Ray Wenderlich.