
GraphQL is a data query language that simplifies client-server interactions over conventional REST or ad-hoc systems. It was opened to the community at large in 2015, and since then, has rapidly gained traction, standardizing the process of defining and delivering data to mobile and web apps alike.
The increasing popularity of GraphQL created a thriving, open-source community focused on everything from client libraries to IDE tools. One of the most popular of these projects is Apollo, a type-safe, caching GraphQL implementation available on a number of platforms.
The Apollo Framework makes it simple to consume a GraphQL schema, auto-generate data models, fetch and mutate data for any GraphQL endpoint, all on the client platform of your choice.
In this tutorial, you’ll learn how to use the Apollo framework for iOS to consume data from a GraphQL representation of SWAPI (the Star Wars API) and populate a simple reference app.
Along the way, you’ll learn about basic GraphQL concepts, such as data types, how to define queries, and how to simplify consuming repetitious code using fragments.
Strap in and get ready to go to a GraphQL galaxy far, far away!
Getting Started
To kick things off, start by downloading the materials for this tutorial (you can find a link at the top or bottom of this tutorial)
This project uses Cocopoads, so open the project by double-clicking JediArchives.xcworkspace in Finder.

There’s a standard navigation structure, ready to be filled up with Wookies and Jedi. But first, you’re going to install and start the server that will power the app.
Running the SWAPI GraphQL Server
Before you start working on the Jedi Archives app, you’re going to need a GraphQL server for it to connect to. The starter project includes a pre-configured Node.js project that will serve SWAPI on your local machine.
Open Terminal and navigate to the bin directory of the starter project. Next, run the following command to install the dependencies and bootstrap the project:
./install_server.sh
Finally, run the following command to start up the server:
./start_server.sh &
After some initial Terminal output, you should see a message telling you the server is now running on port 8080. You now have a GraphQL endpoint for SWAPI running on your machine.
Xcode Configuration
One of Apollo’s best features is its ability to generate statically-typed Swift queries and models based on any GraphQL schema. To generate these, you use a tool called Apollo Codegen to consume the schema and generate the Swift output.
In Terminal, run the following command to install Apollo Codegen:
npm install -g apollo-codegen
Next you’re going to add a Run Build Script phase to your Xcode project that executes apollo-codegen whenever you build, to ensure you always have an updated set of Swift models and queries.
In Xcode, select JediArchives in the project navigator, then select the JediArchives target and click the Build Phases tab. Click the “+” button and select New Run Script Phase.
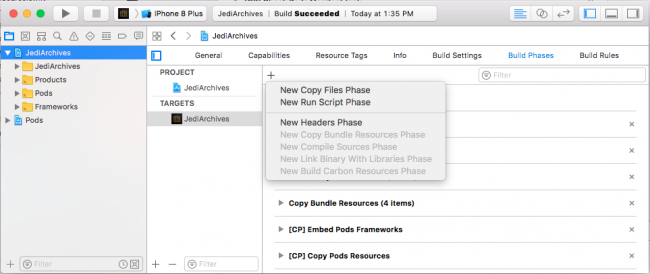
Expand the new run phase and insert the following script into the script text area below the Shell variable:
if which apollo-codegen >/dev/null; then

  APOLLO_FRAMEWORK_PATH="$(eval find $FRAMEWORK_SEARCH_PATHS -name "Apollo.framework" -maxdepth 1)"

  if [ -z "$APOLLO_FRAMEWORK_PATH" ]; then
    echo "warning: Couldn't find Apollo.framework in FRAMEWORK_SEARCH_PATHS; make sure to add the framework to your project."
    exit 0
  fi

  cd "${SRCROOT}/${TARGET_NAME}/GraphQL"
  $APOLLO_FRAMEWORK_PATH/check-and-run-apollo-codegen.sh generate \
    $(find . -name '*.graphql') \
    --schema schema.json \
    --output Generated/GraphQLAPI.swift
else
  echo "Skipping Apollo code generation"
fi
The bulk of the script ensures the tools you expect are present. The most important line is the one that executes check-and-run-apollo-codegen.sh.
Taking each parameter in turn:
generate $(find . -name '*.graphql'): Invokes thegeneratecommand and passes any files with the extension .graphql. These types of files contain the GraphQL queries and fragments you define. You’ll learn more about this later.--schema schema.json: Indicates the location of the GraphQL schema file relative to the current directory. The GraphQL schema defines all the data types and their relationships for a given endpoint.--output Generated/GraphQLAPI.swift: Indicates the Swift file that houses the generated code. This file is updated every time this script is run and contains the code you’ll use to interact with the GraphQL endpoint. You should never modify this file directly.
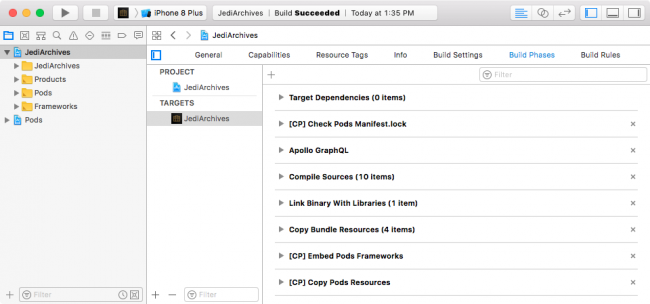
Now the script is ready, single-click the name of the Run Script Phase and change it to Apollo GraphQL so it’s clear what the phase is doing. Finally, since you’ll be writing code that consumes this generated code, this script needs to run prior to the rest of your code compiling.
Click and drag the phase so it appears right before the “Compile Sources” phase. When you’re done, the Build Phases screen should look similar to the following:
Well done young Padawan! It’s time to become a fully-fledged Jedi Knight by writing some code.
Populating the Films Screen
The first screen you’re going to put together will show a list of all the Star Wars films. In a traditional REST-based app, this would be about the time when you’d have to create a web client of some sort, using something like Alamofire to wrap each API endpoint, define a series of structs or classes to represent result data, and configure a JSON mapping tool to glue it all together.
Instead, you’re going to use GraphQL and Apollo to achieve all of this — with far less effort on your part.
The first thing to do is create a wrapper around the Apollo client to house basic configuration and maintain a static instance to use across the various view controllers.
First, open Apollo.swift inside the GraphQL folder and import the Apollo framework:
import Apollo
Next, add the following class definition:
class Apollo {

  // 1
  static let shared = Apollo()
  // 2
  let client: ApolloClient

  init() {
    // 3
    client = ApolloClient(url: URL(string: "http://localhost:8080")!)
  }

}
Here’s a rundown of what you just added:
- You declare a static instance of the Apollo wrapper class to expose it as a singleton.
- Next, you declare a variable to house an instance of
ApolloClientwhich is the class through which you’ll interact with GraphQL. - Finally, you initialize the
ApolloClientinstance, supplying the URL of the GraphQL server you’re running on your local machine.
Now you’ve added the ability to interact with Apollo, it’s time to define your first GraphQL query.
GraphQL is, at its core, a data query language. A GraphQL server defines a schema, including all the objects, their fields and types, as well as relationships, in a standard JSON format. You configured Apollo to consume the schema in the last section. Any client can use this schema to construct queries for any subset of data, including primitive fields and nested object references and lists.
Allowing the client to determine exactly how to fetch the data is a key feature that makes GraphQL so powerful. Throughout the rest of this tutorial, you’re going to see this concept in action.
Open Queries.graphql and add the following:
query AllFilms {
  # 1
  allFilms {
    # 2
    films {
      # 3
      id
      title
      releaseDate
    }
  }
}
This is a very basic query. Here’s what each section means:
- This statement defines the top level query collection from which you’re requesting data. In this case,
allFilmsreturns, unsurprisingly, all films. - The
allFilmscollection returns a list of intermediateFilmConnectionobjects, so here you request thefilmsattribute, which will include a list of actualFilmobjects. - Finally, you define the attributes you want to request from each
Filmobject.
At this point, build the project and then open GraphQLAPI.swift: the file where Apollo drops generated code. You should now see a class named AllFilmsQuery. This class contains the Swift representation of the query itself, as well as structs that represent the result data.
Now you’ve defined a query and have generated result models, you need to map the film results to view models that are consumed by your view controllers.
Open Models.swift and add the following initializer to the RefItem class:
init(film: AllFilmsQuery.Data.AllFilm.Film) {
  id = film.id
  label = film.title ?? ""
  value = film.releaseDate ?? ""
}
RefItem is a general-use model that will be used across the app to represent any data type that references other data. These items are rendered in table cells with a left-aligned label and right-aligned value. In the above code, you create an initializer that takes an instance of AllFilmsQuery.Data.AllFilm.Film, which is the type of the embedded Film result object returned by the AllFilms query.
The last thing to do here is to execute the query and populate the first screen of the app.
Open FilmsViewController.swift and replace loadFilms() with the following:
func loadFilms() {
  // 1
  let query = AllFilmsQuery()
  Apollo.shared.client.fetch(query: query) { results, error in
    // 2
    if let films = results?.data?.allFilms?.films?.compactMap({$0}) {
      // 3
      let models = films.map(RefItem.init)
      // 4
      let sections: [Section] = [
        .references(title: NSLocalizedString("Films", comment: ""), models: models)
      ]
      // 5
      self.dataSource.sections = sections
      self.tableView.reloadData()
    } else if let error = error {
      print("Error loading data \(error)")
    }
  }
}
There’s a lot going on here, so to explain line-by-line:
- First, you execute the
AllFilmsquery by passing an instance of it to the shared Apollo client.ApolloClienttranslates the query to JSON, executes the HTTP call, maps the response to the generated structs, and invokes the provided completion handler with either result data or an error if there was a failure. - Next, you unwrap a chain of optionals and
compactMapto produce a list of film results. If you inspect the type ofresults?.data?.allFilms?.films, you’ll see it’s[Film?]?. ThereforecompactMapis used to produce a list without optional objects. - Here you map the film results to
RefItemusing the initializer you added previously. - Now you create a list of
Sectionenums that represent the sections displayed in the table view. In this case there is just one section of films. - Finally, you set the list of sections on the table view’s data source and reload the table view to render the data to the screen.
Build and run; you should see a list of Star Wars films:
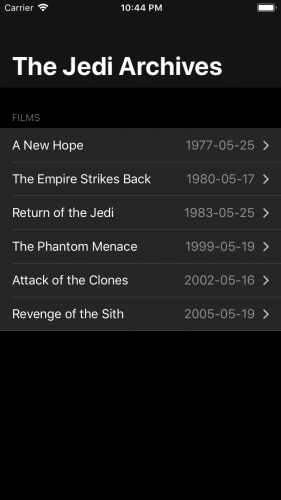
Excellent! Your app is starting to take shape. In the next section, you’ll flesh out a detail screen to show even more data about each film.
Populating the Film Detail Screen
Seeing a list of Star Wars movies is great, but seeing details for each film would be even better. GraphQL makes it a snap to retrieve extended info for each film. You’re going to define a new query for film details and use the results of that query to populate the film detail view controller.
Open Queries.graphql and add the following query:
# 1
query FilmDetail($id: ID) {
  # 2
  film(id: $id) {
    # 3
    title
    episodeID
    releaseDate
    director
    # 4
    characterConnection(first: 10) {
      # 5
      characters {
        id
        name
      }
    }
  }
}
This query is similar to the “All Films” query you defined in the previous section, but there are a few new concepts to note:
- In the query definition, unlike
AllFilms,FilmDetailtakes an argument for the film ID. This argument can be referenced anywhere within the query and will be automatically included as an argument of the initializer in the generated Swift query. - Here you specify the
filmcollection and pass the film ID to pull back a singleFilmobject. - As in the previous query, you specify the fields you’d like to fetch from the
Filmobject as part of the query. - Here you specify you want to include
characterConnection, which is a list of related characters appearing in this film. You specifyfirst: 10to include a max of 10 characters. - Finally, you specify the
characterslist to get the actual list of characters, as well as the fields you care about for each individual character.
Build the app to generate the appropriate Swift code that references the new query and objects. Now you have a query you can use to fetch film detail, you’re going to add some code to populate the film detail screen.
Open Models.swift and add the following initializer to RefItem:
init(character: FilmDetailQuery.Data.Film.CharacterConnection.Character) {
  id = character.id
  label = character.name ?? ""
  value = nil
}
This new initializer takes an instance of the Character object from the FilmDetail query. You’ll see FilmDetail used in the next step when you map the query results to UI models. When you render a character in the table view, the cell will only contain that character’s name; you supply nil for value.
Open FilmDetailViewController.swift and replace loadFilmData() with the following:
func loadFilmDetail() {
  // 1
  let query = FilmDetailQuery(id: filmID)
  Apollo.shared.client.fetch(query: query) { result, error in
    // 2
    if let film = result?.data?.film {
      // 3
      self.navigationItem.title = film.title ?? ""

      // 4
      let infoItems: [InfoItem] = [
        InfoItem(label: NSLocalizedString("Title", comment: ""), value: film.title ?? "NA"),
        InfoItem(label: NSLocalizedString("Episode", comment: ""), value: "\(film.episodeId ?? 0)"),
        InfoItem(label: NSLocalizedString("Released", comment: ""), value: film.releaseDate ?? "NA"),
        InfoItem(label: NSLocalizedString("Director", comment: ""), value: film.director ?? "NA")
      ]
      // 5
      var sections: [Section] = [
        .info(title: NSLocalizedString("Info", comment: ""), models: infoItems)
      ]

      // 6
      let characterItems = film.characterConnection?.characters?
        .compactMap({$0}).map({RefItem(character: $0)})
      // 7
      if let characterItems = characterItems, characterItems.count > 0 {
        sections.append(.references(title: NSLocalizedString("Characters", comment: ""),
                                    models: characterItems))
      }

      // 8
      self.dataSource.sections = sections
      self.tableView.reloadData()
    } else if let error = error {
      print("Error loading data \(error)")
    }
  }
}
You should see some similarities between this and loadFilms() you created above. Here’s what you’re doing in detail:
- First, you create an instance of
FilmDetailQueryand pass the ID for the film this view controller should display. With that query object, you execute the fetch via the Apollo client. - Next, you use optional binding to get the
filmfrom the query result. - Then, you set the title of the screen to the name of the film.
- You create a list of
InfoItemmodels to represent each attribute of the film you want to render to the UI. Each item has a title and value, and there is somenilcoalescing to account for missing values. - Next you define a
Sectionfor the film info section, providing the list of info items you just created. - The second section of this detail screen is a list of characters that appear in this film. You map the character list from the film result to a list of
RefItemobjects. - Again, you create a new
Section, to show the character items. - Finally, you update the data source and reload the table view to render the data.
Build and run, and tap on any of the films in the main list to see the details for that film. The resulting screen should look similar to the following:
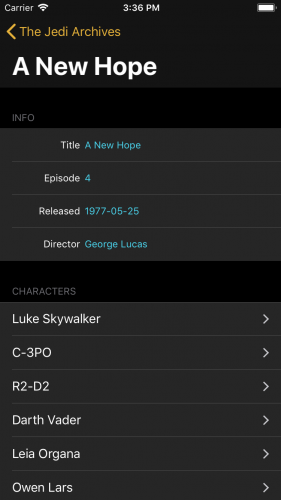
You’ve taken your first step into a larger world. In the next section, you’ll wrap up the app by populating a character detail screen.
Populating the Character Detail Screen
Your Star Wars app is looking great! All that’s left is to add a screen for viewing character details and you’ll be a bona fide Jedi Master. Once again, you’re going to start by adding a query that fetches only the data you need to populate this screen. Open Queries.graphql and add the following text:
query CharacterDetail($id: ID) {
  person(id: $id) {
    name
    birthYear
    eyeColor
    gender
    hairColor
    skinColor
    homeworld {
      name
    }
    filmConnection(first: 10) {
      films {
        id
        title
        releaseDate
      }
    }
  }
}
This query is very similar to the film detail query you defined in the previous section. The data you’re requesting from each object in the films list is exactly the same data you’re requesting for films in the AllFilms query.
If you leave the queries as they are, you’ll end up with two different Film structs, each scoped to their parent query objects. It’s not awful; but code that consumes films in this form will need multiple paths for each parent object type. What’s more, it’s likely if you ever request more film data through one of these queries, you’ll probably want that same data in the other query. What you really want is a way to generalize this query section into something common.
GraphQL has just the tool to solve this problem: fragments.
Add the following to the top of Queries.graphql:
fragment ListFilmFragment on Film {
  id
  title
  releaseDate
}
Here you define the name of the fragment, ListFilmFragment, and the object to which it applies, Film. Then you simply specify the fields you’d like to request. Now you can replace those fields in any query with ... ListFilmFragment and those fields will be requested as if you had explicitly specified them.
Even better, instead of having Film structs specific to each query, each query result will now return this data as part of a globally scoped ListFilmFragment. This drastically simplifies code that consumes film objects.
Now you’ve defined ListFilmFragment, it’s time to use it to improve a few queries. Still in Queries.graphql, replace the AllFilms query with the following:
query AllFilms {
  allFilms {
    films {
      ...ListFilmFragment
    }
  }
}
Since the CharacterDetail query wants the same data for its film list, replace it with the following:
query CharacterDetail($id: ID) {
  person(id: $id) {
    name
    birthYear
    eyeColor
    gender
    hairColor
    skinColor
    homeworld {
      name
    }
    filmConnection(first: 10) {
      films {
        ...ListFilmFragment
      }
    }
  }
}
Build your project to update the generated code. You’ve cleaned up your queries, so you also need to change the consuming code to take advantage of the newly added ListFilmFragment.
Open Models.swift and change the first initializer of RefItem to this:
init(film: ListFilmFragment) {
  id = film.id
  label = film.title ?? ""
  value = film.releaseDate ?? ""
}
You’ve changed the film parameter type so it now consumes ListFilmFragment instead of the film type from the AllFilms query. This will let you use this same constructor for mapping results from both AllFilmsQuery and CharacterDetailQuery. Score one Republic credit for code reuse and a Bantha for simpler logic!
Since you changed the RefItem initializer, you’re going to need to adjust the code that uses it.
Open FilmsViewController.swift and find the following line in loadFilms():
if let films = results?.data?.allFilms?.films?.compactMap({$0}) {
Replace with the following:
if let films = results?.data?.allFilms?.films?.compactMap({$0}).map({$0.fragments.listFilmFragment}) {
Instead of mapping the film objects directly, you’re mapping listFilmFragment that lives on a property named fragments. Every Apollo result that includes fragments has a fragments property and it’s where you’ll find, er, the fragments.
Now your Jedi temple is in better order, the only thing left is to finish up the character detail screen. Open CharacterDetailViewController.swift and replace loadCharacter() with the following:
func loadCharacter() {
  // 1
  let query = CharacterDetailQuery(id: characterID)
  Apollo.shared.client.fetch(query: query) { (result, error) in
    // 2
    if let character = result?.data?.person {
      // 3
      self.navigationItem.title = character.name ?? ""

      // 4
      let infoItems: [InfoItem] = [
        InfoItem(label: NSLocalizedString("Name", comment: ""),
                 value: character.name ?? "NA"),
        InfoItem(label: NSLocalizedString("Birth Year", comment: ""),
                 value: character.birthYear ?? "NA"),
        InfoItem(label: NSLocalizedString("Eye Color", comment: ""),
                 value: character.eyeColor ?? "NA"),
        InfoItem(label: NSLocalizedString("Gender", comment: ""),
                 value: character.gender ?? "NA"),
        InfoItem(label: NSLocalizedString("Hair Color", comment: ""),
                 value: character.hairColor ?? "NA"),
        InfoItem(label: NSLocalizedString("Skin Color", comment: ""),
                 value: character.skinColor ?? "NA"),
        InfoItem(label: NSLocalizedString("Home World", comment: ""),
                 value: character.homeworld?.name ?? "NA")
      ]

      // 5
      var sections: [Section] = [
        .info(title: NSLocalizedString("Info", comment: ""), models: infoItems)
      ]

      // 6
      let filmItems = character.filmConnection?.films?.compactMap({$0})
        .map({RefItem(film: $0.fragments.listFilmFragment)})
      if let filmItems = filmItems, filmItems.count > 0 {
        sections.append(.references(title: NSLocalizedString("Appears In", comment: ""),
                                    models: filmItems))
      }

      // 7
      self.dataSource.sections = sections
      self.tableView.reloadData()
    } else if let error = error {
      print("Error loading data \(error)")
    }
  }
}
Again, this method is similar to the other data loading methods you’ve written. However for the sake of clarity, here’s what’s happening:
- First, you initialize and execute
CharacterDetailQuery, providing the character ID. - Next, you use optional binding to get the character from the result object.
- You set the title of the view controller to the character’s name.
- Then you create a list of
InfoItemobjects to represent the various character attributes you requested. - Here you create the first table view section, passing the
InfoItemobjects as the contents. - In this block, you make use of the films, again using the
ListFilmFragment, to populate a table view section with films this character has appeared in. - Finally, you update the data source’s section list and reload the table view to render the new data to the UI.
Build and run. Tap first on any film, then on any character in the second section. You should see a screen similar to the following:
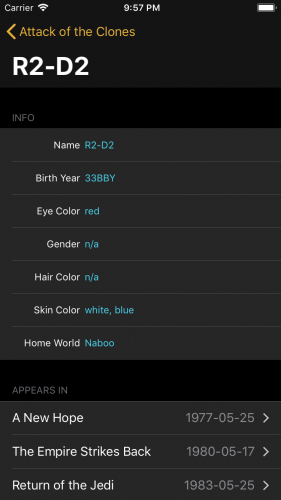
Because you’ve closed the loop by including a films list in the character screen, you can now dive endlessly through films and characters, exploring the entirety of the Star Wars universe. On behalf of the Rebellion, congratulations on a job well done!
Where to Go From Here?
You can download the final project using the link at the top or bottom of this tutorial.
GraphQL is an extremely powerful technology, and through this tutorial, you’ve seen how it can simplify the development of a data-driven app when paired with the Apollo framework.
There are more concepts to explore in GraphQL and Apollo, such as mutations, variables, and caching to name just a few. The official GraphQL and Apollo sites are both great places to continue learning.
If you have any comments or questions about this tutorial, please join the forum discussion below!
The post GraphQL Using the Apollo Framework: Getting Started appeared first on Ray Wenderlich.