
With the release of Unity 2017.3, much has been refined or completely changed since Kirill Muzykov’s superb Jetpack Joyride tutorial. Now is definitely the perfect time to revisit this tutorial using Unity’s beautifully matured 2D feature set and their revamped UI system. Let’s get started!
Jetpack Joyride was released by Halfbrick Studios in 2011. It’s a very easy game to understand. Steal a jetpack, and fly away with it. Collect the low hanging coins and avoid the lasers!
In essence, it’s a fun twist on an endless runner that works well with touch screens: Touch the screen to fly up; release the screen to drop back down. Avoid the obstacles to stay alive as long as you can. Notably, my kids know the game well and were super excited that I was writing an update for this tutorial:

In this game, you will be steering a mouse through a very long house, collecting coins and avoiding lasers in a similar fashion. Granted, not everyone hangs coins from their walls, but I’m guessing a few of you have one or two high-wattage lasers hanging about!
This is the first part of a three part series. In this tutorial, you’ll learn how to:
- Work with physics in Unity.
- Use sorting layers to organize your sprites.
- Use colliders to define your world limits. Your mouse will be pleased to not be blasted into orbit with a long click!
Thank you to Space X for their wonderful public domain images.
In Part 2, you’re going to move the mouse forward through randomly generated rooms simulating an endless level. You’ll also add a fun animation to make the mouse run when it is grounded.
In Part 3, you will add lasers, coins, sound effects, music and even parallax scrolling. By the end of the series, you will have a fully functional game — albeit with a lower mice population, for sure.
Getting Started
To get started, you’ll need some art, sound effects and music for the game. Download the materials using the link at the top or bottom of this tutorial. You will also need Unity 2017.3 or newer installed on your machine.
- Game art created by Vicki Wenderlich for the original How to Make a Game Like Jetpack Joyride using LevelHelper, SpriteHelper tutorials.
- Sounds from freesound.org website:
- Soft wood kick by jorickhoofd
- Retro Coin Collect by DrMinky
- zoup.wav by themfish
- Rocket Flight Loop by qubodup
- Music track called ‘Whiskey on the Mississippi’ created by Kevin MacLeod (incompetech.com).
If you are new to Unity, check out our Intro to Unity tutorial to get you started.
Creating and Configuring the Project
Open Unity and select New project from the Project window, or click the New button on the top right if you already have a few projects in your navigator.

Note: If you’ve already created a few Unity 2D projects, feel free to use the RocketMouse Part 1 Starter Project in the materials. I suggest you only skip as far as Configuring the Game View to make sure your project matches the screenshots in the tutorial.
Type RocketMouse in the Project name field and set the location to where you would like the project saved. The ellipsis button at the end of the field will allow you to navigate to a directory of your choosing. Once you’ve chosen a location, click Select folder to set the Location. Select the 2D radio button and click Create Project.

Unless you downloaded the Starter Project, create a folder named RW in the Project view using Assets▸ ▸ Create ▸ Folder, or use the Create dropdown at the top left of the Project view. You will save all subsequent folders and files you create within this directory. This will keep them separate from assets you import.
Create another new folder named Scenes within the RW directory in the Project view. Then open the Save Scene dialog by selecting File ▸ Save Scene or using the ⌘S (Ctrl+S on Windows) shortcut. Navigate to the Scenes folder you just created, name the scene RocketMouse.unity and click Save.

Configuring the Game View
Switch to the Game view and set the size to a fixed resolution of 1136×640. If you don’t have this resolution option in the list, create it and name it iPhone Landscape.

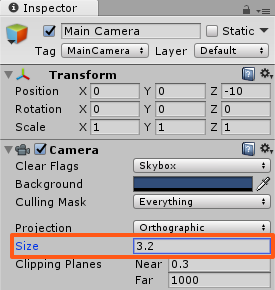
Select the Main Camera in the Hierarchy. In the Inspector, inside the Camera component, set the Size to 3.2.
Save the scene. There are no big changes since the project creation, but you’ve done several very important configuration steps.
Adding the Player Character
In this section of the tutorial you will add the player character: a cool mouse with a jetpack. Just when you thought you had seen it all!
Unpack the materials you downloaded for this tutorial and locate the two directories Sprites and Audio. You will not use the audio files until a future part of this tutorial. Just keep them handy for the time being.
Importing Game Assets
To add the assets, open the RocketMouse_Resources folder, select both the Sprites and Audio folders, and drag them onto the Assets folder in the Project view.

You’ve just added all required assets. At this point, it might seem that there are many strange files in there. Don’t worry, most of the images are just decorations and backgrounds. Apart from that, there is a sprite sheet for the mouse character, the laser and the coin objects.
Adding the Player to the Scene
Many animated game sprites are supplied in a sprite sheet, and our heroic mouse is no exception.
Slicing The Mouse Sprite Sheet
Frames of the running, flying and dying animation are contained within the mouse_sprite_sheet. Your first step is to slice it correctly.
Open the Sprites folder in the Project view and find mouse_sprite_sheet. Select it and set its Sprite Mode to Multiple in the Inspector, and then click Apply.

Then click the Sprite Editor button to open the Sprite Editor.

In the Sprite Editor click the Slice button near the left top corner to open the slicing options.
- Set the Type field to Grid By Cell Size.
- Set the Pixel Size to 162 x 156.
- Click the Slice button.
- You will see a faint grid immediately appear. Don’t forget to click the Apply button to save changes.

Still within the Sprite Editor, select the top left image to display its details. Click in the Name field and give the sprite a more appropriate name: mouse_run_0.

Rename the remaining sprites from top-left to bottom-right as follows:
- mouse_run_1
- mouse_run_2
- mouse_run_3
- mouse_fly
- mouse_fall
- mouse_die_0
- mouse_die_1
Click Apply again to save changes.
Close the Sprite Editor. Expand mouse_sprite_sheet in the Project view, and you will see that it was sliced into eight different sprites. Nice!
It is time to actually add something to the scene. Select the sprite named mouse_fly and drag it into the Scene view.

Doing this will create an object in the Hierarchy named mouse_fly (just as was the image used to create it).
Select mouse_fly in the Hierarchy and make the following changes in the Inspector:
- Change name to mouse, since this will better describe the player character.
- Set its Position to (0, 0, 0). You will move the mouse to its final position a bit later, but right now it is better to place it right at the screen center, so that you can see it better.
- Add a Circle Collider 2D component, by clicking Add Component in the Inspector. In the drop down menu select Physics 2D and then choose Circle Collider 2D.
- Set the Radius of the Circle Collider 2D component to 0.5.
![]()
- Add a Rigidbody 2D component by clicking Add Component and selecting Physics 2D\Rigidbody 2D.
- Expand the constraints section within the Rigidbody 2D component. Enable the Freeze Rotation Z checkbox.

Here is an image demonstrating all the steps:

The green circle in the Scene view shows the collider; its size changed when you changed the Radius property of the Circle Collider 2D component.
Colliders define a shape that are used by the physics engine to determine collisions with other objects. You could have created a more pixel-perfect collider by using a Polygon Collider 2D component, as in the screenshot below:

However, using complex colliders makes it harder for the physics engine to detect collisions, which in turn creates a performance hit. A good rule is to always use simple colliders whenever possible. As you will see, a circle collider works really well for this game. The only adjustment was the radius of the collider so that it matched the original mouse image.
While colliders define the shape of the object, the Rigidbody is what puts your game object under the control of the physics engine. Without a Rigidbody component, the GameObject is not affected by gravity. Thus, you cannot apply things such as force and torque to the GameObject.
In fact, you wouldn’t even detect collisions between two GameObjects, even if both had Collider components. One of the objects must have a Rigidbody component.
However, while you want the mouse to be affected by gravity and collide with other objects, you don’t want its rotation to be changed. Fortunately, this is easy to solve by enabling the Freeze Rotation property of the Rigidbody 2D component.
Run the scene and watch as the mouse falls down, affected by the gravity force.

But wait! Why did the mouse fall down at all? You didn’t add any gravity to the Rigidbody… or did you? In fact, when you added the Rigidbody 2D component, it was given a default Gravity Scale of 1. This tells the system to make the character fall using the default gravity of the physics engine.
Creating a Script to Control the Jetpack
You won’t let that mouse fall down into the abyss. Not on your watch!
You need to add a script that will enable the jetpack and apply force to the mouse object to move it up and keep it from falling.
To add a script to the mouse object:
- In the Project browser, create a new folder within the RW directory called Scripts, just as you created the Scenes folder before. Make sure that this folder is selected, since Unity will add a new script to the currently selected folder.
![]()
- Select Create ▸ C# Script in the top menu and name the script MouseController.
- Drag the MouseController script over mouse in the Hierarchy to add it to the mouse GameObject. This will add a Script component and set its Script property to MouseController script.


Can't add script behaviour MouseController. The script's file name does not match the name of the class defined in the script!This happens because Unity creates the following class inside the script, and renaming the script doesn’t change the class name inside:
public class NewBehaviourScript
It’s time to write some code. Open the MouseController script by double-clicking it either in the Project view or in the Inspector. This will open MouseController.cs in the editor of your choice.
Add the following jetpackForce variable just inside the class definition:
public float jetpackForce = 75.0f;
This will be the force applied to the mouse when the jetpack is on.

Just below jetpackForce, add the following variable:
private Rigidbody2D playerRigidbody;
Next add the following code to the automatically generated Start method:
playerRigidbody = GetComponent<Rigidbody2D>();
When the game starts, you retain a reference to the player’s Rigidbody. You will need to access this component very frequently in this script, and you don’t want to create a performance hit every time you need to locate it.
Next, add the following method inside the class:
void FixedUpdate()
{
    bool jetpackActive = Input.GetButton("Fire1");
    if (jetpackActive)
    {
        playerRigidbody.AddForce(new Vector2(0, jetpackForce));
    }
}
FixedUpdate() is called by Unity at a fixed time interval. All physics-related code is written in this method.
Update and the FixedUpdate is that FixedUpdate is called at a fixed rate, while Update is simply called for every rendered frame. Since frame rate can vary, the time between subsequent Update method calls can also vary and physics engines do not work well with variable time steps. This is why FixedUpdate exists and should be used to write the code related to the physics simulation (e.g. applying force, setting velocity and so on).
In FixedUpdate, you check if the Fire1 button is currently pressed. In Unity, Fire1 by default is defined as a left mouse button click, the left Control key on a keyboard, or a simple screen tap in the case of an iOS app. For this game, you want the jetpack to engage when the user touches the screen. Therefore, if Fire1 is currently pressed, the code will add a force to the mouse.
AddForce simply applies the force to the rigidbody. It takes a Vector2 that defines the direction and the magnitude of the force to apply. You will move your hero mouse forward later, so right now you only apply the force to move the mouse up with the magnitude of jetpackForce.
Run the scene and hold your left mouse button to enable the jetpack and make the mouse move up.

Adjusting the Gravity
The jetpack works, but you can see several problems straight away. First, depending on your perspective, the jetpack force is either too strong, or the gravity is too weak. It’s far too easy to send the mouse flying off the top of the screen, never to be seen again.
Rather than change the jetpack force, you can change the gravity setting of the entire project. By changing the gravity setting globally, you set a smarter default for the smaller iPhone screen. And besides, who doesn’t like the idea of controlling gravity?
To change the gravity force globally, chose Edit ▸ Project Settings ▸ Physics 2D. This will open the Physics 2D Settings of the project in the Inspector. Find the Gravity field and set its Y value to -15.

Run the scene again. It should be much easier to keep the mouse within the game screen.

Don’t worry if you’re still having difficulties keeping the mouse within the game screen. Try making your Game view bigger or adjust the jetpackForce or Gravity settings. The values recommended here work well when you run the game on the iPhone. Of course, adding a floor and a ceiling will help keep the mouse in sight, so you’ll add those next.
Adding the Floor and the Ceiling
Adding a floor and a ceiling is a relatively simple exercise; all you need is an object for the mouse to collide with at the top and bottom of the scene. When you created the mouse object earlier, it was created with an image so the user could visually track where the object is throughout the game. The floor and ceiling, however, can be represented by empty GameObjects, as they never move, and their location is relatively obvious to the user.
Choose GameObject ▸ Create Empty to create an empty object. You won’t see it on the screen. What do you expect? It’s empty!
Select the new GameObject in the Hierarchy and make the following changes in the Inspector:
- Rename it to floor.
- Set its Position to (0, -3.3, 0).
- Set its Scale to (14.4, 1, 1).
- Click Add Component and add a Box Collider 2D component by selecting Physics 2D\Box Collider 2D.
Now you should see a green collider at the bottom of the scene:

Don’t worry too much about the magic numbers in the Position and Scale properties; they will make more sense later as you add more elements to the Scene.
Run the scene. Now the mouse falls on the floor and stays there.

However if you activate the jetpack, the mouse still leaves the room since there is no ceiling.
I’m sure you can add a ceiling yourself. Set its Position to (0, 3.7, 0), and don’t forget to rename it ceiling. If you need a hint, check the spoiler below.

Now there is both a floor and a ceiling present in the scene. Run the game, and try as you might, the mouse will never fly off the top or fall off the bottom of the scene.

Using a Particle System to Create Jetpack Flames
Now that you’ve got the mouse moving at the user’s every will, it’s time to add some flair — or is that flare? In this section, you’ll make the jetpack shoot flames when the mouse goes up. Why flames? Because everything’s better with flames!
There are many different ways you can show flames coming out of the jetpack, but my personal favorite is using a Particle System. Particle systems are used to create a lot of small particles and simulate effects like fire, explosions, fog, all based on how you configure the system.
Creating a Particle System
To add a Particle System to the scene, choose GameObject ▸ Effects ▸ Particle System. You’ll notice a change to the scene immediately: the Particle System will show its default behavior in the Scene when the object is selected.

This is a good start, but right away you should notice some problems. First, the particle system always stays in the middle of the screen, regardless of where the rocket mouse flies. To make the particles always emit from the jetpack, you’ll need to add the Particle System as a child of the mouse. In the Hierarchy, drag the Particle System over the mouse to add it as a child. It should look like the following screenshot:

Now that the Particle System moves correctly, configure it to resemble flames by selecting the Particle System in the Hierarchy and changing the following in the Inspector:
- Rename the Particle System to jetpackFlames.
- Set its Position to (-0.62, -0.33, 0) to move it to the jetpack nozzle.
- Set its Rotation to (65, 270, 270) to set the direction at which the particles will be emitted.
- Still in the Inspector, find the Particle System component and set following properties:
- Set Start Lifetime to 0.5
- Set Start Size to 0.3
- Click on Start Color and set Red to 255, Green to 135, Blue to 40 and leave Alpha at 255. You should get a nice orange color.
- Expand the Emission section and set Rate over Time to 300. Make sure you don’t uncheck the checkbox to the left of Emission section and disable it.
- Expand the Shape section. Make sure Shape is set to Cone, set Angle to 12 and Radius to 0.1. Finally set the Randomize Direction to 1.
Here is how the particle system should look:

If your jetpack flames look different, make sure you’ve set all the settings shown on this screenshot:

Improving the Flames
The flames are looking good, but you’ll notice that the flame particles stop suddenly, as if they hit an invisible wall at the end of the particle emitter. You can fix this by changing the color of the particles as they fall further from the jet pack.
Select jetpackFlames in the Hierarchy and search for a section called Color over Lifetime in the Particle System component. Enable it by checking the white circle checkbox to the left of the section name and click the title to expand the section.

Since multiplying any color with white simply gives the original color, you always see the orange color. But you can change the Color over Lifetime to a gradient and set the end color to have 0 alpha. This way particles will disappear gradually.
Click the white color box within Color over Lifetime to open the Gradient Editor. It should look like this:

Select the top slider on the right and change the Alpha value to 0. Then close the Gradient Editor.

Run the scene. Now the jetpack flames look much more realistic.

Creating a Level Section
Remember that the mouse should glide through an endless room, avoiding lasers and collecting coins. Unless you have a huge amount of time on your hands, I highly recommend not creating your endless room by adding everything by hand!
You are going to create a few different level sections and add a script that will randomly add them ahead of the player. As you might imagine, this can’t all be done at once! You’ll start by simply adding a few background elements in this tutorial.
In Part 2, you’ll start creating additional rooms for the mouse to fly through.
This is how one level section might look like:

The process of creating a level section (let’s call one section a room) consists of three steps:
- Adding the background
- Adding the floor and the ceiling
- Adding decorative objects
Adding the Room Background
Make sure the Scene view and the Project view are visible. In the Project view, open the Sprites folder and drag the bg_window sprite to the scene. You don’t need to place it in a precise location; you’ll take care of that in a minute.

Select bg_window in the Hierarchy and set its Position to (0, 0, 0).
After placing the central section of the room, you need to add a few more sections, one to the left and one to the right of the window.
This time use the bg sprite. Find bg in the Project view and drag it to the scene twice. First time to the left, and second time to the right of bg_window. Don’t try to place it precisely. Right now you only need to add it to the scene.
You should get something like this:

Looks like a room by Salvador Dali, doesn’t it?
Using Vertex Snapping
You could simply position every background element on the screen based on each element’s size, but moving objects by calculating these values all the time is not very convenient.
Instead you’re going to use Unity’s Vertex Snapping feature, which easily allows you to position elements next to each other. Just look how easy it is:

To use vertex snapping, you simply need to hold the V key after selecting, but before moving the GameObject.
Select the room background object that you want to move. Don’t forget to release the mouse button. Then hold the V key and move the cursor to the corner you want to use as a pivot point.
This will be one of the left corners, for the background to the right of the window, and one of the right corners (any) for the background to the left of the window.
Note how the blue point shows which vertex will be used as pivot point.
After selecting the pivot point, hold down the left mouse button and start moving the object. You will notice that you can only move the object so that its pivot point matches the position of the other sprite’s corner (vertex).
If you run the game scene, you will notice your jetpack flames are behind the background. It’s possible that even your brave rocket mouse is hiding from view! In fact, any new sprites you drag into the scene may not be correctly positioned by Unity with respect to depth.
New sprites may be positioned behind or in front of any other sprite. You will be adding some decorations to your room soon but they will look pretty silly on the outside of your house! So for perfect control of sprite depth in the scene, you’ll next look at using Sorting Layers to control their ordering.
Using Sorting Layers
To make sure your background stays in the background, and that your mouse does not duck behind a bookcase mid-game, you’re going to use a feature called Sorting Layers. It will take only a moment to set everything up.
Select the mouse in the Hierarchy and find the Sprite Renderer component in the Inspector. There you will see a drop down called Sorting Layer, which currently has a value of Default, as it is shown below.

Open the drop down and you’ll see a list of all the sorting layers that you currently have in your project. Right now there should be only Default.

Click on the Add Sorting Layer… option to add more sorting layers. This will immediately open the Tags & Layers editor.
Add the following sorting layers by clicking the + button.
- Background
- Decorations
- Objects
- Player
Note: The order is important, since the order of sorting layers defines the order of the objects in the game.
When you’re done the Tags & Layers editor should look like this:

For now you’re only going to need Background and Player sorting layers. Other sorting layers will be used later.
Select mouse in the Hierarchy and set its Sorting Layer to Player.

Now select the three background pieces, bg_window, bg and bg (1) in the Hierarchy and set their Sorting Layers to Background.

Thankfully, this new version of Unity introduces the same sorting layer parameters to particle effects. This makes the use of particle effects in 2D games far more practical. Select the jetpackFlames in the Hierarchy. In the Inspector find the Renderer tab at the bottom of Particle System and click to expand it. Set the Sorting Layer to Player and the Order in Layer to -1. The Order in Layer sets the order of the object within its sorting layer for even finer control.

You set the jetpackFlames to -1 so that they are always emitted from under the player’s mouse sprite.
Run the game and you should see that the jetpack flames are now displayed above the background.

Decorating the Room
To decorate the room you can use any amount of bookcases and mouse holes from the Sprites folder in the Project browser. You can position them any way you want. Just don’t forget to set their Sorting Layer to Decorations.
Here is a decorated room example:

Need some decorating inspiration? In the Project browser find an image named object_bookcase_short1. Drag it to the scene just as you did with room backgrounds. Don’t try to position it somewhere in particular, just add it to the scene.
Select object_bookcase_short1 in the Hierarchy and set its Sorting Layer to Decorations. Now you will be able to see it.
Set the bookcase Position to (3.42, -0.54, 0) or place it anywhere you want. Now add the object_mousehole sprite. Set its Sorting Layer to Decorations and Position to (5.15, -1.74, 0).
Just don’t cover the window with book cases. You will add something ouside the window to look at later in the tutorial.
Now, this is starting to look like a real game!
Where to Go From Here?
Now that you have your hero flying up and down on a basic background, head in to Part 2 where your mouse will start to move forward through randomly generated rooms. You’ll even add a few animations to keep the game fun and engaging.
You can download the final project for this part in the tutorial materials. The link is at the top or bottom of this tutorial.
I would love to hear your comments and questions below. See you in Part 2!
The post How to Make a Game Like Jetpack Joyride in Unity 2D – Part 1 appeared first on Ray Wenderlich.