Learn how easy it is to build a personal health app with CareKit!
In a zombie apocalypse (or any other time, really) there’s nothing as important as health. Thankfully we have CareKit, an open source framework designed for building iOS apps that help users manage and understand their personal health. CareKit apps help users create and follow health plans, track progress, analyze the resulting data and even share that data with care providers.
Thanks to Apple’s continued interest in improving personal health with open source software, along with the health tracking capabilities of the iPhone and Apple Watch, it’s never been easier to put together an app that can have a powerful impact on the lives of many people!
In this CareKit tutorial, you’ll leverage CareKit in an app aimed at users trying to stay infection-free during a zombie apocalypse. You’ll create a care plan consisting of treatments to minimize risk and assessments to track signs of infection. You’ll also learn how integrating ResearchKit and HealthKit can make CareKit much more powerful.
If you’re unfamiliar with ResearchKit tasks, you may benefit from reviewing our ResearchKit tutorial before starting.
In Part 1 of the CareKit tutorial you’ll work on Zombie Training and Symptom Tracker; Part 2 will cover Insights and Connect.
Grab some … err … your brains, and let’s dive in!
Getting Started
Download the ZombieKit starter project and open it in Xcode. This contains a stubbed-out Tab Bar Controller, ResearchKit and HealthKit, plus a few helpers you’ll learn about during this CareKit tutorial.
Build and run ZombieKit to see the placeholder Tab Bar Controller in all its glory.

First, add the CareKit framework to your project. Head over to the CareKit repository on GitHub and download the stable_xcode80_candidate zip or clone that branch using the following terminal command:
git clone -b stable_xcode80_candidate --recurse-submodules https://github.com/carekit-apple/carekit.git |
Drag the downloaded CareKit.xcodeproj from Finder into the Project Navigator under the Linked Frameworks group. It should look like this:

Select the ZombieKit target, then the General tab of the target editor. Add CareKit.framework under the Embedded Binaries section.

To confirm that you’ve successfully added CareKit to the project, add the following to the top of TabBarViewController.swift:
import CareKit |
Build and run. If the project builds successfully, you’re all set!

Anatomy of a CareKit App
Functionally, CareKit consists of four main UI modules:
- Care Card defines and tracks actions meant to positively impact the user’s health. For example, a weight loss app might track minutes spent exercising each day.
- Symptom and Measurement Tracker defines and tracks symptoms or vitals. For instance, that weight loss app would track your weight each day.
- Insights allows you to chart the collected data as well as present written alerts or findings. The weight loss app could chart exercise against weight to help visualize the correlation.
- Connect enables communication with care providers and friends. The chart showing weight loss compared to exercise efforts could, for example, be put into PDF format and emailed to your physician.
Care Plan Store
The core of a CareKit app is the Care Plan Store, which manages and provides an interface to a database that persists the care plan. Its data are mapped to any connected Care Card and Symptom and Measurement Tracker controllers. When information is entered in views owned by these controllers, the Care Plan Store automatically picks it up.
The store handles two primary data types you’ll use throughout this CareKit tutorial:
- Activities represent the activities users will perform to manage their care and track their condition. These are often referred to collectively as the care plan.
- Events represent an individual occurrence of a scheduled activity. They are made up of the activity itself along with scheduling data, completion status and results when applicable.
Activities are further broken down into two types:
- Intervention Activities are actions users take as part of their treatment. They appear on the Care Card.
- Assessment Activities represent activities users take within the app to evaluate their health. These appear on the Symptom and Measurement Tracker.
You might have noticed that the Connect module wasn’t mentioned in the store. It actually doesn’t live there; instead, it’s up to you to persist OCKContact objects on your own.
The below chart shows the flow of information between the store, your contacts and the primary UI modules:

Now that you’ve got the basics down, it’s time to set up the Care Plan Store so it persists training and tracking data in ZombieKit. Open CarePlanStoreManager.swift and replace import Foundation with:
import CareKit |
You’ll use CareKit in this file, and it already includes Foundation.
Add the following property to the top of the CarePlanStoreManager class:
var store: OCKCarePlanStore |
Next, add the following inside init(), just above super.init():
store = OCKCarePlanStore(persistenceDirectoryURL: storeURL) |
This creates a Care Plan Store at storeURL in your documents directory. Note that the starter project includes a type property singleton called sharedCarePlanStoreManager—this allows you to access the store from anywhere in ZombieKit.
Build and run to confirm a successful build. You won’t notice any differences until you add data and start hooking up CareKit controllers.
Care Card
In a zombie apocalypse, your users need to stay sharp. A great first step is to define a training plan and track adherence to it. CareKit has just the thing you need—the Care Card!
Open TabBarViewController.swift and add the following property to the top of the TabBarViewController class:
fileprivate let carePlanStoreManager = CarePlanStoreManager.sharedCarePlanStoreManager |
This provides a pointer to the store you created in CarePlanStoreManager.
Find createCareCardStack() and replace this line:
let viewController = UIViewController() |
With this:
let viewController = OCKCareCardViewController(carePlanStore: carePlanStoreManager.store) viewController.maskImage = UIImage(named: "heart") viewController.smallMaskImage = UIImage(named: "small-heart") viewController.maskImageTintColor = UIColor.darkGreen() |
This initializes an OCKCareCardViewController, the main controller for the Care Card, and passes a Care Plan Store to act as the data source. You also set the maskImage, smallMaskImage and maskImageTintColor with images and colors from the starter project that help zombify the look of the progress indicator. If these aren’t set, the Care Card progress image defaults to a red heart with red fill.
Build and run—your Care Card should show a header with weekly navigation and progress as well as a detail view with a larger progress indicator. Right now both show 100% because you’ve completed 100% of your non-existent Intervention Activities. You’re great at doing nothing!

Preparing Care Plan Data
Now you need to generate some care plan data, which will require a bit of setup. Select the Care Plan Store group in the Project Navigator and select File\New\File…, then choose the iOS\Source\Swift File template and click Next. Name the file CarePlanData.swift and click Create. In the new file, replace the template code with the following:
import CareKit enum ActivityIdentifier: String { case cardio case limberUp = "Limber Up" case targetPractice = "Target Practice" case pulse case temperature } class CarePlanData: NSObject { let carePlanStore: OCKCarePlanStore init(carePlanStore: OCKCarePlanStore) { self.carePlanStore = carePlanStore //TODO: Define intervention activities //TODO: Define assessment activities super.init() //TODO: Add activities to store } } |
This code creates an enum, ActivityIdentifier, that will provide unique identifiers for intervention and assessment activities. It then defines a stubbed-out CarePlanData class which will be tasked with defining activities and adding them to the data store. Its initializer currently grabs a reference to OCKCarePlanStore for this purpose.
To initialize an OCKCarePlanActivity to define an activity, you need to provide a schedule minimally defining a start date and frequency. Add the following to CarePlanData just below the properties:
class func dailyScheduleRepeating(occurencesPerDay: UInt) -> OCKCareSchedule { return OCKCareSchedule.dailySchedule(withStartDate: DateComponents.firstDateOfCurrentWeek, occurrencesPerDay: occurencesPerDay) } |
This method calls the convenience initializer dailySchedule(withStartDate:occurrencesPerDay:), which creates an OCKCareSchedule with the given start date and number of daily occurrences. For the start date, you’re using NSDateComponents.firstDateOfCurrentWeek which is a computed property included with the starter project. This will generate results to cover the current week.
Intervention Activities
Now you’re ready to create some intervention activities. Replace //TODO: Define intervention activities with:
let cardioActivity = OCKCarePlanActivity( identifier: ActivityIdentifier.cardio.rawValue, groupIdentifier: nil, type: .intervention, title: "Cardio", text: "60 Minutes", tintColor: UIColor.darkOrange(), instructions: "Jog at a moderate pace for an hour. If there isn't an actual one, imagine a horde of zombies behind you.", imageURL: nil, schedule:CarePlanData.dailyScheduleRepeating(occurencesPerDay: 2), resultResettable: true, userInfo: nil) let limberUpActivity = OCKCarePlanActivity( identifier: ActivityIdentifier.limberUp.rawValue, groupIdentifier: nil, type: .intervention, title: "Limber Up", text: "Stretch Regularly", tintColor: UIColor.darkOrange(), instructions: "Stretch and warm up muscles in your arms, legs and back before any expected burst of activity. This is especially important if, for example, you're heading down a hill to inspect a Hostess truck.", imageURL: nil, schedule: CarePlanData.dailyScheduleRepeating(occurencesPerDay: 6), resultResettable: true, userInfo: nil) let targetPracticeActivity = OCKCarePlanActivity( identifier: ActivityIdentifier.targetPractice.rawValue, groupIdentifier: nil, type: .intervention, title: "Target Practice", text: nil, tintColor: UIColor.darkOrange(), instructions: "Gather some objects that frustrated you before the apocalypse, like printers and construction barriers. Keep your eyes sharp and your arm steady, and blow as many holes as you can in them for at least five minutes.", imageURL: nil, schedule: CarePlanData.dailyScheduleRepeating(occurencesPerDay: 2), resultResettable: true, userInfo: nil) |
This code allocates three OCKCarePlanActivity objects of type intervention, which correlate to your Care Card. Each has a unique identifier based on your enum along with the title, instructions, tint color and schedule created with the helper. Soon you’ll be able to view where each of these fields map.
To get the activities to appear in your Care Card View Controller, add them to the store by adding the following method to the bottom of CarePlanData:
func add(activity: OCKCarePlanActivity) { // 1 carePlanStore.activity(forIdentifier: activity.identifier) { [weak self] (success, fetchedActivity, error) in guard success else { return } guard let strongSelf = self else { return } // 2 if let _ = fetchedActivity { return } // 3 strongSelf.carePlanStore.add(activity, completion: { _ in }) } } |
What this code does:
-
You call
activity(forIdentifier:completion:)to search the store for an activity with the given identifier. This is required to avoid inserting items with duplicate identifiers. - If the fetch is successful,
fetchedActivityunwraps; since there’s nothing to add, you return. - If the identifier didn’t exist, you call
add(_:completion:)on the store to add theactivityto thecarePlanStore.
Now you can use that code to add each of the activities you defined. Back in init(carePlanStore:), replace //TODO: Add activities to store with:
for activity in [cardioActivity, limberUpActivity, targetPracticeActivity] { add(activity: activity) } |
This iterates through the activities you defined and adds each one to the store.
You need to initialize this data class so the process to add data to the store will begin, so head over to TabBarViewController.swift and add the following property at the top of TabBarViewController:
fileprivate let carePlanData: CarePlanData |
Now add the following to init(coder:), before the call to super:
carePlanData = CarePlanData(carePlanStore: carePlanStoreManager.store) |
This kicks off the initialization you wrote for CarePlanData that adds activities to the store.
Build and run—you’ve got yourself a zombie apocalypse training plan! Tap any bubble to fill it in, indicating you’ve completed one instance (or event) of the activity, and Care Completion updates accordingly. Tap elsewhere on the cell to see the instructions you provided for that activity.

After a modest amount of code, mostly to seed the data source, you now have a UI that displays and updates persisted Care Card data. That’s great news for your zombie-apocalypse users!
Symptom and Measurement Tracker
Now that your users have a plan to avoid infection, it’s time to tackle symptom tracking to monitor their zombie status.
While the Care Card tracks actions taken to improve or maintain a condition, the Symptom and Measurement Tracker monitors progress. For ZombieKit, that means checking for signs of infection—or (un)death.
In TabBarViewController.swift, add the following property to the others at the top of TabBarViewController:
fileprivate var symptomTrackerViewController: OCKSymptomTrackerViewController? = nil |
You’ll need a reference to the OCKSymptomTrackerViewController, as it will be used throughout this class.
In createSymptomTrackerStack(), replace:
let viewController = UIViewController() |
with the following:
let viewController = OCKSymptomTrackerViewController(carePlanStore: carePlanStoreManager.store) viewController.progressRingTintColor = UIColor.darkGreen() symptomTrackerViewController = viewController |
This initializes your OCKSymptomTrackerViewController while providing its datasource, the Care Plan Store. You also set the progressRingTintColor, which optionally colors the progress indicator. Finally, you store the reference in symptomTrackerViewController for use elsewhere.
Build and run, and check out the Symptom Tracker tab. Similarly to the Care Card, you’ll see a weekly and detail progress indicator, currently set to 100% due to your lack of activities.
![]()
Assessment Activities
As you might have guessed, it’s time to eat some brai … Rather, it’s time to add some assessment activities to the store!
Open CarePlanData.swift and head over to init(carePlanStore:). Replace the line //TODO: Define assessment activities with the following:
let pulseActivity = OCKCarePlanActivity .assessment(withIdentifier: ActivityIdentifier.pulse.rawValue, groupIdentifier: nil, title: "Pulse", text: "Do you have one?", tintColor: UIColor.darkGreen(), resultResettable: true, schedule: CarePlanData.dailyScheduleRepeating(occurencesPerDay: 1), userInfo: ["ORKTask": AssessmentTaskFactory.makePulseAssessmentTask()]) let temperatureActivity = OCKCarePlanActivity .assessment(withIdentifier: ActivityIdentifier.temperature.rawValue, groupIdentifier: nil, title: "Temperature", text: "Oral", tintColor: UIColor.darkYellow(), resultResettable: true, schedule: CarePlanData.dailyScheduleRepeating(occurencesPerDay: 1), userInfo: ["ORKTask": AssessmentTaskFactory.makeTemperatureAssessmentTask()]) |
You’ve defined two OCKCarePlanActivity objects—one for pulse and one for temperature—using a convenience initializer that creates assessment activities. This required a couple parameters not used in the intervention activities created earlier:
resultResettabletakes a Boolean that indicates whether the user can re-take the assessment. When turned off, once data is entered, there’s no covering it up if you’re a zombie.- You place a dictionary in
userInfowith the key"ORKTask". The value is a ResearchKit task (ORKTask) created by calling factory methods provided inAssessmentTaskFactory, a struct included with the starter project. CareKit can leverage ResearchKit tasks for obtaining health data, and you’ll see shortly how these tasks are used when the user completes an assessment.
At the bottom of init(carePlanStore:), add your new tasks to the array you loop through when calling addActivity(). It should now look like this:
for activity in [cardioActivity, limberUpActivity, targetPracticeActivity, pulseActivity, temperatureActivity] { add(activity: activity) } |
Build and run, and your new activities will appear in the Symptom Tracker tab. You’re now at 0% progress, because you haven’t completed either assessment yet. Note that as long as it isn’t the first day of the week, you can select and view prior days. Future days are never selectable.

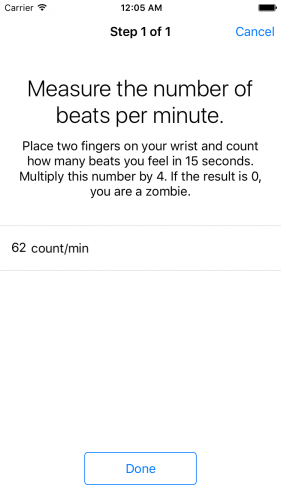
There’s no putting it off—you might as well check to see if you’ve become a zombie. Select one of the assessments and … nothing happens!

Handling Input
On the Care Card, intervention activities have a binary input—the user simply taps an event on or off to indicate if it occurred. Assessments are more versatile; they can capture all types of data and thus require a variety of user interfaces. For this reason, you’re required to provide a view controller to handle assessment input.
ResearchKit provides a number of options for handling input of health data, and CareKit is designed to work well with them. As you may recall from the ResearchKit with Swift tutorial, input is gathered with ORKTaskViewController objects which require ORKTask objects. You’ve already bundled a task in the userInfo of your assessment object—now it’s time to use it.
Open TabBarViewController.swift and add the following to the bottom of the file:
// MARK: - OCKSymptomTrackerViewControllerDelegate extension TabBarViewController: OCKSymptomTrackerViewControllerDelegate { func symptomTrackerViewController(_ viewController: OCKSymptomTrackerViewController, didSelectRowWithAssessmentEvent assessmentEvent: OCKCarePlanEvent) { guard let userInfo = assessmentEvent.activity.userInfo, let task: ORKTask = userInfo["ORKTask"] as? ORKTask else { return } let taskViewController = ORKTaskViewController(task: task, taskRun: nil) //TODO: Set a delegate present(taskViewController, animated: true, completion: nil) } } |
The Symptom and Measurement Tracker view controller requires an OCKSymptomTrackerViewControllerDelegate that must implement symptomTrackerViewController(_:didSelectRowWithAssessmentEvent:). This method is required to present a view controller for obtaining assessment data. It unwraps the ORKTask you stored in userInfo and uses that to initialize an ORKTaskViewController, then present it.
Hop back up to createSymptomTrackerStack() and add the following just after viewController is allocated:
viewController.delegate = self |
This sets the TabBarViewController as the delegate, which means the extension you just defined will be used when an assessment is selected.
Build and run, then head to the Symptom Tracker tab. Select either Pulse or Temperature and…you’ll get a crash. If you look in the console, there will be a message similar to this:
*** Terminating app due to uncaught exception 'NSInvalidArgumentException', reason: 'NSHealthShareUsageDescription must be set in the app's Info.plist in order to request read authorization.' |
This is because ResearchKit tasks rely on HealthKit, and you haven’t yet enabled that capability. You’ll get to that in a bit, but for now you need to add the plist entry to appease this check.
Open Info.plist within ZombieKit and add the NSHealthShareUsageDescription key with the value I want to obtain your pulse and temperature data because zombies:

You’ll access HealthKit data later in this tutorial, at which point the user will be prompted for authorization including the description you just provided.
Build and run, and once again select Pulse or temperature on the Symptom Tracker tab. Your ResearchKit controller now presents data from the task factory.
[ResearchKit][Warning]. This is because ResearchKit wants to check HealthKit for the data, and you haven’t set that up yet.

If you try to hit Done or Cancel then End Task, nothing happens. This is because an ORKTaskViewController requires a delegate callback to handle its results. Back in TabBarViewController.swift, add the following at the bottom of the file:
// MARK: - ORKTaskViewControllerDelegate extension TabBarViewController: ORKTaskViewControllerDelegate { func taskViewController(_ taskViewController: ORKTaskViewController, didFinishWith reason: ORKTaskViewControllerFinishReason, error: Error?) { // 1 defer { dismiss(animated: true, completion: nil) } // 2 guard reason == .completed else { return } guard let symptomTrackerViewController = symptomTrackerViewController, let event = symptomTrackerViewController.lastSelectedAssessmentEvent else { return } //TODO: convert ORKTaskResult to CareKit result and add to store } } |
- This dismisses the task view controller in a defer block that will execute after handling the results.
- Upon successful completion, you unwrap
symptomTrackerViewController.lastSelectedAssessmentEventto gain access to the event tied to the task that triggered the current task flow. In a moment, you’ll use this reference to save the results to the store.
You can’t simply save a ResearchKit task result into CareKit—you need to first convert it. Open CarePlanStoreManager.swift and import ResearchKit:
import ResearchKit |
Then add the following method to CarePlanStoreManager:
func buildCarePlanResultFrom(taskResult: ORKTaskResult) -> OCKCarePlanEventResult { // 1 guard let firstResult = taskResult.firstResult as? ORKStepResult, let stepResult = firstResult.results?.first else { fatalError("Unexepected task results") } // 2 if let numericResult = stepResult as? ORKNumericQuestionResult, let answer = numericResult.numericAnswer { return OCKCarePlanEventResult(valueString: answer.stringValue, unitString: numericResult.unit, userInfo: nil) } // 3 fatalError("Unexpected task result type") } |
This converts a ResearchKit result into a CareKit result.
- The
ORKTaskResults you created have a single step, so you pull the first and only one intofirstResult. Next you grab the first and only question result of this step, which will contain the data you collected. - You cast the result as a
ORKNumericQuestionResult, which is the only result type your tasks collect. You then grab the answer and pass it as the value when creating and returning anOCKCarePlanEventResult. - Remember that you only call this method when a task successfully completes, so if it doesn’t contain a value, you’re simply failing.
Return to TabBarViewController.swift and replace //TODO: convert ORKTaskResult to CareKit result and add to store with:
let carePlanResult = carePlanStoreManager.buildCarePlanResultFrom(taskResult: taskViewController.result) carePlanStoreManager.store.update(event, with: carePlanResult, state: .completed) { success, _, error in if !success { print(error?.localizedDescription) } } |
This passes your ResearchKit task result to buildCarePlanResultFrom(taskResult:) and gets back an OCKCarePlanEventResult. You pass that carePlanResult along with the current event to update(:_with:state:completion:) to commit it to the store. You print an error message if it was unsuccessful.
Finally, head back to symptomTrackerViewController(_:didSelectRowWithAssessmentEvent:) and replace //TODO: Set a delegate with:
taskViewController.delegate = self |
Now when the user submits a completed ResearchKit task, your new delegate method will be invoked to convert and save it.
Build and run. Now when you complete an assessment, the task controller will dismiss, your care store will update, and the symptom tracker will update to reflect changes to the completion percent and recorded value.

HealthKit Integration
As you’ve seen, CareKit is able to leverage ResearchKit to gather health data. Both of these frameworks also work closely with HealthKit, which makes it easy to access, transform and store health data. This enables powerful flows such as CareKit obtaining a pulse from HealthKit, which may have passively collected it from an Apple Watch or other device.
Because you’re already using ResearchKit to gather this data, enabling the option to pull from HealthKit is as trivial as enabling HealthKit in your project. Just be warned—there’s no hiding the fact that you’re a zombie from your Watch. :]
First, select the ZombieKit target, then the General tab. Set the bundle identifier to match your domain or naming convention, then select the Team associated with your development account. This is necessary so that Xcode can create an App ID with the appropriate entitlement.

With the target still selected, switch to the Capabilities tab. Flip the switch for HealthKit to enable it for your newly created app ID.
Select ResearchKit.xcodeproj from the Linked Frameworks group, then the ResearchKit target. Set your team here for this target as well.
Build and run, select the Symptom Tracker tab, and attempt one of the assessments. You will now see a prompt requesting HealthKit access, with the message you defined earlier, before the task controller is displayed. And if you’re running on a device that has pulse or temperature data stored, you’ll see the most recent reading automatically populate!
Unbalanced calls to begin/end appearance transitions. This is a known ResearchKit issue that occurs on the automatic display of the initial permission request view controller. Unfortunately, it’s built into the ResearchKit framework, so it can’t be avoided.

HealthKit Permission Prompt
Data populated from HealthKit!
Where To Go From Here?
Download the completed code for this CareKit tutorial here. Note that the final project does not have HealthKit enabled, since doing so requires access to your developer account. If you want to skip to the final project and wish to see HealthKit, follow the quick config steps in the HealthKit Integration section above.
To learn about more ResearchKit tasks you can leverage for assessments, check out ResearchKit Tutorial with Swift: Getting Started and Accessing Heart Rate Data for Your ResearchKit Study. You can also review HealthKit Tutorial with Swift: Getting Started for a refresher on working with HealthKit.
Stay tuned for Part 2 of this series, where you’ll build on ZombieKit to visualize the collected data via Insights and share it using Connect.
We hope you enjoyed the CareKit tutorial and feel empowered to help people take control of their health. Please join the discussion about this CareKit tutorial and the coming zombie apocalypse below!
The post CareKit Tutorial for iOS: Part 1 appeared first on Ray Wenderlich.