 A managed object context is an in-memory scratchpad for working with your managed objects.
Most apps need just a single managed object context. The default configuration in most Core Data apps is a single managed object context associated with the main queue. Multiple managed object contexts make your apps harder to debug; it’s not something you’d use in every app, in every situation.
That being said, certain situations do warrant the use of more than one managed object context. For example, long-running tasks, such as exporting data, will block the main thread of apps that use only a single main-queue managed object context and cause the UI to stutter.
In other situations, such as when edits are being made to user data, it’s helpful to treat a managed object context as a set of changes that the app can discard if it no longer needs them. Using child contexts makes this possible.
In this tutorial, you’ll learn about multiple managed object contexts by taking a journaling app for surfers and improving it in several ways by adding multiple contexts.
Getting Started
This tutorial’s starter project is a simple journal app for surfers. After each surf session, a surfer can use the app to create a new journal entry that records marine parameters, such as swell height or period, and rate the session from 1 to 5. Dude, if you’re not fond of hanging ten and getting barreled, no worries, brah. Just replace the surfing terminology with your favorite hobby of choice!
Introducing SurfJournal
Download the starter project for this tutorial: SurfJournal. Open the project, then build and run the app.
On startup, the application lists all previous surf session journal entries. Tapping a row brings up the detail view of a surf session with the ability to make edits.

As you can see, the sample app works and has data. Tapping the Export button on the top-left exports the data to a comma-separated values (CSV) file. Tapping the plus (+) button on the top-right adds a new journal entry. Tapping a row in the list opens the entry in edit mode, where you can change or view the details of a surf session.
Although the sample project appears simple, it actually does a lot and will serve as a good base to add multi-context support. First, let’s make sure you have a good understanding of the various classes in the project.
Open the project navigator and take a look at the full list of files in the starter project:

Before jumping into the code, take a brief moment to go over what each class does for you out of the box.
-
AppDelegate: On first launch, the app delegate creates the Core Data stack and sets the
coreDataStackproperty on the primary view controllerJournalListViewController. - CoreDataStack: This object contains the cadre of Core Data objects known as the stack. The stack installs a database that already has data in it on first launch. No need to worry about this just yet; you’ll see how it works shortly.
- JournalListViewController: The sample project is a one-page, table-based application. This file represents that table. If you’re curious about its UI elements, head over to Main.storyboard. There’s a table view controller embedded in a navigation controller and a single prototype cell of type SurfEntryTableViewCell.
- JournalEntryViewController: This class handles creating and editing surf journal entries. You can see its UI in Main.storyboard.
-
JournalEntry: This class represents a surf journal entry. It’s an
NSManagedObjectsubclass with six properties for attributes:date,height,location,period,ratingandwind. If you’re curious about this class’s entity definition, check out SurfJournalModel.xcdatamodel.

-
JournalEntry+Helper: This is an extension to the
JournalEntryobject. It includes the CSV export methodcsv()and thestringForDate()helper method. These methods are implemented in the extension to avoid being destroyed when you make changes to the Core Data model.
There was already a significant amount of data when you first launched the app, as this sample project comes with a seeded Core Data database.
The Core Data Stack
Open CoreDataStack.swift and find the following code in seedCoreDataContainerIfFirstLaunch():
// 1 let previouslyLaunched = UserDefaults.standard.bool(forKey: "previouslyLaunched") if !previouslyLaunched { UserDefaults.standard.set(true, forKey: "previouslyLaunched") // Default directory where the CoreDataStack will store its files let directory = NSPersistentContainer.defaultDirectoryURL() let url = directory.appendingPathComponent(modelName + ".sqlite") // 2: Copying the SQLite file let seededDatabaseURL = Bundle.main.urlForResource(modelName, withExtension: "sqlite")! _ = try? FileManager.default.removeItem(at: url) do { try FileManager.default.copyItem(at: seededDatabaseURL, to: url) } catch let nserror as NSError { fatalError("Error: \(nserror.localizedDescription)") } |
As you can see, this tutorial’s version of CoreDataStack.swift is a little different:
-
You first check
UserDefaultsfor thepreviouslyLaunchedboolean value. If the current execution is indeed the app’s first launch, theBoolwill befalse, making theifstatement true. On first launch, the first thing you do is setpreviouslyLaunchedtotrueso the seeding operation never happens again. -
You then copy the SQLite seed file SurfJournalModel.sqlite, included with the app bundle, to the directory returned by the Core Data-provided method
NSPersistentContainer.defaultDirectoryURL().
Now view the rest of seedCoreDataContainerIfFirstLaunch():
// 3: Copying the SHM file let seededSHMURL = Bundle.main.urlForResource(modelName, withExtension: "sqlite-shm")! let shmURL = directory.appendingPathComponent( modelName + ".sqlite-shm") _ = try? FileManager.default.removeItem(at: shmURL) do { try FileManager.default.copyItem(at: seededSHMURL, to: shmURL) } catch let nserror as NSError { fatalError("Error: \(nserror.localizedDescription)") } // 4: Copying the WAL file let seededWALURL = Bundle.main.urlForResource(modelName, withExtension: "sqlite-wal")! let walURL = directory.appendingPathComponent( modelName + ".sqlite-wal") _ = try? FileManager.default.removeItem(at: walURL) do { try FileManager.default.copyItem(at: seededWALURL, to: walURL) } catch let nserror as NSError { fatalError("Error: \(nserror.localizedDescription)") } print("Seeded Core Data") } |
- Once the copy of SurfJournalModel.sqlite has succeeded, you then copy over the support file SurfJournalModel.sqlite-shm.
- Finally, you copy over the remaining support file SurfJournalModel.sqlite-wal.
The only reason SurfJournalModel.sqlite, SurfJournalModel.sqlite-shm or SurfJournalModel.sqlite-wal would fail to copy on first launch is if something really bad happened, such as disk corruption from cosmic radiation. In that case the device, including any apps, would likely also fail. If the files fail to copy, there’s no point in continuing, so the catch blocks call fatalError.
abort and fatalError, as it confuses users by causing the app to quit suddenly and without explanation. This is one scenario where fatalError is acceptable, since the app needs Core Data to work. If an app requires Core Data and Core Data isn’t working, there’s no point in letting the app continue on, only to fail sometime later in a non-deterministic way.
Calling fatalError, at the very least, generates a stack trace, which can be helpful when trying to fix the problem. If your app has support for remote logging or crash reporting, you should log any relevant information that might be helpful for debugging before calling fatalError.
To support concurrent reads and writes, the persistent SQLite store in this sample app uses SHM (shared memory file) and WAL (write-ahead logging) files. You don’t need to know how these extra files work, but you do need to be aware of their existence, and that you need to copy them over when seeding the database. If you fail to copy over these files, the app will work, but it might be missing data.
Now that you know something about beginning with a seeded database, you’ll start learning about multiple managed object contexts by working on a temporary private context.
Doing Work in the Background
If you haven’t done so already, tap the Export button at the top-left and then immediately try to scroll the list of surf session journal entries. Notice anything? The export operation takes several seconds, and it prevents the UI from responding to touch events such as scrolling.
The UI is blocked during the export operation because both the export operation and UI are using the main queue to perform their work. This is the default behavior.
The traditional way to fix this is to use Grand Central Dispatch to run the export operation on a background queue. However, Core Data managed object contexts are not thread-safe. That means you can’t just dispatch to a background queue and use the same Core Data stack.
The solution is simple: use a private background queue rather than the main queue for the export operation. This will keep the main queue free for the UI to use.
But before you jump in and fix the problem, you need to understand how the export operation works.
Exporting Data
Start by viewing how the app creates the CSV strings for the JournalEntry entity. Open JournalEntry+Helper.swift and find csv():
func csv() -> String { let coalescedHeight = height ?? "" let coalescedPeriod = period ?? "" let coalescedWind = wind ?? "" let coalescedLocation = location ?? "" let coalescedRating: String if let rating = rating?.int32Value { coalescedRating = String(rating) } else { coalescedRating = "" } return "\(stringForDate()),\(coalescedHeight), \(coalescedPeriod), \(coalescedWind), \(coalescedLocation),\(coalescedRating)\n" } |
As you can see, JournalEntry returns a comma-separated string of the entity’s attributes. Because the JournalEntry attributes are allowed to be nil, the function uses the nil coalescing operator (??) to export an empty string instead of an unhelpful debug message that the attribute is nil.
??) unwraps an optional if it contains a value; otherwise it returns a default value. For example, the following: let coalescedHeight = height != nil ? height! : "" can be shortened using the nil coalescing operator to: let coalescedHeight = height ?? "".
That’s how the app creates the CSV strings for an individual journal entry, but how does the app save the CSV file to disk? Open JournalListViewController.swift and find the following code in exportCSVFile():
// 1 let context = coreDataStack.mainContext var results: [JournalEntry] = [] do { results = try context.fetch(self.surfJournalFetchRequest()) } catch let error as NSError { print("ERROR: \(error.localizedDescription)") } // 2 let exportFilePath = NSTemporaryDirectory() + "export.csv" let exportFileURL = URL(fileURLWithPath: exportFilePath) FileManager.default.createFile(atPath: exportFilePath, contents: Data(), attributes: nil) |
Going through the CSV export code step-by-step:
-
First, retrieve all
JournalEntryentities by executing a fetch request. The fetch request is the same one used by the fetched results controller. Therefore you reuse thesurfJournalFetchRequestmethod to create the requst to avoid duplication. -
Next, create the URL for the exported CSV file by appending the file name (“export.csv”) to the output of the
NSTemporaryDirectorymethod.The path returned by
NSTemporaryDirectoryis a unique directory for temporary file storage. This a good place for files that can easily be generated again and don’t need to be backed up by iTunes or to iCloud.After creating the export URL, call
createFileAtPath(_:contents:attributes:)to create the empty file where you’ll store the exported data. If a file already exists at the specified file path, this method will remove it first.
Once the app has the empty file, it can write the CSV data to disk:
// 3 let fileHandle: FileHandle? do { fileHandle = try FileHandle(forWritingTo: exportFileURL) } catch let error as NSError { print("ERROR: \(error.localizedDescription)") fileHandle = nil } if let fileHandle = fileHandle { // 4 for journalEntry in results { fileHandle.seekToEndOfFile() guard let csvData = journalEntry .csv() .data(using: .utf8, allowLossyConversion: false) else { continue } fileHandle.write(csvData) } // 5 fileHandle.closeFile() print("Export Path: \(exportFilePath)") self.navigationItem.leftBarButtonItem = self.exportBarButtonItem() self.showExportFinishedAlertView(exportFilePath) } else { self.navigationItem.leftBarButtonItem = self.exportBarButtonItem() } |
Here’s how the file-handling works:
-
First, the app needs to create a file handler for writing, which is simply an object that handles the low-level disk operations necessary for writing data. To create a file handler for writing, use the
FileHandle(forWritingTo:)initializer.
-
Next, iterate over all
JournalEntryentities. During each iteration, you attempt to create a UTF8-encoded string usingcsv()onJournalEntryanddata(using:allowLossyConversion:)onString. If it’s successful, you write the UTF8 string to disk using the file handlerwrite()method. - Finally, close the export file-writing file handler, since it’s no longer needed.
Once the app has written all the data to disk, it shows an alert dialog with the exported file path:
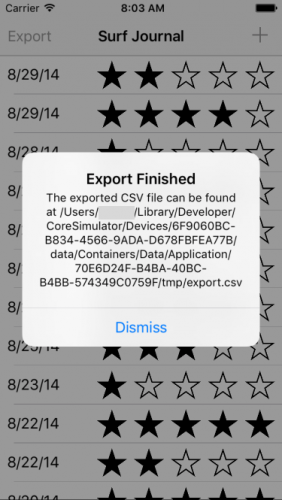
UIActivityViewController.
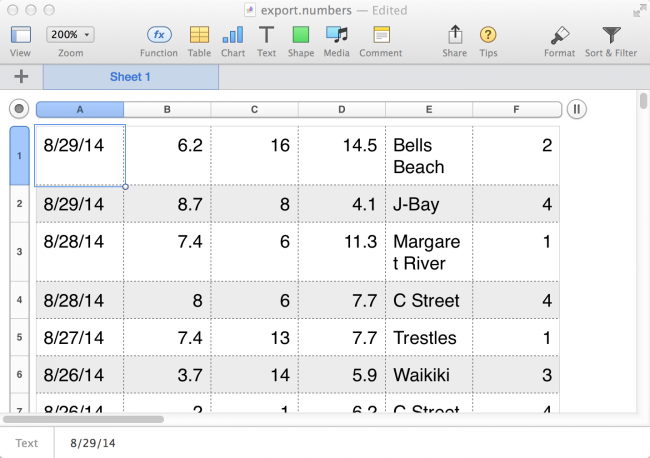
To open the exported CSV file, use Excel, Numbers or your favorite text editor to navigate to and open the file specified in the alert dialog. If you open the file in Numbers you will see the following:
Now that you’ve seen how the app currently exports data, it’s time to make some improvements.
Exporting in the Background
You want the UI to continue working while the export is happening. To fix the UI problem, you’ll perform the export operation on a private background context instead of on the main context.
Open JournalListViewController.swift and find the following code in exportCSVFile():
// 1 let context = coreDataStack.mainContext var results: [JournalEntry] = [] do { results = try context.fetch(self.surfJournalFetchRequest()) } catch let error as NSError { print("ERROR: \(error.localizedDescription)") } |
As you saw earlier, this code retrieves all of the journal entries by calling fetch() on the managed object context.
Next, replace the above code with the following:
// 1 coreDataStack.storeContainer.performBackgroundTask { (context) in var results: [JournalEntry] = [] do { results = try context.fetch(self.surfJournalFetchRequest()) } catch let error as NSError { print("ERROR: \(error.localizedDescription)") } |
Instead of using the main managed object context also used by the UI, you’re now calling performBackgroundTask(_:) method. This creates and executes the code block on that private context.
The private context created by performBackgroundTask(_:) is on a private queue, which doesn’t block the main UI queue. You could also manually create a new temporary private context with a concurrency type of PrivateQueueConcurrencyType instead of using performBackgroundTask(_:).
ConfinementConcurrencyType specifies that the context will use the thread confinement pattern and that the developer will be responsible for managing all thread access. You should consider this type deprecated and never use it, as the next two types cover all use cases.
PrivateQueueConcurrencyType specifies the context will be associated with a private dispatch queue instead of the main queue. This is the type of queue you just used to move the export operation off of the main queue so it would no longer interfere with the UI.
MainQueueConcurrencyType, the default type, specifies that the context will be associated with the main queue. This type is what the main context (coreDataStack.mainContext) uses. Any UI operation, such as creating the fetched results controller for the table view, must use a context of this type.
Next, find the following code in the same method:
print("Export Path: \(exportFilePath)") self.navigationItem.leftBarButtonItem = self.exportBarButtonItem() self.showExportFinishedAlertView(exportFilePath) } else { self.navigationItem.leftBarButtonItem = self.exportBarButtonItem() } |
Replace the code with the following:
print("Export Path: \(exportFilePath)") // 6 DispatchQueue.main.async { self.navigationItem.leftBarButtonItem = self.exportBarButtonItem() self.showExportFinishedAlertView(exportFilePath) } } else { DispatchQueue.main.async { self.navigationItem.leftBarButtonItem = self.exportBarButtonItem() } } } // 7 Closing brace for performBackgroundTask |
To finish off the task:
-
You should always perform all operations related to the UI on the main queue, such as showing an alert view when the export operation is finished; otherwise, unpredictable things might happen. Use
DispatchQueue.main.asyncto show the final alert view message on the main queue. -
Finally, add a closing curly brace to close the block you opened earlier in step 1 via the
performBackgroundTask(_:)call.
Now that you’ve moved the export operation to a new context with a private queue, build and run to see if it works!
You should see exactly what you saw before:
Tap the Export button in the top left, and immediately try to scroll the list of surf session journal entries. Notice anything different this time? The export operation still takes several seconds to complete, but the table view continues to scroll during this time. The export operation is no longer blocking the UI.
Cowabunga, dude! Gnarly job making the UI more responsive.
You’ve just witnessed how doing work on a private background queue can improve a user’s experience with your app. Now you’ll expand on the use of multiple contexts by examining a child context.
Editing on a Scratchpad
Right now, SurfJournal uses the main context (coreDataStack.mainContext) when creating a new journal entry or or viewing an existing one. There’s nothing wrong with this approach; the starter project works as-is.
For journaling-style apps like this one, you can simplify the app architecture by thinking of edits or new entries as a set of changes, like a scratch pad. As the user edits the journal entry, you update the attributes of the managed object. Once the changes are complete, you either save them or throw them away, depending on what the user wants to do.
You can think of child managed object contexts as temporary scratch pads that you can either discard completely, or save and send the changes to the parent context.
But what is a child context, technically?
All managed object contexts have a parent store from which you can retrieve and change data in the form of managed objects, such as the JournalEntry objects in this project. Typically, the parent store is a persistent store coordinator, which is the case for the main context provided by the CoreDataStack class. Alternatively, you can set the parent store for a given context to another managed object context, making it a child context.

When you save a child context, the changes only go to the parent context. Changes to the parent context won’t be sent to the persistent store coordinator until the parent context is saved.
Before you jump in and add a child context, you need to understand how the current viewing and editing operation works.
Viewing and Editing
The first part of the operation requires segueing from the main list view to the journal detail view. Open JournalListViewController.swift and find prepareForSegue(for:sender:):
// 1 if segue.identifier == "SegueListToDetail" { // 2 guard let navigationController = segue.destination as? UINavigationController, let detailViewController = navigationController.topViewController as? JournalEntryViewController, let indexPath = tableView.indexPathForSelectedRow else { fatalError("Application storyboard mis-configuration") } // 3 let surfJournalEntry = fetchedResultsController.object(at: indexPath) //4 detailViewController.journalEntry = surfJournalEntry detailViewController.context = surfJournalEntry.managedObjectContext detailViewController.delegate = self |
Taking the segue code step-by-step:
- There are two segues: SegueListToDetail and SegueListToDetailAdd. The first, shown in the previous code block, runs when the user taps on a row in the table view to view or edit a previous journal entry.
-
Next, you get a reference to the
JournalEntryViewControllerthat the user is going to end up seeing. It’s presented inside a navigation controller so there’s some unpacking to do. This code also verifies there’s a selected index path in the table view. -
Then you get the
JournalEntryselected by the user, using the fetched results controller’sobject(at:)method. -
Finally, you set all required variables on the
JournalEntryViewControllerinstance. ThesurfJournalEntryvariable corresponds to theJournalEntryentity resolved in step 3. The context variable is the managed object context to be used for any operation; for now, it just uses the main context. TheJournalListViewControllersets itself as the delegate of theJournalEntryViewControllerso it can be informed when the user has completed the edit operation.
SegueListToDetailAdd is similar to SegueListToDetail, except the app creates a new JournalEntry entity instead of retrieving an existing one. The app executes SegueListToDetailAdd when the user taps the plus (+) button on the top-right to create a new journal entry.
Now you know how both segues work, switch to JournalEntryViewController.swift and look at the JournalEntryDelegate protocol at the top of the file:
protocol JournalEntryDelegate { func didFinish(viewController: JournalEntryViewController, didSave: Bool) } |
As you can see, the JournalEntryDelegate protocol is very short and consists of only one method: didFinish(viewController:didSave:). This method, which the protocol requires the delegate to implement, indicates if the user is done editing or viewing a journal entry and whether any changes should be saved.
To understand how didFinish(viewController:didSave:) works, switch back to JournalListViewController.swift and find that method:
func didFinish(viewController: JournalEntryViewController, didSave: Bool) { // 1 guard didSave, let context = viewController.context, context.hasChanges else { dismiss(animated: true) return } // 2 context.perform { do { try context.save() } catch let error as NSError { fatalError("Error: \(error.localizedDescription)") } // 3 self.coreDataStack.saveContext() } // 4 dismiss(animated: true) } |
Taking each numbered comment in turn:
-
First, use a
guardstatement to check thedidSaveparameter. This will betrueif the user taps the Save button instead of the Cancel button, so the app should save the user’s data. Theguardstatement also uses thehasChangesproperty to check if anything’s changed; if nothing has changed, there’s no need to waste time doing more work. -
Next, save the
JournalEntryViewControllercontext inside of aperform(_:)closure. The code sets this context to the main context; in this case it’s a bit redundant since there’s only one context, but this doesn’t change the behavior. Once you add a child context to the workflow later on, theJournalEntryViewControllercontext will be different from the main context, making this code necessary. If the save fails, callfatalErrorto abort the app with the relevant error information. -
Next, save the main context via
saveContext, defined in CoreDataStack.swift, persisting any edits to disk. -
Finally, dismiss the
JournalEntryViewController.
MainQueueConcurrencyType, you don’t have to wrap code in perform(_:), but it doesn’t hurt to use it.
didFinish(viewController:didSave:), it’s safest to use perform(_:) so it will work with both parent and child contexts.
There’s a problem with the above implementation — have you spotted it?
When the app adds a new journal entry, it creates a new object and adds it to the managed object context. If the user taps the Cancel button, the app won’t save the context, but the new object will still be present. If the user then adds and saves another entry, the canceled object will still be present! You won’t see it in the UI unless you’ve got the patience to scroll all the way to the end, but it will show up at the bottom of the CSV export.
You could solve this problem by deleting the object when the user cancels the view controller. But what if the changes were complex, involved multiple objects, or required you to alter properties of an object as part of the editing workflow? Using a child context will help you manage these complex situations with ease.
Using Child Contexts for Sets of Edits
Now that you know how the app currently edits and creates JournalEntry entities, you’ll modify the implementation to use a child managed object context as a temporary scratch pad.
It’s easy to do — you simply need to modify the segues. Open JournalListViewController.swift and find the following code for SegueListToDetail in prepareForSegue(for:sender:):
detailViewController.journalEntry = surfJournalEntry detailViewController.context = surfJournalEntry.managedObjectContext detailViewController.delegate = self |
Next, replace that code with the following:
// 1 let childContext = NSManagedObjectContext( concurrencyType: .mainQueueConcurrencyType) childContext.parent = coreDataStack.mainContext // 2 let childEntry = childContext.object(with: surfJournalEntry.objectID) as? JournalEntry // 3 detailViewController.journalEntry = childEntry detailViewController.context = childContext detailViewController.delegate = self |
Here’s the play-by-play:
-
First, you create a new managed object context named
childContextwith aMainQueueConcurrencyType. Here you set a parent context instead of a persistent store coordinator as you would normally do when creating a managed object context. Here, you setparenttomainContextof yourCoreDataStack. -
Next, you retrieve the relevant journal entry using the child context’s
object(with:)method. You must useobject(with:)to retrieve the journal entry because managed objects are specific to the context that created them. However,objectIDvalues are not specific to a single context, so you can use them when you need to access objects in multiple contexts. -
Finally, you set all required variables on the
JournalEntryViewControllerinstance. This time, you usechildEntryandchildContextinstead of the originalsurfJournalEntryandsurfJournalEntry.managedObjectContext.
detailViewController, since managed objects already have a context variable. This is because managed objects only have a weak reference to the context. If you don’t pass the context, ARC will remove the context from memory (since nothing else is retaining it) and the app will not behave as you expect.
Build and run your app; it should work exactly as before. In this case, no visible changes to the app are a good thing; the user can still tap on a row to view and edit a surf session journal entry.

By using a child context as a container for the journal edits, you’ve reduced the complexity of your app’s architecture. With the edits on a separate context, canceling or saving managed object changes is trivial.
Nice work, dude! You’re no longer a kook when it comes to multiple managed object contexts. Bodacious!
Where to Go From Here?
You can download the finished project from this tutorial here.
If you followed this tutorial all the way through, you’ve turned an app with a single managed object context into an app with multiple contexts. You can find the final project from this tutorial here.
You improved UI responsiveness by performing the export operation on a private background managed object context, and you improved the app’s architecture by creating a child context and using it like a scratch pad.
But best of all, you learned how to talk like a surfer. That’s a good day’s work! :]
 If you enjoyed this tutorial, you’d definitely enjoy our book Core Data by Tutorials.
The book goes into further detail on Core Data and is written for intermediate iOS developers who already know the basics of iOS and Swift development but want to learn how to leverage Core Data to persist data in their apps.
It’s been fully updated for Swift 3, iOS 10 and Xcode 8 — get it on the raywenderlich.com store today!
The post Multiple Managed Object Contexts with Core Data Tutorial appeared first on Ray Wenderlich.