Welcome back to our Scene Kit Tutorial with Swift series!
This tutorial series will show you how to create your first game with Scene Kit, Apple’s built-in 3D game framework.
In the first part of the series, you learned how to make an empty Scene Kit project as a good starting point.
In the second part of the series, you started making your game, learning about Scene Kit nodes along the way.
In this third part of the series, you’ll learn how to make your geometry move through the power of Scene Kit physics.
Let’s dive back in!
Getting Started
In this tutorial, you’ll use SceneKit’s physics engine to add physics to your game.
SceneKit’s physics engine is powerful, yet easy to use. You simply tell SceneKit on which objects you want to apply physics, and the engine will take over from that point, simulating things such as gravity and collisions.
Before you dive into integrating physics into your game, you’ll first need to add some game utilities to your project.
Introducing the Game Utilities
The game utilities were created especially for you. They include helper methods which handle the complicated bits in your game. This lets you focus on the gameplay rather than those pesky bits.
Download the SceneKit_Part3_resources here.
Adding the Game Utilities
To add the game utilities, simply drag and drop the GameUtils folder into your project under the GeometryFighter group folder:

Leave all the settings at their defaults and click Finish:
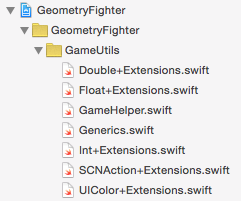
This imports the entire GameUtils folder into your project as a group. Expand this group folder and have a quick look at some of the helper methods. Don’t worry too much if some of the code doesn’t make sense to you yet.
Physics
Time for a quick status check of the current state of your game. Build and run the game; a cool random geometric object spawns out of thin air like some kind of dark magic. This might not seem like much right now, but things will definitely start to shape up soon! :]
The freshly spawned object just hangs there in an empty space and doesn’t do much. Sure, you can rotate the camera around it and zoom in and out, but that’s about it. It’s not much of a fun game. To pump up the excitement level, it would be nice if the object at least moved around a little.
Now, you could take the long way around and manipulate the object’s position and rotation over time so that it spins and moves around. You’d soon realize that although it’s possible to animate objects in this manner, it requires a lot of coding effort — especially when you add into the mix other features like realistic collisions and interactions between objects.
Thankfully, the developers at Apple have already thought about this; to this end, they integrated a very powerful 3D physics engine into SceneKit. To make use of this built-in physics engine, you simply need to make the engine aware of your object.
In the same way you attach geometry information to your node, you can attach a physics body to your node. The physics body describes all the physical properties of your node, which includes things such as shape, mass, friction, damping and restitution. The physics engine takes all this information into account when it simulates the real-world physics interactions of your objects. This includes things such as gravity, friction and collisions with other bodies within the physics world.
The next section details some of the important characteristics of a physics body.
Physics Body Types
One of the key properties you must specify when creating a physics body is its type. The physics body type defines how the body interacts with forces and other bodies in the simulation.
There are three types used in SceneKit:
- Static bodies don’t move: while other objects can collide with these bodies, the static bodies themselves are unaffected by any forces and collisions in the simulation. You can use this type for things like walls and massive immobile boulders.
- Dynamic bodies are automatically moved by the physics engine in response to forces and collisions. You can use this type for things such as movable chairs, tables and cups.
- Kinematic bodies are not automatically moved by the physics engine in response to forces and collisions. In other words, if a kinematic body collides with a dynamic body, the dynamic body will move, but the kinematic body won’t. However, you can move kinematic bodies around manually in code. You can use this type for things you want to control manually, such as moving elevators or a door that can open and close.
Physics Shapes
In addition to the type of the body, another import property you must specify when creating a physics body is its shape. The physics shape defines the 3D shape used by the physics engine during collision detections. While the geometry defines the visuals of the node, the physics body defines how the node interacts with other objects in a physics simulation.
You can make the shape exactly the same as the visual geometry, but this is often more computationally expensive than you need (hence causing your game to run slower). Instead, you should usually work with a simplified version of the geometry for your shape, such as a simple bounding box, sphere or one of the provided primitive shapes that roughly matches the node’s visible appearance like so:

Adding Physics
Now that you’ve learned the theory behind the physics, it’s time to start using these concepts to move things around in your game.
In SceneKit, all the physics bodies are SCNPhysicsBody objects. Once you create the physics body, you can assign it to the physicsBody property of the SCNNode instance. Once you assign the physics body to the appropriate node, the physics engine can simulate the physics for you. It’s that simple! :]
Open GameViewController.swift and add the following after the line of code that creates geometryNode in spawnShape():
geometryNode.physicsBody = SCNPhysicsBody(type: .dynamic, shape: nil) |
This line of code creates a new instance of SCNPhysicsBody and assigns it to the physicsBody property of geometryNode. When you create a physics body, you specify the type and shape of the body. If you pass in nil for the physics shape, SceneKit will automatically generate a shape based on the visual geometry of the node. Neat, huh?
If you want to add more detail to the physics shape, you can create a SCNPhysicsShape and use that for the shape instead of passing in nil.
Build and run your game; a random shape spawns into the scene, and then drops out of the air with all the grace of a dead bird, falling out of sight:

You can even pan the camera to watch the object fall into oblivion. What you’re witnessing here is the effect of gravity acting on the object. A scene in SceneKit has gravity turned on by default. Now that the spawned object has a physics body, the physics simulation will apply simulated forces — such as gravity — to the object.
Forces
Think about objects in real life for a moment: to make something move — such as a spoon on top of a table — you have to apply some type of physical force on it. Unless you’re living inside the Matrix, your name is Neo and there isn’t even an actual spoon to begin with. :]
The SceneKit physics engine does a pretty good job mimicking real-life physics, so just as you’d apply a force to move an object in real life, you’ll need to apply a force on your physics body to move it around.
When you apply a force to a physics body, you use applyForce(direction: at: asImpulse:) and pass in an instance of SCNVector3 for both the force and the position where you want to apply that force, along with whether the force should be applied as an impulse. The force you apply affects both the linear and angular acceleration of the physics body.
An impulse applies the force only once to the physics body, such as when you kick a ball. Forces that aren’t impulses are applied at each step in the physics simulation. SceneKit will add up all applied forces on the object and accelerate the physics body according to the net result of those forces. This can simulate something like a booster rocket, where the force is continuous.
Earlier, you learned that a force is a vector with an x, y and z component. But what does that mean? Take a look at the diagram below:

A force has both magnitude and direction, so the vector determines the magnitude of the force for each individual axis. In the example above, applying a force with a vector of (x:0, y:10, z:0) moves the body upwards with a vertical force.
To apply a horizontal force, you would only specify the magnitude of the force on the x axis using a vector of (x:10, y:0, z:0). To move the body left instead of right, you would apply a negative magnitude of force on the x axis. When you combine various vectors together like (x:10, y:10, z:0), you can control exactly how you want the body to move — in this case, diagonally.
Forces can also be applied at a specific position on a physics body to produce different movements:

Again, it helps to think of real-life examples. If you had a block in front of you and pushed it, the block would move differently depending on the spot you applied the push. Applying the same force to the left or right of the body’s center of mass, for example, at (x:1, y:0, z:0) would cause it to spin. Applying the force directly in line with the center of mass at (x:0, y:0, z:0) wouldn’t produce a spin.
Applying Force
Roll up your sleeves — it’s time to apply some force! :]
Add the following code after the line where you create the physics body for geometryNode inside spawnShape():
// 1 let randomX = Float.random(min: -2, max: 2) let randomY = Float.random(min: 10, max: 18) // 2 let force = SCNVector3(x: randomX, y: randomY , z: 0) // 3 let position = SCNVector3(x: 0.05, y: 0.05, z: 0.05) // 4 geometryNode.physicsBody?.applyForce(force, at: position, asImpulse: true) |
Taking each commented line in turn:
-
This creates two random float values that represent the x- and y-components of the force. It uses an extension on
Floatfrom the utilities you added earlier in this tutorial. - Next, you use those random components to create a vector to represent this force.
- This creates another vector that represents the position to which the force will be applied. The position is slightly off-center so as to create a spin on the object.
-
Finally, using all those components, you apply the force to
geometryNode’s physics body usingapplyForce(direction: at: asImpulse:).
Build and run; as the object spawns out of thin air, some magical force kicks it up into the air instead of dropping like a dead bird:

As gravity takes its toll, the object eventually falls back down.
Torque
Torque is another rotational force you can apply to a body using applyTorque(torque: asImpulse:). Torque only affects the angular momentum (spin) of the physics body, not the linear momentum (x, y, z). Applying torque causes an object to spin around its center of mass.
To see how torque affects a physics body, take a look at the following illustration:

When applying a torque force, you specify a four-component vector using SCNVector4 rather than a three-component vector as you do with forces. The x-, y- and z-components determine the rotation axis, while the w-component determines the rotation angle, that is, the magnitude of the torque.
Just as you do with applyForce(direction: at: asImpulse:), you can choose whether or not to apply the torque as an impulse, which affects how the physics engine treats the vector.
If the torque is an impulse, the directional vector is treated as an instantaneous change in the angular momentum. Think of spinning a basketball on your finger; to keep the ball spinning, you have to quickly flick the side of the ball with you hand, which applies an a impulse with each flick that instantaneously increases the angular momentum of the ball.
When a torque is not applied as an impulse, it’s applied after each physics simulation step. SceneKit will sum all applied forces and torques, and accelerate the angular force of the physics body according to the net effect of those forces. Think of this as a planet spinning at a constant speed around its own axis.
Adding Flair
Now that you’ve got your geometric object moving, you may have noticed it spawns out of thin air right in the middle of the screen, which looks a bit awkward. To fix that, you’ll shift the camera on the y-axis a bit so that the object spawns off-screen.
Positioning the Camera
To move the camera position up, replace the line where you set the camera’s position in setupCamera() with the following:
cameraNode.position = SCNVector3(x: 0, y: 5, z: 10) |
Build and run, and you’ll see that the object appears to spawn off-screen!

Adding some Color
As a final touch, you’ll add a bit of variety to your randomly generated shapes.
Add the following lines inside spawnShape(), after the spot where you randomly create geometry, but just before you create geometryNode:
geometry.materials.first?.diffuse.contents = UIColor.random() |
To color your random object, you modify materials on geometry; this line gets the first available material of geometry and sets the diffuse property’s contents to a random UIColor. The random() method on UIColor is another helper defined as an extension inside the game utilities.
UIColor to the diffuse property’s content in order to change the object’s color.
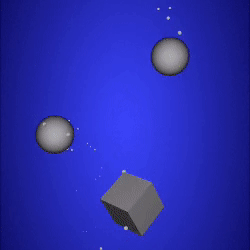
Finally, build and run your game to see a beautifully colored object:

Wouldn’t it be neat if you could spawn more than one object? You’ll fix this…in the next part of this series! :]
Where to Go From Here?
You’re making excellent progress, and you’re more than halfway through your first SceneKit game! If you’re flexible (unlike me), give yourself a pat on the back.
Here is the finished project from this part of the tutorial.
At this point, you should keep reading on to the fourth part of this tutorial series, where you’ll learn how to make geometry spawn over time using the Scene Kit render loop.
If you’d like to learn more, you should check out our book 3D iOS Games by Tutorials. The book teaches you everything you need to know to make 3D iOS games, by making a series of mini-games like this one, including a games like Breakout, Marble Madness, and even Crossy Road.
In the meantime, if you have any questions or comments about this tutorial, please join the forum discussion below!
The post Scene Kit Tutorial with Swift Part 3: Physics appeared first on Ray Wenderlich.