The Swift Package Manager, officially released alongside Swift 3.0, is a new way to create Swift libraries and apps on macOS and Linux. It helps you manage your dependencies and allows you to easily build, test and run your Swift code.
The Swift Package Manager will help to vastly improve the Swift ecosystem, making Swift much easier to use and deploy on platforms without Xcode such as Linux. The Swift Package Manager also addresses the problem of dependency hell that can happen when using many interdependent libraries.
It is important to note that as of Swift 3 the Swift Package Manager only compiles for host platforms. In other words, for now you won’t be able to build or consume packages for for iOS, watchOS, or tvOS.
Time to get started!
Getting Started
Before starting, make sure you have Swift 3.0 or greater installed. Swift 3 is included with Xcode 8.0+, so if you have Xcode 8 or better, you are ready to start. You actually don’t even need Xcode to complete most of this tutorial; you can simply install Swift 3 from swift.org.
Open a new Terminal window and type swift package. You’ll see an overview of the commands. The main commands you will be using are:
swift package initto create new packagesswift package updateto update the dependencies of a packageswift package generate-xcodeprojto generate an Xcode project for your package
To learn about the Swift Package Manager, you will create a command-line app that uses a small library to print the emoji flag for any country. You will start by creating the executable package. These are packages that are meant to be command-line apps. Swift web apps also fall into this category.
Create a Flag executable package by running the following commands in the terminal:
mkdir Flag cd Flag swift package init --type executable |
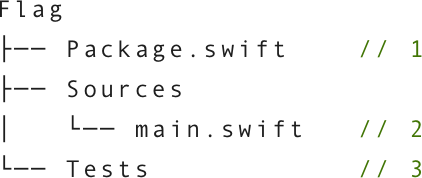
The current directory Flag is important when you run swift package init because it becomes the name of the generated package. You will see a few files and folders in the output that were created for you. Take some time to get familiar with the project structure:

Package.swifthas your package description, and it will also have your package’s dependencies.Sources/, as the name suggests, is where you will have all your Swift source files. Amain.swiftfile has also been created for you. This will be the entry point for your application. For now, it prints hello, world to the Terminal.Tests/will contain unit tests you can write usingXCTest. You will write tests for your code soon!
Go back to your Terminal window and run the following:
swift build |
This will build the package and create an executable at .build/debug/Flag. Execute the app by running:
.build/debug/Flag |
You should see Hello, world! printed to the screen.
Congratulations: you’ve created and built your first Swift package!
Creating the Library
To do the actual work of generating an emoji flag for a country, you will create a library named Atlas. You can then use this library in your Flag application.
Move outside of the Flag package and create a library package by typing the following commands into the terminal:
cd .. mkdir Atlas cd Atlas swift package init --type library |
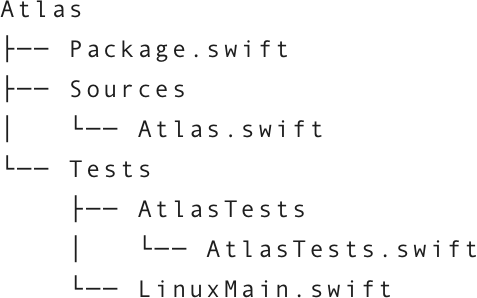
The Swift Package Manager will again create a few files and folders for you.

This time instead of a main.swift, you’ll get an Atlas.swift. This file, and any other file in the Sources/, folder will be imported with your library. In fact, the difference between a library and an executable is the existence of a main.swift.
You also get one example test this time. Run the tests with swift test. The Swift Package Manager will then compile your library and run your tests.
LinuxMain.swift file in the Tests/ directory and the allTests property in the AtlasTests test case class. Both of these are necessary for XCTest tests to work on Linux. Linux does not have the Objective-C runtime, which automatically finds methods that begin with the prefix test to run. Just update the allTests property just as you did with the example every time you add a new test method, then update LinuxMain.swift with each test case class you add to your package.
Open Atlas.swift in your text editor and replace its contents with the following:
public struct Country { public let code: String public init(code: String) { self.code = code.uppercased() } public var emojiFlag: String { return "\u{1f1f5}\u{1f1f7}" } } |
Here you implement a Country struct that can be initialized with an ISO country code. The emojiFlag property returns the flag for that code. For now, you’ll implement the minimum to allow you to write tests.
Also note that everything here is marked public, so that each member is visible to code that consumes the Atlas module. :]
Now open AtlasTests.swift and replace the contents with the following:
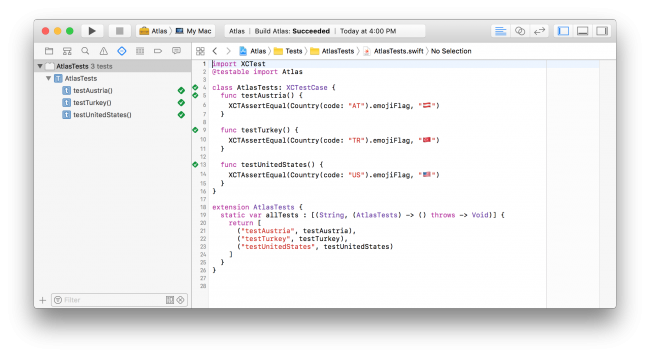
import XCTest @testable import Atlas class AtlasTests: XCTestCase { func testAustria() { XCTAssertEqual(Country(code: "AT").emojiFlag, "\u{1f1e6}\u{1f1f9}") } func testTurkey() { XCTAssertEqual(Country(code: "TR").emojiFlag, "\u{1f1f9}\u{1f1f7}") } func testUnitedStates() { XCTAssertEqual(Country(code: "US").emojiFlag, "\u{1f1fa}\u{1f1f8}") } } extension AtlasTests { static var allTests : [(String, (AtlasTests) -> () throws -> Void)] { return [ ("testAustria", testAustria), ("testTurkey", testTurkey), ("testUnitedStates", testUnitedStates) ] } } |
Here you implement three tests. You create three different countries and then assert that they have the correct emoji flag.
Run your tests:
swift test |
You should see that three tests executed, and three tests failed. It appears you still have some work to do! :]
Now that you have failing tests, it’s time to make them pass.
The way emoji flags work is actually pretty simple: Given a country code like AT, you need to convert each letter into a so-called regional indicator symbol. Those are, for example,  and
and  . When you put those together, you get the emoji flag!

Switch over to Atlas.swift and add the following method to the Country struct:
func regionalIndicatorSymbol(unicodeScalar: UnicodeScalar) -> UnicodeScalar? { let uppercaseA = UnicodeScalar("A")! let regionalIndicatorSymbolA = UnicodeScalar("\u{1f1e6}")! let distance = unicodeScalar.value - uppercaseA.value return UnicodeScalar(regionalIndicatorSymbolA.value + distance) } |
Here you take advantage of the fact that letters and regional indicator symbols are right next to each other in the Unicode table for values that are logically next to each other. So if A is 65, B is just 66 and if  is 127462, then
  is just 127463. So to convert the letter P to a regional indicator symbol, you just need to get the distance between A and P, then add that distance to
  .
.
That was the hard part. Now that you have this method, the rest is easy! Replace the emojiFlag property with the following:
public var emojiFlag: String { return code.unicodeScalars.map { String(regionalIndicatorSymbol(unicodeScalar: $0)!) } .joined() } |
You convert the country code to an array of each letter, then you convert each letter to its regional indicator symbol and join them back together. This gets you the flag!
Run the tests again and watch all three tests pass.
The next step of creating a Swift package is committing your code to Git and tagging it with a version. Since this is your first version, you will call it 1.0.0.
Execute the following commands to create your Git repo and tag it:
git init git add . git commit -m "Initial commit" git tag 1.0.0 |
Creating the Executable
Now that you have your emoji flag library, you can add it as a dependency to the Flag executable package.
Navigate back to the Flag directory and open the Package.swift file. Its contents look like this:
import PackageDescription let package = Package( name: "Flag" ) |
Every Swift package has a description like this. The most important of the parameters you’ll use will be the dependencies parameter. Replace the package description with the following:
let package = Package( name: "Flag", dependencies: [ .Package(url: "../Atlas", "1.0.0") ] ) |
Above, you state that the Flag package will have a single dependency with a URL of ../Atlas and that the version should be 1.0.0.
The version should use semantic versioning. In a nutshell, this means that the version should look like MAJOR.MINOR.PATCH. The MAJOR version is for any backwards-incompatible changes; the MINOR version is for changes that are done in a backwards-compatible way; and the PATCH version is for bug fixes. You can read more about the details of semantic versioning here.
In almost all cases, you’ll want to automatically update to newer versions of the library with bug fixes or even minor improvements. Conveniently, the Swift package manager allows you to do this. Change your package description to the following:
let package = Package( name: "Flag", dependencies: [ .Package(url: "../Atlas", majorVersion: 1) ] ) |
The Swift Package Manger provides even more ways to precisely specify the exact version or versions of the library you want to update to. Read more about all of them here.
Build the package:
swift build |
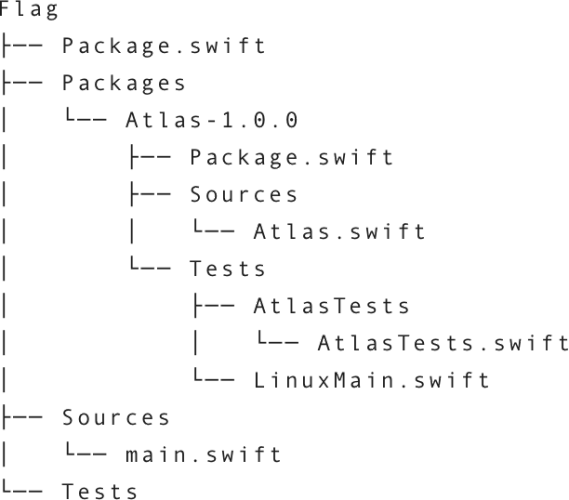
The Swift Package Manager fetches and builds your library and links it to your executable. The tree now looks like this:

You can see that the Swift Package Manager has carefully chosen version 1.0.0 based on your dependency requirements and installed it. Open the main.swift file and replace the contents with the following code:
import Atlas let arguments = CommandLine.arguments if arguments.count != 2 { print("USAGE: flag [iso country code]") } else { let code = arguments[1] let country = Atlas.Country(code: code) print(country.emojiFlag) } |
Here you import your library, then print the emoji flag for the first command line argument given. If no argument is given, you print a help message.
Build the app again and run it:
swift build ./.build/debug/Flag US |
You should now see the United States flag in your Terminal window!
Once you are happy with your app it’s time to ship it. Build the app one last time, this time using the optimized release configuration:
swift build --configuration release |
Now you can run the release version of your app like so:
./.build/release/Flag PR |
You can now zip the ./.build/release/Flag file and share it with your, friends, family, or anyone, really! :]
Generating an Xcode Project with The Swift Package Manager
Going old-school with the command line and your text editor of choice is fun, but you might be an iOS or macOS developer who is used to Xcode. Fear not — most of what you did works with Xcode as well.
Switch back to the Atlas package and generate an Xcode project by running the following:
cd ../Atlas swift package generate-xcodeproj |
This command will generate a Atlas.xcodeproj for you. Now you can go ahead and open the project in Xcode and build the package or run the test suite like you would any other Xcode project~

You can also do this for the Flag package. Run swift package generate-xcodeproj in the Flag folder to generate Flag.xcodeproj.
cd ../Flag swift package generate-xcodeproj |
After you open the Xcode project, make sure the Flag executable target is selected; that’s the one with a little Terminal window for an icon. Now you can also build and run this package.
To give the executable command-like arguments, go to Product\Scheme\Edit Scheme…, then select Run\Arguments and add an argument like US under the Arguments Passed on Launch section.

Note that Xcode is unable to to add and build dependencies, so you can’t fully avoid the command line!
Where to Go From Here?
You can download the completed Swift Package Manager projects for this tutorial here.
You can also check out the package manager section on the official Swift site here.
The most recent documentation about the package description options can be found on GitHub.
For an overview of the direction of updates to the Swift Package Manager for Swift 4 you can check out the roadmap on the Swift Evolution mailing list.
You might also want to check out IBM’s Swift Package Catalog, which helps you discover new packages that can be used in your projects.
Until the Swift Package Manager supports non-host platforms, it is still recommended to use Cocoapods or Carthage to build iOS, watchOS, and tvOS apps.
As a challenge, why don’t you push the library you just created to GitHub, and then use Atlas as a remote dependency? Hint: You just need to change the url option of the dependency to the GitHub URL.
Try implementing new features, like listing all countries and their flags when Flag is run without any arguments. Hint: You might need to use Locale.isoRegionCodes.
Implement your new feature in the Atlas library, then create a new version like 1.1.0, and finally use the new version in Flag. Make sure you select an appropriate version in your package description and then use swift package update to update your dependencies to the latest allowed versions.
Share your solutions in the comments below and have fun!
The post An Introduction to the Swift Package Manager appeared first on Ray Wenderlich.
