Learn the basics of UFPS!
Obliterating hordes of sinister enemies with a shotgun or carefully sniping your opponent across the battlefield are immensely satisfying gaming experiences. Games that center around action-packed gun-slinging segments are defined as First-Person-Shooter (FPS). A close cousin is a third-person shooter — the difference is whether you’re looking at the character’s back or down the barrel of a gun.
When you make an FPS game, you sign yourself up for a substantial amount of work. However, you don’t have to start from scratch when you leverage the power of the Ultimate First Person Shooter Framework (UFPS)!
In this tutorial, you’ll learn what UFPS is and how to use it to create a basic Unity FPS sandbox game — “sandbox” refers to the fact that the player is limited to a contained area.
After this tutorial, you’ll be comfortable with:
- Using fundamental UFPS scripts to move the player and fire guns
- Working with
vp_FPcomponents - Adding bullet holes after a surface takes a shot
- Adding a player with standard FPS movement to a scene
- Adding a new gun and configuring some properties
- Adding a sniper rifle (which is better than just any old new gun) with zooming and cross-hair targeting
Prerequisites
You should be comfortable with scripting in C# and attaching components to GameObjects. If you’re new to Unity or need to refresh your memory, start with our getting started in Unity tutorial.
You’ll also need a license for “UFPS: Ultimate FPS” by Opsive, which you can get in the Unity Asset Store. This tutorial was written using UFPS version 1.7.
Lastly, you’ll need Unity 5.5.0 or a newer version.
Getting Started
UFPS is a Unity plugin that includes core logic to power a typical FPS game. Rather than painstakingly write scripts for every scenario, you can modify preloaded scripts to handle typical activities such as:
- Equipping guns
- Animating and firing guns
- Managing ammo and inventory
- Moving the player
- Managing the camera’s perspective
- Tracking the camera
- Managing events, such as getting hit by a ray gun
- Managing surfaces, e.g., slippery slopes and waterways
- Ragdoll and gravity physics
No amazing game was ever created in one step. The best way to build games is to focus on the basics, such as core gameplay, and then build it up from there. UFPS helps you with the basics and goes further by providing a larger framework to leverage.
Download the starter project: ReadyAimFire_Unity3D_starter.
Open the project in Unity and double-click the Main scene in the project to load the game scene.
Note: We cannot redistribute the source files for UFPS, so there is not a final project for this tutorial, nor are they part of the starter project. You will build this entire game yourself. :]
After finding UFPS in the Unity Asset Store, go to the downloads section and click the Download button. When it finishes, click the Import button, wait for it to display the package’s contents then click OK. It’s a large package so be patient.
Note: If you get the following warning about importing a complete project:

This happens when an asset includes Project Settings that will overwrite your open project settings. In this case, only Graphics and Tag settings will be overwritten, so you can safely select the Import button to continue importing UFPS.
After the import completes, you might get some warnings. These are from UFPS and can be ignored.
Select Save Scenes from the File menu to save your work. Click the Play button and marvel in the glory of a fresh project.
![A fresh project with UFPS installed :]](http://koenig-media.raywenderlich.com/uploads/2016/12/projectsetup-650x368.png)
Important Concepts
I’m sure you’re eager to get shooting (and scripting) but it’s important that you know these key concepts for the UFPS framework.
FP components
FP indicates a component belongs to a family of scripts that manage the actual first-person shooter object — aka the player. These components always begin with vp_FP. Among the most critical is the vp_FPController script that will be on the player object when it’s created.
States
States can be a confusing concept. Within many vp_FP components you’ll find a section named State. Here is an example of what it looks like:
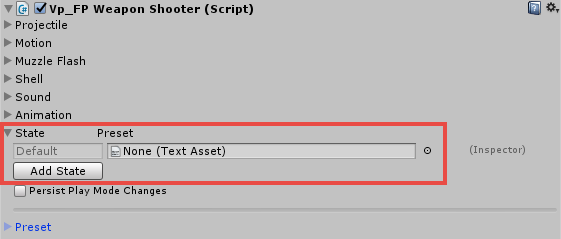
An area where states can be added
Certain vp_FP scripts have a state section that track the values that local variables should be for the state of that component at a given time. Think of it like this: when you zoom in and use a sniper rifle’s crosshairs, you would be in a “Zoom” state — the preset values for that state would raise and center the gun by changing its position and rotation. When you zoom, it’ll also animate the weapon’s movement.
Events
An event is a signal between objects that indicates something important happened and other objects might need to react. Take, for example, when something gets hit. The ‘getting hit’ part is the event — a signal, if you will. Other objects react based on how you’ve set up your game. This tutorial won’t cover events in detail.
OK, well done, partner.

Setting Up The Player Prefab
Type SimplePlayer into the Project browser’s search bar and then drag the SimplePlayer prefab into the scene in front of one of the targets.

Select the SimplePlayer GameObject in the Hierarchy and set its Position to (X = -26.6, Y = 1.3, Z = -21.3) and Rotation to (X = 0, Y = 0, Z = 0).

Delete the Camera GameObject from the Hierarchy. You don’t need it because the camera on SimplePlayer gives you a first-person perspective.

Press play and voila, you have an FPS game up and running!
Press play as soon as you fire or zoom to lock the cursor to the screen. Press Escape to regain control of the cursor.
Use the WASD keys to walk and press the left mouse button to fire the pistol and the right mouse button to zoom — you can fire while zoomed. You can also press Shift to run and Space to jump. Make sure you shoot the target :]

There is a lot of logic under the hood, but the beauty of UFPS is that it does a lot of heavy lifting for you. It lets you focus on more important matters, such as adding guns with custom behavior.
You might be surprised to learn that you don’t have to create animations for when the player moves or fires the gun. The movement you see is done with physics. That’s how UFPS does it!
UFPS starts you off with a pistol, but the starter project includes a shotgun and a sniper rifle prefab. You’ll put both to work shortly and will edit UFPS settings to perfect the animations.
Although you don’t need to animate the gun’s movement, you are on your own for hand animations. This tutorial will not cover hand animations, nor will UFPS do them for you. However, you’d want to consider them when you’re building an FPS for release.
Lastly, you do have the option to add complex animations with gun models. In that case, you’d need to include the hand with the model.
Adding Bullet Holes
You can already hear the gun and watch shells eject! There’s even a cool flare effect at the front of the gun! UFPS does that for you, which is one of the features that makes it easy to add and configure new guns.
Try shooting something and tell me what’s missing. Is that gun shooting blanks? Why are there no bullet holes?
Anytime you shoot something, you should leave a mark. Stop play. In the Hierarchy view, click the dropdown arrow to the left of the Environment GameObject and select the child Wall GameObjects.
In the Inspector, click Add Component and type vp_SurfaceIdentifier into the search field. Click vp_SurfaceIdentifier — the only available script — to add it. Click the dot to the right of the Surface Type field. In the menu that pops up, click the Assets tab and select Metal.

Select the Ground GameObject in the Hierachy and repeat the above steps, but select Wood for the last step.
The targets need a wood surface identifier, so click the dropdown arrow next to the Target and BackTarget GameObjects in the Hierarchy to expand them, and then select their children and add the vp_SurfaceIdentifier script component. Also set the surface type to Wood.
Click Play and try shooting the target, the walls and the floor. Now you can see the results of your handiwork, partner. :]

How The UFPS Pistol Works
No one ever defeated a horde of evil monsters with a single a pistol, right? :] You’ll add a shotgun soon, and it’ll be easier if you understand how the pistol works.
Expand the SimplePlayer GameObject in the Hierachy, and then expand the FPSCamera GameObject. Select the 1Pistol GameObject.
The number 1 in front of a weapon name represents the number the player should press to equip that pistol during gameplay. When you add new weapons, you’ll just increment the number and UFPS will automatically handle weapon swapping.
The 1Pistol GameObject has several important components:
AudioSourcemakes the pistol go “bang” when it fires.vp_FPWeaponidentifies this GameObject as a weapon in the UFPS framework and controls aspects that relate to the weapon itself.vp_FPWeaponShooterhandles effects like muzzle flash, shell ejection and the projectile.vp_FPWeaponReloaderhandles sounds and animations that relate to reloading.
Note: Ammo and reloading are out of scope for this tutorial, but they’re something you’ll want to think about when you make your game. Also, there are many sections for these vp_FP components and the UFPS documentation covers them in full, so make it your first stop when you have questions.
vp_FPWeapon
Expand the Position Springs section on the vp_FPWeapon Script component in the Inspector. This component sets up the gun’s on-screen position, which changes based on the state — for instance, when the pistol moves for zooming. Offset is where the gun sits on-screen.
Click Play and move the gun around by playing with the Offset values. By the way, you won’t mess up the game’s actual values while you’re in play mode.
Tinkering with settings in play mode is a good way to test and debug — but make sure you’re not in play mode when you’re actually trying to change settings. It’s easy to get wrapped up in things and forget you’re still in play mode, which can lead to extensive reworking and bad words coming from your mouth.

Look a little further down in the component to find Spring2 Stiffn and Spring2 Damp — these are the gun’s recoil settings. Spring2 Stiffn is ‘elastically’, or how the gun bounces back to its original position after firing. Spring2 Damp is how fast the bounce wears off. The easiest way to visualize this is by…actually visualizing it. :]
Click Play and move the sliders around for Spring2 Stiffn and Spring2 Damp to get a feel for what they do.

It can take some trial and error to make these animations look right, so don’t feel bad if your first few attempts make the gun bounce like a pogo stick.
Now that you’ve familiarized yourself with Position, it’s time to focus on Rotation. Expand the RotationSprings section on the vp_FPWeapon in the Inspector. Look at the Offset values, which are the same as what you saw in the PositionSprings section. The difference is that these values control the gun’s rotation.
Click Play and mess around with Offset values to get a feel for what it does.

Now think about how it looks when you fire that pistol. UFPS creates the animation on the fly by on interpolating between state values.
All you need to do is set up various state values in the vp_FPWeapon component — no need to import and set up animations for this effect. You’ll get hands-on experience with that when you add the sniper rifle and shotgun.
Stop the game play.
Dig a little deeper here. Expand the States section on the vp_FPWeapon in the Inspector and have a look at the pre-existing states and their associated data files. The data files track what values should change in the vp_FPWeapon when the state changes.
For example, take a look at the Zoom state. Double-click WeaponPistolZoom and have a look at the script file — it will open in your default code editor for Unity. It should be a simple data file with the following:
ComponentType vp_FPWeapon ShakeSpeed 0.05 ShakeAmplitude 0.5 0 0 PositionOffset 0 -0.197 0.17 RotationOffset 0.4917541 0.015994 0 PositionSpringStiffness 0.055 PositionSpringDamping 0.45 RotationSpringStiffness 0.025 RotationSpringDamping 0.35 RenderingFieldOfView 20 RenderingZoomDamping 0.2 BobAmplitude 0.5 0.4 0.2 0.005 BobRate 0.8 -0.4 0.4 0.4 BobInputVelocityScale 15 PositionWalkSlide 0.2 0.5 0.2 LookDownActive false |
These are the changes that must occur when the vp_FPWeapon enters the Zoom state. This might seem a little intimidating, but it’s actually quite easy — you can position the gun during play and then save a state file from there.
vp_FPWeaponShooter
Expand the Projectile section under the vp_FPWeaponShooter in the Inspector. This controls the firing of the gun.
Firing Rateis how long the gun animation fires.Tap Firingis an override that lets the player fire without waiting for the fire animation to finish — it resets the fire animation.Prefabis the bullet. Keep in mind that bullets have their own script undervp_BulletFX, and you can learn more about it in the documentation.
Expand the Muzzle Flash section. You can configure the art prefab as well as its scale and position to achieve the perfect flash effect each time the player fires the weapon.
Expand the Shell section to see the settings that control what happens when the shell ejects from the gun.
Finally, expand the Sound section. Here you configure the settings for the sound the weapon makes when the gun fires with and without ammo.
You’ll also notice a States section in here too. It is similar to the state section for the vp_FPWeapon. If you’re curious how this works you can look into the source code, which involves the advanced topic of Reflection — you’ll see a link at the end of this tutorial where you can learn more.
Adding a Shotgun
What’s the point of building an FPS if you’re not going to give your hero a tool that destroys enemies at short range? There isn’t. It would be a sad, sad little FPS without such a weapon.
To allow you to stay focused on UFPS, you’ll just add the gun model and won’t mess around with hands.
In the Project browser, type 2Shotgun and drag the 2Shotgun prefab under the 1Pistol GameObject in the Hierachy.

You might notice that the vp_WeaponShooter doesn’t have any options, and that’s because the prefab is disabled. Toggle the active box on the 2Shotgun GameObject.

You might be thinking you can just click play then press 2 and load the shotgun right? Well — almost! The SimplePlayer prefab is only configured for the pistol.
To make it work for new weapons you need to add a special component. Click the SimplePlayer GameObject in the Hierachy and then click Add Component in the Inspector. Type in vp_FPWeaponHandler and select the script. This is the component that allows weapon switching.

Set the value of Start Weapon to 1 to set it to the pistol. Now when you click Play and then press 2 you’ll swap your pistol for the shotgun.

Wait a minute…something is off — you’ve got that gun in a rather precarious position! With the 2Shotgun prefab selected in the Hierachy, expand the PositionSprings section of the vp_FPWeapon in the Inspector and set the Offset to (X = -0.04, Y = -0.46, Z = 4.89). Expand the RotationSprings section and set the offset to (X = -1.09, Y = -93.3, z = 2.5).

The shotgun should fire a cluster of bullets. Where’s the fun in a single bullet?
Expand Projectile on the vp_FPWeaponShooter and set Count to 10 and the Spread to 2.
Expand the MuzzleFlash and set the prefab to MuzzleFlashShotgun.

Set the Position to (X = -0.08, Y = -0.24, Z = 8.88) and set the Scale to (X = 1, Y = 1, Z = 1). If you want to figure out these values yourself just edit the MuzzleFlash Position during gameplay and update the position after you’ve stopped playing — the muzzle flash stays on so you can precisely position it.
Expand the Sound section and set the Fire to ShotgunFire.

Click Play then press 2 and add some holes to the target!

Zoom is a special state pre-configured for the RMB (right mouse button) in UFPS. Upon clicking, it sets the zoom state for all components that are set to listen for this change.
You can add custom zoom states. Try it for yourself by clicking Play and pressing 2 to equip the shotgun. Change the Position Springs and Rotation Springs Offset values for vp_FPWeapon so the camera looks down the barrel. Click the Save button at the bottom of the vp_FPWeapon, name the file ShotgunZoom and click Save again.

Note: If you’re having trouble getting zoom to look right, or you’re on a Mac and can’t see the save button in the vp_FileDialog window, just download this ShotgunZoom and add it to your Assets folder in Unity.
Now you have the zoom, but the shotgun doesn’t know how to use it. Stop game play and click the 2Shotgun GameObject in the Hierachy. Expand the vp_FPWeapon in the Inspector and expand the States section. Drag ShotgunZoom over to the Zoom field.

UFPS takes the start and end values then creates an animation. Click Play and Zoom with the shotgun and it will animate to where you saved it to for the zoom state.

Adding A Sniper Rifle
Any good FPS game comes with an array of weapons so the player can wipe out enemies in a variety of situations. For those times when you want to pick ’em one by one from a safe distance, there’s nothing better than the almighty sniper rifle!
Type 3Sniper in the Project browser search and drag the 3Sniper prefab under the 2Shotgun GameObject in the Hierachy. In the Inspector, add the vp_FPWeapon and vp_WeaponShooter scripts as you’ve done previously.

Add the sniper rifle model to the Rendering section of the vp_FPWeapon by going to the Project browser and expanding the Assets folder then the Prefabs folder.
Click the 3Sniper GameObject in the Hierarchy, and then expand the vp_FPWeapon component in the Inspector. Expand the Rendering section to display the 1st Person Weapon (Prefab) field. Finally, drag the m24 Prefab from the Project browser to the 1st Person Weapon (Prefab) field.

Under vp_FPWeapon, set Position Springs to (X = 1.4, Y = -0.81, Z = 4.88) and Rotation Springs to (X = -2.7, Y = 79.62, Z = -5.01). Expand the Sound section on the vp_FPWeaponShooter and set Fire to SniperShot.
The gun is now in a functional state. Click Play and press 3 to see for yourself. Don’t forget to give it a test fire. :]

“Functional state” is rather subjective, don’t you think? There are no crosshairs when you zoom! Adding a scope zoom is an excellent use case for creating states while playing the game.
It’s time to add a Sniper component that helps with zooming. This is a special script that needs to listen for player events in order to work.
Open the Scripts folder, right-click anywhere and use the pop-up menu to create a new C# script named Sniper. Double-click to open it and replace its contents with the following code:
using UnityEngine; using System.Collections; public class Sniper : MonoBehaviour { //1 public vp_FPPlayerEventHandler playerEventHandler; public Camera mainCamera; private bool isZooming = false; private bool hasZoomed = false; //2 void Update() { if (playerEventHandler.Zoom.Active && !isZooming) { isZooming = true; StartCoroutine("ZoomSniper"); } else if (!playerEventHandler.Zoom.Active) { isZooming = false; hasZoomed = false; GetComponent<vp_FPWeapon>().WeaponModel.SetActive(true); } if (hasZoomed) { mainCamera.fieldOfView = 6; } } //3 IEnumerator ZoomSniper() { yield return new WaitForSeconds(0.40f); GetComponent<vp_FPWeapon>().WeaponModel.SetActive(false); hasZoomed = true; } } |
Stepping through the script:
1. These variables keep track of references to the PlayerEventHandler and the camera. The Booleans are flags that track the state of the zoom.
2. This section checks if the zoom state is active. When the gun is zoomed, it sets the field of view to 6, which is what triggers zoom.
3. This coroutine tracks when the zoom animation will complete — after 0.4 seconds in this case — and then hides the weapon model. This creates a bit of time for the player to look down the scope before transitioning to the scope effect.
Save the file and return to Unity. Drag the Sniper script to the 3Sniper GameObject.

Drag the SimplePlayer prefab over the PlayerEventHandler on the Sniper component. Next, drag the FPSCamera over the Main Camera field on the Sniper component.

In the Hierarchy, you’ll find a UI GameObject that has been set up with a SniperZoom texture.
Go to the Scripts folder and create another new C# script. Name it GameUI. Select the UI GameObject in the Hierachy, and then drag the GameUI script from the Project browser to the Inspector.

Open the GameUI script and replace the code with the following:
using UnityEngine; using UnityEngine.UI; public class GameUI : MonoBehaviour { public GameObject sniperZoom; public vp_PlayerEventHandler playerEventHandler; public void ShowSniperZoom() { sniperZoom.SetActive(true); sniperZoom.GetComponent<Image>().enabled = true; } public void HideSniperZoom() { sniperZoom.SetActive(false); sniperZoom.GetComponent<Image>().enabled = false; } } |
These are public methods that you’ll use to show and hide the sniper scope texture — they keep a reference to the scope texture and the event handler. The Sniper script will call these after you configure it to do so. Save the script and return to Unity.
Expand the UI GameObject in the Hierarchy. Drag SniperZoom to the SniperZoom field in the Inspector then drag SimplePlayer to the PlayerEventHandler field.

Open the Sniper script. Add this variable to the top:
public GameUI gameUI; |
Now the script will keep a reference to the GameUI.
Below the else if (!playerEventHandler.Zoom.Active) statement, add the following:
gameUI.HideSniperZoom(); |
Before the change:
else if (!playerEventHandler.Zoom.Active) { isZooming = false; hasZoomed = false; GetComponent<vp_FPWeapon>().WeaponModel.SetActive(true); } |
After making the change:
else if (!playerEventHandler.Zoom.Active) { gameUI.HideSniperZoom(); isZooming = false; hasZoomed = false; GetComponent<vp_FPWeapon>().WeaponModel.SetActive(true); } |
Now the sniper zoom texture will hide when in the non-zoom state.
Below GetComponent<vp_FPWeapon>().WeaponModel.SetActive(false); add the following:
gameUI.ShowSniperZoom(); |
Before the change you should have:
IEnumerator ZoomSniper() { yield return new WaitForSeconds(0.40f); GetComponent<vp_FPWeapon>().WeaponModel.SetActive(false); hasZoomed = true; } |
After this change you should now have:
IEnumerator ZoomSniper() { yield return new WaitForSeconds(0.40f); GetComponent<vp_FPWeapon>().WeaponModel.SetActive(false); gameUI.ShowSniperZoom(); hasZoomed = true; } |
This line shows the sniper scope texture when the sniper rifle is in zoom. Save and return to Unity. Select the the 3Sniper GameObject then drag the UI GameObject to the GameUI field.

All of that was to hide the gun and show the sniper scope when the player zooms. Take it for a test run by clicking Play, pressing 3 to equip the sniper and pressing the RMB to zoom.

It works but it’s a rudimentary implementation. You can make it better by setting it so that the player glimpses down the scope when zooming.
Click Play and press 3 to equip the sniper rifle. Expand the Position Springs and Rotation Springs for the 3Sniper and tinker with the position and rotation offset values until the scope is front of the camera.
Click the Save button at the bottom of the vp_FPWeapon component. Name the file SniperZoom then click Save again.
You’ve just finished setting the sniper rifle’s state when it’s zoomed. In this case, you moved the gun up and in front of the camera so it will appear as though the player is looking down the scope, and SniperZoom is where you saved the state.

As of this moment, you’ve got the settings for the state but still need to create the required state. Select 3Sniper and expand the vp_FPWeapon then expand the State section.
Click the Add State button and replace the word Untitled with Zoom in the new State field.
Drag the SniperZoom.txt file from the Assets folder to the Text Asset field of 3Sniper’s vp_FPWeapon component.

Pump it Full of Lead
Just a few more tasks lie between you and sniping the day away. It does seem like a good idea to add bullets to your gun — of course, you can skip this step, but sniping just wouldn’t be the same. :] Previously the Pistol and Shotgun weapons already had bullets set up. You created the sniper rifle from scratch, and so you’ll also need to configure a prefab to use for its bullets.
While you’re still in 3Sniper, expand vp_FPWeaponShooter then expand the Projectile section. Click the small selector button to the right of the Prefab field. Find and select the PistolBullet prefab.

Click Play, and focus on the most distant target — you may need to turn around. Press the RMB to zoom then fire the sniper rifle!

Now you get the effect of looking down the scope before zooming in. Great zoom’n, partner. :]
Where To Go From Here
Oh, the places you can go from here. Where to start? UFPS is a rich framework and this tutorial just scratches the surface of what’s possible.
A logical next step would be to add an assault rifle complete with realistic animations. Play with the sliders and values in the vp_FPWeapon until it looks and feels right. Remember it should shoot very quickly and have a fast-but-small recoil after each shot.
You covered the basics, but there’s still a lot more to learn in the UFPS documentation. For one, you didn’t touch vp_FXBullet. Another key feature to FPS games is inventory and ammo management, which involves working with the UI.
You didn’t get to experience UFPS’ many cool features — so check them out!
Work through these tutorials if you’d like to learn more about the Unity UI system:
Or pick up Unity Games by Tutorials and learn Unity from the inside out while you build four awesome games.
As I mentioned earlier, reflection is an advanced skill that’s a great tool to have in your coding toolbox, so read up on it when you get a chance.
Lean more about how the event system works by watching this official Unity Events tutorial
If you have questions, feedback or just want to ask for more UFPS tutorials, leave a comment in our forums. Your feedback determines what we write next — so speak up!
Acknowledgments
Special thanks to Wojciech Klimas for the gun models. See more good work here:
The post Introduction To UFPS: Unity FPS Tutorial appeared first on Ray Wenderlich.