 The cry of “You must do dependency injection!” is heard throughout modern software development teams. With such an imposing name, Dependency Injection (or DI for short) can put a fright into any software developer.
It turns out that Dependency Injection is nowhere near as complex as its name implies, and is a key tool for building software systems that are maintainable and testable. In the end, relying on dependency injection will simplify your code quite a bit and also allow for a clearer path to writing testable code.
In this tutorial, you’ll update an existing app named DeezFoodz to use DI. The DeezFoodz app shows a list of foods obtained from USDA Food Composition Databases, found here. A user can tap on one of the foods and see the sugar content of the food along with a thumbs up or thumbs down on the amount of sugar.

The app uses common Android libraries and patterns such as Retrofit and Model-View-Presenter. You’ll use the popular Java/Android dependency injection framework Dagger 2 to perform DI within the app.
Here’s a quick peek at the detail screen in DeezFoodz:

Before you begin, visit the link under Gaining Access on the USDA site linked to above. You’ll need that API key in order to build and use the starter app.
Introduction
So, just what are what are dependencies? Any non-trivial software program is going to contain components that pass information and message calls back and forth between one another.
For example, when using an Object Oriented Programming language (such as Java on Android), objects will call methods on other objects that they have references to. A dependency is simply when one of the objects depends on the concrete implementation of another object.
From a practical perspective in Java code, you can identify a dependency in your code whenever you use the new keyword to instantiate one object within another. In such a case, you are fully responsible for creating and properly configuring the object that is being created. For example, in the following class A:
public class A { private B b; public A() { b = new B(); } } |
An A instance creates its b field in its constructor. The A instance is fully dependent on the concrete implementation of B and on configuring the b field in order to use it properly.
This presents a coupling or dependency of the A class on the B class. If the setup of a B object is complex, all of that complexity will be reflected within the A class as well. Any changes necessary to configure a B object will have to be made within class A.
Should the B class depend itself on class C, which in turn depends on class D, all of that complexity will propagate throughout the code base and cause a tight coupling between the components of the application.
Dependency Injection is the term used to describe the technique of loosening the coupling just described. In the simple example above, only one tiny change is needed:
public class A { private B b; public A(B b) { this.b = b; } } |
Voilà — that’s dependency injection at its core! Rather than creating the b object in the A constructor, the b object is passed into or injected into A‘s constructor. The responsibility for configuring b is elsewhere, and the A class is simply a consumer of the B class.
The Dependency Inversion Principle
Dependency injection is often discussed in conjunction with one of the five SOLID principles of Object-Oriented Design: the Dependency Inversion principle. For a great introduction to the SOLID principles, particularly on Android, check out this post from Realm on Dependency Inversion.
The gist of the Dependency Inversion principle is that it is important to depend on abstractions rather than concrete implementations.
In the simple example above, this means changing B to a Java interface rather than a Java class. With this change, many different types of concrete B type objects that adhere to the B interface can be passed into the A constructor. This presents several key benefits:
- Allows for the
Aclass to be tested with various kinds ofBobjects. - Mock
Bobjects can be used as needed in certain test scenarios. - Testing of
Ais independent of the implementation ofB.
While often discussed together, dependency injection and the Dependency Inversion principle are not the same. Essentially, dependency injection is a technique that is used as part of adhering to the Dependency Inversion Principle.
Dagger 2
In the Java world, there are a number of frameworks that have been created to simplify the application of dependency injection. The frameworks remove a lot of the boilerplate code that can occur, and also provide a systematic way to apply dependency injection across a software system.
One of the earlier Java dependency injection frameworks was Guice, created at Google. The team at Square later developed the Dagger framework, targeted primarily at Android.
While a fantastic accomplishment, the initial Dagger framework had a few downsides. For example, performance issues due to runtime reflection and difficulty working with ProGuard.
As a result, the updated Dagger 2 framework was born, which produces simpler generated code and solves the performance issues by having injection occur at compile time.
The name “Dagger” is inspired in part by the nature of dependencies in software development. The web of dependencies that occur between objects such as A, B, C, …, create a structure called a Directed Acyclic Graph. Dagger and Dagger 2 are used to simplify the creation of such graphs in your Java and Android projects.
For the remainder of the tutorial, the term Dagger will refer to Dagger 2.
Enough theory! Time to start writing some code.
Getting Started
Download the starter project here.
Open the starter app in Android Studio. You’ll need Android Studio 2.2.2 or later. If you’re using a later version of Android Studio than 2.2.2 and are prompted to update your gradle version, go ahead and do so.
Also update the file Constants.java in the app package to replace the API_KEY constant with the key you obtained from the USDA web site.
Build and run the app in either an emulator or on a device to make sure you can build the starter project.

The app consists of two screens. The first is a list of foods downloaded from USDA Food Composition Databases, again found here. Tapping on any item on the list shows a detail screen, which contains info on the sugar content on the food.
Examine the app project structure and existing classes. You’ll see that the app uses the Model-View-Presenter (MVP) pattern to structure the code, and also uses the Retrofit 2 library from Square as part of its networking layer to connect to the USDA API.
The subpackages in the main package are app, model, network, and ui. If you explore the ui package, you’ll see subpackages for the two screens. Each screen has classes for the view and presenter classes for the screen.

By examining the app build.gradle file, you’ll also see that the app uses Butterknife for view binding, and a lightweight stream library for Java 8-like stream processing.
MVP
In case you’re unfamiliar with the MVP pattern, there are many good online resources for getting started.
MVP is similar to other structural patterns for implementing separation of concerns, such as Model-View-Controller and Model-View-ViewModel. In MVP on Android, your activities and fragments typically act as the view objects by implementing a view interface, and handle interaction of the app with the user.
The view passes on user actions to the presenter, which handles the business logic and interaction with data repositories, such as a server API or database. The model layer consists of the objects that make up the content of the app.
In the case of DeezFoodz, the FoodActivity class for the detail screen implements the FoodView interface. FoodActivity has a reference to a FoodPresenter interface, which controls access to model objects of type Food.
The use of Retrofit 2 is found in the UsdaApi class in the network package. This class defines the interface to the USDA API required by the app. There are two calls of type GET defined, one to retrieve a FoodzList and the other to get details on a particular Food object via a query parameter.
Note: Retrofit is a powerful type-safe HTTP client. It lets you represent the USDA REST API as Java interfaces. Retrofit simplifies the task of making synchronous or asynchronous requests to a web service, and turning the responses into Plain Old Java Objects (POJOs). For more information, see Android Networking Tutorial: Getting Started.
Dependencies in DeezFoodz
Open the FoodActivity class in the ui.food package. In its onCreate() method, there are several calls to create and configure a FoodPresenter:
presenter = new FoodPresenterImpl(); presenter.setView(this); presenter.getFood(foodId); |
Here, you create a concrete implementation of a FoodPresenter. Open FoodPresenterImpl.java and take a look at getFood(). Both a Retrofit object and a UsdaApi object are created and configured in getFood() using factory methods.
This creation of dependencies couple the model, view, and presenter layers too tightly. Swapping in a mock presenter for the view is impossible as written without updating the view code. The code for creating the Retrofit and UsdaApi objects is repeated between the two presenter implementations in the app: FoodPresenterImpl and FoodzPresenterImpl.
Next up, you’ll use Dagger to implement dependency injection in DeezFoodz and remove the coupling between layers as well as the code duplication.
Finally, it’s time to start writing some new code!
Configure the Project With Dagger 2
Open up the app build.gradle file and add the following Dagger dependencies to the app dependencies:
depencies { ... // Dependency Injection apt "com.google.dagger:dagger-compiler:2.2" compile "com.google.dagger:dagger:2.2" provided 'javax.annotation:jsr250-api:1.0' ... } |
The ellipses represent existing dependencies in the starter project. Android Studio will prompt you to sync your gradle files on this change, so please go ahead and do so to ensure that you’re including Dagger correctly. Notice that you are including an annotation library from javax, because many of the features of Dagger are provided by Java annotations.
Modules
The first annotation you’ll use is the @Module annotation. Start by creating a new package named dagger under the app main package, by right-clicking the main package and selecting New/Package:

Next, create a new file in the dagger package. Right-click dagger and select New/Java Class. Name the class AppModule.


Add the following empty class to the new file:
@Module public class AppModule { } |
Here, you’ve created a class named AppModule and annotated it with the Dagger @Module annotation. Android Studio should automatically create any necessary import statements for you, but if not, hit Alt-Enter to create them as needed.
The @Module annotation tells Dagger that the AppModule class will provide dependencies for a part of the application. It is normal to have multiple Dagger modules in a project, and it is typical for one of them to provide app-wide dependencies.
Add that capability now by inserting the following code within the body of the AppModule class:
private Application application; public AppModule(Application application) { this.application = application; } @Provides @Singleton public Context provideContext() { return application; } |
You’ve added a private field to hold a reference to the application object, a constructor to configure application, and a provideContext() method that returns the application object. Notice that there are two more Dagger annotations on that method: @Provides and @Singleton.
The @Provides annotation tells Dagger that the method provides a certain type of dependency, in this case, a Context object. When a part of the app requests that Dagger inject a Context, the @Provides annotation tells Dagger where to find it.
Note: The method names for the providers, such as provideContext(), are not important and can be named anything you like. Dagger only looks at the return type.
The @Singleton annotation tells Dagger that there should only be a singleton instance of that dependency and removes a lot of the boilerplate singleton code for you.
Components
Now that you have a Dagger module that contains a dependency that can be injected, how do you use it?
That requires the use of another Dagger annotation, @Component. Start by creating a new Java file in the dagger package, and name it AppComponent.
Add the following code to the file (replace class with interface if needed):
@Singleton @Component(modules = {AppModule.class}) public interface AppComponent { } |
You’ve told Dagger that AppComponent is a singleton component interface for the app. The @Component annotation takes a list of modules as an input, and you’ve added AppModule to the list.
The component is used to connect objects to their dependencies, typically by use of overridden inject() methods. It takes the place of the reflective object graph in the original version of Dagger. In order to use the component, it must be accessible from the parts of the app that need injection. Typically, that will happen from the app Application subclass, as follows.
First, add the following field and getter to DeezFoodzApplication:
private AppComponent appComponent; public AppComponent getAppComponent() { return appComponent; } |
Now, you must initialize AppComponent. Do so by adding the following method to DeezFoodzApplication:
protected AppComponent initDagger(DeezFoodzApplication application) { return DaggerAppComponent.builder() .appModule(new AppModule(application)) .build(); } |
You’ll likely notice an error called out by Android Studio on DaggerAppComponent. That class has not yet been generated within the project. Choose Make Module ‘app’ from the Android Studio Build menu. This may produce compile errors, but will clear the error in the code.
Run Make Module ‘app’ again to clear the compile errors. Once done, you’ll then notice a deprecation warning on the appModule() method; that will be fixed shortly.
Finally, update onCreate() in DeezFoodzApplication to read as follows:
@Override public void onCreate() { super.onCreate(); appComponent = initDagger(this); } |
This initializes the appComponent field when the application first starts up.

Dependency Injection With Dagger 2
Add the following method declaration within the AppComponent interface:
void inject(FoodzActivity target); |
Here, you’ve specified that the FoodzActivity class will require injection from AppComponent. You’re going to inject the presenter object into FoodzActivity.
Create a new class in the dagger package and name it PresenterModule. Add the following code into PresenterModule:
@Module public class PresenterModule { @Provides @Singleton FoodzPresenter provideFoodzPresenter() { return new FoodzPresenterImpl(); } } |
You’re specifying that a FoodzPresenter will be provided, and that the presenter returned will be the concrete implementation FoodzPresenterImpl.
Next, wire up PresenterModule with AppComponent by updating the @Component annotation in AppComponent to read:
@Component(modules = {AppModule.class, PresenterModule.class}) |
Finally, open up the FoodzActivity class in the ui.foodz package. First, add a new annotation @Inject onto the presenter field:
@Inject
FoodzPresenter presenter; |
Then, remove the following creation of the presenter object in onCreate():
presenter = new FoodzPresenterImpl(); |
The @Inject annotation tells Dagger that you want it to do an injection of the presenter field.
Were you to run your app now, however, you would get a crash from a NullPointerException (NPE) on presenter. There is one last step to hook everything up.
Update onCreate() by adding the call to AppComponent.inject() as follows:
@Override protected void onCreate(Bundle savedInstanceState) { super.onCreate(savedInstanceState); setContentView(R.layout.activity_foodz); ((DeezFoodzApplication)getApplication()).getAppComponent().inject(this); ButterKnife.bind(this); ... |
You are getting the AppComponent from DeezFoodzApplication and asking it to inject all known dependencies into FoodzActivity. Since you annotated presenter with @Inject, Dagger will inject a concrete FoodzPresenter object into FoodzActivity.
Dagger knows that you defined provideFoodzPresenter() in the PresenterModule class, and uses it to create the injected FoodzPresenter object.
Build and run your app now. It should behave exactly as before, and you’ve avoided the NPE. You’ve just finished your first dependency injection with Dagger 2!
There is a general pattern that emerges based on the previous code changes. Think about the steps just taken to use Dagger dependency injection with FoodzActivity:
- Add
inject()inAppComponentwithFoodzActivityargument. - Add
provideFoodzPresenter()inPresenterModule. - Add
@Injectannotation toFoodzPresenter presenterinFoodzActivity. - Add
DeezFoodzApplication.getAppComponent().inject(this)inOnCreate()inFoodzActivity.
If you consider FoodzActivity as the target class, and FoodzPresenter as the source interface to be injected, then the above steps can be generalized as follows for any target class requiring source interfaces to be injected:
- Add
inject()inAppComponentwithTargetclass argument. - Add
@Providesannotated method inPresenterModulefor each source object to be injected. - Add
@Injectannotation to eachSourcemember variable inTargetclass. - Add
DeezFoodzApplication.getAppComponent().inject(this)inOnCreate()inTargetclass.
As a challenge, see if you can perform an injection of the FoodPresenter detail screen into FoodActivity in the ui.food package, which will include removing the following line of code:
presenter = new FoodPresenterImpl(); |
The steps are just the same as above for FoodzActivity. Use the pattern, and if you get stuck, check out the final project code at the end of this tutorial.
Injecting the Network Graph
In the app as written currently, both the list screen and detail screen presenters create their own network dependencies. In a typical app that uses Dagger 2 and Retrofit together, Retrofit will be provided by dependency injection.
Here you will see some of the many advantages of using dependency injection and Dagger 2, including:
- Eliminating code duplication.
- Eliminating the need for dependency configuration.
- Automatic construction of a dependency graph.
Start by creating a new file in the dagger package, this time named NetworkModule, which starts off as follows:
@Module public class NetworkModule { } |
What you’re looking to do here is to inject a UsdaApi object into the app’s presenter implementations, so that the presenters can call the API.
For example, if you look at the current FoodPresenterImpl, you see that UsdaApi depends on a Retrofit object, whereas creation of a Retrofit object requires a String for the base URL of the API as a well as a Converter.Factory object.
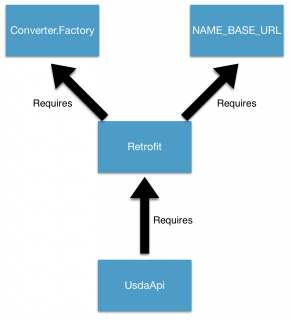
Start by adding those two methods into NetworkModule along with a constant string:
private static final String NAME_BASE_URL = "NAME_BASE_URL"; @Provides @Named(NAME_BASE_URL) String provideBaseUrlString() { return Constants.BASE_URL; } @Provides @Singleton Converter.Factory provideGsonConverter() { return GsonConverterFactory.create(); } |
There is a new Dagger annotation in play here, @Named. You are injecting a String object, and since String is such a common type to use in an Android app, you’ve taken advantage of the @Named annotation to specify a specific string to be provided. This same technique can be used for your own types if you need multiple variations injected.
Now that you have a String and a GsonConverterFactory, add the following to the bottom of NetworkModule:
@Provides @Singleton Retrofit provideRetrofit(Converter.Factory converter, @Named(NAME_BASE_URL) String baseUrl) { return new Retrofit.Builder() .baseUrl(baseUrl) .addConverterFactory(converter) .build(); } @Provides @Singleton UsdaApi provideUsdaApi(Retrofit retrofit) { return retrofit.create(UsdaApi.class); } |
You’ve added the provides methods for both a Retrofit object and a UsdaApi object. This allows Dagger to construct a dependency graph, so that when an object asks for a UsdaApi object to be injected, Dagger will first provide a Retrofit object to use in provideUsdaApi(Retrofit retrofit).
Then, Dagger will continue walking up the graph to find a converter and baseUrl for provideRetrofit(Converter.Factory converter, @Named(NAME_BASE_URL) String baseUrl).
By using the @Singleton annotations, only one instance of the UsdaApi and Retrofit objects will be created and shared between both activities in the app.
Add your NetworkModule to AppComponent by updating the @Component annotation to the following:
@Component(modules = {AppModule.class, PresenterModule.class, NetworkModule.class}) |
Next, update the PresenterModule provide methods so that the presenter constructors are passed a Context:
@Provides @Singleton FoodzPresenter provideFoodzPresenter(Context context) { return new FoodzPresenterImpl(context); } @Provides @Singleton FoodPresenter provideFoodPresenter(Context context) { return new FoodPresenterImpl(context); } |
Add the following two inject methods into AppComponent:
void inject(FoodzPresenterImpl target); void inject(FoodPresenterImpl target); |
Next, update FoodzPresenterImpl and FoodPresenterImpl to add the following constructors:
public FoodzPresenterImpl(Context context) { ((DeezFoodzApplication)context).getAppComponent().inject(this); } |
public FoodPresenterImpl(Context context) { ((DeezFoodzApplication)context).getAppComponent().inject(this); } |
Add the following field injection to both classes:
@Inject
UsdaApi usdaApi; |
Now that you’re injecting UsdaApi into the two presenter implementations, remove the following duplicated code from each:
Converter.Factory converter = GsonConverterFactory.create(); Retrofit retrofit = new Retrofit.Builder() .baseUrl(Constants.BASE_URL) .addConverterFactory(converter) .build(); UsdaApi usdaApi = retrofit.create(UsdaApi.class); |
You’ve successfully injected the UsdaApi dependency into both presenters, which allowed you to remove the duplicated creation of the GsonConverterFactory and Retrofit objects.
Build and run your app one final time. Once again, you should see no change in the app behavior, but you’ve successfully applied dependency injection and made your app both more maintainable and testable!
Where to Go From Here?
You can download the final project here.
The changes you made to DeezFoodz may seem like a lot of work. But the utility of dependency injection and a framework like Dagger 2 become most evident in real-world production apps, where the dependency graph can get very complex.
Dagger 2 and dependency injection become especially useful when implementing proper testing into your app, allowing mock implementations of back-end APIs and data repositories to be used in testing.
There’s much more to learn about in Dagger 2 and its usage, including:
- Scopes
- Subcomponents
- Testing with Mockito
There are many great resources out there on the interwebs to dive into these topics. As you do, happy injecting!
If you have any questions or comments, please join the discussion below!
The post Dependency Injection in Android with Dagger 2 appeared first on Ray Wenderlich.