Apple announced a new feature before WWDC 2016: auto-renewable subscriptions. Aside from the obvious benefit to your pocketbook, there’s more to love about this new feature.
With a normal purchase, Apple takes a 30 percent cut of the revenue and you get the remaining 70 percent. When a user signs up for an auto-renewable subscription for a year, however, Apple only takes 15 percent and you get 85 percent.
This is excellent news for developers that offer subscription-based content!
You’ll learn how to set up auto-renewable subscriptions and offer them to users through the App Store in this hands-on iOS tutorial.
Prerequisites
Before working through this tutorial, you should be familiar with in-app purchases. If you’re not, you should read our In-App Purchases: Non-Renewing Subscriptions tutorial — at least until you reach the Implementing Non-Renewing Subscriptions: Overview section.
You also need access to a paid iTunes Connect account and an actual device; unfortunately, the simulator and free Apple developer account won’t suffice.
Getting Started
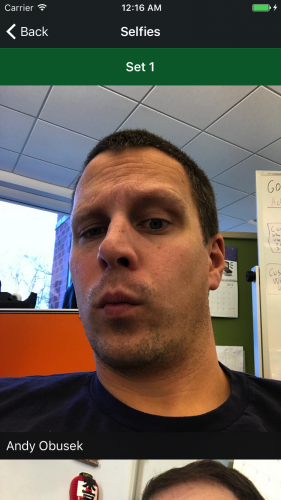
Selfie Friday is a weekly ritual for RW team members. It’s a special day where we post our most candid selfies in a private Slack channel. You wouldn’t believe how impeccable Ray looks each week! ;]
Until now, these photographic gems have only been available to team members. No More! These selfies should be available to everyone — at a price.
In this iOS tutorial, you’ll create an app that offers users these auto-renewable subscriptions:
- $0.99/week for 1 selfie each week
- $2.99/month for 1 selfie each week with a 1-week trial period
- $1.99/week for all selfies each week
- $5.99/month for all selfies each week with a 1-week trial period
Total bargain, right?!
The app uses a simple collection view to display the selfies. Per App Store review Guidelines — which you should read after you’re done here — a user must get access to your content as soon as she subscribes.
You’ll use a mock “server” that provides selfies based on a user’s subscription status. It is part of this tutorial so that you can focus on auto-renewable subscriptions and not on the app design.
This server acts as a go-between from your phone to the App Store sandbox and it works around the nuances of sandboxing for auto-renewable subscriptions. In particular, the sandbox simulates subscription renewal at an accelerated rate. This way, you won’t need to wait weeks to test your app.
The table below shows how actual durations translate to sandbox durations:
Download the starter project and open RW Selfies.xcodeproj.
Select the blue RW Selfies project folder in the project navigator, and then RW Selfies under the Targets.
Change the Bundle Identifier to something unique — for example, com.yourcompanyaddress.selfies.
In the Signing section, check Automatically Manage Signing, and then select your paid development team. Xcode should create a provisioning profile and signing certificate for you.
Build and run on your actual device. Remember that you need a device — the simulator might get you started but won’t take you all the way through this tutorial.
You’ll then see the app’s landing screen. Tap Subscribed? Come on in….
Wait! Weren’t you supposed to subscribe to see the selfies?
The starter app is generous. Even though you haven’t purchased a subscription, the starter project gives you unlimited access to the first week’s content. Don’t worry about losing revenue to “lookee-lous” — you’ll change this setting to prevent giving away this incredibly valuable content for free! ;]
Introducing StoreKit
Similar to other areas of iOS development, there is a “kit”. StoreKit allows you to communicate with iTunes Connect and request in-app purchase information. It also handles requests for payments and processing.
Before you can leverage StoreKit within the app, however, you need to set up four in-app subscription options on iTunes Connect.
Creating Auto-Renewable Subscriptions
First, you need to create an app for this tutorial on iTunes Connect, so sign into iTunes Connect with your paid developer account.
Select My Apps from the dashboard, click the + button and select New App from the drop-down menu.
Enter the following values for this app:
- Platforms: iOS
- Name: RW Selfies – [Your Name] (or something else that’s unique)
- Primary Language: English (U.S.)
- Bundle ID: Select the Bundle ID you entered earlier in Xcode
- SKU: Enter something unique across all your apps — use your Bundle ID if you’re not sure what to use
Click Create to go to the app’s configuration screen.
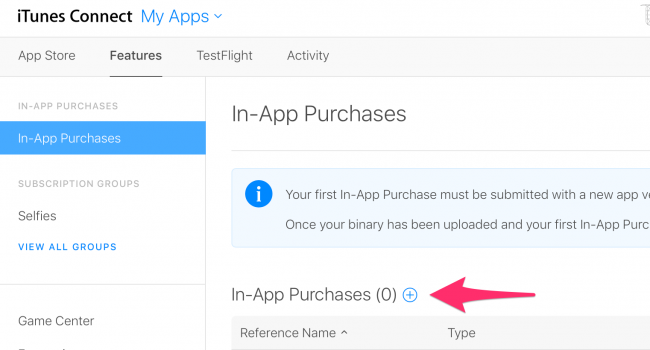
Select the Features tab near the top-left corner of the navigation area, and then click the + button next to In-App Purchases (0).
Pick the option for Auto-Renewable Subscription.
Note: If you don’t see an option for Auto-Renewable Subscription, you probably need to complete some contracts for your account.
Press Cancel and select My Apps from the top-left part of the screen. Then pick Agreements, Tax, and Banking from the options.
Make sure all the contracts are complete, especially the Paid Applications contract.
When you’re done, the status may show as “Processing”. Even so, you should be able to return to the In-App Purchases page and create a new Auto-Renewable Subscription.
Enter the following values for the first purchase option:
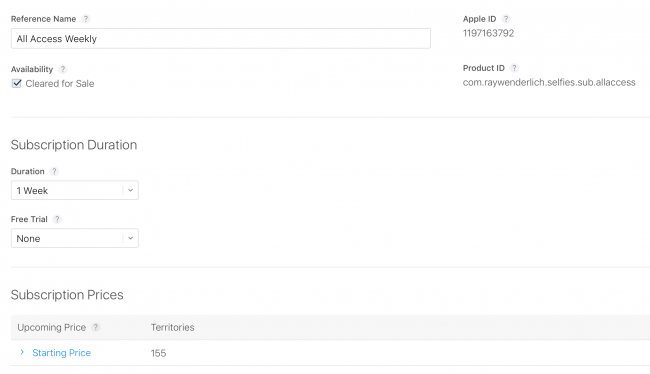
- Reference Name: All Access Weekly
- Product ID: [Your Bundle ID].sub.allaccess (replace [Your Bundle ID] with your bundle ID from Xcode, which makes this identifier globally unique)
- Subscription Group Reference Name: Selfies
Click Create, then you’ll go to the in-app configuration page, where you should enter the following values:
- Cleared for Sale: Check the box
- Duration: 1 week
- Free Trial: None
- Starting Price: 1.99 USD, and accept the auto-selected values for all territories
- Localizations: Add English (U.S.)
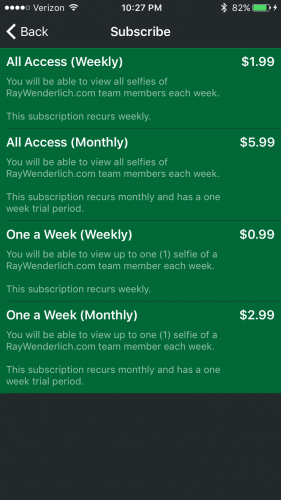
- Subscription Display Name: All Access (Weekly)
- Description: You will be able to view all the selfies from RayWenderlich.com team members each week. This subscription recurs weekly.
You can skip Review Information during this tutorial, but don’t skip it when you’re working with a real app.
Press Save to complete the subscription setup.
One down, three to go. Using the values below, repeat the process to create the second, third and fourth subscription options.
Second Subscription Values
- Reference Name: All Access Monthly
- Product ID: [Your Bundle ID].sub.allaccess.monthly
- Subscription Group Reference Name: Selfies
- Cleared for Sale: Check the box
- Duration: 1 Month
- Free Trial: 1 Week
- Starting Price: 5.99 USD
- Localizations: Add English (U.S.)
- Subscription Display Name: All Access (Monthly)
- Description: You will be able to view all selfies of RayWenderlich.com team members each week. This subscription recurs monthly and has a one-week trial period.
Third Subscription Values
- Reference Name: One a Week Weekly
- Product ID: [Your Bundle ID].sub.oneaweek
- Subscription Group Reference Name: Selfies
- Cleared for Sale: Check the box
- Duration: 1 Week
- Free Trial: None
- Starting Price: 0.99 USD
- Localizations: Add English (U.S.)
- Subscription Display Name: One a Week (Weekly)
- Description: You will be able to view up to one (1) selfie of a RayWenderlich.com team member each week. This subscription recurs weekly.
Fourth Subscription Values
- Reference Name: One a Week Monthly
- Product ID: [Your Bundle ID].sub.oneaweek.monthly
- Subscription Group Reference Name: Selfies
- Cleared for Sale: Check the box
- Duration: 1 Month
- Free Trial: 1 Week
- Starting Price: 2.99 USD
- Localizations: Add English (U.S.)
- Subscription Display Name: One a Week (Monthly)
- Description: You will be able to view up to one (1) selfie of a RayWenderlich.com team member each week. This subscription recurs monthly and has a one-week trial period.
Whew, nice work!
Configuring the Subscription Group
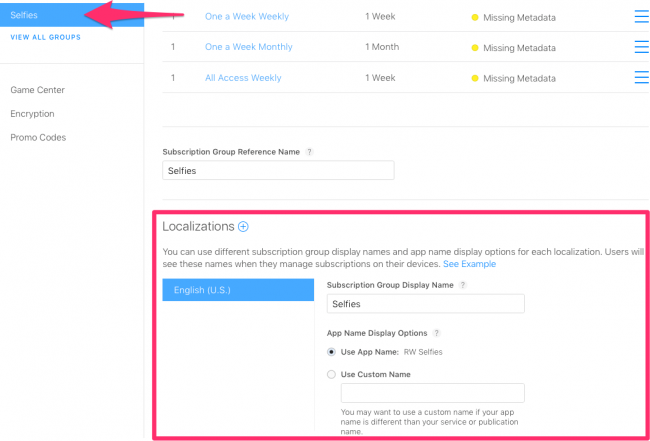
Return to the “Selfies” subscription group and add an English (U.S.) localization.
- Subscription Group Display Name: Selfies
- App Name Display Options: Use App Name
Click Save and then take a cool selfie to commemorate the occasion.
Setting up a Test User
You next need to create a sandbox test user to simulate purchases.
Select My Apps and then pick Users and Roles. Click Sandbox Testers, and then click the + button next to Testers (0).
Complete the entire form. Be careful as you enter these values — you can’t recover or edit them later.
Note: You must use a valid e-mail address for this test user.
Within mere moments, you should receive an e-mail from Apple that asks you to verify the test account. You must validate your e-mail, or any purchases you make will silently fail.
Keep the login for this account handy as you’ll need it later in the tutorial.
Obtaining a Shared Secret
The last thing to do in iTunes Connect is obtain a Shared Secret.
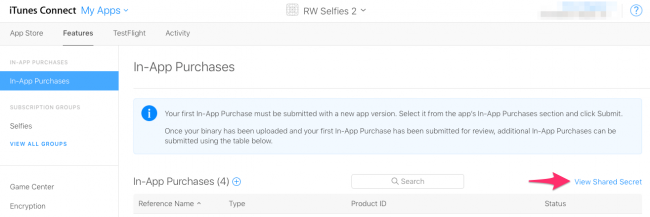
Click on My Apps and choose RW Selfies. Navigate to the Features and click View Shared Secret at the top-left side of the “In-App Purchases” table. If necessary, click the button for Generate Shared Secret.
Leave this page open because you’ll need it later.
Everything is all set for iTunes Connect! Congratulations for surviving this (not so) horrifically grueling process! 
Implementing StoreKit
It’s finally time to dive into the sample project and write some code! Here’s an overview of the in-app purchase process that you’ll step through:
- Prevent free access to content
- Load product identifiers
- Fetch product information
- Present products to the user
- Enable users to purchase
- Process the transaction
- Make purchased content available in the app
- Complete the transaction
- Restore purchased transactions
Step 1: Prevent Free Access to Content
Before you write the purchase logic, you need to lock down your content. These beautiful faces don’t come for free!
Open SelfiesViewController.swift and replace viewDidLoad with the following:
override func viewDidLoad() { super.viewDidLoad() guard SubscriptionService.shared.currentSessionId != nil, SubscriptionService.shared.hasReceiptData else { showRestoreAlert() return } loadSelfies() } |
This block prevents users from loading your precious content without a current session and receipt data. If either is missing, the code triggers an alert that prompts the user to restore purchases.
Note: Apple requires apps to support restoring purchases, so your app must comply. You’ll handle this requirement during step 9.
Steps 2 through 4: Loading, Fetching and Presenting
In this section, you’ll add the logic that allows users to access these incredible selfies.
- Load product identifiers
- Fetch product information
- Present products to the user
For the sake of simplicity, you’ll hardcode the product identifiers — the same ones you set up in iTunes Connect.
When you work with your own app, you might opt to provide these identifiers via a REST call or some other implementation. This would enable you to do things like reveal special purchase options during “holiday sales” or special events.
Open SubscriptionService.swift: this is a singleton service that you’ll use throughout the app to make it easier to work with StoreKit.
Add this import to the top of the file:
import StoreKit |
Replace loadSubscriptionOptions with the following and ignore the compiler error for now:
func loadSubscriptionOptions() { let productIDPrefix = Bundle.main.bundleIdentifier! + ".sub." let allAccess = productIDPrefix + "allaccess" let oneAWeek = productIDPrefix + "oneaweek" let allAccessMonthly = productIDPrefix + "allaccess.monthly" let oneAWeekMonthly = productIDPrefix + "oneaweek.monthly" let productIDs = Set([allAccess, oneAWeek, allAccessMonthly, oneAWeekMonthly]) let request = SKProductsRequest(productIdentifiers: productIDs) request.delegate = self request.start() } |
You’ve just created an SKProductsRequest by using the product identifiers you defined in iTunes Connect. You also set the delegate to self and started the request.
Now you’ll make SubscriptionService conform to SKProductsRequestDelegate by adding the following extension after the class closing brace:
extension SubscriptionService: SKProductsRequestDelegate { func productsRequest(_ request: SKProductsRequest, didReceive response: SKProductsResponse) { options = response.products.map { Subscription(product: $0) } } func request(_ request: SKRequest, didFailWithError error: Error) { if request is SKProductsRequest { print("Subscription Options Failed Loading: \(error.localizedDescription)") } } } |
When the SKProductsRequest completes successfully, this extension calls productsRequest(_:didReceive:). It converts the received SKProduct array into a Subscription array that’s set to options. Note that Subscription is a simple model for this app that you’re using instead invoking SKProduct directly.
Should the request fail due to an error, the method calls request(_:didFailWithError:).
Next, you need to call the loadSubscriptionOptions method. Open AppDelegate.swift and replace the following method:
func application(_ application: UIApplication, didFinishLaunchingWithOptions launchOptions: [UIApplicationLaunchOptionsKey: Any]?) -> Bool { SubscriptionService.shared.loadSubscriptionOptions() return true } |
Build and run to see your work come to life. Tap the Subscribe Now button shortly after the app launches to see the subscription options.
Nice work! You successfully loaded product information from iTunes Connect.
Note: Product identifiers are the only subscription data stored within the app. You should not store pricing or description information in there. iTunes Connect should handle this aspect. Whenever you want to change pricing information, supported regions or localized descriptions, you should make the changes in iTunes Connect.
Step 5: User Makes the Purchase
Now that you’ve got the subscriptions to display, it’d be great to actually let the user purchase one, right? These selfies are worth some serious coin!
Open SubscribeViewController.swift and find the tableView(_:didSelectRowAt:) method at the bottom of the file. Whenever the user selects a row in the table view, you’ll invoke the purchase.
Replace the TODO with the following code:
guard let option = options?[indexPath.row] else { return } SubscriptionService.shared.purchase(subscription: option) |
This gets the selected Subscription instance from options and passes it to purchase(subscription:) on the SubscriptionService.
Pretty straightforward, right? You’re probably itching to see what purchase(subscription:) does. Well, it does absolutely nothing! That’s your job to implement. ;]
Open SubscriptionService.swift and replace purchase(subscription:) with the following:
func purchase(subscription: Subscription) { let payment = SKPayment(product: subscription.product) SKPaymentQueue.default().add(payment) } |
This creates an SKPayment using the SKProduct associated with the subscription and then adds the payment to the default payment queue. What now? Well, the result of this call is delegated. You’ll need to configure a delegate for the payment queue, which is the next step.
Step 6: Process the Transaction
Open AppDelegate.swift and add this import:
import StoreKit |
At the top of application(_:didFinishLaunchingWithOptions:), add the following — just ignore the error for now:
SKPaymentQueue.default().add(self) |
This registers the AppDelegate as an SKPaymentTransactionObserver. Add the following after the closing class curly brace to make AppDelegate conform to this protocol:
extension AppDelegate: SKPaymentTransactionObserver { func paymentQueue(_ queue: SKPaymentQueue, updatedTransactions transactions: [SKPaymentTransaction]) { } } |
In the above block, you call paymentQueue(_:updatedTrasactions:) whenever something happens with a payment transaction. Making your AppDelegate observe these events is a convenience-driven implementation because it’s a singleton that’s always around when your app is running. Alternatively, you can move this logic to a custom class, but you’ll need to make sure your app will handle these events whenever they’re received.
Fill in the implementation for paymentQueue(_:updatedTransactions:) with the following — again, ignore the errors:
for transaction in transactions { switch transaction.transactionState { case .purchasing: handlePurchasingState(for: transaction, in: queue) case .purchased: handlePurchasedState(for: transaction, in: queue) case .restored: handleRestoredState(for: transaction, in: queue) case .failed: handleFailedState(for: transaction, in: queue) case .deferred: handleDeferredState(for: transaction, in: queue) } } |
This method receives an array of SKPaymentTransaction objects and updates the transactionState, but doesn’t process the transactions.
Each case requires a different response. Add the following right under the above method:
func handlePurchasingState(for transaction: SKPaymentTransaction, in queue: SKPaymentQueue) { print("User is attempting to purchase product id: \(transaction.payment.productIdentifier)") } func handlePurchasedState(for transaction: SKPaymentTransaction, in queue: SKPaymentQueue) { print("User purchased product id: \(transaction.payment.productIdentifier)") } func handleRestoredState(for transaction: SKPaymentTransaction, in queue: SKPaymentQueue) { print("Purchase restored for product id: \(transaction.payment.productIdentifier)") } func handleFailedState(for transaction: SKPaymentTransaction, in queue: SKPaymentQueue) { print("Purchase failed for product id: \(transaction.payment.productIdentifier)") } func handleDeferredState(for transaction: SKPaymentTransaction, in queue: SKPaymentQueue) { print("Purchase deferred for product id: \(transaction.payment.productIdentifier)") } |
For now, you’re printing out information for each state.
You can apply some common sense to figure out what each state means by looking at its name, and you can read up on states later. But what about deferred. Huh?
Deferred indicates that a user requested a purchase, but it’s pending until some other user approves it. For example, a child with excellent taste may want this exclusive selfie app but can’t until his mother approves the purchase via the family account.
Steps 7 and 8
In this section, you’ll make the content available and complete the transaction.
Technically, the transaction wasn’t processed in the previous step. Rather, the payment queue’s delegate was informed of an updated transaction. Processing involves a bit more logic, and it’s part of making the content available within the app.
Apple informs you of any successful purchase. From there, it’s your responsibility to determine when and how to deliver the content.
After purchasing an auto-renewable subscription, the user’s receipt data for your app is updated with the subscription information. Receipts reside on the user’s device as cryptographic binary data.
This is all rather complicated and more involved than the scope of this tutorial permits. In essence, the app runs a service that trades receipt data using a Session ID. This Session ID is then used to load the selfies.
Note: The project app runs SelfieService, which accepts receipts and uploads them directly to Apple’s receipt validation service. This is a “cheat” to keep the tutorial focused on setting up the subscriptions. In a real app, you should use a remote server for this — not the app.
The reasoning is that SelfieService could be susceptible to man-in-the-middle attacks. It leaves an opening for a hacker to intercept the request and return a false successful response, thus preventing the request from reaching Apple’s validation service.
You can avoid this issue by having a remote server handle both receipt validation and content vending in a real app. This way, man-in-the-middle attacks aren’t possible. As with all security-related issues, however, you’ll need to consider whether your content is worth the effort required to protect it.
Sam Davies does a stellar job explaining a lot of these details in In-App Purchase Video Tutorial: Part 4 Receipts.
Speaking of SelfieService, there is one thing you need to update there: add your iTunes Connect Shared Secret. Open SelfieService.swift and replace the YOUR_ACCOUNT_SECRET string at the top of the file with the value you generated earlier in iTunes Connect.
Return to AppDelegate to add state handling implementations. Start by replacing handlePurchasedState(for:in:) with the following:
func handlePurchasedState(for transaction: SKPaymentTransaction, in queue: SKPaymentQueue) { print("User purchased product id: \(transaction.payment.productIdentifier)") queue.finishTransaction(transaction) SubscriptionService.shared.uploadReceipt { (success) in DispatchQueue.main.async { NotificationCenter.default.post(name: SubscriptionService.purchaseSuccessfulNotification, object: nil) } } } |
This method first prints out a message so that you can observe the call in your console, and then it marks the transaction as finished. It’s important to prevent the payment queue from notifying you again about the transaction.
The device’s receipt data is uploaded via SelfieService, and upon completion, a notification is posted.
Open SubscriptionService.swift and locate uploadReceipt(completion:). This method loads receipt data from the device and uploads it to SelfieService. When the operation is successful, SubscriptionService retains the Session ID and the current subscription from the receipt.
You also need to implement loadReceipt():
private func loadReceipt() -> Data? { guard let url = Bundle.main.appStoreReceiptURL else { return nil } do { let data = try Data(contentsOf: url) return data } catch { print("Error loading receipt data: \(error.localizedDescription)") return nil } } |
The receipt data resides in the App’s main bundle, and fortunately, its URL is easily accessible.
If Bundle.main.appStoreReceiptURL returns a URL, this method attempts to load the data. If the data is available, it’s returned or nil otherwise.
To make purchases via the App Store Sandbox Environment, you’ll need to sign out of your personal App Store account — navigate to Setting\iTunes & App Store, tap your Apple ID at the top and choose Sign Out. Do NOT attempt to sign in here with your Sandox Testing Account.
Build and run.
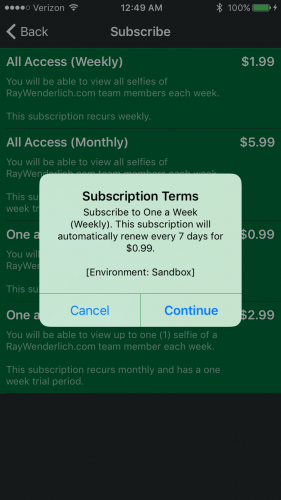
Tap on Subscribe Now, and choose to purchase One a Week (Weekly). When prompted, tap Use Existing Apple ID and use your sandbox tester account.
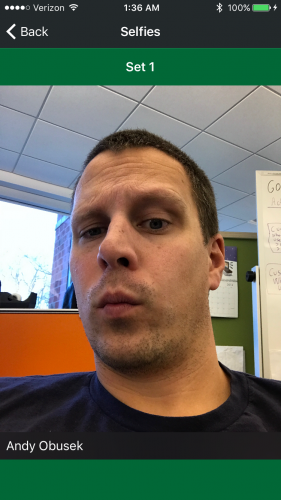
Confirm the purchase and press Back and then Subscribed? Come on in…. You should see Andy questioning why you’re spending money on pictures of him.
Nice work! You’ve successfully implemented and started testing an in-app purchase of an auto-renewable subscription. Remember that the sandbox accelerates subscription times, so just three minutes after you purchased the subscription you’ll receive the next set of pictures.
The app isn’t configured to automatically refresh the feed, so you’ll need to press Back and then Subscribed? Come on in… again to see the next batch of selfies.
While you’re waiting, prepare to upgrade your subscription when you re-enter the app to All Access (Weekly).
A caveat of the sandbox environment is that it will only auto-renew subscriptions for the same sandbox user six times per day. After this, you can still make purchases, but they won’t automatically renew.
SelfiesService also has some built-in nuances to make testing easier. Upon app startup, it saves the current time and stores it in UserDefaults. Subscriptions purchased prior to this time are ignored, so you can delete, re-install the app and make purchases again. You wouldn’t want a real app to do this in production.
Step 9: Restore Purchased Transactions
Lastly, you’ll need to provide users with a means to restore purchases. Users delete apps, lose and upgrade devices all the time. “RW team selfies are so compelling, I’d gladly pay for them again”, says no user…ever. So, you need to allow users to access content they’ve previously purchased.
The sample app’s configuration allows the user to restore purchases if SelfiesViewController found no receipt when it loaded.
Open SubscriptionService.swift and replace restorePurchases() with the following:
func restorePurchases() { SKPaymentQueue.default().restoreCompletedTransactions() } |
This tells StoreKit to restore all transactions that you previously marked as finished.
You need to update AppDelegate too, since it’s the payment queue’s delegate. Open AppDelegate.swift and add the following to the end of handleRestoredState(for:in:) after the print statement:
queue.finishTransaction(transaction) SubscriptionService.shared.uploadReceipt { (success) in DispatchQueue.main.async { NotificationCenter.default.post(name: SubscriptionService.restoreSuccessfulNotification, object: nil) } } |
This again marks the transaction as processed, uploads the receipt data, and posts the relevant notification to unlock the content.
Whew, that’s a lot of bookkeeping. Get it? Money, sales… Oh fine…!
Where To Go From Here?
Here’s the final app in case you’d like to see the finished project. Note that you’ll still need to set your own development team, do all of the iTunes Connect set up and set your iTunes Connection shared secret to use the completed app.
Now that you have an idea of what’s required to set up auto-renewable subscriptions, there are a few things you should review further before adding them to your own apps:
- Check out Apple’s new subscription page
- Watch the latest WWDC 2016 Videos, especially these:
- Introducing Expanded Subscriptions in iTunes Connect
- Using Store Kit for In-App Purchases with Swift 3
- See the Apple documentation for more details about each purchase state.
- Read up on the App Store Review Guidelines
- Read Curtis Herbert’s excellent write up about subscriptions
I hope you enjoyed this tutorial. Please use the forum below for any questions or comments!
The post In-App Purchases: Auto-Renewable Subscriptions Tutorial appeared first on Ray Wenderlich.


