Storyboards, Segues and Static Cells
Update note: This tutorial has been updated for Xcode 9, iOS 11, and Swift 4 by Nicholas Sakaimbo. The original tutorial was written by Matthijs Hollemans.
If you want to learn about storyboards, you’ve come to the right place!
In the first part of this series, you covered the basics of using Interface Builder to create and connect various view controllers, along with how to make custom table view cells directly from the storyboard editor.
In this second and final part of this storyboards tutorial series, we’ll cover segues, static table view cells, the Add Player scene, and game picker scene!
We’ll start where we left off last tutorial, so open your project from last time, or download the example code from the previous tutorial here.
OK, now you’ll dive into some of the other cool features in storyboards!
Introducing Segues
It’s time to add more view controllers to the storyboard. You’re going to create a scene to add new players to the app.
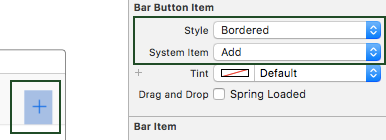
Open Main.storyboard and drag a Bar Button Item into the right slot of the navigation bar on the Players scene. In the Attributes inspector change System Item to Add, and set its Style to Bordered.
When the user taps this button, you want the app to pop up a new modal scene for entering details of a new player.
Drag a new Table View Controller into the canvas to the right of the Players scene. Remember you can double-click the canvas to zoom out so you have more room to work. With the new Table View Controller selected, choose Editor\Embed in\Navigation Controller.
Here’s the trick: Select the + button you just added on the Players scene and ctrl-drag to the new Navigation Controller. Release the mouse button and select Present Modally from the popup menu:

This places a new arrow between the Players scene and the Navigation Controller:

This type of connection is known as a segue (pronounce: seg-way) and represents a transition from one scene to another. The storyboard connections you’ve seen so far were relationships and they described one view controller containing another. A segue, on the other hand, changes what’s on the scene. Segues are triggered by taps on buttons, table view cells, gestures, and so on.
The cool thing about using segues is you don’t have to write any code to present the new scene, or hook up your buttons to IBAction methods. What you just did, dragging from the Bar Button Item to the next scene, is enough to create the transition. (Note: If your control already has an IBAction connection, the segue overrides it.)
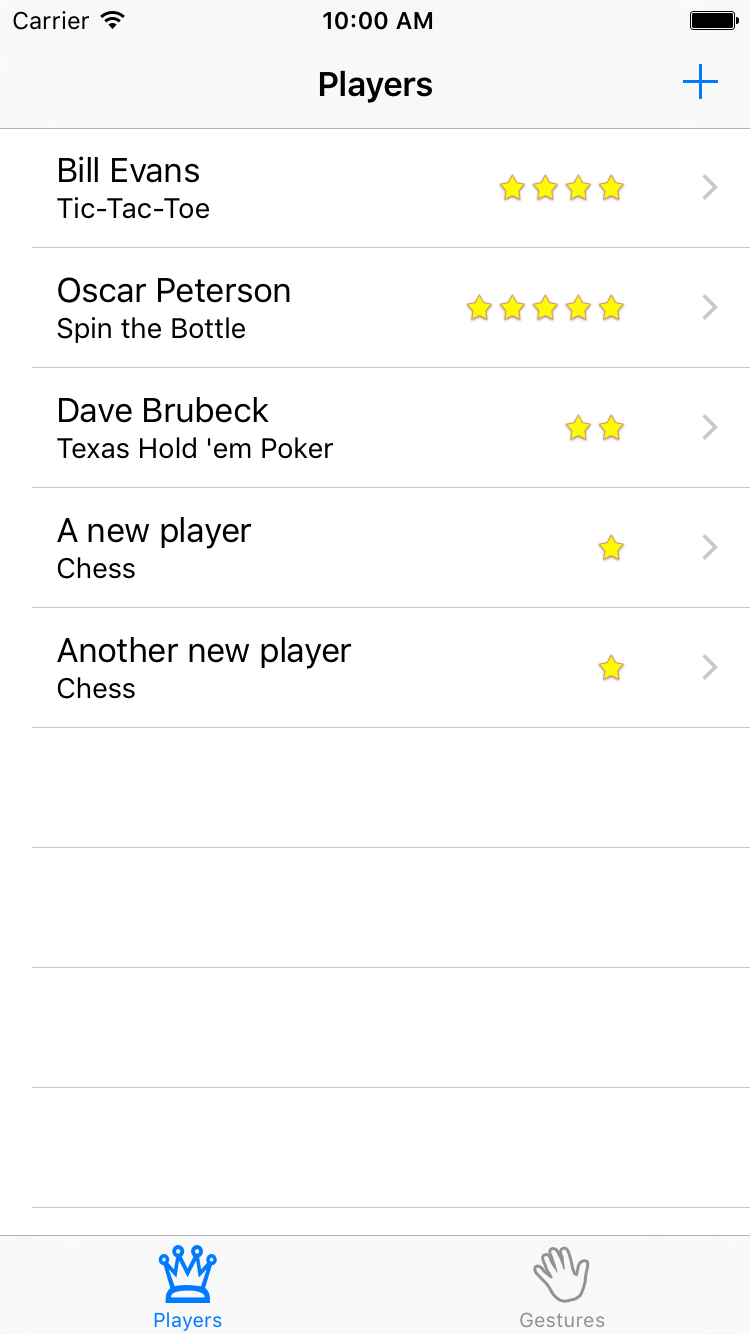
Build and run the app and tap the + button. A new table view will slide up from the bottom.

This is called a modal segue. The new scene completely obscures the previous one. The user cannot interact with the underlying scene until they close the modal scene first. Later you’ll see “show” segues that push a new scene onto a Navigation Controller’s navigation stack.
The new scene isn’t very useful yet – you can’t even close it to go back to the main scene. That’s because segues only go one way – so while it can go from the Players scene to this new one, it can’t go back.
Storyboards provide the ability to ‘go back’ with something called an unwind segue, which you’ll implement next. There’s three main steps:
- Create an object for the user to select, usually a button.
- Create an unwind method in the controller you want to return to.
- Hook up the method and the object in the storyboard.
First, open Main.storyboard and select the new Table View Controller scene. Change the title of the scene to Add Player (by double-clicking in the navigation bar). Next, add two Bar Button Items, one to each side of the navigation bar. In the Attributes inspector, set the System Item property of the left button to Cancel, and the right button to Done.

Next, add a new file to the project using the Cocoa Touch Class template – name it PlayerDetailsViewController and make it a subclass of UITableViewController. Next, open Main.storyboard and select the Add Player scene. In the Identity inspector set its Class to PlayerDetailsViewController. I always forget this very important step, so to make sure you don’t; I’ll keep pointing it out.
Now you can finally create the unwind segue. Open PlayersViewController.swift, add the following extension above your UITableViewDataSource extension:
// MARK: - IBActions
extension PlayersViewController {

  @IBAction func cancelToPlayersViewController(_ segue: UIStoryboardSegue) {
  }

  @IBAction func savePlayerDetail(_ segue: UIStoryboardSegue) {
  }
}
cancelToPlayersViewController(_:) is simply a marker for the unwind segue. Later you’ll add code to savePlayerDetail(_:) to allow it to live up to it’s name!
Finally, open Main.storyboard and hook up the Cancel and Done buttons to their respective action methods. Ctrl-drag from the bar button to the exit object above the view controller then pick the correct action name from the popup menu:

Note the name you gave the cancel method. When you create an unwind segue, the list will show all unwind methods (i.e. ones with the signature @IBAction func methodname(_ segue:)) in the entire app, so create a name you can recognize.
Build and run the app, tap the + button, and test the Cancel and Done buttons. A lot of functionality for very little code!
Storyboards Static Cells
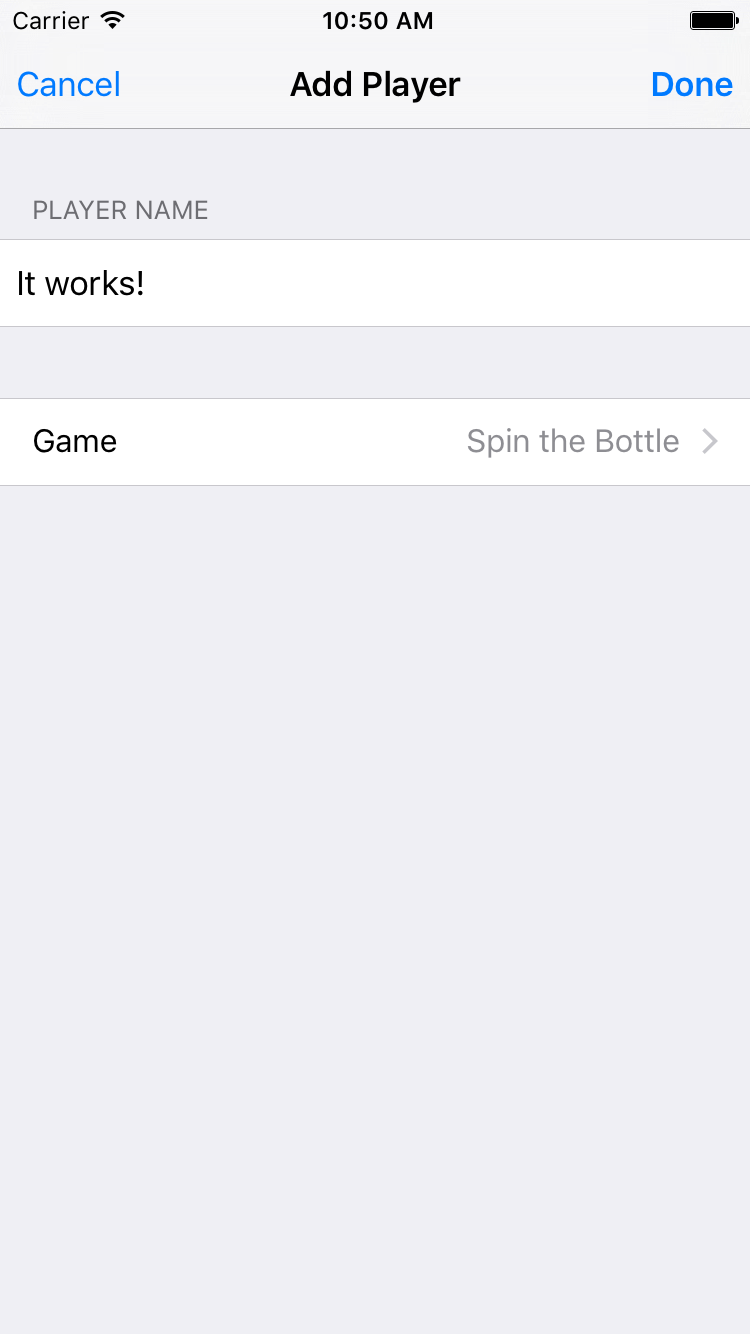
When you’re finished with this section, the Add Player scene will look like this:

That’s a grouped table view, but you don’t have to create a data source for this table. You can design it directly in the storyboard — no need to write tableView(_:cellForRowAt:) for this one! Static cells is the feature that makes this possible.
Open Main.storyboard and select the table view in the Add Player scene. In the Attributes inspector change Content to Static Cells. Change Style from Plain to Grouped and give the table view 2 sections.

Note: When you change the value of the Sections attribute, the editor will clone the existing section. (You can also select a specific section in the Document Outline on the left and duplicate it.)
The finished scene will have only one row in each section, so select two cells in each of the sections and delete them using the Document Outline.
Next, select the top table view section (from the Document Outline) and set the header value to Player Name.

Drag a new Text Field into the cell for this section. Stretch out its width and remove its border so you can’t see where the text field begins or ends. Set the Font to System 17.0 and uncheck Adjust to Fit.

You’re going to make an outlet for this text field on the PlayerDetailsViewController using the Assistant Editor feature of Xcode. While still in the storyboard, open the Assistant Editor with the button from the toolbar (the one at the top right with two intertwining rings). It should automatically open on PlayerDetailsViewController.swift (if it doesn’t, use the jumpbar in the right hand split window to select PlayerDetailsViewController.swift).
Select the new text field and ctrl-drag to the top of PlayersDetailViewController, just below the class definition. When the popup appears, name the new outlet nameTextField, and click Connect. Xcode will add the property to the PlayersDetailViewController class and connect it in the storyboard:

Creating outlets for views on your table cells is exactly the kind of thing I said you shouldn’t try with prototype cells, but for static cells it’s OK. There will be only one instance of each static cell so it’s perfectly acceptable to connect their subviews to outlets on the view controller.
Select the second section of the table view in the Document Outline and delete the placeholder “Section-2” text in the Header field in the Attributes Inspector. Set the Style of the static cell in the second section to Right Detail. This gives you a standard cell style to work with. Change the label on the left to read Game by double clicking it and give the cell a Disclosure Indicator accessory.

Just as you did for nameTextField, make an outlet for the label that says Detail and name it detailLabel. The labels on this cell are just regular UILabel objects. You might need to click a few times on the text “Detail” to select the label (and not the whole cell) before ctrl-clicking and dragging to PlayerDetailsViewController.swift. Once done, it will look similar to the following:

The final design of the Add Player scene looks like this:

Note: The scenes you’ve designed so far in this storyboard all have the width and height of the 4.7-inch screen of the iPhone 7, which is 667 points tall. Obviously, your app should work properly with different screen sizes, and you can preview these sizes within your Storyboard.
Open the Assistant Editor from the toolbar, and use the jump bar to select Preview. At the bottom left of the assistant editor, click the + symbol to add new screen sizes to preview. To remove a screen size, select it and hit the Delete key.

For the Ratings app, you don’t have to do anything fancy. It only uses table view controllers and they automatically resize to fit the screen space. When you do need to support different layouts for different sized devices, you’ll use Auto Layout and Size Classes.
Build and run the app. You’ll notice the Add Player scene is still blank!

When you use static cells, your table view controller doesn’t need a data source. Since you used an Xcode template to create the PlayerDetailsViewController class, it still has some placeholder code for the data source and this prevents the static cells from working properly. Time to fix it!
Open PlayerDetailsViewController.swift and delete everything from the following line down (except for the class closing bracket):
override func viewDidLoad() {
  super.viewDidLoad()
}
Build and run the app. Now the new scene displays the static cells, and all without writing a line of code.

One more thing about static cells: they only work in UITableViewController. Even though Interface Builder will let you add them to a table view inside a regular UIViewController, this won’t work during runtime. The reason is UITableViewController provides some extra magic to take care of the data source for the static cells. Xcode prevents you from compiling such a project with the error message: “Illegal Configuration: Static table views are only valid when embedded in UITableViewController instances”. Prototype cells, on the other hand, work just fine in table view’s placed inside regular view controllers.
Note: If you’re building a scene with a lot of static cells — more than can fit in the visible frame — you can scroll through them in Interface Builder with the scroll gesture on the mouse or trackpad (2 finger swipe).
You can’t always avoid writing code altogether though, even for a table view of static cells. When you dragged the text field into the first cell, you probably noticed it didn’t fit completely. There’s a small margin of space around the text field. The user can’t see where the text field begins or ends, so if they tap in the margin and the keyboard doesn’t appear, they’ll be confused.
To avoid this, let a tap anywhere inside the row bring up the keyboard. Open PlayerDetailsViewController.swift and add the following extension to the end of the file:
// MARK: - UITableViewDelegate
extension PlayerDetailsViewController {

  override func tableView(_ tableView: UITableView, didSelectRowAt indexPath: IndexPath) {
    if indexPath.section == 0 {
      nameTextField.becomeFirstResponder()
    }
  }
}
If the user taps the first cell, the app should activate the text field. There’s only one cell in the section so you only need to test for the section index. Making the text field the first responder will automatically bring up the keyboard.
Note: when adding a delegate method, or overriding a view controller method, just start typing the method name (without preceding it with “func”), and you’ll be able to select the correct method from the available list.
You should also set the Selection for the cell to None in the storyboard Attributes Inspector, otherwise the row appears highlighted when the user taps in the margin around the text field.

All right, that’s the design of the Add Player scene. Now to actually make it work!
The Add Player Scene at Work
For now you’ll ignore the Game row and just let users enter the name of the player.
When the user taps the Cancel button the scene should close and the data entered should be lost. This already works with the unwind segue.
When the user taps Done, you should create a new Player object, fill its properties and update the list of players.
prepare(for:sender:) is invoked whenever a segue is about to take place. You’ll override this method to store the data entered into a new Player object before dismissing the view.
Note: Never call prepare(for:sender:) yourself. It’s a message from UIKit to let you know a segue has just been triggered.
Open PlayerDetailsViewController.swift, and add the following property at the top of the class:
// MARK: - Properties
var player: Player?
Next, add the following method below your IBOutlets definitions:
// MARK: - Navigation
override func prepare(for segue: UIStoryboardSegue, sender: Any?)  {
  if segue.identifier == "SavePlayerDetail",
    let playerName = nameTextField.text {
      player = Player(name: playerName, game: "Chess", rating: 1)
  }
}
prepare(for:sender:) creates a new Player instance with default values for game and rating. It does this only for a segue with the identifier SavePlayerDetail.
Open Main.storyboard, find the Add Player scene in the Document Outline and select the unwind segue tied to savePlayerDetail:. Change Identifier to SavePlayerDetail:

Next, open PlayersViewController and replace the unwind segue method savePlayerDetail(_:) with the following:
@IBAction func savePlayerDetail(_ segue: UIStoryboardSegue) {

  guard let playerDetailsViewController = segue.source as? PlayerDetailsViewController,
    let player = playerDetailsViewController.player else {
      return
  }

  // add the new player to the players array
  players.append(player)

  // update the tableView
  let indexPath = IndexPath(row: players.count - 1, section: 0)
  tableView.insertRows(at: [indexPath], with: .automatic)
}
This obtains a reference to the PlayerDetailsViewController via the segue reference and resolves the Player object. Next, append the new Player object to the players array. Finally, inform the table view a new row was inserted at the bottom, since the table view and its data source must always be in sync.
You could have invoked tableView.reloadData() but it looks nicer to insert the new row with an animation. UITableViewRowAnimation.automatic automatically picks the correct animation, depending on where you insert the new row.
Build and run the app, you should now be able to add new players to the list!
Performance
Since you have several view controllers in the storyboard, you might be wondering about performance. Loading a whole storyboard at once isn’t a big deal. The storyboard doesn’t instantiate all the view controllers right away – only the initial view controller is immediately loaded. Since your initial view controller is a Tab Bar Controller, the two view controllers it contains are also loaded (the Players scene from the first tab and the scene from the second tab).
The other view controllers are not instantiated until you segue to them. When you close these view controllers they’re immediately deallocated, so only the actively used view controllers are in memory.
To see this in practice, open PlayerDetailsViewController.swift and add the following below your IBOutlet definitions:
// MARK: - Initializers
required init?(coder aDecoder: NSCoder) {
  print("init PlayerDetailsViewController")
  super.init(coder: aDecoder)
}

deinit {
  print("deinit PlayerDetailsViewController")
}
You’re overriding init?(coder:) and deinit, and making them log a message to the Xcode Debug pane.
Build and run the app. Open the Add Player scene. You should see the print() log statement from init?(coder:).
When you close the Add Player scene, either by tapping Cancel or Done, you should see the print() log statement from deinit. If you open the scene again, you should also see the message from init?(coder:) again. This should reassure you that view controllers are loaded on-demand only.
The Game Picker Scene
Tapping the Game row in the Add Player scene should open a new scene to let the user pick a game from a list. This means you’ll add another table view controller, although this time you’re going to push it on the navigation stack rather than show it modally.
Open Main.storyboard and drag a new Table View Controller into the canvas. Next, select the Game table view cell in the Add Player scene (be sure to select the entire cell, not one of the labels) and ctrl-drag to the new table view controller to create a segue between them. Select Show under Selection Segue in the popup, not Accessory Action.
Select this new segue and give it the identifier PickGame in the Attributes Inspector.
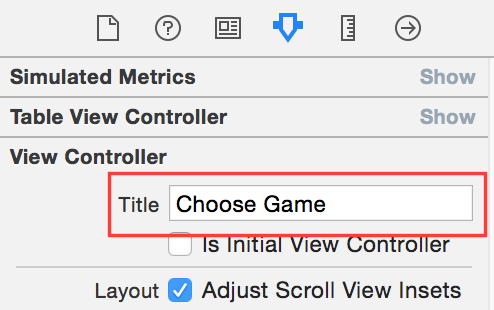
Select the new table view controller in the Document Outline and in the Attributes Inspector, name this scene Choose Game.
Next, select the prototype table view cell and set the Style of the prototype cell to Basic, and give it the reuse identifier GameCell. That’s all you need to do for the design of this scene:

Add a new Swift file to the project, using the Cocoa Touch Class template and name it GamePickerViewController, subclass of UITableViewController.
Next, open Main.storyboard and select the Choose Game Scene. In the Identity Inspector, set its Custom Class to GamePickerViewController.
Now you’ll give this new scene some data to display. Open GamePickerViewController.swift, and add replace everything in the class definition with the following:
// MARK: - Properties
var games = [
  "Angry Birds",
  "Chess",
  "Russian Roulette",
  "Spin the Bottle",
  "Texas Hold'em Poker",
  "Tic-Tac-Toe"
]
Next, add the following extension to the end of the file:
// MARK: - UITableViewDataSource
extension GamePickerViewController {

  override func tableView(_ tableView: UITableView,
                          numberOfRowsInSection section: Int) -> Int {
    return games.count
  }

  override func tableView(_ tableView: UITableView,
                          cellForRowAt indexPath: IndexPath) -> UITableViewCell {
    let cell = tableView.dequeueReusableCell(withIdentifier: "GameCell", for: indexPath)
    cell.textLabel?.text = games[indexPath.row]
    return cell
  }
}
Here you’re setting up the data source to use the games array and placing the string values in the cell’s textLabel.
Build and run the app and tap the Game row. The new Choose Game scene will slide into view. Tapping the rows won’t do anything yet, but because this scene is presented on the navigation stack, you can always tap the back button to return to the Add Player scene.

This is pretty cool, huh? You didn’t have to write any code to invoke this new scene. You just ctrl-dragged from the static table view cell to the new scene and that’s it. The only code you wrote was to populate the contents of the table view, which is typically something more dynamic rather than a hardcoded list.
Currently, this new scene isn’t very useful since it doesn’t send any data back. You’ll have to add a new unwind segue.
In GamePickerViewController add the following properties below the games property:
var selectedGame: String? {
  didSet {
    if let selectedGame = selectedGame,
      let index = games.index(of: selectedGame) {
        selectedGameIndex = index
    }
  }
}

var selectedGameIndex: Int?
Whenever selectedGame is updated, didSet will locate the game string in games array and automatically update selectedGameIndex with the correct index from the table.
Next, replace tableView(_:cellForRowAt:) with the following:
override func tableView(_ tableView: UITableView,
                        cellForRowAt indexPath: IndexPath) -> UITableViewCell {

  let cell = tableView.dequeueReusableCell(withIdentifier: "GameCell", for: indexPath)
  cell.textLabel?.text = games[indexPath.row]

  if indexPath.row == selectedGameIndex {
    cell.accessoryType = .checkmark
  } else {
    cell.accessoryType = .none
  }

  return cell
}
This sets a checkmark on the cell containing the name of the currently selected game. Small gestures such as these will be appreciated by users of the app.
Next, add the following extension below the UITableViewDataSource extension:
// MARK: - UITableViewDelegate
extension GamePickerViewController {

  override func tableView(_ tableView: UITableView, didSelectRowAt indexPath: IndexPath) {
    tableView.deselectRow(at: indexPath, animated: true)

    // Other row is selected - need to deselect it
    if let index = selectedGameIndex {
      let cell = tableView.cellForRow(at: IndexPath(row: index, section: 0))
      cell?.accessoryType = .none
    }

    selectedGame = games[indexPath.row]

    // update the checkmark for the current row
    let cell = tableView.cellForRow(at: indexPath)
    cell?.accessoryType = .checkmark
  }
}
This method is called whenever the user taps a row. First deselect the row after it was tapped (makes it fade from the gray highlight color back to white). Finally, remove the checkmark from the previously selected cell, and puts it on the just tapped cell.
Build and run the app. Tap the name of a game and its row will get a checkmark. Tap the name of another game and the checkmark moves to that row.

The scene should close when the user taps a row but that doesn’t happen yet because you haven’t hooked up an unwind segue. Sounds like a great next step!
Open PlayerDetailsViewController.swift, and add the following below the player property:
var game: String = "Chess" {
  didSet {
    detailLabel.text = game
  }
}
This property will hold the selected game so it can be stored in the Player object later. didSet will display the name of the game in the static table cell whenever the name changes.
Still in PlayerDetailsViewController.swift, add the following extension above your UITableViewDelegate extension:
// MARK: - IBActions
extension PlayerDetailsViewController {

  @IBAction func unwindWithSelectedGame(segue: UIStoryboardSegue) {
    if let gamePickerViewController = segue.source as? GamePickerViewController,
      let selectedGame = gamePickerViewController.selectedGame {
        game = selectedGame
    }
  }
}
This method is executed once the user selects a game from the Choose Game Scene and updates both the label on screen and the game property based on the game selected. The unwind segue also pops GamePickerViewController off the navigation controller’s stack.
Open Main.storyboard, ctrl-drag from the tableview cell to the Exit as you did before, and choose unwindWithSelectedGame: from the popup list:

In the Attributes Inspector give the new unwind segue the Identifier SaveSelectedGame.
Build and run the app. Create a new player, select the player’s game row and choose a game.

The game is not updated on the Add Player scene!
Unfortunately, the unwind segue method is performed before tableView(_:didSelectRowAt:), so the selectedGameIndex is not updated in time. Fortunately, you can override prepare(for:sender:) and complete the operation before the unwind happens.
Open GamePickerViewController, and add the following method below your property definitions:
override func prepare(for segue: UIStoryboardSegue, sender: Any?) {

  guard segue.identifier == "SaveSelectedGame",
    let cell = sender as? UITableViewCell,
    let indexPath = tableView.indexPath(for: cell) else {
      return
  }

  let index = indexPath.row
  selectedGame = games[index]
}
The sender parameter of prepare(for:sender:) is the object that initiated the segue, which in this case was the selected game cell. You can use the indexPath to locate the selected game in games array then set selectedGame so it’s available in the unwind segue.
Build and run the app and select the game, it’ll update the player’s game details!
Next, you need to change PlayerDetailsViewController‘s prepare(for:sender:) to return the selected game, rather than the hardcoded “Chess”. This way, when you complete adding a new player, their actual game will be displayed on the Players scene.
Open PlayerDetailsViewController.swift, replace prepareForSegue(_:sender:) with the following:
override func prepare(for segue: UIStoryboardSegue, sender: Any?) {
  if segue.identifier == "SavePlayerDetail",
    let playerName = nameTextField.text {
      player = Player(name: playerName, game: game, rating: 1)
  }
}
When you complete the Add Player scene and tap done, the list of players will now update with the correct game.
One more thing – when you choose a game, return to the Add Player scene, then try to choose a game again, the game you chose before should have a checkmark by it. The solution is to pass the selected game stored in PlayerDetailsViewController over to the GamePickerViewController when you segue.
Still in PlayerDetailsViewController.swift, add the following to the end of prepare(for:sender:):
if segue.identifier == "PickGame",
  let gamePickerViewController = segue.destination as? GamePickerViewController {
  gamePickerViewController.selectedGame = game
}
Note you now have two if statements checking segue.identifier. SavePlayerDetail is the unwind segue going back to the Players list, and PickGame is the show segue going forwards to the Game Picker scene. The code you added will set the selectedGame on the GamePickerViewController just before the view is loaded. Setting selectedGame will automatically update selectedGameIndex which is the index the table view cell uses to set a checkmark.
Awesome. You now have a functioning Choose Game scene!

One More Thing: Storyboard References
Open Main.storyboard and zoom out. You’ll see the complete project has several scenes.

This bird’s-eye-view of your project is nice, but you can imagine a large number of scenes could become unwieldy to navigate. In addition, multiple people working in the same storyboard file can lead to nasty merge conflicts in version control.
To mitigate these issues, you can use Storyboard References to split up an existing storyboard into one or more smaller storyboard files, separated by logical areas of functionality. Let’s see how this works by refactoring all view controllers from the Players tab into their own storyboard.
To do this, click + drag to select all view controllers starting from PlayerViewController‘s containing navigation controller to the Choose Game scene (you may need to zoom out sufficiently to do this). Alternatively, you could also use Command + click to select view controllers in the Document Outline.
Next, select Editor\Refactor to Storyboard to consolidate the selected scenes into their own storyboard.

When prompted for a filename, type “Players” and hit “Save”. You’ll see a new Players.storyboard file in your project containing all the scenes you just built. In addition, back in Main.storyboard, you’ll see the tab bar controller now points to the Players Storyboard Reference and not directly to the Players scene.

Build and run the project to confirm everything works as before. Voila! Refactoring storyboards is easy and could save you down the road – it’s a great tool to have in your toolbelt.
Where To Go From Here?
Here is the final Ratings example project with all of the code from the above tutorial.
Congratulations, you now know the basics of using the Storyboard Editor, and can create apps with multiple view controllers transitioning between each other with segues! Editing multiple view controllers and their connections to each other in one place makes it easy to visualize your app as a whole.
One item you didn’t add as part of this tutorial is the ability to change the player rating, but you now know enough about storyboards to implement this yourself for practice. :]
You’ve also seen how easy it is to customize table views and table view cells. Static cells make it easy to set up an interface without implementing all the data source methods.
If you want to learn more about storyboards, check out our book the iOS Apprentice.
If you have any questions or comments on this tutorial or on storyboards in general, please join the forum discussion below!
The post Storyboards Tutorial for iOS: Part 2 appeared first on Ray Wenderlich.