
Did Vikings have cannons in reality? I’m not entirely sure, but there’s no reason Vikings can’t have cannons in Augmented Reality! :]
At WWDC 2017, Apple announced ARKit, its foray into the world of AR development. Not to be outdone, just last week Google announced ARCore, extracted from the Tango indoor mapping project. Tango requires using particular devices that have a depth sensor, whereas ARCore will (eventually) be available on most Android devices.
The race to explore this new domain is on, with demo projects coming fast and furious. You can check out some of the ARCore demos at the AR Experiments site.
ARCore apps can be built using OpenGL, Unity, and Unreal. In this tutorial, you’ll get started by building on top of a modified version of the OpenGL sample app provided by Google, working entirely in Kotlin! And all within the comfort of Android Studio! :]
If you’re just getting started with Kotlin, please check out Kotlin For Android: An Introduction.
ARCore does not work with the Android Emulator. As of this writing, you’ll need a Samsung Galaxy S8 or Google Pixel/Pixel XL to fully follow along, ideally running Android Nougat (7.0) or later. If you don’t have either of those devices, hopefully you’ll still get a feel for working with the ARCore SDK.
Ready to explore this brave new (augmented) world? Let’s go!
Getting Started
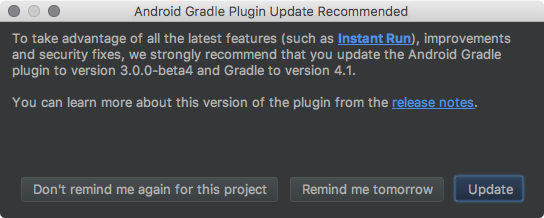
Begin by downloading the starter project here. Open up the starter project in Android Studio 3.0 Beta 4 or later.
DexArchiveMergerException in Android Studio 3.0 Beta 4.
You may also have luck if you’re using Android Studio 2.3.3 with the Kotlin plugin. :]
Next, make sure to enable developer options on your device, and enable USB debugging. Before running the starter project, you’ll also need to download and install the ARCore Service provided by Google.
The ARCore Service can be installed using the following adb command:
$ adb install -r -d arcore-preview.apk
Check out the adb documentation if you need more info.
Now you can hit Run/Run ‘app’ or hit Ctrl-R, and the starter up should be up and running.
You’ll first get prompted to provide camera permissions, and on approving, you’ll see a radio group at the top, which you’ll use later to select the type of object to insert into the scene.
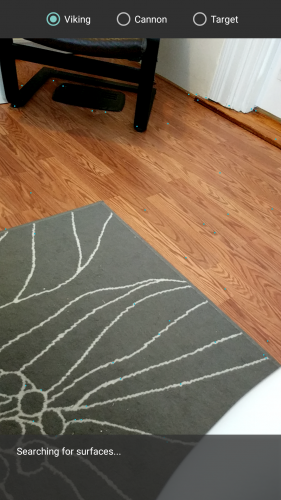
You’ll see a snackbar at the bottom indicating “Searching for surfaces…”. You may also see a few points highlighted, which are points being tracked.
Aiming the device at a flat surface, a plane will be detected:
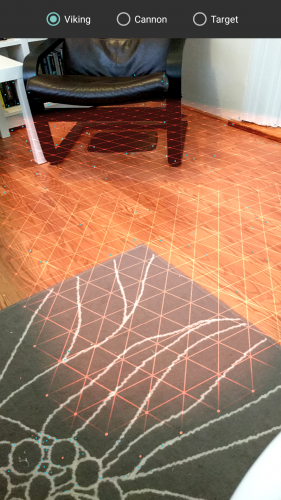
Once the first plane is detected, the snackbar disappears and the plane is highlighted on the screen. Note that light-colored planes may have trouble being detected.
At this point, the starter app doesn’t do a whole lot, but time to check out some it’s code to get your bearings! Especially before you setup a viking with a cannon!
The ARCode SDK
The starter app has the 3D models we’ll be using in the main/assets folder in the Project view of Android Studio. There are models for a viking, a cannon, and a target. The 3D model files were created in Blender using the instructions in How To Export Blender Models to OpenGL ES: Part 1/3.
Inside of res/raw, there are OpenGL shaders, all from the Google ARCore sample app.
You’ll see a package in the starter app named rendering, which contains some OpenGL renderers and utilities from the Google ARCore sample app. There’s also a class named PlaneAttachment that has been converted to Kotlin and that uses the ARCore SDK.
Planes, Anchors, and Poses
The PlaneAttachment class is constructed using a Plane and an Anchor, and can be used to construct a Pose. All three are from the ARCore SDK.
A Plane describes a real-world planar surface. An Anchor descibes a fixed location and orientation in space. A Pose describes a coordinate transformation from one system to another, from an object’s local frame to the world coordinate frame.
You can read more about each in the official documentation.
So, PlaneAttachment let’s you attach an anchor to a plane, and retrieve the corresponding pose, which is used by ARCore as you move about the anchor point.
ARCore Session
The starter app includes an ARCore Session object in MainActivity. The session describes the entire AR state, and you’ll use it to attach anchors to planes when the user taps the screen.
In setupSession(), called from onCreate(...), the starter app checks that the device supports ARCore. If not, a Toast is displayed and the activity finishes.
Assuming you have a supported device, it’s time to setup some objects to render in the scene!
Adding Objects
Open up MainActivity, and add the following properties
private val vikingObject = ObjectRenderer()
private val cannonObject = ObjectRenderer()
private val targetObject = ObjectRenderer()
Each is defined as an ObjectRenderer from the ARCore sample app.
Also, add three PlaneAttachment properties just below the objects:
private var vikingAttachment: PlaneAttachment? = null
private var cannonAttachment: PlaneAttachment? = null
private var targetAttachment: PlaneAttachment? = null
These are Kotlin nullables initialized as null, and will be created later when the user taps the screen.
You need to setup the objects, which you’ll do in onSurfaceCreated(...). Find the existing try-catch block in that function add the following try-catch above it:
// Prepare the other rendering objects.
try {
  vikingObject.createOnGlThread(this, "viking.obj", "viking.png")
  vikingObject.setMaterialProperties(0.0f, 3.5f, 1.0f, 6.0f)
  cannonObject.createOnGlThread(this, "cannon.obj", "cannon.png")
  cannonObject.setMaterialProperties(0.0f, 3.5f, 1.0f, 6.0f)
  targetObject.createOnGlThread(this, "target.obj", "target.png")
  targetObject.setMaterialProperties(0.0f, 3.5f, 1.0f, 6.0f)
} catch (e: IOException) {
  Log.e(TAG, "Failed to read obj file")
}
You’re using the 3D model files provided in the starter app to setup each of the three objects, as well as setting some material properties on each.
Attaching Anchors to the Session
Find handleTaps(...) in MainActivity. Add the following inside the innermost if statement, just above the comment before the break statement:
when (mode) {
  Mode.VIKING -> vikingAttachment = addSessionAnchorFromAttachment(vikingAttachment, hit)
  Mode.CANNON -> cannonAttachment = addSessionAnchorFromAttachment(cannonAttachment, hit)
  Mode.TARGET -> targetAttachment = addSessionAnchorFromAttachment(targetAttachment, hit)
}
The value of mode is controlled by the radio buttons at the top of the screen. Mode is a Kotlin enum class that also includes a scale factor float value for each mode. The scale factor is used to tune the size of the corresponding 3D model in the scene.
In the when statement, for each mode, you’re setting a new value for the corresponding PlaneAttachment, using the old attachment and the hit value for the tap, which is an ARCore PlaneHitResult defining the intersection of the 3D ray for the tap and a plane.
You now need to add addSessionAnchorFromAttachment(...):
private fun addSessionAnchorFromAttachment(
  previousAttachment: PlaneAttachment?, hit: PlaneHitResult): PlaneAttachment {
  previousAttachment?.let {
    session.removeAnchors(Arrays.asList(previousAttachment.anchor))
  }
  return PlaneAttachment(hit.plane, session.addAnchor(hit.hitPose))
}
If the previousAttachment is not null, you’re first removing its anchor from the session, then adding in the new anchor to the session and returning a new value for the PlaneAttachment, based on the PlaneHitResult plane and an anchor from the PlaneHitResult pose.

You’re almost ready to see your viking do some target practice! :]
Drawing the Objects
The last step you need to do is draw the objects on the screen. You’re creating plane attachments when the user taps, but now you need to draw the objects as part of the screen rendering.
Look for the onDrawFrame(...) function. Add the following calls to the bottom of the try block:
drawObject(vikingObject, vikingAttachment, Mode.VIKING.scaleFactor,
  projectionMatrix, viewMatrix, lightIntensity)
drawObject(cannonObject, cannonAttachment, Mode.CANNON.scaleFactor,
  projectionMatrix, viewMatrix, lightIntensity)
drawObject(targetObject, targetAttachment, Mode.TARGET.scaleFactor,
  projectionMatrix, viewMatrix, lightIntensity)
You’re calling the pre-existing drawObject(...) helper function, which takes the object, its corresponding attachment, its corresponding scale factor, as well as matrices and values needed for OpenGL to draw the object that are computed using these starter app helpers:
private fun computeProjectionMatrix(): FloatArray {
  val projectionMatrix = FloatArray(16)
  session.getProjectionMatrix(projectionMatrix, 0, 0.1f, 100.0f)
  return projectionMatrix
}

private fun computeViewMatrix(frame: Frame): FloatArray {
  val viewMatrix = FloatArray(16)
  frame.getViewMatrix(viewMatrix, 0)
  return viewMatrix
}

private fun computeLightIntensity(frame: Frame) = frame.lightEstimate.pixelIntensity
The projectionMatrix is calculated from the ARCore Session. The viewMatrix is calculated from the ARCore Frame, which describes the AR state at a particular point in time. The lightIntensity is also determined from the frame.
Go ahead and run the app. Select a radio button at the top to select an object mode. Then find a plane with your camera and tap to place an object. Once you’ve placed all of the objects, if you rotate your phone, you’ll see a scene like this:
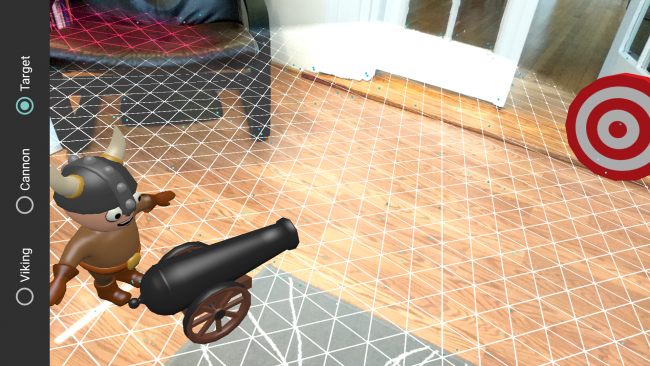
You can move around the scene and watch as your Viking prepares to fire. There’s no stopping your Viking now! :]
Where to go from here?
You’ve just scratched the surface of using ARCore with OpenGL in Android Studio. For more information, check out the ARCore API page and the ARCore Overview.
The final app for this tutorial can be downloaded here.
You can also use ARCore with Unity and ARCore with Unreal. Since a good portion of the development with ARCore will likely rely on Unity, I highly recommended you also take a look at our Unity content.
In addition to Android, ARCore targets the web, and you can find more info here. Finally, some cool demos made with ARCore (primarily with Unity) can be found at the Google experiments site.
I hope you enjoyed this brief intro to ARCore with Kotlin! Stay tuned for more! :]
The post Getting Started with ARCore with Kotlin appeared first on Ray Wenderlich.