 This is an abridged chapter from our book iOS Animations by Tutorials, which has been completely updated for Swift 4 and iOS 11. This tutorial is presented as part of our iOS 11 Launch Party — enjoy!
Whether you’re presenting the camera view controller, the address book, or one of your own custom-designed modal screens, you call the same UIKit method every time: present(_:animated:completion:). This method “gives up” the current screen to another view controller.
The default presentation animation simply slides the new view up to cover the current one. The illustration below shows a “New Contact” view controller sliding up over the list of contacts:

In this tutorial, you’ll create your own custom presentation controller animations to replace the default one and liven up this tutorial’s project.
Getting Started
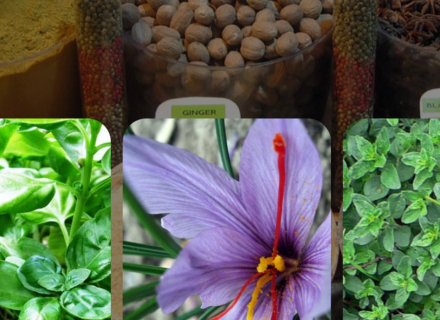
Download the starter project for this tutorial here, an app called Beginner Cook. Open the project and select Main.storyboard to begin the tour:

The first view controller (ViewController) contains the app’s title and main description as well as a scroll view at the bottom, which shows the list of available herbs.
The main view controller presents HerbDetailsViewController whenever the user taps one of the images in the list; this view controller sports a background, a title, a description and some buttons to credit the image owner.
There’s already enough code in ViewController.swift and HerbDetailsViewController.swift to support the basic application. Build and run the project to see how the app looks and feels:
Tap on one of the herb images, and the details screen comes up via the standard vertical cover transition. That might be OK for your garden-variety app, but your herbs deserve better!
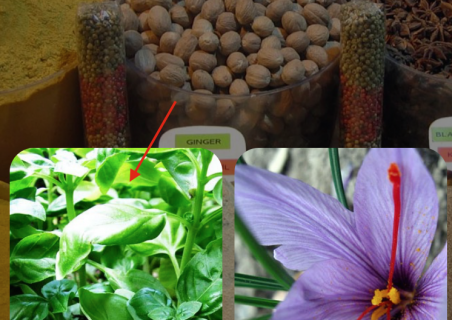
Your job is to add some custom presentation controller animations to your app to make it blossom! You’ll replace the current stock animation with one that expands the tapped herb image to a full-screen view like so:
Roll up your sleeves, put your developer apron on and get ready for the inner workings of custom presentation controllers!
Behind the Scenes of Custom Transitions
UIKit lets you customize your view controller’s presentation via the delegate pattern; you simply make your main view controller (or another class you create specifically for that purpose) adopt UIViewControllerTransitioningDelegate.
Every time you present a new view controller, UIKit asks its delegate whether or not it should use a custom transition. Here’s what the first step of the custom transitioning dance looks like:

UIKit calls animationController(forPresented:presenting:source:) to see if a UIViewControllerAnimatedTransitioning is returned. If that method returns nil, UIKit uses the built-in transition. If UIKit receives a UIViewControllerAnimatedTransitioning object instead, then UIKit uses that object as the animation controller for the transition.
There are a few more steps in the dance before UIKit can use the custom animation controller:
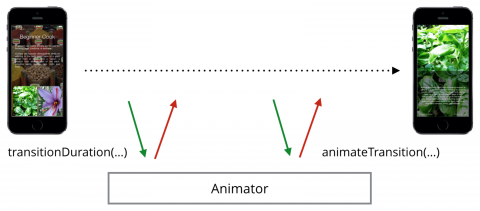
UIKit first asks your animation controller (simply known as the animator) for the transition duration in seconds, then calls animateTransition(using:) on it. This is when your custom animation gets to take center stage.
In animateTransition(using:), you have access to both the current view controller on the screen as well as the new view controller to be presented. You can fade, scale, rotate and manipulate the existing view and the new view however you like.
Now that you’ve learned a bit about how custom presentation controllers work, you can start to create your own.
Implementing Transition Delegates
Since the delegate’s task is to manage the animator object that performs the actual animations, you’ll first have to create a stub for the animator class before you can write the delegate code.
From Xcode’s main menu select File\New\File… and choose the template iOS\Source\Cocoa Touch Class.
Set the new class name to PopAnimator, make sure Swift is selected, and make it a subclass of NSObject.
Open PopAnimator.swift and update the class definition to make it conform to the UIViewControllerAnimatedTransitioning protocol as follows:
class PopAnimator: NSObject, UIViewControllerAnimatedTransitioning {

}
You’ll see some complaints from Xcode since you haven’t implemented the required delegate methods yet, so you’ll stub those out next.
Add the following method to the class:
func transitionDuration(using transitionContext: UIViewControllerContextTransitioning?) -> TimeInterval {
  return 0
}
The 0 value above is just a placeholder value for the duration; you’ll replace this later with a real value as you work through the project.
Now add the following method stub to the class:
func animateTransition(using transitionContext: UIViewControllerContextTransitioning) {

}
The above stub will hold your animation code; adding it should have cleared the remaining errors in Xcode.
Now that you have the basic animator class, you can move on to implementing the delegate methods on the view controller side.
Open ViewController.swift and add the following extension to the end of the file:
extension ViewController: UIViewControllerTransitioningDelegate {

}
This code indicates the view controller conforms to the transitioning delegate protocol. You’ll add some methods here in a moment.
Find didTapImageView(_:) in the main body of the class. Near the bottom of that method you’ll see the code that presents the details view controller. herbDetails is the instance of the new view controller; you’ll need to set its transitioning delegate to the main controller.
Add the following code right before the line where you call present(...) to present the details view controller:
// ...
herbDetails.transitioningDelegate = self // <-- Add this line
present(herbDetails, animated: true, completion: nil)
Now UIKit will ask ViewController for an animator object every time you present the details view controller on the screen. However, you still haven’t implemented any of the UIViewControllerTransitioningDelegate methods, so UIKit will still use the default transition.
The next step is to actually create your animator object and return it to UIKit when requested. Add the following new property to ViewController:
let transition = PopAnimator()
This is the instance of PopAnimator that will drive your animated view controller transitions. You only need one instance of PopAnimator since you can continue to use the same object each time you present a view controller, as the transitions are the same every time.
Now add the first delegate method to the extension in ViewController:
func animationController(forPresented presented: UIViewController, presenting: UIViewController, source: UIViewController) -> UIViewControllerAnimatedTransitioning? {
  return transition
}
This method takes a few parameters that let you make an informed decision whether or not you want to return a custom animation. In this tutorial you’ll always return your single instance of PopAnimator since you have only one presentation transition.
You’ve already added the delegate method for presenting view controllers, but how will you deal with dismissing one?
Add the following delegate method to handle this:
func animationController(forDismissed dismissed: UIViewController) -> UIViewControllerAnimatedTransitioning? {
  return nil
}
The above method does essentially the same thing as the previous one: you check which view controller was dismissed and decide whether to return nil and use the default animation, or return a custom transition animator and use that instead. At the moment you return nil, as you aren’t going to implement the dismissal animation until later.
You finally have a custom animator to take care of your custom transitions. But does it work?
Build and run your project and tap one of the herb images:
Nothing happens. Why? You have a custom animator to drive the transition, but... oh, wait, you haven’t added any code to the animator class! You’ll take care of that in the next section.
Creating your Transition Animator
Open PopAnimator.swift; this is where you’ll add the code to transition between the two view controllers.
First, add the following properties to this class:
let duration = 1.0
var presenting = true
var originFrame = CGRect.zero
You’ll use duration in several places, such as when you tell UIKit how long the transition will take and when you create the constituent animations.
You also define presenting to tell the animator class whether you are presenting or dismissing a view controller. You want to keep track of this because typically, you’ll run the animation forward to present and in reverse to dismiss.
Finally, you will use originFrame to store the original frame rect of the image the user taps — you will need that to animate from the original frame to a full screen image and vice versa. Keep an eye out for originFrame later on when you fetch the currently selected image and pass its frame to the animator instance.
Now you can move on to the UIViewControllerAnimatedTransitioning methods.
Replace the code inside transitionDuration() with the following:
return duration
Reusing the duration property lets you easily experiment with the transition animation. You can simply modify the value of the property to make the transition run faster or slower.
Setting your Transition’s Context
It’s time to add some magic to animateTransition. This method has one parameter of type UIViewControllerContextTransitioning, which gives you access to the parameters and view controllers of the transition.
Before you start working on the code itself, it’s important to understand what the animation context actually is.
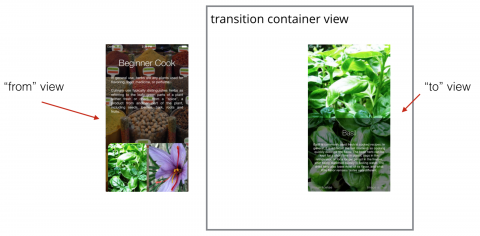
When the transition between the two view controllers begins, the existing view is added to a transition container view and the new view controller’s view is created but not yet visible, as illustrated below:
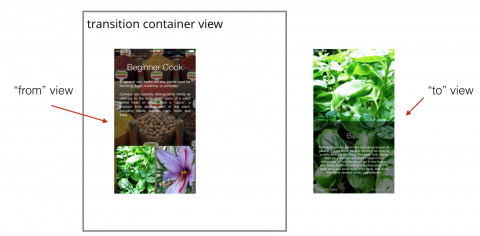
Therefore your task is to add the new view to the transition container within animateTransition(), “animate in” its appearance, and “animate out” the old view if required.
By default, the old view is removed from the transition container when the transition animation is done.
Before you get too many cooks in this kitchen, you’ll create a simple transition animation to see how it works before implementing a much cooler, albeit more complicated, transition.
Adding a Fade Transition
You’ll start with a simple fade transition to get a feel for custom transitions. Add the following code to animateTransition():
let containerView = transitionContext.containerView

let toView = transitionContext.view(forKey: .to)!
First, you get the container view where your animations will take place, and then you fetch the new view and store it in toView.
The transition context object has two very handy methods that give you access to the transition players:
-
view(forKey:): This lets you access the views of the “old” and “new” view controllers via the argumentsUITransitionContextViewKey.fromorUITransitionContextViewKey.torespectively. -
viewController(forKey:): This lets you access the “old and “new” view controllers via the argumentsUITransitionContextViewControllerKey.fromorUITransitionContextViewControllerKey.torespectively.
At this point, you have both the container view and the view to be presented. Next you need to add the view to be presented as a child to the container view and animate it in some way.
Add the following to animateTransition():
containerView.addSubview(toView)
toView.alpha = 0.0
UIView.animate(withDuration: duration,
  animations: {
    toView.alpha = 1.0
  },
  completion: { _ in
    transitionContext.completeTransition(true)
  }
)
Note that you call completeTransition() on the transition context in the animation completion block; this tells UIKit that your transition animations are done and that UIKit is free to wrap up the view controller transition.
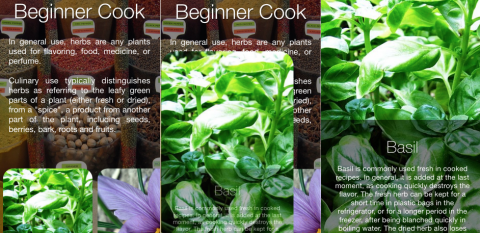
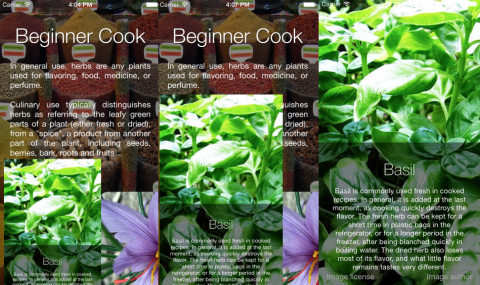
Build and run your project; tap one of the herbs in the list and you’ll see the herb overview fade in over the main view controller:

The transition is acceptable and you’ve seen what to do in animateTransition — but you’re going to add something even better!
Adding a Pop Transition
You’re going to structure the code for the new transition slightly differently, so replace all the code in animateTransition() with the following:
let containerView = transitionContext.containerView
let toView = transitionContext.view(forKey: .to)!
let herbView = presenting ? toView :
  transitionContext.view(forKey: .from)!
containerView is where your animations will live, while toView is the new view to present. If you’re presenting, herbView is just the toView; otherwise it will be fetched from the context. For both presenting and dismissing, herbView will always be the view that you animate. When you present the details controller view, it will grow to take up the entire screen. When dismissed, it will shrink to the image’s original frame.
Add the following to animateTransition():
let initialFrame = presenting ? originFrame : herbView.frame
let finalFrame = presenting ? herbView.frame : originFrame

let xScaleFactor = presenting ?

  initialFrame.width / finalFrame.width :
  finalFrame.width / initialFrame.width

let yScaleFactor = presenting ?

  initialFrame.height / finalFrame.height :
  finalFrame.height / initialFrame.height
In the code above, you detect the initial and final animation frames and then calculate the scale factor you need to apply on each axis as you animate between each view.
Now you need to carefully position the new view so it appears exactly above the tapped image; this will make it look like the tapped image expands to fill the screen.
Add the following to animateTransition():
let scaleTransform = CGAffineTransform(scaleX: xScaleFactor,
                                            y: yScaleFactor)

if presenting {
  herbView.transform = scaleTransform
  herbView.center = CGPoint(
    x: initialFrame.midX,
    y: initialFrame.midY)
  herbView.clipsToBounds = true
}
When presenting the new view, you set its scale and position so it exactly matches the size and location of the initial frame.
Now add the final bits of code to animateTransition():
containerView.addSubview(toView)
containerView.bringSubview(toFront: herbView)

UIView.animate(withDuration: duration, delay:0.0,
  usingSpringWithDamping: 0.4, initialSpringVelocity: 0.0,
  animations: {
    herbView.transform = self.presenting ?
      CGAffineTransform.identity : scaleTransform
    herbView.center = CGPoint(x: finalFrame.midX, y: finalFrame.midY)
  },
  completion: { _ in
    transitionContext.completeTransition(true)
  }
)
This will first add toView to the container. Next, you need to make sure the herbView is on top since that’s the only view you’re animating. Remember that when dismissing, toView is the original view so in the first line, you’ll be adding it on top of everything else, and your animation will be hidden away unless you bring herbView to the front.
Then, you can kick off the animations. Using a spring animation here will give it a bit of bounce.
Inside the animations expression, you change the transform and position of herbView. When presenting, you’re going from the small size at the bottom to the full screen so the target transform is just the identity transform. When dismissing, you animate it to scale down to match the original image size.
At this point, you’ve set the stage by positioning the new view controller over the tapped image, you’ve animated between the initial and final frames, and finally, you’ve called completeTransition() to hand things back to UIKit. It’s time to see your code in action!
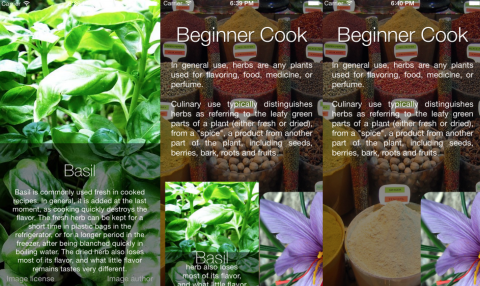
Build and run your project; tap the first herb image to see your view controller transition in action.

Well, it’s not perfect, but once you take care of a few rough edges your animation will be exactly what you wanted!
Currently your animation starts from the top-left corner; that’s because the default value of originFrame has the origin at (0, 0) – and you never set it to any other value.
Open ViewController.swift and add the following code to the top of animationController(forPresented:):
transition.originFrame =
selectedImage!.superview!.convert(selectedImage!.frame, to: nil)

transition.presenting = true
selectedImage!.isHidden = true
This sets the originFrame of the transition to the frame of selectedImage, which is the image view you last tapped. Then you set presenting to true and hide the tapped image during the animation.
Build and run your project again; tap different herbs in the list and see how your transition looks for each.

Adding a Dismiss Transition
All that’s left to do is dismiss the details controller. You’ve actually done most of the work in the animator already — the transition animation code does the logic juggling to set the proper initial and final frames, so you’re most of the way to playing the animation both forwards and backwards. Sweet!
Open ViewController.swift and replace the body of animationController(forDismissed:) with the following:
transition.presenting = false
return transition
This tells your animator object that you’re dismissing a view controller so the animation code will run in the correct direction.
Build and run the project to see the result. Tap on an herb and then tap anywhere on screen to dismiss it.
The transition animation looks great, but notice the herb you picked has disappeared from the scroll view! You’ll need to make sure the tapped image re-appears when you dismiss the details screen.
Open PopAnimator.swift and add a new closure property to the class:
var dismissCompletion: (()->Void)?
This will let you pass in some code to run when the dismiss transition completes.
Next, find animateTransition() and add the following code to the completion handler in the call to animateWithDuration(...), right before the call to completeTransition():
if !self.presenting {
  self.dismissCompletion?()
}
This code executes dismissCompletion once the dismiss animation has finished — which is the perfect spot to show the original image.
Open ViewController.swift and add the following code to viewDidLoad():
transition.dismissCompletion = {
  self.selectedImage!.isHidden = false
}
This code displays the original image to replace the herb details view controller once the transition animation completes.
Build and run your app to enjoy the transition animations both ways, now that the herbs aren’t getting lost along the way!
Device Orientation Transition
You can think of device orientation changes as a presentation transition from a view controller to itself, just at a different size.
viewWillTransition(to size:coordinator:), introduced in iOS 8, gives you a simple and straightforward way to handle device orientation changes. You don’t need to build separate portrait or landscape layouts; instead, you just need to react to the change to the view controller view’s size.
Open ViewController.swift and add the following stub for viewWillTransition(to:with:):
override func viewWillTransition(to size: CGSize, with coordinator: UIViewControllerTransitionCoordinator) {
  super.viewWillTransition(to: size, with: coordinator)

}
The first parameter (size) tells you what size your view controller is transitioning to. The second parameter (coordinator) is the transition coordinator object, which gives you access to a number of the transition’s properties.
All you need to do in this app is reduce the alpha of the app’s background image to improve the readability of the text when the device is in landscape mode.
Add the following code to viewWillTransitionToSize:
coordinator.animate(
  alongsideTransition: { context in
    self.bgImage.alpha = (size.width>size.height) ? 0.25 : 0.55
  },
  completion: nil
)
animate(alongsideTransition:) lets you specify your own custom animations to execute in parallel with the rotation animation that UIKit performs by default when you change the orientation.
Your animation closure will receive a transitioning context, just like the one you used when presenting a view controller. In this case, you don’t have “from” and “to” view controllers since they’re the same, but instead you can fetch properties such as the transition duration.
Inside the animation closure you check if the width of the target size is bigger than the height; if so, you reduce the alpha value of the background image to 0.25. This makes the background fade out when transitioning to landscape mode and fade in to 0.55 alpha when transitioning to portrait orientation.
Build and run your app; rotate the device (or press Cmd + left arrow if testing in the iPhone Simulator) to see your alpha animation in action.
You can clearly see the background dim when you rotate the screen to a landscape mode. This makes the longer lines of text easier to read.
However if you tap on a herb image you will notice that animation is somewhat messy.
This happens because the screen has a landscape orientation, but the images still have portrait dimensions. Therefore the transition between the original image and the image stretched to fill up the screen is not fluid.
Not to fear — you can use your new friend viewWillTransition(to:with:) to fix this problem too.
There is an instance method on ViewController called positionListItems() that sizes and positions the herb images. This method is called from viewDidLoad() when your app first starts.
Add a call to this method inside the animate(alongsideTransition:) animation block you added last, just after you set the alpha:
self.positionListItems()
This will animate the size and position of the herb images while the device rotates. As soon as the screen finishes re-orientating the herb images will also have resized:

And since those images will now have a landscape layout also your transition animation will work just fine. Give it a try!

Where to Go From Here?
You can download the completed project from this tutorial here.
 If you enjoyed what you learned in this tutorial, why not check out the complete iOS Animations by Tutorials book, available in our store?
Here’s a taste of what’s in the book:
Section I: View Animations: The first section of the book covers view animations in UIKit. View animations are the simplest type of animations in iOS, but still very powerful; you can easily animate almost any view element and change things such as its size, position and color.
Section II: Auto Layout: Auto Layout is becoming more common in apps, and there are some special techniques to animate views that are sized and positioned with auto layout constraints. This section provides a crash course in Auto Layout and then covers the
animation techniques that play nicely with Auto Layout.
Section III: Layer Animations: Views on iOS are backed by layers, which offer a lower-level interface to the visual content of your apps. When you need more flexibility or performance, you can use layer animations rather than view animations. In this section, you’ll learn about layers and the Core Animation API.
Section IV: View Controller Transitions: Animating views and layers is impressive, but you can dial it up to 11 and animate entire view controllers! In this section, you’ll learn the techniques for transitioning between view controllers, as well as transitioning between changes in device orientations, all in the same view controller.
Section V: 3D Animations In this section, you’ll move beyond two dimensions and learn about 3D animations and effects with CATransform3D. Although Core Animation isn’t a true 3D framework, it lets you position things in 3D-space and set perspective – which leads to some very slick and impressive effects!
Section VI: Animations with UIViewPropertyAnimator: UIViewPropertyAnimator, introduced in iOS 10, helps developers create interactive, interruptible view animations. Since all APIs in UIKit just wrap that lower level functionality, there won’t be many surprises for you when looking at UIViewPropertyAnimator. This class does make certain types of view animations a little easier to create, so it is definitely worth looking into.
Section VII: Further types of animations: There are two more animation techniques that are part of Core Animation and UIKit, but don’t really fit into Sections I and III. In this section, you’ll get an impressive snowy effect working with particle emitters, and then learn about flipbook-style frame animation with UIImageView.
And to help sweeten the deal, the digital edition of the book is on sale for $49.99! But don’t wait — this sale price is only available for a limited time.
Speaking of sweet deals, be sure to check out the great prizes we’re giving away this year with the iOS 11 Launch Party, including over $9,000 in giveaways!
To enter, simply retweet this post using the #ios11launchparty hashtag by using the button below:
We hope you enjoy this update, and stay tuned for more book releases and updates!
The post iOS Animation Tutorial: Custom View Controller Presentation Transitions appeared first on Ray Wenderlich.


