 In modern Android app development, fragments are tools commonly used when composing UI layouts. In this tutorial you will dig into the fundamental concepts of Android Fragments while creating an app that displays the Rage Comics.
an isolated or incomplete part of something
A fragment is an Android component that holds part of the behavior and/or UI of an activity. As the name would suggest, fragments are not independent entities, but are tied to a single activity.
In many ways, they have functionality similar to that of activities.
Imagine for a moment that you’re an activity. You have a lot to do, so you might employ a few minions to run around and do your laundry and taxes in exchange for lodging and food. That’s kind of like the relationship between activities and fragments.
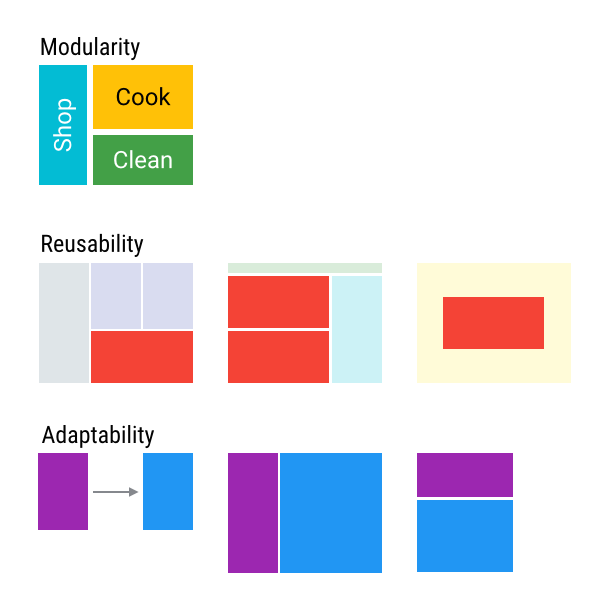
In the same way that you don’t actually need an army of little helpers to do your bidding, you don’t have to use fragments. However, if you do use them and use them well, they can provide:
- Modularity: Dividing complex activity code across fragments for better organization and maintenance.
- Reusability: Placing behavior or UI parts into fragments that can be shared across multiple activities.
- Adaptability: Representing sections of a UI as different fragments and utilizing different layouts depending on screen orientation and size.
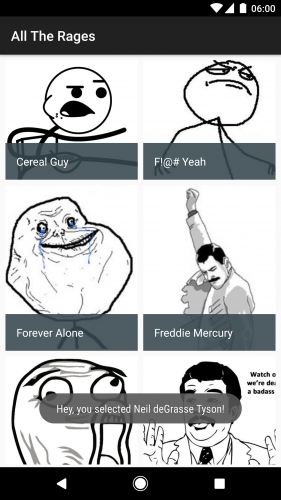
In this tutorial, you will build a mini-encyclopedia of Rage Comics. The app will display a list of Rage Comics arranged in a grid. When a Rage Comic is selected, information about it will be displayed. In this tutorial you will learn:
- How to create and add fragments to an activity.
- How to let your fragments send information to an activity.
- How to add and replace fragments by using transactions.
Note: This tutorial assumes you’re comfortable the basics of Android programming and understand what the activity lifecycle means. A few points to keep in mind:
- If you’re brand new to Android, you should work through both the Android Tutorial for Beginners and the Introduction to Activities first.
- This tutorial utilizes an Android
RecyclerView. If you’ve never usedRecyclerViewor need a refresher, you should also look at the Android RecyclerView Tutorial.
Now, lets dig in!
Getting Started With Android Fragments
Download the starter project, unzip and start Android Studio 3.0 Beta 2 or later.
In the Welcome to Android Studio dialog, select Import project (Eclipse ADT, Gradle, etc.).

Choose the top-level directory of the starter project, and click OK.

If you see a message to update the project’s Gradle plugin since you’re using a later version of Android Studio, then go ahead and choose “Update”.
Check out the project for the All the Rages app, and you’ll find some resource files; strings.xml, activity_main.xml, and drawable and layout files. There are also some boilerplate layouts for your fragments, non-fragment code that you’ll need, and a fragment class that you’ll use later to write your own.
The MainActivity will host all of your wee fragments, and RageComicListFragment contains code to display a list of the Rage Comic content so that you can focus on fragments.
Build and run the project. You’ll see that it’s pretty quiet in there.

You’ll fix that…

Android Fragment Lifecycle
Like an activity, a fragment has a lifecycle with events that occur when the fragment’s status changes. For instance, an event happens when the fragment becomes visible and active, or when the fragment becomes unused and is removed. Also like an activity, you can add code and behaviors to callbacks for these events.
Here’s a fragment lifecycle diagram from the official Android Developer documentation.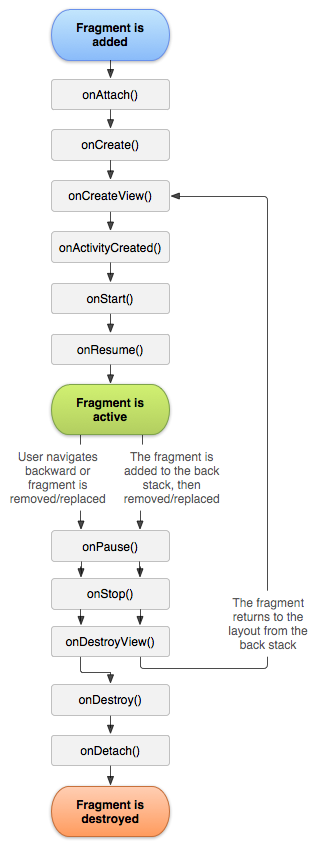

The following lifecycle events come into play when you add a fragment:
onAttach: When the fragment attaches to its host activity.onCreate: When a new fragment instance initializes, which always happens after it attaches to the host — fragments are a bit like viruses.onCreateView: When a fragment creates its portion of the view hierarchy, which is added to its activity’s view hierarchy.onActivityCreated: When the fragment’s activity has finished its ownonCreateevent.onStart: When the fragment is visible; a fragment starts only after its activity starts and often starts immediately after its activity does.onResume: When the fragment is visible and interactable; a fragment resumes only after its activity resumes and often resumes immediately after the activity does.
But wait, the fragment isn’t done! These lifecycle events happen when you remove a fragment:
onPause: When the fragment is no longer interactable; this occurs when either the fragment is about to be removed or replaced or when the fragment’s activity pauses.onStop: When the fragment is no longer visible; this occurs either after the fragment is about to be removed or replaced or when the fragment’s activity stops.onDestroyView: When the view and related resources created inonCreateVieware removed from the activity’s view hierarchy and destroyed.onDestroy: When the fragment does its final clean up.onDetach: When the fragment is detached from its activity.
As you can see, the fragment’s lifecycle is intertwined with the activity’s lifecycle. But it has extra events that are particular to the fragment’s view hierarchy, state and attachment to its activity.
The v4 Support Library
In Android, when using fragments, there are two alternative fragment implementations you can use. One type is the fragment that is provided by the platform version. A platform version corresponds to the version of Android that a user is running. For example, a device running Android 6.0 (SDK Version 23) would be running platform version 23 of the library.
The second type is a support library fragment. When you include a support library, it is added to your project in the same manner as any third-party library. This has two benefits when developing applications for multiple versions of Android.
First, it ensures that you have consistency in your code and functionality across different devices and platform versions. This means that bugs, and fixes, will be more consistent across different versions of Android using these libraries.
Second, when new features are added to the latest version of Android, the Android team will often back-port these features via the support library in order for developers to use on older versions of Android.
Which Library Should Be Used?
If you are writing an application that will be targeting multiple versions of Android on multiple devices, you should use support libraries for Fragments. You should also use the support library for any other functionality in your application when available. This is considered a best practice by most senior Android developers and the Core Android team. The only time you might want to use a platform library is if you are, in fact, doing very specialized development for an app that is only targeting one version of Android.
To put it another way: odds are that you will want to use support libraries if and when they are available. With fragments, that means you’ll want to use the v4 support library.
Creating a Fragment
Eventually, All the Rages will show a list of Rage Comics on launch, and tapping on any of the items will display details about that particular comic. To start, you’ll work backwards and first create the detail page.
Open the starter project in Android Studio and find fragment_rage_comic_details.xml under app -> res -> layout; this XML file lays out the comic detail display. It also displays one of the drawable resources and the associated string resources.

Select Android Studio’s Project tab and locate the RageComicDetailsFragment file. This class will be responsible for displaying details for a selected comic.
In RageComicDetailsFragment.kt, the code now looks like what is shown below:
import android.os.Bundle
import android.support.v4.app.Fragment
import android.view.LayoutInflater
import android.view.View
import android.view.ViewGroup

//1
class RageComicDetailsFragment : Fragment() {

  //2
  companion object {

    fun newInstance(): RageComicDetailsFragment {
      return RageComicDetailsFragment()
    }
  }

  //3
  override fun onCreateView(inflater: LayoutInflater?, container: ViewGroup?,
                            savedInstanceState: Bundle?): View? {
    return inflater?.inflate(R.layout.fragment_rage_comic_details, container, false)
  }

}
This is what this code does:
- Declares
RageComicDetailsFragmentas a subclass ofFragment. - Provides a method for creating new instances of the fragment, a factory method.
- Creates the view hierarchy controlled by the fragment.
Activities use setContentView() to specify the XML file that defines their layouts, but fragments create their view hierarchy in onCreateView(). Here you called LayoutInflater.inflate to create the hierarchy of RageComicDetailsFragment.
The third parameter of inflate specifies whether the inflated fragment should be added to the container. The container is the parent view that will hold the fragment’s view hierarchy. You should always set this to false: the FragmentManager will take care of adding the fragment to the container.
There’s a new kid in town here: FragmentManager. Each activity has a FragmentManager that manages its fragments. It also provides an interface for you to access, add and remove those fragments.
You’ll notice that while RageComicDetailsFragment has a factory instance method, newInstance(), it does not have any constructors.
Wait, why do you need a factory method but not a constructor?
First, because you did not define any constructors, the compiler automatically generates an empty, default constructor that takes no arguments. This is all that you should have for a fragment: no other constructors.
Second, you probably know that Android may destroy and later re-create an activity and all its associated fragments when the app goes into the background. When the activity comes back, its FragmentManager starts re-creating fragments by using the empty default constructor. If it cannot find one, you get an exception.
For this reason, it is best practice to never specify any non-empty constructors, and in fact, the easiest thing to do is to specify none as you just did.
What if you need to pass information or data to a Fragment? Hang on, you’ll get the answer to that later!
Adding a Fragment
Here’s where you get to add a fragment using the simplest approach — adding it to the activity’s XML layout.
To do this, open activity_main.xml, select the Text tab and add the following inside of the root FrameLayout:
<fragment
  android:id="@+id/details_fragment"
  class="com.raywenderlich.alltherages.RageComicDetailsFragment"
  android:layout_width="match_parent"
  android:layout_height="match_parent"/>
In this step, you’re placing a <fragment> tag inside of the activity layout and specifying the type of fragment the class attribute should inflate. The view ID of the <fragment> is required by the FragmentManager.
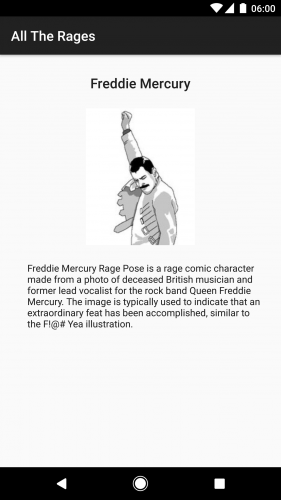
Build and run. You will see the fragment:
Adding a Fragment Dynamically
First, open activity_main.xml again and remove the <fragment> you just inserted. (Embrace the Zen of deleting code!) You’ll replace it with the list of Rage Comics.

Open RageComicListFragment.kt, which has all the list code. You can see that the RageComicListFragment has no explicit constructors and a newInstance().
The list code in RageComicListFragment depends on some resources. You have to ensure that the fragment has a valid reference to a Context for accessing those resources. That’s where onAttach() comes into play.
Open RageComicListFragment.kt, and add these imports directly below the existing imports:
import android.os.Bundle
import android.support.v7.widget.GridLayoutManager
The GridLayoutManager, helps in positioning items in the Rage Comic list. The other import is for standard fragment overrides.
Inside of RageComicListFragment.kt, add the following two methods above the definition of the RageComicAdapter:
  override fun onAttach(context: Context?) {
    super.onAttach(context)

    // Get rage face names and descriptions.
    val resources = context!!.resources
    names = resources.getStringArray(R.array.names)
    descriptions = resources.getStringArray(R.array.descriptions)
    urls = resources.getStringArray(R.array.urls)

    // Get rage face images.
    val typedArray = resources.obtainTypedArray(R.array.images)
    val imageCount = names.size
    imageResIds = IntArray(imageCount)
    for (i in 0..imageCount - 1) {
      imageResIds[i] = typedArray.getResourceId(i, 0)
    }
    typedArray.recycle()
  }

  override fun onCreateView(inflater: LayoutInflater?, container: ViewGroup?,
                            savedInstanceState: Bundle?): View? {

    val view: View = inflater!!.inflate(R.layout.fragment_rage_comic_list, container,
        false)
    val activity = activity
    val recyclerView = view.findViewById<RecyclerView>(R.id.recycler_view) as RecyclerView
    recyclerView.layoutManager = GridLayoutManager(activity, 2)
    recyclerView.adapter = RageComicAdapter(activity)
    return view
  }
onAttach() contains code that accesses the resources you need via the Context to which the fragment is attached. Because the code is in onAttach(), you can rest assured that the fragment has a valid Context.
In onCreateView(), you inflate the view hierarchy of RageComicListFragment, which contains a RecyclerView, and perform some setup.
If you have to inspect a fragment’s view, onCreateView() is a good place to start because it is where the view is generated.
Next open MainActivity.kt and replace onCreate() with the following:
 override fun onCreate(savedInstanceState: Bundle?) {
    super.onCreate(savedInstanceState)
    setContentView(R.layout.activity_main)

    if (savedInstanceState == null) {
      supportFragmentManager
              .beginTransaction()
              .add(R.id.root_layout, RageComicListFragment.newInstance(), "rageComicList")
              .commit()
    }
  }
At this point, you get RageComicListFragment into MainActivity. You ask your new friend, FragmentManager, to add it.
First, you grab the FragmentManager by referencing supportFragmentManager, as opposed to fragmentManager since you are using support fragments.
Then, you ask that FragmentManager to start a new transaction by calling beginTransaction() — you probably figured that out yourself. Next, you specify the add operation that you want by calling add and passing in:
-
The view ID of a container for the fragment’s view hierarchy in the activity’s layout. If you take a look at
activity_main.xml, you’ll find@+id/root_layout. - The fragment instance to be added.
-
A string that acts as a tag/identifier for the fragment instance. This allows the
FragmentManagerto later retrieve the fragment for you.
Finally, you ask the FragmentManager to execute the transaction by calling commit().
And with that, the fragment is added!
Build, run and you’ll see a Rage-filled list once the app launches:

FragmentManager helped achieve this awesomeness through FragmentTransactions, which are basically fragment operations such as add, remove, etc.
In the code above, an if block contains the code that displays the fragment and checks that the activity doesn’t have saved state. When an activity is saved, all of its active fragments are also saved. If you don’t perform this check, this could happen:
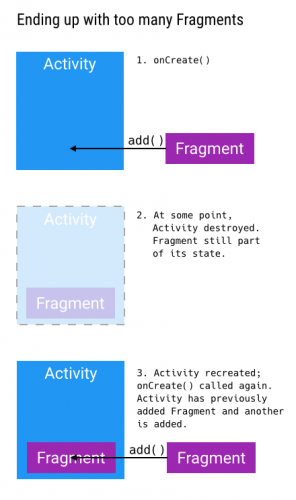
And you may feel like this:

The lesson: Always keep in mind how the saved state affects your fragments.
Data Binding
While poking around the project you may have noticed a few things:
- A file called
DataBindingAdapters. - A reference to
dataBindingin the app modulebuild.gradle:dataBinding { enabled = true } - A data section in the
recycler_item_rage_comic.xmllayout file.<layout xmlns:android="http://schemas.android.com/apk/res/android"> <data> <variable name="comic" type="com.raywenderlich.alltherages.Comic" /> </data> ... </layout> - A
Comicdata class.
If you haven’t used data binding before you may be like…

Let’s take a quick walkthrough.
Normally, if you want to set the value of properties in your layout, you’d use something like the following in your fragments and activities:
programmer.name = "a purr programmer"
view.findViewById<TextView>(R.id.name).setText(programmer.name)
The problem with that is that if you change the value of name for programmer, you would need to do a subsequent setText to the TextView in order to update the item. Imagine having a tool where you could bind a variable from your fragments and activities to your view and allow for changes to the variable to automatically update in the View. That is what data binding does for you.
Looking at our All The Rages app, the enabled=true in the build.gradle enables data binding in the application. Your data class contains data that we want to use in our fragment and display in our view. The data field contains variables consisting of name and type options that specify the type and name of the variable being bound. This data is used in the view using {@} notation. For example, the following would set a text field to the value held by the name field of the comic variable:
tools:text="@{comic.name}"
Now that you have your view set up, you need to access your view and bind the variables to it. This is where the data binding magic comes in! Whenever a view has a data field, the framework automatically generates a binding object. The name of the object is derived by converting the snake case name of the view into camel case and adding binding to the name. For example, a view called recycler_item_rage_comic.xml would have a corresponding binding called RecyclerItemRageComicBinding.
override fun onCreateViewHolder(viewGroup: ViewGroup, viewType: Int): ViewHolder {
  //1
  val recyclerItemRageComicBinding = RecyclerItemRageComicBinding.inflate(layoutInflater,
    viewGroup, false)
  //2
  val comic = Comic(imageRmesIds[position], names[position], descriptions[position],
    urls[position])
  recyclerItemRageComicBinding.comic = comic
You can then inflate the view via the inflater method on the binding object and set properties via standard property access mechanisms.
Data binding follows a Model-View-ViewModel (MVVM) pattern. MVVM consists of three components:
- A View: The layout file.
- A Model: The data class
- A View Model/Binder: The auto-generated binding files.
For further reading on the MVVM, and other design patterns, refer to the tutorial: Common Design Patterns for Android. You’ll see more on data biding later on.
Communicating with the Activity
Even though fragments are attached to an activity, they don’t necessarily all talk to one another without some further “encouragement” from you.
For All the Rages, you’ll need RageComicListFragment to let MainActivity know when the user has made a selection so that RageComicDetailsFragment can display the selection.
To start, open RageComicListFragment.kt and add the following Kotlin interface at the bottom of the class:
interface OnRageComicSelected {
  fun onRageComicSelected(comic: Comic)
}
This defines a listener interface for the activity to listen to the fragment. The activity will implement this interface, and the fragment will invoke the onRageComicSelected() when an item is selected, passing the selection to the activity.
Add this new field below the existing ones in RageComicListFragment:
private lateinit var listener: OnRageComicSelected
This field is a reference to the fragment’s listener, which will be the activity.
In onAttach(), add the following just below super.onAttach(context):
if (context is OnRageComicSelected) {
  listener = context
} else {
  throw ClassCastException(context.toString() + " must implement OnRageComicSelected.")
}
This initializes the listener reference. You wait until onAttach() to ensure that the fragment actually attached itself. Then you verify that the activity implements the OnRageComicSelected interface via instanceof.
If it doesn’t, it throws an exception, since you can’t proceed. If it does, you then set the activity as the listener for RageComicListFragment.
In the onBindViewHolder() method in RageComicAdapter, add this code to the bottom. (Okay, I lied a little; the RageComicAdapter doesn’t have everything you need!)
viewHolder.itemView.setOnClickListener { listener.onRageComicSelected(comic) }
This adds a View.OnClickListener to each Rage Comic so that it invokes the callback on the listener (the activity) to pass along the selection.
Open MainActivity.kt and update the class definition to following:
class MainActivity : AppCompatActivity(), RageComicListFragment.OnRageComicSelected {
You will get an error asking you to make MainActivity abstract or implement the abstract method OnRageComicSelected(comic: Comic). Don’t fret just yet, you’ll resolve it soon.
This code specifies that MainActivity is an implementation of the OnRageComicSelected interface.
For now, you’ll just show a toast to verify that the code works. Add the following import below the existing imports so that you can use toasts:
import android.widget.Toast
Then add the following method below onCreate():
override fun onRageComicSelected(comic: Comic) {
  Toast.makeText(this, "Hey, you selected " + comic.name + "!",
      Toast.LENGTH_SHORT).show()
}
The error is gone! Build and run. Once the app launches, click one of the Rage Comics. You should see a toast message naming the clicked item:
Now you’ve got the activity and its fragments talking. You’re like a master digital diplomat!
Fragment Arguments and Transactions
Currently, RageComicDetailsFragment displays a static Drawable and set of Strings, but let’s say you want it to display the user’s selection.
First, replace the entire view in fragment_rage_comic_details.xml with:
<layout xmlns:android="http://schemas.android.com/apk/res/android">

    <data>

        <variable
            name="comic"
            type="com.raywenderlich.alltherages.Comic" />
    </data>

    <ScrollView xmlns:tools="http://schemas.android.com/tools"
        android:layout_width="match_parent"
        android:layout_height="match_parent"
        android:fillViewport="true"
        tools:ignore="RtlHardcoded">

        <LinearLayout
            android:layout_width="match_parent"
            android:layout_height="wrap_content"
            android:gravity="center"
            android:orientation="vertical">

            <TextView
                android:id="@+id/name"
                style="@style/TextAppearance.AppCompat.Title"
                android:layout_width="wrap_content"
                android:layout_height="wrap_content"
                android:layout_marginBottom="0dp"
                android:layout_marginTop="@dimen/rage_comic_name_margin_top"
                android:text="@{comic.name}" />

            <ImageView
                android:id="@+id/comic_image"
                android:layout_width="wrap_content"
                android:layout_height="@dimen/rage_comic_image_size"
                android:layout_marginBottom="@dimen/rage_comic_image_margin_vertical"
                android:layout_marginTop="@dimen/rage_comic_image_margin_vertical"
                android:adjustViewBounds="true"
                android:contentDescription="@null"
                android:scaleType="centerCrop"
                imageResource="@{comic.imageResId}" />

            <TextView
                android:id="@+id/description"
                style="@style/TextAppearance.AppCompat.Body1"
                android:layout_width="match_parent"
                android:layout_height="match_parent"
                android:layout_marginBottom="@dimen/rage_comic_description_margin_bottom"
                android:layout_marginLeft="@dimen/rage_comic_description_margin_left"
                android:layout_marginRight="@dimen/rage_comic_description_margin_right"
                android:layout_marginTop="0dp"
                android:autoLink="web"
                android:text="@{comic.text}" />

        </LinearLayout>

    </ScrollView>
</layout>
At the top you’ll see that we’ve added a variable for our Comic. The text for name and description is bound to the variables of the same name in the Comic object.
Binding Adapters
On the ImageView for the comic image you’ll notice the following tag:
imageResource="@{comic.imageResId}"
This corresponds to a binding adapter that we’ve created in the DataBindingAdapters.kt file.
  @BindingAdapter("android:src")
  fun setImageResoruce(imageView: ImageView, resource: Int) {
    imageView.setImageResource(resource)
  }
A binding adapter allows us to perform actions on an element which are not supported by default data binding. In your case you are storing a resource integer for the image to be displayed, but data binding does not provide a default way to display an image from an ID. To fix that, you have a BindingAdapter that takes a reference to the object that it was invoked from, along with a parameter. It uses that to call setImageResource on the imageView that displays the image for the comic.
Now that your view is set up, add the following import to the top of RageComicDetailsFragment.kt:
import java.io.Serializable
Replace newInstance() with the code shown below:
private const val COMIC = "comic"

fun newInstance(comic: Comic): RageComicDetailsFragment {
  val args = Bundle()
  args.putSerializable(COMIC, comic as Serializable)
  val fragment = RageComicDetailsFragment()
  fragment.arguments = args
  return fragment
}
A fragment can take initialization parameters through its arguments, which you access via the arguments property. The arguments are actually a Bundle that stores them as key-value pairs, just like the Bundle in Activity.onSaveInstanceState.
You create and populate the arguments’ Bundle, set the arguments, and when you need the values later, you reference arguments property to retrieve them.
As you learned earlier, when a fragment is re-created, the default empty constructor is used — no parameters for you.
Because the fragment can recall initial parameters from its persisted arguments, you can utilize them in the re-creation. The above code also stores information about the selected Rage Comic in the RageComicDetailsFragment arguments.
Add the following import to the top of RageComicDetailsFragment.kt:
import com.raywenderlich.alltherages.databinding.FragmentRageComicDetailsBinding
Now, replace the contents of onCreateView() with the following:
val fragmentRageComicDetailsBinding = FragmentRageComicDetailsBinding.inflate(inflater!!,
    container, false)

val comic = arguments.getSerializable(COMIC) as Comic
fragmentRageComicDetailsBinding.comic = comic
comic.text = String.format(getString(R.string.description_format), comic.description, comic.url)
return fragmentRageComicDetailsBinding.root
Since you want to dynamically populate the UI of the RageComicDetailsFragment with the selection, you grab the reference to the FragmentRageComicDetailsBinding in the fragment view in onCreateView. Next, you bind the view comic with the Comic that you’ve passed to RageComicDetailsFragment.
Finally, you need to create and display a RageComicDetailsFragment when a user clicks an item, instead of just showing a toast. Open MainActivity and replace the logic inside onRageComicSelected with:
val detailsFragment =
    RageComicDetailsFragment.newInstance(comic)
supportFragmentManager.beginTransaction()
    .replace(R.id.root_layout, detailsFragment, "rageComicDetails")
    .addToBackStack(null)
    .commit()
You’ll find that this code is similar to your first transaction which added the list to MainActivity, but there are also some notable differences.
- You create a fragment instance that included some nifty parameters.
- You call
replace(), instead ofadd, which removes the fragment currently in the container and then adds the new Fragment. - You call another new friend: the
addToBackStack()ofFragmentTransaction. Fragments have a back stack, or history, just like Activities.
The fragment back stack is not independent of the activity back stack. Think of it as an extra stack of history on top of that of the host activity.

When you navigate between activities, each one gets placed on the activity back stack. Whenever you commit a FragmentTransaction, you have the option to add that transaction to the back stack.
So, what does addToBackStack() do? It adds the replace() to the back stack so that when the user hits the device’s back button it undoes the transaction. In this case, hitting the back button sends the user back to the full list.
The add() transaction for the list omits calling addToBackStack(). This means that the transaction is part of the same history entry as the entire activity. If the user hits the back button from the list, it backs the user out of the app.
Now, build and run and you should see details about each Rage when you tap on them:
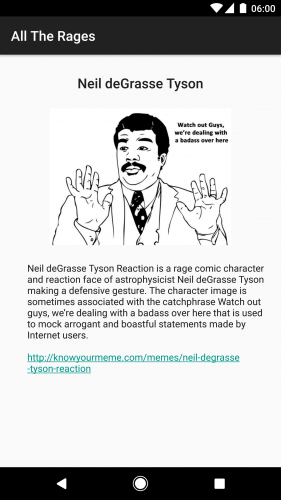
With that your done! You now have a All The Rages app that displays details about the comics.
Where To Go From Here?
You can download the final project here.
There is a lot more to learn and do with fragments. Like any kind of tool or feature, consider whether fragments fit your app’s needs, and if they do, try to follow best practices and conventions.
To take your skills to the next level, here are some additional things to explore:
- Using fragments within a
ViewPager. Many apps, including the Play Store, utilize a swipeable, tabbed content structure viaViewPagers. - Using a more powerful, advantageous
DialogFragmentinstead of a plain vanilla dialog orAlertDialog. - Playing with how fragments interact with other parts of an Activity, like the app bar.
- Creating adaptive UIs with fragments. In fact, you should run through Adaptive UI in Android Tutorial.
- Using fragments as part of the implementation of a high-level behavioral architecture. You can take a look at Common Design Patterns for Android as a good starting point to get the architecture ball rolling.
We hope that you’ve enjoyed this Introduction to Android Fragments tutorial, and if you have any questions or comments, please join the forum discussion below!
The post Android Fragments Tutorial: An Introduction with Kotlin appeared first on Ray Wenderlich.