Let’s get geofencing!
Geofencing notifies your app when its device enters or leaves geographical regions you set up. It lets you make cool apps that can trigger a notification whenever you leave home, or greet users with the latest and greatest deals whenever favorite shops are nearby. In this geofencing tutorial, you’ll learn how to use region monitoring in iOS with Swift – using the Region Monitoring API from Core Location.
In particular, you’ll create a location-based reminder app called Geotify that will let the user create reminders and associate them with real-world locations. Time to get started!
Getting Started
Use the Download Materials at the top or bottom of this tutorial to download the starter project. It provides a simple user interface for adding/removing annotation items to/from a map view. Each annotation item represents a reminder with a location, or as I like to call it, a geotification. :]
Build and run the project, and you’ll see an empty map view.

Tap the + button on the navigation bar to add a new geotification. The app will present a separate view, allowing you to set up various properties for your geotification.
For this tutorial, you will add a pin on Apple’s new headquarters in Cupertino. If you don’t know where it is, open this Google map and use it to hunt the right spot. Be sure to zoom in to make the pin nice and accurate!

The Radius represents the distance in meters from the specified location, at which iOS will trigger the notification. The Note can be any message you wish to display during the notification. The app also lets the user specify whether it should trigger the reminder upon either entry or exit of the defined circular geofence, via the segmented control at the top.
Enter 1000 for the radius value and Say Hi to Tim! for the note, and leave it as Upon Entry for your first geotification.
Click Add once you’re satisfied with all the values. You’ll see your geotification appear as a new annotation pin on the map view, with a circle around it denoting the defined geofence:

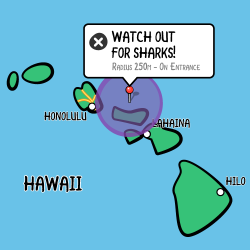
Tap the pin and you’ll reveal the geotification’s details, such as the reminder note and the event type you specified earlier. Don’t tap the little cross unless you want to delete the geotification!
Feel free to add or remove as many geotifications as you want. Since the app uses UserDefaults as a persistence store, the list of geotifications will persist between relaunches.
Setting Up Core Location and Permissions
At this point, any geotifications you’ve added to the map view are only for visualization. You’ll fix this by taking each geotification and registering its associated geofence with Core Location for monitoring.
Before any geofence monitoring can happen, though, you need to set up a CLLocationManager instance and request the appropriate permissions.
Open GeotificationsViewController.swift and declare a constant instance of a CLLocationManager. Add the following after var geotifications: [Geotification] = []:
let locationManager = CLLocationManager()
Next, replace viewDidLoad() with the following code:
override func viewDidLoad() {
  super.viewDidLoad()
  // 1
  locationManager.delegate = self
  // 2
  locationManager.requestAlwaysAuthorization()
  // 3
  loadAllGeotifications()
}
Here’s an overview of this method step by step:
- You set the view controller as the delegate of the
locationManagerinstance so that the view controller receives the relevant delegate method calls. - You call
requestAlwaysAuthorization(), which displays a prompt to the user requesting authorization to use location services Always. Apps with geofencing capabilities require Always authorization since they must monitor geofences even when the app isn’t running. Info.plist already contains the message to show the user under the key NSLocationAlwaysAndWhenInUseUsageDescription. Since iOS 11, all apps that request Always also allow the user to select When In Use. Info.plist also contains a message for NSLocationWhenInUseUsageDescription. It’s important to explain to your users as simply as possible why they need to have Always selected. - You call
loadAllGeotifications(), which deserializes the list of geotifications previously saved toUserDefaultsand loads them into the localgeotificationsarray. The method also adds the geotifications as annotations on the map view.
When the app prompts the user for authorization, it will show NSLocationAlwaysAndWhenInUseUsageDescription, a user-friendly explanation of why the app requires access to the user’s location. This key is mandatory when you request authorization for location services. If it’s missing, the system will ignore the request and prevent location services from starting altogether.
Build and run the project; you’ll see a user prompt with the aforementioned description that’s been set:

You’ve set up your app to request the required permission. Great! Click or tap Allow to ensure the location manager will receive delegate callbacks at the appropriate times.
Before you proceed to implement the geofencing, there’s a small issue you have to resolve: the user’s current location isn’t showing up on the map view! By default, the map view disables this feature and, as a result, the zoom button on the top-left of the navigation bar doesn’t work.
Fortunately, the fix is not difficult — you’ll simply enable the current location only after the user authorizes the app.
In GeotificationsViewController.swift, add the following delegate method to the CLLocationManagerDelegate extension:
func locationManager(_ manager: CLLocationManager, didChangeAuthorization status: CLAuthorizationStatus) {
  mapView.showsUserLocation = (status == .authorizedAlways)
}
The location manager calls locationManager(_:didChangeAuthorizationStatus:) whenever the authorization status changes. If the user has already granted the app permission to use Location Services, the location manager calls this method after you’ve initialized the location manager and set its delegate.
That makes this method an ideal place to check for app authorization. If it is, you enable the map view to show the user’s current location.
Build and run the app. If you’re running it on a device, you’ll see the location marker appear on the main map view. If you’re running on the simulator, click Debug ▸ Location ▸ Apple in the menu to see the location marker:

In addition, the zoom button on the navigation bar now works. :]

Registering Your Geofences
With the location manager properly configured, you must now allow your app to register user geofences for monitoring.
Your app stores the user geofence information within your custom Geotification model. However, to monitor geofences, Core Location requires you to represent each one as a CLCircularRegion instance. To handle this requirement, you’ll create a helper method that returns a CLCircularRegion from a given Geotification object.
Open GeotificationsViewController.swift and add the following method to the main body:
func region(with geotification: Geotification) -> CLCircularRegion {
  // 1
  let region = CLCircularRegion(center: geotification.coordinate,
    radius: geotification.radius,
    identifier: geotification.identifier)
  // 2
  region.notifyOnEntry = (geotification.eventType == .onEntry)
  region.notifyOnExit = !region.notifyOnEntry
  return region
}
Here’s what the above method does:
- You initialize a
CLCircularRegionwith the location of the geofence, the radius of the geofence and an identifier that allows iOS to distinguish between the registered geofences of a given app. The initialization is rather straightforward as theGeotificationmodel already contains the required properties. CLCircularRegionalso has two boolean properties:notifyOnEntryandnotifyOnExit. These flags specify whether to trigger geofence events when the device enters or leaves the defined geofence, respectively. Since you’re designing your app to allow only one notification type per geofence, you set one of the flags totrueand the other tofalsebased on theeventTypevalue stored in theGeotificationobject.
Next, you need a method to start monitoring a given geotification whenever the user adds one.
Add the following method to the body of GeotificationsViewController:
func startMonitoring(geotification: Geotification) {
  // 1
  if !CLLocationManager.isMonitoringAvailable(for: CLCircularRegion.self) {
    showAlert(withTitle:"Error", message: "Geofencing is not supported on this device!")
    return
  }
  // 2
  if CLLocationManager.authorizationStatus() != .authorizedAlways {
    let message = """
      Your geotification is saved but will only be activated once you grant
      Geotify permission to access the device location.
      """
    showAlert(withTitle:"Warning", message: message)
  }
  // 3
  let fenceRegion = region(with: geotification)
  // 4
  locationManager.startMonitoring(for: fenceRegion)
}
Here’s an overview of this method step by step:
isMonitoringAvailableForClass(_:)determines if the device has the required hardware to support the monitoring of geofences. If monitoring is unavailable, you bail out entirely and alert the user accordingly.showAlert(withTitle:message:)is a helper function in Utilities.swift that takes a title and message and displays an alert view.- Next, you check the authorization status to ensure the user has granted the app the required permission to use Location Services. If the user hasn’t granted permission, the app won’t receive any geofence-related notifications. However, in this case, you’ll still allow the user to save the geofence, since Core Location doesn’t require permission to register geofences. When the user subsequently grants authorization to the app, monitoring for those geofences will begin automatically.
- You create a
CLCircularRegioninstance from the given geotification using the helper method you defined earlier. - Finally, you register the
CLCircularRegioninstance with Core Location for monitoring via theCLLocationManager.
With your start method done, you also need a method to stop monitoring a given geotification when the user removes it from the app.
In GeotificationsViewController.swift, add the following method below startMonitoring(geotificiation:):
func stopMonitoring(geotification: Geotification) {
  for region in locationManager.monitoredRegions {
    guard let circularRegion = region as? CLCircularRegion,
      circularRegion.identifier == geotification.identifier else { continue }
    locationManager.stopMonitoring(for: circularRegion)
  }
}
The method simply instructs the locationManager to stop monitoring the CLCircularRegion associated with the given geotification.
Now that you have both the start and stop methods complete, you’ll use them whenever you add or remove a geotification. You’ll begin with the adding part.
First, take a look at addGeotificationViewController(_:didAddCoordinate:radius:identifier:note:eventType:) in GeotificationsViewController.swift.
This is the delegate method invoked by AddGeotificationViewController upon creating a geotification. It’s responsible for creating a new Geotification object and updating both the map view and the geotifications list accordingly. Finally, it calls saveAllGeotifications(), which takes the newly-updated geotifications list and persists it via UserDefaults.
Now, replace addGeotificationViewController(_:didAddCoordinate:radius:identifier:note:eventType:) with the following:
func addGeotificationViewController(
  _ controller: AddGeotificationViewController, didAddCoordinate coordinate: CLLocationCoordinate2D,
  radius: Double, identifier: String, note: String, eventType: Geotification.EventType
) {
  controller.dismiss(animated: true, completion: nil)
  // 1
  let clampedRadius = min(radius, locationManager.maximumRegionMonitoringDistance)
  let geotification = Geotification(coordinate: coordinate, radius: clampedRadius,
    identifier: identifier, note: note, eventType: eventType)
  add(geotification)
  // 2
  startMonitoring(geotification: geotification)
  saveAllGeotifications()
}
You’ve made two key changes to the code:
- You ensure the value of the radius doesn’t exceed the
maximumRegionMonitoringDistanceproperty oflocationManager, which defines the largest radius, in meters, for a geofence. This is important as any value that exceeds this maximum will cause monitoring to fail. - You add a call to
startMonitoring(geotification:)to register the newly-added geotification with Core Location for monitoring.
At this point, the app is fully capable of registering new geofences for monitoring. There is, however, a limitation: As geofences are a shared system resource, Core Location restricts the number of registered geofences to a maximum of 20 per app.
While there are workarounds to this limitation (See Where to Go From Here? at the bottom of this tutorial for a short discussion), for the purposes of this tutorial, you’ll take the approach of limiting the number of geotifications the user can add.
Add the following to the end of updateGeotificationsCount():
navigationItem.rightBarButtonItem?.isEnabled = (geotifications.count < 20)
This line disables the Add button in the navigation bar whenever the app reaches the limit.
Finally, you need to deal with the removal of geotifications. This functionality is handled in mapView(_:annotationView:calloutAccessoryControlTapped:), which is invoked whenever the user taps the "delete" accessory control on an annotation.
In mapView(_:annotationView:calloutAccessoryControlTapped:), before remove(geotification), add the following:
stopMonitoring(geotification: geotification)
This stops monitoring the geofence associated with the geotification, before removing it and saving the changes to UserDefaults.
At this point, your app is fully capable of monitoring and un-monitoring user geofences. Hurray!
Build and run the project. You won't see any changes, but the app will now be able to register geofence regions for monitoring. However, it won't be able to react to any geofence events just yet. Not to worry — that will be your next order of business!
Reacting to Geofence Events
You'll start by implementing some of the delegate methods to facilitate error handling. These are important to add in case anything goes wrong.
In GeotificationsViewController.swift, add the following methods to the CLLocationManagerDelegate extension:
func locationManager(_ manager: CLLocationManager, monitoringDidFailFor region: CLRegion?,
                     withError error: Error) {
  print("Monitoring failed for region with identifier: \(region!.identifier)")
}

func locationManager(_ manager: CLLocationManager, didFailWithError error: Error) {
  print("Location Manager failed with the following error: \(error)")
}
These delegate methods simply log any errors the location manager encounters to facilitate your debugging.
Note: You’ll definitely want to handle these errors more robustly in your production apps. For example, instead of failing silently, you could inform the user what went wrong.
Next, open AppDelegate.swift; this is where you'll add code to properly listen for and react to geofence entry and exit events.
Add the following line at the top of the file to import the CoreLocation framework:
import CoreLocation
Add a new property below var window: UIWindow?:
let locationManager = CLLocationManager()
Replace application(_:didFinishLaunchingWithOptions:) with the following implementation:
func application(
  _ application: UIApplication,
  didFinishLaunchingWithOptions launchOptions: [UIApplicationLaunchOptionsKey : Any]? = nil
) -> Bool {
  locationManager.delegate = self
  locationManager.requestAlwaysAuthorization()
  return true
}
You’ve set up your AppDelegate to receive geofence-related events. Ignore the error Xcode will show here; you'll fix it shortly. But you might wonder, “Why did I designate the AppDelegate to do this instead of the view controller?”
iOS monitors the geofences registered by an app at all times, including when the app isn’t running. If the device triggers a geofence event while the app isn’t running, iOS automatically relaunches the app directly into the background. This makes AppDelegate an ideal entry point to handle the event as the view controller may not be loaded or ready.
Now you might also wonder, “How will a newly-created CLLocationManager instance know about the monitored geofences?”
It turns out that all geofences registered by your app for monitoring are conveniently accessible by all location managers in your app, so it doesn't matter where you initialize the location managers. Pretty nifty, right? :]
Now all that’s left is to implement the relevant delegate methods to react to the geofence events. Before you do so, you'll create a method to handle a geofence event.
Add the following method to AppDelegate.swift:
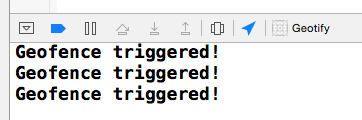
func handleEvent(for region: CLRegion!) {
  print("Geofence triggered!")
}
At this point, the method takes in a CLRegion and simply logs a statement. Not to worry — you'll implement the event handling later.
Next, add the following extension at the bottom of AppDelegate.swift:
extension AppDelegate: CLLocationManagerDelegate {
  func locationManager(_ manager: CLLocationManager, didEnterRegion region: CLRegion) {
    if region is CLCircularRegion {
      handleEvent(for: region)
    }
  }

  func locationManager(_ manager: CLLocationManager, didExitRegion region: CLRegion) {
    if region is CLCircularRegion {
      handleEvent(for: region)
    }
  }
}
As the method names aptly suggest, you receive locationManager(_:didEnterRegion:) when the device enters a CLRegion and locationManager(_:didExitRegion:) when the device exits a CLRegion.
Both methods receive the CLRegion in question. You need to check to ensure it's a CLCircularRegion, since it could be a CLBeaconRegion if your app happens to be monitoring iBeacons, too. If the region is indeed a CLCircularRegion, you call handleEvent(for:).
requestStateForRegion(_:).Now that your app is able to receive geofence events, you're ready to give it a proper test run. If that doesn’t excite you, it really ought to, because for the first time in this tutorial, you’re going to see some results. :]
The most accurate way to test your app is to deploy it on your device, add some geotifications and take the app for a walk or a drive. However, it wouldn't be wise to do so right now, as you wouldn't be able to verify the print logs emitted by the geofence events with the device unplugged. Besides, it would be nice to get assurance that the app works before you commit to taking it for a spin.
Fortunately, there’s an easy way do this without leaving the comfort of your home. Xcode lets you include a hard-coded waypoint GPX file in your project that you can use to simulate test locations. The starter project includes one for your convenience. :]
Open SimulatedLocations.gpx, which you can find in the Supporting Files group, and inspect its contents. You’ll see the following:
<?xml version="1.0"?>
<gpx version="1.1" creator="Xcode">
  <wpt lat="37.3349285" lon="-122.011033">
    <name>Apple</name>
    <time>2014-09-24T14:00:00Z</time>
  </wpt>
  <wpt lat="37.422" lon="-122.084058">
    <name>Google</name>
    <time>2014-09-24T14:00:05Z</time>
  </wpt>
</gpx>
The GPX file is essentially an XML file that contains two waypoints: Google's Googleplex in Mountain View and Apple Park in Cupertino. You'll notice that there are time nodes on each waypoint. They are spaced at 5 seconds apart, so when you simulate locations with this file, it will take 5 seconds to go between Apple and Google. There are also two additional GPX files: Apple.gpx, and Google.gpx. These are fixed locations, and you may use them for convenience when creating geofences.
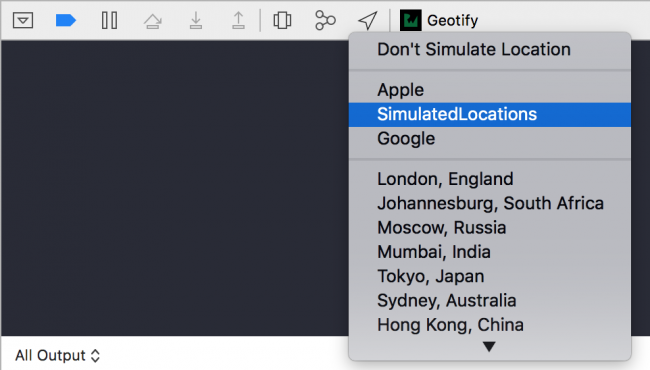
To begin simulating the locations in the GPX file, build and run the project. When the app launches the main view controller, go back to Xcode, select the Location icon in the Debug bar and choose SimulatedLocations:
Back in the app, use the Zoom button on the top-left of the navigation bar to zoom to the current location. Once you get close to the area, you’ll see the location marker moving repeatedly from the Googleplex to Apple, Inc. and back.
Test the app by adding a few geotifications along the path defined by the two waypoints. If you added any geotifications earlier in the tutorial before you enabled geofence registration, those geotifications will obviously not work, so you might want to clear them out and start afresh.
For the test locations, it’s a good idea to place a geotification roughly at each waypoint. Here’s a possible test scenario:
- Google: Radius: 1000m, Message: "Say Bye to Google!", Notify on Exit
- Apple: Radius: 1000m, Message: "Say Hi to Apple!", Notify on Entry

Once you've added your geotifications, you’ll see a log in the console each time the location marker enters or leaves a geofence. If you activate the home button or lock the screen to send the app to the background, you’ll also see the logs each time the device crosses a geofence, though you obviously won't be able to verify that behavior visually.
Note: Location simulation works both in iOS Simulator and on a real device. However, the iOS Simulator can be quite inaccurate in this case; the timings of the triggered events do not coincide very well with the visual movement of the simulated location in and out of each geofence. You would do better to simulate locations on your device, or better still, take the app for a walk!
Notifying the User of Geofence Events
You've made a lot of progress with the app. At this point, it simply remains for you to notify the user whenever the device crosses the geofence of a geotification — so prepare yourself to do just that.
To obtain the note associated with a triggering CLCircularRegion returned by the delegate calls, you need to retrieve the corresponding geotification that was persisted in UserDefaults. This turns out to be trivial, as you can use the unique identifier you assigned to the CLCircularRegion during registration to find the right geotification.
In AppDelegate.swift, add the following import:
import UserNotifications
Next, add the following helper method at the bottom of the class:
func note(from identifier: String) -> String? {
  let geotifications = Geotification.allGeotifications()
  guard let matched = geotifications.filter {
    $0.identifier == identifier
  }
  .first else { return nil }
  return matched.note
}
This helper method retrieves the geotification note from the persistent store, based on its identifier, and returns the note for that geotification.
Now that you're able to retrieve the note associated with a geofence, you'll write code to trigger a notification whenever a geofence event fires and to use the note as the message.
Add the following statements to the end of application(_:didFinishLaunchingWithOptions:), just before the method returns:
let options: UNAuthorizationOptions = [.badge, .sound, .alert]
UNUserNotificationCenter.current()
  .requestAuthorization(options: options) { success, error in
  if let error = error {
    print("Error: \(error)")
  }
}
Finally, add the following method:
func applicationDidBecomeActive(_ application: UIApplication) {
  application.applicationIconBadgeNumber = 0
  UNUserNotificationCenter.current().removeAllPendingNotificationRequests()
  UNUserNotificationCenter.current().removeAllDeliveredNotifications()
}
The code you’ve added prompts the user for permission to enable notifications for this app. In addition, it does some housekeeping by clearing out all existing notifications.
Next, replace handleEvent(for:) with the following:
func handleEvent(for region: CLRegion!) {
  // Show an alert if application is active
  if UIApplication.shared.applicationState == .active {
    guard let message = note(from: region.identifier) else { return }
    window?.rootViewController?.showAlert(withTitle: nil, message: message)
  } else {
    // Otherwise present a local notification
    guard let body = note(from: region.identifier) else { return }
    let notificationContent = UNMutableNotificationContent()
    notificationContent.body = body
    notificationContent.sound = UNNotificationSound.default()
    notificationContent.badge = UIApplication.shared.applicationIconBadgeNumber + 1 as NSNumber
    let trigger = UNTimeIntervalNotificationTrigger(timeInterval: 1, repeats: false)
    let request = UNNotificationRequest(identifier: "location_change",
                                        content: notificationContent,
                                        trigger: trigger)
    UNUserNotificationCenter.current().add(request) { error in
      if let error = error {
        print("Error: \(error)")
      }
    }
  }
}
If the app is active, the code above simply shows an alert controller with the note as the message. Otherwise, it presents a location notification with the same message.
Build and run the project, and run through the test procedure covered in the previous section. Whenever your test triggers a geofence event, you’ll see an alert controller displaying the reminder note:

Send the app to the background by activating the Home button or locking the device while the test is running. You’ll continue to receive notifications periodically that signal geofence events:

And with that, you have a fully functional, location-based reminder app in your hands. And yes, get out there and take that app for a spin!
Note: When you test the app, you may encounter situations where the notifications don’t fire exactly at the point of boundary crossing.
This is because before iOS considers a boundary as crossed, there is an additional cushion distance that must be traversed and a minimum time period that the device must linger at the new location. iOS internally defines these thresholds, seemingly to mitigate the spurious firing of notifications in the event the user is traveling very close to a geofence boundary.
In addition, these thresholds seem to be affected by the available location hardware capabilities. From experience, the geofencing behavior is a lot more accurate when Wi-Fi is enabled on the device.
Where to Go From Here?
Congratulations! You’re now equipped with the basic knowledge you need to build your own geofencing-enabled apps!
You can download the completed version of the project using the Download Materials button at the top or bottom of this tutorial.
Geofencing is a powerful technology with many practical and far-reaching applications in such realms as marketing, resource management, security, parental control and even gaming — what you can achieve is really up to your imagination. You can read Apple's Region Monitoring to learn more.
I hope you’ve enjoyed this tutorial. Feel free to leave a comment or question below!
The post Geofencing with Core Location: Getting Started appeared first on Ray Wenderlich.