The screencast shows how to refactor your Alamofire code to avoid code duplication and provide a centralized configuration for network calls.
The post Screencast: Alamofire: Routing Requests appeared first on Ray Wenderlich.
The screencast shows how to refactor your Alamofire code to avoid code duplication and provide a centralized configuration for network calls.
The post Screencast: Alamofire: Routing Requests appeared first on Ray Wenderlich.

Now that the annual migration of the “Developer Triceraptus” is over and the WWDC 2018 wrappings have come off the McEnery Convention Center in San Jose, we are left with another slew of compelling session videos.
There are videos on the latest APIs, such as ARKit 2, Core ML 2, Create ML and Siri Shortcuts; ones covering Xcode 10 with the new Dark Mode support and improved source code editing; and then there’s everything new in Swift 4.2, improvements in debugging, testing, and so much more. As there are over 100 WWDC 2018 session videos available this year, catching up by actually watching the videos will be quite a challenge! What’s a busy developer to do?
Fear not, as the raywenderlich.com tutorial team and learned colleagues have assembled a list of the Top 10 WWDC 2018 videos that cover everything you need to know in a minimum of time. The polling of the sessions was pretty close this year and the last four tied for 7th place. We consider these “must-see” sessions for developers from all backgrounds and specialties!

If you only have time for one video, this is it! For developers, the real start of WWDC 2018 is the Platforms State of the Union session. The Keynote is a fluffy offering to surprise and delight the general public, investors and Apple faithfuls. The State of the Union, in contrast, is where the really interesting details come out.
This talk surveys the new technologies and outlines which sessions will provide more details on each technology. Here are the highlights of the 2018 Platforms State of the Union:
The Platform State of the Union covers far more new items than I can address in this article. If you watch no other WWDC 2018 session videos, this is definitely the one you want.

The session, presented by Josh Shaffer, starts off with an emphasis on performance improvements in iOS 12 — covering improvements in scrolling, memory use, Auto Layout and UIKit.
This session is fairly dense; here, we’ll only cover some of the highlights:
drawRect on iPhone and even less on iPad Pro screens. Scrolling speed benefits from a new pre-fetch API from where data is collected with serialization, so it’s ready before rendering.UIEdgeInsets and UIImage gain property methods in a natural Swift-feeling way.Of all of these, Siri Shortcuts steals the show. Apple also provides the Shortcuts app on the App Store for users to create their own shortcuts.

[Video Link]
“The potential of Siri Shortcuts is virtually unlimited. Implemented correctly, it’s a paradigm shift in how iOS devices will be used and how we’ll think about making our apps.” — Ish ShaBazz, independent iOS Developer
Ari Weinstein, the creator of the award-winning Workflow app, presented Siri Shortcuts, which bares the fruit of Apple’s acquisition of Workflow. The sophomoric SiriKit now lets you expose the capabilities of your app to Siri. It’s a pretty straight-forward approach. You can design the intent or shortcut. Donate that shortcut to the OS and handle the intent when Siri successfully makes the call back to your app. Shortcuts can be informational or a call to your app’s workflow. You can also make use of an NSUserActivity type by simply setting isEligibleForPrediction to true in your App Delegate.
In the sample app, Soup Chef, Apple demonstrates how you would categorize the shortcut, and then add in some parameters such as string, number, person or location. Once donated to Siri, you can trigger the shortcut by speaking the phrase you provide. Siri can also run your shortcut independently of your app, making a suggested action at a certain time or place based on repeated user actions. If your app supports media types, Siri can access and start playing your content directly.

“Create ML is amazing. I can’t wait to see iOS devs doing fantastic things using machine learning.” — Sanket Firodiya, Lead iOS Engineer at Superhuman Labs, Inc.
Machine learning continues to be a hot topic these days and Apple has made it easy to add this technology to your apps. With Core ML 2, you can consider machine learning as simply calling a library from code. You only need to drop a Core ML library into your project and let Xcode sort everything else out.
Building on Core ML 2’s demystification of neural networks, Apple gives you Create ML. It only takes a few lines of code to use. You create and traine your model in Swift, right on your Mac. Create ML can work with image identification, text analysis and even with tabular data wherein multiple features can make solid predictions. You can even augment the training with Apple’s ready-made models utilizing Transfer Learning — reducing the training time from hours to minutes. This also further reduces the size of the models from hundreds of megabytes down to a mere handful. In another session, “Introduction to Core ML 2 Part One,” Apple expounds on weight quantization to further reduce the size without losing quality.
In the workflow for Create ML, you define your problem, collect some categorized sample data and train your model right inside a Playground file, using a LiveView trainer. Drag and drop your training data into the view. Once trained, you save your new model. You can also drop in some data to test the accuracy of the predictions. When you’re happy with the model you’ve made, export it. Finally, drag your new model into your project. You can train models on macOS Mojave in Swift and in the command line REPL.

This session takes a focused look a Swift generics. Previous sessions have covered generics, in part, but here is a deeper dive into the specifics. Swift and generics have evolved over the years and are now posed toward ABI stability in Swift 5.0, which is coming soon. Generics have been refined over time, and Swift 4.2 marks a significant point. Recently, the language has gained conditional conformance and recursive protocol constraints.
The sessions covers why generics are needed, and it builds up the Swift generic system from scratch. Untyped storage is challenging and error prone because of constant casting. Generics allow developers to know what type it is going to contain. This also provides optimization opportunities. Utilizing a generic type enables Swift to use parametric polymorphism — another name for generics.
Designing a protocol is a good way to examine generics is Swift. The talk covers how to unify concrete types with a generic type. A placeholder type, or associated type, is a sort of placeholder for a concrete type that is passed in at runtime. The talk covers some powerful opportunities with generics.
The second part of the talk covers conditional conformance and protocol inheritance, as well as classes with generics. In the talk, they look at a collection protocol to extend capabilities. Conditional conformance extends or adds composability to protocols and types that conform to it.
Swift also supports object-oriented programing. Any instance or subclass should be able to substitute for the parent and continue execution — this is known as Liskov Substitution Principle. A protocol conformance should also be available to subclasses — capturing capabilities of some of the types.

“Debugging is what we developers do when we’re not writing bugs.” — Tim Mitra, Software Developer, TD Bank
Chris Miles describes how the Xcode team has smoothed out many bugs that made Swift debugging difficult. Radars filed by fellow developers have exposed the edge cases for the team to fix. Doing a live debugging session, Miles shows an advanced use of breakpoints. Using the expression command and editing a breakpoint, you can change the value to test your code, without having compile and rerun your code.
You can also add your forgotten line of code at a breakpoint by double-clicking the breakpoint and opening the editor. For example, if you forget to set a delegate, you can enter the code to set your delegate, but also to test this fix. Use the breakpoint to set the delegate and test it right away. You can also test a function call inside a framework, even though you don’t know the values passed in — you’re working with assembly language now. You can examine the registers because the debugger provides pseudo registers. The first argument is the receiver, the second in Objective-C message send is the selector and the next series are the arguments passed in. Generally, you can use the po command in the console to print a debug description and see the current values. A little bit of typecasting can help. Miles further demonstrates how to cut through repeated calls by judiciously setting properties during the run.
Anther advanced tricks involves the thread of execution — with caution, as you can change the state of you app. p is another LLDB command to see a debug representation of the current object. Using the Variable Debugger, while paused, lets you view and filter properties to find the items to inspect. You can set a watchpoint by setting a “watch attempt” contextually on a property. Watchpoints are like breakpoints, but pause the debugger when a value changes.
“We use our debugger to debug our debuggers.” — Chris Miles, Software Engineering Manager, Apple, Inc.
During the session a macOS app’s views are also debugged — this time, inspecting elements in the View Debugger — using the same tricks to print out the values of views and constraints. Using the View Debugger’s inspector, you can find elements and see the current values or determine if they are set up by their parent or superviews. You can sort out whether your element in the view is supporting a dark variant for Dark Mode or even for Accessibility. This also covers Auto Layout debugging, debug descriptions and even the super handy Command/Control-click-through for accessing items layered behind others.

“Documentation is what our towers of abstraction are built upon and the new Playground execution model helps make playgrounds a compelling form of documentation that can be used for serious play.” — Ray Fix, Software Engineer, Discover Echo, Inc.
This playgrounds session presents an overview of playground fundamentals for users who may be new to them. Speaker Tibet Rooney-Rabdau reviews the support of markup to make your text stand out. She covers text style formatting, lists, navigation, support for links and even the inclusion of video playback within the playground.
Alex Brown demonstrates the new Playground step-by-step feature. With it, you can explore your work one line at a time. He builds up a tic-tac-toe game in stages, stepping through the execution until finally beating the computer player and rewarding himself with a nice particle system effect.
TJ Usiyan provides an overview of the more advanced Playground features. In particular, the new Custom Playground Display Convertible allows you to display your own custom values in the live REPL-like results inline view. He also highlighted how to support your own frameworks in your project. Employing an Xcode workspace, you can import your own frameworks and add a playground to make use of them.
Playgrounds aren’t just for fun. They are serious tools for developing your functions, testing out APIs and working out your own inspirations.

This session is packed with insights on building projects more efficiently. David Owens covers the new features of Xcode 10 to reduce build times. Jordan Rose covers how to optimize your Swift code and mixed-source code for faster compilation. Xcode 10 includes the ability to use parallelizing build processes and also adds detailed measurements to build times. He explains how your projects and dependencies are handled can remove complexity in builds.
Here are some of this session’s highlights:
This talk is chock full of tips. You may require repeated viewings. The Xcode build process is pretty involved, especially to a newcomer. Learning about some of its parts will take the mystery out of this daily exercise.

Ken Ferry begins this session demystifying how the Auto Layout engine and constraints really work. The engine caches layout information and tracks dependencies. He dives into the render loop as it deals with the various parts that get views on the screen. First up is updateConstraints, which has established whether constraint updates were needed and set. Second, the subviews are laid out and set. Finally, the display draws the views and refreshes, if required. The render loop updates 120 times per second.
It is important the avoid wasted work that can slow down or stutter the performance. Often, you’d set your constraints in code after clearing the existing constraints and then adding your own. This repeated exercise can produce “constraint churn” and the engine has to do repeat calculation and delivery. Simply using Interface Builder can be better, since it’s optimized and doesn’t overwork the system. In Cocoa, it is said that “simple things are simple and complicated things are possible”: Model the problem more naturally and try not to churn.
Kasia Wawer continues the session by explaining how to build efficient layouts. One trick with an element that doesn’t always appear is to set it to hidden rather than adding or removing it. Think about the constraints that are always present and group the constraints that come and go separately. Put those in an array of constraints and make an array with no constraints. Then you are simply dealing with an array of constraints. Be mindful of the difference between Intrinsic Content Size and systemLayoutSizeFitting, which are actually opposites. The former’s view can be informed about sizing by its content text or image. The latter gets sizing information out of the engine.
Calling systemLayoutSizeFitting creates an engine instance, adds constraints, solves layouts, returns sizing and deletes that engine. This can happen repeatedly, adding to the churn. Other tricks around text measurement and unsatisfiable constraints messages are covered as well. The moral is: Think before you update constraints.

“The video I enjoyed most was Embracing Algorithms — the next installment of David Abrahams and Crusty. This video didn’t so much disseminate knowledge, as propose a different coding paradigm.” — Caroline Begbie, Independent iPhone Developer
Dave Abrahams is back with another coding allegory with his alter ego, Crusty, the old-school developer who favors an 80 x 120, plain-text terminal. No “fancy debuggers” or IDEs for Crusty. His insistence on straight forward development practice was the runaway favorite of WWDC 2015 with the Introduction of Protocol Oriented Programming session.
In this talk focused on Swift programing methodologies, we walk through Dave’s use of for loops and while loops, then reduce the complexity and code sizing with the judicious use of algorithms. Using functions from the Swift standard library, Abrahams explains how to employ an algorithm driven approach.
“He talks about the importance of understanding algorithms beyond preparing for technical interviews. He goes through a case study on how misusing clean but inefficient code can critically impact scalability and performance.” – Kelvin Lau, Senior iOS Developer, Apply Digital, Ltd.
In summary, here are our picks of the top 10 WWDC 2018 videos to watch:
Thanks to contributors: Ish ShaBazz, Thom Pheijffer, Arthur Garza, Sanket Firodiya, Darren Ferguson, David Okun, Cosmin Pupăză, Caroline Begbie, Lorenzo Boaro, Khairil, Caesar Wirth, Mark Powell, Ray Fix, Dann Beauregard, Shawn Marston, Shai Mishali, Felipe Laso-Marsetti, Sarah Reichelt, Alexis Gallagher, Kelvin Lau.
Special thanks to: Mark Rubin, Rasmus Sten, Ray Fix, Darren Ferguson, Joey deVilla, Scott McAlister, Jean-Pierre, Distler, Josh Steele, Antonio Bello, Greg Heo, Fuad, Chief Cook & Bottle Washer Extraordinaire, Dru Freeman, Luke Parham, Caroline, Lea.
What do you think are the “don’t miss” videos of WWDC 2018? Tell us in the comments below!
The post Top 10 WWDC 2018 Videos in Review appeared first on Ray Wenderlich.

Part four of our new, free course, Server Side Swift with Kitura, is available today! If you ever wanted to extend your skills past developing for mobile devices, but didn’t have time to learn a new language, this is your chance.
In the final part of the course, you’ll create a web frontend for your EmojiJournal app with the help of your Kitura server and KituraStencil!
Take a look at what’s inside:


Want to check out the course? The entire course is ready for you today, and is available for free!
Stay tuned for more new and updated courses to come. I hope you enjoy the course! :]
The post Server Side Swift with Kitura Part 4: Templating A HTML Front-End With Stencil appeared first on Ray Wenderlich.

With the release of Unity 2017.3, much has been refined or completely changed since Kirill Muzykov’s superb Jetpack Joyride tutorial. Now is definitely the perfect time to revisit this tutorial using Unity’s beautifully matured 2D feature set and their revamped UI system. Let’s get started!
Jetpack Joyride was released by Halfbrick Studios in 2011. It’s a very easy game to understand. Steal a jetpack, and fly away with it. Collect the low hanging coins and avoid the lasers!
In essence, it’s a fun twist on an endless runner that works well with touch screens: Touch the screen to fly up; release the screen to drop back down. Avoid the obstacles to stay alive as long as you can. Notably, my kids know the game well and were super excited that I was writing an update for this tutorial:

In this game, you will be steering a mouse through a very long house, collecting coins and avoiding lasers in a similar fashion. Granted, not everyone hangs coins from their walls, but I’m guessing a few of you have one or two high-wattage lasers hanging about!
This is the first part of a three part series. In this tutorial, you’ll learn how to:
Thank you to Space X for their wonderful public domain images.
In Part 2, you’re going to move the mouse forward through randomly generated rooms simulating an endless level. You’ll also add a fun animation to make the mouse run when it is grounded.
In Part 3, you will add lasers, coins, sound effects, music and even parallax scrolling. By the end of the series, you will have a fully functional game — albeit with a lower mice population, for sure.
To get started, you’ll need some art, sound effects and music for the game. Download the materials using the link at the top or bottom of this tutorial. You will also need Unity 2017.3 or newer installed on your machine.
If you are new to Unity, check out our Intro to Unity tutorial to get you started.
Open Unity and select New project from the Project window, or click the New button on the top right if you already have a few projects in your navigator.

Note: If you’ve already created a few Unity 2D projects, feel free to use the RocketMouse Part 1 Starter Project in the materials. I suggest you only skip as far as Configuring the Game View to make sure your project matches the screenshots in the tutorial.
Type RocketMouse in the Project name field and set the location to where you would like the project saved. The ellipsis button at the end of the field will allow you to navigate to a directory of your choosing. Once you’ve chosen a location, click Select folder to set the Location. Select the 2D radio button and click Create Project.

Unless you downloaded the Starter Project, create a folder named RW in the Project view using Assets▸ ▸ Create ▸ Folder, or use the Create dropdown at the top left of the Project view. You will save all subsequent folders and files you create within this directory. This will keep them separate from assets you import.
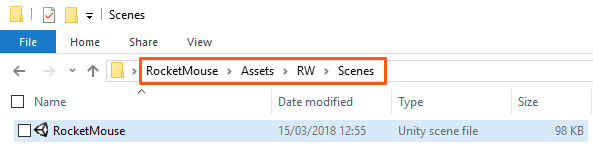
Create another new folder named Scenes within the RW directory in the Project view. Then open the Save Scene dialog by selecting File ▸ Save Scene or using the ⌘S (Ctrl+S on Windows) shortcut. Navigate to the Scenes folder you just created, name the scene RocketMouse.unity and click Save.

Switch to the Game view and set the size to a fixed resolution of 1136×640. If you don’t have this resolution option in the list, create it and name it iPhone Landscape.

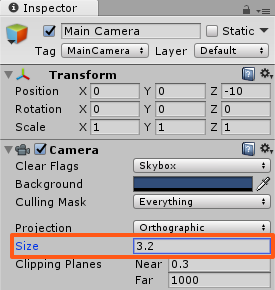
Select the Main Camera in the Hierarchy. In the Inspector, inside the Camera component, set the Size to 3.2.
Save the scene. There are no big changes since the project creation, but you’ve done several very important configuration steps.
In this section of the tutorial you will add the player character: a cool mouse with a jetpack. Just when you thought you had seen it all!
Unpack the materials you downloaded for this tutorial and locate the two directories Sprites and Audio. You will not use the audio files until a future part of this tutorial. Just keep them handy for the time being.
To add the assets, open the RocketMouse_Resources folder, select both the Sprites and Audio folders, and drag them onto the Assets folder in the Project view.

You’ve just added all required assets. At this point, it might seem that there are many strange files in there. Don’t worry, most of the images are just decorations and backgrounds. Apart from that, there is a sprite sheet for the mouse character, the laser and the coin objects.
Many animated game sprites are supplied in a sprite sheet, and our heroic mouse is no exception.
Frames of the running, flying and dying animation are contained within the mouse_sprite_sheet. Your first step is to slice it correctly.
Open the Sprites folder in the Project view and find mouse_sprite_sheet. Select it and set its Sprite Mode to Multiple in the Inspector, and then click Apply.

Then click the Sprite Editor button to open the Sprite Editor.

In the Sprite Editor click the Slice button near the left top corner to open the slicing options.

Still within the Sprite Editor, select the top left image to display its details. Click in the Name field and give the sprite a more appropriate name: mouse_run_0.

Rename the remaining sprites from top-left to bottom-right as follows:
Click Apply again to save changes.
Close the Sprite Editor. Expand mouse_sprite_sheet in the Project view, and you will see that it was sliced into eight different sprites. Nice!
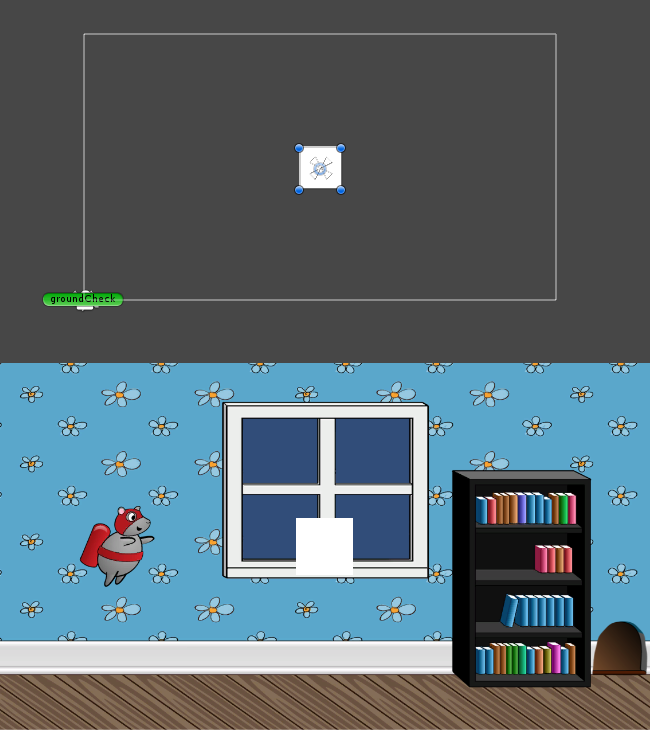
It is time to actually add something to the scene. Select the sprite named mouse_fly and drag it into the Scene view.

Doing this will create an object in the Hierarchy named mouse_fly (just as was the image used to create it).
Select mouse_fly in the Hierarchy and make the following changes in the Inspector:

Here is an image demonstrating all the steps:

The green circle in the Scene view shows the collider; its size changed when you changed the Radius property of the Circle Collider 2D component.
Colliders define a shape that are used by the physics engine to determine collisions with other objects. You could have created a more pixel-perfect collider by using a Polygon Collider 2D component, as in the screenshot below:

However, using complex colliders makes it harder for the physics engine to detect collisions, which in turn creates a performance hit. A good rule is to always use simple colliders whenever possible. As you will see, a circle collider works really well for this game. The only adjustment was the radius of the collider so that it matched the original mouse image.
While colliders define the shape of the object, the Rigidbody is what puts your game object under the control of the physics engine. Without a Rigidbody component, the GameObject is not affected by gravity. Thus, you cannot apply things such as force and torque to the GameObject.
In fact, you wouldn’t even detect collisions between two GameObjects, even if both had Collider components. One of the objects must have a Rigidbody component.
However, while you want the mouse to be affected by gravity and collide with other objects, you don’t want its rotation to be changed. Fortunately, this is easy to solve by enabling the Freeze Rotation property of the Rigidbody 2D component.
Run the scene and watch as the mouse falls down, affected by the gravity force.

But wait! Why did the mouse fall down at all? You didn’t add any gravity to the Rigidbody… or did you? In fact, when you added the Rigidbody 2D component, it was given a default Gravity Scale of 1. This tells the system to make the character fall using the default gravity of the physics engine.
You won’t let that mouse fall down into the abyss. Not on your watch!
You need to add a script that will enable the jetpack and apply force to the mouse object to move it up and keep it from falling.
To add a script to the mouse object:

Can't add script behaviour MouseController. The script's file name does not match the name of the class defined in the script!public class NewBehaviourScript
It’s time to write some code. Open the MouseController script by double-clicking it either in the Project view or in the Inspector. This will open MouseController.cs in the editor of your choice.
Add the following jetpackForce variable just inside the class definition:
public float jetpackForce = 75.0f;
This will be the force applied to the mouse when the jetpack is on.

Just below jetpackForce, add the following variable:
private Rigidbody2D playerRigidbody;
Next add the following code to the automatically generated Start method:
playerRigidbody = GetComponent<Rigidbody2D>();
When the game starts, you retain a reference to the player’s Rigidbody. You will need to access this component very frequently in this script, and you don’t want to create a performance hit every time you need to locate it.
Next, add the following method inside the class:
void FixedUpdate()
{
    bool jetpackActive = Input.GetButton("Fire1");
    if (jetpackActive)
    {
        playerRigidbody.AddForce(new Vector2(0, jetpackForce));
    }
}
FixedUpdate() is called by Unity at a fixed time interval. All physics-related code is written in this method.
Update and the FixedUpdate is that FixedUpdate is called at a fixed rate, while Update is simply called for every rendered frame. Since frame rate can vary, the time between subsequent Update method calls can also vary and physics engines do not work well with variable time steps. This is why FixedUpdate exists and should be used to write the code related to the physics simulation (e.g. applying force, setting velocity and so on).
In FixedUpdate, you check if the Fire1 button is currently pressed. In Unity, Fire1 by default is defined as a left mouse button click, the left Control key on a keyboard, or a simple screen tap in the case of an iOS app. For this game, you want the jetpack to engage when the user touches the screen. Therefore, if Fire1 is currently pressed, the code will add a force to the mouse.
AddForce simply applies the force to the rigidbody. It takes a Vector2 that defines the direction and the magnitude of the force to apply. You will move your hero mouse forward later, so right now you only apply the force to move the mouse up with the magnitude of jetpackForce.
Run the scene and hold your left mouse button to enable the jetpack and make the mouse move up.

The jetpack works, but you can see several problems straight away. First, depending on your perspective, the jetpack force is either too strong, or the gravity is too weak. It’s far too easy to send the mouse flying off the top of the screen, never to be seen again.
Rather than change the jetpack force, you can change the gravity setting of the entire project. By changing the gravity setting globally, you set a smarter default for the smaller iPhone screen. And besides, who doesn’t like the idea of controlling gravity?
To change the gravity force globally, chose Edit ▸ Project Settings ▸ Physics 2D. This will open the Physics 2D Settings of the project in the Inspector. Find the Gravity field and set its Y value to -15.

Run the scene again. It should be much easier to keep the mouse within the game screen.

Don’t worry if you’re still having difficulties keeping the mouse within the game screen. Try making your Game view bigger or adjust the jetpackForce or Gravity settings. The values recommended here work well when you run the game on the iPhone. Of course, adding a floor and a ceiling will help keep the mouse in sight, so you’ll add those next.
Adding a floor and a ceiling is a relatively simple exercise; all you need is an object for the mouse to collide with at the top and bottom of the scene. When you created the mouse object earlier, it was created with an image so the user could visually track where the object is throughout the game. The floor and ceiling, however, can be represented by empty GameObjects, as they never move, and their location is relatively obvious to the user.
Choose GameObject ▸ Create Empty to create an empty object. You won’t see it on the screen. What do you expect? It’s empty!
Select the new GameObject in the Hierarchy and make the following changes in the Inspector:
Now you should see a green collider at the bottom of the scene:

Don’t worry too much about the magic numbers in the Position and Scale properties; they will make more sense later as you add more elements to the Scene.
Run the scene. Now the mouse falls on the floor and stays there.

However if you activate the jetpack, the mouse still leaves the room since there is no ceiling.
I’m sure you can add a ceiling yourself. Set its Position to (0, 3.7, 0), and don’t forget to rename it ceiling. If you need a hint, check the spoiler below.
Now there is both a floor and a ceiling present in the scene. Run the game, and try as you might, the mouse will never fly off the top or fall off the bottom of the scene.

Now that you’ve got the mouse moving at the user’s every will, it’s time to add some flair — or is that flare? In this section, you’ll make the jetpack shoot flames when the mouse goes up. Why flames? Because everything’s better with flames!
There are many different ways you can show flames coming out of the jetpack, but my personal favorite is using a Particle System. Particle systems are used to create a lot of small particles and simulate effects like fire, explosions, fog, all based on how you configure the system.
To add a Particle System to the scene, choose GameObject ▸ Effects ▸ Particle System. You’ll notice a change to the scene immediately: the Particle System will show its default behavior in the Scene when the object is selected.

This is a good start, but right away you should notice some problems. First, the particle system always stays in the middle of the screen, regardless of where the rocket mouse flies. To make the particles always emit from the jetpack, you’ll need to add the Particle System as a child of the mouse. In the Hierarchy, drag the Particle System over the mouse to add it as a child. It should look like the following screenshot:

Now that the Particle System moves correctly, configure it to resemble flames by selecting the Particle System in the Hierarchy and changing the following in the Inspector:
Here is how the particle system should look:

If your jetpack flames look different, make sure you’ve set all the settings shown on this screenshot:

The flames are looking good, but you’ll notice that the flame particles stop suddenly, as if they hit an invisible wall at the end of the particle emitter. You can fix this by changing the color of the particles as they fall further from the jet pack.
Select jetpackFlames in the Hierarchy and search for a section called Color over Lifetime in the Particle System component. Enable it by checking the white circle checkbox to the left of the section name and click the title to expand the section.

Click the white color box within Color over Lifetime to open the Gradient Editor. It should look like this:

Select the top slider on the right and change the Alpha value to 0. Then close the Gradient Editor.

Run the scene. Now the jetpack flames look much more realistic.

Remember that the mouse should glide through an endless room, avoiding lasers and collecting coins. Unless you have a huge amount of time on your hands, I highly recommend not creating your endless room by adding everything by hand!
You are going to create a few different level sections and add a script that will randomly add them ahead of the player. As you might imagine, this can’t all be done at once! You’ll start by simply adding a few background elements in this tutorial.
In Part 2, you’ll start creating additional rooms for the mouse to fly through.
This is how one level section might look like:

The process of creating a level section (let’s call one section a room) consists of three steps:
Make sure the Scene view and the Project view are visible. In the Project view, open the Sprites folder and drag the bg_window sprite to the scene. You don’t need to place it in a precise location; you’ll take care of that in a minute.

Select bg_window in the Hierarchy and set its Position to (0, 0, 0).
After placing the central section of the room, you need to add a few more sections, one to the left and one to the right of the window.
This time use the bg sprite. Find bg in the Project view and drag it to the scene twice. First time to the left, and second time to the right of bg_window. Don’t try to place it precisely. Right now you only need to add it to the scene.
You should get something like this:

Looks like a room by Salvador Dali, doesn’t it?
You could simply position every background element on the screen based on each element’s size, but moving objects by calculating these values all the time is not very convenient.
Instead you’re going to use Unity’s Vertex Snapping feature, which easily allows you to position elements next to each other. Just look how easy it is:

To use vertex snapping, you simply need to hold the V key after selecting, but before moving the GameObject.
Select the room background object that you want to move. Don’t forget to release the mouse button. Then hold the V key and move the cursor to the corner you want to use as a pivot point.
This will be one of the left corners, for the background to the right of the window, and one of the right corners (any) for the background to the left of the window.
Note how the blue point shows which vertex will be used as pivot point.
After selecting the pivot point, hold down the left mouse button and start moving the object. You will notice that you can only move the object so that its pivot point matches the position of the other sprite’s corner (vertex).
If you run the game scene, you will notice your jetpack flames are behind the background. It’s possible that even your brave rocket mouse is hiding from view! In fact, any new sprites you drag into the scene may not be correctly positioned by Unity with respect to depth.
New sprites may be positioned behind or in front of any other sprite. You will be adding some decorations to your room soon but they will look pretty silly on the outside of your house! So for perfect control of sprite depth in the scene, you’ll next look at using Sorting Layers to control their ordering.
To make sure your background stays in the background, and that your mouse does not duck behind a bookcase mid-game, you’re going to use a feature called Sorting Layers. It will take only a moment to set everything up.
Select the mouse in the Hierarchy and find the Sprite Renderer component in the Inspector. There you will see a drop down called Sorting Layer, which currently has a value of Default, as it is shown below.

Open the drop down and you’ll see a list of all the sorting layers that you currently have in your project. Right now there should be only Default.

Click on the Add Sorting Layer… option to add more sorting layers. This will immediately open the Tags & Layers editor.
Add the following sorting layers by clicking the + button.
Note: The order is important, since the order of sorting layers defines the order of the objects in the game.
When you’re done the Tags & Layers editor should look like this:

For now you’re only going to need Background and Player sorting layers. Other sorting layers will be used later.
Select mouse in the Hierarchy and set its Sorting Layer to Player.

Now select the three background pieces, bg_window, bg and bg (1) in the Hierarchy and set their Sorting Layers to Background.

Thankfully, this new version of Unity introduces the same sorting layer parameters to particle effects. This makes the use of particle effects in 2D games far more practical. Select the jetpackFlames in the Hierarchy. In the Inspector find the Renderer tab at the bottom of Particle System and click to expand it. Set the Sorting Layer to Player and the Order in Layer to -1. The Order in Layer sets the order of the object within its sorting layer for even finer control.

You set the jetpackFlames to -1 so that they are always emitted from under the player’s mouse sprite.
Run the game and you should see that the jetpack flames are now displayed above the background.

To decorate the room you can use any amount of bookcases and mouse holes from the Sprites folder in the Project browser. You can position them any way you want. Just don’t forget to set their Sorting Layer to Decorations.
Here is a decorated room example:

Need some decorating inspiration? In the Project browser find an image named object_bookcase_short1. Drag it to the scene just as you did with room backgrounds. Don’t try to position it somewhere in particular, just add it to the scene.
Select object_bookcase_short1 in the Hierarchy and set its Sorting Layer to Decorations. Now you will be able to see it.
Set the bookcase Position to (3.42, -0.54, 0) or place it anywhere you want. Now add the object_mousehole sprite. Set its Sorting Layer to Decorations and Position to (5.15, -1.74, 0).
Just don’t cover the window with book cases. You will add something ouside the window to look at later in the tutorial.
Now, this is starting to look like a real game!
Now that you have your hero flying up and down on a basic background, head in to Part 2 where your mouse will start to move forward through randomly generated rooms. You’ll even add a few animations to keep the game fun and engaging.
You can download the final project for this part in the tutorial materials. The link is at the top or bottom of this tutorial.
I would love to hear your comments and questions below. See you in Part 2!
The post How to Make a Game Like Jetpack Joyride in Unity 2D – Part 1 appeared first on Ray Wenderlich.
This is the final part of our three-part tutorial series on how to create a game like Jetpack Joyride in Unity 2D. If you’ve missed the previous parts, you should head back and complete Part 1 and Part 2 first.

In this part you will add lasers, coins, sound effects, music and even parallax scrolling. So enough talking, let’s get to the fun!
You can continue on with this tutorial using the project you created in the second part. Alternatively, you can download the RocketMouse Part 2 Final project in the materials at the top or bottom of this tutorial.
Open the RocketMouse.unity scene and get going!
The mouse flying through the room is great, but to make things interesting you’ll add some obstacles. What can be cooler than lasers?
Lasers will be generated randomly in a similar manner to the room generation, so you need to create a Prefab. You will need to create a small script to control the laser also.
Here are the steps required to create a laser object:
This is convenient for many reasons. For example, if the mouse dies on top of the laser, it won’t hang in the air, lying there on the laser. Also, the mouse would likely still move forward a bit after hitting the laser instead of bouncing back due to inertia. Besides that, real lasers are not a hard, physical object, so enabling this property simulates the real laser.
Here is the full list of steps displayed:

Open the LaserScript and add the following instance variables:
//1
public Sprite laserOnSprite;
public Sprite laserOffSprite;
//2
public float toggleInterval = 0.5f;
public float rotationSpeed = 0.0f;
//3
private bool isLaserOn = true;
private float timeUntilNextToggle;
//4
private Collider2D laserCollider;
private SpriteRenderer laserRenderer;
It might seem like a lot of variables, but in fact everything is quite trivial.
toggleInterval so that all lasers on the level don’t work exactly the same. By setting a low interval, you create a laser that will turn on and off quickly, and by setting a high interval you will create a laser that will stay in one state for some time. The rotationSpeed variable serves a similar purpose and specifies the speed of the laser rotation.Here is an example of different laser configurations, each with different toggleInterval and rotationSpeed.

Add the following code to the Start method:
//1
timeUntilNextToggle = toggleInterval;
//2
laserCollider = gameObject.GetComponent<Collider2D>();
laserRenderer = gameObject.GetComponent<SpriteRenderer>();
To toggle and rotate the laser add the following to the Update method:
//1
timeUntilNextToggle -= Time.deltaTime;
//2
if (timeUntilNextToggle <= 0)
{
    //3
    isLaserOn = !isLaserOn;
    //4
    laserCollider.enabled = isLaserOn;
    //5
    if (isLaserOn)
    {
        laserRenderer.sprite = laserOnSprite;
    }
    else
    {
        laserRenderer.sprite = laserOffSprite;
    }
    //6
    timeUntilNextToggle = toggleInterval;
}
//7
transform.RotateAround(transform.position, Vector3.forward, rotationSpeed * Time.deltaTime);
Here is what this code does:
timeUntilNextToggle is equal to or less then zero, it is time to toggle the laser state.timeUntilNextToggle variable since the laser has just been toggled.rotationSpeed.rotationSpeed to zero.
Switch back to Unity and select the laser in the Hierarchy. Make sure the Laser Script component is visible.
Drag the laser_on sprite from the Project view to the Laser On Sprite property of the Laser Script component in the Inspector.
Then drag the laser_off sprite to the Laser Off Sprite property.
Set Rotation Speed to 30.

Now set the laser Position to (2, 0.25, 0) to test that everything works correctly. Run the scene, and you should see the laser rotating nicely.

Now, turn the laser into a prefab. You should be able to do this on your own by now, but check the hints below if you need help.
Right now the mouse can easily pass through the enabled laser without so much as a bent whisker. Better get to fixing that.
Open the MouseController script and add an isDead instance variable.
private bool isDead = false;
This instance variable will indicate the player has died. When this variable is true, you will not be able to activate the jetpack, move forward, or do anything else that you’d expect from a live mouse.
Now add the following two methods somewhere within the MouseController class:
void OnTriggerEnter2D(Collider2D collider)
{
    HitByLaser(collider);
}

void HitByLaser(Collider2D laserCollider)
{
    isDead = true;
}
The OnTriggerEnter2D method is called whe then mouse collides with any laser. Currently, it simply marks the mouse as dead.
OnTriggerEnter2D and HitByLaser so this is simply a way to prepare for future changes.
Now, when the mouse is dead it shouldn’t move forward or fly using the jetpack. Make the following changes in the FixedUpdate method to make sure this doesn’t happen:
bool jetpackActive = Input.GetButton("Fire1");
jetpackActive = jetpackActive && !isDead;

if (jetpackActive)
{
    playerRigidbody.AddForce(new Vector2(0, jetpackForce));
}

if (!isDead)
{
    Vector2 newVelocity = playerRigidbody.velocity;
    newVelocity.x = forwardMovementSpeed;
    playerRigidbody.velocity = newVelocity;
}

UpdateGroundedStatus();
AdjustJetpack(jetpackActive);
Note that jetpackActive is now always false when the mouse is dead. This means that no upward force will be applied to the mouse and also, since jetpackActive is passed to AdjustJetpack, the particle system will be disabled.
In addition, you don’t set the mouse’s velocity if it's dead, which also makes a lot of sense. Unless they’re zombie mice. Switch back to Unity and run the scene. Make the mouse fly into the laser.

Hmm... it looks like you can no longer use the jetpack and the mouse doesn’t move forward, but the mouse seems rather OK with that. Perhaps you do have zombie mice about, after all!
The reason for this strange behavior is that you have two states for the mouse: run and fly. When the mouse falls down on the floor, it becomes grounded, so the run animation is activated. Since the game cannot end like this, you need to add a few more states to show that the mouse is dead.
Select the mouse GameObject in the Hierarchy and open the Animation view. Create a new clip called die. Save the new animation to the Animations folder.

After that, follow these steps to complete the animation:

That was easy. In fact I think you can create the fall animation yourself. This time, simply use the mouse_fall sprite as a single frame. However, if you get stuck feel free to expand the section below for detailed instructions.
After creating the animations, you need to make the Animator switch to the corresponding animation at the right time. To do this, you’re going to transition from a special state called Any State, since it doesn’t matter what state the mouse is currently in when it hits the laser.
Since you created two animations (fall and die), you’ll need to handle things differently depending on whether the mouse hits the laser in the air or while running on the ground. In the first case, the mouse should switch to the fall animation state and, only after hitting the ground, should you play the die animation.
However, in both cases you need one new parameter (as you don't yet have a parameter to handle the mouse's death by laser!) Open the Animator view and create a new Bool parameter called isDead.

Next, create a new Transition from Any State to fall.

Select this transition and in the Conditions, set isDead to true. Add isGrounded as a second parameter by clicking the + button and set its value to false.

Next, create a new transition from Any State to die. Select this transition and in Conditions set both isDead and isGrounded parameters to true.

This way there are two possible combinations:

This way, if the mouse is dead, but still in the air (not grounded) the state is switched to fall. However, if the mouse is dead and grounded, or was dead and becomes grounded after falling to the ground, the state is switched to die
The only thing left to do is update the isDead parameter from the MouseController script. Open the MouseController script and add the following line to the end of the HitByLaser method:
mouseAnimator.SetBool("isDead", true);
This will set the isDead parameter of the Animator component to true. Run the scene and fly into the laser.

When the mouse hits the laser, the script sets the isDead parameter to true and the mouse switches to the fall state (since isGrounded is still false). However, when the mouse reaches the floor, the script sets the isGrounded parameter to true. Now, all conditions are met to switch to the die state.
Once again, there is something not quite right. Your poor mouse is not resting in peace. Honestly, now is not the time to pull out the dance moves and break into “The Worm”!

During play mode, click on the Animator view after the mouse dies and you will see the die animation is being played on repeat. Oh, the brutality!

This happens because you transition from Any State to die repeatedly, forever. The grounded and dead parameters are always true, which triggers the animator to transition from Any State.
To fix this, you can use a special parameter type called a Trigger. Trigger parameters are very similar to Bools, with the exception that they are automatically reset after use.
Open the Animator view and add a new Trigger parameter called dieOnceTrigger. Set its state to On, by selecting the radio button next to it.

Next, select the transition from Any State to die, and add dieOnceTrigger in the Conditions section.

Next, open the Animations folder in the RW directory in the Project view and select die. In the Inspector, uncheck Loop Time. This will stop the animation from looping.

Run the scene and collide with a laser.

This time the mouse looks far more peaceful!
While death dealing lasers are fun to implement, how about adding some coins for the mouse to collect?
Creating a coin Prefab is similar to creating the laser, so you should try doing this yourself. Just use the coin sprite and follow these tips:
If you have any questions on how to do this, take a look at the expandable section below.
Now add several coins to the scene by dragging coin Prefabs to the Scene view. Create something like this:

Run the scene. Grab those coins!

Wow, the poor mouse has been having a really tough time in Part 3 of this tutorial! Why can’t you collect a coin? The mouse dies because the code in MouseController script currently treats any collision as a collision with a laser.
To distinguish coins from lasers, you will use Tags, which are made exactly for situations like this.
Select the coin Prefab in the Prefabs folder in the Project view. This will open the Prefab properties in the Inspector. Find the Tag dropdown right below the name field, click to expand it, and choose Add Tag....

This will open the already familiar Tags & Layers editor in the Inspector. In the Tags section add a tag named Coins.
Now select the coin Prefab in the Project view once again, and set its Tag to Coins in the Inspector.

Of course just setting the Tag property doesn’t make the script distinguish coins from lasers. You’ll still need to modify some code.
Open the MouseController script and add a coins counter variable:
private uint coins = 0;
This is where you’ll store the coin count.
Then add the CollectCoin method:
void CollectCoin(Collider2D coinCollider)
{
    coins++;
    Destroy(coinCollider.gameObject);
}
This method increases the coin count and removes the coin from the scene so that you don't collide with it a second time.
Finally, make the following changes in the OnTriggerEnter2D method:
if (collider.gameObject.CompareTag("Coins"))
{
    CollectCoin(collider);
}
else
{
    HitByLaser(collider);
}
With this change, you call CollectCoin in the case of a collision with a coin, and HitByLaser in all other cases.
Run the scene.

That’s much better! The mouse collects coins and dies if it hits a laser. It looks like you’re ready to generate lasers and coins using a script.
Generating coins and lasers is similar to what you did when you generated rooms. The algorithm is almost identical. However, you currently have a Prefab that consists of only one coin. If you write generation code now, you would either generate only one coin here and there on the level, or you'd have to manually create groups of coins programmatically.
How about creating different configurations of coins and generating a pack of coins at once?
Open the Prefabs folder in the Project viewer and drag 9 coins into the scene using the coin Prefab. It should look something like this:

Select any coin and set its Position to (0, 0, 0). This will be the central coin. You will add all coins into an Empty GameObject, so you need to build your figure around the origin.
After placing the central coin, build a face down triangle shaped figure around the coin. Don’t forget that you can use Vertex Snapping by holding the V key.

Now create an Empty GameObject by choosing GameObject ▸ Create Empty. Select it in the Hierarchy and rename it to coins_v.
Set its Position to (0, 0, 0) so that it has the same position as the central coin. After that, select all coins in the Hierarchy and add them to coins_v. You should get something like this in the Hierarchy:

Select coins_v in the Hierarchy and drag it to Prefabs folder in the Project view to create a new coin formation Prefab.

You're done. Remove all the coins and lasers from the scene since they will be generated by the script.
Open GeneratorScript and add the following instance variables:
public GameObject[] availableObjects;
public List<GameObject> objects;

public float objectsMinDistance = 5.0f;
public float objectsMaxDistance = 10.0f;

public float objectsMinY = -1.4f;
public float objectsMaxY = 1.4f;

public float objectsMinRotation = -45.0f;
public float objectsMaxRotation = 45.0f;
The availableObjects array will hold all objects that the script can generate (i.e. different coin packs and the laser). The objects list will store the created objects, so that you can check if you need to add more ahead of the player or remove them when they have left the screen.
The variables objectsMinDistance and objectsMaxDistance are used to pick a random distance between the last object and the currently added object, so that the objects don't appear at a fixed interval.
By using objectsMinY and objectsMaxY, you can configure the minimum and maximum height at which objects are placed, and by using objectsMinRotation and objectsMaxRotation you can configure the rotation range.
New objects are added in the following AddObject method in a similar way to how rooms are added. Add the following to the GeneratorScript:
void AddObject(float lastObjectX)
{
    //1
    int randomIndex = Random.Range(0, availableObjects.Length);
    //2
    GameObject obj = (GameObject)Instantiate(availableObjects[randomIndex]);
    //3
    float objectPositionX = lastObjectX + Random.Range(objectsMinDistance, objectsMaxDistance);
    float randomY = Random.Range(objectsMinY, objectsMaxY);
    obj.transform.position = new Vector3(objectPositionX,randomY,0);
    //4
    float rotation = Random.Range(objectsMinRotation, objectsMaxRotation);
    obj.transform.rotation = Quaternion.Euler(Vector3.forward * rotation);
    //5
    objects.Add(obj);
}
This method takes the position of the last (rightmost) object and creates a new object at a random position after it, within a given interval. By calling this method, you create a new object off screen each time the last object is about to show on the screen. This creates an endless flow of new coins and lasers.
Here is the description of each code block:
With the code in place, the only thing left to do is actually use it!
Add the following in the GeneratorScript:
void GenerateObjectsIfRequired()
{
    //1
    float playerX = transform.position.x;
    float removeObjectsX = playerX - screenWidthInPoints;
    float addObjectX = playerX + screenWidthInPoints;
    float farthestObjectX = 0;
    //2
    List<GameObject> objectsToRemove = new List<GameObject>();
    foreach (var obj in objects)
    {
        //3
        float objX = obj.transform.position.x;
        //4
        farthestObjectX = Mathf.Max(farthestObjectX, objX);
        //5
        if (objX < removeObjectsX)
        {
            objectsToRemove.Add(obj);
        }
    }
    //6
    foreach (var obj in objectsToRemove)
    {
        objects.Remove(obj);
        Destroy(obj);
    }
    //7
    if (farthestObjectX < addObjectX)
    {
        AddObject(farthestObjectX);
    }
}
Here's the breakdown of how this method checks if an object should be added or removed:
removeObjectsX, then it has already left the screen and is far behind. You will have to remove it. If there is no object after addObjectX point, then you need to add more objects since the last of the generated objects is about to enter the screen.The farthestObjectX variable is used to find the position of the last (rightmost) object to compare it with addObjectX.objX you get a maximum objX value in farthestObjectX at the end of the loop (or the initial value of 0, if all objects are to the left of origin, but not in our case).To make this method work, add a call to GenerateObjectsIfRequired to GeneratorCheck just below GenerateRoomIfRequired:
GenerateObjectsIfRequired();
Like with the room prefab, this method is called a few times per second, ensuring that there will always be objects ahead of the player.
To make the GeneratorScript work, you need to set a few of its parameters. Switch back to Unity and select the mouse GameObject in the Hierarchy.
Find the Generator Script component in the Inspector and make sure that the Prefabs folder is open in the Project view.
Drag the coins_v Prefab from the Project view to the Available Objects list in the GeneratorScript component. Next, drag the laser Prefab from the Project view to the Available Objects list also.

That’s it! Run the scene.

Now this looks like an almost complete game.
What’s the point of collecting coins if you can’t see how many coins you have collected? Also, There's no way for the player to restart the game once they have died. It's time to fix these issues by adding a couple of GUI elements.
Open the MouseController script and add the UnityEngine.UI namespace, as you will now be wielding the power of Unity’s new GUI system!
using UnityEngine.UI;
Switch back to Unity to begin creating the UI. Click GameObject/UI/Image to add an Image element.
If this is the first UI element in your scene, Unity will automatically create a couple objects to get you started: a Canvas and an EventSystem. You will notice your new Image element is a child of the canvas. All elements within the canvas will be rendered after scene rendering and by default will overlay the available screen space, which is perfect for your UI score and any other information you want to display to the player. The EventSystem is responsible for processing raycasts and inputs to your scene’s UI and handling their respective events.

In the Scene view, the canvas exists somewhat separately from the rest of your level, however, in the Game view it is rendered on top.
Now click GameObject/UI/Text to add a Text element.
Those are the only two elements you need to display the coin count; now to get them positioned and styled.
Select the Image Object in the Hierarchy and rename it coinImage in the Inspector. Unity’s UI uses a unique Rect Transform component, a more 2D-centric take on the normal Transform component. The Rect Transform additionally exposes parameters to control size, anchor and pivot point of your UI elements. This allows control of your UI scale and position with respect to screen size and aspect ratio.

Note: For a more extensive explanation of the UI system, I highly recommend having a look at our Introduction to Unity tutorial. The awesome Brian Moakley shows you how to create a start menu for this very game!
You want your image to be locked in position near the top left of the screen.
Have a look at the box in the top left of the Rect Transform component. This represents the Anchor and pivot point of your UI element. Tapping the box will bring up a grid of options titled Anchor Presets. These allow you to adjust the Anchor and stretch of the element. Holding Shift at the same time will also set the pivot and holding Alt will set the position. Let's get these UI elements set up.

Now to adjust the tiny little mouse sized text element. Your jetpacking hero may be a mouse, but let’s assume your user is not.
If everything looks the same as below, you are ready to head to the Text component to adjust the Font and Alignment.

Make the following adjustments to the Text component:
It should look something like this:

You are already counting the coins collected in the MouseController script, so let's hook that value up to the coinsCollected Text.
Create a new public instance variable in the MouseController.
public Text coinsCollectedLabel;
In the CollectCoin method, just after coins++;, add the following line of code:
coinsCollectedLabel.text = coins.ToString();
The coins integer is simply converted to a string and applied to the text property of the Text element.
Finally, back in Unity, drag the coinsCollected Text element from the hierarchy to the coinsCollectedLabel in the MouseController:

Hit run and start racking up those coins! The number should be displayed in the corner of the screen.

Now you need a restart button in there.
You will need another new namespace in MouseController to reload the level. Open the script and add the following at the top:
using UnityEngine.SceneManagement;
Now add the following new public method:
public void RestartGame()
{
    SceneManager.LoadScene("RocketMouse");
}
This method should be self-explanatory. When the RestartGame method is called, you ask the SceneManager to load the RocketMouse scene, starting it from the beginning again.
You only want the button to be displayed once the player has died and hit the ground. Therefore, to interact with the button in code, you need to add a public instance variable for it.
public Button restartButton;
Finally, add the following code to the end of the FixedUpdate method:
if (isDead && isGrounded)
{
    restartButton.gameObject.SetActive(true);
}
Head back into Unity to create the Button. Select GameObject ▸ UI ▸ Button.

In the Inspector rename your new button to restartButton. The button should already be centered perfectly. However, for future reference this could have been achieved by selecting the Anchor Preset Box, Holding down Alt and Shift and hitting the center and middle grid square.
Let’s make the button a little bigger. Adjust the Width to 200 and the Height to 60.

The text in the button is a child element of the Button. In the Hierarchy click the disclosure triangle next to the restartButton and select the Text element.
Back in the Inspector, change the Text to "Tap to restart!" and adjust the Font Size to 24.

You don’t want the button displayed at the start of the game, so once again select the restartButton in the hierarchy and uncheck the checkbox beside the name in the Inspector. This will leave it in the scene, but in an inactive state.

Select the mouse to display the Mouse Controller script in the Inspector, and drag the restartButton from the Hierarchy to the Restart Button in Mouse Controller.

The final step is to tell the button what method to execute when it’s tapped. Select the resetButton in the Hierarchy and in the Button component in the Inspector, find the On Click () at the bottom. Click the + button and drag the mouse GameObject from the Hierarchy into the None (Object) box. The No Function dropdown should become active. Click on it and select MouseController ▸ RestartGame().

That should be it! Hit run and have a go. When the mouse hits a laser, the "tap to restart" button should appear, and selecting it should restart the game.

The game is deadly quiet. You will be amazed how much better it feels once you add some sound and music.
Open the Prefabs folder in the Project view and select the laser Prefab.

In the Inspector, add an Audio Source component by clicking Add Component and selecting Audio ▸ Audio Source. Then open the Audio folder in the Project view and drag the laser_zap sound to the Audio Clip field.
Don’t forget to uncheck Play On Awake — otherwise the laser zap sound will be played right at the start of the game and give your player a fright!
This is what you should get:

Now open the MouseController script and add the following code to the beginning of the HitByLaser method:
if (!isDead)
{
    AudioSource laserZap = laserCollider.gameObject.GetComponent<AudioSource>();
    laserZap.Play();
}
isDead to true, otherwise it won’t be played even once.
When the mouse touches the laser, you get a reference to the laser’s collider in OnTriggerEnter2D. By accessing the gameObject property of laserCollider you then get the laser object itself. Then, you can access the Audio Source component, and make it play.
Run the scene; you will now hear a zap sound when the mouse hits any laser.

While you could apply the same approach with coins, you'll be doing something a little bit different. Open the MouseController script and add the following instance variable:
public AudioClip coinCollectSound;
Scroll down to the CollectCoin method and add following line of code at the end of the method:
AudioSource.PlayClipAtPoint(coinCollectSound, transform.position);
AudioSource class to play the coin collect sound at the current position of the mouse. The reason this method plays the audio clip at a specific position is more for 3D games where sounds can be more positional in a 3D environment. For the purpose of this game, you'll just play the audio clip at the mouse's position.
Switch back to Unity and select the mouse GameObject in the Hierarchy. Drag the coin_collect sound from the Project view to the Coin Collect Sound field in the MouseController script.

Run the scene. Grab a coin and enjoy the resulting sound effect!

Next, you need to add the sound of the jetpack and the mouse's footsteps when it is running on the floor. This will be just a little bit different since the mouse will have to have two Audio Source components at once.
Select the mouse GameObject in the Hierarchy and add two Audio Source components. Drag footsteps from the Project view to the Audio Clip of the first Audio Source component. Then drag jetpack_sound to the Audio Clip field of the second Audio Source component.
Enable Play On Awake and Loop for both Audio Sources.

If you run the scene, you will hear both sounds playing all the time, independently of whether the mouse is flying or running on the floor. You'll fix this in code.
Open the MouseController script and add the following two instance variables:
public AudioSource jetpackAudio;
public AudioSource footstepsAudio;
These will reference your newly created Audio Sources. Now add the AdjustFootstepsAndJetpackSound method:
void AdjustFootstepsAndJetpackSound(bool jetpackActive)
{
    footstepsAudio.enabled = !isDead && isGrounded;
    jetpackAudio.enabled = !isDead && !isGrounded;
    if (jetpackActive)
    {
        jetpackAudio.volume = 1.0f;
    }
    else
    {
        jetpackAudio.volume = 0.5f;
    }
}
This method enables and disables the footsteps and the jetpack Audio Source components. The footsteps sound is enabled when the mouse is not dead and on the ground. The jetpack sound is enabled only when the mouse is not dead and not on the ground.
In addition, this method also adjusts the jetpack volume so that it corresponds with the particle system.
Finally, add a call to AdjustFootstepsAndJetpackSound at the end of the FixedUpdate method:
AdjustFootstepsAndJetpackSound(jetpackActive);
Next you will need to assign references to the Audio Source components within the mouse GameObject to the footstepsAudio and jetpackAudio variables.
Switch back to Unity and select the mouse GameObject in the Hierachy. You’re going to work only within the Inspector window. Collapse all components except Mouse Controller.
Now drag the top Audio Source component to Footsteps Audio in the Mouse Controller script component.
After that, drag the second Audio Source component to the Jetpack Audio in the Mouse Controller script component.

Run the scene. Now you should hear the footsteps when the mouse is running on the floor and jetpack engine when it’s flying. Also the jetpack sound should become stronger when you enable the jetpack by holding the left mouse button.

To add music, follow these simple steps:

That’s it. Run the scene and enjoy some music!
Currently this room with a view is pretty... well, blue.

However, there are two ways to solve it:
Of course you’ll go with the first option. But instead of adding a motionless background image, you will add a parallax background.
You will add two Quads, one for the background and one for the foreground parallax layer.
You will set a texture for each quad, and instead of moving quads to simulate movement, you will simply move the textures within the quad at a different speed for the background and the foreground layer.
To use background images with quads, you need to adjust how they are imported to Unity.
Open the Sprites folder in the Project view and select window_background. In the Inspector change its Texture Type to Default instead of Sprite (2D and UI). After that change Wrap Mode to Repeat and click Apply.

Do the same for the window_foreground image.

Wait, what, another camera? The Main Camera is reserved for following the mouse through the level. This new camera will render the parallax background and won't move.
Create a new camera by selecting GameObject ▸ Camera. Select it in the Hierarchy and make the following changes in the Inspector:

Since you have two cameras, you also have two audio listeners in the scene. Disable the Audio Listener in ParallaxCamera or you will get the following warning:
There are 2 audio listeners in the scene. Please ensure there is always exactly one audio listener in the scene.

Create two Quad objects by choosing GameObject ▸ 3D Object ▸ Quad. Name the first quad parallaxBackground and the second parallaxForeground. Drag both quads to ParallaxCamera to add them as children.

Select parallaxBackground and change its Position to (0, 0.7, 10) and Scale to (11.36, 4.92, 1).
Note: You use this scale to accommodate the background image's size of 1136 × 492 px without distortion.

Select parallaxForeground and set its Position to (0, 0.7, 9) and Scale to (11.36, 4.92, 1).

Open the Sprites folder in the Project view. Drag the window_background over to parallaxBackground and window_foreground over parallaxForeground in the Hierarchy.

Then select parallaxForeground in the Hierarchy. You will see that a Mesh Renderer component was added. Click on the Shader drop down and select Unlit ▸ Transparent.

Do the same for parallaxBackground.

This is what you should see in the Scene view right now.

If you disable 2D mode and rotate the scene a little, you can see how all the scene components are positioned and layered.

Run the scene. You will see that the background is in front of the main level. This is useful so you can see how the textures move with ParallaxScrolling. Once you have the textures moving, you will move it to the background.

You will not move the Quads. Instead, you're going to move the textures of the quads by changing the texture offset. Since you set the Wrap Mode to Repeat the texture will repeat itself.
Create a new C# Script called ParallaxScroll and attach it to ParallaxCamera.

Open the ParallaxScroll script and add the following instance variables:
//1
public Renderer background;
public Renderer foreground;
//2
public float backgroundSpeed = 0.02f;
public float foregroundSpeed = 0.06f;
//3
public float offset = 0.0f;
Here is a breakdown of what these variables will do:
Renderer variables will hold a reference to the Mesh Renderer component of each of the quads so that you can adjust their texture properties.backgroundSpeed and foregroundSpeed just define the speed for each background.offset will be provided by the player’s position. This will enable you to couple the mouse’s movement to the movement of the parallax background. If your pick up a power up and boost forward, the background will move quickly. If the player dies, the movement stops.Add the following code to the Update method:
float backgroundOffset = offset * backgroundSpeed;
float foregroundOffset = offset * foregroundSpeed;

background.material.mainTextureOffset = new Vector2(backgroundOffset, 0);
foreground.material.mainTextureOffset = new Vector2(foregroundOffset, 0);
This code increases the texture offset of each of the quad’s textures with the offset, thus moving it. The resulting speed is different since the script uses the backgroundSpeed and foregroundSpeed coefficients.
Switch back to Unity and select ParallaxCamera in the Hierarchy. Drag the parallaxBackground quad to the Background field of the ParallaxScroll script and parallaxForeground to Foreground.

Now open the MouseController script and add the following public variable:
public ParallaxScroll parallax;
Then add the following code to the end of the FixedUpdate method:
parallax.offset = transform.position.x;
Switch back to Unity and select the mouse GameObject in the Hierarchy. Make sure the MouseController script is visible in the Inspector.
Drag ParallaxCamera from the Hierarchy to the Parallax field in the Inspector.

This will allow the MouseController script to change the offset variable of the ParallaxScroll script with respect to the mouse’s position.
Run the scene, and behold the beautiful parallax effect!

But what about the level itself? You can’t see it!
Select ParallaxCamera in the Hierarchy. In the Inspector, find the Camera component and look for a Depth field. Set it to -2.

However, if you run the game right now you won’t see the parallax background through the window.

To fix this, select the Main Camera in the Hierarchy and set its Clear Flags to Depth Only. This way it won't clear out the picture drawn by the parallax camera.

Run the scene. Now you will see the parallax background through the window.

You now have a fully functioning and decorated game. Great job! Thanks for sticking with it through all three parts!.
That mouse sure did sacrifice himself many times in the making of this tutorial series. Hopefully you enjoyed the end result though and his deaths were not in vain! If you want to compare your end result you can download the final project from the materials at the top or bottom of this tutorial.
Check out this this video if you want to know more about the making of the actual Jetpack Joyride game.
Creating a parallax background is heavily inspired by this video by Mike Geig, who has a lot of really cool videos on Unity.
Please post your questions and comments below. Thank you for following along with this tutorial! :]
The post How to Make a Game Like Jetpack Joyride in Unity 2D – Part 3 appeared first on Ray Wenderlich.
This is the second part of the tutorial on how to create a game like Jetpack Joyride in Unity 2D. If you’ve missed the first part, you can find it here.
In the first part of this tutorial series, you created a game with a mouse flying up and down in a room. Oh, and don’t forget the flames shooting from his jetpack! Although the fire is fun to look at, simply adding jetpack flames doesn’t make a good game.
In this part of the tutorial series, you’re going to move the mouse forward through randomly generated rooms to simulate an endless level. You’ll also add a fun animation to make the mouse run when it is grounded.
If you completed the first part of this tutorial series, you can continue working with your own project. Alternatively, you can download the RocketMouse Part 1 Final from the materials at the top or bottom of this tutorial. Unpack that and open the RocketMouse.unity scene contained within.
It’s time to move forward — literally! To make the mouse fly forward you will need to do two things:
Adding a bit of code will solve both tasks.
Open the MouseController script and add the following public variable:
public float forwardMovementSpeed = 3.0f;
This will define how fast the mouse moves forward.

Next, add the following code to the end of FixedUpdate:
Vector2 newVelocity = playerRigidbody.velocity;
newVelocity.x = forwardMovementSpeed;
playerRigidbody.velocity = newVelocity;
This code simply sets the velocity x-component without making any changes to the y-component. It is important to only update the x-component, since the y-component is controlled by the jetpack force.
Run the scene! The mouse moves forward, but at some point, the mouse just leaves the screen.

To fix this, you need to make the camera follow the mouse.
In the Project view, navigate to RW/Scripts and create a new C# Script named CameraFollow. Drag it onto the Main Camera in the Hierarchy to add it as a component.
Open this CameraFollow script and add the following public variable:
public GameObject targetObject;
You will assign the mouse GameObject to this variable in a moment, so that the camera knows which object to follow.
Add the following code to the Update method:
float targetObjectX = targetObject.transform.position.x;
Vector3 newCameraPosition = transform.position;
newCameraPosition.x = targetObjectX;
transform.position = newCameraPosition;
This code simply takes the x-coordinate of the target object and moves the camera to that position.
Switch back to Unity and select Main Camera in the Hierarchy. There is a new property in the CameraFollow component called Target Object. You will notice that it is not set to anything.

To set the Target Object, click on mouse in the Hierarchy and, without releasing, drag the mouse to the Target Object field in the Inspector as shown below:

Note: It is important to not release the mouse button, since if you click on the mouse and release the mouse button you will select the mouse character and the Inspector will show the mouse properties instead of Main Camera.
Alternatively, you can lock the Inspector to the Main Camera by clicking the lock button in the Inspector.

Run the scene. This time the camera follows the mouse.

This is a good news / bad news kind of thing – the good news is that the camera follows the mouse, but the bad news is that, well, nothing else does!
You’ll address this in a moment, but first you will need to offset the mouse to the left side of the screen. Why? Unless the player has the reflexes of a cat, you will want to give them a little more time to react and avoid obstacles, collect coins, and generally have fun playing the game.
Select the mouse in the Hierarchy and set its Position to (-3.5, 0, 0) and run the scene.

Wait — the mouse is still centered on the screen, but this has nothing to do with the mouse position. This happens because the camera script centers the camera at the target object. This is also why you see the blue background on the left, which you didn’t see before.
To fix this, open the CameraFollow script and add a distanceToTarget private variable:
private float distanceToTarget;
Then add the following code to the Start method:
distanceToTarget = transform.position.x - targetObject.transform.position.x;
This will calculate the initial distance between the camera and the target. Finally, modify the code in the Update method to take this distance into account:
float targetObjectX = targetObject.transform.position.x;
Vector3 newCameraPosition = transform.position;
newCameraPosition.x = targetObjectX + distanceToTarget;
transform.position = newCameraPosition;
The camera script will now keep the initial distance between the target object and the actual camera. It will also maintain this gap throughout the entire game.
Run the scene, and the mouse will remain offset to the left.

Right now playing the game for more than a few seconds isn’t much fun. The mouse simply flies out of the room into a blue space. You could write a script that adds backgrounds, places the floor and the ceiling and finally adds some decorations. However, it is much easier to save the complete room as a Prefab and then instantiate the whole room at once.
Here is an excerpt from the Unity documentation regarding Prefabs:
In other words, you add objects to your scene, set their properties, add components like scripts, colliders, rigidbodies and so on. Then you save your object as a Prefab and you can instantiate it as many times as you like with all the properties and components in place.
You’ll want your Prefab to contain all the different room elements: the book case, the window, the ceiling, etc. To include all these elements as part of the same Prefab, you’ll first need to add them to a parent object.
To do this, create an Empty GameObject by choosing GameObject ▸ Create Empty. Then select this new GameObject in the Hierarchy, and make the following changes in the Inspector:
This is what you should see in the Inspector:

Note: It is important to understand that room1 is placed right in the center of the scene and at the (0, 0, 0) point. This is not a coincidence.
When you add all the room parts into room1 to group them, their positions will become relative to the room1 GameObject. Later when you will want to move the whole room, it will be much easier to position it knowing that setting the position of room1 will move the room’s center to this point.
In other words, when you add objects to room1, its current position becomes the pivot point. So it is much easier if the pivot point is at the center of the group rather then somewhere else.
Move all the room parts (bg, bg (1), bg_window, ceiling, floor, object_bookcase_short1, object_mousehole) into room1, just as you did when you added the jetpack flame particle system to the mouse object.
Create a new folder named Prefabs in the RW directory in the Project browser. Open it and drag room1 from the Hierarchy directly into the Prefabs folder.

That’s it. Now you can see a Prefab named room1 containing all the room parts. To test it, try to drag the room1 Prefab into the scene. You will see how easy it is to create room duplicates using a Prefab.
Note: You can reuse this Prefab not only in this scene, but in other scenes too!

The idea behind the generator script is quite simple. The script has an array of rooms it can generate, a list of rooms currently generated, and two additional methods. One method checks to see if another room needs to be added, and the other method actually adds a room.
To check if a room needs to be added, the script will enumerate all existing rooms and see if there is a room ahead, farther then the screen width, to guarantee that the player never sees the end of the level.

Create a new C# Script in the RW/Scripts folder and name it GeneratorScript. Add this script to the mouse GameObject. Now the mouse should have two script components:

Open this new GeneratorScript by double clicking it in the Project view or in the Inspector.
Then add the following variables:
public GameObject[] availableRooms;
public List<GameObject> currentRooms;
private float screenWidthInPoints;
The availableRooms field will contain an array of Prefabs, which the script can generate. Currently you have only one Prefab (room1). But you can create many different room types and add them all to this array, so that the script could randomly choose which room type to generate.
The currentRooms list will store instanced rooms, so that it can check where the last room ends and if it needs to add more rooms. Once the room is behind the player character, it will remove it as well.
The screenWidthInPoints field is just required to cache the screen size in points.
Now, add the following code to the Start method:
float height = 2.0f * Camera.main.orthographicSize;
screenWidthInPoints = height * Camera.main.aspect;
Here you calculate the size of the screen in points. The screen size will be a used to help determine if you need to generate a new room, as described above.
Add the following AddRoom method to your GeneratorScript:
void AddRoom(float farthestRoomEndX)
{
    //1
    int randomRoomIndex = Random.Range(0, availableRooms.Length);
    //2
    GameObject room = (GameObject)Instantiate(availableRooms[randomRoomIndex]);
    //3
    float roomWidth = room.transform.Find("floor").localScale.x;
    //4
    float roomCenter = farthestRoomEndX + roomWidth * 0.5f;
    //5
    room.transform.position = new Vector3(roomCenter, 0, 0);
    //6
    currentRooms.Add(room);
}
This method adds a new room using the farthestRoomEndX point, which is the rightmost point of the level so far. Here is a description of every line of this method:
Now take a short break; the next method is going to be a bit bigger!
Ready for some more code? Add the following GenerateRoomIfRequired method:
private void GenerateRoomIfRequired()
{
    //1
    List<GameObject> roomsToRemove = new List<GameObject>();
    //2
    bool addRooms = true;
    //3
    float playerX = transform.position.x;
    //4
    float removeRoomX = playerX - screenWidthInPoints;
    //5
    float addRoomX = playerX + screenWidthInPoints;
    //6
    float farthestRoomEndX = 0;
    foreach (var room in currentRooms)
    {
        //7
        float roomWidth = room.transform.Find("floor").localScale.x;
        float roomStartX = room.transform.position.x - (roomWidth * 0.5f);
        float roomEndX = roomStartX + roomWidth;
        //8
        if (roomStartX > addRoomX)
        {
            addRooms = false;
        }
        //9
        if (roomEndX < removeRoomX)
        {
            roomsToRemove.Add(room);
        }
        //10
        farthestRoomEndX = Mathf.Max(farthestRoomEndX, roomEndX);
    }
    //11
    foreach (var room in roomsToRemove)
    {
        currentRooms.Remove(room);
        Destroy(room);
    }
    //12
    if (addRooms)
    {
        AddRoom(farthestRoomEndX);
    }
}
It only looks scary, but in fact it is quite simple. Especially if you keep in mind the ideas previously described:
foreach loop.addRoomX point, then you need to add a room, since the end of the level is closer than the screen width.farthestRoomEndX, you store the point where the level currently ends. You will use this variable to add a new room if required, since a new room should start at that point to make the level seamless.foreach loop you simply enumerate currentRooms. You use the floor to get the room width and calculate the roomStartX (the point where the room starts, i.e. the leftmost point of the room) and roomEndX (the point where the room ends, i.e. the rightmost point of the room).addRoomX then you don’t need to add rooms right now. However there is no break instruction here, since you still need to check if this room needs to be removed.removeRoomX point, then it is already off the screen and needs to be removed.addRooms is still true then the level end is near. addRooms will be true if it didn’t find a room starting farther than the screen's width. This indicates that a new room needs to be added.Phew, that was a lot of code — but you’ve made it!
You will need to periodically execute GenerateRoomIfRequired. One way to accomplish this is with a Coroutine.
Add the following to the GeneratorScript:
private IEnumerator GeneratorCheck()
{
    while (true)
    {
        GenerateRoomIfRequired();
        yield return new WaitForSeconds(0.25f);
    }
}
The while loop will ensure any code will continue to be executed whilst the game is running and the GameObject is active. Operations involving List<> can be performance limiting; therefore, a yield statement is used to add a 0.25 second pause in execution between each iteration of the loop. GenerateRoomIfRequired is only executed as often as it is required.
To kick off the Coroutine, add the following code to the end of the Start method in GeneratorScript:
StartCoroutine(GeneratorCheck());
Return to Unity and select the mouse GameObject in the Hierarchy. In the Inspector, find the GeneratorScript component.

Drag room1 from the Hierarchy to the Current Rooms list. Then open the Prefabs folder in the Project view and drag room1 from it to Available Rooms.
As a reminder, the availableRooms property in the GeneratorScript is used as an array of room types that the script can generate. The currentRooms property is room instances that are currently added to the scene.
This means that availableRooms or currentRooms can contain unique room types that are not present in the other list.
Here is an animated GIF demonstrating the process. Note that I’ve created one more room type called room2, just to demonstrate what you would do in case you had many room Prefabs:

Run the scene. Now the mouse can endlessly fly through the level.

Note that rooms are appearing and disappearing in the Hierarchy while you fly. For even more fun, run the scene and switch to the Scene view without stopping the game. Select the mouse in the Hierarchy and press Shift-F to lock the scene camera to the mouse. Now zoom out a little (Use the scroll wheel, or hold Alt+right-click, then drag). This lets you see how rooms are added and removed in real time.

Right now the mouse is very lazy. It doesn’t want to move a muscle and simply lets the jetpack drag it on the floor. However, the price of jetpack fuel is quite expensive, so it is better for the mouse to run while on the ground.
To make the mouse run, you’re going to create an animation and modify the MouseController script to switch between animations while on the ground or in the air.
Click the disclosure triangle beside the mouse_sprite_sheet to display all of the mouse animation frames.
To work with animations, you will need to open the Animation window, if you don’t have it opened already. Choose Window ▸ Animation to open the Animation view.
Place it somewhere so that you can see both the Animation view and the Project view. I prefer placing it on top, next to the Scene and the Game views, but you can place it anywhere you like.

Before you create your first animation, create an Animations folder in the RW directory in the Project view and make sure it is selected. Don't forget that most of new files in Unity are created in the folder that is currently selected in the Project view.

Next, select the mouse GameObject in the Hierarchy, since new animations will be added to the most recently selected object in the Hierarchy.

In the Animation window, you will be prompted to create an Animator and an Animation Clip to begin. Click Create and name the first animation run. Create a second clip called fly by selecting [Create New Clip] in the dropdown menu at the top left corner, to the left of the Samples property.

Note the three new files created in the Project view. In addition to the two fly and run animations, there is also a mouse animator file. Select the mouse in the Hierarchy. In the Inspector, you will see that that an Animator component was automatically added to it.

First, you’re going to add frames to the run animation. Make sure both the Animation view and the Project view are visible. In the Animation view, select the run animation.

In the Project view, open the Sprites folder and expand the mouse_sprite_sheet.
Select all the run animation frames: mouse_run_0, mouse_run_1, mouse_run_2, mouse_run_3. Drag the frames to the Animation view's timeline as shown below:

Here is how the timeline should look like after you have added the frames.

Believe it or not, the fly animation consists of only one frame. Select the fly animation in the Animation view.

In the Project view find the mouse_fly sprite and drag it to the timeline, just as you did with the run animation. But this time you only need to add one sprite.

Why would someone want to create an animation with only one frame? This makes it much easier to switch between the running and flying mouse states using the Animator transitions. You’ll see this in a moment.
Run the scene. You will notice something is not quite right: Your poor mouse is stuck in a perpetual insane sprint! Sadly, the GIF can't fully represent the insanity here.

Since the run animation was added first, the Animator component set it as the default animation. Therefore the animation starts playing as soon as the scene runs. To fix the animation speed, select the run animation in the Animation view and set the Samples property to 8 instead of 60.

Select the mouse GameObject in the Hierarchy and find the Animator component in the Inspector. Select the Update Mode dropdown box and change Normal to Animate Physics.

As the game is using physics, it's a good idea to keep animations in sync with physics.
Run the scene. Now the mouse should be walking at a sensible rate.

However, the mouse continues to walk even while it is in the air. To fix this, you need to create some animation transitions.
To use the Animator Transitions mechanism, you’re going to need one more Unity window. In the top menu, choose Window ▸ Animator to add the Animator view, and ensure you have the mouse GameObject selected in the Hierarchy. Currently you have two animations there: run and fly. The run animation is orange, which means that it is the default animation.

However, there is no transition between the run and fly animations. This means that the mouse is stuck forever in the run animation state. To fix this you need to add two transitions: one from run to fly, and another back from fly to run.
To add a transition from run to fly, right-click the run animation and select Make Transition, then hover over the fly animation and left-click on it.
Similarly, to add a transition from fly to run, right-click the fly animation. Select Make Transition, and this time hover over the run animation and left-click.
Here is the process of creating both transitions:

This has created two unconditional transitions, which means that when you run the scene the mouse will first play its run state, but after playing the run animation one time, the mouse will switch to the fly state. Once the fly state is completed, it will transition back to run and so forth.
Switch to the Animator while the scene is running. You will see that there is a constant process of transitioning between the animations:

To break this vicious circle, you need to add a condition that controls when the fly animation should transition to the run animation and vice versa.
Open the Animator view and find the Parameters panel in the top left corner, which is currently empty. Click the + button to add a parameter, and in the dropdown select Bool.

Name the new parameter isGrounded.
Select the transition from run to fly to open transition properties in the Inspector. In the Conditions section, click the plus to add isGrounded and set its value to false.
While you are here, you’ll prevent against any lag or transition between the animation states. Uncheck Has Exit Time and click the disclosure arrow to expand the Settings for the transition. Set the Transition Duration to 0.

Do the same with the transition from fly to run, but this time set the isGrounded value to true.
This way the mouse state will change to fly when isGrounded is false, and to run when isGrounded is true.
While you still have yet to pass in the parameters, you can test the transitions right now. Run the scene, then make sure the Animator view is visible and check/uncheck the isGrounded while the game is running.

There are many ways to check if the game object is grounded. The following method is great because it provides visual representation of the point where the ground is checked, and it can be quite useful when you have many different checks, such as ground check, ceiling check, or others.
What gives this method visual representation is an Empty GameObject added as a child of the player character, as shown below.

Create an Empty GameObject, then drag it over the mouse GameObject in the Hierarchy to add it as a child object. Select this GameObject in the Hierarchy and rename it to groundCheck. Set its Position to (0, -0.7, 0).
To make it visible in the scene, click on the icon selection button in the Inspector and set its icon to the green oval. You can really choose any color, but green is truly the best.

Here is what you should get in the end:

The MouseController script will use the position of this Empty GameObject to check if it is on the ground.
Before you can check that the mouse is on the ground, you need to define what is ground. If you don’t do this, the mouse will walk on top of lasers, coins and other game objects with colliders.
You’re going to use the LayerMask class in the script, but to use it, you first must set the correct Layer to the floor object.
Open the Prefabs folder in the Project view and expand the room1 Prefab. Select the floor inside the Prefab.

In the Inspector, click on the Layer dropdown and choose the Add Layer... option.

This will open the Tags & Layers editor in the Inspector. Find the first editable element, User Layer 8, and enter Ground in it. All previous layers are reserved by Unity.

Next, select the floor within the room1 Prefab once again and set its Layer to Ground.

To make the mouse automatically switch states, you will have to update the MouseController script to check if the mouse is currently grounded, then let the Animator know about it.
Open the MouseController script and add the following instance variables:
public Transform groundCheckTransform;
private bool isGrounded;
public LayerMask groundCheckLayerMask;
private Animator mouseAnimator;
The groundCheckTransform variable will store a reference to the groundCheck Empty GameObject that you created earlier. The isGrounded variable denotes if the mouse is grounded, while the groundCheckLayerMask stores a LayerMask that defines what is the ground. Finally, the mouseAnimator variable contains a reference to the Animator component.
GetComponent in an instance variable, since GetComponent is slower.
To cache the Animator component add the following line of code to Start:
mouseAnimator = GetComponent<Animator>();
Now add UpdateGroundedStatus:
void UpdateGroundedStatus()
{
    //1
    isGrounded = Physics2D.OverlapCircle(groundCheckTransform.position, 0.1f, groundCheckLayerMask);
    //2
    mouseAnimator.SetBool("isGrounded", isGrounded);
}
This method checks if the mouse is grounded and sets the Animator parameter as follows:
groundCheckLayerMask then the mouse is grounded.Finally, add a call to UpdateGroundedStatus at the end of the FixedUpdate method:
UpdateGroundedStatus();
This calls the method with each fixed update, ensuring that the ground status is consistently checked.
There is only one small step left to make the mouse automatically switch between flying and running. Open Unity and select the mouse GameObject in the Hierarchy.
Search for the Mouse Controller script component. You will see two new parameters exposed in the Inspector:

Click the Ground Check Layer Mask dropdown and select the Ground layer. Drag the groundCheck from the Hierarchy to the Ground Check Transform property.

Run the scene.

Although you cured the mouse of laziness, you haven’t cured its wastefulness. The jetpack is still firing, even when the mouse is on the ground. Think of the carbon emissions, people!
Fortunately, you only need to add a few tweaks in the code to fix this.
Open the MouseController script and add the following jetpack variable to store a reference to the particle system.
public ParticleSystem jetpack;
Then add the following AdjustJetpack method:
void AdjustJetpack(bool jetpackActive)
{
    var jetpackEmission = jetpack.emission;
    jetpackEmission.enabled = !isGrounded;
    if (jetpackActive)
    {
        jetpackEmission.rateOverTime = 300.0f;
    }
    else
    {
        jetpackEmission.rateOverTime = 75.0f;
    }
}
This method disables the jetpack’s emission when the mouse is grounded. It also decreases the emission rate when the mouse is falling down, since the jetpack might still be active, but not at full strength.
Add a call to this method to the end of FixedUpdate:
AdjustJetpack(jetpackActive);
As a reminder, the jetpackActive variable is true when you the left mouse button is depressed and false when released.
Now switch back to Unity and drag the mouse's jetpackFlames from the Hierarchy to the Jetpack property of the MouseController component.

Run the scene.

Now the jetpack has three different states: It’s disabled when the mouse is grounded, full strength when going up, and runs at a decreased emission rate when the mouse is going down. Things are looking pretty good!
Enjoying the tutorial series so far? You can download the final project for this part using the materials link at the top or bottom of this tutorial.
The final part of this series adds all the “fun” stuff: lasers, coins, sound effects, and much more!
If you want to know more about Prefabs, the Unity documentation is a good place to start.
If you have any comments, questions or issues, please post them below!
The post How to Make a Game Like Jetpack Joyride in Unity 2D – Part 2 appeared first on Ray Wenderlich.

Infinite scrolling allows users to load content continuously, eliminating the need for pagination. The app loads some initial data and then adds the rest of the information when the user reaches the bottom of the visible content.
Social media companies like Twitter and Facebook have made this technique popular over the years. If you look at their mobile applications, you can see infinite scrolling in action.
In this tutorial, you’ll learn how to add infinite scrolling to an iOS app that fetches data from a REST API. In particular, you’ll integrate the Stack Exchange REST API to display the list of moderators for a specific site, like Stack Overflow or Mathematics.
To improve the app experience, you’ll use the Prefetching API introduced by Apple in iOS 10 for both UITableView and UICollectionView. This is an adaptive technology that performs optimizations targeted to improve scrolling performances. Data source prefetching provides a mechanism to prepare data before you need to display it. For large data sources where fetching the information takes time, implementing this technology can have a dramatic impact on user experience.
For this tutorial, you’ll use ModeratorsExplorer, an iOS app that uses the Stack Exchange REST API to display the moderators for a specific site.
Start by downloading the starter project using the Download Materials link at the top or bottom of this tutorial. Once downloaded, open ModeratorsExplorer.xcodeproj in Xcode.
To keep you focused, the starter project has everything unrelated to infinite scrolling already set up for you.
In Views, open Main.storyboard and look at the view controllers contained within:

The view controller on the left is the root navigation controller of the app. Then you have:
ModeratorsSearchViewController: This contains a text field so you can search for a site. It also contains a button which takes you to the next view.ModeratorsListViewController: This includes a table which lists the moderators for a given site. Each table cell, of type ModeratorTableViewCell, includes two labels: one to display the name of the moderator and one for the reputation. There’s also a busy indicator that spins when new content is requested.Build and run the app, and you’ll see the initial screen:

At the moment, tapping on Find Moderators! will show a spinner that animates indefinitely. Later in this tutorial, you’ll hide that spinner once the initial content gets loaded.
The Stack Exchange API provides a mechanism to query items from the Stack Exchange network.
For this tutorial, you’re going to use the /users/moderators API. As the name implies, it returns the list of moderators for a specific site.
The API response is paginated; the first time you request the list of moderators, you won’t receive the whole list. Instead, you’ll get a list with a limited number of the moderators (a page) and a number indicating the total number of moderators in their system.
Pagination is a common technique for many public APIs. Instead of sending you all the data they have, they send a limited amount; when you need more, you make another request. This saves server resources and provides a faster response.
Here’s the JSON response (for clarity, it only shows the fields related to pagination):
{

  "has_more": true,
  "page": 1,
  "total": 84,
  "items": [

    ...
    ...
  ]
}
The response includes the total number of moderators in their system (84) and the requested page (1). With this information, and the list of moderators received, you can determine the number of items and pages you need to request to show the complete list.
If you want to learn more about this specific API, visit Usage of /users/moderators.
Note: This tutorial uses URLSession to implement the network client. If you’re not familiar with it, you can learn about it in URLSession Tutorial: Getting Started or in our course Networking with URLSession.
Start by loading the first page of moderators from the API.
In Networking, open StackExchangeClient.swift and find fetchModerators(with:page:completion:). Replace the method with this:
func fetchModerators(with request: ModeratorRequest, page: Int,
     completion: @escaping (Result<PagedModeratorResponse, DataResponseError>) -> Void) {
  // 1
  let urlRequest = URLRequest(url: baseURL.appendingPathComponent(request.path))
  // 2
  let parameters = ["page": "\(page)"].merging(request.parameters, uniquingKeysWith: +)
  // 3
  let encodedURLRequest = urlRequest.encode(with: parameters)

  session.dataTask(with: encodedURLRequest, completionHandler: { data, response, error in
    // 4
    guard
      let httpResponse = response as? HTTPURLResponse,
      httpResponse.hasSuccessStatusCode,
      let data = data
    else {
        completion(Result.failure(DataResponseError.network))
        return
    }

    // 5
    guard let decodedResponse = try? JSONDecoder().decode(PagedModeratorResponse.self, from: data) else {
      completion(Result.failure(DataResponseError.decoding))
      return
    }

    // 6
    completion(Result.success(decodedResponse))
  }).resume()
}
Here’s the breakdown:
URLRequest initializer. Prepend the base URL to the path required to get the moderators. After its resolution, the path will look like this:ModeratorRequest instance — except for the page and the site; the former is calculated automatically each time you perform a request, and the latter is read from the UITextField in ModeratorsSearchViewController.URLSessionDataTask with that request. URLSession data task. If it’s not valid, invoke the completion handler and return a network error result.PagedModeratorResponse object using the Swift Codable API. If it finds any errors, call the completion handler with a decoding error result.Now it’s time to work on the moderators list. In ViewModels, open ModeratorsViewModel.swift, and replace the existing definition of fetchModerators with this one:
func fetchModerators() {
  // 1
  guard !isFetchInProgress else {
    return
  }

  // 2
  isFetchInProgress = true

  client.fetchModerators(with: request, page: currentPage) { result in
    switch result {
    // 3
    case .failure(let error):
      DispatchQueue.main.async {
        self.isFetchInProgress = false
        self.delegate?.onFetchFailed(with: error.reason)
      }
    // 4
    case .success(let response):
      DispatchQueue.main.async {
        self.isFetchInProgress = false
        self.moderators.append(contentsOf: response.moderators)
        self.delegate?.onFetchCompleted(with: .none)
      }
    }
  }
}
Here’s what’s happening with the code you just added:
isFetchInProgress to true and send the request.Note: In both the success and failure cases, you need to tell the delegate to perform its work on the main thread: DispatchQueue.main. This is necessary since the request happens on a background thread and you’re going to manipulate UI elements.
Build and run the app. Type stackoverflow in the text field and tap on Find Moderators. You’ll see a list like this:

Hang on! Where’s the rest of the data? If you scroll to the end of the table, you’ll notice it’s not there.
By default, the API request returns only 30 items for each page, therefore, the app shows the first page with the first 30 items. But, how do you present all of the moderators?
You need to modify the app so it can request the rest of the moderators. When you receive them, you need to add those new items to the list. You incrementally build the full list with each request, and you show them in the table view as soon as they’re ready.
You also need to modify the user interface so it can react when the user scrolls down the list. When they get near the end of the list of loaded moderators, you need to request a new page.
Because network requests can take a long time, you need to improve the user experience by displaying a spinning indicator view if the moderator information is not yet available.
Time to get to work!
You need to modify the view model code to request the next pages of the API. Here’s an overview of what you need to do:
Open ModeratorsViewModel.swift, and add the following method below fetchModerators() :
private func calculateIndexPathsToReload(from newModerators: [Moderator]) -> [IndexPath] {
  let startIndex = moderators.count - newModerators.count
  let endIndex = startIndex + newModerators.count
  return (startIndex..<endIndex).map { IndexPath(row: $0, section: 0) }
}
This utility calculates the index paths for the last page of moderators received from the API. You'll use this to refresh only the content that's changed, instead of reloading the whole table view.
Now, head to fetchModerators(). Find the success case and replace its entire content with the following:
DispatchQueue.main.async {
  // 1
  self.currentPage += 1
  self.isFetchInProgress = false
  // 2
  self.total = response.total
  self.moderators.append(contentsOf: response.moderators)

  // 3
  if response.page > 1 {
    let indexPathsToReload = self.calculateIndexPathsToReload(from: response.moderators)
    self.delegate?.onFetchCompleted(with: indexPathsToReload)
  } else {
    self.delegate?.onFetchCompleted(with: .none)
  }
}
There’s quite a bit going on here, so let’s break it down:
You can now request all of the pages from the total list of moderators, and you can aggregate all of the information. However, you still need to request the appropriate pages dynamically when scrolling.
To get the infinite scrolling working in your user interface, you first need to tell the table view that the number of cells in the table is the total number of moderators, not the number of moderators you have loaded. This allows the user to scroll past the first page, even though you still haven't received any of those moderators. Then, when the user scrolls past the last moderator, you need to request a new page.
You'll use the Prefetching API to determine when to load new pages. Before starting, take a moment to understand how this new API works.
UITableView defines a protocol, named UITableViewDataSourcePrefetching, with the following two methods:
tableView(_:prefetchRowsAt:): This method receives index paths for cells to prefetch based on current scroll direction and speed. Usually you'll write code to kick off data operations for the items in question here.tableView(_:cancelPrefetchingForRowsAt:): An optional method that triggers when you should cancel prefetch operations. It receives an array of index paths for items that the table view once anticipated but no longer needs. This might happen if the user changes scroll directions.
Since the second one is optional, and you're interested in retrieving new content only, you'll use just the first method.
Note: If you're using a collection view instead of a table view, you can get similar behaviour by implementing UICollectionViewDataSourcePrefetching.
In the Controllers group, open ModeratorsListViewController.swift, and have a quick look. This controller implements the data source for UITableView and calls fetchModerators() in viewDidLoad() to load the first page of moderators. But it doesn't do anything when the user scrolls down the list. Here's where the Prefetching API comes to the rescue.
First, you have to tell the table view that you want to use Prefetching. Find viewDidLoad() and insert the following line just below the line where you set the data source for the table view:
tableView.prefetchDataSource = self
This causes the compiler to complain because the controller doesn't yet implement the required method. Add the following extension at the end of the file:
extension ModeratorsListViewController: UITableViewDataSourcePrefetching {
  func tableView(_ tableView: UITableView, prefetchRowsAt indexPaths: [IndexPath]) {

  }
}
You'll implement its logic soon, but before doing so, you need two utility methods. Move to the end of the file, and add a new extension:
private extension ModeratorsListViewController {
  func isLoadingCell(for indexPath: IndexPath) -> Bool {
    return indexPath.row >= viewModel.currentCount
  }

  func visibleIndexPathsToReload(intersecting indexPaths: [IndexPath]) -> [IndexPath] {
    let indexPathsForVisibleRows = tableView.indexPathsForVisibleRows ?? []
    let indexPathsIntersection = Set(indexPathsForVisibleRows).intersection(indexPaths)
    return Array(indexPathsIntersection)
  }
}
isLoadingCell(for:): Allows you to determine whether the cell at that index path is beyond the count of the moderators you have received so far.
visibleIndexPathsToReload(intersecting:): This method calculates the cells of the table view that you need to reload when you receive a new page. It calculates the intersection of the IndexPaths passed in (previously calculated by the view model) with the visible ones. You'll use this to avoid refreshing cells that are not currently visible on the screen.With these two methods in place, you can change the implementation of tableView(_:prefetchRowsAt:). Replace it with this:
func tableView(_ tableView: UITableView, prefetchRowsAt indexPaths: [IndexPath]) {
  if indexPaths.contains(where: isLoadingCell) {
    viewModel.fetchModerators()
  }
}
As soon as the table view starts to prefetch a list of index paths, it checks if any of those are not loaded yet in the moderators list. If so, it means you have to ask the view model to request a new page of moderatos. Since tableView(_:prefetchRowsAt:) can be called multiple times, the view model — thanks to its isFetchInProgress property — knows how to deal with it and ignores subsequent requests until it's finished.
Now it is time to make a few changes to the UITableViewDataSource protocol implementation. Find the associated extension and replace it with the following:
extension ModeratorsListViewController: UITableViewDataSource {
  func tableView(_ tableView: UITableView, numberOfRowsInSection section: Int) -> Int {
    // 1
    return viewModel.totalCount
  }

  func tableView(_ tableView: UITableView, cellForRowAt indexPath: IndexPath) -> UITableViewCell {
    let cell = tableView.dequeueReusableCell(withIdentifier: CellIdentifiers.list,
               for: indexPath) as! ModeratorTableViewCell
    // 2
    if isLoadingCell(for: indexPath) {
      cell.configure(with: .none)
    } else {
      cell.configure(with: viewModel.moderator(at: indexPath.row))
    }
    return cell
  }
}
Here's what you've changed:
You're almost there! You need to refresh the user interface when you receive data from the API. In this case, you need to act differently depending on the page received.
When you receive the first page, you have to hide the main waiting indicator, show the table view and reload its content.
But when you receive the next pages, you need to reload the cells that are currently on screen (using the visibleIndexPathsToReload(intersecting:) method you added earlier.
Still in ModeratorsListViewController.swift, find onFetchCompleted(with:) and replace it with this:
func onFetchCompleted(with newIndexPathsToReload: [IndexPath]?) {
  // 1
  guard let newIndexPathsToReload = newIndexPathsToReload else {
    indicatorView.stopAnimating()
    tableView.isHidden = false
    tableView.reloadData()
    return
  }
  // 2
  let indexPathsToReload = visibleIndexPathsToReload(intersecting: newIndexPathsToReload)
  tableView.reloadRows(at: indexPathsToReload, with: .automatic)
}
Here's the breakdown:
newIndexPathsToReload is nil (first page), hide the indicator view, make the table view visible and reload it.newIndexPathsToReload is not nil (next pages), find the visible cells that needs reloading and tell the table view to reload only those.It's time to see the result of all your hard work! :]
Build and run the app. When the app launches, you'll see the search view controller.
Type stackoverflow into the text field and tap the Find Moderators! button. When the first request completes and the waiting indicator disappears, you'll see the initial content. If you start scrolling to the bottom, you may notice a few cells showing a loading indicator for the moderators that haven't been received yet.

When a request completes, the app hides the spinners and shows the moderator information in the cell. The infinite loading mechanism continues until no more items are available.

Note: If the network activities occur too quickly to see your cells spinning and you're running on an actual device, you can make sure this works by toggling some network settings in the Developer section of the Settings app. Go to the Network Link Conditioner section, enable it, and select a profile. Very Bad Network is a good choice.
If you're running on the Simulator, you can use the Network Link Conditioner included in the Advanced Tools for Xcode to change your network speed. This is a good tool to have in your arsenal because it forces you to be conscious of what happens to your apps when connection speeds are less than optimal.
Hurray! This is the end of your hard work. :]
You can download the completed version of the project using the Download Materials link at the top or the bottom of this tutorial.
You’ve learned how to achieve infinite scrolling and take advantage of the iOS Prefetching API. Your users can now scroll through a potentially unlimited number of cells. You also learned how to deal with a paginated REST API like the Stack Exchange API.
If you want to learn more about iOS' prefetching API, check out Apple's documentation at What's New in UICollectionView in iOS 10, our book iOS 10 by Tutorials or Sam Davies's free screencast on iOS 10: Collection View Data Prefetching.
In the meantime, if you have any questions or comments, please join the forum discussion below!
The post UITableView Infinite Scrolling Tutorial appeared first on Ray Wenderlich.

The command line is a powerful tool that developers, or anyone, can use in their day to day work. If you’re not familiar with the command line, or want to gain confidence in your skills, then our new course, Command Line Basics, is for you!
In this 21-video course, you’ll get started with the command line and then take your knowledge to the next level right away! You’ll learn how to search and sort through directories and files, as well as how to take your knowledge and turn it into scripts you can use to automate away tedious tasks.
Take a look at what’s inside:

Introduction: Learn what exactly the command line is and why it can be such a powerful tool for your arsenal.
Man Pages: Man is your wellspring of knowledge when it comes to learning about new commands. Make sure to get well-acquianted with it before moving on to more complex challenges.
Navigation: In order to function on the command line, you’ll need to be able to see where you are and know how to move around inside the system. It’s just like riding a glowing bike that creates walls that…ok it’s not like Tron at all.
Creation and Destruction: Once youre comfortable moving around, it’s time to learn how to create files and folders and how to get rid of ones you don’t need anymore.
Creation and Destruction: Hierarchy Challenge: Test your new skills and learn how to create one new type of file.
Find: This time around, you’ll be learning how to search through a deep hierarchy of folders to find any file or type of file you’re looking for without opening Finder and doing it manually.
Searching Inside Files: Next, you’ll learn how to search and parse through the oceans of text you find in the files you come across.
Challenge: Sorting: Finally, you’ll learn how to take the results you’ve found and sort them until they’re in a shape that is most pleasing to you.
Conclusion: In the conclusion, we’ll do a quick recap of what we’ve learned so far and what we have to look forward to in the next half of the course.

Introduction: In this introduction, get a quick overview of what’s to come in the second half of our course.
Customizing Bash: Get a feel for what it’s like to edit config files in Bash and how you can bend the system to your will.
Diff: Sometimes you need to look at what has changed between two versions of a file. If that’s the case, diff has got you covered!
Challenge: Undoing a Bad Patch: And sometimes you realize you really don’t want the changes that have been made to a given file. Not to worry, the patch command has you covered there too!
File System: After working with the filesystem for so long, it’s good to take a step back and think about what’s really going on. In this video you’ll get an idea of what a file really is.
File Permissions: Now that you’ve seen how files work, it’s time to think about what file permissions are and how you can change them to suit your needs.
Bash Scripting: Tests and Ifs: In this introduction to Bash scripts, you’ll learn how to define variables as well as how to use "tests" and if-statements.
Bash Scripting: Loops and Switches: Next, you’ll learn how to add looping constructs and switch-statements to your bag of tricks.
Bash Scripting: Functions: Finally, we’ll end our tour of Bash by looking at how functions work.
Automating Your Job: Now that you’ve learned the basics, it’s time to test your skills by putting together a script that will make the lives of the designers on your team a little easier.
Challenge: Automating Your Job – Refactoring: In this challenge, you’ll refactor your script a little bit by pulling some functionality out into a re-usable function.
Conclusion: In the conclusion, we’ll recap what we’ve learned in this course, and find out where to go to learn more.
Want to check out the course? You can watch the course Introduction and Creation & Destruction for free!
The rest of the course is for raywenderlich.com subscribers only. Here’s how you can get access:
Stay tuned for more new and updated courses to come. I hope you enjoy the course! :]
The post New Course: Command Line Basics appeared first on Ray Wenderlich.
Learn how to use Operations in your app!
Everyone has had the frustrating experience of tapping a button or entering some text in an iOS or Mac app, when all of a sudden: WHAM! The user interface stops responding.
On the Mac, your users get to stare at the colorful wheel rotating for a while until they can interact with the UI again. In an iOS app, users expect apps to respond immediately to their touches. Unresponsive apps feel clunky and slow, and usually receive bad reviews.
Keeping your app responsive is easier said than done. Once your app needs to perform more than a handful of tasks, things get complicated quickly. There isn’t much time to perform heavy work in the main run loop and still provide a responsive UI.
What’s a poor developer to do? The solution is to move work off the main thread via concurrency. Concurrency means that your application executes multiple streams (or threads) of operations all at the same time. This way the user interface stays responsive as you’re performing your work.
One way to perform operations concurrently in iOS is with the Operation and OperationQueue classes. In this tutorial, you’ll learn how to use them! You’ll start with an app that doesn’t use concurrency at all, so it will appear very sluggish and unresponsive. Then, you’ll rework the app to add concurrent operations and provide a more responsive interface to the user!
The overall goal of the sample project for this tutorial is to show a table view of filtered images. The images are downloaded from the Internet, have a filter applied, and then displayed in the table view.
Here’s a schematic view of the app model:
Preliminary Model
Use the Download Materials button at the top or bottom of this tutorial to download the starter project. It is the first version of the project that you’ll be working on in this tutorial.
Build and run the project, and (eventually) you’ll see the app running with a list of photos. Try scrolling the list. Painful, isn’t it?
Classic photos, running slowly
All of the action is taking place in ListViewController.swift, and most of that is inside tableView(_:cellForRowAtIndexPath:).
Have a look at that method and note there are two things taking place that are quite intensive:
In addition, you’re also loading the list of photos from the web when it is first requested:
lazy var photos = NSDictionary(contentsOf:dataSourceURL)!
All of this work is taking place on the main thread of the application. Since the main thread is also responsible for user interaction, keeping it busy with loading things from the web and filtering images is killing the responsiveness of the app. You can get a quick overview of this by using Xcode’s gauges view. You can get to the gauges view by showing the Debug navigator (Command-7) and then selecting CPU while the app is running.
Xcode’s Gauges view, showing heavy lifting on the main thread
You can see all those spikes in Thread 1, which is the main thread of the app. For more detailed information, you can run the app in Instruments, but that’s a whole other tutorial. :]
It’s time to think about how can you improve that user experience!
Before going further, there are a few technical concepts you need to understand. Here are some key terms:
The Foundation framework contains a class called Thread, which is much easier to deal with, but managing multiple threads with Thread is still a headache. Operation and OperationQueue are higher level classes that have greatly simplified the process of dealing with multiple threads.
In this diagram, you can see the relationship between a process, threads, and tasks:
Process, Thread and Task
As you can see, a process can contain multiple threads of execution, and each thread can perform multiple tasks one at a time.
In this diagram, thread 2 performs the work of reading a file, while thread 1 performs user-interface related code. This is quite similar to how you should structure your code in iOS — the main thread performs any work related to the user interface, and secondary threads perform slow or long-running operations such as reading files, accessing the network, etc.
You may have heard of Grand Central Dispatch (GCD). In a nutshell, GCD consists of language features, runtime libraries, and system enhancements to provide systemic and comprehensive improvements to support concurrency on multi-core hardware in iOS and macOS. If you’d like to learn more about GCD, you can read our Grand Central Dispatch Tutorial.
Operation and OperationQueue are built on top of GCD. As a very general rule, Apple recommends using the highest-level abstraction, then dropping down to lower levels when measurements show this is necessary.
Here’s a quick comparison of the two that will help you decide when and where to use GCD or Operation:
This tutorial will use Operation because you’re dealing with a table view and, for performance and power consumption reasons, you need the ability to cancel an operation for a specific image if the user has scrolled that image off the screen. Even if the operations are on a background thread, if there are dozens of them waiting on the queue, performance will still suffer.
It is time to refine the preliminary non-threaded model! If you take a closer look at the preliminary model, you’ll see that there are three thread-bogging areas that can be improved. By separating these three areas and placing them in separate threads, the main thread will be relieved and can stay responsive to user interactions.
Improved model
To get rid of your application bottlenecks, you’ll need a thread specifically to respond to user interactions, a thread dedicated to downloading data source and images, and a thread for performing image filtering. In the new model, the app starts on the main thread and loads an empty table view. At the same time, the app launches a second thread to download the data source.
Once the data source has been downloaded, you’ll tell the table view to reload itself. This has to be done on the main thread, since it involves the user interface. At this point, the table view knows how many rows it has, and it knows the URL of the images it needs to display, but it doesn’t have the actual images yet! If you immediately started to download all the images at this point, it would be terribly inefficient since you don’t need all the images at once!
What can be done to make this better?
A better model is just to start downloading the images whose respective rows are visible on the screen. So your code will first ask the table view which rows are visible and, only then, will it start the download tasks. Similarly, the image filtering tasks can’t begin until the image is completely downloaded. Therefore, the app shouldn’t start the image filtering tasks until there is an unfiltered image waiting to be processed.
To make the app appear more responsive, the code will display the image right away once it is downloaded. It will then kick off the image filtering, then update the UI to display the filtered image. The diagram below shows the schematic control flow for this:
Control Flow
To achieve these objectives, you’ll need to track whether the image is downloading, has downloaded, or is being filtered. You’ll also need to track the status and type of each operation, so that you can cancel, pause or resume each as the user scrolls.
Okay! Now you’re ready to get coding!
In Xcode, add a new Swift File to your project named PhotoOperations.swift. Add the following code:
import UIKit

// This enum contains all the possible states a photo record can be in
enum PhotoRecordState {
  case new, downloaded, filtered, failed
}

class PhotoRecord {
  let name: String
  let url: URL
  var state = PhotoRecordState.new
  var image = UIImage(named: "Placeholder")

  init(name:String, url:URL) {
    self.name = name
    self.url = url
  }
}
This simple class represents each photo displayed in the app, together with its current state, which defaults to .new. The image defaults to a placeholder.
To track the status of each operation, you’ll need a separate class. Add the following definition to the end of PhotoOperations.swift:
class PendingOperations {
  lazy var downloadsInProgress: [IndexPath: Operation] = [:]
  lazy var downloadQueue: OperationQueue = {
    var queue = OperationQueue()
    queue.name = "Download queue"
    queue.maxConcurrentOperationCount = 1
    return queue
  }()

  lazy var filtrationsInProgress: [IndexPath: Operation] = [:]
  lazy var filtrationQueue: OperationQueue = {
    var queue = OperationQueue()
    queue.name = "Image Filtration queue"
    queue.maxConcurrentOperationCount = 1
    return queue
  }()
}
This class contains two dictionaries to keep track of active and pending download and filter operations for each row in the table, and an operation queues for each type of operation.
All of the values are created lazily — they aren’t initialized until they’re first accessed. This improves the performance of your app.
Creating an OperationQueue is very straightforward, as you can see. Naming your queues helps with debugging, since the names show up in Instruments or the debugger. The maxConcurrentOperationCount is set to 1 for the sake of this tutorial to allow you to see operations finishing one by one. You could leave this part out and allow the queue to decide how many operations it can handle at once — this would further improve performance.
How does the queue decide how many operations it can run at once? That’s a good question! It depends on the hardware. By default, OperationQueue does some calculation behind the scenes, decides what’s best for the particular platform it’s running on, and launches the maximum possible number of threads.
Consider the following example: Assume the system is idle and there are lots of resources available. In this case, the queue may launch eight simultaneous threads. Next time you run the program, the system may be busy with other, unrelated operations which are consuming resources. This time, the queue may launch only two simultaneous threads. Because you’ve set a maximum concurrent operations count in this app, only one operation will happen at a time.
Note: You might wonder why you have to keep track of all active and pending operations. The queue has an operations method which returns an array of operations, so why not use that? In this project, it won’t be very efficient to do so. You need to track which operations are associated with which table view rows, which would involve iterating over the array each time you needed one. Storing them in a dictionary with the index path as a key means lookup is fast and efficient.
It’s time to take care of download and filtration operations. Add the following code to the end of PhotoOperations.swift:
class ImageDownloader: Operation {
  //1
  let photoRecord: PhotoRecord

  //2
  init(_ photoRecord: PhotoRecord) {
    self.photoRecord = photoRecord
  }

  //3
  override func main() {
    //4
    if isCancelled {
      return
    }

    //5
    guard let imageData = try? Data(contentsOf: photoRecord.url) else { return }

    //6
    if isCancelled {
      return
    }

    //7
    if !imageData.isEmpty {
      photoRecord.image = UIImage(data:imageData)
      photoRecord.state = .downloaded
    } else {
      photoRecord.state = .failed
      photoRecord.image = UIImage(named: "Failed")
    }
  }
}
Operation is an abstract class, designed for subclassing. Each subclass represents a specific task as represented in the diagram earlier.
Here’s what’s happening at each of the numbered comments in the code above:
PhotoRecord object related to the operation.main() is the method you override in Operation subclasses to actually perform work. Next, you’ll create another operation to take care of image filtering. Add the following code to the end of PhotoOperations.swift:
class ImageFiltration: Operation {
  let photoRecord: PhotoRecord

  init(_ photoRecord: PhotoRecord) {
    self.photoRecord = photoRecord
  }

  override func main () {
    if isCancelled {
        return
    }

    guard self.photoRecord.state == .downloaded else {
      return
    }

    if let image = photoRecord.image,
       let filteredImage = applySepiaFilter(image) {
      photoRecord.image = filteredImage
      photoRecord.state = .filtered
    }
  }
}
This looks very similar to the downloading operation, except that you’re applying a filter to the image (using an as yet unimplemented method, hence the compiler error) instead of downloading it.
Add the missing image filter method to the ImageFiltration class:
func applySepiaFilter(_ image: UIImage) -> UIImage? {
  guard let data = UIImagePNGRepresentation(image) else { return nil }
  let inputImage = CIImage(data: data)

  if isCancelled {
    return nil
  }

  let context = CIContext(options: nil)

  guard let filter = CIFilter(name: "CISepiaTone") else { return nil }
  filter.setValue(inputImage, forKey: kCIInputImageKey)
  filter.setValue(0.8, forKey: "inputIntensity")

  if isCancelled {
    return nil
  }

  guard
    let outputImage = filter.outputImage,
    let outImage = context.createCGImage(outputImage, from: outputImage.extent)
  else {
    return nil
  }

  return UIImage(cgImage: outImage)
}
The image filtering is the same implementation used previously in ListViewController. It’s been moved here so that it can be done as a separate operation in the background. Again, you should check for cancellation very frequently; a good practice is to do it before and after any expensive method call. Once the filtering is done, you set the values of the photo record instance.
Great! Now you have all the tools and foundation you need in order to process operations as background tasks. It’s time to go back to the view controller and modify it to take advantage of all these new benefits.
Switch to ListViewController.swift and delete the lazy var photos property declaration. Add the following declarations instead:
var photos: [PhotoRecord] = []
let pendingOperations = PendingOperations()
These properties hold an array of the PhotoRecord objects and a PendingOperations object to manage the operations.
Add a new method to the class to download the photos property list:
func fetchPhotoDetails() {
  let request = URLRequest(url: dataSourceURL)
  UIApplication.shared.isNetworkActivityIndicatorVisible = true

  // 1
  let task = URLSession(configuration: .default).dataTask(with: request) { data, response, error in

    // 2
    let alertController = UIAlertController(title: "Oops!",
                                            message: "There was an error fetching photo details.",
                                            preferredStyle: .alert)
    let okAction = UIAlertAction(title: "OK", style: .default)
    alertController.addAction(okAction)

    if let data = data {
      do {
        // 3
        let datasourceDictionary =
          try PropertyListSerialization.propertyList(from: data,
                                                     options: [],
                                                     format: nil) as! [String: String]

        // 4
        for (name, value) in datasourceDictionary {
          let url = URL(string: value)
          if let url = url {
            let photoRecord = PhotoRecord(name: name, url: url)
            self.photos.append(photoRecord)
          }
        }

        // 5
        DispatchQueue.main.async {
          UIApplication.shared.isNetworkActivityIndicatorVisible = false
          self.tableView.reloadData()
        }
        // 6
      } catch {
        DispatchQueue.main.async {
          self.present(alertController, animated: true, completion: nil)
        }
      }
    }

    // 6
    if error != nil {
      DispatchQueue.main.async {
        UIApplication.shared.isNetworkActivityIndicatorVisible = false
        self.present(alertController, animated: true, completion: nil)
      }
    }
  }
  // 7
  task.resume()
}
Here’s what this does:
URLSession data task to download the property list of images on a background thread.UIAlertController to use in the event of an error.PhotoRecord objects from the dictionary.URLSession tasks run on background threads and display of any messages on the screen must be done from the main thread.Call the new method at the end of viewDidLoad():
fetchPhotoDetails()
Next, find tableView(_:cellForRowAtIndexPath:) — it’ll be easy to find because the compiler is complaining about it — and replace it with the following implementation:
override func tableView(_ tableView: UITableView, cellForRowAt indexPath: IndexPath) -> UITableViewCell {
  let cell = tableView.dequeueReusableCell(withIdentifier: "CellIdentifier", for: indexPath)

  //1
  if cell.accessoryView == nil {
    let indicator = UIActivityIndicatorView(activityIndicatorStyle: .gray)
    cell.accessoryView = indicator
  }
  let indicator = cell.accessoryView as! UIActivityIndicatorView

  //2
  let photoDetails = photos[indexPath.row]

  //3
  cell.textLabel?.text = photoDetails.name
  cell.imageView?.image = photoDetails.image

  //4
  switch (photoDetails.state) {
  case .filtered:
    indicator.stopAnimating()
  case .failed:
    indicator.stopAnimating()
    cell.textLabel?.text = "Failed to load"
  case .new, .downloaded:
    indicator.startAnimating()
    startOperations(for: photoDetails, at: indexPath)
  }

  return cell
}
Here’s what this does:
UIActivityIndicatorView and set it as the cell’s accessory view.PhotoRecord. Fetch the correct one based on the current indexPath.PhotoRecord as it is processed, so you can set them both here, regardless of the state of the record.Add the following method to the class to start the operations:
func startOperations(for photoRecord: PhotoRecord, at indexPath: IndexPath) {
  switch (photoRecord.state) {
  case .new:
    startDownload(for: photoRecord, at: indexPath)
  case .downloaded:
    startFiltration(for: photoRecord, at: indexPath)
  default:
    NSLog("do nothing")
  }
}
Here, you pass in an instance of PhotoRecord along with its index path. Depending on the photo record’s state, you kick off either a download or filter operation.
Now you need to implement the methods that you called in the method above. Remember that you created a custom class, PendingOperations, to keep track of operations; now you actually get to use it! Add the following methods to the class:
func startDownload(for photoRecord: PhotoRecord, at indexPath: IndexPath) {
  //1
  guard pendingOperations.downloadsInProgress[indexPath] == nil else {
    return
  }

  //2
  let downloader = ImageDownloader(photoRecord)

  //3
  downloader.completionBlock = {
    if downloader.isCancelled {
      return
    }

    DispatchQueue.main.async {
      self.pendingOperations.downloadsInProgress.removeValue(forKey: indexPath)
      self.tableView.reloadRows(at: [indexPath], with: .fade)
    }
  }

  //4
  pendingOperations.downloadsInProgress[indexPath] = downloader

  //5
  pendingOperations.downloadQueue.addOperation(downloader)
}

func startFiltration(for photoRecord: PhotoRecord, at indexPath: IndexPath) {
  guard pendingOperations.filtrationsInProgress[indexPath] == nil else {
      return
  }

  let filterer = ImageFiltration(photoRecord)
  filterer.completionBlock = {
    if filterer.isCancelled {
      return
    }

    DispatchQueue.main.async {
      self.pendingOperations.filtrationsInProgress.removeValue(forKey: indexPath)
      self.tableView.reloadRows(at: [indexPath], with: .fade)
    }
  }

  pendingOperations.filtrationsInProgress[indexPath] = filterer
  pendingOperations.filtrationQueue.addOperation(filterer)
}
Here’s a quick list to make sure you understand what’s going on in the code above:
indexPath to see if there is already an operation in downloadsInProgress for it. If so, ignore this request.ImageDownloader by using the designated initializer.downloadsInProgress to help keep track of things.The method to filter the image follows the same pattern, except it uses ImageFiltration and filtrationsInProgress to track the operations. As an exercise, you could try getting rid of the repetition in this section of code :]
You made it! Your project is complete. Build and run to see your improvements in action! As you scroll through the table view, the app no longer stalls and starts downloading images and filtering them as they become visible.
Classic photos, now with actual scrolling!
Isn’t that cool? You can see how a little effort can go a long way towards making your applications a lot more responsive — and a lot more fun for the user!
You’ve come a long way in this tutorial! Your little project is responsive and shows lots of improvement over the original version. However, there are still some small details that are left to take care of.
You may have noticed that as you scroll in the table view, those off-screen cells are still in the process of being downloaded and filtered. If you scroll quickly, the app will be busy downloading and filtering images from the cells further back in the list even though they aren’t visible. Ideally, the app should cancel filtering of off-screen cells and prioritize the cells that are currently displayed.
Didn’t you put cancellation provisions in your code? Yes, you did — now you should probably make use of them! :]
Open ListViewController.swift. Go to the implementation of tableView(_:cellForRowAtIndexPath:), and wrap the call to startOperationsForPhotoRecord in an if statement, as follows:
if !tableView.isDragging && !tableView.isDecelerating {
  startOperations(for: photoDetails, at: indexPath)
}
You tell the table view to start operations only if the table view is not scrolling. These are actually properties of UIScrollView and, because UITableView is a subclass of UIScrollView, table views automatically inherit these properties.
Next, add the implementation of the following UIScrollView delegate methods to the class:
override func scrollViewWillBeginDragging(_ scrollView: UIScrollView) {
  //1
  suspendAllOperations()
}

override func scrollViewDidEndDragging(_ scrollView: UIScrollView, willDecelerate decelerate: Bool) {
  // 2
  if !decelerate {
    loadImagesForOnscreenCells()
    resumeAllOperations()
  }
}

override func scrollViewDidEndDecelerating(_ scrollView: UIScrollView) {
  // 3
  loadImagesForOnscreenCells()
  resumeAllOperations()
}
A quick walk-through of the code above shows the following:
suspendAllOperations in just a moment.false, that means the user stopped dragging the table view. Therefore you want to resume suspended operations, cancel operations for off-screen cells, and start operations for on-screen cells. You will implement loadImagesForOnscreenCells and resumeAllOperations in a little while, as well.Now, add the implementation of these missing methods to ListViewController.swift:
func suspendAllOperations() {
  pendingOperations.downloadQueue.isSuspended = true
  pendingOperations.filtrationQueue.isSuspended = true
}

func resumeAllOperations() {
  pendingOperations.downloadQueue.isSuspended = false
  pendingOperations.filtrationQueue.isSuspended = false
}

func loadImagesForOnscreenCells() {
  //1
  if let pathsArray = tableView.indexPathsForVisibleRows {
    //2
    var allPendingOperations = Set(pendingOperations.downloadsInProgress.keys)
    allPendingOperations.formUnion(pendingOperations.filtrationsInProgress.keys)

    //3
    var toBeCancelled = allPendingOperations
    let visiblePaths = Set(pathsArray)
    toBeCancelled.subtract(visiblePaths)

    //4
    var toBeStarted = visiblePaths
    toBeStarted.subtract(allPendingOperations)

    // 5
    for indexPath in toBeCancelled {
      if let pendingDownload = pendingOperations.downloadsInProgress[indexPath] {
        pendingDownload.cancel()
      }
      pendingOperations.downloadsInProgress.removeValue(forKey: indexPath)
      if let pendingFiltration = pendingOperations.filtrationsInProgress[indexPath] {
        pendingFiltration.cancel()
      }
      pendingOperations.filtrationsInProgress.removeValue(forKey: indexPath)
    }

    // 6
    for indexPath in toBeStarted {
      let recordToProcess = photos[indexPath.row]
      startOperations(for: recordToProcess, at: indexPath)
    }
  }
}
suspendAllOperations() and resumeAllOperations() have straightforward implementations. OperationQueues can be suspended, by setting the suspended property to true. This will suspend all operations in a queue — you can’t suspend operations individually.
loadImagesForOnscreenCells() is a little more complex. Here’s what’s going on:
PendingOperations.startOperations(for:at:) for each.Build and run and you should have a more responsive and better resource-managed application! Give yourself a round of applause!
Classic photos, loading things one step at a time!
Notice that when you finish scrolling the table view, the images on the visible rows will start processing right away.
You can download the completed version of the project using the Download Materials button at the top or bottom of this tutorial.
You’ve learned how to use Operation and OperationQueue to move long-running computations off of the main thread while keeping your source code maintainable and easy to understand.
But beware — like deeply-nested blocks, gratuitous use of multi-threading can make a project incomprehensible to people who have to maintain your code. Threads can introduce subtle bugs that may never appear until your network is slow, or the code is run on a faster (or slower) device, or one with a different number of cores. Test very carefully and always use Instruments (or your own observations) to verify that introducing threads really has made an improvement.
A useful feature of operations that isn’t covered here is dependency. You can make an operation dependent on one or more other operations. This operation then won’t start until the operations on which it depends have all finished. For example:
// MyDownloadOperation is a subclass of Operation
let downloadOperation = MyDownloadOperation()
// MyFilterOperation  is a subclass of Operation
let filterOperation = MyFilterOperation()

filterOperation.addDependency(downloadOperation)
To remove dependencies:
filterOperation.removeDependency(downloadOperation)
Could the code in this project be simplified or improved by using dependencies? Put your new skills to use and try it. :] An important thing to note is that a dependent operation will still be started if the operations it depends on are cancelled, as well as if they finish naturally. You’ll need to bear that in mind.
If you have any comments or questions about this tutorial or Operations in general, please join the forum discussion below!
The post Operation and OperationQueue Tutorial in Swift appeared first on Ray Wenderlich.

There are times when a user is required to choose a file to upload into an app. There are many places from which to upload files: local storage on the device, Dropbox, Google Drive and other services. In this tutorial, you will create an app that will authenticate a user with Google, launch Google Drive, and then allow a user to choose a file. Once the user selects a file, the app will download and open it.
The Google Drive SDK is used to connect to a user’s Google Drive files. This tutorial will focus on allowing a user to choose an existing file, download it and display it through the app. You will use Google Drive’s built-in file picker, which will allow us to choose any file that is on the user’s Google drive.
Make sure you have Android Studio and the Kotlin plugin installed before you begin. To install Android Studio go to developer.android.com. Your phone or emulator will need up-to-date Google Play services on the device to run the app.
Since your UI will be bare-bones, open up Android Studio 3.1.1 or later and create a new project. From Android Studio, select Start a new Android Studio project from the startup screen or New Project from the File menu.

Enter the name GoogleDriveDemo, your company domain (or example.com if your wish) and a project location. Make sure that Kotlin support is selected and then press Next.

You shouldn’t need to change anything on this screen. Just click Next.

Select Empty Activity and press Next.

Click Finish.
In order to use the Google Drive SDK, you need to enable the API in your app.
Walking through the steps:


If everything works correctly, you should see something like this:


Go back to the Android app and you can start adding settings and code.
First, you’ll update the build.gradle file inside the app folder. Add two variables for the version of Google Play services and Android support libraries after the apply plugin statements near the top:
ext {
  play_services_version = "15.0.1"
  support_version = "27.1.1"
}
This will let you re-use the variables and easily change the versions. Replace the version of com.android.support:appcompat-v7 with variable, and add the support design library, both in the dependencies block:
implementation "com.android.support:appcompat-v7:$support_version"
implementation "com.android.support:design:$support_version"
The appcompat library contains all of the compatibility classes that help you write code that works on many versions of the Android OS. The design support library is used in this tutorial to display a Snackbar message.
Next, add the libraries for the Google Drive SDK and the Okio library from Square for downloading files.
// Google Drive
implementation "com.google.android.gms:play-services-auth:$play_services_version"
implementation "com.google.android.gms:play-services-drive:$play_services_version"
implementation 'com.squareup.okio:okio:1.14.0'
Now, sync the project Gradle files (File ▸ Sync Project with Gradle Files)
Next, you’ll modify AndroidManifest.xml. Open the file and add internet permissions right above the
<uses-permission android:name="android.permission.INTERNET"/>
As the first sub-element in the
<meta-data
    android:name="com.google.android.gms.version"
    android:value="@integer/google_play_services_version" />
If you command-click (or Ctrl-click on PC) on the @integer/google_play_services_version you will see that it takes you to the play services values file that let’s the Google Play SDK know which version you are using.
Next, you’ll create a FileProvider. This is required for Android 8.0 Oreo and above to access local files.
First, create a new directory by right-clicking on the app/res directory and selecing New ▸ Android Resource Directory. Name it xml. Right-click on the xml directory and select New ▸ File; name it provider_paths.
This is needed since Android Oreo does not support sharing file:// urls. Open the new file and paste in the following:
<?xml version="1.0" encoding="utf-8"?>
<paths xmlns:android="http://schemas.android.com/apk/res/android">
   <external-path name="external_files" path="."/>
</paths>
Now, in the Android Manifest file, after the meta-data tag you recently added, add:
<provider
  android:name="android.support.v4.content.FileProvider"
  android:authorities="${applicationId}.provider"
  android:exported="false"
  android:grantUriPermissions="true">
  <meta-data
    android:name="android.support.FILE_PROVIDER_PATHS"
    android:resource="@xml/provider_paths"/>
This sets up your app to use Android’s FileProvider class to handle local files as urls instead of as files. This is a security restriction that Google has implemented.
Now, you’ll add the strings that you’ll need for the UI. Open the strings.xml file and add:
<string name="source_google_drive">Google Drive</string>
<string name="start_drive">Start Google Drive</string>
<string name="login">Log In</string>
<string name="logout">Log Out</string>
<string name="status_logged_out">Logged Out</string>
<string name="status_logged_in">Logged In</string>
<string name="status_user_cancelled">User Cancelled</string>
<string name="status_error">We found a problem: %1$s</string>
<string name="not_open_file">Could not open file</string>
The first string is for the Google Drive’s activity title, and the rest are for the UI.
Next, you’ll update the UI. To do so, you’ll simply create three buttons to Login, Logout, and Open Google Drive, and a TextView to display login status. Open activity_main.xml and replace the contents with the following:
<?xml version="1.0" encoding="utf-8"?>
<android.support.constraint.ConstraintLayout xmlns:android="http://schemas.android.com/apk/res/android"
  xmlns:app="http://schemas.android.com/apk/res-auto"
  xmlns:tools="http://schemas.android.com/tools"
  android:id="@+id/main_layout"
  android:layout_width="match_parent"
  android:layout_height="match_parent"
  tools:context=".MainActivity">

  <Button
    android:id="@+id/login"
    android:layout_width="wrap_content"
    android:layout_height="wrap_content"
    android:text="@string/login"
    app:layout_constraintBottom_toTopOf="@+id/start"
    app:layout_constraintEnd_toEndOf="parent"
    app:layout_constraintHorizontal_bias="0.5"
    app:layout_constraintStart_toStartOf="parent"
    app:layout_constraintTop_toTopOf="parent" />

  <Button
    android:id="@+id/start"
    android:layout_width="wrap_content"
    android:layout_height="wrap_content"
    android:text="@string/start_drive"
    app:layout_constraintBottom_toTopOf="@+id/logout"
    app:layout_constraintEnd_toEndOf="parent"
    app:layout_constraintHorizontal_bias="0.5"
    app:layout_constraintStart_toStartOf="parent"
    app:layout_constraintTop_toBottomOf="@+id/login" />

  <Button
    android:id="@+id/logout"
    android:layout_width="wrap_content"
    android:layout_height="wrap_content"
    android:text="@string/logout"
    app:layout_constraintBottom_toBottomOf="parent"
    app:layout_constraintEnd_toEndOf="parent"
    app:layout_constraintHorizontal_bias="0.5"
    app:layout_constraintStart_toStartOf="parent"
    app:layout_constraintTop_toBottomOf="@+id/start" />

  <TextView
    android:id="@+id/status"
    android:layout_width="0dp"
    android:layout_height="wrap_content"
    android:layout_marginBottom="8dp"
    android:gravity="center_horizontal"
    android:text="@string/status_logged_out"
    app:layout_constraintBottom_toBottomOf="parent"
    app:layout_constraintEnd_toEndOf="parent"
    app:layout_constraintStart_toStartOf="parent" />
</android.support.constraint.ConstraintLayout>
Run the app and make sure the UI is displayed correctly:

If everything works correctly, you should have a basic UI with three buttons and a status message at the bottom. If the project does not compile or something goes wrong when running, compare your work with each of the steps above.
Since there are only a few classes, you will put all of them in the root source folder. Start with the interface that the listener of your service must implement. Create a new Kotlin interface named ServiceListener:
interface ServiceListener {
  fun loggedIn() //1
  fun fileDownloaded(file: File) //2
  fun cancelled() //3
  fun handleError(exception: Exception) //4
}
You may need to choose Option+Return on macOS Alt+Enter on PC to pull in the import for the File class.
These methods notify the listener when:
loggedIn(): A user is successfully authenticated.fileDownloaded(file: File): A file is selected and downloaded successfully.cancelled(): A login or file selection is cancelled.handleError(exception: Exception): There is any error.This interface will be implemented by MainActivity and used by a service as a way to let the user of the service know when something has happened.
Next, create a simple data class for holding the information that the service needs. Create a new data class named GoogleDriveConfig:
data class GoogleDriveConfig(val activityTitle: String? = null, val mimeTypes: List<String>? = null)
This class contains the title that Google Drive will designate as the activity’s title and the mimeTypes that determines which file types to show.
Next, you’ll create the actual service. Create a new class named GoogleDriveService:
class GoogleDriveService(private val activity: Activity, private val config: GoogleDriveConfig) {

}
The class is not an Android Service, but instead acts as a service for MainActivity. You will be adding the following code, in order.
First, add a companion object:
companion object {
  private val SCOPES = setOf<Scope>(Drive.SCOPE_FILE, Drive.SCOPE_APPFOLDER)
  val documentMimeTypes = arrayListOf(
      "application/pdf",
      "application/msword",
      "application/vnd.openxmlformats-officedocument.wordprocessingml.document")

  const val REQUEST_CODE_OPEN_ITEM = 100
  const val REQUEST_CODE_SIGN_IN = 101
  const val TAG = "GoogleDriveService"
}
Scopes are Google Drive’s set of permissions. Therefore, by giving a file and an app folder scope, you tell Google Drive to let you handle files and folders.
The mime types are for the type of files you want to allow the user to pick. If you want the user to choose images, you would use image/*. Here, you pick .pdf and .doc/.docx files.
You also have two request codes to use for handling the result of signing in and picking a file. The TAG constant is used for Logging.
After the companion object section, add the following variables:
var serviceListener: ServiceListener? = null //1
private var driveClient: DriveClient? = null //2
private var driveResourceClient: DriveResourceClient? = null //3
private var signInAccount: GoogleSignInAccount? = null //4
These are:
serviceListener is the listener of your service.driveClient handles high-level drive functions like Create File, Open File, and Sync.driveResourceClient handles access to Drive resources and/or files.signInAccount keeps track of the currently signed-in account.Now add a GoogleSignInClient property that is lazily-initialized:
private val googleSignInClient: GoogleSignInClient by lazy {
  val builder = GoogleSignInOptions.Builder(GoogleSignInOptions.DEFAULT_SIGN_IN)
  for (scope in SCOPES) {
    builder.requestScopes(scope)
  }
  val signInOptions = builder.build()
  GoogleSignIn.getClient(activity, signInOptions)
}
googleSignInClient is created when needed and includes the scopes defined earlier. The last statement returns the GoogleSignInClient.
You need to be able to handle the results from the user who is signing in and picking a file in the MainActivity. Create a method named onActivityResult, which will be called inside onActivityResult of MainActivity:
fun onActivityResult(requestCode: Int, resultCode: Int, data: Intent?) {
  when (requestCode) {
    REQUEST_CODE_SIGN_IN -> {
      if (data != null) {
        handleSignIn(data)
      } else {
        serviceListener?.cancelled()
      }
    }

    REQUEST_CODE_OPEN_ITEM -> {
      if (data != null) {
        openItem(data)
      } else {
        serviceListener?.cancelled()
      }
    }
  }
}
In the method, you call helper methods or the serviceListener depending on the requestCode. You can check the result against the presence of data instead of resultCode. If no data is returned, it means the user cancelled the action.
Now add the helper method for handling sign in with another method to initialize the drive client:
private fun handleSignIn(data: Intent) {
  val getAccountTask = GoogleSignIn.getSignedInAccountFromIntent(data)
  if (getAccountTask.isSuccessful) {
    initializeDriveClient(getAccountTask.result)
  } else {
    serviceListener?.handleError(Exception("Sign-in failed.", getAccountTask.exception))
  }
}

private fun initializeDriveClient(signInAccount: GoogleSignInAccount) {
  driveClient = Drive.getDriveClient(activity.applicationContext, signInAccount)
  driveResourceClient = Drive.getDriveResourceClient(activity.applicationContext, signInAccount)
  serviceListener?.loggedIn()
}
Once the user has signed in, you handle the result in initializeDriveClient(). This will create your drive clients. It also notifies the listener that the user has successfully signed in.
After a user has picked a file, you will get an activity intent and pass it to openItem(), so add that helper method now:
private fun openItem(data: Intent) {
  val driveId = data.getParcelableExtra<DriveId>(OpenFileActivityOptions.EXTRA_RESPONSE_DRIVE_ID)
  downloadFile(driveId)
}
This function gets the driveId from the intent options and passes that ID to another helper method downloadFile().
The key aspect of the whole service is downloading the picked file. To do that, you need to get an input stream to the file and save it to a local file. You will use Square’s Okio library to easily take that stream and save it to a file.
Add the downloadFile() method now:
private fun downloadFile(data: DriveId?) {
  if (data == null) {
    Log.e(TAG, "downloadFile data is null")
    return
  }
  val drive = data.asDriveFile()
  var fileName = "test"
  driveResourceClient?.getMetadata(drive)?.addOnSuccessListener {
    fileName = it.originalFilename
  }
  val openFileTask = driveResourceClient?.openFile(drive, DriveFile.MODE_READ_ONLY)
  openFileTask?.continueWithTask { task ->
    val contents = task.result
    contents.inputStream.use {
      try {
        //This is the app's download directory, not the phones
        val storageDir = activity.getExternalFilesDir(Environment.DIRECTORY_DOWNLOADS)
        val tempFile = File(storageDir, fileName)
        tempFile.createNewFile()
        val sink = Okio.buffer(Okio.sink(tempFile))
        sink.writeAll(Okio.source(it))
        sink.close()

        serviceListener?.fileDownloaded(tempFile)
      } catch (e: IOException) {
        Log.e(TAG, "Problems saving file", e)
        serviceListener?.handleError(e)
      }
    }
    driveResourceClient?.discardContents(contents)
  }?.addOnFailureListener { e ->
    // Handle failure
    Log.e(TAG, "Unable to read contents", e)
    serviceListener?.handleError(e)
  }
}
There’s a lot going on in this method. Notice the getMetaData() call. That is needed to get the name of the chosen file. You are then saving the file to your app’s internal download folder (which is not visible to the user), then alerting the listener about the downloaded file and where to find it.
You have created the methods to handle the result of signing in and picking a file, but you don’t yet have a method to initiate those actions. Create a method named pickFiles() to open the picked-file dialog:
/**
 * Prompts the user to select a text file using OpenFileActivity.
 *
 * @return Task that resolves with the selected item's ID.
 */
fun pickFiles(driveId: DriveId?) {
  val builder = OpenFileActivityOptions.Builder()
  if (config.mimeTypes != null) {
    builder.setMimeType(config.mimeTypes)
  } else {
    builder.setMimeType(documentMimeTypes)
  }
  if (config.activityTitle != null && config.activityTitle.isNotEmpty()) {
    builder.setActivityTitle(config.activityTitle)
  }
  if (driveId != null) {
    builder.setActivityStartFolder(driveId)
  }
  val openOptions = builder.build()
  pickItem(openOptions)
}
You set the mime type and title, and then set the starting folder if driveId is provided. Then call pickItem with those options.
Next add the pickItem method:
private fun pickItem(openOptions: OpenFileActivityOptions) {
  val openTask = driveClient?.newOpenFileActivityIntentSender(openOptions)
  openTask?.let {
    openTask.continueWith { task ->
      ActivityCompat.startIntentSenderForResult(activity, task.result, REQUEST_CODE_OPEN_ITEM,
          null, 0, 0, 0, null)
    }
  }
}
This will start Google Drive’s File Picker activity, which will call your onActivityResult with the user’s response.
Next, you add a method that can retrieve any account that has been signed in from previous launches:
fun checkLoginStatus() {
  val requiredScopes = HashSet<Scope>(2)
  requiredScopes.add(Drive.SCOPE_FILE)
  requiredScopes.add(Drive.SCOPE_APPFOLDER)
  signInAccount = GoogleSignIn.getLastSignedInAccount(activity)
  val containsScope = signInAccount?.grantedScopes?.containsAll(requiredScopes)
  val account = signInAccount
  if (account != null && containsScope == true) {
    initializeDriveClient(account)
  }
}
If a signed-in account is found and no scope has changed, you call initializeDriveClient() that you created earlier to handle the sign in. Add the following method to launch the Authentication dialog:
fun auth() {
  activity.startActivityForResult(googleSignInClient.signInIntent, REQUEST_CODE_SIGN_IN)
}
Finally, add a method to allow a user to log out.
fun logout() {
  googleSignInClient.signOut()
  signInAccount = null
}
Now, you will turn your attention back to the MainActivity.
Above the onCreate() function, create a simple enum to keep track of the buttons state:
enum class ButtonState {
  LOGGED_OUT,
  LOGGED_IN
}
As mentioned earlier, the activity needs to be set as a serviceListener so that it can respond to the service. Implement the ServiceListener interface in the MainActivity:
class MainActivity : AppCompatActivity(), ServiceListener {
And add the interface methods:
override fun loggedIn() {
}

override fun fileDownloaded(file: File) {
}

override fun cancelled() {
}

override fun handleError(exception: Exception) {
}
Add properties for the service and button state:
private lateinit var googleDriveService: GoogleDriveService
private var state = ButtonState.LOGGED_OUT
You need to change the state of the buttons based on your logged-in or logged-out state. Consequently, you create a function named setButtons:
private fun setButtons() {
  when (state) {
    ButtonState.LOGGED_OUT -> {
      status.text = getString(R.string.status_logged_out)
      start.isEnabled = false
      logout.isEnabled = false
      login.isEnabled = true
    }

    else -> {
      status.text = getString(R.string.status_logged_in)
      start.isEnabled = true
      logout.isEnabled = true
      login.isEnabled = false
    }
  }
}
status, start, logout, and login are the ID of the views you created in activity_main.xml. You should be able to import them using Option+Return on macOS Alt+Enter on PC as long as you have apply plugin:'kotlin-android-extensions' in the app module build.gradle, which new projects do by default.
Update onCreate() to be:
override fun onCreate(savedInstanceState: Bundle?) {
  super.onCreate(savedInstanceState)
  setContentView(R.layout.activity_main)

  //1
  val config = GoogleDriveConfig(
      getString(R.string.source_google_drive),
      GoogleDriveService.documentMimeTypes
  )
  googleDriveService = GoogleDriveService(this, config)

  //2
  googleDriveService.serviceListener = this

  //3
  googleDriveService.checkLoginStatus()

  //4
  login.setOnClickListener {
    googleDriveService.auth()
  }
  start.setOnClickListener {
    googleDriveService.pickFiles(null)
  }
  logout.setOnClickListener {
    googleDriveService.logout()
    state = ButtonState.LOGGED_OUT
    setButtons()
  }

  //5
  setButtons()
}
Here’s what the above does:
Add the onActivityResult() method and have it pass the result to the service:
override fun onActivityResult(requestCode: Int, resultCode: Int, data: Intent?) {
 googleDriveService.onActivityResult(requestCode, resultCode, data)
}
Now, add implementations for the listener methods:
override fun loggedIn() {
  state = ButtonState.LOGGED_IN
  setButtons()
}

override fun fileDownloaded(file: File) {
  val intent = Intent(Intent.ACTION_VIEW)
  val apkURI = FileProvider.getUriForFile(
      this,
      applicationContext.packageName + ".provider",
      file)
  val uri = Uri.fromFile(file)
  val extension = MimeTypeMap.getFileExtensionFromUrl(uri.toString())
  val mimeType = MimeTypeMap.getSingleton().getMimeTypeFromExtension(extension)
  intent.setDataAndType(apkURI, mimeType)
  intent.flags = FLAG_GRANT_READ_URI_PERMISSION
  if (intent.resolveActivity(packageManager) != null) {
    startActivity(intent)
  } else {
    Snackbar.make(main_layout, R.string.not_open_file, Snackbar.LENGTH_LONG).show()
  }
}

override fun cancelled() {
  Snackbar.make(main_layout, R.string.status_user_cancelled, Snackbar.LENGTH_LONG).show()
  }

override fun handleError(exception: Exception) {
  val errorMessage = getString(R.string.status_error, exception.message)
  Snackbar.make(main_layout, errorMessage, Snackbar.LENGTH_LONG).show()
}
The code inside loggedIn(), cancelled(), and handleError() are pretty straightforward. They update the UI and/or display messages with Snackbar.
In fileDownloaded(), a file is received; subsequently, you want the system to open the file. This is where the FileProvider information you put in the AndroidManifest.xml file comes in.
In Android 8.0 Oreo and above, you can no longer open file:// url’s, so you need to provide your own FileProvider for that. You don’t need any other code than this. MimeTypeMap is a system class that has a few helper methods you can use to get the file extension and mime type from the url. You create an intent and make sure that the system can handle it before starting the activity — the app will crash otherwise.
Time to give it a try! Build and run the app.
First, try logging in:

You will first be presented with an account chooser. After you’ve chosen an account, you’ll need to give the app permissions to access your Google Drive.
Next, hit the “Start Google Drive” button, and you will see your files like this:

Once you select a file and press Select, the download process will start. After the download is complete, you should then see the file you picked automatically open in a system viewer.
In this tutorial, you have learned how to integrate your app with Google Drive and how to download a file. Congratulations on successfully downloading files from your Google Drive!
You can download the final project by using the download button at the top or bottom of this tutorial.
You can do much more with Google Drive. Try, for example, adding more capabilities to your app, such as creating a file or deleting a file. Check out the documentation about other Google Drive SDK features for Android.
If you have any comments or questions about this tutorial or Google Drive SDK, feel free to join the forum discussion below!
The post Integrating Google Drive in Android appeared first on Ray Wenderlich.
In this screencast, learn how you can handle and detect Internet connection issues using reachability.
The post Screencast: Reachability in iOS appeared first on Ray Wenderlich.

We ask our mobile devices to do so many things at the same time, like play music while we use other apps, or let us use an app while it downloads and refreshes data behind the scenes. Background processing is a generic term we can use to describe how all these actions occur simultaneously.
In our new course, Android Background Processing, you’ll see how to take advantage of background processing in your Android apps, from doing two things at once, to having the OS do work for your app when it’s not running. We’ll cover all the basics you need to know to get started.
Take a look at what’s inside:


Want to check out the course? You can watch the course Introduction for free!
The rest of the course is for raywenderlich.com subscribers only. Here’s how you can get access:
Stay tuned for more new and updated courses to come. I hope you enjoy the course! :]
The post New Course: Android Background Processing appeared first on Ray Wenderlich.
 We’re happy to announce that the first 10 chapters of our book Metal by Tutorials are now available!
This book will introduce you to graphics programming in Metal — Apple’s framework for programming on the GPU. You’ll build your own game engine in Metal where you can create 3D scenes and build your own 3D games.
The book is currently in early release and available on our online store.
The two new chapters include:
Give better perspective and placement in your scene with Scene Graphs!
In our last post, we covered the updates that you can expect to see after the announcements made at WWDC 2018. But in case you missed that post:
With OpenGL and OpenCL now deprecated, WWDC 2018 brought Metal to the forefront of graphics and compute on macOS, iOS and tvOS!
The team is excited about the changes that come with Metal 2, and, of course, they will bring the latest tutorial content to you in upcoming editions of the book:
Vertices aren’t forgotten — you can inspect them with the new geometry viewer. This has a free-fly camera so that you can investigate issues outside your camera frame. If you have an iPhone X or newer, you’ll be able to use the A11 shader profiler to see how long each statement in your shaders takes to execute. Apple have really worked hard on these and other GPU profiling tools!
Remember that, when you buy the early access release, not only do you have a chance to dig into the content early, but you’ll also receive free updates when you purchase the book!
Want to buy Metal by Tutorials?
We look forward to hearing what you think of the book!
The post Metal by Tutorials: First 10 Chapters Now Available! appeared first on Ray Wenderlich.
You’ve been working on iOS apps for a while now and you think you’re pretty slick. Think you’ve done it all, eh?
Yeah I get it, you can probably do some basic networking? Maybe pull in some JSON and put together a decent table view with cells that have text and images.
That’s an impressive list of accomplishments to be sure, but tell me…
Can you do this??

That’s right, it’s time to take your app to the next level, and learn how to add video streaming!

This time around, you’ll be building a new app for all those travel vloggers out there. Some people want to make artsy films about their travels and some people want to enjoy these experiences from the comfort of their own bed.
You’re here to make both of these dreams come true.
In the process, you’ll learn the basics of the AVKit and AVFoundation frameworks.
To get started, make sure you’ve downloaded the resources available at the top of the tutorial. Then, open TravelVlogs.xcodeproj and head to VideoFeedViewController.swift.
A useful bit of development wisdom: Always favor the highest level of abstraction available to you. Then, you can drop down to lower levels when what you’ve been using no longer suits your needs. In line with this advice, you’ll start your journey at the highest level video framework.
AVKit sits on top of AVFoundation and provides all necessary UI for interacting with a video.
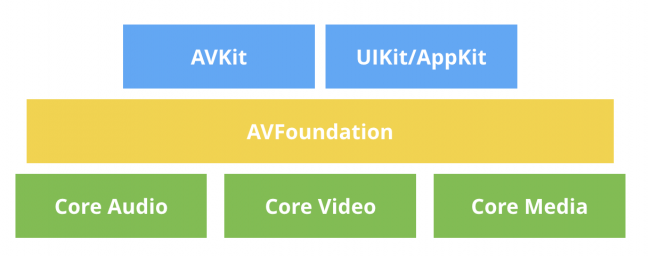
If you build and run, you’ll see an app that has already been set up with a table full of potential videos to watch.
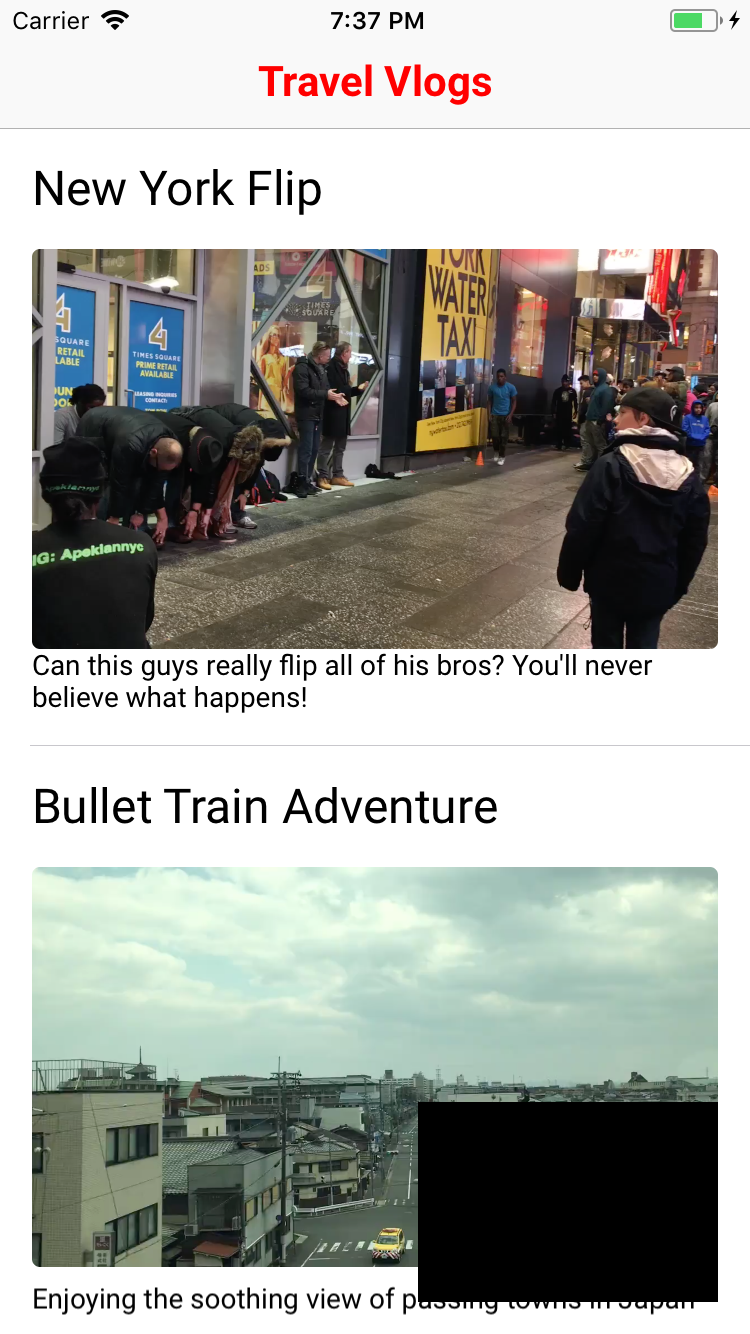
Your goal is to show a video player whenever a user taps on one of the cells.
There are actually two types of videos you can play. The first one you’ll look at is the type that’s currently sitting on the phone’s hard drive. Later, you’ll learn how to play videos streaming from a server.
To get started, navigate to VideoFeedViewController.swift. Add the following import right below the UIKit import.
import AVKit
Look below this, and you’ll see that you already have a tableView and an array of Videos defined. This is how the existing tableView is being filled with data. The videos themselves are coming from a video manager class. You can look in AppDelegate.swift to see how they’re fetched.
Next, scroll down until you find tableView(_ tableView:didSelectRowAt:). Add the following code to the existing method:
//1
let video = videos[indexPath.row]

//2
let videoURL = video.url
let player = AVPlayer(url: videoURL)
Video objects have a url property representing the path to the video file. Here, you take the url and create an AVPlayer object.AVPlayer is the heart of playing videos on iOS.
A player object can start and stop your videos, change their playback rate and even turn the volume up and down. You can think of a player as a controller object that’s able to manage playback of one media asset at a time.
At the end of the method, add the following lines to get the view controller set up.
let playerViewController = AVPlayerViewController()
playerViewController.player = player

present(playerViewController, animated: true) {
  player.play()
}
AVPlayerViewController is a handy view controller that needs a player object to be useful. Once it has one, present it as a fullscreen video player.
Once the presentation animation has finished, you call play() to get the video started.
And that’s all there is to it! Build and run to see how it looks.

The view controller shows a set of basic controls. This includes a player button, a mute button and 15 second skip buttons to go forward and backward.
That was pretty easy. How about adding video playback from a remote URL? That must be a lot harder, for sure.
Go to AppDelegate.swift. Find the line where the feed.videos is set. Instead of loading local videos, load all the videos by replacing that line with the following.
feed.videos = Video.allVideos()
And…that’s it! Go to Video.swift. Here you can see that allVideos() is simply loading one extra video. The only difference is that its url property represents an address on the web instead of a filepath.
Build and run and then scroll to the bottom of the feed to find the キツネ村 (kitsune-mura) or Fox Village video.
This is the beauty of AVPlayerViewController; all you need is a URL and you’re good to go!
In fact, go to allVideos() and swap out this line:
let videoURLString =
  "https://wolverine.raywenderlich.com/content/ios/tutorials/video_streaming/foxVillage.mp4"
…with this one:
let videoURLString =
  "https://wolverine.raywenderlich.com/content/ios/tutorials/video_streaming/foxVillage.m3u8"
Build and run and you’ll see that the fox village video still works.

The only difference is that the second URL represents an HLS Livestream. HLS live streaming works by splitting a video up into 10-second chunks. These are then served to the client a chunk at a time. As you can see in the example GIF, the video started playing a lot more quickly than when you used the MP4 version.
You may have noticed that black box in the bottom right hand corner. You are going to turn that black box into a floating custom video player. Its purpose is to play a revolving set of clips to get users excited about all these videos.

Then you need to add a few custom gestures like tapping to turn on sound and double tapping to change it to 2x speed. When you want to have very specific control over how things work, it’s better to write your own video view.
Go back to VideoFeedViewController.swift and check out the property definitions. You’ll see that the shell of this class already exists and is being created with a set of video clips.
It’s your job to get things going.
While AVFoundation can feel a bit intimidating, most of the objects you deal with are still pretty high-level, all things considered.
The main classes you’ll need to get familiar with are:
AVPlayerLayer: This special CALayer subclass can display the playback of a given AVPlayer object.AVAsset: These are static representations of a media asset. An asset object contains information such as duration and creation date.AVPlayerItem: The dynamic counterpart to an AVAsset. This object represents the current state of a playable video. This is what you need to provide to an AVPlayer to get things going.AVFoundation is a huge framework that goes well beyond these few classes. Luckily, this is all you’ll need to create your looping video player.
You’ll come back to each of these in turn, so don’t worry about memorizing them or anything.
The first class you need to think about is AVPlayerLayer. This CALayer subclass is like any other layer: It displays whatever is in its contents property onscreen.
This layer just happens to fill its contents with frames from a video you’ve given it via its player property.
Head over to VideoPlayerView.swift where you’ll find an empty view you’ll use to show videos.
The first thing you need to do is add the proper import statement, this time for AVFoundation.
import AVFoundation
Good start; now you can get AVPlayerLayer into the mix.
A UIView is really just a wrapper around a CALayer. It provides touch handling and accessibility features, but isn’t a subclass. Instead, it owns and manages an underlying layer property. One nifty trick is that you can actually specify what type of layer you would like your view subclass to own.
Add the following property override to inform this class that it should use an AVPlayerLayer instead of a plain CALayer.
override class var layerClass: AnyClass {
  return AVPlayerLayer.self
}
Since you’re wrapping the player layer in a view, you’ll need to expose a player property.
To do so, first add the following computed property so you don’t need to cast your layer subclass all the time.
var playerLayer: AVPlayerLayer {
  return layer as! AVPlayerLayer
}
Next, add the actual player definition with both a getter and a setter.
var player: AVPlayer? {
  get {
    return playerLayer.player
  }

  set {
    playerLayer.player = newValue
  }
}
Here, you’re just setting and getting your playerLayer‘s player object. The UIView is really just the middle man.
Once again, the real magic comes when you start interacting with the player itself.
Build and run to see…
You’re halfway there, even though you can’t see anything new yet!
Next, go over to VideoLooperView.swift and get ready to put your VideoPlayerView to good use. This class already has a set of VideoClips and is initializing a VideoPlayerView property.
All you need to do is take these clips and figure out how to play them in a continuous loop.
To get started, add the following player property.
private let player = AVQueuePlayer()
The discerning eye will see that this is no plain AVPlayer instance. That’s right, this is a special subclass called AVQueuePlayer. As you can probably guess by the name, this class allows you to provide a queue of items to play.
Add the following method to get started setting up your player.
private func initializePlayer() {
  videoPlayerView.player = player
}
Here, you pass the player to the videoPlayerView to connect it to the underlying AVPlayerLayer.
Now it’s time to add your list of video clips to the player so it can start playing them.
Add the following method to do so.
private func addAllVideosToPlayer() {
  for video in clips {
    //1
    let asset = AVURLAsset(url: video.url)
    let item = AVPlayerItem(asset: asset)

    //2
    player.insert(item, after: player.items().last)
  }
}
Here, you’re looping through all the clips. For each one, you:
AVURLAsset from the URL of each video clip object.AVPlayerItem with the asset that the player can use to control playback.insert(_after:) method to add each item to the queue.Now, go back to initializePlayer() and call the method.
addAllVideosToPlayer()
Now that you have your player set, it’s time to do some configuration.
To do this, add the following two lines:
player.volume = 0.0
player.play()
This sets your looping clip show to autoplay and audio off by default.
Finally, you need to call the method you’ve been working on. Go to the init(clips:) method and add this line at the bottom.
initializePlayer()
Build and run to see your fully working clip show!

Unfortunately, when the last clip has finished playing, the video player fades to black.
Apple wrote a nifty new class called AVPlayerLooper. This class will take a single player item and take care of all the logic it takes to play that item on a loop. Unfortunately, that doesn’t help you here!

What you want is to be able to play all of these videos on a loop. Looks like you’ll have to do things the manual way. All you need to do is keep track of your player and the currently playing item. When it gets to the last video, you’ll add all the clips to the queue again.
When it comes to “keeping track” of a player’s information, the only route you have is to use Key-Value Observing.

Yeah, it’s one of the wonkier APIs Apple has come up with. Even so, if you’re careful, it’s a powerful way to observe and respond to state changes in real time. If you’re completely unfamiliar with KVO, here’s the quick answer. The basic idea is that you register for notification any time the value of a particular property changes. In this case, you you want to know whenever the player‘s currentItem changes. Each time you’re notified, you’ll know the player has advanced to the next video.
The first thing you need to do is change the player property you defined earlier. Go to the top of the file and replace the old definition with:
@objc private let player = AVQueuePlayer()
The only difference is that you’ve added the @objc directive. This tells Swift that you would like to expose property to Objective-C things like KVO. To use KVO in Swift — much nicer than in Objective-C — you need to retain a reference to the observer. Add the following property just after player:
private var token: NSKeyValueObservation?
To start observing the property, go back to initializePlayer() and add the following at the end:
token = player.observe(\.currentItem) { [weak self] player, _ in
  if player.items().count == 1 {
    self?.addAllVideosToPlayer()
  }
}
Here, you’re registering a block to run each time the player’s currentItem property changes. When the current video changes, you want to check to see if the player has moved to the final video. If it has, then it’s time to add all the video clips back to the queue.
That’s all there is to it! Build and run to see your clips looping indefinitely.
One thing to note before moving on is that playing video is a resource intensive task. As things are, your app will continue to play these clips, even when you start watching a fullscreen video.
To fix it, first add the following two methods to the bottom of the VideoLooperView.swift.
func pause() {
  player.pause()
}

func play() {
  player.play()
}
As you can see, you’re exposing play() and pause() methods and passing the message along to this view’s player.
Now, go to VideoFeedViewController.swift and find viewWillDisappear(_:). There, add the following call to pause the video looper.
videoPreviewLooper.pause()
Then, go to viewWillAppear(_:) and add the matching call to resume playback when the user returns.
videoPreviewLooper.play()
Build and run, and go to a fullscreen video. The preview will resume where it left off when you return to the feed.

Next, it’s time to add some controls. Your tasks are to:
You’ll start with the actual methods you need to accomplish these things. First, go back to VideoLooperView.swift and find where you added your play and pause methods.
Add the following single tap handler that will toggle the volume between 0.0 and 1.0.
@objc func wasTapped() {
  player.volume = player.volume == 1.0 ? 0.0 : 1.0
}
Next, add a double tap handler.
@objc func wasDoubleTapped() {
  player.rate = player.rate == 1.0 ? 2.0 : 1.0
}
This one is similar in that it toggles the play rate between 1.0 and 2.0.
Next, add the following method definition that creates both gesture recognizers.
func addGestureRecognizers() {
  // 1
  let tap = UITapGestureRecognizer(target: self, action: #selector(VideoLooperView.wasTapped))
  let doubleTap = UITapGestureRecognizer(target: self,
                                         action: #selector(VideoLooperView.wasDoubleTapped))
  doubleTap.numberOfTapsRequired = 2

  // 2
  tap.require(toFail: doubleTap)

  // 3
  addGestureRecognizer(tap)
  addGestureRecognizer(doubleTap)
}
Taking it comment-by-comment:
To finish things off, go up to init(clips:) and add the following method call at the bottom.
addGestureRecognizers()
Build and run again and you’ll be able to tap and double tap to play around with the speed and volume of the clips. This shows how easy it is to add custom controls for interfacing with a custom video view.

Now, you can pump up the volume and throw things into overdrive at the tap of a finger. Pretty neat!
As a final note, if you’re going to make an app that has videos, it’s important to think about how your app will affect your users.
Yeah I know, that sounds blindingly obvious. But how many times have you been using an app that starts a silent video but turns off your music?
If you’ve never experienced this first world travesty, then go ahead and plug in your headphones… Oh, sorry. 2018 version: Bluetooth-connect your headphones. Turn on some music and then run the app. When you do, you’ll notice that your music is off even though the video looper isn’t making any noise!
It’s my contention that you should allow your user to turn off their own music instead of making such a bold assumption. Lucky for you, this isn’t very hard to fix by tweaking AVAudioSession‘s settings.
Head over to AppDelegate.swift and add the following import to the top of the file.
import AVFoundation
Next, at the top of application(_:didFinishLaunchingWithOptions:), add the following line.
try? AVAudioSession.sharedInstance().setCategory(AVAudioSessionCategoryAmbient,
                                                 mode: AVAudioSessionModeMoviePlayback,
                                                 options: [.mixWithOthers])
Here, you’re telling the shared AVAudioSession that you would like your audio to be in the AVAudioSessionCategoryAmbient category. The default is AVAudioSessionCategorySoloAmbient, which explains shutting off the audio from other apps.
You’re also specifying that your app is using audio for “movie playback” and that you’re fine with the sound mixing with sound from other sources.
For your final build and run, start your music back up and launch the app one more time.

You now have a baller video app that gives you the freedom to be the captain of your own ship.
You can download the final project using the link at the top or bottom of this tutorial.
You’ve successfully put together an application that can play both local and remote videos. It also efficiently spams your users with a highlights reel of all the coolest videos on the platform.
If you’re looking to learn more about video playback, this is the tip of the iceberg. AVFoundation is a vast framework that can handle things such as:
As always, I recommend looking at the WWDC video archive when trying to learn more about a particular subject.
One thing in particular not covered in this tutorial is reacting to AVPlayerItem‘s status property. Observing the status of remote videos will tell you about network conditions and playback quality of streaming video.
To learn more about how to react to changes in this status, I recommend Advances in AVFoundation Playback.
Also, we mentioned HLS Live Streaming but there’s a lot more to learn about this topic. If it’s something that interests you, I recommend Apple’s documentation. This page contains a nice list of links to other resources you can use to learn more.
As always, thanks for reading, and let me know if you have any questions in the comments!
The post Video Streaming Tutorial for iOS: Getting Started appeared first on Ray Wenderlich.
Part two of our new Android Background Processing course is available today! In this part of the course, you’ll learn how to make your apps more battery friendly using two APIs: JobScheduler and WorkManager.
Take a look at how JobScheduler works by using it to periodically download a JSON data file, then switch to using WorkManager, part of the new Android Jetpack library, to perform the same task.

Want to check out the course? You can watch the course Introduction and JobService videos for free!
The rest of the course is for raywenderlich.com subscribers only. Here’s how you can get access:
Stay tuned for more new and updated courses to come. I hope you enjoy the course! :]
The post Android Background Processing Part 2: JobScheduler and WorkManager appeared first on Ray Wenderlich.
![]()
We welcome the team from “ARKit by Tutorials” to talk about ARKit. What it is, what’s new this year, and the workhorse that is Facial Recognition.
[Subscribe in iTunes] [RSS Feed]
This episode is sponsored by Instabug.
Instabug is an SDK that minimizes your debugging time by providing you with a comprehensive bug and crash reporting solution. It only takes a line of code to integrate. Get started now for free or get 20% off all plans, use discount code raypodcast.
Interested in sponsoring a podcast episode? We sell ads via Syndicate Ads, check it out!
ARKit/Facial Recognition
We hope you enjoyed this episode of our podcast. Be sure to subscribe in iTunes to get notified when the next episode comes out.
We’d love to hear what you think about the podcast, and any suggestions on what you’d like to hear in future episodes. Feel free to drop a comment here, or email us anytime at podcast@raywenderlich.com.
The post ARKit/Facial Recognition – Podcast S08 E02 appeared first on Ray Wenderlich.
Part two of our new course, Command Line Basics, is ready today! In the second and final part of this course, you’ll move on to a few intermediate topics like customizing your shell, looking at the difference between two versions of a file, and changing file permissions.
Finally, bring your command line skills up to the next level with Bash Scripting, and find out how it can help you automate tedious tasks.

Introduction: In this introduction, get a quick overview of what’s to come in the second half of our course.
Customizing Bash: Get a feel for what it’s like to edit config files in Bash and how you can bend the system to your will.
Diff: Sometimes you need to look at what has changed between two versions of a file. If that’s the case, diff has got you covered!
Challenge: Undoing a Bad Patch: And sometimes you realize you really don’t want the changes that have been made to a given file. Not to worry, the patch command has you covered there too!
File System: After working with the filesystem for so long, it’s good to take a step back and think about what’s really going on. In this video you’ll get an idea of what a file really is.
File Permissions: Now that you’ve seen how files work, it’s time to think about what file permissions are and how you can change them to suit your needs.
Bash Scripting: Tests and Ifs: In this introduction to Bash scripts, you’ll learn how to define variables as well as how to use "tests" and if-statements.
Bash Scripting: Loops and Switches: Next, you’ll learn how to add looping constructs and switch-statements to your bag of tricks.
Bash Scripting: Functions: Finally, we’ll end our tour of Bash by looking at how functions work.
Automating Your Job: Now that you’ve learned the basics, it’s time to test your skills by putting together a script that will make the lives of the designers on your team a little easier.
Challenge: Automating Your Job – Refactoring: In this challenge, you’ll refactor your script a little bit by pulling some functionality out into a re-usable function.
Conclusion: In the conclusion, we’ll recap what we’ve learned in this course, and find out where to go to learn more.
Want to check out the course? You can watch the course Introduction and Creation & Destruction for free!
The rest of the course is for raywenderlich.com subscribers only. Here’s how you can get access:
Stay tuned for more new and updated courses to come. I hope you enjoy the course! :]
The post Command Line Basics Part 2: Intermediate Command Line appeared first on Ray Wenderlich.
In this video tutorial, you'll see how to setup your Android app to use a Firebase backend, and then integrate Firebase Authentication into your app.
The post Screencast: Firebase for Android – Authentication appeared first on Ray Wenderlich.

If you’ve been playing recent AAA games, you may have noticed a trend in snow covered landscapes. A few examples are Horizon Zero Dawn, Rise of the Tomb Raider and God of War. In all of these games, one thing stands out about the snow: you can create snow trails!
Allowing the player to interact with the environment like this is a great way to increase immersion. It makes the environment feel more realistic and let’s face it — it’s just really fun. Why spend hours designing fun mechanics when you can just plop on the ground and make snow angels?
In this tutorial, you will learn how to:
Start by downloading the materials for this tutorial (you can find a link at the top or bottom of this tutorial). Unzip it and navigate to SnowDeformationStarter and open SnowDeformation.uproject. For this tutorial, you will create trails using a character and a few boxes.

Before we start, you should know that the method in this tutorial will only store trails in a defined area rather than the entire world. This is because performance depends on the render target’s resolution.
For example, if you want to store trails for a large area, you would need to increase the resolution. But this also increases the scene capture’s performance impact and render target’s memory size. To optimize this, you need to limit the effective area and resolution.
Now that we have that out of the way, let’s look at what you need to create snow trails.
The first thing you need to create trails is a render target. The render target will be a grayscale mask where white indicates a trail and black is no trail. You can then project the render target onto the ground and use it to blend textures and displace vertices.

The second thing you need is a way to mask out only the snow-affecting objects. You can do this by first rendering the objects to Custom Depth. Then, you can use a scene capture with a post process material to mask out any objects rendered to Custom Depth. You can then output the mask to a render target.
The important part of the scene capture is where you place it. Below is an example of the render target captured from a top-down view. Here, the third person character and boxes have been masked out.

At first glance, a top-down capture looks like the way to go. The shapes seem to be accurate to the meshes so there should be no problem, right?
Not exactly. The issue with a top-down capture is that it does not capture anything underneath the widest point. Here’s an example:

Imagine the yellow arrows extending all the way to the ground. For the cube and cone, the arrowhead will always stay inside the object. However, for the sphere, the arrowhead will leave the sphere as it approaches the ground. But as far as the camera can tell, the arrowhead is always inside the sphere. This is what the sphere would look like to the camera:

This will cause the sphere’s mask to be larger than it should be, even though the area of contact with the ground is small.
An extension to this problem is that it is difficult to determine if an object is touching the ground.

A way to fix both of these issues is to capture from the bottom instead.
Capturing from the bottom looks like this:

As you can see, the camera now captures the bottom side which is the side that touches the ground. This solves the "widest area" issue from the top-down capture.
To determine if the object is touching the ground, you can use a post process material to perform a depth check. This would check if the object’s depth is higher than the ground depth and lower than a specified offset. If both conditions are true, you can mask out that pixel.

Below is an in-engine example with a capture zone 20 units above the ground. Notice how the mask only appears when the object passes a certain point. Also notice that the mask becomes whiter the closer the object is to the ground.

First, let’s create a post process material to perform the depth check.
To do a depth check, you need to use two depth buffers. One for the ground and another for snow-affecting objects. Since the scene capture will only see the ground, Scene Depth will output the depth for the ground. To get the depth for objects, you just render them to Custom Depth.
First, you need to calculate each pixel’s distance to the ground. Open Materials\PP_DepthCheck and then create the following:

Next, you need to create the capture zone. To do this, add the highlighted nodes:
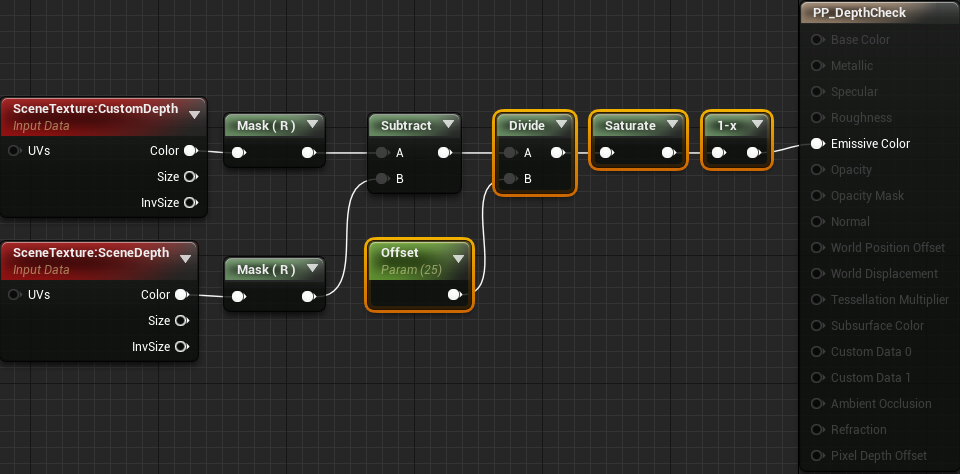
Now, if the pixel is within 25 units of the ground, it will show up in the mask. The masking intensity depends on how close the pixel is to the ground. Click Apply and then go back to the main editor.
Next, you need to create the scene capture.
First, you need a render target for the scene capture to write to. Navigate to the RenderTargets folder and create a new Render Target named RT_Capture.
Now let’s create the scene capture. For this tutorial, you will add a scene capture to a Blueprint since you will need to do some scripting for it later on. Open Blueprints\BP_Capture and then add a Scene Capture Component 2D. Name it SceneCapture.

First, you need to set the capture’s rotation so that it looks up towards the ground. Go to the Details panel and set Rotation to (0, 90, 90).

Up next is the projection type. Since the mask is a 2D representation of the scene, you need to remove any perspective distortion. To do this, set Projection\Projection Type to Orthographic.

Next, you need to tell the scene capture which render target to write to. To do this, set Scene Capture\Texture Target to RT_Capture.

Finally, you need to use the depth check material. Add PP_DepthCheck to Rendering Features\Post Process Materials. In order for post processing to work, you also need to change Scene Capture\Capture Source to Final Color (LDR) in RGB.

Now that the scene capture is all set up, you need to specify the size of the capture area.
Since it’s best to use low resolutions for the render target, you need to make sure you are using its space efficiently. This means deciding how much area one pixel covers. For example, if the capture area and render target’s resolution are the same size, you get a 1:1 ratio. Each pixel will cover a 1×1 area (in world units).
For snow trails, a 1:1 ratio is not required since it is unlikely you will need that much detail. I recommend using higher ratios since they will allow you to increase the size of the capture area while still using a low resolution. Be careful not to increase the ratio too much otherwise you will start to lose detail. For this tutorial, you will use an 8:1 ratio which means the size of each pixel is 8×8 world units.
You can adjust the size of the capture area by changing the Scene Capture\Ortho Width property. For example, if you wanted to capture a 1024×1024 area, you would set it to 1024. Since you are using an 8:1 ratio, set this to 2048 (the default render target resolution is 256×256).

This means the scene capture will capture a 2048×2048 area. This is approximately 20×20 metres.
The ground material will also need access to the capture size to project the render target correctly. An easy way to do this is to store the capture size into a Material Parameter Collection. This is basically a collection of variables that any material can access.
Go back to the main editor and navigate to the Materials folder. Afterwards, create a Material Parameter Collection which is listed under Materials & Textures. Rename it to MPC_Capture and then open it.
Next, create a new Scalar Parameter and name it CaptureSize. Don’t worry about setting its value — you will do this in Blueprints.

Go back to BP_Capture and add the highlighted nodes to Event BeginPlay. Make sure to set Collection to MPC_Capture and Parameter Name to CaptureSize.

Now any material can get the value of Ortho Width by reading from the CaptureSize parameter. That’s it for the scene capture for now. Click Compile and then go back to the main editor. The next step is to project the render target onto the ground and use it to deform the landscape.
Open M_Landscape and then go to the Details panel. Afterwards, Set the following properties:

Once you have tessellation enabled, World Displacement and Tessellation Multiplier will be enabled.

Tessellation Multipler controls the amount of tessellation. For this tutorial, leave this unplugged which means it will use the default value of 1.
World Displacement takes in a vector value describing which direction to move the vertex and by how much. To calculate the value for this pin, you first need to project the render target onto the ground.
To project the render target, you need to calculate its UV coordinates. To do this, create the following setup:

Summary:
Next, create the highlighted nodes and connect the previous calculation as shown below. Make sure to set the Texture Sample’s texture to RT_Capture.

This will project the render target onto the ground. However, any vertices outside of the capture area will sample the edges of the render target. This is an issue because the render target is only meant to be used on vertices inside the capture area. Here’s what it would look like in-game:

To fix this, you need to mask out any UVs that fall outside the 0 to 1 range (the capture area). The MF_MaskUV0-1 function is a function I built to do this. It will return 0 if the provided UV is outside the 0 to 1 range and return 1 if it is within range. Multiplying the result with the render target will perform the masking.
Now that you have projected the render target, you can use it to blend colors and displace vertices.
Let’s start with blending colors. To do this, simply connect the 1-x to the Lerp like so:

Now when there is a trail, the ground’s color will be brown. If there is no trail, it will be white.
The next step is to displace the vertices. To do this, add the highlighted nodes and connect everything like so:

This will cause all snow areas to move up by 25 units. Non-snow areas will have zero displacement which is what creates the trail.
Click Apply and then go back to the main editor. Create an instance of BP_Capture in the level and set its location to (0, 0, -2000) to place it underneath the ground. Press Play and walk around using W, A, S and D to start deforming the snow.

The deformation is working but there aren’t any trails! This is because the capture overwrites the render target every time it captures. What you need here is some way to make the trails persistent.
To create persistency, you need another render target (the persistent buffer) to store the contents of the capture before it gets overwritten. Afterwards, you add the persistent buffer back to the capture (after it gets overwritten). What you get is a loop where each render target writes to the other. This is what creates the persistency.

First, you need to create the persistent buffer.
Go to the RenderTargets folder and create a new Render Target named RT_Persistent. For this tutorial, you don’t have to change any texture settings but for your own project, make sure both render targets use the same resolution.
Next, you need a material that will copy the capture to the persistent buffer. Open Materials\M_DrawToPersistent and then add a Texture Sample node. Set its texture to RT_Capture and connect it like so:

Now you need to use the draw material. Click Apply and then open BP_Capture. First, let’s create a dynamic instance of the material (you will need to pass in values later on). Add the highlighted nodes to Event BeginPlay:

The Clear Render Target 2D nodes will make sure each render target is in a blank slate before use.
Next, open the DrawToPersistent function and add the highlighted nodes:

Next, you need to make sure you are drawing to the persistent buffer every frame since the capture happens every frame. To do this, add DrawToPersistent to Event Tick.

Finally, you need to add the persistent buffer back to the capture render target.
Click Compile and then open PP_DepthCheck. Afterwards, add the highlighted nodes. Make sure to set the Texture Sample to RT_Persistent:

Now that the render targets are writing to each other, you’ll get persistent trails. Click Apply and then close the material. Press Play and start making trails!

The result is looking great but the current setup only works for one area of the map. If you walk outside of the capture area, trails will stop appearing.

A way to get around this is move the capture area with the player. This means trails will always appear around the player’s area.
You might think that all you have to do is set the capture’s XY position to the player’s XY position. But if you do this the render target will start to blur. This is because you are moving the render target in steps that are smaller than a pixel. When this happens, a pixel’s new location will end up being between pixels. This results in multiple pixels interpolating to a single pixel. Here’s what it looks like:

To fix this, you need to move the capture in discrete steps. What you do is calculate the world size of a pixel and then move the capture in steps equal to that size. Now each pixel will never end up inbetween other pixels and therefore no blurring occurs.
To start, let’s create a parameter to hold the capture’s location. The ground material will need this for the projection math. Open MPC_Capture and add a Vector Parameter named CaptureLocation.

Next, you need to update the ground material to use the new parameter. Close MPC_Capture and then open M_Landscape. Modify the first section of the projection math to this:

Now the render target will always be projected at the capture’s location. Click Apply and then close the material.
Up next is to move the capture in discrete steps.
To calculate the pixel’s world size, you can use the following equation:
(1 / RenderTargetResolution) * CaptureSize
To calculate the new position, use the equation below on each position component (in this case, the X and Y positions).
(floor(Position / PixelWorldSize) + 0.5) * PixelWorldSize
Now let’s use those in the capture Blueprint. To save time, I have created a SnapToPixelWorldSize macro for the second equation. Open BP_Capture and then open the MoveCapture function. Afterwards, create the following setup:

This will calculate the new location and then store the difference between the new and current locations into MoveOffset. If you are using a resolution other than 256×256, make sure you change the highlighted value.
Next, add the highlighted nodes:

This will move the capture using the calculated offset. Then it will store the capture’s new location into MPC_Capture so the ground material can use it.
Finally, you need to perform the position update every frame. Close the function and then add MoveCapture before DrawToPersistent in Event Tick.

Moving the capture is only half of the solution. You also need to shift the persistent buffer as the capture moves as well. Otherwise, the capture and persistent buffer will desync and produce strange results.

To shift the persistent buffer, you will need to pass in the move offset you calculated. Open M_DrawToPersistent and add the highlighted nodes:
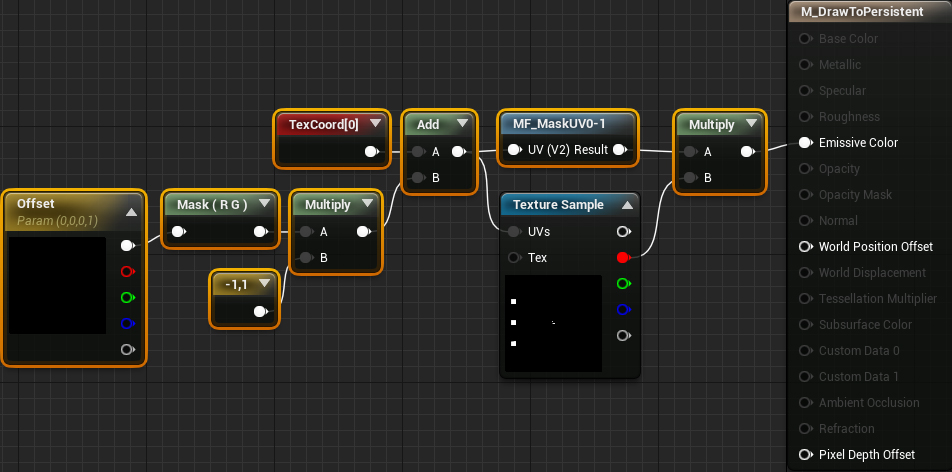
This will shift the persistent buffer using the provided offset. And just like in the ground material, you also need to flip the X coordinate and perform masking. Click Apply and then close the material.
Next, you need to pass in the move offset. Open BP_Capture and then open the DrawToPersistent function. Afterwards, add the highlighted nodes:
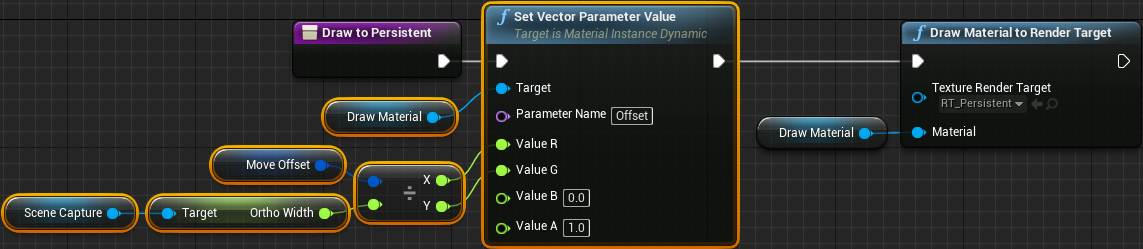
This will convert MoveOffset into UV space and then pass it to the draw material.
Click Compile and then close the Blueprint. Press Play and then run to your heart’s content! No matter how far you run, there will always be snow trails around you.
You can download the completed project using the link at the top or bottom of this tutorial.
You don’t have to use the trails in this tutorial just for snow. You can even use it for things like trampled grass (I’ll show you how to do an advanced version in the next tutorial).
If you’d like to do more with landscapes and render targets, I’d recommend checking out Building High-End Gameplay Effects with Blueprint by Chris Murphy. In this tutorial, you’ll learn how to create a giant laser that burns the ground and grass!
If there are any effects you’d like to me cover, let me know in the comments below!
The post Creating Snow Trails in Unreal Engine 4 appeared first on Ray Wenderlich.

If you’re interested in graphics programming, chances are that you’ve read about OpenGL, which remains the most-adopted API from a hardware and software perspective. Apple has developed a framework called GLKit to help developers create apps that leverage OpenGL and to abstract boilerplate code. It also allows developers to focus on drawing, not on getting the project set up. You’ll learn how all of this works in this GLKit tutorial for iOS.
GLKit provides functionality in four areas:
Without further ado, it’s time to get started!

The goal of this tutorial is to get you up-to-speed with the basics of using OpenGL with GLKit, assuming you have no previous experience with this whatsoever. You will build an app that draws a cube to the screen and makes it rotate.
There’s no starter project for this tutorial. You’re going to make it all from scratch!
Open Xcode and create a brand new project. Select the iOS\Application\Single View App template.
Set the Product Name to OpenGLKit and the Language to Swift. Make sure none of the checkboxes are selected. Click Next, choose a folder in which to save your project and click Create.
Build and run. You’ll see a simple, blank screen:

Here’s where the fun begins! Open ViewController.swift and replace its contents with:
import GLKit

class ViewController: GLKViewController {

}
You need to import GLKit and your view controller needs to be subclass of GLKViewController.
GLKit is supported in Interface Builder, so this is the best way to set it up. Do that now.
Open Main.storyboard and delete the contents of the storyboard. Then, from the Object Library, drag a GLKit View Controller into your scene.
In the Identity inspector, change the class to ViewController. In the Attributes inspector, select the Is Initial View Controller checkbox.
Finally, change the Preferred FPS to 60:

With the Attributes inspector open, click the GLKView in the canvas and notice some of the settings for color, depth and stencil formats, as well as for multisampling. You only need to change these if you’re doing something advanced, which you’re not here. So the defaults are fine for this tutorial.
Your OpenGL context has a buffer that it uses to store the colors that will be displayed to the screen. You can use the Color Format property to set the color format for each pixel in the buffer.
The default value is GLKViewDrawableColorFormatRGBA8888, meaning that eight bits are used for each color component in the buffer (four total bytes per pixel). This is optimal because it gives you the widest possible range of colors to work with which means the app will look more high quality.
That’s all the setup you need to do in the storyboard. Your view controller is set up with a GLKView to draw OpenGL content into, and it’s also set as the GLKViewDelegate for your update and draw calls.
Back in ViewController.swift, add the following variable and method:
private var context: EAGLContext?

private func setupGL() {
  // 1
  context = EAGLContext(api: .openGLES3)
  // 2
  EAGLContext.setCurrent(context)

  if let view = self.view as? GLKView, let context = context {
    // 3
    view.context = context
   // 4
    delegate = self
  }
}
Here’s what’s happening in this method:
An EAGLContext manages all of the information that iOS needs to draw with OpenGL. It’s similar to needing Core Graphics context to do anything with Core Graphics. When you create a context, you specify what version of the API that you want to use. In this case, you want to use OpenGL ES 3.0.
OpenGL contexts should not be shared across threads, so you will have to make sure that you only interact with this context from whichever thread you used to call this method `setupGL()`.
GLKView‘s context to this OpenGL ES 3.0 context that you created.ViewController) as the GLKViewController’s delegate. Whenever state and logic updates need to occur, the glkViewControllerUpdate(_ controller:) method will get called.Having done this, add the following to implement viewDidLoad() to call this method:
override func viewDidLoad() {
  super.viewDidLoad()
  setupGL()
}
So now you know which thread called `setupGL()` — it’s the main thread, which is the special thread that is dedicated to interactions with UIKit and that is used by the system when it calls `viewDidLoad()`.
At this point, you may notice that there’s an error. This is because you’re not conforming to GLKViewControllerDelegate yet. Go ahead and make it conform by adding the following extension:
extension ViewController: GLKViewControllerDelegate {
  func glkViewControllerUpdate(_ controller: GLKViewController) {

  }
}
Next, add the following method to the ViewController main class definition:
override func glkView(_ view: GLKView, drawIn rect: CGRect) {
  // 1
  glClearColor(0.85, 0.85, 0.85, 1.0)
  // 2
  glClear(GLbitfield(GL_COLOR_BUFFER_BIT))
}
This is part of the GLKViewDelegate, which draws contents on every frame. Here’s what it does:
glClearColor to specify the RGB and alpha (transparency) values to use when clearing the screen. You set it to a light gray, here.glClear to actually perform the clearing. There can be different types of buffers like the render/color buffer you’re displaying right now, and others like the depth or stencil buffers. Here you use the GL_COLOR_BUFFER_BIT flag to specify that you want to clear the current render/color buffer.Build and run the app. Notice how the screen color has changed:

It’s time to begin the process of drawing a square on the screen! Firstly, you need to create the vertices that define the square. Vertices (plural of vertex) are simply points that define the outline of the shape that you want to draw.
You will set up the vertices as follows:

Only triangle geometry can be rendered using OpenGL. You can, however, create a square with two triangles as you can see in the picture above: One triangle with vertices (0, 1, 2) and one triangle with vertices (2, 3, 0).
One of the nice things about OpenGL ES is that you can keep your vertex data organized however you like. For this project, you will use a Swift structure to store the vertex position and color information, and then an array of vertices for each one that you’ll use to draw.
Right click the OpenGLKit folder in the Project navigator and select New File… Go to iOS\Swift File and click Next. Name the file Vertex and click Create. Replace the contents of the file with the following:
import GLKit

struct Vertex {
  var x: GLfloat
  var y: GLfloat
  var z: GLfloat
  var r: GLfloat
  var g: GLfloat
  var b: GLfloat
  var a: GLfloat
}
This is a pretty straightforward Swift structure for a vertex that has variables for position (x, y, z) and color (r, g, b, a). GLFloat is a type alias for a Swift Float, but it’s the recommended way to declare floats when working with OpenGL. You may see similar patterns wherein you use OpenGL types for other variables that you create.
Return to ViewController.swift. Add the following code inside your controller:
var Vertices = [
  Vertex(x:  1, y: -1, z: 0, r: 1, g: 0, b: 0, a: 1),
  Vertex(x:  1, y:  1, z: 0, r: 0, g: 1, b: 0, a: 1),
  Vertex(x: -1, y:  1, z: 0, r: 0, g: 0, b: 1, a: 1),
  Vertex(x: -1, y: -1, z: 0, r: 0, g: 0, b: 0, a: 1),
]

var Indices: [GLubyte] = [
  0, 1, 2,
  2, 3, 0
]
Here, you are using the Vertex structure to create an array of vertices for drawing. Then, you create an array of GLubyte values. GLubyte is just a type alias for good old UInt8, and this array specifies the order in which to draw each of the three vertices that make up a triangle. That is, the first three integers (0, 1, 2) indicate to draw the first triangle by using the 0th, the 1st and, finally, the 2nd verex. The second three integers (2, 3, 0) indicate to draw the second triangle by using the 2nd, the 3rd and then the 0th vertex.
Because triangles share vertices, this saves resources: You create just one array with all of the four vertices, and then you use a separate array to define triangles by referring to those vertices. Because an array index that points to a vertex takes less memory than the vertex itself, this saves memory.
With this complete, you have all the information you need to pass to OpenGL to draw your square.
The best way to send data to OpenGL is through something called Vertex Buffer Objects. These are OpenGL objects that store buffers of vertex data for you.
There are three types of objects to be aware of, here:
Vertices array.Indices array.At the top of ViewController.swift, add the following Array extension to help getting the size, in bytes, of the Vertices and Indices arrays:
extension Array {
  func size() -> Int {
    return MemoryLayout<Element>.stride * self.count
  }
}
An important subtlety here is that, in order to determine the memory occupied by an array, we need to add up the stride, not the size, of its constituent elements. An element’s stride is, by definition, the amount of memory the element occupies when it is in an array. This can be larger than the element’s size because of padding, which is basically a technical term for “extra memory that we use up to keep the CPU happy.”
Next, add the following variables inside ViewController:
private var ebo = GLuint()
private var vbo = GLuint()
private var vao = GLuint()
These are variables for the element buffer object, the vertex buffer object and the vertex array object. All are of type GLuint, a type alias for UInt32.
Now, you want to start generating and binding buffers, passing data to them so that OpenGL knows how to draw your square on screen. Start by adding the following helper variables at the bottom of the setupGL() method:
// 1
let vertexAttribColor = GLuint(GLKVertexAttrib.color.rawValue)
// 2
let vertexAttribPosition = GLuint(GLKVertexAttrib.position.rawValue)
// 3
let vertexSize = MemoryLayout<Vertex>.stride
// 4
let colorOffset = MemoryLayout<GLfloat>.stride * 3
// 5
let colorOffsetPointer = UnsafeRawPointer(bitPattern: colorOffset)
Here’s what that does:
GLuint for the color vertex attribute. Here, you use the GLKVertexAttrib enum to get the color attribute as a raw GLint. You then cast it to GLuint — what the OpenGL method calls expect — and store it for use in this method.GLuint.MemoryLayout enum to get the stride, which is the size, in bytes, of an item of type Vertex when in an array.MemoryLayout enum once again except, this time, you specify that you want the stride of a GLfloat multiplied by three. This corresponds to the x, y and z variables in the Vertex structure.UnsafeRawPointer.With some helper constants ready, it’s time for you to create your buffers and set them up via a VAO for drawing.
Creating VAO Buffers
Add the following code right after the constants that you added inside setupGL():
// 1
glGenVertexArraysOES(1, &vao)
// 2
glBindVertexArrayOES(vao)
The first line asks OpenGL to generate, or create, a new VAO. The method expects two parameters: The first one is the number of VAOs to generate — in this case one — while the second expects a pointer to a GLuint wherein it will store the ID of the generated object.
In the second line, you are telling OpenGL to bind the VAO you that created and stored in the vao variable and that any upcoming calls to configure vertex attribute pointers should be stored in this VAO. OpenGL will use your VAO until you unbind it or bind a different one before making draw calls.
Using VAOs adds a little bit more code, but it will save you tons of time by not having to write lines of code to everything needed to draw even the simplest geometry.
Having created and bound the VAO, it’s time to create and set up the VBO.
Creating VBO Buffers
Continue by adding this code at the end of setupGL():
glGenBuffers(1, &vbo)
glBindBuffer(GLenum(GL_ARRAY_BUFFER), vbo)
glBufferData(GLenum(GL_ARRAY_BUFFER), // 1
             Vertices.size(),         // 2
             Vertices,                // 3
             GLenum(GL_STATIC_DRAW))  // 4
Like the VAO, glGenBuffers tells OpenGL you want to generate one VBO and store its identifier in the vbo variable.
Having created the VBO, you now bind it as the current one in the call to glBindBuffer. The method to bind a buffer expects the buffer type and buffer identifier. GL_ARRAY_BUFFER is used to specify that you are binding a vertex buffer and, because it expects a value of type GLenum, you cast it to one.
The call to glBufferData is where you’re passing all your vertex information to OpenGL. There are four parameters that this method expects:
size() helper method on Array that you wrote earlier.GL_STATIC_DRAW because the data you are passing to the graphics card will rarely change, if at all. This allows OpenGL to further optimize for a given scenario.By now, you may have noticed that working with OpenGL in Swift has a pattern of having to cast certain variables or parameters to OpenGL-specific types. These are type aliases and nothing for you to be worried about. It makes your code a bit longer or trickier to read at first, but it’s not difficult to understand once you get into the flow of things.
You have now passed the color and position data for all your vertices to the GPU. But you still need to tell OpenGL how to interpret that data when you ask it to draw it all on screen. To do that, add this code at the end of setupGL():
glEnableVertexAttribArray(vertexAttribPosition)
glVertexAttribPointer(vertexAttribPosition,       // 1
                      3,                          // 2
                      GLenum(GL_FLOAT),           // 3
                      GLboolean(UInt8(GL_FALSE)), // 4
                      GLsizei(vertexSize),        // 5
                      nil)                        // 6

glEnableVertexAttribArray(vertexAttribColor)
glVertexAttribPointer(vertexAttribColor,
                      4,
                      GLenum(GL_FLOAT),
                      GLboolean(UInt8(GL_FALSE)),
                      GLsizei(vertexSize),
                      colorOffsetPointer)
You see another set of very similar method calls. Here’s what each does, along with the parameters they take. Before you can tell OpenGL to interpret your data, you need to tell it what it’s even interpreting in the first place.
The call to glEnableVertexAttribArray enables the vertex attribute for position so that, in the next line of code, OpenGL knows that this data is for the position of your geometry.
glVertexAttribPointer takes six parameters so that OpenGL understands your data. This is what each parameter does:
Vertex struct, you’ll see that, for the position, there are three GLfloat (x, y, z) and, for the color, there are four GLfloat (r, g, b, a).vertexSize, here.
Vertices array, which is why this value is nil.The second set of calls to glEnableVertexttribArray and glVertexAttribPointer are identical except that you specify that there are four components for color (r, g, b, a), and you pass a pointer for the offset of the color memory of each vertex in the Vertices array.
With your VBO and its data ready, it’s time to tell OpenGL about your indices by using the EBO. This will tell OpenGL what vertices to draw and in what order.
Creating EBO Buffers
Add the following code at the bottom of setupGL():
glGenBuffers(1, &ebo)
glBindBuffer(GLenum(GL_ELEMENT_ARRAY_BUFFER), ebo)
glBufferData(GLenum(GL_ELEMENT_ARRAY_BUFFER),
             Indices.size(),
             Indices,
             GLenum(GL_STATIC_DRAW))
This code should look familiar to you. It’s identical to what you used for the VBO. You first generate a buffer and store its identifier in the ebo variable, then you bind this buffer to the GL_ELEMENT_ARRAY_BUFFER, and, finally, you pass the Indices array data to the buffer.
The last bit of code to add to this method is the following lines:
glBindVertexArrayOES(0)
glBindBuffer(GLenum(GL_ARRAY_BUFFER), 0)
glBindBuffer(GLenum(GL_ELEMENT_ARRAY_BUFFER), 0)
First, you unbind (detach) the VAO so that any further calls to set up buffers, attribute pointers, or something else, is not done on this VAO. The same is done for the vertex and element buffer objects. While not necessary, unbinding is a good practice and can help you avoid logic bugs in the future by not associating setup and configuration to the wrong object.

Build your project to make sure it compiles, then press ahead.
You’ve created several buffers that need to be cleaned up. Add the following method in ViewController to do so:
private func tearDownGL() {
  EAGLContext.setCurrent(context)

  glDeleteBuffers(1, &vao)
  glDeleteBuffers(1, &vbo)
  glDeleteBuffers(1, &ebo)

  EAGLContext.setCurrent(nil)

  context = nil
}
With the code above, you:
EAGLContext to your context — the one you’ve been working with this whole time.context variable to nil to prevent anything else from being done with it.Now, add the following method:
deinit {
  tearDownGL()
}
This is the deinitializer, which simply calls the teardown method.
Build and run the project — notice the same gray screen? The thing about graphics programming and working with OpenGL is that it often requires a lot of initial setup code before you can see things.
Now it’s time for the next topic: Shaders.
Modern OpenGL uses what’s known as a programmable pipeline that gives developers full control of how each pixel is rendered. This gives you amazing flexibility and allows for some gorgeous scenes and effects to be rendered. The tradeoff, however, is that there’s more work for the programmer than in the past. Shaders are written in GLSL (OpenGL Shading Language) and need to be compiled before they can be used.
Here’s where GLKit comes to the rescue! With GLKBaseEffect, you don’t have to worry about writing shaders. It helps you achieve basic lighting and shading effects with little code.
To create an effect, add this variable to ViewController:
private var effect = GLKBaseEffect()
Then, add this line at the bottom of glkView(_ view:, drawIn rect:):
effect.prepareToDraw()
That single line of code binds and compiles shaders for you, and it does it all behind the scenes without writing any GLSL or OpenGL code. Pretty cool, huh? Build your project to ensure it compiles.
With your buffers and effects ready, you now need three more lines of code to tell OpenGL what to draw and how to draw it. Add the following lines right below the line you just added:
glBindVertexArrayOES(vao);
glDrawElements(GLenum(GL_TRIANGLES),     // 1
               GLsizei(Indices.count),   // 2
               GLenum(GL_UNSIGNED_BYTE), // 3
               nil)                      // 4
glBindVertexArrayOES(0)
Here’s what each method call does. The call to glBindVertexArrayOES binds (attaches) your VAO so that OpenGL uses it — and all its the setup and configuration — for the upcoming draw calls.
glDrawElements() is the call to perform drawing and it takes four parameters. Here’s what each of them does:
GL_TRIANGLES parameter cast as a GLenum.GLsizei since this is what the method expects.GL_UNSIGNED_BYTE because Indices is an array of GLubyte elements.nil.The moment of truth has arrived! Time to build and run your project.
You’ll see something like this:

Not bad, but also not what you were expecting. This isn’t a square being drawn and it’s not rotating. What’s going on? Well, no properties were set on the GLKBaseEffect, specifically, the transform properties for the projection and model view matrices.
Time for some theory…
A projection matrix is how you tell the GPU how to render 3D geometry on a 2D plane. Think of it as drawing a bunch of lines out from your eye through each pixel in your screen. The pixel that is drawn to the screen is determined by whatever the frontmost 3D object each line hits.
GLKit has some handy functions to set up a projection matrix. The one you’re going to use allows you to specify the field of view along the y-axis, the aspect ratio and the near and far planes.
The field of view is like a camera lens. A small field of view (e.g., 10) is like a telephoto lens — it magnifies images by “pulling” them closer to you. A large field of view (e.g., 100) is like a wide-angle lens — it makes everything seem farther away. A typical value to use for this is around 65-75.
The aspect ratio is the aspect ratio that you want to render to (e.g., the aspect ratio of the view). It uses this in combination with the field of view, which is for the y-axis, to determine the field of view along the x-axis.
The near and far planes are the bounding boxes for the “viewable” volume in the scene. If something is closer to the eye than the near plane, or further away than the far plane, it won’t be rendered.

Add the following code to the bottom of glkViewControllerUpdate(_:):
// 1
let aspect = fabsf(Float(view.bounds.size.width) / Float(view.bounds.size.height))
// 2
let projectionMatrix = GLKMatrix4MakePerspective(GLKMathDegreesToRadians(65.0), aspect, 4.0, 10.0)
// 3
effect.transform.projectionMatrix = projectionMatrix
Here’s what that does:
You need to set one more property on the effect — the modelViewMatrix. This is the transform that is applied to any geometry that the effect renders.
The GLKit math library, once again, comes to the rescue with some handy functions that make performing translations, rotations and scales easy, even if you don’t know much about matrix math. Add the following lines to the bottom of glkViewControllerUpdate(_ controller:):
// 1
var modelViewMatrix = GLKMatrix4MakeTranslation(0.0, 0.0, -6.0)
// 2
rotation += 90 * Float(timeSinceLastUpdate)
modelViewMatrix = GLKMatrix4Rotate(modelViewMatrix, GLKMathDegreesToRadians(rotation), 0, 0, 1)
// 3
effect.transform.modelviewMatrix = modelViewMatrix
If you look back to where you set up the vertices for the square, remember that the z-coordinate for each vertex was 0. If you tried to render it with this perspective matrix, it wouldn’t show up because it’s closer to the eye than the near plane.
Here’s how you fix that with the code above:
GLKMatrix4MakeTranslation function to create a matrix that translates six units backwards.GLKMatrix4Rotate method to change the current transformation by rotating it as well. It takes radians, so you use the GLKMathDegreesToRadians method for the conversion.Finally, add the following property to the top of the class:
private var rotation: Float = 0.0
Build and run the app one last time and check out the results:

A rotating square! Perfect!
Congratulations! You’ve made your very own OpenGL ES 3.0 app with GLKit from the ground up. You can download the final project using the Download Materials link at the top or bottom of this tutorial.

You’ve learned about important concepts and techniques like vertex and element buffers, vertex attributes, vertex array objects and transformations. There are many effects you can still do with GLKBaseEffect for reflection maps, lighting, fog and more, as well as using the texture-loading classes to apply textures to your geometry.
I hope you enjoyed this tutorial, and if you have any questions or comments about OpenGL or GLKit, please join the discussion in our forums below. Happy rendering! :]
The post GLKit Tutorial for iOS: Getting started with OpenGL ES appeared first on Ray Wenderlich.