Learn how to optimize rendering performance using indices. You’ll also learn how to do simple animation and create a scene graph.
The post Video Tutorial: Beginning Metal Part 4: Indices and Constants appeared first on Ray Wenderlich.
Learn how to optimize rendering performance using indices. You’ll also learn how to do simple animation and create a scene graph.
The post Video Tutorial: Beginning Metal Part 4: Indices and Constants appeared first on Ray Wenderlich.
In this screencast, you'll learn how to create basic controller objects to organize the routes for your web apps.
The post Screencast: Server Side Swift with Vapor: Basic Controllers appeared first on Ray Wenderlich.
In this episode, you'll learn about access modifiers and keep your objects unique through the use of namespaces.
The post Screencast: Beginning C# Part 18: Access Control and Namespaces appeared first on Ray Wenderlich.
 For the past several years, people have asked me if we’ll have a Black Friday sale.
Up until now, we never have – in fact we tend not to have any sales, except during the iOS feast or when a new book comes out.
But this year we want to try something different, so we’re running a Black Friday sale for the first time ever!
So if there’s something you’ve had your eye on, come back next Friday to find out what’s inside.
I can’t spill the beans yet, but it will be hyuuuge! (Too soon?) ;]
The post Black Friday Sale Coming Soon! appeared first on Ray Wenderlich.
The Swift Algorithm Club is an open source project on implementing data structures and algorithms in Swift.
Every month, Kelvin Lau and I feature a cool data structure or algorithm from the club in a tutorial on this site. If you want to learn more about algorithms and data structures, follow along with us!
In this tutorial, you’ll learn how to implement a queue in Swift 3. A queue is one of the most popular data structures, and is fairly simple to implement in Swift.
The queue implementation was first implemented by Matthijs Hollemans, the founder of the Swift Algorithm Club.
A queue is a list where you can only insert new items at the back and remove items from the front. This ensures that the first item you enqueue is also the first item you dequeue. First come, first serve!
Why would you need this? Well, in many algorithms you want to add items to a temporary list at some point and then pull them off this list again at a later time. Often the order in which you add and remove these items matters.
A queue gives you a FIFO or first-in, first-out order. The element you inserted first is also the first one to come out again. It’s only fair! (A very similar data structure, the stack, is LIFO or last-in first-out.)
An example
The easiest way to understand a queue is to see how it’s used.
Imagine you have a queue. Here’s how you would enqueue a number:
queue.enqueue(10) |
The queue would now be [ 10 ]. Then you could add the next number to the queue:
queue.enqueue(3) |
The queue would now be [ 10, 3 ]. You could add one more number:
queue.enqueue(57) |
The queue would now be[ 10, 3, 57 ]. You could dequeue to pull the first element off the front of the queue:
queue.dequeue() |
This would return 10 because that was the first number you inserted. The queue would now be [ 3, 57 ]. Every item moved up by one place.
queue.dequeue() |
This would returns 3. The next dequeue would return 57, and so on. If the queue is empty, dequeuing would return nil.
In this section, you’ll implement a simple general-purpose queue that stores Int values.
Start by downloading the queue starter project. The playground will contain an empty Queue:
public struct Queue { } |
The playground also contains the code for a LinkedList (you can see this by going to View\Project Navigators\Show Project Navigator and opening Sources\LinkedList.
LinkedList works? Check out our Swift linked list tutorial, which walks you through it step by step.A queue needs an enqueue function. You’ll use the LinkedList implementation included in the starter project to implement your queue. Add the following between the curly braces:
// 1 fileprivate var list = LinkedList<Int>() // 2 public mutating func enqueue(_ element: Int) { list.append(element) } |
Here’s what you’ve done:
LinkedList variable that will be used to store the items in your queue.LinkedList so you’ve explicitly specified that by prepending the mutating keyword in front of the method.A queue also needs a dequeue function.
// 1 public mutating func dequeue() -> Int? { // 2 guard !list.isEmpty, let element = list.first else { return nil } list.remove(element) return element.value } |
Here’s what you’ve done:
dequeue function that returns the first item in the queue. The return type is nullable to handle the queue being empty. This function will mutate the underlying LinkedList so you’ve explicitly specified that by prepending the mutating keyword in front of the method.guard statement handle the queue being empty. If this queue is empty, then guard will fail into the else block.A queue also needs a peek function which returns the item at the beginning of the queue without removing it.
Try updating the implementation of Queue to include a peek function.
The solution is provided in the spoiler section down below, but try it yourself first!
A queue can be empty. You can add an isEmpty property that will return a value based on the underlying LinkedList:
public var isEmpty: Bool { return list.isEmpty } |
Let’s try out your new queue. Outside the implementation of Queue, write the following into your playground:
var queue = Queue() queue.enqueue(10) queue.enqueue(3) queue.enqueue(57) |
After defining the queue, try printing the queue to the console:
print(queue) |
You can bring up the console by pressing the following keys in combination: Command-Shift-Y. You should see the following printed out to the console:
Queue
That isn’t very helpful. To display a more readable output string, you can make Queue adopt the CustomStringConvertable protocol. To do this, add the following just below the implementation of your Queue class:
// 1 extension Queue: CustomStringConvertible { // 2 public var description: String { // 3 return list.description } } |
Here’s how the code works:
Queue class, and you’ve adopted the CustomStringConvertible protocol. This protocol expects you to implement a computed property with the name description, with the String type.description property. This is a computed property, a read only property that returns a String.LinkedListNow, when you call print on your Queue, you’ll get a nice representation of your list like this:
"[10, 3, 57]"
At this point, you’ve implemented a general-purpose queue that stores Int values, and have provided functionality to peek, enqueue and dequeue items in your Queue class.
In this section, you will use generics to abstract away the type requirement from our queue.
Update the implementation of your Queue class to the following:
// 1 public struct Queue<T> { // 2 fileprivate var list = LinkedList<T>() public var isEmpty: Bool { return list.isEmpty } // 3 public mutating func enqueue(_ element: T) { list.append(element) } // 4 public mutating func dequeue() -> T? { guard !list.isEmpty, let element = list.first else { return nil } list.remove(element) return element.value } // 5 public func peek() -> T? { return list.first?.value } } |
Here’s what you’ve done:
Queue to take a generic type T.Queue to take in values of any type, so you’ll constrain your underlying LinkedList to be type T rather than a Int.enqueue to take any type.dequeue to return any type.peek to return any type.You can fix up your test code as follows:
var queue = Queue<Int>() queue.enqueue(10) queue.enqueue(3) queue.enqueue(57) |
And you can even try your Queue with different types as well:
var queue2 = Queue<String>() queue2.enqueue("mad") queue2.enqueue("lad") if let first = queue2.dequeue() { print(first) } print(queue2) |
I hope you enjoyed this tutorial on making a queue!
Here is a SwiftQueue.Finished.playground with the above code. You can also find alternative implementations and further discussion in the queue section of the Swift Algorithm Club repository.
This was just one of the many algorithm clubs focused on the Swift Algorithm Club repository. If you’re interested in more, check out the repo.
If you have any questions on queues in Swift, please join the forum discussion below!
The post Swift Algorithm Club: Swift Queue Data Structure appeared first on Ray Wenderlich.
Learn about the shader library and how to use Metal Shading Language in vertex and fragment functions.
The post Video Tutorial: Beginning Metal Part 5: Shaders appeared first on Ray Wenderlich.
 Developers constantly strive to make amazing, intuitive and immersive apps for users. But are developers really building for every possible user? Can everyone truly use your app to its full ability?
An accessible approach to designing apps, products or any kind of services lets people use those products — regardless of ability. This includes people with vision, motor, learning, or hearing disabilities.
Apple continues to provide developers with new and updated tools to design with accessibility in mind. Take a moment to watch this inspiring introductory video from Apple (8 mins).
In this iOS accessibility tutorial you will start off with a finished recipe app and transform it to become more accessible. You will learn the following:
This iOS accessibility tutorial requires Xcode 8 and Swift 3. It assumes you already know the basics of Swift development. If you’re new to Swift, you should first check out our book Swift Apprentice.
Note: You’ll need a physical device to work with VoiceOver — this accessibility feature is not supported in the simulator.
The app you will be enhancing is a simple recipe app, which shows you the difficulty level of each recipe and lets you rate what you made.
Start by downloading the starter project. Open Recipe.xcodeproj in the Recipe folder. Before you can run on a device, you need to configure signing.
Click on the Recipe project in the navigator, then select the target with the same name. Select the General tab and in the Signing section select your Team from the drop down.
Now build and run the app to become familiar with its features. The root controller is a table view of recipes containing an image, description, and difficulty rating. Click into a recipe for a larger picture with the recipe’s ingredients and instructions.
To make things more exciting, you can also cross off the items in the list to make sure you are on top of your cooking game! If you love or hate what you made, you can even toggle the like/dislike emoji.
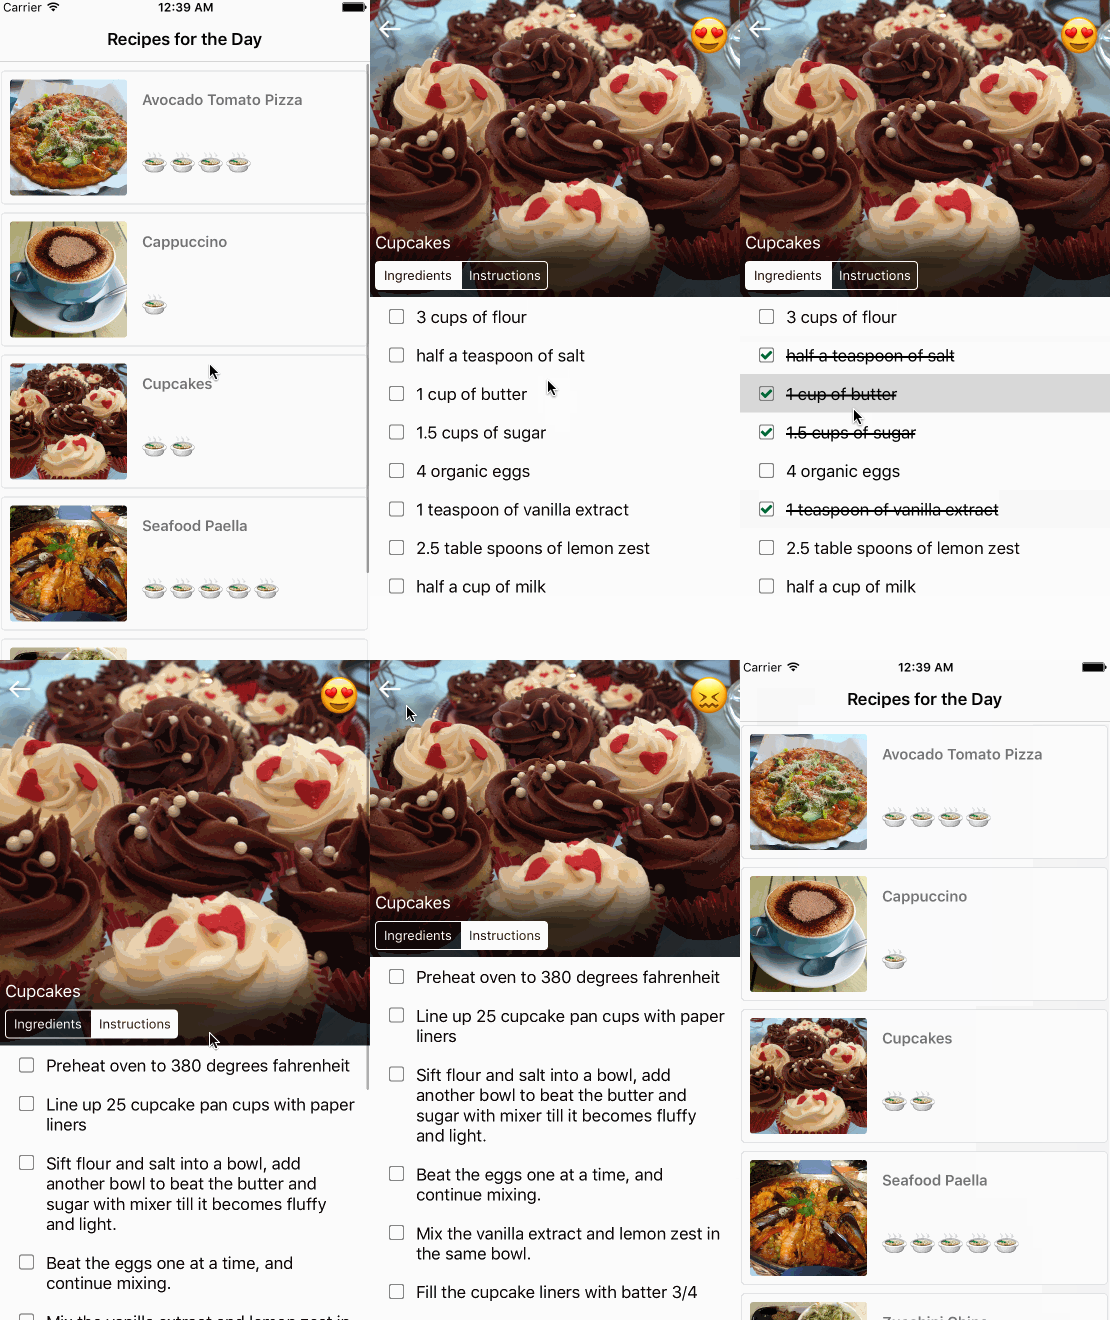
Spend a few minutes becoming familiar with the code in the starter. Here are some highlights:
InstructionViewModel.RecipeInstructionsViewController. It includes descriptions for ingredients and instructions as well as state information for the check boxes.Recipe model object.Recipe objects as the data source.Now that you have an understanding of how the app works, you’ll begin to add some accessibility features.
Before you get started with the code, it’s important to understand the benefits of accessibility.
The VoiceOver screen-reading tool included with iOS helps users interact with software without the need to see the screen. It’s specifically designed for those with vision problems.
VoiceOver is the link between the UI and the user’s touch input, and provides audible descriptions of different UI components and audible feedback on actions taken in the app.
To start using VoiceOver, first open the Settings app and navigate to General\Accessibility\Accessibility Shortcut. There, ensure the VoiceOver cell is selected.
This creates a shortcut so you can triple-click the home button on a physical device to toggle VoiceOver on and off. Imagine the time you’d waste toggling this setting without the shortcut! :]
There are many different accessibility features including VoiceOver, Invert Colors, Color Filters, Reduce White Point, Zoom, Switch Control and a lot more. You will only be focusing on VoiceOver in this iOS accessibility tutorial.
Now that you know how to enable VoiceOver, a brief overview of the feature is in order. Below is a summary of some of the more common gestures:
It’s time to see how smoothly your app works with VoiceOver.
Build and run the app on a physical device, and triple click the home button. Swipe left and right to navigate through the recipe list. VoiceOver reads the elements starting from top left to bottom right. It starts with the header name followed by each recipe name and the name of the associated image.
Do you notice anything wrong with the VoiceOver experience?
With the problem areas identified, it’s time to fix them!
Accessibility attributes are the core component you must implement in order to support accessibility. VoiceOver uses the attributes to supply users with audible information about displayed elements in your app.
An accessibility attribute has four properties:
CGRect. VoiceOver speaks the contents of the CGRect.Most UIKit components have these attributes already set for you; you simply need to supply the information in the right manner for the user experience. You’ll have to supply most of the attributes for any custom controls you create.
Note: The Recipe app only uses standard UIKit views and controls, which are already accessible and, at most, require modification to the attribute strings. For projects with custom elements, be sure to read Apple’s Making Your iOS App Accessible.
While fixing these issues, you’ll use a brand-new tool shipped with Xcode 8: the Accessibility Inspector. The inspector does the following:
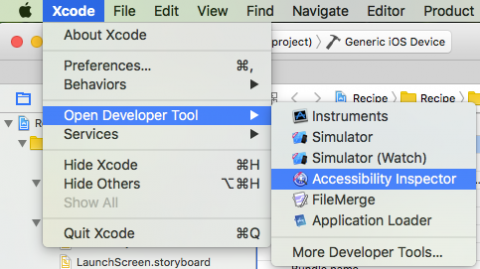
It’s time to take a look at the tool. In the Xcode menu, navigate to Xcode\Open Developer Tool\Accessibility Inspector.
The inspector should look something like this, depending on your selections:
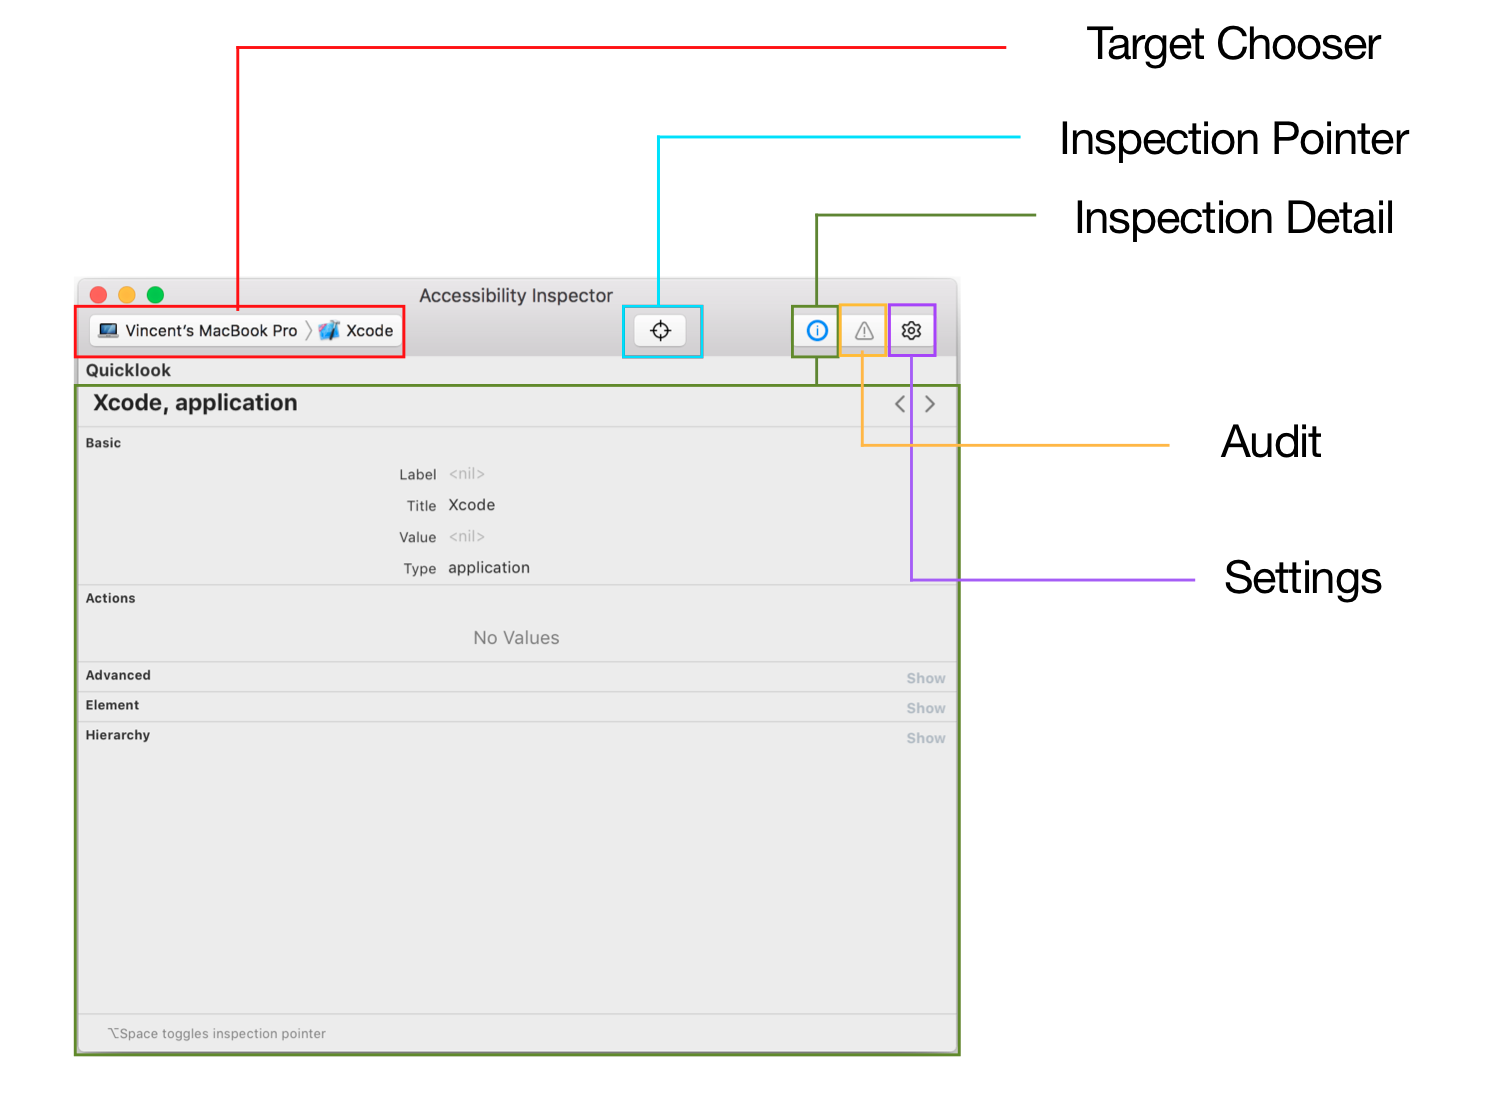
The target chooser lets you pick which device you would like to inspect. This could be your MacBook Pro, iOS device, or your simulator.
The fact that this inspector can provide live previews of accessibility elements makes it possible to do some useful testing in the simulator. Since live previews are much faster than listening to VoiceOver, this is where you’ll do the bulk of your work during this iOS accessibility tutorial.
Build and run Recipe in a simulator, and change the Accessibility Inspector target to your simulator like so:
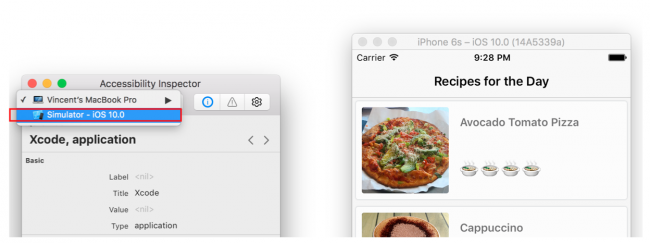
Selecting the Inspection Pointer, pictured as a reticle sight in the inspector UI, is similar to enabling VoiceOver on your device. When you activate the pointer, you can hover over any UI element to check its attributes. Interacting with the simulator directly via button presses will deactivate the inspection pointer.
The Inspection Detail pane has everything you need to review and interact with the accessibility attributes in your app:
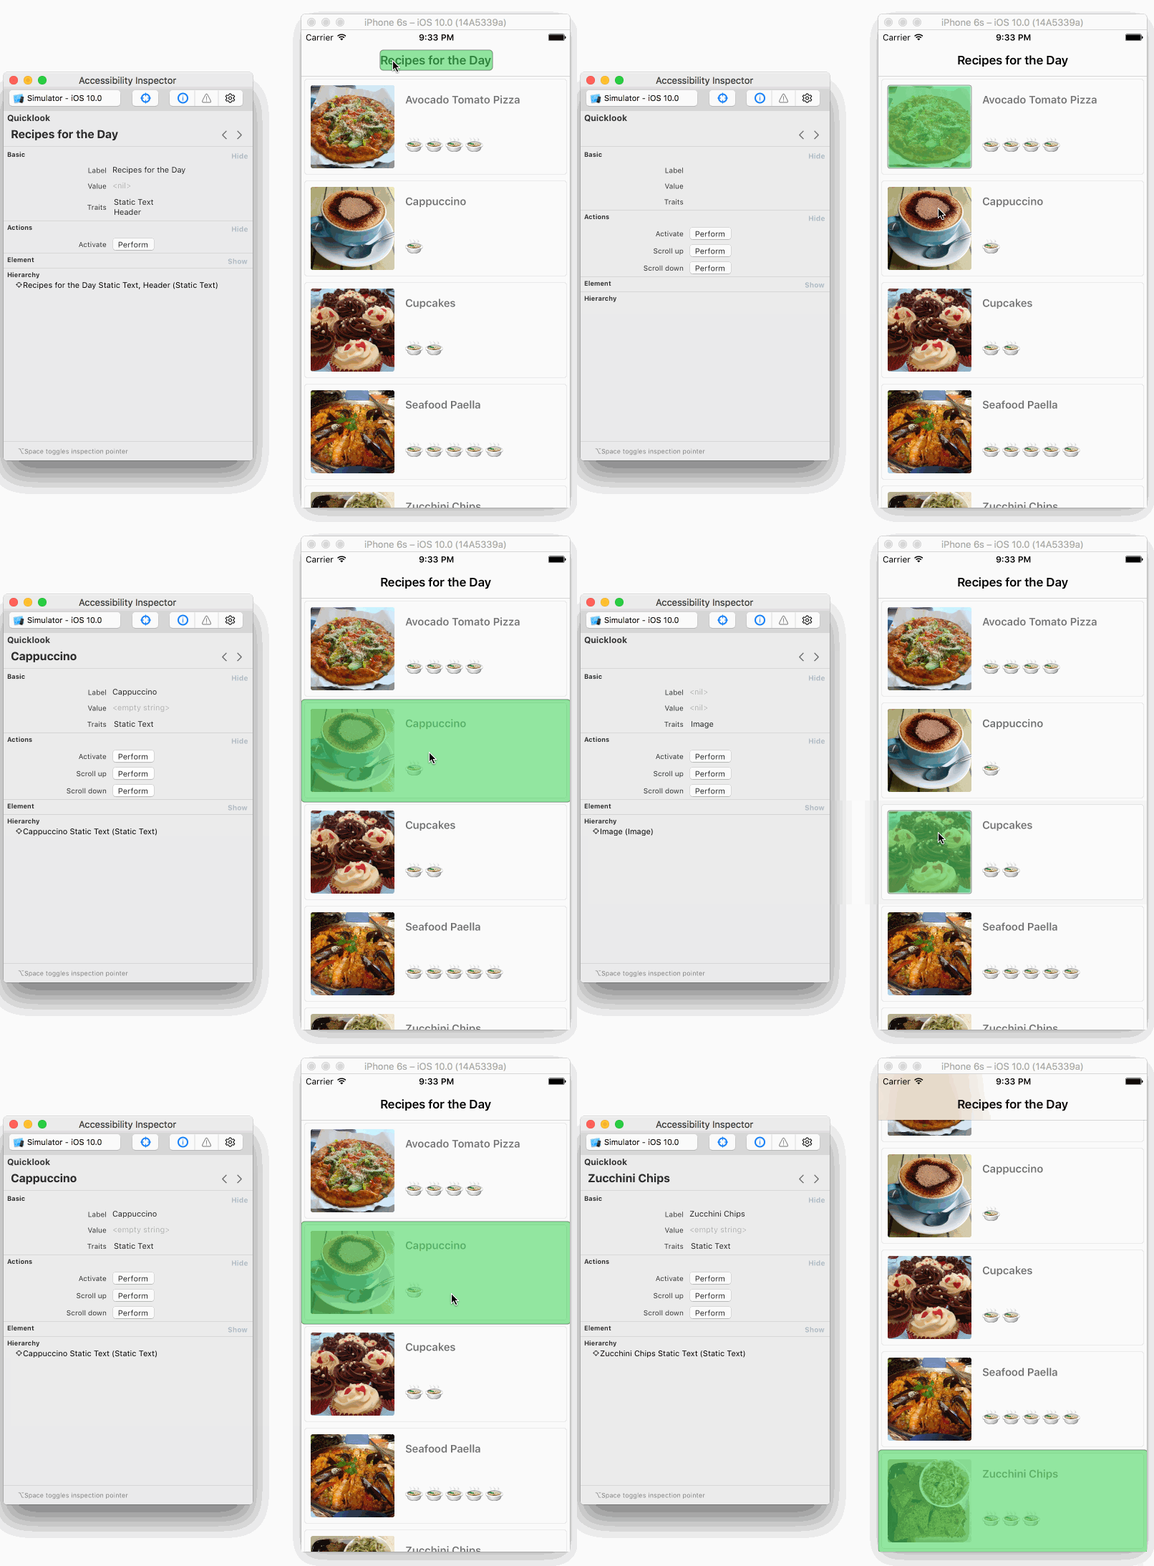
This removes the time overhead involved with running your app on a device and using VoiceOver.
Make sure the simulator is still running and you’re on the recipe list. In the inspector, click on the Audit icon and hit Run audit. You will immediately notice that the inspector has found some elements that lack description. When you click a warning, the related element will be highlighted on the simulator. In this case, the image views associated with the cells have no description.
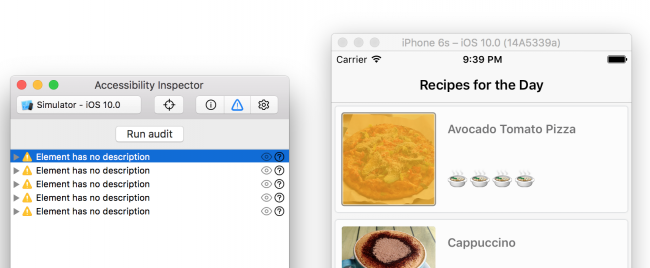
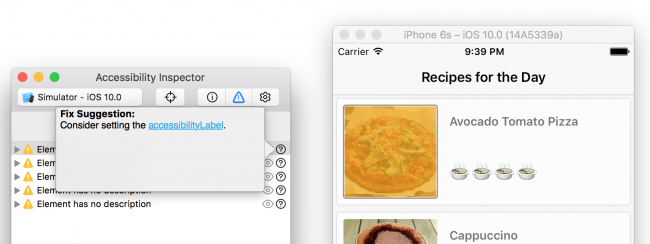
If you click the question mark (?) for one of the warnings, the inspector gives you suggestions how to fix the issue. You’ll act on this suggestion in just a bit.
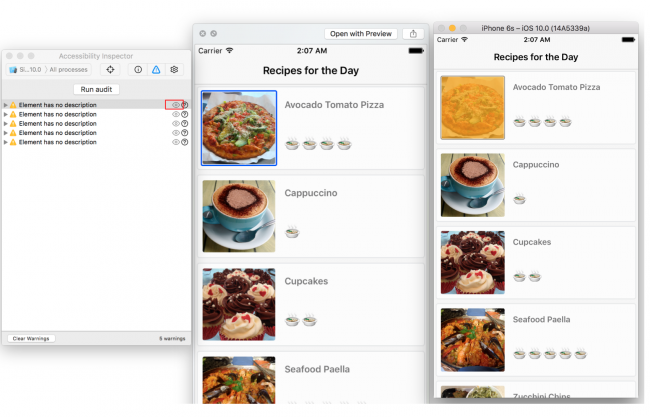
You can click the eye icon to take a snapshot of the app — this is useful for anyone in quality assurance who needs to create accurate bug reports.
The Accessibility Inspector also lets you test the following Accessibility settings:
You no longer have to keep going back to Settings app to enable these features. The Accessibility Inspector is currently limited to these four options, but I believe Apple plans to add more in the future.
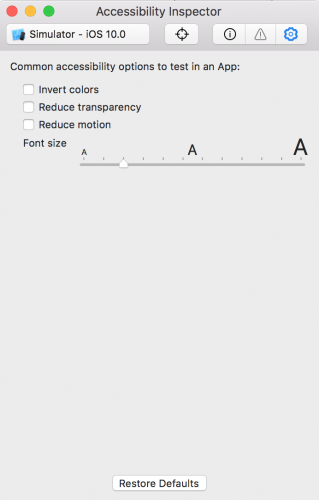
Although you can do a lot from the Accessibility Inspector, you should still test VoiceOver manually to see the actual user experience.
Recall that the audit tool showed that the image view didn’t have an accessibility label. You noted this same issue when testing on your device with VoiceOver — the description of “Image” just wasn’t very useful.
In Xcode, open RecipeCell.swift and add the following code to the very bottom of the file:
// MARK: Accessibility extension RecipeCell { func applyAccessibility(_ recipe: Recipe) { foodImageView.accessibilityTraits = UIAccessibilityTraitImage //1 foodImageView.accessibilityLabel = recipe.photoDescription //2 } } |
This code will fill in the missing accessibility properties based on the Recipe object for the cell. Here’s how it works:
accessibilityTraits takes a mask of traits that characterize the accessibility element. In this case UIAccessibilityTraitImage indicates it is an image.accessibilityLabel is used to describe the element in VoiceOver. Here it is set to recipe.photoDescription, which is a string that describes the contents of the image.Find configureCell(_:) in the RecipeCell class. Add the following line to the end of the method:
applyAccessibility(recipe) |
Every time you create a cell, the accessibility attributes will be applied to the image using properties in the recipe object.
Build and run on your device, and enable VoiceOver with three clicks on the home button. Test the recipe list to see if the image descriptions are more meaningful:
Isn’t that much better? Instead of simply hearing “Image”, which provided no specific details, you now hear a full description of the image. The user can now visualize the food, instead of being frustrated at not knowing what the image is!
Run the Accessibility Inspector, and either rebuild in the simulator or switch the target in the Accessibility isnspector to your device.
Navigate to the recipe list on the target device. Make sure you clear all warnings in the inspector and hit Run Audit.
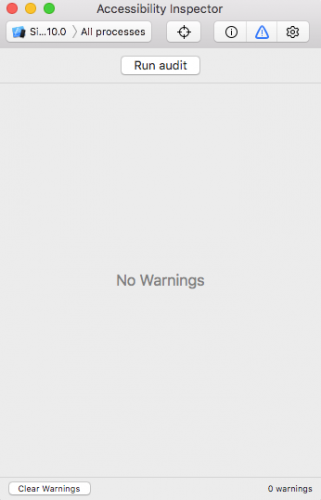
Woot — no warnings! After successfully adding descriptions to the images, the core of this view is now fully accessible.
Now it’s time to make the difficulty level of a recipe accessible.
Even though the audit produced no warnings, the difficulty label is still invisible to a vision impaired user. You need to identify the label as accessible and update its properties to provide a meaningful description.
Within RecipeCell.swift, add the following to the end of applyAccessibility(_:):
difficultyLabel.isAccessibilityElement = true //1 difficultyLabel.accessibilityTraits = UIAccessibilityTraitNone //2 difficultyLabel.accessibilityLabel = "Difficulty Level" //3 switch recipe.difficulty { //4 case .unknown: difficultyLabel.accessibilityValue = "Unknown" case .rating(let value): difficultyLabel.accessibilityValue = "\(value)" |
Here’s some more detail on what this code does:
isAccessibilityElement is a flag that makes the item visible to accessibility features when true. For most UIKit classes the default is true, but for UILabel it is false.accessibilityTraits helps characterize the accessibility element. There is no interaction needed, so you simply set it as having no traits."Difficulty Level" lets the user know exactly what this is for.accessibilityValue will be read out as part of the label description. Setting the difficulty level here makes that element much more useful.Build and run your app on a physical device, triple tap the home button to enable VoiceOver, and swipe through the recipe list.
Now as the user scrolls through the different accessibility elements, the cells are fully descriptive, including the difficulty level.
Every time you expose a new accessibility element, it’s a good idea to run the audit again.
Start the Accessibility Inspector if it isn’t already running. Run the app on your device or the simulator, and set the inspector target accordingly. Now select the audit toggle button and hit Run audit.
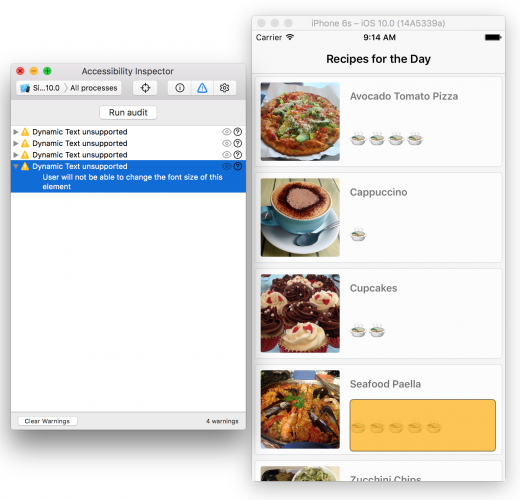
More warnings appeared! The inspector is complaining about the difficulty label not supporting dynamic text. This warning wasn’t available the first time you ran the audit because you hadn’t yet made the label visible to accessibility.
Click the question mark icon (Fix Suggestion):

Dynamic type is important to accessibility, as users with non complete vision impairment will often increase font size for readability. Non dynamic font types do not allow this.
Within RecipeCell.swift add the following code inside applyAccessibility(_:) at the very bottom:
difficultyLabel.font = UIFont.preferredFont(forTextStyle: .body) difficultyLabel.adjustsFontForContentSizeCategory = true |
This sets the preferredFont to a body style which means iOS will style this as it would the body of a document. The specifics of the size and font are dependent on accessibility settings. adjustsFontForContentSizeCategory is a new property in iOS 10 that indicates the font should update automatically when the user changes the text content size.
Testing how your app handles resizing fonts is easy — with a little help from the Accessibility Inspector.
Build and run the recipe app alongside the Accessibility Inspector. Navigate to the Settings toggle in the inspector and experiment with some of the tools:
Your testing probably looks a lot like this:
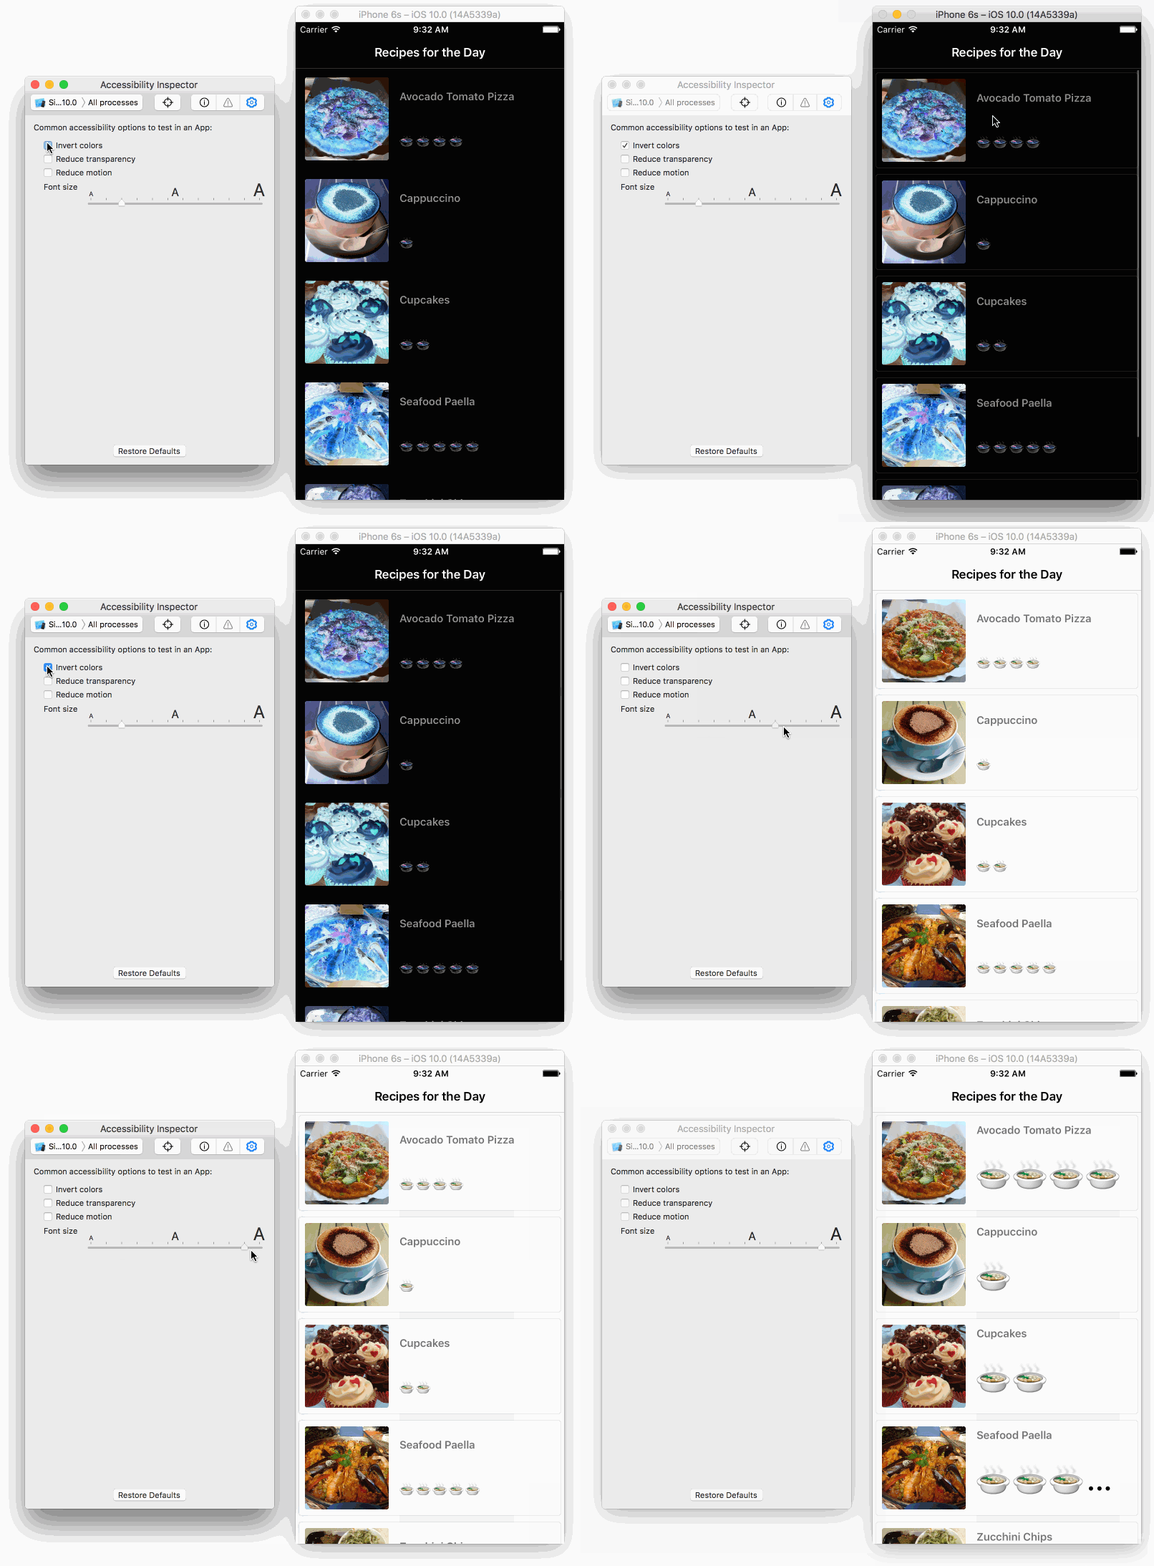
The inspector tool makes testing accessibility cases an easy task. From this, you can tell that the recipe list will work well for users with visual impairments.
Note: There is a bug in Xcode 8 that prevents Accessibility Inspector from clearing Dynamic Text warnings when using preferredFont(forTextStyle:) in code. If you want to clear the Audit warnings, you can set difficultyLabel’s font to “Body” in Main.storyboard.
Now that the list is taken care of, it’s time to look at the detail view.
Run the app on your device, enable VoiceOver and look around the detail view.
Did you notice the following issues with VoiceOver interaction?
Open up RecipeInstructionsViewController.swift and add the following to viewDidLoad after assert(recipe != nil):
backButton.accessibilityLabel = "back" backButton.accessibilityTraits = UIAccessibilityTraitButton |
Instead of “left Arrow button”, VoiceOver will now say “back button”.
In the same file, replace the contents of isLikedFood(_:) with the following:
if liked { likeButton.setTitle("😍", for: .normal) likeButton.accessibilityLabel = "Like" likeButton.accessibilityTraits = UIAccessibilityTraitButton didLikeFood = true } else { likeButton.setTitle("😖", for: .normal) likeButton.accessibilityLabel = "Dislike" likeButton.accessibilityTraits = UIAccessibilityTraitButton didLikeFood = false } |
For both like and dislike modes, you’ve added an accessibilityLabel that’s clear about what the button does. You also set accessibilityTraits to identify it as a button, clarifying how the user can interact with it.
Build and run on a device and enable VoiceOver. Navigate using VoiceOver to the detail recipe screen to test your changes to the buttons at the top of the view.
Clear, short intents that the user can understand! Much better.
The final issue is with the checklist. VoiceOver currently states “icon empty” followed by the instruction. What does this mean? It’s not clear at all!
Open InstructionCell.swift and look for shouldStrikeThroughText(_:). Replace the entire if strikeThrough struct with the following:
checkmarkButton.isAccessibilityElement = false //1 if strikeThrough { descriptionLabel.accessibilityLabel = "Completed: \(text)" //2 attributeString.addAttribute(NSStrikethroughStyleAttributeName, value: 2, range: NSMakeRange(0, attributeString.length)) } else { descriptionLabel.accessibilityLabel = "Uncompleted: \(text)" //3 } |
Here’s what this code is doing:
accessibilityLabel for the description now uses the hardcoded string "Completed" followed by the text to provide all necessary info with a single visit to the label."Uncompleted" before the label description.The reason for turning off the checkmark button’s accessibility is so the cell reads as one unit, instead of two different accessibility elements. Check out the final app and see how it sounds!
Sounds great — and it will be music to the ears of your users. :]
You can download the completed project here.
In this iOS accessibility tutorial you learned about VoiceOver and how to perform manual auditing by actually scrolling through every accessible element, and see the user experience yourself. You then used the Accessibility Inspector to perform audits, look at accessibility element values, and perform live dynamic changes to invert colors or change the font size.
You are now equipped with the necessary tools to conquer the world of accessibility. Knowing you will have a positive impact on someone’s life is a rewarding experience.
There are a ton of possibilities with accessibility features; this iOS accessibility tutorial only scratches the surface to get you started.
One thing to take a look at is Speech Recognition. Sam Davies has recorded some great screencasts related to this topic. Imagine displaying transcribed text on a user’s device while someone else speaks — the ultimate accessory for users with a hearing impairment.
Below are more resources about accessibility that I encourage you to check out:
If you have any comments or questions on this iOS accessibility tutorial, please join the discussion below!
The post iOS Accessibility Tutorial: Getting Started appeared first on Ray Wenderlich.
In this video tutorial on Metal, you'll learn how textures map to vertices and how to use sampler states.
The post Video Tutorial: Beginning Metal Part 6: Textures appeared first on Ray Wenderlich.
In this beginning Metal video tutorial, you'll learn how to use matrices to translate, scale and rotate models.
The post Video Tutorial: Beginning Metal Part 7: Matrices 2D to 3D appeared first on Ray Wenderlich.
Learn how to create a RESTful interface for your model objects in Vapor, a popular server side swift framework.
The post Screencast: Server Side Swift with Vapor: RESTful Controllers appeared first on Ray Wenderlich.
 Good news — we’ve released an update to Core Data by Tutorials, Third Edition!
This update handles a small change in Xcode 8.1, which defaults the Codegen setting of your project to Class Definition.
Previous versions of Xcode, including Xcode 8.0 (which we used to write this book), used the default Codegen setting of Manual/None. However, the change in Xcode 8.1 to default Codegen to Class Definition means working through some of the chapters in the first version of the book won’t work as described.
Since Chapters 2 and 3 walk you through manual creation of your managed object subclasses, you don’t want Xcode to generate this code for you. The fix is simply to make sure your Codegen setting is set to Manual/None before you compile your project for the first time. If you make this change after compiling your project, it can be a pain to remove the generated code.
So we’ve updated Core Data by Tutorials, Third Edition with explicit instructions in Chapter 2 and 3 to help you avoid this issue.
This free update is available today for all Core Data by Tutorials PDF Customers.
Hat tip to all our forum members and readers who emailed in to help diagnose and correct this issue!
The post Core Data by Tutorials Update Now Available! appeared first on Ray Wenderlich.
Since we set up the Unity team last year, we’ve made over 15 free Unity tutorials for everyone to enjoy and learn from.
We’ve also recently released our first book – Unity Games by Tutorials – that teaches you how to create 4 complete Unity games from scratch!
We want to offer our readers more awesome Unity tutorials, so we’re currently recruiting new Unity developers to join the tutorial team.
Specifically, we’re looking for the following:
Here are some skillsets that would greatly complement the team (not required but helpful):
Joining our team is a great way to learn and improve – not to mention, getting paid for it!
If this sounds interesting, keep reading to find out what’s involved and how to apply.
Here are the top 5 reasons to join the Unity team:
Here are the requirements:
To apply, send me an e-mail. Be sure to include the following information:
If your application looks promising, we’ll send you a tryout to gauge your writing and/or editing skills.
If you pass the tryout, you’re in!
If this opportunity interests you, go on and send me an e-mail! I look forward to creating some great tutorials with you. :]
The post Open Call for Applications on the Unity Team appeared first on Ray Wenderlich.

Picture this: You’re testing your latest and greatest shoot ‘em up. Enemies fly on screen as fast as your fingers can tap, then boom! A measly frame skip later and you’re nothing more than a pitiful pile of ash at the hands of some angry, bug-eyed Martian from Neptune!
In this scenario, you’re outnumbered 1000 to 1. There’s no need to give the Neptunians the upper hand with unexpected memory spikes. Sound familiar? Go ahead and pull up a chair and get up to speed on Object Pooling.
In this Unity tutorial, you’ll learn:
By the end of this tutorial, you’ll have a generic script you can readily drop into a new game. Additionally, you’ll understand how to retrofit the same script for an existing game.
Prerequisites: You’ll need to be familiar with some basic C# and how to work within Unity’s development environment. If you need some assistance getting up to speed, check out the Unity tutorials on this site.
Instantiate() and Destroy() are useful and necessary methods during gameplay. Each generally requires minimal CPU time.
However, for objects created during gameplay that have a short lifespan and get destroyed in vast numbers per second, the CPU needs to allocate considerably more time.
Bullets are a great example of a GameObject that you might pool.
Additionally, Unity uses Garbage Collection to deallocate memory that’s no longer in use. Repeated calls to Destroy() frequently trigger this task, and it has a knack for slowing down CPUs and introducing pauses to gameplay.
This behavior is critical in resource-constrained environments such as mobile devices and web builds.
Object pooling is where you pre-instantiate all the objects you’ll need at any specific moment before gameplay — for instance, during a loading screen. Instead of creating new objects and destroying old ones during gameplay, your game reuses objects from a “pool”.

If you don’t already have Unity 5 or newer, download it from Unity’s website.
Download the starter project, unzip and open SuperRetroShooter_Starter project in Unity — it’s a pre-built vertical scroll shooter.
Note: Credit goes to Master484, Marcus, Luis Zuno and Skorpio for the medley of art assets from OpenGameArt. The royalty-free music was from the excellent Bensound.
Feel free to have a look at some of the scripts, such as Barrier; they are generic and useful, but their explanations are beyond the scope of this tutorial.
As you work through everything, it will be helpful to see what’s happening in your game’s Hierarchy during gameplay. Therefore, I recommend that you deselect Maximize on Play in the Game Tab’s toolbar.

Click the play button to see what you have. :]
Note how there are many PlayerBullet(Clone) objects instantiated in the Hierarchy when shooting. Once they hit an enemy or leave the screen, they are destroyed.
Making matters worse is the act of collecting those randomly dropped power-ups; they fill the game’s Hierarchy with bullet clones with just a few shots and destroy them all the very next second.

In its current state, Super Retro Shooter is a “bad memory citizen”, but you’ll be the hero that gets this shooter firing on all cylinders and using resources more scrupulously.
Click on the Game Controller GameObject in the Hierarchy. Since this object will persist in the Scene, you’ll add your object pooler script here.
In the Inspector, click the Add Component button, and select New C# Script. Give it the name ObjectPooler.
Double-click the new script to open it in MonoDevelop, and add the following code to the class:
public static ObjectPooler SharedInstance; void Awake() { SharedInstance = this; } |
Several scripts will need to access the object pool during gameplay, and public static instance allows other scripts to access it without getting a Component from a GameObject.
At the top of the script, add the following using statement:
using System.Collections.Generic; |
You’ll be using a generic list to store your pooled objects. This statement gives you access to generic data structures so that you can use the List class in your script.
Note: Generic? Nobody wants to be generic! Everybody wants to be special!
In a programming language like C#, generics allow you to write code that can be used by many different types while still enforcing type safety.
Typically, you use generics when working with collections. This approach allows you to have an array that only allows one type of object, preventing you from putting a dog inside a cat array, although that could be pretty funny. :]
Speaking of lists, add the object pool list and two new public variables:
public List<GameObject> pooledObjects; public GameObject objectToPool; public int amountToPool; |
The naming is fairly self-explanatory.
By using the Inspector in Unity, you’ll be able to specify a GameObject to pool and a number to pre-instantiate. You’ll do that in a minute.
Meanwhile, add this code to Start():
pooledObjects = new List<GameObject>(); for (int i = 0; i < amountToPool; i++) { GameObject obj = (GameObject)Instantiate(objectToPool); obj.SetActive(false); pooledObjects.Add(obj); } |
The for loop will instantiate the objectToPool GameObject the specified number of times in numberToPool. Then the GameObjects are set to an inactive state before adding them to the pooledObjects list.
Go back to Unity and add the Player Bullet Prefab to the objectToPool variable in the Inspector. In the numberToPool field, type 20.

Run the game again. You should now have 20 pre-instantiated bullets in the Scene with nowhere to go.
Well done! You now have an object pool. :]
Jump back into the ObjectPooler script and add the following new method:
public GameObject GetPooledObject() { //1 for (int i = 0; i < pooledObjects.Count; i++) { //2 if (!pooledObjects[i].activeInHierarchy) { return pooledObjects[i]; } } //3 return null; } |
The first thing to note is that this method has a GameObject return type as opposed to void. This means a script can ask for a pooled object from GetPooledObject and it’ll be able to return a GameObject in response. Here’s what else is happening here:
for loop to iterate through your pooledObjects list.GetPooledObject.Now that you can ask the pool for an object, you need to replace your bullet instantiation and destroy code to use the object pool instead.
Player bullets are instantiated in two methods in the ShipController script.
Shoot()ActivateScatterShotTurret()Open the ShipController script in MonoDevelop and find the lines:
Instantiate(playerBullet, turret.transform.position, turret.transform.rotation); |
Replace both instances with the following code:
GameObject bullet = ObjectPooler.SharedInstance.GetPooledObject(); if (bullet != null) { bullet.transform.position = turret.transform.position; bullet.transform.rotation = turret.transform.rotation; bullet.SetActive(true); } |
Note: Make sure this replacement is made in both Shoot() and ActivateScatterShotTurret() before you continue.
Previously, the methods iterated through the list of currently active turrets on the player’s ship (depending on power-ups) and instantiated a player bullet at the turrets position and rotation.
You’ve set it to ask your ObjectPooler script for a pooled object. If one is available, it’s set to the position and rotation of the turret as before, and then set to active to rain down fire upon your enemy. :]
Instead of destroying bullets when they’re no longer required, you’ll return them to the pool.
There are two methods that destroy unneeded player bullets:
OnTriggerExit2D() in the DestroyByBoundary script removes the bullet when it leaves the screen.OnTriggerEnter2D() in the EnemyDroneController script removes the bullet when it collides and destroys an enemy.Open DestroyByBoundary in MonoDevelop and replace the contents of the OnTriggerExit2D method with this code:
if (other.gameObject.tag == "Boundary") { if (gameObject.tag == "Player Bullet") { gameObject.SetActive(false); } else { Destroy(gameObject); } } |
Here’s a generic script that you can attach to any number of objects that need removal when they leave the screen. You check if the object that triggered the collision has the Player Bullet tag — if yes, you set the object to inactive instead of destroying it.
Similarly, open EnemyDroneController and find OnTriggerEnter2D(). Replace Destroy(other.gameObject); with this line of code:
other.gameObject.SetActive(false); |
Wait!
Yes, I can see you hovering over the play button. After all that coding, you must be itching to check out your new object pooler. Don’t do it yet! There is one more script to modify — don’t worry, it’s a tiny change. :]
Open the BasicMovement script in MonoDevelop and rename the Start Method to OnEnable.
One gotcha when you use the object pool pattern is remembering that the lifecycle of your pooled object is a little different.
Ok, now click play. :]
As you shoot, the inactive player bullet clones in the Hierarchy become active. Then they elegantly return to an inactive state as they leave the screen or destroy an enemy drone.
Well Done!

But what happens when you collect all those power-ups?
Running out of ammo eh?

As the game designer, you enjoy supreme powers, such as limiting players’ firepower to encourage a more focused strategy as opposed to just shooting everything and everywhere.
You could exert your powers to do this by adjusting the number of bullets you initially pool to get this effect.
Conversely, you can also go in the other direction pool a huge number of bullets to cover all power-up scenarios. That begs a question: why would you pool 100 bullets for the elusive ultimate power-up when 90 percent of the time 50 bullets is adequate?
You would have 50 bullets in memory that you would only need rarely.

Now you’ll modify the object pool so you can opt to increase the number of pooled objects at runtime if needed.
Open the ObjectPooler script in MonoDevelop and add this new public variable:
public bool shouldExpand = true; |
This code creates a checkbox in the Inspector to indicate whether it’s possible to increase the number of pooled objects.
In GetPooledObject(), replace the line return null; with the following code.
if (shouldExpand) { GameObject obj = (GameObject)Instantiate(objectToPool); obj.SetActive(false); pooledObjects.Add(obj); return obj; } else { return null; } |
If a player bullet is requested from the pool and no inactive ones can be found, this block checks to see it’s possible to expand the pool instead of exiting the method. If so, you instantiate a new bullet, set it to inactive, add it to the pool and return it to the method that requested it.
Click play in Unity and try it out. Grab some power-ups and go crazy. Your 20 bullet object pool will expand as needed.
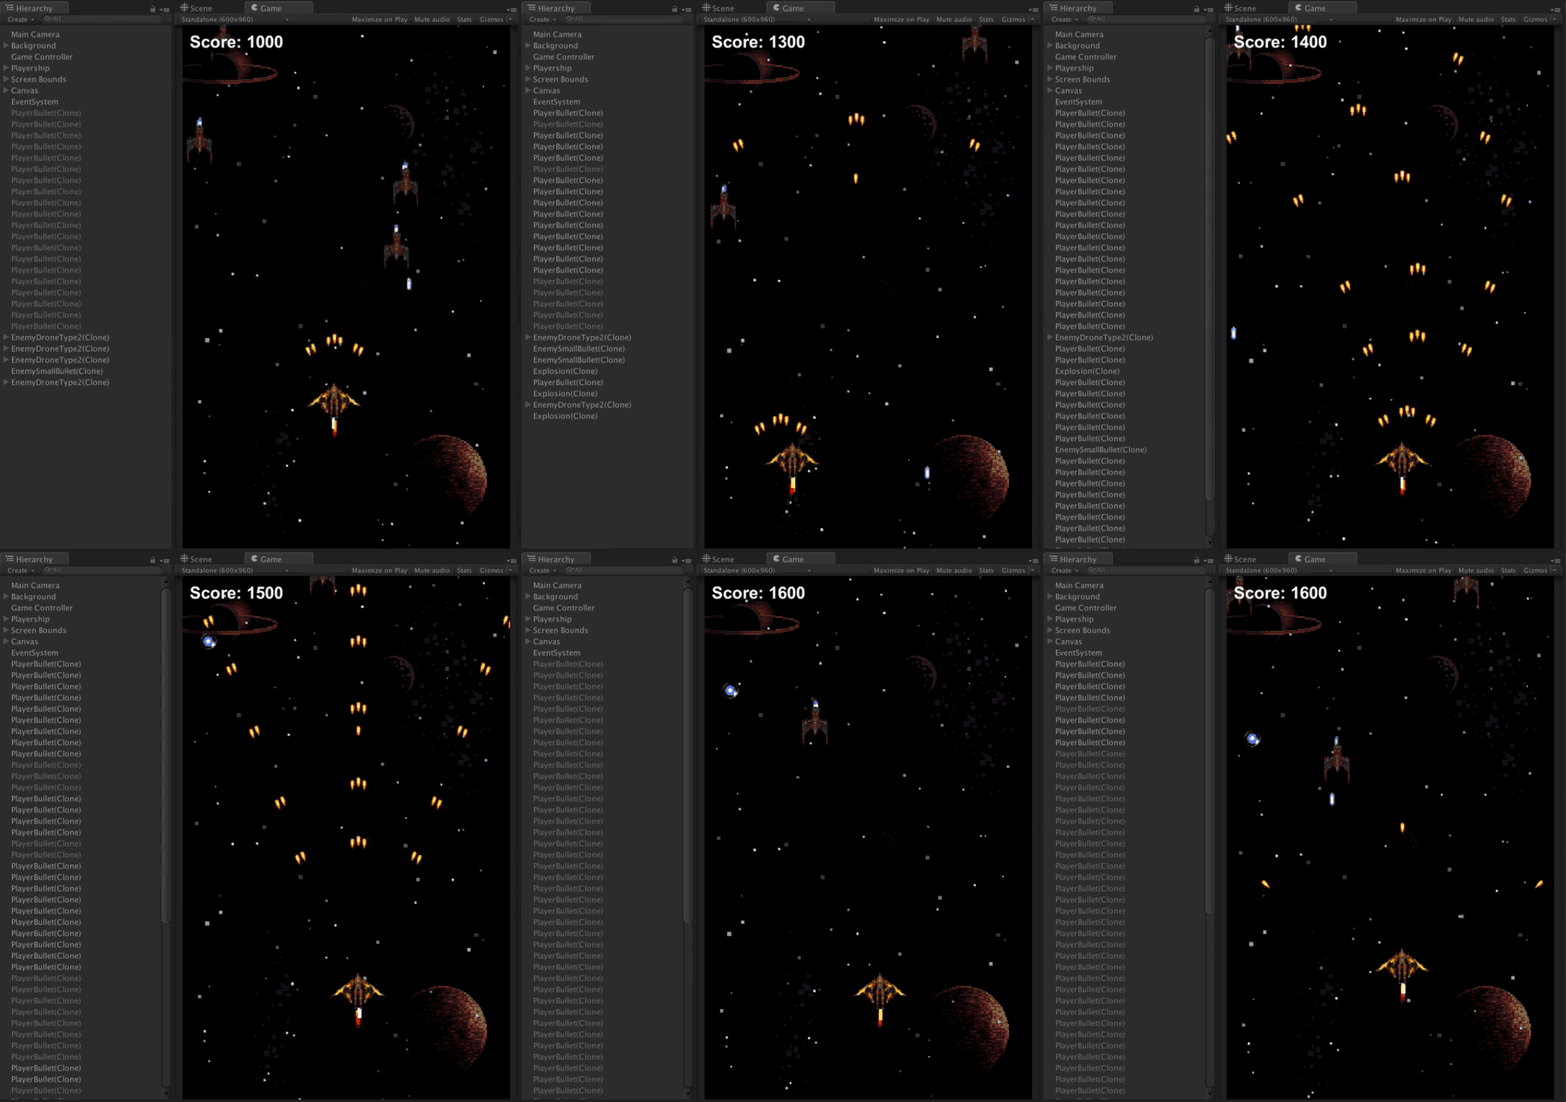

Invariably, lots of bullets mean lots of enemies, lots of explosions, lots of enemy bullets and so on.
To prepare for the onslaught of madness, you’ll extend the object pooler so it handles multiple object types. You’ll take it a step further and will make it possible to configure each type individually from one place in the Inspector.
Add the following code above the ObjectPooler class:
[System.Serializable] public class ObjectPoolItem { } |
[System.Serializable] allows you to make instances of this class editable from within the Inspector.
Next, you need to move the variables objectToPool, amountToPool and shouldExpand into the new ObjectPoolItem class. Heads up: you’ll introduce some errors in the ObjectPooler class during the move, but you’ll fix those in a minute.
Update the ObjectPoolItem class so it looks like this:
[System.Serializable] public class ObjectPoolItem { public int amountToPool; public GameObject objectToPool; public bool shouldExpand; } |
Any instance of ObjectPoolItem can now specify its own data set and behavior.
Once you’ve added the above public variables, you need make sure to delete those variables from the ObjectPooler. Add the following to ObjectPooler:
public List<ObjectPoolItem> itemsToPool; |
This is new list variable that lets you hold the instances of ObjectPoolItem.
Next you need to adjust Start() of ObjectPooler to ensure all instances of ObjectPoolItem get onto your pool list. Amend Start() so it looks like the code below:
void Start () { pooledObjects = new List<GameObject>(); foreach (ObjectPoolItem item in itemsToPool) { for (int i = 0; i < item.amountToPool; i++) { GameObject obj = (GameObject)Instantiate(item.objectToPool); obj.SetActive(false); pooledObjects.Add(obj); } } } |
In here, you added a new foreach loop to iterate through all instances of ObjectPoolItem and add the appropriate objects to your object pool.
You might be wondering how to request a particular object from the object pool – sometimes you need a bullet and sometimes you need more Neptunians, you know?
Tweak the code in GetPooledObject so it matches the following:
public GameObject GetPooledObject(string tag) { for (int i = 0; i < pooledObjects.Count; i++) { if (!pooledObjects[i].activeInHierarchy && pooledObjects[i].tag == tag) { return pooledObjects[i]; } } foreach (ObjectPoolItem item in itemsToPool) { if (item.objectToPool.tag == tag) { if (item.shouldExpand) { GameObject obj = (GameObject)Instantiate(item.objectToPool); obj.SetActive(false); pooledObjects.Add(obj); return obj; } } } return null; } |
GetPooledObject now takes a string parameter so your game can request an object by its tag. The method will search the object pool for an inactive object that has a matching tag, and then it returns an eligible object.
Additionally, if it finds no appropriate object, it checks the relevant ObjectPoolItem instance by the tag to see if it’s possible to expand it.
Get this working with bullets first, then you can add additional objects.
Reopen the ShipController script in MonoDevelop. In both Shoot() and ActivateScatterShotTurret(), look for the line:
GameObject bullet = ObjectPooler.SharedInstance.GetPooledObject(); |
Append the code so that it includes the Player Bullet tag parameter.
GameObject bullet = ObjectPooler.SharedInstance.GetPooledObject(“Player Bullet”); |
Return to Unity and click on the GameController object to open it in the Inspector.
Add one item to the new ItemsToPool list and populate it with 20 player bullets.

Click Play to make sure all that extra work changed nothing at all. :]
Good! Now you’re ready to add some new objects to your object pooler.
Change the size of ItemsToPool to three and add the two types of enemy ships. Configure the ItemsToPool instances as follows:
Element 1:
Object to Pool: EnemyDroneType1
Amount To Pool: 6
Should Expand: Unchecked
Element 2
Object to Pool: EnemyDroneType2
Amount to Pool: 6
Should Expand: Unchecked

As you did for the bullets, you need to change the instantiate and destroy methods for both types of ships.
The enemy drones are instantiated in the GameController script and destroyed in the EnemyDroneController script.
You’ve done this already, so the next few steps will go a little faster. :]
Open the GameController script. In SpawnEnemyWaves(), find the enemyType1 instantiation code:
Instantiate(enemyType1, spawnPosition, spawnRotation); |
And replace it with the following code:
GameObject enemy1 = ObjectPooler.SharedInstance.GetPooledObject("Enemy Ship 1"); if (enemy1 != null) { enemy1.transform.position = spawnPosition; enemy1.transform.rotation = spawnRotation; enemy1.SetActive(true); } |
Find this enemyType2 instantiation code:
Instantiate(enemyType2, spawnPosition, spawnRotation); |
Replace it with:
GameObject enemy2 = ObjectPooler.SharedInstance.GetPooledObject("Enemy Ship 2"); if (enemy2 != null) { enemy2.transform.position = spawnPosition; enemy2.transform.rotation = spawnRotation; enemy2.SetActive(true); } |
Finally, open the EnemyDroneController script. Currently, OnTriggerExit2D() just destroys the enemy ship when it leaves the screen. What a waste!
Find the line of code:
Destroy(gameObject); |
Replace it with the code below to ensure the enemy goes back to the object pool:
gameObject.SetActive(false); |
Similarly, in OnTriggerEnter2D(), the enemy is destroyed when it hits a player bullet. Again, find Destroy():
Destroy(gameObject); |
And replace it with the following:
gameObject.SetActive(false); |
Hit the play button and watch as all of your instantiated bullets and enemies change from inactive to active and back again as and when they appear on screen.
Elon Musk would be envious your reusable space ships!

Thank you for taking the time to work through this tutorial. Here’s a link to the Completed Project.
In this tutorial, you retrofitted an existing game with object pooling to save your users’ CPUs from a near-certain overload and the associated consquences of frame skipping and battery burning.
You also got very comfortable jumping between scripts to connect all the pieces together.
If you want to learn more about object pooling, check out Unity’s live training on the subject.
I hope you found this tutorial useful! I’d love to know how it helped you develop something cool or take an app to the next level.
Feel free to share a link to your work in the comments. Questions, thoughts or improvements are welcome too! I look forward to chatting with you about object pooling, Unity and destroying all the aliens.
The post Object Pooling in Unity appeared first on Ray Wenderlich.
In this video tutorial on Metal, you’ll learn how to add depth to scenes and render models in front of other models.
The post Video Tutorial: Beginning Metal Part 8: Depth appeared first on Ray Wenderlich.
In this video tutorial on Metal, you’ll learn how to import Blender and other 3D models into your game scenes.
The post Video Tutorial: Beginning Metal Part 9: Model I/O appeared first on Ray Wenderlich.
 I am happy to announce our first ever Black Friday sale!
From today until the end of Cyber Monday, we are offering a massive 50% Off All Books on our site (for new purchases only).
This is the biggest sale we’ve ever had, and is a great chance to get something you’ve had your eye on.
All of our books have recently been updated for iOS 10, Xcode 8, and Swift 3. Our books also include free updates – for example, our book the iOS Apprentice was first written for iOS 5, and has been updated 5 times for free!
Let’s take a look at what’s inside.

|
1) The iOS ApprenticeThis is our best-selling book for complete beginners to iOS development, with over 10,000 copies sold. Learn how to create 4 complete apps from scratch! |

|
2) The Swift ApprenticeIf you want to learn Swift 3, there’s no better way. Takes you all the way from beginning to advanced topics, including generics, access control, error handling, pattern matching, and protocol-oriented-programming. |

|
3) The tvOS ApprenticeWant to make apps on the big screen? This book teaches you everything you need to know, including details on the two methods of making apps on tvOS: the traditional method using UIKit, and the new Client-Server method using TVML. |

|
4) iOS 10 by TutorialsThis is a great book for intermediate to advanced developers who want to quickly learn the new APIs introduced in Xcode 8 and iOS 10. Covers Message Apps, SiriKit, Memory Debugging, and much more. |

|
5) watchOS by TutorialsThe most comprehensive book on making apps for Apple Watch anywhere. Covers layout, tables, snapshots, notifications, background refresh, CloudKit, and much more. |

|
6) Core Data by TutorialsAfter you read this book, you’ll never fear Core Data again! Takes you from the basics all the way to advanced topics, and includes detailed coverage of the new |

|
7) iOS Animations by TutorialsLearn from the master of iOS Animations himself – Marin Todorov – as you learn how to make delightful animations in your apps. Basic animations, layer animations, view controller transition animations, oh my! |

|
8) 2D Apple Games by TutorialsLearn how to make iOS, tvOS, watchOS, and macOS games using Swift 3 and SpriteKit. A great way to make games leveraging your existing iOS development skills! |

|
9) 3D Apple Games by TutorialsLearn how to make 3D games using Apple’s built in API: SceneKit. Through a series of mini-games and challenges, you will go from beginner to advanced and learn everything you need to make your own 3D game! |

|
10) Unity Games by TutorialsLearn how to make professional cross-platform games using Unity, a popular 2D and 3D game framework. Make 4 complete games: a twin-stick action game, a first-person shooter, a 2D platformer, and a tower defense game with VR support! |
Want to save even more? Our bundles are (at least) 50% off too!

In fact, you can get the entire collection of books for just $199.99.
There’s simply no better investment you can make as an iOS developer. Your career will thank you later!
This is the first time we’ve done a Black Friday sale, so there are bound to be some questions. Here are some answers:
If you have any other questions, please contact us.
At raywenderlich.com we don’t often have sales, so this is a one-of-a-kind opportunity. Be sure to take advantage of it while you can!
The team and I hope you enjoy our new lineup of books, and we hope it makes your learning fun and enjoyable.
Happy shopping! :]
The post raywenderlich.com Black Friday Sale: 50% Off All Books appeared first on Ray Wenderlich.
Learn how you can using instancing to render crowd scenes or a field of grass using minimal resources.
The post Video Tutorial: Beginning Metal Part 10: Instancing appeared first on Ray Wenderlich.
iOS devices provide rich multimedia experiences to users with vivid visual, audio and haptic interfaces. Despite the broad range of capabilities on offer, as developers we tend to focus almost exclusively on the visual design of our apps and neglect the audio side of the user experience.
AudioKit is a comprehensive audio framework built by audio designers, programmers and musicians for iOS. Under the hood, AudioKit is a mixture of Swift, Objective-C, C++ and C, interfacing with Apple’s Audio Unit API. All of this fantastic (and quite complex) technology is wrapped up in a super-friendly Swift API that you can use directly within Xcode Playgrounds!
This AudioKit tutorial doesn’t attempt to teach you all there is to know about AudioKit. Instead, you’ll be taken on a fun and gentle journey through the framework via the history of sound synthesis and computer audio. Along the way, you’ll learn the basic physics of sound, and how early synthesizers such as the Hammond Organ work. You’ll eventually arrive at the modern day where sampling and mixing dominate.
So pour yourself a coffee, pull up a chair and get ready for the journey!
Admittedly, the first step on your journey isn’t all that exciting. There’s some basic plumbing required in order to use AudioKit within a playground.
Open Xcode and create a new workspace via File\New\Workspace, name it Journey Through Sound, and save it in a convenient location.
At this point you’ll see an empty workspace. Click the + button in the bottom left-hand corner of the Navigator view. Select the New Playground… option, name it Journey, and save it in the same location as your workspace.
Your newly added playground will compile and execute, and look like the following:
Download the AudioKit source code and unzip the file into the same folder as your playground.
Open Finder, and drag the Xcode project located at AudioKit-3.4.1/AudioKit/iOS/AudioKit For iOS.xcodeproj into the root of your workspace.
Your Navigator view will look like the following:
Select iPhone 7 Plus as the build target:
Then select the menu option Product\Build to build the AudioKit framework. There are ~700 files in the framework, so expect this to take a little time!
Note: When using AudioKit within an application, as opposed to a playground, you can download and use the precompiled framework instead or use CocoaPods or Carthage. The only reason you need to follow this slightly more complex process here is that playgrounds don’t support frameworks just yet!
Once complete, click on Journey to open your playground. Replace the Xcode-generated code with the following:
import AudioKit let oscillator = AKOscillator() AudioKit.output = oscillator AudioKit.start() oscillator.start() sleep(10) |
Once built, you’ll hear your playground emit 10 seconds of a beeping sound. You can use the Play/Stop button at the bottom left of the playground window within the Debug Area to stop or repeat the playground.
Note: If the playground fails to execute, and you see errors in the Debug Area, try restarting Xcode. Unfortunately, using playgrounds in combination with frameworks can be a little error-prone and unpredictable. :[
Humans have been making music from physical objects — through hitting, plucking and strumming them in various ways — for thousands of years. Many of our traditional instruments, such as drums and guitars, have been around for centuries. The first recorded use of an electronic instrument, or at least the first time electronic circuitry was used to make sound, was in 1874 by Elisha Gray who worked in the field of telecommunication. Elisha discovered the oscillator, the most basic of sound synthesizers, which is where your exploration will begins.
Right click your playground, select New Playground Page, and create a new page named Oscillators.
Replace the generated code with the following:
import AudioKit import PlaygroundSupport // 1. Create an oscillator let oscillator = AKOscillator() // 2. Start the AudioKit 'engine' AudioKit.output = oscillator AudioKit.start() // 3. Start the oscillator oscillator.start() PlaygroundPage.current.needsIndefiniteExecution = true |
The playground will emit a never-ending beep — how, er, lovely. You can press Stop if you like.
This is much the same as your test playground that you created in the previous step, but this time you are going to dig into the details.
Considering each point in turn:
AKNode. Nodes form the main building blocks of your audio pipeline.An oscillator creates a repeating, or periodic signal that continues indefinitely. In this playground, the AKOscillator produces a sine wave. This digital sine wave is processed by AudioKit, which directs the output to your computer’s speakers or headphones, which physically oscillate with the exact same sine wave. This sound is transmitted to your ears by compression waves in the air around you, which is how you can hear that annoyingly sharp sound!
There are two parameters that determine what the oscillator sounds like: its amplitude, which is the height of the sine wave and determines how loud it is, and its frequency, which determines the pitch.
Within your playground, add the following after the line where you created the AKOscillator:
oscillator.frequency = 300 oscillator.amplitude = 0.5 |
Listen closely, and you’ll hear the sound is now half as loud and much lower in pitch. The frequency, measured in hertz (or cycles per second), determines the pitch of the note. The amplitude, with a scale from 0 to 1, gives the volume.
Elisha Gray was unfortunately beaten to the patent office by Alexander Graham Bell, narrowly missing out on going down in history as the inventor of the telephone. However, his accidental discovery of the oscillator did result in the very first patent for an electronic musical instrument.
Many years later, Léon Theremin invented a slightly strange musical instrument that is still used today. With the eponymous theremin, you can change the frequency of an electronic oscillator by waving your hand above the instrument. If you have no idea what this instrument sound like, I’d recommend listening to Good Vibrations by the Beach Boys; you can’t miss the distinctive theremin sound in that track!
You can simulate this effect by adding the following code to the end of your playground:
oscillator.rampTime = 0.2 oscillator.frequency = 500 AKPlaygroundLoop(every: 0.5) { oscillator.frequency = oscillator.frequency == 500 ? 100 : 500 } |
The rampTime property allows the oscillator to transition smoothly between property values (e.g. frequency or amplitude). AKPlaygroundLoop is a useful little utility provided by AudioKit for periodically executing code in playgrounds. In this case, you are simply switching the oscillator frequency from 500Hz to 100Hz every 0.5 seconds.
You just built your very own theremin!
Simple oscillators can create musical notes, but are not terribly pleasing to the ear. There are a number of other factors that give physical instruments, such as the piano, their distinctive sound. In the next few sections you’ll explore how these are constructed.
When a musical instrument plays a note, the amplitude (or loudness) varies over time, and is different from instrument to instrument. A model that can be used to simulate this effect is an Attack-Decay-Sustain-Release (ADSR) Envelope:
The component parts of this envelope are:
A piano, where strings are hit with a hammer, has a very brief attack and a rapid decay. A violin can have a longer attack, decay and sustain as the musician continues to bow the string.
One of the first electronic instruments that used an ADSR envelope was the Novachord. This instrument, built in 1939, contained 163 vacuum tubes and over 1,000 custom capacitors, and weighed in at 500 pounds (230 kg). Unfortunately, only one thousand Novachords were made and it was not a commercial success.
Image courtesy of Hollow Sun – CC attribution license.
Control-click the top element in your playground, Journey, select New Playground Page and create a new page named ADSR. Replace the generated content with the following:
import AudioKit import PlaygroundSupport let oscillator = AKOscillator() |
This create the oscillator that you are already familiar with. Next add the following code to the end of your playground:
let envelope = AKAmplitudeEnvelope(oscillator) envelope.attackDuration = 0.01 envelope.decayDuration = 0.1 envelope.sustainLevel = 0.1 envelope.releaseDuration = 0.3 |
This creates an AKAmplitudeEnvelope which defines an ADSR envelope. The duration parameters are specified in seconds and the level is an amplitude with a range of 0 – 1.
AKAmplitudeEnvelope subclasses the AKNode, just like AKOscillator. In the above code, you can see that the oscillator is passed to the envelope’s initializer, connecting the two nodes together.
Next add the following:
AudioKit.output = envelope AudioKit.start() oscillator.start() |
This starts the AudioKit engine, this time taking the output from the ADSR envelope, and starts the oscillator.
In order to hear the effect of the envelope you need to repeatedly start then stop the node. That’s the final piece to add to your playground:
AKPlaygroundLoop(every: 0.5) { if (envelope.isStarted) { envelope.stop() } else { envelope.start() } } PlaygroundPage.current.needsIndefiniteExecution = true |
You will now hear the same note played repeatedly, but this time with a sound envelope that sounds a little bit like a piano.
The loop executes two times per second, with each iteration either starting or stopping the ADSR. When the loop starts, the rapid attack to full volume will take just 0.01 seconds, followed by a 0.1-second decay to the sustain level. This is held for 0.5 seconds, then released with a final decay of 0.3 seconds.
Play around with the ADSR values to try and create some other sounds. How about a violin?
The sounds you have explored so far have been based on sine waves produced by AKOscillator. While you can play musical notes with this oscillator, and use an ADSR to soften its sharp tones, you wouldn’t exactly call it musical!
In the next section you’ll learn how to create a richer sound.
Each musical instrument has a distinctive sound quality, known as its timbre. This is what makes a piano sound quite different from a violin, even though they’re playing exactly the same note. An important property of timbre is the sound spectrum that an instrument produces; this describes the range of frequencies that combine to produce a single note. Your current playgrounds used oscillators that emit a single frequency, which sounds quite artificial.
You can create a realistic synthesis of an instrument by adding together the output of a bank of oscillators to play a single note. This is known as additive synthesis, and is the subject of your next playground.
Right click your playground, select New Playground Page and create a new page named Additive Synthesis. Replace the generated content with the following:
import AudioKit import PlaygroundSupport func createAndStartOscillator(frequency: Double) -> AKOscillator { let oscillator = AKOscillator() oscillator.frequency = frequency oscillator.start() return oscillator } |
For additive synthesis, you need multiple oscillators. createAndStartOscillator is a convenient way to create them.
Next add the following:
let frequencies = (1...5).map { $0 * 261.63 } |
This uses the Range Operator to create a range with the numbers from 1 to 5. You then map this range by multiplying each entry by 261.53. There is a reason for this magic number: It’s the frequency of middle C on a standard keyboard. The other frequencies are multiples of this value, which are known as harmonics.
Next add the following:
let oscillators = frequencies.map { createAndStartOscillator(frequency: $0) } |
This performs a further map operation to create your oscillators.
The next step is to combine them together. Add the following:
let mixer = AKMixer() oscillators.forEach { mixer.connect($0) } |
The AKMixer class is another AudioKit node; it takes the output of one or more nodes and combines them together.
Next add the following:
let envelope = AKAmplitudeEnvelope(mixer) envelope.attackDuration = 0.01 envelope.decayDuration = 0.1 envelope.sustainLevel = 0.1 envelope.releaseDuration = 0.3 AudioKit.output = envelope AudioKit.start() AKPlaygroundLoop(every: 0.5) { if (envelope.isStarted) { envelope.stop() } else { envelope.start() } } |
The above code should be quite familiar to you; it adds an ADSR to the output of the mixer, provides it to the AudioKit engine, then periodically starts and stops it.
To really learn how additive synthesis works, it would be nice if you could play around with the various combinations of these frequencies. The playground live-view is an ideal tool for this!
Add the following code:
class PlaygroundView: AKPlaygroundView { override func setup() { addTitle("Harmonics") oscillators.forEach { oscillator in let harmonicSlider = AKPropertySlider( property: "\(oscillator.frequency) Hz", value: oscillator.amplitude ) { amplitude in oscillator.amplitude = amplitude } addSubview(harmonicSlider) } } } PlaygroundPage.current.needsIndefiniteExecution = true PlaygroundPage.current.liveView = PlaygroundView() |
AudioKit has a number of classes that make it easy for you to create interactive playgrounds; you’re using several of them here.
The Playground class subclasses AKPlaygoundView, which constructs a vertical stack of subviews. Within the setup method, you iterate over the oscillators, and create an AKPropertySlider for each. The sliders are initialized with the frequency and amplitude of each oscillator and invoke a callback when you interact with the slider. The trailing closure that provides this callback updates the amplitude of the respective oscillator. This is a very simple method to making your playground interactive.
In order to see the results of the above code, you need to ensure the live view is visible. Click the button with the linked circles icon in the top right corner to show the assistant view. Also ensure that the live view is set to the correct playground output.
You can alter the amplitude of each slider to change the timbre of your instrument. For a more natural sound quality, I’d suggest a configuration similar to the one pictured above.
One of the earliest synthesizers to employ additive synthesis was the 200 ton (!) Teleharmonium. The immense size and weight of this instrument were almost certainly responsible for its demise. The more successful Hammond organ used a similar tonewheel technique, albeit in a smaller package, to achieve the same additive synthesis which was part of its distinctive sound. Invented in 1935, the Hammond is still well-known and was a popular instrument in the progressive rock era.
The C3 Hammond – public domain image.
Tonewheels are physical spinning disks with a number of smooth bumps on their rim, which rotate next to a pickup assembly. The Hammond organ has a whole bank of these tonewheels spinning at various different speeds. The musician uses drawbars to determine the exact mix of tones used to generate a musical note. This rather crude sounding way of creating sound is, strictly speaking, electromechanical rather than electronic!
There are a number of other techniques that can be used to create a more realistic sound spectrum, including Frequency Modulation (FM) and Pulse Width Modulation (PWM), both of which are available in AudioKit via the AKFMOscillator and AKPWMOscillator classes. I’d certainly encourage you to play around with both of these. Why not swap out the AKOscillator you are using in your current playgrounds for one of these?
The 1970s saw a shift away from modular synthesis, which uses separate oscillators, envelopes and filters, to the use of microprocessors. Rather than using analogue circuitry, sounds were instead synthesized digitally. This resulted in far cheaper and more portable sound synthesizers, with brands such as Yamaha becoming widely used by professionals and amateurs alike.
The 1983 Yamaha DX7 – public domain image.
All of your playgrounds so far have been limited a single note at a time. With many instruments, musicians are able to play more than one note simultaneously. These instruments are called polyphonic, whereas those that can only play a single note, just like your examples, are called monophonic.
In order to create polyphonic sound, you could create multiple oscillators, each playing a different note, and feed them through a mixer node. However, there is a much easier way to create the same effect: using AudioKit’s oscillator banks.
Ctrl-click your playground, select New Playground Page and create a new page named Polyphony. Replace the generated content with the following:
import PlaygroundSupport import AudioKit let bank = AKOscillatorBank() AudioKit.output = bank AudioKit.start() |
This simply creates the oscillator bank and sets it as the AudioKit output. If you Command-click the AKOscillatorBank class to navigate to its definition, you will find that it subclasses AKPolyphonicNode. If you follow this to its definition, you’ll find that it subclasses AKNode and adopts the AKPolyphonic protocol.
As a result, this oscillator bank is just like any other AudioKit node in that its output can be processed by mixers, envelopes and any other filters and effects. The AKPolyphonic protocol describes how you play notes on this polyphonic node, as you’ll see shortly.
In order to test this oscillator you need a way to play multiple notes in unison. That sounds a bit complicated doesn’t it?
Add the following to the end of your playground, and ensure the live view is visible:
class PlaygroundView: AKPlaygroundView { override func setup() { let keyboard = AKKeyboardView(width: 440, height: 100) addSubview(keyboard) } } PlaygroundPage.current.liveView = PlaygroundView() PlaygroundPage.current.needsIndefiniteExecution = true |
Once the playground has compiled you’ll see the following:
How cool is that? A playground that renders a musical keyboard!
The AKKeyboardView is another AudioKit utility that makes it really easy to ‘play’ with the framework and explore its capabilities. Click on the keys of the keyboard, and you’ll find it doesn’t make a sound.
Time for a bit more wiring-up.
Update setUp of your PlaygroundView to the following:
let keyboard = AKKeyboardView(width: 440, height: 100) keyboard.delegate = self addSubview(keyboard) |
This sets the keyboard view’s delegate to the PlaygroundView class. The delegate allows you to respond to these keypresses.
Update the class definition accordingly:
class PlaygroundView: AKPlaygroundView, AKKeyboardDelegate |
This adopts the AKKeyboardDelegate protocol. Finally add the following methods to the class, just after setup:
func noteOn(note: MIDINoteNumber) { bank.play(noteNumber: note, velocity: 80) } func noteOff(note: MIDINoteNumber) { bank.stop(noteNumber: note) } |
Each time you press a key, the keyboard invokes noteOn of the delegate. The implementation of this method is quite straightforward; it simply invokes play on the oscillator bank. noteOff, invokes the corresponding stop method.
Click and slide across the keyboard, and you’ll find it plays a beautiful crescendo. This oscillator bank already has ADSR capabilities built in. As a result, the decay from one note mixes with the attack, release and sustain of the next, creating quite a pleasing sound.
You’ll notice that the note supplied by the keyboard is not defined as a frequency. Instead, it uses the MIDINoteNumber type. If you Command-click to view its definition, you’ll see that it is simply an integer:
public typealias MIDINoteNumber = Int |
MIDI stands for Musical Instrument Digital Interface, which is a widely adopted communication format between musical instruments. The note numbers correspond to notes on a standard keyboard. The second parameter in the play method is velocity, another standard MIDI property which details how hard a note is struck. Lower values indicate a softer strike which result in a quieter sound.
The final step is to set the keyboard to polyphonic mode. Add the following to the end of the setup method:
keyboard.polyphonicMode = true |
You will find you can now play multiple notes simultaneously, just like the following:
…which is, incidentally, C-major.
AudioKit has a long history with its foundations in the early microprocessor era. The project uses Soundpipe, and code from Csound, an MIT project that started in 1985. It’s fascinating to think that audio code you can run in a playground and add to your iPhone apps started life over 30 years ago!
The sound synthesis techniques you have explored so far all try to construct realistic sounds from quite basic building blocks: oscillators, filters and mixers. In the early 1970s, the increase in computer processing power and storage gave rise to a completely different approach — sound sampling — where the aim is to create a digital copy of the sound.
Sampling is a relatively simple concept and shares the same principles as digital photography. Natural sounds are smooth waveforms; the process of sampling simply records the amplitude of the soundwave at regularly spaced intervals:
There are two important factors that affect how faithfully a sound is captured:
You’ll explore these properties with your next playground.
Right-click your playground, select New Playground Page and create a new page named Samples. Replace the generated content with the following:
import PlaygroundSupport import AudioKit let file = try AKAudioFile(readFileName: "climax-disco-part2.wav", baseDir: .resources) let player = try AKAudioPlayer(file: file) player.looping = true |
The above loads a sound sample, creates an audio player and sets it to repeatedly loop the sample.
The WAV file for this AudioKit tutorial is available within this zip file. Unzip the contents, then drag the WAV files into the resources folder of your playground:
Finally, add the following to the end of your playground:
AudioKit.output = player AudioKit.start() player.play() PlaygroundPage.current.needsIndefiniteExecution = true |
This wires up your audio player to the AudioKit engine and starts it playing. Turn up the volume and enjoy!
This brief sampled loop comprises a wide variety of sounds that would be a real challenge with the basic building blocks of oscillators.
The MP3 sound you’re using has a high bit depth and sample rate, giving it a crisp and clear sound. In order to experiment with these parameters, add the following code to your playground, just after you create your audio player:
let bitcrusher = AKBitCrusher(player) bitcrusher.bitDepth = 16 bitcrusher.sampleRate = 40000 |
And update the AudioKit output:
AudioKit.output = bitcrusher |
The output of the playground is now very different; it’s clearly the same sample, but it now sounds very tinny.
AKBitCrusher is an AudioKit effect that simulates a reduction of bit depth and sample rate. As a result, you can produce an audio output that is similar to the early samples produced by computers such as the ZX Spectrum or BBC Micro, which only had a few kilobytes of memory and processors that are millions of times slower than today’s!
For your final experiment, you’re going to assemble a number of nodes together to create a stereo delay effect. To start, remove the three lines of code that create and configure the bit crusher.
Next, add the following:
let delay = AKDelay(player) delay.time = 0.1 delay.dryWetMix = 1 |
This creates a delay effect of 0.1 seconds using your sample loop as an input. The wet/dry mix value lets you mix the delayed and non-delayed audio, in this case, a value of 1 ensures only the delayed audio is output by this node.
Next, add the following:
let leftPan = AKPanner(player, pan: -1) let rightPan = AKPanner(delay, pan: 1) |
The AKPanner node lets you pan audio to the left, to the right, or somewhere in between. The above pans the delayed audio to the left, and the non-delayed to the right.
The final step is to mix the two together, and configure the AudioKit output by adding the following two lines to replace the old line that configured the AudioKit to use bitcrusher:
let mix = AKMixer(leftPan, rightPan) AudioKit.output = mix |
This will play the same sound sample, but with a very short delay between the left and right speaker.
In this AudioKit Tutorial you’ve only scratched the surface of what’s possible with AudioKit. Start exploring — try a moog filter, a pitch shifter, a reverb, or a graphic equalizer to see what effects they have.
With a little creativity, you’ll be creating your own custom sounds, electronic instruments or game effects.
You can download the finished playground, although you’ll still have to add the AudioKit library to the workspace as described in the Getting Started section.
Finally, thanks to Aurelius Prochazka, the AudioKit project lead, for reviewing this article.
If you have any questions or comments on this AudioKit tutorial, feel free to join the discussion below!
The post AudioKit Tutorial: Getting Started appeared first on Ray Wenderlich.
 If you missed last week’s Black Friday sale, don’t worry: the sale deadline goes until the end of today – Cyber Monday. So you have one last chance!
It’s huge – we are offering a massive 50% Off All Books on our site (for new purchases only).
This is the biggest sale we’ve ever had, and is a great chance to get something you’ve had your eye on.
All of our books have recently been updated for iOS 10, Xcode 8, and Swift 3. Our books also include free updates – for example, our book the iOS Apprentice was first written for iOS 5, and has been updated 5 times for free!
In case you missed it before, here’s what’s inside.

|
1) The iOS ApprenticeThis is our best-selling book for complete beginners to iOS development, with over 10,000 copies sold. Learn how to create 4 complete apps from scratch! |

|
2) The Swift ApprenticeIf you want to learn Swift 3, there’s no better way. Takes you all the way from beginning to advanced topics, including generics, access control, error handling, pattern matching, and protocol-oriented-programming. |

|
3) The tvOS ApprenticeWant to make apps on the big screen? This book teaches you everything you need to know, including details on the two methods of making apps on tvOS: the traditional method using UIKit, and the new Client-Server method using TVML. |

|
4) iOS 10 by TutorialsThis is a great book for intermediate to advanced developers who want to quickly learn the new APIs introduced in Xcode 8 and iOS 10. Covers Message Apps, SiriKit, Memory Debugging, and much more. |

|
5) watchOS by TutorialsThe most comprehensive book on making apps for Apple Watch anywhere. Covers layout, tables, snapshots, notifications, background refresh, CloudKit, and much more. |

|
6) Core Data by TutorialsAfter you read this book, you’ll never fear Core Data again! Takes you from the basics all the way to advanced topics, and includes detailed coverage of the new |

|
7) iOS Animations by TutorialsLearn from the master of iOS Animations himself – Marin Todorov – as you learn how to make delightful animations in your apps. Basic animations, layer animations, view controller transition animations, oh my! |

|
8) 2D Apple Games by TutorialsLearn how to make iOS, tvOS, watchOS, and macOS games using Swift 3 and SpriteKit. A great way to make games leveraging your existing iOS development skills! |

|
9) 3D Apple Games by TutorialsLearn how to make 3D games using Apple’s built in API: SceneKit. Through a series of mini-games and challenges, you will go from beginner to advanced and learn everything you need to make your own 3D game! |

|
10) Unity Games by TutorialsLearn how to make professional cross-platform games using Unity, a popular 2D and 3D game framework. Make 4 complete games: a twin-stick action game, a first-person shooter, a 2D platformer, and a tower defense game with VR support! |
Want to save even more? Our bundles are (at least) 50% off too!

In fact, you can get the entire collection of books for just $199.99.
There’s simply no better investment you can make as an iOS developer. Your career will thank you later!
This is the first time we’ve done a Black Friday / Cyber Monday sale, so there are bound to be some questions. Here are some answers:
If you have any other questions, please contact us.
At raywenderlich.com we don’t often have sales, so this is a one-of-a-kind opportunity. Today is the last day, so don’t miss it!
The team and I hope you enjoy our new lineup of books, and we hope it makes your learning fun and enjoyable.
Happy shopping! :]
The post raywenderlich.com Cyber Monday Sale: Last Chance appeared first on Ray Wenderlich.
In this video tutorial, you'll discover how lighting is important to a scene and learn how to implement ambient lighting.
The post Video Tutorial: Beginning Metal Part 11: Ambient Lighting appeared first on Ray Wenderlich.