Quantcast
Channel: Kodeco | High quality programming tutorials: iOS, Android, Swift, Kotlin, Unity, and more
Viewing all 4373 articles
Browse latest View live

RWDevCon 2017: Choose Your Topics!

$
0
0

RWDevCon-feature

Next March, we are running an iOS conference focused on high quality hands-on tutorials called RWDevCon 2017.

One of the unique things about RWDevCon is it’s coordinated as a team.

That means we can do some cool things, like let you decide the content of the conference. Here’s how it works:

  1. Send your suggestions. First we’ll send an email to everyone who’s bought a ticket, asking for ideas for tutorials. For example, you might suggest a tutorial on rxSwift, the new Swift 3 API Design Guidelines, or Server Side Swift w/ Vapor.
  2. Vote your favorites. We’ll put the most common suggestions on a survey, and you can vote on which you’d like in the conference.
  3. Enjoy your top picks. Based on the results, we’ll be sure to cover everyone’s top picks, and match speakers to topics based on experience. w00t!

There’s no other conference like this – RWDevCon is truly a conference where you decide what’s inside.

This process is starting today, so if you’d like to be a part of the decision making process, grab your ticket now.

We can’t wait to see what you choose this year! :]

The post RWDevCon 2017: Choose Your Topics! appeared first on Ray Wenderlich.


Firebase Remote Config Tutorial for iOS

$
0
0

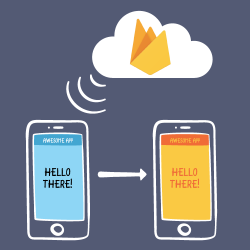
With Remote Config, you can update the look of your app whenever you want!

With Remote Config, you can update the look of your app whenever you want!

Remember that time you published your app, and it was perfect in every way? You never had to touch another line of code because you managed to get everything just right first time around?

Yeah, me neither.

Fact is, being a successful app developer usually means making frequent changes to your app. Sometimes these changes are new features or bug fixes. But sometimes, the most impactful updates are one-line changes to your code, like adjusting a line of text, or nerfing a powerful unit in a tower defense game.

While these kinds of changes are easy to make, publishing them is still a multi-day process. Wouldn’t it be nice if you could make some of these tweaks without having to go through that whole process?

Firebase Remote Config gives you that power. Throughout the course of this Firebase Remote Config tutorial for iOS, you’ll take the Planet Tour sample app and learn how you can change text, colors, and other behavior on the fly without having to publish new builds! Once mastered, you’ll cover some of the more powerful features, like delivering different sets of content to different users.

Prerequisites: This Firebase Remote Config tutorial for iOS assumes you have some familiarity with, and an installation of, CocoaPods. If you don’t, please check out our CocoaPods tutorial first.

Running the Sample App

Get started in this Firebase Remote Config tutorial for iOS by downloading and running the Planet Tour Starter app. You can scroll around to view different planets, tapping on each to get some (mostly-accurate) extra information.

Firebase Remote Config Tutorial for iOS

Things at Planet Tour Apps, Inc. are going great, until one day Greg from marketing decides Planet Tour should switch to a green color scheme in celebration of Earth Day. (Yes, you might be doing this Firebase Remote Config tutorial for iOS nowhere near Earth Day, but use your imagination.)

It’s an easy enough fix — if you look in AppConstants.swift there’s an appPrimaryColor variable you can change, which will affect many of your text label colors. Pushing this change out to your users would involve publishing a new build, submitting it to the App Store, getting it approved, then hoping all of your users download it before Earth Day. To revert the change once Earth Day is over, you’d have to do the whole process over again.

Wouldn’t it be nice if you could just alter these values… from the cloud?

Installing the Remote Config Library

This seems like a good case for Firebase Remote Config. Hop into the nearest available time machine and let’s pretend you decided to wire up your app using Remote Config instead of hard-coded values currently in AppConstants.

To get started, you’ll need to create a project in the Firebase Console, associate it with the Planet Tour app, then install the Firebase Remote Config library.

Going over this one step at a time:

  1. Open firebase.google.com/console
  2. Click on Create New Project.
  3. Name your project Planet Tour, make sure your region is selected, then click Create Project.
    Firebase Remote Config Tutorial for iOS
  4. Next, click on Add Firebase to your iOS app.
    Firebase Remote Config Tutorial for iOS
  5. Add the bundle ID of your project (com.razeware.Planet-Tour) and leave the App Store ID field blank then click Add App.
    Firebase Remote Config Tutorial for iOS
  6. At this point, your browser will download a GoogleServices-info.plist file for you. Drag this file into your Xcode project (select Copy Items if Needed).
  7. Click Continue through the remaining few steps in the setup wizard. (Don’t worry — we’ll walk you through those instructions next.)
  8. Close Planet Tour in Xcode.
  9. Open a terminal window, navigate to your project and type pod init to create a basic Podfile.
  10. Edit your podfile in your favorite text editor so it looks like this:
    target 'Planet Tour' do
      # Comment this line if you're not using Swift and don't want to use dynamic frameworks
      use_frameworks!
     
      # Pods for Planet Tour
      pod 'Firebase/Core'
      pod 'Firebase/RemoteConfig'
    end
  11. Run pod install, then open Planet Tour.xcworkspace in Xcode
  12. Open AppDelegate.swift. Add the following below import UIKit:
    import Firebase

    Next, add the following to application(_:didFinishLaunchingWithOptions:) above the return statement:

    FIRApp.configure()

    This method looks at what libraries you have installed and initializes them using the constants provided to your project when you added the GoogleServices-info.plist file. The Remote Config library now knows the proper place to look on the internet to find new values.

Build and run your app. The app should look as it did previously except, you’ll see some debug information in your console output you didn’t see before.

Note: You might receive errors like FIRInstanceID/WARNING STOP!! Will reset deviceID from memory. In Xcode 8, you need to allow Keychain sharing to remove these errors when using FireBase.

Congratulations! You’ve installed Remote Config! Now you can go ahead and use it in the rest of this Firebase Remote Config tutorial for iOS.

Using Remote Config

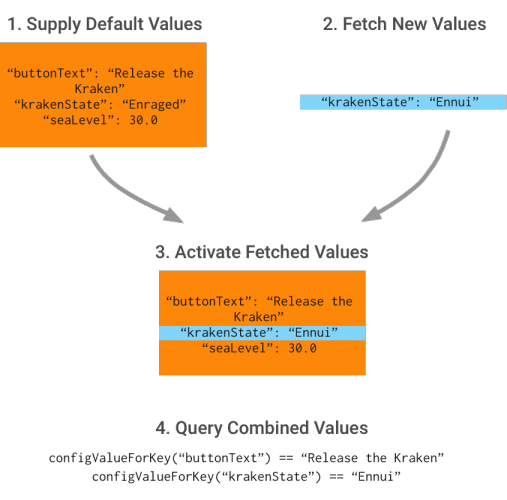
If you want the overly-simplified version of how Remote Config works, think of it as an NSDictionary living in the cloud. When your app starts up, it grabs any new values it might need from the cloud, and applies them on top of any old values you may have specified as defaults. The general process for using Remote Config looks a little like this:

  1. Provide Remote Config with defaults for any value you may possibly change in the future.
  2. Fetch any new values from the cloud. These are kept in a cached holding pattern on your device.
  3. “Activate” those fetched values. When this happens, you can think of this as applying those fetched values on top of your existing default values.
  4. Query Remote Config for values. Remote Config will either give you a value from the cloud (if it found one), or a default value based on the provided key.

Firebase Remote Config Tutorial for iOS

One important thing to note is these new values you fetch are generally a subset of the default values you supply. You can take nearly any hard-coded string, number, or boolean in your app, and wire them up to use Remote Config. This gives you the flexibility to change many aspects of your app later, while still keeping your actual network calls nice and small.

Enough theory. Time to put this into practice!

First, open your Utilities folder in the Planet Tour Xcode project and right-click to create a new file. Select Swift file. Name it RCValues.swift, and create it in the default folder suggested by Xcode.

Replace the contents of the file with the following:

import Foundation
import Firebase
 
class RCValues {
 
  static let sharedInstance = RCValues()
 
  private init() {
    loadDefaultValues()
  }
 
  func loadDefaultValues() {
    let appDefaults: [String: NSObject] = [
      "appPrimaryColor" : "#FBB03B" as NSObject
    ]
    FIRRemoteConfig.remoteConfig().setDefaults(appDefaults)
  }
}

Here you use the Singleton approach for the RCValues class. Inside loadDefaultValues(), you’re passing along a set of keys and values to the Remote Config as defaults. Right now, you’re only suppling one value, but don’t worry. You’ll add more later.

Next, you need to ask Remote Config to fetch new values from the cloud. Add the following to the end of init():

fetchCloudValues()

Next, add the following method below loadDefaultValues() to fetch these values:

func fetchCloudValues() {
  // 1
  // WARNING: Don't actually do this in production!
  let fetchDuration: TimeInterval = 0
  FIRRemoteConfig.remoteConfig().fetch(withExpirationDuration: fetchDuration) {
    [weak self] (status, error) in
 
    guard error == nil else {
      print ("Uh-oh. Got an error fetching remote values \(error)")
      return
    }
 
    // 2
    FIRRemoteConfig.remoteConfig().activateFetched()
    print ("Retrieved values from the cloud!")
  }
}

Let’s go over what you did here:

1. By default, Remote Config will cache any values it retrieves from the cloud for about 12 hours. In a production app, this is probably just fine. But when you’re doing development (or following a Firebase Remote Config tutorial for iOS online), this makes it really tough to test out new values. So instead, you’re specifying a fetchDuration of 0 to ensure you never use the cached data.

2. In the completion handler, you activate these fetched values immediately — i.e., you’re telling remote config to apply these newer values on top of any older ones it might have.

Now, the code you added at the beginning has some issues. The Remote Config library has a client-side throttle to ensure you don’t ping the service too frequently. By setting your fetchDuration to 0, you’ll hit this throttle and your library will stop making calls.

You can get around this by enabling developer mode. Add the following method below fetchCloudValues():

func activateDebugMode() {
  let debugSettings = FIRRemoteConfigSettings(developerModeEnabled: true)
  FIRRemoteConfig.remoteConfig().configSettings = debugSettings!
}

By setting developer mode to true, you’re telling Remote Config to bypass the client-side throttle. For development purposes, or testing with your 10-person team, this is fine. But if you were to launch this app to the public with your millions of adoring fans, you’re going to hit the server-side throttle pretty quickly, and Remote Config will stop working. (This is the whole reason you have a client-side throttle in the first place.)

So, for crying out loud, before you launch this app for real, make sure you disable developer mode and set your fetchDuration to something a little more reasonable, like 43200 (that’s 12 hours to you and me).

Finally, add the following right after you set fetchDuration:

activateDebugMode()

The above will activate debug mode and you will no longer hit the server-side throttling issue.

Okay, time to get this code up and running. Open AppDelegate.swift, add the following to application(_:didFinishLaunchingWithOptions:), below FIRApp.configure():

let _ = RCValues.sharedInstance

Build and run. You should see the following line in your debug console:

Retrieved values from the cloud!
Note: At the time of this writing, it takes a very long time (about 45 seconds) for this line to appear in the Xcode 8 simulator. If you try this on an actual device, it runs much faster.

Using Remote Config Values

Now that you’re downloading these values, try printing them to the console. Add the following to your fetchCloudValues() call, right after the “Retrieved values from the cloud” line:

print ("Our app's primary color is
    \(FIRRemoteConfig.remoteConfig().configValue(forKey: "appPrimaryColor"))")

This will grab the appropriate value for your appPrimaryColor key.

Build and run your app. You’ll see a line like this:

Our app's primary color is <FIRRemoteConfigValue: 0x61000003ece0>

Well, that’s somewhat helpful, but you’re kind of hoping for a string value.

Remote Config retrieves values as FIRRemoteConfigValue objects, which you can think of as wrappers around the underlying data, which is represented internally as a UTF8-encoded string). You’ll almost never use this object directly. Instead, you’ll call a helper method like numberValue or boolValue to retrieve the actual value you want.

Firebase Remote Config Tutorial for iOS

Replace the line you just added with:

print ("Our app's primary color is
    \(FIRRemoteConfig.remoteConfig().configValue(forKey: "appPrimaryColor").stringValue)")

Build and run your app; this time you’ll see:

Our app's primary color is Optional("#FBB03B")

That’s more like it. Remote Config provides you the default value you’ve supplied earlier.

Updating Values from the Cloud

Now you’re getting proper values from Remote Config, let’s try supplying new values from the cloud.

Open the Firebase Console and click on the Remote Config header on the left. Click Add your first parameter. In the form, enter appPrimaryColor for the key and Greg from Marketing’s favorite new green — #36C278 — for the value.

Firebase Remote Config Tutorial for iOS

Click Add Parameter, then click Publish Changes to update the changes.

Build and run your app. Take a look at what you have in the console now….

Our app’s primary color is Optional("#36C278")

Hooray! You’re updating values from the cloud!

Changing Your App’s Look and Feel

While this new Xcode console output might be exciting to you and me, your audience will be considerably less excited. Lets hook up your app to use this new value.

First, add an enum to represent your keys. Using raw strings for key names is a recipe for disaster — or at least spending an afternoon hunting down a mystery bug because you mistyped a key name. By using an enum, Xcode can catch errors at compile time instead of runtime.

Open RCValues.swift and add the following above the class definition:

enum ValueKey: String {
  case appPrimaryColor
}

Next, update loadDefaultValues() to use this enum instead of the raw string:

let appDefaults: [String: NSObject] = [
  ValueKey.appPrimaryColor.rawValue : "#FBB03B" as NSObject
]

Next, add the following helper method to RCValues, which takes in a ValueKey and returns a UIColor based on the string from Remote Config.

func color(forKey key: ValueKey) -> UIColor {
  let colorAsHexString = FIRRemoteConfig.remoteConfig()[key.rawValue].stringValue ?? "#FFFFFFFF"
  let convertedColor = UIColor(rgba: colorAsHexString)
  return convertedColor
}

Finally, change the places in your app using the old AppConstants value to use this new RCValues helper method instead. You’ll do this in three locations.

1. Open ContainerViewController.swift, change the following inside updateBanner():

bannerView.backgroundColor = AppConstants.appPrimaryColor

to this:

bannerView.backgroundColor = RCValues.sharedInstance.color(forKey: .appPrimaryColor)

2. Open GetNewsletterViewController.swift, change the following inside updateSubmitButton():

submitButton.backgroundColor = AppConstants.appPrimaryColor

to this:

submitButton.backgroundColor = RCValues.sharedInstance.color(forKey: .appPrimaryColor)

3. Open PlanetDetailViewController.swift, change the following inside updateLabelColors():

nextLabel.textColor = AppConstants.appPrimaryColor

to this:

nextLabel.textColor = RCValues.sharedInstance.color(forKey: .appPrimaryColor)

To be thorough, open AppConstants.swift and delete the following:

static let appPrimaryColor = UIColor(rgba: "#36C278")

See ya later, hard-coded value…

Build and run your app. You should see the new green throughout your app.

Firebase Remote Config Tutorial for iOS

You don’t have a lot of control as to when these new values get applied. First time you ran the app, you probably saw the default orange on the main menu then the new green on the planet detail screens once your new values were loaded from the cloud.

This can be a bit confusing to your users. Sure, in this case, you’re only changing some label colors, but if your app starts changing text or values affecting its behavior while your user is in the middle of using it, it can be quite confusing.

There are numerous ways you can deal with this issue, but perhaps the easiest might be to create a loading screen. As luck would have it, there’s already one partially set up for you.

Firebase Remote Config Tutorial for iOS

Hooking Up a Loading Screen

First thing you’ll want to do is make the loading screen your app’s initial view controller. Open Main.storyboard and Control-drag from your Navigation Controller to the Waiting View Controller — it’s the view controller with the black background, although it might be easier to do this Control-dragging in your storyboard outline. Select root view controller from the pop-up: this will make your loading screen the initial screen when your app loads.

Firebase Remote Config Tutorial for iOS

Now, you’ll add the logic to transition to the main menu when Remote Config is finished loading.

Open RCValues.swift, add the following below your sharedInstance property:

var loadingDoneCallback: (() -> ())?
var fetchComplete: Bool = false

Next, add the following two lines indicated below, to the end of your completion handler in fetchCloudValues()

func fetchCloudValues() {
 // WARNING: Don't actually do this in production!
 let fetchDuration : TimeInterval = 0
 activateDebugMode()
 FIRRemoteConfig.remoteConfig().fetch(withExpirationDuration: fetchDuration) {
   [weak self] (status, error) in
 
   guard error != nil else {
     print ("Uh-oh. Got an error fetching remote values \(error)")
     return
   }
 
   FIRRemoteConfig.remoteConfig().activateFetched()
   print ("Retrieved values from the cloud!")
   print ("Our app's primary color is
     \(FIRRemoteConfig.remoteConfig().configValue(forKey: "appPrimaryColor").stringValue)")
 
   // ADD THESE TWO LINES HERE!
   self?.fetchComplete = true
   self?.loadingDoneCallback?()
 }
}

Here, you set the fetchComplete variable to true indicating fetching is complete. Finally you call the optional callback to inform the listener the Remote Config values have finished loading. This could be used to tell a loading screen to dismiss itself.

Open WaitingViewController.swift and add the following method:

func startAppForReal() {
  performSegue(withIdentifier: "loadingDoneSegue", sender: self)
}

Next, replace viewDidLoad() with the following:

override func viewDidLoad() {
  super.viewDidLoad()
 
  if RCValues.sharedInstance.fetchComplete {
    startAppForReal()
  }
 
  RCValues.sharedInstance.loadingDoneCallback = startAppForReal
}

Here, you’re making startAppForReal() the method RCValues calls when all of its values are done loading. You’re also adding a check just in case RCValues somehow manages to finish its network call before the waiting screen is done loading. This should never happen, but it never hurts to code defensively!

Todd’s rule of coding: Adding “This should never happen” to your code comments will guarantee that, at some point in the future, that thing will actually happen.

Build and run your app. You’ll see the waiting screen appear for a short while (depending on your network speed) before jumping into the rest of your app. If you change the value of your app’s primary color and restart your app, the color will properly appear everywhere in your app.

Firebase Remote Config Tutorial for iOS

Hook Up the Rest of Your App

Now you’ve converted one value from AppConstants to RCValues, you can convert the rest! Open RCValues.swift and replace ValueKey with the following:

enum ValueKey: String {
  case bigLabelColor
  case appPrimaryColor
  case navBarBackground
  case navTintColor
  case detailTitleColor
  case detailInfoColor
  case subscribeBannerText
  case subscribeBannerButton
  case subscribeVCText
  case subscribeVCButton
  case shouldWeIncludePluto
  case experimentGroup
  case planetImageScaleFactor
}

Next, replace loadDefaultValues() with the following:

func loadDefaultValues() {
  let appDefaults: [String: NSObject] = [
    ValueKey.bigLabelColor.rawValue: "#FFFFFF66" as NSObject,
    ValueKey.appPrimaryColor.rawValue: "#FBB03B" as NSObject,
    ValueKey.navBarBackground.rawValue: "#535E66" as NSObject,
    ValueKey.navTintColor.rawValue: "#FBB03B" as NSObject,
    ValueKey.detailTitleColor.rawValue: "#FFFFFF" as NSObject,
    ValueKey.detailInfoColor.rawValue: "#CCCCCC" as NSObject,
    ValueKey.subscribeBannerText.rawValue: "Like Planet Tour?" as NSObject,
    ValueKey.subscribeBannerButton.rawValue: "Get our newsletter!" as NSObject,
    ValueKey.subscribeVCText.rawValue: "Want more astronomy facts? Sign up for our newsletter!" as NSObject,
    ValueKey.subscribeVCButton.rawValue: "Subscribe" as NSObject,
    ValueKey.shouldWeIncludePluto.rawValue: false as NSObject,
    ValueKey.experimentGroup.rawValue: "default" as NSObject,
    ValueKey.planetImageScaleFactor.rawValue: 0.33 as NSObject
  ]
  FIRRemoteConfig.remoteConfig().setDefaults(appDefaults)
}

Next, add three helper methods to allow retrieving values other than colors:

func bool(forKey key: ValueKey) -> Bool {
  return FIRRemoteConfig.remoteConfig()[key.rawValue].boolValue
}
 
func string(forKey key: ValueKey) -> String {
  return FIRRemoteConfig.remoteConfig()[key.rawValue].stringValue ?? ""
}
 
func double(forKey key: ValueKey) -> Double {
  if let numberValue = FIRRemoteConfig.remoteConfig()[key.rawValue].numberValue {
    return numberValue.doubleValue
  } else {
    return 0.0
  }
}

Next, replace every part of your app that uses AppConstants with the corresponding call to RCValues. You’ll make nine changes throughout your app:

1. Open ContainerViewController.swift, replace updateNavigationColors() with the following:

func updateNavigationColors() {
  navigationController?.navigationBar.tintColor = RCValues.sharedInstance.color(forKey: .navTintColor)
}

2. Replace updateBanner() with the following:

func updateBanner() {
  bannerView.backgroundColor = RCValues.sharedInstance.color(forKey: .appPrimaryColor)
  bannerLabel.text = RCValues.sharedInstance.string(forKey: .subscribeBannerText)
  getNewsletterButton.setTitle(RCValues.sharedInstance.string(forKey: .subscribeBannerButton), for: .normal)
}

3. Open GetNewsletterViewController.swift, replace updateText() with the following:

func updateText() {
  instructionLabel.text = RCValues.sharedInstance.string(forKey: .subscribeVCText)
  submitButton.setTitle(RCValues.sharedInstance.string(forKey: .subscribeVCButton), for: .normal)
}

4. Open PlanetDetailViewController.swift, in updateLabelColors() replace the line

nextLabel.textColor = AppConstants.detailInfoColor

with

nextLabel.textColor = RCValues.sharedInstance.color(forKey: .detailInfoColor)

5. Replace the line

planetNameLabel.textColor = AppConstants.detailTitleColor

with

planetNameLabel.textColor = RCValues.sharedInstance.color(forKey: .detailTitleColor)

6. Open PlanetsCollectionViewController.swift, and inside customizeNavigationBar() replace the line

navBar.barTintColor =  AppConstants.navBarBackground

with

navBar.barTintColor =  RCValues.sharedInstance.color(forKey: .navBarBackground)

7. Inside collectionView(_:cellForItemAt:), replace the line

cell.nameLabel.textColor = AppConstants.bigLabelColor

with

cell.nameLabel.textColor = RCValues.sharedInstance.color(forKey: .bigLabelColor)

8. Open SolarSystem.swift, inside init(), replace the line

if AppConstants.shouldWeIncludePluto {

with

if RCValues.sharedInstance.bool(forKey: .shouldWeIncludePluto) {

9. Finally, inside calculatePlanetScales() replace the line

scaleFactors[i] = pow(ratio, AppConstants.planetImageScaleFactor)

with the line

scaleFactors[i] = pow(ratio, RCValues.sharedInstance.double(forKey: .planetImageScaleFactor))

Whew! Okay, that was a lot of changes, but now you should have your entire app switched over. If you want to be sure, do a search in your app for “AppConstants” — you should only have one result left, which is defining the struct itself.

Firebase Remote Config Tutorial for iOS

If you want to be really sure, delete your AppConstants file. Your app should continue to build and run without any errors.

Now your app is fully wired up to Remote Config, you can make some other changes to go along with the green color that Gary likes so much.

Open the Firebase Console. Make sure you’re in the Remote Config section, then click Add Parameter. Choose navBarBackground for the key, and #35AEB1 for the new value, then click Add Parameter. Then do the same thing to set navTintColor to #FFFFFF. Click Publish Changes to publish these changes to your app.

When you’re finished, your console should look like this:

Firebase Remote Config Tutorial for iOS

Your app should look a little something like this:

Firebase Remote Config Tutorial for iOS

Feel free to play around! Change some other values. Mess around with the text. See what kind of stylish… or gaudy… color combinations you can come up with.

But when you’re finished, come on back to the Firebase Remote Config tutorial for iOS because you have an international crisis to deal with!

Bringing Back Pluto

Things are rotten in the state of Denmark! While most of the world has begrudgingly accepted Pluto isn’t a planet, the Scandinavian Society for Preserving Pluto, a totally-not-made-up society of rabid Pluto fans, has lobbied hard for Pluto to be a planet and hence worthy of inclusion in Planet Tour. As you read this, protests are mounting in the streets of Copenhagen! Whatever can be done?

Firebase Remote Config Tutorial for iOS

Another app release, another angry mob…

Well, this seems like a simple job for Remote Config! You could set shouldWeIncludePluto to true. But hang on; that will change this setting for all of your users, not just those in Scandinavia. How can you deliver different settings just to residents of these countries?

Conditions to the Rescue!

What makes Remote Config more sophisticated than just a simple dictionary in the cloud is its ability to deliver different sets of data to different people. You’ll take advantage of this feature in order to make Pluto a planet again for your Scandinavian users.

First, open the Firebase Console, make sure you’re in the Remote Config panel, and click Add Parameter to add a new parameter

Enter shouldWeIncludePluto as the parameter key.

Next, click the dropdown next to the value field labelled Add value for condition.

Next, select Define New Condition.

Firebase Remote Config Tutorial for iOS

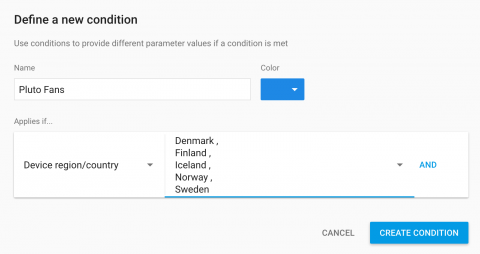
In the dialog, give the new condition a name of Pluto Fans.

In the drop-down underneath, select Device Region / Country.

From the countries list, select Denmark, Sweden, Norway, Iceland, and Finland.

Firebase Remote Config Tutorial for iOS

Click Create Condition.

Next, add a value of true in the Value for Pluto Fans field, and a value of false as your default value.

Firebase Remote Config Tutorial for iOS

Finally, click Add Parameter, then click Publish Changes to push these changes to the world.

Build and run your app. Assuming you don’t live in one of these northernly countries, you still probably won’t see Pluto in your list of planets. If you want to test the experience for your Scandinavian users, I recommend booking a flight to Copenhagen, getting yourself a new Danish iPhone, then running your app on it, perhaps while enjoying a smoked-salmon open-faced sandwich.

Firebase Remote Config Tutorial for iOS

A slightly more economical option (potentially involving less jet lag) is to open the Settings app on your device or simulator. Select General > Language & Region > Region > Denmark (or whatever your favorite Scandinavian country is).

Firebase Remote Config Tutorial for iOS

It’s slightly cheaper than a trip to Copenhagen, but also less fun.

Build and run your app; this time you should see Pluto back where it belongs, among the other planets. Whew! International crisis averted!

Firebase Remote Config Tutorial for iOS

Welcome back, Pluto. We missed you!

Where to Go From Here?

You can download the fully finished project for this Firebase Remote Config tutorial for iOS here. Please note, however, you still need to create a project in the Firebase Console and drag in your GoogleServices-info.plist file for the project to work.

There’s a lot you can do with Remote Config. If you’re developing any kind of game, it can be a great way to tweak your gameplay if your players are finding it too easy or too hard. It’s also an easy way to create a “Message of the Day” kind of feature. Or just use it to experiment with different button or label text to see what your users react to best. Try it out in your favorite app and see what you can change on the fly!

There are more features you haven’t touched on yet, too. By delivering values to random groups of users, you can use Remote Config to run A/B tests, or gradually roll out new features. You can also deliver different data sets to specific groups of people you’ve identified in Firebase Analytics, which gives you some nice customization features. If you want to find out more, you can check out the documentation.

As always, if you have any questions or comments about this Firebase Remote Config tutorial for iOS (or Planet Tour color schemes) please join the forum discussion below!

The post Firebase Remote Config Tutorial for iOS appeared first on Ray Wenderlich.

Beginning iOS 10 Course Now Available

$
0
0

iOS10-beg-feature

Good news: my new course Beginning iOS 10 Part 1: Getting Started is now available!

This is a course for complete beginners to iOS development, where you will build your first complete iOS app from scratch.

In this course, you’ll build a simple game called Bulls-Eye, based on our popular tutorial in the iOS Apprentice by Matthijs Hollemans. Specifically, you’ll learn:

  • How to use Xcode, Storyboards, and Swift 3 in an easygoing manner.
  • How to use standard UIKit components.
  • How to customize them to make them look good!

The entire course is up-to-date with Swift 3 and the latest version of Xcode, so you can follow along as you watch – and practice what you learned with some hands-on exercises at the end.

brian

Here’s how you can get access to this course:

  • If you are a raywenderlich.com subscriber: You can immediately access the entire Beginning iOS 10 Part 1 course today.
  • If you are not subscribed yet: Now’s a good time to subscribe! You can get 10% off a subscription — or anything else in our store — with the code IOS10FEAST.

We hope you enjoy, and stay tuned for more new Swift 3 courses and updates to come! :]

The post Beginning iOS 10 Course Now Available appeared first on Ray Wenderlich.

Screencast: Server Side Swift with Vapor: Persisting Models

8 Free Swift Tutorials Updated For Swift 3

$
0
0

Swift3Update-Swift-feature

Did you know that Xcode 8.2 officially deprecates Swift 2?

That means there has never been a better time to get up-to-speed with Swift 3 and start converting your apps! :]

Today, we are excited announce we’ve updated 8 more free tutorials to Swift 3 and Xcode 8, this time from the Swift language team.

Again, we want to do our best to keep our tutorials as up-to-date and polished as possible, because we understand your learning time is valuable, and if you trust us we don’t want to let you down.

So if you’re ready for some Swift 3 learning, check out the updates below!

Updated For Swift 3

What's New in Swift 3

  1. What’s new in Swift 3 by Ben Morrow – Originally released during the WWDC 2016 announcement when Swift 3 was still in beta, this article is now updated to reflect the released version.

Collection Data Structures in Swift

  1. Collection Data Structures in Swift by Niv Yahel – Learn the basics of big-O notation and when to use Swift arrays, dictionaries and sets.

Collection Data Structures in Swift

  1. Initialization In Depth Part 1 | Part 2 by René Cacheaux – Take your Swift skills to the next level by learning about how your instances are initialized in this in-depth two-part tutorial on initialization.

Custom Subscripts in Swift

  1. Implementing Custom Subscripts in Swift by Mikael Konutgan – Learn how to extend your own types with subscripts, allowing you to index into them with simple syntax just like native arrays and dictionaries.

Pattern Matching in Swift

  1. Pattern Matching in Swift by Cosmin Pupăză – Learn how you can use pattern matching with tuples, types, wildcards, optionals, enumeration, and expressions.

Magical Error Handling in Swift

  1. Magical Error Handling in Swift by Gemma Barlow – Learn all about error handling in Swift. You’ll learn about all the new features added in Swift and discover how to use them.

Getting to Know Enums, Structs and Classes in Swift

  1. Getting to Know Enums, Structs and Classes in Swift by Ray Fix – Learn about the difference between enums, structs, and classes in Swift, when to use each, and how they work!

Reference vs Value Types in Swift

  1. Reference vs Value Types in Swift: Part 1 and 2 by Eric Cerney – Learn the difference between reference and value types in Swift in part 1 of this tutorial. In part 2, you will see reference and value types in action, including an example of how to mix the two effectively and safely.

Call For Feedback: Swift 3 Style Guide

With Swift 3, conventions for writing good Swift have improved.

Therefore, we are currently in the midst of upgrading our official Swift Style Guide to reflect these changes.

If you have any feedback, now’s a great time; simply check out the repo and open an issue.

Where to Go From Here?

Want even more Swift 3 tutorials? Check out our list of 27 iOS tutorials updated for Swift 3.

Swift 3 contains some exciting and major changes to the Swift language. Here at raywenderlich.com we keep on top of things by updating the all of the more recent and popular tutorials to work with the latest version of Swift and Xcode. This trend will continue.

Thanks to all of the authors for updating their tutorials, and thanks to you for reading this site – stay tuned for more new Swift 3 tutorials each and every week!

The post 8 Free Swift Tutorials Updated For Swift 3 appeared first on Ray Wenderlich.
iOS 10 Feast Giveaway Winners – And Last Day For Discount!

$
0
0

Our whirlwind eight-week-long celebration – the iOS 10 Feast – has now officially concluded!

We had a whale of a time releasing 10 books this year, including some fin-tastic new covers:

All10Books

After the excitement of the book launches, the early access sneak-peek releases, and the free tutorials and screencasts, we’re a little bit sad that it’s all over. :[

But wait — there’s one last thing to announce: the winners of the iOS 10 Feast Giveaway!

This year represents our biggest giveaway ever, with an unbelievable $40,000 in prizes up for grabs — including the Grand Prize of over $10,000 worth of development tools, services, and swag!

Let’s review what’s inside and see who won.

Grand Prize Package

iOS10_Feast_Giveaway

The grand prize winner will receive a massive prize pack of 53 prizes split into 13 categories:

Version Control Tools

  1. GitHub 1-year subscription ($84 value): Build your own projects on GitHub.com and invite collaborators to join you in unlimited private repositories.
  2. GitKraken Pro 1-year subscription ($60 value): Fantastic Git client; edit your merge conflict output in-app, maintain multiple profiles and more!
  3. Tower 2 ($79 value): Version control with Git – made easy. In a beautiful, efficient, and powerful app.

Continuous Integration

  1. Bitrise Pro 1-year subscription with 2 Concurrencies ($1080 value): iOS Continuous Integration and Delivery for your whole team, with dozens of integrations for your favorite services.
  2. Buddybuild 1-year team subscription ($1908 value): Buddybuild ties together a continuous integration, continuous delivery and an iterative feedback solution into a single, seamless platform for all your mobile apps.

App Localization

  1. Applanga 6-month Starter Subscription ($330 value): Everything you need to make mobile app localization fast and easy.

iOS Controls

  1. shinobicontrols professional bundle 1-year subscription ($1495 value) includes the following:
  • ShinobiCharts: Bring your app’s data to life with these professional chart components.
  • ShinobiToolkit: An excellent collection of UI controls to enhance your apps with features like Grids, Calendars, Carousels and Gauges.
  • ShinobiForms: Tools for building user input forms quickly and easily.

Other Development Tools

  1. AppCode 1-year subscription ($199 value): A smart IDE for iOS and macOS development.
  2. Base 2 ($29 value): Create, design, edit and browse SQLite 3 database files. It’s quick to get in to and get the data you need.
  3. Charles ($50 value): A slick HTTP proxy, monitor and reverse proxy that lets you view all of the HTTP and SSL/HTTPS traffic between their machine and the Internet.
  4. Dash for macOS ($30 value): Instant offline access to documentation sets, and extremely handy snippet manager.
  5. Dash for iOS ($10 value): Mobile offline access to documentation sets.
  6. Paw 1-year team subscription (up to 5 users) ($500 value): Powerful HTTP API test client that syncs automatically between team members.
  7. Reveal ($59 value) – A powerful runtime view debugging tool with advanced visualisations, comprehensive inspectors and the ability to modify applications on the fly.

Design Tools

  1. Acorn 5 ($30 value): An easy to use Mac image editor, designed for humans. With a ton of new features and refinements, you will make beautiful images in Acorn!
  2. Affinity Designer ($50 value): A 2015 Apple Design Award winner, this innovative illustrator combines vector design and raster finishing naturally in one tool. Put simply, its speed, power and precision make creating art feel fun and spontaneous again!
  3. Affinity Photo for Mac ($50 value): Apple’s App of the Year 2015, this professional photo editing tool has live retouch tools that work in real time, non-destructive editing, raw processing and end-to-end color management – make beautiful photographs spring to life!
  4. AppCooker ($30 value): Design apps like a chef – right on your iPad!
  5. Astropad for iPad ($30 value): Turn your iPad into a graphics tablet!
  6. Avocode 3-month subscription ($39 value): Got a design? Turn it into code with Avocode. Upload and share your designs; get CSS, export assets, measure and handpick colors.
  7. Briefs ($10 value): Share your ideas without code. Create prototypes with the animation performance and responsive interaction of a native application.
  8. ColorSnapper 2 ($9 value): The classic color picker app for designers & developers which makes it easy to collect, adjust, organize and export colors of any pixel on the screen.
  9. Core Animator ($100 value): Turn your own animations into native iOS code.
  10. PaintCode 2 ($100 value): PaintCode is a vector drawing app that generates Core Graphics code in real time.
  11. Principle for Mac ($100 value): Principle makes it easy to create animated and interactive user interface designs!
  12. Promotee ($10 value): Make your app’s promo art shine using this tool to create slick framed product shots.
  13. Sketch 3 ($99 value): Vector-based app for designers of all types to create create beautiful, high-quality artwork.
  14. Zeplin 6-month Growing Business Subscription ($150 value): A tool that makes handing off designs from designers to developers much easier. Generate styleguides, and resources, automatically!

Productivity Tools

  1. Duet ($20 value): Lets you use your iDevice as an extra display for your Mac using the Lightning or 30-pin cable. In Retina. At 60 frames per second. Seriously.
  2. Focused ($30 value): No clutter, no distractions. Just a perfectly crafted set of tools to help you write and stay focused on the task at hand.
  3. Monodraw ($20 value): A neat tool for creating diagrams, layouts, and flow charts – in ASCII art! :]
  4. Quiver ($10 value): A notebook built for programmers; mix text, code, Markdown and LaTeX within one note, with live preview Markdown and LaTeX.
  5. Soulver ($12 value): A handy app to help you play around with numbers, more conveniently than a traditional calculator.
  6. 1Password 1-year Individual Subscription ($36 value): All your passwords and credentials in one, secure location.

Blogging Tools

  1. WordPress.com Premium 1-year subscription ($99 value): Create a beautiful website to promote your app with the same awesome software we use for our blog.

Game Tools

  1. Glyph Designer 2 1-year Subscription ($53 value): Design beautiful fonts for your iOS games.
  2. Particle Designer 2 ($80 value): Create amazing particle systems for your games with a visual editor designed specifically for Mac OS X.
  3. Spine ($69 value): Build realistic 2D skeletal animations and easily integrate them into your games.

Conference tickets

  1. RWDevCon ($1499 value): A free ticket to our official raywenderlich.com conference which also gets you into the exclusive pre-conference workshop! Come meet the team for some great hands-on tutorials, inspiration, and fun!
  2. 360iDev ($799 value): A free ticket to 360iDev 2017 – an awesome conference for app developers!

Books

  1. Swift Apprentice PDF ($55 value): A book for complete beginners to Apple’s brand new programming language – Swift 3.
  2. iOS Apprentice PDF ($55 value): Learn how to make iPhone and iPad apps from the ground up, with a series of epic-length tutorials for beginners!
  3. tvOS Apprentice ($55 value): Learn how to build great-looking interfaces with UI elements designed for the Apple TV experience, monetize your app with in-app purchases, add animations, and more!
  4. iOS 10 by Tutorials PDF ($55 value): Learn about the new APIs in iOS 10 and what’s new in Swift 3!
  5. watchOS by Tutorials PDF ($55 value): Learn about UI controls and layout, the new dock, notifications, Snap, and more!
  6. Core Data by Tutorials PDF ($55 value): Take control of your data in iOS apps using Core Data, Apple’s powerful object graph and persistence framework.
  7. iOS Animations by Tutorials Second Edition PDF ($55 value): Learn how to make iOS Animations in Swift 3 through a series of hands-on tutorials and challenges.
  8. 2D Apple Games by Tutorials PDF ($55 value): Learn how to make your own iOS and tvOS games using Swift 3 and SpriteKit.
  9. 3D Apple Games by Tutorials PDF ($55 value): Make stunning 3D games in SpriteKit, and learn how to build your own 3D game art!
  10. Unity Games by Tutorials PDF ($55 value): Create 4 complete Unity games from scratch, including a 3D first-person shooter, a twin-stick shooter, a 2D platformer, and a virtual reality tower defense game!
  11. Plus two more surprise books that we haven’t yet announced on the site! ($110 value)

Video Tutorials

  1. 1-year raywenderlich.com Subscription ($180 value): Get full access to our complete catalog of video tutorials – plus get access to a new video tutorial each week!

Bonus Loot

  1. raywenderlich.com T-shirt ($25 value): Sport a stylish gray t-shirt with a “Eat, Drink, Swift” design!

Again, a huge thanks goes out to everyone who donated their products and services for the iOS 10 Feast. We couldn’t do this without the generous support of folks like this. These prizes are all amazing resources for developers that come highly recommended.

The Winner Is…

Augh! The anticipation is killing me! The winner of this massive, epic $10,000 prize pack is…

Epic Grin

Jason Trimble (@jasontrimble on Twitter)!

Congratulations Jason! We will be in touch shortly to arrange the delivery of your iOS 10 Feast prize pack.

Individual Prize Winners

If you didn’t snag the first place prize, don’t worry — we still have 229 individual prize winners to announce as well!

Once again, anyone who tweeted with the #ios10feast hashtag was automatically entered into our huge draw for individual prizes — and here they are!

  1. @_a_lex_is
  2. @_limamedeiros
  3. @_SS19
  4. @0samox
  5. @77AKA
  6. @abhinav_Dugar
  7. @Abo_SmRaN
  8. @adamwright_1989
  9. @AdriLeverkuhn
  10. @AGorchakov7
  11. @Akhenaten
  12. @Aknapp1212
  13. @akonakov
  14. @alessandrodn
  15. @AlexHedley
  16. @allenlinli
  17. @andreatorrisi
  18. @andronikos3000
  19. @anesi_anesi
  20. @AngelinaMon98
  21. @annievang
  22. @ant_bello
  23. @antocara
  24. @anver_bogatov
  25. @asefimenko
  26. @ASTestApp
  27. @AthenaZoe78
  28. @azamsharp
  29. @BanqueroDigital
  30. @bastyen00
  31. @bdre_d
  32. @betancur
  33. @bgsudeep
  34. @birkserg
  35. @Blendersleuth
  36. @bluemix2
  37. @BobBaffy
  38. @brodlycooper
  39. @cammster__
  40. @caniplay_co_uk
  41. @Capt_Logun
  42. @carlfranzon
  43. @castus
  44. @catterwauls
  45. @chalfacre
  46. @chandan_im
  47. @CindyLin16
  48. @cmckni3
  49. @cognisoft
  50. @cotemustis
  51. @cousinmayan
  52. @cowlibob
  53. @crisredfi
  54. @Da_CroSensation
  55. @Dale_Buckley
  56. @DanDanMartins
  57. @danieljch16
  58. @danny_wonglh
  59. @dannyomo
  60. @davidliongson
  61. @deadfrogstudios
  62. @decatilinae
  63. @divyenduz
  64. @dlcferro
  65. @Donald_M_Voltz
  66. @donnywdavis
  67. @DottieYottie
  68. @dougguitar
  69. @druizzzz
  70. @dvd_pop
  71. @EduardGhergu
  72. @EeEe1987
  73. @elitree
  74. @emanahov
  75. @EmraanDharsi
  76. @endodoug
  77. @Erailtrain
  78. @erikkerber
  79. @esra_malkoc_
  80. @evankstone
  81. @f_messina
  82. @faabalia
  83. @fabianehlert
  84. @faisalmaqsod
  85. @fauooh
  86. @FerryvdHeijden
  87. @flexkid1
  88. @Freeubi
  89. @freshapplenews
  90. @frtncr
  91. @futurelaza
  92. @g00ddy
  93. @gemmakbarlow
  94. @geykel
  95. @gifou
  96. @HakShinKen
  97. @HansaGames
  98. @happiehappie92
  99. @HarriVayrynen
  100. @heavysword
  101. @hexaedre
  102. @huiping192
  103. @iGeoCacher
  104. @ilittlewood
  105. @iMaddin
  106. @IndieGameDevBot
  107. @iStickerAlbums
  108. @its_quon
  109. @itsajamesthing
  110. @ivantrotter
  111. @jacinmontava
  112. @jakeliu
  113. @jamescalby
  114. @JaredTHill
  115. @JasonR
  116. @jcesarmobile
  117. @JCubedApps
  118. @jerometonnelier
  119. @jessyMeow
  120. @johnnelm9r
  121. @jonyzume
  122. @jpsmarinho
  123. @JustGeekGirl
  124. @kareemdjames
  125. @KaterynaSytnyk
  126. @Kdawgwilk
  127. @kendeveloper
  128. @kevinmunc
  129. @kjf_52
  130. @Knabino4ka
  131. @ksikluks
  132. @leastudiosboise
  133. @letsnottalkagai
  134. @lkhammer
  135. @LloroPorTi_
  136. @LTrutter
  137. @luigitel180
  138. @Lupardi
  139. @machetman
  140. @Maikolde
  141. @MarcBunkers
  142. @MarcS404
  143. @MariuszHenke
  144. @markbeaty
  145. @MattJensen03
  146. @maumercado
  147. @merrywhether_
  148. @Metalboyblue
  149. @MetTheGeek
  150. @mightyquinn
  151. @mindandmagicltd
  152. @mmandell70
  153. @mmars123
  154. @mrahmiao
  155. @muckypause
  156. @MyersChris78
  157. @nateinc
  158. @nfgrilo
  159. @nyxos
  160. @ocampesato
  161. @OhadYaniv
  162. @owenied
  163. @palmeromiranda
  164. @pardel
  165. @PaulBlacklock2
  166. @paullee999
  167. @pbellot
  168. @pdenlinger
  169. @peeterrussak
  170. @petitJo
  171. @phillydev716
  172. @prism_studios
  173. @pulsarman325
  174. @Pym
  175. @RamiroRafart
  176. @randoramma
  177. @RedQueenCoder
  178. @rmorlen
  179. @robcornerstone
  180. @robert_mcbryde
  181. @Roberto_Pastor
  182. @RoqApps
  183. @rrozen01
  184. @Ryur
  185. @sabano_doreen
  186. @samcat116
  187. @scascacha
  188. @ScottWickham
  189. @sdoowhsoj
  190. @SeanMurphy747
  191. @sekornblatt
  192. @shawn_rogers
  193. @shoeb01717
  194. @singlesignon
  195. @sproutworks
  196. @squatto
  197. @StanislavK
  198. @staticsteven
  199. @SteveMoser
  200. @sumitpaul
  201. @sunfishgurl
  202. @SymoSys
  203. @T_Yusupov
  204. @ta_franks
  205. @tarekmhsalama
  206. @TechFirth
  207. @techginny
  208. @TechStoriesGR
  209. @TeguStudios
  210. @teomatteo89
  211. @th3xyz
  212. @The_Poor_Tom
  213. @Theastamana
  214. @TheCodingArt
  215. @theresaa_pack
  216. @TheRonWheeler
  217. @ThomasY388
  218. @tobias_helmrich
  219. @toby1061
  220. @trotamund
  221. @ttrentler
  222. @ujwntx
  223. @vassilag
  224. @warmlove619
  225. @welverinmobile
  226. @wichmannoa
  227. @wiltabone94
  228. @x0000ff
  229. @xnukernel

How To Claim Your Prize

If you’re a lucky individual prize winner, please email our Feast coordinator Christine with your top 5-10 choices from the list below (in order of most wanted to least wanted).

Christine will then do her best to match you with your preference (keep in mind each prize only has a limited number available). You have 48 hours to claim your prize, otherwise we’ll need to give them away to others (more details on that below).

It’s first come, first serve, so email your choices right away!

Unclaimed Prizes

As explained above, there is a chance that some of the prizes may go unclaimed, especially with so many winners and so many prizes up for grabs this year!

After 48 hours, we will give any unclaimed prizes away to forum members who post a comment on this thread.

  • We’ll give half of the prizes away in order from those with the most overall posts on the raywenderlich.com forums to those with the least posts, in order to reward regular forum members.
  • We’ll give the other half away based on whoever submits the funniest or most interesting comments, since we like to LOL ;]

So if you want one last shot at winning, simply post on this thread and who knows — you might get lucky and win an unclaimed prize! :]

Last Day for the iOS 10 Feast Discount!

And that concludes the iOS 10 Feast! We hope you enjoyed everything at the Feast this year — and that you came away stuffed and happy!

Congrats to all of the prize winners, and a huge thank you to everyone who supported us by purchasing our new Swift books, subscribing to our video tutorials, signing up for RWDevCon, or recommending our site. This site is a lot of work, and you are what makes all of this possible.

And don’t forget, today is the last day to use coupon code IOS10FEAST to save on anything in the raywenderlich.com store — don’t miss out.

Thanks to everyone who took part in the iOS 10 Feast this year — we now return you to the regularly scheduled programming at raywenderlich.com!

The post iOS 10 Feast Giveaway Winners – And Last Day For Discount! appeared first on Ray Wenderlich.

Building a Custom Collection in Swift

$
0
0

customcollections-featureArrays, dictionaries, and sets are all examples of commonly used collection types; they come bundled with the Swift standard library.

But what if they don’t provide everything you need for your application right out of the box?

One common solution is to use an Array or Dictionary with a bunch of business logic to keep your data organized. This can be problematic as it’s often unintuitive and hard to maintain.

That’s where creating your own collection type becomes relevant. In this article, you’ll create a custom collection using Swift’s powerful collection protocols.

In the end, you’ll have a useful custom collection data type with all the functionality of a Swift provided collection.

Note: This tutorial works with Swift 3.0. Previous versions will not compile because of major changes to the Swift standard library.

Getting Started

SetvsBag

In this tutorial, you’re going to be building a multiset (bag) from scratch.

A bag is like a set in that it stores objects with no repeated values. In a set, duplicate object are ignored. A bag, on the other hand, keeps a running count for each object.

A great example of where this would come in handy is a shopping list. You’d want a list of unique grocery items with an associated quantity for each. Rather than adding duplicate item instances, you’d expect to increment the existing item’s quantity.

Before jumping into the collection protocols, you’ll first create the basic implementation of a Bag.

First, create a new playground: in Xcode, select File\New\Playground… and name the playground Bag. You can select either platform since this tutorial is platform-agnostic and only focuses on the Swift language.

Click Next, choose a convenient location to save the playground and click Create.

Next, replace the contents of the playground with an empty implementation of a bag:

struct Bag<Element: Hashable> {
 
}

Bag is a generic structure that requires an element type that is Hashable. Requiring Hashable elements allows you to compare and only store unique values at O(1) time complexity. This means that no matter the size of its contents, Bag will perform at constant speeds. You used a struct to enforce value semantics as found with Swift’s standard collections.

Next, add the following properties to Bag:

// 1
fileprivate var contents = [Element: Int]
 
// 2
var uniqueCount: Int {
  return contents.count
}
 
// 3
var totalCount: Int {
  return contents.values.reduce(0) { $0 + $1 }
}

These are the basic properties needed for a bag. Here’s what each does:

  1. You’re using a Dictionary as the internal data structure. This works great for a bag because it enforces unique keys which you’ll use to store elements. The dictionary value for each element is its count. It’s marked as fileprivate to hide the inner workings of bag from the outside world.
  2. uniqueCount returns the number of unique items, ignoring their individual quantities. For example, a bag of 4 oranges and 2 apples would return a uniqueCount of 2.
  3. totalCount returns the total number of items in the bag. In the same example as before, totalCount would return 6.

Now you’ll need some methods to edit the contents of Bag. Add the following method below the properties you just added:

// 1
mutating func add(_ member: Element, occurrences: Int = 1) {
  // 2
  precondition(occurrences > 0, "Can only add a positive number of occurrences")
 
  // 3
  if let currentCount = contents[member] {
    contents[member] = currentCount + occurrences
  } else {
    contents[member] = occurrences
  }
}

Here’s what this does:

  1. add(_:occurrences:) provides a way to add elements to the bag. It takes two parameters: the generic type Element and an optional number of occurrences. The mutating keyword is used to let variables be modified in a struct or enum. These methods will not be available if the instance is defined as a constant let rather than var.
  2. precondition(_:_:) takes a Boolean value as its first parameter. If false, execution of the program will stop and the String from the second parameter will be output in the Debug area. You’ll use preconditions a number of times in this tutorial to ensure Bag is used in its intended way. You’ll also use it as a sanity check to make sure things work as expected as you add functionality.
  3. This checks if the element already exists in the bag. If it does, increment the count, if not, create a new element.

On the flip side, you’ll need a way to remove elements from Bag. Add the following method just below add(_:occurrences:):

mutating func remove(_ member: Element, occurrences: Int = 1) {
  // 1
  guard let currentCount = contents[member], currentCount >= occurrences else {
    preconditionFailure("Removed non-existent elements")
  }
 
  // 2
  precondition(occurrences > 0, "Can only remove a positive number of occurrences")
 
  // 3
  if currentCount > occurrences {
    contents[member] = currentCount - occurrences
  } else {
    contents.removeValue(forKey: member)
  }
}

remove(_:occurrences:) takes the same parameters as add(_:occurrences:) and does the opposite with them. Here’s how it works:

  1. First it checks that the element exists and that it has at least the number of occurrences as being removed.
  2. Next it makes sure that the number of occurrences to remove is greater than 0.
  3. Finally, it checks if the element exists and decrements the count. If the count drops to zero, it removes the element entirely.

At this point Bag doesn’t do much; its contents aren’t even accessible once added. You also lose the useful higher-order methods available on Dictionary.

But all is not lost. You’ve started the process of separating all this wrapper code into it’s own object. That’s one step in the right direction of keeping your code clean!

Nick is intrigued

But wait, there’s more! Swift provides all the tools you need to make Bag into a legitimate collection.

To do this you’ll need to look at what makes an object a collection in Swift.

What’s a Custom Collection?

To understand what a Swift Collection is, you first need to look at its protocol inheritance hierarchy.

Collection type hierarchy

The Sequence protocol represents a type that provides sequential, iterated access to its elements. You can think of a sequence as a list of items that let you step over each element one at a time.

A linked list is an example of sequence

There are way too many Pokemon to keep track these days

Iteration is a simple concept, but this ability provides huge functionality to your object. It allows you to perform a variety of powerful operations like:

  • map(_:): Returns an array of results after transforming each element in the sequence using the provided closure.
  • filter(_:): Returns an array of elements that satisfy the provided closure predicate.
  • reduce(_:_:): Returns a single value by combining each element in the sequence using the provided closure.
  • sorted(by:): Returns an array of the elements in the sequence sorted based on the provided closure predicate.

This barely scratches the surface. To see all methods available from Sequence, take a look at the Sequence docs.

One caveat to Sequence is that it makes no requirement for conforming types to be destructive or not. This means that after iteration, there’s no guarantee that future iterations will start from the beginning.

Thats a huge issue if you plan on iterating over your data more than once. To enforce nondestructive iteration, your object needs to conform to the Collection protocol.

Collection inherits from Sequence and Indexable. The main difference is that a collection is a sequence you can traverse multiple times and access by index.

You’ll get many methods and properties for free by conforming to Collection. Some examples are:

  • isEmpty: Returns a boolean indicating if the collection is empty or not.
  • first: Returns the first element in the collection.
  • count: Returns the number of elements in the collection.

There are many more available based on the type of elements in the collection. If you’d like a sneak peek for yourself, check out the Collection docs.

Before implementing these protocols, there are some easy improvements you can make to Bag.

Textual Representation

Currently, Bag objects expose little information through print(_:) or the results sidebar.

Add the following code to the end of the playground to see for yourself:

var shoppingCart = Bag<String>()
shoppingCart.add("Banana")
shoppingCart.add("Orange", occurrences: 2)
shoppingCart.add("Banana")
 
shoppingCart.remove("Orange")

This creates a new Bag object with a few pieces of fruit. If you look at the playground debugger, you’ll see the object type without any of its contents.

InitialBagPrint

You can fix this using a single protocol provided by the Swift standard library. Add the following just after the closing brace of Bag above shoppingCart:

extension Bag: CustomStringConvertible {
  var description: String {
    return contents.description
  }
}

Conforming to CustomStringConvertible requires that you implement a single property named description. This property returns the textual representation of the specific instance.

This is where you would put any logic needed to create a string representing your data. Because Dictionary conforms to CustomStringConvertible, you simply reuse the value of description from contents.

Take a look at the previously useless debug information for shoppingCart:

CustomStringConvertibleBag

Awesome! Now as you add functionality to Bag, you’ll be able to verify its contents.

While you’re writing code in a playground, you can verify a result you expect by calling precondition(_:_:). Doing so incrementally will also keep you from accidentally breaking functionality that was previously working. You can use this tool just as you would with unit tests — it would be a great idea to incorporate this into your every day coding!

Add the following just after the last call to add(_:occurrences:) at the end of the playground:

precondition("\(shoppingCart)" == "\(shoppingCart.contents)", "Expected bag description to match its contents description")

This will result in an error if the description of shoppingCart diverges from contents.

Next up for creating powerful collection types that feel native is initialization.

Initialization

It’s pretty annoying that you have to add each element one at a time. One common expectation is to be able to initialize collection types with other collections.

Here’s how you might expect to create a Bag. Add the following code to the end of the playground:

let dataArray = ["Banana", "Orange", "Banana"]
let dataDictionary = ["Banana": 2, "Orange": 1]
let dataSet: Set = ["Banana", "Orange", "Banana"]
 
var arrayBag = Bag(dataArray)
precondition(arrayBag.contents == dataDictionary, "Expected arrayBag contents to match \(dataDictionary)")
 
var dictionaryBag = Bag(dataDictionary)
precondition(dictionaryBag.contents == dataDictionary, "Expected dictionaryBag contents to match \(dataDictionary)")
 
var setBag = Bag(dataSet)
precondition(setBag.contents == ["Banana": 1, "Orange": 1], "Expected setBag contents to match \(["Banana": 1, "Orange": 1])")

This won’t compile because you haven’t defined any initializers for these types. Rather than explicitly creating an initialization method for each type, you’ll use generics.

Add the following methods just below totalCount inside the implementation of Bag:

// 1
init() { }
 
// 2
init<S: Sequence>(_ sequence: S) where S.Iterator.Element == Element {
  for element in sequence {
    add(element)
  }
}
 
// 3
init<S: Sequence>(_ sequence: S) where S.Iterator.Element == (key: Element, value: Int) {
  for (element, count) in sequence {
    add(element, occurrences: count)
  }
}

Let’s take a look at what you just added:

  1. First, you created an empty initialization method. You’re required to add this after defining additional init methods to avoid compiler errors.
  2. Next, you added an initialization method that accepts any Sequence of elements. This sequence must have a matching Element type. This, for example, covers both Array and Set objects. You iterate over the passed in sequence and add each element one at a time.
  3. The last method works similarly, but for tuple elements of type (Element, Int). An example of this is a Dictionary. Here, you iterate over each element in the sequence and add the specified count.

These generic initializers enable a much wider variety of data sources for Bag objects. They do, however, need you to initialize another sequence simply to pass to Bag.

To avoid this, the Swift standard library supplies two protocols. These protocols enable initialization with sequence literals. Literals give you a shorthand way to write data without explicitly creating an object.

Add the following code to the end of your playground to see an example of how this is used:

var arrayLiteralBag: Bag = ["Banana", "Orange", "Banana"]
precondition(arrayLiteralBag.contents == dataDictionary, "Expected arrayLiteralBag contents to match \(dataDictionary)")
 
var dictionaryLiteralBag: Bag = ["Banana": 2, "Orange": 1]
precondition(dictionaryLiteralBag.contents == dataDictionary, "Expected dictionaryLiteralBag contents to match \(dataDictionary)")

Again, you’ll see compiler errors which you’ll fix next. This is an example of initialization using Array and Dictionary literals rather than objects.

Add the following two extensions just below the other Bag extension:

extension Bag: ExpressibleByArrayLiteral {
  init(arrayLiteral elements: Element...) {
    self.init(elements)
  }
}
 
extension Bag: ExpressibleByDictionaryLiteral {
  init(dictionaryLiteral elements: (Element, Int)...) {
    // The map converts elements to the "named" tuple the initializer expects.
    self.init(elements.map { (key: $0.0, value: $0.1) })
  }
}

Both ExpressibleByArrayLiteral and ExpressibleByDictionaryLiteral require an initializer that handles their matching literal parameter. These were incredibly easy to implement due to the previous initializers you added.

With Bag looking a lot more like a native collection type, it’s time to get to the real magic.

Sequence

By far the most common action performed on a collection type is iterating through its elements. To see an example of this, add the following to the end of the playground:

for element in shoppingCart {
  print(element)
}

Super basic stuff here. As with Array and Dictionary, you should be able to loop through a bag. This won’t compile because currently the Bag type doesn’t conform to Sequence.

Add the following just after the ExpressibleByDictionaryLiteral extension:

extension Bag: Sequence {
  // 1
  typealias Iterator = DictionaryIterator<Element, Int>
 
  // 2
  func makeIterator() -> Iterator {
    // 3
    return contents.makeIterator()
  }
}

There’s not too much needed to conform to Sequence. Let’s look at what you just added:

  1. You defined a typealias named Iterator that Sequence defines as conforming to IteratorProtocol. DictionaryIterator is the type that Dictionary objects use to iterate through their elements. You’re using this type because Bag stores its underlying data in a Dictionary.
  2. makeIterator() returns an Iterator that can step through each element of the sequence.
  3. You create an iterator by calling makeIterator() on contents, which already conforms to Sequence.

That’s all you need to make Bag conform to Sequence.

You can now iterate through each element of a Bag and get the count for each object. Add the following to the end of the playground after the previous for-in loop:

for (element, count) in shoppingCart {
  print("Element: \(element), Count: \(count)")
}

Open the Debug area and you’ll see the printout of the elements in the sequence.

Implementing Sequence allows for iteration

Being able to iterate through Bag enables many useful methods implemented by Sequence.

Add the following to the end of the playground to see some of these in action:

// Find all elements with a count greater than 1
let moreThanOne = shoppingCart.filter { $0.1 > 1 }
moreThanOne
precondition(moreThanOne.first!.key == "Banana" && moreThanOne.first!.value == 2, "Expected moreThanOne contents to be [(\"Banana\", 2)]")
 
// Get an array of all elements without counts
let itemList = shoppingCart.map { $0.0 }
itemList
precondition(itemList == ["Orange", "Banana"], "Expected itemList contents to be [\"Orange\", \"Banana\"]")
 
// Get the total number of items in the bag
let numberOfItems = shoppingCart.reduce(0) { $0 + $1.1 }
numberOfItems
precondition(numberOfItems == 3, "Expected numberOfItems contents to be 3")
 
// Get a sorted array of elements by their count in decending order
let sorted = shoppingCart.sorted { $0.0 < $1.0 }
sorted
precondition(sorted.first!.key == "Banana" && moreThanOne.first!.value == 2, "Expected sorted contents to be [(\"Banana\", 2), (\"Orange\", 1)]")

These are all useful methods for working with sequences — and they were given to you practically for free!

Now, you could be content with the way things are with Bag, but where’s the fun in that?! You can definitely improve the current Sequence implementation.

Improving Sequence

Currently, you’re relying on Dictionary to handle the heavy lifting for you. That’s fine and dandy because it makes creating powerful collections of your own easy. The problem is that it creates strange and confusing situations for Bag users.

For example, it’s not intuitive that Bag returns an iterator of type DictionaryIterator. Creating your own iterator type is definitely possible, but fortunately not needed.

Swift provides the type AnyIterator to hide the underlying iterator from the outside world.

Replace the implementation of the Sequence extension with the following:

extension Bag: Sequence {
  // 1
  typealias Iterator = AnyIterator<(element: Element, count: Int)>
 
  func makeIterator() -> Iterator {
    // 2
    var iterator = contents.makeIterator()
 
    // 3
    return AnyIterator {
      return iterator.next()
    }
  }
}

The playground will show a couple errors which you’ll fix soon. This looks close to the previous implementation with the addition of AnyIterator:

  1. AnyIterator is a type-erased iterator that forwards its next() method to an underlying iterator. This allows you to hide the actual iterator type used.
  2. Just like before, you create a new DictionaryIterator from contents.
  3. Finally, you wrap iterator in a new AnyIterator object to forward its next() method.

Now to fix the errors. You’ll see the following two errors:

PreconditionError

Before, you were using the DictionaryIterator tuple names key and value. You’ve hidden DictionaryIterator from the outside world and renamed the exposed tuple names to element and count. To fix the errors, replace key and value with element and count respectively.

Your preconditions should now pass and work just as they did before. This is why preconditions are awesome at making sure things don’t change unexpectedly.

Now no one will know that you’re just using a dictionary to do everything for you.

You can take all the credit by using your own custom collections!

Now that you’re feeling better about Bag, it’s time to bring it home. Ok, ok, collect your excitement, it’s Collection time! :]

Collection

Without further ado, here’s the real meat of creating a collection… the Collection protocol! To reiterate, a Collection is a sequence that you can access by index and traverse multiple times, nondestructively.

To add Collection conformance, you’ll need to provide the following details:

  • startIndex and endIndex: Define the bounds of a collection and expose starting points for transversal.
  • subscript (position:): Lets you to access any element within the collection using an index. This access should run in O(1) time complexity.
  • index(after:): Returns the index immediately after the passed in index.

You’re only four details away from having a working collection. Add the following code just after the Sequence extension:

extension Bag: Collection {
  // 1
  typealias Index = DictionaryIndex<Element, Int>
 
  // 2
  var startIndex: Index {
    return contents.startIndex
  }
 
  var endIndex: Index {
    return contents.endIndex
  }
 
  // 3
  subscript (position: Index) -> Iterator.Element {
    precondition((startIndex ..< endIndex).contains(position), "out of bounds")
    let dictionaryElement = contents[position]
    return (element: dictionaryElement.key, count: dictionaryElement.value)
  }
 
  // 4
  func index(after i: Index) -> Index {
    return contents.index(after: i)
  }
}

This is fairly straightforward:

  1. First, you declare the Index type defined in Collection as DictionaryIndex. You’ll pass these indices to contents. Note that the compiler could infer this type based on the rest of your implementation. Explicitly defining it keeps the code clean and maintainable.
  2. Next, you return the start and end indices from contents.
  3. Here, you use a precondition to enforce valid indices. You return the value from contents at that index as a new tuple.
  4. Finally, you echo the value of index(after:) called on contents.

By simply adding these properties and methods, you’ve created a fully functional collection! Add the following code to the end of the playground to test some of the new functionality:

// Get the first item in the bag
let firstItem = shoppingCart.first
precondition(firstItem!.element == "Orange" && firstItem!.count == 1, "Expected first item of shopping cart to be (\"Orange\", 1)")
 
// Check if the bag is empty
let isEmpty = shoppingCart.isEmpty
precondition(isEmpty == false, "Expected shopping cart to not be empty")
 
// Get the number of unique items in the bag
let uniqueItems = shoppingCart.count
precondition(uniqueItems == 2, "Expected shoppingCart to have 2 unique items")
 
// Find the first item with an element of "Banana"
let bananaIndex = shoppingCart.indices.first { shoppingCart[$0].element == "Banana" }!
let banana = shoppingCart[bananaIndex]
precondition(banana.element == "Banana" && banana.count == 2, "Expected banana to have value (\"Banana\", 2)")

Awesome!

(Cue the moment where you’re feeling pretty good about what you’ve done, but sense that a “but wait, you can do better” comment is coming…)

Well, you’re right! You can do better. There’s still some Dictionary smell leaking from Bag.

Improving Collection

Bag is back to showing too much of its inner workings. Users of Bag need to use DictionaryIndex objects to access elements within the collection.

You can easily fix this. Add the following just after the Collection extension:

// 1
struct BagIndex<Element: Hashable>: Comparable {
  // 2
  fileprivate var index: DictionaryIndex<Element, Int>
 
  // 3
  fileprivate init(_ dictionaryIndex: DictionaryIndex<Element, Int>) {
    self.index = dictionaryIndex
  }
}

There’s nothing too strange here, but let’s walk through what you just added:

  1. You’re defining a new generic type, BagIndex, that conforms to Comparable. Collection requires Index to be comparable to allow comparing two indexes to perform operations. Like Bag, this requires a generic type that’s Hashable for use with dictionaries.
  2. The underlying data for this index type is a fileprivate DictionaryIndex object. BagIndex is really just a wrapper that hides its true index from the outside world.
  3. Last, you create a fileprivate initializer that accepts a DictionaryIndex to store.

Because BagIndex conforms to Comparable, add the following methods just after BagIndex to fix the errors:

func ==<Element: Hashable>(lhs: BagIndex<Element>, rhs: BagIndex<Element>) -> Bool {
  return lhs.index == rhs.index
}
 
func <<Element: Hashable>(lhs: BagIndex<Element>, rhs: BagIndex<Element>) -> Bool {
  return lhs.index < rhs.index
}

The logic here is simple; you’re using the Comparable methods of DictionaryIndex to return the correct value.

Now you’re ready to update Bag to use BagIndex. Replace the Collection extension with the following:

extension Bag: Collection {
  // 1
  typealias Index = BagIndex<Element>
 
  var startIndex: Index {
    // 2.1
    return BagIndex(contents.startIndex)
  }
 
  var endIndex: Index {
    // 2.2
    return BagIndex(contents.endIndex)
  }
 
  subscript (position: Index) -> Iterator.Element {
    precondition((startIndex ..< endIndex).contains(position), "out of bounds")
    // 3
    let dictionaryElement = contents[position.index]
    return (element: dictionaryElement.key, count: dictionaryElement.value)
  }
 
  func index(after i: Index) -> Index {
    // 4
    return Index(contents.index(after: i.index))
  }
}

Each numbered comment marks a change. Here’s what they are:

  1. First you replaced the Index type from DictionaryIndex to BagIndex.
  2. Next, for both startIndex and endIndex, you created a new BagIndex from contents.
  3. Then you used the property of BagIndex to access and return an element from contents.
  4. Finally, you used a combination of the previous steps. You got the DictionaryIndex value from contents using the property of BagIndex. Then you created a new BagIndex using this value.

That’s it! Users are back to knowing nothing about how you store the data. You also have the potential for much greater control of index objects.

Before wrapping this up, there’s one more important topic to cover. With the addition of index-based access, you can now index a range of values in a collection.

To finish off, you’ll take a look at how a Slice works with collections.

Slice

A Slice is a view into a subsequence of elements within a collection. It lets you perform actions on a specific subsequence of elements without making a copy.

A slice stores reference to the base collection it was created from. It also keeps reference to the start and end indices to mark the subsequence range. Slices maintain a O(1) complexity because they directly reference their base collection.

Slices share indices with their base collection which make them incredibly useful.

To see how this works in practice, add the following code to the end of the playground:

// 1
let fruitBasket = Bag(dictionaryLiteral: ("Apple", 5), ("Orange", 2), ("Pear", 3), ("Banana", 7))
 
// 2
let fruitSlice = fruitBasket.dropFirst() // No pun intended ;]
 
// 3
if let fruitMinIndex = fruitSlice.indices.min(by: { fruitSlice[$0] > fruitSlice[$1] }) {
  // 4
  let minFruitFromSlice = fruitSlice[fruitMinIndex]
  let minFruitFromBasket = fruitBasket[fruitMinIndex]
}

Let’s take a look at what’s going on here and why it’s significant:

  1. First you create a fruit basket made up of four different fruits.
  2. Next, you remove the first type of fruit to eat. This creates a new Slice view into the fruit basket excluding the first element you removed.
  3. With the remaining fruit in the slice, you find the index of the least occurring fruit.
  4. Although you calculated the index from a slice, you’re able to use it successfully from both the base collection as well as the slice.
Note: Slices may seem a little less useful for hash-based collections like Dictionary and Bag because their order isn’t defined in any meaningful way. An Array, on the other hand, is an excellent example of a collection type where slices play a huge role in performing subsequences operations.

Congratulations — you’re a collection pro now! You can celebrate by making a bag of whatever prizes you want. :]

Where to Go From Here?

You can download the complete playground with all the code in this article here. If you’d like to view or contribute to a more complete Bag implementation, check it out on github.

In this article you learned what makes a data structure a collection in Swift by creating your own. You added conformance to Sequence, Collection, CustomStringConvertible, ExpressibleByArrayLiteral, ExpressibleByDictionaryLiteral as well as creating your own index type.

These are just a taste of all the protocols Swift provides to create robust and useful collection types. If you’d like to read about some that weren’t covered here, check out the following:

  • BidirectionalCollection: BidirectionalCollection Documentation
  • I hope you enjoyed this tutorial! Building your own custom collection might not be the most common requirement, but hopefully it’s given you a better understanding of Swift’s provided collection types.

    If you have any comments or questions, feel free to join in the forum discussion below!

    The post Building a Custom Collection in Swift appeared first on Ray Wenderlich.
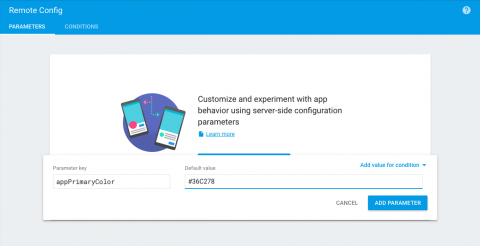
    3D Tools for Developers, and Core Graphics Revisited – Podcast S06 E12

    $
    0
    0
    3d tools

    Find out all about the best 3D modelling tools for developers in this episode!

    Join Mic, Jake, and Chris for the final time this season as they discuss some of the best 3D tools for aspiring game developers, as well as a clear learning path for those with little to no experience. Beyond that, they revisit Core Graphics and take a look at some of the big changes introduced with Swift 3.

    [Subscribe in iTunes] [RSS Feed]

    Our Sponsor

    Tired of your dead-end job? Ever thought about changing your career? DevMountain makes it easier than ever to land your perfect job in tech.

    DevMountain is Utah’s number one coding school teaching modern technical skills for today’s fast-paced, high-tech industries. They offer both full-time and part-time coding courses in web development, iOS development, and UX design.

    DevMountain’s expert faculty are passionate about sharing their craft and empowering the next wave of programmers, entrepreneurs and designers.

    Visit devmountain.com and start your new career today!

    Interested in sponsoring a podcast episode? We sell ads via Syndicate Ads, check it out!

    Show Notes

    Contact Us

    Where To Go From Here?

    We hope you enjoyed this episode of our podcast. Be sure to subscribe in iTunes to get notified when the next episode comes out.

    We’d love to hear what you think about the podcast, and any suggestions on what you’d like to hear in future episodes. Feel free to drop a comment here, or email us anytime at podcast@raywenderlich.com.

    The post 3D Tools for Developers, and Core Graphics Revisited – Podcast S06 E12 appeared first on Ray Wenderlich.


    Screencast: Server Side Swift with Vapor: CRUD Database Operations

    Screencast: Beginning C# Part 17: Structs

    Top 8 Programmer Hobbies

    $
    0
    0

    hobbies-feature

    If you read raywenderlich.com, it’s quite likely that you enjoy programming. You probably have a job as a developer, or enjoy coding in your spare time in the evenings or weekends.

    Although programming is a noble calling, having some hobbies outside programming can bring significant benefits to your personal and professional life.

    I recently surveyed fellow raywenderlich.com readers and asked them what their favorite hobbies were other than programming. In this article, I’ll share the results with you!

    For each of the top 8 programming hobbies, I’ll explain why you should do it and share some handy resources and tips to get started.

    Who knows – maybe I’ll tempt you to start a new hobby by the end of this article! :]

    8) Writing

    17.5% of survey respondents had this as a hobby. Writing can be a great hobby for programmers, as often you can combine your passion with programming with your passion for writing. For example, every article on this site was written by a developer!

    Why Do it?

    “Writing, because the nature of writing has helped me document better code and understand the creative process in writing code.” – Joseph Mennemeier

    Have you thought about the fact that you write every day? Emails, messages, source code and Facebook posts fly from your fingers on to the screen every single day. Whether you’re composing 140 characters or 140 pages, you’re writing all the time!

    So why not do it for fun too? For example, keeping a journal or writing a novel can be a cathartic experience. It’s also a great way to preserve extended memories in ways that photos or video can’t. You can’t capture what you were thinking or feeling at a specific moment in a photo.

    Chris Wagner doing some good ol' writing

    Chris Wagner doing some good ol’ writing

    Another idea is to start blogging on something that interest you, such as programming or technology. You can use sites like Medium if you don’t want to go through the hassle of starting your own blog.

    Last but not least, you could write short stories or novels, perhaps even take part in National Novel Writing Month (NaNoWriMo), where you attempt to compose a 50,000-word novel in thirty days!

    Writing is not for everyone, but it’s a rewarding pursuit and another great tool to have in your arsenal.

    How to Get Started

    Here are some resources that might give you a bit of writing motivation:

    • Day One App: A simple, elegant journaling app
    • Medium: A site you can blog on without starting your own blog
    • Nanowrimo: Join a commmunity of people around the world and write your first novel — or your tenth
    • Scrivener: A great writing tool to keep you organized and producting
    • 15 Apps for Writers: Every writer can use a little writing help

    Practical First Steps

    Start by keeping a personal journal. This isn’t a huge commitment like a book or a blog, but it helps you stay on track with your writing and takes only a few minutes a day.

    7) Board Games

    24.6% of survey respondents enjoy playing board games. And I’m not talking about Candyland – I’m talking about “serious board games” like Settlers of Catan, Bohnanza, Small World, and more.

    Why Do it?

    Board games are one of the best ways to connect with other people. While it’s easy to curl up with a controller for your video game console at the end of the day and play with friends or strangers across the globe, it doesn’t have that personal feeling of being near others, joking or grabbing a meal afterwards.

    Board games at RWDevCon.

    Board games at RWDevCon.

    This isn’t to say you can’t play board games online. There are fantastic alternatives on consoles, PC, and mobile devices, such as this excellent port of Small World to the iPad:

    SmallWorld

    When I lived in Miami as a teen, I loved going to my local Wizards of the Coast store and painting Warhammer 40K figurines while watching, in amusement, as others played and showed off their collection. I would also take my Game Boy Advance and Pokémon cards to take part in local Pokémon leagues or just enjoy some multiplayer gaming.

    Asking for help, making friends in your town and getting out of the house are all things that board games can provide while having a blast playing games about characters you love.

    How to Get Started

    Want to start your very own board game night? Here’s a few resources to get started:

    Practical First Steps

    Go down to your local hobby store and see if they offer any board game groups you can join. If not, get a group of friends together and play something as simple as chess, or as robust as Dungeons & Dragons.

    The Ray Wenderlich board game collection

    The Ray Wenderlich board game collection

    6) Art and Illustration

    24.6% of survey respondents had this as a hobby. Get your charcoal and sketch pad ready!

    Why Do It?

    Tammy Coron put it best:

    “As a developer, I often find myself buried under hundreds, sometimes thousands of lines of code. Solving problems and working out design patterns can take a lot out of you. At some point, you need to unwind.

    For me, it’s through my art — whether it’s illustration or storytelling, the result is always the same: I’m creating something, from nothing. Having the ability to create is such a rewarding experience.

    For the record, you don’t have to be a professional artist or writer to create. Just sit back and enjoy the process — you might even surprise yourself. =]” —Tammy Coron

    Tammy illustrating on her Cintiq

    Tammy illustrating on her Cintiq

    Tammy touches on a fantastic point which is creating! You don’t have to get fancy or know how to draw realistic human figures or portraits. A simple coloring book you do on your spare time, simple smiley faces, drawing cartoons, they are all art.

    Deep down we are all artistic and creative somehow. Find what you like drawing and creating, and enjoy!

    How to Get Started

    Can’t even draw a stick figure? Don’t worry, there are some great ways to get started even if you’re a complete beginner:

    • Drawspace: Learn to draw online
    • Proko: Video tutorials to help you sketch life studies
    • Draw a Box: Regularly updated drawing tutorials

    Practical First Steps

    If you want to pursue art, don’t try to start off by drawing a character from The Avengers. Start with something simple, like an apple or a little cartoon. Carry a drawing pad, your iPad and Apple Pencil, or a little notepad so you can doodle during those precious spare minutes of your day.

    5) Cooking

    28.1% of survey respondents had this as a hobby. Wait, does making Top Ramen count as cooking?

    Why Do it?

    Here is a story from Janie Clayton on how and why cooking is such an important part of her life:

    “I went through a divorce a year and a half ago. I live in the middle of nowhere and I work from home, so I decided to learn how to cook almost as self defense against starvation. I got a subscription food service called Plated that sends me recipes and ingredients, which is really convenient because I have had so many recipes I want to do but find out I am missing one vital, important ingredient and I would need to drive half an hour to pick it up.

    It also made it easier to try new recipes that I found intimidating, like thai curry and homemade pizza. It’s also really nice to get away from the computer sometimes. I feel like what I am doing is existential. I type words into the computer and stuff happens, but none of it is real.

    Getting to touch carrots and onions while I chop them up and smell them cooking and plating them and tasting something I made is rewarding and fulfilling. It helps me get through sometimes feeling like what I do isn’t important.”Janie Clayton

    Janie with her home-cooked meal and precious pug.

    Janie with her home-cooked meal and precious pug.

    Cooking awakens many sense and can be a great release of endorphins. You are feeling things with your hands, touching different textures. You smell delicious spices and food as you prepare it, and finally you taste all of these flavors and combinations.

    Like art or many other hobbies on this list, you are creating something from a separate group of items or ingredients. You are putting together something that pleases you (or others if you cook for friends and relatives) while getting to keep a nutritious, healthy diet.

    How to Get Started

    Here are some cooking resources survey respondents found helpful:

    Practical First Steps

    Find something you’d like to eat that takes less than 30 minutes to prepare, buy ingredients for it and get cooking! Start simple and use ingredients you’re already familiar with.

    4) Reading

    47.4% of survey respondents had this as a hobby. Curl up in your favorite chair and read on to find out whodunit.

    Why Do it?

    “Reading. UX is about empathy. Reading shows you the world through another’s eyes.” – Anonymous survey responder

    I’m sure several of you have read a book series which was then turned into a movie and thought: “The books were SO much better. The movie left out a lot of details and changed too many things.”

    Yup, I’m with you on that one. This happened to me with the Harry Potter series. While the movies are fantastic, they do the books no justice. There’s also something indescribable about how your brain imagines things while you read a book.

    1-reading-vs-movie

    Reading a book is an intensely personal experience; you can imagine a character and world in any way, giving things as little or as much detail as you wish. They are also easy to carry around (even more so if you have an e-reader or a mobile device) relatively inexpensive, and fantastic to fill those spaces in time when you’re waiting for your doctor or riding the bus to work.

    If you’re like me and not terribly interested in fantasy or fiction, there are biographies you can read to learn more about historical characters, books about computer history or cryptography, or even books about programming itself! :] While I would recommend you also have non-programming books in your list, reading is also a GREAT way to learn about your career and profession.

    Trust me, even if you don’t like reading, it’s the best way to learn pretty much anything.

    How to Get Started

    Check out the following reading list that is probably as far away from programming as you’re likely to get:

    Practical First Steps

    Find a book you like, whether it’s science fiction, a biography or a novel, and and start by reading a chapter a day.

    3) Video Games

    52.6% of survey respondents had this as a favorite activity. Experience relaxation through fragging your friends. :]

    Why Do it?

    “Heroes of the Storm, surprisingly, has helped me with teamwork. Having butterfingers, I never did sports in school to practice teamwork. But HotS, or any other team-based online video game, can help fill this gap.” – Robert Chen
    Heroes of the Storm, a popular game by Blizzard.

    Heroes of the Storm, a popular game by Blizzard.

    Ah, video games. My undisputed favorite hobby and activity apart from programming. Video games are such a fantastic way to relax and immerse yourself in virtual worlds that let you make your dreams come true. Regardless of the day’s weather or how close your friends live, you can enjoy video games whenever, often wherever, you want!

    Video games can also be a great learning tool. I count some puzzle games including TIS100 or Human Resource Machine among my favorite on iOS at the moment, as they help exercise the mind of a programmer.

    Human Resource Machine video game.

    Human Resource Machine video game.

    Video games are such an important aspect of my life that I even had a Zelda-themed wedding, with a painted cake, souvenirs, cookies, and in-game music as my wife walked down the aisle.

    Zelda-themed wedding cake for our Zelda-themed wedding.

    Zelda-themed wedding cake for our Zelda-themed wedding.

    People often think you need to be super-skilled to play video games, and truthfully, you need a bit of dexterity to play Counter Strike or Overwatch. But what about Sudoku 3D, a retro Mario game, online chess, or Angry Birds?

    There is a video game out there to suit almost everyone on the planet. If you like cars in real life, chances are you will enjoy racing games. Into football? Yup, there’s a few games about that. Many video games have fantastic storylines and character arcs that span multiple releases, and even have spin-off books and comics. It’s like opening Pandora’s box!

    What are you waiting for? If you’re a developer, it’s almost guaranteed you have a mobile device or computer you can play video games on. All that’s left to do is figure out what games you like and find what platforms they’re available on.

    How to Get Started

    Here are some great ways to get started with video games:

    • Steam: Games galore — check out their sales
    • League of Legends: Join the fray and slay dragons — or whatever is in your path
    • Hearthstone: Fast-paced card strategy game

    Practical First Steps

    There are great free games like Team Fortress, League of Legends or Hearthstone that you can get started with. If these are too daunting, you can always start simpler with some fantastic iOS games on this list here.

    2) Sports and Exercise

    57.9% of survey respondents listed sports and exercise as a hobby. Are you all warmed up and ready to hit the field? Great! :]

    Why Do It?

    “Just realize that your health is your prime asset (your brain lives inside your body, remember)” – Anonymous survey responder

    We often associate sports and exercise with looking good or losing weight, but there are tons of benefits beyond these two. Let me share my own story.

    Ever since I can remember, I have dealt with anxiety and generalized anxiety disorder (GAD). Trust me, it’s not something I wish upon anyone! I was always told by my my psychologist, doctors, and peers that I should try exercising as it would help me relax, reduce my anxiety when it triggers and make future episodes less intense.

    I tried going to a gym; I tried walking, yoga, and swimming but none of those were a good fit for me. I felt quite isolated going to a gym, putting on a pair of headphones and getting on a treadmill. It was also SUPER boring.

    Last year, I found a dojo near my house and started doing martial arts. My goal wasn’t to become Mr. Miyagi and judo chop everything in sight! I just wanted to remain fit, meet new people, get out of the house a few days a week and get some exercise to help with my anxiety.

    2-chopchop

    The difference between then and now is like night and day! Not only would I go to a class with extreme anxiety and return much more relaxed (or even completely forgetting about the initial issue), but I would sleep better, feel better and come away with a sense of reward about learning something new or pulling off something I was struggling with in previous classes.

    Martial arts worked for me, as had dance lessons before that, but you should definitely try something that interests you. What about rock climbing, running, archery, golf, basketball, soccer, baseball, volleyball, swimming, yoga, pilates, and SO much more that I’m probably forgetting about right now?

    Ballroom dancing on our wedding day.

    Ballroom dancing on our wedding day.

    Remember you don’t need to have anxiety or depression to try exercise. You will realize lots of other benefits; from the endorphins your body produces, improved sleep, being fitter, and having a sense of well being and accomplishment. You may even shed that extra weight you have been wanting to get rid of for many years. ;]

    How to Get Started

    There are some great online resources to get you started in fitness:

    • Runkeeper: Track your runs on your phone!
    • Best iOS Exercise apps from PC Mag: A great list of more apps to get you to stop crushing candy and get moving
    • CrossFit: Group-based workouts if you want some external motivation
    • Just Dance: An interactive dance app
    • Wii Fit: The classic Wii game that makes exercise fun
    • Zumba: The shimmying, shaking Latin exercise phemonenon

    Practical First Steps

    Set an exercise goal that you can achieve three times a week, doing whatever exercise or activity you like. The important thing is to be active, not to do a specific exercise or burn “X” calories.

    1) Music

    66.7% of survey respondents had this as a hobby. No wonder it looks like so many developers have their iPod earbuds permanently installed! :]

    Why Do it?

    Unlike other hobbies that need some affinity or skill, everyone likes music even if it’s just listening to music. There are probably special songs that trigger fond memories within you, and all of us have played an air guitar solo or sung in the shower when no one was listening.

    Music is one of the most rewarding hobbies you can have, whether it’s playing an instrument or simply listening to music. It’s also a hobby that you can mix with pretty much any other on this list. You can be programming, cooking a nice new meal, or exercising while listening to your favorite tunes.

    Playing instruments or creating music has also become much easier with technology. Did you know that you can connect your guitar or a MIDI keyboard to your computer and learn how to play either using Garageband? There’s also a game called Rocksmith in which you can plug in an electric guitar or bass and learn to play either from scratch.

    If playing an instrument is what you yearn to do, there has never been a better time — and it’s never too late to learn, thanks to technology. If it’s listening to music, then experiment with new artists or genres, or try something different and discover new aspects of world music that you may be missing out on.

    How to Get Started

    You can either take music lessons from someone local, or use some of these great resources:

    • Garageband lessons: Learn to make music on your Mac, iPad, or iPhone
    • Rocksmith: Build your guitar chops on your computer or game console
    • Sing Star: Take karaoke to the next level, complete with music videos

    Practical First Steps

    If you’ve ever wanted to play an instrument, try it out with the plethora of tools available. There are guitar tab apps and websites, YouTube tutorials, apps like Garageband or Yousician, or games like Sing Star and Rocksmith. The investment is small, but the reward is huge.

    Where to Go From Here?

    Finding a new hobby beyond the realm of programming doesn’t have to be difficult or intimidating. All you need to do it find what makes you happy, take small steps toward that, and share your new knowledge with the world.

    Find What Makes You Happy and Have Fun Doing It

    “If you don’t love what you’re doing stop. If you do, make sure you balance your life so you don’t start hating what you do.” – Anonymous survey responder

    We are all different, and each one of us is unique. There is no single recipe or blueprint on how to be happy, or what to do outside of your job or programming.

    For instance, I like video games, watching sports, cooking, music and reading. You might like photography, art and music. Do what makes you feel happy and fulfilled. There is no right or wrong way to approach it, and there’s really no way to fail can’t fail. The worst that can happen as you learn something new is that it will take time to get good at it, but I’m sure it took you a while to get good at programming as well!

    Start With Small Steps

    “Find your passion and make it a reality. If you truly love what you do, it makes the hard days easier and the good days great.” – Ric Perrott

    Start small. Check out the sections in this article for individual topics that interest you, and look at some of the quotes or stories of what respondents had to say. Look at the resources for that section, and take the practical first step.

    Set short-range goals that you can reach fairly easily. Add bigger, more difficult goals as you learn more and get comfortable with it.

    Give Back to the World

    “Share your curiosity along with you knowledge” – Catie

    I have sometimes come across people who haven’t wanted to share their knowledge about programming because they feel it will make them less valuable and can create competition. However this is silly and not true at all. Information wants to be free, and in the age of the Internet it can be acquired almost immediately by going to a website or purchasing a book.

    Share your gifts with others; it’s no coincidence you are good at what you do. Remember that you too were once a “newbie” like those who may now seek your help, and in many aspects all programmers are amateurs in some language, framework or tool.

    Giving your gift of knowledge to the world is rewarding, a great way to learn more about yourself and others, and will make you happy in a way you haven’t felt before.

    One last quote to leave you with before you forge on with pursuing your new passion:

    “One should love, respect, and hold high standards for BOTH oneself, AND others. Without this, continual self-betterment is thwarted.” – Jessy

    The post Top 8 Programmer Hobbies appeared first on Ray Wenderlich.

    WebSockets on iOS with Starscream

    $
    0
    0

    Websockets-featureTraditional networking techniques (namely Berkeley sockets) are considered reliable and robust. However, Berkeley sockets don’t work well with web technologies like proxies and firewalls. WebSockets appeared in 2011 as a new way of establishing two-way communication channels between clients and servers. WebSockets are also more efficient when compared to multiple HTTP requests and allow for persistent connections.

    Using WebSockets in iOS isn’t as straight-forward as it could be. The iOS and Mac library Starscream dramatically simplifies the setup and usage of WebSockets.

    Note: This tutorial assumes you have some familiarity with CocoaPods. If you don’t, please check out our CocoaPods tutorial first.

    In this tutorial, you’ll be finishing the networking in an app named Emoji Communicator for this tutorial. Emoji Communicator lets you broadcast your current state of mind to everyone connected to the service with a single emoji character.

    The original developer for Emoji Communicator was going to use HTTP requests with polling to watch for new messages, but WebSockets are the better approach for this feature. You’ll be using Starscream to hook into the backend webserver.

    Getting Started

    The first thing you need to use WebSockets is a web server. For this tutorial, you’ll start up a web server on your local machine. This demo web server runs on Node.js and uses a small JavaScript file to power it.

    Therefore, you need to have Node.js installed first. To check if you have Node.js already installed, open a Terminal window and type the following:

    node --version

    If you receive an error, follow the steps below to download and install Node.js. If instead you receive a version of Node.js in response, then you can skip the download section below.

    Downloading and Installing Node.js

    Download the current Node.js installer at https://nodejs.org/ (v6.6.0 Current as of 22-Sep-2016). Once you download the package file (node-v6.6.0.pkg, for example) double click it to install. Follow the prompts; the default options should suffice.

    Once the install completes, verify Node.js works properly on the command line using Terminal:

    node --version

    If you don’t see 6.6.0 (or whatever version you installed), or you see an error, double check that the installer worked properly.

    The Chat Server

    The application you’ll be using is a chat server. Download the example iOS application and web server code here. Unzip the file into a folder on your desktop or a folder of your choice. In Terminal, change to that directory, then change to the subfolder nodeapp.

    The application requires a third-party module that is installed with npm, the package manager Node.js uses.

    While in the chat server’s folder, execute the following:

    npm install websocket

    Type the following to start the chat server:

    node chat-server.js

    You should see something similar to the following:

    Tue Sep 13 2016 18:54:44 GMT-0500 (CDT) Server is listening on port 1337

    Next open the file frontend.html in a current web browser like Safari or Chrome.

    WebSockets Server

    Enter a name and then send a test message. If you want to test a second client, try opening a different browser or tab using the same URL. Login with a different name and send a message; you’ll see that the message comes through almost immediately in the other browser.

    whoa

    This demonstrates the power of WebSockets. Each browser has a single persistent connection to the web server — there’s no polling. When a message arrives, it’s broadcast out to every connected user. Switch back to Terminal and you should see all of the chat activity:

    $ node chat-server.js
    Tue Sep 13 2016 18:54:44 GMT-0500 (CDT) Server is listening on port 1337
    Tue Sep 13 2016 18:55:19 GMT-0500 (CDT) Connection from origin null.
    Tue Sep 13 2016 18:55:19 GMT-0500 (CDT) Connection accepted.
    Tue Sep 13 2016 18:55:34 GMT-0500 (CDT) User is known as: Aaron with green color.
    Tue Sep 13 2016 18:55:37 GMT-0500 (CDT) Received Message from Aaron: Hello
    Tue Sep 13 2016 18:58:49 GMT-0500 (CDT) Connection from origin null.
    Tue Sep 13 2016 18:58:49 GMT-0500 (CDT) Connection accepted.
    Tue Sep 13 2016 18:58:51 GMT-0500 (CDT) User is known as: James with red color.
    Tue Sep 13 2016 18:58:55 GMT-0500 (CDT) Received Message from James: This is pretty slick!
    Tue Sep 13 2016 18:59:03 GMT-0500 (CDT) Received Message from James: :]
    Tue Sep 13 2016 18:59:27 GMT-0500 (CDT) Peer undefined disconnected.

    WebSockets

    HTTP was first created in 1991 and was designed to be a request-response mechanism for communication. Web browsers work well with this paradigm; the user requests a web page and the server responds with the content. Sometimes the user may need to be notified of new data without issuing a request — in other words, a server push.

    HTTP doesn’t handle the push model very well. Web service implementations before WebSockets meant creating some sort of polling mechanism from the web browser side, which isn’t terribly efficient.

    WebSockets help facilitate the server-side push mechanism. Newer web browsers all support WebSockets, which makes it super-simple to set up and use. Connections over WebSockets persist to open, and most networks have no difficulty handling WebSockets connections.

    WebSockets are commonly used in scenarios with rapidly or often-changed data. Web notifications in Facebook, real-time chat in Slack, and streaming stock prices in a trading application are good use cases for WebSockets.

    Using WebSockets in iOS is not simple; you have to do a lot of setup and there’s no built-in API to help you. This is where Starscream helps you out — all of the headache is taken away with a small and simple-to-use library.

    Emoji Communicator

    EmojiCommunicator

    Open the EmojiTransmitter.xcodeproj file in Xcode. Build and run the application in a simulator. The application is simple; it asks for the user’s name, then presents a screen to send emoji and shows any received emoji.

    The application doesn’t do any networking calls yet. You’ll use Starscream to perform all the networking calls over a WebSocket to your server.

    There are a number of different ways to get Starscream into your project. CocoaPods and Carthage are the two most common dependency managers. You can use either, but for this tutorial CocoaPods will be the dependency manager of choice.

    First, close the Xcode project file you just opened. Next, open a Terminal window and change directories to the project’s folder.

    A Podfile has already been created for the project with the Starscream pod referenced. Install the Pods with the following:

    pod repo update; pod install

    Once CocoaPods finishes, open the EmojiTransmitter.xcworkspace file in Xcode 8. Build and run the application to make sure nothing is broken.

    Open ViewController.swift and add the following below import UIKit:

    import Starscream

    Next, add the following property to the ViewController class below username:

    var socket = WebSocket(url: URL(string: "ws://localhost:1337/")!, protocols: ["chat"])

    This is the magic to create a WebSocket connection. Notice the format of the URL; the protocol is ws, not http or https. A protocol is specified (chat) but it really depends on the server implementation whether this protocol is used or ignored. In this demo, it’s pretty much ignored.

    Next, add the following method below viewDidLoad():

    deinit {
      socket.disconnect(forceTimeout: 0)
      socket.delegate = nil
    }

    This forces the WebSocket connection to disconnect when the view controller is deallocated.

    All of the magic happens with delegates in Starscream. Starscream alternately supports using closures if you prefer that over delegates.

    Still inside ViewController.swift, add the following extension below the fileprivate extension:

    // MARK: - WebSocketDelegate
    extension ViewController : WebSocketDelegate {
      public func websocketDidConnect(_ socket: Starscream.WebSocket) {
     
      }
     
      public func websocketDidDisconnect(_ socket: Starscream.WebSocket, error: NSError?) {
     
      }
     
      public func websocketDidReceiveMessage(_ socket: Starscream.WebSocket, text: String) {
     
      }
     
      public func websocketDidReceiveData(_ socket: Starscream.WebSocket, data: Data) {
     
      }
    }

    These four delegate methods are required to be implemented for your code to compile.

    Next, add the following to viewDidLoad(), directly below super.viewDidLoad():

    socket.delegate = self
    socket.connect()

    Build and run the application. Enter a name for the user and tap Next. Go back to the Node.js application console and you should see a connect notice.

    Now that you are able to make a connection to the Node.js application, the next step is to send your messages to the server for distribution.

    First, replace sendMessage(_:) with the following:

    func sendMessage(_ message: String) {
      socket.write(string: message)
    }

    This will send any messages (or emojis, in this application’s case) to the Node.js server.

    Next, add the following to websocketDidConnect(_:):

    socket.write(string: username)

    This sends the username entered from the first screen as soon as the socket connects. This specific server implementation uses the first received message to define the username.

    Add the following to websocketDidDisconnect(_:error:):

    performSegue(withIdentifier: "websocketDisconnected", sender: self)

    This pops the user back to the username screen if the socket disconnects for whatever reason. You should consider a more robust error handling routine if you decide to use Starscream inside your own application.

    Next, add the following to websocketDidReceiveMessage(_:text:):

    // 1
    guard let data = text.data(using: .utf16),
      let jsonData = try? JSONSerialization.jsonObject(with: data),
      let jsonDict = jsonData as? [String: Any],
      let messageType = jsonDict["type"] as? String else {
        return
    }
     
    // 2
    if messageType == "message",
      let messageData = jsonDict["data"] as? [String: Any],
      let messageAuthor = messageData["author"] as? String,
      let messageText = messageData["text"] as? String {
     
      messageReceived(messageText, senderName: messageAuthor)
    }

    The text received is literally plain text — if the payload is JSON, it has to be converted into collection objects. Let’s go through this step by step:

    1. First you convert the String to NSData. Next you pass the NSData to the JSONSerialization object to parse the payload and (hopefully) return a valid object. Finally you check that several important keys are set within the object. If the data is not valid, the method will exit early using the guard statement.
    2. The messages are filtered by messageType and then sent through to the existing messageReceived(messageText:, senderName:) method.

    Below is an example of the JSON-formatted string received from the Node.js server:

    {
      "type": "message",
      "data": {
        "time": 1472513071731,
        "text": ":]",
        "author": "iPhone Simulator",
        "color": "orange"
      }
    }

    Build and run the application. Immediately after you send a message, the emoji is updated with your selected emoji and username. Switch back to the web console and your emoji message will be there as well.

    That’s all that’s required to use WebSockets with Starscream!

    Where to Go From Here?

    You can download the final project code here.

    Emoji Communicator is a rather simplistic example of what WebSockets can be used for. If you want to leverage Starscream in a pre-existing service, there are several steps you can take to learn more:

    If you have any questions or comments on this tutorial, please join the discussion below!

    The post WebSockets on iOS with Starscream appeared first on Ray Wenderlich.

    RWDevCon 2017: Time to Vote!

    $
    0
    0

    RWDevCon-feature

    At RWDevCon, we make tutorials based on what the attendees vote for. That way, we cover what you want to learn about!

    Last week, we put out a call for suggestions for what tutorials. Huge thanks to all of the attendees who submitted your ideas!

    Here are a few of the ideas that folks submitted:

    • Complex Auto Layout
    • Continuous Integration
    • Idiomatic Swift
    • Machine Learning
    • Message Apps
    • Mobile Back-End As a Service Options Compared
    • Swift & Parallel Computing
    • Swift Package Manager
    • rxSwift
    • …and over 50 other ideas!

    Today, we are moving on to the next phase, where attendees get to vote on these suggestions, to help choose what tutorials we make for the conference.

    Here’s how you can cast your vote:

    • If you bought a RWDevCon 2017 ticket, check your email: I sent you a link with the vote.
    • If you don’t have a RWDevCon 2017 ticket yet, now’s the time! If you grab your ticket today I’ll send you a link to the vote.

    We can’t wait to see what topics we cover this year!

    The post RWDevCon 2017: Time to Vote! appeared first on Ray Wenderlich.

    Video Tutorial: Beginning Metal Part 1: Introduction

    Video Tutorial: Beginning Metal Part 2: Getting Started


    Video Tutorial: Beginning Metal Part 3: Triangles

    New Course: Beginning Metal

    $
    0
    0

    x_post_Metal-Beg-feature

    Today I’m happy to announce my brand new course on raywenderlich.com: Beginning Metal!

    Metal is Apple’s low-level GPU access API. It’s the underlying framework for all of Apple’s graphics and game APIs such as Core Animation, Core Graphics and SpriteKit. And we’re able to hook into Metal when we need to render 3D graphics or do any heavy parallel computation.

    This is a course for complete beginners to Metal. It’s perfect if you want to gain a better understanding of how 2D and 3D graphics actually works under-the-hood in iOS.

    It’s also fully up-to-date with Swift 3, Xcode 8, and iOS 10!

    Here’s an overview of what’s inside:

    MetalPipeline

    Videos 1-2: 3D Graphics Basics. You’ll start by learning what the GPU does and what the graphics pipeline is.

    Triangles

    Videos 3-4: Hello, Metal! You’ll then move on to the Hello World of graphics – rendering triangles.

    struct Constants {
      float animateBy;
    };
     
    vertex float4 vertex_shader(const device packed_float3 *vertices [[buffer(0)]],
                                constant Constants &constants [[buffer(1)]],
                                uint vertexId [[vertex_id]]) {
      float4 position = float4(vertices[vertexId], 1);
      position.x += constants.animateBy;
      return position;
    }

    Video 5: Metal Shaders. Shader functions are little programs that run on a GPU. You’ll learn about the Metal Shading Language, how shaders fit into the pipeline, and how to position and color vertices.

    TextureCoords

    Video 6: Texturing. You’ll learn how to map textures to your model’s vertices to make your graphics start looking great!

    3DModels

    Videos 7-8: 2D to 3D Matrix Transformations. Probably the most complex aspect to 3D is understanding how transforms work, and how amazing matrices are. You’ll learn how to set up a series of matrix transformations to move your app from 2D to 3D.

    Mushroom

    Videos 9-10: Model I/O. Just last year, Apple introduced Model I/O. You’ll learn how to use this to import models from Blender or other 3D modeling apps with ease.

    Mushroom2

    Videos 11-12: Lighting. You’ll learn how to implement lighting with a simple shading method called Phong, using ambient, diffuse and specular lighting.

    Game

    Videos 13-15: Making a Simple Game Engine. By this point you’ll have learned enough to put it all together to create a simple 3D app, so you’ll learn how to create a simple game engine and make a Breakout clone!

    Where To Go From Here?

    Want to check out the course? The first two parts are available now for free:

    The rest of the course is for raywenderlich.com subscribers only. Here’s how you can get access:

    • If you are a raywenderlich.com subscriber: You can access to the first three parts of Beginning Metal today, and the rest will be coming out in the next few weeks.
    • If you are not subscribed yet: What are you waiting for – subscribe now to get access to our new Metal course and our entire catalog of over 500 videos.

    We hope you enjoy, and stay tuned for more new Swift 3 courses and updates to come! :]

    The post New Course: Beginning Metal appeared first on Ray Wenderlich.

    Screencast: Server Side Swift with Vapor: Deploying to Heroku with PostgreSQL

    6 Free macOS Tutorials Now Updated For Swift 3

    $
    0
    0

    Swift3Update-mac-feature

    As you may have noticed, we’ve recently updated a ton of tutorials to Swift 3: 27 iOS tutorials, and 8 Swift tutorials.

    Well, we didn’t want poor macOS to feel neglected, so we updated a bunch of macOS tutorials too. :]

    Today the macOS Team and I are happy to announce that we’ve updated 6 macOS tutorials to Swift 3, and more are on the way! And even better – these updates are free and available today.

    Let’s dive in.

    macOS Tutorials Updated For Swift 3

    Cocoa Bindings on macOS Tutorial

    1. Cocoa Bindings on macOS by Andy Pereira – Cocoa bindings have a simple goal: write less code. Learn how to create links between the model and the view controller with Interface Builder.

    NSOutlineView on macOS Tutorial

    1. NSOutineView on macOS Tutorial by Jean-Pierre Distler – Discover how to display and interact with hierarchical data on macOS.

    Scanner Tutorial for macOS

    1. Scanner Tutorial for macOS by Hai Nguyen – Use Scanner to analyze strings from natural form to computer languages. Here you’ll learn how to extract information from emails.

    Command Line Programs on macOS Tutorial

    1. Command Line Programs on macOS Tutorial by Jean-Pierre Distler – Discover how easy it is to get started making your own terminal-based apps.

    Core Graphics on macOS Tutorial

    1. Core Graphics on macOS Tutorial by Ernesto García – Learn how to build a great disc info app for macOS using Core Graphics to draw charts.

    Making a Mac App Scriptable Tutorial

    1. Making a Mac App Scriptable Tutorial by Sarah Reichelt – Allow users to write scripts to control your macOS app – giving it unprecedented usability.

    Where to Go From Here?

    Even with all of these macOS tutorials that use Swift 3, it’s only the beginning. We’ll be releasing a new macOS tutorial each and every month: fully compatible with Swift 3!

    Thanks to all of the authors for updating their tutorials, and thanks to you for reading this site – stay tuned for more new Swift 3 tutorials each and every week.

    As always, if there’s something you’d like to see a tutorial for, or if there’s an old favorite tutorial you’d like to see updated, please drop me a note! :]

    The post 6 Free macOS Tutorials Now Updated For Swift 3 appeared first on Ray Wenderlich.

    Couchbase Tutorial for Android: Getting Started

    $
    0
    0

    CouchbaseAndroid-feature

    Couchbase Mobile is a distributed database that runs on mobile devices and on app servers. Having a mobile database under your app results in speedy interactions with your application — even without network connectivity. When connectivity is restored, the full master-master replication automatically synchronizes the data.

    Why would you choose Couchbase over the built-in SQLite support or a cloud-based data service?

    • Easy migration: Since Couchbase is built on NoSQL, you can seamlessly change data as your application grows — without requiring elaborate upgrade scripts.
    • Simple data mapping: Couchbase lets you store data in a format that closely resembles how your app uses the data.
    • Built-in synchronization: If you have ever needed to build your own syncing solution, you know how complicated it can be. Couchbase’s Sync Gateway does all of the hard work for you.
    • Offline support: Couchbase lets you develop your app without thinking about a network connection. You simply write to the local database and let Couchbase handle the rest.

    In this Couchbase tutorial, you’ll develop a crowd-sourcing quiz application called QuizzDroid. Your answers will be shared (via Sync Gateway) with all other users. So there is no right or wrong answer — only what other users have answered. :]

    couchbase tutorial demo

    When you’re done, you’ll have learned the following:

    • How to use prebuilt Couchbase Lite databases.
    • How to model and query data including attachments.
    • How to craft data.
    • How to sync data and manage network availability.
    • How to deploy your app to multiple emulators.

    Are you excited? Let’s go!

    Note: You should have a working knowledge of Android development before working through this Couchbase tutorial. If you need a refresher, take a look at some of our introductory Android tutorials!

    Getting Started

    Download the QuizzDroid starter project and open it in Android Studio. It already contains the Couchbase Lite Android SDK as a dependency and has two activities:

    • HomeActivity will display the list of questions.
    • QuestionActivity will contain the image, possible choices to select from and all answers from other users.

    Build and run your app (some configurations of Android Studio may report build errors on the first attempt; in this case, simply build and run again, and you’ll be error-free). As you can see, the screen is empty:

    couchbase tutorial image01

    You’re now ready to start bringing the activities to life.

    Couchbase Mobile is divided into three components:

    • Couchbase Lite: An embedded NoSQL database that runs on the device, within your application.
    • Sync Gateway: An Internet-facing synchronization server that securely syncs data between device and cloud.
    • Couchbase Server: A highly scalable cloud-based NoSQL server used as a storage engine by Sync Gateway.

    You’ll use the Couchbase Lite database and the Sync Gateway in this tutorial in a simulated multi-user environment and briefly touch on the Couchbase server component.

    Using the Prebuilt Database

    Since Couchbase Lite runs right on the device, you can bundle a prebuilt database in your application. This is optional; most apps start with an empty database and add data entered by the user or synchronized through Sync Gateway.

    In this Couchbase tutorial, you will use a database containing a list of questions. Download the database and move the zip file to app/src/main/assets/ in the starter project:

    couchbase tutorial drag-db-finder

    The database starts in the assets folder, but Couchbase Lite reads from and persists to the data/data/com.raywenderlich.quizzdroid/files folder. In the next section you’ll add code to move the database to its final location.

    Initializing the Database

    Open DataManager.java. This is a singleton class providing access to the database instance throughout the application. Add the following to the constructor:

    Manager manager = null;
    try {
      // 1
      manager = new Manager(new AndroidContext(context), Manager.DEFAULT_OPTIONS);
      // 2
      database = manager.getExistingDatabase("quizzdroid");
    } catch (IOException e) {
      e.printStackTrace();
    } catch (CouchbaseLiteException e) {
      e.printStackTrace();
    }
     
    // 3
    if (database == null) {
      try {
        ZipUtils.unzip(context.getAssets().open("quizzdroid.cblite2.zip"), manager.getContext().getFilesDir());
        // 4
        database = manager.getDatabase("quizzdroid");
      } catch (IOException e) {
        e.printStackTrace();
      } catch (CouchbaseLiteException e) {
        e.printStackTrace();
      }
    }

    Here’s what this code does:

    1. Instantiates the Couchbase Lite Manager. A Manager is the top-level object managing a collection of Couchbase Lite Database instances. You must create a Manager instance before working with Couchbase Lite objects. The Manager.DEFAULT_OPTIONS parameter indicates default options, including read/write support.
    2. Checks for an existing Database named “quizzdroid”. This line returns null if the database doesn’t exist, as would be the case on first launch.
    3. If the database doesn’t exist, the ZipUtils.unzip method unzips the zip database file into the files directory; otherwise, nothing further needs to be done.
    4. The database is instantiated using the getDatabase method.

    Next, instantiate the Manager at the bottom of onCreate in HomeActivity.java:

    DataManager manager = DataManager.getSharedInstance(getApplicationContext());

    Database Listener

    Now that the database is initialized, you should verify it is working properly. This is a perfect job for the Database Listener, which is a component that provides an HTTP entry point to the database. This component is optional and is often used for the following reasons:

    • Debugging: In development, it’s much faster to use the HTTP API to inspect the database than to set breakpoints and examine query results.
    • Peer-to-peer: Other databases (often running on different devices) can persist data to the listener directly without the need for a server to act as the intermediary. This aspect of Couchbase Mobile isn’t covered in this Couchbase tutorial.
    • Hybrid development: Used to access the database from JavaScript frameworks within a WebView.

    The image below illustrates the Couchbase system architecture. Notice that a database can communicate directly with another database with a listener, instead of having to use the server as a middle-man.

    diagrams.002

    Back in DataManager.java, add the following below the existing code in the constructor method:

    View.setCompiler(new JavaScriptViewCompiler());
    Database.setFilterCompiler(new JavaScriptReplicationFilterCompiler());
     
    Credentials credentials = new Credentials(null, null);
    LiteListener liteListener = new LiteListener(manager, 5984, credentials);
     
    Thread thread = new Thread(liteListener);
    thread.start();

    Be sure to import the Credentials from the com.couchbase.lite.listener namespace.

    couchbase tutorial image02

    This code creates a database listener on port 5984 and starts it on a background thread.

    Build and run your app; you should see the same blank screen as before.

    To access the database from a browser or a command-line utility such as curl, you must enable port forwarding for that port using ADB. From the command line, run the following:

    adb forward tcp:5984 tcp:5984

    Your database is now accessible on http://localhost:5984/quizzdroid.

    You can also access the database using the following curl command:

    $ curl -X GET 'http://localhost:5984/quizzdroid'
     
    {
      "disk_size":147960,
      "db_uuid":"53b66d23-8803-43f3-a4db-a49d51b09efe",
      "db_name":"quizzdroid",
      "update_seq":6,
      "instance_start_time":1468585759670000,
      "doc_count":6
    }

    Notice the doc_count is 6, which confirms the prebuilt database was successfully loaded.

    Your next task is to display the six questions on the Home Screen.

    The Home Screen

    Couchbase Mobile is a schemaless database, which means there are no restrictions on the database schema. This lets you be quite flexible during development because you don’t need to run database migrations every time the schema changes. Nonetheless, the application code must know about the data structures underneath.

    Data Modeling

    Below is the data model for this application:

    diagrams.003

    Data records are called documents, and there are two document types: question and answer. The underlying data format is JSON. You can think of a document as a set of key-value pairs. There is a one-to-many relationship between the question and answer documents.

    POJO Classes

    In order to manage the Couchbase documents, you will create POJO (Plain Old Java Object) classes to map the Couchbase documents to Java objects.

    Open model/Question.java and add the following instance variables:

    private String _id;
    private String _rev;
    private String text;
    private String tag;
    private String type;
    private List<String> options;
     
    @JsonIgnore
    private String _attachments;

    Notice the instance variables are the same as the ones listed in the data model table. These variables represent the keys in the question document type. You will use the Jackson library to convert between POJOs and JSON.

    All the properties reserved for Couchbase Lite are prepended with _, such as _id, _rev, and _attachments. The _attachments property is only present if the document contains attachments. You will load attachments through another API method, so it’s marked with the @JsonIgnore annotation, telling Jackson to ignore the variable.

    Use the Android Studio CTRL+Enter shortcut to add getter and setter methods for each instance variable.

    getter-setters

    With the Question model in the application, you can now write a view to index question documents.

    Indexing Data

    The way to query data in Couchbase Lite is by registering a View and then running a Query on it with QueryOptions. The first thing to know about Couchbase Views is that they have nothing to do with the user interface views.

    A View in Couchbase is a persistent index of documents in a database, which can be queried to find data. The main component of a View is its map function. It takes a document’s JSON as input, and emits any number of key-value pairs to be indexed.

    First, you will define the view to index the documents of type question. The diagram below shows the result of that map function.

    diagrams.005

    Remember that a view index is a list of key-value pairs, sorted by key. The view’s logic is written in the native language of the platform you’re developing on.

    Add the following static method to models/Question.java:

    public static Query getQuestions(Database database) {
      // 1
      View view = database.getView("app/questions");
      if (view.getMap() == null) {
        // 2
        view.setMap(new Mapper() {
          @Override
          // 3
          public void map(Map<String, Object> document, Emitter emitter) {
            // 4
            if (document.get("type").equals("question")) {
              emitter.emit(document.get("_id"), null);
            }
          }
        }, "1");
      }
      Query query = view.createQuery();
      return query;
    }

    This method returns a query from a database View. Walking through the code:

    1. Request a database view named questions. This will create the view if it doesn’t exist.
    2. If the view does not already have a mapping, create one with a new Mapper object. The second parameter to setMap is a version number. If your code for the map changes in the future, the version number should be incremented as well.
    3. The Mapper object calls map for each document in the database.
    4. If the document type equals question, then emit the key-value pair for the view.

    Querying and Displaying Data

    With the view now defined, you are ready to run a Query on it. The result of a query is an instance of QueryEnumerator, which provides a list of QueryRow objects, each one describing a single row from the view’s index.

    Add the following code to the end of the onCreate method in HomeActivity.java:

    // 1
    QueryEnumerator questions = null;
    try {
      questions = Question.getQuestions(manager.database).run();
    } catch (CouchbaseLiteException e) {
      e.printStackTrace();
    }
     
    // 2
    List<Question> data = new ArrayList<>();
    for (QueryRow question : questions) {
      Document document = question.getDocument();
      Question model = ModelHelper.modelForDocument(document, Question.class);
      data.add(model);
    }
     
    // 3
    final HomeAdapter adapter = new HomeAdapter(data);
    mRecyclerView.setAdapter(adapter);

    This code does the following:

    1. Runs the query and saves the result in a questions variable.
    2. Loops over the query rows and deserializes the Question model objects.
    3. Connects the questions to the RecyclerView

    Notice the call to ModelHelper.modelForDocument. Open ModelHelper.java, and take a look at modelForDocument. It uses the Jackson library to convert the properties in the question QueryRow object to the Question object.

    If you run the app, the screen will still be blank because the Recycler View isn’t drawing the rows. In adapter/HomeAdapter.java, add the following code to onBindViewHolder:

    // 1
    Question question = mQuestions.get(position);
     
    // 2
    switch (question.getTag()) {
      case "science":
        holder.itemView.setBackgroundColor(Color.parseColor("#EC5766"));
        break;
      case "geography":
        holder.itemView.setBackgroundColor(Color.parseColor("#FFC857"));
        break;
      case "android":
        holder.itemView.setBackgroundColor(Color.parseColor("#63ADF2"));
        break;
      case "logic":
        holder.itemView.setBackgroundColor(Color.parseColor("#86CD82"));
    }
     
    // 3
    holder.mQuestion.setText(question.getText());
    holder.mTag.setText(question.getTag());
     
    // 4
    holder.itemView.setOnClickListener(new View.OnClickListener() {
      @Override
      public void onClick(View v) {
        if (mOnItemClickListener != null) {
          mOnItemClickListener.OnClick(v, position);
        }
      }
    });

    This code does the following:

    1. Retrieves the question object for the requested row position.
    2. Uses the category returned by getTag to set the background colors.
    3. Sets the content to display in the TextViews for the question text and category.
    4. Assigns an onClick listener to respond when the user taps a question.
    Note: Check out the Recycler View tutorial if you need a refresher on using Recycler Views.

    Build and run your app; you should now see six questions on the home screen.

    image03

    Well done! In the next section, you’ll add a row click handler to open the Question activity.

    Note: Run the same query using the Listener. The result has the same questions you see in the app. This lets you examine the details of each question document. The query link is http://localhost:5984/quizzdroid/_design/app/_view/questions?include_docs=true

    Home Activity → Question Activity

    Head back to HomeActivity.java and add the following code to the end of onCreate:

    adapter.setOnItemClickListener(new HomeAdapter.OnItemClickListener() {
      @Override
      public void OnClick(View view, int position) {
        Intent intent = new Intent(getApplicationContext(), QuestionActivity.class);
        Question selected = adapter.getQuestions().get(position);
        intent.putExtra(EXTRA_INTENT_ID, selected.get_id());
        startActivity(intent);
      }
    });

    This code assigns an item click listener to the adapter. When you click an item, an Android intent is created containing the document ID of the selected question as an extra, which is then passed along to start the QuestionActivity.

    Build and run. Click on any row to open the question activity. The Question activity is blank, but the next section will take care of that.

    image04

    The Question Screen

    Your first task is to load the full question document from the database and use it to populate the Question activity.

    Loading the Question Data

    Open QuestionActivity.java and paste the following at the end of onCreate:

    // 1
    Intent intent = getIntent();
    String questionId = intent.getStringExtra(HomeActivity.EXTRA_INTENT_ID);
     
    // 2
    DataManager manager = DataManager.getSharedInstance(getApplicationContext());
    Document document = manager.database.getDocument(questionId);
     
    // 3
    mQuestion = ModelHelper.modelForDocument(document, Question.class);
    mTextView.setText(mQuestion.getText());

    Here’s what this code does:

    1. Retrieves the questionId of the selected question from the intent extra.
    2. Uses the manager singleton database to load the document with the questionId.
    3. Deserializes the document into question and sets the text property on the textView

    Build and run your app, and click on a question to display each question detail:

    image05

    Multiple Choice in a GridView

    The data modeling diagram lists the options property as an array of strings. Those are the possible choices shown to the user.

    Add the following method to QuestionActivity.java:

    To display the choices, add the following to the end of onCreate in QuestionActivity.java:

    mQuestionOptions = (GridView) findViewById(R.id.question_options);
    mQuestionOptions.setChoiceMode(AbsListView.CHOICE_MODE_SINGLE);
    mQuestionOptions.setNumColumns(2);
    mQuestionOptions.setSelector(R.drawable.selector_button);
     
    mQuestionOptions.setAdapter(new QuestionOptionsAdapter(mQuestion.getOptions(), null));
     
    mQuestionOptions.setOnItemClickListener(new AdapterView.OnItemClickListener() {
      @Override
      public void onItemClick(AdapterView<?> parent, View view, int position, long id) {
        mSelectedOption = position;
      }
    });

    Here’s what’s happening in this code segment:

    In the above code segment, you create a GridView, assign it an adapter populated with mQuestionOptions and then set up a click listener to store the user’s choice in mSelectedOption.

    Build and run. Open any question and click on the possible options:

    image06

    In the next section you’ll add a Submit button to save your answer to a new document.

    Writing Data

    User answers will be stored in the database as Answer documents. First, you’ll create an Answer model class.

    Create a new file model/Answer.java and add to it the following instance variables:

    private String _id;
    private String _rev;
    private String question_id;
    private String type;
    private String user_answer;

    These property names match the ones on the data modeling diagram. Next, add a getter and setter for each instance variable using the CTRL+Enter shortcut in Android Studio.

    image06

    To create Answer instances, add the following constructor in mode/Answer.java:

    public Answer(String question_id, String type, String user_answer) {
      this.question_id = question_id;
      this.type = type;
      this.user_answer = user_answer;
    }

    To save an answer, you’ll add a button with a click handler. Open activity_question.xml and add the following Button element below the GridView:

    <Button
        android:id="@+id/submit_button"
        android:layout_width="match_parent"
        android:layout_height="wrap_content"
        android:onClick="onButtonClicked"
        android:text="Submit" />

    Within activity_question.xml, create a click handler with the Alt+Enter shortcut:

    onclick

    Add the following to the body of onButtonClicked.

      Answer answer = new Answer(mQuestion.get_id(), "answer",
          mQuestion.getOptions().get(mSelectedOption));
      ModelHelper.save(DataManager.getSharedInstance(getApplicationContext()).database, answer);

    This instantiates a new answer object and saves it using ModelHelper.save.

    Build and run, select an answer and tap Submit.

    image07

    Well done! You can now save answers to the database.

    Note: There’s no visual cue to indicate the answer was saved, but you should see the doc_count value increase at http://localhost:5984/quizzdroid

    One more feature to add before you dive into synchronization is to display the image. The generic term in Couchbase is Attachment.

    Using Attachments

    Add the following code to the end of onCreate in QuestionActivity.java:

    Revision revision = document.getCurrentRevision();
    Attachment attachment = revision.getAttachment("image");
    if (attachment != null) {
      InputStream is = null;
      try {
        is = attachment.getContent();
      } catch (CouchbaseLiteException e) {
        e.printStackTrace();
      }
      Drawable drawable = Drawable.createFromStream(is, "image");
      mImageQuestion.setImageDrawable(drawable);
    }

    This uses the current document revision to load the attachment named image as an InputStream. It then converts the stream into a Drawable and assigns it to the mImageQuestion ImageView shown above the question.

    Note: Make sure to import java.io.InputStream for the InputStream class, not the com.couchbase version.

    image08

    Build and run your app; select a question and the image will appear:

    image09

    Note: This Couchbase tutorial only covers how to read attachments. Refer to the Couchbase documentation to learn how to save attachments with a write operation.

    Adding Synchronization

    You will use Sync Gateway in what’s known as walrus mode, which is an in-memory, development-only mode. In production, you would install both Couchbase Server and Sync Gateway.

    Installing Sync Gateway

    Download Sync Gateway community edition and unzip the file. The executable is located in the bin folder. If you unzipped the file to the Downloads folder, start it with this command:

    $ ~/Downloads/couchbase-sync-gateway/bin/sync_gateway -dbname="quizzdroid"

    You should see Starting server on localhost:4984 ... in your terminal window.

    You can now head to http://localhost:4984 to check that it’s up and running:

    browser

    Now that the Sync Gateway is running, you’ll add some code to replicate the database to the server.

    Synchronization

    Set up the push and pull replications by adding the following code to the end of the constructor in DataManager.java.

    // 1
    URL syncGatewayURL = null;
    try {
      String SYNC_GATEWAY_URL = "http://localhost:4984/quizzdroid";
      syncGatewayURL = new URL(SYNC_GATEWAY_URL);
    } catch (MalformedURLException e) {
      e.printStackTrace();
    }
     
    // 2
    mPush = database.createPushReplication(syncGatewayURL);
    mPush.setContinuous(true);
    mPush.start();
     
    // 3
    mPull = database.createPullReplication(syncGatewayURL);
    mPull.setContinuous(true);
    mPull.start();

    This code segment does the following:

    1. Instantiates a URL pointing to http://localhost:4984/quizzdroid, which is your local Sync Gateway instance.
    2. Starts a push replication in continuous mode, which is the operation that will send data from the local database to the server.
    3. Starts a pull replication in continuous mode, which is the operation that will retrieve data from the server and save it to the local database.

    Before you can build and run, you’ll need to use an ADB command to ensure that QuizzDroid, running on a plugged-in device or emulator, can reach the server over localhost.

    With the emulator running, run the following from the command line:

    $ adb reverse tcp:4984 tcp:4984
    Note: This command only works on devices running Android 5.0+ (API 21). Instead of setting up the reverse proxy, you can replace localhost in the previous code block with 10.0.2.2 for Android stock emulators, 10.0.3.2 for Genymotion emulators or, if you’re deploying to a device, the local IP address of your development machine.

    Build and run your app; you should see a new document appear on the Sync Gateway admin UI (http://localhost:4985/_admin/db/quizzdroid, note the different port number) every time you answer a question.

    Sync Gateway UI

    Note: Using Android Studio’s Instant Run sometimes doesn’t set up the sync correctly; if you don’t see the documents in the Sync Gateway admin, try quitting the app and then build and run again.

    So far so good, but what about displaying answers from other users? You’ll do exactly that in the next section.

    Aggregating Data

    Data aggregation is a problem across many applications. Couchbase Lite lets you run those data queries using the full capabilities of map and reduce. To run aggregation queries on the rows emitted by the map function, you can use a reduce function to take several rows and aggregate them together in a single object.

    You’ll write a view to query the number of answers for each possible choice. You’ll define a map function which returns the number of answers for each question, group them by their value and count the number of rows in each group.

    The requirements for this query are:

    • Get all answers that belong to a given question
    • Count the number of answers for each possible choice

    With that in mind, you can emit the question_id and user_answer fields as a compound key with a null value, while using a reduce function to count the number of emitted rows.

    Add the following class method to Answer.java:

    public static Query getAnswersForQuestion(Database database, String questionId) {
      View view = database.getView("app/answers");
      if (view.getMap() == null) {
        view.setMapReduce(new Mapper() {
          @Override
          public void map(Map<String, Object> document, Emitter emitter) {
            if (document.get("type").equals("answer")) {
              List<Object> keys = new ArrayList<>();
              keys.add((String) document.get("question_id"));
              keys.add((String) document.get("user_answer"));
              emitter.emit(keys, null);
            }
          }
        }, new Reducer() {
          @Override
          public Object reduce(List<Object> keys, List<Object> values, boolean rereduce) {
            return values.size();
          }
        }, "1");
      }
      Query query = view.createQuery();
      query.setGroupLevel(2);
      query.setStartKey(Arrays.asList(questionId));
      query.setEndKey(Arrays.asList(questionId, new HashMap<String, Object>()));
      return query;
    }

    Grouping is a powerful feature of Couchbase. It’s available on a Query using the numeric groupLevel property, which defaults to 0. It takes the entire range of rows from the query and coalesces together adjacent rows with the same key.

    Notice that groupingLevel = 2 coalesces the rows by key. Keys that are arrays are called compound keys; a group level of 2 means the query will coalesce rows with the same question_id and user_answer.

    You can read more about setStartKey() and setEndKey() in the Couchbase documentation for configuring queries.

    Run the Query

    Time to run the query and use the results. Add the following method to QuestionActivity.java:

    private Map<String,Integer> getAnswerCounts(QueryEnumerator answers) {
     
      Map<String,Integer> answerCounts = new HashMap<String, Integer>();
     
      for (String option: mQuestion.getOptions()) {
        answerCounts.put(option, 0);
      }
     
      for (QueryRow row : answers) {
        LazyJsonArray<Object> key = (LazyJsonArray<Object>) row.getKey();
        String answer = (String) key.get(1);
        answerCounts.put(answer, (Integer)row.getValue());
      }
     
      return answerCounts;
    }

    The above method takes a QueryEnumerator returned from getAnswersForQuestion() and returns a Map that stores an answer count for each option. The map object makes it quick and easy to access answer counts for each option.

    Add the following code to onCreate(), just before the line mQuestionOptions = (GridView) findViewById(R.id.question_options):

    Query answers = Answer.getAnswersForQuestion(manager.database, mQuestion.get_id());
    QueryEnumerator answersQuery = null;
    try {
      answersQuery = answers.run();
    } catch (CouchbaseLiteException e) {
      e.printStackTrace();
    }

    This code stores a QueryEnumerator to be used when calling getAnswerCounts() below.

    Next, find the call to mQuestionOptions.setAdapter(new QuestionOptionsAdapter(mQuestion.getOptions(), null)); and replace it with this line:

    mQuestionOptions.setAdapter(new QuestionOptionsAdapter(mQuestion.getOptions(),
        getAnswerCounts(answersQuery)));

    This passes the Map returned from getAnswerCounts() into the GridView adapter, allowing it to display answer counts.

    Add a LiveQuery

    Next, you’ll add the method to set up a LiveQuery to keep the answer counts updated. A LiveQuery is a great way to keep your interface updated with database changes. It automatically refreshes any time Database changes affect your query.

    In QuestionActivity.java, add the following method:

    private void showAnswers() {
      DataManager manager = DataManager.getSharedInstance(getApplicationContext());
      Query answersQuery = Answer.getAnswersForQuestion(manager.database, mQuestion.get_id());
      LiveQuery liveQuery = answersQuery.toLiveQuery();
     
      liveQuery.addChangeListener(new LiveQuery.ChangeListener() {
        @Override
        public void changed(LiveQuery.ChangeEvent event) {
          QueryEnumerator result = event.getRows();
     
          Map<String,Integer> counts = getAnswerCounts(result);
     
          final QuestionOptionsAdapter adapter =
              (QuestionOptionsAdapter)mQuestionOptions.getAdapter();
     
          adapter.setAnswerCounts(counts);
     
          runOnUiThread(new Runnable() {
            @Override
            public void run() {
              adapter.notifyDataSetChanged();
            }
          });
        }
      });
      liveQuery.start();
    }

    This code starts by creating a LiveQuery from Answer.getAnswersForQuestion.

    You then add a ChangeListener to the liveQuery object. The liveQuery object calls the changed method when required, and passes to it a ChangeEvent object.

    Next, you use the previously created getAnswerCounts to return the map of answer counts, which is passed to the GridView adapter to refresh the counts in the UI.

    Activity.runOnUiThread updates the GridView on the UI thread.

    Add the following line to the end of onCreate in QuestionActivity.java.

    showAnswers();

    Build and run your app; open a question and answer it (note that you can answer it more than once).

    image10

    Great job! You can now see your own answers, but what about those from other users?

    By running two instances of the app at the same time, both accessing the same Sync Gateway, you will have real-time visibility into other user’s answers!

    Simulating Multiple Users

    In order to simulate other users answering the questions, you can run the app on a second emulator.

    From Android Studio, you can deploy the app on multiple devices simultaneously using the Run button and Shift key :

    deploy-multiple-devices

    Note: The above won’t work in Debug mode, so if you’re having difficulty, be sure to use the Run command in Android Studio, not Debug.

    If your using the reverse proxy method, you will need to make sure it is enabled for both devices. List the running emulators with the following:

    $ adb devices
     
    List of devices attached
    emulator-5556	device
    emulator-5554	device

    With more than one emulator device, you must specify the device in ADB commands. Enable the reverse proxy for access to Sync Gateway on both devices:

    $ adb -s emulator-5554 reverse tcp:4984 tcp:4984
    $ adb -s emulator-5556 reverse tcp:4984 tcp:4984

    Now you can start answering questions on both devices. Notice the answers are updated automatically across emulators due to the live query.

    image11

    Well done! You’ve built a shareable quiz application that works equally well when it’s offline.

    Where to Go From Here?

    You can get the full source code for this project as a downloadable zip or as a repo on GitHub.

    The Couchbase Lite Guides have detailed explanation for every concept covered in this Couchbase tutorial. Also check out PhotoDrop, a peer-to-peer photo sharing application and ToDoLite Android, a multi-user todo list application, both built on Couchbase.

    If you found this tutorial interesting, you might want to try adding peer-to-peer sync capabilities. Start by replacing the remote URL pointing to a Sync Gateway instance with one from another device on the same local network. The challenge in this case is discovering the IP addresses of peer devices. One solution that works well is to use NsdManager, the Android implementation of mDNS.

    Feel free to share your feedback, findings and ask any questions in the comments below or in the forums!

    The post Couchbase Tutorial for Android: Getting Started appeared first on Ray Wenderlich.

    Viewing all 4373 articles
    Browse latest View live


    <script src="https://jsc.adskeeper.com/r/s/rssing.com.1596347.js" async> </script>