Quantcast
Channel: Kodeco | High quality programming tutorials: iOS, Android, Swift, Kotlin, Unity, and more
Viewing all 4373 articles
Browse latest View live

Creator of Trainyard, Unity Expert & Indie Dev: A Top Dev Interview With Matt Rix

$
0
0
Matt Rix

Matt Rix – creator of Trainyard

Welcome to another installment of our Top App Dev Interview series. Each interview in this series focuses on a successful mobile app or developer and the path they took to get where they are today. Today’s special guest is Matt Rix.

Matt is a Unity guru, successful indie developer and game jam aficionado. Matt is best known for being the creator of Trainyard, a global #1 app store game in 2009.

When he’s not busy creating exciting games and working as an indie developer, Matt spends plenty of time with his family.

The Beginning of the Story

What are the top 3 things that you attribute to your success with Trainyard?

Having a good game. Making a good product is no guarantee of success, just like making a bad product is no guarantee of failure (see: the old fart app craze), but the quality of Trainyard definitely swung the odds in my favor.

The release of Trainyard Express (the “lite” version of the game). Having a free app was crucial to the game becoming well known. It drastically increased the “word of mouth” marketing potential.

The popularity of the game in Italy. For some reason, Trainyard caught on in Italy before anywhere else in the world. This led to Apple learning about the game and deciding to feature it on the U.S. App Store.

In your blog post “The Story So Far”, you mentioned that several times during the development of Trainyard, there were various interruptions that de-railed (pun intended) development – yet you always came back and got the game done.

What advice would you give to developers struggling to wrap up their projects and get them out the door?

There are really two ways to get things done. Either:

  • Small amounts on a regular basis, or
  • Giant amounts on an irregular basis.

In theory, if you work for only an hour per day, you will eventually finish your project, but that doesn’t seem to work for most people. Sometimes what is needed, especially to finish something off, is to allocate an entire weekend and just push through the tough stuff.

One common reason developers get derailed is they get bored of working on the same project, and get excited about something new and shiny. How do you deal with this?

This is something I struggle with constantly, especially after working on the same game for over two years now. Coming up with new ideas and prototyping them is my favorite part of game development, so I feel a strong need to do it. The key is to know what is your “main project” and what are your “side projects”, and allocate time to them accordingly.

Most “shiny new ideas” can be prototyped in a weekend, but then they should (usually) be put aside after that. On the other hand, if you find yourself constantly thinking about a certain side project, maybe it really should become your main project! It comes down to knowing why you’re making your work in the first place. Are you looking to make:

  • The most financially successful thing?
  • The most thought-provoking thing?
  • The most innovative thing?

It’s really easy for us developers to switch to a new project solely because the technical challenges are more interesting, but I think very few of us have the primary goal of “make something technically impressive”.

You have to be very introspective about why you are really making this thing. Is it because it’s an exciting technical challenge now, or is it because the final product is going to be great?

If you could jump back to 2010 when you were building Trainyard, what would you do differently and why?

These days, I wish the game had been built in Unity, so it would be easier to update. With that said, I think that Cocos 2D and Objective-C were the right technologies to use at the time.

If I chose to build in Unity it would have been much easier to port the game to other platforms. The Android port was done by Noodlecake (who did a great job!), but it would have been nice to do that port myself.

I also wish I’d been able to make a Steam version, but it would have required a complete rewrite. If I’d made the game in Unity, it would have been a piece of cake.

Updates to Trainyard would have been much easier too, I’ve actually considered rewriting it in Unity for that very reason, but I think I will save that for the (eventual) sequel.

screen320x480screen320x480 (1)screen320x480 (2)

The Indie Story

Are you still a full-time indie? What’s your typical day look like?

Yes! On weekdays I get my kids up, make their breakfasts and get them ready for school. Then I work for 6-8 hours before picking the kids up again. Most of my work day is spent in Unity and communicating with Owen (my business partner) via Skype chat.

How do you plan your day ahead? For example, do you keep a TODO list, or use any tools to help with task management or planning?

So at a company level, for our high level planning, we use Gantt charts on tomsplanner, and for regular TODOs, we use Trello.

For me personally, I have a very specific way I track my tasks and manage my time. I don’t like using digital tracking tools because I’ve found I always forget to use them. Instead, I use only Action Runner notepads. Any notepad could work, I just love the look, size, and feel of these ones!

At the end of each workday, I write down the next day’s date and tasks on a new page. This is really important because it means that I can carry my train of thought from the end of one day into the beginning of the next. Otherwise I might forget something by the next morning! The size of the Action Runner limits me to a max of 8 tasks per day, which is ideal (at least for me).

To track my time, I set consecutive 1 hour long timers with my phone. Every time it goes off, I mark an X at the top of the page. This makes it really easy to go back through the notepad and see exactly what I was working on and how many hours I worked.

It’s a simple system, which is why I’ve been able to stick to it for so long now.

What is your take on the “indiepocalypse” discussion? Do you think it’s still possible to make it as an indie, and why or why not?

Disco Zoo, the app created by Matt Rix

Disco Zoo, created by Matt Rix and Owen Goss

There is some truth to the indiepocalypse, especially on mobile. Apple features don’t have the impact they used to, and even high chart positions don’t come with as big download numbers as they used to. The key to making it is to design your business around not requiring “hit” games. There is a great talk on that topic here.

I haven’t felt the effects yet, but only because I haven’t released a game in a while! I think we’ll have a hard time getting FutureGrind noticed by press and players, but we’re hoping that the quality of the game will shine through.

With that said, we’ve actually been quite fortunate, because Disco Zoo continues to do quite well on the App Store, despite being released over two years ago.

What mistakes do you often see indie developers making?

I think developers (myself included!) spend way too much time on our games. This is for two reasons.

  1. We are just bad at estimating how long games will take to develop.
  2. We simply don’t weigh the development time of the game highly enough when we’re choosing what game we want to make in the first place.

From what I can tell, there is very little correlation between development time and game success, so in general, we should be making games that are faster to develop. This doesn’t mean low-quality games. They should be high-quality games with limited size and scope.

One of the most important things game and app developers can do is promote their product well before it’s actually released. I still see way too many developers who don’t do ANY marketing or promotion until a week before their product hits the store. That’s way too late!

The Unity Story

What made you start working with Unity, and what are your favorite features?

Unity is great! Here are what I consider the top three advantages of Unity:

  1. The biggest advantage is that it uses C#, which is a great language to program in.
  2. The second advantage is the way it’s built around the component-based architecture, which makes game dev a lot more fun and flexible.
  3. The third advantage is the easy “one-click” publishing to many different platforms.

These days I love hooking everything up using public fields in the editor instead of in code. I don’t call GetComponent anymore, I just make a “public” property and assign it in the editor. I also don’t use prefabs anymore; instead, I put my prefabs within a disabled game object and instantiate them from there.

One specific feature I use a lot when making mobile stuff is Unity Remote, where you can view & play your game instantly on your device. The visual quality isn’t great, but it’s good enough to get a feel for whether UI elements are the correct size, and whether the multi-touch code is working properly.

In the past, you developed your own code-centric 2D framework for Unity called Futile. Can you tell us a bit about that and what happened with it?

Futile was my bridge between my previous worlds of Flash/Cocos2D and Unity. It allowed me to create games in the same code-centric manner I was used to. I was basically using Unity as a publishing/rendering layer and not much else.

Futile still exists and works great, though I don’t use it for most of my projects anymore. I’ve become used to making games the “Unity Way” now, which makes it easier to take advantage of the great 3rd party plugins for Unity out there (such as TextMesh Pro).

You seem to be quite proficient with making editor tools in Unity, judging by the track system you have in place in Future Grind.

How much time have you spent making editor tools for your games, and what advice would you have for developers considering making editing tools for their games?

I’ve probably spent too much time making editor tools! I love it so I can’t help doing it.

It’s easy to spend too much time making tools. The tools often increase the complexity and development time of the game rather than reducing it like they’re supposed to!

The main advice I can give is to build the game first, and then build the tools. For example, don’t build a level editor before you’ve built a few levels manually! You may find that the game design doesn’t work, or that building the levels manually was easy enough.

What’s your process when designing a game? Do you use pen and paper or do you dive straight in and create a playable prototype? And how does this fit in when working with Owen Goss on upcoming games?

A little bit of both. I often write down a few initial ideas on paper, but if I like the idea at all, I usually start making a playable prototype well before the entire idea has been figured out. There are very few games where it’s possible to fully plan them out on paper.

We’re lucky because we both have similar taste when it comes to game design, so we agree on gameplay ideas 99% of the time. It doesn’t matter who comes up with the idea, if it’s a good one, we’ll use it. Owen is a programmer by trade, but on our recent games, he has switched to being the main artist (and doing a great job at it!). I end up doing most of the programming and the UI design.

Original design concept for Trainyard

Original design concept for Trainyard

How did the partnership come about? Do you have any advice for finding the perfect working partnership you have with Owen?

Matt's partner Owen Goss

Matt’s business partner Owen Goss

I’ll give the same advice I give for everything else: start small! The game jam I did with Owen was the perfect way for us to get a chance to work together without a lot of commitment. There wouldn’t have been any bad blood if things didn’t work out.

There’s nothing wrong with a few disagreements, in fact I think it’s good to have them! The key is about the level that the disagreements happen on. If you have core philosophical differences with your partner, I really don’t see how that can work out long term.

For example: if your goal is to make art, and your partner’s goal is to make a massive hit, I think you’re constantly going to be butting heads.

I really think the key to any relationship is trust. You need to trust the person that you’re dealing with. You need to know what their motivations are, what their goals are, etc. Not just what they *say* they are, but what their actions show you.

What advice would you give someone that has never made games before and want to make their first one using Unity?

Just do it! Make something super small and simple, and then work on expanding it one tweak at a time.

Tweaking things is the best way to learn how to use any new technology. Start with something that works, and then make tiny changes to it. That way it’s easy to roll back if something goes wrong, and meanwhile, you are tackling only one thing at a time, so you won’t get overwhelmed.

Here is a list of actions I do for releasing a brand new game:

  1. Create prototype
  2. Make sure game is actually good (send prototype to friends etc)
  3. Come up with a good name and brand/style for the game (names are important)
  4. Start a blog (or vlog! I don’t think this is actually that important, but it’s a good outlet as a developer)
  5. Create a PR page
  6. Tweet about your game. If your gifs aren’t getting lots of retweets/likes, figure out how to make them more appealing. Twitter likes short & sweet gifs with gimmicks, like this:

  1. Demo game at a conf (this depends on the type of game. I don’t think it’s actually important for PR, but it’s a really good way for you to get feedback and see how people react to your game)
  2. Beta test the game with friends
  3. Beta test the game with a larger audience (depending on the type of game, you could do “early access” at this point)
  4. Finish making the game. Do not launch the game the moment you finish it. Schedule the launch a few weeks later!
  5. Spend a couple weeks contacting press, making a trailer, building buzz in whatever way you can!
  6. Launch the game
  7. Support the game. How long this takes depends on the type of game AND how big your audience is. If your game is a flop, try to make some key fixes to solve the major issues, but spend your next year supporting it (unless that’s really what you want to do).
  8. Start working on something new!

Where To Go From Here?

And that concludes our Top App Dev Interview with Matt Rix. Huge thanks to Matt for sharing his past with Trainyard, his love for Unity and finally being a successful indie games developer.

We hope you enjoyed this inspiring interview and if you’re thinking of building your very own game will consider using Matt’s experience and advice to heart.

If you are an app developer with a hit app or game in the top 100 in the App store, we’d love to hear from you. Please drop us a line anytime. If you have a request for any particular developer you’d like to hear from, please post your suggestion below!

The post Creator of Trainyard, Unity Expert & Indie Dev: A Top Dev Interview With Matt Rix appeared first on Ray Wenderlich.


Swift Algorithm Club: January Digest

$
0
0

SwiftAlgClub-Sept-Digest-feature

The Swift Algorithm Club is an open source project to implement popular algorithms and data structures in Swift.

We thought it would be useful to periodically give a status update with how things are going with the project.

Here’s our first update for 2017!

New Co-Maintainer

Our previous co-maintainer, Chris Pilcher, is leaving us due to new responsibilities in his life. Chris has been responsible for adding Swift lint, our CI integration, blog posts, and countless reviews and merge requests since he’s been on board. Thanks Chris, and I’m sure we’ll see him around in the repo, as he’s a contributor as well.

Last week, we had a call for applications for a new co-maintainer, and the response has been tremendous. So far we’ve got 22 really passionate applicants, ranging from talented students to seasoned veterans. In the next few days, we plan on welcoming our new co-maintainer.

Contributions

In addition to a few dozen great fixes and minor updates from our community, we also have a couple of new contributions as well.

Dining Philosophers Problem

In computer science, the dining philosophers problem is an example problem often used in concurrent algorithm design to illustrate synchronization issues and techniques for resolving them. It was originally formulated in 1965 by Edsger Dijkstra as a student exam exercise, presented in terms of computers competing for access to tape drive peripherals. Soon after, Tony Hoare gave the problem its present formulation. This Swift implementation is based on the Chandy/Misra solution and it use GCD Dispatch and Semaphone on Swift cross platform” target=”_blank”>dining philosophers problem is an example problem often used in concurrent algorithm design to illustrate synchronization issues and techniques for resolving them.

It was originally formulated in 1965 by Edsger Dijkstra as a student exam exercise, presented in terms of computers competing for access to tape drive peripherals. Soon after, Tony Hoare gave the problem its present formulation.

This Swift implementation is based on the Chandy/Misra solution and it use GCD Dispatch and Semaphone on Swift cross platform

Knuth-Morris-Pratt String Search

The Knuth-Morris-Pratt algorithm is considered one of the best algorithms for solving the pattern matching problem. Although in practice Boyer-Moore is usually preferred, the algorithm that we will introduce is simpler, and has the same (linear) running time.

Swift 3 Migration

Our Swift 3 migration is coming to a close. So far, 66 of the 71 algorithms have been converted to Swift 3. Migration has generally been quite straightforward – it’s just the process of:

Want to help out? It’s a great way to learn about algorithms and Swift 3 at the same time. If so, check out our Github issue and sign up!

Where To Go From Here?

The Swift Algorithm Club is always looking for new members. Whether you’re here to learn or here to contribute, we’re happy to have you around.

To learn more about the Swift Algorithm Club, check out our introductory article. We hope to see you at the club! :]

The post Swift Algorithm Club: January Digest appeared first on Ray Wenderlich.

In-App Purchases: Non-Renewing Subscriptions Tutorial

$
0
0

>Offer access to time-limited content to users and monetize your app using In-App Purchases in this Non-Renewing Subscriptions Tutorial

Offer access to time-limited content to users and monetize your app using In-App Purchases in this Non-Renewing Subscriptions Tutorial


iOS has four major types of In-App Purchases (IAP):
  1. Consumables: User purchases the same product multiple times. Often they’re “used up” and bought again. Examples are currency in a free-to-play game, or healing potions, extra lives, etc.
  2. Non-consumables: User buys once (and only once), then has access to the item forever. Examples are an extra level pack or some downloadable content.
  3. Auto-renewable Subscriptions: Dynamic content or ongoing service accessible for a set period – making the user purchase a subscription to continue access. Examples are subscribing to an electronic magazine, subscribing to unlock an extra feature in an app for a month, etc. These subscriptions are automatically renewed by Apple indefinitely until the user decides to cancel.
  4. Non-renewing Subscriptions: Time-limited access to a service or content that may be static. User needs to manually renew subscription after it’s expired.

There are two types of subscriptions: auto-renewable and non-renewing. This tutorial focuses on non-renewing subscriptions.

Note: In recent years, auto-renewing subscriptions have gone through major changes. Initially they were limited mostly to Newsstand apps, later expanded to include a few more categories with very strict rules and now with the introduction of iOS 10 a broader range of apps can take advantage of this type. Its important to point out the advantages of auto-renewing over non-renewing subscriptions to assist in your decision of which to use. The pros and cons are discussed in a bit.

In this tutorial, you’ll add non-renewing subscriptions to an app called “InsomniOwl”, an app that allows you to browse owl comics. You’ll also be using Parse Server with Heroku as a back-end provider for the app to keep track of users and their purchased subscriptions.

Before beginning, you should be sure to complete, or have experience equivalent to:

If you’re ready to level-up your IAP mastery, read on!

When to Use Non-Renewing Subscriptions

It may seem obvious, but here’s a bit more about the type of subscriptions in iOS.

Auto-renewable subscriptions

When a user signs up for an auto-renewable subscription, they’re continually charged until they manually cancel it. This is obviously great from a developer’s point of view, because it takes a lot more effort to cancel something than to just let it continue. This means that Apple allows you to set a subscription duration and manage renewals automatically through the StoreKit framework.

Apple also has revenue incentives for developers using auto-renewing. If a subscriber continues an auto-renewing subscription past the first year, then Apple will increase the developers part of the cash from 70% to 85%.

As of iOS 10, auto-renewing subscriptions are no longer restricted to Newsstand type apps, but is now allowed for all app categories.

Non-renewing subscriptions

When a user signs up for a non-renewing subscription, they subscribe for a set period of time (1 month, 3 months, etc). When the time runs out, their access to the content ends. To continue to access the content, they have to re-subscribe.

This is not ideal from a developer’s point of view as it forces customers to have to continually make the decision to subscribe. It also means your code must keep track of the expiration date, which can get a bit tricky with users having multiple devices.

So far it seems that non-renewing subscriptions cause more work without offering any advantages. In many cases this may be true, but there are situations where it still makes sense. For example, if the subscription gives users access to a static archive which doesn’t provide a benefit for long term access. Other examples may be apps providing seasonal information, like garden planting tips or winter elk hunting expedition info. These are cases where maintaining the subscription is only applicable to the user for a period of a month or so.

Implementing Non-Renewing Subscriptions: Overview

All right, so you’ve decided you want to begin building your non-renewing subscription empire. What does this mean when it comes to the nitty-gritty of development?

Unlike auto-renewable subscriptions, where the StoreKit framework handles subscription durations and renewals, non-renewing subscriptions require you to do all the heavy lifting.

Non-Renewing Subscriptions Tutorial

Here are some things to consider when implementing non-renewing subscriptions:

  • The subscription duration is not managed for you by StoreKit, so you’ll need a way of calculating the duration at the point of purchase.
  • As with consumable products, your users should be able to purchase items multiple times. Thus, you’ll need a way of determining if there’s time remaining on an existing subscription, and including that time in any new duration, should a user choose to renew.
  • You’re also required to make the subscription available to any device owned by the user. There are generally two feasible options you can use to accommodate this requirement:

    iCloud. Since the user’s iCloud account is exclusive to them, but shared across their devices, this is a simple and effective option. However, if your app is cross-platform, or has a companion web app, this won’t be the best choice since iCloud restricts usage to iOS devices.

    Backend as a service, or BaaS. By requiring a user to create an account in order to subscribe, you can store any necessary data, such as the subscription expiry date, against their account on the server. This method will allow you to share a subscription across all platforms simply, by requiring a user to log in.

In this tutorial, you’ll be using Migrating to Parse Server with Heroku as the backend to store this information, as it is very popular and easy to use. Time to get started!

Getting Started

When you’re ready to begin, download the starter project here.
The starter project already has the basics for IAP, such as StoreKit handling, some product ids, and others. It also contains the code required for logging into the Parse Server, but everything directly related to non-renewing subscriptions and setting up the server has yet to be implemented.

Take a peak at the To Do List below to get an idea of the steps you will be taking.

To Do List

  1. Get a copy of Parse Server
  2. Connect a new Heroku app to the Parse Server
  3. Setup the app to use MongoLab for the server database
  4. Connect the InsomniOwl app to Heroku
  5. Add new products to iTunes Connect
  6. Setup a Sandbox Tester
  7. Add new products to InsomniOwl app
  8. Expiration date handling
  9. Display the content
  10. Final touches

Now that you know where you are going, time to get to it!

Parse Server & Heroku

First, you’ll need to set up an app in Heroku for this tutorial. To do this, do the following:

  1. Head over to the Parse Server GitHub.
  2. Click the Fork button at the top right and select one of your existing repositories. This will create a copy of the Parse Server example that you can integrate with Heroku.
  3. Non-Renewing Subscriptions

  4. Scroll down the forked repository and click the Deploy to Heroku button. This will open the Heroku website and begin the Parse Server integration.
  5. Non-Renewing Subscriptions

  6. Create a new Heroku account or login to an existing one.
  7. A new Parse Server Example app will appear. Enter an app name.
  8. Non-Renewing Subscriptions

  9. The MongoLab Add-On is free, but you may need to enter credit card information to use it. Finish filling out the remaining fields. Leave the PARSE_MOUNT value at the default /parse location. Replace the yourappname section in the SERVER_URL field with, you guessed it, your app name. But be sure to keep the .herokuapp.com/parse part.
  10. Note: Enter random characters in the APP_ID and MASTER_KEY fields. Keep these secret as it prevents others from accessing your app backend. You’ll use them shortly in the iOS app.

  11. Click Deploy and wait until the deployment process completes. The automatic process is copying over the Parse SDK server to Heroku and setting up the variables needed for access.
  12. Non-Renewing Subscriptions

  13. Once deployment is successful, click on Manage App. Then click Settings to view the application variables.
  14. Non-Renewing Subscriptions

  15. Now click the Reveal Config Vars button to display the configuration variables created during deployment. There are 3 variables to copy to the Xcode project: APP_ID, MASTER_KEY, and SERVER_URL. Take note of them!
  16. Non-Renewing Subscriptions

Now that you’ve finished the Heroku and the Parse Server setup, open the Xcode starter project. Open AppDelegate.swift and in application(_:didFinishLaunchingWithOptions:) replace the applicationId, clientKey and server property values with your Heroku’s configuration values.

let configuration = ParseClientConfiguration {
  $0.applicationId = "com.razeware.InsomniOwl.somethingRandomHere"
  $0.clientKey = "myMasterKeyKeepItSecret"
  $0.server = "https://insomniowl.herokuapp.com/parse"
}

Note: You must prefix the server property with https, NOT http. Otherwise, the app will not access the Parse Server and the Console will display an error: The resource could not be loaded because the App Transport Security policy requires the use of a secure connection.

Build and run. When the app launches for the first time, you need to create a new account before the displaying the products list.

Non-Renewing Subscriptions

Enter a username and password to create a new account and select Sign Up. When you’re done, you should see something like this:

Non-Renewing Subscriptions

Who stole the goods!

Wait a second, where are the cool Owl images? Well…they’re not in your iTunes Connect account yet. Head over there now!

iTunes Connect

Add In-App Purchase Items

You must register In-App purchased products into iTunes Connect before they will appear in an app. Do the following:

  1. Log onto iTunes Connect
  2. Click My Apps
  3. Add a new iOS app for this project.
  4. Select the new app and click on Features.
  5. Click In-App Purchases and then the + button.

Non-Renewing Subscriptions

To provide the app some purchasing variety, add the following Consumable, Non-Consumable and Non-Renewing Subscriptions. For the tutorial, only enter the name, product ID, and a price. The product ID should be your reverse website, app name and product name. For example: com.yoursite.yourappname.3monthsOfRandom. The last part (ex. 3monthsOfRandom) for each item must match perfectly as listed below in order for the tutorial app to grab the correct Owl image.
Also, be sure to check the Cleared for Sale box or the item won’t display in the app.
Enter the following items and use the specified Product ID suffix:

  • Non-Renewing Subscription: 3monthsOfRandom
  • Non-Renewing Subscription: 6monthsOfRandom
  • Non-Consumable: CarefreeOwl
  • Non-Consumable: CouchOwl
  • Non-Consumable: CryingOwl
  • Non-Consumable: GoodJobOwl
  • Non-Consumable: GoodNightOwl
  • Non-Consumable: InLoveOwl
  • Non-Consumable: LonelyOwl
  • Non-Consumable: NightOwl
  • Non-Consumable: ShyOwl
  • Consumable: RandomOwls

Note: It is important that you specify the duration of any subscription-based IAP, and the most common way to do this is in the display name or description. There’s a good chance Apple will reject the app if it fails to clearly state the duration of any subscription.

When it is all said and done, you should see the following:

Non-Renewing Subscriptions

It’s important to get the Product IDs specified correctly. The Product IDs prefix must match your apps Bundle Identifier. The suffix uniquely describes the product. Ex: com.yourwebsite.yourappname.3monthsOfRandom.

If you are using your own Bundle Identifier in the app, you’ll need to update the Product IDs in the starter project. Open OwlProducts.swift and update productIDsNonConsumables to match the Product IDs you setup in iTunes Connect.

static let productIDsNonConsumables: Set<ProductIdentifier> = [
  "com.back40.InsomniOwl.CarefreeOwl",
  "com.back40.InsomniOwl.GoodJobOwl",
  "com.back40.InsomniOwl.CouchOwl",
  "com.back40.InsomniOwl.NightOwl",
  "com.back40.InsomniOwl.LonelyOwl",
  "com.back40.InsomniOwl.ShyOwl",
  "com.back40.InsomniOwl.CryingOwl",
  "com.back40.InsomniOwl.GoodNightOwl",
  "com.back40.InsomniOwl.InLoveOwl"
]

Sandbox Surprises

Ok, you have the goods, but something is still missing. A sandbox user!
Testing In-App Purchases requires at least one sandbox user. This lets you make purchases in the app without actually paying the cash. Add one now:

  1. In iTunes Connect, click Users and Roles
  2. Click Sandbox Testers
  3. Add a tester with an email address that is not used as an Apple ID.

You must always test In-App purchases on an actual device. Sorry Mr. Simulator, you’re out of job.
Open Settings on your iOS device and logout of iTunes & App Store. Do NOT login as your sandbox user email. Doing so will make it an Apple ID and the email will no longer be valid for sandbox testing.

Now you have the goods to sell and a sandbox tester, run the app again. You should now see the list of items you entered. But why are only the non-consumables showing? Good question. It is because the starter app doesn’t support the other types yet. You’ll be fixing that shortly.

Non-Renewing Subscriptions

Non-Consumables

You have to check out at least one of the owl images. So go ahead and make a purchase. Its on me!
When it prompts you to sign into iTunes Store, be sure to use a sandbox user.

Non-Renewing Subscriptions

Good Job Mate!

Non-consumable items show up in the app and are ready for sale. Now you’re ready to begin implementing non-renewing subscriptions!

Adding Your Subscriptions to the Product List

Previously in the tutorial, you added subscriptions and a consumable to iTunes Connect. They provide the user with a choice of two subscription durations, three months or six months. A subscription needs to benefit the user in some way and that’s where the Random Owl product comes in. A subscribed user has the unlimited awesomeness to view random owl images throughout eternity!

Add the new product identifiers to the starter project now.
Open OwlProducts.swift and add the following code below the PurchaseNotification property:

static let randomProductID = "com.back40.InsomniOwl.RandomOwls"
static let productIDsConsumables: Set<ProductIdentifier> = [randomProductID]
static let productIDsNonRenewing: Set<ProductIdentifier> = ["com.back40.InsomniOwl.3monthsOfRandom", "com.back40.InsomniOwl.6monthsOfRandom"]
 
static let randomImages = [
    UIImage(named: "CarefreeOwl"),
    UIImage(named: "GoodJobOwl"),
    UIImage(named: "CouchOwl"),
    UIImage(named: "NightOwl"),
    UIImage(named: "LonelyOwl"),
    UIImage(named: "ShyOwl"),
    UIImage(named: "CryingOwl"),
    UIImage(named: "GoodNightOwl"),
    UIImage(named: "InLoveOwl")
  ]

The code above lists out each product id and groups them nicely based on the type of purchase. The array of UIImages lists out the random images the user can cycle through.

Note: Again, be sure to enter the product ids based on your website and app name to match the iTunes Connect entries but don’t change product name itself. Ex: com.yourwebsite.yourappname.3monthsOfRandom.

The IAPHelper needs to know about the new productIDs. Update the store initialization:

public static let store = IAPHelper(productIds: OwlProducts.productIDsConsumables
  .union(OwlProducts.productIDsNonConsumables)
  .union(OwlProducts.productIDsNonRenewing))

This combines all the purchasing types into one Set and passes it to the IAPHelper initializer.

Expiration Handling

The user’s local device needs to know the status of its subscription expiration. The starter project already has some variables setup for you to do this. Open UserSettings.swift and take a peek.

  • expirationDate: last known subscription date
  • randomRemaining: number of remaining random images user can view
  • lastRandomIndex: last random image index
  • increaseRandomExpirationDate: increments expiration date by months
  • increaseRandomRemaining: increases the number of random images user can view

Notice that UserDefaults is the local persistence for the variables. Something not obvious is later in the project you’ll also save each product id to UserDefaults with a Bool value indicating the purchased state.

As mentioned earlier, you need code to generate and handle the expiration date of a subscription purchase. This date needs to be saved locally and on the Parse Server so it is available to all the user’s devices. Open OwlProducts.swift and add the following to the bottom of the OwlProduct struct:

public static func setRandomProduct(with paidUp: Bool) {
  if paidUp {
    UserDefaults.standard.set(true, forKey: OwlProducts.randomProductID)
    store.purchasedProducts.insert(OwlProducts.randomProductID)
  } else {
    UserDefaults.standard.set(false, forKey: OwlProducts.randomProductID)
    store.purchasedProducts.remove(OwlProducts.randomProductID)
  }
}

This is the first of several helper functions you’ll need for subscription handling. The above code updates the local UserDefaults with a Bool depending on if the user paid up. It also updates the IAHelper.purchasedProducts array which keeps track of the paid status of all the product ids.

Next, add the following below setRandomProduct(with:):

public static func daysRemainingOnSubscription() -> Int {
  if let expiryDate = UserSettings.shared.expirationDate {
    return Calendar.current.dateComponents([.day], from: Date(), to: expiryDate).day!
  }
  return 0
}

This code returns the number of days remaining on the subscription. If the subscription has expired, it will return 0 or negative.

Next, add the following below daysRemainingOnSubscription():

public static func getExpiryDateString() -> String {
  let remaining = daysRemainingOnSubscription()
  if remaining > 0, let expiryDate = UserSettings.shared.expirationDate {
    let dateFormatter = DateFormatter()
    dateFormatter.dateFormat = "dd/MM/yyyy"
    return "Subscribed! \nExpires: \(dateFormatter.string(from: expiryDate)) (\(remaining) Days)"
  }
  return "Not Subscribed"
}

This function formats and returns the expiration date or Not Subscribed when expired.

Since there are two ways a user can purchase random owl images (by subscription or in batches of 5), you’ll need a convenient way to determine if a random owl product is viewable. Add the following code below getExpiryDateString():

public static func paidUp() -> Bool {
  var paidUp = false
  if OwlProducts.daysRemainingOnSubscription() > 0 {
    paidUp = true
  } else if UserSettings.shared.randomRemaining > 0 {
    paidUp = true
  }
  setRandomProduct(with: paidUp)
  return paidUp
}

This code checks to see if any days remain on the subscription. If not, it checks to see if the user purchased unused owl images. Once finished, it calls setRandomProduct(with:) and returns the paid up status.

Non-Renewing Subscriptions

Hang in there, Ole Bird!

Parse Server Sync

As mentioned before, the local and remote server subscription date need to be synchronized. This requires a trip to the Parse Server. Add the following code below paidUp() to handle this.

public static func syncExpiration(local: Date?, completion: @escaping (_ object: PFObject?) -> ()) {
  // Query Parse for expiration date.
 
  guard let user = PFUser.current(),
    let userID = user.objectId,
    user.isAuthenticated else {
      return
  }
 
  let query = PFQuery(className: "_User")
  query.getObjectInBackground(withId: userID) {
    object, error in
 
    // TODO: Find latest subscription date.
 
    completion(object)
  }
}

The code communicates with the Parse Server, retrieving the data for the currently logged in user. The functions goal is to synchronize the locally stored subscription date with the remote server. The first function parameter is the local date, the second parameter is a completion handler passing back the PFObject returned by Parse.

It’s necessary to compare the local and server date to determine which is more recent. This avoids a potential problem where a user has renewed their subscription on one device and then tries to renew it on a different device, before restoring any existing purchases.
Insert the following code inside the Parse background callback at the TODO: marker.

let parseExpiration = object?[expirationDateKey] as? Date
 
// Get to latest date between Parse and local.
var latestDate: Date?
if parseExpiration == nil {
  latestDate = local
} else if local == nil {
  latestDate = parseExpiration
} else if parseExpiration!.compare(local!) == .orderedDescending {
  latestDate = parseExpiration
} else {
  latestDate = local
}
 
if let latestDate = latestDate {
  // Update local
  UserSettings.shared.expirationDate = latestDate
 
  // See if subscription valid
  if latestDate.compare(Date()) == .orderedDescending {
    setRandomProduct(with: true)
  }
}

The first line grabs the value of the expirationDateKey from Parse. Next, it decides which date represents the latest subscription, local or remote. Next, the code updates the local UserSetting’s synced date. Finally, call setRandomProduct if the subscription is valid.

Now the foundations are in place, you’re able to write the subscription purchasing method. Add the following below syncExpiration(local:completion:):

private static func handleMonthlySubscription(months: Int) {
  // Update local and Parse with new subscription.
 
  syncExpiration(local: UserSettings.shared.expirationDate) {
    object in
 
    // Increase local
    UserSettings.shared.increaseRandomExpirationDate(by: months)
    setRandomProduct(with: true)
 
    // Update Parse with extended purchase
    object?[expirationDateKey] = UserSettings.shared.expirationDate
    object?.saveInBackground()
 
    NotificationCenter.default.post(name: NSNotification.Name(rawValue: PurchaseNotification),
                                    object: nil)
  }
}

For each new subscription purchase, the expiration date increases by the months parameter. Time to talk about what is going on here.

  1. syncExpiration syncs the latest expiration date with UserSettings
  2. increaseRandomExpirationDate increments the local expiration date by X months
  3. setRandomProduct updates the variable & product array pertaining to the random product id
  4. Parse remote server receives the new subscription value
  5. A notification rings throughout the app broadcasting the new purchase

New Product ID Handling

Currently, new purchases coming from IAPHelper pass through OwlProducts.handlePurchase. But the starter project code only supported non-consumables. You’ll give it an overhaul. Replace the existing contents with:

if productIDsConsumables.contains(productID) {
  UserSettings.shared.increaseRandomRemaining(by: 5)
  setRandomProduct(with: true)
 
  NotificationCenter.default.post(name: NSNotification.Name(rawValue: PurchaseNotification),
                                  object: nil)
} else if productIDsNonRenewing.contains(productID), productID.contains("3months") {
  handleMonthlySubscription(months: 3)
} else if productIDsNonRenewing.contains(productID), productID.contains("6months") {
  handleMonthlySubscription(months: 6)
} else if productIDsNonConsumables.contains(productID) {
  UserDefaults.standard.set(true, forKey: productID)
  store.purchasedProducts.insert(productID)
 
  NotificationCenter.default.post(name: NSNotification.Name(rawValue: PurchaseNotification),
                                  object: nil)
}

Based on the purchased product type:

  1. Consumables: Increase random images remaining by 5 and
  2. Non-Renewing 3 months: increase subscription by 3 months
  3. Non-Renewing 6 months: increase subscription by 6 months
  4. Non-Consumables: update the IAPHelper store’s purchasedProducts

In all of the cases, the code posts the PurchaseNotification either directly from this function or indirectly. setRandomProduct is only called for cases dealing with the random owl image product, which includes all types except non-consumables.

Progress Check!

Wow, too much coding. Build and run to see your progress.

Non-Renewing Subscriptions

Cough up the cash!

Good news! The new subscriptions and consumable products are now showing. If you buy a subscription it still doesn’t let you view the random owl images though. You’ll fix that next.

That completes the subscription handling code. Now head over to the GUI side of things and display the new content to the user.

Providing Subscription Content

Up to this point, the new subscription and consumable products appear in the list but don’t display random owls when selected. You’ll fix that.
Open MasterViewController.swift and replace the tableView(_:didSelectRowAt:) code with the following:

let product = products[indexPath.row]
if OwlProducts.productIDsConsumables.contains(product.productIdentifier)
  || OwlProducts.productIDsNonRenewing.contains(product.productIdentifier) {
    performSegue(withIdentifier: randomImageSegueIdentifier, sender: product)
} else {
  performSegue(withIdentifier: showDetailSegueIdentifier, sender: product)
}

Now the user can segue to the RandomViewController when selecting a product related to the random owl.

Next, you’ll update the functionality of the Restore feature. The Restore button allows users to retrieve purchases made on other devices or from a previous install of the app. Currently, the project only restores consumable products. Add the following to the bottom of restoreTapped(_:):

// Restore Non-Renewing Subscriptions Date saved in Parse
OwlProducts.syncExpiration(local: UserSettings.shared.expirationDate) {
  object in
 
  DispatchQueue.main.async {
    self.tableView.reloadData()
  }
}

This code calls syncExpiration to sync the expirationDate with the Parse Server. Once the app has the latest date, the completion handler reloads the product list with up-to-date status of each product.

Note: You’ll notice that restore doesn’t reload consumable products. This is by design. Consumables are not transferable between devices nor retainable when the app is deleted.

Build and run.

Non-Renewing Subscriptions

Randomly….. Empty!

Close, but no cigar. The random content is still missing from RandomViewController. Open RandomViewController.swift and add the following to refresh():

guard OwlProducts.paidUp() else {
  resetGUI()
  return
}
 
// User has paid for something
btnRandom.isHidden = false
 
// Get a random image, not same image as last time
var index = 0
let count = UInt32(OwlProducts.randomImages.count)
 
repeat {
  index = Int(arc4random() % count)
} while index == UserSettings.shared.lastRandomIndex
 
imageView.image = OwlProducts.randomImages[index]
UserSettings.shared.lastRandomIndex = index

Regarding the code above. The first few lines check to see if the user paid for the product. If not, no random images will display. Next, the code assumes all is good and enables btnRandom allowing the user to cycle through to the next random image. Finally, use arc4random to randomize the next image index. You’ll also notice the code prevents the same image from displaying twice in a row.

refresh() needs more functionality. You need something to display the expiration date to the user and to keep track of consumables used up by the user. Add the following to the bottom of refresh().

// Subscription or Times
if OwlProducts.daysRemainingOnSubscription() > 0 {
  lblExpiration.text = OwlProducts.getExpiryDateString()
} else {
  lblExpiration.text = "Owls Remaining: \(UserSettings.shared.randomRemaining)"
 
  // Decrease remaining Times
  UserSettings.shared.randomRemaining = UserSettings.shared.randomRemaining - 1
  if UserSettings.shared.randomRemaining <= 0 {
    OwlProducts.setRandomProduct(with: false)
  }
}

The code validates the user’s expiration date. If paid up, it updates lblExpiration. If no valid subscription exists, it reduces the number of consumables remaining by 1. Each time the app calls refresh() another consumable consumed. Once all purchased images are gone, nothing more will display.

Note: Pressing btnRandom calls refresh(), which also uses up the purchased images.

Build and run to see the progress.
Purchase a subscription and check out some Owls.

Non-Renewing Subscriptions

Random Owls

Hoot! Hoot!

Clean Up

It would be nice if the subscription items in the table indicated if the subscription is already purchased. Plus, the Random Owl item needs to stand out a little to indicate it’s our special random product.
Open ProductCell.swift and replace the line of code toggling the visibility of imgRandom with the following:

imgRandom.isHidden = (product.productIdentifier != OwlProducts.randomProductID)

This will show a special icon next to the Random Owl item in the table.

Next, insert the following code below at the TODO: marker.

else if OwlProducts.productIDsNonRenewing.contains(product.productIdentifier) {
  btnBuy.isHidden = false
  imgCheckmark.isHidden = true
 
  if OwlProducts.daysRemainingOnSubscription() > 0 {
    btnBuy.setTitle("Renew", for: .normal)
    btnBuy.setImage(UIImage(named: "IconRenew"), for: .normal)
  } else {
    btnBuy.setTitle("Buy", for: .normal)
    btnBuy.setImage(UIImage(named: "IconBuy"), for: .normal)
  }
 
  ProductCell.priceFormatter.locale = product.priceLocale
  lblPrice.text = ProductCell.priceFormatter.string(from: product.price)
}

This code sets the Buy button to Renew for valid subscriptions. You’ll still want to let users buy additional months, but it should always be clear to a user what they’ve purchased. Finally, the last couple lines of code display the pricing for the subscription.

Build and run.

Non-Renewing Subscriptions

Hoot! Hoot!

The product list should now behave correctly. If you purchase everything, the Subscribe buttons should all change to Renew and the Buy buttons change to checkmarks:

Where to Go from Here?

Here’s the completed sample project.

Congratulations! You’ve implemented in-app non-renewing subscriptions in your app.

For many simple apps this approach is more than sufficient. But if you want to take things even further check out the other IAP tutorials and videos on the site. Also, checkout the WWDC 2016: Introducing Expanded Subscriptions in iTunes Connect video for all the cool new features.

I hope you enjoyed this tutorial. Please join the forum below for any questions or comments!

The post In-App Purchases: Non-Renewing Subscriptions Tutorial appeared first on Ray Wenderlich.

raywenderlich.com Print Books Available Now!

$
0
0

Print books are available now!

Print books are available now!

We have some great news — the print versions of our new books are now available!

Call us traditional, but there’s something amazing about holding a physical book in your hand that is hard to replicate with an electronic version.

It’s awesome to visually see your place within the book and have “thumb memory” of your favorite chapters — not to mention that feeling of happiness when a new print book arrives at your door! :]

Keep reading to check out some fun pictures and facts about the books, and find out how to get a free print book for yourself.

The Books

I can’t believe we’ve managed to put out so many books in just one year!

To give you some idea about how much content is in these books, check out these three facts:

  1. If stacked on top of each other, the books measure nearly 12 inches high:
  2. IMG_3488x

  3. The books weigh a staggering 21 pounds when stacked together, or roughly the weight of your average pug:
  4. scalepug

  5. Altogether, the ten books from this season have over 5,000 pages of content. If you took all the pages out of the books and laid them end to end, they would stretch over 1,920 feet — or over a third of a mile in length!

Why Print Books Are Great

Although the PDF versions of our books are amazingly handy, and extremely portable, there are lots of great reasons to own a print copy as well:

  • You can read it anywhere, at anytime — no device or laptop needed!
  • You can easily jot notes in the margins or mark pages for future reference as you make your way through the books.
  • You can even display it proudly on your bookshelf or on your desk to show off to your family and co-workers. You can’t do that with a PDF!
  • IMG_3501

Since so many kids seem to be permanently connected to their devices these days, we thought we might be able to market the books as great bedtime stories. But that didn’t quite work out as planned…

Not yet kid-approved. Soon, though!

Not yet kid-approved. Soon, though!

Where to Get the Books

You can get all of these books in our new raywenderlich.com store. Each book has links to buy the PDF version directly from us, or the print version from Amazon.com.

Since we now sell the books in different places, there is no option for a “bundle” of print + PDF; they are separate purchases.

If you haven’t visited the store in a while, come check out some of the new improvements we’ve made!

Print Book Launch Giveaway

To celebrate the launch of these books, we’d love to give away some free T-shirts and books to our readers!

If you’ve bought the PDF version of any of our new books this year, please email us a screenshot of your book review from Amazon.com. The first 5 people to send us a screenshot of their review for each book will receive either a free PDF or print book of their choice, or a free “Eat, Drink, Swift” T-shirt! Just let us know your choice in your email.

A huge thanks goes out to all of our book authors, editors, artists and designers who helped create an amazing set of books this year — we couldn’t be more proud of them.

Happy reading!

The post raywenderlich.com Print Books Available Now! appeared first on Ray Wenderlich.

Readers’ App Reviews – January 2017

$
0
0

Review-2017-01-feature

It’s a new year and that means new apps from readers like you!

I’ve got an inbox full of apps to start the new year off right. I’ve downloaded them all, tried them out, and picked just a few to share with you.

To kick off the year we have:

  • An app to help you find bikes for rent
  • A game that combines the addiction of poker and tetris
  • An app to catalog your favorite spots near and far
  • And of course, much more!

Keep reading to see the latest apps released by raywenderlich.com readers like you.

Avélo

Avelo
More people are turning to bicycles instead of cars around the world. Just like you can rent a car when you travel, you can rent a bike too!

Avélo will help you find the closest bike to rent in over 400 cities around the world.

It’s easy to see available bike stations near you. They’ll show the number of bikes and racks available at each station. Your estimated travel time to each station is calculated, and with a tap you can get walking directions to the bikes from your current location.

You can also favorite stations to find them easily later, and you can setup proximity notifications so you’ll get notified when you’re near a station.

You don’t even need to open Avélo for it to help you. The app includes a today widget that will show your favorite stations and how far away they are right on your lock screen!

Waypoint: Record and Share your Favorite Places

Waypoint
Waypoint lets you highlight your favorite places and share them with friends and family.

This is great for an ongoing list of your favorite places to visit in your city. It’s also useful if you want to remember your favorite places at a frequent vacation area.

You can share lists with friends to keep track of favorite restaurants or boutiques. These lists are easy to share and make a great guide if you’re traveling to a new place where a friend has already been. You can also see Waypoint lists from other users to get inspiration of where to go or to see the best places to visit once you’re there.

Waypoint is sort of like an interactive yellow pages built by your friends and family. A great way to explore new places!

Poker Puzzle Game

PokerPuzzle
What if you could combine Tetris and Poker? Wonder no longer: Poker Puzzle does just that!

Poker Puzzle is a fun game where you’re given Tetris-style pieces to place on the board. Lines are eliminated when there is a valid poker hand in the line. Anything from a pair to a royal flush. The better the hand the higher your score. You can score on both vertical and horizontal lines.

You can compete with friends and other players for the highest score. Its a fun game to pick up and play in short sessions, and is definitely addicting enough to keep you coming back for more.

Super Spelling

SuperSpelling
Super Spelling is an app to help kids aged 4 and up learn to spell.

Super Spelling shows a picture and lets kids drag and drop letters. Vowels are highlighted green so kids can get a sense where the vowels in the words are.

It even supports both English and Dutch with more languages on the way – so you can teach kids in their native language or even help them become bilingual at an early age! :]

There are more than 400 words spread across 9 levels. They start with easy 3 letter words then move on to 4 letter words shortly. As the game progresses the words get more and more challenging. As levels are completed you get medals. These unlock some fun mini games like memory and word search.

Travel Dubai

TravelDubai
Travel Dubai is the ultimate Dubai travel guide. Dubai is famous for its extravagant luxury and modern architecture. The world’s largest mall and tallest building are both found in Dubai. This app will help you discover Dubai and all it has to offer. Travel Dubai will help you find the best places to shop, eat, and stay while you’re there.

The shopping section will show you all the best malls, list their stores, location, pictures and more. You’ll be able to get directions and see the mall hours.

The hotels section will show you all the amazing hotels. You’ll get a little more information about each one including services offered, onsite restaurants, key perks like free internet or breakfast. You’ll also be able to visit the hotel website or give them a call. Location is also shown so you can get an idea of whats around.

There is a full business directory as well covering every part of Dubai. The directory is open to the public so businesses in Dubai can list themselves in the proper categories. Visitors can also list the businesses they come across.

If you’re traveling to Dubai, give this app a try.

Dodo – Lame Jokes

Dodo
Dodo will give you a little pick me up in the middle of the day with some hilarious jokes.

I call these types of jokes dad jokes. Some call them bad jokes. But whatever you call them, they’re funny. :]

There are hundreds of jokes packed in this app. Anytime you need a little laugh, just open the app and you’re shown a joke.

You can save your favorites so its easy to pull them up later and tell to friends. You’ll definitely be the funniest around with these in your pocket. ;]

The app also makes it easy to share jokes on Twitter, Facebook, or iMessage. And perhaps best of all, you can turn on notifications and you’ll get jokes throughout the day.

Drone Leader Solo

DroneLeader
While it seems like everyone is working towards reusable rockets and getting to Mars, not one is talking about the important issues: asteroids and aliens!

Drone Leader Solo is an old school arcade space shooter. Its time to practice up on your ability to take down asteroids and aliens. You’ve got one ship with limited shields. Take down as many asteroids as you can. Watch out for the UFOs hiding in the bigger asteroids, they shoot back!

There are 4 weapon types available to give you some extra asteroid busting power. And of course some shield packs to charge back up. The longer you survive, the higher your rank. Can you make it all the way to Fleet Admiral?

Prompt Me

PromptMe
Prompt Me is an app that takes reminders and timers to the next level with two types of prompts available. Timed Prompts and Activity Prompts.

Timed Prompts are great for workouts or anything that requires repeated actions on a fixed time interval. You simply set the time, number of intervals, and number of repetitions. Prompt me handles the rest. You can receive your notifications with a tone, vibration, or even audible voice. Great for workouts like stretching or yoga.

Activity Prompts are like a todo list on steroids. They’re great for recipes or anything with a set number of steps. Each step can have notes, pictures, and even individual timed notifications so your recipe can automatically start a 20 minute timer when you check off the bake step and start another 5 minute timer when you start the cool step.

Prompt me is a new take on reminders and timers being used together in interesting ways. Give it a try and see how it might fit your life.

Mindle Reminder App

Mindle
Mindle is new app that brings your quick notes, lists, and reminders all together in one app.

You can create either a note or a list. Notes are simple text and lists are simple todo lists. You can easily attach images to both notes and lists. There are easy to use settings for colors and notification tones.

Both notes and lists can have reminders attached to them. Time based reminders fire after a certain amount of time and can repeat automatically if you’d like daily, weekly, monthly etc. You can also create location based reminders that are great for grocery lists popping up automatically at the store or todo lists popping up automatically at work.

Mindle then brings all your notes and lists together in a dashboard. You can quickly scroll through all your notes and lists to see brief snippets, countdowns to reminders, and more.

Where To Go From Here?

Each month, I really enjoy seeing what our community of readers comes up with. The apps you build are the reason we keep writing tutorials. Make sure you tell me about your next one, submit here.

If you saw an app your liked, hop to the App Store and leave a review! A good review always makes a dev’s day. And make sure you tell them you’re from raywenderlich.com; this is a community of makers.

If you’ve never made an app, this is the month! Check out our free tutorials to become an iOS star. What are you waiting for – I want to see your app next month.

The post Readers’ App Reviews – January 2017 appeared first on Ray Wenderlich.

Updated Course: Intermediate Core Data

$
0
0

x-post-feature-CD-Beg

Last week, we updated our popular Beginning Core Data course for Swift 3 & iOS 10.

This week, we’re happy to announce we updated the follow-up course for Swift 3 & iOS 10 too: Intermediate Core Data!

In this 7-part course, you’ll bring your Core Data skills to the next level, including learning about versioning and migrations, unit testing, performance and profiling, and more.

If you know the basics of Core Data but want to go a bit deeper, this is the course for you. Let’s take a look at what’s inside!

Video1

Video 1: Introduction. Gives an overview of what’s inside the course, and why each part is important to know in practice.

Video2

Video 2: Predicates and Sorting. Get a more in-depth look at fetch requests and learn about the different types of result types you can use.

Video3

Video 3: Versioning and Migrations. Learn how to migrate an older data store to a newer one by using custom migration tools like mapping models and entity migration policies.

Video4

Video 4: Unit Testing. Learn about writing basic unit tests and as well as asynchronous tests.

Video5

Video 5: Profiling and Performance. Learn how to use the Core Data template to analyze fetch requests.

Video6

Video 6: Query Generations. Learn how query generations can prevent a class of crashes and make users’ experience better at the same time.

Video7

Video 7: Conclusion. Get an overview of what you’ve learned so far and where to learn more.

Where To Go From Here?

Want to check out the course? You can watch the introduction for free!

The rest of the course is for raywenderlich.com subscribers only. Here’s how you can get access:

  • If you are a raywenderlich.com subscriber: The entire course is complete and available today You can check out the first part here.
  • If you are not a subscriber yet: What are you waiting for? Subscribe now to get access to our updated Intermediate Core Data course and our entire catalog of over 500 videos.

We hope you enjoy, and stay tuned for more new Swift 3 courses and updates to come! :]

The post Updated Course: Intermediate Core Data appeared first on Ray Wenderlich.

An Introduction to the Swift Package Manager

$
0
0
The Swift Package Manager

Learn how to create and use libraries using the Swift Package Manager!

The Swift Package Manager, officially released alongside Swift 3.0, is a new way to create Swift libraries and apps on macOS and Linux. It helps you manage your dependencies and allows you to easily build, test and run your Swift code.

The Swift Package Manager will help to vastly improve the Swift ecosystem, making Swift much easier to use and deploy on platforms without Xcode such as Linux. The Swift Package Manager also addresses the problem of dependency hell that can happen when using many interdependent libraries.

It is important to note that as of Swift 3 the Swift Package Manager only compiles for host platforms. In other words, for now you won’t be able to build or consume packages for for iOS, watchOS, or tvOS.

Time to get started!

Getting Started

Before starting, make sure you have Swift 3.0 or greater installed. Swift 3 is included with Xcode 8.0+, so if you have Xcode 8 or better, you are ready to start. You actually don’t even need Xcode to complete most of this tutorial; you can simply install Swift 3 from swift.org.

Open a new Terminal window and type swift package. You’ll see an overview of the commands. The main commands you will be using are:

  1. swift package init to create new packages
  2. swift package update to update the dependencies of a package
  3. swift package generate-xcodeproj to generate an Xcode project for your package

To learn about the Swift Package Manager, you will create a command-line app that uses a small library to print the emoji flag for any country. You will start by creating the executable package. These are packages that are meant to be command-line apps. Swift web apps also fall into this category.

Create a Flag executable package by running the following commands in the terminal:

mkdir Flag
cd Flag
swift package init --type executable

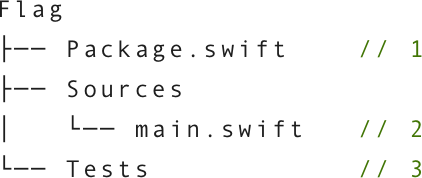
The current directory Flag is important when you run swift package init because it becomes the name of the generated package. You will see a few files and folders in the output that were created for you. Take some time to get familiar with the project structure:

Structure of a newly created executable package.

  1. Package.swift has your package description, and it will also have your package’s dependencies.
  2. Sources/, as the name suggests, is where you will have all your Swift source files. A main.swift file has also been created for you. This will be the entry point for your application. For now, it prints hello, world to the Terminal.
  3. Tests/ will contain unit tests you can write using XCTest. You will write tests for your code soon!

Go back to your Terminal window and run the following:

swift build

This will build the package and create an executable at .build/debug/Flag. Execute the app by running:

.build/debug/Flag

You should see Hello, world! printed to the screen.

Congratulations: you’ve created and built your first Swift package!

Creating the Library

To do the actual work of generating an emoji flag for a country, you will create a library named Atlas. You can then use this library in your Flag application.

Move outside of the Flag package and create a library package by typing the following commands into the terminal:

cd ..
mkdir Atlas
cd Atlas
swift package init --type library

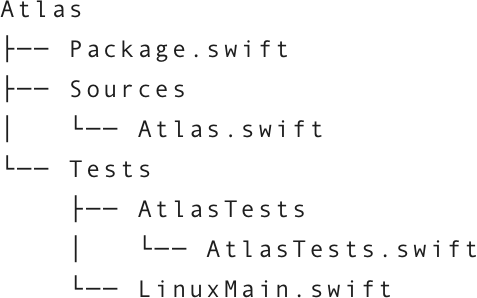
The Swift Package Manager will again create a few files and folders for you.

Atlas Library directory structure

This time instead of a main.swift, you’ll get an Atlas.swift. This file, and any other file in the Sources/, folder will be imported with your library. In fact, the difference between a library and an executable is the existence of a main.swift.

You also get one example test this time. Run the tests with swift test. The Swift Package Manager will then compile your library and run your tests.

Note: You might have noticed the LinuxMain.swift file in the Tests/ directory and the allTests property in the AtlasTests test case class. Both of these are necessary for XCTest tests to work on Linux. Linux does not have the Objective-C runtime, which automatically finds methods that begin with the prefix test to run. Just update the allTests property just as you did with the example every time you add a new test method, then update LinuxMain.swift with each test case class you add to your package.

Open Atlas.swift in your text editor and replace its contents with the following:

public struct Country {
  public let code: String
 
  public init(code: String) {
    self.code = code.uppercased()
  }
 
  public var emojiFlag: String {
    return "\u{1f1f5}\u{1f1f7}"
  }
}

Here you implement a Country struct that can be initialized with an ISO country code. The emojiFlag property returns the flag for that code. For now, you’ll implement the minimum to allow you to write tests.

Also note that everything here is marked public, so that each member is visible to code that consumes the Atlas module. :]

Now open AtlasTests.swift and replace the contents with the following:

import XCTest
@testable import Atlas
 
class AtlasTests: XCTestCase {
  func testAustria() {
    XCTAssertEqual(Country(code: "AT").emojiFlag, "\u{1f1e6}\u{1f1f9}")
  }
 
  func testTurkey() {
    XCTAssertEqual(Country(code: "TR").emojiFlag, "\u{1f1f9}\u{1f1f7}")
  }
 
  func testUnitedStates() {
    XCTAssertEqual(Country(code: "US").emojiFlag, "\u{1f1fa}\u{1f1f8}")
  }
}
 
extension AtlasTests {
  static var allTests : [(String, (AtlasTests) -> () throws -> Void)] {
    return [
      ("testAustria", testAustria),
      ("testTurkey", testTurkey),
      ("testUnitedStates", testUnitedStates)
    ]
  }
}

Here you implement three tests. You create three different countries and then assert that they have the correct emoji flag.

Run your tests:

swift test

You should see that three tests executed, and three tests failed. It appears you still have some work to do! :]

Now that you have failing tests, it’s time to make them pass.

The way emoji flags work is actually pretty simple: Given a country code like AT, you need to convert each letter into a so-called regional indicator symbol. Those are, for example, 🇦 and 🇹. When you put those together, you get the emoji flag!

Unicode Flags.  So much win!

Switch over to Atlas.swift and add the following method to the Country struct:

func regionalIndicatorSymbol(unicodeScalar: UnicodeScalar) -> UnicodeScalar? {
  let uppercaseA = UnicodeScalar("A")!
  let regionalIndicatorSymbolA = UnicodeScalar("\u{1f1e6}")!
  let distance = unicodeScalar.value - uppercaseA.value
  return UnicodeScalar(regionalIndicatorSymbolA.value + distance)
}

Here you take advantage of the fact that letters and regional indicator symbols are right next to each other in the Unicode table for values that are logically next to each other. So if A is 65, B is just 66 and if 🇦 is 127462, then 🇧 is just 127463. So to convert the letter P to a regional indicator symbol, you just need to get the distance between A and P, then add that distance to 🇵.

That was the hard part. Now that you have this method, the rest is easy! Replace the emojiFlag property with the following:

public var emojiFlag: String {
  return code.unicodeScalars.map { String(regionalIndicatorSymbol(unicodeScalar: $0)!) } .joined()
}

You convert the country code to an array of each letter, then you convert each letter to its regional indicator symbol and join them back together. This gets you the flag!

Run the tests again and watch all three tests pass.

The next step of creating a Swift package is committing your code to Git and tagging it with a version. Since this is your first version, you will call it 1.0.0.

Execute the following commands to create your Git repo and tag it:

git init
git add .
git commit -m "Initial commit"
git tag 1.0.0

Creating the Executable

Now that you have your emoji flag library, you can add it as a dependency to the Flag executable package.

Navigate back to the Flag directory and open the Package.swift file. Its contents look like this:

import PackageDescription
 
let package = Package(
  name: "Flag"
)

Every Swift package has a description like this. The most important of the parameters you’ll use will be the dependencies parameter. Replace the package description with the following:

let package = Package(
  name: "Flag",
  dependencies: [
    .Package(url: "../Atlas", "1.0.0")
  ]
)

Above, you state that the Flag package will have a single dependency with a URL of ../Atlas and that the version should be 1.0.0.

The version should use semantic versioning. In a nutshell, this means that the version should look like MAJOR.MINOR.PATCH. The MAJOR version is for any backwards-incompatible changes; the MINOR version is for changes that are done in a backwards-compatible way; and the PATCH version is for bug fixes. You can read more about the details of semantic versioning here.

In almost all cases, you’ll want to automatically update to newer versions of the library with bug fixes or even minor improvements. Conveniently, the Swift package manager allows you to do this. Change your package description to the following:

let package = Package(
  name: "Flag",
  dependencies: [
    .Package(url: "../Atlas", majorVersion: 1)
  ]
)

The Swift Package Manger provides even more ways to precisely specify the exact version or versions of the library you want to update to. Read more about all of them here.

Build the package:

swift build

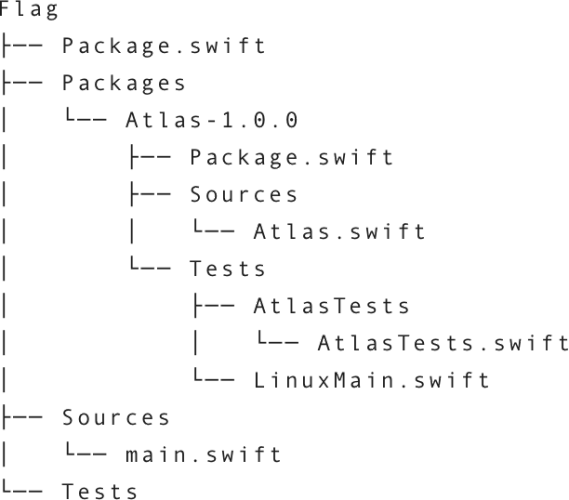
The Swift Package Manager fetches and builds your library and links it to your executable. The tree now looks like this:

Structure of Flag executable after Atlas package installed

You can see that the Swift Package Manager has carefully chosen version 1.0.0 based on your dependency requirements and installed it. Open the main.swift file and replace the contents with the following code:

import Atlas
 
let arguments = CommandLine.arguments
 
if arguments.count != 2 {
  print("USAGE: flag [iso country code]")
} else {
  let code = arguments[1]
  let country = Atlas.Country(code: code)
  print(country.emojiFlag)
}

Here you import your library, then print the emoji flag for the first command line argument given. If no argument is given, you print a help message.

Build the app again and run it:

swift build
./.build/debug/Flag US

You should now see the United States flag in your Terminal window!

Once you are happy with your app it’s time to ship it. Build the app one last time, this time using the optimized release configuration:

swift build --configuration release

Now you can run the release version of your app like so:

./.build/release/Flag PR

You can now zip the ./.build/release/Flag file and share it with your, friends, family, or anyone, really! :]

Generating an Xcode Project with The Swift Package Manager

Going old-school with the command line and your text editor of choice is fun, but you might be an iOS or macOS developer who is used to Xcode. Fear not — most of what you did works with Xcode as well.

Switch back to the Atlas package and generate an Xcode project by running the following:

cd ../Atlas
swift package generate-xcodeproj

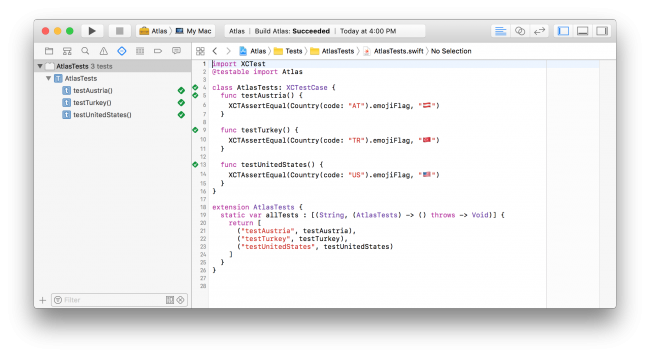
This command will generate a Atlas.xcodeproj for you. Now you can go ahead and open the project in Xcode and build the package or run the test suite like you would any other Xcode project~

Xcode running tests

You can also do this for the Flag package. Run swift package generate-xcodeproj in the Flag folder to generate Flag.xcodeproj.

cd ../Flag
swift package generate-xcodeproj

After you open the Xcode project, make sure the Flag executable target is selected; that’s the one with a little Terminal window for an icon. Now you can also build and run this package.

To give the executable command-like arguments, go to Product\Scheme\Edit Scheme…, then select Run\Arguments and add an argument like US under the Arguments Passed on Launch section.

Arguments for Flag executable.

Note that Xcode is unable to to add and build dependencies, so you can’t fully avoid the command line!

Where to Go From Here?

You can download the completed Swift Package Manager projects for this tutorial here.

You can also check out the package manager section on the official Swift site here.

The most recent documentation about the package description options can be found on GitHub.

For an overview of the direction of updates to the Swift Package Manager for Swift 4 you can check out the roadmap on the Swift Evolution mailing list.

You might also want to check out IBM’s Swift Package Catalog, which helps you discover new packages that can be used in your projects.

Until the Swift Package Manager supports non-host platforms, it is still recommended to use Cocoapods or Carthage to build iOS, watchOS, and tvOS apps.

As a challenge, why don’t you push the library you just created to GitHub, and then use Atlas as a remote dependency? Hint: You just need to change the url option of the dependency to the GitHub URL.

Try implementing new features, like listing all countries and their flags when Flag is run without any arguments. Hint: You might need to use Locale.isoRegionCodes.

Implement your new feature in the Atlas library, then create a new version like 1.1.0, and finally use the new version in Flag. Make sure you select an appropriate version in your package description and then use swift package update to update your dependencies to the latest allowed versions.

Share your solutions in the comments below and have fun!

The post An Introduction to the Swift Package Manager appeared first on Ray Wenderlich.

iOS Animations by Tutorials – Updated with Four New Chapters!

$
0
0

iOS-Anim-featureGood news — we’ve expanded our classic animation book iOS Animations by Tutorials and added four new chapters covering UIViewPropertyAnimator!

UIViewPropertyAnimator was introduced in iOS 10; it helps make some certain types of view animations a little easier to create so it’s definitely worth learning about.

Here are the four new chapters in this edition:

  • Chapter 20, Getting Started with UIViewPropertyAnimator: Learn how to create basic view animations and keyframe animations. You’ll look into using custom timing that goes beyond the built-in easing curves.
  • Chapter 21, Intermediate Animations with UIViewPropertyAnimator: In this chapter you are going to learn about using animators with Auto Layout. Further, you will learn how to reverse animations or make additive animations for smoother changes along the way.
  • Chapter 22, Interactive Animations with UIViewPropertyAnimator: Learn how to drive your animations interactively based on the user’s input. For extra fun you’ll look into both basic and keyframe animations interactivity.
  • Chapter 23, UIViewPropertyAnimator View Controller Transitions: Create custom View Controller transitions using a UIViewPropertyAnimator to drive the transition animations. You will create both static and interactive transitions.
Use UIViewPropertyAnimator to  create great effects, including interactive 3D touch animations!

Use UIViewPropertyAnimator to create great effects, including interactive 3D touch animations!

How to Get the Update

This free update is available today for all iOS Animations by Tutorials PDF Customers.

If you’ve already bought the iOS Animations by Tutorials PDF, you can download the updated book immediately from our store page.

If you bought the print version, no worries — these chapters are already included!

If you don’t have iOS Animations by Tutorials yet, you can grab your own updated copy — in either PDF or print format — from the raywenderlich.com store.

Happy animating! :]

The post iOS Animations by Tutorials – Updated with Four New Chapters! appeared first on Ray Wenderlich.


RWDevCon 2017 Schedule Now Available!

$
0
0

RWDevCon-feature

As you probably know, the team and I are running an iOS conference next March focused on hands-on, high quality tutorials: RWDevCon.

A while back we put out a poll to all attendees, and had everyone vote on their favorite topics – we chose the top-voted topics, and coordinated a schedule around that.

Today, we are happy to announce the schedule! The conference has 24 tutorials across 3 simultaneous tracks, so you can always find something that interests you.

In addition to that, we also have inspiration talks, conference parties, board games, and even a game show! :]

Let’s take a quick peek at what’s in store this March.

Pre-Conference Workshops

Before the conference, we have two optional day-long pre-conference workshops for folks who want to get an early start, diving into some cool and advanced topics.

Advanced Apple Debugging & Reverse Engineering (Derek Selander)

Learn to wield the power of LLDB and other debugging tools while exploring code you do(n\’t)? have source for. Create powerful, custom debugging scripts to quickly hunt down any item that piques your interest.

Advanced App Architecture (Josh Berlin & Rene Cacheaux)

Thoughtful design of the boundaries between your apps subsystems is the foundation of a stable codebase.

In this workshop, we cover how to create a well designed boundary between subsystems, dependency injection, use case driven development, creating injectable subsystems, and using state management to result in a clean architecture for your apps.

Tutorials

The “main course” of the conference is our menu of 24 hands-on tutorials. You’ll learn by doing!

1: Advanced Core Data (Matt Morey)

Core Data has many advanced features which can make development of complex apps easier while increasing performance. During this talk Matt will show how to take advantage of some of the advanced features of Core Data such as background fetching and child contexts.

2: Advanced Auto Layout (Scott Berrevoets)

Learn how you can use some of Auto Layout’s more advanced features to your advantage while designing complex, dynamic views.

3: Machine Learning in iOS (Alexis Gallagher)

Machine Learning. Convolutional Neural Networks. Deep Learning Neural Networks.

What is all the hype about? What are these technologies, what are they good for, and can we use them for anything useful right now? This session requires no background in any of these areas, and will introduce you to machine learning on iOS with a worked example.

4: iOS Concurrency (Audrey Tam)

Learn how to add concurrency to your apps with GCD & Operations. Keep your app’s UI responsive to give your users a great user experience, and learn how to avoid common concurrency problems, like race condition and deadlock.

5: Reconstructing Popular iOS Animations (Caroline Begbie)

In this session Caroline will examine two high profile apps with gorgeous fluid, tactile interfaces and reconstruct them.

6: Mastering Git (Sam Davies)

In this session you’ll learn some of git’s more advanced topics, such as rebasing, hooks and history mutation. You’ll also gain a better understanding of how git works under the covers and gain some experience with realistic day-to-day scenarios.

7: Building Reusable Frameworks (Eric Cerney)

Using shared code from the community has become a major benefit for developers. Why not pay it back and share the awesome things you’ve written with the world?

In this session, you’ll learn how to create a framework from your code that’s compatible with all three of the main dependency manager players: Cocoapods, Carthage, and the Swift Package Manager.

8: Swift Memory Management (Ray Fix)

While the design of Swift and the compiler relieve you from much of the drudgery associated with reference counting, it is critical that you understand what the system is doing for you, so that you can create higher performance, bug free apps.

Learn how to think about objects and closures and how to use the latest Xcode tools to analyze and debug your code.

9: Cross-Platform React Native (Christine Abernathy)

React Native is a framework for building native apps with React. It’s been used by many developers who are drawn to it’s learn once, write anywhere paradigm and fast development cycle.

In this session you’ll learn how to create a cross- platform (iOS and Android) app, learning how to create an app from scratch and how to integrate React Native into an existing native app.

10: Fastlane (Kishin Manglani)

Fastlane is a suite of tools to help automate building and release iOS (and Android!) apps.

From creating screenshots to handling provisioning to submitting your application, Fastlane can help with it all. In this session, you’ll learn how to use these tools to help automate the mundane tasks we all dread doing in iTunes Connect.

11: RxSwift in Practice (Marin Todorov)

RxSwift, and its companion framework RxCocoa, allow you to create reactive apps for iOS and macOS. Glancing upon some Rx code might be intimidating without a proper introduction but in this session we will start in Playgrounds, learn the core concepts, and then move on to building a real iOS application in Xcode.

Just beware – you might like programming with RxSwift too much :]

12: How to Make a Platformer Game in Unity (Sean Duffy)

Unity is used by thousands of indie development studios, hobbyist game developers, and even AAA game studios.

In this session, you’ll power through creating a platformer game like Super Meat Boy, and learn first hand how easy it is to start becoming productive with this powerful and versatile multi-platform game engine.

13: iMessage Apps (Ryan Ackermann)

The Messages framework in iOS 10 allows developers to extend their apps to iMessages to further their app’s reach.

In this session, you’ll learn how to extend an existing app by adding a Messages extension.

14: Practical Unit Testing I (Jack Wu)

Unit tests allow you to develop without fear and ship with confidence. They can even serve as documentation for your code and make everything easier to understand. But you already know this, don’t you?

In this session, you will explore ways to add at least one more unit test to your app.

15: Server Side Swift with Perfect (Ray Wenderlich)

Perfect is an open source server side Swift framework that allows you to create web apps, or web APIs, purely in Swift.

In this session, you’ll learn how to create your first web app in Swift from scratch, including routing, templating, and persistence.

16: Swift Playgrounds in Depth (Jawwad Ahmad)

Swift playgrounds have come a long way since their initial release in 2014 alongside the Swift language. This session covers a broad range of topics, a few of which are interactive playgrounds, how to use external frameworks, prototyping animations and much more.

Along the way you’ll also learn a few practical tips and tricks to take your playground-fu to the next level.

17: Practical Unit Testing II (Gemma Barlow)

Continuous Integration (CI) is the art of automatically translating your code into a build that can be easily accessed by project stakeholders.

In the first half of this session, Gemma will talk through different aspects of CI setup design, followed by a review of fundamentals that can be applied to any CI solution. In the latter half, she’ll demo CI setup for a project created in Practical Unit Testing I.

18: Cocoa Bindings (Jake Gundersen)

In this session, Jake will cover the basic of bindings, how to set them up in Interface Builder, some common debugging pitfalls, and some binding related tools (like value transformers and number formatters.

19: Engaging On-Boarding (Lea Marolt Sonnenschein)

Users abandon apps when they can’t figure out how to use it fast enough. To lower the abandonment rate for your app, create an on-boarding experience that keeps the user engaged, informed and delighted the first time they open your app.

In this session we’ll talk about the pros and cons on on-boarding, when to use it, and best practices. Finally, we will brainstorm and implement our own on-boarding experience!

20: Advanced iOS Design Patterns (Joshua Greene)

In this “Advanced iOS Design Patterns” talk, you’ll learn design patterns for solving common iOS development problems, including: authentication and auto re-login; networking and domain model management; and data persistence and cache management.

21: Android for iOS Developers (Ellen Shapiro)

Learn how to make a simple, professional Android app using Material Design, Realm, and Retrofit 2.

22: Accessibility & Internationalization (Mic Pringle)

Does your app speak Swahili? Or cater for the colour blind? No? Then this session’s for you! Learn how to reach exciting new audiences by taking full advantage of the fantastic Internationalisation and Accessibility support provided by Apple’s iOS frameworks.

23: Swift Error Handling (Michael Katz)

The best apps delight their users by remaining responsive and stable in the face of errors. In this session, you’ll learn how to write code that responds to and recovers from errors, and even anticipates them.

24: Game AI with GameplayKit (Tammy Coron)

GameplayKit is an independent Apple framework that game developers may use to help them create better games, with less effort. In this session, the focus and emphasis will be placed on using GameplayKit to add artificial intelligence (AI) to your games.

Inspiration Talks

There’s more than just tutorials—we also have several inspiration talks that will fill you with new ideas and energy.

Building Compassionate Software (Ash Furrow)

Business success depends on team performance, and building high- performing teams is a well-understood problem. Come hear Ash Furrow discuss the science and mechanics of software team dynamics with useful tips and best practices to help improve any team environment.

I’m an Idiot. (Rich Turton)

Do you ever feel like a fraud, or that you’re blu ng it as a professional developer? You’re not alone.

Rich is a professional idiot. If he remembers to turn up, he’ll be talking about how to leverage your inner idiot to make you a better coder, writer and communicator.

Finding Freedom through Freelancing (Lyndsey Scott)

Have you ever dreamed of pursuing all of your interests? Victoria’s Secret and Calvin Klein model, Lyndsey Scott, shares how she’s made room in her life for acting, modeling, and iOS development contracts.

Creating Community (Sarah Olson)

As Director of Women Who Code Twin Cities, Sarah Olson has spent the past two years creating a safe space for marginalized developers to connect and learn. In this process, she’s learned many things about building a community. What makes a community thrive? How do we make it as inclusive and welcoming as possible?

Silver Bullets and Hype (Roy Marmelstein)

As developers, we aim to live in the future and we tend to get super excited by the latest and greatest. This often leads to a quixotic search for a “silver bullet” that will solve all of our problems.

In this talk, I will share some experiences and missteps with hyped iOS technologies and we will look at how to critically evaluate “cool new things” and make better choices.

New Tricks (James Dempsey)

This year marks James Dempsey’s 20th year writing code for the Apple ecosystem. In this talk, James explores how he thinks about and works through the many major changes encountered along the way – like transitioning to Swift.

You’ll see that no matter where you are in your career, a young pup or an old dog, you can still learn new tricks!

Where to Go From Here?

The team and I are really excited about the schedule – we think it has something for everyone.

And that’s not all! In addition to the above, the conference includes a special James Dempsey Game Show, Firebase labs, lunchtime board games, an opening and closing reception, and and much more!

You can download a PDF version of the schedule with times and details on the RWDevCon website.

Interested in your own ticket?

  • Are you a student? Good news – we’re currently accepting applications for 5 student scholarships. Apply now!
  • Not a student? Unfortunately the conference is already sold out (for the third year in a row!), but you can sign up for the waiting list to be notified if any tickets become available for this conference or a future event.

We hope you like the schedule, and we can’t wait to see you in March! :]

The post RWDevCon 2017 Schedule Now Available! appeared first on Ray Wenderlich.
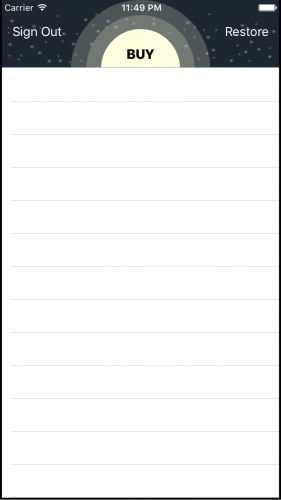
How I Fight Procrastination and Usually Win

$
0
0

My “aha” moment with procrastination was in college, when I had a huge research paper due immediately after the November Thanksgiving holiday. “No problem”, I thought when it was assigned, “this is more than two months away!”

At first, it started out great: I chose a topic quickly and completed my research well before November arrived. But then came procrastination!

You can imagine what happened during my Thanksgiving holiday. Rather than enjoying time with my family, I had to work all weekend writing my paper. I did take a break for the turkey dinner, though!

Procrastination-01-car

I now consider myself a pretty productive person, but I still fight procrastination — and it appears I’m not alone. The results of the survey I conducted as research for this article tell the tale:

  • 85% of respondents procrastinate at least occasionally.
  • Nearly 25% of respondents procrastinate often or more frequently.

Do you fall in that 85% of people — or even in the top 25% of procrastinators from our survey? You’re in good company.

In this article, I’ll explain some tips I’ve learned in my struggles with procrastination over the years, which should help you get your next project done on time. Trust me, you’ll thank me next Thanksgiving.

The Good Side of Procrastination

Before we get into tips about fighting procrastination, I thought it would only be fair to mention that procrastination isn’t always bad; it has a good side too.

In fact, sometimes there are actually benefits to putting off a task until the last minute – when you take the right approach. Let’s take a look at the top 3.

1) Lack of Time to Overthink

I’ve developed a good packing routine for my short trips, but I often overthink what I need to take on longer trips. The longer I have to pack, the more I second-guess myself and pull out my suitcase to repack.

A few years ago, I packed days in advance of a week-long trip to Death Valley, California. With daytime temperatures over 100 degrees and nights below freezing, packing properly for the extremes was a challenge.

No sooner than I’d finished packing, I immediately started overthinking what I’d packed. “What if it got colder than forecast? What if I ended up taking a longer trip? What if…?” Before I knew it, I had a suitcase that wouldn’t close. I had to repack everything the night before — and ended up pretty much with the exact same things as when I’d started.

All I’d accomplished by packing early was a lot of wasted time. Delaying tasks that you tend to obsess over reduces the time available to overthink what you’re doing.

Procrastination-02-suitcase

2) Allows the Dust to Settle

Procrastinating can also give you more time to gather information about the task at hand. When faced with tasks that are directly impacted by things beyond my control, I find it saves time to wait until those outside events have settled as possible.

For example, when integrating a project with an API still under development, I’ve found that completing the API integration tasks earlier is rarely worth the time. There’s too much of a risk those implementation details will change near the end of the project.

Note from Ray: Welcome to our world writing our tutorial books while iOS is still in beta each year! ;]

3) Starves Out Bad Ideas

Finally, it frequently pays to procrastinate on tasks of questionable validity.

Have you ever been faced with a task you can’t say no to, for political or personal reasons, but you know is a waste of time, effort, or just a bad idea overall? Sitting on that task usually means the team will forget about the task (since it wasn’t important anyway), or people will eventually come to their senses and realize it was a bad idea to start.

It’s not a terribly moral high ground, to be sure, but I’ve dealt with contracts and scenarios where it can be easier to wait and let a task go away, than to waste time arguing against it.

This Only Works If You Make a Conscious Decision

Note that all three of these cases only work when you make a conscious decision to delay tasks for a future net benefit, rather than just letting it happen.

For example, you might think:

  • “I know I can do this at the last minute and get a better result.”
  • “It’s probably worth waiting on this because too much is in flux.”
  • “This is a dumb idea; I’ll try waiting in hopes that it’s deemed not important.”

In these situations, procrastination isn’t hurting your ability to get things done; it’s actually improving your ability to get things done.

OK, so there are cases when procrastination can be good. But what about its bad side?

The Bad Side of Procrastination

Putting important, doable tasks off until a later time has real consequences: the task must be rushed, resulting in lower quality results. Put a task off too long, and you’ll miss an important deadline.

Why is that bad? Well, missed deadlines in a team environment delay others who are waiting for your work — and you’ll end up with a line of angry coworkers outside your door!

Procrastination-03-angrypeople

Poor results and missed deadlines can result in lost contracts and wasted money for freelancers and consultants. Rushing at the last minute can mean important steps are missed or glossed over.

Kaden Wilkinson (@kdawgwilk) shared a story about rushing a product release:

“I was prepping to release an iOS app to the App Store and waited too long to get everything done. I ended up forgetting to test database migrations from the previous version to the latest version being released, and the app ended up crashing on launch for all users.” –@kdawgwilk

I’m sure we all have a similar story, where due to procrastination we ended up with a problem that wouldn’t have happened if we had started earlier!

Why Do You Procrastinate?

Understanding why you are procrastinating on a task can help determine the best approach to overcome the procrastination.

The survey highlighted many common reasons for procrastinating — they oddly line up quite neatly with my own reasons for procrastination. Here are the top 3 reasons people gave.

1) I Procrastinate Because I Feel Overwhelmed

Procrastination can often result from feeling overwhelmed by a task. When overwhelmed, there’s an urge to put off a task and hope for clarity to appear later. Ironically, the clarity may never arrive because of your procrastination. When I’m unsure of what my priorities are, it’s easy to work on the wrong thing or not work on anything.

The irony of procrastination is that it can feed on itself. Tasks that come in the door while you’re putting things off also suffer. This compounds the feeling of being overwhelmed, which causes you to procrastinate more.

Procrastination-04-despair
The feeling of being overwhelmed can be signs of uncertainty as to where to start on a task. It can be a result of poor direction, trying something outside your comfort zone, or working on a project that needs organized. Whatever the cause, not being sure where to start often leads to not starting at all.

2) I Procrastinate Because I Don’t Want To Do It

Procrastination can also be a sign you’re faced with a task you just don’t want to do. The majority of respondents to the questionnaire listed “lack of motivation” or “boredom” as the primary cause of their procrastination.

You rarely need encouragement to do something you enjoy or find exciting, so it’s no surprise that difficult tasks spawn procrastination.

For instance, I really should be working on my app, but hey, cool — someone just liked my post on Facebook and I should totally check that out. I really don’t like doing my taxes, and Netflix is right there in the other room with all these movies I haven’t watched yet — and that tax deadline is so far away.

3) I Procrastinate Because I’m Afraid of Failure

Fear of failure often manifests itself as continuous tweaking and endless revisions, insisting that your task must be “perfect” or “done done” before you can release it to the world. In reality, you’re just avoiding the judgment of the world.

A task that you never finish will never be reviewed by others; an incomplete project cannot be evaluated or criticized. An app never published never gets one star reviews. Even without formal grades as you have in academia, work projects are judged by peers or supervisors and the success (or failure!) of those projects determines eligibility for promotions and pay increases.

It’s easy to get sucked down by the problems of procrastination — but don’t fear! People have spent many, many years analyzing how to beat procrastination. Read on to see how you can get yourself out of that rut and back on top of your work!

How I Fight Procrastination and Usually Win

OK, so we’ve seen that although procrastination can be good sometimes, it can also cause major problems.

Now, it’s time for me to share the promise of this article: techniques I’ve learned to fight procrastination over the years, allowing me to (usually) win! :]

There are three techniques I’ll cover:

  1. Managing Distractions
  2. Managing Time
  3. Managing Energy

Let’s dive in!

Note: Although I think the advice in this article should help if you struggle with procrastination, note that you can’t cure procrastination overnight.

Personally, I recognize that procrastination is a constant enemy of mine, and I have to make sure I don’t slip back into old habits. No single article can give you all the answers to overcome procrastination, but I’ve found three things that have helped me keep procrastination (mostly) at bay.

1) Managing Distractions

There are a million distractions in this world, but there a lot of distractions that are completely under your control.

I recommend taking some time to reduce your distractions, allow you to focus on your real work. Here are three things that have worked for me:

a) Turn off notifications

Whenever I set up a new computer or a new phone, my very first step is to turn off almost all notifications.

My coworkers took a while to get used to the idea that I only check email a few times a day, but I find I have better focus when I’m not distracted by email and other social notifications. It takes very little time to shut down notifications, but you’ll be surprised at the time you gain back.

Procrastination-05-notifications

b) Make it harder to go social

When struggling with an Auto Layout bug, the temptation to lose yourself in your Twitter feed can be irresistible. Adding just a small bit of friction between yourself and your social feeds can be really effective.

For instance, stay logged out of Facebook while you work. The extra time to log in will serve as a constant reminder of what you’re not getting done.

c) Block the biggest time sinks

In more extreme cases, most browsers have extensions that can be used to selectively block sites.

Quitter can shut down selected apps when they’ve been left idle and reduce the temptation to switch from your work. Cold Turkey will temporarily block tempting web sites and apps during specified times.

2) Managing Time

OK, so you’ve gotten a lot of time back from managing distractions: how can you make the most of it?

I find focusing on time and project management really helps me feel in control of the situation, and reduces my desire to procrastinate. There are many time and project management systems, and all have unique approaches to the problem of getting stuff done. Some systems are simple tricks or rules of thumb, while others provide a complete, all-encompassing approach to managing your work and personal life.

I’ve found a combination of three of these systems works best for me: Getting Things Done, the Pomodoro Technique, and simple prioritization techniques. Let’s take a look at all three.

a) Getting Things Done

I’ve used the basic Getting Things Done, or GTD, approach for a long time. The GTD system uses five steps to process tasks and projects:

  1. Capture what needs your attention
  2. Clarify what needs to be done.
  3. Organize what you capture.
  4. Review and reflect on where you are on a regular basis.
  5. Take appropriate actions depending on location and priorities.

I feel the most valuable step in this methodology is recording everything I might need to do at the moment it enters my mind so I don’t need to keep everything in mental RAM. Capturing these thoughts lets ideas and upcoming tasks flow freely into my mind without interrupting what I’m doing at the time.

The organizational aspect of GTD means you start tasks with everything you need to complete the task right at hand. Imagine sitting down and getting straight to work, without hunting for files or notes or tools — what a relief!

The GTD approach also focuses your effort solely on the next small task that will move your project forward. This takes your attention away from the overwhelming large picture so you can focus on, well, getting things done. :]

b) The Pomodoro Technique

Procrastination-06-timerWhile GTD provides a solid method to determine, capture and organize your actions, the Pomodoro Technique sets up a direct framework for doing the work.

Under the Pomodoro Technique, you break your work time into 25 minute periods called Pomodoros. During each Pomodoro, you work on the task without interruption and without giving up. After 25 minutes, you take a short break, then start the next pomodoro.

After completing four Pomodoros, you take a longer break so your brain can process the work you’ve done and get ready for the next tasks to tackle. Depending on the work I’m doing, I will often expand or contact the 25-minute period to better fit the task at hand. When I writing, I’ve found stretches of 50 minutes of writing with a slightly longer break in between pomodoros works best for me.

c) Simple Prioritization techniques

GTD helps you organize, and Pomodoro helps you focus, but how do you know what to work on?

Every morning, I select three tasks I would like to complete by the end of the day. Some days I know that I won’t be able to complete all three, and some days I know that I can do more. But going through the selection process helps me consider and pick just the three things that are most beneficial to me.

Examples of priority tasks are things that need to be completed on a specific day, things you want to get off your mind, or even things that will give you a clear sense of accomplishment when done.

How They Work Together

Here’s how these three techniques work well together for me:

  • The Pomodoro technique helps me overcome inertia and get started. I can work on anything for 25 minutes, and I almost always make some progress in that time.
  • GTD helps me from becoming overwhelmed by complex projects that stretch over months and have lots of moving parts which distract from my focus.
  • My three priorities help me finish each day with a feeling of accomplishment. Feeling good about what you’ve done is as important and getting the things done in the first place.

3) Managing Energy

Procrastination-07-hikingHave you ever felt like you just don’t have energy to complete a task?

Personally, I’ve noticed that certain times of the day give me more energy, while other times of the day leave me feeling drained. Therefore, I try to plan tasks needing less mental or physical energy for lower-energy time, and I save more challenging tasks for those times when I know my energy level will be higher.

For example, reviews, email, and research come when I have less energy. Debugging and other high-focus tasks come when I know I’ll have more energy.

If I know I have a very demanding week ahead, I schedule the more difficult tasks early in the week when I’m fresh. I also take my current physical state into account. If I have a cold, then it’s probably not the best day to design a new application. On those days, I tackle jobs that require less physical and mental agility. If I’m unexpectedly energetic right before lunch, then I’ll pivot and pick up a task that needs extra energy.

When I need a quick energy boost to finish a high-focus task, moving around or taking a short walk can do wonders to get my energy back up. When I just can’t seem to focus at all, I’ve found a nice long outdoor stroll, exercise, or a hike in the woods does wonders to clear my mind for the next days. Sometimes my breaks between pomodoros are composed of short walks. Find what gets your energy up and work it into your day.

Despite all my planning and my processes, sometimes I still have to delay a task until another time. But when I’m not hiding behind procrastination, I can push back a task without guilt.

Where to Go From Here?

There’s been a lot to absorb in this article…assuming you didn’t put off reading it! :]

Beating procrastination is far from a simple process. Everyone’s reasons for putting things off are different; you’ll find that some of these ideas and techniques work for you, and others don’t work as well.

Looking for a simple way to start? Start with removing distractions. It doesn’t take a lot of time to turn off notifications on your phone — and fiddling with your phone is a fun bit of procrastination in itself! Also close every app and program on your workstation that you don’t absolutely need. You’ll see an immediate boost in focus when you don’t have 23 apps vying for your attention.

Check out Ray Wenderlich’s amazing Inspiration Talk from RWDevCon 2016, Feed Your Fire, that covers motivation and procrastination, including the concept of internal vs. external motivation. If you’re going to kill time watching videos, you might as well be learning something! :]

If you’re looking for more approaches to beating procrastination, here are some great resources that cover the techniques discussed here and many more:

If you have any comments or questions about this article, come share them in the discussion below. And don’t wait for later — do it now! :]

The post How I Fight Procrastination and Usually Win appeared first on Ray Wenderlich.

Introduction to Protocol Buffers on iOS

$
0
0
protocol buffers

Introduction to Protocol Buffers

For most apps that require backend services, transmitting and storing data is a big job. When interfacing with a web service, developers are usually required to send and receive data using JSON or XML, building structures and parsing them later.

Although there are plenty of APIs and frameworks to help with serialization and deserialization, going this route introduces maintenance concerns, such as versioning code and updating object parsers to support backend model changes.

If you are serious about making your new backend and frontend services robust, consider using protocol buffers, which are language-agnostic methods developed by Google for serializing structured data. In many cases, they are more flexible and efficient than other common methods like JSON and XML.

One of the key features is they allow you to define your data structure once, from which a compiler can generate code in any supported language — including Swift! The generated class files provide effortless reading and writing of objects.

In this tutorial, you will start up a Python server and integrate data with an existing iOS app. To get started, you will learn how protocol buffers work, how to set up the environment, and lastly how to transmit data with protocol buffers.

Still not convinced protocol buffers is what you need? Read on!

Note: This tutorial assumes you have the basic knowledge in iOS and Swift, with some basic server-side knowledge, and using the terminal.

As well, make sure you are running Apple’s latest Xcode 8.2.

Getting Started

RWCards is an app that lets you view your conference ticket and the list of speakers at the event.

Start by downloading the Starter Project and open the root directory Starter. Familiarize yourself with the three included components listed below:

The Client

Within Starter/RWCards, open RWCards.xcworkspace and take a look at some of the key files in the project:

  • SpeakersListViewController.swift manages a table view which displays the list of speakers. The controller is currently a template since you haven’t created a model object yet.
  • SpeakersViewModel.swift acts as the data source for SpeakersListViewController. It will contain the list of speakers.
  • CardViewController.swift contains the controller code to display an attendee’s badge along with their social information.
  • RWService.swift manages the integration between the client and backend. You will use Alamofire to make the service calls.
  • Main.storyboard contains all storyboard scenes for the app.

The project uses CocoaPods to pull in two frameworks:

  • Swift Protobuf allows you to use protocol buffers in your Xcode project.
  • Alamofire is a HTTP networking library that you will use to make requests to the server.

Note: In this tutorial you will use Swift Protobuf 0.9.24 and Google’s Protoc Compiler 3.1.0. They are already packaged with the starter so you don’t need to do anything further.

How do Protocol Buffers Work?

To use protocol buffers, you must first define a .proto file. Within the file, you specify a message type that defines how your schema or data structure will look. Below is a sample of a .proto file:

syntax = "proto3";
 
message Contact {
 
  enum ContactType {
    SPEAKER = 0;
    ATTENDANT = 1;
    VOLUNTEER = 2;
  }
 
  string first_name = 1;
  string last_name = 2;
  string twitter_name = 3;
  string email = 4;
  string github_link = 5;
  ContactType type = 6;
  string imageName = 7;
};

This defines a Contact message along with associated attributes.

With a .proto file defined, all you have to do is pass the file into the protocol buffer compiler, and it will generate data access classes (structs in Swift) in the supported languages of your choice. You can then use the classes/structs generated in the project you are working with. It’s that simple!

protocol buffers

The compiler will interpret the message, map the value types to the chosen language and generate the appropriate model object files. You’ll cover more on how to define a message later.

Before considering protocol buffers, you should first consider if it’s an appropriate strategy for your project.

Benefits

JSON and XML may be the standard approach that developers use to store and transmit data, but here’s why protocol buffers are great:

  • Faster, and smaller: According to Google, protocol buffers are 3-10 times smaller, and 20-100 times faster than XML. Also check out this post by Damien Bod where he compares the read and write times between popular formats.
  • Type safety: Protocol buffers are type-safe like Swift. Using the protocol buffer language, you need to specify a type for every property.
  • Automatic deserialization: You no longer need to write boilerplate parsing code. You simply need to update your proto file and regenerate the data access classes.
  • Sharing is caring: The ability to share models across various platforms with supported languages means less work is required when working cross-platform.

Limitations

Protocol buffers, as useful as they are, aren’t the answer to every problem:

  • Time and effort: It may not be cost effective to adapt protocol buffers in existing systems due to conversion costs. Additionally, it requires learning a new language syntax.
  • Not human readable: XML and JSON are more descriptive, and easier to read. Protocol buffers in their raw format are not self-describing. Without the .proto file, you won’t be able to interpret the data.
  • Just not a good fit: XML is great when you want to use stylesheets like XSLT. Protocol buffers are not always the best tool for the job.
  • Not supported: The compiler may not support the language of other systems you are communicating with.

While it’s not right for every situation, there certainly are some great arguments for using protocol buffers!

Build and run the app and try it out.

protocol buffers

Unfortunately you can’t view any of the information yet because the datasource hasn’t been populated. Your job will be to call the backend service and populate the UI with the list of speakers and attendee badges. First, you’ll take a look at what the starter has provided for these two pieces.

Protocol Buffer Schema

Head back to Finder and look inside Starter/ProtoSchema. You’ll see the following files:

  • contact.proto describes how a contact should be structured using the protocol buffer language. You’ll dive deeper into this later.
  • protoScript.sh is a bash script that will generate Swift structs and Python classes for contact.proto using the protocol buffer compiler.

The Backend

Within the folder Starter/Server, you’ll see the following:

  • RWServer.py manages a Python server built on top of Flask. It contains two GET requests:
    • /currentUser gets the current attendee’s information.
    • /speakers gets the list of speakers.
  • RWDict.py contains a dictionary of speakers that RWServer will read from.

Now it’s time to set up the environment to run protocol buffers. In the following section, you’ll set up the required environments to run Google’s protocol buffer compiler, Swift’s Protobuf plugin, and install Flask to run your Python server.

Environment Setup

There are a several tools and libraries that you have to install before using protocol buffers. The starter project includes a script named protoInstallation.sh that handles all of this for you. Luckily for you, it will check if any of the libraries are installed before installing each one!

This script will take a while to install, especially when installing Google’s protocol buffer libraries. Open up your terminal, cd into the Starter directory and execute the following command:

$ ./protoInstallation.sh

Note: You may be prompted to enter your admin password while running the script.

When the script completes, run it again to ensure you get output similar to the following:

protocol buffers

If you see this, the script has successfully completed. If the script failed, you might have entered the wrong admin password. In that cause, try rerunning the script; it won’t reinstall anything that happened successfully.

Here’s what the script has accomplished:

  1. Installed Flask to run the Python Local Server.
  2. Built the Google protocol buffer compiler from Starter/protobuf-3.1.0.
  3. Installed the protocol buffer module for Python so the server can use the Protobuf library.
  4. Moved the Swift Protobuf plugin protoc-gen-swift into /usr/local/bin. This allows the Protobuf compiler to generate Swift structs.

Note: For more information on how the script works, you can open the protoInstallation.sh file in a text editor to see what commands are being executed. This requires some basic bash knowledge.

You now have everything you need to start using protocol buffers!

Defining a .proto File

.proto files define protocol buffer messages which describe the structure of your data. When fed through the protocol buffer compiler, they generate data accessor structs.

Note:In this tutorial, you’ll define messages with proto3, the latest protocol buffer language version. For more in-depth knowledge on syntax and how to define a proto3 file, check out Google’s guidelines.

Open ProtoSchema/contact.proto in your favorite text editor. Here the .proto file has already been defined for you to generate Contact and Speakers messages:

syntax = "proto3";
 
message Contact { // 1
 
  enum ContactType { // 2
    SPEAKER = 0;
    ATTENDANT = 1;
    VOLUNTEER = 2;
  }
 
  string first_name = 1; //3
  string last_name = 2;
  string twitter_name = 3;
  string email = 4;
  string github_link = 5;
  ContactType type = 6;
  string imageName = 7;
};
 
message Speakers { // 4
  repeated Contact contacts = 1;
};

Going over what this definition actually contains:

  1. The Contact model describes a person’s contact information. This will be displayed on their badges in the app.
  2. Every contact should be categorized so it will be easy to differentiate between guest and speakers.
  3. Every message and enum field found in a proto definition must be assigned an incremental and unique tag. These numbers are used to identify fields in the message binary format, so it’s vital to maintaining the order. For more information on tag and field management, check out reserved fields in Google’s doc.
  4. The Speakers model contains a collection of contacts. The repeated tag indicates an array of objects.

Generating Swift Structs

When you pass contact.proto into the protoc program, the messages in the proto file will generate Swift structs. These structs will conform to ProtobufMessage. protoc will provide properties for every Swift field, initializer, and methods to serialize and deserialize data.

Note: For more information about the capabilities of Swift’s protobuf API, please refer to Apple’s Protobuf API documentation.

In terminal, navigate to the Starter/ProtoSchema directory. Open protoScript.sh in a text editor and you’ll see the following:

#!/bin/bash
echo 'Running ProtoBuf Compiler to convert .proto schema to Swift'
protoc --swift_out=. contact.proto // 1
echo 'Running Protobuf Compiler to convert .proto schema to Python'
protoc -I=. --python_out=. ./contact.proto // 2

The script runs protoc twice against contact.proto — once to create the Swift source and then once again for Python.

Back in the terminal, execute the script by running the following:

$ ./protoScript.sh

You should see this output:

Running ProtoBuf Compiler to convert .proto schema to Swift
protoc-gen-swift: Generating Swift for contact.proto
Running Protobuf Compiler to convert .proto schema to Python

You’ve created Swift and Python source files from the contact.proto file.

Within the ProtoSchema directory, you should see two generated files one in Swift, and one in Python. Notice that each generated file will have a corresponding .pb.swift or .pb.py The prefix pb represents that it’s a protocol buffer generated class.

protocol buffers

Drag contact.pb.swift into Xcode’s project navigator and place it in the Protocol Buffer Objects group folder. Check “Copy items if needed” when prompted. In either Finder or Terminal, copy contact_pb2.py to the Starter/Server folder.

Feel free to look inside the contents of contact.pb.swift and contact_pb2.py to see how the proto messages map to structures in the output languages.

Now that you have your generated model objects, it’s time to integrate!

Running the Local Server

The sample project contains a prebuilt Python server. This server will provide two GET calls: one to retrieve the attendee’s badge information, and another to list the speakers.

This tutorial won’t get into the server code. However, it’s important to note that it leverages the contact_pb2.py model file you generated with the protocol buffer compiler. Feel free to take a closer look at RWServer.py if you are interested in the specifics of this, but it isn’t necessary to do this to follow along with this tutorial.

To run the server, open Terminal and navigate to Starter/Server. Now run the following command:

$ python RWServer.py

You should see the following:

protocol buffers

Testing GET Requests

By running the HTTP request in a browser, you can see the protocol buffer’s raw data format.

Visit http://127.0.0.1:5000/currentUser and you’ll see the following:

protocol buffers

Next try the speaker call, http://127.0.0.1:5000/speakers:

protocol buffers

Note: You can either leave the local server running, or stop it and run it again when testing the RWCards app.

You’re now running a simple server that leverages models built from messages defined in your proto file. Pretty powerful stuff!

Making the Service Calls

Now that you have your local server up and running, it’s time to call the services within your app. In RWService.swift replace the existing RWService class with the following:

class RWService {
  static let shared = RWService() // 1
  let url = "http://127.0.0.1:5000"
 
  private init() { }
 
  func getCurrentUser(_ completion: @escaping (Contact?) -> ()) { // 2
    let path = "/currentUser"
    Alamofire.request("\(url)\(path)").responseData { response in
      if let data = response.result.value { // 3
        let contact = try? Contact(protobuf: data) // 4
        completion(contact)
      }
      completion(nil)
    }
  }
}

This class will be used for network interaction with your Python server. You’ve started off by implementing the currentUser call. Here’s what this does:

  1. shared is a singleton you’ll use to access network calls.
  2. getCurrentUser(_:) makes a request to get the current user’s data via the /currentUser endpoint. This is a hard-coded user in the simple backend you have running.
  3. The if let unwraps the response value.
  4. The data returned is a binary representation of the protocol buffer. The Contact initializer takes this data as input, decoding the received message.

Decoding an object with protocol buffer is straightforward as calling the object’s initializer and passing in data. No parsing required. The Swift Protobuf library handles all of that for you!

Now that you have your service up, it’s time to display the information.

Integrate the Attendee’s Badge

Open CardViewController.swift and add the following methods after viewWillAppear(_:):

func fetchCurrentUser() { // 1
  RWService.shared.getCurrentUser { contact in
    if let contact = contact {
      self.configure(contact)
    }
  }
}
 
func configure(_ contact: Contact) { // 2
  self.attendeeNameLabel.attributedText = NSAttributedString.attributedString(for: contact.firstName, and: contact.lastName)
  self.twitterLabel.text = contact.twitterName
  self.emailLabel.text = contact.email
  self.githubLabel.text = contact.githubLink
  self.profileImageView.image = UIImage(named: contact.imageName)
}

These methods will help fetch data from the server and use it to configure the badge. Here’s how they work:

  1. fetchCurrentUser() calls the service to fetch the current user’s info, and configures CardViewController with the contact.
  2. configure(_:) takes a Contact and sets all the UI components in the controller.

You’ll use these shortly, but first you need to derive a readable representation of attendee type from the ContactType enum.

Customizing Protocol Buffer Objects

You need to add a method to convert the enum type to a string so the badge can display SPEAKER rather than 0.

But there’s a problem. If you need to regenerate the .proto file every time you update the message, how do you add custom functionality to the model?

protocol buffers

Swift extensions are well suited for this purpose. They allow you to add to a class without modifying its source code.

Create a new file named contact+extension.swift and add it in the Protocol Buffer Objects group folder. Add the following code to that file:

extension Contact {
  func contactTypeToString() -> String {
    switch type {
    case .speaker:
      return "SPEAKER"
    case .attendant:
      return "ATTENDEE"
    case .volunteer:
      return "VOLUNTEER"
    default:
      return "UNKNOWN"
    }
  }
}

contactTypeToString() maps a ContactType to a string representation for display.

Open CardViewController.swift and add the following line in configure(_:):

self.attendeeTypeLabel.text = contact.contactTypeToString()

This populates attendeeTypeLabel with the string representation of the contact type.

Lastly, add the following after applyBusinessCardAppearance() in viewWillAppear(_:):

if isCurrentUser {
  fetchCurrentUser()
} else {
  // TODO: handle speaker
}

isCurrentUser is currently hard-coded to true, and will be modified when support for speakers is added. fetchCurrentUser() is called in this default case, fetching and populating the card with the current user’s information.

Build and run to see the attendee’s badge!

protocol buffers

Integrate the List of Speakers

With the My Badge tab done, it’s time to turn your attention to the currently blank Speakers tab.

Open RWService.swift and add the following method to the class:

func getSpeakers(_ completion: @escaping (Speakers?) -> ()) { // 1
  let path = "/speakers"
  Alamofire.request("\(url)\(path)").responseData { response in
    if let data = response.result.value { // 2
      let speakers = try? Speakers(protobuf: data) // 3
      completion(speakers)
    }
  }
  completion(nil)
}

This should look familiar; it’s similar to the way getCurrentUser(_:) works, except it fetches Speakers. Speakers contain an array of Contact objects, representing all of the conference speakers.

Open SpeakersViewModel.swift and replace the current implementation with the following:

class SpeakersViewModel {
  var speakers: Speakers!
  var selectedSpeaker: Contact?
 
  init(speakers: Speakers) {
    self.speakers = speakers
  }
 
  func numberOfRows() -> Int {
    return speakers.contacts.count
  }
 
  func numberOfSections() -> Int {
    return 1
  }
 
  func getSpeaker(for indexPath: IndexPath) -> Contact {
    return speakers.contacts[indexPath.item]
  }
 
  func selectSpeaker(for indexPath: IndexPath) {
    selectedSpeaker = getSpeaker(for: indexPath)
  }
}

This acts as a data source for SpeakersListViewController, which displays a list of conference speakers. speakers consists of an array of Contacts and will be populated by the response of the /speakers endpoint. The datasource implementation returns a single Contact for each row.

Now that the view model is set up, you will next configure the cell. Open SpeakerCell.swift and add the following code in SpeakerCell:

func configure(with contact: Contact) {
  profileImageView.image = UIImage(named: contact.imageName)
  nameLabel.attributedText = NSAttributedString.attributedString(for: contact.firstName, and: contact.lastName)
}

This takes a Contact and uses its properties to set the cell’s image and label. The cell will show an image of the speaker, as well as their first and last name.

Next, open SpeakersListViewController.swift and add the following code in viewWillAppear(_:), below the call to super:

RWService.shared.getSpeakers { [unowned self] speakers in
  if let speakers = speakers {
    self.speakersModel = SpeakersViewModel(speakers: speakers)
    self.tableView.reloadData()
  }
}

getSpeakers(_:) makes a request to get the list of speakers. An SpeakersViewModel is initialized with the returned speakers. The tableView is then refreshed to update with the newly fetched data.

Now for every row in the table view, you need to assign a speaker to display. Replace the code in tableView(_:cellForRowAt:) with the following:

let cell = tableView.dequeueReusableCell(withIdentifier: "SpeakerCell", for: indexPath) as! SpeakerCell
if let speaker = speakersModel?.getSpeaker(for: indexPath) {
  cell.configure(with: speaker)
}
return cell

getSpeaker(for:) returns the contact associated with the current table indexPath. configure(with:) is the method you defined on SpeakerCell for setting the speaker’s image and name in the cell.

When a cell is tapped in the speaker list, you want to display the selected speaker in the CardViewController. To start, open CardViewController.swift and add the following property to the top of the class:

var speaker: Contact?

You’ll eventually use this to pass along the selected speaker. Once you have it, you’ll want to display it. Replace // TODO: handle speaker with:

if let speaker = speaker {
  configure(speaker)
}

This checks to see if speaker is populated, and if so, calls configure() on it. That in turn updates the card with the speaker’s information.

Now head back to SpeakersListViewController.swift to pass along the selected speaker. First add the following code in tableView(_:didSelectRowAt:), above performSegue(withIdentifier:sender:):

speakersModel?.selectSpeaker(for: indexPath)

This flags the speaker the user selected in the speakersModel.

Next, add the following in prepare(for:sender:) under vc.isCurrentUser = false:

vc.speaker = speakersModel?.selectedSpeaker

This passes the selectedSpeaker into CardViewController for display.

Make sure your local server is still running, and build and run Xcode. You should now see that the app is fully integrated with the user’s badge, and also shows the list of speakers.

protocol buffers

You have successfully built an end-to-end application using a Python server and a Swift client. They also both share the same model generated with a proto file. If you ever need to modify the model, you simply run the compiler to generate it again, and you’re ready to go on both the client and server side!

Where to Go From Here?

You can download the finished project here.

In this tutorial, you have learned about the basic features of protocol buffers, how to define a .proto file and generate Swift code with the compiler. You also learned how to startup a small local server using Flask, where you created a service to send a protocol buffer binary to the client, and how effortless it was to deserialize the data.

There is much more to protocol buffers, such as defining maps in messages and dealing with backwards compatibility. If you are interested in learning more, please check out Google’s documentation.

Lastly another interesting thing to explore is Remote Procedure Calls which work well with protocol buffers. Check it out at GRPC.

If you have any questions or comments, feel free to join the discussion below!

The post Introduction to Protocol Buffers on iOS appeared first on Ray Wenderlich.

New Course: Beginning Auto Layout

$
0
0

x-post-feature-AutoLayout-beg

In the past, we had three separate courses related to Auto Layout for raywenderlich.com subscribers: one on Auto Layout constraints, one on Stack Views, and one on Adaptive Layout. There were some references between the courses, but they weren’t well connected.

These three concepts are all pretty important for every iOS developer to understand, since everyone needs to know how to make their layouts work well on all device sizes.

So this year, we decided to make two new courses that combine all three concepts into a single learning path: Beginning and Mastering Auto Layout!

Today, we are releasing the the first course in this series: Beginning Auto Layout. You’ll start with the basics like autoresizing masks and Stack Views, then move onto creating and editing your own constraints.

If you’re new to Auto Layout, or if it’s ever confused you in the past, this is the course for you. And best yet: it’s fully up-to-date for iOS 10 and Swift 3.

Let’s take a look at what’s inside!

Video1

Video 1: Introduction. Learn the basics of Auto Layout, get familiar with the various Xcode tools at your disposal, and see how to save yourself time and frustration with your layout tasks.

Video2

Video 2: Autoresizing Masks. Autoresizing masks define the relationship between a view and its superview. Learn how autoresizing masks work, and when to use them.

Video3

Video 3: Stack Views. Stack Views are powerful layout tools that let you create simple to extremely complex layouts, in a minimum of time.

Video4

Video 4: Intrinsic Content Size. Learn how various UI elements can have a preferred size, based on the content, and how this affects your layouts.

Video5

Video 5: Nesting Stack Views. Stack views can contain other stack views, which lets you create complex, flexible layouts. You’ll learn how to make nested stack views play nicely with each other.

Video6

Video 6: Introducing Constraints. Constraints are the “building blocks” of Auto Layout. Learn what they are, and when to choose them over autoresizing masks or stack views.

Video7

Video 7: Creating Constraints. There are several ways to create constraints in Xcode — explore the most common ways and see how constraints affect your layouts.

Video8

Video 8: Editing Constraints. Now that you’ve created constraints, learn how to edit them to add more complex arrangements — or even delete constraints altogether.

Video9

Video 9: Conclusion. Recap what you’ve learned in this series, check out a few Auto Layout tips, and get a preview of the Mastering Auto Layout series!

Where To Go From Here?

Want to check out the course? You can watch the introduction for free!

The rest of the course is for raywenderlich.com subscribers only. Here’s how you can get access:

  • If you are a raywenderlich.com subscriber: The entire course is complete and available today. You can check out the first part here.
  • If you are not a subscriber yet: What are you waiting for? Subscribe now to get access to our new Beginning Auto Layout course and our entire catalog of over 500 videos.

Next week, we’ll be releasing our second new course – Mastering Auto Layout – which covers constraint inequalities and priorities, constraints in code, debugging Auto Layout, size classes, and more.

Stay tuned for that – and for many more new Swift 3 courses and updates to come! :]

The post New Course: Beginning Auto Layout appeared first on Ray Wenderlich.
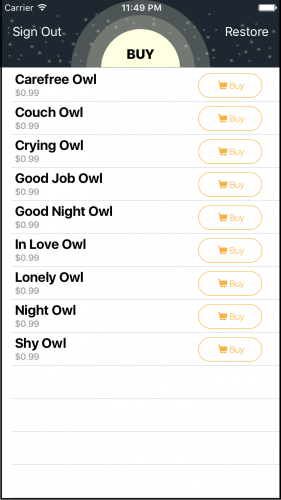
Android Fragments Tutorial: An Introduction

$
0
0

Fragments-featureThis tutorial is an introduction to Android Fragments. You will learn the fundamental concepts of Android Fragments while creating an app that displays the rage comics.

Update note: This tutorial has been updated to API 25 and Android Studio 2.2.2 by Huyen Tue Dao. The original tutorial was written by Huyen Tue Dao.

fragment | noun | /’frag-mənt/
an isolated or incomplete part of something

A fragment is an Android component that holds part of the behavior and/or UI of an activity. As the name intimates, fragments are not independent entities, but are subservient to a single activity.

In many ways, they resemble and echo the functionality of activities.

Imagine for a moment that you’re an activity. You have a lot to do, so you’d employ a few mini-me’s to run around and do your laundry and taxes in exchange for lodging and food. That’s kind of like the relationship between activities and fragments.

Now just like you don’t actually need a few minions to do your bidding, you don’t have to use fragments. However, if you do use them and use them well, they can provide:

  • Modularity: dividing complex activity code across fragments for better organization and maintenance.
  • Reusability: placing behavior or UI parts into fragments that can be shared across multiple activities.
  • Adaptability: representing sections of a UI as different fragments and utilizing different layouts depending on screen orientation and size.

android_fragments_d001_why_fragments
In this introduction to Android fragments tutorial, you’ll build a mini encyclopedia of Rage Comics. The app will display a list of Rage Comics arranged in a grid. When a Rage Comic is selected, the app displays information about it. In this tutorial, you’ll learn:

  • How to create and add fragments to an activity.
  • How to let your fragments send information to an activity.
  • How to add and replace fragments by using transactions.

Note: This tutorial assumes you’re comfortable the basics of Android programming and understand what activity lifecycle means. If you’re brand new to Android, you should work through both the Android Tutorial for Beginners and the Introduction to Activities first. This tutorial also utilizes an Android RecyclerView. If you have never used RecyclerView or need a refresher, you should also look at the Android RecyclerView Tutorial.

The time has come to release the fragments!

Getting Started With Android Fragments

Download the starter project, unzip and start Android Studio.

In the Welcome to Android Studio dialog, select Import project (Eclipse ADT, Gradle, etc.).
Android Studio Welcome Screen

Choose the top-level directory of the starter project, and click OK.

Select project to import

Check out the project, and you’ll find some resource files; strings.xml, activity_main.xml, and drawable and layout files. There are also some boilerplate layouts for your fragments, non-fragment code that you’ll need and a fragment class that you’ll use later to write your own.

The MainActivity will host all your wee fragments, and RageComicListFragment contains code to display a list of the Rage Comic content so that you can focus on fragments.

Build and run the project. You’ll see that it’s pretty quiet in there.
Running the starter app

You’ll fix that…

android_fragments_005_app_soon

Android Fragment Lifecycle

Like an activity, a fragment has a lifecycle with events that occur when the fragment’s status changes. For instance, an event happens when the fragment becomes visible and active. Or when the fragment becomes unused and is removed. Also like an activity, you can add code and behaviors to callbacks for these events.

Here’s a fragment lifecycle diagram from the official Android Developer documentation.android_fragments_d002_fragment_lifecycle

android_fragments_006_fragment_lifecycle_hmm

The following lifecycle events come into play when you add a fragment:

  • onAttach: when the fragment attaches to its host activity
  • onCreate: when a new fragment instance initializes, which always happens after it attaches to the host — fragments are a bit like viruses
  • onCreateView: when a fragment creates its portion of the view hierarchy, which is added to its activity’s view hierarchy
  • onActivityCreated: when the fragment’s activity has finished its own onCreate event
  • onStart: when the fragment is visible; a fragment starts only after its activity starts and often starts immediately after its activity does
  • onResume: when the fragment is visible and interactable; a fragment resumes only after its activity resumes and often resumes immediately after the activity does

But wait, the fragment isn’t done. These lifecycle events happen when you remove a fragment:

  • onPause: when the fragment is no longer interactable; this occurs when either the fragment is about to be removed or replaced or when the fragment’s activity pauses
  • onStop: when the fragment is no longer visible; this occurs either after the fragment is about to be removed or replaced or when the fragment’s activity stops
  • onDestroyView: when the view and related resources created in onCreateView are removed from the activity’s view hierarchy and destroyed
  • onDestroy: when the fragment does its final clean up
  • onDetach: when the fragment is detached from its activity

As you can see, the fragment’s lifecycle is intertwined with the activity’s lifecycle. But it has extra events that are particular to the fragment’s view hierarchy, state and attachment to its activity.

The v4 Support Library

Fragments were introduced as part of the oft-forgotten, tablet-targeted Honeycomb release for creating device-specific layouts for a single app.

The v4 Support Library provides a fragment implementation for devices running less than Android 3.0, specifically under android.support.v4.app.Fragment package.

Even if your app is running 4.0+, you should probably still use support fragments.

android_fragments_007_support_fragment_why

It’s not just developers that depend on the Support Library. Other libraries also need it, like the v7 AppCompat Library, which holds the AppCompatActivity and other back-porting of API 21 functionality. In fact, AppCompatActivity is a subclass of the v4 FragmentActivity.

So, if you want to get that sweet functionality on Lollipop and above, you’ll need to take the same road as v4.

Creating a Fragment

Eventually, All the Rages will show a list of Rage Comics on launch, and tapping on any of the items will display details about that particular comic. To start, you’ll work backwards and first create the detail page.

Open the starter project in Android Studio and find fragment_rage_comic_details.xml under app -> res -> layout; this XML file lays out the comic detail display. It also displays one of the drawable resources and the associated string resources.

Fragment details preview

Select Android Studio’s Project tab and locate the RageComicDetailsFragment file. This class will be responsible for displaying details for a selected comic.

In RageComicDetailsFragment.java, the code looks like what is shown below:

import android.os.Bundle;
import android.support.annotation.Nullable;
import android.support.v4.app.Fragment;
import android.view.LayoutInflater;
import android.view.View;
import android.view.ViewGroup;
 
//1	
public class RageComicDetailsFragment extends Fragment {
  //2	  
  public static RageComicDetailsFragment newInstance() {
    return new RageComicDetailsFragment();
  }
 
  //3	
  @Nullable
  @Override
  public View onCreateView(LayoutInflater inflater, ViewGroup container, Bundle savedInstanceState) {
    return inflater.inflate(R.layout.fragment_rage_comic_details, container, false);
  }
}

This is what this code does:

  1. Declares RageComicDetailsFragment as a subclass of Fragment.
  2. Provides a method for creating new instances of the fragment, a factory method.
  3. Creates the view hierarchy controlled by the fragment.

Activities use setContentView() to specify the XML file that defines their layouts, but fragments create their view hierarchy in onCreateView(). Here you called LayoutInflater.inflate to create the hierarchy of RageComicDetailsFragment.

The third parameter of inflate specifies whether the inflated fragment should be added to the container. The container is the parent view that will hold the fragment’s view hierarchy. You should always set this to false: the FragmentManager will take care of adding the fragment to the container.

There’s a new kid in town here: FragmentManager. Each activity has a FragmentManager that manages its fragments. It also provides an interface for you to access, add and remove those fragments.

You’ll notice that while RageComicDetailsFragment has a factory instance method, newInstance(), it does not have any constructors.

Wait, why do you need a factory method but not a constructor?

First, because you did not define any constructors, the compiler automatically generates an empty, default constructor that takes no arguments. This is all that you should have for a fragment: no other constructors.

If you specify a non-empty constructor but not explicitly write an empty constructor, Lint will give you an error:

Lint warning for no default constructor

Now it will compile still, but when you run your application, you’ll get an even nastier exception.

You probably know that Android may destroy and later re-create an activity and all its associated fragments when the app goes into the background. When the activity comes back, its FragmentManager starts re-creating fragments by using the empty default constructor. If it cannot find one, you get an exception.

Because of this, it is best practice to never specify any non-empty constructors, and in fact, the easiest thing to do is to specify none as you just did.

Wait, what if you need to pass information or data to a Fragment? Hold on tight: you’ll get the answer to that later.

Adding a Fragment

Here’s where you get to add your own shiny new fragment using the simplest approach: adding it to the activity’s XML layout.

To do this, open activity_main.xml, select the Text tab and add the following inside of the root FrameLayout:

<fragment
  android:id="@+id/details_fragment"
  class="com.raywenderlich.alltherages.RageComicDetailsFragment"
  android:layout_width="match_parent"
  android:layout_height="match_parent"/>

Here you’re placing a <fragment> tag inside of the activity layout and specifying the type of fragment the class attribute should inflate. The view ID of the <fragment> is required by the FragmentManager.

Build and run. You will see the fragment:

The details fragment in its full glory

Adding a Fragment Dynamically

First, open activity_main.xml again and remove the <fragment> you just placed. (Yes, I know, you just put it there — sorry.) You’ll replace it with the list of Rage Comics.

Open RageComicListFragment.java, which has all the lovely list code. You can see that the RageComicListFragment has no explicit constructors and a newInstance().

The list code in RageComicListFragment depends on some resources. You have to ensure that the fragment has a valid reference to a Context for accessing those resources. That’s where onAttach() comes into play.

Open RageComicListFragment.java, and add these imports directly below the existing imports:

import android.content.res.Resources;
import android.content.res.TypedArray;
import android.support.annotation.Nullable;
import android.os.Bundle;
import android.support.v7.widget.GridLayoutManager;
import android.app.Activity;

The first two imports allow you to access some string resources that you will use as data in the list. The fifth import, the GridLayoutManager, helps in positioning items in the Rage Comic list. The other imports are for standard fragment overrides.

Inside of RageComicListFragment.java, add the following two methods above the definition of the RageComicAdapter:

@Override
public void onAttach(Context context) {
  super.onAttach(context);
 
  // Get rage face names and descriptions.
  final Resources resources = context.getResources();
  mNames = resources.getStringArray(R.array.names);
  mDescriptions = resources.getStringArray(R.array.descriptions);
  mUrls = resources.getStringArray(R.array.urls);
 
  // Get rage face images.
  final TypedArray typedArray = resources.obtainTypedArray(R.array.images);
  final int imageCount = mNames.length;
  mImageResIds = new int[imageCount];
  for (int i = 0; i < imageCount; i++) {
    mImageResIds[i] = typedArray.getResourceId(i, 0);
  }
  typedArray.recycle();
}
 
@Nullable
@Override
public View onCreateView(LayoutInflater inflater, ViewGroup container, Bundle savedInstanceState) {
  final View view = inflater.inflate(R.layout.fragment_rage_comic_list, container, false);
 
  final Activity activity = getActivity();
  final RecyclerView recyclerView = (RecyclerView) view.findViewById(R.id.recycler_view);
  recyclerView.setLayoutManager(new GridLayoutManager(activity, 2));
  recyclerView.setAdapter(new RageComicAdapter(activity));
  return view;
}

onAttach() contains code that accesses the resources you need via the Context to which the fragment has attached. Because the code is in onAttach(), you can rest assured that the fragment has a valid Context.

In onCreateView(), you inflate the view hierarchy of RageComicListFragment, which contains a RecyclerView, and perform some setup.

Generally, if you have to poke and prod at a fragment’s view, onCreateView() is a good place to start because you have the view right there.

Next open MainActivity.java and replace onCreate() with the following:

@Override
protected void onCreate(Bundle savedInstanceState) {
super.onCreate(savedInstanceState);
setContentView(R.layout.activity_main);
 
  if (savedInstanceState == null) {
    getSupportFragmentManager()
      .beginTransaction()
      .add(R.id.root_layout, RageComicListFragment.newInstance(), "rageComicList")
      .commit();
  }
}

Here you get RageComicListFragment into MainActivity. You ask your new friend, FragmentManager, to add it.

Build, run and you’ll see a Rage-filled list once the app launches:

The list of Rage Comics. Woo!

FragmentManager helped achieve this awesomeness through FragmentTransactions, which are basically fragment operations such as, add, remove, etc.

First you grab the FragmentManager by calling getSupportFragmentManager(), as opposed to getFragmentManager since you are using support fragments.

Then you ask that FragmentManager to start a new transaction by calling beginTransaction() — you probably figured that out yourself. Next you specify the add operation that you want by calling add and passing in:

  • The view ID of a container for the fragment’s view hierarchy in the activity’s layout. If you sneak a quick peek at activity_main.xml, you’ll find @+id/root_layout.
  • The fragment instance to be added.
  • A string that acts as a tag/identifier for the fragment instance. This allows the FragmentManager to later retrieve the fragment for you.

Finally, you ask the FragmentManager to execute the transaction by calling commit().

And with that, the fragment is added!

An if block contains the code that displays the fragment and checks that the activity doesn’t have saved state. When an activity is saved, all of its active fragments are also saved. If you don’t perform this check, this could happen:

android_fragments_d003_fragments_too_many

And you would be like this:

android_fragments_014_y_u_no_have

The lesson: Always keep in mind how the saved state affects your fragments.

Communicating with the Activity

Even though fragments are attached to an activity, they don’t necessarily all talk to one another without some further “encouragement” from you.

For All the Rages, you’ll need RageComicListFragment to let MainActivity know when the user has made a selection so that RageComicDetailsFragment can display the selection.

To start, open RageComicListFragment.java and add the following Java interface at the bottom:

public interface OnRageComicSelected {
  void onRageComicSelected(int imageResId, String name,
    String description, String url);
}

This defines a listener interface for the activity to listen to the fragment. The activity will implement this interface, and the fragment will invoke the onRageComicSelected() when an item is selected, passing the selection to the activity.

Add this new field below the existing ones in RageComicListFragment:

private OnRageComicSelected mListener;

This field is a reference to the fragment’s listener, which will be the activity.

In onAttach(), add the following just below super.onAttach(context);:

if (context instanceof OnRageComicSelected) {
  mListener = (OnRageComicSelected) context;
} else {
  throw new ClassCastException(context.toString() + " must implement OnRageComicSelected.");
}

This initializes the listener reference. You wait until onAttach() to ensure that the fragment actually attached itself. Then you verify that the activity implements the OnRageComicSelected interface via instanceof.

If it doesn’t, it throws an exception since you can’t proceed. If it does, then you set the activity as the listener for RageComicListFragment.

In the onBindViewHolder() method, add this code to the bottom — okay, I fibbed a little; the RageComicAdapter doesn’t have everything you need):

viewHolder.itemView.setOnClickListener(new View.OnClickListener() {
  @Override
  public void onClick(View v) {
    mListener.onRageComicSelected(imageResId, name, description, url);
  }
});

This adds a View.OnClickListener to each Rage Comic so that it invokes the callback on the listener (the activity) to pass along the selection.

Open MainActivity.java and update the class definition to following:

public class MainActivity extends AppCompatActivity
  implements RageComicListFragment.OnRageComicSelected {

You will get an error asking you to make MainActivity abstract or implement abstract method OnRageComicSelected(int, String, String, String). Don’t fret just yet, you’ll resolve it soon.

This code specifies that MainActivity is an implementation of the OnRageComicSelected interface.

For now, you’ll just show a toast to verify that the code works. Add the following import below the existing imports so that you can use toasts:

import android.widget.Toast;

And then add the following method below onCreate():

@Override
public void onRageComicSelected(int imageResId, String name, String description, String url) {
  Toast.makeText(this, "Hey, you selected " + name + "!", Toast.LENGTH_SHORT).show();
}

There you go, the error is gone! Build and run. Once the app launches, click one of the Rage Comics. You should see a toast message naming the clicked item:

You selected Neil deGrasse Tyson!

You got the activity and its fragments talking. You’re like a master digital diplomat.

Fragment Arguments and Transactions

Currently, RageComicDetailsFragment displays a static Drawable and set of Strings, but say you want it to display the user’s selection.

Open RageComicDetailsFragment.java and add the following constants at the top of the class definition:

private static final String ARGUMENT_IMAGE_RES_ID = "imageResId";
private static final String ARGUMENT_NAME = "name";
private static final String ARGUMENT_DESCRIPTION = "description";
private static final String ARGUMENT_URL = "url";

These constants are keys you will use to save and restore the fragment’s state.

Replace newInstance() with the code shown below:

public static RageComicDetailsFragment newInstance(int imageResId, String name,
  String description, String url) {
 
  final Bundle args = new Bundle();
  args.putInt(ARGUMENT_IMAGE_RES_ID, imageResId);
  args.putString(ARGUMENT_NAME, name);
  args.putString(ARGUMENT_DESCRIPTION, description);
  args.putString(ARGUMENT_URL, url);
  final RageComicDetailsFragment fragment = new RageComicDetailsFragment();
  fragment.setArguments(args);
  return fragment;
}

A fragment can take initialization parameters through its arguments, which you access via getArguments() and setArguments(). The arguments are actually a Bundle that stores them as key-value pairs, just like the Bundle in Activity.onSaveInstanceState.

You create and populate the arguments’ Bundle, call setArguments, and when you need the values later, you call getArguments to retrieve them.

As you learned earlier, when a fragment is re-created, the default empty constructor is used — no parameters for you.

Because the fragment can recall initial parameters from its persisted arguments, you can utilize them in the re-creation. The above code also stores information about the selected Rage Comic in the RageComicDetailsFragment arguments.

Add the following imports to the top of RageComicDetailsFragment.java:

import android.widget.ImageView;
import android.widget.TextView;

Now, replace onCreateView() with the following:

@Nullable
@Override
public View onCreateView(LayoutInflater inflater, ViewGroup container, Bundle savedInstanceState) {
  final View view = inflater.inflate(R.layout.fragment_rage_comic_details, container, false);
  final ImageView imageView = (ImageView) view.findViewById(R.id.comic_image);
  final TextView nameTextView = (TextView) view.findViewById(R.id.name);
  final TextView descriptionTextView = (TextView) view.findViewById(R.id.description);
 
  final Bundle args = getArguments();
  imageView.setImageResource(args.getInt(ARGUMENT_IMAGE_RES_ID));
  nameTextView.setText(args.getString(ARGUMENT_NAME));
  final String text = String.format(getString(R.string.description_format), args.getString
    (ARGUMENT_DESCRIPTION), args.getString(ARGUMENT_URL));
  descriptionTextView.setText(text);
  return view;
}

Since you want to dynamically populate the UI of the RageComicDetailsFragment with the selection, you grab references to the ImageView and TextViews in the fragment view in onCreateView. Then you populate them with the image and text you passed to RageComicDetailsFragment, using them as arguments.

Finally, you need to create and display a RageComicDetailsFragment when a user clicks an item, instead of just showing a dinky little toast. Open MainActivity and replace the logic inside onRageComicSelected with:

@Override
public void onRageComicSelected(int imageResId, String name, String description, String url) {
  final RageComicDetailsFragment detailsFragment =
    RageComicDetailsFragment.newInstance(imageResId, name, description, url);
  getSupportFragmentManager()
    .beginTransaction()
    .replace(R.id.root_layout, detailsFragment, "rageComicDetails")
    .addToBackStack(null)
    .commit();
}

The code includes some classes you haven’t used previously. So you need to fire off a couple of option + enter sequences to import the missing classes.

You’ll find that this code is similar to your first transaction that added the list to MainActivity, but there are some notable differences.

  • You create a fragment instance that included some nifty parameters.
  • You call replace(), instead of add, which removes the fragment currently in the container and then adds the new Fragment.
  • You call another new friend: the addToBackStack() of FragmentTransaction. Fragments have a back stack, or history, just like activities.

The fragment back stack is not independent of the activity back stack. Think of it as an extra stack of history on top of that of the host activity.

Fragments and back stack

When you navigate between activities, each one gets placed on the activity back stack. Whenever you commit a FragmentTransaction, you have the option to add that transaction to the back stack.

So what does addToBackStack() do? It adds the replace() to the back stack so that when the user hits the device’s back button it undoes the transaction. In this case, hitting the back button sends the user back to the full list.

The add() transaction for the list omits calling addToBackStack(). This means that the transaction is part of the same history entry as the entire activity. If the user hits the back button from the list, it backs the user out of the app.

Guess what? That’s all the code, so build and run.

There won’t be too much difference at first; it’s still the same ol’ list. This time, however, if you click on a Rage Comic, you should see the details for that comic instead of a dinky little toast:

Yay! Actual details on Neil deGrasse Tyson

Woo hoo! Your app is now officially All the Rages, and you have a nice understanding of fragments.

Where To Go From Here?

You can download the final project here.

There is a lot more to learn and do with fragments. Like any kind of tool or feature, consider whether fragments fit your app’s needs and if they do, try to follow best practices and conventions.

To take your skills to the next level, here are some things to explore:

  • Using fragments within a ViewPager: many apps, including the Play Store, utilize a swipeable, tabbed content structure via ViewPagers.
  • Using a more powerful, advantageous DialogFragment instead of a plain old dialog or AlertDialog.
  • Playing with how fragments interact with other parts of the activity, like the app bar.
  • Creating adaptive UIs with fragments. In fact, you should run through Adaptive UI in Android Tutorial.
  • Using fragments as part of the implementation of a high-level behavioral architecture. You can take a look at Common Design Patterns for Android and finding a good starting off point to get the architecture ball rolling.

We hope you enjoyed this introduction to Android fragments tutorial, and if you have any questions or comments, please join the forum discussion below!

The post Android Fragments Tutorial: An Introduction appeared first on Ray Wenderlich.
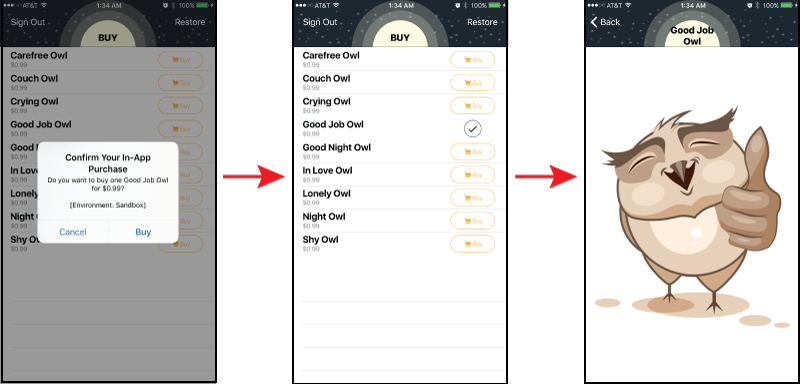
Screencast: Server Side Swift with Vapor: Registering Users over SSL

Screencast: Beginning C# with Unity Part 23: Classes


Swift Algorithm Club: Swift Merge Sort

$
0
0

SwiftAlgClub-MergeSort-feature

The Swift Algorithm Club is an open source project to implement popular algorithms and data structures in Swift.

Every month, the SAC team will feature a cool data structure or algorithm from the club in a tutorial on this site. If your want to learn more about algorithms and data structures, follow along with us!

In this tutorial, you’ll walk through one of the classics of sorting algorithms, the merge sort.

This algorithm was first implemented by Kelvin Lau, and is now refactored for tutorial format.

Note: New to the Swift Algorithm Club? Check out our getting started post first.

Getting Started

Invented in 1945 by John von Neumann, merge sort is a efficient sorting algorithm. The idea behind merge sort is to divide and conquer; To break up a big problem into small problems. A helpful mantra to remember merge sort by is split first and merge after.

Assume you’re given a pile of playing cards.

cards-01

The merge sort algorithm works as follows:

  1. Split in half. You now have two unsorted piles.cards-02
  2. Keep splitting the resulting piles until you can’t split anymore. In the end, you will have 1 card for each pile.

    cards-03
    cards-04

  3. Merge the piles together. During each merge, you put the contents in sorted order. This is easy because each individual pile is already sorted.
    cards-05cards-06cards-07

Swift Merge Sort

Let’s see what the merge sort algorithm looks like in Swift.

Open up a new Swift Playground add the following code:

let array = [7, 2, 6, 3, 9]
 
func mergeSort(_ array: [Int]) -> [Int] {
 
}

Here you start off with an unsorted array of integers. Your goal is to implement this function that takes an integer array and returns a new array in sorted order.

1) Split

Remember your first step is to split the array in half. To do this, update the mergeSort function to the following:

func mergeSort(_ array: [Int]) -> [Int] {
  // 1
  let middleIndex = array.count / 2
  // 2
  let leftArray = Array(array[0..<middleIndex])
  let rightArray = Array(array[middleIndex..<array.count])
}

The code shouldn’t compile yet, but don’t worry. Your first task is to split the array in two halves.

  1. You find the middle index of the array by taking the count of the array and dividing it by half.
  2. Now that you have the middle index, you create two new arrays. The left array contains the first half of the original array, and the right array contains the second half.

2) Keep Splitting

Now that you know how to split the array in half, it’s time for the second step: to keep splitting the array until you can’t split anymore (i.e. each subdivision contains 1 element). That’s a standard use case for recursion.

You will do this using recursion. To do this, update the mergeSort function to the following:

func mergeSort(_ array: [Int]) -> [Int] {
  // 1
  guard array.count > 1 else { return array }
 
  let middleIndex = array.count / 2
 
  // 2
  let leftArray = mergeSort(Array(array[0..<middleIndex]))
  let rightArray = mergeSort(Array(array[middleIndex..<array.count]))
}

You’ve made 2 changes here:

  1. All recursive implementations need a base case. You can also think of it as an “exit condition”. In your case, you want to stop the recursion when the array only has 1 element.
  2. You’re now calling mergeSort on the left and right halves of the original array. As soon as you’ve split the array in half, you’re going to try to split again.
Note: Understanding recursion can be quite tricky. If you’re confused at how this works, try to trace out each step on paper using the test array of [7, 2, 6, 3, 9].

There’s still more work to do before your code will compile. Now that you’ve accomplished the splitting part, it’s time to focus on merging.

3) Merge

Your final step is to merge the leftArray and rightArray together. To keep things clean, you will create a separate merge function for this.

The sole responsibility of the merging function is to take in 2 sorted arrays and combine them together. The output needs to retain the sorted order. Add the following to the playground:

func merge(_ left: [Int], _ right: [Int]) -> [Int] {
  // 1
  var leftIndex = 0
  var rightIndex = 0
 
  // 2
  var orderedArray: [Int] = []
 
  // merging logic goes here!
 
  return orderedArray
}

This is the basic skeleton for the merging function:

  1. You’ve declared 2 variables – leftIndex and rightIndex. You’ll use them to keep track of your progress as you parse through the two arrays.
  2. The orderedArray will house the combined array.
Quick quiz:
What’s the downside of doing the following?
func merge(_ left: [Int], _ right: [Int]) -> [Int] {
  let combinedArray = left + right
  return combinedArray.sorted(<)
}

Solution Inside SelectShow>

The strategy is to append elements from the left and right arrays one by one. Comparisons will be made at each step, ensuring that the smaller of the two elements goes into the orderedArray. Update the merge function to the following:

func merge(_ left: [Int], _ right: [Int]) -> [Int] {
  var leftIndex = 0
  var rightIndex = 0
 
  var orderedArray: [Int] = []
 
  // 1
  while leftIndex < left.count && rightIndex < right.count {
    // challenge!
  }
 
  // 2
  while leftIndex < left.count {
    orderedArray.append(left[leftIndex])
    leftIndex += 1
  }
 
  while rightIndex < right.count {
    orderedArray.append(right[rightIndex])
    rightIndex += 1
  }
 
  return orderedArray
}

This sets up the things to consider when iterating through the arrays:

  1. The idea is to start in the beginning, comparing the elements in left and right arrays sequentially. If you reached the end of either array, there’s nothing else to compare.
  2. The first loop guarantees that either left or right is empty. Since both arrays are sorted, this ascertains that the rest of the contents in the leftover array are equal or greater than the ones currently in orderedArray. In this scenario, you’ll append the rest of the elements without comparison.

Challenge

The challenge for this article is for you to implement the comparison logic. The key thing to remember is that both left and right is already sorted. Use leftIndex and rightIndex to keep track of the progress you’ve made on the respective arrays.

Your merging solution should be O(n) in terms of time complexity.

Solution Inside SelectShow>

With that, your merging function is complete. Time to finally fix that compiler error!

Finishing up

Update the mergeSort function to the following:

func mergeSort(_ array: [Int]) -> [Int] {
  guard array.count > 1 else { return array }
 
  let middleIndex = array.count / 2
 
  let leftArray = mergeSort(Array(array[0..<middleIndex]))
  let rightArray = mergeSort(Array(array[middleIndex..<array.count]))
 
  // here
  return merge(leftArray, rightArray)
}

This is the final version of the merge sort algorithm. Here’s a summary of the key procedures of merge sort:

  1. The strategy of merge sort (and many other algorithms) is divide and conquer. You want to solve many small problems rather than one big problem.
  2. There are two core responsibilities – A method that handles dividing the initial array recursively, and a method that handles merging two arrays together.
  3. The merging function should take two sorted arrays and produce a single sorted array.

You can try this out for yourself by adding the following at the end of the playground:

mergeSort(array)

You should see a sorted array in the sidebar of the Playground:

[2, 3, 6, 7, 9]

Generic Swift Merge Sort Implementation

Now that you’ve written a merge sort function that handles integers, your next goal is to create a more robust merge sort that can handle all data types. You can achieve that easily with generics and luckily, it’s only a minor change.

Find and replace all the Int declarations with T, and add <T: Comparable> after each function name. Your functions should look like this:

func mergeSort<T: Comparable>(_ array: [T]) -> [T] {
  guard array.count > 1 else { return array }
 
  let middleIndex = array.count / 2
 
  let leftArray = mergeSort(Array(array[0..<middleIndex]))
  let rightArray = mergeSort(Array(array[middleIndex..<array.count]))
 
  return merge(leftArray, rightArray)
}
 
func merge<T: Comparable>(_ left: [T], _ right: [T]) -> [T] {
  var leftIndex = 0
  var rightIndex = 0
 
  var orderedArray: [T] = []
 
  while leftIndex < left.count && rightIndex < right.count {
    let leftElement = left[leftIndex]
    let rightElement = right[rightIndex]
 
    if leftElement < rightElement {
      orderedArray.append(leftElement)
      leftIndex += 1
    } else if leftElement > rightElement {
      orderedArray.append(rightElement)
      rightIndex += 1
    } else {
      orderedArray.append(leftElement)
      leftIndex += 1
      orderedArray.append(rightElement)
      rightIndex += 1
    }
  }
 
  while leftIndex < left.count {
    orderedArray.append(left[leftIndex])
    leftIndex += 1
  }
 
  while rightIndex < right.count {
    orderedArray.append(right[rightIndex])
    rightIndex += 1
  }
 
  return orderedArray
}

As long as the elements you’re trying to sort is Comparable, i.e. you can use comparison operators < and >, you’ll be able use merge sort.

Where To Go From Here?

I hope you enjoyed this tutorial on the merge sort algorithm!

Here is a playground with the above code. You can also find the original implementation and further discussion in the merge sort section of the Swift Algorithm Club repository.

This was just one of the many algorithm clubs focused on the Swift Algorithm Club repository. If you’re interested in more, check out the repo.

It’s in your best interest to know about algorithms and data structures – they’re solutions to many real world problems, and are frequently asked as interview questions. Plus it’s fun!

So stay tuned for many more tutorials from the Swift Algorithm club in the future. In the meantime, if you have any questions on implementing trees in Swift, please join the forum discussion below!

Note: The Swift Algorithm Club is always looking for more contributors. If you’ve got an interesting data structure, algorithm, or even an interview question to share, don’t hesitate to contribute! To learn more about the contribution process, check out our Join the Swift Algorithm Club article.

The post Swift Algorithm Club: Swift Merge Sort appeared first on Ray Wenderlich.
Grand Central Dispatch Tutorial for Swift 3: Part 1/2

$
0
0

grand central dispatch tutorial

Update note: This tutorial has been updated for Swift 3 by Christine Abernathy. The previous tutorial was written by Bjørn Ruud.

Grand Central Dispatch (GCD) is a low-level API for managing concurrent operations. GCD can help you improve your app’s responsiveness by defering computationally expensive tasks to the background. It’s an easier concurrency model to work with than locks and threads.

In Swift 3, GCD got a major revamp, moving from a C-based API to a “Swiftier” API that included new classes and new data structures.

In this two-part Grand Central Dispatch tutorial, you’ll learn the ins and outs of GCD. This first part will explain what GCD does and showcase several basic GCD functions. In the second part, you’ll learn about some advanced functions GCD has to offer.

You’ll build upon an existing application called GooglyPuff. GooglyPuff is a non-optimized, “thread-unsafe” app that overlays googly eyes on detected faces using Core Image’s face detection API. You can select images to apply this effect on from your Photo Library or select images downloaded from the internet.

Your mission in this tutorial, if you choose to accept it, is to use GCD to optimize the app and ensure you can safely call code from different threads.

Getting Started

Download the starter project for this tutorial and unzip it. Run the project in Xcode to see what you have to work with.

The home screen is initially empty. Tap + then select Le Internet to download predefined images from the internet. Tap the first image and you’ll see googly eyes added to the face.

grand central dispatch tutorial

There are four classes that you’ll primarily be working with in this tutorial:

  • PhotoCollectionViewController: The initial view controller. It displays the selected photos as thumbnails.
  • PhotoDetailViewController: Displays a selected photo from PhotoCollectionViewController and adds googly eyes to the image.
  • Photo: This is a protocol describing the properties of a photo. It provides an image, thumbnail and their corresponding statuses. Two classes are provided which implement the protocol: DownloadPhoto which instantiate a photo from an instance of URL, and AssetPhoto which instantiates a photo from an instance of PHAsset.
  • PhotoManager: This manages all the Photo objects.

There are a few problems with the app. One that you may have noticed when running the app is that the download complete alert is premature. You’ll fix this in the second part of the series.

In this first part, you’ll work on a few improvements including optimizing the googly-fying process and making PhotoManager thread safe.

GCD Concepts

To understand GCD, you need to be comfortable with several concepts related to concurrency and threading.

Concurrency

In iOS a process or application is made up of one or more threads. The threads are managed independently by the operating system scheduler. Each thread can execute concurrently but it’s up to the system to decide if this happens and how it happens.

Single-core devices can achieve concurrency through time-slicing. They would run one thread, perform a context switch, then run another thread.

grand central dispatch tutorial

Multi-core devices on the other hand, execute multiple threads at the same time via parallelism.

GCD is built on top of threads. Under the hood it manages a shared thread pool. With GCD you add blocks of code or work items to dispatch queues and GCD decides which thread to execute them on.

As you structure your code, you’ll find code blocks that can run simultaneously and some that should not. This then allows you to use GCD to take advantage of concurrent execution.

Note that GCD decides how much parallelism is required based on the system and available system resources. It’s important to note that parallelism requires concurrency, but concurrency does not guarantee parallelism.

Basically, concurrency is about structure while parallelism is about execution.

Queues

GCD provides dispatch queues represented by DispatchQueue to manage tasks you submit and execute them in a FIFO order guaranteeing that the first task submitted is the first one started.

Dispatch queues are thread-safe which means that you can access them from multiple threads simultaneously. The benefits of GCD are apparent when you understand how dispatch queues provide thread safety to parts of your own code. The key to this is to choose the right kind of dispatch queue and the right dispatching function to submit your work to the queue.

Queues can be either serial or concurrent. Serial queues guarantee that only one task runs at any given time. GCD controls the execution timing. You won’t know the amount of time between one task ending and the next one beginning:

grand central dispatch tutorial

Concurrent queues allow multiple tasks to run at the same time. Tasks are guaranteed to start in the order they were added. Tasks can finish in any order and you have no knowledge of the time it will take for the next task to start, nor the number of tasks that are running at any given time.

See the sample task execution below:

grand central dispatch tutorial

Notice how Task 1, Task 2, and Task 3 start quickly one after the other. On the other hand, Task 1 took a while to start after Task 0. Also notice that while Task 3 started after Task 2, it finished first.

The decision of when to start a task is entirely up to GCD. If the execution time of one task overlaps with another, it’s up to GCD to determine if it should run on a different core, if one is available, or instead to perform a context switch to run a different task.

GCD provides three main types of queues:

  1. Main queue: runs on the main thread and is a serial queue.
  2. Global queues: concurrent queues that are shared by the whole system. There are four such queues with different priorities : high, default, low, and background. The background priority queue is I/O throttled.
  3. Custom queues: queues that you create which can be serial or concurrent. These actually trickle down into being handled by one of the global queues.

When setting up the global concurrent queues, you don’t specify the priority directly. Instead you specify a Quality of Service (QoS) class property. This will indicate the task’s importance and guide GCD into determining the priority to give to the task.

The QoS classes are:

  • User-interactive: This represents tasks that need to be done immediately in order to provide a nice user experience. Use it for UI updates, event handling and small workloads that require low latency. The total amount of work done in this class during the execution of your app should be small. This should run on the main thread.
  • User-initiated: The represents tasks that are initiated from the UI and can be performed asynchronously. It should be used when the user is waiting for immediate results, and for tasks required to continue user interaction. This will get mapped into the high priority global queue.
  • Utility: This represents long-running tasks, typically with a user-visible progress indicator. Use it for computations, I/O, networking, continous data feeds and similar tasks. This class is designed to be energy efficient. This will get mapped into the low priority global queue.
  • Background: This represents tasks that the user is not directly aware of. Use it for prefetching, maintenance, and other tasks that don’t require user interaction and aren’t time-sensitive. This will get mapped into the background priority global queue.

Synchronous vs. Asynchronous

With GCD, you can dispatch a task either synchronously or asynchronously.

A synchronous function returns control to the caller after the task is completed.

An asynchronous function returns immediately, ordering the task to be done but not waiting for it. Thus, an asynchronous function does not block the current thread of execution from proceeding on to the next function.

Managing Tasks

You’ve heard about tasks quite a bit by now. For the purposes of this tutorial you can consider a task to be a closure. Closures are self-contained, callable blocks of code that can be stored and passed around.

Tasks that you submit to a DispatchQueue are encapsulated by DispatchWorkItem. You can configure the behavior of a DispatchWorkItem such as its QoS class or whether to spawn a new detached thread.

Handling Background Tasks

With all this pent up GCD knowledge, it’s time for your first app improvement!

Head back to the app and add some photos from your Photo Library or use the Le Internet option to download a few. Tap on a photo. Notice how long it takes for the photo detail view to show up. The lag is more pronounced when viewing large images on slower devices.

Overloading a view controller’s viewDidLoad() is easy to do resulting in long waits before the view appears. It’s best offload work to the background if it’s not absolutely essential at load time.

This sounds like a job for DispatchQueue‘s async!

Open PhotoDetailViewController.swift. Modify viewDidLoad() and replace these two lines:

let overlayImage = faceOverlayImageFromImage(image)
fadeInNewImage(overlayImage)

With the following code:

DispatchQueue.global(qos: .userInitiated).async { // 1
  let overlayImage = self.faceOverlayImageFromImage(self.image)
  DispatchQueue.main.async { // 2
    self.fadeInNewImage(overlayImage) // 3
  }
}

Here’s what the code’s doing step by step:

  1. You move the work to a background global queue and run the work in the closure asynchronously. This lets viewDidLoad() finish earlier on the main thread and makes the loading feel more snappy. Meanwhile, the face detection processing is started and will finish at some later time.
  2. At this point, the face detection processing is complete and you’ve generated a new image. Since you want to use this new image to update your UIImageView, you add a new closure to the main queue. Remember – you must always access UIKit classes on the main thread!
  3. Finally, you update the UI with fadeInNewImage(_:) which performs a fade-in transition of the new googly eyes image.

Build and run the app. Download photos through Le Internet option. Select a photo and you’ll notice that the view controller loads up noticeably faster and adds the googly eyes after a short delay:

grand central dispatch tutorial

This lends a nice before and after effect to the app as the googly eyes are added. Even if you were trying to load an insanely huge image, your app wouldn’t hang as the view controller is loaded.

In general, you’ll want to use async when you need to perform a network-based or CPU intensive task in the background and not block the current thread.

Here’s a quick guide of how and when to use the various queues with async:

  • Main Queue: This is a common choice to update the UI after completing work in a task on a concurrent queue. To do this, you’ll code one closure inside another. Targeting the main queue and calling async guarantees that this new task will execute sometime after the current method finishes.
  • Global Queue: This is a common choice to perform non-UI work in the background.
  • Custom Serial Queue: A good choice when you want to perform background work serially and track it. This eliminates resource contention since you know only one task at a time is executing. Note that if you need the data from a method, you must inline another closure to retrieve it or consider using sync.

Delaying Task Execution

DispatchQueue allows you to delay task execution. Care should be taken not to use this to solve race conditions or other timing bugs through hacks like introducing delays. Use this when you want a task to run at a specific time.

Consider the user experience of your app for a moment. It’s possible that users might be confused about what to do when they open the app for the first time — were you? :]

It would be a good idea to display a prompt to the user if there aren’t any photos. You should also consider how the user’s eyes will navigate the home screen. If you display a prompt too quickly, they might miss it as their eyes linger on other parts of the view. A one-second delay before displaying the prompt should be enough to catch the user’s attention and guide them.

Open PhotoCollectionViewController.swift and fill in the implementation for showOrHideNavPrompt():

let delayInSeconds = 1.0 // 1
DispatchQueue.main.asyncAfter(deadline: .now() + delayInSeconds) { // 2
  let count = PhotoManager.sharedManager.photos.count
  if count > 0 {
    self.navigationItem.prompt = nil
  } else {
    self.navigationItem.prompt = "Add photos with faces to Googlyify them!"
  }
}

Here’s what’s going on above:

  1. You specify a variable for the amount of time to delay.
  2. You then wait for the specified time then asynchronously run the block which updates the photos count and updates the prompt.

showOrHideNavPrompt() executes in viewDidLoad() and anytime your UICollectionView is reloaded.

Build and run the app. There should be a slight delay before a prompt is displayed:

grand central dispatch tutorial

Wondering when it’s appropriate to use asyncAfter? Generally it’s a good choice to use it in the main queue. You’ll want to use caution when using asyncAfter on other queues such as the global background queues or a custom serial queue. You’re better off sticking to the main queue.

Why not use Timer? You could consider using it if you have repeated tasks which are easier to schedule with Timer. Here are two reasons to stick with dispatch queue’s asyncAfter.

One is readability. To use Timer you have to define a method then create the timer with a selector or invocation to the defined method. With DispatchQueue and asyncAfter you simply add a closure.

Timer is scheduled on run loops so you would also have to make sure it was scheduled on the run loop you want it to fire (and in some cases for the correct run loop modes). In this regard, working with dispatch queues is easier.

Managing Singletons

Singletons. Love them or hate them, they’re as popular in iOS as cat photos on the web. :]

One frequent concern with singletons is that often they’re not thread safe. This concern is justified given their use: singletons are often used from multiple controllers accessing the singleton instance at the same time. Your PhotoManager class is a singleton, so you’ll need to consider this issue.

Thread safe code can be safely called from multiple threads or concurrent tasks without causing any problems such as data corruption, or app crashes. Code that is not thread safe must only be run in one context at a time.

There are two thread safety cases to consider, during initialization of the singleton instance and during reads and writes to the instance.

Initialization turns out to be the easy case because of how Swift initializes global variables. Global variables are initialized when they are first accessed, and they are guaranteed to be initialized in an atomic fashion. That is, the code performing initialization is treated as a critical section and is guaranteed to complete before any other thread gets access to the global variable.

A critical section is a piece of code that must not be executed concurrently, that is, from two threads at once. This is usually because the code manipulates a shared resource such as a variable that can become corrupt if it’s accessed by concurrent processes.

Open up PhotoManager.swift to see how the singleton is initialized:

private let _sharedManager = PhotoManager()

The private global _sharedManager variable is used to initialize PhotoManager lazily. This happens only on the first access which you can see here:

class var sharedManager: PhotoManager {
  return _sharedManager
}

The public sharedManager variable returns the private _sharedManager variable. Swift ensures that this operation is thread safe.

You still have to deal with thread safety when accessing code in the singleton that manipulates shared internal data. You can handle this through methods such as synchronizing data access. You’ll see one approach in the next section.

Handling the Readers-Writers Problem

In Swift, any variable declared with the let keyword is considered a constant and is read-only and thread-safe. Declare the variable with the var keyword however, and it becomes mutable and not thread-safe unless the data type is designed to be so. The Swift collection types like Array and Dictionary are not thread-safe when declared mutable.

Although many threads can read a mutable instance of Array simultaneously without issue, it’s not safe to let one thread modify the array while another is reading it. Your singleton doesn’t prevent this condition from happening in its current state.

To see the problem, take a look at addPhoto(_:) in PhotoManager.swift, which has been reproduced below:

func addPhoto(_ photo: Photo) {
  _photos.append(photo)
  DispatchQueue.main.async {
    self.postContentAddedNotification()
  }
}

This is a write method as it modifies a mutable array object.

Now take a look at the photos property, reproduced below:

fileprivate var _photos: [Photo] = []
var photos: [Photo] {
  return _photos
}

The getter for this property is termed a read method as it’s reading the mutable array. The caller gets a copy of the array and is protected against mutating the original array inappropriately. This does not provide any protection against one thread calling the write method addPhoto(_:) while simultaneously another thread calls the getter for the photos property.

Note: In the code above, why does the caller get a copy of the photos array? In Swift parameters and return types of functions are either passed by reference or by value.

Passing by value results in a copy of the object, and changes to the copy will not affect the original. By default in Swift class instances are passed by reference and structs passed by value. Swift’s built-in data types like Array and Dictionary, are implemented as structs.

It may look like there’s a lot of copying in your code when passing collections back and forth. Don’t worry about the memory usage implications of this. The Swift collection types are optimized to only make copies when necessary, for instance when an array passed by value is modified for the first time after being passed.

This is the classic software development Readers-Writers Problem. GCD provides an elegant solution of creating a read/write lock using dispatch barriers. Dispatch barriers are a group of functions acting as a serial-style bottleneck when working with concurrent queues.

When you submit a DispatchWorkItem to a dispatch queue you can set flags to indicate that it should be the only item executed on the specified queue for that particular time. This means that all items submitted to the queue prior to the dispatch barrier must complete before the DispatchWorkItem will execute.

When the DispatchWorkItem‘s turn arrives, the barrier executes it and ensures that the queue does not execute any other tasks during that time. Once finished, the queue returns to its default implementation.

The diagram below illustrates the effect of a barrier on various asynchronous tasks:

grand central dispatch tutorial

Notice how in normal operation the queue acts just like a normal concurrent queue. But when the barrier is executing, it essentially acts like a serial queue. That is, the barrier is the only thing executing. After the barrier finishes, the queue goes back to being a normal concurrent queue.

Use caution when using barriers in global background concurrent queues as these queues are shared resources. Using barriers in a custom serial queue is redundant as it already executes serially. Using barriers in custom concurrent queue is a great choice for handling thread safety in atomic of critical areas of code.

You’ll use a custom concurrent queue to handle your barrier function and separate the read and write functions. The concurrent queue will allow multiple read operations simultaneously.

Open PhotoManager.swift and add a private property just above the _photos declaration:

fileprivate let concurrentPhotoQueue =
  DispatchQueue(
    label: "com.raywenderlich.GooglyPuff.photoQueue", // 1
    attributes: .concurrent) // 2

This initializes concurrentPhotoQueue as a concurrent queue.

  1. You set up label with a descriptive name that is helpful during debugging. Typically you’ll use the reversed DNS style naming convention.
  2. You specify a concurrent queue.

Next, replace addPhoto(_:) with the following code:

func addPhoto(_ photo: Photo) {
  concurrentPhotoQueue.async(flags: .barrier) { // 1
    self._photos.append(photo) // 2
    DispatchQueue.main.async { // 3
      self.postContentAddedNotification()
    }
  }
}

Here’s how your new write function works:

  1. You dispatch the write operation asynchronously with a barrier. When it executes, it will be the only item in your queue.
  2. You add the object to the array.
  3. Finally you post a notification that you’ve added the photo. This notification should be posted on the main thread because it will do UI work. So you dispatch another task asynchronously to the main queue to trigger the notification.

This takes care of the write, but you also need to implement the photos read method.

To ensure thread safety with your writes, you need to perform reads on the concurrentPhotoQueue queue. You need return data from the function call so an asynchronous dispatch won’t cut it. In this case, sync would be an excellent candidate.

Use sync to keep track of your work with dispatch barriers, or when you need to wait for the operation to finish before you can use the data processed by the closure.

You need to be careful though. Imagine if you call sync and target the current queue you’re already running on. This will result in a deadlock situation.

Two (or sometimes more) items — in most cases, threads — are said to be deadlocked if they all get stuck waiting for each other to complete or perform another action. The first can’t finish because it’s waiting for the second to finish. But the second can’t finish because it’s waiting for the first to finish.

In your case, the sync call will wait until the closure finishes, but the closure can’t finish (it can’t even start!) until the currently executing closure is finished, which can’t! This should force you to be conscious of which queue you’re calling from — as well as which queue you’re passing in.

Here’s a quick overview of when and where to use sync:

  • Main Queue: Be VERY careful for the same reasons as above; this situation also has potential for a deadlock condition.
  • Global Queue: This is a good candidate to sync work through dispatch barriers or when waiting for a task to complete so you can perform further processing.
  • Custom Serial Queue: Be VERY careful in this situation; if you’re running in a queue and call sync targeting the same queue, you’ll definitely create a deadlock.

Still in PhotoManager.swift modify the photos property getter:

var photos: [Photo] {
  var photosCopy: [Photo]!
  concurrentPhotoQueue.sync { // 1
    photosCopy = self._photos // 2
  }
  return photosCopy
}

Here’s what’s going on step-by-step:

  1. Dispatch synchronously onto the concurrentPhotoQueue to perform the read.
  2. Store a copy of the photo array in photosCopy and return it.

Build and run the app. Download photos through Le Internet option. It should behave as before but underneath the hood, you have some very happy threads.

grand central dispatch tutorial

Congratulations — your PhotoManager singleton is now thread safe. No matter where or how you read or write photos, you can be confident that it will be done in a safe manner with no surprises.

Where To Go From Here?

In this Grand Central Dispatch tutorial, you learned how to make your code thread safe and how to maintain the responsiveness of the main thread while performing CPU intensive tasks.

You can download the completed project which contains all the improvements made in this tutorial so far. In the second part of this tutorial you’ll continue to improve upon this project.

If you plan on optimizing your own apps, you really should be profiling your work with the Time Profile template in Instruments. Using this utility is outside the scope of this tutorial, so check out How to Use Instruments for a excellent overview.

Also make sure that you profile with an actual device, since testing on the Simulator can give very different results that are different from what your users will experience.

You may also want to check out this excellent talk by Rob Pike on Concurrency vs Parallelism.

Our iOS Concurrency with GCD and Operations video tutorial series also covers a lot of the same topics that we’ve covered in this tutorial.

In the next part of this tutorial you’ll dive even deeper into GCD’s API to do even more cool stuff.

If you have any questions or comments, feel free to join the discussion below!

The post Grand Central Dispatch Tutorial for Swift 3: Part 1/2 appeared first on Ray Wenderlich.
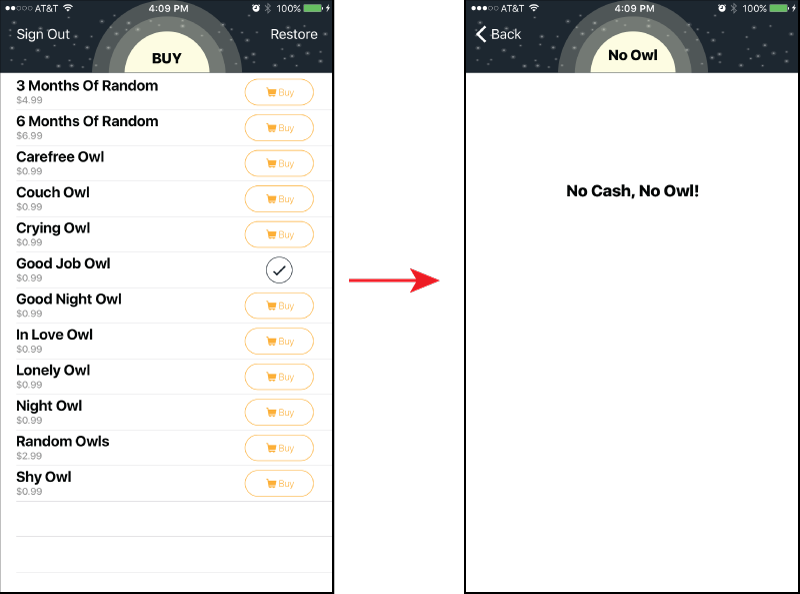
Grand Central Dispatch Tutorial for Swift 3: Part 2/2

$
0
0

grand central dispatch tutorial
Update note: This tutorial has been updated for Swift 3 by Christine Abernathy. The previous tutorial was written by Bjørn Ruud.

Welcome to the second and final part of this Grand Central Dispatch tutorial series!

In the first part of this series, you learned about concurrency, threading, and how GCD works. You made a singleton thread safe for reading and writing using a combination of dispatch barriers and synchronous dispatch queues. You also enhanced the app’s UX by using dispatch queues to delay the display of a prompt and to asynchronously offload CPU intensive work when instantiating a view controller.

In this second Grand Central Dispatch tutorial, you’ll be working with the same GooglyPuff application you know and love from the first part. You’ll delve into advanced GCD concepts including dispatch groups, cancelling dispatch blocks, asynchronous testing techniques, and dispatch sources.

It’s time to explore some more GCD!

Getting Started

You can pick up where you left off with the sample project from part one if you followed along. Alternatively, you can download the finished project from the first part of this tutorial here.

Run the app, tap +, and select Le Internet to add internet photos. You may notice that a download completion alert message pops up well before the images have finished downloading:

grand central dispatch tutorial

That’s the first thing you’ll work on fixing.

Dispatch Groups

Open PhotoManager.swift and check out downloadPhotosWithCompletion(_:):

func downloadPhotosWithCompletion(
  _ completion: BatchPhotoDownloadingCompletionClosure?) {
  var storedError: NSError?
  for address in [overlyAttachedGirlfriendURLString,
                  successKidURLString,
                  lotsOfFacesURLString] {
                    let url = URL(string: address)
                    let photo = DownloadPhoto(url: url!) {
                      _, error in
                      if error != nil {
                        storedError = error
                      }
                    }
                    PhotoManager.sharedManager.addPhoto(photo)
    }
 
    completion?(storedError)
}

The alert is fired by the completion closure passed into the method. This is called after the for loop where the photos are downloaded. You’ve incorrectly assumed that the downloads are complete before the closure is called.

Photo downloads are kicked off by calling DownloadPhoto(url:). This call returns immediately but the actual download happens asynchronously. Therefore when completion is called, there’s no guarantee that all the downloads are done.

What you want is for downloadPhotosWithCompletion(_:) to call its completion closure after all the photo download tasks are complete. How can you monitor these concurrent asynchronous events to achieve this? With the current methodology, you don’t know when the tasks are complete and they can finish in any order.

Good news! This is exactly what dispatch groups are designed to handle. With dispatch groups you can group together multiple tasks and either wait for them to be completed or be notified once they are complete. Tasks can be asynchronous or synchronous and can even run on different queues.

DispatchGroup manages dispatch groups. You’ll first look at its wait method. This blocks your current thread until all the group’s enqueued tasks have been completed.

In PhotoManager.swift and replace the code in downloadPhotosWithCompletion(_:) with the following:

DispatchQueue.global(qos: .userInitiated).async { // 1
  var storedError: NSError?
  let downloadGroup = DispatchGroup() // 2
  for address in [overlyAttachedGirlfriendURLString,
                  successKidURLString,
                  lotsOfFacesURLString] {
    let url = URL(string: address)
    downloadGroup.enter() // 3
    let photo = DownloadPhoto(url: url!) {
      _, error in
      if error != nil {
        storedError = error
      }
      downloadGroup.leave() // 4
    }
    PhotoManager.sharedManager.addPhoto(photo)
  }
 
  downloadGroup.wait() // 5
  DispatchQueue.main.async { // 6
    completion?(storedError)
  }
}

Here’s what the code is doing step-by-step:

  1. Since you’re using the synchronous wait method which blocks the current thread, you use async to place the entire method into a background queue to ensure you don’t block the main thread.
  2. This creates a new dispatch group.
  3. You call enter() to manually notify the group that a task has started. You must balance out the number of enter() calls with the number of leave() calls or your app will crash.
  4. Here you notify the group that this work is done.
  5. You call wait() to block the current thread while waiting for tasks’ completion. This waits forever which is fine because the photos creation task always completes. You can use wait(timeout:) to specify a timeout and bail out on waiting after a specified time.
  6. At this point, you are guaranteed that all image tasks have either completed or timed out. You then make a call back to the main queue to run your completion closure.

Build and run the app. Download photos through Le Internet option and verify that the alert doesn’t show up until all the images are downloaded.

grand central dispatch tutorial

Note: If the network activities occur too quickly to discern when the completion closure should be called and you’re running the app on a device, you can make sure this really works by toggling some network settings in the Developer Section of the Settings app. Just go to the Network Link Conditioner section, enable it, and select a profile. “Very Bad Network” is a good choice.

If you are running on the Simulator, you can use the Network Link Conditioner included in the Advanced Tools for Xcode to change your network speed. This is a good tool to have in your arsenal because it forces you to be conscious of what happens to your apps when connection speeds are less than optimal.

Dispatch groups are a good candidate for all types of queues. You should be wary of using dispatch groups on the main queue if you’re waiting synchronously for the completion of all work since you don’t want to hold up the main thread. However, the asynchronous model is an attractive way to update the UI once several long-running tasks finish, such as network calls.

Your current solution is good, but in general it’s best to avoid blocking threads if at all possible. Your next task is to rewrite the same method to notify you asynchronously when all the downloads have completed.

Dispatch Groups, Take 2

Dispatching asynchronously to another queue then blocking work using wait is clumsy. Fortunately, there is a better way. DispatchGroup can instead notify you when all the group’s tasks are complete.

Still in PhotoManager.swift, replace the code inside downloadPhotosWithCompletion(_:) with the following:

// 1
var storedError: NSError?
let downloadGroup = DispatchGroup()
for address in [overlyAttachedGirlfriendURLString,
                successKidURLString,
                lotsOfFacesURLString] {
  let url = URL(string: address)
  downloadGroup.enter()
  let photo = DownloadPhoto(url: url!) {
    _, error in
    if error != nil {
      storedError = error
    }
    downloadGroup.leave()
  }
  PhotoManager.sharedManager.addPhoto(photo)
}
 
downloadGroup.notify(queue: DispatchQueue.main) { // 2
  completion?(storedError)
}

Here’s what’s going on:

  1. In this new implementation you don’t need to surround the method in an async call since you’re not blocking the main thread.
  2. notify(queue:work:) serves as the asynchronous completion closure. It is called when there are no more items left in the group. You also specify that you want to schedule the completion work to be run on the main queue.

This is a much cleaner way to handle this particular job as it doesn’t block any threads.

Build and run the app. Verify that the download complete alert is still displayed afer all internet photos are downloaded:

grand central dispatch tutorial

Concurrency Looping

With all of these new tools at your disposal, you should probably thread everything, right!?

grand central dispatch tutorial

Take a look at downloadPhotosWithCompletion(_:) in PhotoManager. You might notice that there’s a for loop in there that cycles through three iterations and downloads three separate images. Your job is to see if you can run this for loop concurrently to try and speed things up.

This is a job for DispatchQueue.concurrentPerform(iterations:execute:). It works similarly to a for loop in that it executes different iterations concurrently. It is sychronous and returns only when all of the work is done.

Care must be taken when figuring out the optimal number of iterations for a given amount of work. Many iterations and a small amount of work per iteration can create so much overhead that it negates any gains from making the calls concurrent. The technique known as striding helps you out here. This is where for each iteration you do multiple pieces of work.

When is it appropriate to use DispatchQueue.concurrentPerform(iterations:execute:)? You can rule out serial queues because there’s no benefit there – you may as well use a normal for loop. It’s a good choice for concurrent queues that contain looping, especially if you need to keep track of progress.

In PhotoManager.swift replace the code inside downloadPhotosWithCompletion(_:) with the following:

var storedError: NSError?
let downloadGroup = DispatchGroup()
let addresses = [overlyAttachedGirlfriendURLString,
                 successKidURLString,
                 lotsOfFacesURLString]
let _ = DispatchQueue.global(qos: .userInitiated)
DispatchQueue.concurrentPerform(iterations: addresses.count) {
  i in
  let index = Int(i)
  let address = addresses[index]
  let url = URL(string: address)
  downloadGroup.enter()
  let photo = DownloadPhoto(url: url!) {
    _, error in
    if error != nil {
      storedError = error
    }
    downloadGroup.leave()
  }
  PhotoManager.sharedManager.addPhoto(photo)
}
downloadGroup.notify(queue: DispatchQueue.main) {
  completion?(storedError)
}

The former for loop has been replaced with DispatchQueue.concurrentPerform(iterations:execute:) to handle concurrent looping.

Build and run the app. Verify that the internet download functionality still behaves properly:

grand central dispatch tutorial

Running this new code on the device will occasionally produce marginally faster results. But was all this work worth it?

Actually, it’s not worth it in this case. Here’s why:

  • You’ve probably created more overhead running the threads in parallel than just running the for loop in the first place. You should use DispatchQueue.concurrentPerform(iterations:execute:) for iterating over very large sets along with the appropriate stride length.
  • Your time to create an app is limited — don’t waste time pre-optimizing code that you don’t know is broken. If you’re going to optimize something, optimize something that is noticeable and worth your time. Find the methods with the longest execution times by profiling your app in Instruments. Check out How to Use Instruments in Xcode to learn more.
  • Typically, optimizing code makes your code more complicated for yourself and for other developers coming after you. Make sure the added complication is worth the benefit.

Remember, don’t go crazy with optimizations. You’ll only make it harder on yourself and others who have to wade through your code.

Cancelling Dispatch Blocks

Thus far, you haven’t seen code that allows you to cancel enqueued tasks. This is where dispatch block objects represented by DispatchWorkItem comes into focus. Be aware that you can only cancel a DispatchWorkItem before it reaches the head of a queue and starts executing.

Let’s demonstrate this by starting download tasks for several images from Le Internet then cancelling some of them.

Still in PhotoManager.swift, replace the code in downloadPhotosWithCompletion(_:) with the following:

var storedError: NSError?
let downloadGroup = DispatchGroup()
var addresses = [overlyAttachedGirlfriendURLString,
                 successKidURLString,
                 lotsOfFacesURLString]
addresses += addresses + addresses // 1
var blocks: [DispatchWorkItem] = [] // 2
 
for i in 0 ..< addresses.count {
  downloadGroup.enter()
  let block = DispatchWorkItem(flags: .inheritQoS) { // 3
    let index = Int(i)
    let address = addresses[index]
    let url = URL(string: address)
    let photo = DownloadPhoto(url: url!) {
      _, error in
      if error != nil {
        storedError = error
      }
      downloadGroup.leave()
    }
    PhotoManager.sharedManager.addPhoto(photo)
  }
  blocks.append(block)
  DispatchQueue.main.async(execute: block) // 4
}
 
for block in blocks[3 ..< blocks.count] { // 5
  let cancel = arc4random_uniform(2) // 6
  if cancel == 1 {
    block.cancel() // 7
    downloadGroup.leave() // 8
  }
}
 
downloadGroup.notify(queue: DispatchQueue.main) {
  completion?(storedError)
}

Here’s a step-by-step walk through the code above:

  1. You expand the addresses array to hold three copies of each image.
  2. You initialize a blocks array to hold dispatch block objects for later use.
  3. You create a new DispatchWorkItem. You pass in a flags parameter to specify that the block should inherit its Quality of Service class from the queue it is dispatched to. You then define the work to be done in a closure.
  4. You dispatch the block asynchronously to the main queue. For this example, using the main queue makes it easier to cancel select blocks since it’s a serial queue. The code that sets up the dispatch blocks is already executing on the main queue so you are guaranteed that the download blocks will execute at some later time.
  5. You skip the first three download blocks by slicing the blocks array.
  6. Here you use arc4random_uniform() to randomly pick a number between 0 and 1. It’s like a coin toss.
  7. If the random number is 1 you cancel the block. This can only cancel blocks that are still in a queue and haven’t began executing. Blocks can’t be canceled in the middle of execution.
  8. Here you remember to remove the canceled block from the dispatch group.

Build and run the app, then add images from Le Internet. You’ll see that the app now downloads more than three images. The number of extra images changes each time you re-run your app. Some of the additional image downloads in the queue are canceled before they start.

grand central dispatch tutorial

This is a pretty contrived example but it a nice illustration of how dispatch block objects are used and cancelled.

Dispatch block objects can do a lot more, so be sure to check out Apple’s documentation.

Miscellaneous GCD Fun

But wait! There’s more! Here are some extra functions that are a little farther off the beaten path. Although you won’t use these tools nearly as frequently, they can be tremendously helpful in the right situations.

Testing Asynchronous Code

This might sound like a crazy idea, but did you know that Xcode has testing functionality? :] I know, sometimes I like to pretend it’s not there, but writing and running tests is important when building complex relationships in code.

Testing in Xcode is performed on subclasses of XCTestCase and runs any method in its method signature that begins with test. Testing is measured on the main thread, so you can assume that every test happens in a serial manner.

As soon as a given test method completes, XCTest methods will consider a test to be finished and move onto the next test. That means that any asynchronous code from the previous test will continue to run while the next test is running.

Networking code is usually asynchronous, since you don’t want to block the main thread while performing a network fetch. That, coupled with the fact that tests finish when the test method finishes, can make it hard to test networking code.

Let’s take a brief look at two common techniques for testing asynchronous code: one using semaphores and one using expectations.

Semaphores

Semaphores are an old-school threading concept introduced to the world by the ever-so-humble Edsger W. Dijkstra. Semaphores are a complex topic because they build upon the intricacies of operating system functions.

If you want to learn more about semaphores, check out this detailed discussion on semaphore theory. If you’re the academic type, you may want to check out Dining Philosophers Problem which is a classic software development problem that uses semaphores.

Open GooglyPuffTests.swift and replace the code inside downloadImageURLWithString(_:) with the following:

let url = URL(string: urlString)
let semaphore = DispatchSemaphore(value: 0) // 1
let _ = DownloadPhoto(url: url!) {
  _, error in
  if let error = error {
    XCTFail("\(urlString) failed. \(error.localizedDescription)")
  }
  semaphore.signal() // 2
}
let timeout = DispatchTime.now() + .seconds(defaultTimeoutLengthInSeconds)
if semaphore.wait(timeout: timeout) == .timedOut { // 3
  XCTFail("\(urlString) timed out")
}

Here’s how the semaphore works in the code above:

  1. You create a semaphore and set its start value. This represents the number of things that can access the semaphore without needing the semaphore to be incremented (note that incrementing a semaphore is known as signaling it).
  2. You signal the semaphore in the completion closure. This increments the semaphore count and signals that the semaphore is available to other resources that want it.
  3. You wait on the semaphore, with a given timeout. This call blocks the current thread until the semaphore has been signaled. A non-zero return code from this function means that the timeout was reached. In this case, the test is failed because it is deemed that the network should not take more than 10 seconds to return — a fair point!

Run your tests by selecting Product\Test from the menu or using ⌘+U if you have the default key bindings. They should all succeed in a timely manner:

grand central dispatch tutorial

Disable your connection and run the tests again. If you’re running on a device, put it in airplane mode. If you’re running on the simulator then simply turn off your connection. The tests complete with a fail result after 10 seconds. Great, it worked!

grand central dispatch tutorial

These are rather trivial tests, but if you’re working with a server team then these basic tests can prevent a wholesome round of finger-pointing of who is to blame for the latest network issue.

Expectations

The XCTest framework provides another solution to the asynchronous code testing problem in the form of expectations. This feature lets you set up an expectation – something you expect will happen – and then start an asynchronous task. Then you can have the test runner wait until the asynchronous task marks the expectation as fulfilled.

Still working in GooglyPuffTests.swift, replace the code in downloadImageURLWithString(_:) with the following:

let url = URL(string: urlString)
let downloadExpectation =
  expectation(description: "Image downloaded from \(urlString)") // 1
let _ = DownloadPhoto(url: url!) {
  _, error in
  if let error = error {
    XCTFail("\(urlString) failed. \(error.localizedDescription)")
  }
  downloadExpectation.fulfill() // 2
}
waitForExpectations(timeout: 10) { // 3
  error in
  if let error = error {
    XCTFail(error.localizedDescription)
  }
}

Here’s how it works:

  1. You create the expectation with expectation(description:). The test runner will display the string parameter in the test log upon failure, so describe what you expect to happen.
  2. You call fulfill() in the closure that executes asynchronously to mark the expectation as fulfilled.
  3. You wait for expectations to be fulfilled by calling waitForExpectations(timeout:handler:). If the wait times out, it’s treated as an error.

Run the tests with a good network connection. You should see a summary logged to Xcode’s console like this:

Test Suite 'All tests' passed at 2016-12-01 02:32:57.179.
   Executed 3 tests, with 0 failures (0 unexpected) in 10.666 (10.672) seconds

Now disable your network connection and re-run the tests. You should see an error message and summary results logged that looks like this:

[GooglyPuffTests.GooglyPuffTests testLotsOfFacesImageURL] : failed - http://i.imgur.com/tPzTg7A.jpg failed. The Internet connection appears to be offline.
...
Test Suite 'All tests' failed at 2016-12-01 02:35:10.055.
   Executed 3 tests, with 3 failures (0 unexpected) in 0.061 (0.082) seconds

The end result is not very different from using a semaphore, but leveraging the XCTest framework is a cleaner and more readable solution.

Dispatch Sources

Dispatch sources are a particularly interesting feature of GCD. A dispatch source can basically be used to monitor for some type of event. Events can include Unix signals, file descriptors, Mach ports, VFS Nodes, and other obscure stuff.

When setting up a dispatch source, you tell it what type of events you want to monitor and the dispatch queue on which its event handler block should be executed. You then assign an event handler to the dispatch source.

Upon creation, dispatch sources start off in a suspended state. This allows for additional configuration steps to take place, for example setting up the event handler. Once you’ve configured your dispatch source, you should resume it to start processing events.

In this tutorial, you’ll get a small taste of working with dispatch sources by using it in a rather peculiar way: to monitor when your app is put into debug mode.

Open PhotoCollectionViewController.swift and add the following just below the backgroundImageOpacity global property declaration:

#if DEBUG // 1
  var signal: DispatchSourceSignal? // 2
  private let setupSignalHandlerFor = { (_ object: AnyObject) -> Void in // 3
    let queue = DispatchQueue.main
    signal =
      DispatchSource.makeSignalSource(signal: Int32(SIGSTOP), queue: queue) // 4
    signal?.setEventHandler { // 5
      print("Hi, I am: \(object.description!)")
    }
    signal?.resume() // 6
  }
#endif

The code is a little involved, so walk through it step-by-step:

  1. You compile this code only in DEBUG mode to prevent “interested parties” from gaining a lot of insight into your app. :] DEBUG is defined by adding -D DEBUG under Project Settings -> Build Settings -> Swift Compiler – Custom Flags -> Other Swift Flags -> Debug. It should be set already in the starter project.
  2. You declare a signal variable of type DispatchSourceSignal for use in monitoring Unix signals.
  3. You create a block assigned to the setupSignalHandlerFor global variable that you’ll use for one-time setup of your dispatch source.
  4. Here you set up signal. You indicate that you’re interested in monitoring the SIGSTOP Unix signal and handling received events on the main queue — you’ll discover why shortly.
  5. If the dispatch source is successfully created, you register an event handler closure that’s invoked whenever you receive the SIGSTOP signal. Your handler prints a message that includes the class description.
  6. All sources start off in the suspended state by default. Here you tell the dispatch source to resume so it can start monitoring events.

Add the following code to viewDidLoad() just below the call to super.viewDidLoad():

#if DEBUG
  _ = setupSignalHandlerFor(self)
#endif

This code invokes the dispatch source’s initialization code.

Build and run the app. Pause the program execution and resume the app immediately by tapping the pause then play buttons in Xcode’s debugger:

grand central dispatch tutorial

Check out the console. You should see something like this:

Hi, I am: <GooglyPuff.PhotoCollectionViewController: 0x7fbf0af08a10>

You app is now debugging-aware! That’s pretty awesome, but how would you use this in real life?

You could use this to debug an object and display data whenever you resume the app. You could also give your app custom security logic to protect itself (or the user’s data) when malicious attackers attach a debugger to your application.

An interesting idea is to use this approach as a stack trace tool to find the object you want to manipulate in the debugger.

grand central dispatch tutorial

Think about that situation for a second. When you stop the debugger out of the blue, you’re almost never on the desired stack frame. Now you can stop the debugger at anytime and have code execute at your desired location. This is very useful if you want to execute code at a point in your app that’s tedious to access from the debugger. Try it out!

Put a breakpoint on the print() statement inside the setupSignalHandlerFor block that you just added.

Pause in the debugger, then start again. The app will hit the breakpoint you added. You’re now deep in the depths of your PhotoCollectionViewController method. Now you can access the instance of PhotoCollectionViewController to your heart’s content. Pretty handy!

Note: If you haven’t already noticed which threads are which in the debugger, take a look at them now. The main thread will always be the first thread followed by libdispatch, the coordinator for GCD, as the second thread. After that, the thread count and remaining threads depend on what the hardware was doing when the app hit the breakpoint.

In the debugger console, type the following:

(lldb) expr object.navigationItem.prompt = "WOOT!"

The Xcode debugger can sometimes be uncooperative. If you get the message:

error: use of unresolved identifier 'self'

Then you have to do it the hard way to work around a bug in LLDB. First take note of the address of object in the debug area:

(lldb) po object

Then manually cast the value to the type you want:

(lldb) expr let $vc = unsafeBitCast(0x7fbf0af08a10, to: GooglyPuff.PhotoCollectionViewController.self)
(lldb) expr $vc.navigationItem.prompt = "WOOT!"

Now resume execution of the app. You’ll see the following:

grand central dispatch tutorial

With this method, you can make updates to the UI, inquire about the properties of a class, and even execute methods — all while not having to restart the app to get into that special workflow state. Pretty neat.

Where To Go From Here?

You can download the completed project for this Grand Central Dispatch tutorial here.

I hate to bang on this subject again, but you really should check out the How to Use Instruments tutorial. You’ll definitely need this if you plan on doing any optimization of your apps. Be aware that Instruments is good for profiling relative execution: comparing which areas of code takes longer in relation to other areas. If you’re trying to figure out the actual execution time of a method, you might need to come up with a more home-brewed solution.

Also check out How to Use NSOperations and NSOperationQueue Tutorial in Swift, a concurrency technology that is built on top of GCD. In general, it’s best practice to use GCD if you are using simple fire-and-forget tasks. NSOperations offers better control, an implementation for handling maximum concurrent operations, and a more object-oriented paradigm at the cost of speed.

You should also take a look at our iOS Concurrency with GCD and Operations video tutorial series, which covers a lot of the same topics that we’ve covered in this tutorial.

Remember, unless you have a specific reason to go lower, always try and stick with a higher level API. Only venture into the dark arts of Apple if you want to learn more or to do something really, really “interesting”. :]

Good luck and have fun! Post any questions or feedback in the discussion below!

The post Grand Central Dispatch Tutorial for Swift 3: Part 2/2 appeared first on Ray Wenderlich.
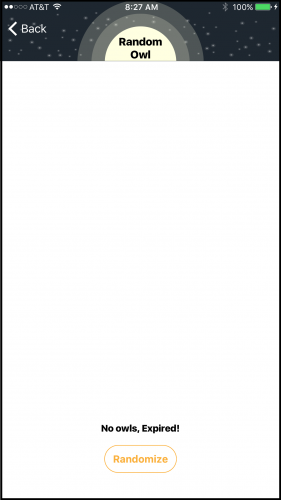
New Course: Mastering Auto Layout

$
0
0
Mastering Auto Layout

Mastering Auto Layout

Last week, we came out with a brand new course on Beginning Auto Layout, that covers the basics of iOS app layout, including autoresizing masks, Stack Views, and constraints.

But what if you’re familiar with the basics of Auto Layout already, but sometimes struggle with putting together a tricky layout?

Well, today we’re happy to announce a new course that might help: Mastering Auto Layout!

In this course, you’ll learn advanced ways of working with constraints such as inequalities, priorities, and creating layouts in code. You’ll also learn how to create adaptive layouts using size classes.

By the time you are done this course, you’ll be able to create even the trickiest of layouts. Let’s take a look at what’s inside!

Video1

Video 1: Introduction. Dive a little deeper into Auto Layout. Learn more about creating complex constraints, debugging Auto Layout, and creating universal layouts for all devices.

Video1

Video 2: Constraint Inequalities. For more powerful layouts, learn how to use constraints that are greater than or less than a given value.

Video1

Video 3: Constraint Priorities. Learn how to modify the priorities of constraints to create a powerful hierarchy that can handle multiple situations.

Video1

Video 4: Constraints in Code. You’ve learned a lot about using constraints in Interface Builder — now see how to interact with them in your code.

Video1

Video 5: Visual Format Language. The Visual Format Language lets you create many constraints quickly, but it’s also used in the logs to describe what has been created.

Video1

Video 6: Debugging Auto Layout. Learn how to look under the hood and understand why Auto Layout is placing a specific view in a specific spot.

Video1

Video 7: Size Classes. Go one step further than constraints and define differences in your layout between devices of different size classes.

Video1

Video 8: Images. Views and constraints aren’t the only things you might want to vary by size class. Learn how to adjust fonts, images, and more.

Video1

Video 9: Adaptive Layout Environment. The adaptive layout environment describes layout traits that you can use to adjust to different situations.

Video1

Video 10: Adaptive Presentation. View controllers can adapt how they are presented based on the adaptive environment. Learn what the framework does for you and how to modify its behavior.

Video1

Video 11: Conclusion. Recap what you’ve learned in this series, and check out a few Auto Layout tips to keep your layout tasks simple.

Where To Go From Here?

Want to check out the course? You can watch the introduction for free!

The rest of the course is for raywenderlich.com subscribers only. Here’s how you can get access:

  • If you are a raywenderlich.com subscriber: The entire course is complete and available today. You can check out the first part here.
  • If you are not a subscriber yet: What are you waiting for? Subscribe now to get access to our new Mastering Auto Layout course and our entire catalog of over 500 videos.

There’s much more in store for raywenderlich.com subscribers – if you’re curious, you can check out our full schedule of upcoming courses.

Stay tuned many more new Swift 3 courses and updates to come! :]

The post New Course: Mastering Auto Layout appeared first on Ray Wenderlich.
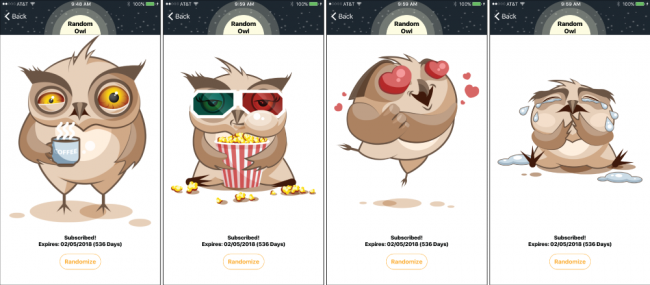
Introduction To UFPS: Unity FPS Tutorial

$
0
0
UFPS The Unity FPS Framework

Learn the basics of UFPS!

Obliterating hordes of sinister enemies with a shotgun or carefully sniping your opponent across the battlefield are immensely satisfying gaming experiences. Games that center around action-packed gun-slinging segments are defined as First-Person-Shooter (FPS). A close cousin is a third-person shooter — the difference is whether you’re looking at the character’s back or down the barrel of a gun.

When you make an FPS game, you sign yourself up for a substantial amount of work. However, you don’t have to start from scratch when you leverage the power of the Ultimate First Person Shooter Framework (UFPS)!

In this tutorial, you’ll learn what UFPS is and how to use it to create a basic Unity FPS sandbox game — “sandbox” refers to the fact that the player is limited to a contained area.

After this tutorial, you’ll be comfortable with:

  • Using fundamental UFPS scripts to move the player and fire guns
  • Working with vp_FP components
  • Adding bullet holes after a surface takes a shot
  • Adding a player with standard FPS movement to a scene
  • Adding a new gun and configuring some properties
  • Adding a sniper rifle (which is better than just any old new gun) with zooming and cross-hair targeting

Prerequisites
You should be comfortable with scripting in C# and attaching components to GameObjects. If you’re new to Unity or need to refresh your memory, start with our getting started in Unity tutorial.

You’ll also need a license for “UFPS: Ultimate FPS” by Opsive, which you can get in the Unity Asset Store. This tutorial was written using UFPS version 1.7.

Lastly, you’ll need Unity 5.5.0 or a newer version.

Getting Started

UFPS is a Unity plugin that includes core logic to power a typical FPS game. Rather than painstakingly write scripts for every scenario, you can modify preloaded scripts to handle typical activities such as:

  • Equipping guns
  • Animating and firing guns
  • Managing ammo and inventory
  • Moving the player
  • Managing the camera’s perspective
  • Tracking the camera
  • Managing events, such as getting hit by a ray gun
  • Managing surfaces, e.g., slippery slopes and waterways
  • Ragdoll and gravity physics

No amazing game was ever created in one step. The best way to build games is to focus on the basics, such as core gameplay, and then build it up from there. UFPS helps you with the basics and goes further by providing a larger framework to leverage.

Download the starter project: ReadyAimFire_Unity3D_starter.

Open the project in Unity and double-click the Main scene in the project to load the game scene.

Note: We cannot redistribute the source files for UFPS, so there is not a final project for this tutorial, nor are they part of the starter project. You will build this entire game yourself. :]

After finding UFPS in the Unity Asset Store, go to the downloads section and click the Download button. When it finishes, click the Import button, wait for it to display the package’s contents then click OK. It’s a large package so be patient.

Note: If you get the following warning about importing a complete project:

Import Warning
This happens when an asset includes Project Settings that will overwrite your open project settings. In this case, only Graphics and Tag settings will be overwritten, so you can safely select the Import button to continue importing UFPS.

After the import completes, you might get some warnings. These are from UFPS and can be ignored.

Select Save Scenes from the File menu to save your work. Click the Play button and marvel in the glory of a fresh project.

A fresh project with UFPS installed :]

Important Concepts

I’m sure you’re eager to get shooting (and scripting) but it’s important that you know these key concepts for the UFPS framework.

FP components
FP indicates a component belongs to a family of scripts that manage the actual first-person shooter object — aka the player. These components always begin with vp_FP. Among the most critical is the vp_FPController script that will be on the player object when it’s created.

States
States can be a confusing concept. Within many vp_FP components you’ll find a section named State. Here is an example of what it looks like:

An

An area where states can be added

Certain vp_FP scripts have a state section that track the values that local variables should be for the state of that component at a given time. Think of it like this: when you zoom in and use a sniper rifle’s crosshairs, you would be in a “Zoom” state — the preset values for that state would raise and center the gun by changing its position and rotation. When you zoom, it’ll also animate the weapon’s movement.

Events
An event is a signal between objects that indicates something important happened and other objects might need to react. Take, for example, when something gets hit. The ‘getting hit’ part is the event — a signal, if you will. Other objects react based on how you’ve set up your game. This tutorial won’t cover events in detail.

OK, well done, partner.

high-time-shootn

Setting Up The Player Prefab

Type SimplePlayer into the Project browser’s search bar and then drag the SimplePlayer prefab into the scene in front of one of the targets.

simpleplayerdrag

Select the SimplePlayer GameObject in the Hierarchy and set its Position to (X = -26.6, Y = 1.3, Z = -21.3) and Rotation to (X = 0, Y = 0, Z = 0).

playersetuppostion

Delete the Camera GameObject from the Hierarchy. You don’t need it because the camera on SimplePlayer gives you a first-person perspective.

The Camera is no longer needed

Press play and voila, you have an FPS game up and running!

Press play as soon as you fire or zoom to lock the cursor to the screen. Press Escape to regain control of the cursor.

Use the WASD keys to walk and press the left mouse button to fire the pistol and the right mouse button to zoom — you can fire while zoomed. You can also press Shift to run and Space to jump. Make sure you shoot the target :]

Bang bang bang!

Note: At the time of writing, there’s a bug in UFPS that prevents the muzzle flash from showing when you play a scene for the first time. The workaround is to click the right mouse button once to zoom — it should work correctly after that.

There is a lot of logic under the hood, but the beauty of UFPS is that it does a lot of heavy lifting for you. It lets you focus on more important matters, such as adding guns with custom behavior.

You might be surprised to learn that you don’t have to create animations for when the player moves or fires the gun. The movement you see is done with physics. That’s how UFPS does it!

UFPS starts you off with a pistol, but the starter project includes a shotgun and a sniper rifle prefab. You’ll put both to work shortly and will edit UFPS settings to perfect the animations.

Although you don’t need to animate the gun’s movement, you are on your own for hand animations. This tutorial will not cover hand animations, nor will UFPS do them for you. However, you’d want to consider them when you’re building an FPS for release.

Lastly, you do have the option to add complex animations with gun models. In that case, you’d need to include the hand with the model.

Adding Bullet Holes

You can already hear the gun and watch shells eject! There’s even a cool flare effect at the front of the gun! UFPS does that for you, which is one of the features that makes it easy to add and configure new guns.

Try shooting something and tell me what’s missing. Is that gun shooting blanks? Why are there no bullet holes?

Anytime you shoot something, you should leave a mark. Stop play. In the Hierarchy view, click the dropdown arrow to the left of the Environment GameObject and select the child Wall GameObjects.

In the Inspector, click Add Component and type vp_SurfaceIdentifier into the search field. Click vp_SurfaceIdentifier — the only available script — to add it. Click the dot to the right of the Surface Type field. In the menu that pops up, click the Assets tab and select Metal.

wallsurface

Select the Ground GameObject in the Hierachy and repeat the above steps, but select Wood for the last step.

The targets need a wood surface identifier, so click the dropdown arrow next to the Target and BackTarget GameObjects in the Hierarchy to expand them, and then select their children and add the vp_SurfaceIdentifier script component. Also set the surface type to Wood.

Click Play and try shooting the target, the walls and the floor. Now you can see the results of your handiwork, partner. :]

shotall

How The UFPS Pistol Works

No one ever defeated a horde of evil monsters with a single a pistol, right? :] You’ll add a shotgun soon, and it’ll be easier if you understand how the pistol works.

Expand the SimplePlayer GameObject in the Hierachy, and then expand the FPSCamera GameObject. Select the 1Pistol GameObject.

The number 1 in front of a weapon name represents the number the player should press to equip that pistol during gameplay. When you add new weapons, you’ll just increment the number and UFPS will automatically handle weapon swapping.

The 1Pistol GameObject has several important components:

  • AudioSource makes the pistol go “bang” when it fires.
  • vp_FPWeapon identifies this GameObject as a weapon in the UFPS framework and controls aspects that relate to the weapon itself.
  • vp_FPWeaponShooter handles effects like muzzle flash, shell ejection and the projectile.
  • vp_FPWeaponReloader handles sounds and animations that relate to reloading.

Note: Ammo and reloading are out of scope for this tutorial, but they’re something you’ll want to think about when you make your game. Also, there are many sections for these vp_FP components and the UFPS documentation covers them in full, so make it your first stop when you have questions.

vp_FPWeapon

Expand the Position Springs section on the vp_FPWeapon Script component in the Inspector. This component sets up the gun’s on-screen position, which changes based on the state — for instance, when the pistol moves for zooming. Offset is where the gun sits on-screen.

Click Play and move the gun around by playing with the Offset values. By the way, you won’t mess up the game’s actual values while you’re in play mode.

Tinkering with settings in play mode is a good way to test and debug — but make sure you’re not in play mode when you’re actually trying to change settings. It’s easy to get wrapped up in things and forget you’re still in play mode, which can lead to extensive reworking and bad words coming from your mouth.

pistolpos

Look a little further down in the component to find Spring2 Stiffn and Spring2 Damp — these are the gun’s recoil settings. Spring2 Stiffn is ‘elastically’, or how the gun bounces back to its original position after firing. Spring2 Damp is how fast the bounce wears off. The easiest way to visualize this is by…actually visualizing it. :]

Click Play and move the sliders around for Spring2 Stiffn and Spring2 Damp to get a feel for what they do.

pistolspr2

It can take some trial and error to make these animations look right, so don’t feel bad if your first few attempts make the gun bounce like a pogo stick.

Now that you’ve familiarized yourself with Position, it’s time to focus on Rotation. Expand the RotationSprings section on the vp_FPWeapon in the Inspector. Look at the Offset values, which are the same as what you saw in the PositionSprings section. The difference is that these values control the gun’s rotation.

Click Play and mess around with Offset values to get a feel for what it does.

pistolrot2

Now think about how it looks when you fire that pistol. UFPS creates the animation on the fly by on interpolating between state values.

All you need to do is set up various state values in the vp_FPWeapon component — no need to import and set up animations for this effect. You’ll get hands-on experience with that when you add the sniper rifle and shotgun.

Stop the game play.

Dig a little deeper here. Expand the States section on the vp_FPWeapon in the Inspector and have a look at the pre-existing states and their associated data files. The data files track what values should change in the vp_FPWeapon when the state changes.

For example, take a look at the Zoom state. Double-click WeaponPistolZoom and have a look at the script file — it will open in your default code editor for Unity. It should be a simple data file with the following:

ComponentType vp_FPWeapon
ShakeSpeed 0.05
ShakeAmplitude 0.5 0 0
PositionOffset 0 -0.197 0.17
RotationOffset 0.4917541 0.015994 0
PositionSpringStiffness 0.055
PositionSpringDamping 0.45
RotationSpringStiffness 0.025
RotationSpringDamping 0.35
RenderingFieldOfView 20
RenderingZoomDamping 0.2
BobAmplitude 0.5 0.4 0.2 0.005
BobRate 0.8 -0.4 0.4 0.4
BobInputVelocityScale 15
PositionWalkSlide 0.2 0.5 0.2
LookDownActive false

These are the changes that must occur when the vp_FPWeapon enters the Zoom state. This might seem a little intimidating, but it’s actually quite easy — you can position the gun during play and then save a state file from there.

vp_FPWeaponShooter

Expand the Projectile section under the vp_FPWeaponShooter in the Inspector. This controls the firing of the gun.

  • Firing Rate is how long the gun animation fires.
  • Tap Firing is an override that lets the player fire without waiting for the fire animation to finish — it resets the fire animation.
  • Prefab is the bullet. Keep in mind that bullets have their own script under vp_BulletFX, and you can learn more about it in the documentation.

Expand the Muzzle Flash section. You can configure the art prefab as well as its scale and position to achieve the perfect flash effect each time the player fires the weapon.

Expand the Shell section to see the settings that control what happens when the shell ejects from the gun.

Finally, expand the Sound section. Here you configure the settings for the sound the weapon makes when the gun fires with and without ammo.

You’ll also notice a States section in here too. It is similar to the state section for the vp_FPWeapon. If you’re curious how this works you can look into the source code, which involves the advanced topic of Reflection — you’ll see a link at the end of this tutorial where you can learn more.

Adding a Shotgun

What’s the point of building an FPS if you’re not going to give your hero a tool that destroys enemies at short range? There isn’t. It would be a sad, sad little FPS without such a weapon.

To allow you to stay focused on UFPS, you’ll just add the gun model and won’t mess around with hands.

In the Project browser, type 2Shotgun and drag the 2Shotgun prefab under the 1Pistol GameObject in the Hierachy.

addshotgun

You might notice that the vp_WeaponShooter doesn’t have any options, and that’s because the prefab is disabled. Toggle the active box on the 2Shotgun GameObject.

Active Component

You might be thinking you can just click play then press 2 and load the shotgun right? Well — almost! The SimplePlayer prefab is only configured for the pistol.

To make it work for new weapons you need to add a special component. Click the SimplePlayer GameObject in the Hierachy and then click Add Component in the Inspector. Type in vp_FPWeaponHandler and select the script. This is the component that allows weapon switching.

weaponhandler

Set the value of Start Weapon to 1 to set it to the pistol. Now when you click Play and then press 2 you’ll swap your pistol for the shotgun.

newshotgun

Wait a minute…something is off — you’ve got that gun in a rather precarious position! With the 2Shotgun prefab selected in the Hierachy, expand the PositionSprings section of the vp_FPWeapon in the Inspector and set the Offset to (X = -0.04, Y = -0.46, Z = 4.89). Expand the RotationSprings section and set the offset to (X = -1.09, Y = -93.3, z = 2.5).

shotgunpositioned

The shotgun should fire a cluster of bullets. Where’s the fun in a single bullet?

Expand Projectile on the vp_FPWeaponShooter and set Count to 10 and the Spread to 2.

Expand the MuzzleFlash and set the prefab to MuzzleFlashShotgun.

muzzleflash

Set the Position to (X = -0.08, Y = -0.24, Z = 8.88) and set the Scale to (X = 1, Y = 1, Z = 1). If you want to figure out these values yourself just edit the MuzzleFlash Position during gameplay and update the position after you’ve stopped playing — the muzzle flash stays on so you can precisely position it.

Expand the Sound section and set the Fire to ShotgunFire.

shotgunsetup

Click Play then press 2 and add some holes to the target!

shotgunfire

Zoom is a special state pre-configured for the RMB (right mouse button) in UFPS. Upon clicking, it sets the zoom state for all components that are set to listen for this change.

You can add custom zoom states. Try it for yourself by clicking Play and pressing 2 to equip the shotgun. Change the Position Springs and Rotation Springs Offset values for vp_FPWeapon so the camera looks down the barrel. Click the Save button at the bottom of the vp_FPWeapon, name the file ShotgunZoom and click Save again.

shotgunzoom

Note: If you’re having trouble getting zoom to look right, or you’re on a Mac and can’t see the save button in the vp_FileDialog window, just download this ShotgunZoom and add it to your Assets folder in Unity.

Now you have the zoom, but the shotgun doesn’t know how to use it. Stop game play and click the 2Shotgun GameObject in the Hierachy. Expand the vp_FPWeapon in the Inspector and expand the States section. Drag ShotgunZoom over to the Zoom field.

Drag ShotgunZoomFile

UFPS takes the start and end values then creates an animation. Click Play and Zoom with the shotgun and it will animate to where you saved it to for the zoom state.

shotgunzooming

Adding A Sniper Rifle

Any good FPS game comes with an array of weapons so the player can wipe out enemies in a variety of situations. For those times when you want to pick ’em one by one from a safe distance, there’s nothing better than the almighty sniper rifle!

Type 3Sniper in the Project browser search and drag the 3Sniper prefab under the 2Shotgun GameObject in the Hierachy. In the Inspector, add the vp_FPWeapon and vp_WeaponShooter scripts as you’ve done previously.

sniperadd

Add the sniper rifle model to the Rendering section of the vp_FPWeapon by going to the Project browser and expanding the Assets folder then the Prefabs folder.

Click the 3Sniper GameObject in the Hierarchy, and then expand the vp_FPWeapon component in the Inspector. Expand the Rendering section to display the 1st Person Weapon (Prefab) field. Finally, drag the m24 Prefab from the Project browser to the 1st Person Weapon (Prefab) field.

Add Prefab

Under vp_FPWeapon, set Position Springs to (X = 1.4, Y = -0.81, Z = 4.88) and Rotation Springs to (X = -2.7, Y = 79.62, Z = -5.01). Expand the Sound section on the vp_FPWeaponShooter and set Fire to SniperShot.

The gun is now in a functional state. Click Play and press 3 to see for yourself. Don’t forget to give it a test fire. :]

sniperadd

“Functional state” is rather subjective, don’t you think? There are no crosshairs when you zoom! Adding a scope zoom is an excellent use case for creating states while playing the game.

It’s time to add a Sniper component that helps with zooming. This is a special script that needs to listen for player events in order to work.

Open the Scripts folder, right-click anywhere and use the pop-up menu to create a new C# script named Sniper. Double-click to open it and replace its contents with the following code:

using UnityEngine;
using System.Collections;
 
public class Sniper : MonoBehaviour
{
  //1
  public vp_FPPlayerEventHandler playerEventHandler;
  public Camera mainCamera;
  private bool isZooming = false;
  private bool hasZoomed = false;
 
  //2
  void Update()
  {
    if (playerEventHandler.Zoom.Active && !isZooming)
    {
      isZooming = true;
      StartCoroutine("ZoomSniper");
    }
    else if (!playerEventHandler.Zoom.Active)
    {
      isZooming = false;
      hasZoomed = false;
      GetComponent<vp_FPWeapon>().WeaponModel.SetActive(true);
    }
 
    if (hasZoomed)
    {
      mainCamera.fieldOfView = 6;
    }
  }
 
  //3
  IEnumerator ZoomSniper()
  {
    yield return new WaitForSeconds(0.40f);
    GetComponent<vp_FPWeapon>().WeaponModel.SetActive(false);
    hasZoomed = true;
  }
}

Stepping through the script:

1. These variables keep track of references to the PlayerEventHandler and the camera. The Booleans are flags that track the state of the zoom.

2. This section checks if the zoom state is active. When the gun is zoomed, it sets the field of view to 6, which is what triggers zoom.

3. This coroutine tracks when the zoom animation will complete — after 0.4 seconds in this case — and then hides the weapon model. This creates a bit of time for the player to look down the scope before transitioning to the scope effect.

Save the file and return to Unity. Drag the Sniper script to the 3Sniper GameObject.

Add Sniper Script

Drag the SimplePlayer prefab over the PlayerEventHandler on the Sniper component. Next, drag the FPSCamera over the Main Camera field on the Sniper component.

Set Sniper Event

In the Hierarchy, you’ll find a UI GameObject that has been set up with a SniperZoom texture.

Go to the Scripts folder and create another new C# script. Name it GameUI. Select the UI GameObject in the Hierachy, and then drag the GameUI script from the Project browser to the Inspector.

uiscriptdrag

Open the GameUI script and replace the code with the following:

using UnityEngine;
using UnityEngine.UI;
 
public class GameUI : MonoBehaviour
{
  public GameObject sniperZoom;
  public vp_PlayerEventHandler playerEventHandler;
 
  public void ShowSniperZoom()
  {
    sniperZoom.SetActive(true);
    sniperZoom.GetComponent<Image>().enabled = true;
  }
 
  public void HideSniperZoom()
  {
    sniperZoom.SetActive(false);
    sniperZoom.GetComponent<Image>().enabled = false;
  }
}

These are public methods that you’ll use to show and hide the sniper scope texture — they keep a reference to the scope texture and the event handler. The Sniper script will call these after you configure it to do so. Save the script and return to Unity.

Expand the UI GameObject in the Hierarchy. Drag SniperZoom to the SniperZoom field in the Inspector then drag SimplePlayer to the PlayerEventHandler field.

gameuisetup

Open the Sniper script. Add this variable to the top:

public GameUI gameUI;

Now the script will keep a reference to the GameUI.

Below the else if (!playerEventHandler.Zoom.Active) statement, add the following:

gameUI.HideSniperZoom();

Before the change:

else if (!playerEventHandler.Zoom.Active)
{
  isZooming = false;
  hasZoomed = false;
  GetComponent<vp_FPWeapon>().WeaponModel.SetActive(true);
}

After making the change:

else if (!playerEventHandler.Zoom.Active)
{
  gameUI.HideSniperZoom();
  isZooming = false;
  hasZoomed = false;
  GetComponent<vp_FPWeapon>().WeaponModel.SetActive(true);
}

Now the sniper zoom texture will hide when in the non-zoom state.

Below GetComponent<vp_FPWeapon>().WeaponModel.SetActive(false); add the following:

gameUI.ShowSniperZoom();

Before the change you should have:

IEnumerator ZoomSniper()
{
  yield return new WaitForSeconds(0.40f);
  GetComponent<vp_FPWeapon>().WeaponModel.SetActive(false);
  hasZoomed = true;
}

After this change you should now have:

IEnumerator ZoomSniper()
{
  yield return new WaitForSeconds(0.40f);
  GetComponent<vp_FPWeapon>().WeaponModel.SetActive(false);
  gameUI.ShowSniperZoom();
  hasZoomed = true;
}

This line shows the sniper scope texture when the sniper rifle is in zoom. Save and return to Unity. Select the the 3Sniper GameObject then drag the UI GameObject to the GameUI field.

snipergameuisetup

All of that was to hide the gun and show the sniper scope when the player zooms. Take it for a test run by clicking Play, pressing 3 to equip the sniper and pressing the RMB to zoom.

badzoom

It works but it’s a rudimentary implementation. You can make it better by setting it so that the player glimpses down the scope when zooming.

Click Play and press 3 to equip the sniper rifle. Expand the Position Springs and Rotation Springs for the 3Sniper and tinker with the position and rotation offset values until the scope is front of the camera.

Click the Save button at the bottom of the vp_FPWeapon component. Name the file SniperZoom then click Save again.

You’ve just finished setting the sniper rifle’s state when it’s zoomed. In this case, you moved the gun up and in front of the camera so it will appear as though the player is looking down the scope, and SniperZoom is where you saved the state.

sniperzoomconfig

Note: If you’re having trouble setting this up or saving your settings, go ahead and download this SniperZoom file.

As of this moment, you’ve got the settings for the state but still need to create the required state. Select 3Sniper and expand the vp_FPWeapon then expand the State section.

Click the Add State button and replace the word Untitled with Zoom in the new State field.

Drag the SniperZoom.txt file from the Assets folder to the Text Asset field of 3Sniper’s vp_FPWeapon component.

Add State

Pump it Full of Lead

Just a few more tasks lie between you and sniping the day away. It does seem like a good idea to add bullets to your gun — of course, you can skip this step, but sniping just wouldn’t be the same. :] Previously the Pistol and Shotgun weapons already had bullets set up. You created the sniper rifle from scratch, and so you’ll also need to configure a prefab to use for its bullets.

While you’re still in 3Sniper, expand vp_FPWeaponShooter then expand the Projectile section. Click the small selector button to the right of the Prefab field. Find and select the PistolBullet prefab.

Add Projectile

Click Play, and focus on the most distant target — you may need to turn around. Press the RMB to zoom then fire the sniper rifle!

sniperzoom2

Now you get the effect of looking down the scope before zooming in. Great zoom’n, partner. :]

Where To Go From Here

Oh, the places you can go from here. Where to start? UFPS is a rich framework and this tutorial just scratches the surface of what’s possible.

A logical next step would be to add an assault rifle complete with realistic animations. Play with the sliders and values in the vp_FPWeapon until it looks and feels right. Remember it should shoot very quickly and have a fast-but-small recoil after each shot.

You covered the basics, but there’s still a lot more to learn in the UFPS documentation. For one, you didn’t touch vp_FXBullet. Another key feature to FPS games is inventory and ammo management, which involves working with the UI.

You didn’t get to experience UFPS’ many cool features — so check them out!

Work through these tutorials if you’d like to learn more about the Unity UI system:

Or pick up Unity Games by Tutorials and learn Unity from the inside out while you build four awesome games.

As I mentioned earlier, reflection is an advanced skill that’s a great tool to have in your coding toolbox, so read up on it when you get a chance.

Lean more about how the event system works by watching this official Unity Events tutorial

If you have questions, feedback or just want to ask for more UFPS tutorials, leave a comment in our forums. Your feedback determines what we write next — so speak up!

Acknowledgments

Special thanks to Wojciech Klimas for the gun models. See more good work here:

The post Introduction To UFPS: Unity FPS Tutorial appeared first on Ray Wenderlich.
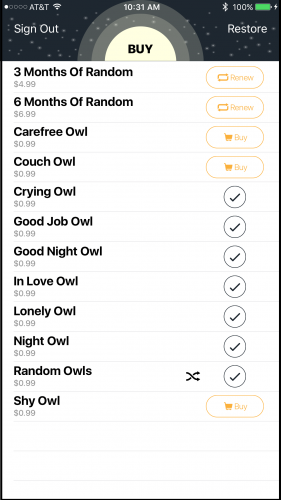
Viewing all 4373 articles
Browse latest View live


<script src="https://jsc.adskeeper.com/r/s/rssing.com.1596347.js" async> </script>