Quantcast
Channel: Kodeco | High quality programming tutorials: iOS, Android, Swift, Kotlin, Unity, and more
Viewing all 4373 articles
Browse latest View live

RxSwift: Transforming Operators

$
0
0

This tutorial has been taken from Chapter 7, “Transforming Operators” of our book RxSwift: Reactive Programming with Swift. The book covers everything from basic Rx theory, all the way up to error handling, UI, architecture, and other advanced Rx concepts. Enjoy!

In this tutorial, you’re going to learn about one of the most important categories of operators in RxSwift: transforming operators. You’ll use transforming operators all the time, to prep data coming from an observable for use by your subscriber.

Once again, there are parallels between transforming operators in RxSwift and the Swift standard library, such as map(_:) and flatMap(_:). By the end of this tutorial, you’ll be transforming all the things!

Getting Started

The starter project for this tutorial is named RxSwiftPlayground; you can download it here. Once you’ve opened it and done an initial build, you’re ready for action. The same unicodeDescription(lowercased:) helper function exists in the SupportCode.swift file in Sources, which you can review by twisting down the main playground page.

Transforming Elements

Observables emit elements individually, but you will frequently want to work with collections, such as when you’re binding an observable to a table or collection view, which you’ll learn how to do later in the book. A convenient way to transform an observable of individual elements into an array of all those elements is by using toArray. As depicted in this marble diagram, toArray will convert an observable sequence of elements into an array of those elements, and emit a .next event containing that array to subscribers.

Add this new example to your playground:

example(of: "toArray") {
 
  let disposeBag = DisposeBag()
 
  // 1
  Observable.of("A", "B", "C")
    // 2
    .toArray()
    .subscribe(onNext: {
      print($0)
    })
    .addDisposableTo(disposeBag)
}

Here’s what you just did:

  1. Create an observable of letters.
  2. Use toArray to transform the elements in an array.

An array of the letters is printed.

--- Example of: toArray ---
["A", "B", "C"]

RxSwift’s map operator works just like Swift’s standard map, except it operates on observables. In the marble diagram, map takes a closure that multiplies each element by 2.

Add this new example to your playground:

example(of: "map") {
 
  let disposeBag = DisposeBag()
 
  // 1
  let formatter = NumberFormatter()
  formatter.numberStyle = .spellOut
 
  // 2
  Observable<NSNumber>.of(123, 4, 56)
    // 3
    .map {
      formatter.string(from: $0) ?? ""
    }
    .subscribe(onNext: {
      print($0)
    })
    .addDisposableTo(disposeBag)
}

Here’s the play-by-play:

  1. You create a number formatter to spell out each number.
  2. You create an observable of NSNumbers (so that you don’t have to convert integers when using the formatter next).
  3. You use map, passing a closure that gets and returns the result of using the formatter to return the number’s spelled out string or an empty string if that operation returns nil.

Chapter 5 of the book covers filtering operators, some of them with withIndex variations. The same holds true for transforming operators. mapWithIndex also passes the element’s index to its closure. In this marble diagram, mapWithIndex will transform the element by multiplying it by 2 if its index is greater than 1, otherwise it will pass through the element as-is, so only the 3rd element is transformed.

Now add this new example to your playground to implement the example in the marble diagram:

example(of: "mapWithIndex") {
 
  let disposeBag = DisposeBag()
 
  // 1
  Observable.of(1, 2, 3, 4, 5, 6)
    // 2
    .mapWithIndex { integer, index in
      index > 2 ? integer * 2 : integer
    }
    .subscribe(onNext: {
      print($0)
    })
    .addDisposableTo(disposeBag)
}

Quite simply:

  1. You create an observable of integers.
  2. You use mapWithIndex, and if the element’s index is greater than 2, multiply it by 2 and return it, else return it as is.

Only the fourth element onward will be transformed and sent to the subscriber to be printed.

--- Example of: mapWithIndex ---
1
2
3
8
10
12

You may have wondered at some point, “How do I work with observables that are properties of observables?” Enter the matrix.

Transforming Inner Observables

Add the following code to your playground, which you’ll use in the upcoming examples:

struct Student {
 
  var score: Variable<Int>
}

Student is structure that has a score property that is a Variable. RxSwift includes a few operators in the flatMap family that allow you to reach into an observable and work with its observable properties. You’re going to learn how to use the two most common ones here.

Note: A heads up before you begin: these operators have elicited more than their fair share of questions (and groans and moans) from newcomers to RxSwift. They may seem complex at first, but you are going to walk through detailed explanations of each, so by the end of section you’ll be ready to put these operators into action with confidence.

The first one you’ll learn about is flatMap. The documentation for flatMap describes that it “Projects each element of an observable sequence to an observable sequence and merges the resulting observable sequences into one observable sequence.” Whoa! That description, and the following marble diagram, may feel a bit overwhelming at first. Read through the play-by-play explanation that follows, referring back to the marble diagram.

The easiest way to follow what’s happening in this marble diagram is to take each path from the source observable (the top line) all the way through to the target observable that will deliver elements to the subscriber (the bottom line). The source observable is of an object type that has a value property that itself is an observable of type Int. It’s value property’s initial value is the number of the object, that is, O1’s initial value is 1, O2’s is 2, and O3’s is 3.

Starting with O1, flatMap receives the object and reaches in to access its value property and multiply it by 10. It then projects the transformed elements from O1 onto a new observable (the 1st line below flatMap just for O1), and that observable is flattened down to the target observable that will deliver elements to the subscriber (the bottom line).

Later, O1’s value property changes to 4, which is not visually represented in the marble diagram (otherwise the diagram would become even more congested). But the evidence that O1’s value has changed is that it is transformed, projected onto the existing observable for O1 as 40, and then flattened down to the target observable. This all happens in a time-linear fashion.

The next value in the source observable, O2, is received by flatMap, its initial value 2 is transformed to 20, projected onto a new observable for O2, and then flattened down to the target observable. Later, O2’s value is changed to 5. It is transformed to 50, projected, and flattened to the target observable.

Finally, O3 is received by flatMap, its initial value of 3 is transformed, projected, and flattened.

flatMap projects and transforms an observable value of an observable, and then flattens it down to a target observable. Time to go hands-on with flatMap and really see how to use it. Add this example to your playground:

example(of: "flatMap") {
 
  let disposeBag = DisposeBag()
 
  // 1
  let ryan = Student(score: Variable(80))
  let charlotte = Student(score: Variable(90))
 
  // 2
  let student = PublishSubject<Student>()
 
  // 3
  student.asObservable()
    .flatMap {
      $0.score.asObservable()
    }
    // 4
    .subscribe(onNext: {
      print($0)
    })
    .addDisposableTo(disposeBag)
}

Here’s the play-by-play:

  1. You create two instances of Student, ryan and charlotte.
  2. You create a source subject of type Student.
  3. You use flatMap to reach into the student subject and access its score, which is a Variable, so you call asObservable() on it. You don’t modify score in any way. Just pass it through.
  4. You print out .next event elements in the subscription.

Nothing is printed yet. Add this code to the example:

student.onNext(ryan)

As a result, ryan’s score is printed out.

--- Example of: flatMap ---
80

Now change ryan’s score by adding this code to the example:

ryan.score.value = 85

ryan’s new score is printed.

85

Next, add a different Student instance (charlotte) onto the source subject by adding this code:

student.onNext(charlotte)

flatMap does its thing and charlotte’s score is printed.

90

Here’s where it gets interesting. Change ryan’s score by adding this line of code:

ryan.score.value = 95

ryan’s new score is printed.

95

This is because flatMap keeps up with each and every observable it creates, one for each element added onto the source observable. Now change charlotte’s score by adding the following code, just to verify that both observables are being monitored and changes projected:

charlotte.score.value = 100

Sure enough, her new score is printed out.

100

To recap, flatMap keeps projecting changes from each observable. There will be times when you want this behavior. And there will be times when you only want to keep up with the latest element in the source observable. So what do you think is the name of the flatMap operator that only keeps up with the latest element?

flatMapLatest

flatMapLatest is actually a combination of two operators, map and switchLatest. You’ll learn about switchLatest in the “Combining Operators” chapter of the book, but you’re getting a sneak peek here. switchLatest will produce values from the most recent observable, and unsubscribe from the previous observable.

So, flatMapLatest “Projects each element of an observable sequence into a new sequence of observable sequences and then transforms an observable sequence of observable sequences into an observable sequence producing values only from the most recent observable sequence.” Wowza! Take a look at the marble diagram of flatMapLatest.

flatMapLatest works just like flatMap to reach into an observable element to access its observable property, it applies a transform and projects the transformed value onto a new sequence for each element of the source observable. Those elements are flattened down into a target observable that will provide elements to the subscriber. What makes flatMapLatest different is that it will automatically switch to the latest observable and unsubscribe from the the previous one.

In the above marble diagram, O1 is received by flatMapLatest, it transforms its value to 10, projects it onto a new observable for O1, and flattens it down to the target observable. Just like before. But then flatMapLatest receives O2 and it does its thing, switching to O2’s observable because it’s now the latest.

When O1’s value changes, flatMapLatest actually still does the transform (something to be mindful of if your transform is an expensive operation), but then it ignores the result. The process repeats when O3 is received by flatMapLatest. It then switches to its sequence and ignores the previous one (O2). The result is that the target observable only receives elements from the latest observable.

Add the following example to your playground, which is a copy/paste of the previous example except for changing flatMap to flatMapLatest:

example(of: "flatMapLatest") {
 
  let disposeBag = DisposeBag()
 
  let ryan = Student(score: Variable(80))
  let charlotte = Student(score: Variable(90))
 
  let student = PublishSubject<Student>()
 
  student.asObservable()
    .flatMapLatest {
      $0.score.asObservable()
    }
    .subscribe(onNext: {
      print($0)
    })
    .addDisposableTo(disposeBag)
 
  student.onNext(ryan)
 
  ryan.score.value = 85
 
  student.onNext(charlotte)
 
  // 1
  ryan.score.value = 95
 
  charlotte.score.value = 100
}

Only one thing to point out here that’s different from the previous example of flatMap:

  1. Changing ryan’s score here will have no effect. It will not be printed out. This is because flatMapLatest has already switched to the latest observable, for charlotte.
--- Example of: flatMapLatest ---
80
85
90
100

So you may be wondering when would you use flatMap for flatMapLatest? Probably the most common use case is using flatMapLatest with networking operations. You will go through examples of this later in the book, but for a simple example, imagine that you’re implementing a type-ahead search. As the user types each letter, s, w, i, f, t, you’ll want to execute a new search and ignore results from the previous one. flatMapLatest is how you do that.

Challenges

Completing challenges helps drive home what you learned in this tutorial. There are starter and finished versions of the challenge in the exercise files download.

Challenge 1: Accept Alpha-Numeric Characters

In the accompanying challenge, you have code necessary to look up a contact based on a 10-digit number entered by the user.

input
  .skipWhile { $0 == 0 }
  .filter { $0 < 10 }
  .take(10)
  .toArray()
  .subscribe(onNext: {
    let phone = phoneNumber(from: $0)
    if let contact = contacts[phone] {
       print("Dialing \(contact) (\(phone))...")
    } else {
       print("Contact not found")
    }
  })
  .addDisposableTo(disposeBag)

Your goal for this challenge is to modify this implementation to be able to take letters as well, and convert them to their corresponding number based on a standard phone keypad (abc is 2, def is 3, and so on).

The starter project includes a helper closure to do the conversion:

let convert: (String) -> UInt? = { value in
  if let number = UInt(value),
    number < 10 {
    return number
  }
 
  let convert: [String: UInt] = [
    "abc": 2, "def": 3, "ghi": 4,
    "jkl": 5, "mno": 6, "pqrs": 7,
    "tuv": 8, "wxyz": 9
  ]
 
  var converted: UInt? = nil
 
  convert.keys.forEach {
    if $0.contains(value.lowercased()) {
      converted = convert[$0]
    }
  }
 
  return converted
}

And there are closures to format and “dial” the contact if found (really, just print it out):

let format: ([UInt]) -> String = {
  var phone = $0.map(String.init).joined()
 
  phone.insert("-", at: phone.index(
    phone.startIndex,
    offsetBy: 3)
  )
 
  phone.insert("-", at: phone.index(
    phone.startIndex,
    offsetBy: 7)
  )
 
  return phone
}
 
 
let dial: (String) -> String = {
  if let contact = contacts[$0] {
    return "Dialing \(contact) (\($0))..."
  } else {
    return "Contact not found"
  }
}

These closures allow you to move the logic out of the subscription, where it really doesn’t belong. So what’s left to do then? You’ll use multiple maps to perform each transformation along the way. You’ll use skipWhile to skip 0s at the beginning.

You’ll also need to handle the optionals returned from convert. To do so, you can use a handy operator from the RxSwiftExt repo created by fellow author Marin: unwrap. RxSwiftExt includes useful operators that are not part of the core RxSwift library. The unwrap operator replaces the need to do this:

Observable.of(1, 2, nil, 3)
  .flatMap { $0 == nil ? Observable.empty() : Observable.just($0!) }
  .subscribe(onNext: {
    print($0)
  })
  .addDisposableTo(disposeBag)

With unwrap, you can just do this:

Observable.of(1, 2, nil, 3)
  .unwrap()
  .subscribe(onNext: {
    print($0)
  })
  .addDisposableTo(disposeBag)

The starter project also includes code to test your solution. Just add your solution right below the comment // Add your code here.

Where to Go From Here?

You can download the final package from this tutorial here.

If you enjoyed what you learned in this tutorial, why not check out the complete RxSwift book, available on our store?

Here’s a taste of what’s in the book:

  • Getting Started: Get an introduction to the reactive programming paradigm, learn the terminology involved and see how to begin using RxSwift in your projects.
  • Event Management: Learn how to handle asynchronous event sequences via two key concepts in Rx — Observables and Observers.
  • Being Selective: See how to work with various events using concepts such as filtering, transforming, combining, and time operators.
  • UI Development: RxSwift makes it easy to work with the UI of your apps using RxCocoa, which provides an integration of both UIKit and Cocoa.
  • Intermediate Topics: Level up your RxSwift knowledge with chapters on reactive networking, multi-threading, and error handling.
  • Advanced Topics: Round out your RxSwift education by learning about MVVM app architecture, scene-based navigation, and exposing data via services.
  • And much, much more!

By the end of this book, you’ll have hands-on experience solving common issues in a reactive paradigm — and you’ll be well on your way to coming up with your own Rx patterns and solutions!

To celebrate the launch of the book, it’s currently on sale for $44.99 – that’s a $10 discount off the cover price! But don’t wait too long, as this deal is only on until Friday, April 7.

If you have any questions or comments on this tutorial, feel free to join the discussion below!

The post RxSwift: Transforming Operators appeared first on Ray Wenderlich.


Background Promises in PromiseKit

Screencast: Server Side Swift with Perfect: Persisting Models with StORM

RWDevCon 2017 Post-Mortem

$
0
0

We recently finished our third annual hands-on tutorial conference: RWDevCon 2017.

During our three days together, we had 2 workshops, 3 open bars, 6 inspiration talks, 24 hands-on tutorials, and 275 attendees from 19 countries across the world!

The conference was a massive success, with an average 4.63 overall rating, and everyone seemed to love the both the unique hands-on aspect of the tutorials as well as the feeling of friendship and community throughout the conference.

Now that Vicki and I are back home, we thought you might like to see to see some pictures and feedback from the attendees, so that’s what this post is all about.

Then we’ll get into the post-mortem, with three things that went well, and three things that we can improve upon in the future. Let’s dive in!

Conference Highlights

This year, for the first time ever, we offered two optional pre-conference workshops:

  1. Advanced App Architecture: This advanced workshop by Josh Berlin and René Cacheaux covered how to create a well designed boundary between subsystems, dependency injection, use case driven development, and more to result in a clean architecture for your apps.
  2. Advanced Apple Debugging and Reverse Engineering: This “mind-blowing” workshop by Derek Selander covered how to wield the power of LLDB and other debugging tools and dig deep into code.

RWDevCon 2017 Workshops

After the workshops, we had the opening reception for the conference. This was a chance for everyone to get to know each other, and enjoy some passed appetizers, beer, and mojitos! :]

RWDevCon 2017 Opening Reception

The next morning, Marin Todorov kicked off the conference with his inspiring speech titled Reflect & Refactor. He challenged us all to take stock of our lives at this moment, and ask ourselves “what do you need right now?”

RWDevCon 2017 Keynote

After that we started the main event of the conference: the 24 hands-on tutorials. The key difference is that instead of just watching the instructor talk, you code along with him or her!

RWDevCon 2017 Tutorials

Some of our most popular tutorials this year included Swift Playgrounds in Depth, Server Side Swift, Advanced Auto Layout, Machine Learning, iOS Design Patterns, and Swift Memory Management.

After two hard day’s work on tutorials, we switched over to inspiration talks. These are short, 18-minute non-technical talks designed to give you a new ideas and some battle-won advice, so you can go home energized and excited.

RWDevCon 2017 Inspiration Talks

Don’t worry – aside from all of these tutorials and inspiration talks, we had plenty of time for fun too. We played board games at lunch, and during our Friday night party we had the first ever James Dempsey Game Show!

RWDevCon 2017 James Dempsey Game Show

During the James Dempsey Game Show, contestants answered Apple and iOS trivia questions. Some were technical – like “Will it Compile?” – and some are non-technical, like “Who Said It – Jobs, Cook, or Ives?”

The last day of the conference was on April 1, so of course we couldn’t miss the chance to play an April Fool’s joke on everyone: the “release” of Programmer Dancing by Tutorials!

Then we had the real special surprise of the conference: all attendees got a free print copy of our new book RxSwift: Reactive Programming with Swift, and an advance copy of our upcoming book Advanced LLDB Debugging & Reverse Engineering (that isn’t even available on our site yet)!

RWDevCon 2017 Surprise Books

Overall, the team and I had so much fun learning, getting inspired, and meeting friends both new and old. We can’t wait for next year!

What Went Well

From the evaluation forms and people I spoke to, people seemed to really love the conference and look forward to attending next year.

Here are a few comments from attendees:

“For the 3rd straight year you both, and your incredible team, have put together the best technical conference of the year! Thank you very much! I will be seeing you next year!”

“This was my very first dev conference and I have to say, I came with high really high expectations but the actual event was event more amazing than I could ever have imagined!”

“I truly love my first (of many) RWDevCons!”

Here are three things I think went particularly well about the conference.

1) Hands-On Tutorials

RWDevCon is the only conference that focuses 100% on hands-on tutorials, and people seemed to love this hands-on approach.

“The demos and labs are invaluable! Excellent practice. Would come back in the future, and would recommend to a friend (and have already).”

“I’ve been to many conferences, and RWDevCon is so much unlike all of them. It was awesome getting hands-on experience with interesting concepts. Very well run.”

“Most informative conference I’ve been to. I attended some seriously great tutorials/workshops with some amazing instructors.”

If you are the type of person who learns best by doing, this is the conference for you.

2) Friendly and Supportive Community

Another thing I heard time and time again from attendees was how open, inclusive, and friendly everyone was. We make an effort to encourage this, since the best thing about conferences (other than what you learn) are the amazing people you meet. It was wonderful seeing speakers and attendees making new friends!

RWDevCon 2017 Attendees

“I felt more at ease meeting everyone at this conference vs other tech conferences. The RWDevCon crew and attendees have made this conference a psychological safe environment for me.”

“It’s definitely not natural for me to go up to strangers and talk to them and I felt like the conference environment made it a lot easier for me to go out of my comfort zone.”

“I love meeting friends and this is the first conference that offered a very open and friendly environment where not all devs were just staring at their computers/phones and open to meet & talk.”

I was so happy to see folks going out of their way to make folks feel welcome, because as an introvert myself, I know how hard it can be to go up and say hi to people, or to even know what to say sometimes.

A huge thanks to everyone who helped all the introverts like me – I feel so lucky to be a part of such an amazing community! :]

3) Team Coordination

At RWDevCon, we carefully coordinated every detail as a team: we chose the topics as a team based on an attendee vote, we tech edited each other’s materials, and we went through 2 round of practice for every tutorial.

We even created a 450+ page conference book!

RWDevCon 2017 Conference Book

Our goal is to make sure every tutorial at the conference is up to the high quality standards that folks know and love from our site.

“The organization, practice, and polish really show and make a difference.”

“Well organized! Pre work pays off!! Lots of real world examples and use cases.”

“Professional materials! Love the hands on demos!”

What Could Be Improved

As with anything, there are always some things you can improve. Here are the top 3 suggestions:

1) Less Tutorials, More Time

The most common piece of feedback I got from attendees is that they wished we would have a few less tutorials, but more time on each tutorial so we could go a little bit deeper.

RWDevCon 2017 Tutorials
So next year, we’re considering going down from 24 tutorials to 18 tutorials, but with more depth on each tutorial.

2) Rethink Labs

After each tutorial this year, we offered a lab where the speaker would go to another room to answer questions or talk about their subject.

A lot of attendees liked this idea, but didn’t like having to miss a tutorial to go to the labs. So next year, we’d like to find a way to do this (or something similar, like guided breakfast or lunch discussions) that doesn’t cause people to have to miss tutorial time.

3) More Pacing Tweaks

Pacing is one of the biggest challenges with hands-on tutorials, as some people are more advanced than others, some people are faster typers than others, etc. Getting it “just right” is quite difficult!

RWDevCon 2017 Registration

Although I think we made some improvements this year, I think we can still do better here. A lot of attendees had some good ideas that we intend to investigate to improve further in this area.

Where To Go From Here?

For everyone asking – yes, we are planning on having a RWDevCon 2018 next year!

The conference has sold out for three years in a row now, so you won’t want to miss your chance at getting a ticket.

We will email everyone who is on our conference newsletter first before we announce the event publicly. If you’d like to be notified if/when tickets become available, sign up here.

The RWDevCon 2017 Vault

The RWDevCon 2017 Vault

If you didn’t get to attend, definitely check out our massive vault of tutorial videos from the conference – 24+ hours of video tutorials, plus a 450+ page conference book.

Thanks again for everyone who helped make the third annual RWDevCon a success!

The post RWDevCon 2017 Post-Mortem appeared first on Ray Wenderlich.

RxSwift: Transforming Operators in Practice

$
0
0

This tutorial has been taken from Chapter 8, “Transforming Operators in Practice” of our book RxSwift: Reactive Programming with Swift. The book covers everything from basic Rx theory, all the way up to error handling, UI, architecture, and other advanced Rx concepts. Enjoy!

In the previous tutorial on transforming operators, you learned about the real workhorses behind reactive programming with RxSwift: the map and flatMap dynamic duo.

Of course, those aren’t the only two operators you can use to transform observables, but a program can rarely do without using those two at least few times. The more experience you gain with these two, the better (and shorter) your code will be.

You already got to play around with transforming operators in the safety of a Swift playground, so hopefully you’re ready to take on a real-life project. You’ll get a starter project, which includes as much non-Rx code as possible, and you will complete that project by working through a series of tasks. In the process, you will learn more about map and flatMap, and in which situations you should use them in your code.

Note: In this tutorial, you will need to understand the basics of transforming operators in RxSwift. If you haven’t worked through the previous tutorial, “RxSwift: Transforming Operators”, do that first and then come back to this tutorial.

Without further ado, it’s time to get this show started!

Getting Started With GitFeed

Download the starter project for this tutorial here.

I wonder what the latest activity is on the RxSwift repository? In this tutorial, you’ll build a project to tell you this exact thing.

The project you are going to work on in this tutorial displays the activity of a GitHub repository, such as all the latest likes, forks, or comments. To get started with GitFeed, open the starter project for this tutorial, install the required CocoaPods, and open GitFeed.xcworkspace.

The app is a simple navigation controller project and features a single table view controller in which you will display the latest activity fetched from GitHub’s JSON API.

Note: The starter project is set to display the activity of https://github.com/ReactiveX/RxSwift, but if you’d like to change it to any other repository of your choice, feel free.

Run the app and you will see the empty default screen:

There’s nothing too complex going on right now, but you’ll soon have this whole setup ablaze! :]

The project will feature two distinct storylines:

  • The main plot is about reaching out to GitHub’s JSON API, receiving the JSON response, and ultimately converting it into a collection of objects.
  • The subplot is persisting the fetched objects to the disk and displaying them in the table before the “fresh” list of activity events is fetched from the server.

You will see that these two complement each other perfectly — and there are plenty of opportunities to use both map and flatMap to build what’s required.

Fetching Data From the Web

Hopefully you’ve used the URLSession API before and have a general idea of its workflow. In summary: you create a URLRequest containing a web URL and parameters, then send it off to the Internet. After a bit, you receive the server response.

With your current knowledge of RxSwift, it won’t be difficult to add a reactive extension to the URLSession class. In this tutorial, you will simply use a solution boxed with RxCocoa — RxSwift’s companion library.

If you peek into GitFeed’s Podfile, you will notice that you import two different CocoaPods: RxSwift and RxCocoa. What gives?

RxCocoa is a library based on RxSwift, which implements many helpful APIs to aid with developing against RxSwift on Apple’s platforms. In an effort to keep RxSwift itself as close as possible to the common Rx API shared between all implementations such as RxJS, RxJava, and RxPython, all “extra functionality” is separated into RxCocoa.

You will use the default RxCocoa URLSession extension to quickly fetch JSON from GitHub’s API in this tutorial.

Using map to Build a Request

The first task you will undertake is to build a URLRequest you will send off to GitHub’s server. You will follow a reactive approach that might not make sense immediately, but don’t worry — when you re-visit that part of the project later on, you will appreciate it!

Open ActivityController.swift and peek inside. You configure the view controller’s UI in viewDidLoad(), and when you’re finished, you call refresh(). refresh() in turn calls fetchEvents(repo:) and hands over to it the repo name "ReactiveX/RxSwift".

It is in fetchEvents(repo:) where you will add most of your code in this section. To get started, add the following:

let response = Observable.from([repo])

To start building the web request, you begin with a simple string, which is the repository’s full name. The idea to start with a string instead of directly building a URLRequest is to be flexible with the observable’s input.

Next, take the address string and create the fully qualified URL of the activity API endpoint:

.map { urlString -> URL in
  return URL(string: "https://api.github.com/repos/\(urlString)/events")!
}

You use a couple of shortcuts to create the full URL by using a hard-coded string and force unwrapping the result. You end up with the URL to access the latest events’ JSON.

Have you noticed that you specified the closure’s output type? Did you really have to do that? The obvious answer is no; usually you don’t need to explicitly spell out closure input and output types. You can usually leave it to the compiler to figure those out.

However, especially in code where you have several map and/or flatMap operators chained together, you might need to help the compiler out. It will sometimes get lost in figuring out the proper types, but you can aid it by at least spelling out the output types. If you see an error about mismatched or missing types, you can add more type information to your closures and it’ll probably fix the problem.

But enough about compiler woes — back to coding!

Now that you have a URL, you can move on to transforming it into a complete request. Chain to the last operator:

.map { url -> URLRequest in
  return URLRequest(url: url)
}

Easy enough: you use map to transform a URL to a URLRequest by using the provided web address.

Nice work! You’ve chained a couple of map operators to create a more complex transformation:

Now it’s time to bring flatMap into play and fetch some JSON.

Using flatMap to Wait for a Web Response

In the previous tutorial, you learned that flatMap flattens out observable sequences. One of the common applications of flatMap is to add some asynchronicity to a transformation chain. Let’s see how that works.

When you chain several transformations, that work happens synchronously. That is to say, all transformation operators immediately process each other’s output:

When you insert a flatMap in between, you can achieve different effects:

  • You can flatten observables that instantly emit elements and complete, such as the Observable instances you create out of arrays of strings or numbers.
  • You can flatten observables that perform some asynchronous work and effectively “wait” for the observable to complete, and only then let the rest of the chain continue working.

What you need to do in your GitFeed code is something like this:

To do that, append the following code to the operator chain that you have so far:

.flatMap { request -> Observable<(HTTPURLResponse, Data)> in
  return URLSession.shared.rx.response(request: request)
}

You use the RxCocoa response(request:) method on the shared URLSession object. That method returns an Observable<(HTTPURLResponse, Data)>, which completes whenever your app receives the full response from the web server. You will learn more about the RxCocoa rx extensions and how to extend Foundation and UIKit classes yourself in the full RxSwift book.

In the code you just wrote, flatMap allows you to send the web request and receive a response without the need of protocols and delegates. How cool is that? Freely mixing map and flatMap transformations (as above) enables the kind of linear yet asynchronous code you hopefully are starting to appreciate.

Finally, to allow more subscriptions to the result of the web request, chain one last operator. You will use shareReply(1) to share the observable and keep in a buffer the last emitted event:

.shareReply(1)

Here you’re using shareReply(_). Let’s have a look why.

share vs. shareReply

URLSession.rx.response(request:) sends your request to the server and upon receiving the response emits once a .next event with the returned data, and then completes.

In this situation, if the observable completes and then you subscribe to it again, that will create a new subscription and will fire another identical request to the server.

To prevent situations like this, you use shareReply(_). This operator keeps a buffer of the last X emitted elements and feeds them to any newly subscribed observer. Therefore if your request has completed and a new observer subscribes to the shared sequence (via shareReply(_)) it will immediately receive the response from the server that’s being kept in the buffer.

The rule of thumb for using shareReply(_) is to use it on any sequences you expect to complete – this way you prevent the observable from being re-created. You can also use this if you’d like observers to automatically receive the last X emitted events.

Transforming the Response

It will probably not come as a surprise that along with all the map transforms you did before sending the web request, you will need to do some more after you receive its response.

If you think about it, the URLSession class gives you back a Data object, and this is not an object you can work with right away. You need to transform it to JSON and then to a native object you can safely use in your code.

You’ll now create a subscription to the response observable that converts the response data into objects. Just after that last piece of code you wrote, add the following code on a new line:

response
  .filter { response, _ in
    return 200..<300 ~= response.statusCode
  }

With the filter operator above, you easily discard all error response codes. Your filter will only let through responses having a status code between 200 and 300, which is all the success status codes.

Note 1: Interested in the HTTP response codes list? Check out this article on Wikipedia: https://en.wikipedia.org/wiki/List_of_HTTP_status_codes
Note 2: What about this pesky, built-in ~= operator? It’s one of the lesser-known Swift operators, and when used with a range on its left side, checks if the range includes the value on its right side.
Note 3: You’re going to ignore the non-successful status codes, instead of having your observable send an error event. This is a stylistic choice meant to keep the code simple for now.

The data you receive will generally be a JSON-encoded server response containing a list of event objects. As your next task, you will try transforming the response data to an array of dictionaries.

Append another map to the last operator chain:

.map { _, data -> [[String: Any]] in
  guard let jsonObject = try? JSONSerialization.jsonObject(with: data, options: []),
    let result = jsonObject as? [[String: Any]] else {
      return []
  }
  return result
}

Let’s deconstruct this piece of code:

  • Unlike what you’ve done previously, you discard the response object and take only the response data.
  • You aid the compiler by letting it know you will return an Array<[String: Any]>. This is what an array of JSON objects looks like.
  • You proceed to use JSONSerialization as usual to try to decode the response data and return the result.
  • In case JSONSerialization fails, you return an empty array.

It’s really cool how RxSwift forces you to encapsulate these discrete pieces of work by using operators. And as an added benefit, you are always guaranteed to have the input and output types checked at compile time.

You are almost finished processing the API response. There’s a couple of things left to do before updating the UI. First, you need to filter out any responses that do not contain any event objects. Append to the chain:

.filter { objects in
  return objects.count > 0
}

This will discard any error responses or any responses that do not contain new events since you last checked. You’ll implement fetching only new events later in the tutorial, but you can account for this now and help out your future self. :]

As a final transformation, you will convert the list of JSON objects to a collection of Event objects. Open Event.swift from the starter project and you will see that the class already includes the following:

  • A handy init that takes a JSON object as a parameter
  • A dynamic property named dictionary that exports the event as a JSON object

That’s about everything you need this data entity class to do.

Switch back to ActivityController.swift and append this to the last operator chain inside fetchEvents(repo:):

.map { objects in
  return objects.map(Event.init)
}

This final map transformation takes in a [[String: Any]] parameter and outputs an [Event] result. It does that by calling map on the array itself and transforming its elements one-by-one.

Bam! map just went meta! You’re doing a map inside of a map. :]

I hope you noticed the difference between the two maps. One is a method on an Observable> instance and is acting asynchronously on each emitted element. The second map is a method on an Array; this map synchronously iterates over the array elements and converts them using Event.init.

Finally, it’s time to wrap up this seemingly endless chain of transformations and get to updating the UI. To simplify the code, you will write the UI code in a separate method. For now, simply append this code to the final operator chain:

.subscribe(onNext: { [weak self] newEvents in
  self?.processEvents(newEvents)
})
.addDisposableTo(bag)

Processing the Response

Yes, it’s finally time to perform some side effects. You started with a simple string, built a web request, sent it off to GitHub, and received an answer back. You transformed the response to JSON and then to native Swift objects. Now it’s time to show the user what you’ve been cooking up behind the scenes all this time.

Add this code anywhere in ActivityController’s body:

func processEvents(_ newEvents: [Event]) {
 
}

In processEvents(_:), you grab the last 50 events from the repository’s event list and store the list into the Variable property events on your view controller. You’ll do that manually for now, since you haven’t yet learned how to directly bind sequences to variables or subjects.

Insert into processEvents():

var updatedEvents = newEvents + events.value
if updatedEvents.count > 50 {
  updatedEvents = Array<Event>(updatedEvents.prefix(upTo: 50))
}
 
events.value = updatedEvents

You append the newly fetched events to the list in events.value. Additionally, you cap the list to 50 objects. This way you will show only the latest activity in the table view.

Finally, you set the value of events and are ready to update the UI. Since the data source code is already included in ActivityController, you simply reload the table view to display the new data. To the end of the processEvents function, add the following line:

tableView.reloadData()

Run the app, and you should see the latest activity from GitHub. Yours will be different, depending on the current state of the repo in GitHub.

Note: Since you are currently not managing threads, it might take a while for the results to show up in the table. That’s because you end up updating your UI from a background thread. Although this is a bad practice, it still happens to work on the current version of iOS. For now, ignore the delay and you will fix your code later in the tutorial. While waiting, click on the simulator to force a refresh.

Since the code that came with the starter project in viewDidLoad() sets up a table refresh control, you can try to pull down the table. As soon as you pull far enough, the refresh control calls the refresh() method and reloads the events.

If someone forked or liked the repo since the last time you fetched the repo’s events, you will see new cells appear on top.

There is a little issue when you pull down the table view: the refresh control never disappears, even if your app has finished fetching data from the API. To hide it when you’ve finished fetching events, add the following code just below tableView.reloadData():

refreshControl?.endRefreshing()

endRefreshing() will hide the refresh control and reset the table view to its default state.

So far, you should have a good grasp of how and when to use map and flatMap. Throughout the rest of the tutorial, you are going to tie off a few loose ends of the GitFeed project to make it more complete.

Intermission: Handling Erroneous Input

The project as-is is pretty solid, at least in the perfect safety of a Swift Playground or in a step-by-step tutorial like this one. In this short intermission, you are going to look into some real-life server woes that your app might experience.

Switch to Event.swift and have a look at its init. What would happen if one of those objects coming from the server contained a key with a wrong name? Yes you guessed it — your app would crash. The code of the Event class is written somewhat lazily, and it assumes the server will always return valid JSON.

Fix this quickly before moving on. First of all, you need to change the init to a failing initializer. Add a question mark right after the word init like so:

init?(dictionary: AnyDict)

This way, you can return nil from the initializer instead of crashing the app. Find the line fatalError() and replace it with the following:

return nil

As soon as you do that, you will see a few errors pop up in Xcode. The compiler complains that your subscription in ActivityController expects [Event], but receives an [Event?] instead. Since some of the conversions from JSON to an Event object might fail, the result has now changed type to [Event?].

Fear not! This is a perfect opportunity to exercise the difference between map and flatMap one more time. In ActivityController, you are currently converting JSON objects to events via map(Event.init). The shortcoming of this approach is that you can’t filter out nil elements and change the result, so to say, in mid-flight.

What you want to do is filter out any calls to Event.init that returned nil. Luckily, there’s a function that can do this for you: flatMap — specifically, the flatMap on Array (not Observable).

Return to ActivityController.swift and scroll to fetchEvents(repo:). Replace .map(Event.init) with:

objects.flatMap(Event.init)

To recap: any Event.init calls will return nil, and flatMap on those objects will remove any nil values, so you end up with an Observable that returns an array of Event objects (non-optional!). And since you removed the call to fatalError() in the Event.init function, your code is now safer. :]

Persisting Objects to Disk

In this section, you are going to work on the subplot as described in the introduction, where you will persist objects to disk, so when the user opens the app they will instantly see the events you last fetched.

In this example, you are about to persist the events to a .plist file. The amount of objects you are about to store is small, so a .plist file will suffice for now.

First, add a new property to the ActivityController class:

private let eventsFileURL = cachedFileURL("events.plist")

eventsFileURL is the file URL where you will store the events file on your device’s disk. It’s time to implement the cachedFileURL function to grab a URL to where you can read and write files. Add this outside the definition of the view controller class:

func cachedFileURL(_ fileName: String) -> URL {
  return FileManager.default
    .urls(for: .cachesDirectory, in: .allDomainsMask)
    .first!
    .appendingPathComponent(fileName)
}

Add that function anywhere in the controller file. Now, scroll down to processEvents(_:) and append this to the bottom:

let eventsArray = updatedEvents.map{ $0.dictionary } as NSArray
eventsArray.write(to: eventsFileURL, atomically: true)

In this code, you convert updatedEvents to JSON objects (a format also good for saving in a .plist file) and store them in eventsArray, which is an instance of NSArray. Unlike a native Swift array, NSArray features a very simple and straight-forward method to save its contents straight to a file.

To save the array, you call write(to:atomically:) and give it the URL of the file where you want to create the file (or overwrite an existing one).

Cool! processEvents(_:) is the place to perform side effects, so writing the events to disk in that place feels right. But where can you add the code to read the saved events from disk?

Since you need to read the objects back from the file just once, you can do that in viewDidLoad(). This is where you will check if there’s a file with stored events, and if so, load its contents into events.

Scroll up to viewDidLoad() and add this just above the call to refresh():

let eventsArray = (NSArray(contentsOf: eventsFileURL)
  as? [[String: Any]]) ?? []
events.value = eventsArray.flatMap(Event.init)

This code works similarly to the one you used to save the objects to disk —  but in reverse. You first create an NSArray by using init(contentsOf:), which tries to load list of objects from a plist file and cast it as Array<[String: Any]>.

Then you do a little dance by using flatMap to convert the JSON to Event objects and filter out any failing ones. Even though you persisted them to disk, they all should be valid, but hey — safety first! :]

That should do it. Delete the app from the Simulator, or from your device if you’re working there. Then run the app, wait until it displays the list of events, and then stop it from Xcode. Run the project a second time, and observe how the table view instantly displays the older data while the app fetches the latest events from the web.

Add a Last-Modified Header to the Request

To exercise flatMap and map one more time (yes, they simply are that important), you will optimize the current GitFeed code to request only events it hasn’t fetched before. This way, if nobody has forked or liked the repo you’re tracking, you will receive an empty response from the server and save on network traffic and processing power.

First, add a new property to ActivityController to store the file name of the file in question:

private let modifiedFileURL = cachedFileURL("modified.txt")

This time you don’t need a .plist file, since you essentially need to store a single string like Mon, 30 May 2017 04:30:00 GMT. This is the value of a header named Last-Modified that the server sends alongside the JSON response. You need to send the same header back to the server with your next request. This way, you leave it to the server to figure out which events you last fetched and if there are any new ones since then.

As you did previously for the events list, you will use a Variable to keep track of the Last-Modified header. Add the following new property to ActivityController:

fileprivate let lastModified = Variable<NSString?>(nil)

You will work with an NSString object for the same reasons you used an NSArray before — NSString can easily read and write to disk, thanks to a couple of handy methods.

Scroll to viewDidLoad() and add this code above the call to refresh():

lastModified.value = try? NSString(contentsOf: modifiedFileURL, usedEncoding: nil)

If you’ve previously stored the value of a Last-Modified header to a file, NSString(contentsOf:usedEncoding:) will create an NSString with the text; otherwise, it will return a nil value.

Start with filtering out the error responses. Move to fetchEvents() and create a second subscription to the response observable by appending the following code to the bottom of the method:

response
  .filter {response, _ in
    return 200..<400 ~= response.statusCode
  }

Next you need to:

  • Filter all responses that do not include a Last-Modified header.
  • Grab the value of the header.
  • Convert it to an NSString value.
  • Finally, filter the sequence once more, taking the header value into consideration.

It does sound like a lot of work, and you might be planning on using a filter, map, another filter, or more. In this section, you will use a single flatMap to easily filter the sequence.

Consider the fact that flatMap only emits the values of an observable when the observable completes. Therefore, if an observable does not complete, flatMap will never emit any values. You’ll use that phenomenon to filter responses that don’t feature a Last-Modified header.

Append this to the operator chain from above:

.flatMap { response, _ -> Observable<NSString> in
  guard let value = response.allHeaderFields["Last-Modified"]  as? NSString else {
    return Observable.never()
  }
  return Observable.just(value)
}

You use guard to check if the response contains an HTTP header by the name of Last-Modified, whose value can be cast to an NSString. If you can make the cast, you return an Observable with a single element; otherwise, you return an Observable, which never emits any elements:

Now that you have the final value of the desired header, you can proceed to update the lastModified property and store the value to the disk. Add the following:

.subscribe(onNext: { [weak self] modifiedHeader in
  guard let strongSelf = self else { return }
  strongSelf.lastModified.value = modifiedHeader
  try? modifiedHeader.write(to: strongSelf.modifiedFileURL, atomically: true,
    encoding: String.Encoding.utf8.rawValue)
})
.addDisposableTo(bag)

In your subscription’s onNext closure, you update lastModified.value with the latest date and then call NSString.write(to:atomically:encoding) to save to disk. In the end, you add the subscription to the view controller’s dispose bag.

To finish working through this part of the app, you need to use the stored header value in your request to GitHub’s API. Scroll toward the top of fetchEvents(repo:) and find the particular map below where you create a URLRequest:

.map { url -> URLRequest in
  return URLRequest(url: url)
}

Replace the above code with this:

.map { [weak self] url -> URLRequest in
  var request = URLRequest(url: url)
  if let modifiedHeader = self?.lastModified.value {
    request.addValue(modifiedHeader as String,
      forHTTPHeaderField: "Last-Modified")
  }
  return request
}

In this new piece of code, you create a URLRequest just as you did before, but you add an extra condition: if lastModified contains a value, no matter whether it’s loaded from a file or stored after fetching JSON, add that value as a Last-Modified header to the request.

This extra header tells GitHub that you aren’t interested in any events older than the header date. This will not only save you traffic, but responses which don’t return any data won’t count towards your GitHub API usage limit. Everybody wins!

In this tutorial, you learned about different real-life use cases for map and flatMap — and built a cool project along the way (even though you still need to handle the results on the main thread like the smart programmer you are).

Where to Go From Here?

You can download the final package from this tutorial here.

If you enjoyed what you learned in this tutorial, why not check out the complete RxSwift book, available on our store?

Here’s a taste of what’s in the book:

  • Getting Started: Get an introduction to the reactive programming paradigm, learn the terminology involved and see how to begin using RxSwift in your projects.
  • Event Management: Learn how to handle asynchronous event sequences via two key concepts in Rx — Observables and Observers.
  • Being Selective: See how to work with various events using concepts such as filtering, transforming, combining, and time operators.
  • UI Development: RxSwift makes it easy to work with the UI of your apps using RxCocoa, which provides an integration of both UIKit and Cocoa.
  • Intermediate Topics: Level up your RxSwift knowledge with chapters on reactive networking, multi-threading, and error handling.
  • Advanced Topics: Round out your RxSwift education by learning about MVVM app architecture, scene-based navigation, and exposing data via services.
  • And much, much more!

By the end of this book, you’ll have hands-on experience solving common issues in a reactive paradigm — and you’ll be well on your way to coming up with your own Rx patterns and solutions!

To celebrate the launch of the book, it’s currently on sale for $44.99 – that’s a $10 discount off the cover price! But don’t wait too long, as this deal is only on until Friday, April 7.

If you have any questions or comments on this tutorial, feel free to join the discussion below!

The post RxSwift: Transforming Operators in Practice appeared first on Ray Wenderlich.

Screencast: Beginning C# with Unity Part 27: Overloading

How To Use Git Source Control with Xcode 8

$
0
0
Update: Updated for Xcode 8 by Richard Critz. Original tutorial by Malek Trablesi and previously updated by Felipe Laso-Marsetti.

Whether you’re a solo developer or working on a team, if you’re not using source control for your projects, you should be. Source control is amazing because it helps you more easily revert to older versions of your code, add new features without risk to your working app, see how your code has changed over time, and work as a team. And one of the best source control systems is built right into Xcode – Git!

Git is a distributed version control system initially developed by Linus Torvalds, the principal force behind the development of the Linux kernel. The nice thing about Git is there doesn’t have to be any central repository – everyone can have his or her own view of the code, and pull in changes from other sources.

In this tutorial, you’ll get hands on experience with Git and learn how to use it directly inside Xcode.

Gitting Started

Rather than ramble on about the theory of Git, you’re going to dive right in and try it out. You’ll create a new Xcode project and try some tasks that you will typically do on a day-to-day basis with Git source control.

Fire up Xcode and create a new Single View Application project.

Single View Application Template

Fill in the template options as follows:

GitUseExample Project Creation

  • Product Name: GitUseExample
  • Team: Your Apple Developer team if you have one, or None
  • Organization Name: Your name
  • Organization identifier: As the name indicates, it’s your organization’s identifier, if you have one. Otherwise, type whatever.
  • Language: Swift
  • Device family: iPhone
  • Use Core Data, Include Unit Tests, and Include UI Tests: not checked

Now click Next. The following dialog allows you to choose where to save your project. Choose a location and make sure Create git repository on My Mac is selected before proceeding. Once you do that, click Create.

GitUseExample Saving

Note: If you don’t see the checkbox, click the Options button.

Xcode will create your new project along with a new Git repository.

All source control systems, including Git, store their data into a repository so that they can manage your project versions and keep track of changes throughout the development cycle. Think of a repository as a database for versions.

versions database

In the course of working on your project, you’ll add files, modify code, and change your project many times.

After you make a big set of changes and your project is in a “known good” state (typically one or more times per day), it’s a good idea to check your changes into the repository. This gives you a record of “known good” states that you can always return to.

But what about the code that was created by the project template?

Your project still contains only the template files. There is nothing yet for you to commit because Xcode did it for you when you created your project. :]

To check that, choose Source Control\History… from the menu.

Source Control History menu

In the drop down window, notice there’s a commit along with some information about it including the commit identifier, date and time, person who made the commit, files changed, and commit message.

GitUseExample History

Note: Normally, you could click the Show modified files button to see more information about the contents of a commit. Unfortunately, due to a bug in Xcode, this only works some of the time. You will learn a different, more reliable way to see this information below.

Now, make some changes to your project. Open AppDelegate.swift and change the method application(_:didFinishLaunchingWithOptions:) to the following:

func application(_ application: UIApplication,
        didFinishLaunchingWithOptions launchOptions: [UIApplicationLaunchOptionsKey: Any]?) -> Bool {
  print("Application did finish launching")
  return true
}

After you save the file, you will note that AppDelegate.swift now has an “M” badge next to the filename:
Modified AppDelegate.swift file

The “M” badge stands for “modified.” It means you have modified the file but have not yet committed the changes to your local Git repository.

Next, open ViewController.swift and add the following code after viewDidLoad():

@IBAction func buttonClicked(_ sender: UIButton) {
  print("This is a Git tutorial")
}

Now, open Main.storyboard and drag a button to the screen from the Object library. Change the button’s displayed text to whatever you want as shown in the screenshot below.

Modified View Controller

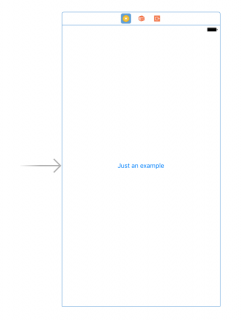
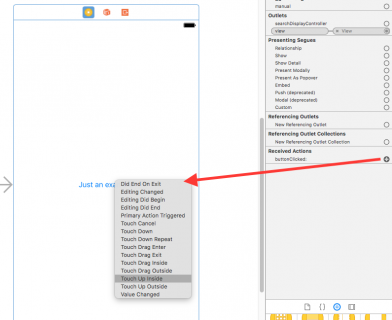
The last thing to do is to connect the action to the button. Click the yellow View Controller icon in the View Controller scene. From the Connections Inspector (last tab on the right sidebar), click the open circle next to buttonClicked: in the Received Actions panel and drag it to the button in the Storyboard Editor. Choose Touch Up Inside from the pop-up menu.

Connecting Button Action

If you check the Project navigator, you will notice that all three of the files you have edited have an “M” badge.

Modified Project Navigator Files

Build and run to make sure the project works. Verify that when you click the button you see the “This is a Git tutorial” message logged to the console.

Button Action Console Log

w00t – your code is now in a “known good” state! It’s time to commit.

Making Some Commit-ments

Committing files is easy! Select Source Control\Commit… from the menu.

Commit

A new window will show, similar to the following:

Commit pane

As you can see, the screen is split into two panes. The left pane shows the file in its current state with all changes made since the last commit. Since this is your first commit, you will see all changes made since the creation of the project.

The right pane shows the file before you made your changes.

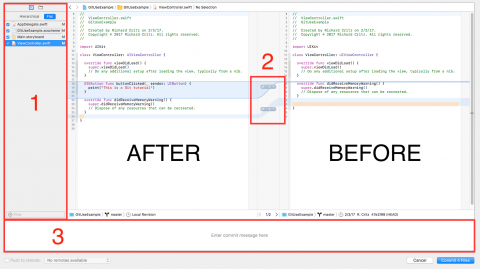
Annotated Commit Pane

Look more closely at what Xcode presents in the Commit window.

The left panel (1) shows all of the files in your project with uncommitted changes. By default, Xcode assumes you want to include all of them in this commit and checks their boxes. If you want to exclude a file from this commit, uncheck it. As you will see in a moment, you can also decide which individual changes within a file to include in this commit.

Notice the blue highlights in the code panes. These indicate changes you have made. Any change, even if it only adds or removes blank space, is tracked and will be marked with these blue highlights.

Try it for yourself. Click the Cancel button, open ViewController.swift, and add several new lines at the end of the file. Now select Source Control\Commit… again. Your results should be similar to the following:

Modified sections

As you can see, Git carefully tracks every single change you make throughout your development cycle.

In the area between the two source panes, all of your changes are enumerated by Xcode (labeled “2” above).

Each change is checked by default. To exclude a specific change from this commit, uncheck it.

For example, change 3 is not important since it consists only of the blank lines you added earlier. Uncheck it so that this change isn’t committed.

Excluded change

Notice the indicator has turned gray to make it clear this change is now excluded from the commit.

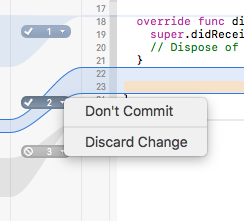
Another way to exclude an individual change is to click on the arrow next the change number. Two options will appear: Don’t Commit (or Commit in case the change is unchecked) and Discard Change. In this case, select Don’t Commit.

Don't Commit/Discard Change

Before you can complete a commit, Xcode requires you to enter a commit message in the bottom part of the screen (labeled “3” above). These messages help you better understand at a glance the purpose of each commit.

Commit message

Now click Commit 4 Files. Congrats, you have made your first commit! If you go back to the History pane you should see your new commit in the log:

Commit History

This simple process of making changes and committing them is what you’ll be doing 90% of the time. Pretty easy, right? Now you have no excuse not to do it! :]

Note: Eagle-eyed readers will be thinking “I only changed 3 files. Why did I commit 4 files?” Git tracks every file in your project directory including all of the files Xcode uses behind the scenes. Usually, this is exactly what you want. You will see later how to alter this behavior when needed.

Branching Out

Another feature of Git supported by Xcode is the ability to commit your changes to a specific branch.

But wait, what’s a branch?

A branch is way to keep a set of commits together. By working on different branches, you can keep features separated and reduce your risk of totally breaking your project.

Believe it or not, you’re already using a branch. When a repository is first created, Git also creates a branch named “master” within that repository. All of your work so far has been on the master branch.

The master branch should always keep the main copy of your project. You use other branches as a way to store work in progress that is not yet ready for release. You can also use them to store experiments that may never be released.

For example, let’s say you’re adding a new map feature into your app but it isn’t quite ready for production. To simulate this, create a new class derived from NSObject and name it MapForItinerary. At this point your project might look like this:

Added a file

Notice the status “A” for the new file MapForItinerary.swift. This indicates this is a new file that has not yet been committed to the repository.

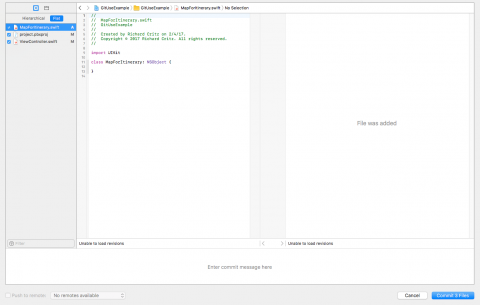
Select Source Control\Commit… from the menu.

Commit for new file

If you select the file with the A status, you will notice that Xcode doesn’t provide any earlier version to compare with. This is because the file hasn’t been committed to the repository yet so there is nothing to compare it with.

Adding the map feature to your app represents a big change in your code. This is a perfect situation to use a branch. This will help to isolate the risk in case there are problems with your new map code.

Instead of clicking the Commit 3 Files button, click Cancel instead. Choose Source Control\GitUseExample\New Branch… from the menu. Notice that the current branch – master – shows in the menu.

New Branch

Xcode asks you to name your new branch.

New Branch name pane

Name the branch map_feature and click Create.

Xcode creates the new branch and switches to it. You can verify this by opening the Source Control menu.

Source Control menu showing current branch

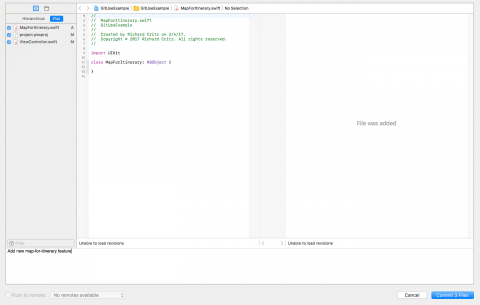
Select Source Control\Commit…, enter a commit message, and click Commit 3 Files.

MapForItinerary commit message

Notice that all of the status letters next to the files in the Project navigator have been cleared. This means you no longer have any uncommitted changes.

Project navigator with no uncommitted changes

To see your branches, choose Source Control\GitUseExample\Configure GitUseExample… from the menu.

Configure Git project

Select the Branches tab in the resulting pane.

Git branches

Backing Out

You’re working on the latest revision of your project, building the newest cool feature. You take a break for a snack and have a sudden inspiration for a better way to build it. At this point, you may want to recover the last revision from source control and start fresh.

badstableversion

Git makes it trivial to do just that! :]

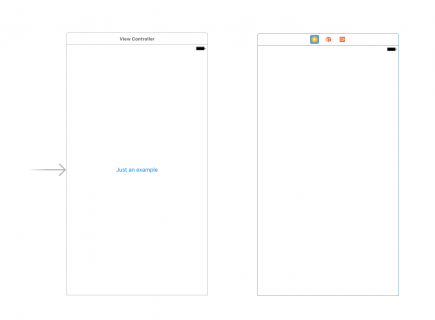
Open Main.storyboard and drag a new view controller onto the canvas from the Object library.

Two view controllers

Open MapForItinerary.swift and add the method sayHello().

class MapForItinerary: NSObject {
 
  func sayHello() {
    print("Hello from MapForItinerary")
  }
 
}

Notice that the status of the modified files has changed to “M”, meaning that the files are locally modified and are waiting to be committed.

At this point, you can selectively discard the changes you’ve made to the project. Select Main.storyboard in the Project navigator and then select Source Control\Discard Changes in “Main.storyboard”… from the menu.

Discard changes menu

Xcode will prompt you to confirm that you really wish to discard all changes in that file.

Discard prompt

Click Discard Changes. You should see the view controller (and the yellow warning icon) you just added vanish! This can be extremely useful when you’ve added some changes but they aren’t working, and you want to get back to the last known good state.

In addition to discarding an entire file’s changes, you can also discard individual changes.

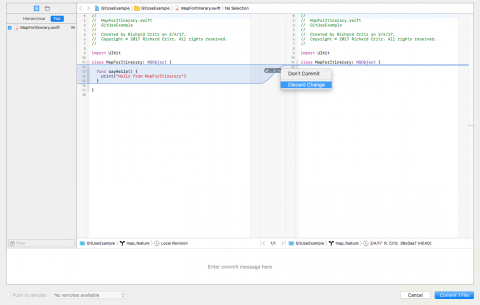
MapForItinerary.swift still has the “M” badge on it. Select Source Control\Commit… from the menu. Click the down arrow next to the change number and choose Discard Change:

Selective discard

Poof! Your change is gone. Since there is nothing left to commit, just click Cancel to close the commit window.

Now that you’ve tried out Discard Change, you might wonder what the difference is between that and the Don’t Commit option you chose earlier.

While it’s true that both of these options result in the change not being recorded in the repository, there is a big difference:

  • Don’t Commit lets you skip the change so that it won’t be committed with other changes, but it will remain in the local source code.
  • Discard Changes not only skips the change, but also deletes it from the local source code.

Time Travel

Discarding changes is a good way to revert back to working code and save you time. However, it can be a little limiting in some cases.

Git allows you to save multiple revisions for your project where each revision has specific changes. These are all stored into a repository managed for you by Git.

If you choose to discard changes made to a file, Git will restore the last committed version of the file and only the last. And that’s actually where the limitation lies.

Over time, your project repository will grow to contain multiple revisions reflecting the history of your development. Suppose you wish to revert to the first or second version of a particular file. There is no way to do that just by discarding changes. Don’t despair, however, as Xcode and Git make this easy to do.

Select ViewController.swift in the Project navigator. Now select View\Version Editor\Show Comparison View from the menu. Alternatively, you can click the third button in the Editor section on the toolbar at the top right of the Xcode window.

Editor selection buttons

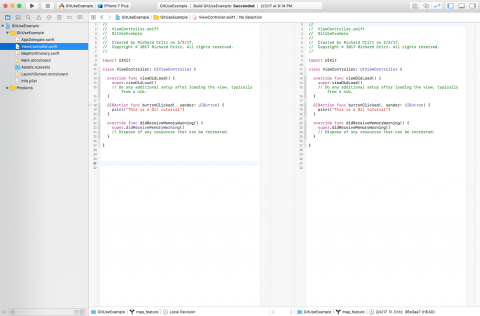
The version editor is split into two panes as shown below:

Comparison view

This allows you to compare two revisions of the selected file and works exactly like the comparison view in the Commit window. By default, your current source file is shown on the left and the most recent revision stored in the repository – Git calls this the HEAD – is shown on the right.

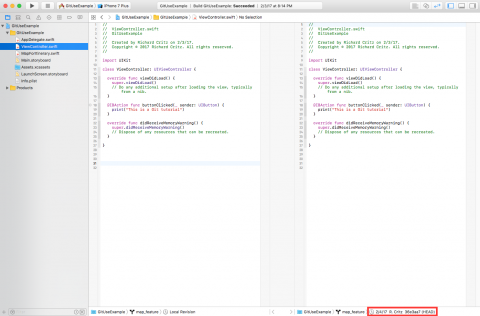
To display earlier versions from your repository, click on the clock icon at the bottom of the right pane (marked in red below) and select an earlier revision.

Revision list icon

Select the revision just prior the HEAD revision as shown below. The exact information you see will be different from the screenshot.

Previous revision list

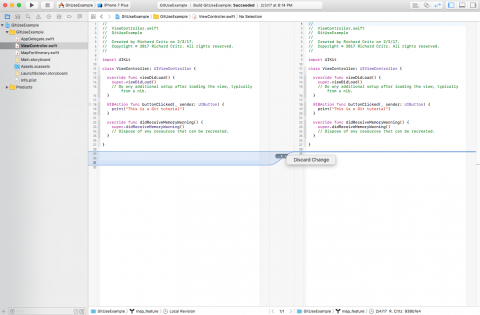
Now, to revert to that file version, just click the arrow next to the change number in the comparison pane and select Discard Change. It’s that easy! :]

Discard Changes

Once you finish reverting to an earlier version, you will need to commit this “new” version of the file as the most recent. Go ahead and do that now.

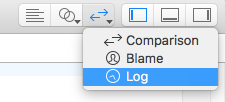
How do you know which earlier commit is the one you want? While you can certainly use the History command you learned earlier, there is a better way. Click and hold on the Version Editor button and select Log. You can also choose View\Version Editor\Show Log View from the menu.

Select Log View

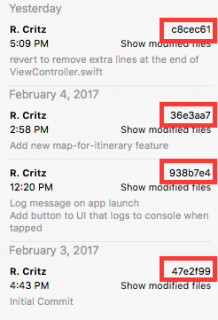
Xcode will list the commits that contain changes to the current file. Notice that the listing for each commit contains a commit identifier.

Revision history

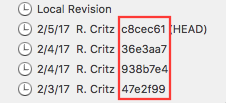
These identifiers match the ones shown in the revision history list you were using earlier.

Annotated Revision history list

You can also click Show modified files to explore the differences in more detail. Try it now!

Another incredibly useful view into your project is called the Blame View. This view shows you which commit contributes each line of your file.

Switch to the Blame View. Click and hold on the Version Editor button and select Blame. You can also choose View\Version Editor\Show Blame View from the menu.

Select Blame View

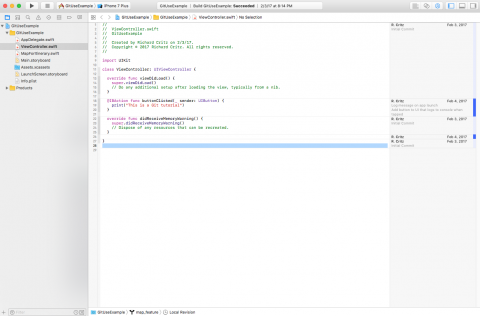
Your screen will look something like this:

Blame View

To see more details about a committed change, press the info button next to the date. The resulting pop-up shows you who made the commit, when it was made, the commit message, and the commit identifier. It also has a button to show all of the files modified in the commit and a button to open the current file in Comparison View, comparing the this commit with the HEAD commit.

Show more blame info

Merging Branches

You learned earlier that Git allows you to work on multiple streams of revisions known as branches. You also learned that it is good practice to do all of your development on a branch other than the master branch. What, then, are you to do when you finish development of a feature and want to release it? Simple! You merge your development branch into your master branch.

Your new map feature is not yet finished but your designer has asked for another label on the main interface. To implement this, you will need to leave your map_feature branch behind for now and create a new branch from the “known good” state that is your master branch.

Select Source Control\GitUseExample\Switch to Branch… from the menu.

Switch to Branch

From the list of available branches, select master and click Switch.

Switching to master

It is important to ensure that you are starting your new branch from the correct “known good” state.

Now, select Source Control\GitUseExample\New Branch… from the menu.

Create new branch

Name the branch new_label and click Create.

Name new_label branch

You can verify that you are working on the new_label branch by clicking Source Control and looking at the name of the branch under Working Copies.

Verify your branch

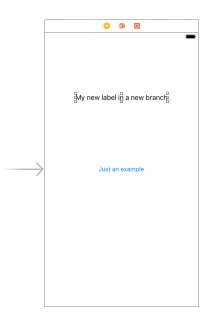
Now, it’s time to add that new label your designer requested.

Switch back to the Standard Editor view, select Main.storyboard, and drag a UILabel on to the main view.

My new label

Build and run to make sure that all is OK and then commit your changes to the repository. Be sure to add a commit message.

Now switch to the master branch and run the app again. As expected, the new UILabel you added in the branch is not there. The final job is to merge the new branch back to master.

Select Source Control\GitUseExample\Merge from Branch… from the menu.

Merge from branch

From the list of available branches, select new_label and click Merge.

Select merge source

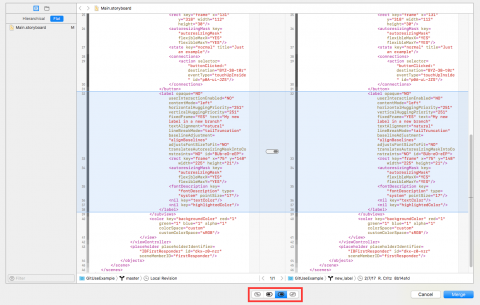
The merge window will appear allowing you to control the merge process. The merge source (the “merge from” branch) will appear on the right. Your current source, as modified by the merge, will appear on the left. Use the buttons at the bottom of the screen to control the direction of the merge. For a simple merge such as this one, Xcode’s default setting will be the correct one.

Merge window

Finally, click the Merge button to start the process :]

If all goes well, you should see the changes (the UILabel) from the new branch appear in the user interface when you click on Main.storyboard or when you run your application. Now your changes are in the master branch because of the merge! Use one of the methods of viewing your commit history that you learned to verify that this change appears in the history.

Log view commit history

Ignoring generated files

Way back at your first commit you saw that, in addition to your source files, Git tracks revisions to files managed by Xcode. This is important because those files are just as necessary to your project as your source files. You need them to rebuild your app or to collaborate with others.

However, as it does its work, Xcode also generates other files that change with each build. It is not important to save these as Xcode can automatically regenerate them. In fact, saving them causes Git to do unnecessary work and makes it harder to find the significant changes in your commit history.

Git provides a mechanism to ignore these files: the aptly-named .gitignore file. The period at the beginning of its name causes macOS to treat it as a hidden file, so it doesn’t normally appear when you look at your project in Xcode or Finder. Never fear, though, because Git will find and use it without a problem.

Rather than working out for yourself everything to put in your .gitignore file, you can download one from gitignore.io.

First, open a Terminal window and enter the following command. You only need to do this step once, not for every project.

$ git config --global alias.ignore '!gi() { curl -L -s https://www.gitignore.io/api/$@ ;}; gi'

Now, for any project using Git, do the following in a Terminal window:

cd <directory where your project is stored>
git ignore swift,macos >.gitignore
git add .gitignore
git commit -m "Add .gitignore file"

This downloads the most current .gitignore configuration for writing Swift code on macOS. Your terminal session should look similar to this:

adding a .gitignore file

Note that you added the .gitignore file to your repository for Git to track since the filtering it provides is also an important part of your project.

Xcode and GitHub

All the work you’ve done so far has been using a local repository saved on your computer. The GitHub website allows you to publish your project to a remote repository saved on the GitHub servers. This is great because it allows you to easily share your code with others and work on a project as a group.

If you don’t already have a GitHub account, go to GitHub and sign up for one.

Once that’s done, create a repository for your project on GitHub. Click the + button in the upper right of the GitHub site and select New repository.

GitHub New repository

GitHub will present you with a screen similar to the following:

GitHub New repo sheet

Fill in the repository name and click Create repository. GitHub will create your repository and take you to the Quick Setup screen. You can ignore most of this screen. You need to save the HTTPS URL for your repository to your clipboard. Make sure the HTTPS button is selected and click the clipboard icon.

GitHub Quick setup

In Xcode, select Source Control\GitUseExample\Configure GitUseExample… from the menu. Select the Remotes tab, then click the + button and select Add Remote….

Add remote

The remote’s name will default to “origin”. Leave that as is and paste your GitHub HTTPS string into the Address field. Click Add Remote.

Remote address

Finally, click Done. You are now ready to publish your project on GitHub!

Select Source Control\Push… from the menu. Xcode will prompt you for the remote’s name and branch. Since you only have one remote configured, the default will be correct.

Remote branch name

Click Push. Xcode will prompt you for your GitHub login credentials.

GitHub login

Enter your credentials and click OK.

Xcode will save your credentials to the macOS Keychain. You can manage them on the Accounts tab in Xcode Preferences. After a few seconds, Xcode will complete the push.

Check your GitHub page to verify that your files are there.

Verify on GitHub

Note: If you have set up your SSH credentials on GitHub (see GitHub SSH Instructions), Xcode supports using SSH to connect to GitHub. Just use the SSH connection information instead of the HTTPS string when adding your remote.

Now it’s time to make one final change to your project. Open ViewController.swift and change the buttonClicked() method as follows:

@IBAction func buttonClicked(_ sender: UIButton) {
  print("You finished!")
}

Select Source Control\Commit… from the menu. Enter a commit message and then check the Push to remote: box in the lower left corner. Again, since you only have one remote configured, the default will be correct.

Commit and Push

Click Commit 1 File and Push. After a few seconds, Xcode will complete the commit and the push. Look for your new commit on your GitHub page.

GitHub push confirmation

Success! :]

Where To Go From Here?

Congratulations, you now know how to use Git source control from Xcode, use branches, merge branches, work with GitHub, and more!

At this point you have most of the tools you’ll need on a day-to-day basis to work with Git source control in Xcode. If you’d like to learn more, here is a list of great resources to check out:

I hope you enjoyed this tutorial, and I look forward for your comments! :]

The post How To Use Git Source Control with Xcode 8 appeared first on Ray Wenderlich.

Updated Course: Beginning iOS Animations

$
0
0

We’ve been busy updating courses for our raywenderlich.com subscribers, and we have another one to offer you.

Today, we’re excited to release an update to the popular Beginning iOS Animations course, ready for iOS 10 and Swift 3!

This course will get you started with the basics of animating views in iOS:

  • You’ll start with simple animations using Auto Layout constraints.
  • You’ll then work your way up to more complex animations as you learn to add springs, animate transforms, and build multi-part animations with keyframes.
  • You’ll even get to wrap all of these new skills up in a custom view controller transition!

Let’s take a look at what’s in this course.

Video 1: Introduction. Find out what’s covered in our Beginning iOS Animations course!

Video 2: Beginning Constraint Animations. Learn the basics of animating constraints to create animations in an Auto Layout based project.

Video 3: Intermediate Constraint Animations. Build upon basic constraint animations and learn more ways to create Auto Layout animations.

Video 4: Spring Animations. Learn how to add a fun factor to your iOS app UI by using spring-driven animations.

Video 5: View Transitions. Look into the built-in view transitions that UIKit offers and learn how to trigger them with a single line of code.

Video 6: Beginning View Animations. Learn how and when to use non-constraint animations with Auto Layout.

Video 7: Intermediate View Animations. Build upon the basics and create more complex view animations using the transform property.

Video 8: Keyframe Animations. Learn how to build complex animation sequences with view keyframe animations.

Video 9: Beginning View Controller Transitions. Learn how to create simple View Controller transition animations.

Video 10: Intermediate View Controller Transitions. Go beyond the basics and create more complex View Controller transitions.

Video 11: Conclusion. Review what you’ve learned in this course, and find out where to learn about more advanced animation techniques.

Where To Go From Here?

Want to check out the course? You can watch the introduction for free!

The rest of the course is for raywenderlich.com subscribers only. Here’s how you can get access:

  • If you are a raywenderlich.com subscriber: The entire course is complete and available today. You can check out the first part here.
  • If you are not a subscriber yet: What are you waiting for? Subscribe now to get access to our updated Scroll View School course and our entire catalog of over 500 videos.

We hope you enjoy, and stay tuned for more new Swift 3 courses and updates to come! :]

The post Updated Course: Beginning iOS Animations appeared first on Ray Wenderlich.


How to Make a Match 3 Game in Unity

$
0
0

Match 3 games are some of the most popular games on the market. From Candy Crush to Bejeweled, Match 3 games are enjoyed by many, and are part of a classic age-old genre of tile-matching games.

In a Match 3 game, the goal is simple: swap pieces around till there’s 3 or more in a row. When a match is made, those tiles are removed and the empty spaces are filled. This lets players rack up potential combos and tons of points!

In this tutorial you’ll learn how to do the following:

  • Create a board filled with game tiles
  • Select and deselect tiles with mouse clicks
  • Identify adjacent tiles with raycasts
  • Swap tiles
  • Detect a match of 3 or more using raycasts
  • Fill empty tiles after a match has been made
  • Keep score and count moves
Note: This tutorial assumes you know your way around the Unity editor, that you know how to edit code in a code editor and that you have a basic knowledge of C#. Check out some of our other Unity tutorials first if you need to sharpen your skills on Unity.

Getting Started

Download the Match 3 how-to starter project and extract it to a location of your choosing.

Open up the Starter Project in Unity. The assets are sorted inside several folders:

Match3StarterAssests

  • Animations: Holds the game over panel animation for when the game ends. If you need to brush up on animation, check out our Introduction to Unity Animation tutorial.
  • Audio: Contains the music and sound effects used in the game.
  • Fonts: Holds the fonts used in the game.
  • Prefabs: Contains various managers, UI, and tile prefabs.
  • Scenes: Holds the menu and game scene.
  • Scripts: Contains the scripts used in the game. BoardManager.cs and Tile.cs are the ones you’ll be editing.
  • Sprites: Contains the UI assets and various character sprites that will be used as tile pieces on the board.

Creating the Board

If it’s not opened yet, open up the Game scene and click play. It’s simply a plain blue background with a score and move counter. Time to fix that!

First, create an empty game object and name it BoardManager.

The BoardManager will be responsible for generating the board and keeping it filled with tiles.

Next, locate BoardManager.cs under Scripts\Board and Grid in the Project window. Drag and drop it onto the BoardManager empty game object in the Hierarchy window.

You should now have this:

BoardManagerEmptyPic

It’s time to dive into some code. Open up BoardManager.cs and take a look at what’s already in there:

public static BoardManager instance;     // 1
    public List<Sprite> characters = new List<Sprite>();     // 2
    public GameObject tile;      // 3
    public int xSize, ySize;     // 4
 
    private GameObject[,] tiles;      // 5
 
    public bool IsShifting { get; set; }     // 6
 
    void Start () {
        instance = GetComponent<BoardManager>();     // 7
 
        Vector2 offset = tile.GetComponent<SpriteRenderer>().bounds.size;
        CreateBoard(offset.x, offset.y);     // 8
    }
 
    private void CreateBoard (float xOffset, float yOffset) {
        tiles = new GameObject[xSize, ySize];     // 9
 
        float startX = transform.position.x;     // 10
        float startY = transform.position.y;
 
        for (int x = 0; x < xSize; x++) {      // 11
            for (int y = 0; y < ySize; y++) {
                GameObject newTile = Instantiate(tile, new Vector3(startX + (xOffset * x), startY +                                                                 (yOffset * y), 0), tile.transform.rotation);
                tiles[x, y] = newTile;
            }
        }
    }
  1. Other scripts will need access to BoardManager.cs, so the script uses a Singleton pattern with a static variable named instance, this allows it to be called from any script.
  2. characters is a list of sprites that you’ll use as your tile pieces.
  3. The game object prefab tile will be the prefab instantiated when you create the board.
  4. xSize and ySize are the X and Y dimensions of the board.
  5. There’s also a 2D array named tiles which will be used to store the tiles in the board.
  6. An encapsulated bool IsShifting is also provided; this will tell the game when a match is found and the board is re-filling.
  7. The Start() method sets the singleton with reference of the BoardManager.
  8. Call CreateBoard(), passing in the bounds of the tile sprite size.
  9. In CreateBoard(), the 2D array tiles gets initialized.
  10. Find the starting positions for the board generation.
  11. Loop through xSize and ySize, instantiating a newTile every iteration to achieve a grid of rows and columns.

Next, locate your character sprites under Sprites\Characters in the Project window. Select the BoardManager in the Hierarchy window.

In the Inspector window, change the Character Size value for the BoardManager script component to 7. This will add 7 elements to the Characters array and display the slots for them in the Inspector window.

Now drag each character into the empty slots. Finally, locate the Tile prefab under the Prefabs folder and drag it into the Tile slot.

When finished, your scene should look like this:

BoardManagerFilledPic

Now select BoardManager again. In the BoardManager component in the Inspector window, set X Size to 8 and Y Size to 12. This is the board size you’ll be working with in this tutorial.

Click play. A board is generated, but it’s strangely going offscreen:

boardOffScreen

This is because your board generates the tiles up and to the right, with the first tile starting at the BoardManager’s position.

To fix this, adjust the BoardManager‘s position so it’s at the bottom left of your camera’s field of view. Set the BoardManager’s X position to -2.66 and the Y position to -3.83.

Final BoardManager settings

Hit play. That looks better, but it won’t be much of a game if all the tiles are the same. Luckily, there’s an easy way to randomize the board.

BoardAllTheSame

Randomizing the Board

Open the BoardManager script and add add these lines of code to the CreateBoard method, right underneath tiles[x, y] = newTile;:

newTile.transform.parent = transform; // 1
Sprite newSprite = characters[Random.Range(0, characters.Count)]; // 2
newTile.GetComponent<SpriteRenderer>().sprite = newSprite; // 3

These lines do three key things:

  1. Parent all the tiles to your BoardManager to keep your Hierarchy clean in the editor.
  2. Randomly choose a sprite from the ones you previously dragged in earlier.
  3. Set the newly created tile’s sprite to the randomly chosen sprite.

Run the game, and you should see a randomized board:

randomized

As you may have noticed, your board can generate a matching 3 combo at the start, and that kind of takes the fun out of it!

Prevent Repeating Tiles

generatingMatches

The board generates up and then right, so to correct the “automatic” matching 3 combo you’ll need to detect what sprite is to the left of your new tile, and what sprite is below your new tile.

To do this, create two Sprite variables in the CreateBoard method, right above the double for-loops:

    Sprite[] previousLeft = new Sprite[ySize];
    Sprite previousBelow = null;

These variables will be used to hold a reference to adjacent tiles so you can replace their characters.
Take a look at the image below:

The loop iterates through all tiles from the bottom left and goes up one tile at a time. Every iteration gets the character displayed left and below the current tile and removes those from a list of new possible characters.
A random character gets pulled out of that list and assigned to both the left and bottom tiles.
This makes sure there’ll never be a row of 3 identical characters from the start.

To make this happen, add the following lines right above Sprite newSprite = characters[Random.Range(0, characters.Count)];:

List<Sprite> possibleCharacters = new List<Sprite>(); // 1
possibleCharacters.AddRange(characters); // 2
 
possibleCharacters.Remove(previousLeft[y]); // 3
possibleCharacters.Remove(previousBelow);
  1. Create a list of possible characters for this sprite.
  2. Add all characters to the list.
  3. Remove the characters that are on the left and below the current sprite from the list of possible characters.

Next, replace this line:

Sprite newSprite = characters[Random.Range(0, characters.Count)];

with

Sprite newSprite = possibleCharacters[Random.Range(0, possibleCharacters.Count)];

This will select a new sprite from the list of possible characters and store it.

Finally, add these lines underneath newTile.GetComponent().sprite = newSprite;:

previousLeft[y] = newSprite;
previousBelow = newSprite;

This assign the newSprite to both the tile left and below the current one for the next iteration of the loop to use.

Run the game, and check out your new dynamic grid with non-repeating tiles!

non-repeating

Swapping Tiles

The most important gameplay mechanic of Match 3 games is selecting and swapping adjacent tiles so you can line up 3 in a row. To achieve this you’ll need to do some additional scripting. First up is selecting the tile.

Open up Tile.cs in a code editor. For convenience, this script has already been laid out with a few variables and two methods: Select and Deselect.

Select tells the game that this tile piece has been selected, changes the tile’s color, and plays a selection sound effect. Deselect returns the sprite back to its original color and tells the game no object is currently selected.

What you don’t have is a way for the player to interact with the tiles. A left mouse click seems to be a reasonable option for controls.

Unity has a built-in MonoBehaviour method ready for you to use: OnMouseDown.

Add the following method to Tile.cs, right below the Deselect method:

void OnMouseDown() {
	// 1
    if (render.sprite == null || BoardManager.instance.IsShifting) {
        return;
    }
 
    if (isSelected) { // 2 Is it already selected?
        Deselect();
    } else {
        if (previousSelected == null) { // 3 Is it the first tile selected?
            Select();
        } else {
            previousSelected.Deselect(); // 4
        }
    }
}
  1. Make sure the game is permitting tile selections. There may be times you don’t want players to be able to select tiles, such as when the game ends, or if the tile is empty.
  2. if (isSelected) determines whether to select or deselect the tile. If it’s already been selected, deselect it.
  3. Check if there’s already another tile selected. When previousSelected is null, it’s the first one, so select it.
  4. If it wasn’t the first one that was selected, deselect all tiles.

Save this script and return to the editor.
You should now be able to select and deselect tiles by left clicking them.

select

All good? Now you can add the swapping mechanism.

Swapping Tiles

Start by opening Tile.cs and adding the following method named SwapSprite underneath the OnMouseDown method:

public void SwapSprite(SpriteRenderer render2) { // 1
    if (render.sprite == render2.sprite) { // 2
        return;
    }
 
    Sprite tempSprite = render2.sprite; // 3
    render2.sprite = render.sprite; // 4
    render.sprite = tempSprite; // 5
    SFXManager.instance.PlaySFX(Clip.Swap); // 6
}

This method will swap the sprites of 2 tiles. Here’s how it works:

  1. Accept a SpriteRenderer called render2 as a parameter which will be used together with render to swap sprites.
  2. Check render2 against the SpriteRenderer of the current tile. If they are the same, do nothing, as swapping two identical sprites wouldn’t make much sense.
  3. Create a tempSprite to hold the sprite of render2.
  4. Swap out the second sprite by setting it to the first.
  5. Swap out the first sprite by setting it to the second (which has been put into tempSprite.
  6. Play a sound effect.

With the SwapSprite method implemented, you can now call it from OnMouseDown.
Add this line right above previousSelected.Deselect(); in the else statement of the OnMouseDown method:

SwapSprite(previousSelected.render);

This will do the actual swapping once you’ve selected the second tile.
Save this script and return to the editor.
Run the game, and try it out! You should be able to select two tiles and see them swap places:

SwappingGif

Finding Adjacent Tiles

You’ve probably noticed that you can swap any two tiles on the board. This makes the game way too easy. You’ll need a check to make sure tiles can only be swapped with adjacent tiles.

But how do you easily find tiles adjacent to a given tile?

Open up Tile.cs and add the following method underneath the SwapSprite method:

private GameObject GetAdjacent(Vector2 castDir) {
    RaycastHit2D hit = Physics2D.Raycast(transform.position, castDir);
    if (hit.collider != null) {
        return hit.collider.gameObject;
    }
    return null;
}

This method will retrieve a single adjacent tile by sending a raycast in the target specified by castDir. If a tile is found in that direction, return its GameObject.

AdjacentRaycasts

Next, add the following method below the GetAdjacent method:

private List<GameObject> GetAllAdjacentTiles() {
    List<GameObject> adjacentTiles = new List<GameObject>();
    for (int i = 0; i < adjacentDirections.Length; i++) {
        adjacentTiles.Add(GetAdjacent(adjacentDirections[i]));
    }
    return adjacentTiles;
}

This method uses GetAdjacent() to generate a list of tiles surrounding the current tile. This loops through all directions and adds any adjacent ones found to the adjacentDirections which was defined at the top of the script.

With the new handy methods you just created, you can now force the tile to only swap with its adjacent tiles.

Replace the following code in the OnMouseDown method:

else {
    SwapSprite(previousSelected.render);
    previousSelected.Deselect();
}

with this:

else {
    if (GetAllAdjacentTiles().Contains(previousSelected.gameObject)) { // 1
        SwapSprite(previousSelected.render); // 2
        previousSelected.Deselect();
    } else { // 3
        previousSelected.GetComponent<Tile>().Deselect();
        Select();
    }
}
  1. Call GetAllAdjacentTiles and check if the previousSelected game object is in the returned adjacent tiles list.
  2. Swap the sprite of the tile.
  3. The tile isn’t next to the previously selected one, deselect the previous one and select the newly selected tile instead.

Save this script and return to the Unity editor.
Play your game and poke at it to make sure everything’s working as intended. You should only be able to swap two tiles that are adjacent to one another now.

Now you need to handle the real point of the game — matching!

Matching

Matching can be broken down into a few key steps:

  1. Find 3 or more of the same sprites next to each other and consider it a match.
  2. Remove matching tiles.
  3. Shift tiles down to fill the empty space.
  4. Refill empty tiles along the top.
  5. Check for another match.
  6. Repeat until no more matches are found.

Open up Tile.cs and add the following method below the GetAllAdjacentTiles method:

private List<GameObject> FindMatch(Vector2 castDir) { // 1
    List<GameObject> matchingTiles = new List<GameObject>(); // 2
    RaycastHit2D hit = Physics2D.Raycast(transform.position, castDir); // 3
    while (hit.collider != null && hit.collider.GetComponent<SpriteRenderer>().sprite == render.sprite) { // 4
        matchingTiles.Add(hit.collider.gameObject);
        hit = Physics2D.Raycast(hit.collider.transform.position, castDir);
    }
    return matchingTiles; // 5
}

So what’s going on here?

  1. This method accepts a Vector2 as a parameter, which will be the direction all raycasts will be fired in.
  2. Create a new list of GameObjects to hold all matching tiles.
  3. Fire a ray from the tile towards the castDir direction.
  4. Keep firing new raycasts until either your raycast hits nothing, or the tiles sprite differs from the returned object sprite. If both conditions are met, you consider it a match and add it to your list.
  5. Return the list of matching sprites.

Keep up the momentum, and add the following boolean to the top of the file, right above the Awake method:

private bool matchFound = false;

When a match is found, this variable will be set to true.
Now add the following method below the FindMatch method:

private void ClearMatch(Vector2[] paths) // 1
{
    List<GameObject> matchingTiles = new List<GameObject>(); // 2
    for (int i = 0; i < paths.Length; i++) // 3
    {
        matchingTiles.AddRange(FindMatch(paths[i]));
    }
    if (matchingTiles.Count >= 2) // 4
    {
        for (int i = 0; i < matchingTiles.Count; i++) // 5
        {
            matchingTiles[i].GetComponent<SpriteRenderer>().sprite = null;
        }
        matchFound = true; // 6
    }
}

This method finds all the matching tiles along the given paths, and then clears the matches respectively.

  1. Take a Vector2 array of paths; these are the paths in which the tile will raycast.
  2. Create a GameObject list to hold the matches.
  3. Iterate through the list of paths and add any matches to the matchingTiles list.
  4. Continue if a match with 2 or more tiles was found. You might wonder why 2 matching tiles is enough here, that’s because the third match is your initial tile.
  5. Iterate through all matching tiles and remove their sprites by setting it null.
  6. Set the matchFound flag to true.

Now that you’ve found a match, you need to clear the tiles. Add the following method below the ClearMatch method:

public void ClearAllMatches() {
    if (render.sprite == null)
        return;
 
    ClearMatch(new Vector2[2] { Vector2.left, Vector2.right });
    ClearMatch(new Vector2[2] { Vector2.up, Vector2.down });
    if (matchFound) {
        render.sprite = null;
        matchFound = false;
        SFXManager.instance.PlaySFX(Clip.Clear);
    }
}

This will start the domino method. It calls ClearMatch for both the vertical and horizontal matches. ClearMatch will call FindMatch for each direction, left and right, or up and down.

If you find a match, either horizontally or vertically, then you set the current sprite to null, reset matchFound to false, and play the “matching” sound effect.

For all this to work, you need to call ClearAllMatches() whenever you make a swap.

In the OnMouseDown method, and add the following line just before the previousSelected.Deselect(); line:

previousSelected.ClearAllMatches();

Now add the following code directly after the previousSelected.Deselect(); line:

ClearAllMatches();

You need to call ClearAllMatches on previousSelected as well as the current tile because there’s a chance both could have a match.

Save this script and return to the editor. Press the play button and test out the match mechanic, if you line up 3 tiles of the same type now, they’ll disappear.

To fill in the empty space, you’ll need to shift and re-fill the board.

Shifting and Re-filling Tiles

Before you can shift the tiles, you need to find the empty ones.
Open up BoardManager.cs and add the following coroutine below the CreateBoard method:

public IEnumerator FindNullTiles() {
    for (int x = 0; x < xSize; x++) {
        for (int y = 0; y < ySize; y++) {
            if (tiles[x, y].GetComponent<SpriteRenderer>().sprite == null) {
                yield return StartCoroutine(ShiftTilesDown(x, y));
                break;
            }
        }
    }
}

Note: After you’ve added this coroutine, you’ll get an error about ShiftTilesDown not exisiting. You can safely ignore that error as you’ll be adding that coroutine next!

This coroutine will loop through the entire board in search of tile pieces with null sprites. When it does find an empty tile, it will start another coroutine ShiftTilesDown to handle the actual shifting.

Add the following coroutine below the previous one:

private IEnumerator ShiftTilesDown(int x, int yStart, float shiftDelay = .03f) {
    IsShifting = true;
    List<SpriteRenderer>  renders = new List<SpriteRenderer>();
    int nullCount = 0;
 
    for (int y = yStart; y < ySize; y++) {  // 1
        SpriteRenderer render = tiles[x, y].GetComponent<SpriteRenderer>();
        if (render.sprite == null) { // 2
            nullCount++;
        }
        renders.Add(render);
    }
 
    for (int i = 0; i < nullCount; i++) { // 3
        yield return new WaitForSeconds(shiftDelay);// 4
        for (int k = 0; k < renders.Count - 1; k++) { // 5
            renders[k].sprite = renders[k + 1].sprite;
            renders[k + 1].sprite = null; // 6
        }
    }
    IsShifting = false;
}

ShiftTilesDown works by taking in an X position, Y position, and a delay. X and Y are used to determine which tiles to shift. You want the tiles to move down, so the X will remain constant, while Y will change.

The coroutine does the following:

  1. Loop through and finds how many spaces it needs to shift downwards.
  2. Store the number of spaces in an integer named nullCount.
  3. Loop again to begin the actual shifting.
  4. Pause for shiftDelay seconds.
  5. Loop through every SpriteRenderer in the list of renders.
  6. Swap each sprite with the one above it, until the end is reached and the last sprite is set to null

Now you need to stop and start the FindNullTiles coroutine whenever a match is found.

Save the BoardManager script and open up Tile.cs. Add the following lines to the ClearAllMatches() method, right above SFXManager.instance.PlaySFX(Clip.Clear);:

StopCoroutine(BoardManager.instance.FindNullTiles());
StartCoroutine(BoardManager.instance.FindNullTiles());

This will stop the FindNullTiles coroutine and start it again from the start.

Save this script and return to the edior. Play the game again and make some matches, you’ll notice that the board runs out of tiles as you get matches. To make a never-ending board, you need to re-fill it as it clears.

Open BoardManager.cs and add the following method below ShiftTilesDown:

private Sprite GetNewSprite(int x, int y) {
    List<Sprite> possibleCharacters = new List<Sprite>();
    possibleCharacters.AddRange(characters);
 
    if (x > 0) {
        possibleCharacters.Remove(tiles[x - 1, y].GetComponent<SpriteRenderer>().sprite);
    }
    if (x < xSize - 1) {
        possibleCharacters.Remove(tiles[x + 1, y].GetComponent<SpriteRenderer>().sprite);
    }
    if (y > 0) {
        possibleCharacters.Remove(tiles[x, y - 1].GetComponent<SpriteRenderer>().sprite);
    }
 
    return possibleCharacters[Random.Range(0, possibleCharacters.Count)];
}

This snippet creates a list of possible characters the sprite could be filled with. It then uses a series of if statements to make sure you don’t go out of bounds. Then, inside the if statements, you remove possible duplicates that could cause an accidental match when choosing a new sprite. Finally, you return a random sprite from the possible sprite list.

In the coroutine ShiftTilesDown, replace:

renders[k + 1].sprite = null;

with:

renders[k + 1].sprite = GetNewSprite(x, ySize - 1);

This will make sure the board is always filled.

When a match is made and the pieces shift there’s a chance another match could be formed. Theoretically, this could go on forever, so you need to keep checking until the board has found all possible matches.

MatchFlowChart

Combos

By re-checking all the tiles after a match is found, you’ll be able to locate any possible combos that may have been created during the shifting process.
Open up BoardManager.cs and find the FindNullTiles() method.

Add the following for at the bottom of the method, below the for loops:

for (int x = 0; x < xSize; x++) {
    for (int y = 0; y < ySize; y++) {
        tiles[x, y].GetComponent<Tile>().ClearAllMatches();
    }
}

After all of this hard work, it’s time to make sure everything works as intended.

Save your work and Run the game. Start swapping tiles and watch the endless supply of new tiles keep the board filled as you play.

ComboGif

Moving the Counter and Keeping Score

It’s time keep track of the player’s moves and their score.

Open GUIManager.cs located under Scripts\Managers in your favorite code editor. This script handles the UI aspects of the game, including the move counter and score keeper.

To get started add this variable to the top of the file, below private int score;:

private int moveCounter;

Now add this at the top of the Awake() method to initialize the number of moves the player can do:

moveCounter = 60;
moveCounterTxt.text = moveCounter.ToString();

Now you need to encapsulate both integers so you can update the UI Text every time you update the value. Add the following code right above the Awake() method:

public int Score {
    get {
        return score;
    }
 
    set {
        score = value;
        scoreTxt.text = score.ToString();
    }
}
 
public int MoveCounter {
    get {
        return moveCounter;
    }
 
    set {
        moveCounter = value;
        moveCounterTxt.text = moveCounter.ToString();
    }
}

These will make sure that every time the variables Score or MoveCounter are changed, the text components representing them get updated as well. You could’ve put the text updating in an Update() method, but doing it this way is much better for performance, especially as it involves handling strings.

Time to start adding points and tracking moves! Every time the player clears a tile they will be rewarded with some points.

Save this script and open up BoardManager.cs. Add the following to the ShiftTilesDown method, right above yield return new WaitForSeconds(shiftDelay);:

GUIManager.instance.Score += 50;

This will increase the score every time an empty tile is found.

Over in Tile.cs, add the following line below SFXManager.instance.PlaySFX(Clip.Swap); in the ClearAllMatches method:

GUIManager.instance.MoveCounter--;

This will decrement MoveCounter every time a sprite is swapped.

Save your work and test out if the move and score counters are working correctly. Each move should substract the move counter and each match should award some points.

Game Over Screen

The game should end when the move counter reaches 0. Open up GUIManager.cs and add the following if statement to MoveCounters’s setter, right below moveCounter = value;:

if (moveCounter <= 0) {
    moveCounter = 0;
    GameOver();
}

This will work — mostly. Because GameOver() is called right on the final move, combos won’t count towards the final score. That would get you a one-star review for sure!

To prevent this, you need to create a coroutine that waits until BoardManager.cs has finished all of its shifting. Then you can call GameOver().

Add the following coroutine to GUIManager.cs below the GameOver() method:

private IEnumerator WaitForShifting() {
    yield return new WaitUntil(()=> !BoardManager.instance.IsShifting);
    yield return new WaitForSeconds(.25f);
    GameOver();
}

Now replace the following line in the MoveCounter setter:

GameOver();

With:

StartCoroutine(WaitForShifting());

This will make sure all combos will get calculated before the game is over.
Now save all scripts, play the game and score those combos! :]

GameOver

Where to Go From Here?

You can download the final project here.

Now you know how to make a basic Match 3 game by using Unity! I encourage you to keep working and building on this tutorial! Try adding the following on your own:

  • Timed mode
  • Different levels with various board sizes
  • Bonus points for combos
  • Add some particles to make cool effects

If you’re enjoyed this tutorial want to learn more, you should definitely check out our book Unity Games by Tutorials, which teaches you to make 4 full games, scripting in C# and much more.

Here are a few resources to learn even more:

Can’t wait to see what you all come up with! If you have any questions or comments you can post them in the Comments section.

The post How to Make a Match 3 Game in Unity appeared first on Ray Wenderlich.

Parsing JSON Using Swift

Server Side Swift with Perfect: CRUD Database Operations with StORM

How to Make a Game Like Stack

$
0
0

In this SceneKit tutorial, you’ll learn how to create a game like Stack.

Have you ever seen one of those amazing 3D games that uses slick simplistic graphics and requires a steady timed tapping finger to create a fun and immersive gaming experience? With the power of SceneKit, it’s amazingly easy to create those types of games yourself!

Here’s what you’ll learn:

  • Visually creating a 3D scene.
  • Programmatically adding nodes to a scene.
  • Using physics bodies with nodes.
  • Combining UIKit and SceneKit.
  • Playing audio in SceneKit games.

This tutorial assumes you’re familiar with SceneKit and Swift. If you are beginning your SceneKit journey, check out our SceneKit tutorials as well as our beginning Swift tutorials.

Getting Started

Start by downloading the starter project.

Inside, you’ll find a SceneKit catalog filled with some audio and a scene file. In addition, there are some SCNVector3 extensions to perform simple arithmetic operations on vectors and a gradient image. You’ll also notice the App Icon has already been added for you! :] Take some time to look around and get familiar with the project.

You’ll be creating a game similar to Stack. The goal of stack is to place blocks one on top of the other. Be careful though: Placing a block even slightly off will cause it to become sliced. Miss entirely, and it’s game over!

Setting up the Scene

You’ll begin by setting up your game scene. Open GameScene.scn.

game_scene

Drag a new camera into your scene, then select the Node Inspector and rename the node to Main Camera. Set the Position to X: 3, Y: 4.5, Z: 3 and the Rotation to X: -40, Y: 45, Z:0:

camera_node_inspector

Now switch to the Attributes Inspector and change the camera’s Projection type to Orthographic.

Next, you’ll add some light to the scene.

Drag a new directional light from the object library into the scene and rename it to Directional Light. Since the camera is viewing the scene from one side, you don’t have to light the side you don’t see. Back in the Attributes Inspector, set the Position to X: 0, Y: 0, Z: 0 and the Rotation to X: -65, Y: 20, Z:-30:

directional_light

Fantastic. It’s lit!

Now onto the tower. You’ll need a base block to support the tower as the player builds it up. Drag a new box into the scene and apply the following properties to it:

  • In the Node Inspector, change the name to Base Block and set the position to X:0, Y:-4, Z:0.
  • In the Attributes Inspector, change the size to Width: 1, Height: 8, Length: 1.
  • In the Material Inspector, change the diffuse hex color to #434343.

base_block_diffuse_color

You need to add a physics body to the base block, so switch to the Physics Inspector and change the physics body type to Static.

Now let’s spice it up with a cool background! With the base block still selected, switch to the Scene Inspector and drag the file Gradient.png to the background slot like this:

scene_background

You need a way to show the player how high they’ve stacked their tower. Open Main.storyboard; you’ll notice it already has a SCNView. Add a label on top of the SCNView and set its text to 0. Then add a constraint that aligns the label to the center, like so:

Add another constraint that pins the top of the label to the top of the screen.

Now switch to the Attributes Inspector and change the font to Custom, Thonburi, Regular, 50.

label_text_settings

Then use the assistant editor (hint: it’s the one with the two overlapping circles located at the top right of Xcode’s window) to add an outlet from the label to the view controller and name it scoreLabel:

Build and run to see what you have so far.

build_and_run_1

Adding Your First Block

Do you know what makes a tower taller and taller? Yep! Building blocks.

You’re going to add some properties to help you keep track of the blocks in play. To do this, open ViewController.swift() and add the following variables right above viewDidLoad():

//1
var direction = true
var height = 0
 
//2
var previousSize = SCNVector3(1, 0.2, 1)
var previousPosition = SCNVector3(0, 0.1, 0)
var currentSize = SCNVector3(1, 0.2, 1)
var currentPosition = SCNVector3Zero
 
//3
var offset = SCNVector3Zero
var absoluteOffset = SCNVector3Zero
var newSize = SCNVector3Zero
 
//4
var perfectMatches = 0

Here’s what this code does:

  1. The direction will track whether the block’s position is increasing or decreasing, and the height variable will contain how high the tower is.
  2. The previousSize and previousPosition variables contain the size and position of the previous layer. The currentSize and currentPosition variables contain the size and position of the current layer.
  3. You will use the offset, absoluteOffset, and newSize variables to calculate the size of the new layer.
  4. The perfectMatches keeps track of how many times the player has perfectly matched the previous layer in a row.

With this in place, it’s time to add a block to your scene. Add this at the bottom of viewDidLoad():

//1
let blockNode = SCNNode(geometry: SCNBox(width: 1, height: 0.2, length: 1, chamferRadius: 0))
blockNode.position.z = -1.25
blockNode.position.y = 0.1
blockNode.name = "Block\(height)"
 
//2
blockNode.geometry?.firstMaterial?.diffuse.contents =
      UIColor(colorLiteralRed: 0.01 * Float(height), green: 0, blue: 1, alpha: 1)
scnScene.rootNode.addChildNode(blockNode)

Here’s the play-by-play:

  1. Here you create a new block using a box-shaped SCNNode, position it on the Z and Y axis, and name it according to its place in the tower using the height property.
  2. You calculate a new number for the diffuse color’s red value so that it increases with the height. Finally, you add the node to the scene.

Build and run, and you should now see your new block show up on the screen!

build_and_run_2

Moving the Blocks

Excellent! Now you have a brand new block ready to play. However, I think we can all agree that blocks are more fun when they’re moving.

You will accomplish this movement by setting the view controller as the scene renderer delegate and implementing the required methods on the SCNSceneRendererDelegate protocol.

Add this extension at the bottom of the class:

extension ViewController: SCNSceneRendererDelegate {
  func renderer(_ renderer: SCNSceneRenderer, updateAtTime time: TimeInterval) {
 
  }
}

Here you implement the SCNSceneRendererDelegate protocol and add renderer(_:updateAtTime:).

Add the following inside renderer(_:updateAtTime:):

// 1
if let currentNode = scnScene.rootNode.childNode(withName: "Block\(height)", recursively: false) {
      // 2
      if height % 2 == 0 {
        // 3
        if currentNode.position.z >= 1.25 {
          direction = false
        } else if currentNode.position.z <= -1.25 {
          direction = true
        }
 
        // 4
        switch direction {
        case true:
          currentNode.position.z += 0.03
        case false:
          currentNode.position.z -= 0.03
        }
      // 5
      } else {
        if currentNode.position.x >= 1.25 {
          direction = false
        } else if currentNode.position.x <= -1.25 {
          direction = true
        }
 
        switch direction {
        case true:
          currentNode.position.x += 0.03
        case false:
          currentNode.position.x -= 0.03
        }
      }
    }

Here’s what’s happening:

  1. You use the name of the block specified earlier to find it in the scene.
  2. You need to move the block on the X or Z axis, depending on the layer it’s in. Even layers move on the Z axis, while odd layers move on the X axis. If the layer height divided by 2 has a remainder of 0, the layer height is even. You use the modulo operator (%) to find the remainder.
  3. If the position of the box hits either 1.25 or -1.25, you change its direction and start moving it the other way.
  4. Depending on the direction, the box is either moving forward or backward along the Z axis.
  5. You repeat the same code as before, but for the X axis.

By default, SceneKit pauses the scene. To be able to see moving objects in your scene, add this at the bottom of viewDidLoad():

scnView.isPlaying = true
scnView.delegate = self

In this code you also set this view controller as the scene’s renderer delegate, so you can execute the code you wrote above.

Build and run to see some movement!

Handling Taps

Now that you’ve got the block moving, you need to add a new block and resize the old block whenever the player taps the screen. Switch to Main.storyboard and add a tap gesture recognizer to the view like this:

tap_add

Now create an action and name it handleTap inside the view controller using the assistant editor.

tap_action

Switch back to the Standard Editor and open ViewController.swift, then place this inside handleTap(_:):

if let currentBoxNode = scnScene.rootNode.childNode(
  withName: "Block\(height)", recursively: false) {
      currentPosition = currentBoxNode.presentation.position
      let boundsMin = currentBoxNode.boundingBox.min
      let boundsMax = currentBoxNode.boundingBox.max
      currentSize = boundsMax - boundsMin
 
      offset = previousPosition - currentPosition
      absoluteOffset = offset.absoluteValue()
      newSize = currentSize - absoluteOffset
 
      currentBoxNode.geometry = SCNBox(width: CGFloat(newSize.x), height: 0.2,
        length: CGFloat(newSize.z), chamferRadius: 0)
      currentBoxNode.position = SCNVector3Make(currentPosition.x + (offset.x/2),
        currentPosition.y, currentPosition.z + (offset.z/2))
      currentBoxNode.physicsBody = SCNPhysicsBody(type: .static,
        shape: SCNPhysicsShape(geometry: currentBoxNode.geometry!, options: nil))
}

Here you retrieve the currentBoxNode from the scene. Then you calculate the offset and new size of the block. From there you change the size and position of the block and give it a static physics body.

The offset is equal to the difference in position between the previous layer and the current layer. By subtracting the absolute value of the offset from the current size, you get the new size.

You’ll notice that by setting the position of the current node to the offset divided by two, the block’s edge matches perfectly with the previous layer’s edge. This gives the illusion of chopping the block.

Next, you need a method to create the next block in the tower. Add this under handleTap(_:):

func addNewBlock(_ currentBoxNode: SCNNode) {
  let newBoxNode = SCNNode(geometry: currentBoxNode.geometry)
  newBoxNode.position = SCNVector3Make(currentBoxNode.position.x,
    currentPosition.y + 0.2, currentBoxNode.position.z)
  newBoxNode.name = "Block\(height+1)"
  newBoxNode.geometry?.firstMaterial?.diffuse.contents = UIColor(
    colorLiteralRed: 0.01 * Float(height), green: 0, blue: 1, alpha: 1)
 
  if height % 2 == 0 {
    newBoxNode.position.x = -1.25
  } else {
    newBoxNode.position.z = -1.25
  }
 
  scnScene.rootNode.addChildNode(newBoxNode)
}

Here you create a new node with the same size as the current block. You position it above the current block and change its X or Z position depending on the layer height. Finally, you change its diffuse color and add it to the scene.

You will use handleTap(_:) to keep all your properties up to date. Add this to the end of handleTap(_:) inside the if let statement:

addNewBlock(currentBoxNode)
 
if height >= 5 {
  let moveUpAction = SCNAction.move(by: SCNVector3Make(0.0, 0.2, 0.0), duration: 0.2)
  let mainCamera = scnScene.rootNode.childNode(withName: "Main Camera", recursively: false)!
  mainCamera.runAction(moveUpAction)
}
 
scoreLabel.text = "\(height+1)"
 
previousSize = SCNVector3Make(newSize.x, 0.2, newSize.z)
previousPosition = currentBoxNode.position
height += 1

The first thing you do is call addNewBlock(_:). If the tower size is greater than or equal to 5, you move the camera up.

You also update the score label, set the previous size and position equal to the current size and position. You can use newSize because you set the current box node’s size to newSize. Then you increment the height.

Build and run. Things are stacking up nicely! :]

Implementing Physics

The game resizes the blocks correctly, but it would be cool if the chopped block would fall down the tower.

Define the following new method under addNewBlock(_:):

func addBrokenBlock(_ currentBoxNode: SCNNode) {
    let brokenBoxNode = SCNNode()
    brokenBoxNode.name = "Broken \(height)"
 
    if height % 2 == 0 && absoluteOffset.z > 0 {
      // 1
      brokenBoxNode.geometry = SCNBox(width: CGFloat(currentSize.x),
        height: 0.2, length: CGFloat(absoluteOffset.z), chamferRadius: 0)
 
      // 2
      if offset.z > 0 {
        brokenBoxNode.position.z = currentBoxNode.position.z -
          (offset.z/2) - ((currentSize - offset).z/2)
      } else {
        brokenBoxNode.position.z = currentBoxNode.position.z -
          (offset.z/2) + ((currentSize + offset).z/2)
      }
      brokenBoxNode.position.x = currentBoxNode.position.x
      brokenBoxNode.position.y = currentPosition.y
 
      // 3
      brokenBoxNode.physicsBody = SCNPhysicsBody(type: .dynamic,
        shape: SCNPhysicsShape(geometry: brokenBoxNode.geometry!, options: nil))
      brokenBoxNode.geometry?.firstMaterial?.diffuse.contents = UIColor(colorLiteralRed: 0.01 *
        Float(height), green: 0, blue: 1, alpha: 1)
      scnScene.rootNode.addChildNode(brokenBoxNode)
 
    // 4
    } else if height % 2 != 0 && absoluteOffset.x > 0 {
      brokenBoxNode.geometry = SCNBox(width: CGFloat(absoluteOffset.x), height: 0.2,
        length: CGFloat(currentSize.z), chamferRadius: 0)
 
      if offset.x > 0 {
        brokenBoxNode.position.x = currentBoxNode.position.x - (offset.x/2) -
          ((currentSize - offset).x/2)
      } else {
        brokenBoxNode.position.x = currentBoxNode.position.x - (offset.x/2) +
          ((currentSize + offset).x/2)
      }
      brokenBoxNode.position.y = currentPosition.y
      brokenBoxNode.position.z = currentBoxNode.position.z
 
      brokenBoxNode.physicsBody = SCNPhysicsBody(type: .dynamic,
        shape: SCNPhysicsShape(geometry: brokenBoxNode.geometry!, options: nil))
      brokenBoxNode.geometry?.firstMaterial?.diffuse.contents = UIColor(
        colorLiteralRed: 0.01 * Float(height), green: 0, blue: 1, alpha: 1)
      scnScene.rootNode.addChildNode(brokenBoxNode)
    }
  }

Here you create a new node and name it using the height variable. You use anif statement to determine the axis and make sure the offset is greater than 0, because if it is equal to zero then you shouldn’t spawn a broken block!

Breaking down the rest:

  1. Earlier, you subtracted the offset to find the new size. Here, you don’t need to subtract anything, as the correct size is equal to the offset.
  2. You change the position of the broken block.
  3. You add a physics body to the broken block so it will fall. You also change its color and add it to the scene.
  4. You do the same for the X axis as you did for the Z.

You find the position of the broken block by subtracting half the offset from the current position. Then, depending on whether the block is in a positive or negative position, you add or subtract half the current size minus the offset.

Add a call to this method right before you call addNewBlock(_:) in handleTap(_:):

addBrokenBlock(currentBoxNode)

When the broken node falls out of view, it doesn’t get destroyed: It continues falling infinitely. Add this inside renderer(_:updateAtTime:), right at the top:

for node in scnScene.rootNode.childNodes {
  if node.presentation.position.y <= -20 {
    node.removeFromParentNode()
  }
}

This code deletes any node whose Y position is less than -20.

Build and run to see some sliced blocks!

Finishing Touches

Now that you’ve finished the core game mechanics, there are only a few loose ends to tie up. There should be a reward for the player if they match the previous layer perfectly. Also, there is no win/lose condition or any way to start a new game when you’ve lost! Finally, the game is devoid of sound, so you’ll need to add some as well.

Handling Perfect Matches

To handle the “perfect matching” case, add the following method under addBrokenBlock(_:):

func checkPerfectMatch(_ currentBoxNode: SCNNode) {
    if height % 2 == 0 && absoluteOffset.z <= 0.03 {
      currentBoxNode.position.z = previousPosition.z
      currentPosition.z = previousPosition.z
      perfectMatches += 1
      if perfectMatches >= 7 && currentSize.z < 1 {
        newSize.z += 0.05
      }
 
      offset = previousPosition - currentPosition
      absoluteOffset = offset.absoluteValue()
      newSize = currentSize - absoluteOffset
    } else if height % 2 != 0 && absoluteOffset.x <= 0.03 {
      currentBoxNode.position.x = previousPosition.x
      currentPosition.x = previousPosition.x
      perfectMatches += 1
      if perfectMatches >= 7 && currentSize.x < 1 {
        newSize.x += 0.05
      }
 
      offset = previousPosition - currentPosition
      absoluteOffset = offset.absoluteValue()
      newSize = currentSize - absoluteOffset
    } else {
      perfectMatches = 0
    }
  }

If the player stops the block within 0.03 of the previous position, you’ll consider this a a perfect match. You set the position of the current block equal to the position of the previous block, since it’s not quite a perfect mathematical match, but it’s close enough.

By setting the current and previous positions equal, you make the perfect match mathematically correct and then recalculate the offset and new size. Call this method right after you calculate the offset and new size inside handleTap(_:):

checkPerfectMatch(currentBoxNode)

Handling Misses

Now you’ve covered the cases where the player matches perfectly and when they partially match, but you haven’t covered the case when the player misses.

Add the following right above the call to checkPerfectMatch(_:) inside handleTap(_:):

if height % 2 == 0 && newSize.z <= 0 {
        height += 1
        currentBoxNode.physicsBody = SCNPhysicsBody(type: .dynamic,
          shape: SCNPhysicsShape(geometry: currentBoxNode.geometry!, options: nil))
        return
      } else if height % 2 != 0 && newSize.x <= 0 {
        height += 1
        currentBoxNode.physicsBody = SCNPhysicsBody(type: .dynamic,
          shape: SCNPhysicsShape(geometry: currentBoxNode.geometry!, options: nil))
        return
      }

If the player misses the block, the new size calculation will be negative, so you can check for this to see if the player has missed. If the player has missed, you increment the height by one so that the movement code is no longer moving the current block. Then you add a dynamic physics body so the block will fall.

Finally, you return so that the code after does not run, such as checkPerfectMatch(_:), and addBrokenBlock(_:).

Adding Sound Effects

Since the audio files are very short, it makes sense to pre-load the audio. Add a new dictionary property named sounds to the variable declarations:

var sounds = [String: SCNAudioSource]()

Next, add these two methods below viewDidLoad:

func loadSound(name: String, path: String) {
  if let sound = SCNAudioSource(fileNamed: path) {
    sound.isPositional = false
    sound.volume = 1
    sound.load()
    sounds[name] = sound
  }
}
 
func playSound(sound: String, node: SCNNode) {
  node.runAction(SCNAction.playAudio(sounds[sound]!, waitForCompletion: false))
}

The first method loads the audio file at the path specified and stores it inside the sounds dictionary. The second method plays the audio file stored in the sounds dictionary.

Add these inside the middle of viewDidLoad():

loadSound(name: "GameOver", path: "HighRise.scnassets/Audio/GameOver.wav")
loadSound(name: "PerfectFit", path: "HighRise.scnassets/Audio/PerfectFit.wav")
loadSound(name: "SliceBlock", path: "HighRise.scnassets/Audio/SliceBlock.wav")

There are a few places where you’ll need to play the sound effects. Inside handleTap(_:), add this line inside each section of the if statement that checks whether the player missed the block, but before the return statement:

playSound(sound: "GameOver", node: currentBoxNode)

Add this line below the call to addNewBlock:

playSound(sound: "SliceBlock", node: currentBoxNode)

Scroll down to checkPerfectMatch(_:) and add this line inside both sections of the if statement:

playSound(sound: "PerfectFit", node: currentBoxNode)

Build and run — things feel much more fun with some sounds, don’t they?

Handling Win/Lose Condition

What good is a game that doesn’t end? You’re going to fix that right now! :]

Head into Main.storyboard and drag a new button onto the view. Change the text color’s hex value to #FF0000 and its text to Play. Then change its font to Custom, Helvetica Neue, 66.

Next, align the button to the center and pin it to the bottom with a constant of 100.

Connect an outlet to the view controller titled playButton. Then create an action titled playGame and place this code inside:

playButton.isHidden = true
 
let gameScene = SCNScene(named: "HighRise.scnassets/Scenes/GameScene.scn")!
let transition = SKTransition.fade(withDuration: 1.0)
scnScene = gameScene
let mainCamera = scnScene.rootNode.childNode(withName: "Main Camera", recursively: false)!
scnView.present(scnScene, with: transition, incomingPointOfView: mainCamera, completionHandler: nil)
 
height = 0
scoreLabel.text = "\(height)"
 
direction = true
perfectMatches = 0
 
previousSize = SCNVector3(1, 0.2, 1)
previousPosition = SCNVector3(0, 0.1, 0)
 
currentSize = SCNVector3(1, 0.2, 1)
currentPosition = SCNVector3Zero
 
let boxNode = SCNNode(geometry: SCNBox(width: 1, height: 0.2, length: 1, chamferRadius: 0))
boxNode.position.z = -1.25
boxNode.position.y = 0.1
boxNode.name = "Block\(height)"
boxNode.geometry?.firstMaterial?.diffuse.contents = UIColor(colorLiteralRed: 0.01 * Float(height),
  green: 0, blue: 1, alpha: 1)
scnScene.rootNode.addChildNode(boxNode)

You’ll notice that you’re resetting all the game’s variables to their default value and adding the first block.

Since you are now adding the first block here, remove the following lines of code out the viewDidLoad(_:) again, specifically from the declaration of blockNode until you add it to the scene.

    //1
    let blockNode = SCNNode(geometry: SCNBox(width: 1, height: 0.2, length: 1, chamferRadius: 0))
    blockNode.position.z = -1.25
    blockNode.position.y = 0.1
    blockNode.name = "Block\(height)"
 
    //2
    blockNode.geometry?.firstMaterial?.diffuse.contents =
      UIColor(colorLiteralRed: 0.01 * Float(height), green: 0, blue: 1, alpha: 1)
    scnScene.rootNode.addChildNode(blockNode)

Define a new method below the method you just created:

func gameOver() {
    let mainCamera = scnScene.rootNode.childNode(
      withName: "Main Camera", recursively: false)!
 
    let fullAction = SCNAction.customAction(duration: 0.3) { _,_ in
      let moveAction = SCNAction.move(to: SCNVector3Make(mainCamera.position.x,
        mainCamera.position.y * (3/4), mainCamera.position.z), duration: 0.3)
      mainCamera.runAction(moveAction)
      if self.height <= 15 {
        mainCamera.camera?.orthographicScale = 1
      } else {
        mainCamera.camera?.orthographicScale = Double(Float(self.height/2) /
          mainCamera.position.y)
      }
    }
 
    mainCamera.runAction(fullAction)
    playButton.isHidden = false
  }

Here, you zoom out the camera to reveal the entire tower. At the end, you set the play button to visible so the player can start a new game.

Place the following call to gameOver() in the missed block if statement inside handleTap(_:), above the return statement and inside both parts of the if statement:

gameOver()

Build and run. You should now be able to start a new game if — I mean when — you lose. :]

Launch Image

You get an ugly white screen right before the game starts up. Open up LaunchScreen.storyboard and drag in an image view. Pin it to all four sides of the screen:

Change the image to Gradient.png

Now you’ve replaced that ugly white screen with a nicer looking gradient! :]

Where to Go From Here?

Congratulations, you’re all done! You can download the final project here.

I hope you’ve enjoyed this tutorial on making a game like Stack!

There are many additional features that you could add to the game:

  • Make the Color Change With Height more distinctively
  • Currently, the Camera won’t zoom out all the way for certain heights. Change the amount the camera zooms out to fix this.
  • Apply a force to the cut off block to make it spin off the tower

If you’d like to learn more about making 3D Games with Scene Kit, check out our 3D Apple Games by Tutorials book. We also recommend checking out the official Apple’s Scene Kit page for even more details about SceneKit.

We’d love to see what you’ve done, so join the discussion below share some of your ideas to improve this game and feel free to ask any questions you may have!

The post How to Make a Game Like Stack appeared first on Ray Wenderlich.

SwiftyBeaver Tutorial for iOS: A Logging Platform for Swift

$
0
0


Bugs come in all shapes and sizes. Some bugs are nice and fuzzy and easy to fix because you can launch your app and go right to spot where the bug happens. If you’re lucky, Xcode will even show you which line caused your app to crash.

Other bugs are more sinister. They lurk in the background and happen when you least expect it. They are the dreaded stuff of nightmares and Listerine commercials.

In this tutorial, you’ll discover a secret weapon you can use to crush those sinister bugs in the background. When wielded properly, this weapon is like shining a flashlight into the deepest darkest crevices of your app. Those creepy crawlers won’t stand a chance!

That weapon is SwiftyBeaver, a Swift-based logging framework for iOS and macOS.

In this tutorial, you’ll learn how to debug using SwiftyBeaver and pick up the following skills along the way:

  • When SwiftyBeaver logging is better than print() and NSLog()
  • How to access your SwiftyBeaver logs on Crypto Cloud
  • How to use Log Levels for different types of log messages
  • How to filter logs to make bug hunting even easier

Note: Before starting this tutorial, you should be familiar with Cocoapods and the CoreLocation framework. Check out the linked tutorials to brush up on these skills first.

Getting Started

Download the starter project here. It includes all of the project files and artwork you will need to complete this tutorial.

You are going to build an app for tracking your children. If they get too far away from home, the app will warn them to stay in the safe zone.

It’s called Ten PM (Do you know where your children are?) after the famous public service announcements from the ’80s.

Open TenPM.xcworkspace and look around the project. Now open Main.storyboard and you’ll see two view controllers inside a navigation controller:

storyboard_vcs

The view controller on the left is the one parents can use to tell the app where “home” is, and also to specify a maximum distance they will allow their child to wander. The backing class is TrackingSetupViewController, which requests location tracking authorization and stores an input distance for geofencing.

The view controller on the right is the one the kids will use. It shows a map with a green circle that represents the safe zone. It also has a text box down below to tell them if they are currently safe or not. The backing class is TrackingViewController, which draws an overlay on an MKMapView illustrating the allowable child locations.

Here are a few other files of note:

  • LocationTracker.swift: Acts as the Core Location Manager’s delegate. It handles location updates and permission changes.
  • ParentProfile.swift: Stores important user data to NSUserDefaults. The data includes the parents’ home location and the distance their kids are allowed to wander.

Using The Starter App

Build and run the Ten PM app on the iOS Simulator. You will see the view controlled by TrackingSetupViewController:

Simulator Screen Shot Jan 24, 2017, 4.08.49 PM

Before you set up tracking, you need to make sure the simulator is providing a starting location. To do that, select the simulator and in the toolbar select Debug\Location\Apple.

Tap the SETUP TRACKING button and the app will ask your permission to start gathering location data. Because this screen is for the parents, there is an extra alert confirming that you are the parent and you are at home. Select Yes and then Allow. Once the app determines your location, it will save your home address to use as the center point for your kid’s safe zone circle.

Now input 1 in the prompt for Safe Distance from home. This means you don’t want to be any further than 1 kilometer from the simulated Apple location.

Simulator Screen Shot Jan 24, 2017, 4.32.31 PM

Tap NEXT and you will be taken to the view backed by TrackingViewController. This view has an annotation with your current location along with a green circle outlining your safe zone.

Come to think of it, this app might be useful for Apple employees carrying expensive iPhone prototypes.

Come to think of it, this app might be useful for Apple employees carrying expensive iPhone prototypes.

Now that you are all set up, it’s time to pretend that it’s the year 2011 and you’ve got an iPhone 4 prototype you’re taking out for a stroll. Let’s simulate a new location, just outside of your safe zone, where you’ve set up a meeting with a reporter from Gawker.

In the simulator menu, go to Debug\Location again, but this time choose Custom Location. Enter 37.3397 as your latitude and -122.0426 as your longitude and hit OK.

You should see the blue dot move to the new location, and the message at the bottom should change to tell you that you are dangerously far from home.

That’s the basic rundown of Ten PM’s functionality. It’s a fairly simple app that can be expanded upon pretty easily. You could have it start sending remote notifications to the parents once their child goes outside of the safe zone, etc.

But you’re not going to do that today. Instead, you’ll use this app to simulate some nasty background bugs that you will then fix with the assistance of SwiftyBeaver.

Installing SwiftyBeaver

First, install SwiftyBeaver via Cocoapods. Find the root directory for Ten PM and locate the Podfile. Open it in the editor of your choice, then add the following line under # Pods for TenPM:

pod 'SwiftyBeaver'

Open a Terminal and navigate to the directory with your Podfile. Type the following:

pod install

After a minute or so, the installation of SwiftyBeaver will complete. Now open AppDelegate.swift and add the following import to the top:

import SwiftyBeaver

Build the project, and you’ll see SwiftyBeaver is now available to the project because the project will successfully compile.

Note: This install guide only works with Cocoapods and Swift 3. More detailed installation instructions can be found on the SwiftyBeaver GitHub Repository page.

Writing Your First Logs With SwiftyBeaver

Whew. Are you ready to write some code?

Look at AppDelegate.swift again. This is where you will set up logging for SwiftyBeaver. Did you notice the skeleton method provided in the stater project?

setupSwiftyBeaverLogging() gets called every time your application launches, and as the name implies, you’ll use it to prepare SwiftyBeaver for use. Go to that method and add the following:

let console = ConsoleDestination()
SwiftyBeaver.addDestination(console)

SwiftyBeaver isn’t any ordinary logging tool. It has multiple inputs called Destinations that you can configure to suit your needs. A Destination defines where your logs appear.

ConsoleDestination() creates a Console Destination, which you added as an active SwiftyBeaver destination. Now any log messages you create will show up in the console, just like a print() statement would.

In application(_:didFinishLaunchingWithOptions:), add the following after the call to setupSwiftyBeaverLogging:

SwiftyBeaver.info("Hello SwiftyBeaver Logging!")

This will print an info level log to the console when the app starts up. You’ll learn more about log levels in a moment.

Build and run Ten PM again. Check the console, and you’ll see the following log message:

12:06:05.402 💙 INFO AppDelegate.application():36 - Hello SwiftyBeaver Logging!

Cool! You’re logging to the console with SwiftyBeaver. The heart relates to the log level, which are explained below.

A Brief Explanation of Log Levels

At this point, I am sure you’re wondering why SwiftyBeaver makes you use a method named info() instead of the far more intuitive log() or print().

It has to do with something called Log Levels.

Not everything you log is equally important. Some logs are useful for giving the programmer a bit of extra contextual information. Other logs communicate more serious issues like errors and warnings.

When reading through a log file, it is especially helpful to have log messages that are categorized by the threat they pose to your application. It helps you filter through the less important messages quickly so you can fix bugs faster.

SwiftyBeaver sticks to log level conventions and adopts these five log levels:

  1. Verbose: The lowest priority level. Use this one for contextual information.
  2. Debug: Use this level for printing variables and results that will help you fix a bug or solve a problem.
  3. Info: This is typically used for information useful in a more general support context. In other words, info that is useful for non developers looking into issues.
  4. Warning: Use this log level when reaching a condition that won’t necessarily cause a problem but strongly leads the app in that direction.
  5. Error: The most serious and highest priority log level. Use this only when your app has triggered a serious error.

How to Write to Different Log Levels With SwiftyBeaver

Just as you used SwiftyBeaver’s info() method to log to the info log level, you can use the other four methods — verbose(), debug(), warning(), and error() — to log the other four levels.

Give it a try. Back in application(_:didFinishLaunchingWithOptions:), replace the call to info() with this:

SwiftyBeaver.debug("Look ma! I am logging to the DEBUG level.")

Now build and run your app. You should see a different colored heart icon and a log message at the debug level.

14:48:14.155 💚 DEBUG AppDelegate.application():36 - Look ma! I am logging to the DEBUG level.

Notice that the color of the icon changed to green to indicate the Debug log level. It’s one of the reasons why SwiftyBeaver is better than print() and NSLog(). You can quickly scan your logs to find messages at the log level you are interested in.

Note: Try not to abuse the higher priority log levels. Warnings and errors should be reserved for situations that require attention. It’s just like that old saying, “When everything is urgent, nothing is.”

Setting Up The SwiftyBeaver Crypto Cloud

One of the coolest features in SwiftyBeaver is the ability to log directly to the cloud. SwiftyBeaver comes with a macOS App that lets you view your logs in real time. If you have ever wondered what’s happening in your app that is installed on thousands of devices, now you can know.

Download The SwiftyBeaver Mac App. Open the app, and fill out the form to create an account.

Next, you will be taken directly to a dialog box that asks you to save a file. It’s a little strange because they don’t tell you what the file is for.

Name it TenPMLogs, chose any location you prefer and hit Save.

The file you created stores the logs for a single app, which is why you named it TenPMLogs. When you open this file using the SwiftyBeaver Mac App, you can view the logs associated with the Ten PM app.

Once you have saved your log file, you will be presented with a choice. You can either register a new app, or you can view logs from a previously registered app. You’ll continue with a New App.

Click on the Generate New App Credentials button. You should see the following screen, showing the generated ID and keys for your app:

You are going to add another log destination using the Crypto Cloud security credentials just generated. Keep this window open, and go back to setupSwiftyBeaverLogging() in AppDelegate.swift.

Add these lines to the bottom of the method, substituting the string values shown in the macOS app for the stand-in strings below:

let platform = SBPlatformDestination(appID: "Enter App ID Here",
                                     appSecret: "Enter App Secret Here",
                                     encryptionKey: "Enter Encryption Key Here")
 
SwiftyBeaver.addDestination(platform)

Go back to the SwiftyBeaver Mac App and click on the Connect button. Then build and run Ten PM.

Note: If you are a silly fool like me, and you clicked the Connect button before copying your credentials into your app, you can click on the settings gear in the SwiftyBeaver Mac App to view them after connecting.

Check it out! Your log message now appears in the SwiftyBeaver Mac App. If you don’t see the logs right away, don’t despair. Sometimes, it can take a few minutes for the log messages to get to the cloud. They will show up eventually. You can see that I anxiously relaunched the app to see if it might make my log messages appear faster.

SwiftyBeaver also puts an automatic one hour expiration on all logs you generate — that is, unless you upgrade to a paid account. For most debugging tasks, this won’t be an issue. But it is worth mentioning in case you ever wonder why your older logs aren’t visible any more.

Filtering Logs By Log Level, Favorites, and Minimum Log Levels

The truly great thing about the SwiftyBeaver Mac App is the ability to filter your logs by log level. It dramatically simplifies the process of digging through log files to find the cause of a critical bug.

You may have noticed the different tabs up at the top. Each of those tabs represents a different log level. You can view multiple log levels at a time, or you can drill down and look at just the warnings and errors.

You can also star a log to mark it as a Favorite. You can view all favorites by clicking on the star in the left hand menu.

Filtering Logs With Minimum Log Levels

There’s one more feature you’re really going to love. SwiftyBeaver lets you set a minimum log level for a given log destination. If you want to reserve your Crypto Cloud account for serious warnings and errors, you can do that.

First, replace the debug log statement in applicationDidFinishLaunching() with the following:

SwiftyBeaver.verbose("Watch me bloviate. I'm definitely not important enough for the cloud.")
 
SwiftyBeaver.debug("I am more important, but the cloud still doesn't care.")
 
SwiftyBeaver.info("Why doesn't the crypto cloud love me?")
 
SwiftyBeaver.warning("I am serious enough for you to see!")
 
SwiftyBeaver.error("Of course I'm going to show up in your console. You need to handle this.")

Now you’re logging a message at every level. Build and run the app, and you should see all of the logs make it up to Crypto Cloud.

In setupSwiftyBeaverLogging(), add the following right before you add the platform logging destination:

platform.minLevel = .warning

Build and run the app again. Take another look at your Crypto Cloud console.

You should only see the warnings and errors for the latest timestamp. None of the other log statements will have made it to the Crypto Cloud console. You will still see everything in the Xcode console!

Note: You can specify a minimum log level for any type of SwiftyBeaver logging destination. You can even create multiple Crypto Cloud destinations for different log levels just to keep things nice and separate. SwiftyBeaver has a lot of wiggle room for customization.

Fixing Hard-to-Reach Bugs

It’s been fun to talk about logging to Crypto Cloud, but you have some sinister bugs you need to fix — or at least, some sinister bugs that you are going to intentionally simulate and then fix.

Start by cleaning up some of your earlier logs. Remove all of the logs from application(_:didFinishLaunchingWithOptions:). Also delete the platform.minLevel setting so that the default of printing all logs occurs.

For this test, you’ll want to see all logs.

Simulating a Bug

Now that you are ready to go with cloud logging, it’s time to simulate a nasty background bug.

Open LocationTracker.swift and find locationManager(_:didUpdateLocations:). Insert the following code right after the two guard statements at the top:

let bug = true
 
if bug == true {
  return
}

This is rather silly, but you are pretending there’s a bug somewhere in the LocationTracker preventing it from tracking the user’s location. The placement here prevents the notifications that indicate the user has entered or left the safe zone from posting. When the bug is “turned off”, the behavior will function normally.

Build and run to confirm the issue.

As long as you left the location in the custom area used previously, you’ll see the bug. Although you are clearly outside of the safe zone, the text is indicating you are a safe distance from home.

Bug Sleuthing With SwiftyBeaver

Now how might you do some sleuthing with SwiftyBeaver?

If you received error reports about tracking failures, and had no good guesses on the bug, put log statements everywhere to gather as much information as possible from impacted users.

First, go up to the top of the LocationTracker class and import SwiftyBeaver:

import SwiftyBeaver

Next, put a log statement at the top of the locationManager(_:didUpdateLocations:):

SwiftyBeaver.info("Got to the didUpdateLocations() method")

Now go a few lines down and paste this line of code right after the line where you declare bug:

SwiftyBeaver.debug("The value of bug is: \(bug)")

Next add another inside of the conditional where you check for the presence of the bug, just before the return:

SwiftyBeaver.error("There's definitely a bug... Aborting.")

And finally, put one more log at the end of locationManager(_:didUpdateLocations:):

SwiftyBeaver.info("Got to the end the didUpdateLocations method")

That ought to be enough information to start figuring out what’s going on in your code. For reference, here is what the entire contents of locationManager(_:didUpdateLocations:) should look like:

SwiftyBeaver.info("Got to the didUpdateLocations() method")
 
guard let homeLocation = ParentProfile.homeLocation else {
  ParentProfile.homeLocation = locations.first
  return
}
 
guard let safeDistanceFromHome = ParentProfile.safeDistanceFromHome else {
  return
}
 
let bug = true
SwiftyBeaver.debug("The value of bug is: \(bug)")
 
if bug == true {
  SwiftyBeaver.error("There's definitely a bug... Aborting.")
  return
}
 
for location in locations {
  let distanceFromHome = location.distance(from: homeLocation)
 
  if distanceFromHome > safeDistanceFromHome {
    NotificationCenter.default.post(name: TenPMNotifications.UnsafeDistanceNotification, object: nil)
  } else {
    NotificationCenter.default.post(name: TenPMNotifications.SafeDistanceNotification, object: nil)
  }
}
SwiftyBeaver.info("Got to the end the didUpdateLocations method")

In the sim, set the location to Apple just as you did before. Now build and run the application. Although you’ll have the Xcode console logs available in this scenario, you’re going to ignore them and imagine you’re monitoring cloud logs from a remote user.

Enter a safe distance of 1 km, and press NEXT. After the map loads, change your location to a latitude of: 37.3397 and longitude: -122.0426 via a custom location.

Again, you’ve moved out of your safe zone without the text updating.

You should also notice the following logs repeating on the SwiftyBeaver Crypto Cloud, after setting the log filter to ALL:

Wow, that’s really helpful! If you go back to your code in the LocationTracker class, you can compare it to the logs and see how far the app got before it stopped executing your code. Here it clearly bailed out in the if bug == true check, where an error was printed.

To “fix” the bug, simply set the bug variable to false when it is declared in locationManager(_:didUpdateLocations:).

let bug = false

Build and run Ten PM. Simulate starting at Apple and moving outside of the safe zone. This time, you’ll see the safe zone warning is properly triggered.

You should also see the following logs in your Crypto Cloud console.

It looks like the app got past the problem and is successfully responding to location changes once more. You squashed that bug!

Where to Go From Here?

You can find the completed sample project from this tutorial here.

Also check out File Logging with SwiftyBeaver. If you have an iPhone and want to be 100% certain that you’ll get your logs (even when there’s no Internet connection), this feature can be incredibly helpful.

For more advanced use cases, check out custom formatting for your logs.

If you have any questions or comments on this tutorial or SwiftyBeaver, please come join the discussion below!

The post SwiftyBeaver Tutorial for iOS: A Logging Platform for Swift appeared first on Ray Wenderlich.

New Course: Publishing to the App Store

$
0
0

Today we’re proud to release Publishing to the App Store, our 20th course since WWDC!

In this focused, 3-part course for beginning developers, you’ll be guided through the process of submitting your first app to the App Store.

You’ll see every step from registering as an Apple Developer, to uploading and submitting an app for review. This is great if you want a guided tour on how to submit your first app.

Let’s take a look at what’s inside.

Video 1: Getting Started. Learn what you’ll need to develop apps for Apple platforms, including how to register as an Apple Developer, and create a paid developer account. You’ll also see how to setup your Mac for development, and register iOS devices for testing.

Video 2: iTunes Connect. In this video, learn how to setup and use the iTunes Connect portal. We’ll cover requesting and signing contracts, and adding banking and contact information.

Video 3: Submitting Your App. This video will cover how to submit your app to the App Store. You’ll see how to test your app on an actual device. Then, you’ll learn how to create a New App entry within the iTunes Connect portal, create an archive and upload a binary from within Xcode, and finally submit your app for review.

Where To Go From Here?

Want to check out the course? You can watch the introduction for free!

The rest of the course is for raywenderlich.com subscribers only. Here’s how you can get access:

  • If you are a raywenderlich.com subscriber: The entire course is complete and available today. You can check out the first part here.
  • If you are not a subscriber yet: What are you waiting for? Subscribe now to get access to our Publishing to the App Store course, and our entire catalog of over 500 videos.

There’s much more in store for raywenderlich.com subscribers – if you’re curious, you can check out our full schedule of upcoming courses.

I hope you enjoy our new course, and stay tuned for many more new Swift 3 courses and updates to come!

The post New Course: Publishing to the App Store appeared first on Ray Wenderlich.

Bond Tutorial: Bindings in Swift

$
0
0
Bond tutorial

The name’s Bond, Swift Bond

Note: Updated for Xcode 8.3, iOS 10.3, and Swift 3.1 by Tom Elliott. Original tutorial by Colin Eberhardt.

Almost any app you can think of needs to be able to fetch some sort of data from somewhere (disk, the network, the user) and display it somewhere else, possibly transforming or translating it along the way. Often you may want to show the same data in multiple ways.

The process of keeping all your UI elements in sync (often referred to as ‘wiring up’ your UI) is harder than it looks. Left unchecked it can rapidly lead to unmaintainable, difficult to modify spaghetti monstrosities. We’ve all been there :]

In this tutorial, you will use Bond to clarify and simplify the process of attaching what your users do to what they see on the screen.

Consider the seemingly trivial example of a slider with a text field.

Bond tutorial

In this example, you will update the text field to always show the same value as the slider. Updates made to the text field will also update the slider. For extra measure, you will connect buttons to set the slider to its maximum and minimum values.

With UIKit, you might commonly write code in an imperative manner – that is, by telling the program how it should do something, rather than declaring what it should do. In this example, you would tell the program “Hey! When somebody changes the slider, make the text field show the same value. And if they change the text field, make the slider show the same value. And while you’re at it, when somebody clicks the ‘Set to Minimum’ button set the slider down to zero. Oh, and don’t forget to set the text field to ‘0’ as well!”.

Instead, Bond allows us to write declarative code, focussing on the what without worrying about the how. “Hey! I want the slider and the text field to show the same value. And when somebody clicks the ‘Set to Minimum’ button, set the slider to zero”. In the language of Bond, you bind the value of the text field to the value of the slider.

Bond is a binding framework which sits on top of the ReactiveKit framework. ReactiveKit provides the base classes needed for functional reactive programming (FRP) in Swift. If you aren’t familiar with ReactiveKit, you may want to stop and review the project documentation on github.

Bond provides AppKit and UIKit bindings, reactive delegates and datasources to ReactiveKit. Bond makes it easy to bridge the FRP world with Apple’s APIs. Time to get binding with Bond … Swift Bond.

A Quick Bond Binding

To get started, download the starter project, which contains a ‘skeleton’ application. This will allow you to concentrate on Bond instead of fiddling with Interface Builder.

This project uses CocoaPods, so open the project using the BindingWithBond.xcworkspace file. (If you are not familiar with CocoaPods, check out this tutorial to help you get started.)

Now build and run. You will be greeted with the following:

Bond tutorial

All good? Then it’s time to create your first binding!

Open PhotoSearchViewController.swift and add the following to viewDidLoad():

_ = searchTextField.reactive.text.observeNext {
  text in
  if let text = text {
    print(text)
  }
}

The Bond framework adds various properties to UIKit controls, under the reactive proxy. In this case, reactive.text is a signal based on the text property of UITextField. Signals represent sequences of events that can be observed.

observeNext does just that, and executes its closure when the event occurs. Don’t worry, you’ll learn more about this shortly. For now, build and run, and then type “hello” to see what happens.

You will observe the following in the Xcode console:

h
he
hel
hell
hello

Each time you press a key, the closure in the code you just added executes; which results in the application logging the current state of the text field. This illustrates how events such as a property changing can be observed. Now you’re going to see what power that can bring.

Manipulating Data

Returning to PhotoSearchViewController.swift, update the code after super.viewDidLoad() as follows:

let uppercase = searchTextField.reactive.text
  .map { $0?.uppercased() }
 
_ = uppercase.observeNext {
  text in
  if let text = text {
    print(text)
  }
}

The map operation returns a signal by transforming the output of reactive.text into an uppercase string. The result is again printed in the observeNext closure, which is called as events arise.

Note: If you’re not familiar with map, check out Colin Eberhardt’s excellent tutorial on Functional Swift.

Build and run. Then type “hello” again:

H
HE
HEL
HELL
HELLO

You might have noticed that the result of applying map is itself a signal. Therefore you don’t need the intermediate assignment. Update your code as follows:

_ = searchTextField.reactive.text
  .map { $0?.uppercased() }
  .observeNext {
    text in
    if let text = text {
      print(text)
    }
}

This gives rise to an elegant fluent syntax. Build and run your application to see the same behavior.

You’re probably only mildly impressed at the moment, so get ready to try something absolutely awesome.

Replace your current code with the following:

_ = searchTextField.reactive.text
  .map { $0!.characters.count > 0 }
  .bind(to: activityIndicator.reactive.isAnimating)

The map transforms each text string to a boolean, based on the presence of characters in the searchTextField. The bind, unsurprisingly, binds that boolean to the isAnimating property of activityIndicator.

Build and run your application. You will notice that the activity indicator animates only when the text field has text within it! That’s a pretty impressive feat with just three lines of code — perhaps even more impressive than a classic James Bond car chase :]

As you can see, Bond provides a fluent and expressive way to describe how data flows between your application and your UI. This makes your applications simpler, easier to understand, and ultimately gets the job done more quickly.

In the next section you’ll learn more about how bindings actually work. But for now, it’s worth appreciating the power of Bond … Bond.

Bond tutorial

I’ll drink to that!

A Peek Under the Hood

Before building a more meaningful app, take a quick look at how Bond functions. I’d recommend navigating around the Bond types (via cmd+click) as you read the explanation below.

Starting with your current code, the map function returns a Signal which fires Events whenever the search text field text is changed. You can bind that signal to the activityIndicator.reactive.isAnimating property, which is of type Bond.

A Bond just holds a weak reference to the target (the activity indicator) and acts as an observer of the signal. Whenever the signal emits a value, the Bond calls its setter and updates the target with the given value.

Note: SignalProtocol is where the map operation is defined via a protocol extension. You might have heard of “protocol oriented programming,” and this is a great example.

As well as binding to signals you can also observe them. For example, consider the code you first added:

_ = searchTextField.reactive.text.observeNext {
    text in
    print(text)
  }

The call to observeNext sets up the given closure to be executed every time the text property of searchTextField changes.

Note: This is based on a classic design pattern known as the Observer Pattern.

Finally, consider the reactive.text property of searchTextField. Clearly, this is a Signal as you are able to observe it. reactive.text is referred to as an Observer – and these allow you to get values from the observed object.

You may also like to set the text. That is, you would like the text property of the text field to observe other objects. This requires a Subject – an object that is both a Signal and Observer.

Bond extends UIKit, adding corresponding Bond or Subject properties. You’ve already seen UITextField has a reactive.text observable property. You’ll explore observables later in this tutorial.

MVVM

While Bond makes it easy to bind UI properties directly to each other, this isn’t how you’ll likely want to use it in practice. Bond is a framework that supports the Model-View-ViewModel (MVVM) pattern. If you haven’t come across this pattern before, I’d recommend reading the first few sections of this tutorial on that topic.

That’s enough theory for now — you’re probably itching to write some more code. :]

Adding a View Model

It’s time to get started with a more realistic application structure. Create a new file named PhotoSearchViewModel.swift in the ViewModel group. Replace the contents with the following:

import Foundation
import Bond
import ReactiveKit
 
class PhotoSearchViewModel {
  let searchString = Observable<String?>("")
 
  init() {
    searchString.value = "Bond"
 
    _ = searchString.observeNext {
      text in
      if let text = text {
        print(text)
      }
    }
  }
}

This creates a simple view model with a single searchString property. The closure for observeNext will print the contents of searchString when signaled by a change.

Open PhotoSearchViewController.swift and add the following property near the top of the class:

private let viewModel = PhotoSearchViewModel()

Next add the following method to PhotoSearchViewController:

func bindViewModel() {
  viewModel.searchString.bind(to:searchTextField.reactive.text)
}

bindViewModel() is where you’ll add further bindings, but for now you just connect searchTextField to the underlying view model.

Now replace the contents of viewDidLoad() with the following:

super.viewDidLoad()
bindViewModel()

Build and run your application. You’ll see the text: “Bond”:

bond tutorial

Your view model currently observes changes to searchString, but you’ll find that as you type text into the text field, the view model is not being updated. What gives?

Your current binding is one-way, which means it only propagates changes from the source (your viewModel property) to the destination (the text field reactive.text property).

How do you make changes propagate the other way? Simple – in PhotoSearchViewController update the binding in bindViewModel() to appear as follows:

viewModel.searchString.bidirectionalBind(to:searchTextField.reactive.text)

That was easy! bidirectionalBind(to:context:) establishes a bond that also signals changes in the destination back to the source.

Now, to clean up your prior test, open PhotoSearchViewModel.swift and remove the following line from init():

searchString.value = "Bond"

Build and run, then type “Bond Love”:

B
Bo
Bon
Bond
Bond
Bond L
Bond Lo
Bond Lov
Bond Love

Great – you confirmed that the text field updates are being propagated back to the view model.

Creating Observable from Observables

It’s time to do something a bit more useful with an observable mapping. You’ll enforce a requirement that searches contain more than three characters by making the text red until this is true.

Returning to PhotoSearchViewModel.swift, add the following property to the view model:

let validSearchText = Observable<Bool>(false)

This boolean property will indicate whether the searchString value is valid or not.

Now, replace the code in the initializer with the following:

searchString
  .map { $0!.characters.count > 3 }
  .bind(to:validSearchText)

This maps the searchString observable to a boolean which is true when the string length is greater than three characters, then binds it to the validSearchText property.

In PhotoSearchViewController.swift, locate bindViewModel() and add the following:

viewModel.validSearchText
  .map { $0 ? .black : .red }
  .bind(to: searchTextField.reactive.textColor)

This maps the validSearchText property to a color, based on the boolean value. It then binds the resulting color to the textColor property of searchTextField.

Now build and run and type some text:

bond tutorial

When the text is too short to constitute a valid search, it is now colored red. It changes to black as soon as it’s considered valid.

Bond makes it very easy for you to connect and transform properties. As easy as…

bond tutorial

Pie! Yep, it really is this easy.

Preparing To Search

The app you’re building will query 500px to retrieve photos as the user types, giving the same kind of immediate feedback users are used to from Google.

You could trigger a search each time the searchString view model property changes, however this could result in TONS of requests. It’s much better to throttle the queries so that at most only one or two are sent per second.

With Bond, this is really easy to do!

In PhotoSearchViewModel.swift add the following method to the class for searching:

func executeSearch(_ text: String) {
  print(text)
}

For now this just logs the passed search string so that you can see the throttle in action.

Now add the following to the bottom of init():

_ = searchString
  .filter { $0!.characters.count > 3 }
  .throttle(seconds: 0.5)
  .observeNext {
    [unowned self] text in
    if let text = text {
      self.executeSearch(text)
    }
}

This filters the searchString to exclude invalid (i.e. length <= 3) values, then applies the Bond throttle operation, which does exactly what you require, throttling changes so that at most you receive one notification each 0.5 seconds. When the event fires, executeSearch(_:) is called to complete the search.

Build and run, then try typing some text.

You will see something similar to the following, where the throttle disposes of events so that at most the text is logged once per 0.5 seconds once the four character threshold is reached:

Bond
Bond Th
Bond Throttles
Bond Throttles Good!

It would take forever to add this sort of functionality without Bond. Impressive stuff!

Using the 500px API

The app you are building uses the 500px API. This was selected because it has a relatively simple interface and authentication mechanism.

Note: The starter application already has all the code you need to query 500px; you’ll find the code in the Model group.

To use the interface, you’ll have to register as a developer. Fortunately this is free, quick and easy!

Sign up via the following URL: https://500px.com/signup

Once you have signed up, navigate to your applications: https://500px.com/settings/applications. Here you will see an interface that allows you to register an application.

bond tutorial

Select Register your application and fill in the registration form (only a few fields are mandatory). Your application will be created immediately.

bond tutorial

Click on your app link and grab a copy of your consumer key. This is passed to 500px along with every request.

Open up Info.plist and edit the apiKey, adding the consumer key supplied by 500px:

bond tutorial

Return to PhotoSearchViewModel.swift and add the following lazy property to PhotoSearchViewModel:

private let searchService: PhotoSearch = {
  let apiKey = Bundle.main.object(forInfoDictionaryKey: "apiKey") as! String
  return PhotoSearch(key: apiKey)
}()

This initializes the PhotoSearch class, which provides a Swift API for querying 500px.

In PhotoSearchViewModel.swift, update the executeSearch(_:) method contents as follows:

var query = PhotoQuery()
query.text = searchString.value ?? ""
 
searchService.findPhotos(query) {
  result in
  switch result {
  case .success(let photos):
    print("500px API returned \(photos.count) photos")
  case .error:
    print("Sad face :-(")
  }
}

This constructs a PhotoQuery, which represents the query parameters, and then executes the search with the searchService. The result is returned asynchronously, with the result enumeration representing success or failure.

Build and run the application and type a string. The view model will execute the query and you’ll see the following logged:

500px API returned 20 photos

If something went wrong then you’ll see the following:

Sad face :-(

If this happens, double-check your API key, your internet connection, cross your fingers, and try again! If it still doesn’t work, then it’s likely the 500px API is down.

Rendering the Results

It would be much more interesting if you could actually see the photos that your query returns, wouldn’t it?

Open PhotoSearchViewModel.swift, and add the following property to PhotoSearchViewModel:

let searchResults = MutableObservableArray<Photo>([])

As the name suggests, MutableObservableArray is a special type of observable, one that supports arrays.

Before trying it out, take a look at the MutableObservableArray (and ObservableArray) in a bit more detail. Use cmd+click to navigate around the various Bond APIs.

ObservableArray is similar to Observable: it is also a Signal. This means you can subscribe to events from that signal when the array changes. In this case, the event emits ObservableArrayEvent instances.

ObservabelArrayEvent encodes the change that occurred to the array via the ObservableArrayChange enumeration. The events emitted by the ObservableArray are quite detailed. Rather than informing observers of the new array value, they instead describe the changes that have occurred.

There is a very good reason for this level of detail. You could use a Bond Observable to bind an array to the UI, via a table view perhaps. However, if you add a single item to this array, the Observable can only indicate that *something* has changed, and as a result the entire UI would have to be re-built. The detail provided by MutableObservableArray allows for much more efficient UI updates.

Now that you know what an observable array is, it’s time to put one to use.

In PhotoSearchViewModel.swift, locate executeSearch(_:) and update the success case as follows:

case .success(let photos):
  self.searchResults.removeAll()
  self.searchResults.insert(contentsOf: photos, at: 0)

This clears the array, adding the new results.

Open PhotoSearchViewController.swift, and add the following to the end of bindViewModel():

viewModel.searchResults.bind(to: resultsTable) { dataSource, indexPath, tableView in
  let cell = tableView.dequeueReusableCell(withIdentifier: "MyCell", for: indexPath) as! PhotoTableViewCell
  let photo = dataSource[indexPath.row]
  cell.title.text = photo.title
 
  let backgroundQueue = DispatchQueue(label: "backgroundQueue",
                                      qos: .background,
                                      attributes: .concurrent,
                                      autoreleaseFrequency: .inherit,
                                      target: nil)
  cell.photo.image = nil
  backgroundQueue.async {
    if let imageData = try? Data(contentsOf: photo.url) {
      DispatchQueue.main.async() {
        cell.photo.image = UIImage(data: imageData)
      }
    }
  }
  return cell
}

Bond has a protocol extension for SignalProtocol that is specifically intended for binding observable arrays to table views. You use it here to bind searchResults to the resultsTable. The closure takes on a similar role to the standard table view datasource.

The closure is your standard table view cell wire-up. A cell is dequeued and various properties are set. Notice that the image is downloaded via a background queue in order to keep the UI responsive.

Build and run to see your application coming to life:

bond tutorial

Notice that as you type into the text field, it automagically updates. Very cool.

A Bit of UI Flair

Time to wire up a bit more of your UI!

Within PhotoSearchViewModel.swift, add the following property:

let searchInProgress = Observable<Bool>(false)

This Observable will be used to indicate when a search is in progress. Now update the contents of executeSearch(_:) to make use of it:

var query = PhotoQuery()
query.text = searchString.value ?? ""
 
searchInProgress.value = true
 
searchService.findPhotos(query) {
  [unowned self] result in
  self.searchInProgress.value = false
  switch result {
  case .success(let photos):
    self.searchResults.removeAll()
    self.searchResults.insert(contentsOf: photos, at: 0)
  case .error:
    print("Sad face :-(")
  }
}

This sets searchInProgress.value to true before querying 500px, then returns it with false when the result is returned.

In PhotoSearchViewController.swift, add the following to the bottom of bindViewModel():

viewModel.searchInProgress
  .map { !$0 }.bind(to: activityIndicator.reactive.isHidden)
 
viewModel.searchInProgress
  .map { $0 ? CGFloat(0.5) : CGFloat(1.0) }
  .bind(to: resultsTable.reactive.alpha)

This shows the activity indicator and reduces the opacity of resultsTable when a query is in progress.

Build and run to see this in action:

bond tutorial

By now you should really be starting to feel the benefits of Bond! And the effects of that martini :]

Handling Errors

Currently if the 500px query fails, your app just logs it to the console. It really should report any failure back to the user in a helpful and constructive fashion.

The problem is, how should this be modeled? An error doesn’t feel like it should be a view model property, since it is a transient occurrence rather than a change in state.

The answer is simple enough: rather than an Observable, all you need is a PublishSubject. In PhotoSearchViewModel.swift, add the following property:

let errorMessages = PublishSubject<String, NoError>()

Next, update the Error case of executeSearch(_:) as follows:

  case .error:
    self.errorMessages.next("There was an API request issue of some sort. Go ahead, hit me with that 1-star review!")

Within PhotoSearchViewController.swift, add the following to the bottom of bindViewModel:

_ = viewModel.errorMessages.observeNext {
   [unowned self] error in
 
  let alertController = UIAlertController(title: "Something went wrong :-(", message: error, preferredStyle: .alert)
  self.present(alertController, animated: true, completion: nil)
  let actionOk = UIAlertAction(title: "OK", style: .default,
    handler: { action in alertController.dismiss(animated: true, completion: nil) })
 
  alertController.addAction(actionOk)
}

This subscribes to the events emitted by the errorMessages property, displaying the supplied error message via a UIAlertController.

Build and run your application, then disconnect from the internet or remove your consumer key to see the error message in action:

bond tutorial

Perfect. :]

Adding Search Settings

The current application queries the 500px API based on a simple search term. If you look at the documentation for the API endpoint, you’ll see that it supports a number of other parameters.

If you tap the Settings button on your app, you’ll see it already has a simple UI for refining the search. You’ll wire that up now.

Add a new file named PhotoSearchMetadataViewModel.swift to the ViewModel group, with the following contents:

import Foundation
import Bond
 
class PhotoSearchMetadataViewModel {
  let creativeCommons = Observable<Bool>(false)
  let dateFilter = Observable<Bool>(false)
  let minUploadDate = Observable<Date>(Date())
  let maxUploadDate = Observable<Date>(Date())
}

This class is going to back the settings screen. Here you have an Observable property associated with each setting on that screen.

In PhotoSearchViewModel.swift, add the following property:

let searchMetadataViewModel = PhotoSearchMetadataViewModel()

Update executeSearch(_:), adding the following lines just after the current one that sets the query.text property:

query.creativeCommonsLicence = searchMetadataViewModel.creativeCommons.value
query.dateFilter = searchMetadataViewModel.dateFilter.value
query.minDate = searchMetadataViewModel.minUploadDate.value
query.maxDate = searchMetadataViewModel.maxUploadDate.value

This simply copies the view model state to the PhotoQuery object.

This view model will be bound to the settings view controller. It’s time to perform that wire-up, so open SettingsViewController.swift and add the following property after the outlets:

var viewModel: PhotoSearchMetadataViewModel?

So just how does this property get set? When the Settings button is tapped, the storyboard performs a segue. You can intercept this process in order to pass data to the view controller.

In PhotoSearchViewController.swift add the following method:

override func prepare(for segue: UIStoryboardSegue, sender: Any?) {
  if segue.identifier == "ShowSettings" {
    let navVC = segue.destination as! UINavigationController
    let settingsVC = navVC.topViewController as! SettingsViewController
    settingsVC.viewModel = viewModel.searchMetadataViewModel
  }
}

This ensures that when the ShowSettings segue is executed, the view model is correctly set on the destination view controller.

In SettingsViewController.swift, add the following method:

func bindViewModel() {
  guard let viewModel = viewModel else {
    return
  }
  viewModel.creativeCommons.bidirectionalBind(to: creativeCommonsSwitch.reactive.isOn)
}

This code binds viewModel to the creativeCommonsSwitch.

Now add the following to the end of viewDidLoad():

bindViewModel()

Build and run the application, open settings and toggle the Creative Commons switch. You will notice its state persists, i.e. if you turn it on, it stays on, and the photos that are returned are different (you will need to click in the search bar again to force a new request).

bond tutorial

Binding the Dates

The settings view has a few other controls that need to be wired up, and that’s your next task.

Within SettingsViewController.swift, add the following to bindViewModel():

viewModel.dateFilter.bidirectionalBind(to: filterDatesSwitch.reactive.isOn)
 
let opacity = viewModel.dateFilter.map { $0 ? CGFloat(1.0) : CGFloat(0.5) }
opacity.bind(to: minPickerCell.leftLabel.reactive.alpha)
opacity.bind(to: maxPickerCell.leftLabel.reactive.alpha)
opacity.bind(to: minPickerCell.rightLabel.reactive.alpha)
opacity.bind(to: maxPickerCell.rightLabel.reactive.alpha)

This binds the date filter switch to the view model, and also reduces the opacity of the date picker cells when they are not in use.

The date picker cells contain a date picker and a few labels, with the implementation provided by the aptly-named DatePickerCell CocoaPod. However, this poses a little problem: Bond does not supply bindings for the properties exposed by this cell type!

If you take a peek at the API for DatePickerCell, you’ll see that it has a date property which sets both the label and the picker that it contains. You could bind bidirectionally to the picker, but this would mean the label setter logic is bypassed.

Fortunately a manual two-way binding, where you observe both the model and the date picker, is quite straightforward.

Add the following method to SettingsViewController.swift:

fileprivate func bind(_ modelDate: Observable<Date>, picker: DatePickerCell) {
  _ = modelDate.observeNext {
    event in
    picker.date = event
  }
 
  _ = picker.datePicker.reactive.date.observeNext {
    event in
    modelDate.value = event
  }
}

This helper method accepts a Date and a DatePickerCell and creates bindings between the two. The modelDate is bound to the picker.date and vice versa.

Now add these two lines to bindViewModel():

bind(viewModel.minUploadDate, picker: minPickerCell)
bind(viewModel.maxUploadDate, picker: maxPickerCell)

These bind the upload dates to the picker cells using your new helper method.

Build, run and rejoice! The dates are now correctly bound:

bond tutorial

Note: The 500px API does not support date filtering; this is being applied to the photos returned by the code in the Model group; as a result, you can easily filter out all of the photos returned by 500px. For a better result, try integrating with Flickr, which does support server-side date filtering.

Date Constraints

Currently, the user can create date filters that don’t make sense, i.e. where the minimum date is after the maximum.

Enforcing these constraints is really rather easy. Within PhotoSearchMetadataViewModel.swift, add the following initializer:

init() {
  _ = maxUploadDate.observeNext {
    [unowned self]
    maxDate in
    if maxDate.timeIntervalSince(self.minUploadDate.value) < 0 {
      self.minUploadDate.value = maxDate
    }
  }
  _ = minUploadDate.observeNext {
    [unowned self]
    minDate in
    if minDate.timeIntervalSince(self.maxUploadDate.value) > 0 {
      self.maxUploadDate.value = minDate
    }
  }
}

The above simply observes each date, and if the situation where min > max arises, the values are changed accordingly.

Build and run to see the code in action. You should try setting the max date to something less than the min date. It’ll change the min date accordingly.

You might have noticed a small inconsistency: when you change the search settings, the app doesn’t repeat the query. This could be a bit confusing for your user. Ideally the application should execute the search if any of the settings change.

Each setting is an observable property, so you could observe each of one of them; however, that would require a lot of repetitive code. Fortunately, there’s a better way!

Within PhotoSearchViewModel.swift, add the following to the end of init():

_ = combineLatest(searchMetadataViewModel.dateFilter, searchMetadataViewModel.maxUploadDate,
                  searchMetadataViewModel.minUploadDate, searchMetadataViewModel.creativeCommons)
  .throttle(seconds: 0.5)
  .observeNext {
    [unowned self] _ in
    self.executeSearch(self.searchString.value!)
}

The combineLatest function combines any number of observables, allowing you to treat them as one. The above code combines, throttles, then executes the query.

Build and run to see it in action. Try changing the dates, or either of the toggles. The search results will update after each time you change something!

How easy was that?! :]

bond tutorial

A piece of cake, right?

Where To Go From Here?

You can find the finished project here.

Hopefully you’ve enjoyed this Bond tutorial and seen how easily you can wire-up your UI with Bond. Now it’s time to go forth and Bond … Swift Bond.

If you have any questions or comments, feel free to join the discussion below!

The post Bond Tutorial: Bindings in Swift appeared first on Ray Wenderlich.


FileManager Class Tutorial for macOS: Getting Started with the File System

$
0
0
File Manager Case Tutorial for macOS: Getting Started with the File System

macOS File System

The file system in macOS underlies every app — and the FileManager class has a lot to do with that. Your app is stored in the Applications folder, users store documents in their Documents folder, and preferences and support files are stored in the users Library folder.

With files and data spread all over the filesystem, how can your app find out about files and folders, work with file and folder paths, and even read and write data to a file?

The FileManager class — that’s how!

In this tutorial, you’ll learn how to manage directory paths, work with URLs, use common file and folder dialogs, display file and folder information, and much more!

Getting Started

For this tutorial, you’ll start with a playground and move on to an app later once you’ve learned the basics.

macOS uses a hierarchical file system: files & folders inside folders, inside folders. This means that finding a particular file can be complicated. Each file has its own address; the structure that defines this address is named URL.

Open Xcode and click Get started with a playground in the Welcome to Xcode window, or choose File/New/Playground… Set the name of the playground to Files, make sure the Platform is set to macOS and click Next.

Select your Desktop and click Create to save the playground.

New Playground

Note: For this tutorial, the name of the playground must be Files and it must be located on your Desktop. If you gave it a different name or saved it somewhere else, please rename it and move it before proceeding, or else the code below just won’t work!

Once the starting playground is open, delete all the lines except for import Cocoa.

Add the following line to your playground, but don’t worry about changing the username for now:

let completePath = "/Users/sarah/Desktop/Files.playground"

completePath now contains the address, or path, of this playground file. Since macOS is Unix-based, this is how Unix (and all its variants) describe file paths. The first slash indicates the root directory, which in this case is your startup disk. After that, every slash delimits a new folder or file. So Files.playground is in the Desktop folder in the sarah folder in the Users folder on the startup drive.

While this string describes the full path to this file, it isn’t the best way to handle addresses. Instead, you are going to convert the address into a URL by adding:

let completeUrl = URL(fileURLWithPath: completePath)

In the results panel of the playground, you now see: file:///Users/sarah/Desktop/Files.playground

Create a URL

“Wait a minute!” you cry. “I thought a URL was a web address like https://www.raywenderlich.com, not a directory path!”

Well, yes…and yes!

URL stands for Uniform Resource Locator — which also can point to local files and folders. Instead of https://, local file URLs start with file://. In the results panel, it looks like there are 3 slashes, but that is because the path itself starts with a slash.

FileManager Class

You’ve used a String to specify a file path and converted it to a URL. But while this is a valid URL, it won’t work — unless your user name also happens to be sarah. Therefore, the next step is to create a URL that works on anyone’s computer.

To do this, you’ll use the FileManager class, which provides methods to handle most file-related actions in macOS.

The first task is to identify your Home folder and replace sarah with your own user name.

Add the following line to your playground:

let home = FileManager.default.homeDirectoryForCurrentUser

default returns the FileManager class singleton instance, and homeDirectoryForCurrentUser contains the URL for the home folder of the current user.

Now that you have a URL pointing to your home folder, you can derive the path to the playground by adding the following code:

let playgroundPath = "Desktop/Files.playground"
let playgroundUrl = home.appendingPathComponent(playgroundPath)

The results panel should show you the URL for your own home folder.

Add these lines to the playground to query various URL properties:

playgroundUrl.path
playgroundUrl.absoluteString
playgroundUrl.absoluteURL
playgroundUrl.baseURL
playgroundUrl.pathComponents
playgroundUrl.lastPathComponent
playgroundUrl.pathExtension
playgroundUrl.isFileURL
playgroundUrl.hasDirectoryPath

The pathComponents property is interesting, as it separates out all folder and file names into an array. The lastPathComponent and pathExtension properties are both quite useful in practice.

Here’s what you should have in your playground:

URL Components

Note: Note that the playground file has the property hasDirectoryPath set to true. This marks the URL as representing a directory. But why is the playground file marked as a directory?

That’s because .playground files are folder bundles, just like .app files. Right-click on the playground file and select Show Package Contents to see what’s inside.

The URL class makes it easy to edit URLs.

Add the following code to your playground:

var urlForEditing = home
urlForEditing.path
 
urlForEditing.appendPathComponent("Desktop")
urlForEditing.path
 
urlForEditing.appendPathComponent("Test file")
urlForEditing.path
 
urlForEditing.appendPathExtension("txt")
urlForEditing.path
 
urlForEditing.deletePathExtension()
urlForEditing.path
 
urlForEditing.deleteLastPathComponent()
urlForEditing.path

Note how you show the path property each time so it’s easy to see what’s changed.

While those commands edited the URL in place, you can also create a new URL from an existing one.

To see how to do this, insert the following commands into your playground:

let fileUrl = home
    .appendingPathComponent("Desktop")
    .appendingPathComponent("Test file")
    .appendingPathExtension("txt")
fileUrl.path
 
let desktopUrl = fileUrl.deletingLastPathComponent()
desktopUrl.path

These methods return new URLs, so chaining them into a sequence works well.

The three appending methods could have been shortened to just one, but I’ve broken them out here to make the individual steps clear to you.

Here’s what the playground should look like:

Append Path to a URL

Checking for Files and Folders

NSString has a lot of file path manipulation methods, but Swift’s String struct doesn’t. Instead, you should use URLs when working with file paths. Working with paths in this manner will become even more important as Apple transitions to the new Apple File System (APFS).

However, there is one case where you still have to use a string representation of a file URL: checking to see if a file or folder exists. The best way to get a string version of a URL is through the path property.

Add the following code to your playground:

let fileManager = FileManager.default
fileManager.fileExists(atPath: playgroundUrl.path)
 
let missingFile = URL(fileURLWithPath: "this_file_does_not_exist.missing")
fileManager.fileExists(atPath: missingFile.path)

Checking whether a folder exists is slightly more obscure, as you have to check if the URL points to a valid resource that is also a folder.

This requires what I consider a very un-Swifty mechanism of using an inout Objective-C version of a Bool. Add the following:

var isDirectory: ObjCBool = false
fileManager.fileExists(atPath: playgroundUrl.path, isDirectory: &isDirectory)
isDirectory.boolValue

Your playground should look something like this:

FileManager Class Check For File Exists

A fully-annotated version of the playground can be downloaded here.

Now that you understand how to use URL to identify files and folders, close the playground. It’s time to build an app!

File Spy

In this part of the tutorial, you’re going to build the File Spy app, which lets you select a folder and view a listing of every file or folder inside. Selecting any item will give you more details about it.

FileManager Class File Information

Download the starter app project, open it in Xcode and click the Play button in the toolbar, or press Command-R to build and run. The UI is already set up, but you’ll need to add the file management bits.

Your first task is to let the user select a folder and then list its contents. You’ll add some code behind the Select Folder button and use the NSOpenPanel class to select a folder.

In ViewController.swift, find selectFolderClicked in the Actions section and insert the following:

// 1
guard let window = view.window else { return }
 
// 2
let panel = NSOpenPanel()
panel.canChooseFiles = false
panel.canChooseDirectories = true
panel.allowsMultipleSelection = false
 
// 3
panel.beginSheetModal(for: window) { (result) in
  if result == NSFileHandlingPanelOKButton {
    // 4
    self.selectedFolder = panel.urls[0]
    print(self.selectedFolder)
  }
}

Here’s what’s going on in the code above:

  1. Check that you can get a reference to the window, since that’s where the NSOpenPanel will be displayed.
  2. Create a new NSOpenPanel and set some properties to only permit a single selection which must be a folder.
  3. Display the NSOpenPanel modally in the window and use a closure to wait for the result.
  4. If the result shows that the user clicked the OK button (the displayed button will have a different label depending on your locale), get the selected URL and set a specific ViewController property. For a quick temporary test, you print the selected URL to the console. Ignore the warning on this line for now.

Build and run, click the Select Folder button and choose a folder. Confirm that the URL for the selected folder prints in the console.

Click the button again to open the dialog,but this time click Cancel. This will not print a selected URL.

Selecting a Folder

Quit the app and delete the temporary print statement.

Folder Contents

Now that you can select a folder, your next job is to find the contents of that folder and display it.

The previous section of code populated a property named selectedFolder. Scroll to the top of the ViewController definition and check out the selectedFolder property. It’s using a didSet property observer to run code whenever its value is set.

The key line here is the one that calls contentsOf(folder:). Scroll down to the stub of this method, which is currently returning an empty array. Replace the entire function with the following:

func contentsOf(folder: URL) -> [URL] {
  // 1
  let fileManager = FileManager.default
 
  // 2
  do {
    // 3
    let contents = try fileManager.contentsOfDirectory(atPath: folder.path)
 
    // 4
    let urls = contents.map { return folder.appendingPathComponent($0) }
    return urls
  } catch {
    // 5
    return []
  }
}

Stepping through what the code does:

  1. Get the FileManager class singleton, just as before.
  2. Since the FileManager method can throw errors, you use a do...catch block.
  3. Try to find the contents of the folder contentsOfDirectory(atPath:) and return an array of file and folder names inside.
  4. Process the returned array using map to convert each name into a complete URL with its parent folder. Then return the array.
  5. Return an empty array if contentsOfDirectory(atPath:) throws an error.

The selectedFolder property sets the filesList property to the contents of the selected folder, but since you use a table view to show the contents, you need to define how to display each item.

Scroll down to the NSTableViewDataSource extension. Note that numberOfRows already returns the number of URLs in the filesList array. Now scroll to NSTableViewDelegate and note that tableView(_:viewFor:row:) returns nil. You need to change that before anything will appear in the table.

Replace the method with:

func tableView(_ tableView: NSTableView, viewFor
  tableColumn: NSTableColumn?, row: Int) -> NSView? {
  // 1
  let item = filesList[row]
 
  // 2
  let fileIcon = NSWorkspace.shared().icon(forFile: item.path)
 
  // 3
  if let cell = tableView.make(withIdentifier: "FileCell", owner: nil)
  	as? NSTableCellView {
    // 4
    cell.textField?.stringValue = item.lastPathComponent
    cell.imageView?.image = fileIcon
    return cell
  }
 
  // 5
  return nil
}

Here’s what you do in this code:

  1. Get the URL matching the row number.
  2. Get the icon for this URL. NSWorkspace is another useful singleton; this method returns the Finder icon for any URL.
  3. Get a reference to the cell for this table. The FileCell identifier was set in the Storyboard.
  4. If the cell exists, set its text field to show the file name and its image view to show the file icon.
  5. If no cell exists, return nil.

Now build and run, select a folder and you should see a list of files and folders appear — hurray!

Show Folder Contents

But clicking on a file or folder gives no useful information yet, so on to the next step.

Getting File Information

Open up the Finder and press Command-I to open a window with information about the file: creation date, modification date, size, permissions and so on. All that information, and more, is available to you through the FileManager class.

File Information

Back in the app, still in ViewController.swift, look for tableViewSelectionDidChange. This sets the property of the ViewController: selectedItem.

Scroll back to the top and look at where selectedItem is defined. As with selectedFolder, a didSet observer is watching for changes to this property. When the property changes, and if the new value is not nil, the observer calls infoAbout(url:). This is where you will retrieve the information for display.

Find infoAbout, which currently returns a boring static string, and replace it with the following:

func infoAbout(url: URL) -> String {
  // 1
  let fileManager = FileManager.default
 
  // 2
  do {
    // 3
    let attributes = try fileManager.attributesOfItem(atPath: url.path)
    var report: [String] = ["\(url.path)", ""]
 
    // 4
    for (key, value) in attributes {
      // ignore NSFileExtendedAttributes as it is a messy dictionary
      if key.rawValue == "NSFileExtendedAttributes" { continue }
      report.append("\(key.rawValue):\t \(value)")
    }
    // 5
    return report.joined(separator: "\n")
  } catch {
    // 6
    return "No information available for \(url.path)"
  }
}

There are a few different things happening here, so take them one at a time:

  1. As usual, get a reference to the FileManager shared instance.
  2. Use do...catch to trap any errors.
  3. Use the FileManager Class’ attributesOfItem(atPath:) method to try to get the file information. If this succeeds, it returns a dictionary of type [FileAttributeKey: Any] FileAttributeKeys, which are members of a struct with a String rawValue.
  4. Assemble the key names & values into an array of tab-delimited strings. Ignore the NSFileExtendedAttributes key as it contains a messy dictionary that isn’t really useful.
  5. Join these array entries into a single string & return it.
  6. If the try throws an error, return a default report.

Build and run again, select a folder as before, then click on any file or folder in the list:

Folder Information

You now get a lot of useful details about the file or folder. But there’s still more you can do!

More Features

The app is getting better, but it’s still missing a few things:

  • Clicking on Show Invisible Files doesn’t change anything.
  • Double-clicking on a folder should drill into its contents.
  • The Move Up button needs to move back up the folder hierarchy.
  • Save Info should record the selected file’s details to a file.

You’ll tackle these next.

Handling Invisible Files

In Unix systems, files and folders whose name starts with a period are invisible. You’ll add code to handle this case.

Go to contentsOf(folder:) and replace the line containing map with the following:

let urls = contents
  .filter { return showInvisibles ? true : $0.characters.first != "." }
  .map { return folder.appendingPathComponent($0) }

The above adds a filter that rejects hidden items if the showInvisibles property is not true. Otherwise the filter returns every item, including hidden items.

Find the toggleShowInvisibles method of ViewController and insert this into the function:

// 1
showInvisibles = (sender.state == NSOnState)
 
// 2
if let selectedFolder = selectedFolder {
  filesList = contentsOf(folder: selectedFolder)
  selectedItem = nil
  tableView.reloadData()
}

Here is what this code does:

  1. Sets the showInvisibles property based on the sender’s state. Since the sender is an NSButton, it has either NSOnState or NSOffState. Because this is a checkbox button, NSOnState means checked.
  2. If there is a currently selectedFolder, regenerate the filesList and update the UI.

Build and run, select a folder and check and un-check the Show Invisible Files button. Depending on the folder you’re viewing, you may see files starting with a period when Show Invisible Files is checked.

Show Invisible Files

Handling Double-Clicking on a Folder

In the storyboard, the table view has been assigned a doubleAction that calls tableViewDoubleClicked. Find tableViewDoubleClicked and replace it with the following:

@IBAction func tableViewDoubleClicked(_ sender: Any) {
  // 1
  if tableView.selectedRow < 0 { return }
 
  // 2
  let selectedItem = filesList[tableView.selectedRow]
  // 3
  if selectedItem.hasDirectoryPath {
    selectedFolder = selectedItem
  }
}

Taking the above code comment-by-comment:

  1. Check to see whether the double-click occurred on a populated row. Clicking in a blank part of the table sets the tableView's selectedRow to -1.
  2. Get the matching URL from filesList.
  3. If the URL is a folder, set the ViewController's selectedFolder property. Just like when you select a folder using the Select Folder button, setting this property triggers the property observer to read the contents of the folder and update the UI. If the URL is not a folder, nothing happens.

Build and run, select a folder containing other folders, and then double-click a folder in the list to drill down into it.

Handle the Move Up Button

Once you have implemented double-click to drill down, the next obvious step is to move back up the tree.

Find the empty moveUpClicked method and replace it with the following:

@IBAction func moveUpClicked(_ sender: Any) {
  if selectedFolder?.path == "/" { return }
  selectedFolder = selectedFolder?.deletingLastPathComponent()
}

This first checks to see whether the selectedFolder is the root folder. If so, you can’t go any higher. If not, use a URL method to strip the last segment off the URL. Editing selectedFolder will trigger the update as before.

Build and run again; confirm that you can select a folder, double-click to move down into a sub-folder and click Move Up to go back up the folder hierarchy. You can move up even before double-clicking a folder, as long as you are not already at the root level.

Move Up The Folder Tree

Note: As you’ve seen, using property observers (didSet) can be incredibly useful. All the code for updating the display is in an observer, so no matter what method or UI element changes an observed property, the update happens with no need to do anything else. Sweet!

Saving Information

There are two main ways to save data: user-initiated saves and automatic saves. For user-initiated saves, your app should prompt the user for a location to save the data, then write the data to that location. For automatic saves, the app has to figure out where to save the data.

In this section, you are going to handle the case when the user clicks the Save Info button to initiate a save.

You used NSOpenPanel to prompt the user to select a folder. This time, you are going to use NSSavePanel. Both NSOpenPanel and NSSavePanel are subclasses of NSPanel, so they have a lot in common.

Replace the empty saveInfoClicked method with the following:

@IBAction func saveInfoClicked(_ sender: Any) {
  // 1
  guard let window = view.window else { return }
  guard let selectedItem = selectedItem else { return }
 
  // 2
  let panel = NSSavePanel()
  // 3
  panel.directoryURL = FileManager.default.homeDirectoryForCurrentUser
  // 4
  panel.nameFieldStringValue = selectedItem
    .deletingPathExtension()
    .appendingPathExtension("fs.txt")
    .lastPathComponent
 
  // 5
  panel.beginSheetModal(for: window) { (result) in
    if result == NSFileHandlingPanelOKButton,
      let url = panel.url {
      // 6
      do {
        let infoAsText = self.infoAbout(url: selectedItem)
        try infoAsText.write(to: url, atomically: true, encoding: .utf8)
      } catch {
        self.showErrorDialogIn(window: window,
                               title: "Unable to save file",
                               message: error.localizedDescription)
      }
    }
  }
}

Taking each numbered comment in turn:

  1. Confirm that everything you need is available: a window for displaying the panel and the URL whose info you are going to save.
  2. Create an NSSavePanel.
  3. Set the directoryURL property which dictates the initial folder shown in the panel.
  4. Set the nameFieldStringValue property to supply a default name of the file.
  5. Show the panel and wait in a closure for the user to finish.
  6. If the user selects a valid path for the data file (a valid URL) and clicks the OK button, get the file information and write it to the selected file. If there is an error, show a dialog. Note that if the user clicks Cancel on the save dialog, you simply ignore the operation.

write(to:atomically:encoding) is a String method that writes the string to the provided URL. The atomically option means that the string will be written to a temporary file and then renamed, ensuring that you won’t end up with a corrupt file — even if the system crashes during the write. The encoding for the text in this file is set to UTF8, which is a commonly used standard.

Build and run, select a file or folder from the table and click Save Info. Select a save location, and click Save. You will end up with a text file that looks similar to the following:

File Info

Note: One neat feature of using NSSavePanel is that if you try to overwrite a file that already exists, your app will automatically display a confirmation dialog asking if you want to replace that file.

That closes off the list of features for this app, but there is one more feature I think would be a nice addition: recording the selected folder and item so that when the app restarts, the last selected folder is re-displayed.

Saving App State

Normally, I would store app-state data in UserDefaults, which is saved automatically for you in the Preferences folder. But that doesn’t allow you to do anything fancy with the file system. Instead, you will save this data to a dedicated app folder inside the Application Support folder.

Scroll down to the end of ViewController.swift and you’ll see an extension dedicated to saving and restoring the user’s selections.

I’ve provided the functions that do the actual writing and reading. Writing uses the same write(to:atomically:encoding) method used when saving the info file. Reading uses a String initializer to create a String from a URL.

The really interesting thing here is how to decide where to save the data. You’ll do that in urlForDataStorage, which is returning nil at the moment.

Replace urlForDataStorage with the following:

private func urlForDataStorage() -> URL? {
  // 1
  let fileManager = FileManager.default
 
  // 2
  guard let folder = fileManager.urls(for: .applicationSupportDirectory,
                                      in: .userDomainMask).first else {
                                        return nil
  }
 
  // 3
  let appFolder = folder.appendingPathComponent("FileSpy")
  var isDirectory: ObjCBool = false
  let folderExists = fileManager.fileExists(atPath: appFolder.path,
  			                    isDirectory: &isDirectory)
  if !folderExists || !isDirectory.boolValue {
    do {
      // 4
      try fileManager.createDirectory(at: appFolder,
                                      withIntermediateDirectories: true,
                                      attributes: nil)
    } catch {
      return nil
    }
  }
 
  // 5
  let dataFileUrl = appFolder.appendingPathComponent("StoredState.txt")
  return dataFileUrl
}

What is all this code doing?

  1. It’s your old friend FileManager class to the rescue again. :]
  2. The FileManager class has a method for returning a list of appropriate URLs for specific uses. In this case, you are looking for the applicationSupportDirectory in the current user’s directory. It is unlikely to return more than one URL, but you only want to take the first one. You can use this method with different parameters to locate many different folders.
  3. As you did in the playground, append a path component to create an app-specific folder URL and check to see if it exists.
  4. If the folder does not exist, try to create it and any intermediate folders along the path, returning nil if this fails.
  5. Append another path component to create the full URL for the data file and return that.
Note: .applicationSupportDirectory is a short way to say FileManager.SearchPathDirectory.applicationSupportDirectory. .userDomainMask refers to FileManager.SearchPathDomainMask.userDomainMask. While the shorthand is much easier to type and read, it is useful to know where these come from, so you can find them in the documentation if you ever need to look them up.

Build and run, select a folder, then click on a folder or file. Use the Quit menu item or Command-Q to close the app. Don’t quit via Xcode, or the lifecycle methods won’t trigger a save. Run the app again and notice it opens up to the file or folder you were viewing when you quit.

Saved App State

Note: If you want to see the stored-state data file, hold down Option while clicking on Finder’s Go menu and select Library. In the new Finder window, open Application Support and look for the FileSpy folder. You should see the StoredState.txt file with your selected folder and item.

Where to Go From Here?

You can download the final sample project here.

In this FileManager class tutorial:

  1. You learned how URLs can represent local files and folders and can show many properties available to you about a file or folder.
  2. You learned how you can add and remove path components to a URL.
  3. You explored the FileManager class which gives you access properties like homeDirectoryForCurrentUser, the applicationSupportDirectory and even attributesOfItem with detailed information about a file or folder.
  4. You learned how to save information to a file.
  5. You learned how to check if a file or folder exists.

For more information, check out Apple’s FileManager API Reference Documentation which shows many more of the available methods in the FileManager class.

You are now ready to begin incorporating the use of files and folders in your own apps.

If you have any questions or comments please join the forum discussion below!

The post FileManager Class Tutorial for macOS: Getting Started with the File System appeared first on Ray Wenderlich.

Parsing JSON with Gloss

Server Side Swift with Perfect: Basic Controllers

Unreal Engine 4 Blueprints Tutorial

$
0
0

unreal-blueprints

Blueprints is the visual scripting system inside Unreal Engine 4 and is a fast way to start prototyping your game. Instead of having to write code line by line, you do everything visually: drag and drop nodes, set their properties in a UI, and drag wires to connect.

In addition to being a fast prototyping tool, Blueprints also makes it very easy for non-programmers to dive in and start scripting.

In this tutorial, you will use Blueprints to:

  • Set up a top-down camera
  • Create a player-controlled actor with basic movement
  • Set up player inputs
  • Create an item that disappears when the player touches it
Note: This tutorial assumes you know how to navigate the Unreal Engine 4 interface. You should be comfortable with basic Blueprint concepts such as components and nodes. If you need a refresher, check out our beginner tutorial for Unreal Engine 4.

This tutorial also makes basic use of vectors. If you are not familiar with vectors, I recommend this article on vectors at gamedev.net

Getting Started

Download the starter project and unzip it. To open the project, go to the project folder and open BananaCollector.uproject.

Note: If you get a message saying that the project was created with an earlier version of the Unreal editor, that’s OK (the engine is updated frequently). You can either choose the option to open a copy, or the option to convert in place.

You will see the scene below. This is where the player will move around and collect the items.

I have categorized the project files into folders for easier navigation, like you see here:

You can use the button highlighted in red above to show or hide the sources panel if you’d like.

Creating the Player

In the Content Browser, navigate to the Blueprints folder. Click the Add New button and select Blueprint Class.

Since you want the actor to be able to receive inputs from the player, the Pawn class is fitting. Select Pawn from the pop-up window and name it BP_Player.

Note: The Character class would also work. It even includes a movement component by default. However, you will be implementing your own system of movement so the Pawn class is sufficient.

Attaching a Camera

A camera is the player’s method of looking into the world. You will create a camera that looks down towards the player.

In the Content Browser, double-click on BP_Player to open it in the Blueprint editor.

To create a camera, go to the Components panel. Click Add Component and select Camera.

For the camera to be in a top-down view, you need to place it above the player. With the camera component selected, go to the Viewport tab.

Activate the move manipulator by pressing the W key and then move it to (-1100, 0, 2000). Alternatively, you can type the coordinates into the Location fields. It is located under the Transform section in the Details panel.

If you have lost sight of the camera, press the F key to focus on it.

Next, activate the rotation manipulator by pressing the E key. Rotate the camera down to -60 degrees on the Y-axis.

Representing the Player

A red cube will represent the player so you will need to use a Static Mesh component to display it.

First, deselect the Camera component by left-clicking an empty space in the Components panel. If you don’t do this, the next added component will be a child of Camera.

Click Add Component and select Static Mesh.

To display the red cube, select the Static Mesh component and then go to the Details tab. Click on the drop-down located to the right of Static Mesh and select SM_Cube.

This is what you should see (you can hit F inside the Viewport to focus on this if you don’t see it):

Now, it’s time to spawn the player Pawn. Click Compile and go back to the main editor.

Spawning the Player

Before the player can control the Pawn, you need to specify two things:

  1. The Pawn class the player will control
  2. Where the Pawn will spawn

You accomplish the first by creating a new Game Mode class.

Creating a Game Mode

A Game Mode is a class that controls how a player enters the game. For example, in a multiplayer game, you would use Game Mode to determine where each player spawns. More importantly, the Game Mode determines which Pawn the player will use.

Go to the Content Browser and make sure you are in the Blueprints folder. Click the Add New button and select Blueprint Class.

From the pop-up window, select Game Mode Base and name it GM_Tutorial.

Now, you need to specify which Pawn class will be the default. Double-click on GM_Tutorial to open it.

Go to the Details panel and look under the Classes section. Click the drop-down for Default Pawn Class and select BP_Player.

Before you can use your new Game Mode, the level needs to know which Game Mode to use. You can specify this in World Settings. Click Compile and close the Blueprint editor.

Each level has their own settings. You can access the settings by selecting Window\World Settings. Alternatively, you can go to the Toolbar and select Settings\World Settings.

A new World Settings tab will open next to the Details tab. From here, click the drop-down for GameMode Override and select GM_Tutorial.

You will now see that the classes have changed to the ones selected in GM_Tutorial.

Finally, you need to specify where the player will spawn. You do this by placing a Player Start actor into the level.

Placing the Player Start

During the process of spawning a player, the Game Mode looks for a Player Start actor. If the Game Mode finds one, it will attempt to spawn the player there.

To place a Player Start, go to the Modes panel and search for Player Start. Left-click and drag Player Start from the Modes panel into the Viewport. Releasing left-click will place it.

You can place this wherever you like. When you’re done, go to the Toolbar and click Play. You will spawn where you placed the Player Start.

To exit the game, click the Stop button in the Toolbar or press the Esc key. If you can’t see your cursor, press Shift+F1.

It’s not much of a game if you can’t move around, right? Your next task is to set up the input settings.

Setting Up Inputs

Assigning a key to an action is called key binding.

In Unreal, you can set up key bindings that will trigger an event when you press them. Events are nodes that execute when certain actions happen (in this case, when you press the bound key). When the event is triggered, any nodes hooked up to the event will execute.

This method of binding keys is useful because it means you do not have to hard code keys.

For example, you bind left-click and name it Shoot. Any actor that can shoot can use the Shoot event to know when the player has pressed left-click. If you want to change the key, you change it in the input settings.

If you had hard coded it, you would have to go through each actor and change the keys individually.

Axis and Action Mappings

To view the input settings, go to Edit\Project Settings. On the left, select Input under the Engine section.

The Bindings section is where you will set up your inputs.

Unreal provides two methods to create key bindings:

  • Action Mapping: These can only be in two states: pressed or not pressed. Action events will only trigger once you press or release the key. Used for actions that don’t have an in-between state, such as firing a gun.
  • Axis Mapping: These output a numerical value called an axis value (more on that later). Axis events will fire every frame. Generally used for actions that require a thumbstick or mouse.

For this tutorial, you will use axis mappings.

Creating Movement Mappings

First, you will create two axis mapping groups. Groups allow you to bind multiple keys to one event.

To create a new axis mapping group, click the + sign to the right of Axis Mappings. Create two groups and name them MoveForward and MoveRight.

MoveForward will handle moving forward and backwards. MoveRight will handle moving left and right.

You will map movement to four keys: W, A, S and D. Currently, there are only two slots to map keys. Add another axis mapping to each group by clicking the + sign next to the group name field.

To map a key, click the drop-down to bring up a list of keys. Map the W and S keys to MoveForward. Map the A and D keys to MoveRight.

Next, you will set the Scale fields.

Axis Value and Input Scale

Before you set the Scale fields, you need to learn about how they work with axis values.

An axis value is a numerical value that is determined by the type of input and how you use it. Buttons and keys output 1 when pressed. Thumbsticks output a value between -1 and 1 depending on the direction and how far you push it.

You can use the axis value to control a Pawn’s speed. For example, if you push the thumbstick to the edge, the axis value will be 1. If you push it halfway, it will be 0.5.

By multiplying the axis value with a speed variable, you can adjust the speed with the thumbstick.

You can also use the axis value to specify a direction along an axis. If you multiply a Pawn’s speed by a positive axis value, you will get a positive offset. Using a negative axis value will result in a negative offset. Adding this offset to the Pawn’s location will determine which direction it moves in.

Since keyboard keys can only output an axis value of 1 or 0, you can use scale to convert it to a negative. It works by taking the axis value and multiplying it by the scale.

If you multiply a positive (the axis value) with a negative (the scale), you will get a negative.

Set the scale of the S and A keys by clicking on the Scale field and entering -1.

Next, comes the fun part: making the Pawn move! Close the Project Settings and then open up BP_Player in the Blueprints editor by double clicking on it.

Moving the Player

First, you need to get the events for your movement mappings. Right-click an empty space in the Event Graph to get a list of nodes. From the menu, search for MoveForward. Add the MoveForward node listed under Axis Events. Note you’re looking for the red node under Axis Events, not the green node under Axis Values.

Repeat the process for MoveRight.

Now, you will set up the nodes for MoveForward.

Using Variables

To move, you need to specify how fast the Pawn is moving. An easy way to specify the speed is by storing it in a variable.

To create one, go to the My Blueprint tab and click the + sign to the right of the Variables section.

With your new variable selected, head over to the Details tab. Rename the variable to MaxSpeed. Afterwards, change the variable type to float. Do this by clicking the drop-down next to Variable Type and selecting Float.

Next, you need to set the default value. Before you can set it though, you need to click Compile in the Toolbar.

With your variable still selected, go back to the Details tab. Go to the Default Value section and change the default value of MaxSpeed to 10.

Next, drag-click the MaxSpeed variable from the My Blueprint tab into the Event Graph. Select Get from the menu.

You will now multiply MaxSpeed and the axis value to determine the final speed and direction. Add a float * float node and connect Axis Value and MaxSpeed to it.

Getting the Player Direction

To move forward, you need to know where the Pawn is facing. Luckily, Unreal has a node for that purpose. Add a Get Actor Forward Vector node.

Next, add a Add Movement Input node. This node will take in a direction and value and convert it to a stored offset. Connect the nodes like so:

The white line represents a chain of execution. In other words, when the player moves the input axis, an event will generate that will execute the InputAxis MoveForward node. The white line represents that once this happens, you will then execute the Add Movement Input node.

The Add Movement Input node takes the following inputs:

  • Target: set to self, which in this case is the player (the red box).
  • World Direction: The direction to move the target, which in this case is the direction the player is facing.
  • Scale Value: How much to move the player, which in this case is the max speed * the axis value (which remember is a value in the range of -1 to 1).

Repeat the process for MoveRight but replace Get Actor Forward Vector with Get Actor Right Vector. See how much you can do yourself without reviewing the instructions above!

Adding the Offset

To actually move the Pawn, you need to get the offset calculated by Add Movement Input and add it to the Pawn’s location.

Basically your strategy will be to move the player a small amount each frame of your game, so you’ll need to add the movement to an Event Tick event, which is generated every frame.

Navigate to the Event Tick node in your Event Graph. It should be grayed out to the left, but create one if you don’t have it.

To get the offset, create a Consume Movement Input Vector node. To add the offset, create an AddActorLocalOffset node. Afterwards, link them like so:

Basically, this means that each frame of the game, you’ll get any stored movement input, and add it to the actor’s current location.

Click Compile, and go back to the main editor and click Play. You will now be able to move around!

There is one small problem though. Higher end machines are be able to render frames at a quicker rate. Since Event Tick is called every frame, the movement nodes will execute more often. This results in the Pawn moving at a faster rate on high end machines and vice versa.

To fix this, your movement needs to be frame rate independent.

Note: I’ve set up some key bindings that will show you the effect of frame rate dependence. Press 0 to cap the frame rate to 60 and press 1 to reset the cap. Move around in both frame rates to see the difference in speed.

Frame Rate Independence

Frame rate independence means everything will have the same result, regardless of frame rate. Thankfully, achieving frame rate independence in Unreal is easy.

Exit the game and then open up BP_Player. Next, navigate to your Event Tick node and take a look at Delta Seconds.

Delta Seconds is the amount of time elapsed since the last Event Tick. By multiplying your offset with Delta Seconds, your movement will be frame rate independent.

For example, your Pawn has a maximum speed of 100. If one second had passed since the last Event Tick, your Pawn would move the full 100 units. If half a second had passed, it would move 50 units.

If the movement is frame rate dependent, the Pawn will move 100 units every frame, regardless of the time between frames.

To multiply your offset with Delta Seconds, add a vector * float node. Afterwards, connect your nodes like so:

Because the time between frames (Delta Seconds) is very small, your Pawn will move a lot slower. Fix this by changing the default value of MaxSpeed to 600.

Congratulations, you have successfully achieved frame rate independence!

You might have noticed that the cube passes right through everything. To fix that, you need to learn about collisions.

Strap on your safety helmet because you’re about to have a head-on collision with some theory!

Actor Collisions

When you think of a collision, you probably think of cars crashing into each other. Luckily, collisions in Unreal are much safer.

To be able to collide, an actor needs a representation of its collidable space (usually called collision). You can use one of the following:

  • Collision mesh: These are auto generated (if you enable it) when a mesh gets imported. The user can also create a custom collision mesh using 3D software. The red box already has an auto generated collision mesh.
  • Collision component: These come in three shapes: box, capsule and sphere. You can add them through the Components panel. Generally used for simple collision.

Below is an example of a character and its collision.

A collision occurs when an actor’s collision touches another actor’s collision.

Now, it’s time to enable collision.

Enabling Collision

You’re probably wondering why the box didn’t collide, even though it has a collision mesh. When you move an actor, Unreal only considers the root component for collisions. Since your Pawn’s root component doesn’t have any collision, it passes through everything.

Note: An actor that doesn’t have their collision as the root can still block other actors. But, if you move the actor, it will not collide with anything.

So, to use the collision mesh, StaticMesh needs to be the root. To do this, go to the Components panel. Next, left-click and drag StaticMesh to DefaultSceneRoot. Release left-click to make StaticMesh the new root.

There is one more thing to do before collisions will work. Switch to the Event Graph and go to the AddActorLocalOffset node. Locate the Sweep input and set it to true by left-clicking the checkbox.

Basically, AddActorLocalOffset teleports the actor to a new location. Sweep makes sure the actor collides with anything that is between the old and new locations.

Go back to the main editor and click Play. The cube will now collide with the level!

The last thing you will do is create an item that disappears when the player touches it.

Creating an Item

Generally, an item is anything that the player can collect. You will use BP_Banana as the item.

To detect when the cube touches the item, you need an event node that triggers when there is a collision. You can use collision responses to generate such events.

A collision response also determines how an actor reacts when colliding with another actor. There are three types of collision responses: Ignore, Overlap and Block. Here is how they interact with each other:

Although you can use either Overlap or Block, this tutorial will only show you how to use Overlap.

Setting the Collision Response

Exit the game and then open BP_Banana. Select the StaticMesh component and then go to the Details panel. The Collision section is where you’ll set the collision response.

As you can see, most of the settings are greyed out. To make them editable, left-click the drop-down next to Collision Presets. Select Custom from the list.

Now, you need to specify the collision response between the item and the cube.

Components have an attribute called object type. The object type is just a convenient way to group together similar actors. You can read more about object types here.

Since the cube’s type is WorldDynamic, you want to change the collision response to that type. Under the Collision Responses section, change the collision response of WorldDynamic to Overlap. Do this by left-clicking the middle checkbox to the right of WorldDynamic.

Handling Collision

To handle collision, you need to use an overlap event. Go to the Components panel and right-click on StaticMesh. From the context menu, select Add Event\Add OnComponentBeginOverlap.

This will add the OnComponentBeginOverlap (StaticMesh) node to your Event Graph.

Finally, create a DestroyActor node and link it to the OnComponentBeginOverlap (StaticMesh) node. As its name suggests, it will remove the targeted actor from the game. However, since there is no target, it will destroy the actor that called it.

Placing the Item

Close the Blueprint editor and then make sure you are in the Blueprints folder.

Start placing bananas into the level by left-clicking and dragging BP_Banana into the Viewport.

Click Play and start collecting the bananas!

Where to Go From Here?

You can download the completed project here.

You are now one step closer to becoming an Unreal Engine expert. I hope this tutorial didn’t drive you bananas. Let me know what topic you’d like me to cover next by leaving a comment below!

The post Unreal Engine 4 Blueprints Tutorial appeared first on Ray Wenderlich.

Beginning C# with Unity: Class Constructors

Viewing all 4373 articles
Browse latest View live


<script src="https://jsc.adskeeper.com/r/s/rssing.com.1596347.js" async> </script>