Quantcast
Channel: Kodeco | High quality programming tutorials: iOS, Android, Swift, Kotlin, Unity, and more
Viewing all 4374 articles
Browse latest View live

Charles Proxy Tutorial for iOS

$
0
0

Charles Proxy Tutorial for iOS

Let’s face it – we’ve all written code that just doesn’t work correctly, and debugging can be hard. It’s even more difficult when you’re talking to other systems over a network.

Fortunately, Charles Proxy can make network debugging much easier.

Charles Proxy sits between your app and the Internet. All networking requests and responses will be passed through Charles Proxy, so you’ll be able to inspect and even change data midstream to test how your app responds.

You’ll get hands-on experience with this (and more!) in this Charles Proxy tutorial.

Getting Started

You first need to download the latest version of Charles Proxy (v4.1.1 at the time of this writing). Double-click the dmg file and drag the Charles icon to your Applications folder to install it.

Charles Proxy isn’t free, but everyone is given a free 30-day trial. Charles will only run for 30 minutes in trial mode, so you may need to restart it throughout this Charles Proxy tutorial.

Note: Charles is a Java-based app and supports macOS, Windows and Linux. This Charles Proxy tutorial is for macOS specifically, and some things may be different on other platforms.

Launch Charles, and it will ask for permission to automatically configure your network settings.

Charles Proxy Tutorial

Click Grant Privileges and enter your password if prompted. Charles starts recording network events as soon as it launches. You should already see events popping into the left pane.

Note: If you don’t see events, you may have not granted permissions or may have another proxy already setup. See Charles’ FAQ page for troubleshooting help.

The user interface is fairly simple to understand without too much experience. Many goodies are hidden behind buttons and menus, however, and the toolbar has a few items you should know about:

Charles Proxy Tutorial

  • The first “broom” button clears the current session of all recorded activity.
  • The second “record/pause” button will be red when Charles is recording events, and gray when stopped.
  • The middle buttons from the “turtle” to the “check mark” provide access to commonly-used actions, including throttling, breakpoints and request creation. Hover your mouse over each to see a short description.
  • The last two buttons provide access to commonly-used tools and settings.

For now, stop recording by clicking the red record/pause button.

The left pane can be toggled between Structure and Sequence views. When Structure is selected, all activity is grouped by site address. You can see the individual requests by clicking the arrow next to a site.

Charles Proxy Tutorial

Select Sequence to see all events in a continuous list sorted by time. You’ll likely spend most of your time in this screen when debugging your own apps.

Charles merges the request and response into a single screen by default. However, I recommend you split them into separate events to provide greater clarity.

Click Charles\Preferences and select the Viewers tab; uncheck Combine request and response; and press OK. You may need to restart Charles for the change to take effect.

Try poking around the user interface and looking at events. You’ll notice one peculiar thing: you can’t see most details for HTTPS events!

SSL/TLS encrypts sensitive request and response information. You might think this makes Charles pointless for all HTTPS events, right? Nope! Charles has a sneaky way of getting around encryption that you’ll learn soon.

More About Proxies

You may be wondering, “How does Charles do its magic?”

Charles is a proxy server, which means it sits between your app and computer’s network connections. When Charles automatically configured your network settings, it changed your network configuration to route all traffic through it. This allows Charles to inspect all network events to and from your computer.

Proxy servers are in a position of great power, but this also implies the potential for abuse. This is why SSL is so important: data encryption prevents proxy servers and other middleware from eavesdropping on sensitive information.

Charles Proxy Tutorial

In our case, however, we want Charles to snoop on our SSL messages to let us debug them.

SSL/TLS encrypts messages using certificates generated by trusted third parties called “certificate issuers.”

Charles can also generate its own self-signed certificate, which you can install on your Mac and iOS devices for SSL/TLS encryption. Since this certificate isn’t issued by a trusted certificate issuer, you’ll need to tell your devices to explicitly trust it. Once installed and trusted, Charles will be able to decrypt SSL events!

When hackers use middleware to snoop on network communications, it’s called a “man-in-the-middle” attack. In general, you DON’T want to trust just any random certificate, or you can compromise your network security!

There are some cases where Charles’ sneaky man-in-the-middle strategy won’t work. For example, some apps use “SSL pinning” for extra security. SSL pinning means the app has a copy of the SSL certificate’s public key, and it uses this to verify network connections before communicating. Since Charles’ key wouldn’t match, the app would reject the communication.

In addition to logging events, you can also use Charles to modify data on the fly, record it for later review and even simulate bad network connections. Charles is really powerful!

Charles Proxy Tutorial

Charles Proxy & Your iOS Device

It’s simple to set up Charles to proxy traffic from any computer or device on your network, including your iOS device.

First, turn off macOS proxying in Charles by clicking Proxy (drop-down menu)\macOS Proxy to uncheck it. This way, you’ll only see traffic from your iOS device.

Next, click Proxy\Proxy Settings, click the Proxies and make note of the port number, which by default should be 8888.

Then, click Help\Local IP Address and make note of your computer’s IP address.

Now grab your iOS device. Open Settings, tap on Wi-Fi and verify you’re connected to the same network as your computer. Then tap on the button next to your WiFi network. Scroll down to the HTTP Proxy section and tap Manual.

Enter your Mac’s IP address for Server and the Charles HTTP Proxy port number for Port. Tap the back button, or press the Home button, and changes will be saved automatically.

If you previously stopped recording in Charles, tap the record/pause button button now to start recording again.

You should get a pop-up warning from Charles on your Mac asking to allow your iOS device to connect. Click Allow. If you don’t see this immediately, that’s okay. It may take a minute or two for it to show up.

You should now start to see activity from your device in Charles!

Next, still on your iOS device, open Safari and navigate to http://www.charlesproxy.com/getssl.

A window should pop up asking you to install a Profile/Certificate. You should see a self-signed Charles certificate in the details. Tap Install, then tap Install again after the warning appears, and then tap Install one more time. Finally, tap Done.

Charles Proxy Tutorial

Apple really wants to make sure you want to install this! :] Again, don’t install just any random certificate or else you may comprise your network security! At the end of this Charles Proxy tutorial, you’ll also remove this certificate.

Snooping on Someone Else’s App

If you are like most developers, you’re curious about how things work. Charles enables this curiosity by giving you tools to inspect any app’s communication — even if it’s not your app.

Go to the App Store on your device and find and download Weather Underground. This free app is available in most countries. If it’s not available, or you want to try something else, feel free to use a different app.

You’ll notice a flurry of activity in Charles while you’re downloading Weather Underground. The App Store is pretty chatty!

Once the app is installed, launch the app and click the broom icon in Charles to clear recent activity.

Enter the zip code 90210 and select Beverley Hills as your location in the app. If you were to use your current location, the URL that the app fetches could change if your location changes which might make some later steps in this Charles Proxy tutorial harder to follow.

There are tons of sites listed in the Structure tab! This is a list of all activity from your iOS device, not just the Weather Underground app.

Charles Proxy Tutorial

Switch to the Sequence tab and enter “wund” in the filter box to show only weather traffic.

You should now see just a few requests to api.wunderground.com. Click one of them.

The Overview section shows some request details but not much. Likewise, you won’t see many details in either the Request or Response yet either. The Overview gives the reason why: “SSL Proxying not enabled for this host: enable in Proxy Settings, SSL locations.” You need to enable this.

Click on Proxy\SSL Proxying Settings. Click Add; enter api.wunderground.com for the Host; leave the Port empty; and press OK to dismiss the window.

Back in the Wunderground app, pull down to refresh and refetch data. If the app doesn’t refresh, you might need to kill it from the multitasking view and try again.

Huzzah! Unencrypted requests! Look for one of the requests with a URL containing forecast10day. This contains the payload that’s used to populate the weather screen.

Charles Proxy Tutorial

Let’s have some fun and change the data before the app gets it. Can you get the app to break or act funny?

Right-click the request within the Sequence list, and click the Breakpoints item in the pop-up list. Now each time a request is made with this URL, Charles will pause and let you edit both the request and response.

Again, pull down to refresh the app.

A new tab titled Breakpoints should pop up with the outgoing request. Simply click Execute without modifying anything. A moment later, the Breakpoints tab should again re-appear with the response.

Click on the Edit Response tab near the top. At the bottom, select JSON text. Scroll down and find temperature and change its value to something insane like 9800.

Note: If you take too long editing the request or response, the app may silently time out and never display anything. If the edited temperature doesn’t appear, try again a little quicker.

Charles Proxy Tutorial

9800°F is crazy hot out! Seems like Wunderground can’t show temperatures over 1000°. I guess the app will never show forecasts for the surface of the sun. That’s a definite one-star rating. ;]

Delete the breakpoint you set by going to Proxy\Breakpoint Settings.

Uncheck the entry for api.wunderground.com to temporarily disable it, or highlight the row and click Remove to delete it. Pull down to refresh, and the temperature should return to normal.

Next, click the Turtle icon to start throttling and simulate a slow network. Click Proxy\Throttle Settings to see available options. The default is 56 kbps, which is pretty darn slow. You can also tweak settings here to simulate data loss, reliability issues and high latency.

Try refreshing the app, zooming the map and/or searching for another location. Painfully slow, right?

It’s a good idea to test your own app under poor network conditions. Imagine your users on a subway or entering an elevator. You don’t want your app to lose data, or worse, crash in these circumstances.

Apple’s Network Link Conditioner provides similar throttling capabilities, yet Charles allows for much finer control over network settings. For example, you can apply throttling to only specific URLs to simulate just your servers responding slowly instead of the entire connection.

Remember to turn off throttling when you’re done with it. There’s nothing worse than spending an hour debugging, only to find you never turned off throttling!

Troubleshooting Your Own Apps

Charles Proxy is especially great for debugging and testing your own apps. For example, you can check server responses to ensure you have JSON keys defined correctly and expected data types are returned for all fields. You can even use throttling to simulate poor networks and verify your app’s timeout and error-handling logic.

You’ll try this out using an iMessage app called “Charles in Charge” that I created for this tutorial.

If you’re a child of the ’80s, you may know the popular Charles in Charge comedy starring Scott Baio. The “Charles in Charge” iMessage app uses Microsoft Bing’s Image Search API to provide images of characters that you can send within your iMessages.

You’ll first need to get a free Bing Image Search API key to configure the demo app. Start by creating a Microsoft Cognitive Services account from here. Check your e-mail, and click the verification link to complete your account setup. This is required to generate API keys.

After signing up, click the link for either Get Started for Free or Subscribe to new free trials on your account page (either one may show depending on how you get to the page); select the checkbox for Bing Search – Free; click I agree next to the terms and conditions; and finally, click Subscribe.

After you complete the signup, you’ll get two access keys. Click copy next to either one to copy it to your keyboard. You’ll need this soon.

Charles Proxy Tutorial

Next, download Charles in Charge from here and then open CharlesInCharge.xcodeproj in Xcode.

Open the MessagesExtension group, and you’ll see a few Swift files.

CharlesInChargeService manages the calls to Bing to search for images and then uses ImageDownloadService to download each image for use in the app.

In the findAndDownloadImages(completion:) method within the CharlesInChargeService class, you’ll see the subscriptionKey parameter for BingImageSearchService initializer is an empty string.

Paste your access key from the Microsoft Cognitive Services portal here.

Build and run the app within any iPhone Simulator and try it out.

Note: If it’s not already selected, choose the MessagesExtension scheme to build.

In Charles, click Proxy and select macOS Proxy to turn it back on (if it doesn’t show a checkmark already).

Then, click Proxy\SSL Proxying Settings and add api.cognitive.microsoft.com to the list.

You next need to install the Charles Proxy SSL certificate to allow proxying SSL requests in the Simulator. Before you do, quit the Simulator app. Then in Charles, click Help\SSL Proxying\Install Charles Root Certificate in iOS Simulators.

Back in Xcode, build and run the project in the Simulator. When iMessage launches, find Charles in Charge and select it. Then, wait for the images to load… but they never do! What’s going on here!?

In the console, you’ll see:

Bing search result count: 0

It appears the app isn’t getting search results, or there’s a problem mapping the data.

First verify whether or not you got data back from the API.

In Charles, enter “cognitive” in the filter box to make it easier to find the Bing Image Search request. Click on the request in the list, select the Response tab, and choose JSON text at the bottom. Look for the JSON entry value, and you’ll see there are indeed search results returned.

So, something strange must be happening within the BingImageSearchService.

Open this class in Xcode and look for where the search results are mapped from JSON to a SearchResult struct:

guard let title = hit["name"] as? String,
  let fullSizeUrlString = hit["contenturl"] as? String,
  let fullSizeUrl = URL(string: fullSizeUrlString),
  let thumbnailUrlString = hit["thumbnailurl"] as? String,
  let thumbnailUrl = URL(string: thumbnailUrlString),
  let thumbnailSizes = hit["thumbnail"] as? [String: Any],
  let thumbnailWidth = thumbnailSizes["width"] as? Float,
  let thumbnailHeight = thumbnailSizes["height"] as? Float else {
    return nil
}

Ah ha! The SearchResult will be nil if any of of the keys aren’t found. Compare each of these keys against the response data in Charles. Look closely: case matters.

If you have eagle eyes, you’ll see that both contentUrl and thumbnailUrl don’t have the capital U in the mapping code. Fix these keys and then build and run the app again.
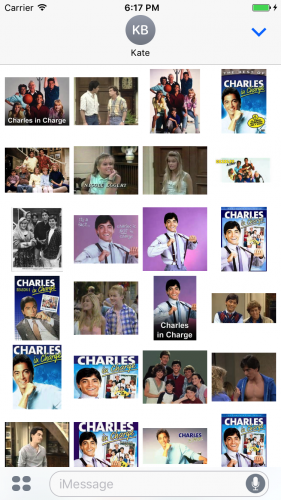
Charles Proxy Tutorial

Success! Charles is now in charge!

Remove Charles’ Certificate

In the past, Charles created a shared certificate across everyone’s devices that used it. Fortunately, Charles now creates unique certificates. This significantly reduces the chance of a man-in-the-middle attack based on this certificate, but it’s still technically possible. Therefore, you should always remember to remove the Charles’ certificates when you’re done with it.

First remove the certificate(s) from macOS. Open the Keychain Access application located in the folder Applications\Utilities. In the search box type in Charles Proxy and delete all the certificates that the search finds. There is most likely only one to delete. Close the application when you’re done.

Next remove the certificates from your iOS device. Open the Settings app and navigate to General\Profiles & Device Management. Under Configuration Profiles you should see one or more entries for Charles Proxy. Tap on one and then tap Delete Profile. Repeat this for each Charles Proxy certificate.

Profiles & Device Management isn’t available in the iOS Simulator. To remove the Charles Proxy certificates, reset the simulator by clicking the Simulator menu and then Reset Content and Settings.

Where to Go From Here?

We hope you enjoyed this Charles Proxy tutorial! Charles Proxy has a ton more features that aren’t covered in this tutorial, and there are many more details for those that we did cover. Check out Charles’ website for more documentation. The more you use Charles, the more features you’ll discover. You can download the final Charles in Charge app with the corrected JSON keys here.

You can also read more about SSL/TLS on Wikipedia at https://en.wikipedia.org/wiki/Transport_Layer_Security. Apple most likely will eventually require all apps to use secure network connections, so you should adopt this soon if you haven’t already.

Also, check out Paw for macOS. It’s a great companion to Charles for helping compose new API requests and for testing parameters.

Do you know of any other useful apps for debugging networking? Or do you have any debugging battle stories? Join the discussion below to share them!

The post Charles Proxy Tutorial for iOS appeared first on Ray Wenderlich.


Video Tutorial: Practical Instruments Part 5: Memory

Video Tutorial: Practical Instruments Part 6: Core Animation

ResearchStack Tutorial: Getting Started

$
0
0

ResearchStack LogoIn April of 2016, Open mHealth announced the release of ResearchStack, an open-source SDK for building research study apps on Android.

This opens up exciting possibilities for researchers looking to roll out large-scale studies to Android users.

One of ResearchStack’s primary goals is to make it easy to port existing iOS apps using Apple’s ResearchKit. Since its release, ResearchKit apps have reached thousands of users to help study conditions ranging from melanoma to autism.

In this ResearchStack tutorial, you will duplicate the functionality in the excellent ResearchKit tutorial written by Matt Luedke. Along the way you will learn:

  • How to set up a new ResearchStack project from scratch.
  • How to translate key ResearchKit concepts to ResearchStack.
  • How to create consent, survey and active tasks.

If you are beginning Android Development, you’ll want to work through the Beginning Android Development Tutorial Series to get familiar with the basic concepts and development tools.

Getting Started

In this tutorial, you are going to take the very important research collected by Matt’s ResearchKit app and open it up to the world of Android users.

This research study attempts to answer the following question: “Does one’s name, quest, or favorite color affect vocal chord variations?”. Don’t worry, as with the iOS version, participants are not asked the airspeed velocity of an unladen swallow. :]

To begin, download the starter project and open with Android Studio. Take a minute to look through the project files.

Starter Project

To verify that everything compiles, build and run the app. You will see three buttons labeled Consent, Survey and Microphone.

Starter First Run

ResearchStack Modules

There are two primary modules for building ResearchStack apps:

  1. Backbone: The core ResearchStack API. This includes Tasks, Steps, Results, Consent, File/Database Storage and Encryption.
  2. Skin: Built on top of Backbone, this provides a way to build ResearchStack apps with minimal Android knowledge. This is mostly compatible with ResearchKit’s AppCore template engine and works with minor changes to AppCore resources.

This tutorial focuses on teaching the core Backbone components. The sample asthma app provides a good way to get more familiar with using Skin.

Application Setup

First, you need to include ResearchStack in the project.

Open the app build.gradle file and add the following to the dependencies section:

compile 'org.researchstack:backbone:1.1.1'

Open the project build.gradle file and add the following to the repositories section under jcenter():

maven { url "https://jitpack.io" }

Sync the gradle changes, then build the app. If your build succeeds, you’re ready to start using ResearchStack!

Custom Application class

Next, you need to initialize the Backbone StorageAccess component. Even though you will not be using the storage engine in this tutorial, Backbone will not run without this initialization.

Open CamelotApplication.java and add the following code at the bottom of OnCreate():

PinCodeConfig pinCodeConfig = new PinCodeConfig();

EncryptionProvider encryptionProvider = new UnencryptedProvider();

FileAccess fileAccess = new SimpleFileAccess();

AppDatabase database = new DatabaseHelper(this,
    DatabaseHelper.DEFAULT_NAME,
    null,
    DatabaseHelper.DEFAULT_VERSION);

StorageAccess.getInstance().init(pinCodeConfig, encryptionProvider, fileAccess, database);

Here you construct PinCodeConfig, UnencryptedProvider, SimpleFileAccess and DatabaseHelper objects and pass them into the StorageAccess singleton object. For more advanced apps, you may provide custom versions of any of these objects.

Note: Throughout this tutorial, you may see errors with resolving names after typing in or pasting blocks of code. If this happens, you can resolve the imports manually or turn on the option in Android Studio preferences to Insert imports on paste and Optimize imports on the fly under Editor\General\Auto Import.

You are now ready to create the first part of the research study!

Informed Consent

The first step in any research study is to get consent from the test subject. ResearchStack’s consent features are designed to let you easily present the study’s goals and requirements and get signed consent from the subject.

The consent section of your ResearchKit app breaks down into four main steps:

  1. Create a consent document.
  2. Create consent steps for the consent document.
  3. Create a consent task from the consent steps.
  4. Display the consent task.

Start by creating a ConsentDocument object. The consent document holds all the information necessary to inform the user and get their consent. This is analogous to ORKConsentDocument in ResearchKit.

Open MainActivity.java and add the following method:

private ConsentDocument createConsentDocument() {

  ConsentDocument document = new ConsentDocument();

  document.setTitle("Demo Consent");
  document.setSignaturePageTitle(R.string.rsb_consent);

  return document;
}

This creates a new ConsentDocument and assigns a main title and a signature page title. Note that R.string.rsb_consent comes from the ResearchStack backbone (rsb) library. You will find such references in other code snippets as well.

Consent Document Contents

You can now add ConsentSections to the consent document. Each ConsentSection will show as a new screen with a built-in graphic illustration. ResearchStack has a comprehensive list of section types defined by the ConsentSection.Type enum. This is comparable to the ORKConsentSectionType enum from ResearchKit.

You have several ContentSections to create, so start by adding the following helper method to MainActivity.java:

private ConsentSection createSection(ConsentSection.Type type, String summary, String content) {

  ConsentSection section = new ConsentSection(type);
  section.setSummary(summary);
  section.setHtmlContent(content);

  return section;
}

This method creates and returns a new ConsentSection based on the passed in type, summary and content parameters.

Add the following before return document; in createConsentDocument():

List<ConsentSection> sections = new ArrayList<>();

sections.add(createSection(ConsentSection.Type.Overview, "Overview Info", "<h1>Read " +
    "This!</h1><p>Some " +
    "really <strong>important</strong> information you should know about this step"));
sections.add(createSection(ConsentSection.Type.DataGathering, "Data Gathering Info", ""));
sections.add(createSection(ConsentSection.Type.Privacy, "Privacy Info", ""));
sections.add(createSection(ConsentSection.Type.DataUse, "Data Use Info", ""));
sections.add(createSection(ConsentSection.Type.TimeCommitment, "Time Commitment Info", ""));
sections.add(createSection(ConsentSection.Type.StudySurvey, "Study Survey Info", ""));
sections.add(createSection(ConsentSection.Type.StudyTasks, "Study Task Info", ""));
sections.add(createSection(ConsentSection.Type.Withdrawing, "Withdrawing Info", "Some detailed steps " +
    "to withdrawal from this study. <ul><li>Step 1</li><li>Step 2</li></ul>"));

document.setSections(sections);

Here you start by creating a new ArrayList named sections to hold the consent sections. Next, you call createSection() for each section and add it to the sections list. Finally, you add the sections to document.

In your own research app, you will likely choose a subset of section types. You will also provide detailed information for each section.

Collecting a Consent Signature

Next, you need to define the ConsentSignature object. This is comparable to ORKConsentSignature object in ResearchKit.

Add the following before return document; in createConsentDocument():

ConsentSignature signature = new ConsentSignature();
signature.setRequiresName(true);
signature.setRequiresSignatureImage(true);

document.addSignature(signature);

You create a new ConsentSignature object requiring a name and signature. You then add the signature to the document.

Adding the Review Content

The last piece needed in the document is the summary content. ResearchKit has a built-in ConsentReviewStep to help with this. In ResearchStack you define this view yourself.

Add the following before return document; in createConsentDocument():

document.setHtmlReviewContent("<div style=\"padding: 10px;\" class=\"header\">" +
        "<h1 style='text-align: center'>Review Consent!</h1></div>");

You add the review content to the document using full HTML syntax.

The Consent Task

Now that you have the consent document created, you will use it to construct a Task. ResearchStack uses the class OrderedTask to keep track of an ordered list of steps to show the user. This class coincides with ORKOrderedTask in ResearchKit.

You will add a VisualConsent object for each document section. This is different from ResearchKit, where a single ORKVisualConsentStep uses the ORKConsentDocument to automatically create the individual screens.

Add the following method to MainActivity.java.

private List<Step> createConsentSteps(ConsentDocument document) {

  List<Step> steps = new ArrayList<>();

  for (ConsentSection section: document.getSections()) {
    ConsentVisualStep visualStep = new ConsentVisualStep(section.getType().toString());
    visualStep.setSection(section);
    visualStep.setNextButtonString(getString(R.string.rsb_next));
    steps.add(visualStep);
  }

  return steps;
}

You create an array of steps and loop through all sections in ConsentDocument to create a ConsentVisualStep for each one. For each visualStep, you set the title, section and a next button label. Finally, you add visualStep to the list of steps.

Note: You can pass in any unique identifier when creating steps. In this case, using the string representation of the ConsentSection type is an easy way to supply the identifier.

Next is the Consent Review step. In ResearchKit, RKConsentReviewStep includes the review step with the signature form. In ResearchStack, the signature form is a separate step.

Add the following before return steps; in createConsentSteps():

ConsentDocumentStep documentStep = new ConsentDocumentStep("consent_doc");
documentStep.setConsentHTML(document.getHtmlReviewContent());
documentStep.setConfirmMessage(getString(R.string.rsb_consent_review_reason));

steps.add(documentStep);

Here, you create a new ConsentDocumentStep and set the HTML content from the ConsentDocument. You also set a confirmation message that displays in a dialog and add the step to the steps list.

Next, add a step to capture the user’s full name. ResearchKit includes this in ORKConsentReviewStep.

Add the following code before return steps; in createConsentSteps().

ConsentSignature signature = document.getSignature(0);

if (signature.requiresName()) {
  TextAnswerFormat format = new TextAnswerFormat();
  format.setIsMultipleLines(false);

  QuestionStep fullName = new QuestionStep("consent_name_step", "Please enter your full name",
      format);
  fullName.setPlaceholder("Full name");
  fullName.setOptional(false);
  steps.add(fullName);
}

First, you retrieve the signature object from the consent document. If the signature name is required, you create a question step to ask for the user’s name and add the step to the steps list.

Answer formats define how a question step will be formatted. You can explore other answer formats here.

Note: If you want to collect multiple questions on a single screen, use FormStep with a series of QuestionSteps.

Next, add a step to collect a signature from the user. ResearchKit includes this in ORKConsentReviewStep. Again, paste this before return steps; in createConsentSteps().

if (signature.requiresSignatureImage()) {

  ConsentSignatureStep signatureStep = new ConsentSignatureStep("signature_step");
  signatureStep.setTitle(getString(R.string.rsb_consent_signature_title));
  signatureStep.setText(getString(R.string.rsb_consent_signature_instruction));
  signatureStep.setOptional(false);

  signatureStep.setStepLayoutClass(ConsentSignatureStepLayout.class);

  steps.add(signatureStep);
}

If the signature requires an image, you create a new signature step and assign the properties, set the step layout class and add the step to the steps list.

Congratulations — you’ve finished the hard part! On to the UI.

Presenting the Consent Task

You will now create and present an OrderedTask, using the steps you created in createConsentSteps().

The tutorial diverges from ResearchKit due to the different UI concepts between iOS and Android. ResearchKit uses a ORKTaskViewController, whereas ResearchStack uses a ViewTaskActivity.

Add the following constant to the top of MainActivity:

private static final int REQUEST_CONSENT = 0;

Add the following method to MainActivity:

@Override
protected void onActivityResult(int requestCode, int resultCode, Intent data) {
  super.onActivityResult(requestCode, resultCode, data);
}

onActivityResult() is used to process the results of a task, using requestCode as a unique task identifier. Normally this is where you would save the results or forward them to a web service.

Add the following to displayConsent() in MainActivity:

// 1
ConsentDocument document = createConsentDocument();

// 2
List<Step> steps = createConsentSteps(document);

// 3
Task consentTask = new OrderedTask("consent_task", steps);

// 4
Intent intent = ViewTaskActivity.newIntent(this, consentTask);
startActivityForResult(intent, REQUEST_CONSENT);

Here’s what’s going on in the code above:

  1. You call createConsentDocument() to create the ConsentDocument.
  2. You pass document into createConsentSteps() to create the consent steps.
  3. You create a new OrderedTask, passing in a unique identifier along with the consent steps.
  4. You create an intent with the task and launch the task activity.

Like any other Android activity, the ViewTaskActivity must be added to the application manifest file. ResearchStack also uses a ViewWebDocumentActivity when displaying Learn More content.

Add the following to AndroidManifest.xml within the Application section:

<activity
    android:name="org.researchstack.backbone.ui.ViewTaskActivity"
    android:windowSoftInputMode="adjustResize"
    />

<activity
    android:name="org.researchstack.backbone.ui.ViewWebDocumentActivity"
    android:label="@string/app_name"
    />

Now is the big moment — your Consent task is ready to go!

Build and run the app. Tap the CONSENT button and work your way through the consent screens and notice the custom graphics for each section:

Consent 1 Consent 2 Consent 3
Consent 4 Consent 5 Consent 6
Consent 7 Consent 8 Consent 9
Consent 10 Consent 11

Note: If you’ve been paying close attention, you may be asking “Why is ConsentDocument needed?” The answer is: it’s not! You could create the consent task and steps without a consent document. Using ConsentDocument separates the model from the presentation. A different consent workflow can be shown to the user by changing what is added to the consent document.

The Survey Module

You are now ready to move onto the heart of the study: the Survey.

Instruction Step

First, you’ll give the user some general instructions using an InstructionStep. This equals ORKInstructionStep in ResearchKit.

Add the following to displaySurvey() in MainActivity.java:

List<Step> steps = new ArrayList<>();

InstructionStep instructionStep = new InstructionStep("survey_instruction_step",
    "The Questions Three",
    "Who would cross the Bridge of Death must answer me these questions three, ere the other side they see.");
steps.add(instructionStep);

You create a list of steps for this task, then create a new instruction step and add it to the steps list.

Text Input Question

Next, you display the first question. This is covered by ORKQuestionStep in ResearchKit. You will format the question using TextAnswerFormat which equals ORKTextAnswerFormat in ResearchKit.

Add the following to the bottom of displaySurvey();

TextAnswerFormat format = new TextAnswerFormat(20);

QuestionStep nameStep = new QuestionStep("name", "What is your name?", format);
nameStep.setPlaceholder("Name");
nameStep.setOptional(false);
steps.add(nameStep);

You create a text answer format with a maximum length of 20. You create a question step with the answer format and add it to the steps list.

Text Choice Question

Next up is a question that lets the user choose from several predefined options. This also uses a QuestionStep, but with a ChoiceAnswerFormat which equals ORKTextChoiceAnswerFormat in ResearchKit.

Add the following to the bottom of displaySurvey:

AnswerFormat questionFormat = new ChoiceAnswerFormat(AnswerFormat.ChoiceAnswerStyle
    .SingleChoice,
    new Choice<>("Create a ResearchKit App", 0),
    new Choice<>("Seek the Holy Grail", 1),
    new Choice<>("Find a shrubbery", 2));

QuestionStep questionStep = new QuestionStep("quest_step", "What is your quest?", questionFormat);
questionStep.setPlaceholder("Quest");
questionStep.setOptional(false);
steps.add(questionStep);

You create a choice–answer format using a .SingleChoice style and pass in three choices. You then create a QuestionStep with the answer format and add it to the steps list.

Note: ChoiceAnswerFormat also allows multiple choice answers using the .MultipleChoice style.

Color Choice Question

The last question asks for the user’s favorite color. In ResearchKit, this is done with ORKImageChoiceAnswerFormat, but ResearchStack doesn’t have a built-in option for image choice format.

You could use ChoiceAnswerFormat and display the colors as simple text labels, but how boring would that be? Instead, you’ll create a custom answer format that displays colors.

ChoiceAnswerFormat has almost everything you need except for color radio buttons. You’ll need a custom StepBody and AnswerFormat to override the default behavior.

Create a new class file named ImageChoiceAnswerFormat.java and replace its contents with the following:

public class ImageChoiceAnswerFormat extends ChoiceAnswerFormat implements AnswerFormat.QuestionType
{
  public ImageChoiceAnswerFormat(ChoiceAnswerStyle answerStyle, Choice... choices) {
    super(answerStyle, choices);
  }

  @Override
  public QuestionType getQuestionType()
  {
    return this;
  }

  @Override
  public Class<?> getStepBodyClass() {
    return ImageChoiceQuestionBody.class;
  }
}

You inherit from ChoiceAnswerFormat and implement the QuestionType interface. You then override getQuestionType() and return the current object. Finally, you implement getStepBodyClass() and return the custom step body class.

Android Studio will complain that it cannot resolve ImageChoiceQuestionBody.class. You’ll fix that now.

ResearchStack provides a class named SingleChoiceQuestionBody that creates a radio group with buttons for the choices. You will extend this class and modify the radio group to provide custom radio buttons.

Create a new class file named ImageChoiceQuestionBody.java and replace the contents with the following:

public class ImageChoiceQuestionBody <T> extends SingleChoiceQuestionBody
{
  private Choice[] mChoices;

  public ImageChoiceQuestionBody(Step step, StepResult result) {
    super(step, result);

    QuestionStep questionStep = (QuestionStep)step;
    ImageChoiceAnswerFormat format = (ImageChoiceAnswerFormat)questionStep.getAnswerFormat();
    mChoices = format.getChoices();
  }

  @Override
  public View getBodyView(int viewType, LayoutInflater inflater, ViewGroup parent)
  {
    RadioGroup group = (RadioGroup)super.getBodyView(viewType, inflater, parent);

    for (int i=0; i<mChoices.length; i++) {

      RadioButton button = (RadioButton)group.getChildAt(i);
      button.setButtonDrawable(Integer.parseInt(mChoices[i].getValue().toString()));
    }

    return group;
  }
}

You inherit from SingleChoiceQuestionBody. The constructor calls the parent constructor and saves the answer choices. You then override getBodyView() and call the base class to create the view. You finish off by looping through the radio buttons and replacing the button drawables using the resource values from mChoices.

With that in place, you can create an ImageChoiceAnswerFormat using resource IDs as the values for your choices.

Add the following to the bottom of displaySurvey() in MainActivity.java:

AnswerFormat colorAnswerFormat = new ImageChoiceAnswerFormat(AnswerFormat.ChoiceAnswerStyle
    .SingleChoice,
    new Choice<>("Red", R.drawable.red_selector),
    new Choice<>("Orange", R.drawable.orange_selector),
    new Choice<>("Yellow", R.drawable.yellow_selector),
    new Choice<>("Green", R.drawable.green_selector),
    new Choice<>("Blue", R.drawable.blue_selector),
    new Choice<>("Purple", R.drawable.purple_selector));

QuestionStep colorStep = new QuestionStep("color_step", "What is your favorite color?",
    colorAnswerFormat);
colorStep.setOptional(false);
steps.add(colorStep);

You create an ImageChoiceAnswerFormat using a SingleChoice style and pass in the color choices, then create a question step with the answer format and add it to the steps list.

Note: The color drawables are included in the starter project. These are standard XML selectors with images for checked and unchecked states.

Summary Step

The last step indicates that the survey is complete. ResearchKit uses ORKCompletionStep for this, but you will use ResearchStack's InstructionStep.

Add the following to the bottom of displaySurvey():

InstructionStep summaryStep = new InstructionStep("survey_summary_step",
    "Right. Off you go!",
    "That was easy!");
steps.add(summaryStep);

Here, you simply create an instruction step and add it to the steps list.

Presenting the Survey

All that's left is to the display the survey. Add the following constant to the top of MainActivity:

private static final int REQUEST_SURVEY  = 1;

Add the following to the bottom of displaySurvey():

OrderedTask task = new OrderedTask("survey_task", steps);

Intent intent = ViewTaskActivity.newIntent(this, task);
startActivityForResult(intent, REQUEST_SURVEY);

In the code above, you create a new OrderedTask, pass in the steps and then launch the activity. You set REQUEST_SURVEY as the request code.

Build and run the app; tap on the Survey button and work your way through the survey.

Survey 1 Survey 2 Survey 3
Survey 4 Survey 5

Active Tasks

Besides surveys, you may want to collect active data as well. ResearchStack doesn’t have any active tasks built-in, so you will create your own with a custom step.

Your custom step will use the device's microphone to record audio samples. ResearchKit uses a built-in AudioTask.

The following diagram illustrates the main components involved in the custom audio task. You will build out the AudioStep and AudioStepLayout parts of the diagram.

AudioStep Diagram

Instruction Step

Start by displaying some basic instructions. Add the following code to displayAudioTask() in MainActivity.java:

List<Step> steps = new ArrayList<>();

InstructionStep instructionStep = new InstructionStep("audio_instruction_step",
    "A sentence prompt will be given to you to read.",
    "These are the last dying words of Joseph of Aramathea.");
steps.add(instructionStep);

Here you add the familiar instruction step to the steps list.

Custom Audio Step

To create a fully custom Step, you need to create the following classes:

  • AudioStepLayout: An Android Layout class that implements the StepLayout interface.
  • AudioStep: A class that extends the base Step class.

Create a new layout resource file named audio_step_layout.xml in the res/layout folder and add the following code:

<?xml version="1.0" encoding="utf-8"?>
<merge
    xmlns:android="http://schemas.android.com/apk/res/android"
    xmlns:tools="http://schemas.android.com/tools"
    android:layout_width="match_parent"
    android:layout_height="match_parent"
    >

  <TextView
      android:id="@+id/title"
      android:layout_width="match_parent"
      android:layout_height="wrap_content"
      android:layout_below="@+id/image"
      android:layout_marginLeft="@dimen/rsb_margin_left"
      android:layout_marginRight="@dimen/rsb_margin_right"
      android:layout_marginTop="20dp"
      android:textColor="?attr/colorAccent"
      android:textSize="20sp"
      tools:text="@string/lorem_name"
      />

  <TextView
      android:id="@+id/summary"
      style="@style/TextAppearance.AppCompat.Subhead"
      android:layout_width="wrap_content"
      android:layout_height="wrap_content"
      android:layout_below="@+id/title"
      android:layout_marginLeft="@dimen/rsb_margin_left"
      android:layout_marginRight="@dimen/rsb_margin_right"
      android:layout_marginTop="36dp"
      tools:text="@string/lorem_medium"
      />

  <LinearLayout
      android:layout_width="match_parent"
      android:layout_height="wrap_content"
      android:layout_below="@id/summary"
      android:layout_centerHorizontal="true"
      android:orientation="vertical"
      >

    <Button
        android:id="@+id/begin_recording"
        android:layout_width="wrap_content"
        android:layout_height="wrap_content"
        android:layout_gravity="center_horizontal"
        android:layout_marginTop="36dp"
        android:text="Begin"
        />

    <TextView
        android:id="@+id/countdown_title"
        style="@style/TextAppearance.AppCompat.Title"
        android:layout_width="wrap_content"
        android:layout_height="wrap_content"
        android:layout_gravity="center_horizontal"
        android:layout_marginTop="36dp"
        android:text="Recording"
        android:visibility="gone"
        />

    <TextView
        android:id="@+id/countdown"
        style="@style/TextAppearance.AppCompat.Subhead"
        android:layout_width="wrap_content"
        android:layout_height="wrap_content"
        android:layout_gravity="center_horizontal"
        android:layout_marginTop="36dp"
        tools:text="@string/lorem_medium"
        />

  </LinearLayout>

  <org.researchstack.backbone.ui.views.SubmitBar
      android:id="@+id/submit_bar"
      android:layout_width="match_parent"
      android:layout_height="wrap_content"
      android:layout_alignParentBottom="true"/>

  <android.support.v7.widget.AppCompatTextView
      android:id="@+id/layout_consent_review_signature_clear"
      style="@style/Widget.AppCompat.Button.Borderless.Colored"
      android:layout_width="wrap_content"
      android:layout_height="wrap_content"
      android:layout_alignParentBottom="true"
      android:layout_alignParentLeft="true"
      android:layout_alignParentStart="true"
      android:layout_alignTop="@+id/submit_bar"
      android:text="@string/rsb_consent_signature_clear"
      android:textColor="@color/rsb_submit_bar_negative"
      />

</merge>

Most of this is boilerplate code used by any custom step layout. The LinearLayout section contains your custom layout UI. This provides a button for the user to start the recording and some labels to show progress.

You’ll now create a Layout class to manage the layout.

Create a new file named AudioStepLayout.java and add the following:

public class AudioStepLayout extends RelativeLayout implements StepLayout
{
  public AudioStepLayout(Context context)
  {
    super(context);
  }

  public AudioStepLayout(Context context, AttributeSet attrs)
  {
    super(context, attrs);
  }

  public AudioStepLayout(Context context, AttributeSet attrs, int defStyleAttr)
  {
    super(context, attrs, defStyleAttr);
  }

  @Override
  public void initialize(Step step, StepResult result) {

  }

  @Override
  public View getLayout() {
    return null;
  }

  @Override
  public boolean isBackEventConsumed() {
    return false;
  }

  @Override
  public void setCallbacks(StepCallbacks callbacks) {

  }
}

Here you inherit from RelativeLayout and implement the StepLayout interface. You add standard layout constructors and overrides for the StepLayout interface. You'll fill in the details for the overrides soon.

Next, you will create the custom audio step. Create a new file named AudioStep.java and add the following code:

public class AudioStep extends Step
{
  private int mDuration;

  public AudioStep(String identifier)
  {
    super(identifier);
    setOptional(false);
    setStepLayoutClass(AudioStepLayout.class);
  }

  public int getDuration() {
    return mDuration;
  }

  public void setDuration(int duration) {
    mDuration = duration;
  }
}

Here you define a custom audio step with one property, mDuration, to control the length of the audio recording. In the constructor, you call the base class, set the step as required and define the default layout class as AudioStepLayout.class.

Now to finish AudioStepLayout. Add the following to the top of the AudioStepLayout class:

public static final String KEY_AUDIO = "AudioStep.Audio";

private StepCallbacks mStepCallbacks;
private AudioStep mStep;
private StepResult<String> mResult;
private boolean mIsRecordingComplete = false;
private String mFilename;

Add the following methods to AudioStepLayout.java:


// 1
private void setDataToResult()
{
  mResult.setResultForIdentifier(KEY_AUDIO, getBase64EncodedAudio());
}

// 2
private String getBase64EncodedAudio()
{
  if(mIsRecordingComplete)
  {

    // 3
    File file = new File(mFilename);

    try {
      byte[] bytes = FileUtils.readAll(file);

      String encoded = Base64.encodeToString(bytes, Base64.DEFAULT);
      return encoded;

    } catch (Exception e) {
      return null;
    }
  }
  else
  {
    return null;
  }
}

Taking it comment-by-comment;

  1. You define setDataToResult() to assign the audio data returned from getBase64EncodedAudio() to the step results. KEY_AUDIO is a unique identifier that distinguishes the audio data from any other results.
  2. You define getBase64EncodedAudio() to translate the raw audio to a Base64 string.
  3. If the recording is complete, you open the recording file, use ResearchStack's FileUtils.readAll() to read in the data from the file and then use Base64.encodeToString() to encode the data to a string and return it.

Now you will create a method to handle initialization. Add the following to AudioStepLayout.java:

private void initializeStep()
{
  LayoutInflater.from(getContext())
      .inflate(R.layout.audio_step_layout, this, true);

  TextView title = (TextView) findViewById(R.id.title);
  title.setText(mStep.getTitle());

  TextView text = (TextView) findViewById(R.id.summary);
  text.setText(mStep.getText());

  final TextView countdown = (TextView) findViewById(R.id.countdown);
  countdown.setText("Seconds remaining: " + Integer.toString(mStep.getDuration()));

  final TextView countdown_title = (TextView) findViewById(R.id.countdown_title);

  final Button beginButton = (Button) findViewById(R.id.begin_recording);

  // TODO: set onClick listener
}

Here you inflate the layout defined earlier and bind the UI elements to variables.

Now replace //TODO: set onClick listener with the following:

// 1
beginButton.setOnClickListener(new OnClickListener() {
  @Override
  public void onClick(View v) {

    // 2
    mFilename = getContext().getFilesDir().getAbsolutePath();
    mFilename += "/camelotaudiorecord.3gp";

    final AudioRecorder audioRecorder = new AudioRecorder();
    audioRecorder.startRecording(mFilename);

    // 3
    beginButton.setVisibility(GONE);
    countdown_title.setVisibility(View.VISIBLE);

    // 4
    CountDownTimer Count = new CountDownTimer(mStep.getDuration()*1000, 1000) {

      // 5
      public void onTick(long millisUntilFinished) {
        countdown.setText("Seconds remaining: " + millisUntilFinished / 1000);
      }

      // 6
      public void onFinish() {

        mIsRecordingComplete = true;

        audioRecorder.stopRecording();

        AudioStepLayout.this.setDataToResult();
        mStepCallbacks.onSaveStep(StepCallbacks.ACTION_NEXT, mStep, mResult);
      }
    };

    // 7
    Count.start();
  }
});

There’s quite a few things going on here, so to break it down:

  1. You create an onClick listener on the beginButton to start recording when tapped.
  2. You get a filename based on the app’s files directory and use the AudioRecorder object to start recording the file. AudioRecorder.java was included in the starter project and provides basic audio recording capabilities.
  3. You hide the Begin button and display the recording countdown timer label.
  4. You start a CountDownTimer based on the requested recording duration.
  5. The CountDownTimer calls onTick() periodically. You’ll use this opportunity to update the countdown timer with the remaining time in seconds.
  6. CountDownTimer calls onFinish() when it is complete. You set the mIsRecordingComplete flag, stop the recording and save the results. You call mStepCallbacks.onSaveStep() to automatically jump to the next step.
  7. Finally, you start the countdown timer.

Now that initializeStep() implements the core functionality for AudioStepLayout, it's time to wire everything up.

Add the following code to initialize():

this.mStep = (AudioStep)step;
this.mResult = result == null ? new StepResult<>(step) : result;

initializeStep();

initialize() is called when the step is about to be displayed. StepResult will contain the user's previous answer if they have already visited this step, otherwise it is null. You save the step along with the step result to member variables and then call the previously defined initializeStep().

Replace the contents of getLayout() with the following:

return this;

getLayout returns the view to be displayed. In this case, it is the current object.

Replace the contents of isBackEventConsumed() with the following:

setDataToResult();
mStepCallbacks.onSaveStep(StepCallbacks.ACTION_PREV, mStep, mResult);
return false;

isBackEventConsumed should return false unless you have special handling in mind when the user tries to back up. This is your chance to save the results. You call onSaveStep() to notify ResearchStack that it can save the results and perform the ACTION_PREV action.

Replace the contents of setCallbacks() method with the following:

this.mStepCallbacks = callbacks;

setCallbacks provides you with a callback object, and you save it for future use.

Great job! You have completed a custom step, and now you can finish the audio task.

Add the following to displayAudioTask() in MainActivity.java:

AudioStep audioStep = new AudioStep("audio_step");
audioStep.setTitle("Repeat the following phrase:");
audioStep.setText("The Holy Grail can be found in the Castle of Aaaaaaaaaaah");
audioStep.setDuration(10);
steps.add(audioStep);

You create the new audio step, set its title, text and duration and add it to the steps list.

Summary Step

The final step display displays a summary. Add the following to displayAudioTask():

InstructionStep summaryStep = new InstructionStep("audio_summary_step",
        "Right. Off you go!",
        "That was easy!");
steps.add(summaryStep);

You create an instruction step and add it to the steps list.

All that's left is to present the task!

Presenting the Audio Task

Add the following constant to the top of MainActivity:

private static final int REQUEST_AUDIO = 2;

Add the following to displayAudioTask():

OrderedTask task = new OrderedTask("audio_task", steps);

Intent intent = ViewTaskActivity.newIntent(this, task);
startActivityForResult(intent, REQUEST_AUDIO);

You create a new OrderedTask and pass in the steps and then launch the activity and set REQUEST_AUDIO as the request code.

Build and run the app. Tap the Microphone button and run through the task:

Audio 1 Audio 2 Audio 3

Where to Go From Here?

You can download the final project for this tutorial here.

While this tutorial covered three typical tasks you'll find in research studies — informed consent, surveys and active tasks – a real-world study will require some additional work. You may need to store or print results, send results to a server, schedule tasks to run periodically and deal with IRB approval.

For more information, visit the official project page for ResearchStack.

Take some time to look at the Skin module. It builds on top of Backbone and provides several advanced features, including:

  • Additional built-in tasks such as ConsentTask and SmartSurveyTask.
  • The ability to build out your studies using JSON files and use ResearchKit resources.
  • Task scheduling system with notifications.

The MoleMapper Open Source app available on GitHub provides a great example of a fully-featured research app created for both iOS and Android.

Thank you for reading this tutorial, and I hope you have enjoyed it. Please join the discussion below if you have any questions!

The post ResearchStack Tutorial: Getting Started appeared first on Ray Wenderlich.

Unity Games by Tutorials Updated for Unity 5.6

$
0
0

Good news – we’ve been hard at work updating our popular book Unity Games by Tutorials for Unity 5.6, and the new version of the book is available today!

We’ve gone through the entire book and updated all the project materials, screenshots and text contained within to make sure it’s all compatible under Unity 5.6.

Updates in the book include:

  • Updates to the navigation system
  • Changes to the lighting window
  • Modifications to the splash images
  • Changes to the WebGL publishing settings
  • Updates to pathfinding
  • Smoothed out NavMesh behavior
  • Additions for extra Collider2D types
  • And more!

Read on to see how to get your updated copy!

What Is Unity Games by Tutorials?

Unity Games by Tutorials is for complete beginners to Unity, or for those who’d like to bring their Unity skills to a professional level. Its goal is to teach you everything you need to know to make your own Unity games – via hands-on experience.

In Unity Games by Tutorials, you’ll learn how to build four games:

  1. A twin-stick shooter
  2. A first-person shooter
  3. A tower defense game (with VR support!)
  4. A 2D platfomer

Build stunning, realistic games — including a tower defense game in VR!

By the end of this book, you’ll be ready to make your own games for Windows, macOS, iOS, and more!

This book is for complete beginners to Unity, or for those who’d like to bring their Unity skills to a professional level. The book assumes you have some prior programming experience (in a language of your choice).

If you are a complete beginner programming, we recommend you learn some basic programming skills first. A great way to do that is to watch our free Beginning C# with Unity series, which will get you familiar with programming in the context of Unity.

The games in the book are made with C#. If you have prior programming experience but are new to C#, don’t worry – the book includes an appendix to give you a crash course on C# syntax.

How to Get the Update

This free update is available today for all Unity Games by Tutorials PDF customers, as our way of saying “thanks” for supporting the book and the site.

  • If you’ve already bought the Unity Games by Tutorials PDF, you can download the updated book immediately from your owned books on the store page.
  • If you don’t have Unity Games by Tutorials yet, you can grab your own updated copy in our store.

We hope you enjoy this version of the book, fully updated for Unity 5.6. And a big thanks to the book team that helped us get this update out!

The post Unity Games by Tutorials Updated for Unity 5.6 appeared first on Ray Wenderlich.

Getting Started with fastlane: Creating Screenshots

Video Tutorial: Practical Instruments Part 7: Energy

Video Tutorial: Practical Instruments Part 8: Conclusion


Beginning C# with Unity Part 29: Interfaces

iBeacon Tutorial with iOS and Swift

$
0
0

iBeaconUpdate note: Updated for iOS 10, Swift 3 and Xcode 8.2.1 by Owen Brown. Original post by Tutorial Team member Chris Wagner.

Have you ever wished that your phone could show your location inside a large building like a shopping mall or baseball stadium?

Sure, GPS can give you an idea of which side of the building you are in. But good luck getting an accurate GPS signal in one of those steel and concrete sarcophaguses. What you need is something inside of the building to let your device determine its physical location.

Enter iBeacons! In this iBeacons tutorial you’ll create an app that lets you register known iBeacon emitters and tells you when your phone has moved outside of their range. The use case for this app is attaching an iBeacon emitter to your laptop bag, purse, or even your cat’s collar — anything important you don’t want to lose. Once your device moves outside the range of the emitter, your app detects this and notifies you.

To continue with this tutorial, you’ll need to test on a real iOS device and an iBeacon. If you don’t have an iBeacon but have a second iOS device, you might be able to use it as a beacon; read on!

Getting Started

There are many iBeacon devices available; a quick Google search should help reveal them to you. But when Apple introduced iBeacon, they also announced that any compatible iOS device could act as an iBeacon. The list currently includes the following devices:

  • iPhone 4s or later
  • 3rd generation iPad or later
  • iPad Mini or later
  • 5th generation iPod touch or later

Note: If you do not have a standalone iBeacon emitter but you do have another iOS device that supports iBeacons, you can follow along by creating an app that acts as an iBeacon as described in Chapter 22 — What’s new in Core Location of iOS 7 by Tutorials.

An iBeacon is nothing more than a Bluetooth Low Energy device that advertises information in a specific structure. Those specifics are beyond the scope of this tutorial, but the important thing to understand is that iOS can monitor for iBeacons that emit three values known as: UUID, major and minor.

UUID is an acronym for universally unique identifier, which is a 128-bit value that’s usually shown as a hex string like this: B558CBDA-4472-4211-A350-FF1196FFE8C8. In the context of iBeacons, a UUID is generally used to represent your top-level identity.

Major and minor values provide a little more granularity on top of the UUID. These values are simply 16 bit unsigned integers that identify each individual iBeacon, even ones with the same UUID.

For instance, if you owned multiple department stores you might have all of your iBeacons emit the same UUID, but each store would have its own major value, and each department within that store would have its own minor value. Your app could then respond to an iBeacon located in the shoe department of your Miami, Florida store.

ForgetMeNot Starter Project

Download the starter project here — it contains a simple interface for adding and removing items from a table view. Each item in the table view represents a single iBeacon emitter, which in the real world translates to an item that you don’t want to leave behind.

Build and run the app; you’ll see an empty list, devoid of items. Press the + button at the top right to add a new item as shown in the screenshot below:

iBeacon

First Launch

To add an item, you simply enter a name for the item and the values corresponding to its iBeacon. You can find your iBeacon’s UUID by reviewing your iBeacon’s documentation – try adding it now, or use some placeholder values, as shown below:

iBeacon

Add an Item

Press Save to return to the list of items; you’ll see your item with a location of Unknown, as shown below:

iBeacon

List of Items Added

You can add more items if you wish, or swipe to delete existing ones. UserDefaults persists the items in the list so that they’re available when the user re-launches the app.

On the surface it appears there’s not much going on; most of the fun stuff is under the hood. The unique aspect in this app is the Item model class which represents the items in the list.

Open Item.swift and have a look at it in Xcode. The model class mirrors what the interface requests from the user, and it conforms to NSCoding so that it can be serialized and deserialized to disk for persistence.

Now take a look at AddItemViewController.swift. This is the controller for adding a new item. It’s a simple UIViewController, except that it does some validation on user input to ensure that the user enters valid names and UUIDs.

The Add button at the bottom left becomes tappable as soon as txtName and txtUUID are both valid.

Now that you’re acquainted with the starter project, you can move on to implementing the iBeacon bits into your project!

Core Location Permissions

Your device won’t listen for your iBeacon automatically — you have to tell it to do this first. The CLBeaconRegion class represents an iBeacon; the CL class prefix indicates that it is part of the Core Location framework.

It may seem strange for an iBeacon to be related to Core Location since it’s a Bluetooth device, but consider that iBeacons provide micro-location awareness while GPS provides macro-location awareness. You would leverage the Core Bluetooth framework for iBeacons when programming an iOS device to act as an iBeacon, but when monitoring for iBeacons you only need to work with Core Location.

Your first order of business is to adapt the Item model for CLBeaconRegion.

Open Item.swift and add the following import to the top of the file:

import CoreLocation

Next, change the majorValue and minorValue definitions as well as the initializer as follows:

let majorValue: CLBeaconMajorValue
let minorValue: CLBeaconMinorValue

init(name: String, icon: Int, uuid: UUID, majorValue: Int, minorValue: Int) {
  self.name = name
  self.icon = icon
  self.uuid = uuid
  self.majorValue = CLBeaconMajorValue(majorValue)
  self.minorValue = CLBeaconMinorValue(minorValue)
}

CLBeaconMajorValue and CLBeaconMinorValue are both a typealias for UInt16, and are used for representing major and minor values in the CoreLocation framework.

Although the underlying data type is the same, this improves readability of the model and adds type safety so you don’t mix up major and minor values.

Open ItemsViewController.swift, add the Core Location import to the top of the file:

import CoreLocation

Add the following property to the ItemsViewController class:

let locationManager = CLLocationManager()

You’ll use this CLLocationManager instance as your entry point into Core Location.

Next, replace viewDidLoad() with the following:

override func viewDidLoad() {
  super.viewDidLoad()

  locationManager.requestAlwaysAuthorization()

  loadItems()
}

The call to requestAlwaysAuthorization() will prompt the user for access to location services if they haven’t granted it already. Always and When in Use are variants on location permissions. When the user grants Always authorization to the app, the app can start any of the available location services while it is running in the foreground or background.

The point of this app is to monitor for iBeacon regions at all times, so you’ll need the Always location permissions scope for triggering region events while the app is both in the foreground and background.

iOS requires that you set up a string value in Info.plist that will be displayed to the user when access to their location is required by the app. If you don’t set this up, location services won’t work at all — you don’t even get a warning!

Open Info.plist and add a new entry by clicking on the + that appears when you select the Information Property List row.

iBeacon

Fortunately, the key you need to add is in the pre-defined list shown in the dropdown list of keys — just scroll down to the Privacy section. Select the key Privacy – Location Always Usage Description and make sure the Type is set to String. Then add the phrase you want to show to the user to tell them why you need location services on, for example: “ForgetMeNot needs to know where you are”.

iBeacon

Build and run your app; once running, you should be shown a message asking you to allow the app access to your location:

iBeacon

Allowing access to your location

Select ‘Allow’, and the app will be able to track your iBeacons.

Listening for Your iBeacon

Now that your app has the location permissions it needs, it’s time to find those beacons! Add the following class extension to the bottom of ItemsViewController.swift :

// MARK: - CLLocationManagerDelegate

extension ItemsViewController: CLLocationManagerDelegate {
}

This will declare ItemsViewController as conforming to CLLocationManagerDelegate. You’ll add the delegate methods inside this extension to keep them nicely grouped together.

Next, add the following line inside of viewDidLoad():

locationManager.delegate = self

This sets the CLLocationManager delegate to self so you’ll receive delegate callbacks.

Now that your location manager is set up, you can instruct your app to begin monitoring for specific regions using CLBeaconRegion. When you register a region to be monitored, those regions persist between launches of your application. This will be important later when you respond to the boundary of a region being crossed while your application is not running.

Your iBeacon items in the list are represented by the the Item model via the items array property. CLLocationManager, however, expects you to provide a CLBeaconRegion instance in order to begin monitoring a region.

In Item.swift create the following helper method on Item:

func asBeaconRegion() -> CLBeaconRegion {
  return CLBeaconRegion(proximityUUID: uuid,
                                major: majorValue,
                                minor: minorValue,
                           identifier: name)
}

This returns a new CLBeaconRegion instance derived from the current Item.

You can see that the classes are similar in structure to each other, so creating an instance of CLBeaconRegion is very straightforward since it has direct analogs to the UUID, major value, and minor value.

Now you need a method to begin monitoring a given item. Open ItemsViewController.swift and add the following method to ItemsViewController:

func startMonitoringItem(_ item: Item) {
  let beaconRegion = item.asBeaconRegion()
  locationManager.startMonitoring(for: beaconRegion)
  locationManager.startRangingBeacons(in: beaconRegion)
}

This method takes an Item instance and creates a CLBeaconRegion using the method you defined earlier. It then tells the location manager to start monitoring the given region, and to start ranging iBeacons within that region.

Ranging is the process of discovering iBeacons within the given region and determining their distance. An iOS device receiving an iBeacon transmission can approximate the distance from the iBeacon. The distance (between transmitting iBeacon and receiving device) is categorized into 3 distinct ranges:

  • Immediate Within a few centimeters
  • Near Within a couple of meters
  • Far Greater than 10 meters away
Note: The real distances for Far, Near, and Immediate are not specifically documented, but this Stack Overflow Question gives a rough overview of the distances you can expect.

By default, monitoring notifies you when the region is entered or exited regardless of whether your app is running. Ranging, on the other hand, monitors the proximity of the region only while your app is running.

You’ll also need a way to stop monitoring an item’s region after it’s deleted. Add the following method to ItemsViewController:

func stopMonitoringItem(_ item: Item) {
  let beaconRegion = item.asBeaconRegion()
  locationManager.stopMonitoring(for: beaconRegion)
  locationManager.stopRangingBeacons(in: beaconRegion)
}

The above method reverses the effects of startMonitoringItem(_:) and instructs the CLLocationManager to stop monitor and ranging activities.

iBeacon

Now that you have the start and stop methods, it’s time to put them to use! The natural place to start monitoring is when a user adds a new item to the list.

Have a look at addBeacon(_:) in ItemsViewController.swift. This protocol method is called when the user hits the Add button in AddItemViewController and creates a new Item to monitor. Find the call to persistItems() in that method and add the following line just before it:

startMonitoringItem(item)

That will activate monitoring when the user saves an item. Likewise, when the app launches, the app loads persisted items from UserDefaults, which means you have to start monitoring for them on startup too.

In ItemsViewController.swift, find loadItems() and add the following line inside the for loop at the end:

startMonitoringItem(item)

This will ensure each item is being monitored.

Now you need to take care of removing items from the list. Find tableView(_:commit:forRowAt:) and add the following line inside the if statement:

stopMonitoringItem(items[indexPath.row])

This table view delegate method is called when the user deletes the row. The existing code handles removing it from the model and the view, and the line of code you just added will also stop the monitoring of the item.

At this point you’ve made a lot of progress! Your application now starts and stops listening for specific iBeacons as appropriate.

You can build and run your app at this point; but even though your registered iBeacons might be within range your app has no idea how to react when it finds one…time to fix that!

Acting on Found iBeacons

Now that your location manager is listening for iBeacons, it’s time to react to them by implementing some of the CLLocationManagerDelegate methods.

First and foremost is to add some error handling, since you’re dealing with very specific hardware features of the device and you want to know if the monitoring or ranging fails for any reason.

Add the following two methods to the CLLocationManagerDelegate class extension you defined earlier at the bottom of ItemsViewController.swift:

func locationManager(_ manager: CLLocationManager, monitoringDidFailFor region: CLRegion?, withError error: Error) {
  print("Failed monitoring region: \(error.localizedDescription)")
}

func locationManager(_ manager: CLLocationManager, didFailWithError error: Error) {
  print("Location manager failed: \(error.localizedDescription)")
}

These methods will simply log any received errors as a result of monitoring iBeacons.

If everything goes smoothly in your app you should never see any output from these methods. However, it’s possible that the log messages could provide very valuable information if something isn’t working.

The next step is to display the perceived proximity of your registered iBeacons in real-time. Add the following stubbed-out method to the CLLocationManagerDelegate class extension:

func locationManager(_ manager: CLLocationManager, didRangeBeacons beacons: [CLBeacon], in region: CLBeaconRegion) {

  // Find the same beacons in the table.
  var indexPaths = [IndexPath]()
  for beacon in beacons {
    for row in 0..<items.count {
        // TODO: Determine if item is equal to ranged beacon
    }
  }

  // Update beacon locations of visible rows.
  if let visibleRows = tableView.indexPathsForVisibleRows {
    let rowsToUpdate = visibleRows.filter { indexPaths.contains($0) }
    for row in rowsToUpdate {
      let cell = tableView.cellForRow(at: row) as! ItemCell
      cell.refreshLocation()
    }
  }
}

This delegate method is called when iBeacons come within range, move out of range, or when the range of an iBeacon changes.

The goal of your app is to use the array of ranged iBeacons supplied by the delegate methods to update the list of items and display their perceived proximity. You'll start by iterating over the beacons array, and then iterating over items to see if there are matches between in-range iBeacons and the ones in your list. Then the bottom portion updates the location string for visible cells. You'll come back to the TODO section in just a moment.

iBeacon

Open Item.swift and add the following property to the Item class:

var beacon: CLBeacon?

This property stores the last CLBeacon instance seen for this specific item, which is used to display the proximity information.

Now add the following equality operator at the bottom of the file, outside the class definition:

func ==(item: Item, beacon: CLBeacon) -> Bool {
  return ((beacon.proximityUUID.uuidString == item.uuid.uuidString)
        && (Int(beacon.major) == Int(item.majorValue))
        && (Int(beacon.minor) == Int(item.minorValue)))
}

This equality function compares a CLBeacon instance with an Item instance to see if they are equal — that is, if all of their identifiers match. In this case, a CLBeacon is equal to an Item if the UUID, major, and minor values are all equal.

Now you'll need to complete the ranging delegate method with a call to the above helper method. Open ItemsViewController.swift and return to locationManager(_:didRangeBeacons:inRegion:). Replace the TODO comment in the innermost for loop with the following:

if items[row] == beacon {
  items[row].beacon = beacon
  indexPaths += [IndexPath(row: row, section: 0)]
}

Here, you set the cell's beacon when you find a matching item and iBeacon. Checking that the item and beacon match is easy thanks to your equality operator!

Each CLBeacon instance has a proximity property which is an enum with values of far, near, immediate, and unknown.

Add the following method to Item:

func nameForProximity(_ proximity: CLProximity) -> String {
  switch proximity {
  case .unknown:
    return "Unknown"
  case .immediate:
    return "Immediate"
  case .near:
    return "Near"
  case .far:
    return "Far"
  }
}

This returns a human-readable proximity value from proximity which you'll use next.

Still in Item, add the following method:

func locationString() -> String {
  guard let beacon = beacon else { return "Location: Unknown" }
  let proximity = nameForProximity(beacon.proximity)
  let accuracy = String(format: "%.2f", beacon.accuracy)

  var location = "Location: \(proximity)"
  if beacon.proximity != .unknown {
    location += " (approx. \(accuracy)m)"
  }

  return location
}

This generates a nice, neat string describing not only the proximity range of the beacon, but also the approximate distance.

Now it's time to use that new method to display the perceived proximity of the ranged iBeacon.

Open ItemCell.swift and add the following to just below the lblName.text = item.name line of code:

lblLocation.text = item.locationString()

This displays the location for each cell's beacon. And to ensure it shows updated info, add the following inside refreshLocation():

lblLocation.text = item?.locationString() ?? ""

refreshLocation() is called each time the locationManager ranges the beacon, which sets the cell's lblLocation.text property with the perceived proximity value and approximate 'accuracy' taken from the CLBeacon.

This latter value may fluctuate due to RF interference even when your device and iBeacon are not moving, so don't rely on it for a precise location for the beacon.

Now ensure your iBeacon is registered and move your device closer or away from your device. You'll see the label update as you move around, as shown below:

iBeacon

Your cat's so close!

You may find that the perceived proximity and accuracy is drastically affected by the physical location of your iBeacon; if it is placed inside of something like a box or a bag, the signal may be blocked as the iBeacon is a very low-power device and the signal may easily become attenuated.

Keep this in mind when designing your application — and when deciding the best placement for your iBeacon hardware.

Notifications

Things feel pretty complete at this point; you have your list of iBeacons and can monitor their proximity in real time. But that isn't the end goal of your app. You still need to notify the user when the app is not running in case they forgot their laptop bag or their cat ran away — or worse, if their cat ran away with the laptop bag! :]

iBeacon

They look so innocent, don't they?

At this point, you've probably noticed it doesn't take much code to add iBeacon functionality to your app. Adding a notification when a cat runs away with your laptop bag is no different!

Open AppDelegate.swift and add the following import:

import CoreLocation

Next, make the AppDelegate class conform to the CLLocationManagerDelegate protocol by adding the following to the very bottom of AppDelegate.swift (below the closing brace):

// MARK: - CLLocationManagerDelegate
extension AppDelegate: CLLocationManagerDelegate {
}

Just as before, you need to initialize the location manager and set the delegate accordingly.
Add a new locationManager property to the AppDelegate class, initialized with an instance of CLLocationManager:

let locationManager = CLLocationManager()

Then add the following statement to the very top of application(_:didFinishLaunchingWithOptions:):

locationManager.delegate = self

Recall that any regions you add for monitoring using startMonitoringForRegion(_:) are shared by all location managers in your application. So the final step here is simply to react when Core Location wakes up your app when a region is encountered.

Add the following method to the class extension you added at the bottom of AppDelegate.swift, like so:

func locationManager(_ manager: CLLocationManager, didExitRegion region: CLRegion) {
  guard region is CLBeaconRegion else { return }

  let content = UNMutableNotificationContent()
  content.title = "Forget Me Not"
  content.body = "Are you forgetting something?"
  content.sound = .default()

  let request = UNNotificationRequest(identifier: "ForgetMeNot", content: content, trigger: nil)
  UNUserNotificationCenter.current().add(request, withCompletionHandler: nil)
}

Your location manager calls the above method when you exit a region, which is the event of interest for this app. You don't need to be notified if you move closer to your laptop bag — only if you move too far away from it.

Here you check the region to see if it's a CLBeaconRegion, since it's possible it could be a CLCircularRegion if you're also performing geolocation region monitoring. Then you post a local notification with the generic message "Are you forgetting something?".

In iOS 8 and later, apps that use either local or remote notifications must register the types of notifications they intend to deliver. The system then gives the user the ability to limit the types of notifications your app displays. The system does not badge icons, display alert messages, or play alert sounds if any of these notification types are not enabled for your app, even if they are specified in the notification payload.

Add the following to the top of of application(_:didFinishLaunchingWithOptions:):

// Request permission to send notifications
let center = UNUserNotificationCenter.current()
center.requestAuthorization(options:[.alert, .sound]) { (granted, error) in }

This simply says that the app wishes to display an alert and play a sound when it receives a notification.

Build and run your app; make sure that your app can see one of your registered iBeacons and put the app into the background by pressing the Home button — which is a real-world scenario given that you want the app to notify you whilst you're pre-occupied with something else — perhaps another Ray Wenderlich tutorial app? :]. Now move away from the iBeacon and once you're far enough away you'll see the notification pop up:

iBeacon

Notification on lock screen

Note: Apple delays exit notifications in undocumented ways. This is probably by design so that your app doesn't receive premature notifications if you're loitering on the fringe of the range or if the iBeacon's signal is briefly interrupted. In my experience, the exit notification usually occurs up to a minute after the iBeacon is out of range.

Where to Go From Here?

Didn't tie an iBeacon to your source code? You can download the final project here, with everything you've done in this tutorial.

You now have a very useful app for monitoring those things that you find tricky to keep track of. With a bit of imagination and coding prowess you could add a lot of really useful features to this app:

  • Notify the user which item has moved out of range.
  • Repeat the notification to make sure the user sees it.
  • Alert the user when iBeacon is back in range.

This iBeacons tutorial merely scratches the surface of what's possible with iBeacons.

iBeacons aren't just limited to custom apps; you can use them with Passbook passes as well. If you ran a movie theater, for example; you could offer movie tickets as Passbook passes. When patrons walked up to the ticket taker with an iBeacon nearby, their app would present the ticket on their iPhone automatically!

If you have any questions or comments on this tutorial, or if you have any novel ideas for the use of iBeacons, feel free to join the discussion below!

The post iBeacon Tutorial with iOS and Swift appeared first on Ray Wenderlich.

Introducing Advanced Apple Debugging & Reverse Engineering

$
0
0

For the past ten months, we’ve been working on a tremendously exciting new book: Advanced Apple Debugging & Reverse Engineering!

We revealed the book at our third annual tutorial conference, RWDevCon 2017, and the book is now available for pre-order on the raywenderlich.com store!

When you pre-order, you’ll get the early-access PDF version of the book, with a full four sections, 24 chapters and two full appendices, including complete source code for all the projects and scripts in the book.

You’ll also get a free upgrade to the full PDF version of the book when it’s released in mid-May, 2017.

To celebrate the launch of the book, we’re offering a great pre-order discount on the book through our store.

Read on to see what the book is all about, and how to grab your discount!

What is Advanced Apple Debugging & Reverse Engineering?

Debugging has a rather bad reputation. If the developer had a complete understanding of the program, there wouldn’t be any bugs and they wouldn’t be debugging in the first place, right?

There are always going to be bugs in your software — or any software, for that matter. No amount of test coverage imposed by your product manager is going to fix that. In fact, viewing debugging as just a process of fixing something that’s broken is actually a poisonous way of thinking that will mentally hinder your analytical abilities.

The same thing applies to reverse engineering. Images of masked hackers stealing bank accounts and credit cards may come to mind, but for this book, reverse engineering really is just debugging without source code — which in turn helps you gain a better understanding of a program or system.

In this book, you’ll come to realize debugging is an enjoyable process to help you better understand software. Not only will you learn to find bugs faster, but you’ll see how other developers have solved problems similar to yours. You’ll also learn how to create custom, powerful debugging scripts that will help you quickly find answers to any item that piques your interest, whether it’s in your code — or someone else’s.

What’s In the Book?

The pre-release version of the book has 24 chapters over four sections:

Section I: Beginning LLDB Commands

  1. Getting Started: In this chapter, you’re going to get acquainted with LLDB and investigate the process of introspecting and debugging a program. You’ll start off by introspecting a program you didn’t even write — Xcode!
  2. Help & Apropos: Just like any respectable developer tool, LLDB ships with a healthy amount of documentation. Knowing how to navigate through this documentation — including some of the more obscure command flags — is essential to mastering LLDB.
  3. Attaching with LLDB: Now that you’ve learned about the two most essential commands, help and apropos, it’s time to investigate how LLDB attaches itself to processes. You’ll learn all the different ways you can attach LLDB to processes using various options, as well as what happens behind the scenes when attaching to processes.
  4. Stopping in Code: Whether you’re using Swift, Objective-C, C++, C, or an entirely different language in your technology stack, you’ll need to learn how to create breakpoints. It’s easy to click on the side panel in Xcode to create a breakpoint using the GUI, but the LLDB console can give you much more control over breakpoints.
  5. Expression: Now that you’ve learned how to set breakpoints so the debugger will stop in your code, it’s time to get useful information out of whatever software you’re debugging. In this chapter you’ll learn about the expression command, which allows you to execute arbitrary code in the debugger.
  6. Thread, Frame & Stepping Around: You’ve learned how to create breakpoints, how to print and modify values, as well as how to execute code while paused in the debugger. But so far you’ve been left high and dry on how to move around in the debugger and inspect data beyond the immediate. In this chapter, you’ll learn how to move the debugger in and out of functions while LLDB is currently paused.
  7. Image: It’s time to explore one of the best tools for finding code of interest through the powers of LLDB. In this chapter, you’ll take a deep dive into the image command.
  8. Persisting & Customizing Commands: In this chapter, you’ll learn how to persist these choices through the .lldbinit file. By persisting your choices and making convenience commands for yourself, your debugging sessions will run much more smoothly and efficiently. This is also an important concept because from here on out, you’ll use the .lldbinit file on a regular basis.
  9. Regex Commands: In the previous chapter, you learned about the command alias command as well as how to persist commands through the lldbinit file. Unfortunately, command alias has some limitations. The LLDB command command regex acts much like command alias, except you can provide a regular expression for input which will be parsed and applied to the action part of the command.

Section II: Understanding Assembly

  1. Assembly Register Calling Convention: Now you’ve gained a basic understanding of how to maneuver around the debugger, it’s time to take a step down the executable Jenga tower and explore the 1s and 0s that make up your source code. This section will focus on the low-level aspects of debugging.
  2. Assembly & Memory: In this chapter, you’ll explore how a program executes. You’ll look at a special register used to tell the processor where it should read the next instruction from, as well as how different sizes and groupings of memory can produce very different results.
  3. Assembly and the Stack: What does being “passed on the stack” mean exactly? It’s time to take a deeper dive into what happens when a function is called from an assembly standpoint by exploring some “stack related” registers as well as the contents in the stack.

Learn how to reverse engineer code like a boss!

Section III: Low Level

  1. Hello, Ptrace: As alluded to in the introduction to this book, debugging is not entirely about just fixing stuff. Debugging is the process of gaining a better understanding of what’s happening behind the scenes. In this chapter, you’ll explore the foundation of debugging, namely, a system call responsible for a process attaching itself to another process: ptrace.
  2. Dynamic Frameworks: With dynamic frameworks comes a very interesting aspect of learning, debugging, and reverse engineering. Since you have the ability to load the framework at runtime, you can use LLDB to explore and execute code at runtime, which is great for spelunking in both public and private frameworks.
  3. Hooking & Executing Code with dlopen & dlsym: It’s time to learn about the complementary skills of developing with these frameworks. In this chapter, you’re going to learn about methods and strategies to “hook” into Swift and C code as well as execute methods you wouldn’t normally have access to.
  4. Exploring and Method Swizzling Objective-C Frameworks: You’ll cap off this round of dynamic framework exploration by digging into Objective-C frameworks using the Objective-C runtime to hook and execute methods of interest.

Section IV: Custom LLDB Commands

  1. Hello Script Bridging: Next up in the tradeoff between convenience and complexity is LLDB’s script bridging. With script bridging, you can do nearly anything you like. Script bridging is a Python interface LLDB uses to help extend the debugger to accomplish your wildest debugging dreams.
  2. Debugging Script Bridging: You need a methodical way to figure out what went wrong in your LLDB script so you don’t pull your hair out. In this chapter, you’ll explore how to inspect your LLDB Python scripts using the Python pdb module, which is used for debugging Python scripts.
  3. Script Bridging Classes and Hierarchy: You’ve learned the essentials of working with LLDB’s Python module, as well as how to correct any errors using Python’s PDB debugging module. Now you’ll explore the main players within the lldb Python module for a good overview of the main parts. In this chapter, you’ll add some arguments to this script and deal with some annoying edge cases, such handling commands differently between Objective-C and Swift.
  4. Script Bridging with Options & Arguments: When you’re creating a custom debugging command, you’ll often want to slightly tweak functionality based upon options or arguments supplied to your command. A custom LLDB command that can do a job only one way is a boring one-trick pony. In this chapter, you’ll explore how to pass optional parameters (aka options) as well as arguments (parameters which are expected) to your custom command to alter functionality or logic in your custom LLDB scripts.
  5. Script Bridging with SBValue & Memory: So far, when evaluating JIT code (i.e. Objective-C, Swift, C, etc. code that’s executed through your Python script), you’ve used a small set of APIs to evaluate the code. It’s time to talk about a new class in the lldb Python module, SBValue, and how it can simplify the parsing of JIT code output.
  6. SB Examples, Improved Lookup: For the rest of the chapters in this section, you’ll focus on Python scripts. As alluded to in the previous chapter, the image lookup -rn command is on its way out. When you finish this chapter, you’ll have a new script named “lookup” which queries in a much cleaner way.
  7. SB Examples, Resymbolicating a Stripped ObjC Binary: When LLDB comes up against a stripped executable (an executable devoid of DWARF debugging information), LLDB won’t have the symbol information to give you the stack trace. Instead, LLDB will generate a synthetic name for a method it recognizes as a method, but doesn’t know what to call it. In this chapter, you’ll build an LLDB script that will resymbolicate stripped Objective-C functions in a stack trace.
  8. SB Examples, Malloc Logging: For the final chapter in this section, you’ll go through the same steps I myself took to understand how the MallocStackLogging environment variable is used to get the stack trace when an object is created. From there, you’ll create a custom LLDB command which gives you the stack trace of when an object was allocated or deallocated in memory — even after the stack trace is long gone from the debugger.

Who Is this Book For?

This book is for intermediate to advanced developers who want to take their debugging and code exploration game to the next level.

The art of debugging code should really be studied by every developer. However, there will be some of you that will get more out of this book. This book is written for:

  • Developers who want to become better at debugging with LLDB
  • Developers who want to build complex debugging commands with LLDB
  • Developers who want to take a deeper dive into the internals of Swift and Objective-C
  • Developers who are interested in understanding what they can do to their program through reverse engineering
  • Developers who are interested in modern, proactive reverse engineering strategies
  • Developers who want to be confident in finding answers to questions they have about their computer or software

Introducing the Author

Derek Selander became interested with debugging when he started exploring how to make (the now somewhat obsolete) Xcode plugins and iOS tweaks on his jailbroken phone, both of which required exploring and augmenting programs with no source available. In his free time, he enjoys pickup soccer, guitar, and playing with his two doggies, Jake & Squid.

Where to Go From Here?

There’s one final piece of good news.

You can get the PDF version of the book for only $44.99 when you buy it through our online store. That’s $10 off the cover price!

But this offer won’t be around forever, so grab it while you can.

Check out the store page to take advantage of this offer:

https://store.raywenderlich.com/products/advanced-apple-debugging-and-reverse-engineering

The Advanced Apple Debugging & Reverse Engineering team and I hope you enjoy the book — and we can’t wait to hear about your debugging and reverse engineering adventures!

The post Introducing Advanced Apple Debugging & Reverse Engineering appeared first on Ray Wenderlich.

Video Tutorial: Advanced Swift 3 Part 1: Introduction

Video Tutorial: Advanced Swift 3 Part 2: Protocol-Oriented Programming

Video Tutorial: Advanced Swift 3 Part 3: Custom Operators

New Course: Advanced Swift 3

$
0
0

We have had the basics of Swift well-covered with our Beginning Swift and Intermediate Swift courses, but raywenderlich.com subscribers have been asking for a more advanced look at the language. Today, I am excited to release my new course, Advanced Swift 3!

Swift is full of features that allow you to write clearer code and hide complexity. We can’t cover it all, but this colossal course spans 16 videos and delves into the advanced techniques that our subscribers have been asking for, including:

  • Protocol-Oriented Programming
  • Generics
  • Error Handling
  • Swift Memory Management
  • and much more!

This course is fully up-to-date with Swift 3, Xcode 8, and iOS 10. Let’s take a look at what’s inside:


Video 1: Introduction. In this video, learn what topics will be covered in the Advanced Swift 3 course.


Video 2: Protocol-Oriented Programming
Swift protocols give all nominal types polymorphic behavior. This video compares class versus protocol based designs.


Video 3: Custom Operators
Swift gives you the ability to create your own operators with custom precedence. This video shows you how to tap into this power.


Video 4: Protocols and Generics
This video reviews generics and shows you how to make them more specific with protocol constraints.


Video 5: Values and References
This video takes a closer look at the difference between values and references and how it affects mutability.


Video 6: Implementing Copy-on-Write
Swift collections have value semantics and good performance because they are implemented
with copy-on-write. This video shows how to do this for your own types.


Video 7: Custom Sequences
The Sequence protocol is foundational to standard library’s collection data structures and algorithms. This video shows how to tap into this powerful system.


Video 8: Custom Collections
The Collection protocol provides capability over a simple Sequence. You gain additional functionality, and get access to more efficient implementations to standard algorithms.


Video 9: Ranges
This video you will learn about the Swift range types in detail and shows how they can be extended without repeating yourself.


Video 10: Types as Documentation
The type system can prevent all kinds of usage errors and bugs from sneaking into your code. Learn to make compiler errors your friend and prevent problems at runtime.


Video 11: ARC with Objects
Swift uses Automatic Reference Counting to determine when it can release memory. Learn when to use unowned and weak to prevent reference cycles and lost memory.


Video 12: ARC with Closures
As reference types, closures face the same challenges that classes do when it comes to memory management. Use weak and unowned with closure captures to prevent leaks.


Video 13: Unsafe Memory Access
By default, Swift is memory safe; it prevents access to uninitialized raw memory. Learn how to circumvent this safety when interfacing with an unsafe language or gain performance.


Video 14: Error Handling
A hallmark of production-ready code is good error handling. Learn about the types of error handling Swift has to offer and when and how to use each.


Video 15: Hashable Types
To use your custom types as dictionary keys or in sets, they need to be hashable. This video explores utilizing custom composable hash algorithms.


Video 16: Conclusion. In this video you’ll get a recap of what you’ve learned so far and find out where to learn more about Swift.

Where To Go From Here?

Want to check out the course? The introduction is available now for free!

The rest of the course is for raywenderlich.com subscribers only. Here’s how you can get access:

  • If you are a raywenderlich.com subscriber: You can access the first three parts of Advanced Swift 3 today, and the rest will be coming out over the next three weeks.
  • If you are not a subscriber yet: What are you waiting for? Subscribe now to get access to our new Advanced Swift 3 course, and our entire catalog of over 500 videos.

There’s much more in store for raywenderlich.com subscribers – if you’re curious, you can check out our full schedule of upcoming courses.

I hope you enjoy our new course, and stay tuned for many more new Swift 3 courses and updates to come!

The post New Course: Advanced Swift 3 appeared first on Ray Wenderlich.


CocoaPods Tutorial for Swift: Getting Started

$
0
0
CocoaPods Tutorial for Swift

Use this CocoaPods tutorial for swift to learn how to manage third-party library dependencies.

Update Note: This tutorial has been updated to Xcode 8.3 and Swift 3.1 by Joshua Greene. The original tutorial was also written by Joshua Greene.

There’s been a lot of buzz about CocoaPods lately. You may have heard about it from another developer, or seen it referenced on a GitHub repository. If you’ve never used it before, you’re probably wondering, “What exactly is CocoaPods?”

It’s probably best to let the CocoaPods website provide the answer:

CocoaPods is a dependency manager for Swift and Objective-C Cocoa projects. It has over 30 thousand libraries and is used in over 1.9 million apps. CocoaPods can help you scale your projects elegantly.

Wow, that’s a lot of libraries used in a ton of apps! Scaling your project elegantly sounds great too. :]

But, what is a dependency manager? And why do you even need one?

A dependency manager makes it easy to add, remove, update and manage third-party dependencies used by your app.

For example, instead of reinventing your own networking library, you can easily pull in Alamofire using a dependency manager. You can even specify the exact version to use or a range of acceptable versions.

So even if Alamofire gets updated with backwards-incompatible changes, your app can continue using the older version until you’re ready to update it.

CocoaPods Tutorial

In this tutorial, you’ll learn how to use CocoaPods with Swift. Specifically, you’ll:

  • Install CocoaPods.
  • Work with a functional demo app that gets you thinking about ice cream.
  • Use CocoaPods to add networking.
  • Learn about semantic versioning.
  • Add another library using a flexible version.
  • Note: This CocoaPods tutorial requires basic familiarity with iOS and Swift development. If you’re completely new to iOS and/or Swift, then please check out some of the other written and/or video tutorials on this site before doing this tutorial. Or, dive into the iOS Apprentice.

    This tutorial also includes classes that use Core Graphics. While knowledge of Core Graphics is beneficial, it’s not strictly required. If you’d like to learn more about Core Graphics, read our Modern Core Graphics With Swift series.

    Getting Started

    You first need to install CocoaPods. Fortunately, CocoaPods is built on Ruby, which ships with all recent versions of Mac OS X. This has been the case since OS X 10.7.

    Open Terminal and enter the following command:

sudo gem install cocoapods

Enter your password when requested. The Terminal output should look something like this:

You must use sudo to install CocoaPods, but you won’t need to use sudo after it’s installed.

Lastly, enter this command in Terminal to complete the setup:

pod setup --verbose

This process will likely take a few minutes as it clones the CocoaPods Master Specs repository into ~/.cocoapods/ on your computer.

The verbose option logs progress as the process runs, allowing you to watch the process instead of seeing a seemingly “frozen” screen.

Awesome, you’re now set up to use CocoaPods!

That was easy!

Ice Cream Shop, Inc.

Your top client is Ice Cream Shop, Inc. Their ice cream is so popular they can’t keep up with customer orders at the counter. They’ve recruited you to create a sleek iOS app that will allow customers to order ice cream right from their iPhones.

You’ve started developing the app, and it’s coming along well. Download the CocoaPods tutorial starter project from here.

Open IceCreamShop.xcodeproj, then build and run to see a mouth-watering vanilla ice cream cone:

IceCreamShop Starter

The user should be able to choose an ice cream flavor from this screen, but that’s not possible because you haven’t finished implementing this functionality.

Open Main.storyboard from the Views/Storyboards & Nibs group to see the app’s layout. Here’s a quick overview of the heart of the app, the “Choose Your Flavor” scene:

  • PickFlavorViewController is the view controller for this scene. It handles user interaction and is the data source for the collection view that displays the different ice cream flavors.
  • IceCreamView is a custom view that displays an ice cream cone, and it’s backed by a Flavor model.
  • ScoopCell is a custom collection view cell that contains a ScoopView, which gets colors from a Flavor model.

While every Ice Cream Shop location will have signature flavors in common, each carries their own local flavors too. For this reason, the data contained Flavor instances need to be provided by a web service.

However, this still doesn’t answer the question, “Why can’t the user select an ice cream flavor?”

Open PickFlavorViewController.swift, found under the Controllers group, and you’ll see a stubbed method:

fileprivate func loadFlavors() {
  // TO-DO: Implement this
}

Ah-ha, there’s no flavors! You need to // Implement this.

While you could use URLSession and write your own networking classes, there’s an easier way: use Alamofire!

You might be tempted to simply download this library and drag the source files right into your project. However, that’d be doing it the hard way. CocoaPods provides a much more elegant and nimble solution.

So, without further ado…

Let's Do This!

Installing Your First Dependency

You first need to close Xcode.

Yeah, you read that right. It’s time to create the Podfile, where you’ll define your project’s dependencies.

Open Terminal and navigate to the directory that contains your IceCreamShop project by using the cd command:

cd ~/Path/To/Folder/Containing/IceCreamShop

Next, enter the following command:

pod init

This creates a Podfile for your project.

Finally, type the following command to open the Podfile using Xcode for editing:

open -a Xcode Podfile

Note: You shouldn’t use TextEdit to edit the Podfile because it replaces standard quotes with more graphically appealing typeset quotes. This can cause CocoaPods to become confused and throw errors, so it’s best to use Xcode or another programming text editor to edit your Podfile.

The default Podfile looks like this:

# Uncomment the next line to define a global platform for your project
# platform :ios, '9.0'

target 'IceCreamShop' do
  # Comment the next line if you're not using Swift and don't want to use dynamic frameworks
  use_frameworks!

  # Pods for IceCreamShop

end

Delete the # and space before platform, and delete the other lines starting with #.

Your Podfile should now look like this:

platform :ios, '9.0'

target 'IceCreamShop' do
  use_frameworks!

end

This tells CocoaPods your project is targeting iOS 9.0 and will be using frameworks instead of static libraries.

In order to use CocoaPods written in Swift, you must explicitly include use_frameworks! to opt into using frameworks. If you forget to include this, and CocoaPods detects you’re trying to use a Swift CocoaPod, you’ll get an error when you try to install the pods.

If you’ve only ever programmed in Swift, this may look a bit strange − that’s because the Podfile is actually written in Ruby. You don’t need to know Ruby to use CocoaPods, but you should be aware that even minor text errors will cause CocoaPods to throw an error.

A Word About Libraries

You’ll see the term “library” often used as a general term that actually means a library or framework. This tutorial is guilty of casually intermixing these words too. In actuality, when someone refers to a “Swift library,” they actually mean a “Swift dynamic framework” because Swift static libraries aren’t allowed.

You may be wondering, “What’s the difference between a library, a framework and a CocoaPod?” And trust me, it’s okay if you find the whole thing a touch confusing!

A CocoaPod, or “pod” for short, is a general term for either a library or framework that’s added to your project by using CocoaPods.

iOS 8 introduced dynamic frameworks, and these allow code, images and other assets to be bundled together. Prior to iOS 8, CocoaPods were created as “fat” static libraries. “Fat” means they contained several code instruction sets (e.g. i386 for the simulator, armv7 for devices, etc.), but static libraries aren’t allowed to contain any resources such as images or assets.

Another important difference is dynamic frameworks have namespace classes and static libraries don’t. So, if you had two classes called MyTestClass in different static libraries within a single project, Xcode would not be able to build the project because it would fail to link correctly citing duplicate symbols. However, Xcode is perfectly happy building a project that has two classes with the same name in different frameworks.

Why does this matter? Unlike Objective-C, the standard Swift runtime libraries aren’t included in iOS! This means your framework must include the necessary Swift runtime libraries. As a consequence, pods written in Swift must be created as dynamic frameworks. If Apple allowed Swift static libraries, it would cause duplicate symbols across different libraries that use the same standard runtime dependencies.

Fortunately, CocoaPods takes care of all of this for you. It even takes care of only including required dependencies once. All you have to do is remember to include use_frameworks! in your Podfile when working with Swift CocoaPods and you’ll be just fine.

Amazing, right?

Back to Installing Your First Dependency

It’s finally time to add your first dependency using CocoaPods. Add the following to your Podfile, right after use_frameworks!:

pod 'Alamofire', '4.4.0'

This tells CocoaPods you want to include Alamofire version 4.4.0 – the latest, stable version at the time of writing this tutorial – as a dependency for your project.

Save and close the Podfile.

You now need to tell CocoaPods to install the dependencies for your project. Enter the following command in Terminal, after ensuring you’re still in the directory containing the IceCreamShop project and Podfile:

pod install

You should see output similar to the following:

Analyzing dependencies
Downloading dependencies
Installing Alamofire (4.4.0)
Generating Pods project
Integrating client project

[!] Please close any current Xcode sessions and use `IceCreamShop.xcworkspace` for this project from now on.

Open the project folder using Finder, and you’ll see CocoaPods created a new IceCreamShop.xcworkspace file and a Pods folder in which to store all the project’s dependencies.

Note: From now on, as the command-line warning mentioned, you must always open the project with the .xcworkspace file and not the .xcodeproj, otherwise you’ll encounter build errors.

Excellent! You’ve just added your first dependency using CocoaPods!

Got the Win!

Using Installed Pods

If the Xcode project is open, close it now and open IceCreamShop.xcworkspace.

Open PickFlavorViewController.swift and add the following just below the existing import:

import Alamofire

Hit ⌘+b to build the project. If all went well, you shouldn’t receive any compilation errors.

Next, replace loadFlavors() with the following:

fileprivate func loadFlavors() {

  // 1
  Alamofire.request(
    "https://www.raywenderlich.com/downloads/Flavors.plist",
    method: .get,
    encoding: PropertyListEncoding(format: .xml, options: 0)).responsePropertyList {
      [weak self] response in

      // 2
      guard let strongSelf = self else { return }

      // 3
      guard response.result.isSuccess,
        let dictionaryArray = response.result.value as? [[String: String]] else {
          return
      }

      // 4
      strongSelf.flavors = strongSelf.flavorFactory.flavors(from: dictionaryArray)

      // 5
      strongSelf.collectionView.reloadData()
      strongSelf.selectFirstFlavor()
  }
}

Here’s the play-by-play of what’s happening:

  1. You use Alamofire to create a GET request and download a plist containing ice cream flavors.
  2. In order to break a strong reference cycle, you use a weak reference to self in the response completion block. Once the block executes, you immediately get a strong reference to self so you can set properties on it later.
  3. You next verify the response.result indicates it was successful, and the response.result.value is an array of dictionaries.
  4. If all goes well, you set strongSelf.flavors to an array of Flavor objects created by a FlavorFactory. This is a class a “colleague” wrote for you (you’re welcome!), which takes an array of dictionaries and uses them to create instances of Flavor.
  5. Lastly, you reload the collection view and select the first flavor.

Build and run. You should now be able to choose an ice cream flavor!

Choose Flavor

Now For a Tasty Topping

The app is looking good, but you can still improve it.

Did you notice the app takes a second to download the flavors file? You may not have if you’re on a fast Internet connection, but customers won’t always be so lucky.

To help customers understand the app is actually loading something, and not just twiddling its libraries, you can show a loading indicator. MBProgressHUD is a really nice indicator that will work well here. And it supports CocoaPods, what a coincidence! :]

You need to add this to your Podfile. Rather than opening the Podfile from the command line, you can now find it in the Pods target in the workspace:

Pods in Workspace

Open Podfile and add the following right after the Alamofire line:

pod 'MBProgressHUD', '~> 1.0'

Save the file, and install the dependencies via pod install in Terminal, just as you did before.

Notice anything different this time? Yep, you’ve specified the version number as ~> 1.0. What’s going on here?

CocoaPods recommends that all pods use Semantic Versioning.

Semantic Versioning

The three numbers are defined as major, minor, and patch version numbers.

For example, the version number 1.0.0 would be interpreted as:

Semantic Versioning Example

When the major number is increased, this means that non-backwards compatible changes were introduced. When you upgrade a pod to the next major version, you may need to fix build errors, or the pod may behave differently than before.

When the minor number is increased, this means new functionality was added, but it’s backwards compatible. When you decide to upgrade, you may or may not need the new functionality, but it shouldn’t cause any build errors or change existing behavior.

When the patch number is increased, this means bug fixes were added, but no new functionality was added or behavior changes made. In general, you always want to upgrade patch versions as soon as possible to have the latest, stable version of the pod.

Lastly, the highest order number (major then minor then patch) must be increased per the above rules and any lower order numbers must be reset to zero.

Need an Example?

Consider a pod that has a current version number of 1.2.3.

If changes are made that are not backwards compatible, don’t have new functionality, but fix existing bugs, the next version would be 2.0.0.

Challenge Time

If a pod has a current version of 2.4.6 and changes are made that fix bugs and add backwards-compatible functionality, what should the new version number be?

Solution Inside SelectShow>

If a pod has a current version of 3.5.8 and changes are made to existing functionality which aren’t backwards compatible, what should the new version number be?

Solution Inside SelectShow>

If a pod has a current version of 10.20.30 and only bugs are fixed, what should the new version number be?

Solution Inside SelectShow>

Having said all this, there is one exception to these rules:

If a pod’s version number is less than 1.0.0, it’s considered to be a beta version, and minor number increases may include backwards incompatible changes.

So in the case of MBProgressHUB using ~> 1.0 means you should install the latest version that’s greater than or equal to 1.0 but less than 2.0.

This ensures you get the latest bug fixes and features when you install this pod, but you won’t accidentally pull in backwards-incompatible changes.

There’s several other operators available, too. For a complete list, see the Podfile Syntax Reference.

Showing Progess

Now, back in PickFlavorViewController.swift, add the following right after the other imports:

import MBProgressHUD

Next, add the following helper methods after loadFlavors():

private func showLoadingHUD() {
  let hud = MBProgressHUD.showAdded(to: contentView, animated: true)
  hud.label.text = "Loading..."
}

private func hideLoadingHUD() {
  MBProgressHUD.hide(for: contentView, animated: true)
}

Now in loadFlavors(), add the following two lines (as indicated):

fileprivate func loadFlavors() {
  showLoadingHUD() // <-- Add this line

  Alamofire.request(
    "https://www.raywenderlich.com/downloads/Flavors.plist",
    method: .get,
    encoding: PropertyListEncoding(format: .xml, options: 0)).responsePropertyList {
      [weak self] response in

      guard let strongSelf = self else { return }

      strongSelf.hideLoadingHUD() // <-- Add this line
      // ...

As the method names imply, showLoadingHUD() shows an instance of MBProgressHUD while the GET request downloads, and hideLoadingHUD() hides the HUD when the request is finished. Since showLoadingHUD() is outside the closure it does not need to be prefixed with self.

Build and run. You should now see a loading indicator while the flavors are loading:

Great work! Customers can now select their favorite ice cream flavor, and they are shown a loading indicator while flavors are being downloaded.

Where to Go From Here

You can download the completed project from here.

Congratulations, you now know the basics of using CocoaPods, including creating and modifying dependencies, and understanding semantic versioning. You're now ready to start using them both in your own projects!

There's lots more that you can do with CocoaPods. You can search for existing pods on the official CocoaPods website. Also refer to the CocoaPods Guides to learn the finer details of using this excellent tool. But be warned, once you do begin using it you'll wonder how you ever managed without it! :]

I hope you enjoyed reading this CocoaPods tutorial as much I did writing it.

What are some of your favorite CocoaPods? Which ones do you rely on the most for everyday projects? Feel free to share in the comments below, or on the forums!

The post CocoaPods Tutorial for Swift: Getting Started appeared first on Ray Wenderlich.

Advanced VR Mechanics With Unity and the HTC Vive Part 1

$
0
0

unity-htc-vive

VR is more popular than ever, and making games has never been easier. But to offer a really immersive experience, your in-game mechanics and physics need to feel very, very real, especially when you’re interacting with in-game objects.

In the first part of this advanced HTC Vive tutorial, you’ll learn how to create an expandable interaction system and implement multiple ways to grab virtual objects inside that system, and fling them around like nobody’s business.

By the time you’re done, you’ll have some flexible interaction systems that you can use right in your own VR projects!

Note: This tutorial is intended for an advanced audience, and won’t cover things such as adding components, creating new GameObjects scripts, or C# syntax. If you need to level up your Unity skills, work through our tutorials on getting started with Unity and introduction to Unity Scripting first, then return to this tutorial.

Getting Started

You’ll need the following things for this tutorial:

If you haven’t worked with the HTC Vive before, you might want to check out this previous HTC Vive tutorial to get a feel for the basics of working with the HTC Vive in Unity. The HTC Vive is one of the best head-mounted displays at the moment and offers an excellent immersive experience because of its room-scale gameplay capabilities.

Download the starter project, unzip it somewhere and open the folder inside Unity.

Take a look at the folder structure in the Project window:

Here’s what each contains:

  • Materials: All the materials for the scene.
  • Models: All models for this tutorial.
  • Prefabs: For now, this only contains the prefab for the poles that are scattered around the level. You’ll place your own objects in here for later use.
  • Scenes: The game scene and some lighting data.
  • Scripts: A few premade scripts; you’ll save your own scripts in here as well.
  • Sounds: The sound for shooting an arrow from the bow.
  • SteamVR: The SteamVR plugin and all related scripts, prefabs and examples.
  • Textures: Contains the main texture shared by almost all models (for the sake of efficiency) as well as the texture for the book object.

Open up the Game scene inside the Scenes folder.

Look at the Game view and you’ll notice there’s no camera present in the scene:

In the next section you’ll fix this by adding everything necessary for the HTC Vive to work.

Scene Setup

Select and drag the [CameraRig] and [SteamVR] prefabs from the SteamVR\Prefabs folder to the Hierarchy.

The camera rig will now be on the ground, but it should be on the wooden tower. Change the position of [CameraRig] to (X:0, Y:3.35, Z:0) to correct this. This is what it should look like in the Game view:

Now save the scene and press the play button to test if everything works as intended. Be sure to look around and use at least one controller to see if you can see the in-game controller moving around.

If the controllers didn’t work, don’t panic! At the time of writing, there’s a bug in the latest SteamVR plugin (version 1.2.1) when using Unity 5.6 which causes the movement of the controllers to not register.

To fix this, select Camera (eye) under [CameraRig]/Camera (head) and add the SteamVR_Update_Poses component to it:

This script manually updates the position and rotation of the controllers. Try playing the scene again, and things should work much better.

Before doing any scripting, take a look at these tags in the project:

These tags make it easier to detect which type of object collided or triggered with another.

Interaction System: InteractionObject

An interaction system allows for a flexible, modular approach to interactions between the player and objects in the scene. Instead of rewriting the boilerplate code for every object and the controllers, you’ll be making some classes from which other scripts can be derived.

The first script you’ll be making is the RWVR_InteractionObject class; all objects that can be interacted with will be derived from this class. This base class will hold some essential variables and methods.

Note: To avoid conflicts with the SteamVR plugin and make searching easier, all VR scripts in this tutorial will have the “RWVR” prefix.

Create a new folder in the Scripts folder and name it RWVR. Create a new C# script in there and name it RWVR_InteractionObject.

Open up the script in your favorite code editor and remove both the Start() and Update() methods.

Add the following variables to the top of the script, right underneath the class declaration:

protected Transform cachedTransform; // 1
[HideInInspector] // 2
public  RWVR_InteractionController currentController; // 3

You’ll probably get an error saying RWVR_InteractionController couldn’t be found. Ignore this for now, as you’ll be creating that class next.

Taking each commented line in turn:

  1. You cache the value of the transform to improve performance.
  2. This attribute makes the variable underneath invisible in the Inspector window, even though it’s public.
  3. This is the controller this object is currently interacting with. You’ll visit the controller in detail later on.

Save this script for now and return to the editor.

Create a new C# script inside the RWVR folder named RWVR_InteractionController. Open it up, remove the Start() and Update() methods and save your work.

Open the RWVR_InteractionObject script again, and the error you received before should be gone.

Note: If you’re still getting the error, close your code editor, give focus to Unity and open the script again from there.

Now add the following three methods below the variables you just added:

public virtual void OnTriggerWasPressed(RWVR_InteractionController controller)
{
    currentController = controller;
}

public virtual void OnTriggerIsBeingPressed(RWVR_InteractionController controller)
{
}

public virtual void OnTriggerWasReleased(RWVR_InteractionController controller)
{
    currentController = null;
}

These methods will be called by the controller when its trigger is either pressed, held or released. A reference to the controller is stored when it’s pressed, and removed again when it’s released.

All of these methods are virtual and will be overridden by more sophisticated scripts later on so they can benefit from these controller callbacks.

Add the following method below OnTriggerWasReleased:

public virtual void Awake()
{
    cachedTransform = transform; // 1
    if (!gameObject.CompareTag("InteractionObject")) // 2
    {
        Debug.LogWarning("This InteractionObject does not have the correct tag, setting it now.", gameObject); // 3
        gameObject.tag = "InteractionObject"; // 4
    }
}

Taking it comment-by-comment:

  1. Cache the transform for better performance.
  2. Check to see if this InteractionObject has the proper tag assigned. Execute the code below if it doesn’t.
  3. Log a warning in the inspector to warn the developer of a forgotten tag.
  4. Assign the tag just in time so this object functions as expected.

The interaction system will depend heavily upon the InteractionObject and Controller tags to differentiate those special objects from the rest of the scene. It’s quite easy to forget to add this tag to objects every time you add a script to it. That’s why this failsafe is in place. Better to be safe than sorry! :]

Finally, add these methods below Awake():

public bool IsFree() // 1
{
    return currentController == null;
}

public virtual void OnDestroy() // 2
{
    if (currentController)
    {
        OnTriggerWasReleased(currentController);
    }
}

Here’s what these methods do:

  1. This is a public Boolean that indicates whether or not this object is currently in use by a controller.
  2. When this object gets destroyed, you release it from the current controller (if there are any). This helps to avoid weird bugs later on when working with objects that can be held.

Save this script and open the RWVR_InteractionController script again.

It’s empty at the moment. But you’ll soon fill it up with functionality!

Interaction System: Controller

The controller script might be the most important piece of all, as it’s the direct link between the player and the game. It’s important to make use of as much input as possible and return appropriate feedback to the player.

To start off, add the following variables below the class declaration:

public Transform snapColliderOrigin; // 1
public GameObject ControllerModel; // 2

[HideInInspector]
public Vector3 velocity; // 3
[HideInInspector]
public Vector3 angularVelocity; // 4

private RWVR_InteractionObject objectBeingInteractedWith; // 5

private SteamVR_TrackedObject trackedObj; // 6

Looking at each piece in turn:

  1. Save a reference to the tip of the controller. You’ll be adding a transparent sphere later, which will act as a guide to where and how far you can reach:

  2. This is the visual representation of the controller, seen in white above.
  3. This is the speed and direction of the controller. You’ll use this to calculate how objects should fly when you throw them.
  4. This is the rotation of the controller, also used when calculating the motion of thrown objects.
  5. This is the InteractionObject this controller is currently interacting with. You use it to send events to the active object.
  6. SteamVR_TrackedObject can be used to get a reference to the actual controller.

Add this code below the variables you just added:

private SteamVR_Controller.Device Controller // 1
{
    get { return SteamVR_Controller.Input((int)trackedObj.index); }
}

public RWVR_InteractionObject InteractionObject // 2
{
    get { return objectBeingInteractedWith; }
}

void Awake() // 3
{
    trackedObj = GetComponent<SteamVR_TrackedObject>();
}

Here’s what’s going on in the code above:

  1. This variable acts as a handy shortcut to the actual SteamVR controller class from the tracked object.
  2. This returns the InteractionObject this controller is currently interacting with. It’s been encapsulated to ensure it stays read-only for other classes.
  3. Finally, save a reference to the TrackedObject component attached to this controller to use later.

Now add the following method:

private void CheckForInteractionObject()
{
    Collider[] overlappedColliders = Physics.OverlapSphere(snapColliderOrigin.position, snapColliderOrigin.lossyScale.x / 2f); // 1

    foreach (Collider overlappedCollider in overlappedColliders) // 2
    {
        if (overlappedCollider.CompareTag("InteractionObject") && overlappedCollider.GetComponent<RWVR_InteractionObject>().IsFree()) // 3
        {
            objectBeingInteractedWith = overlappedCollider.GetComponent<RWVR_InteractionObject>(); // 4
            objectBeingInteractedWith.OnTriggerWasPressed(this); // 5
            return; // 6
        }
    }
}

This method searches for InteractionObjects in a certain range from the controller’s snap collider. Once it finds one, it populates the objectBeingInteractedWith with a reference to it.

Here’s what each line does:

  1. Creates a new array of colliders and fills it with all colliders found by OverlapSphere() at the position and scale of the snapColliderOrigin, which is the transparent sphere shown above that you’ll add shortly.
  2. Iterates over the array.
  3. If any of the found colliders has an InteractionObject tag and is free, continue.
  4. Saves a reference to the RWVR_InteractionObject attached to the object that was overlapped in objectBeingInteractedWith.
  5. Calls OnTriggerWasPressed on objectBeingInteractedWith and gives it the current controller as a parameter.
  6. Breaks out of the loop once an InteractionObject is found.

Add the following method that makes use of the code you just added:

void Update()
{
    if (Controller.GetHairTriggerDown()) // 1
    {
        CheckForInteractionObject();
    }

    if (Controller.GetHairTrigger()) // 2
    {
        if (objectBeingInteractedWith)
        {
            objectBeingInteractedWith.OnTriggerIsBeingPressed(this);
        }
    }

    if (Controller.GetHairTriggerUp()) // 3
    {
        if (objectBeingInteractedWith)
        {
            objectBeingInteractedWith.OnTriggerWasReleased(this);
            objectBeingInteractedWith = null;
        }
    }
}

This is fairly straightforward:

  1. When the trigger is pressed, call CheckForInteractionObject() to prepare for a possible interaction.
  2. While the trigger is held down and there’s an object being interacted with, call the object’s OnTriggerIsBeingPressed().
  3. When the trigger is released and there’s an object that’s being interacted with, call that object’s OnTriggerWasReleased() and stop interacting with it.

These checks make sure that all of the player’s input is being passed to any InteractionObjects they are interacting with.

Add these two methods to keep track of the controller’s velocity and angular velocity:

private void UpdateVelocity()
{
    velocity = Controller.velocity;
    angularVelocity = Controller.angularVelocity;
}

void FixedUpdate()
{
    UpdateVelocity();
}

FixedUpdate() calls UpdateVelocity() every frame at the fixed framerate, which updates the velocity and angularVelocity variables. Later, you’ll pass these values to a RigidBody to make thrown objects move more realistically.

Sometimes you’ll want to hide a controller to make the experience more immersive and avoid blocking your view. Add the following two methods below the previous ones:

public void HideControllerModel()
{
    ControllerModel.SetActive(false);
}

public void ShowControllerModel()
{
    ControllerModel.SetActive(true);
}

These methods simply enable or disable the GameObject representing the controller.

Finally, add the following two methods:

public void Vibrate(ushort strength) // 1
{
    Controller.TriggerHapticPulse(strength);
}

public void SwitchInteractionObjectTo(RWVR_InteractionObject interactionObject) // 2
{
    objectBeingInteractedWith = interactionObject; // 3
    objectBeingInteractedWith.OnTriggerWasPressed(this); // 4
}

Here’s how these methods work:

  1. This method makes the piezoelectric linear actuators (no, I’m not making that up) inside the controller vibrate for a certain amount of time. The longer it vibrates, the stronger the vibration feels. Its range is between 1 and 3999.
  2. This switches the active InteractionObject to the one specified in the parameter.
  3. This makes the specified InteractionObject the active one.
  4. Call OnTriggerWasPressed() on the newly assigned InteractionObject and pass this controller.

Save this script and return to the editor. In order to get the controllers working as intended, you’ll need to make a few adjustments.

Select both controllers in the Hierarchy. They’re both children of [CameraRig].

Add a Rigidbody component to both. This will allow them to work with fixed joints and interact with other physics objects.

Uncheck Use Gravity and check Is Kinematic. The controllers don’t need be to affected by physics since they’re strapped to your hands in real life.

Now add the RWVR_Interaction Controller component to the controllers. You’ll configure those in a bit.

Unfold Controller (left) and add a Sphere to it as its child by right-clicking it and selecting 3D Object > Sphere.

Select Sphere, name it SnapOrigin and press F to focus on it in the Scene view. You should see a big white hemisphere at the center of the platform floor:

Set its Position to (X:0, Y:-0.045, Z:0.001) and its Scale to (X:0.1, Y:0.1, Z:0.1). This will position the sphere right at the front of the controller.

Remove the Sphere Collider component, as all physics checks are done in code.

Finally, make the sphere transparent by applying the Transparent material to its Mesh Renderer.

Now duplicate SnapOrigin and drag SnapOrigin (1) to Controller (right) to make it a child of the right controller. Name it SnapOrigin.

The final step is to set up the controllers to make use of their Model and SnapOrigin.

Select and unfold Controller (left), drag its child SnapOrigin to the Snap Collider Origin slot and drag Model to the Controller Model slot.

Do the same for Controller (right).

Now for a bit of fun! Power on your controllers and run the scene.

Move the controllers in front of the HMD to check if the spheres are clearly visible and attached to the controllers.

When you’re done testing, save the scene and prepare to actually use the interaction system!

Grabbing Objects Using The Interaction System

You may have noticed these objects laying around:

You can take a good look at them, but you can’t pick them up yet. You’d better fix that soon, or how will you ever learn how awesome our Unity book is?! :]

In order to interact with rigidbodies like these, you’ll need to create a new derivative class of RWVR_InteractionObject that will let you grab and throw objects.

Create a new C# script in the Scripts/RWVR folder and name it RWVR_SimpleGrab.

Open it up in your code editor and remove the Start() and Update() methods.

Replace the following:

public class RWVR_SimpleGrab : MonoBehaviour

…with:

public class RWVR_SimpleGrab : RWVR_InteractionObject

This makes this script derive from RWVR_InteractionObject, which provides all the hooks onto the controller’s input so it can appropriately handle the input.

Add these variables below the class declaration:

public bool hideControllerModelOnGrab; // 1
private Rigidbody rb; // 2

Quite simply:

  1. A flag indicating whether or not the controller model should be hidden when this object is picked up.
  2. Cache the Rigidbody component for performance and ease of use.

Add the following methods below those variables:

public override void Awake()
{
    base.Awake(); // 1
    rb = GetComponent<Rigidbody>(); // 2
}

Short and sweet:

  1. Call Awake() on the base class RWVR_InteractionObject. This caches the object’s Transform component and checks if the InteractionObject tag is assigned.
  2. Store the attached Rigidbody component for later use.

Now you need some helper methods that will attach and release the object to and from the controller by using a FixedJoint.

Add the following methods below Awake():

private void AddFixedJointToController(RWVR_InteractionController controller) // 1
{
    FixedJoint fx = controller.gameObject.AddComponent<FixedJoint>();
    fx.breakForce = 20000;
    fx.breakTorque = 20000;
    fx.connectedBody = rb;
}

private void RemoveFixedJointFromController(RWVR_InteractionController controller) // 2
{
    if (controller.gameObject.GetComponent<FixedJoint>())
    {
        FixedJoint fx = controller.gameObject.GetComponent<FixedJoint>();
        fx.connectedBody = null;
        Destroy(fx);
    }
}

Here’s what these methods do:

  1. This method accepts a controller to “stick” to as a parameter and then proceeds to create a FixedJoint component. Attach it to the controller, configure it so it won’t break easily and finally connect it to the current InteractionObject. The reason you set a finite break force is to prevent users from moving objects through other solid objects, which might result in weird physics glitches.
  2. The controller passed as a parameter is relieved from its FixedJoint component (if there is one). The connection to this object is removed and the FixedJoint is destroyed.

With those methods in place, you can take care of the actual player input by implementing some OnTrigger methods from the base class. To start off with, add OnTriggerWasPressed():

public override void OnTriggerWasPressed(RWVR_InteractionController controller) // 1
{
    base.OnTriggerWasPressed(controller); // 2

    if (hideControllerModelOnGrab) // 3
    {
        controller.HideControllerModel();
    }

    AddFixedJointToController(controller); // 4
}

This method adds the FixedJoint when the player presses the trigger button to interact with the object. Here’s what you do in each part:

  1. Override the base OnTriggerWasPressed() method.
  2. Call the base method to intialize the controller.
  3. If the hideControllerModelOnGrab flag was set, hide the controller model.
  4. Add a FixedJoint to the controller.

The final step for this simple grab class is to add OnTriggerWasReleased():

public override void OnTriggerWasReleased(RWVR_InteractionController controller) // 1
{
    base.OnTriggerWasReleased(controller); //2

    if (hideControllerModelOnGrab) // 3
    {
        controller.ShowControllerModel();
    }

    rb.velocity = controller.velocity; // 4
    rb.angularVelocity = controller.angularVelocity;

    RemoveFixedJointFromController(controller); // 5
}

This method removes the FixedJoint and passes the controller’s velocities to create a realistic throwing effect. Comment-by-comment:

  1. Override the base OnTriggerWasReleased() method.
  2. Call the base method to unassign the controller.
  3. If the hideControllerModelOnGrab flag was set, show the controller model again.
  4. Pass the controller’s velocity and angular velocity to this object’s rigidbody. This means the object will react in a realistic manner when you release. For example, if you’re throwing a ball, you move the controller from back-to-front in an arc. The ball should gain rotation and a forward-acting force as if you had passed your actual kinetic energy in real life.
  5. Remove the FixedJoint.

Save this script and return to the editor.

The dice and books are linked to their respective prefabs in the Prefabs folder. Open this folder in the Project view:

Select the Book and Die prefabs and add the RWVR_Simple Grab component to both. Also enable Hide Controller Model.

Save and run the scene. Try grabbing some of the books and dice and throwing them around.

In the next section I’ll explain another way of grabbing objects: via snapping.

Grabbing and Snapping Objects

Grabbing objects at the position and rotation of your controller usually works, but in some cases snapping the object to a certain position might be desirable. For example, when the player sees a gun, they would expect the gun to be pointing in the right direction once they’ve picked it up. This is where snapping comes into play.

In order for snapping to work, you’ll need to create another script. Create a new C# script inside the Scripts/RWVR folder and name it RWVR_SnapToController. Open it in your favorite code editor and remove the Start() and Update() methods.

Replace the following:

public class RWVR_SnapToController : MonoBehaviour

..with:

public class RWVR_SnapToController : RWVR_InteractionObject

This lets this script use all of the InteractionObject capabilities.

Add the following variable declarations:

public bool hideControllerModel; // 1
public Vector3 snapPositionOffset; // 2
public Vector3 snapRotationOffset; // 3

private Rigidbody rb; // 4

Here’s what these variables are for:

  1. A flag to tell whether the controller’s model should be hidden once the player grabs this object.
  2. The position added after snapping. The object snaps to the controller’s position by default.
  3. Same as above, except this handles the rotation.
  4. A cached reference of this object’s Rigidbody component.

Add the following method below the variables:

public override void Awake()
{
    base.Awake();
    rb = GetComponent<Rigidbody>();
}

Just as in the SimpleGrab script, this overrides the base Awake() method, calls the base and caches the RigidBody component.

Next up are the helper methods, which form the real meat of this script.

Add the following method below Awake():

private void ConnectToController(RWVR_InteractionController controller) // 1
{
    cachedTransform.SetParent(controller.transform); // 2

    cachedTransform.rotation = controller.transform.rotation; // 3
    cachedTransform.Rotate(snapRotationOffset);
    cachedTransform.position = controller.snapColliderOrigin.position; // 4
    cachedTransform.Translate(snapPositionOffset, Space.Self);

    rb.useGravity = false; // 5
    rb.isKinematic = true; // 6
}

The way this script attaches the object differs from the SimpleGrab script, as it doesn’t use a FixedJoint, but instead makes itself a child of the controller. This means the connection between the controller and snap objects can’t be broken by force. This will keep everything stable for this tutorial, but you might prefer to use a FixedJoint in your own projects.

Taking it play-by-play:

  1. Accept a controller as a parameter to connect to.
  2. Set this object’s parent to be the controller.
  3. Make this object’s rotation the same as the controller and add the offset.
  4. Make this object’s position the same as the controller and add the offset.
  5. Disable the gravity on this object; otherwise, it would fall out of your hand.
  6. Make this object kinematic. While attached to the controller, this object won’t be under the influence of the physics engine.

Now add the matching method to release the object by adding the following method:

private void ReleaseFromController(RWVR_InteractionController controller) // 1
{
    cachedTransform.SetParent(null); // 2

    rb.useGravity = true; // 3
    rb.isKinematic = false;

    rb.velocity = controller.velocity; // 4
    rb.angularVelocity = controller.angularVelocity;
}

This simply unparents the object, resets the rigidbody and applies the controller velocities. In more detail:

  1. Accept the controller to release as a parameter.
  2. Unparent the object.
  3. Re-enable gravity and make the object non-kinematic again.
  4. Apply the controller’s velocities to this object.

Add the following override method to perform the snapping:

public override void OnTriggerWasPressed(RWVR_InteractionController controller) // 1
{
    base.OnTriggerWasPressed(controller); // 2

    if (hideControllerModel) // 3
    {
        controller.HideControllerModel();
    }

    ConnectToController(controller); // 4
}

This one is fairly straightforward:

  1. Override OnTriggerWasPressed() to add the snap code.
  2. Call the base method.
  3. If the hideControllerModel flag was set, hide the controller model.
  4. Connect this object to the controller.

Now add the release method below:

public override void OnTriggerWasReleased(RWVR_InteractionController controller) // 1
{
    base.OnTriggerWasReleased(controller); // 2

    if (hideControllerModel) // 3
    {
        controller.ShowControllerModel();
    }

    ReleaseFromController(controller); // 4
}

Again, fairly simple:

  1. Override OnTriggerWasReleased() to add the release code.
  2. Call the base method.
  3. If the hideControllerModel flag was set, show the controller model again.
  4. Release this object to the controller.

Save this script and return to the editor. Drag the RealArrow prefab out of the Prefabs folder into the Hierarchy window.

Select the arrow and set its position to (X:0.5, Y:4.5, Z:-0.8). It should be floating above the stone slab now:

Attach the RWVR_Snap To Controller component to the new arrow in the Hierarchy so you can interact with it and set its Hide Controller Model bool to true. Finally, press the Apply button at the top of the Inspector window to apply the changes to this prefab.

For this object, there’s no need to change the offsets; it should snap to an acceptable position by default.

Save the scene and run it. Grab the arrow and throw it away. Let your inner beast out!

Notice that the arrow will always be positioned properly in your hand, no matter how you pick it up.

You’re all done with this tutorial; play around with the game a bit to get a feel for the dynamics of the interactions.

Where to Go From Here?

You can download the finished project here.

In this tutorial you’ve learned how to create an expandable interaction system, and you’ve discovered several ways to grab objects using the interaction system.

In the next part of this tutorial, you’ll learn how to expand the system further by making a functional bow and arrow, and even creating a functional backpack!

If you’re interested in learning more about creating killer games with Unity, check out our book, Unity Games By Tutorials.

In this book, you create four complete games from scratch:

  • A twin-stick shooter
  • A first-person shooter
  • A tower defense game (with VR support!)
  • A 2D platformer

By the end of this book, you’ll be ready to make your own games for Windows, macOS, iOS, and more!

This book is for complete beginners to Unity, as well as for those who’d like to bring their Unity skills to a professional level. The book assumes you have some prior programming experience (in a language of your choice).

Thanks for reading! If you have any comments or suggestions, please join the discussion below.

The post Advanced VR Mechanics With Unity and the HTC Vive Part 1 appeared first on Ray Wenderlich.

Video Tutorial: Advanced Swift 3 Part 4: Protocols and Generics

Video Tutorial: Advanced Swift 3 Part 5: Values and References

Getting Started with Fastlane: Submitting to the App Store

Viewing all 4374 articles
Browse latest View live


<script src="https://jsc.adskeeper.com/r/s/rssing.com.1596347.js" async> </script>