Quantcast
Channel: Kodeco | High quality programming tutorials: iOS, Android, Swift, Kotlin, Unity, and more
Viewing all 4374 articles
Browse latest View live

Design Patterns on iOS using Swift – Part 2/2

$
0
0

Design patterns on iOS using Swift – Part 2/2

Update note: This tutorial was updated for iOS 11, Xcode 9 and Swift 4 by Lorenzo Boaro. Original post by Tutorial team member Eli Ganem.

Welcome back to part two of this introductory tutorial on design patterns on iOS! In the first part, you learned about some fundamental patterns in Cocoa such as MVC, singletons, and decorator.

In this final part, you’ll learn about the other basic design patterns that come up a lot in iOS and OS X development: adapter, observer, and memento. Let’s get right into it!

Getting Started

You can download the project source from the end of part 1 to get started.

Here’s where you left off the sample music library app at the end of the first part:

Album app showing populated table view

The original plan for the app included a horizontal scroller at the top of the screen to switch between albums. Instead of coding a single-purpose horizontal scroller, why not make it reusable for any view?

To make this view reusable, all decisions about its content should be left to other two objects: a data source and a delegate. The horizontal scroller should declare methods that its data source and delegate implement in order to work with the scroller, similar to how the UITableView delegate methods work. You’ll implement this when we discuss the next design pattern.

The Adapter Pattern

An Adapter allows classes with incompatible interfaces to work together. It wraps itself around an object and exposes a standard interface to interact with that object.

If you’re familiar with the Adapter pattern then you’ll notice that Apple implements it in a slightly different manner – Apple uses protocols to do the job. You may be familiar with protocols like UITableViewDelegate, UIScrollViewDelegate, NSCoding and NSCopying. As an example, with the NSCopying protocol, any class can provide a standard copy method.

How to Use the Adapter Pattern

The horizontal scroller mentioned before will look like this:

swiftDesignPattern7

To begin implementing it, right click on the View group in the Project Navigator, select New File… and select, iOS > Cocoa Touch class and then click Next. Set the class name to HorizontalScrollerView and make it a subclass of UIView.

Open HorizontalScrollerView.swift and insert the following code above the class HorizontalScroller line:

protocol HorizontalScrollerViewDataSource: class {
  // Ask the data source how many views it wants to present inside the horizontal scroller
  func numberOfViews(in horizontalScrollerView: HorizontalScrollerView) -> Int
  // Ask the data source to return the view that should appear at <index>
  func horizontalScrollerView(_ horizontalScrollerView: HorizontalScrollerView, viewAt index: Int) -> UIView
}

This defines a protocol named HorizontalScrollerViewDataSource that performs two operations: it asks for the number of views to display inside the horizontal scroller and the view that should appear for a specific index.

Just below this protocol definition add another protocol named HorizontalScrollerViewDelegate.

protocol HorizontalScrollerViewDelegate: class {
  // inform the delegate that the view at <index> has been selected
  func horizontalScrollerView(_ horizontalScrollerView: HorizontalScrollerView, didSelectViewAt index: Int)
}

This will let the horizontal scroller inform some other object that a view has been selected.

Note: Dividing areas of concern into separate protocols makes things a lot more clear. In this way you can decide to conform to specific protocols and avoid using the @objc marker to declare optional methods.

In HorizontalScrollerView.swift, add the following code to the HorizontalScrollerView class definition:

weak var dataSource: HorizontalScrollerViewDataSource?
weak var delegate: HorizontalScrollerViewDelegate?

The delegate and data source are optionals, so you don’t have to provide them, but any object that you do set here must conform to the appropriate protocol.

Add some more code to the class:

// 1
private enum ViewConstants {
  static let Padding: CGFloat = 10
  static let Dimensions: CGFloat = 100
  static let Offset: CGFloat = 100
}

// 2
private let scroller = UIScrollView()

// 3
private var contentViews = [UIView]()

Taking each comment block in turn:

  1. Define a private enum to make it easy to modify the layout at design time. The view’s dimensions inside the scroller will be 100 x 100 with a 10 point margin from its enclosing rectangle.
  2. Create the scroll view containing the views.
  3. Create an array that holds all the album covers.

Next you need to implement the initializers. Add the following methods:

override init(frame: CGRect) {
  super.init(frame: frame)
  initializeScrollView()
}

required init?(coder aDecoder: NSCoder) {
  super.init(coder: aDecoder)
  initializeScrollView()
}

func initializeScrollView() {
  //1
  addSubview(scroller)

  //2
  scroller.translatesAutoresizingMaskIntoConstraints = false

  //3
  NSLayoutConstraint.activate([
    scroller.leadingAnchor.constraint(equalTo: self.leadingAnchor),
    scroller.trailingAnchor.constraint(equalTo: self.trailingAnchor),
    scroller.topAnchor.constraint(equalTo: self.topAnchor),
    scroller.bottomAnchor.constraint(equalTo: self.bottomAnchor)
  ])

  //4
  let tapRecognizer = UITapGestureRecognizer(target: self, action: #selector(scrollerTapped(gesture:)))
  scroller.addGestureRecognizer(tapRecognizer)
}

The work is done in initializeScrollView(). Here’s what’s going on in that method:

  1. Adds the UIScrollView instance to the parent view.
  2. Turn off autoresizing masks. This is so you can apply your own constraints
  3. Apply constraints to the scrollview. You want the scroll view to completely fill the HorizontalScrollerView
  4. Create a tap gesture recognizer. The tap gesture recognizer detects touches on the scroll view and checks if an album cover has been tapped. If so, it will notify the HorizontalScrollerView delegate. You’ll have a compiler error here because the tap method isn’t implemented yet, you’ll be doing that shortly.

Now add this method:

func scrollToView(at index: Int, animated: Bool = true) {
  let centralView = contentViews[index]
  let targetCenter = centralView.center
  let targetOffsetX = targetCenter.x - (scroller.bounds.width / 2)
  scroller.setContentOffset(CGPoint(x: targetOffsetX, y: 0), animated: animated)
}

This method retrieves the view for a specific index and centers it. It is used by the following method (add this to the class as well):

@objc func scrollerTapped(gesture: UITapGestureRecognizer) {
  let location = gesture.location(in: scroller)
  guard
    let index = contentViews.index(where: { $0.frame.contains(location)})
    else { return }

  delegate?.horizontalScrollerView(self, didSelectViewAt: index)
  scrollToView(at: index)
}

This method finds the location of the tap in the scroll view, then the index of the first content view that contains that location, if any.

If a content view was hit, the delegate is informed and the view is scrolled to the center.

Next add the following to access an album cover from the scroller:

func view(at index :Int) -> UIView {
  return contentViews[index]
}

view(at:) simply returns the view at a particular index. You will be using this method later to highlight the album cover you have tapped on.

Now add the following code to reload the scroller:

func reload() {
  // 1 - Check if there is a data source, if not there is nothing to load.
  guard let dataSource = dataSource else {
    return
  }

  //2 - Remove the old content views
  contentViews.forEach { $0.removeFromSuperview() }

  // 3 - xValue is the starting point of each view inside the scroller
  var xValue = ViewConstants.Offset
  // 4 - Fetch and add the new views
  contentViews = (0..<dataSource.numberOfViews(in: self)).map {
    index in
    // 5 - add a view at the right position
    xValue += ViewConstants.Padding
    let view = dataSource.horizontalScrollerView(self, viewAt: index)
    view.frame = CGRect(x: CGFloat(xValue), y: ViewConstants.Padding, width: ViewConstants.Dimensions, height: ViewConstants.Dimensions)
    scroller.addSubview(view)
    xValue += ViewConstants.Dimensions + ViewConstants.Padding
    return view
  }
  // 6
  scroller.contentSize = CGSize(width: CGFloat(xValue + ViewConstants.Offset), height: frame.size.height)
}

The reload method is modeled after reloadData in UITableView; it reloads all the data used to construct the horizontal scroller.

Stepping through the code comment-by-comment:

  1. Checks to see if there is a data source before we perform any reload.
  2. Since you're clearing the album covers, you also need to remove any existing views.
  3. All the views are positioned starting from the given offset. Currently it's 100, but it can be easily tweaked by changing the constant ViewConstants.Offset at the top of the file.
  4. You ask the data source for the number of views and then use this to create the new content views array.
  5. The HorizontalScrollerView asks its data source for the views one at a time and it lays them next to each another horizontally with the previously defined padding.
  6. Once all the views are in place, set the content offset for the scroll view to allow the user to scroll through all the albums covers.

You execute reload when your data has changed.

The last piece of the HorizontalScrollerView puzzle is to make sure the album you're viewing is always centered inside the scroll view. To do this, you'll need to perform some calculations when the user drags the scroll view with their finger.

Add the following method:

private func centerCurrentView() {
  let centerRect = CGRect(
    origin: CGPoint(x: scroller.bounds.midX - ViewConstants.Padding, y: 0),
    size: CGSize(width: ViewConstants.Padding, height: bounds.height)
  )

  guard let selectedIndex = contentViews.index(where: { $0.frame.intersects(centerRect) })
    else { return }
  let centralView = contentViews[selectedIndex]
  let targetCenter = centralView.center
  let targetOffsetX = targetCenter.x - (scroller.bounds.width / 2)

  scroller.setContentOffset(CGPoint(x: targetOffsetX, y: 0), animated: true)
  delegate?.horizontalScrollerView(self, didSelectViewAt: selectedIndex)
}

The above code takes into account the current offset of the scroll view and the dimensions and the padding of the views in order to calculate the distance of the current view from the center. The last line is important: once the view is centered, you then inform the delegate that the selected view has changed.

To detect that the user finished dragging inside the scroll view, you'll need to implement some UIScrollViewDelegate methods. Add the following class extension to the bottom of the file; remember, this must be added after the curly braces of the main class declaration!

extension HorizontalScrollerView: UIScrollViewDelegate {
  func scrollViewDidEndDragging(_ scrollView: UIScrollView, willDecelerate decelerate: Bool) {
    if !decelerate {
      centerCurrentView()
    }
  }

  func scrollViewDidEndDecelerating(_ scrollView: UIScrollView) {
    centerCurrentView()
  }
}

scrollViewDidEndDragging(_:willDecelerate:) informs the delegate when the user finishes dragging. The decelerate parameter is true if the scroll view hasn't come to a complete stop yet. When the scroll action ends, the the system calls scrollViewDidEndDecelerating(_:). In both cases you should call the new method to center the current view since the current view probably has changed after the user dragged the scroll view.

Lastly don't forget to set the delegate. Add the following line to the very beginning of initializeScrollView():

scroller.delegate = self

Your HorizontalScrollerView is ready for use! Browse through the code you've just written; you'll see there's not one single mention of the Album or AlbumView classes. That's excellent, because this means that the new scroller is truly independent and reusable.

Build your project to make sure everything compiles properly.

Now that HorizontalScrollerView is complete, it's time to use it in your app. First, open Main.storyboard. Click on the top gray rectangular view and click on the Identity Inspector. Change the class name to HorizontalScrollerView as shown below:

Next, open the Assistant Editor and control drag from the gray rectangular view to ViewController.swift to create an outlet. Name the name the outlet horizontalScrollerView, as shown below:

Next, open ViewController.swift. It's time to start implementing some of the HorizontalScrollerViewDelegate methods!

Add the following extension to the bottom of the file:

extension ViewController: HorizontalScrollerViewDelegate {
  func horizontalScrollerView(_ horizontalScrollerView: HorizontalScrollerView, didSelectViewAt index: Int) {
    //1
    let previousAlbumView = horizontalScrollerView.view(at: currentAlbumIndex) as! AlbumView
    previousAlbumView.highlightAlbum(false)
    //2
    currentAlbumIndex = index
    //3
    let albumView = horizontalScrollerView.view(at: currentAlbumIndex) as! AlbumView
    albumView.highlightAlbum(true)
    //4
    showDataForAlbum(at: index)
  }
}

This is what happens when this delegate method is invoked:

  1. First you grab the previously selected album, and deselect the album cover.
  2. Store the current album cover index you just clicked
  3. Grab the album cover that is currently selected and highlight the selection.
  4. Display the data for the new album within the table view.

Next, it's time to implement HorizontalScrollerViewDataSource. Add the following code at the end of file:

extension ViewController: HorizontalScrollerViewDataSource {
  func numberOfViews(in horizontalScrollerView: HorizontalScrollerView) -> Int {
    return allAlbums.count
  }

  func horizontalScrollerView(_ horizontalScrollerView: HorizontalScrollerView, viewAt index: Int) -> UIView {
    let album = allAlbums[index]
    let albumView = AlbumView(frame: CGRect(x: 0, y: 0, width: 100, height: 100), coverUrl: album.coverUrl)
    if currentAlbumIndex == index {
      albumView.highlightAlbum(true)
    } else {
      albumView.highlightAlbum(false)
    }
    return albumView
  }
}

numberOfViews(in:), as you'll recognize, is the protocol method returning the number of views for the scroll view. Since the scroll view will display covers for all the album data, the count is the number of album records. In horizontalScrollerView(_:viewAt:) you create a new AlbumView, highlight it if it's the selected album, then pass it to the HorizontalScrollerView.

That's it! Only three short methods to display a nice looking horizontal scroller. You now need to connect up the datasource and delegate. Add the following code before showDataForAlbum(at:) in viewDidLoad:

horizontalScrollerView.dataSource = self
horizontalScrollerView.delegate = self
horizontalScrollerView.reload()

Build and run your project and take a look at your awesome new horizontal scroller:

Album cover scroller

Uh, wait. The horizontal scroller is in place, but where are the covers?

Ah, that's right — you didn't implement the code to download the covers yet. To do that, you'll need to add a way to download images. Since all your access to services goes through LibraryAPI, that's where this new method would have to go. However, there are a few things to consider first:

  1. AlbumView shouldn't work directly with LibraryAPI. You don't want to mix view logic with communication logic.
  2. For the same reason, LibraryAPI shouldn't know about AlbumView.
  3. LibraryAPI needs to inform AlbumView once the covers are downloaded since the AlbumView has to display the covers.

Sounds like a conundrum? Don't despair, you'll learn how to do this using the Observer pattern! :]

The Observer Pattern

In the Observer pattern, one object notifies other objects of any state changes. The objects involved don't need to know about one another - thus encouraging a decoupled design. This pattern's most often used to notify interested objects when a property has changed.

The usual implementation requires that an observer registers interest in the state of another object. When the state changes, all the observing objects are notified of the change.

If you want to stick to the MVC concept (hint: you do), you need to allow Model objects to communicate with View objects, but without direct references between them. And that's where the Observer pattern comes in.

Cocoa implements the observer pattern in two ways: Notifications and Key-Value Observing (KVO).

Notifications

Not be be confused with Push or Local notifications, Notifications are based on a subscribe-and-publish model that allows an object (the publisher) to send messages to other objects (subscribers/listeners). The publisher never needs to know anything about the subscribers.

Notifications are heavily used by Apple. For example, when the keyboard is shown/hidden the system sends a UIKeyboardWillShow/UIKeyboardWillHide, respectively. When your app goes to the background, the system sends a UIApplicationDidEnterBackground notification.

How to Use Notifications

Right click on RWBlueLibrary and select New Group. Rename it Extension. Right click again on that group and select New File.... Select iOS > Swift File and set the file name to NotificationExtension.swift.

Copy the following code inside the file:

extension Notification.Name {
  static let BLDownloadImage = Notification.Name("BLDownloadImageNotification")
}

You are extending Notification.Name with your custom notification. From now on, the new notification can be accessed as .BLDownloadImage, just as you would a system notification.

Go to AlbumView.swift and insert the following code to the end of the init(frame:coverUrl:) method:

NotificationCenter.default.post(name: .BLDownloadImage, object: self, userInfo: ["imageView": coverImageView, "coverUrl" : coverUrl])

This line sends a notification through the NotificationCenter singleton. The notification info contains the UIImageView to populate and the URL of the cover image to be downloaded. That's all the information you need to perform the cover download task.

Add the following line to init in LibraryAPI.swift, as the implementation of the currently empty init:

NotificationCenter.default.addObserver(self, selector: #selector(downloadImage(with:)), name: .BLDownloadImage, object: nil)

This is the other side of the equation: the observer. Every time an AlbumView posts a BLDownloadImage notification, since LibraryAPI has registered as an observer for the same notification, the system notifies LibraryAPI. Then LibraryAPI calls downloadImage(with:) in response.

Before you implement downloadImage(with:) there's one more thing to do. It would probably be a good idea to save the downloaded covers locally so the app won't need to download the same covers over and over again.

Open PersistencyManager.swift. After the import Foundation, add the following line:

import UIKit

This import is important because you will deal with UI objects, like UIImage.

Add this computed property to the end of the class:

private var cache: URL {
  return FileManager.default.urls(for: .cachesDirectory, in: .userDomainMask)[0]
}

This variable returns the URL of the cache directory, which is a good place to store files that you can re-download at any time.

Now add these two methods:

func saveImage(_ image: UIImage, filename: String) {
  let url = cache.appendingPathComponent(filename)
  guard let data = UIImagePNGRepresentation(image) else {
    return
  }
  try? data.write(to: url)
}

func getImage(with filename: String) -> UIImage? {
  let url = cache.appendingPathComponent(filename)
  guard let data = try? Data(contentsOf: url) else {
    return nil
  }
  return UIImage(data: data)
}

This code is pretty straightforward. The downloaded images will be saved in the Cache directory, and getImage(with:) will return nil if a matching file is not found in the Cache directory.

Now open LibraryAPI.swift and add import UIKit after the first available import.

At the end of the class add the following method:

@objc func downloadImage(with notification: Notification) {
  guard let userInfo = notification.userInfo,
    let imageView = userInfo["imageView"] as? UIImageView,
    let coverUrl = userInfo["coverUrl"] as? String,
    let filename = URL(string: coverUrl)?.lastPathComponent else {
      return
  }

  if let savedImage = persistencyManager.getImage(with: filename) {
    imageView.image = savedImage
    return
  }

  DispatchQueue.global().async {
    let downloadedImage = self.httpClient.downloadImage(coverUrl) ?? UIImage()
    DispatchQueue.main.async {
      imageView.image = downloadedImage
      self.persistencyManager.saveImage(downloadedImage, filename: filename)
    }
  }
}

Here's a breakdown of the above code:

  1. downloadImage is executed via notifications and so the method receives the notification object as a parameter. The UIImageView and image URL are retrieved from the notification.
  2. Retrieve the image from the PersistencyManager if it's been downloaded previously.
  3. If the image hasn't already been downloaded, then retrieve it using HTTPClient.
  4. When the download is complete, display the image in the image view and use the PersistencyManager to save it locally.

Again, you're using the Facade pattern to hide the complexity of downloading an image from the other classes. The notification sender doesn't care if the image came from the web or from the file system.

Build and run your app and check out the beautiful covers inside your collection view:

Album app showing cover art but still with spinners

Stop your app and run it again. Notice that there's no delay in loading the covers because they've been saved locally. You can even disconnect from the Internet and your app will work flawlessly. However, there's one odd bit here: the spinner never stops spinning! What's going on?

You started the spinner when downloading the image, but you haven't implemented the logic to stop the spinner once the image is downloaded. You could send out a notification every time an image has been downloaded, but instead, you'll do that using the other Observer pattern, KVO.

Key-Value Observing (KVO)

In KVO, an object can ask to be notified of any changes to a specific property; either its own or that of another object. If you're interested, you can read more about this on Apple's KVO Programming Guide.

How to Use the KVO Pattern

As mentioned above, the KVO mechanism allows an object to observe changes to a property. In your case, you can use KVO to observe changes to the image property of the UIImageView that holds the image.

Open AlbumView.swift and add the following property just below the private var indicatorView: UIActivityIndicatorView! declaration:

private var valueObservation: NSKeyValueObservation!

Now add the following code to commonInit, just before you add the cover image view as a subview:

valueObservation = coverImageView.observe(\.image, options: [.new]) { [unowned self] observed, change in
  if change.newValue is UIImage {
      self.indicatorView.stopAnimating()
  }
}

This snippet of code adds the image view as an observer for the image property of the cover image. \.image is the key path expression that enables this mechanism.

In Swift 4, a key path expression has the following form:

\<type>.<property>.<subproperty>

The type can often be inferred by the compiler, but at least 1 property needs to be provided. In some cases, it might make sense to use properties of properties. In your case, the property name, image has been specified, while the type name UIImageView has been omitted.

The trailing closure specifies the closure that is executed every time an observed property changes. In the above code, you stop the spinner when the image property changes. This way, when an image is loaded, the spinner will stop spinning.

Build and run your project. The spinner should disappear:
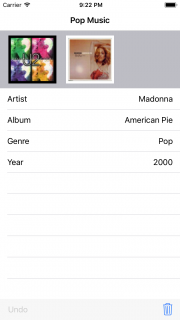
How the album app will look when the design patterns tutorial is complete

Note: Always remember to remove your observers when they're deinited, or else your app will crash when the subject tries to send messages to these non-existent observers! In this case the valueObservation will be deinited when the album view is, so the observing will stop then.

If you play around with your app a bit and terminate it, you'll notice that the state of your app isn't saved. The last album you viewed won't be the default album when the app launches.

To correct this, you can make use of the next pattern on the list: Memento.

The Memento Pattern

The memento pattern captures and externalizes an object's internal state. In other words, it saves your stuff somewhere. Later on, this externalized state can be restored without violating encapsulation; that is, private data remains private.

How to Use the Memento Pattern

iOS uses the Memento pattern as part of State Restoration. You can find out more about it by reading our tutorial, but essentially it stores and re-applies your application's state so the user is back where they left things.

To activate state restoration in the app, open Main.storyboard. Select the Navigation Controller and, in the Identity Inspector, find the Restoration ID field and type NavigationController.

Select the Pop Music scene and enter ViewController for the same field. These IDs tell iOS that you're interested in restoring state for those view controllers when the app restarts.

Add the following code to AppDelegate.swift:

func application(_ application: UIApplication, shouldSaveApplicationState coder: NSCoder) -> Bool {
  return true
}

func application(_ application: UIApplication, shouldRestoreApplicationState coder: NSCoder) -> Bool {
  return true
}

This code turns on state restoration for your app as a whole. Now, add the following code to the Constants enum in ViewController.swift:

static let IndexRestorationKey = "currentAlbumIndex"

This key will be used to save and restore the current album index. Add the following code:

override func encodeRestorableState(with coder: NSCoder) {
  coder.encode(currentAlbumIndex, forKey: Constants.IndexRestorationKey)
  super.encodeRestorableState(with: coder)
}

override func decodeRestorableState(with coder: NSCoder) {
  super.decodeRestorableState(with: coder)
  currentAlbumIndex = coder.decodeInteger(forKey: Constants.IndexRestorationKey)
  showDataForAlbum(at: currentAlbumIndex)
  horizontalScrollerView.reload()
}

Here you are saving the index (this will happen when your app enters the background) and restoring it (this will happen when the app is launched, after the view of your view controller is loaded). After you restore the index, you update the table and scroller to reflect the updated selection. There's one more thing to be done - you need to move the scroller to the right position. It won't look right if you move the scroller here, because the views haven't yet been laid out. Add the following code to move the scroller at the right point:

override func viewDidAppear(_ animated: Bool) {
  super.viewDidAppear(animated)
  horizontalScrollerView.scrollToView(at: currentAlbumIndex, animated: false)
}

Build and run your app. Navigate to one of the albums, send the app to the background with the Home button (Command+Shift+H if you are on the simulator) and then shut down your app from Xcode. Relaunch, and check that the previously selected album is the one centered:

How the album app will look when the design patterns tutorial is complete

If you look at PersistencyManager's init, you'll notice the album data is hardcoded and recreated every time PersistencyManager is created. But it's better to create the list of albums once and store them in a file. How would you save the Album data to a file?

One option is to iterate through Album's properties, save them to a plist file and then recreate the Album instances when they're needed. This isn't the best option, as it requires you to write specific code depending on what data/properties are there in each class. For example, if you later created a Movie class with different properties, the saving and loading of that data would require new code.

Additionally, you won't be able to save the private variables for each class instance since they are not accessible to an external class. That's exactly why Apple created archiving and serialization mechanisms.

Archiving and Serialization

One of Apple's specialized implementations of the Memento pattern can be achieved through archiving and serialization. Before Swift 4, to serialize and archive your custom types you'd have to jump through a number of steps. For class types you'd need to subclass NSObject and conform to NSCoding protocol.

Value types like struct and enum required a sub object that can extend NSObject and conform to NSCoding.

Swift 4 resolves this issue for all these three types: class, struct and enum [SE-0166].

How to Use Archiving and Serialization

Open Album.swift and declare that Album implements Codable. This protocol is the only thing required to make a Swift type Encodable and Decodable. If all properties are Codable, the protocol implementation is automatically generated by the compiler.

Now your code should look like this:

struct Album: Codable {
  let title : String
  let artist : String
  let genre : String
  let coverUrl : String
  let year : String
}

To actually encode the object, you'll need to use an encoder. Open PersistencyManager.swift and add the following code:

private var documents: URL {
  return FileManager.default.urls(for: .documentDirectory, in: .userDomainMask)[0]
}

private enum Filenames {
  static let Albums = "albums.json"
}

func saveAlbums() {
  let url = documents.appendingPathComponent(Filenames.Albums)
  let encoder = JSONEncoder()
  guard let encodedData = try? encoder.encode(albums) else {
    return
  }
  try? encodedData.write(to: url)
}

Here, you're defining a URL where you'll save the file (like you did with caches), a constant for the filename, then a method which writes your albums out to the file. And you didn't have to write much code!

The other part of the process is decode back the data into a concrete object. You're going to replace that long method where you make the albums and load them from a file instead. Download and unzip this JSON file and add it to your project.

Now replace init in PersistencyManager.swift with the following:

let savedURL = documents.appendingPathComponent(Filenames.Albums)
var data = try? Data(contentsOf: savedURL)
if data == nil, let bundleURL = Bundle.main.url(forResource: Filenames.Albums, withExtension: nil) {
  data = try? Data(contentsOf: bundleURL)
}

if let albumData = data,
  let decodedAlbums = try? JSONDecoder().decode([Album].self, from: albumData) {
  albums = decodedAlbums
  saveAlbums()
}

Now, you're loading the album data from the file in the documents directory, if it exists. If it doesn't exist, you load it from the starter file you added earlier, then immediately save it so that it's there in the documents directory next time you launch. JSONDecoder is pretty clever - you tell it the type you're expecting the file to contain and it does all the rest of the work for you!

You may also want to save the album data every time the app goes into the background. I'm going to leave this part as a challenge for you to figure out - some of the patterns and techniques you've learned in these two tutorials will come in handy!

Where to go from here?

You can download the finished project here.

In this tutorial you saw how to harness the power of iOS design patterns to perform complicated tasks in a straightforward manner. You've learned a lot of iOS design patterns and concepts: Singleton, MVC, Delegation, Protocols, Facade, Observer, and Memento.

Your final code is loosely coupled, reusable, and readable. If another developer looks at your code, they'll easily be able to understand what's going on and what each class does in your app.

The point isn't to use a design pattern for every line of code you write. Instead, be aware of design patterns when you consider how to solve a particular problem, especially in the early stages of designing your app. They'll make your life as a developer much easier and your code a lot better!

The long-standing classic book on the topic is Design Patterns: Elements of Reusable Object-Oriented Software. For code samples, check out the awesome project Design Patterns implemented in Swift on GitHub for many more design patters coded up in Swift.

Finally, be sure to check out Intermediate Design Patterns in Swift and our video course iOS Design Patterns for even more design patterns!

Have more to say or ask about design patterns? Join in on the forum discussion below!

The post Design Patterns on iOS using Swift – Part 2/2 appeared first on Ray Wenderlich.


Video Tutorial: Mastering Git Part 7: Gitignore After the Fact

Video Tutorial: Mastering Git Part 8: Cherry Picking

Video Tutorial: Mastering Git Part 9: Filter Branch

UISearchController Tutorial: Getting Started

$
0
0
UISearchBar-square

So much data, so little time.

Note: This tutorial has been updated to Xcode 9 beta, Swift 4, and iOS 11 by Tom Elliott. The original tutorial was written by Andy Pereira.

Scrolling through massive lists of items can be a slow and frustrating process for users. When dealing with large datasets, it’s vitally important to let the user search for specific items. UIKit includes UISearchBar, which seamlessly integrates with UITableView and allows for quick, responsive filtering of information.

In this UISearchController tutorial, you’ll build a searchable Candy app based on a standard table view. You’ll add table view search capability and dynamic filtering, and add an optional scope bar, all while taking advantage of UISearchController. In the end, you’ll know how to make your apps much more user friendly and satisfy your users’ urgent demands.

Ready for some sugar-coated search results? Read on.

Getting Started

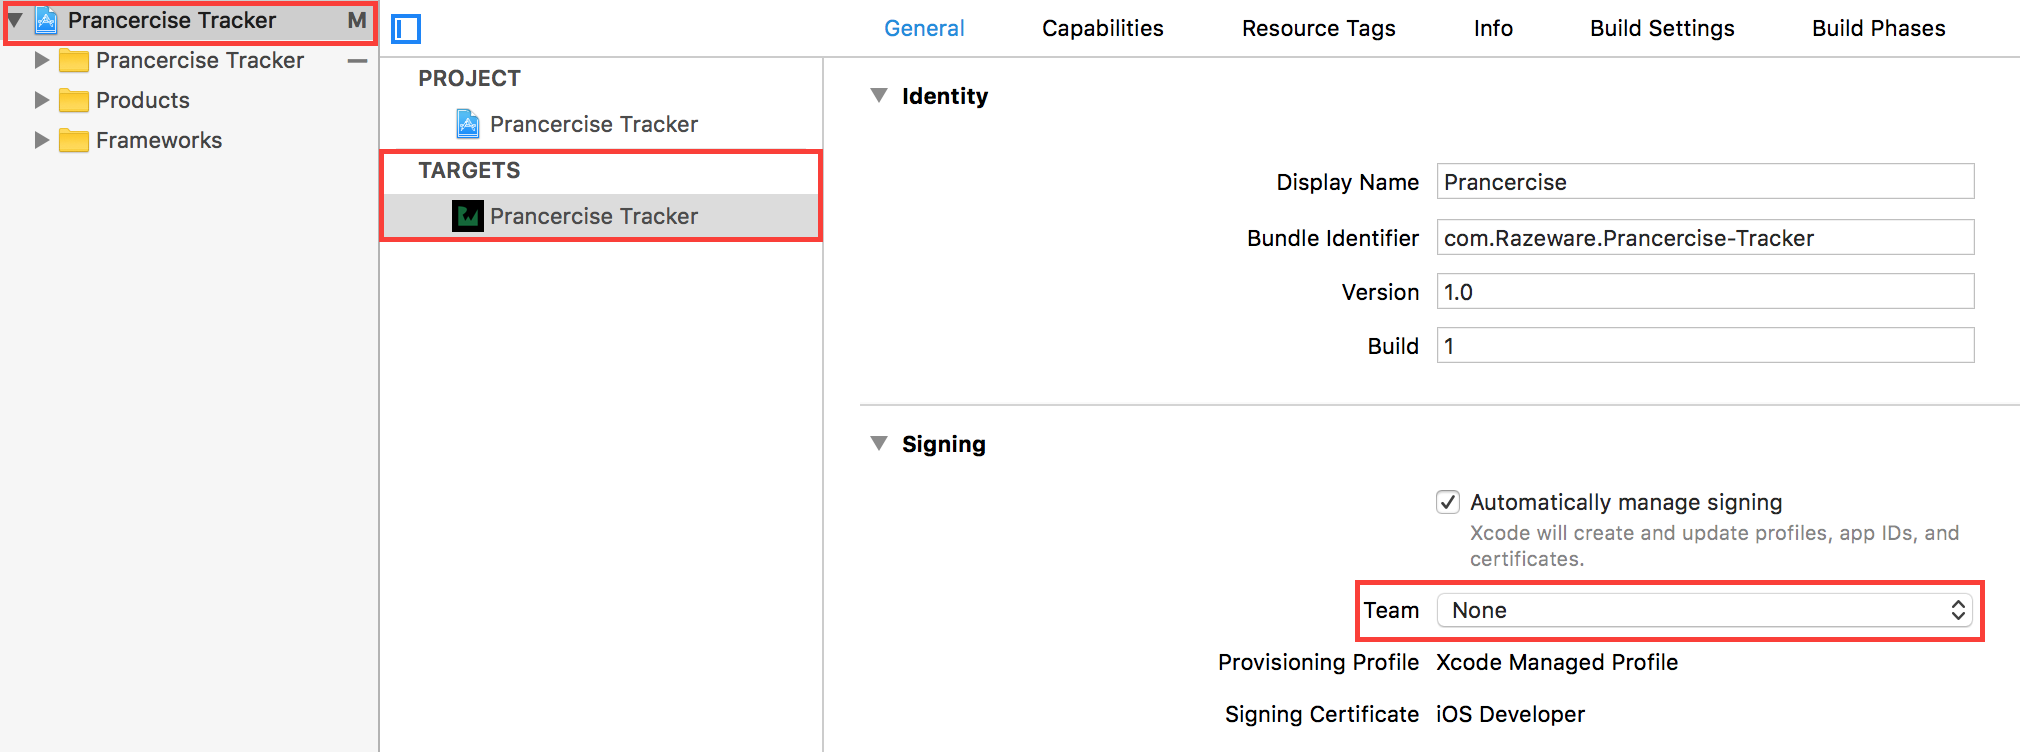
Download the starter project from the tutorial here and open the project. The app has already been set up with a navigation controller. In the Xcode project navigator, select the project file, CandySearch, then select the target CandySearch, and in the signing section update the team to your own development team. Build and run the app, and you’ll see an empty list:

UISearchController Tutorial - Starter

Back in Xcode, the file Candy.swift contains a struct to store the information about each piece of candy you’ll be displaying. This struct has two properties: the category and name of the candy.

When the user searches for a candy in your app, you’ll be searching the name property using the user’s query string. You’ll see how the category string will become important near the end of this UISearchController tutorial when you implement the Scope Bar.

Populating the Table View

Open MasterViewController.swift. The candies property will be where you manage all the different Candy objects for your users to search. Speaking of which, it’s time to create some candy!

In this UISearchController tutorial, you only need to create a limited number of values to illustrate how the search bar works; in a production app, you might have thousands of these searchable objects. But whether an app has thousands of objects to search or just a few, the methods used will remain the same. Scalability at its finest!

To populate your candies array, add the following code to viewDidLoad(), after the call to super.viewDidLoad():

candies = [
  Candy(category:"Chocolate", name:"Chocolate Bar"),
  Candy(category:"Chocolate", name:"Chocolate Chip"),
  Candy(category:"Chocolate", name:"Dark Chocolate"),
  Candy(category:"Hard", name:"Lollipop"),
  Candy(category:"Hard", name:"Candy Cane"),
  Candy(category:"Hard", name:"Jaw Breaker"),
  Candy(category:"Other", name:"Caramel"),
  Candy(category:"Other", name:"Sour Chew"),
  Candy(category:"Other", name:"Gummi Bear"),
  Candy(category:"Other", name:"Candy Floss"),
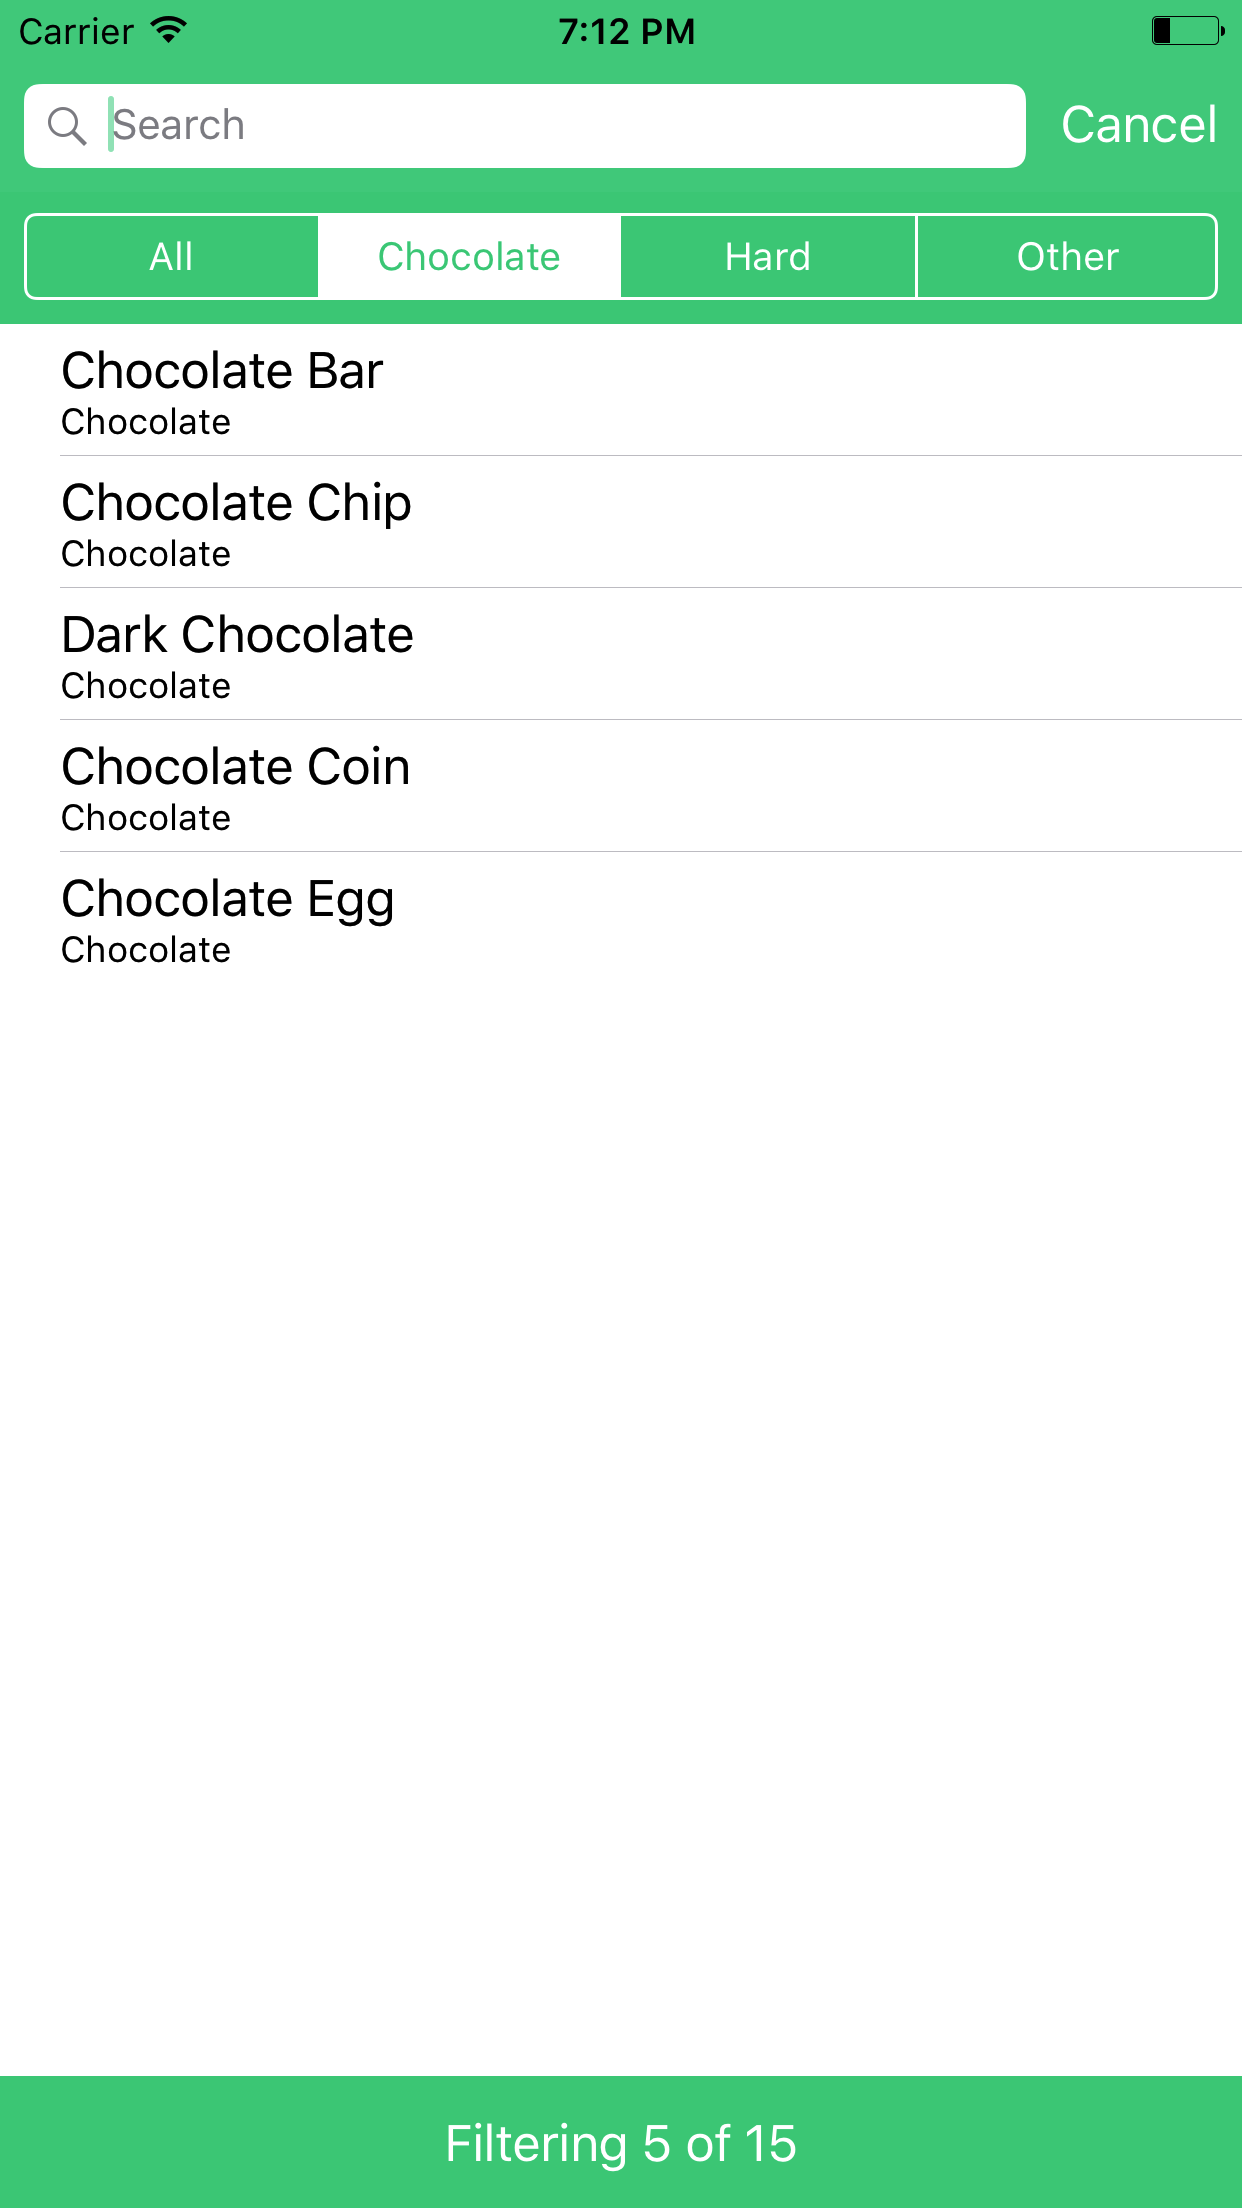
  Candy(category:"Chocolate", name:"Chocolate Coin"),
  Candy(category:"Chocolate", name:"Chocolate Egg"),
  Candy(category:"Other", name:"Jelly Beans"),
  Candy(category:"Other", name:"Liquorice"),
  Candy(category:"Hard", name:"Toffee Apple")
]

Build and run your project. Since the table view’s delegate and dataSource methods have already been implemented, you’ll see that you now have a working table view:

UISearchController Tutorial-Data

Selecting a row in the table will also display a detail view of the corresponding candy:

Dark Chocolate

So much candy, so little time to find what you want! You need a UISearchBar.

Introducing UISearchController

If you look at the UISearchController documentation, you’ll discover it’s pretty lazy. It doesn’t do any of the work of searching at all. The class simply provides a standard interface that users have come to expect from their iOS apps.

UISearchController communicates with a delegate protocol to let the rest of your app know what the user is doing. You have to write all of the actual functionality for string matching yourself.

Although this may seem a tad scary at first, writing custom search functions gives you tight control over how results are returned specifically in your app. Your users will appreciate searches that are intelligent — and fast.

If you’ve worked with searching table views iOS in the past, you may be familiar with UISearchDisplayController. Since iOS 8, this class has been deprecated in favor of UISearchController, which simplifies the entire search process.

Unfortunately, Interface Builder does not support UISearchController at the time of this writing, so you’ll have to create your UI programmatically.

In MasterViewController.swift, add a new property under the candies array declaration:

let searchController = UISearchController(searchResultsController: nil)

By initializing UISearchController with a nil value for the searchResultsController, you tell the search controller that you want use the same view you’re searching to display the results. If you specify a different view controller here, that will be used to display the results instead.

To allow MasterViewController to respond to the search bar, it will have to implement UISearchResultsUpdating. This protocol defines methods to update search results based on information the user enters into the search bar.

Still in MasterViewController.swift, add the following class extension, outside of the main MasterViewController class:

extension MasterViewController: UISearchResultsUpdating {
  // MARK: - UISearchResultsUpdating Delegate
  func updateSearchResults(for searchController: UISearchController) {
    // TODO
  }
}

updateSearchResults(for:) is the one and only method that your class must implement to conform to the UISearchResultsUpdating protocol. You’ll fill in the details shortly.

Next, you’ll need to set up a few parameters for your searchController. Still in MasterViewController.swift, add the following to viewDidLoad(), after the call to super.viewDidLoad():

  // Setup the Search Controller
  searchController.searchResultsUpdater = self
  searchController.dimsBackgroundDuringPresentation = false
  definesPresentationContext = true
  tableView.tableHeaderView = searchController.searchBar

Here’s a rundown of what you just added:

  1. searchResultsUpdater is a property on UISearchController that conforms to the new protocol UISearchResultsUpdating. This protocol allows your class to be informed as text changes within the UISearchBar.
  2. By default, UISearchController will dim the view it is presented over. This is useful if you are using another view controller for searchResultsController. In this instance, you have set the current view to show the results, so you do not want to dim your view.
  3. By setting definesPresentationContext on your view controller to true, you ensure that the search bar does not remain on the screen if the user navigates to another view controller while the UISearchController is active.
  4. Finally, you add the searchBar to your table view’s tableHeaderView. This is necessary as Interface Builder is not yet compatible with UISearchController.

UISearchResultsUpdating and Filtering

After setting up the search controller, you’ll need to do some coding to get it working. First, add the following property near the top of MasterViewController:

var filteredCandies = [Candy]()

This property will hold the candies that the user is searching for.

Next, add the following helper methods to the main MasterViewController class:

// MARK: - Private instance methods

func searchBarIsEmpty() -> Bool {
  // Returns true if the text is empty or nil
  return searchController.searchBar.text?.isEmpty ?? true
}

func filterContentForSearchText(_ searchText: String, scope: String = "All") {
  filteredCandies = candies.filter({( candy : Candy) -> Bool in
    return candy.name.lowercased().contains(searchText.lowercased())
  })

  tableView.reloadData()
}

searchBarIsEmpty() is fairly self-explanatory. filterContentForSearchText(_:scope:) filters the candies array based on searchText and will put the results in the filteredCandies array you just added. Don’t worry about the scope parameter for now; you’ll use that in a later section of this tutorial.

filter() takes a closure of type (candy: Candy) -> Bool. It then loops over all the elements of the array, and calls the closure, passing in the current element, for every one of the elements.

You can use this to determine whether a candy should be part of the search results presented to the user. To do so, you need to return true if the current candy is to be included in the filtered array, or false otherwise.

To determine this, you use contains(_:) to see if the name of the candy contains searchText. But before doing the comparison, you convert both strings to their lowercase equivalents using the lowercased() method.

Note: Most of the time, users don’t bother with the case of letters when performing a search so by only comparing the lowercase version of what they type with the lowercase version of the name of each candy you can easily return a case-insensitive match. Now, you can type “Chocolate” or “chocolate”, and either will return a matching candy. How useful is that?! :]

Remember UISearchResultsUpdating? You left a TODO in updateSearchResults(for:). Well, you’ve now just written a method that should be called when we want to update the search results. Voilà!

Replace the TODO in updateSearchResults(for:) with a call to filterContentForSearchText(_:scope:):

filterContentForSearchText(searchController.searchBar.text!)

Now, whenever the user adds or removes text in the search bar, the UISearchController will inform the MasterViewController class of the change via a call to updateSearchResults(for:), which in turn calls filterContentForSearchText(_:scope:).

Build and run the app now, and you’ll notice that there is now a Search Bar above the table.

UISearchController Tutorial - Showing the Search Bar

However, if you enter some search text you still don’t see any filtered results. What gives? This is simply because you haven’t yet written the code to let the table view know when to use the filtered results.

Updating the Table View

Back in MasterViewController.swift, add a method to determine if you are currently filtering results or not:

func isFiltering() -> Bool {
  return searchController.isActive && !searchBarIsEmpty()
}

Next, replace tableView(_:numberOfRowsInSection:) with the following:

func tableView(_ tableView: UITableView, numberOfRowsInSection section: Int) -> Int {
  if isFiltering() {
    return filteredCandies.count
  }

  return candies.count
}

Not much has changed here; you simply check whether the user is searching or not, and use either the filtered or normal candies as a data source for the table.

Next, replace tableView(_:cellForRowAt:) with the following:

func tableView(_ tableView: UITableView, cellForRowAt indexPath: IndexPath) -> UITableViewCell {
  let cell = tableView.dequeueReusableCell(withIdentifier: "Cell", for: indexPath)
  let candy: Candy
  if isFiltering() {
    candy = filteredCandies[indexPath.row]
  } else {
    candy = candies[indexPath.row]
  }
  cell.textLabel!.text = candy.name
  cell.detailTextLabel!.text = candy.category
  return cell
}

Both methods now use isFiltering(), which refers to the active property of searchController to determine which array to display.

When the user clicks in the search field of the Search Bar, active will automatically be set to true. If the search controller is active, and the user has actually typed something into the search field, the data returned is taken from the filteredCandies array. Otherwise, the data comes from the full list of items.

Recall that the search controller automatically handles showing and hiding the results table, so all your code has to do is provide the correct data (filtered or non-filtered) depending on the state of the controller and whether the user has searched for anything.

Build and run the app. You’ve got a functioning Search Bar that filters the rows of the main table. Huzzah!

UISearchController Tutorial -Filter

Play with the app for a bit to see how you can search for various candies.

Changing the Search Bar Appearance

This works great, but have you noticed the color of the search bar? It uses the default iOS colors. And while those are lovely, they don’t really scream “candy”, do they? :]

In AppDelegate.swift, add the following to the bottom of application(_:didFinishLaunchingWithOptions:), just before the return statement:

UISearchBar.appearance().barTintColor = .candyGreen
UISearchBar.appearance().tintColor = .white
UITextField.appearance(whenContainedInInstancesOf: [UISearchBar.self]).tintColor = .candyGreen

Here, you use the UIAppearance API to set the bar tint color of your search bar to candy green, its tint color to white and then finally the tint color of any UITextField elements contained within a UISearchBar also to candy green.

Build and run the app, and perform another search.

Search Bar in the correct color

Notice how your search bar is now green, and the cancel button is white. Isn’t it beautiful? :]

There’s still one more problem. When you select a row from the search results list, you may notice that the detail view shown is of the wrong candy! Time to fix that.

Sending Data to a Detail View

When sending information to a detail view controller, you need to ensure that the view controller knows which context the user is working with: the full table list, or the search results.

Still in MasterViewController.swift, in prepare(for:sender:), find the following code:

let candy = candies[indexPath.row]

Then replace it with the following:

let candy: Candy
if isFiltering() {
  candy = filteredCandies[indexPath.row]
} else {
  candy = candies[indexPath.row]
}

Here you performed the same isFiltering() check as before, but now you’re providing the proper candy object when performing a segue to the detail view controller.

Build and run the code at this point and see how the app now navigates correctly to the Detail View from either the main table or the search table with ease.

CandySearch-DetailView

Creating a Scope Bar to Filter Results

If you wish to give your users another way to filter their results, you can add a Scope Bar in conjunction with your search bar in order to filter items by category. The categories you will filter on are the ones you assigned to the Candy object when you created the candies array: Chocolate, Hard, and Other.

First, you have to create a scope bar in MasterViewController. The scope bar is a segmented control that narrows down a search by only searching in certain scopes. A scope is really what you define it as. In this case it’s a candy’s category, but scopes could also be types, ranges, or something completely different.

Using the scope bar is as easy as implementing one additional delegate method.

In MasterViewController.swift, you’ll need to add another extension that conforms to UISearchBarDelegate. After the UISearchResultsUpdating extension which you added earlier, add the following:

extension MasterViewController: UISearchBarDelegate {
  // MARK: - UISearchBar Delegate
  func searchBar(_ searchBar: UISearchBar, selectedScopeButtonIndexDidChange selectedScope: Int) {
    filterContentForSearchText(searchBar.text!, scope: searchBar.scopeButtonTitles![selectedScope])
  }
}

This delegate method is called when the user switches the scope in the scope bar. When that happens, you want to redo the filtering, so you call filterContentForSearchText(_:scope:) with the new scope.

Now modify filterContentForSearchText(_:scope:) to take the supplied scope into account:

func filterContentForSearchText(_ searchText: String, scope: String = "All") {
  filteredCandies = candies.filter({( candy : Candy) -> Bool in
    let doesCategoryMatch = (scope == "All") || (candy.category == scope)

    if searchBarIsEmpty() {
      return doesCategoryMatch
    } else {
      return doesCategoryMatch && candy.name.lowercased().contains(searchText.lowercased())
    }
  })
  tableView.reloadData()
}

This now checks to see if the category of the candy matches the category passed in via the scope bar (or if the scope is set to “All”). You then check to see if there is text in the search bar, and filter the candy appropriately. You also need to update isFiltering() to return true when the scope bar is selected.

func isFiltering() -> Bool {
  let searchBarScopeIsFiltering = searchController.searchBar.selectedScopeButtonIndex != 0
  return searchController.isActive && (!searchBarIsEmpty() || searchBarScopeIsFiltering)
}

You’re almost there, but the scope filtering mechanism doesn’t quite work yet. You’ll need to modify updateSearchResults(for:) in the first class extension you created to send the currently selected scope:

func updateSearchResults(for searchController: UISearchController) {
  let searchBar = searchController.searchBar
  let scope = searchBar.scopeButtonTitles![searchBar.selectedScopeButtonIndex]
  filterContentForSearchText(searchController.searchBar.text!, scope: scope)
}

The only problem left is that the user doesn’t actually see a scope bar yet! To add the scope bar, move to the spot in the code just after the search controller setup. In viewDidLoad() within MasterViewController.swift, add the following code just before the assignment to candies:

// Setup the Scope Bar
searchController.searchBar.scopeButtonTitles = ["All", "Chocolate", "Hard", "Other"]
searchController.searchBar.delegate = self

This will add a scope bar to the search bar, with the titles that match the categories you assigned to your candy objects. You also include a catch-all category called “All” that you will use to ignore the candy category in the search altogether.

Now, when you type, the selected scope button will be used in conjunction with the search text.

Build and run your app. Try entering some search text, and changing the scope.

UISearchController Tutorial -Filter with Scope

Type in “caramel” with the scope set to All. It shows up in the list, but when you change the scope to Chocolate, “caramel” disappears because it’s not a chocolate. Hurrah!

Note: At the time of writing, if you’re running this tutorial with Swift 4 you will notice that the top row in the table view is hidden behind the scope bar. This doesn’t happen with earlier versions of iOS and we believe this is a bug in the Beta of iOS 11. We have filed a radar with Apple, and you can keep track of its progress here.

There is still one small problem with the app. We don’t indicate to the user how many results they should expect to see. This is particularly important when there are no results returned at all, as it can be difficult for the user to distinguish between something such as no results returned and a slow network connection fetching the answer.

Adding a Results Indicator

To fix this, we’re going to add a footer to our view. This will be visible when filtering is applied to our list of candies and will tell the user how many candies are in the filtered array. Open SearchFooter.swift. Here you have a simple UIView which contains a label and has a public API to be notified about the number of results returned.

Head back to MasterViewController.swift. At the top of the class you already set up an IBOutlet for the search footer, which can be seen in the master scene in Main.storyboard at the bottom of the screen. Add the following to viewDidLoad(), after the spot where you set up the scope bar:

// Setup the search footer
tableView.tableFooterView = searchFooter

This sets your custom search footer view as the table view’s footer view. Next, you need to update it on the number of results when the search input changes. Replace tableView(_:numberOfRowsInSection:) with the following:

func tableView(_ tableView: UITableView, numberOfRowsInSection section: Int) -> Int {
  if isFiltering() {
    searchFooter.setIsFilteringToShow(filteredItemCount: filteredCandies.count, of: candies.count)
    return filteredCandies.count
  }

  searchFooter.setNotFiltering()
  return candies.count
}

All you’ve done here is add in calls to the searchFooter.

Build and run the application, perform a few searches and watch the footer update as the searches return. You’ll need to hit the search button to dismiss the keyboard and see the search footer.

UISearchController-Filter with footer

UISearchController-Filter with footer, no results

Where To Go From Here?

Congratulations – you now have a working app that allows you to search directly from the main table view.

Here is a downloadable sample project with all of the code from this UISearchController tutorial.

Table views are used in all kinds of apps, and offering a search option is a nice touch for usability. With UISearchBar and the UISearchController, iOS provides much of the functionality out of the box so there’s no excuse for not using it. The ability to search a large table view is something that today’s users expect; when they find it isn’t present, they won’t be happy campers.

I hope to see you adding search capabilities to your table view apps in the future. If you have any questions or comments, please join the forum discussion below!

The post UISearchController Tutorial: Getting Started appeared first on Ray Wenderlich.

Common Design Patterns for Android with Kotlin

$
0
0

Update Note: This tutorial has been updated to Kotlin by Joe Howard. The original tutorial was written by Matt Luedke.

"Future You"

“Future You”

Beyond satisfying your clients and your employer, there’s one more important individual to keep happy in your career as a developer: Future You! (The artist’s conception of Future You to the right implies no guarantee of such cool shirts for developers in the near future.) :]

Future You will inherit the code you write at some point down the road, and will likely have a lot of questions about how and why you coded things the way you did. But instead of leaving tons of confusing comments in your code, a much better approach is to adopt common design patterns.

This article will introduce a few common design patterns for Android that you can use while developing apps. Design patterns are reusable solutions to common software problems. The design patterns covered here aren’t an exhaustive list, nor an academically-citable paper. Rather, they serve as a workable references and starting points for further investigation.

This article also assumes you’re familiar with the basics of Android development. If you’re completely new to Kotlin, XML or Android Studio, you should take a look at the Beginning Android Development Series and Kotlin For Android: An Introduction before you start.

Getting Started

“Is there anywhere in this project where I’ll have to change the same thing in multiple places?” – Future You

Future You should minimize time spent doing “detective work” looking for intricate project dependencies, so they would prefer a project that’s as reusable, readable, and recognizable as possible. These goals span a single object all the way up to the entire project and lead to patterns that fall into the following categories:

  • Creational patterns: how you create objects.
  • Structural patterns: how you compose objects.
  • Behavioral patterns: how you coordinate object interactions.

You may already be using one or several of these patterns already without having A Capitalized Fancy Name for it, but Future You will appreciate you not leaving design decisions up to intuition alone.

In the sections that follow, you’ll cover the following patterns from each category and see how they apply to Android:

Creational

  • Builder
  • Dependency Injection
  • Singleton

Structural

  • Adapter
  • Facade

Behavioral

  • Command
  • Observer
  • Model View Controller
  • Model View ViewModel
  • Clean Architecture
Note: This article isn’t like a traditional raywenderlich.com tutorial in that it doesn’t have an accompanying sample project that you can follow along with. Treat it instead like an article to get you up to speed to the different patterns you’ll see used in our other Android tutorials, and to discover ways to improve your own code.

Creational Patterns

“When I need a particular complex object, how do I get one?” – Future You

Future You hopes the answer is not “copy and paste the same code every time you need an instance of this object.” Instead, creational patterns make object creation simple and easily repeatable.

Here are several examples:

Builder

At a sandwich spot down my block, I use a small pencil to check off the bread, ingredients, and condiments I’d like on my sandwich from a checklist on a slip of paper. Even though the checklist’s title instructs me to “build my own” sandwich, I really only fill out the form and hand it over the counter. I’m not actually doing the sandwich-building, just the customizing…and the consuming. :]

Similarly, the Builder pattern separates the construction of a complex object (the slicing of bread, the stacking of pickles) from its representation (a yummy sandwich); in this way, the same construction process can create different representations.

In Android, the Builder pattern appears when using objects like AlertDialog.Builder:

AlertDialog.Builder(this)
  .setTitle("Metaphorical Sandwich Dialog")
  .setMessage("Metaphorical message to please use the spicy mustard.")
  .setNegativeButton("No thanks", { dialogInterface, i ->
    // "No thanks" button was clicked
  })
  .setPositiveButton("OK", { dialogInterface, i ->
    // "OK" button was clicked
  })
  .show()

This builder proceeds step-by-step and lets you specify only the parts of your AlertDialog that matter to you. Take a look at the AlertDialog.Builder documentation; you’ll see there are quite a few commands to choose from when building your alert.

The code block above produces the following alert:

A different set of choices would result in a completely different sandwich – er, alert. :]

Dependency Injection

Dependency injection is like moving into a furnished apartment. Everything you need is already there; you don’t have to wait for furniture delivery or follow pages of IKEA instructions to put together a Borgsjö bookshelf.

In strictly software terms, dependency injection has you provide any objects required when you instantiate a new object; the new object doesn’t need to construct or customize the objects itself.

In Android, you might find you need to access the same complex objects from various points in your app, such as a network client, an image loader, or SharedPreferences for local storage. You can inject these objects into your activities and fragments and access them right away.

Dagger 2 is the most popular open-source dependency injection framework for Android and was developed in collaboration between Google and Square. You simply annotate a class with @Module, and populate it with @Provides methods such as the following:

@Module
class AppModule {
  @Provides fun provideSharedPreferences(app: Application): SharedPreferences {
    return app.getSharedPreferences("prefs", Context.MODE_PRIVATE)
  }
}

The module above creates and configures all required objects. As an additional best-practice in larger apps, you could even create multiple modules separated by function.

Then, you make a Component interface to list your modules and the classes you’ll inject:

@Component(modules = arrayOf(AppModule::class))
interface AppComponent {
  // ...
}

The component ties together where the dependencies are coming from (the modules), and where they are going to (the injection points).

Finally, you use the @Inject annotation to request the dependency wherever you need it, along with lateinit to allow a non-nullable property to be initialized after the containing object is created:

@Inject lateinit var sharedPreferences: SharedPreferences

As an example, you could use this approach in an Activity and then use local storage, without any need for the Activity having to know how the SharedPreferences object came to be.

Admittedly this is a simplified overview, but you can read up on the Dagger documentation for more detailed implementation details, and also check out Dependency Injection in Android with Dagger 2. This pattern may seem complicated and “magical” at first, but its use can help simplify your activities and fragments.

Singleton

The Singleton Pattern specifies that only a single instance of a class should exist with a global point of access. This works well when modeling real-world objects only having one instance. The Kotlin object keyword is used to declare a singleton, without the need to specify a static instance as in other languages:

object ExampleSingleton {
  fun exampleMethod() {
    // ...
  }
}

When you need to access members of the singleton object, you simply make a call as follows:

ExampleSingleton.exampleMethod()

Behind the scenes, the Kotlin object is backed by an INSTANCE static field, so if you need to use a Kotlin object from Java code, you modify the call as follows:

ExampleSingleton.INSTANCE.exampleMethod();

By using object, you’ll know you’re using the same instance of that class throughout your app.

The Singleton is probably the easiest pattern to initially understand, but can be dangerously easy to overuse – and abuse. Since it’s accessible from multiple objects, the singleton can undergo unexpected side effects that are difficult to track down – exactly what Future You doesn’t want to deal with. It’s important to understand the pattern, but other design patterns may be safer and easier to maintain.

Structural Patterns

“So when I open up this class, how will I remember what’s it’s doing and how it’s put together?” – Future You

Future You will undoubtedly appreciate the Structural Patterns you used to help organize the guts of your classes and objects into familiar arrangements that perform typical tasks. Two commonly-seen patterns in Android are Adapter and Facade.

Adapter

A famous scene in the movie Apollo 13 features a team of engineers tasked with fitting a square peg into a round hole. This, metaphorically, is the role of an adapter. In software terms, this pattern lets two incompatible classes work together by converting the interface of a class into another interface the client expects.

Consider the business logic of your app; it might be a Product, or a User, or a Tribble. It’s the square peg. Meanwhile, a RecyclerView is the same basic object across all Android apps. It’s the round hole.

In this situation, you can use a subclass of RecyclerView.Adapter and implement the required methods to make everything work:

class TribbleAdapter(private val tribbles: List<Tribble>) : RecyclerView.Adapter<TribbleViewHolder>() {
  override fun onCreateViewHolder(viewGroup: ViewGroup, i: Int): TribbleViewHolder {
    val inflater = LayoutInflater.from(viewGroup.context)
    val view = inflater.inflate(R.layout.row_tribble, viewGroup, false)
    return TribbleViewHolder(view)
  }

  override fun onBindViewHolder(viewHolder: TribbleViewHolder, i: Int) {
    viewHolder.bind(tribbles[i])
  }

  override fun getItemCount() = tribbles.size
}

RecyclerView doesn’t know what a Tribble is, as it’s never seen a single episode of Star Trek – not even the new movies. :] Instead, it’s the adapter’s job to handle the data and send the bind command to the correct ViewHolder.

Facade

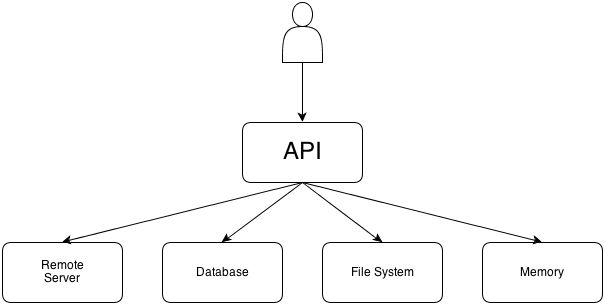
The Facade pattern provides a higher-level interface that makes a set of other interfaces easier to use. The following diagram illustrates this idea in more detail:

facade2

If your Activity needs a list of books, it should be able to ask a single object for that list without understanding the inner workings of your local storage, cache, and API client. Beyond keeping your Activities and Fragments code clean and concise, this lets Future You make any required changes to the API implementation without any impact on the Activity.

Retrofit from Square is an open-source Android library that helps you implement the Facade pattern; you create an interface to provide API data to client classes like so:

interface BooksApi {
  @GET("books")
  fun listBooks(): Call<List<Book>>
}

The client simply needs to call listBooks() to receive a list of Book objects in the callback. It’s nice and clean; for all it knows, you could have an army of Tribbles assembling the list and sending it back via transporter beam. :]

This lets you make all types of customizations underneath without affecting the client. For example, you can specify a customized JSON deserializer about which the Activity has no clue:

val retrofit = Retrofit.Builder()
  .baseUrl("http://www.myexampleurl.com")
  .addConverterFactory(GsonConverterFactory.create())
  .build()

val api = retrofit.create<BooksApi>(BooksApi::class.java)

Notice the use of GsonConverterFactory, working behind the scenes as a JSON deserializer. With Retrofit, you can further customize operations with Interceptor and OkHttpClient to control caching and logging behavior without the client knowing what’s going on.

The less each object knows about what’s going on behind the scenes, the easier it will be for Future You to manage changes in the app. This pattern can be used in a lot of other contexts; Retrofit is only one mechanism among many.

Behavioral Patterns

“So… how do I tell which class is responsible for what?” – Future You

Behavioral patterns let you assign responsibility for different app functions; Future You can use them to navigate the structure and architecture of the project. These patterns can vary in scope, from the relationship between two objects to the entire architecture of your app. In many cases, the various behaviorial patterns are used together in the same app.

Command

When you order some excellent Saag Paneer at an Indian restaurant, you don’t necessarily know which cook will prepare your dish; you only give your order to the waiter, who posts the order in the kitchen for the next available cook.

Similarly, the Command pattern lets you issue requests without knowing the receiver. You encapsulate a request as an object and send it off; deciding how to complete the request is an entirely separate mechanism.

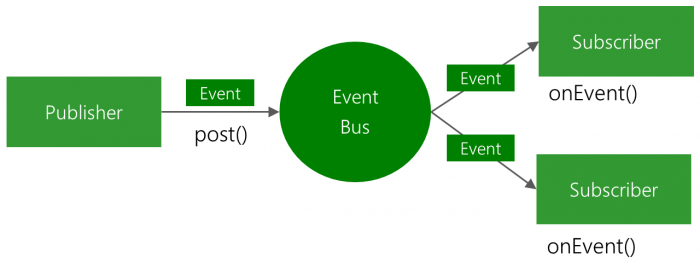
Greenrobot’s EventBus is a popular Android framework that supports this pattern in the following manner:

EventBus-Publish-Subscribe

An Event is a command-style object that can be triggered by user input, server data, or pretty much anything else in your app. You can create specific subclasses which carry data as well:

class MySpecificEvent { /* Additional fields if needed */ }

After defining your event, you obtain an instance of EventBus and register an object as a subscriber:

eventBus.register(this)

Now that the object is a subscriber, tell it what type of event to subscribe to and what it should do when it receives one:

fun onEvent(event: MySpecificEvent) {
  /* Do something */
}

Finally, create and post one of those events based on your criteria:

eventBus.post(event)

Since so much of this pattern works its magic at run-time, Future You might have a little trouble tracing this pattern unless you have good test coverage. Still, a well-designed flow of commands balances out the readability and should be easy enough to follow at a later date.

Observer

The Observer pattern defines a one-to-many dependency between objects. When one object changes state, all of its dependents are notified and updated automatically.

This is a versatile pattern; you can use it for operations of indeterminate time, such as API calls. You can also use it to respond to user input.

The RxAndroid framework (aka Reactive Android) will let you implement this pattern throughout your app:

apiService.getData(someData)
  .subscribeOn(Schedulers.io())
  .observeOn(AndroidSchedulers.mainThread())
  .subscribe (/* an Observer */)

In short, you define Observable objects that will emit values. These values can emit all at once, as a continuous stream, or at any rate and duration.

Subscriber objects will listen for these values and react to them as they arrive. For example, you can open a subscription when you make an API call, listen for the response from the server, and react accordingly.

Model View Controller

Model View Controller, aka MVC, refers to the current reigning presentation architectural pattern across several platforms; it’s particularly easy to set your project up in this way on Android. It refers to the three divisions of classes used in this pattern:

  • Model: your data classes. If you have User or Product objects, these “model” the real world.
  • View: your visual classes. Everything the user sees falls under this category.
  • Controller: the glue between the two. It updates the view, takes user input, and makes changes to the model.

Dividing your code between these three categories will go a long way toward making your code decoupled and reusable.

Future You will eventually get a request from the client to add a new screen to the app, but simply using the existing data in the app; following the MVC paradigm means Future You can easily re-use the same models and only change the views. Or perhaps the client will ask Future You to move that fancy widget from the home screen to the detail screen. Separating your view logic makes this an easy task.

Additionally, moving as much layout and resource logic as possible into Android XML keeps your View layer clean and tidy. Nice!

You may have to do some drawing in Kotlin from time to time, in which case it will help to separate the drawing operations from your activity and fragment classes.

Over time, you’ll find making architectural decisions easier under MVC and Future You can more easily solve issues as they arise.

Model View ViewModel

This unfortunately-quite-confusingly-named presentation architectural pattern is similar to the MVC pattern; the Model and View components are the same. The ViewModel object is the “glue” between the model and view layers, but operates differently than the Controller component. Instead, it exposes commands for the view and binds the view to the model. When the model updates, the corresponding views update as well via the data binding. Similarly, as the user interacts with the view, the bindings work in the opposite direction to automatically update the model. This reactive pattern removes a lot of glue code.

The MVVM pattern is trending upwards in popularity but is still a fairly recent addition to the pattern library. Google recently introduced this pattern as part of its Architecture Components library! Future You would love it if you kept your eye on this one! :]

Clean Architecture

Clean Architecture exists at a higher abstraction level than the MVC and MVVM presentation architecture patterns. It describes the overall application architecture: how the various layers of an app (business objects, use cases, presenters, data storage, and UI) communicate with one another. It is similar to the Hexagonal architecture as well other application architectures. MVC and MVVM exist within Clean Architecture at the outer presentation and UI layers.

The original Clean Architecture definition is here, and many examples can be found on Clean Architecture for Android, including Architecting Android…The evolution.

Where to Go From Here?

While it feels great to keep abreast of the latest flashy APIs, keeping your apps updated can quickly lead to redesign-fatigue. Investing in software design patterns early on will improve your return on development time; you’ll start to notice you get more done with less effort.

I recommend checking out timeless classics such as Design Patterns by the “Gang of Four.” Compared to Material Design or Android Wear, this book might be considered “ancient”, but documents many useful design patterns that predate Android itself !

I hope this article serves as a starting point for your research into common design patterns for Android! If you have any questions or comments, feel free to join the forum discussion below – Future You would be happy if you did. :]

The post Common Design Patterns for Android with Kotlin appeared first on Ray Wenderlich.

Video Tutorial: Mastering Git Part 10: Many Faces of Undo

Video Tutorial: Mastering Git Part 11: GUIs: GITK


RWDevCon 2018 Pre-Conference Workshop Speakers & Topics

$
0
0

Next April, we are running our fourth annual iOS conference focused on high quality hands-on tutorials: RWDevCon 2018.

Today, we are happy to announce some exciting news: we have chosen the topics and speakers for our pre-conference workshops!

This year, we got a number of great submissions, so we will be running four half-day workshops. Let’s take a look at what’s inside.

1) ARKit

Joey deVilla

If you watched that stunning augmented reality (AR) demonstration at WWDC 2017 and thought “I’d like to make apps like that someday,” “someday” starts at this workshop.

You’ll learn about the features of Apple’s ARKit augmented reality framework, harness data from the camera and your users’ motions, present information and draw images over real-world scenes, and make the world your View Controller!

2) Machine Learning with CoreML and Vision

Patrick Kwete and Audrey Tam

With Apple’s new CoreML and Vision frameworks, you can now add machine learning AI to your apps.

In this hands-on workshop, you’ll learn what machine learning actually is, how to train a model, and integrate it into an app.

3) Practical Instruments

Luke Parham

Instruments is an extremely useful tool for getting a real understanding of what’s happening in your apps. Unfortunately, it tends to get neglected by a lot of people since it can be a bit of a learning curve before you really start feeling productive.

In this workshop, you’ll get a hands on look at how Instruments can help you with everything from tracking down and addressing performance bottlenecks to fixing memory leaks and analyzing thread interactions.

4) Swift Algorithms

Kelvin Lau and Vincent Ngo

Modernize your data structures knowledge! In this workshop, you explore the Swift collection protocols and learn the strengths and limits of expressing data structures using enums.

Algorithm challenges follow every major topic, where peer programming is strongly encouraged! This will be in a part-lecture part-peer programming format.

Where to Go From Here?

The team and I are really excited about these pre-conference workshops – we think it has something for everyone.

And that’s not all! In addition to the above, the conference includes 18 hands-on tutorials, a special James Dempsey Game Show, lunchtime board games, an opening and closing reception, and some surprises under our sleeves :]

Interested in your own ticket? Register now while you still can – for the past three years, the tickets have sold out quickly.

We hope you like the pre-conference workshops, and we can’t wait to see you next April! :]

The post RWDevCon 2018 Pre-Conference Workshop Speakers & Topics appeared first on Ray Wenderlich.

Video Tutorial: Mastering Git Part 12: GUIs: SourceTree

Learning Techniques for Programmers, by Programmers

$
0
0

Learning Techniques for Programmers, by Programmers

As a programmer, you know there’s a constant need to stay up-to-date with technologies you love, as well as the ones you don’t — you need to keep learning to stay relevant in your industry.

Learning is a key component of experience. And experience is a cornerstone of a rewarding, fulfilling career as a programmer. I live by the mantra experience comes with experience.

But learning can feel less like an adventure and more like an obligation, especially when there’s a struggle to retain information or the subject matter is dry.

Let’s face it: materials that cover the latest language or platform are rarely compelling page turners.

Sometimes it’s not about what you learn, but how you go about it. Learning as a busy professional is much different than it was when you were in school. You have less time for studies, and your brain works differently than it did back then.

Implementing and testing various learning techniques is one way developers can stay on top of the need to learn.

Learning for a goal

This article takes a look at different styles and theories about learning, and then it goes on to cover some common learning patterns and popular techniques. When you finish this article, you should have some fresh ideas about how to structure your learning processes.

While researching this article, we took a survey of the community to learn more about how people go about learning. I’ll give you a hint: a classroom setting is not a favored learning technique around here! Perhaps you’ll decide try out a new approach to learning once you’ve seen how your peers go about it.

Finally, I’ll leave you with some suggestions about how to stimulate learning.

It’s a long journey. 3, 2, 1, let’s go!

Disclaimer: This article is not the results of years of experience studying learning; I’m not an expert in this field. It’s simply the result of years of learning experience, which I’m sharing in the form of an article, decorated with some theory, statistics, and input provided by other developers like you.

Under the Hood

As mentioned, your learning path begins when you start life. Initially, you learn through unconscious learning: you take lessons from observations of the world and things happening around you — you do this for the rest of your life. It is the opposite of conscious learning, which is driven by the will or need to learn something.

Different Levels of Understanding

There are two different levels of understanding:

  • Conceptual: When you understand how a particular thing works
  • Practical: When you know how to use that particular thing

This classification is what differentiates knowledge from expertise.

You don’t always need both for every experience in your life. You might be a great car designer, but it doesn’t mean you must be good at fixing or even driving it. Similarly, you don’t need to be an expert in electronics to master your TV remote control.

However, there are clear benefits in knowing both. Have you ever murmured “oooh!” after finding a practical use for a theoretical concept? Or have you ever whispered “a-ha!” after realizing how something you use everyday actually works? Then you understand why it’s great to know both sides.

Memory

We have two types of memory:

  • Working memory: A highly volatile and limited resource that you use consciously to store what you’re focusing on at the moment
  • Long-term memory: Where you store all that you know and can recall.

Sounds a bit like RAM and storage, right?

Working memory comprises a number of “slots”, whose size and duration are highly subjective, but usually there are no more than seven slots. Some people forget bits of information in a matter of milliseconds (like me!), while others remember things for decades.

When you’re temporarily remembering a phone number, you’re utilizing your working memory:

  • Conscious use: You must be focused on listening
  • Volatility: You need to constantly repeat it until you write it down
  • Limited resource: You can hardly remember a number that uses more than 3-4 slots.

You may be wondering why you use three or four slots for a phone number, since numbers are often nine to 10 digits long. That’s because we tend to group three or four numbers into a single “entity”. Think of your own phone number: do you know each digit one by one, or do you usually spell it in groups of 3 to 4 digits?

Working Memory

By using spaced repetition, you can move information from working to long-term memory. Repetition alone is not enough. You can spell out a number for hours, but you’ll probably forget it one or two days later. To fully commit it to memory, you repeat it a few times every day.

You don’t necessarily need to say the number aloud, but you do need to focus on it for the time your brain needs to “process” it — sort of like typing it into a keypad. For instance, when you generate a random password that you use frequently, it’ll commit to your long-term memory after a few weeks.

Chunking

The phone number example is a typical case for chunking, which is a technique you can use to overcome the limitation of your working memory by using groups, patterns or semantics. It’s useful for far more than phone numbers.

Chunking by groups is when you split information into smaller parts, as is the natural tendency for remembering phone numbers.

Chunking by patterns is when you don’t remember the information itself; instead you remember an algorithm or a pattern that allows you to reconstruct the information.

For an example of pattern chunking, consider the sequence of letters “lkjhgfds”. It seems complicated to remember, but if you think of it as the last 8 letters in the middle row of a keyboard, in reverse order, then it’s easier to remember.

Semantic chunking is when information is organized according on its context. For example, given the words dog, yellow, banana, black, mouse, white, cake, egg, eagle, you can logically group them as follows:

  • Animals: dog, mouse, eagle
  • Colors: yellow, black, white
  • Food: banana, cake, egg

Practice

“Practice makes perfect”, or at least that’s what the old saying tells us. Perfection may be a far-fetched goal at times, but practice always helps you achieve two important things:

  • Complement conceptual understanding with practical understanding.
  • Make learning permanent.

Permanence is probably the most important benefit that you get from practice. The more often you make practical use of a theoretical concept, the more confident you are next time you use it — and each time you repeat it, you reinforce its permanence in your brain!

Focus Level

I was a smoker until a few years ago. During smoke breaks, I’d occasionally discover a solution to a challenging problem with while I was thinking about something else.

What has this to do with learning? Not much, actually. But it’s a way to explain two different ways of learning:

  • Concentrated (or focused): Focusing on a specific topic
  • Diffused: Looking at it broadly, while relaxed, without focusing on it

Sometimes you can’t solve a given problem because you’re peering at it problem too closely — you develop myopia, or worse yet, “tunnel vision”. When you take a break, you can’t help but view a problem from a different perspective, which helps you discover a solution.

There’s no good or bad when it comes to focus level. It’s actually best to alternate between the two.

For instance, you might read through a brief overview to learn about a complex topic then dive into a learning module that covers a specific sub-topic. Then you might zoom out to revisit the overview and repeat modules until you’re comfortable with the subject matter.

Brain Washing

With Pomodoro technique, you alternate working in concentrated mode with reward time in timed segments, for example, 25 minutes of focused work followed by five minutes of no work. Then you repeat until your work day is done. This approach gives your brain an opportunity to “cool down” after exertion and even wander into a diffused state of focus.

Sleep is another form of “brain washing”. After a day spent working, the brain accumulates fatigue and you need to wash it out. Ever heard somebody say “Let me sleep on it”, or “I woke up with the answer”. Sleep clears your brain’s cache, so it’s important to allow yourself to get a full night’s sleep.

#3 Brain Washing

Learning Techniques and Patterns

Learning is a science, and there are several learning techniques, styles and models.

The classic model is the Visual, Auditory and Kinesthetic model (VAK), which defines three sensory receivers:

  • Visual: Learning through written language and visual references. Visual learners often enjoy lectures that come with handouts and videos.
  • Auditory: Learning through listening and sometimes by repeating thing aloud, either reading out loud or by moving the lips. Auditory learners do well with lectures, podcasts, and reading.
  • Kinesthetic : Learning while doing, touching and moving. Kinesthetic learners react to movement and tactile stimulations, and may lose focus when there’s nothing to do. These learners benefit from hands-on labs and tutorials.

I won’t talk about these in detail. As I mentioned in the introduction, I’m not a learning expert by any means.

What I want to focus on, instead, are some recurring patterns that I’ve experienced myself or have observed in other people. This list is not comprehensive — I am sure there are several other patterns.

Disclaimer: I am using arbitrary names for the below learning patterns. They mean something to me — and hopefully they’ll resonate with you. However, they are not technical names.

Academic Learning

Academic refers to the way topics are taught in school. It’s the classic learn everything first, then (hopefully) apply what you’ve learned.

When learning a complex topic, you start with an introduction or orientation — a high level look at the topic. Next, you try to learn it as a whole, using whatever method works best for you, e.g., video courses, books, tutorials or live classes.

Puzzle Learning

In many cases, a large topic comprises several micro topics that are like pieces of a puzzle. Rather than learning the entire topic as a whole, you focus on one piece at a time.

This model can leave you with a “foggy” view of a topic until you’ve explored all the pieces. But each piece makes the topic as a whole more clear. At some point, you’ll realize how the pieces fit together and will see the big picture.

Puzzle Learning

Learning by Using

This method intersects with puzzle learning; it comprises learning a sub-topic through building a project. It’s almost the opposite to academic learning where you learn first and apply second.

When asked about unconventional learning methods, Mike Oliver said that the biggest thing critical to learning for him and his team is doing. When he hires new engineers, he expects them to be pushing code on day one to fix a bug or otherwise do something needed within the code base. This is true regardless of seniority or prior experience with the language. “You will learn infinitely more in a system if you’re required to work with it immediately, than if you read documentation, watch a video, or do some other form of passive learning.

And I really like this: Don’t focus on learning; focus on doing, and the learning will come.

Learning by Perseverance

Have you ever read an entire chapter in a book but mumbled to yourself, “I didn’t understand a thing”?

When learning through perseverance, you simply keep reading and re-reading even when you don’t truly understand the subject. You might repeat a chapter or plow through the whole book again. And you repeat that cycle until things become less obfuscated.

This learning technique is usually not ideal everyday learning. But for a limited sets of topics you need to master, it can be an effective approach — at least it’s been effective for me.

Learning by Teaching

It may sound counterintuitive, but teaching can aid in learning — maybe not for learning something from scratch. It’s most applicable to advanced topics that are related to subjects you know well.

I’m sure you experienced this when writing a blog post, preparing for a conference, or simply by answering questions on Stack Overflow. You may not have considered it a learning activity at the time, but I bet you learned something from the experience.

How Developers Learn

Here’s a question I frequently ask of others: how did you learn the basics of programming? It’s no surprise that about half of the respondents to our survey learned programming on their own or at a college/university.

How did you learn the basics of programming / computer science?

In terms of learning efficiency, for every one person that favors video courses, two people prefer reading, and four people report that both methods are equally efficient.

You learn more efficiently by

As you might expect, people tend to use tools that are within easy reach.

Official documentation, books, blogs and videos are the most popular learning resources, followed by other methods that are either more expensive, such as conferences and courses. Lowest on the list was reading open-source materials, writing and teaching.

What do you regularly use to learn?

Per Kelvin Lau, “it’s helpful to approach learning through different media, such as writing, reading, watching and listening. Each engages your brain differently, which can help create more paths for memory retrieval.”

I find that I don’t spend as much time as I’d like to on learning. In fact, I’m of the majority who spends, on average, four hours or less per week learning. However, jut under half of the respondents enjoy learning for five or more hours per week.

I can’t comment on the 8% who don’t reserve any of their off-work time for learning. I’m assuming their employers take care of their needs, but it does make me wonder how they stay on top of things.

How many hours per week do you regularly allocate for learning, on average?

It’s interesting to see that, on average, two out of four respondents spend less than $200 per year, one quarter spends less than $500, and the other quarter up to $5,000 — it’s pretty easy to reach four digits with just one or two conferences.

How much do you spend per year on learning (books, videos, classes, conferences, etc.), on average?

No doubt that developers are night predators: eight out of 10 do their learning after work, six of 10 learn at work, and two out of 10 squeeze it in before work.

20% explicitly take time off work — presumably, for conferences or courses.

When do you do your learning?

When learning a new, complex topic, half of developers prefer reading a chapter every few days, but a quarter prefer to finish the book as soon as possible — maybe because they can’t wait to figure out who the murderer is?

The remaining quarter of respondents prefer to read a chapter when they actually need it. Is that learning on demand, or learning by using? I think probably both.

What is your learning preference?

Learning with the goal of staying up-to-date is a challenge for most of us — 75% of respondents — due to lack of time.

A quarter blame it on a lack of quality learning resources. Hmmmmm.

Since there are many resources out there, I wonder if they’re not aware of their own learning styles or just haven’t found tools that suit their needs. It’s also possible that they need quality resources for edge cases and niche topics, which can be difficult to find.

What

It’s no suprise that the majority of tutorial readers work with the presented code, whereas a smaller group only does it occasionally.

When you are following a tutorial with code, do you usually test/try the code?

I thought that more people would use a tablet for learning. But, like me, seven out of 10 prefer a computer. Only two out of 10 use a tablet or phone, whereas almost one out of 10 prefers traditional books — no wi-fi, no battery, no screen: just ink and paper. :]

When learning, what do you usually use for watching videos and reading?

In order of preference, the most-used techniques for learning about a micro-topic, such as an API, method or class are:

  1. Search for an article, blog or tutorial
  2. Search on Stack Overflow
  3. Browse the official documentation

Less popular, but still frequently used methods are:

  • Watch a video
  • Read a book
  • Ask someone
  • Post a question on Stack Overflow

When learning about a macro-topic, such as a new language, framework, or technical concept like advanced debugging and reverse engineering, readers gave similar responses:

  • Search for an article, blog or tutorial (still the most used)
  • Read a book, such as our latest release iOS 11
  • Browse the official documentation
  • Watch a video

…Followed by less-used methods:

  • Buy a video course
  • Ask someone
  • Attend a conference

When asked about the least efficient learning method, two out of four said conferences are the worst way to learn. One out of four say that books, videos and video courses are the last method they’d consider, while about one in six feel that blogs, articles and tutorials are not well suited for learning.

Improving Learning

Improve learning

“I have enough experience, I have nothing else to learn!” said no savvy developer, ever. There’s always something to learn in a world where technology continues to evolve.

Here are some key things that I’ve experienced, or observed in others, that can help you learn more efficiently:

Passion

The more you enjoy a topic, the more you’ll want to know about it. Passion is what drives your will to keep learning.

Aaron Douglas agrees:

“Learning new things takes a lot of effort for people with ADHD. If you’re learning something that is directly applicable to something you’re currently passionate about, any information channel will feed that craving. If I’m trying to learn something required, for work or a task, but it’s not a compelling topic, I need well-written books to keep my interest.”

Note that the opposite of passion isn’t necessarily apathy, but if you have little interest in a topic then convincing yourself to learn about it is a tall order.

Practice

Practice helps you set your knowledge in stone. Just like learning a new language, the more you can use it in practical settings the more fluent you become.

Perseverance

Failure to understand a concept shouldn’t discourage you. What’s unclear today might be explained by tomorrow. And when you don’t give up on finding a solution, you eventually crack the case.

In many cases, you can treat your problem as a black box. For example, with the right search terms and time to search Stack Overflow, you can find a solution or something close enough to use as a model. You can often solve the problem even if the solution’s inner workings aren’t clear.

Wait, am I endorsing “copy & paste” programming? No! Far from it.

I’m saying that working models are great when you have limited time or you’re struggling with a new concept. But use it in moderation, it shouldn’t be a go-to solution.

Taking Notes

For some, taking notes improves recall. To others, it’s processing and grouping information in notes that helps new knowledge to persist.

Whether to take notes is subjective: taking notes can definitely help, but it can also be distracting — it’s difficult to write and listen at the same time.

However, taking notes doesn’t necessarily mean taking them “live”. Kelvin Lau says:

“I do most of my learning through reading text, whether it be blogs or books. When I recognize that the book/blog is covering something that is particularly important to me, I take notes on pen and paper.

Taking notes has given me far greater retention on the stuff I’ve read. First, it drastically slows down my reading speed. I try to filter out unnecessary “fluff” from the text, and jot down important points. My goal is to summarize an entire paragraph into one or two points. This always engages me to think critically: What is that paragraph trying to explain?”.

Active Engagement

Asking questions has two main benefits:

  • Better understanding what’s being taught: Questions can help clarify an aspect, confirm an interpretation, or allow you to revisit to an unclear concept.
  • Immediate processing of what’s being taught: Questions help you process the incoming information into smaller bites.

Making Mistakes

Nobody makes mistakes on purpose, but surely you’ve been told you should “learn from your mistakes”. We tend to hide our errors from others, but most mistakes aren’t that bad.

You learn a lot from the pain of a mistake. If you’ve ever walked into a glass door while tweeting, I’m pretty sure you will avoid that door next time you’re tweeting and walking. The more a mistake hurts, the more likely it is that you won’t repeat it.

It’s unfortunate that mistakes seem controversial and cause people to feel shame. After all, what is “test-driven development”, if it’s not a euphemism for learning from your mistakes?

Teaching

I’m mentioning this again because even small acts of teaching can help a lot, such as answering questions on Stack Overflow. It’s a great way to expand your brain too, because often you get exposure to real, untrivial and unexpected problems.

Pairing

I have only seen people do pair programming a few times, but I immediately realized that it has huge potential for learning. By talking it out, developers can filter out potential problems upfront. This defeats the common belief that pair programming is about two doing the work of one. It’s two brains working in synergy toward a common goal.

Matt Luedke believes that “Integrating a social aspect into learning, as opposed to it being purely an individual effort, has so many benefits: you’ll remember the concepts better, you’ll form relationships and teams, you’ll develop social skills, etc.”

And, definitely, it’s not anything remotely close to what Aaron Douglas thinks about himself: “If I had a second brain, I’d be twice as dumb”. :]

Stimulate Learning

What can you do to improve your learning? Here are some ideas:

Participate in Hackathons: a fast-paced way of learning that’s driven by meeting a goal in a limited amount of time.

Prepare for Interviews: Even if you’re not looking for a job, preparing for an interview is a great way to learn. It helps refresh knowledge that you’ve probably forgotten.

There are several books that can help preparing for interviews. A popular one is Cracking the Coding Interview. I found it to be useful because I learned new stuff while refreshing other bits of knowledge I’d forgotten I had.

Experiment with Tasks: Push an established pattern or model to the limit. Use it as it’s never been used before. Use it for something that it’s not designed for. Find an alternative way of doing something that everybody does the same way. Be creative but define clear and achievable objectives — and be realistic. You don’t want to get yourself deep down a rabbit hole or squander company time in pursuit of a golden unicorn.

Challenges: Challenging a friend in person and participating in an online challenge have similar benefits. The challenge of “beating” somebody else has a learning component all its own. Besides serving as a gym for your brain, challenges are a fun way to learn. Make sure you keep the dynamic between you and your “rival” positive, supportive and healthy.

Where to Go From Here?

I highly recommend the Learning How to Learn course from Coursera. It’s very interesting and well done, and it inspired me while penning this article.

If you want to learn more about learning styles, a good starting point is this article on learning styles from Wikipedia, and a dedicated website called Learning Online Styles, which has tons of useful information.

A huge thanks to everyone who took the time to fill out the survey, which was an important part of the article. There are too many to thank individually, but I thank you all the same.

How do you prefer to learn? Are there strategies that I haven’t touched on in this article? Join the discussion below and let me know!

The post Learning Techniques for Programmers, by Programmers appeared first on Ray Wenderlich.

Video Tutorial: Mastering Git Part 13: GUIs: GitUp

Video Tutorial: Mastering Git Part 14: Conclusion

Storyboards Tutorial for iOS: Part 1

$
0
0
Square Image

Storyboards, Scenes and View Controllers

Update note: This tutorial has been updated for Xcode 9, iOS 11, and Swift 4 by Nicholas Sakaimbo. The original tutorial was written by Matthijs Hollemans.

Storyboards are an exciting feature first introduced in iOS 5 that save time building user interfaces for your apps. Storyboards allow you to prototype and design multiple view controller views within one file.

Before Storyboards you had to use XIB files and you could only use one XIB file per view (UITableViewCell, UITableView or other supported UIView types).

The following image shows you what a storyboard looks like, and it’s similar to the storyboard you’ll build during this tutorial:

Complete Storyboards

You may not know what the app does but you can see its scenes and how they’re related.

Storyboards have a number of advantages:

  • You can visually lay out all your view controllers in “scenes” and describe the connections between them. With a storyboard you’ve a better conceptual overview of all the scenes in your app.
  • Describe the transitions between the various scenes. These transitions are called “segues” and you create them by connecting your view controllers in the storyboard. Thanks to segues you need less code to take care of your UI.
  • Make working with table views a lot easier with prototype and static cells features. You can design your table views almost completely in the storyboard editor, cutting down the amount of code you have to write.
  • Make it easier to use Auto Layout, a feature that allows you to define mathematical relationships between elements defining their position and sizing. This powerful feature makes it easier to handle devices of varying screen sizes and dimensions. In this tutorial you’ll use Auto Layout a little, but it’s outside the scope of this tutorial. You can read more in our Auto Layout Tutorial or watch the video series.

In this tutorial you’re going to build a sample app to create a list of players and show you the games they play and their skill rating. In the process, you’ll learn common tasks which can be accomplished using in storyboards.

Getting Started

Open Xcode and create a new project. Use the Single View Application template as the starting point.

XcodeProject

Fill in the template options as follows, click Next and then Create:

  • Product Name: Ratings
  • Organization Name: fill this in however you like
  • Organization Identifier: the identifier you use for your apps
  • Language: Swift
  • Make sure Use Core Data, Include Unit Tests and UI Tests are unchecked

Once created, the main Xcode window should look like the following:

Main Window

The new project consists of three files, AppDelegate.swift, ViewController.swift, and the star of this tutorial: Main.storyboard.

Under Deployment Info > Device Orientation in the General project settings, set Devices to iPhone. Since this is a portrait-only app, uncheck the Landscape Left and Landscape Right options.

Open Main.storyboard in the project navigator to view it in the Interface Builder editor:

Main Storyboard

The official storyboard terminology for a view controller is “scene”, but you can use the terms interchangeably. A scene represents a view controller in the storyboard.

Here you see a single view controller containing an empty view. The arrow pointing to the view controller from the left indicates it’s the initial view controller to be displayed for this storyboard.

Designing a layout in the storyboard editor is done by dragging controls from the Object Library (see bottom-right corner) into your view controller.

You’ll notice the default scene size is for a 4.7-inch screen. Xcode enables Auto Layout and Size Classes by default for storyboards. Auto Layout and Size Classes allow you to make flexible user interfaces that can easily resize, which is useful for supporting the various sizes of iPhones and iPads. To change the scene size to another device, click the button at the bottom left of the storyboard. You’ll then be able to select from the full range of supported device sizes, ranging from the iPad Pro (12.9-inch) to the iPhone 4S (3.5-inch), in both portrait and landscape orientations.

Size Classes

For this tutorial, we’ll leave the default scene size – iPhone 7 – unchanged, so make sure to switch it back if you’ve toggled through a couple of different device sizes. Xcode will automatically re-size existing and new scenes added to the storyboard for the currently-selected device size.

To get a feel for how the storyboard editor works, drag some controls from the Object Library into the blank view controller:

Drag Controls

As you drag controls in, they should show up in the Document Outline on the left:

Document Outline

The storyboard shows the contents of all your scenes. Currently there’s only one scene in your storyboard, but over the course of this tutorial you’ll add several others.

There’s a miniature version of this Document Outline above the scene called the Dock:

The Dock

The Dock shows the top-level objects in the scene. Each scene has at least a View Controller object, a First Responder object, and an Exit object. It can potentially have other top-level objects as well. The Dock is convenient for making connections to outlets and actions. If you need to connect something to the scene, you can simply drag to its icon in the Dock.

Note: You probably won’t use the First Responder very much. This is a proxy object referring to whatever object has first responder status at any given time. As an example, you can hook up the Touch Up Inside event from a button to First Responder’s cut: selector. If at some point a text field has input focus then you can press that button to make the text field, which is now the first responder, cut its text to the pasteboard.

Build and run the app, it should look exactly like what you designed in the editor (yours may look different than the screenshot below):

Simulator Testing

The single view controller you defined was set as the Initial View Controller – but how did the app load it? Open AppDelegate.swift to find the answer:

import UIKit

@UIApplicationMain
class AppDelegate: UIResponder, UIApplicationDelegate {

  var window: UIWindow?

  func application(_ application: UIApplication,
                   didFinishLaunchingWithOptions launchOptions: [UIApplicationLaunchOptionsKey: Any]?)
                   -> Bool {
    // Override point for customization after application launch.
    return true
  }

The @UIApplicationMain attribute at the top of the file designates the AppDelegate class as the entry point for the module. It’s a requirement for using storyboards your application delegate inherits from UIResponder and has a UIWindow property. All the methods are practically empty. Even application(_:didFinishLaunchingWithOptions:) simply returns true.

The secret’s in the Info.plist file. Open Info.plist in the Project Navigator and you’ll see the following:

Info.plist

Storyboard apps use the UIMainStoryboardFile key, also known as “Main storyboard file base name”, to specify the name of the storyboard to load when the app starts. When this setting is present, UIApplication will load the named storyboard file, automatically instantiate the “Initial View Controller”, and put that controller’s view into a new UIWindow object.

You can also see this in the Project Settings under the General tab and Deployment Info section:

Project Settings

Now to create the real Ratings app with several view controllers.

Just Add It To My Tab

The Ratings app you’re about to build has a tabbed interface with two scenes. With a storyboard it’s easy to create tabs.

Open Main.storyboard and delete the scene you worked with earlier. This can be done by clicking on View Controller in the Document Outline and pressing the delete key.

Drag a Tab Bar Controller from the Object Library into the canvas. You may want to maximize your Xcode window first, because the Tab Bar Controller comes with two view controllers attached and you’ll need some room to maneuver. You can zoom in and out by double-clicking the canvas, or set the zoom scale by ctrl-clicking the canvas and selecting the zoom level.

Tab Bar Controller

The new Tab Bar Controller comes pre-configured with two additional view controllers – one for each tab. UITabBarController is a so-called container view controller because it contains one or more other view controllers. Two other common containers are Navigation Controller and Split View Controller (you’ll use the Navigation Controller later).

The container Relationship is represented by the arrows between the Tab Bar Controller and the view controllers it contains. An embed Relationship in particular is signified by the icon seen below in the middle of the arrow body.

Container Relationship

Note: If you want to move the Tab Bar Controller and its attached view controllers as a group, zoom out, then -click or click and drag to select multiple scenes. This makes it possible to move them around together. (Selected scenes have a thin blue outline.)

Drag a label into the first view controller (currently titled “Item 1”), double click it, and give it the text “First Tab”. Next, drag a label into the second view controller (“Item 2”) and give it the text “Second Tab”. This allows you to see something happen when you switch between the tabs.

Build and run the app. You’ll see something similar to this in the console:

Ratings[18955:1293100] Failed to instantiate the default view controller for UIMainStoryboardFile 'Main' - perhaps the designated entry point is not set?

Fortunately, the error is pretty clear here – you never set an entry point, meaning you didn’t set the Initial View Controller after you deleted the previous scene. To fix this, select the Tab Bar Controller, go to the Attributes Inspector and check Is Initial View Controller.

Initial View Controller

In the canvas, an arrow now points at the Tab Bar Controller:

Is Initial View Controller

Now when you run the app, UIApplication will make the Tab Bar Controller the main screen. Build and run the app. Now you can see a tab bar and can switch between the two view controllers:

App with Tabs

Note: To change the initial view controller, you can also drag the arrow between view controllers.

Xcode comes with a template for building a tabbed app (called the Tabbed Application template). You could have used it, but it’s good to know how this works so you can create a Tab Bar Controller by hand if you have to.

Note: If you connect more than five scenes to the Tab Bar Controller, it automatically gets a More… tab when you run the app. Pretty neat!

Adding a Table View Controller

The two scenes currently attached to the Tab Bar Controller are both UIViewController instances. You’re going to replace first tab scene with a UITableViewController instead.

Click on the first view controller in the Document Outline to select it, then delete it. Drag a new Table View Controller into the canvas where the previous scene used to be:

Table View Controller

Next, you want to place the Table View Controller inside a navigation controller. First, select the Table View Controller. Next, choose Editor\Embed In\Navigation Controller from Xcode’s menubar. This adds another controller to the canvas:

Navigation Controller

You could have dragged in a Navigation Controller from the Object Library and embedded the table view, but this Embed In command is a nice time saver for a common action.

Since the Navigation Controller is also a container view controller (just like the Tab Bar Controller), it has a relationship arrow pointing to the Table View Controller. You can also see these relationships in the Document Outline:

Relationship

Notice embedding the Table View Controller gave it a navigation bar. Interface Builder automatically put it there because this scene will now be displayed inside the Navigation Controller’s frame. It’s not a real UINavigationBar object, but a simulated one. Simulated Metrics will infer the context around the scene and show a navigation bar when it’s inside a Navigation Controller, a tab bar when it’s inside a Tab Bar Controller, and so on.

To connect these two new scenes to the Tab Bar Controller, ctrl-drag from the Tab Bar Controller to the Navigation Controller. When you let go, a small popup menu appears. Choose the Relationship Segue – view controllers option:

Embed VC

This creates a new relationship arrow between the two scenes. This is also an embed Relationship as you saw with the other controllers contained by the Tab Bar Controller.

The Tab Bar Controller has two embed relationships, one for each tab. The Navigation Controller itself has an embed Relationship with the Table View Controller.

When you made this new connection, a new tab was added to the Tab Bar Controller, simply named “Item”. For this app, you want this new scene to be the first tab, so drag the tabs around to change their order:

Drag tab items

Build and run the app to try it out. The first tab now contains a table view inside a navigation controller.

SimulatorFirstTabWithTableView

Before you put some actual functionality into this app, you need to clean up the storyboard a little. You’ll name the first tab “Players” and the second “Gestures”. You don’t change this on the Tab Bar Controller itself, but in the view controllers connected to these tabs.

As soon as you connect a view controller to a Tab Bar Controller, it’s given a Tab Bar Item object which you can see in the Document Outline or the bottom of the scene. Use this Tab Bar Item to configure the tab’s title and image seen on the Tab Bar Controller.

Select the Tab Bar Item inside the Navigation Controller, and in the Attributes inspector set its Title to Players:

Tab Bar Players

Next, rename the Tab Bar Item for the second tab to Gestures the same way you did above.

A well-designed app should also put icons on these tabs. The resources for this tutorial contains a subfolder named Images. Drag that folder into the Assets.xcassets subfolder in the project.

Drag Images to XCAssets

Open Main.storyboard, in the Attributes inspector for the Players Tab Bar Item, choose the Players image.

Players Image

Next, give the Gestures Tab Bar Item the image Gestures.

A view controller embedded inside a Navigation Controller has a Navigation Item used to configure the navigation bar. Select the Navigation Item for the Table View Controller in the Document Outline and change its title in the Attributes inspector to Players. .

Navigation Item

Notice the Scene title in the Document Outline now changes to Players

Note: Alternatively, you can double-click the navigation bar and change the title there. You should double-click the simulated navigation bar in the Table View Controller, not the actual Navigation Bar object in the Navigation Controller.

Build and run the app. Now marvel at your pretty tab bar, created without writing a single line of code!

App With Tab Bar Images

Prototype Cells

Prototype cells allow you to easily design a custom layout for your table view cells directly within the storyboard editor.

The Table View Controller comes with a blank prototype cell. Click the cell to select it and in the Attributes inspector set the Style option to Subtitle. This immediately changes the appearance of the cell to include two labels.

Note: With so much stackable content on a storyboard, it can sometimes be difficult to click on exactly what you want. If you have trouble, there’s several options. One is you can select the item in the Document Outline to the left of the canvas. The second is a handy hotkey: hold control + shift and click on the area you’re interested in. A popup will appear allowing you to select any element directly under your cursor.

If you’ve used table views before and created your own cells by hand, you may recognize this as the UITableViewCellStyle.Subtitle style. With prototype cells you can pick one of the built-in cell styles as you just did, or create your own custom design (which you’ll do shortly).

Set the Accessory attribute to Disclosure Indicator and the Identifier to PlayerCell. All prototype cells must have a reuse identifier so you can refer to them in code. In addition, set the cell’s Selection to None.

Note: The cell’s Selection attribute is set to None to prevent the user from editing an existing item by tapping the PlayerCell. Although you won’t be adding this functionality in this tutorial, you will have enough knowledge by the end of Part 2 to implement this feature into the sample project for additional practice.

Cell Setup

Build and run the app, nothing has changed. That’s not so strange: you still have to make a data source for the table so it knows which rows to display. You’re going to do that next.

Add a new file to the project. Choose the Cocoa Touch Class template under iOS/Source. Name the class PlayersViewController and make it a subclass of UITableViewController. Uncheck Also create XIB file. Choose the Swift language and hit Next followed by Create.

Players View Controller

Open Main.storyboard and select the Table View Controller (make sure you select the actual view controller and not one of its views). In the Identity inspector, set its Class to PlayersViewController. This is an essential step for hooking up a scene from the storyboard with your custom view controller subclass. Don’t forget this or your class won’t be used!

Players VC Class

Now when you run the app the table view controller from the storyboard is an instance of the PlayersViewController class.

The table view should display a list of players, so now you’ll create the main data model for the app – an array containing Player objects. Add a new file to the project using the Swift File template under iOS/Source and name the file Player.

Replace the code in Player.swift with the following:

import Foundation

struct Player {

  // MARK: - Properties
  var name: String?
  var game: String?
  var rating: Int
}

There’s nothing special going on here. Player is simply a container object for these three properties: the name of the player, the game they’re playing, and a rating of 1 to 5 stars. Note because you didn’t define a custom initializer, the struct will automatically receive a default memberwise initializer which can be used to set all of its properties.

Next, create a new file using the Swift File template named SampleData. Replace the contents of SampleData.swift with the following:

import Foundation

final class SampleData {

  static func generatePlayersData() -> [Player] {
    return [
      Player(name: "Bill Evans", game: "Tic-Tac-Toe", rating: 4),
      Player(name: "Oscar Peterson", game: "Spin the Bottle", rating: 5),
      Player(name: "Dave Brubeck", game: "Texas Hold 'em Poker", rating: 2)
    ]
  }
}

Here you’ve defined a static method on SampleData to generate an array of hard coded Player objects.

Next, open PlayersViewController.swift and replace the contents of the file with the following:

import UIKit

class PlayersViewController: UITableViewController {

  // MARK: - Properties
  var players = SampleData.generatePlayersData()
}

You could have set up the sample data in PlayersViewController when defining the players variable. But this data might be provided from a plist or other outside source, hence it’s wise to handle loading the data outside of the view controller.

Now you’ve an array full of Player objects, continue hooking up the data source in PlayersViewController. Still in PlayersViewController.swift, add the following extension to the end of the file:

// MARK: - UITableViewDataSource
extension PlayersViewController {

  override func tableView(_ tableView: UITableView, numberOfRowsInSection section: Int) -> Int {
    return players.count
  }

  override func tableView(_ tableView: UITableView,
                          cellForRowAt indexPath: IndexPath) -> UITableViewCell {
    let cell = tableView.dequeueReusableCell(withIdentifier: "PlayerCell", for: indexPath)

    let player = players[indexPath.row]
    cell.textLabel?.text = player.name
    cell.detailTextLabel?.text = player.game
    return cell
  }
}

The method dequeueReusableCell(withIdentifier:for:) will check to see if there’s an existing cell that can be recycled. If not, it will automatically allocate a prototype cell and return it to you. All you need to do is supply the re-use identifier you set on the prototype cell in the storyboard editor – in this case PlayerCell. Don’t forget to set the identifier, or this little scheme won’t work!

Build and run the app, the table view has players in it!

App With Players

It takes just a few lines of code to use these prototype cells. I think that’s just great!

Note: In this app you’re using only one prototype cell. If your table needs to display different kinds of cells you can add additional prototype cells to the storyboard. Make sure to give each cell its own re-use identifier!

Designing Your Own Prototype Cells

Using a standard cell style is fine for most apps, but for this app you want to add an image on the right-hand side of the cell showing the player’s rating. Having an image view in that spot is not supported by the standard cell styles, so you’ll have to make a custom design.

Open Main.storyboard, select the prototype cell in the table view, and in Attributes inspector, set its Style attribute to Custom. The default labels now disappear.

First make the cell a little taller. Either change the Row Height value in the Size inspector (after checking Custom) or drag the handle at the bottom of the cell. Make the cell 60 points high.

Drag two Label objects from the Objects Library into the cell and place them roughly where the standard labels were previously. Just play with the font and colors in the Attributes Inspector and pick something you like. Set the text of the top label to Name and the bottom label to Game.

Select both the Name and Game labels in the Document Outline using Command+click, and choose Editor\Embed In\Stack View.

Note: Stack views were introduced in in iOS 9 and are brilliant for easily laying out collections of views. You can find out more about stack views in our UIStackView Tutorial.

Drag an Image View into the cell and place it on the right, next to the disclosure indicator. In the Size Inspector, make it 81 points wide and 35 points high. Set its Content Mode to Center (under View in the Attributes inspector) so whatever image you put into this view is not stretched.

Command + click the Stack View and Image View in the Document Outline to select both of them. Choose Editor\Embed in\Stack View. Xcode will create a new horizontal stack view containing these two controls.

Stack View

Select this new horizontal stack view, and in the Attributes Inspector, change the Alignment to Center and the Distribution to Equal Spacing.

Now for some simple auto layout for this control. At the bottom right of the storyboard, click the Pin icon:

Pin Icon

Change the top constraints to Top: 0, Right: 20, Bottom: 0 and Left: 20. Make sure the four red pointers to the values are highlighted as in the picture. Click Add 4 Constraints at the bottom of the popover window.

StackView Constraints

If your stack view has orange constraints, it is misplaced. To fix this, select the horizontal stack view and choose Editor\Resolve Auto Layout Issues\Update Frames (in the Selected Views section of the menu). The stack view should position itself correctly and the orange constraint errors go away.

To position the image view within the stack view, select the image view in the Document Outline and choose Editor\Resolve Auto Layout Issues\Add Missing Constraints (in the Selected Views section of the menu).

You may see a small arrow highlighted in red in the Document Outline indicating unresolved layout issues with the stack view. Click on this arrow and click on the red circle to view Xcode’s suggested auto-fix. Selecting Change Priority for either the Name or Game labels’ hugging priority should silence this warning.

Fix Hugging Priority

The final design for the prototype cell looks something like this:

Final Cell

Because this is a custom designed cell, you can no longer use UITableViewCell’s textLabel and detailTextLabel properties to put text into the labels. These properties refer to labels that aren’t on this cell anymore; they’re only valid for the standard cell types. Instead, you’ll subclass UITableViewCell to provide the functionality.

Note: You could use Tags in this situation, however tags do not provide the type of object which the compiler can check at runtime hence you have to use type casting and checking during runtime which you should avoid if at all possible. For this reason, tags were no longer considered prudent to teach in this situation.

Using a Subclass for the Cell

Add a new file to the project, with the Cocoa Touch Class template. Name it PlayerCell and make it a subclass of UITableViewCell. Don’t check the option to create a XIB, as you already have the cell in your storyboard.

Next, add the following to the PlayerCell class, just below the class definition:

// MARK: - IBOutlets
@IBOutlet weak var gameLabel: UILabel!
@IBOutlet weak var nameLabel: UILabel!
@IBOutlet weak var ratingImageView: UIImageView!

These IBOutlets can be connected to your scene using the storyboard.

Next, add the following property below the IBOutlets:

// MARK: - Properties
var player: Player? {
  didSet {
    guard let player = player else { return }

    gameLabel.text = player.game
    nameLabel.text = player.name
    ratingImageView.image = image(forRating: player.rating)
  }
}

Whenever the player property is set, it’ll verify there’s a value and if so, update the IBOutlets with the correct information.

Next, add the following method below player:

func image(forRating rating: Int) -> UIImage? {
  let imageName = "\(rating)Stars"
  return UIImage(named: imageName)
}

This returns a different star image depending on the provided rating.

Next, open Main.storyboard, select the prototype cell PlayerCell and change its class to PlayerCell in the Identity inspector. Now whenever you ask the table view for a new cell with dequeueReusableCell(withIdentifier:for:), it’ll return a PlayerCell instance instead of a regular UITableViewCell.

Note: You gave this class the same name as the reuse identifier – they’re both called PlayerCell – but that’s only because I like to keep things consistent. The class name and reuse identifier have nothing to do with each other, so you can name them differently if you wish.

Finally, connect the labels and the image view to these outlets. Navigate to the Connections Inspector in the storyboard and then select the Player Cell from either the canvas or Document Outline. Drag from the nameLabel Outlet in the Connections inspector to the Name label object in either the Document Outline, or the canvas. Repeat for gameLabel and ratingImageView.

Name Label

Note: You should hook up the controls to the table view cell, not to the view controller! You see, whenever your data source asks the table view for a new cell with dequeueReusableCell, the table view doesn’t give you the actual prototype cell but a copy (or one of the previous cells is recycled if possible).

This means there will be more than one instance of PlayerCell at any given time. If you were to connect a label from the cell to an outlet on the view controller, then several copies of the label will try to use the same outlet. That’s just asking for trouble. (On the other hand, connecting the prototype cell to actions on the view controller is perfectly fine. You would do that if you’ve custom buttons or other UIControls on your cell.)

Now you’ve hooked up the properties, you can simplify the data source code a bit. Open PlayersViewController.swift, and change tableView(_:cellForRowAt:) to the following:

override func tableView(_ tableView: UITableView,
                        cellForRowAt indexPath: IndexPath) -> UITableViewCell {
    let cell = tableView.dequeueReusableCell(withIdentifier: "PlayerCell",
                                             for: indexPath) as! PlayerCell

    let player = players[indexPath.row]
    cell.player = player
    return cell
}

That’s more like it. You now cast the object you receive from dequeueReusableCell to a PlayerCell, and pass the correct player to the cell. Setting the player variable in PlayerCell will automatically propagate the values into the labels and image view. Isn’t it great how using prototype cells makes table views a whole lot less messy?

Build and run the app.

Wrong Cell Height

Hmm, that doesn’t look quite right – the cells appear to be squished. You did change the height of the prototype cell, but the table view doesn’t take that into consideration. There’s two ways to fix it: you can change the table view’s Row Height attribute, or implement the tableView(_:heightForRowAt:) method. The former is fine in this case because we only have one type of cell and we know the height in advance.

Note: You would use tableView(_:heightForRowAt:) if you didn’t know the height of your cells in advance, or if different rows can have different heights.

Open Main.storyboard, in the Size inspector of the Table View, set Row Height to 60:

Build an run the app.

Proper Row Height

That’s much better isn’t it!

Note: If you changed the cell height by dragging its handle rather than typing in the value, the table view’s Row Height property was automatically changed too. So it may have worked correctly for you the first time around.

Where To Go From Here?

Click here to download the full source code for the project up to this point.

Check out part two of this tutorial, where we’ll cover segues, static table view cells, the Add Player scene, a game picker scene, and the full downloadable example project for this tutorial!

If you felt lost at any point during this tutorial, you also might want to brush up on the basics with our iOS Apprentice series. In that series, you’ll learn the foundational knowledge you need as an iOS developer from the ground up — perfect for complete beginners, or those looking to fill in some gaps.

If you have any questions or comments on this tutorial or on storyboards, please join the forum discussion below!

The post Storyboards Tutorial for iOS: Part 1 appeared first on Ray Wenderlich.

Storyboards Tutorial for iOS: Part 2

$
0
0
Square Image

Storyboards, Segues and Static Cells

Update note: This tutorial has been updated for Xcode 9, iOS 11, and Swift 4 by Nicholas Sakaimbo. The original tutorial was written by Matthijs Hollemans.

If you want to learn about storyboards, you’ve come to the right place!

In the first part of this series, you covered the basics of using Interface Builder to create and connect various view controllers, along with how to make custom table view cells directly from the storyboard editor.

In this second and final part of this storyboards tutorial series, we’ll cover segues, static table view cells, the Add Player scene, and game picker scene!

We’ll start where we left off last tutorial, so open your project from last time, or download the example code from the previous tutorial here.

OK, now you’ll dive into some of the other cool features in storyboards!

Introducing Segues

It’s time to add more view controllers to the storyboard. You’re going to create a scene to add new players to the app.

Open Main.storyboard and drag a Bar Button Item into the right slot of the navigation bar on the Players scene. In the Attributes inspector change System Item to Add, and set its Style to Bordered.

Players Add Button

When the user taps this button, you want the app to pop up a new modal scene for entering details of a new player.

Drag a new Table View Controller into the canvas to the right of the Players scene. Remember you can double-click the canvas to zoom out so you have more room to work. With the new Table View Controller selected, choose Editor\Embed in\Navigation Controller.

Here’s the trick: Select the + button you just added on the Players scene and ctrl-drag to the new Navigation Controller. Release the mouse button and select Present Modally from the popup menu:

PresentModally

This places a new arrow between the Players scene and the Navigation Controller:

Modal relationship

This type of connection is known as a segue (pronounce: seg-way) and represents a transition from one scene to another. The storyboard connections you’ve seen so far were relationships and they described one view controller containing another. A segue, on the other hand, changes what’s on the scene. Segues are triggered by taps on buttons, table view cells, gestures, and so on.

The cool thing about using segues is you don’t have to write any code to present the new scene, or hook up your buttons to IBAction methods. What you just did, dragging from the Bar Button Item to the next scene, is enough to create the transition. (Note: If your control already has an IBAction connection, the segue overrides it.)

Build and run the app and tap the + button. A new table view will slide up from the bottom.

AppPresentModally

This is called a modal segue. The new scene completely obscures the previous one. The user cannot interact with the underlying scene until they close the modal scene first. Later you’ll see “show” segues that push a new scene onto a Navigation Controller’s navigation stack.

The new scene isn’t very useful yet – you can’t even close it to go back to the main scene. That’s because segues only go one way – so while it can go from the Players scene to this new one, it can’t go back.

Storyboards provide the ability to ‘go back’ with something called an unwind segue, which you’ll implement next. There’s three main steps:

  1. Create an object for the user to select, usually a button.
  2. Create an unwind method in the controller you want to return to.
  3. Hook up the method and the object in the storyboard.

First, open Main.storyboard and select the new Table View Controller scene. Change the title of the scene to Add Player (by double-clicking in the navigation bar). Next, add two Bar Button Items, one to each side of the navigation bar. In the Attributes inspector, set the System Item property of the left button to Cancel, and the right button to Done.

Add Player Buttons

Next, add a new file to the project using the Cocoa Touch Class template – name it PlayerDetailsViewController and make it a subclass of UITableViewController. Next, open Main.storyboard and select the Add Player scene. In the Identity inspector set its Class to PlayerDetailsViewController. I always forget this very important step, so to make sure you don’t; I’ll keep pointing it out.

Now you can finally create the unwind segue. Open PlayersViewController.swift, add the following extension above your UITableViewDataSource extension:

// MARK: - IBActions
extension PlayersViewController {

  @IBAction func cancelToPlayersViewController(_ segue: UIStoryboardSegue) {
  }

  @IBAction func savePlayerDetail(_ segue: UIStoryboardSegue) {
  }
}

cancelToPlayersViewController(_:) is simply a marker for the unwind segue. Later you’ll add code to savePlayerDetail(_:) to allow it to live up to it’s name!

Finally, open Main.storyboard and hook up the Cancel and Done buttons to their respective action methods. Ctrl-drag from the bar button to the exit object above the view controller then pick the correct action name from the popup menu:

Make connections

Note the name you gave the cancel method. When you create an unwind segue, the list will show all unwind methods (i.e. ones with the signature @IBAction func methodname(_ segue:)) in the entire app, so create a name you can recognize.

Build and run the app, tap the + button, and test the Cancel and Done buttons. A lot of functionality for very little code!

Storyboards Static Cells

When you’re finished with this section, the Add Player scene will look like this:

Add Player

That’s a grouped table view, but you don’t have to create a data source for this table. You can design it directly in the storyboard — no need to write tableView(_:cellForRowAt:) for this one! Static cells is the feature that makes this possible.

Open Main.storyboard and select the table view in the Add Player scene. In the Attributes inspector change Content to Static Cells. Change Style from Plain to Grouped and give the table view 2 sections.

StaticCells

Note: When you change the value of the Sections attribute, the editor will clone the existing section. (You can also select a specific section in the Document Outline on the left and duplicate it.)

The finished scene will have only one row in each section, so select two cells in each of the sections and delete them using the Document Outline.

Next, select the top table view section (from the Document Outline) and set the header value to Player Name.

Player Name

Drag a new Text Field into the cell for this section. Stretch out its width and remove its border so you can’t see where the text field begins or ends. Set the Font to System 17.0 and uncheck Adjust to Fit.

FormatPlayerName

You’re going to make an outlet for this text field on the PlayerDetailsViewController using the Assistant Editor feature of Xcode. While still in the storyboard, open the Assistant Editor with the button from the toolbar (the one at the top right with two intertwining rings). It should automatically open on PlayerDetailsViewController.swift (if it doesn’t, use the jumpbar in the right hand split window to select PlayerDetailsViewController.swift).

Select the new text field and ctrl-drag to the top of PlayersDetailViewController, just below the class definition. When the popup appears, name the new outlet nameTextField, and click Connect. Xcode will add the property to the PlayersDetailViewController class and connect it in the storyboard:

NameTextField

Creating outlets for views on your table cells is exactly the kind of thing I said you shouldn’t try with prototype cells, but for static cells it’s OK. There will be only one instance of each static cell so it’s perfectly acceptable to connect their subviews to outlets on the view controller.

Select the second section of the table view in the Document Outline and delete the placeholder “Section-2” text in the Header field in the Attributes Inspector. Set the Style of the static cell in the second section to Right Detail. This gives you a standard cell style to work with. Change the label on the left to read Game by double clicking it and give the cell a Disclosure Indicator accessory.

Player Game

Just as you did for nameTextField, make an outlet for the label that says Detail and name it detailLabel. The labels on this cell are just regular UILabel objects. You might need to click a few times on the text “Detail” to select the label (and not the whole cell) before ctrl-clicking and dragging to PlayerDetailsViewController.swift. Once done, it will look similar to the following:

Detail Label

The final design of the Add Player scene looks like this:

Add Player

Note: The scenes you’ve designed so far in this storyboard all have the width and height of the 4.7-inch screen of the iPhone 7, which is 667 points tall. Obviously, your app should work properly with different screen sizes, and you can preview these sizes within your Storyboard.

Open the Assistant Editor from the toolbar, and use the jump bar to select Preview. At the bottom left of the assistant editor, click the + symbol to add new screen sizes to preview. To remove a screen size, select it and hit the Delete key.

Preview

For the Ratings app, you don’t have to do anything fancy. It only uses table view controllers and they automatically resize to fit the screen space. When you do need to support different layouts for different sized devices, you’ll use Auto Layout and Size Classes.

Build and run the app. You’ll notice the Add Player scene is still blank!

Add Player Blank

When you use static cells, your table view controller doesn’t need a data source. Since you used an Xcode template to create the PlayerDetailsViewController class, it still has some placeholder code for the data source and this prevents the static cells from working properly. Time to fix it!

Open PlayerDetailsViewController.swift and delete everything from the following line down (except for the class closing bracket):

override func viewDidLoad() {
  super.viewDidLoad()
}

Build and run the app. Now the new scene displays the static cells, and all without writing a line of code.

Add Player

One more thing about static cells: they only work in UITableViewController. Even though Interface Builder will let you add them to a table view inside a regular UIViewController, this won’t work during runtime. The reason is UITableViewController provides some extra magic to take care of the data source for the static cells. Xcode prevents you from compiling such a project with the error message: “Illegal Configuration: Static table views are only valid when embedded in UITableViewController instances”. Prototype cells, on the other hand, work just fine in table view’s placed inside regular view controllers.

Note: If you’re building a scene with a lot of static cells — more than can fit in the visible frame — you can scroll through them in Interface Builder with the scroll gesture on the mouse or trackpad (2 finger swipe).

You can’t always avoid writing code altogether though, even for a table view of static cells. When you dragged the text field into the first cell, you probably noticed it didn’t fit completely. There’s a small margin of space around the text field. The user can’t see where the text field begins or ends, so if they tap in the margin and the keyboard doesn’t appear, they’ll be confused.

To avoid this, let a tap anywhere inside the row bring up the keyboard. Open PlayerDetailsViewController.swift and add the following extension to the end of the file:

// MARK: - UITableViewDelegate
extension PlayerDetailsViewController {

  override func tableView(_ tableView: UITableView, didSelectRowAt indexPath: IndexPath) {
    if indexPath.section == 0 {
      nameTextField.becomeFirstResponder()
    }
  }
}

If the user taps the first cell, the app should activate the text field. There’s only one cell in the section so you only need to test for the section index. Making the text field the first responder will automatically bring up the keyboard.

Note: when adding a delegate method, or overriding a view controller method, just start typing the method name (without preceding it with “func”), and you’ll be able to select the correct method from the available list.

You should also set the Selection for the cell to None in the storyboard Attributes Inspector, otherwise the row appears highlighted when the user taps in the margin around the text field.

Selection None

All right, that’s the design of the Add Player scene. Now to actually make it work!

The Add Player Scene at Work

For now you’ll ignore the Game row and just let users enter the name of the player.

When the user taps the Cancel button the scene should close and the data entered should be lost. This already works with the unwind segue.

When the user taps Done, you should create a new Player object, fill its properties and update the list of players.

prepare(for:sender:) is invoked whenever a segue is about to take place. You’ll override this method to store the data entered into a new Player object before dismissing the view.

Note: Never call prepare(for:sender:) yourself. It’s a message from UIKit to let you know a segue has just been triggered.

Open PlayerDetailsViewController.swift, and add the following property at the top of the class:

// MARK: - Properties
var player: Player?

Next, add the following method below your IBOutlets definitions:

// MARK: - Navigation
override func prepare(for segue: UIStoryboardSegue, sender: Any?)  {
  if segue.identifier == "SavePlayerDetail",
    let playerName = nameTextField.text {
      player = Player(name: playerName, game: "Chess", rating: 1)
  }
}

prepare(for:sender:) creates a new Player instance with default values for game and rating. It does this only for a segue with the identifier SavePlayerDetail.

Open Main.storyboard, find the Add Player scene in the Document Outline and select the unwind segue tied to savePlayerDetail:. Change Identifier to SavePlayerDetail:

Save Player Detail

Next, open PlayersViewController and replace the unwind segue method savePlayerDetail(_:) with the following:

@IBAction func savePlayerDetail(_ segue: UIStoryboardSegue) {

  guard let playerDetailsViewController = segue.source as? PlayerDetailsViewController,
    let player = playerDetailsViewController.player else {
      return
  }

  // add the new player to the players array
  players.append(player)

  // update the tableView
  let indexPath = IndexPath(row: players.count - 1, section: 0)
  tableView.insertRows(at: [indexPath], with: .automatic)
}

This obtains a reference to the PlayerDetailsViewController via the segue reference and resolves the Player object. Next, append the new Player object to the players array. Finally, inform the table view a new row was inserted at the bottom, since the table view and its data source must always be in sync.

You could have invoked tableView.reloadData() but it looks nicer to insert the new row with an animation. UITableViewRowAnimation.automatic automatically picks the correct animation, depending on where you insert the new row.

Build and run the app, you should now be able to add new players to the list!

App with new players

Performance

Since you have several view controllers in the storyboard, you might be wondering about performance. Loading a whole storyboard at once isn’t a big deal. The storyboard doesn’t instantiate all the view controllers right away – only the initial view controller is immediately loaded. Since your initial view controller is a Tab Bar Controller, the two view controllers it contains are also loaded (the Players scene from the first tab and the scene from the second tab).

The other view controllers are not instantiated until you segue to them. When you close these view controllers they’re immediately deallocated, so only the actively used view controllers are in memory.

To see this in practice, open PlayerDetailsViewController.swift and add the following below your IBOutlet definitions:

// MARK: - Initializers
required init?(coder aDecoder: NSCoder) {
  print("init PlayerDetailsViewController")
  super.init(coder: aDecoder)
}

deinit {
  print("deinit PlayerDetailsViewController")
}

You’re overriding init?(coder:) and deinit, and making them log a message to the Xcode Debug pane.

Build and run the app. Open the Add Player scene. You should see the print() log statement from init?(coder:).

When you close the Add Player scene, either by tapping Cancel or Done, you should see the print() log statement from deinit. If you open the scene again, you should also see the message from init?(coder:) again. This should reassure you that view controllers are loaded on-demand only.

The Game Picker Scene

Tapping the Game row in the Add Player scene should open a new scene to let the user pick a game from a list. This means you’ll add another table view controller, although this time you’re going to push it on the navigation stack rather than show it modally.

Open Main.storyboard and drag a new Table View Controller into the canvas. Next, select the Game table view cell in the Add Player scene (be sure to select the entire cell, not one of the labels) and ctrl-drag to the new table view controller to create a segue between them. Select Show under Selection Segue in the popup, not Accessory Action.

Select this new segue and give it the identifier PickGame in the Attributes Inspector.

Select the new table view controller in the Document Outline and in the Attributes Inspector, name this scene Choose Game.

Choose Game

Next, select the prototype table view cell and set the Style of the prototype cell to Basic, and give it the reuse identifier GameCell. That’s all you need to do for the design of this scene:

Game Cell

Add a new Swift file to the project, using the Cocoa Touch Class template and name it GamePickerViewController, subclass of UITableViewController.

Next, open Main.storyboard and select the Choose Game Scene. In the Identity Inspector, set its Custom Class to GamePickerViewController.

Now you’ll give this new scene some data to display. Open GamePickerViewController.swift, and add replace everything in the class definition with the following:

// MARK: - Properties
var games = [
  "Angry Birds",
  "Chess",
  "Russian Roulette",
  "Spin the Bottle",
  "Texas Hold'em Poker",
  "Tic-Tac-Toe"
]

Next, add the following extension to the end of the file:

// MARK: - UITableViewDataSource
extension GamePickerViewController {

  override func tableView(_ tableView: UITableView,
                          numberOfRowsInSection section: Int) -> Int {
    return games.count
  }

  override func tableView(_ tableView: UITableView,
                          cellForRowAt indexPath: IndexPath) -> UITableViewCell {
    let cell = tableView.dequeueReusableCell(withIdentifier: "GameCell", for: indexPath)
    cell.textLabel?.text = games[indexPath.row]
    return cell
  }
}

Here you’re setting up the data source to use the games array and placing the string values in the cell’s textLabel.

Build and run the app and tap the Game row. The new Choose Game scene will slide into view. Tapping the rows won’t do anything yet, but because this scene is presented on the navigation stack, you can always tap the back button to return to the Add Player scene.

Choose Game

This is pretty cool, huh? You didn’t have to write any code to invoke this new scene. You just ctrl-dragged from the static table view cell to the new scene and that’s it. The only code you wrote was to populate the contents of the table view, which is typically something more dynamic rather than a hardcoded list.

Currently, this new scene isn’t very useful since it doesn’t send any data back. You’ll have to add a new unwind segue.

In GamePickerViewController add the following properties below the games property:

var selectedGame: String? {
  didSet {
    if let selectedGame = selectedGame,
      let index = games.index(of: selectedGame) {
        selectedGameIndex = index
    }
  }
}

var selectedGameIndex: Int?

Whenever selectedGame is updated, didSet will locate the game string in games array and automatically update selectedGameIndex with the correct index from the table.

Next, replace tableView(_:cellForRowAt:) with the following:

override func tableView(_ tableView: UITableView,
                        cellForRowAt indexPath: IndexPath) -> UITableViewCell {

  let cell = tableView.dequeueReusableCell(withIdentifier: "GameCell", for: indexPath)
  cell.textLabel?.text = games[indexPath.row]

  if indexPath.row == selectedGameIndex {
    cell.accessoryType = .checkmark
  } else {
    cell.accessoryType = .none
  }

  return cell
}

This sets a checkmark on the cell containing the name of the currently selected game. Small gestures such as these will be appreciated by users of the app.

Next, add the following extension below the UITableViewDataSource extension:

// MARK: - UITableViewDelegate
extension GamePickerViewController {

  override func tableView(_ tableView: UITableView, didSelectRowAt indexPath: IndexPath) {
    tableView.deselectRow(at: indexPath, animated: true)

    // Other row is selected - need to deselect it
    if let index = selectedGameIndex {
      let cell = tableView.cellForRow(at: IndexPath(row: index, section: 0))
      cell?.accessoryType = .none
    }

    selectedGame = games[indexPath.row]

    // update the checkmark for the current row
    let cell = tableView.cellForRow(at: indexPath)
    cell?.accessoryType = .checkmark
  }
}

This method is called whenever the user taps a row. First deselect the row after it was tapped (makes it fade from the gray highlight color back to white). Finally, remove the checkmark from the previously selected cell, and puts it on the just tapped cell.

Build and run the app. Tap the name of a game and its row will get a checkmark. Tap the name of another game and the checkmark moves to that row.

Game Checkmark

The scene should close when the user taps a row but that doesn’t happen yet because you haven’t hooked up an unwind segue. Sounds like a great next step!

Open PlayerDetailsViewController.swift, and add the following below the player property:

var game: String = "Chess" {
  didSet {
    detailLabel.text = game
  }
}

This property will hold the selected game so it can be stored in the Player object later. didSet will display the name of the game in the static table cell whenever the name changes.

Still in PlayerDetailsViewController.swift, add the following extension above your UITableViewDelegate extension:

// MARK: - IBActions
extension PlayerDetailsViewController {

  @IBAction func unwindWithSelectedGame(segue: UIStoryboardSegue) {
    if let gamePickerViewController = segue.source as? GamePickerViewController,
      let selectedGame = gamePickerViewController.selectedGame {
        game = selectedGame
    }
  }
}

This method is executed once the user selects a game from the Choose Game Scene and updates both the label on screen and the game property based on the game selected. The unwind segue also pops GamePickerViewController off the navigation controller’s stack.

Open Main.storyboard, ctrl-drag from the tableview cell to the Exit as you did before, and choose unwindWithSelectedGame: from the popup list:

UnwindWithSelectedGame

In the Attributes Inspector give the new unwind segue the Identifier SaveSelectedGame.

Build and run the app. Create a new player, select the player’s game row and choose a game.

The game is not updated on the Add Player scene!

Unfortunately, the unwind segue method is performed before tableView(_:didSelectRowAt:), so the selectedGameIndex is not updated in time. Fortunately, you can override prepare(for:sender:) and complete the operation before the unwind happens.

Open GamePickerViewController, and add the following method below your property definitions:

override func prepare(for segue: UIStoryboardSegue, sender: Any?) {

  guard segue.identifier == "SaveSelectedGame",
    let cell = sender as? UITableViewCell,
    let indexPath = tableView.indexPath(for: cell) else {
      return
  }

  let index = indexPath.row
  selectedGame = games[index]
}

The sender parameter of prepare(for:sender:) is the object that initiated the segue, which in this case was the selected game cell. You can use the indexPath to locate the selected game in games array then set selectedGame so it’s available in the unwind segue.

Build and run the app and select the game, it’ll update the player’s game details!

It Works

Next, you need to change PlayerDetailsViewController‘s prepare(for:sender:) to return the selected game, rather than the hardcoded “Chess”. This way, when you complete adding a new player, their actual game will be displayed on the Players scene.

Open PlayerDetailsViewController.swift, replace prepareForSegue(_:sender:) with the following:

override func prepare(for segue: UIStoryboardSegue, sender: Any?) {
  if segue.identifier == "SavePlayerDetail",
    let playerName = nameTextField.text {
      player = Player(name: playerName, game: game, rating: 1)
  }
}

When you complete the Add Player scene and tap done, the list of players will now update with the correct game.

One more thing – when you choose a game, return to the Add Player scene, then try to choose a game again, the game you chose before should have a checkmark by it. The solution is to pass the selected game stored in PlayerDetailsViewController over to the GamePickerViewController when you segue.

Still in PlayerDetailsViewController.swift, add the following to the end of prepare(for:sender:):

if segue.identifier == "PickGame",
  let gamePickerViewController = segue.destination as? GamePickerViewController {
  gamePickerViewController.selectedGame = game
}

Note you now have two if statements checking segue.identifier. SavePlayerDetail is the unwind segue going back to the Players list, and PickGame is the show segue going forwards to the Game Picker scene. The code you added will set the selectedGame on the GamePickerViewController just before the view is loaded. Setting selectedGame will automatically update selectedGameIndex which is the index the table view cell uses to set a checkmark.

Awesome. You now have a functioning Choose Game scene!

Functioning Game Scene

One More Thing: Storyboard References

Open Main.storyboard and zoom out. You’ll see the complete project has several scenes.

Storyboard Zoomed Out

This bird’s-eye-view of your project is nice, but you can imagine a large number of scenes could become unwieldy to navigate. In addition, multiple people working in the same storyboard file can lead to nasty merge conflicts in version control.

To mitigate these issues, you can use Storyboard References to split up an existing storyboard into one or more smaller storyboard files, separated by logical areas of functionality. Let’s see how this works by refactoring all view controllers from the Players tab into their own storyboard.

To do this, click + drag to select all view controllers starting from PlayerViewController‘s containing navigation controller to the Choose Game scene (you may need to zoom out sufficiently to do this). Alternatively, you could also use Command + click to select view controllers in the Document Outline.

Select Players Scenes

Next, select Editor\Refactor to Storyboard to consolidate the selected scenes into their own storyboard.

Refactor to Storyboard

When prompted for a filename, type “Players” and hit “Save”. You’ll see a new Players.storyboard file in your project containing all the scenes you just built. In addition, back in Main.storyboard, you’ll see the tab bar controller now points to the Players Storyboard Reference and not directly to the Players scene.

storyboards reference

Build and run the project to confirm everything works as before. Voila! Refactoring storyboards is easy and could save you down the road – it’s a great tool to have in your toolbelt.

Where To Go From Here?

Here is the final Ratings example project with all of the code from the above tutorial.

Congratulations, you now know the basics of using the Storyboard Editor, and can create apps with multiple view controllers transitioning between each other with segues! Editing multiple view controllers and their connections to each other in one place makes it easy to visualize your app as a whole.

One item you didn’t add as part of this tutorial is the ability to change the player rating, but you now know enough about storyboards to implement this yourself for practice. :]

You’ve also seen how easy it is to customize table views and table view cells. Static cells make it easy to set up an interface without implementing all the data source methods.

If you want to learn more about storyboards, check out our book the iOS Apprentice.

If you have any questions or comments on this tutorial or on storyboards in general, please join the forum discussion below!

The post Storyboards Tutorial for iOS: Part 2 appeared first on Ray Wenderlich.


Opportunity: Senior Fullstack Developer at raywenderlich.com

$
0
0

As you might know, this site is a community effort of over 100 part-time authors and editors, who team up to write high quality tutorials and books.

But you might not know that we also have 10 full-time employees too. Our job is to keep things running smoothly, create video tutorials, and to run our annual conference, RWDevCon.

Today, we are happy to announce an opportunity for a new full-time position: Senior Fullstack Developer at raywenderlich.com!

If you are a great designer with some front-end skills or know someone who is, keep reading to find out what’s involved!

What’s Involved

We are seeking a highly motivated and talented individual to join our team as a senior fullstack developer, to help make a major overhaul of this site.

This is a great chance to work on a green-field project with some great developers using lots of exciting new tech, and to take an already popular site to the next level! :]

Better yet – our team is distributed, so you can work remotely from the comfort of your own home – from anywhere in the world.

The ideal candidate will possess the following skills:

Skill Requirements

  • 4+ years of software engineering experience
  • Experience with Ruby-on-Rails
  • Demonstrable knowledge of architecting microservice-like platforms
  • Deep understanding and interest in a wide range of technologies and design patterns
  • Experience with front-end technologies—React and Redux a bonus
  • Top-notch communication skills
  • Strong analytical skills—the ability to weigh costs & benefits and arrive at a sensible compromise
  • Strong problem-solving ability—in a technology agnostic manner
  • Desire to learn new technologies
  • Interest in / experience of teaching programming
If you like zombie cats, even better!

If you like zombie cats, even better!

About Razeware

Razeware is the company behind this site. We’re passionate about learning new development skills, and teaching others what we’ve learned through high quality, hands-on tutorials.

We are a small company that has been profitable for over 7 years. Currently we have just 10 full-time employees, so you’d be getting in on the ground floor.

We’re also a 100% distributed company: everyone works from their own home or office, whether it be Maryland, Virginia, Connecticut, or England. We make heavy use of Trello, Slack, Google Hangouts, and email for team communication.

We have a ton of great benefits, such as:

  • Remote working!
  • Health insurance and 401K match (US only)
  • Generous PTO – plus 1-week company-wide Christmas vacation
  • Competitive salary
  • Professional development (conferences & training)
  • Free trip to our annual conference – RWDevCon

RWDevCon

Our site is helping millions of developers across the world make apps, further their careers, and fulfill lifelong dreams. If you’re passionate about helping our small but highly motivated team take this to the next level, this is the job for you.

How To Apply

To apply, please email a resume and cover letter to ray@razeware.com.

Otherwise, please help spread the word about this post – we really appreciate it.

We look forward to hearing from you! :]

The post Opportunity: Senior Fullstack Developer at raywenderlich.com appeared first on Ray Wenderlich.
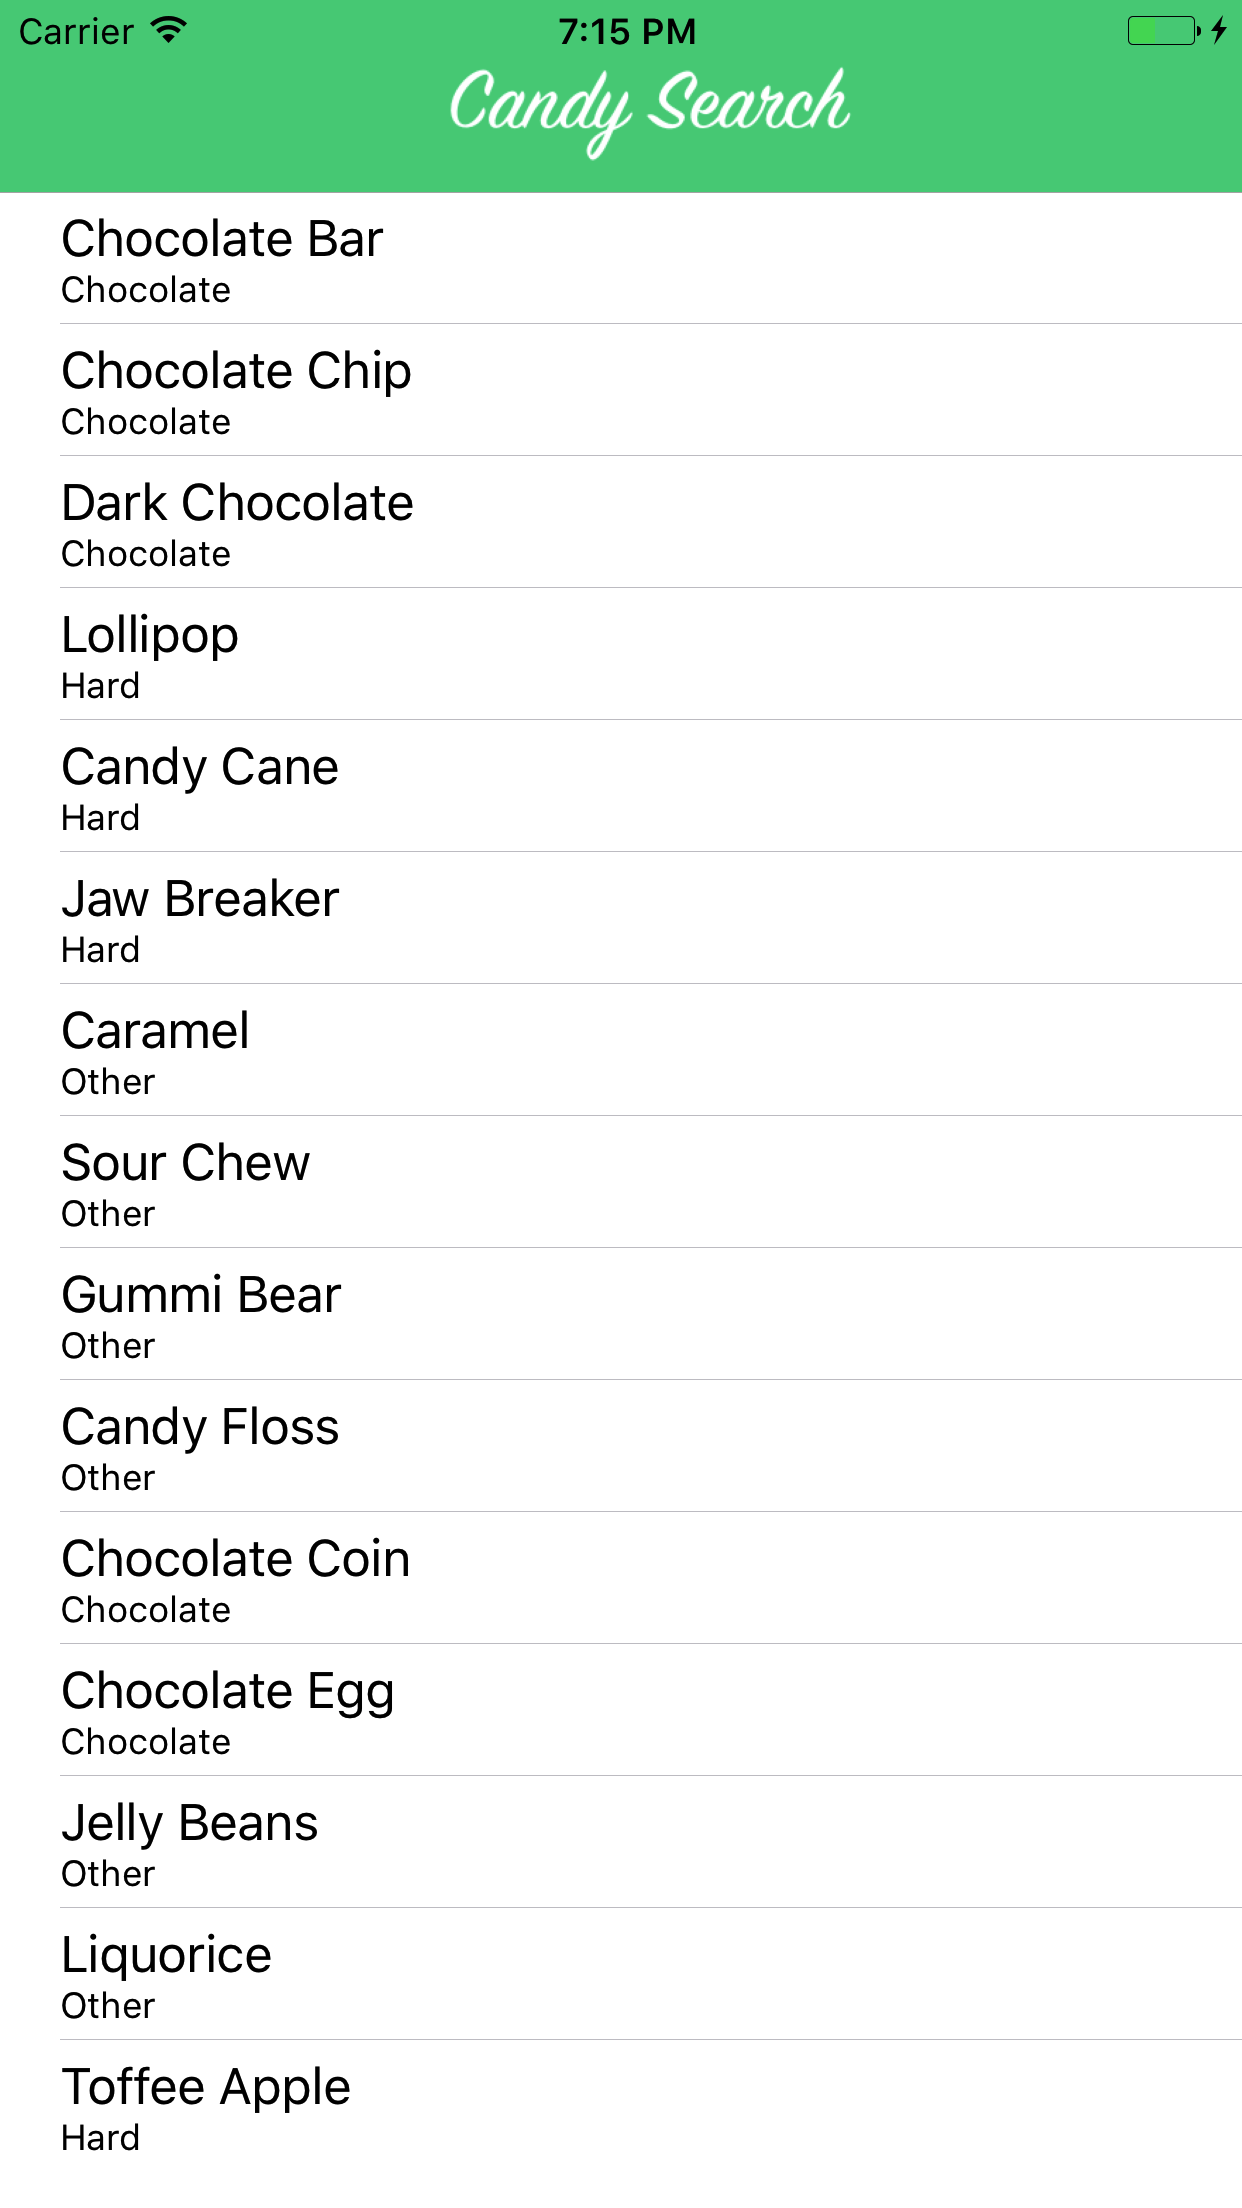
Screencast: Introduction to ARKit: Getting Started

HealthKit Tutorial With Swift: Getting Started

$
0
0

Update Note: This tutorial has been updated for Swift 4, Xcode 9 and iOS 11 by Ted Bendixson. The original tutorial was written by Ernesto García.

Learn about the new HealthKit API in iOS 8!

HealthKit is an API that was introduced in iOS 8. It acts as a central repository for all health-related data, letting users build a biological profile and store workouts.

In this HealthKit tutorial, you will create a simple workout tracking app and learn:

  • How to request permission and access HealthKit data
  • How to read HealthKit data and display it in a UITableView
  • How to write data to HealthKit’s central repository

Ready to start this HealthKit Exercise? Read on!

Note: To work through this HealthKit tutorial, you’ll need an active iOS developer account. Without one, you won’t be able to enable the HealthKit Capability and access the HealthKit Store.

Getting Started

The sample app tracks calories burned doing the latest celebrity endorsed workout routine. It should be obvious to Hollywood insiders and well-mannered socialites that I’m talking about Prancercise.


Download the starter project and open it in Xcode.

Build and run the app. You will see a skeleton of the user interface. Throughout the course of these next two articles, you will slowly add in the functionality.

Assigning a Team

HealthKit is a special framework. Your app can’t use it unless you have an active developer account. Once you have a developer account, you can assign your team.

Select PrancerciseTracker in the Project Navigator, and then select the PrancerciseTracker target. Select the General tab and click on the Team combo box.

Select the team associated with your developer account:

That was a piece of cake, right? Oops. I meant to say that was a low-calorie potato and red lentil soup stewed in a vegetable broth :].

Entitlements

HealthKit also has its own set of entitlements, and you will need to enable them in order to build apps that use the framework.

Open the Capabilities tab in the target editor, and turn on the HealthKit switch, as shown in the screenshot below:

Wait for Xcode to configure HealthKit for you. There usually isn’t a problem here, but you might run into some snags if you forgot to setup your Team and Bundle Identifier like you did in the previous section.

Done and done. Now you just need to ask the user for permission to use HealthKit.

Permissions

HealthKit deals with sensitive and private data. Not everyone feels so comfortable letting their apps access this information.

That’s why HealthKit has a robust privacy system. HealthKit only has access to the kinds of data your users agree to share with it. To build up a health profile for your Prancercise Tracker’s users, you need to be nice and ask for permission to access each type of data first.

Updating the Share Usage Descriptions

First, you need to describe why you are asking for health metrics from your users. Xcode gives you a way to specify this in your application’s Info.plist file.

Open Info.plist. Then add the following keys:
Privacy – Health Share Usage Description
Privacy – Health Update Usage Description

Both keys store text that display when the HeathKit authorization screen appears. The Health Share Usage Description goes under the section for data to be read from HealthKit. The Health Update Usage Description corresponds to data that gets written to HealthKit.

You can put anything you want in there. Typically it’s some explanation saying, “We will use your health information to better track Prancercise workouts.”

Do be aware that if those keys aren’t set, your app will crash when attempting to authorize HealthKit.

Authorizing HealthKit

Open HealthKitSetupAssistant.swift and take a peek inside. You will find an empty class with an error type and the body of a method you will use to authorize HealthKit.

class func authorizeHealthKit(completion: @escaping (Bool, Error?) -> Swift.Void) {

}

the authorizeHealthKit(completion:) method accepts no parameters, and it has a completion handler that returns a boolean (success or failure) and an optional error in case something goes wrong. That’s what the two possible errors are for. You will pass them into the completion handler under two special circumstances.

Solution Inside: What might go wrong when trying to authorize HealthKit? SelectShow>

Let’s break this process down. To authorize HealthKit, the authorizeHealthKit(completion:) method will need to do these four things:

  1. Check to see if Healthkit is available on this device. If it isn’t, complete with failure and an error.
  2. Prepare the types of health data Prancercise Tracker will read and write to HealthKit.
  3. Organize those data into a list of types to be read and types to be written.
  4. Request Authorization. If it’s successful, complete with success.

Checking HealthKit Availability

First things first. You are going to check if HealthKit is available on the device.

Paste the following bit of code at the top of the authorizeHealthKit(completion:) method:

//1. Check to see if HealthKit Is Available on this device
guard HKHealthStore.isHealthDataAvailable() else {
  completion(false, HealthkitSetupError.notAvailableOnDevice)
  return
}

You are going to interact with HKHealthStore quite a lot. It represents the central repository that stores a user’s health-related data. HKHealthStore’s isHealthDataAvailable() method helps you figure out if the user’s current device supports HeathKit data.

The guard statement stops the app from executing the rest of the authorizeHealthKit(completion:) method’s logic if HealthKit isn’t available on the device. When this happens, the method completes with the notAvailableOnDevice error. Your view controller can do something with that, or you can just log it to the console.

Preparing Data Types

Once you know HealthKit is available on your user’s device, it is time to prepare the types of data that will get read from and written to HealthKit.

HealthKit works with a type called HKObjectType. Every type that goes into and out HealthKit’s central repository is some kind of HKObjectType. You will also see HKSampleType and HKWorkoutType. Both inherit from HKObjectType, so they’re basically the same thing.

Paste this next piece of code right after the first piece of code:

//2. Prepare the data types that will interact with HealthKit
guard   let dateOfBirth = HKObjectType.characteristicType(forIdentifier: .dateOfBirth),
        let bloodType = HKObjectType.characteristicType(forIdentifier: .bloodType),
        let biologicalSex = HKObjectType.characteristicType(forIdentifier: .biologicalSex),
        let bodyMassIndex = HKObjectType.quantityType(forIdentifier: .bodyMassIndex),
        let height = HKObjectType.quantityType(forIdentifier: .height),
        let bodyMass = HKObjectType.quantityType(forIdentifier: .bodyMass),
        let activeEnergy = HKObjectType.quantityType(forIdentifier: .activeEnergyBurned) else {

        completion(false, HealthkitSetupError.dataTypeNotAvailable)
        return
}

Wow, that’s big guard statement! It’s also an excellent example of using a single guard to unwrap multiple optionals.

In order to create an HKObjectType for a given biological characteristic or quantity, you need to use either HKObjectType.characteristicType(forIdentifier:) or HKObjectType.quantityType(forIdentifier:)

The characteristic types and the quantity types are both enums defined by the framework. HealthKit is loaded with these. There are so many different dimensions of health for your app to track that it makes my head spin whilst prancercising around the possibilities.

You will also notice that if a single characteristic or sample type is not available, the method will complete with an error. That’s intentional. Your app should always know exactly which HealthKit types it can work with, if any at all.

Preparing a list of data types to read and write

Now it’s time to prepare a list of types to read and types to write.

Paste this third bit of code into the authorizeHealthKit(completion:) method, right after the second piece:

//3. Prepare a list of types you want HealthKit to read and write
let healthKitTypesToWrite: Set<HKSampleType> = [bodyMassIndex,
                                                activeEnergy,
                                                HKObjectType.workoutType()]

let healthKitTypesToRead: Set<HKObjectType> = [dateOfBirth,
                                               bloodType,
                                               biologicalSex,
                                               bodyMassIndex,
                                               height,
                                               bodyMass,
                                               HKObjectType.workoutType()]

HealthKit expects a set of HKSampleType objects that represent the kinds of data your user can write, and it also expects a set of HKObjectType objects for your app to read.

HKObjectType.workoutType() is a special kind of HKObjectType. It represents any kind of workout.

Authorizing HealthKit

The final part is the easiest. You just need to request authorization from HealthKit. Paste this last piece of code after the third piece:

//4. Request Authorization
HKHealthStore().requestAuthorization(toShare: healthKitTypesToWrite,
                                     read: healthKitTypesToRead) { (success, error) in
  completion(success, error)
}

These lines of code request authorization from HealthKit and then call your completion handler. They use the success and error variables passed in from HKHealthStore’s requestAuthorization(toShare: read: completion:) method.

You can think of it as a redirect. Instead of handling the completion inside of HealthKitSetupAssistant, you are passing the buck to a view controller that can present an alert or take some other action.

The starter project already has an Authorize HealthKit button for this, and it invokes the method authorizeHealthKit() in MasterViewController. That sounds like the perfect place to call the new authorization method you just wrote.

Open MasterViewController.swift, locate authorizeHealthKit() and paste this code into the body:

HealthKitSetupAssistant.authorizeHealthKit { (authorized, error) in

  guard authorized else {

    let baseMessage = "HealthKit Authorization Failed"

    if let error = error {
      print("\(baseMessage). Reason: \(error.localizedDescription)")
    } else {
      print(baseMessage)
    }

    return
  }

  print("HealthKit Successfully Authorized.")
}

This code uses the authorizeHealthKit(completion:) method you just implemented. When it is finished, it prints a message to the console to let you know if HealthKit was successfully authorized.

Build and run. Tap Authorize HealthKit in the main view, and you will see an authorization screen pop up:

Turn on all the switches, scrolling the screen to see all of them, and click Allow. You’ll see a message like this in Xcode’s console:

HealthKit Successfully Authorized.

Great! Your app has access to HealthKit’s central repository. Now it’s time to start tracking things.

Characteristics and Samples

In this section, you will learn:

  • How to read your user’s biological characteristics.
  • How to read and write different types of samples (weight, height, etc.)

Biological characteristics tend to be the kinds of things that don’t change, like your blood type. Samples represent things that often do change, like your weight.

In order to properly track the effectiveness of a Prancercise workout regimen, the Prancercise Tracker app needs to get a sample of your user’s weight and height. Put together, these samples can be used to calculate Body Mass Index (BMI).

Note: Body Mass Index (BMI) is a widely used indicator of body fat, and it’s calculated from the weight and height of a person. Learn more about it here.

Reading Characteristics

The Prancercise Tracker app doesn’t write biological characteristics. It reads them from HealthKit. That means those characteristics need to be stored in HeathKit’s central repository first.

If you haven’t already done this, it’s time to tell HeathKit some more about yourself.

Open the Health App on your device or in the simulator. Select the Health Data tab. Then tap on the profile icon in the top right hand corner to view your health profile. Hit Edit, and enter information for Date of Birth, Sex, Blood Type:

Now that HealthKit knows your Date of Birth, Sex, and Blood Type, it’s time to read those characteristics into Prancercise Tracker.

Go back to Xcode and open ProfileDataStore.swift. The ProfileDataStore class represents your point of access to all of the health-related data for your users.

Paste the following method into ProfileDataStore:

class func getAgeSexAndBloodType() throws -> (age: Int,
                                              biologicalSex: HKBiologicalSex,
                                              bloodType: HKBloodType) {

  let healthKitStore = HKHealthStore()

  do {

    //1. This method throws an error if these data are not available.
    let birthdayComponents =  try healthKitStore.dateOfBirthComponents()
    let biologicalSex =       try healthKitStore.biologicalSex()
    let bloodType =           try healthKitStore.bloodType()

    //2. Use Calendar to calculate age.
    let today = Date()
    let calendar = Calendar.current
    let todayDateComponents = calendar.dateComponents([.year],
                                                        from: today)
    let thisYear = todayDateComponents.year!
    let age = thisYear - birthdayComponents.year!

    //3. Unwrap the wrappers to get the underlying enum values.
    let unwrappedBiologicalSex = biologicalSex.biologicalSex
    let unwrappedBloodType = bloodType.bloodType

    return (age, unwrappedBiologicalSex, unwrappedBloodType)
  }
}

The getAgeSexAndBloodType() method accesses HKHealthStore, asks for the user’s date of birth, biological sex, and blood type. It also calculates the user’s age using the date of birth.

  1. You may have noticed this method can throw an error. It happens whenever the date of birth, biological sex, or blood type haven’t been saved in HealthKit’s central repository. Since you just entered this information into your Health app, no error should be thrown.
  2. Using the Calendar class, you can transform any given date into a set of Date Components. These are really handy when you want to get the year for a date. This code simply gets your birth year, the current year, and then calculates the difference.
  3. The “unwrapped” variables are named that way to make it clear that you have to access the underlying enum from a wrapper class (HKBiologicalSexObject and HKBloodTypeObject).

Updating The User Interface

If you were to build and run now, you wouldn’t see any change to the UI because you haven’t connected this logic to it yet.

Open ProfileViewController.swift and find the loadAndDisplayAgeSexAndBloodType() method.

This method will use your ProfileDataStore to load the biological characteristics into the user interface.

Paste the following lines of code into the loadAndDisplayAgeSexAndBloodType() method:

do {
  let userAgeSexAndBloodType = try ProfileDataStore.getAgeSexAndBloodType()
  userHealthProfile.age = userAgeSexAndBloodType.age
  userHealthProfile.biologicalSex = userAgeSexAndBloodType.biologicalSex
  userHealthProfile.bloodType = userAgeSexAndBloodType.bloodType
  updateLabels()
} catch let error {
  self.displayAlert(for: error)
}

This block of code loads age, sex, and blood type as a tuple. It then sets those fields on a local instance of the UserHealthProfile model. Finally, it updates the user interface with the new fields on UserHealthProfile by calling the updateLabels() method.

Because ProfileDataStore’s getAgeSexAndBloodType() method can throw an error, your ProfileViewController has to handle it. In this case, you simply take the error and present it inside of an alert with an “O.K.” button.

All of this is great, but there’s one catch. The updateLabels() method doesn’t do anything yet. It’s just an empty declaration. Let’s hook it up to the user interface for real this time.

Locate the updateLabels() method and paste these lines of code into its body:

if let age = userHealthProfile.age {
  ageLabel.text = "\(age)"
}

if let biologicalSex = userHealthProfile.biologicalSex {
  biologicalSexLabel.text = biologicalSex.stringRepresentation
}

if let bloodType = userHealthProfile.bloodType {
  bloodTypeLabel.text = bloodType.stringRepresentation
}

This code is pretty straightforward. If you user has set an age, it will get formatted an put into the label. The same goes for biological sex and bloodType. The stringRepresentation variable converts the enum to a string for display purposes.

Build and run the app. Go into the Profile & BMI screen. Tap on the Read HealthKit Data button.

If you entered your information into the Health app earlier, it should appear in the labels on this screen. If you didn’t, you will get an error message.

Cool! You’re reading and displaying data directly from HealthKit.

Querying Samples

Now it’s time to read your user’s weight and height. This will be used to calculate and display their BMI in the profile view.

Biological characteristics are easy to access because they almost never change. Samples require a much more sophisticated approach. They use HKQuery, more specifically HKSampleQuery.

To query samples from HealthKit, you will need:

  1. To specify the type of sample you want to query (weight, height, etc.)
  2. Some additional parameters to help filter and sort the data. You can pass in an optional NSPredicate or an array of NSSortDescriptors to do this.

Note: If you’re familiar with Core Data, you probably noticed some similarities. An HKSampleQuery is very similar to an NSFetchedRequest for an entity type, where you specify the predicate and sort descriptors, and then ask the Object context to execute the query to get the results.

Once your query is setup, you simply call HKHealthStore’s executeQuery() method to fetch the results.

For Prancercise Tracker, you are going to create a single generic function that loads the most recent samples of any type. That way, you can use it for both weight and height.

Open ProfileDataStore.swift and paste the following method into the class, just below the getAgeSexAndBloodType() method:

class func getMostRecentSample(for sampleType: HKSampleType,
                               completion: @escaping (HKQuantitySample?, Error?) -> Swift.Void) {

//1. Use HKQuery to load the most recent samples.
let mostRecentPredicate = HKQuery.predicateForSamples(withStart: Date.distantPast,
                                                      end: Date(),
                                                      options: .strictEndDate)

let sortDescriptor = NSSortDescriptor(key: HKSampleSortIdentifierStartDate,
                                      ascending: false)

let limit = 1

let sampleQuery = HKSampleQuery(sampleType: sampleType,
                                predicate: mostRecentPredicate,
                                limit: limit,
                                sortDescriptors: [sortDescriptor]) { (query, samples, error) in

    //2. Always dispatch to the main thread when complete.
    DispatchQueue.main.async {

      guard let samples = samples,
            let mostRecentSample = samples.first as? HKQuantitySample else {

            completion(nil, error)
            return
      }

      completion(mostRecentSample, nil)
    }
  }

HKHealthStore().execute(sampleQuery)
}

This method takes in a sample type (height, weight, bmi, etc.). Then it builds a query to get the most recent sample for that type. If you pass in the sample type for height, you will get back your latest height entry.

There is a lot going on here. I will pause to break down a few things.

  1. HKQuery has a number of methods that can help you filter your HealthKit sample queries. It’s worth taking a look at them. In this case, we are using the built-in date window predicate.
  2. Querying samples from HealthKit is an asynchronous process. That is why the code in the completion handler occurs inside of a Dispatch block. You want the completion handler to happen on the main thread, so the user interface can respond to it. If you don’t do this, the app will crash.

If all goes well, your query will execute and you will get a nice and tidy sample returned to the main thread where your ProfileViewController can put its contents into a label. Let’s do that part now.

Displaying Samples in the User Interface

If you recall from the earlier section, you loaded the data from HealthKit, saved it to a model in ProfileViewController, and then updated the content in the labels using ProfileViewController’s updateLabels() method.

All you need to do now is extend that process by adding a function that loads the samples, processes them for the user interface, and then calls updateLabels() to populate the labels with text.

Open ProfileViewController.swift, locate the loadAndDisplayMostRecentHeight() method, and paste the following code into the body:

//1. Use HealthKit to create the Height Sample Type
guard let heightSampleType = HKSampleType.quantityType(forIdentifier: .height) else {
  print("Height Sample Type is no longer available in HealthKit")
  return
}

ProfileDataStore.getMostRecentSample(for: heightSampleType) { (sample, error) in

  guard let sample = sample else {

    if let error = error {
      self.displayAlert(for: error)
    }

    return
  }

  //2. Convert the height sample to meters, save to the profile model,
  //   and update the user interface.
  let heightInMeters = sample.quantity.doubleValue(for: HKUnit.meter())
  self.userHealthProfile.heightInMeters = heightInMeters
  self.updateLabels()
}
  1. This method starts by creating a Height sample type. It then passes that sample type to the method you just wrote, which will return the most recent height sample recorded to HealthKit.
  2. Once a sample is returned, the height is converted to meters and stored on the UserHealthProfile model. Then the labels get updated.

Note: You usually want to convert your quantity sample to some standard unit. To do that, the code above takes advantage of HKQuantitySample’s doubleValue(for:) method which lets you pass in a HKUnit matching what you want (in this case meters).

You can construct various types of HKUnits using some common class methods made available through HealthKit. To get meters, you just use the meter() method on HKUnit and you’re good to go.

That covers height. What about weight? It’s very similar, but you will need to fill in the body for the loadAndDisplayMostRecentWeight() method in ProfileViewController.

Paste the following code into the loadAndDisplayMostRecentWeight() method body:

guard let weightSampleType = HKSampleType.quantityType(forIdentifier: .bodyMass) else {
  print("Body Mass Sample Type is no longer available in HealthKit")
  return
}

ProfileDataStore.getMostRecentSample(for: weightSampleType) { (sample, error) in

  guard let sample = sample else {

    if let error = error {
      self.displayAlert(for: error)
    }
    return
  }

  let weightInKilograms = sample.quantity.doubleValue(for: HKUnit.gramUnit(with: .kilo))
  self.userHealthProfile.weightInKilograms = weightInKilograms
  self.updateLabels()
}

It’s the exact same pattern. You create the type of sample you want to retrieve, ask HealthKit for it, do some unit conversions, save to your model, and update the user interface.

At this point, you might think you’re finished but there’s one more thing you need to do. The updateLabels() function isn’t aware of the new data you’ve made available to it. Let’s change that.

Add the following lines to the updateLabels() function, just below the part where you unwrap bloodType to display it in a label:

if let weight = userHealthProfile.weightInKilograms {
  let weightFormatter = MassFormatter()
  weightFormatter.isForPersonMassUse = true
  weightLabel.text = weightFormatter.string(fromKilograms: weight)
}

if let height = userHealthProfile.heightInMeters {
  let heightFormatter = LengthFormatter()
  heightFormatter.isForPersonHeightUse = true
  heightLabel.text = heightFormatter.string(fromMeters: height)
}

if let bodyMassIndex = userHealthProfile.bodyMassIndex {
  bodyMassIndexLabel.text = String(format: "%.02f", bodyMassIndex)
}

Following the original pattern in the updateLabels() function, it unwraps the height, weight, and body mass index on your UserHealthProfile model. If those are available, it generates the appropriate strings and puts them in the labels. MassFormatter and LengthFormatter do the work of converting your quantities to strings.

Body Mass Index isn’t actually stored on the UserHealthProfile model. It’s a computed property that does the calculation for you.

Command click on the bodyMassIndex property, and you will see what I mean:

var bodyMassIndex: Double? {

  guard let weightInKilograms = weightInKilograms,
    let heightInMeters = heightInMeters,
    heightInMeters > 0 else {
    return nil
  }

  return (weightInKilograms/(heightInMeters*heightInMeters))
}

Body Mass Index is an optional property, meaning it can return nil if neither height nor weight are set (or if they are set to some number that doesn’t make any sense). The actual calculation is just the weight divided by height squared.

Note: You’ll be stuck soon if you’ve not added data in the HealthKit store for the app to read. If you haven’t already, you need to create some height and weight samples at the very least.

Open the Health App, and go to the Health Data Tab. There, select the Body Measurements option, then choose Weight and then Add Data Point to add a new weight sample. Repeat the process for the Height.

At this point, Prancercise Tracker should be able to read a recent sample of your user’s weight and height, then display it in the labels.

Build and run. Navigate to Profile & BMI. Then tap the Read HealthKit Data button.

Awesome! You just read your first samples from the HealthKit store and used them to calculate the BMI.

Saving Samples

Prancercise Tracker already has a convenient body mass index calculator. Let’s use it to record a sample of your user’s BMI.

Open ProfileDataStore.swift and add the following method:

class func saveBodyMassIndexSample(bodyMassIndex: Double, date: Date) {

  //1.  Make sure the body mass type exists
  guard let bodyMassIndexType = HKQuantityType.quantityType(forIdentifier: .bodyMassIndex) else {
    fatalError("Body Mass Index Type is no longer available in HealthKit")
  }

  //2.  Use the Count HKUnit to create a body mass quantity
  let bodyMassQuantity = HKQuantity(unit: HKUnit.count(),
                                    doubleValue: bodyMassIndex)

  let bodyMassIndexSample = HKQuantitySample(type: bodyMassIndexType,
                                             quantity: bodyMassQuantity,
                                             start: date,
                                             end: date)

  //3.  Save the same to HealthKit
  HKHealthStore().save(bodyMassIndexSample) { (success, error) in

    if let error = error {
      print("Error Saving BMI Sample: \(error.localizedDescription)")
    } else {
      print("Successfully saved BMI Sample")
    }
  }
}

Some of this will seem familiar. As with other sample types, you first need to make sure the sample type is available in HealthKit.

  1. In this case, the code checks to see if there is a quantity type for body mass index. If there is, it gets used to create a quantity and quantity sample. If not, the app intentionally crashes.
  2. The count() method on HKUnit is for a special case when there isn’t a clear unit for the type of sample you are storing. At some point in the future, there may be a unit assigned to body mass index, but for now this more generic unit works just fine.
  3. HKHealthStore saves the sample and lets you know if the process was successful from a trailing closure. You could do more with this, but for the now the app just prints to the console.

Almost done. Let’s hook this thing up the user interface.

Open ProfileViewController.swift, find the saveBodyMassIndexToHealthKit() method. This method gets called when the user taps the Save BMI button in the table view.

Paste the following lines of code into the method:

guard let bodyMassIndex = userHealthProfile.bodyMassIndex else {
  displayAlert(for: ProfileDataError.missingBodyMassIndex)
  return
}

ProfileDataStore.saveBodyMassIndexSample(bodyMassIndex: bodyMassIndex,
                                         date: Date())

You will recall that the body mass index is a computed property which returns a value when both height and weight samples have been loaded from HealthKit. This code attempts to compute that property, and if it can, it gets passed to the savedBodyMassIndexSample(bodyMassIndex: date:) method you just wrote.

It also shows a handy alert message if body mass index can’t be computed for some reason.

Build and run Prancercise Tracker one final time. Go into the Profile & BMI screen. Load your data from HeathKit, then tap the Save BMI button.

Take a look at the console. Do you see this?

Successfully saved BMI Sample

If you do, congratulations! Your BMI sample is now stored in HealthKit’s central repository. Let’s see if we can find it.

Open the Health app, tap the Health Data tab, Tap on Body Measurements in the table view, and then tap on Body Mass Index.

Unless you regularly record your body mass index (as all high profile prancercisers do), you should see a single data point like this one:

Sweet. You can see the sample from an app of your own creation, right there in Apple’s Health app. Imagine the possibilities.

Where To Go From Here?

Here is the example app with all of the modifications we have made up to this point.

Congratulations, you’ve got some hands-on experience with HealthKit! You now know how to request permissions, read biological characteristics, and read and write samples.

If you want to learn more, stay tuned for the next part of this HealthKit tutorial series where you’ll learn more about a more complex type of data: workouts.

In the meantime, if you have any questions or comments, please join the forum discussion below!

The post HealthKit Tutorial With Swift: Getting Started appeared first on Ray Wenderlich.

HealthKit Tutorial with Swift: Workouts

$
0
0

HealthKit tutorial

Update Note: This tutorial has been updated for Swift 4, Xcode 9 and iOS 11 by Ted Bendixson. The original tutorial was written by Ernesto García.

Welcome back to our HealthKit tutorial series!

In the first part of the series, you learned the basics of working with HealthKit: reading and writing data.

In this second and final part of the series, you will learn how to work with a more complex type of data: workouts.

This project picks up where the previous HealthKit tutorial left off. If you don’t have the project already, you can
download it here.

Get ready to take another rep in your HealthKit workout! :]

Getting Started

In your day to day life, a workout is a really simple thing. It’s some period of time where you increase physical exertion doing some sort of activity.

Most workouts have one more of the following attributes:

  • Activity type (running, cycling, prancercising, etc.)
  • Distance
  • Start and end time
  • Duration
  • Energy burned

HealthKit thinks of workouts in much the same way. A workout is a container for these types of information, taken as a collection of samples. A given workout might contain heart rate samples, distance samples, and an activity type to categorize them.

Continuing from the previous article, you are going to track a special kind of workout: Prancercise.

The starter project already contains a view controller that gives you a place to track your Prancercise workouts. To see it, navigate to Workouts and then tap the + button.

HealthKit tutorial

This view contains a button that starts a Prancercise workout. If you tap the button once, the app will start to track your Prancercise session, showing you the start date and duration.

HealthKit tutorial

If you tap the button a second time, the current Prancercise session will stop. You can tap done to record the workout, or tap the New Prancercise button to start a new workout session (be aware this erases the old one).

HealthKit tutorial

Saving Workouts

For the moment, the app doesn’t actually do anything when you tap Done to save your workout. You are going to change that.

First, a little bit of context. Open Workout.swift and take a look around. You should see a struct named PrancerciseWorkout.

struct PrancerciseWorkout {

  var start: Date
  var end: Date

  init(start: Date, end: Date) {
    self.start = start
    self.end = end
  }

  var duration: TimeInterval {
    return end.timeIntervalSince(start)
  }

  var totalEnergyBurned: Double {

    let prancerciseCaloriesPerHour: Double = 450

    let hours: Double = duration/3600

    let totalCalories = prancerciseCaloriesPerHour*hours

    return totalCalories
  }
}

A PrancerciseWorkout is a model the app uses to store information related to a workout. It gets created every time you tap the done button after finishing your Prancercise session.

Each PrancerciseWorkout object keeps track of its:

  1. Start and end time
  2. Duration
  3. Total calories burned

These values are then fed into HealthKit when your workout is saved.

Note: we are assuming a somewhat intense Prancercise pace with aggressive ankle weights and loud fist pumping musical accompaniment. Hence the workout burns 450 Calories per hour. Eat it, Zumba!

Now that you understand what is stored in a PrancerciseWorkout object, let’s save one.

Open WorkoutDataStore.swift and take a look at the save(prancerciseWorkout:completion:) method. This is what you will use to save your Prancercise workout to HealthKit.

Paste the following lines of code into that method:

//1. Setup the Calorie Quantity for total energy burned
let calorieQuantity = HKQuantity(unit: HKUnit.kilocalorie(),
                                 doubleValue: prancerciseWorkout.totalEnergyBurned)

//2. Build the workout using data from your Prancercise workout
let workout = HKWorkout(activityType: .other,
                        start: prancerciseWorkout.start,
                        end: prancerciseWorkout.end,
                        duration: prancerciseWorkout.duration,
                        totalEnergyBurned: calorieQuantity,
                        totalDistance: nil,
                        device: HKDevice.local(),
                        metadata: nil)

//3. Save your workout to HealthKit
let healthStore = HKHealthStore()

healthStore.save(workout) { (success, error) in
  completion(success, error)
}

You probably remember HKQuantity from the earlier HealthKit tutorial. You used it to read and write your user’s height, weight, and body mass index.

HealthKit interacts with HKWorkout in similar fashion. In this case, you can see that your HKWorkout tracks the start time, end time, duration, and total energy burned. All of these attributes get taken from the PrancerciseWorkout entity that gets passed in.

Quite fittingly, a Prancercise Workout is an activity that can only be categorized as Other, but you can pick from any number of supported activity types if you like :].

You may have also noticed that you can tell HealthKit which device the workout was recorded on. This can be useful when querying data later.

The rest of this code is fairly self-explanatory. Just like you did in the last HealthKit tutorial, you use HKHealthStore to save workouts. Once finished, you call the completion handler.

Querying Workouts

Now you can save a workout, but you also need a way to load workouts from HealthKit. Let’s add a new method to WorkoutDataStore to do that.

Paste the following method after the save(prancerciseWorkout:completion:) method in WorkoutDataStore:

class func loadPrancerciseWorkouts(completion: @escaping (([HKWorkout]?, Error?) -> Swift.Void)){

  //1. Get all workouts with the "Other" activity type.
  let workoutPredicate = HKQuery.predicateForWorkouts(with: .other)

  //2. Get all workouts that only came from this app.
  let sourcePredicate = HKQuery.predicateForObjects(from: HKSource.default())

  //3. Combine the predicates into a single predicate.
  let compound = NSCompoundPredicate(andPredicateWithSubpredicates: [workoutPredicate,
                                                                     sourcePredicate])

  let sortDescriptor = NSSortDescriptor(key: HKSampleSortIdentifierEndDate,
                                        ascending: true)

  let query = HKSampleQuery(sampleType: HKObjectType.workoutType(),
                            predicate: compound,
                            limit: 0,
                            sortDescriptors: [sortDescriptor]) { (query, samples, error) in

    DispatchQueue.main.async {

      //4. Cast the samples as HKWorkout
      guard let samples = samples as? [HKWorkout],
            error == nil else {
          completion(nil, error)
          return
      }

      completion(samples, nil)
    }
  }

  HKHealthStore().execute(query)
}

If you followed the previous HealthKit tutorial, much of this code will look familiar. The predicates determine what types of HeathKit data you are looking for, and the sort descriptor tells HeathKit how to sort the samples you get back.

  1. HKQuery.predicateForWorkouts(with:) is a special method that gives you a predicate for workouts with a certain activity type. In this case, you are loading any type of workout where the activity type is Other (all Prancercise workouts use the Other activity type).
  2. HKSource denotes the application that provided the workout data to HealthKit. Whenever you call HKSource.default(), you are basically saying “this app.” The sourcePredicate gets all workouts where the source is, you guessed it, this app.
  3. Those of you with Core Data experience may also be familiar with NSCompoundPredicate. It provides a way to bring one or more filters together. The final result is a query that gets you all workouts with Other as the activity type and Prancercise Tracker as the source app.
  4. In the completion handler, the samples get unwrapped as an array of HKWorkout objects. That’s because HKSampleQuery returns an array of HKSample by default, and you need to cast them to HKWorkout to get all of the useful properties like start time, end time, duration, and energy burned.

Loading Workouts Into The User Interface

You just wrote a method that loads workouts from HealthKit. Now it’s time to take those workouts and use them to populate a table view. Thankfully, I’ve done all the setup for you!

Open WorkoutsTableViewController.swift and take a look around. You will see a few things.

  1. There is an optional array called workouts for storing workouts. Those are what you will load using the loadPrancerciseWorkouts(completion:) method.
  2. There is a method named reloadWorkouts(). It gets called whenever the view for this screen appears. Every time you navigate to this screen the workouts get refreshed.

To populate the user interface with data, you just need to load the workouts and hook up the UITableView’s datasource.

Paste the following lines of code into the reloadWorkouts() method in WorkoutsTableViewController.swift:

WorkoutDataStore.loadPrancerciseWorkouts { (workouts, error) in
  self.workouts = workouts
  self.tableView.reloadData()
}

This code loads workouts using the method you just wrote. When the workouts are loaded, it assigns them to the local workouts property on WorkoutsTableViewController. Then it reloads the table view with the new data.

At this point you may have noticed there is still no way to get the data from the workouts to the UITableView. We need to implement the table view’s datasource.

Paste these lines of code beneath the reloadWorkouts() method:

//MARK: UITableView DataSource
override func numberOfSections(in tableView: UITableView) -> Int {
  return 1
}

override func tableView(_ tableView: UITableView, numberOfRowsInSection section: Int) -> Int {

  guard let workouts = workouts else {
    return 0
  }

  return workouts.count
}

This just says you want one section in the table view, and you want the rows to correspond to the number of workouts you have loaded from HealthKit. Also, if you haven’t loaded any workouts from HealthKit, no rows are shown and the table view will appear empty.

Note: You might be used to seeing these methods without the override keyword in front of them. The reason you need to use override here is because WorkoutsTableViewController is a subclass of UITableViewController.

UITableViewController already implements all of the functions associated with UITableViewDatasource. To get custom behavior, you need to override those default implementations.

Now let’s tell the cells what to display. Paste this method after the two datasource methods:

override func tableView(_ tableView: UITableView, cellForRowAt indexPath: IndexPath) -> UITableViewCell {

  guard let workouts = workouts else {
    fatalError("CellForRowAtIndexPath should never get called if there are no workouts")
  }

  //1. Get a cell to display the workout in.
  let cell = tableView.dequeueReusableCell(withIdentifier: prancerciseWorkoutCellID,
                                           for: indexPath)

  //2. Get the workout corresponding to this row.
  let workout = workouts[indexPath.row]

  //3. Show the workout's start date in the label.
  cell.textLabel?.text = dateFormatter.string(from: workout.startDate)

  //4. Show the Calorie burn in the lower label.
  if let caloriesBurned = workout.totalEnergyBurned?.doubleValue(for: HKUnit.kilocalorie()) {
    let formattedCalories = String(format: "CaloriesBurned: %.2f", caloriesBurned)
    cell.detailTextLabel?.text = formattedCalories
  } else {
    cell.detailTextLabel?.text = nil
  }

  return cell
}

Alright! This is where the magic happens. You dequeue a cell from the table view, and then you populate it with data related to a workout.

Most of this should be familiar from the previous HealthKit tutorial. The only new thing is the unit conversion for Calories burned.

If a workout has its total energy burned set to something, then it gets converted to a double using Kilocalories as the conversion. The string gets formatted and shows up in the cell’s detail label.

Build and run the app. Go to Prancercise Workouts, tap the + button, track a short Prancercise workout, tap Done, and take a look at the table view.

HealthKit tutorial

It’s a short workout, but boy can I feel the burn. This new workout routine gives Crossfit a run for its money.

Adding Samples to Workouts

Up to this point, we have assumed that a Prancercise workout is composed of a single workout session. But if you are like me, and you find Prancercise a little too intense, you might want to break it into a few short intervals.

With samples, you can record multiple exercise intervals under the same workout. It’s a way to give HealthKit a more detailed view of what you did during your workout routine.

You can add all kinds of samples to a workout. If you want, you can add distance, calories burned, heart rate, and more.

Because Prancercise is more of a dance routine, this HealthKit tutorial will focus on calorie burn samples.

Modifying The Model

This is a totally new way of thinking about Prancercise workouts, and that means it is time to change the model.

Instead of using a single Prancercise workout model, there should be some concept of a workout interval representing a short session. That way, a single PrancerciseWorkout becomes a wrapper or container for the workout intervals that store the starts and stops you took during your routine.

Open Workout.swift. Rename PrancerciseWorkout to PrancerciseWorkoutInterval so it looks like this:

struct PrancerciseWorkoutInterval {

  var start: Date
  var end: Date

  var duration: TimeInterval {
    return end.timeIntervalSince(start)
  }

  var totalEnergyBurned: Double {

    let prancerciseCaloriesPerHour: Double = 450

    let hours: Double = duration/3600

    let totalCalories = prancerciseCaloriesPerHour*hours

    return totalCalories
  }

}

You can see that nothing else has changed. What was once an entire workout is now a piece of a workout.

Paste the following code beneath the struct declaration for PrancerciseWorkoutInterval:

struct PrancerciseWorkout {

  var start: Date
  var end: Date

  var intervals: [PrancerciseWorkoutInterval]

  init(with intervals: [PrancerciseWorkoutInterval]) {
    self.start = intervals.first!.start
    self.end = intervals.last!.end
    self.intervals = intervals
  }
}

Now a full PrancerciseWorkout is composed of an array of PrancerciseWorkoutInterval objects. The workout starts when the first item in the array starts, and it ends when the last item in the array ends.

This is a nice way of representing a workout as something composed of time intervals, but it’s still missing a concept of duration and total energy burned. The code won’t compile until you have defined those.

Functional programming comes to the rescue here. You can use the reduce method to sum up the duration and total energy burned properties on PrancerciseWorkoutInterval.

Paste the following computed properties below the init(with:) constructor in PrancerciseWorkout:

var totalEnergyBurned: Double {
  return intervals.reduce(0, { (result, interval) -> Double in
    return result+interval.totalEnergyBurned
  })
}

var duration: TimeInterval {
  return intervals.reduce(0, { (result, interval) -> TimeInterval in
    return result+interval.duration
  })
}

Reduce takes a starting value (in this case zero) and a closure that takes in the result of the previous computation. It does this for each item in the array.

To calculate the total energy burned, reduce starts at zero and adds zero to the first energy burn value in the array. Then it takes the result and adds it to the next value in the array, and so on. Once it has hit the end of the array, you get a sum total of all energy burned throughout your workout.

Reduce is a handy function for neatly summing up arrays. If you would like to read more about functional programming and its awesomeness, check out this article.

Workout Sessions

You are almost finished upgrading the models. Open WorkoutSession.swift and take a look.

WorkoutSession is used to store data related to the current PrancerciseWorkout being tracked. Since you just added in this concept of workout intervals to PrancerciseWorkout, WorkoutSession needs to add new intervals each time you start and end a Prancercise session.

Inside of the WorkoutSession class, locate the line just below the state variable. It looks like this:

var state: WorkoutSessionState = .notStarted

Add a new line declaring an array of PrancerciseWorkoutInterval objects:

var intervals = [PrancerciseWorkoutInterval]()

When you finish a Prancercise session, a new interval will get added to this array. Let’s add a function to do that.

Paste the following method below the clear() method in WorkoutSession:

private func addNewInterval() {
  let interval = PrancerciseWorkoutInterval(start: startDate,
                                            end: endDate)
  intervals.append(interval)
}

This method takes the start and end dates from the workout session, and it creates a PrancerciseWorkoutInterval from them. Note that the start and end dates get reset every time a Prancercise session begins and ends.

You now have a way to add a PrancericseWorkoutInterval. You just need to use it.

Replace the end() method in WorkoutSession with this:

func end() {
  endDate = Date()
  addNewInterval()
  state = .finished
}

You can see that right after you set the end date for the session, you add a new interval to the array of PrancerciseWorkoutInterval objects.

It is also important to clear out the array whenever the workout session needs to get cleared.

Locate the end of the clear() method and add this line:

intervals.removeAll()

removeAll() does exactly what it says :].

There’s just one more modification. The completeWorkout property needs to use the intervals to create a new PrancerciseWorkout object.

Replace the completeWorkout variable with this:

var completeWorkout: PrancerciseWorkout? {
  get {

    guard state == .finished,
          intervals.count > 0 else {
          return nil
    }

    return PrancerciseWorkout(with: intervals)
  }
}

There you have it. Since this property is optional, you only want it to return a full PrancerciseWorkout when the WorkoutSession is finished and you have recorded at least one interval.

If you have followed along, your WorkoutSession class should look like this:

class WorkoutSession {

  private (set) var startDate: Date!
  private (set) var endDate: Date!

  var state: WorkoutSessionState = .notStarted

  var intervals = [PrancerciseWorkoutInterval]()

  func start() {
    startDate = Date()
    state = .active
  }

  func end() {
    endDate = Date()
    addNewInterval()
    state = .finished
  }

  func clear() {
    startDate = nil
    endDate = nil
    state = .notStarted
    intervals.removeAll()
  }

  private func addNewInterval() {
    let interval = PrancerciseWorkoutInterval(start: startDate,
                                              end: endDate)
    intervals.append(interval)
  }

  var completeWorkout: PrancerciseWorkout? {

    get {

      guard state == .finished,
            intervals.count > 0 else {
            return nil
      }

      return PrancerciseWorkout(with: intervals)
    }
  }
}

You can see that every time the stop() method gets called, a new PrancerciseWorkoutInterval with the current start and stop dates gets added to the list. Once the user taps the Done button to save the workout, this code generates a full-blown PrancerciseWorkout entity using the intervals recorded during the multiple sessions.

There’s no need to change the code in CreateWorkoutViewController. The button actions call the same start(), end(), and clear() methods. The only difference is that instead of working with a single time interval, WorkoutSession generates and stores multiple.

Adding Samples While Saving A Workout

If you were to build and run the app right now, it would still record accurate Prancercise workouts to HealthKit. There just wouldn’t be any samples attached. You need a way to convert the PrancerciseWorkoutInterval objects into samples.

Open WorkoutDataStore.swift and paste this new method right after the save(prancerciseWorkout:completion:) method:

private class func samples(for workout: PrancerciseWorkout) -> [HKSample] {

  var samples = [HKSample]()

  //1. Verify that the energy quantity type is still available to HealthKit.
  guard let energyQuantityType = HKSampleType
                                 .quantityType(forIdentifier:HKQuantityTypeIdentifier
                                                            .activeEnergyBurned) else {
    fatalError("*** Energy Burned Type Not Available ***")
  }

  //2. Create a sample for each PrancerciseWorkoutInterval
  for interval in workout.intervals {

    let calorieQuantity = HKQuantity(unit: HKUnit.kilocalorie(),
                                     doubleValue: interval.totalEnergyBurned)

    let sample = HKQuantitySample(type: energyQuantityType,
                                  quantity: calorieQuantity,
                                  start: interval.start,
                                  end: interval.end)

    samples.append(sample)
  }

  return samples
}

Hey you’ve seen this before! It’s the same thing you did when submitting a body mass index sample in the previous HealthKit tutorial. You’re just doing it inside of a loop, creating a sample for each PrancerciseWorkoutInterval associated with your PrancerciseWorkout.

Now you just need to make a few adjustments to the save(prancerciseWorkout:completion:) method to attach the samples to your workout.

Find the lines below the line where you declare:

let healthStore = HKHealthStore()

And replace them with this:

let samples = self.samples(for: prancerciseWorkout)

healthStore.save(workout) { (success, error) in

  guard error == nil else {
    completion(false, error)
    return
  }

  healthStore.add(samples,
                  to: workout,
                  completion: { (samples, error) in

      guard error == nil else {
        completion(false, error)
        return
      }

      completion(true, nil)
  })

}

This code prepares a list of samples using your Prancercise workout. Then it attempts to save the workout to HealthKit just as you’ve done before. Once the workout has been successfully saved, it adds the samples.

Viewing Workout Samples In The Health App

Build and run the app. Tap on Prancerise Workouts. Then tap the + button to track a new Prancercise workout. Record a few Prancercise sessions and tap Done to save them to HealthKit as a single Prancercise workout.

You aren’t going to see anything new in the Prancercise Tracker’s user interface, but trust me there’s loads of data in your Health app to peruse.

Open the Health app. Tap on Activity. You should see a breakdown of your workouts for the day.

HealthKit tutorial

I’ve recorded a few very short Prancercise sessions, so Activity says I have spent one minute exercising. That’s fine. We have already established the relative intensity of the Prancercise regimen, so it ought to be enough physical exertion for a day :].

Tap Workouts. The next screen will give you a breakdown of your workouts for the day. In your case, you want to see where all of those data points came from.

Tap Show All Data. This will take you to a screen that displays all of your workouts for the day, along with their source app.

HealthKit tutorial

Neat. The RW Logo clearly shows that the workouts came from Prancercise Tracker.

Tap on a workout to view its details, scroll down to the Workout Samples section, and then tap on the cell displaying the total active energy.

HealthKit tutorial

At this point, you should see a list of active energy samples associated with the Prancercise workout you just tracked.

HealthKit tutorial

Tap on a sample, and you can see when your short Prancercise session started and finished.

HealthKit tutorial

Awesome. You’ve just built an app that not only tracks a workout but also tracks interval training within that workout.

Where To Go From Here?

Here you can download the project that contains all the code from this HealthKit tutorial.

Hopefully this HealthKit tutorial has given you some insight into the basic concepts of HealthKit and how to use them in your own apps. In order to know more about HealthKit, these are the most relevant sources:

After going through those documents and videos, you’ll be ready to dig into some more advanced aspects on HealthKit and add improvements to this app. For instance, you could add new types of samples or workouts, calculate Statistics using HKStatisticsQuery, or observe changes in the store information with HKObserverQuery.

I hope you enjoyed this HealthKit tutorial, and as always if you have any questions or comments please join the forum discussion below!

The post HealthKit Tutorial with Swift: Workouts appeared first on Ray Wenderlich.
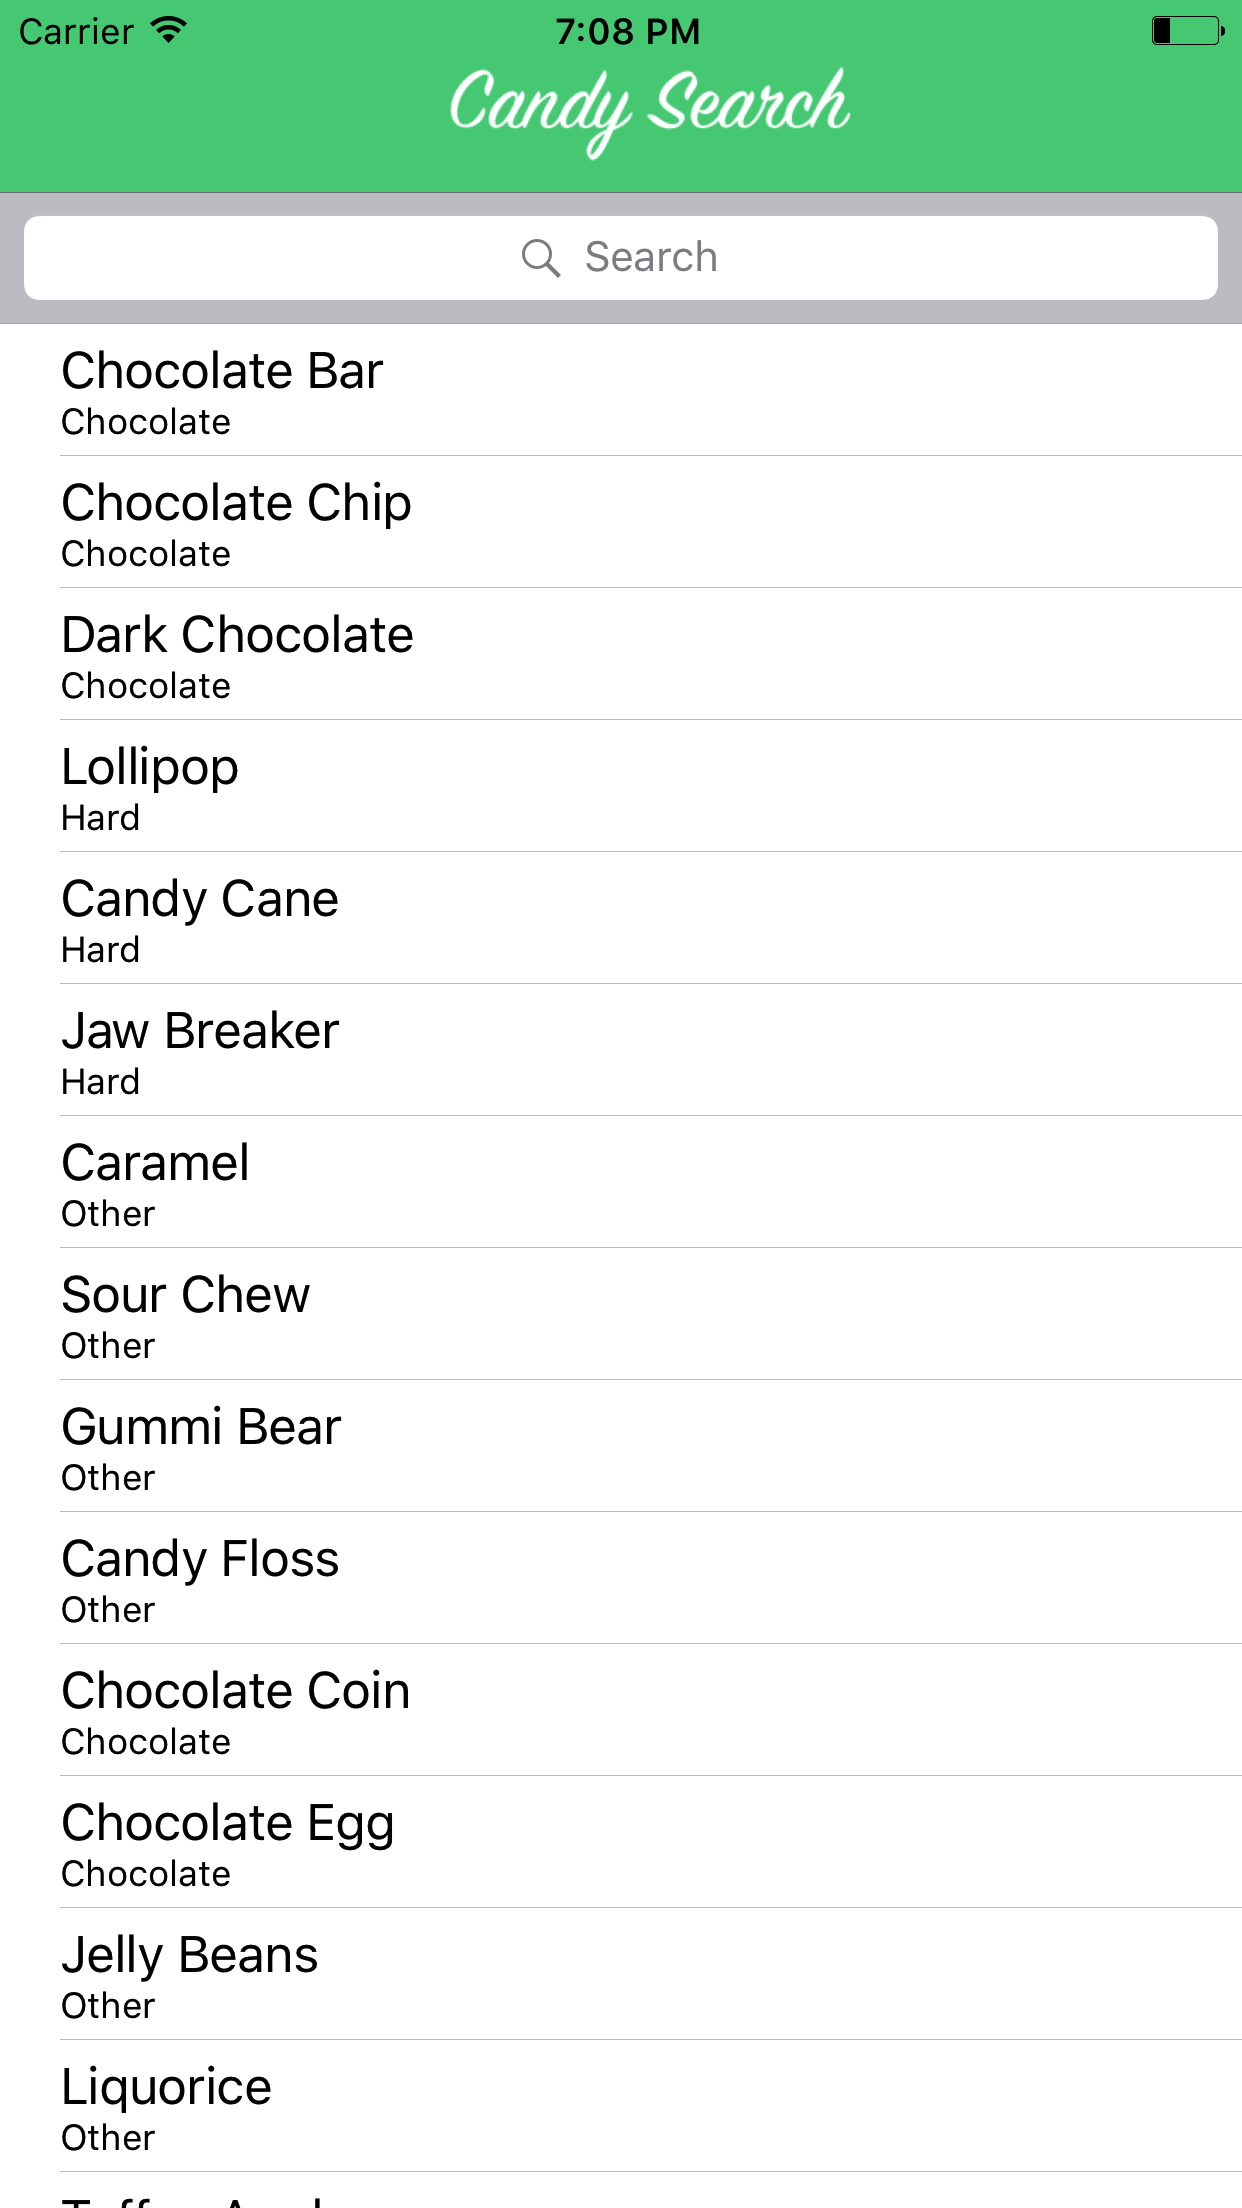
Unity Games by Tutorials Updated for Unity 2017.1

$
0
0

Good news – we’ve been hard at work updating our popular book Unity Games by Tutorials for Unity 2017.1, and the new version of the book is available today!

We’ve gone through the entire book and updated all the project materials, screenshots and text contained within to make sure it’s all compatible under Unity 2017.1.

Read on to see how to get your updated copy!

What Is Unity Games by Tutorials?

Unity Games by Tutorials is for complete beginners to Unity, or for those who’d like to bring their Unity skills to a professional level. Its goal is to teach you everything you need to know to make your own Unity games – via hands-on experience.

In Unity Games by Tutorials, you’ll learn how to build four games:

  1. A twin-stick shooter
  2. A first-person shooter
  3. A tower defense game (with VR support!)
  4. A 2D platfomer

Build stunning, realistic games — including a tower defense game in VR!

By the end of this book, you’ll be ready to make your own games for Windows, macOS, iOS, and more!

This book is for complete beginners to Unity, or for those who’d like to bring their Unity skills to a professional level. The book assumes you have some prior programming experience (in a language of your choice).

If you are a complete beginner programming, we recommend you learn some basic programming skills first. A great way to do that is to watch our free Beginning C# with Unity series, which will get you familiar with programming in the context of Unity.

The games in the book are made with C#. If you have prior programming experience but are new to C#, don’t worry – the book includes an appendix to give you a crash course on C# syntax.

How to Get the Update

This free update is available today for all Unity Games by Tutorials PDF customers, as our way of saying “thanks” for supporting the book and the site.

  • If you’ve already bought the Unity Games by Tutorials PDF, you can download the updated book immediately from your owned books on the store page.
  • If you don’t have Unity Games by Tutorials yet, you can grab your own updated copy in our store.

We hope you enjoy this version of the book, fully updated for Unity 2017.1. And a big thanks to the book team that helped us get this update out!

The post Unity Games by Tutorials Updated for Unity 2017.1 appeared first on Ray Wenderlich.
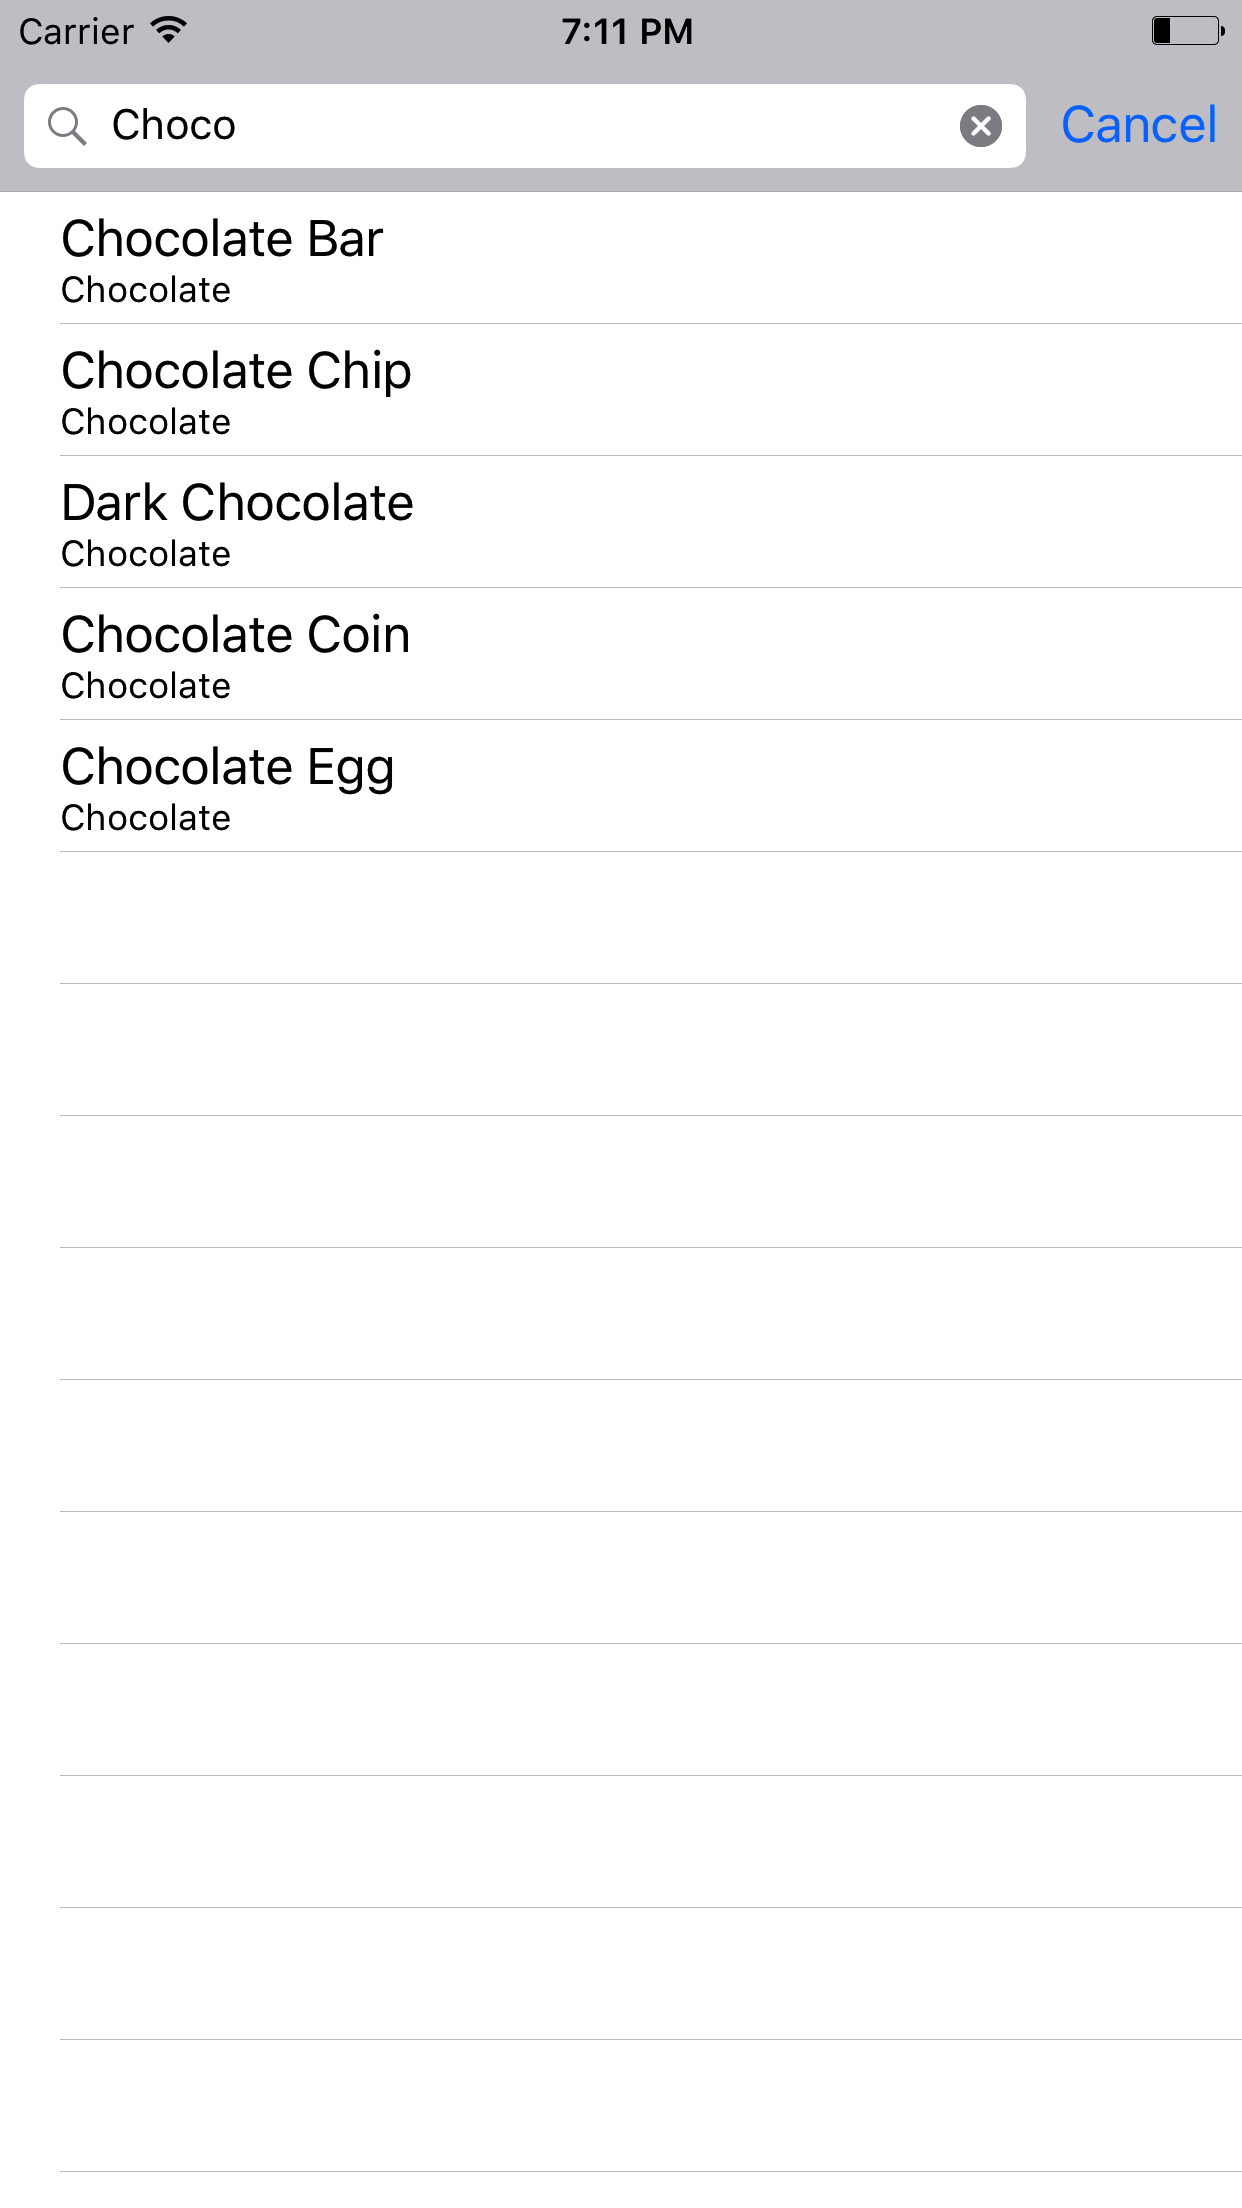
Viewing all 4374 articles
Browse latest View live


<script src="https://jsc.adskeeper.com/r/s/rssing.com.1596347.js" async> </script>