Quantcast
Channel: Kodeco | High quality programming tutorials: iOS, Android, Swift, Kotlin, Unity, and more
Viewing all 4374 articles
Browse latest View live

Swift Algorithm Club: August 2017 Digest

$
0
0

SwiftAlgClub-Sept-Digest-feature

The Swift Algorithm Club is a popular open source project to implement popular algorithms and data structures in Swift, with over 13,000 stars on GitHub.

We periodically give status updates with how things are going with the project. This month, we report on our progress with the Swift 4 update.

Swift 4 Migration

Swift 4 is bundled with Xcode 9, and it’s coming next month. That means all of our topics need to be migrated over from Swift 3 to Swift 4. Most of the changes are relatively minor, but each topic did need to be checked over.

I’d like to specially thank remlostime who spent significant time updating the topics several dozens of topics to Swift 4.

So far, 71 of the 88 topics have been successfully migrated to Swift 4:

All done in 1 day, by 1 person!

There’s a couple of topics left, so if you’re interested in contributing to open source, this is a great opportunity to get started. Migration has generally been straightforward – it’s just the process of:

  • Making sure the playground compiles correctly
  • Making sure README.md file reflects the updated playground
  • Adding a small code check to mark that the code has been updated to Swift 4
    // last checked with Xcode 9.0b4
    #if swift(>=4.0)
       print("Hello, Swift 4!")
    #endif
    

The migration from Swift 3 to Swift 4 has been really smooth. For many topics, no changes were necessary. I’ve seen more swapAt(:) changes more than anything else; Due to the recent changes with memory ownership for Swift 4, swapAt(:) now sits as a member of the MutableCollection protocol.

If you’ve ever wanted to contribute to the Swift Algorithm Club, now’s a great time! It’s a great way to learn about algorithms and Swift 4 at the same time.

If you’d like to contribute, check out the Swift 4 migration issue for more information on how to sign up.

Note: The most straightforward way of compiling in Swift 4 is to use Xcode 9 beta, which you may download from Apple here.

Other News

In addition to the usual minor updates and fixes to the repo, we’ve got a new topic on the Hashed Heap data structure.

This is a variant of the Heap data structure; The Hashed Heap offers a better time complexity by using a dictionary to speed up lookup of elements. Thanks Alejandro Isaza!

Where To Go From Here?

The Swift Algorithm Club is always looking for new members. Whether you’re here to learn or here to contribute, we’re happy to have you around.

To learn more about the SAC, check out our introductory article. We hope to see you at the club! :]

The post Swift Algorithm Club: August 2017 Digest appeared first on Ray Wenderlich.


RWDevCon 2018: Choose Your Topics

$
0
0

RWDevCon-feature

Next April, we are running an iOS conference focused on high quality hands-on tutorials called RWDevCon 2018.

One of the unique things about RWDevCon is it’s coordinated as a team.

That means we can do some cool things, like let you decide the content of the conference. Here’s how it works:

  1. Send your suggestions. First we’ll send an email to everyone who’s bought a ticket, asking for ideas for tutorials. For example, you might suggest a tutorial on ARKit, CoreML, or Metal.
  2. Vote your favorites. We’ll put the most common suggestions on a survey, and you can vote on which you’d like in the conference.
  3. Enjoy your top picks. Based on the results, we’ll be sure to cover everyone’s top picks, and match speakers to topics based on experience. w00t!

There’s no other conference like this – RWDevCon is truly a conference where you decide what’s inside.

This process is starting today, so if you’d like to be a part of the decision making process, grab your ticket now. We will send a survey to everyone who has a ticket.

We can’t wait to see what you choose this year! :]

The post RWDevCon 2018: Choose Your Topics appeared first on Ray Wenderlich.

Video Tutorial: Beginning Firebase Part 9: Updating and Deleting

Video Tutorial: Beginning Firebase Part 10: Deleting Data Challenge

UIGestureRecognizer Tutorial: Getting Started

$
0
0
UIGestureRecognizer

Learn how to use UIGestureRecognizers to pinch, zoom, drag, and more!

Update note: This tutorial has been updated to Xcode 9, Swift 4, and iOS 11 by Brody Eller. The original tutorial was written by Caroline Begbie.

If you need to detect gestures in your app, such as taps, pinches, pans, or rotations, it’s extremely easy with Swift and the built-in UIGestureRecognizer classes.

In this tutorial, you’ll learn how you can easily add gesture recognizers into your app, both within the Storyboard editor in Xcode, and programatically. You’ll create a simple app where you can move a monkey and a banana around by dragging, pinching, and rotating with the help of gesture recognizers.

You’ll also try out some cool extras like:

  • Adding deceleration for movement
  • Setting dependencies between gesture recognizers
  • Creating a custom UIGestureRecognizer so you can tickle the monkey!

This tutorial assumes you are familiar with the basic concepts of Storyboards. If you are new to them, you may wish to check out our Storyboard tutorials first.

I think the monkey just gave us the thumbs up gesture, so let’s get started! :]

Getting Started

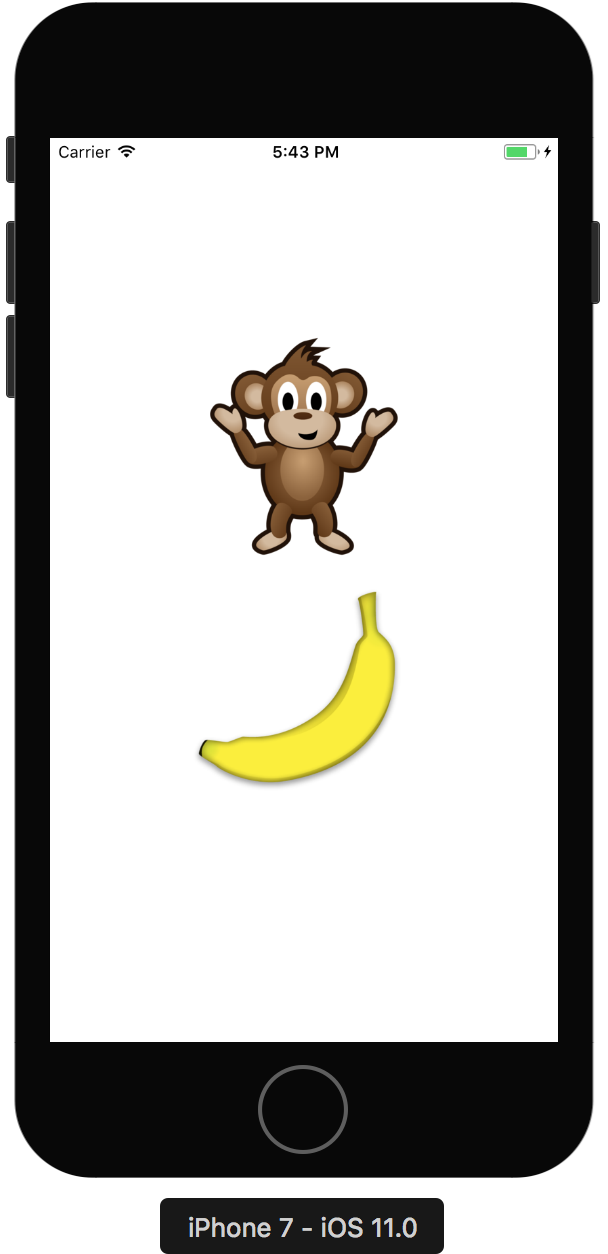
Click here to download the starter project. Open it in Xcode and build and run.

You should see the following on your device or simulator:

UIGestureRecognizer

UIGestureRecognizer Overview

Before you get started, here’s a brief overview of how you use UIGestureRecognizers and why they’re so handy.

In the old days before UIGestureRecognizers, if you wanted to detect a gesture such as a swipe, you’d have to register for notifications on every touch within a UIView – such as touchesBegan, touchesMoves, and touchesEnded. Each programmer wrote slightly different code to detect touches, resulting in subtle bugs and inconsistencies across apps.

In iOS 3.0, Apple came to the rescue with UIGestureRecognizer classes! These provide a default implementation of detecting common gestures such as taps, pinches, rotations, swipes, pans, and long presses. By using them, not only does it save you a ton of code, but it makes your apps work properly too! Of course you can still use the old touch notifications, if your app requires them.

Using UIGestureRecognizer is extremely simple. You just perform the following steps:

  1. Create a gesture recognizer. When you create a gesture recognizer, you specify a callback function so the gesture recognizer can send you updates when the gesture starts, changes, or ends.
  2. Add the gesture recognizer to a view. Each gesture recognizer is associated with one (and only one) view. When a touch occurs within the bounds of that view, the gesture recognizer will look to see if it matches the type of touch it’s looking for, and if a match is found it will notify the callback function.

You can perform these two steps programatically (which you’ll do later on in this tutorial), but it’s even easier adding a gesture recognizer visually with the Storyboard editor.

UIPanGestureRecognizer

Open up Main.storyboard. Inside the Object Library, look for the Pan Gesture Recognizer object. Then drag the Pan Gesture Recognizer object onto the monkey Image View. This both creates the pan gesture recognizer, and associates it with the monkey Image View:

UIGestureRecognizer

You can verify you got it connected OK by clicking on the monkey Image View, looking at the Connections Inspector (View Menu > Utilities > Show Connections Inspector), and making sure the Pan Gesture Recognizer is in the gestureRecognizers Outlet Collection.

UIGestureRecognizer

The starter project has connected the monkey Image View with the Pinch Gesture Recognizer and Rotation Gesture Recognizer for you. It has also connected the banana Image View with the Pan Gesture Recognizer, Pinch Gesture Recognizer, and Rotation Gesture Recognizer for you. These connections from the starter project are achieved by dragging a gesture recognizer on top of an image view as shown earlier.

You may wonder why the UIGestureRecognizer is associated with the image view instead of the view itself. Either approach would be OK, it’s just what makes most sense for your project. Since you tied it to the monkey, you know that any touches are within the bounds of the monkey so you’re good to go. The drawback of this method is sometimes you might want touches to be able to extend beyond the bounds. In that case, you could add the gesture recognizer to the view itself, but you’d have to write code to check if the user is touching within the bounds of the monkey or the banana and react accordingly.

Now that you’ve created the pan gesture recognizer and associated it to the image view, you just have to write the callback function so something actually happens when the pan occurs.

Open up ViewController.swift and add the following function right below viewDidLoad() inside of the ViewController class:

@IBAction func handlePan(recognizer:UIPanGestureRecognizer) {
  let translation = recognizer.translation(in: self.view)
  if let view = recognizer.view {
    view.center = CGPoint(x:view.center.x + translation.x,
                            y:view.center.y + translation.y)
  }
  recognizer.setTranslation(CGPoint.zero, in: self.view)
}

The UIPanGestureRecognizer will call this function when a pan gesture is first detected, and then continuously as the user continues to pan, and one last time when the pan is complete (usually the user lifting their finger).

The UIPanGestureRecognizer passes itself as an argument to this function. You can retrieve the amount the user has moved their finger by calling the translation(in:) function. Here you use that amount to move the center of the monkey the same amount the finger has been dragged.

It’s important to set the translation back to zero once you are done. Otherwise, the translation will keep compounding each time, and you’ll see your monkey rapidly move off the screen!

Note that instead of hard-coding the monkey image view into this function, you get a reference to the monkey image view by calling recognizer.view. This makes your code more generic, so that you can re-use this same routine for the banana image view later on.

OK, now that this function is complete, you will hook it up to the UIPanGestureRecognizer. In Main.storyboard, control drag from the Pan Gesture Recognizer to View Controller. A popup will appear – select handlePan(recognizer:).

UIGestureRecognizer

At this point your Connections Inspector for the Pan Gesture Recognizer should look like this:

UIGestureRecognizer

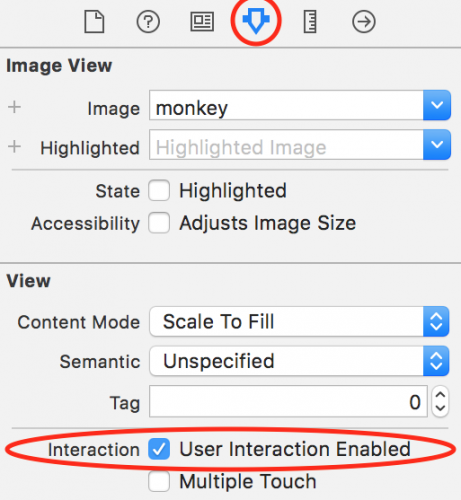
One more thing: If you compile and run, and try to drag the monkey, it won’t work yet. The reason is that touches are disabled by default on views that normally don’t accept touches, like image views. So select both image views, open up the Attributes Inspector, and check the User Interaction Enabled checkbox.

UIGestureRecognizer

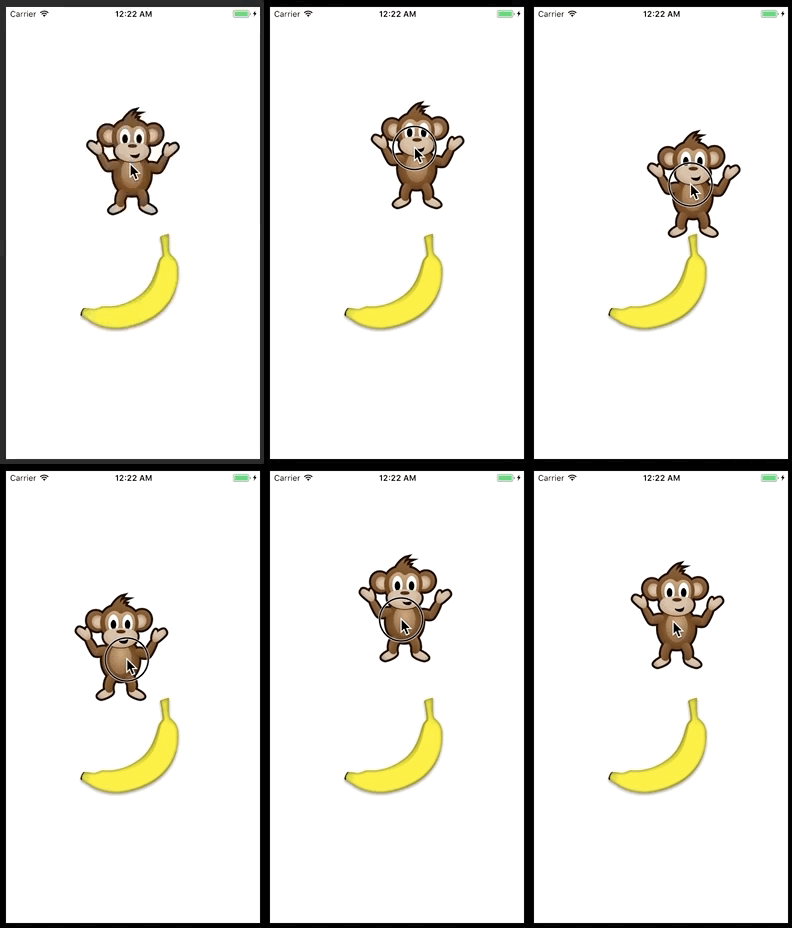
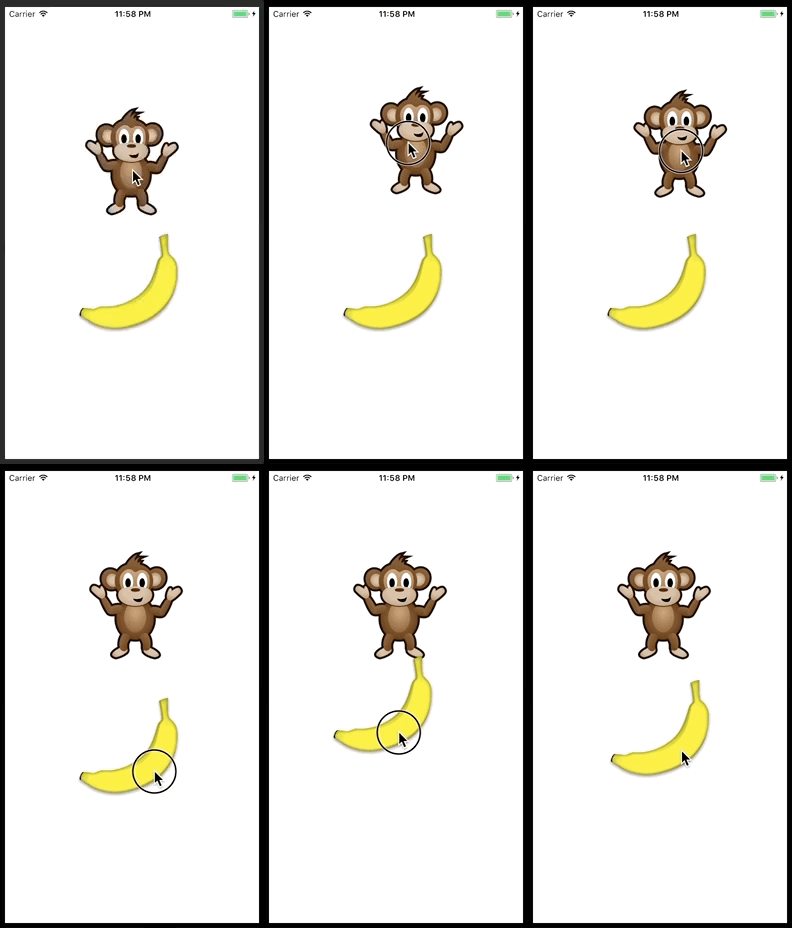
Compile and run again, and this time you should be able to drag the monkey around the screen!

UIGestureRecognizer

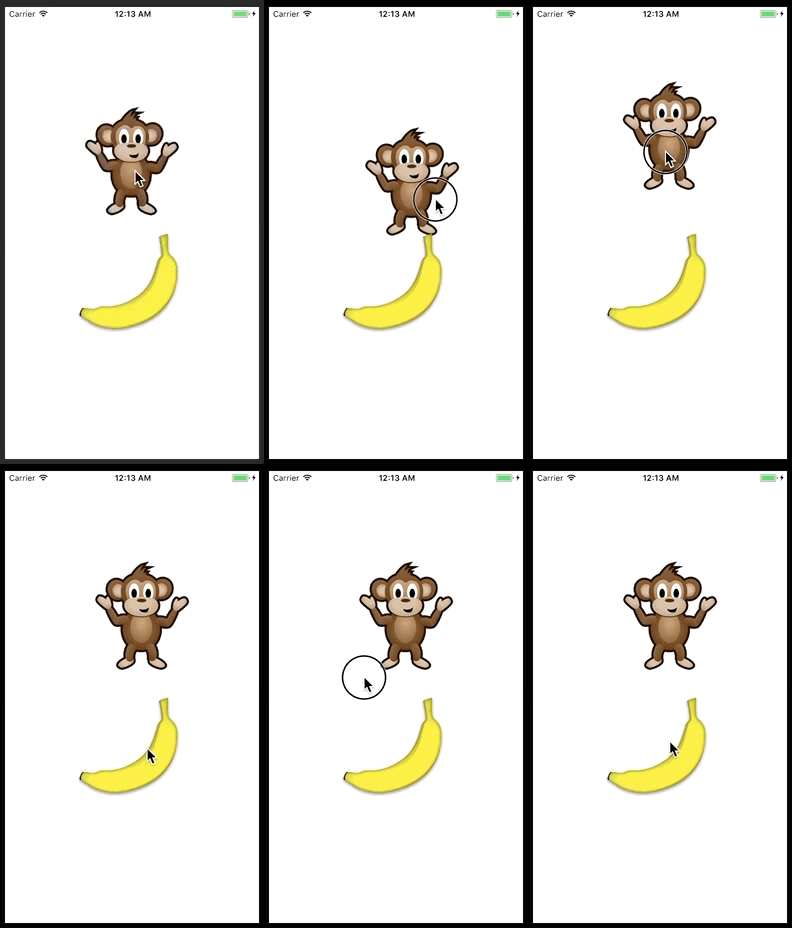
Note that you can’t drag the banana. This is because gesture recognizers should be tied to one (and only one) view.

UIGestureRecognizer

The starter project has attached a Pan Gesture Recognizer to the banana Image View for you. This is achieved using the same method as attaching a Pan Gesture Recognizer to the monkey Image View as shown earlier.

Now connect the handlePan(recognizer:) callback function to the banana Image View by performing the following:

  1. Control drag from the banana Pan Gesture Recognizer to the View Controller and select handlePan:.
  2. Make sure User Interaction Enabled is checked on the banana as well.

Give it a try and you should now be able to drag both image views across the screen. Pretty easy to implement such a cool and fun effect, eh?

Gratuitous Deceleration

In a lot of Apple apps and controls, when you stop moving something there’s a bit of deceleration as it finishes moving. Think about scrolling a web view, for example. It’s common to want to have this type of behavior in your apps.

There are many ways of doing this, but you’re going to do one very simple implementation for a rough but nice effect. The idea is to detect when the gesture ends, figure out how fast the touch was moving, and animate the object moving to a final destination based on the touch speed.

  • To detect when the gesture ends: The callback passed to the gesture recognizer is called potentially multiple times – when the gesture recognizer changes its state to began, changed, or ended for example. You can find out what state the gesture recognizer is in simply by looking at its state property.
  • To detect the touch velocity: Some gesture recognizers return additional information – you can look at the API guide to see what you can get. There’s a handy function called velocity(in:) that you can use in the UIPanGestureRecognizer!

So add the following to the bottom of the handlePan(recognizer:) function in ViewController.swift:

if recognizer.state == UIGestureRecognizerState.ended {
    // 1
    let velocity = recognizer.velocity(in: self.view)
    let magnitude = sqrt((velocity.x * velocity.x) + (velocity.y * velocity.y))
    let slideMultiplier = magnitude / 200
    print("magnitude: \(magnitude), slideMultiplier: \(slideMultiplier)")

    // 2
    let slideFactor = 0.1 * slideMultiplier     //Increase for more of a slide
    // 3
    var finalPoint = CGPoint(x:recognizer.view!.center.x + (velocity.x * slideFactor),
                               y:recognizer.view!.center.y + (velocity.y * slideFactor))
    // 4
    finalPoint.x = min(max(finalPoint.x, 0), self.view.bounds.size.width)
    finalPoint.y = min(max(finalPoint.y, 0), self.view.bounds.size.height)

    // 5
    UIView.animate(withDuration: Double(slideFactor * 2),
                     delay: 0,
                     // 6
                     options: UIViewAnimationOptions.curveEaseOut,
                     animations: {recognizer.view!.center = finalPoint },
                     completion: nil)
}

This simple deceleration function uses the following strategy:

  1. Figure out the length of the velocity vector (i.e. the magnitude)
  2. If the length is < 200, then decrease the base speed, otherwise increase it.
  3. Calculate a final point based on the velocity and the slideFactor.
  4. Make sure the final point is within the view’s bounds
  5. Animate the view to the final resting place.
  6. Use the “ease out” animation option to slow down the movement over time.

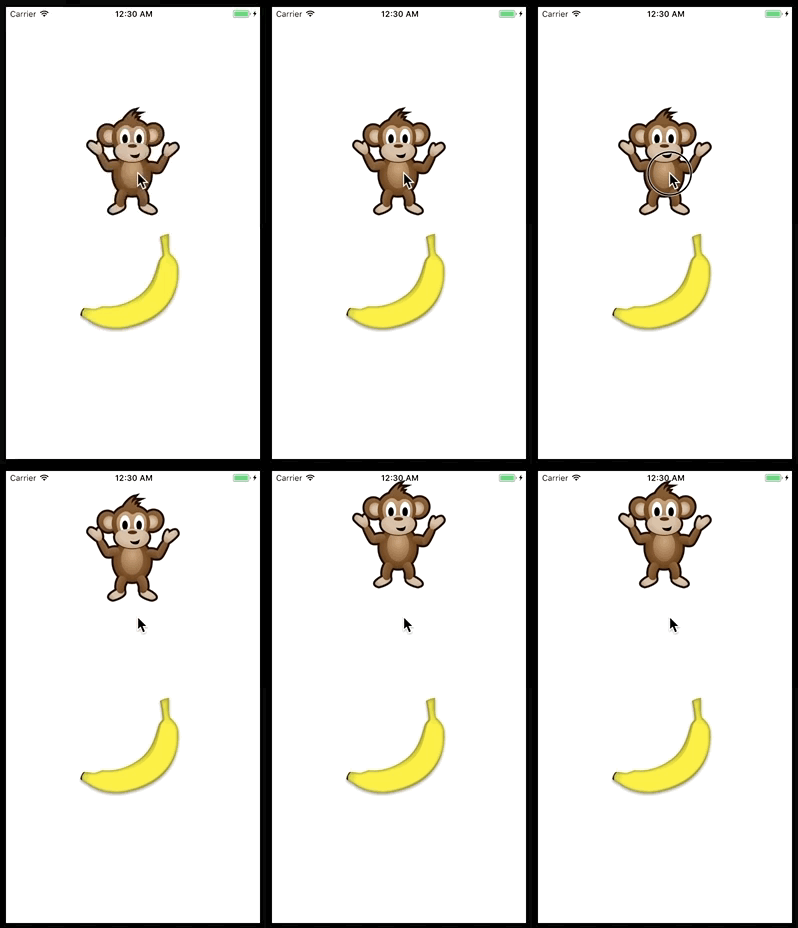
Compile and run to try it out, you should now have some basic but nice deceleration! Feel free to play around with it and improve it – if you come up with a better implementation, please share in the forum discussion at the end of this article.

UIGestureRecognizer

Pinch and Rotation Gestures

Your app is coming along great so far, but it would be even cooler if you could scale and rotate the image views by using pinch and rotation gestures as well!

The starter project has created the handlePinch(recognizer:) and the handleRotate(recognizer:) callback functions for you. It has also connected the callback functions to the monkey Image View and the banana Image View.

Open up ViewController.swift. Add the following to handlePinch(recognizer:):

if let view = recognizer.view {
  view.transform = view.transform.scaledBy(x: recognizer.scale, y: recognizer.scale)
  recognizer.scale = 1
}

Next add the following to handleRotate(recognizer:):

if let view = recognizer.view {
  view.transform = view.transform.rotated(by: recognizer.rotation)
  recognizer.rotation = 0
}

Just like you could get the translation from the UIPanGestureRecognizer, you can get the scale and rotation from the UIPinchGestureRecognizer and UIRotationGestureRecognizer.

Every view has a transform that is applied to it, which you can think of as information on the rotation, scale, and translation that should be applied to the view. Apple has a lot of built in functions to make working with a transform easy, such as CGAffineTransform(scaleX:y:) to scale a given transform and CGAffineTransform(rotationAngle:) to rotate a given transform. Here you will use these to update the view’s transform based on the gesture.

Again, since you’re updating the view each time the gesture updates, it’s very important to reset the scale and rotation back to the default state so you don’t have craziness going on.

Now hook these up in the Storyboard editor. Open up Main.storyboard and perform the following steps:

  1. In the same way that you did previously, connect the two Pinch Gesture Recognizers to the View Controller’s handlePinch(recognizer:) function.
  2. Connect the two Rotation Gesture Recognizers to the View Controller’s handleRotate(recognizer:) function.

Your View Controller connections should now look like this:

UIGestureRecognizer

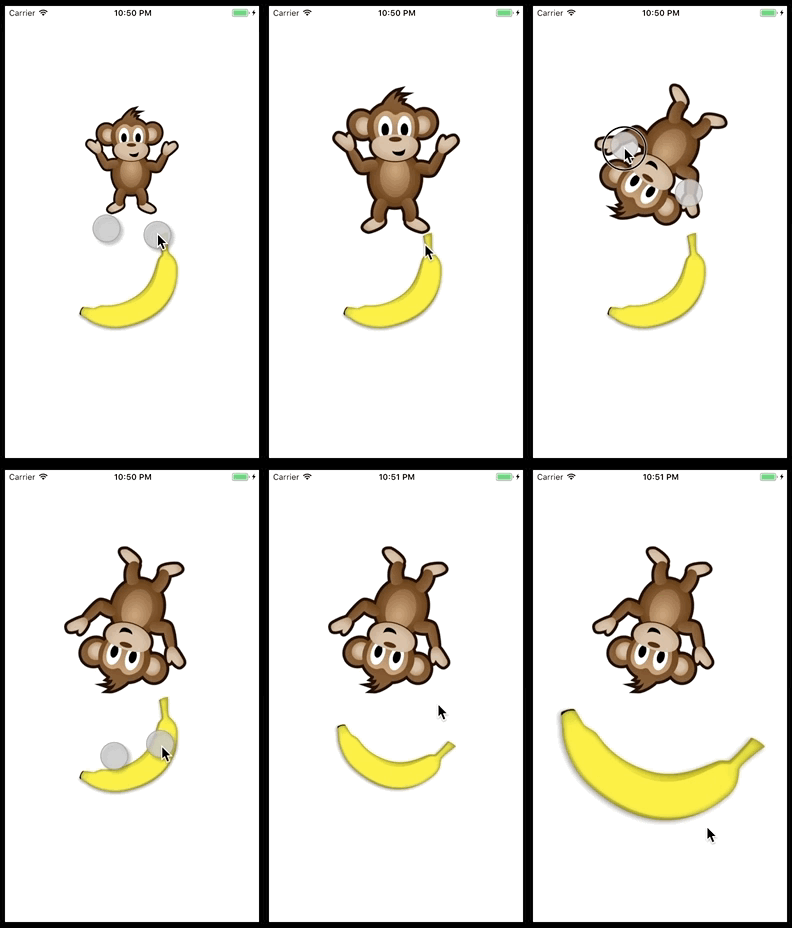
Build and run. Run it on a device if possible, because pinches and rotations are kinda hard to do on the simulator. If you are running on the simulator, hold down the option key and drag to simulate two fingers, and hold down shift and option at the same time to move the simulated fingers together to a different position. Now you should be able to scale and rotate the monkey and banana!

Note: There seems to be a bug with the Xcode 9 Simulator. If you’re experiencing issues with pinch and rotation gestures on the Xcode 9 Simulator, try running on a device instead.

UIGestureRecognizer

Simultaneous Gesture Recognizers

You may notice that if you put one finger on the monkey, and one on the banana, you can drag them around at the same time. Kinda cool, eh?

However, you’ll notice that if you try to drag the monkey around, and in the middle of dragging bring down a second finger to attempt to pinch to zoom, it doesn’t work. By default, once one gesture recognizer on a view “claims” the gesture, no others can recognize a gesture from that point on.

However, you can change this by overriding a function in the UIGestureRecognizer delegate.

Open up ViewController.swift. Below the ViewController class, create a ViewController class extension and adopt it to the UIGestureRecognizerDelegate as shown below:

extension ViewController: UIGestureRecognizerDelegate {

}

Then implement one of the delegate’s optional functions:

func gestureRecognizer(_ gestureRecognizer: UIGestureRecognizer, shouldRecognizeSimultaneouslyWith otherGestureRecognizer: UIGestureRecognizer) -> Bool {
  return true
}

This function tells the gesture recognizer whether it is OK to recognize a gesture if another (given) recognizer has already detected a gesture. The default implementation always returns false – here you switch it to always return true.

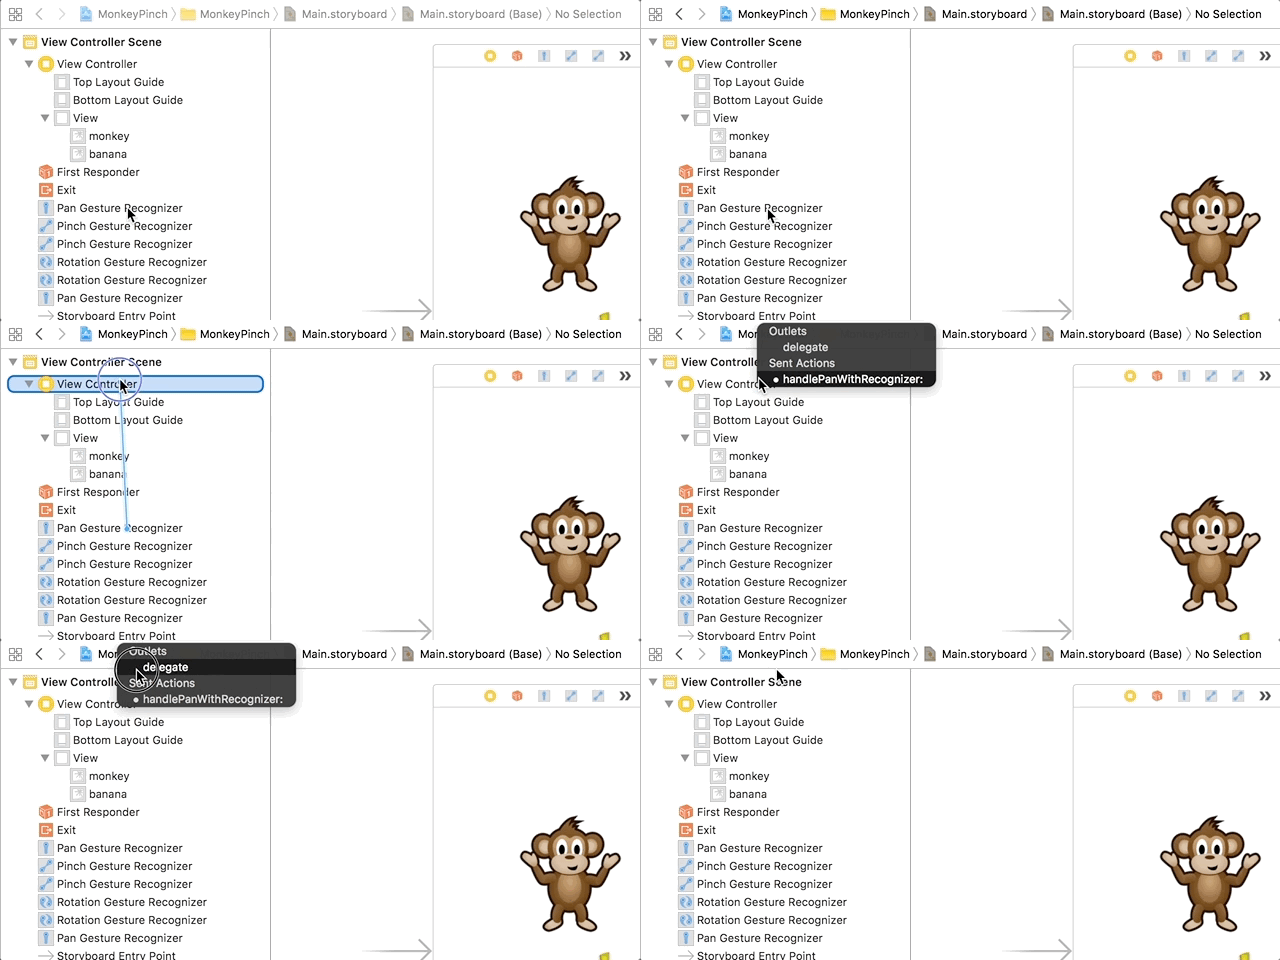
Next, open Main.storyboard, and for each gesture recognizer connect its delegate outlet to the view controller (6 gesture recognizers in total).

UIGestureRecognizer

Build and run the app again, and now you should be able to drag the monkey, pinch to scale it, and continue dragging afterwards! You can even scale and rotate at the same time in a natural way. This makes for a much nicer experience for the user.

Programmatic UIGestureRecognizers

So far you’ve created gesture recognizers with the Storyboard editor, but what if you wanted to do things programatically?

It’s just as easy, so you’ll try it out by adding a tap gesture recognizer to play a sound effect when either of these image views are tapped.

To be able to play a sound, you’ll need to access the AVFoundation framework. At the top of Viewcontroller.swift, add:

import AVFoundation

Add the following changes to ViewController.swift just before viewDidLoad():

var chompPlayer:AVAudioPlayer? = nil

func loadSound(filename: String) -> AVAudioPlayer {
  let url = Bundle.main.url(forResource: filename, withExtension: "caf")
  var player = AVAudioPlayer()
  do {
    try player = AVAudioPlayer(contentsOf: url!)
    player.prepareToPlay()
  } catch {
    print("Error loading \(url!): \(error.localizedDescription)")
  }
  return player
}

Replace viewDidLoad() with the following:

super.viewDidLoad()
//1
let filteredSubviews = self.view.subviews.filter({
  $0 is UIImageView })
  //2
  for view in filteredSubviews  {
  //3
  let recognizer = UITapGestureRecognizer(target: self,
    action:#selector(handleTap(recognizer:)))
  //4
  recognizer.delegate = self
  view.addGestureRecognizer(recognizer)

  //TODO: Add a custom gesture recognizer too
}
self.chompPlayer = self.loadSound(filename: "chomp")

The starter project has created the handleTap(recognizer:) callback function. The starter project has also connected the callback function to the monkey Image View and the banana Image View for you. Add the following inside of handleTap(recognizer:):

self.chompPlayer?.play()

The audio playing code is outside of the scope of this tutorial so I won’t discuss it (although it is incredibly simple).

The important part is in viewDidLoad():

  1. Create a filtered array of just the monkey and banana image views.
  2. Cycle through the filtered array.
  3. Create a UITapGestureRecognizer for each image view, specifying the callback. This is an alternative way of adding gesture recognizers. Previously you added the recognizers to the storyboard.
  4. Set the delegate of the recognizer programatically, and add the recognizer to the image view.

That’s it! Compile and run, and now you should be able to tap the image views for a sound effect!

UIGestureRecognizer Dependencies

It works pretty well, except there’s one minor annoyance. If you drag an object a very slight amount, it will pan it and play the sound effect. But what you really want is to only play the sound effect if no pan occurs.

To solve this you could remove or modify the delegate callback to behave differently in the case a touch and pinch coincide, but here is another useful thing you can do with gesture recognizers: setting dependencies.

There’s a function called require(toFail:) that you can call on a gesture recognizer. Can you guess what it does? ;]

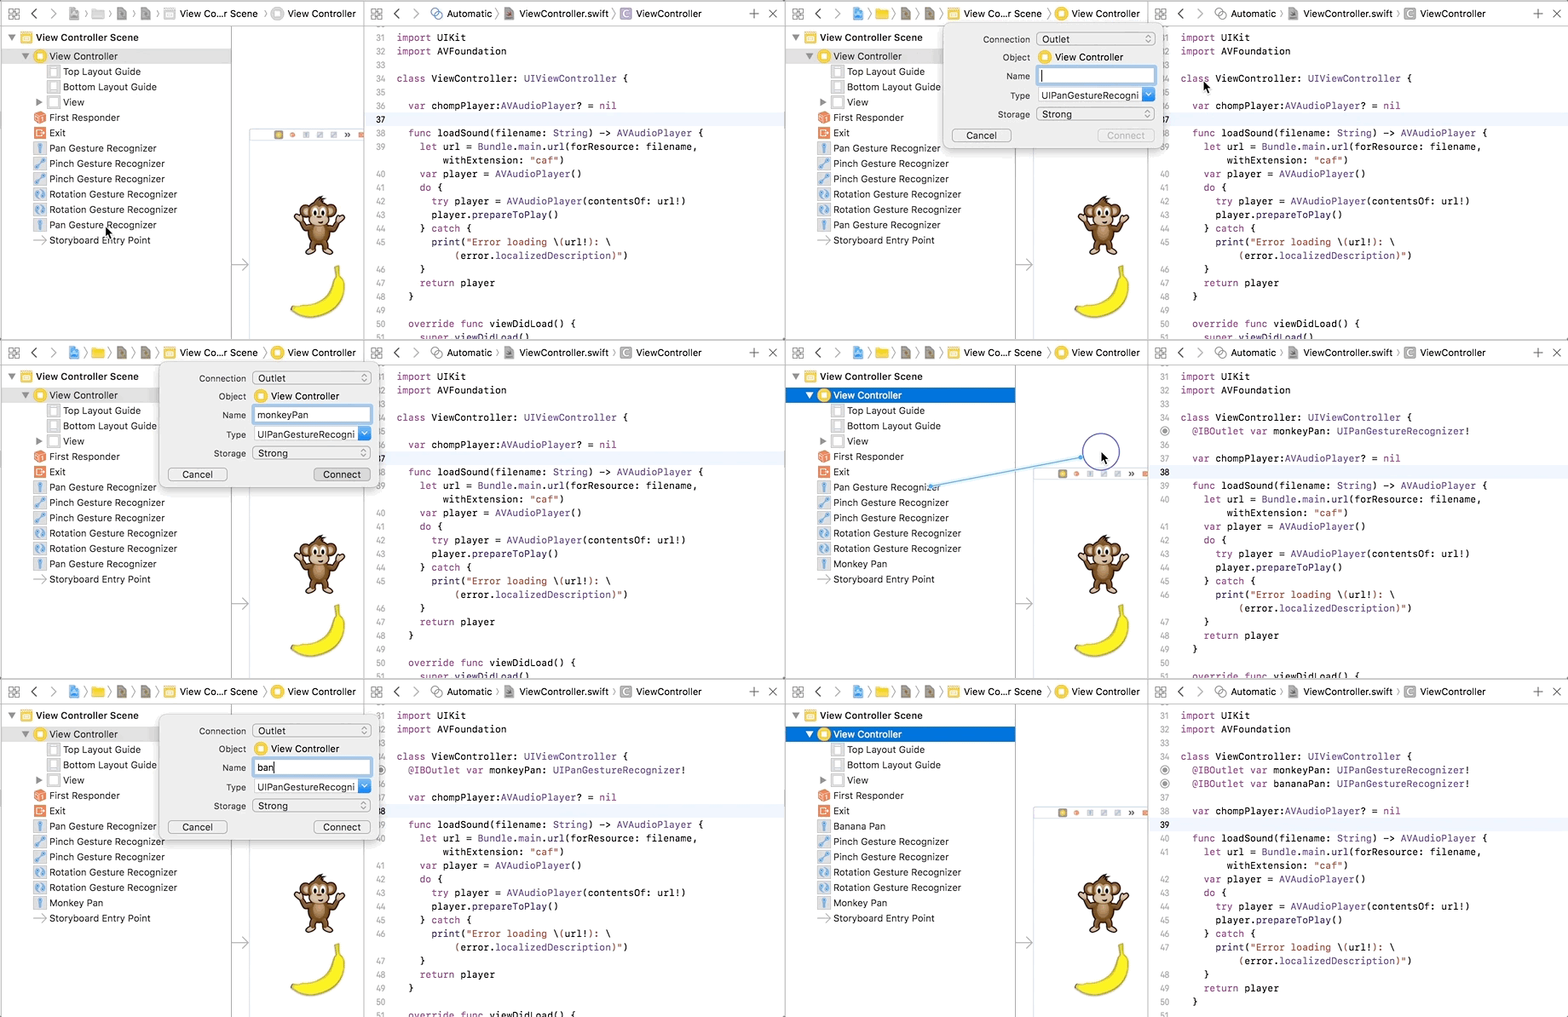
Open Main.storyboard, open up the Assistant Editor, and make sure that ViewController.swift is showing there. Then control drag from the monkey pan gesture recognizer to below the class declaration, and connect it to an outlet named monkeyPan. Repeat this for the banana pan gesture recognizer, but name the outlet bananaPan.

UIGestureRecognizer

Add these two lines to viewDidLoad(), right before the TODO:

recognizer.require(toFail: monkeyPan)
recognizer.require(toFail: bananaPan)

Now the tap gesture recognizer will only get called if no pan is detected. Pretty cool eh? You might find this technique useful in some of your projects.

Custom UIGestureRecognizer

At this point you know pretty much everything you need to know to use the built-in gesture recognizers in your apps. But what if you want to detect some kind of gesture not supported by the built-in recognizers?

Well, you could always write your own! Now you’ll try it out by writing a very simple gesture recognizer to detect if you try to “tickle” the monkey or banana by moving your finger several times from left to right.

Create a new file with the iOS\Source\Swift File template. Name the file TickleGestureRecognizer.

Then replace the contents of TickleGestureRecognizer.swift with the following:

import UIKit

class TickleGestureRecognizer:UIGestureRecognizer {
  // 1
  let requiredTickles = 2
  let distanceForTickleGesture:CGFloat = 25.0

  // 2
  enum Direction:Int {
    case DirectionUnknown = 0
    case DirectionLeft
    case DirectionRight
  }

  // 3
  var tickleCount:Int = 0
  var curTickleStart:CGPoint = CGPoint.zero
  var lastDirection:Direction = .DirectionUnknown
}

This is what you just declared step by step:

  1. These are the constants that define what the gesture will need. Note that requiredTickles will be inferred as an Int, but you need to specify distanceForTickleGesture as a CGFloat. If you do not, then it will be inferred as a Double, and cause difficulties when doing calculations with CGPoints later on.
  2. These are the possible tickle directions.
  3. Here are the three variables to keep track of to detect this gesture:
    • tickleCount: How many times the user has switched the direction of their finger (while moving a minimum amount of points). Once the user moves their finger direction three times, you count it as a tickle gesture.
    • curTickleStart: The point where the user started moving in this tickle. You’ll update this each time the user switches direction (while moving a minimum amount of points).
    • lastDirection: The last direction the finger was moving. It will start out as unknown, and after the user moves a minimum amount you’ll check whether they’ve gone left or right and update this appropriately.

Of course, these properties here are specific to the gesture you’re detecting here – you’ll have your own if you’re making a recognizer for a different type of gesture, but you can get the general idea here.

One of the things that you’ll be changing is the state of the gesture – when a tickle is completed, you’ll need to change the state of the gesture to ended. In the original Objective-C UIGestureRecognizer, state is a read-only property, so you will need to create a Bridging Header to be able to redeclare this property.

The easiest way to do this is to create an Objective-C Class, and then delete the implementation part.

Create a new file, using the iOS\Source\Objective-C File template. Call the file Bridging-Header, and click Create. You will then be asked whether you would like to configure an Objective-C bridging header. Choose Yes. Two new files will be added to your project:

  • MonkeyPinch-Bridging-Header.h
  • Bridging-Header.m

Delete Bridging-Header.m.

Add this Objective-C code to MonkeyPinch-Bridging-Header.h:

#import <UIKit/UIGestureRecognizerSubclass.h>

Now you will be able to change the UIGestureRecognizer‘s state property in TickleGestureRecognizer.swift.

Switch to TickleGestureRecognizer.swift and add the following functions to the class:

override func touchesBegan(_ touches: Set<UITouch>, with event: UIEvent) {
  if let touch = touches.first {
    self.curTickleStart = touch.location(in: self.view)
  }
}

override func touchesMoved(_ touches: Set<UITouch>, with event: UIEvent) {
  if let touch = touches.first {
    let ticklePoint = touch.location(in: self.view)

    let moveAmt = ticklePoint.x - curTickleStart.x
    var curDirection:Direction
    if moveAmt < 0 {
      curDirection = .DirectionLeft
    } else {
      curDirection = .DirectionRight
    }

    //moveAmt is a Float, so self.distanceForTickleGesture needs to be a Float also
    if abs(moveAmt) < self.distanceForTickleGesture {
      return
    }

    if self.lastDirection == .DirectionUnknown ||
      (self.lastDirection == .DirectionLeft && curDirection == .DirectionRight) ||
      (self.lastDirection == .DirectionRight && curDirection == .DirectionLeft) {
      self.tickleCount += 1
      self.curTickleStart = ticklePoint
      self.lastDirection = curDirection

      if self.state == .possible && self.tickleCount > self.requiredTickles {
        self.state = .ended
      }
    }
  }
}

override func reset() {
  self.tickleCount = 0
  self.curTickleStart = CGPoint.zero
  self.lastDirection = .DirectionUnknown
  if self.state == .possible {
    self.state = .failed
  }
}

override func touchesEnded(_ touches: Set<UITouch>, with event: UIEvent) {
  self.reset()
}

override func touchesCancelled(_ touches: Set<UITouch>, with event: UIEvent) {
  self.reset()
}

There’s a lot of code here, but I’m not going to go over the specifics because frankly they’re not quite important. The important part is the general idea of how it works: you’re overriding the UIGestureRecognizer’s touchesBegan(_:with:), touchesMoved(_:with:), touchesEnded(_:with:), and touchesCancelled(_:with:) functions, and writing custom code to look at the touches and detect the gesture.

Once you’ve found the gesture, you want to send updates to the callback function. You do this by changing the state property of the gesture recognizer. Usually once the gesture begins, you want to set the state to .began, send any updates with .changed, and finalize it with .ended.

But for this simple gesture recognizer, once the user has tickled the object, that’s it – you just mark it as ended. The callback you will add to ViewController.swift will get called and you can implement the code there.

OK, now to use this new recognizer! Open ViewController.swift and make the following changes.

Add to the top of the class:

var hehePlayer:AVAudioPlayer? = nil

In viewDidLoad(), right after TODO, add:

let recognizer2 = TickleGestureRecognizer(target: self,
  action:#selector(handleTickle(recognizer:)))
recognizer2.delegate = self
view.addGestureRecognizer(recognizer2)

At end of viewDidLoad() add:

self.hehePlayer = self.loadSound(filename: "hehehe1")

Finally, create a new method at the end of the class:

@objc func handleTickle(recognizer: TickleGestureRecognizer) {
  self.hehePlayer?.play()
}

So you can see that using this custom gesture recognizer is as simple as using the built-in ones!

Compile and run and “he he, that tickles!”

Where To Go From Here?

Here’s the download for the final project with all of the code from the above tutorial.

Congrats, you’re now a master of gesture recognizers, both built-in and your own custom ones! Touch interaction is such an important part of iOS devices and UIGestureRecognizer is the key to easy-to-use gestures beyond simple button taps.

If you have any comments or questions about this tutorial or gesture recognizers in general, please join the forum discussion below!

The post UIGestureRecognizer Tutorial: Getting Started appeared first on Ray Wenderlich.

360|iDev 2017 Conference Highlights

$
0
0

360iDev 2017 Conference Highlights

270 attendees and 59 speakers recently descended upon Denver, Colorado to take part in the annual 360iDev conference.

360iDev 2017 had much to choose from; with seven workshops on Sunday and a whopping 58 sessions over the next three days to choose from, it was easy to find find a mix of sessions tailored to your interests — yet hard to narrow down the field of amazing talks and workshops!

In this article, I’ll share my thoughts on the conference and help you sort through all the great presentations to highlight the “can’t-miss” moments from the conference. Let’s dive in!

Keynote – Finding Your Place on the Internet – Soroush Khanlou

The conference opened with a keynote by Soroush Khanlou, a New York-based iOS developer and host of the FatalError podcast. Sourosh spoke about how you could go about making a name for yourself in the mobile app development industry with the many tools available to you, such as social networks, blogging, and podcasting. Like many worthwhile pursuits, there are no shortcuts to success; many hours of consistent effort are what it takes to make an impact. Sourosh’s own success came from many years of blogging and staying active in the community.

He suggests to look at what your idols have done and learn how they attained their success — which more likely than not took a long time. Simply copying their work and their approach is not enough. One example Sourosh gave was of a copycat’s efforts to mimic a successful Instagrammer — even to the point of flying around the world to reproduce styles and poses. But compare the number of likes between the two, and the comparison is nonexistent.

Find your own “thing”. Take inspiration from your idols, but use your own voice. The internet is huge, and there is room for everybody and everything. Keep at it — be consistent and your audience will find you.

I Wish They Had That In My School – Jessi Chartier

“It’s like trying to teach piano, by listening to Mozart, without giving them a piano to play with.”

Jessi Chartier is focused on what’s going on — or rather, going wrong — in the classroom. According to a recent study, she says that a million jobs in computer science will go unfilled by 2020. Less than 25% of high schools participate in Advanced Placement computer science courses, and many of those AP programs put theory before practice. Misguided information about what businesses require leads the curriculum to cover things such as Java development, instead of real-world needs like iOS development and mobile app development in general.

One of the main problems, she continues, is the lack of instructors. To teach at a high school level, teachers need a CS degree. Jessi is all about turning teachers into developers so they can instruct the next generation. “It’s easier to teach a teacher to develop than it is to teach a developer to teach,” she says. Her efforts also focus on helping school administrators realize that the world of coding is diversified. Meeting with administrators to help them understand the field is important, as is the fact that you don’t really need a CS degree to be viable in the mobile app development industry.

Her organization, Mobile Makers, treats learning to code like an apprenticeship and starts with coding before the theory. Otherwise, “It’s like trying to teach piano, by listening to Mozart, without giving them a piano to play with.” Jessi is also an organizer of App Camp for Girls, which aims to get girls and those who identify as girls to see coding as a career path. Organizations like these focus on getting coders to work in Xcode right away. Playgrounds are great as a digital sketchbook, but actually building real apps in Xcode goes a long way. Of course, Jessi goes into more detail than this short article can cover, and you should definitely check out the video of this talk.

Fun With iOS 11 Workshop – Sam Davies

If you were fortunate enough to attend the Sunday workshop, you would have seen fellow team member Sam Davies’ workshop on new things in coming in iOS. Sam delved into the abilities of the Encode and Decode protocols to create and parse some JSON data. He then went on to show how these come together under the Codable protocol.

Next, Sam had us working in the Drag and Drop framework, taking us slowly through adding draggability to the selected objects, and then through the ins and outs of accepting a dragged object and dropping it into place. He took time to explain properly updating the views accounting for the existing items and updating the data after the drop.

Personally, I think the coolest part of the workshop was adding CoreML to a table’s search function. In the example in the workshop, we added a CoreML model along with Natural Language Processing to search the data for words in similar context. For instance, “dance” also successfully includes “dancing” in the result. Using a sentiment-based model, the app could look at the rating of movie in the sample data and apply the appropriate emoticon. Very cool.

Practical Security – Rob Napier

Rob Napier is a builder of tree houses, hiker, proud father, and sometimes developer. His talk on security starts from the realization that it’s hard to know if you are doing security right, as security seems to be a moving target with exploits and evil-doers all around.

His talk explained Apple’s approach to security and its reliance on improved encryption and cyphers in upcoming requirements. App Transport Security (ATS) was introduced in iOS 9. Unfortunately, many developers turn that feature off in order to work around the encryption requirements and focus on the coding of their apps.

Rob explained that if you do nothing else, you should encrypt traffic to and from your apps with HTTPS. Also, you should stop turning off ATS — leave it alone! If your server host can’t accommodate encryption, get a new server host.

Another technique Rob suggests is certificate pinning. He demystified this concept with some tips for validating and rotating your certificates over future years. He also explained the versions and advantages of data encryption built into iOS. The most interesting section of the talk was on handling user passwords. You don’t ever want to see your user’s passwords, nor do you want anyone else to see them, so hash them into a string. Then simply deal with the hashed string. The only good cryptographic hash he says is SHA-2, known by many names, and the SHA-256 to SHA-512 digests under SHA-2 are suitable for most uses.

Salting and stretching are additional techniques for hardening passwords. This entails salting the password by adding some unique prefix or suffix, such as a reverse domain name, to lengthen the string. Simply adding 80ms per brute-force guess attempt adds an additional 15 million years to crack the string. For best results, start with a good password, salt it, stretch it and bake on at 350° heat for 30 minutes. Well maybe not the last part!

Rob also shared some great resources for beefing up your security. It’s definitely worth checking out this talk.

Deep Learning on iOS – Shuichi Tsutsumi

In his talk, Shuichi Tsutsumi presented some interesting examples of machine learning in action. He explored the evolution and use of deep learning on actual iOS devices. He pointed out some shortfalls of trying to reach a cloud based service without a network signal. Shuichi covers the current state of MPSCNNs and BNNs, which have been available since iOS 10.

If you’re curious about the steps required to use deep learning in your apps, he covers these in his talk, including the steps for training a model, implementing a neural network, and implementing an interface. CoreML, he goes on to explain, also employs MPSCNNs and BNNs under the hood. The former is more GPU-efficient, while the latter is more CPU-efficient.

In his final demo, he shows how simple it can be to use CoreML. Choose a model; if necessary, convert it to a CoreML model; then drop the model into your project. Add the Vision framework and you’re off and running with an app that can (mostly) identify the objects around you.

TensorFlow on iOS – Taylan Pince

“What the heck is Neural Network anyway?”

Taylan Pince starts off by saying that he should have titled his talk “What the heck is a Neural Network anyway?” He tells of his numerous years working on a client project, Field Guide: a collector’s guide of natural history. Having started around 2014, his team started out by exploring computer vision to categorize around 100 species. Using clever image processing techniques, the catalog grew substantially. Eventually, they moved to ImageNet, a research database with 14 million pre-trained images. Taylan then explained how images are weighted for predictability in a neural network.

In the last part of his talk, Taylan explores and compares Tensor Flow, CoreML, Metal Performance Shaders and the Accelerate framework. If you’re looking for a exploration of machine learning and CoreML, this talk, along with Shuichi Tsutsumi’s, are definitely worth checking out.

Playing Nice with Design – Ellen Shapiro

As developers, we can gain a lot by deploying effective and practical communication with our design team. The first challenge, though, is establishing a common terminology. Designers, iOS developers and Android developers can use terms that have very different meanings in their respective ecosystems.

To start, create a table to map out the common terminologies — and while you’re at it, do the same for font styles and colors used in your design language. The team Ellen worked on created an open source app, True Colors, to see the colors used on various devices. She also likes Sourcery to generate code to store values then share those values in files added to projects.

Creating a custom framework is another way to create building blocks that can be used in your apps.

Ellen also takes a look at the benefits and pitfalls of various frameworks. Designers can start their work on iPads and Playground Books to create resource files that the developers can run under Swift Playgrounds on iOS.

In summary, start with a small goal and build up with common paradigms; text, fonts, labels, margins, etc. This talk was full of tips that can be used to add intelligence and tools to your team’s communication.

Bonus: Check out Chris Wagner’s tutorial on Sourcery to see how to create useful templates for your team.

iOS with Continuous Delivery – Cassie Shum

Cassie explains the nuts and bolts of continuous delivery while covering a number of tools and workflow enhancements in this detail-filled talk. The difference between continuous deployment and continuous delivery is that while deployment to production is optional under continuous deployment, continuous delivery can and does deploy to deploy to production.

Continuous delivery, she says, has a reduced risk, as fewer lines of code can be delivered more frequently while changes are fresher in the developer’s mind.

She went on to break down the tools by phases: Build, Deploy, Test, and Release. Best practices include using clean architectures and design patterns to avoid the bloat of the “massive view controller”. Tools such as SwiftLint, ocLint and static code analysis make for better and consistent code. Deployment tools like fastlane automate the pain points, and HockeyApp and TestFlight get builds onto devices for testing.

This talk is packed with workflow enhancements and tools. Definitely check this one out.

Bonus: Check out Lyndsey Scott’s tutorials on fastlane to learn how to automate the drudgery of app deployment.

Fun & Games

The conference was more than just talks. There was some fun & games too!

Stump 360 Episode IV: A New Hope – Hosted by Tom Harrington


Presenting the…Experts?

The fourth annual “Stump 360” picked up where the WWDC favorite “Stump the Experts” left off. A rag-tag collection of “experts” took on the gathered audience in a game-show style battle of inane Apple trivia. The hosts presented questions to challenge the audience, who in turn wrote trivia questions on 3×5 index cards.

The event was rife with comedic moments, and most often useless trivia, with points awarded to each side. Prizes consist of extremely valuable 5-1/4-inch floppies that may have been overwritten, old eWorld and Newton stickers, and a vintage case for a PowerBook Duo battery — batteries not included. This session is a true highlight, and I look forward to many more years of Revenge of the Stump 360, or whatever they choose to call it.

Full disclosure: We did manage to stump some of the audience. However the score was close, as we “experts” were defeated by the audience members! :]

Game Dev Jam – Hosted by Ryan Polos

Every year I’ve attended 360iDev, there’s been an all-nighter dev jam where bleary-eyed developers show off their work first thing in the morning to the collected masses. This year, there were two apps employing ARKit and one watchOS app. The first was a game where players could shoot down pesky Tie Fighters. A second game placed a shuffleboard on a nearby surface then allowed players to send virtual rocks down the board. The watch app enabled wearers to watch and bid on eBay auctions.

The game dev jam and accompanying board game night provided a great way to socialize and collaborate with other developers from around the world.

Bonus: Subscribers can check out our screencasts on ARKit to see how easy it is to get started with ARKit.

We also cover ARKit in iOS 11 By Tutorials, which is available on our store.

Other Interesting Talks

There are a few more other interesting thoughts that I thought you might like to hear about.

Xcode Debugging by Aijaz Ansari was an amazing talk. I was actually overwhelmed as I tried to both keep up with his talk and take notes. Aijaz demonstrated how we could explore objects with LLDB and the clever use of Python scripting. Through two demos, he explored what was captured in LLDB and used a Python script to see the contents of the values held in a object. In the second demo, he showed how to use his script jq to loop through a blob of JSON and extract the values. Using the techniques he presented, it was possible to observe the values, validate the data and extend the output into meaningful data. This talk is definitely worth a look.

In Threads Queues and Things to Come, Ben DiFrancesco covered the current state of GCD and NSOperation queues. He explained that every iOS device has multiple cores, and therefore, has the capacity to run concurrent operations. His talk also looks at what is most likely to come to Swift concurrency in the near future.

Jean MacDonald’s talk, The Art of Responding to Criticism, takes a look at dealing with customer feedback. She explains that it’s really easy to see criticism as a personal put down. She offers sage advice on reflecting on what is being said and how the customer feels, and then offers tools and advice to help us respond in a supportive and grateful way.

Do You Want a Dystopia? was the Day Two Keynote by Jay Freeman. Jay is the creator of Cydia, the app store for jailbroken devices. Like many others, he was once a user of liveJournal.com, which was eventually acquired by a Russian company. He also warned of the potential social dangers in Twitter, and noted he favors Mastodon, a distributed service for “toots” that is potentially safer due to its infrastructure. He’s puzzled by popular social networks that make it easy to create questionable accounts and content but take a long time to remove the content — if ever. Jay’s cautionary tales are interesting, because they make you think about where you put your sensitive personal information. Check it out.

Day Three Keynote – John Wilker

On Day Three, John Wilker gave a keynote about the conference and offered some insights. This is the 11th 360iDev conference in 9 years. Along with the organizers, he thanked the speakers, sponsors, volunteers, and one special angel investor. The conference started 10 years ago, right after the iPhone SDK was announced. The organizers try to have more code than “not code” talks, and average two code talks per session. You can use the insights you glean from code talks right away. The “not code” talks are evergreen concepts that you can use years from now.

The community of 360iDev extends to support Alt-Conf and App Camp For Girls. They also offer two free tickets to the various CocoaHeads around the world. Members of the military and students also benefit from half-price tickets. Grown from John’s own underwhelming experiences at various conferences, 360iDev aims to help others become who they really are. John notes there have been some declines in attendance, but the conference is set to run again in 2018 and 2019. Early bird tickets will be available soon, as well as a Patreon campaign where you buy your own tickets though patronage. I hope to see you all at 360iDev 2018!

Where to Go From Here?

I can’t recommend 360iDev highly enough! It’s a great experience for any developer, designer or anyone involved in app production.

The hosts, John Wilker, Nicole Wilker and Tom Ortega, make the conference feel like home, and the collective masses are super-friendly. No matter what obstacles come up, I feel I cannot afford to miss this conference. Every year I’ve attended I come away re-energized, enlightened, and ready to take on the next year’s work.

Check out Steve Lipton’s summary “The Best of 360iDev 2017” for another perspective on this great experience.

Ray’s said a number of times that 360iDev is one of his favorite iOS conferences — and I’d have to agree. If you’re looking for more hands-on tutorials, check out RWDevCon which runs April 5–7, 2018 in Washington D.C.; RWDevCon and 360iDev are both at the top of my own personal list of conferences.

Did you attend 360iDev this year? Will you attend next year? Will you step up and submit a talk of your own? Let us know in the forum discussion below!

Photo Credits: Fuad Kamal.

The post 360|iDev 2017 Conference Highlights appeared first on Ray Wenderlich.

iOS 11 by Tutorials: First 10 Chapters Now Available!

$
0
0

Great news everyone: The third early access release of iOS 11 by Tutorials is now available!

This release has ten chapters:

  • Chapter 6: Beginning Drag and Drop: Take advantage of the new drag-and-drop features to select one or more files from within your application, drag them around, and drop them on target locations within your app. In this chapter you’ll dive straight in and get your hands dirty with the latter set of APIs, by integrating drag and drop into an iPad bug-tracking app known as Bugray.
  • Chapter 7: Advanced Drag and Drop: In Beginning Drag and Drop, you learned the basics while focusing on collection views. In this chapter you’ll learn how to drag and drop between apps. You’ll also dive deeper, and learn some flexible APIs for working with custom views.
  • Chapter 8: Document Based Apps: Learn how the Document Provider works, how it stands apart from the Document Picker, how to create new files, import existing files, and even add custom actions.
  • Chapter 9: Core ML & Vision Framework: Vision provides several out-of-box features for analyzing images and video. Its supported features include face tracking, face detection, face landmarks, text detection, rectangle detection, barcode detection, object tracking, and image registration. In this chapter, you’ll learn to detect faces, work with facial landmarks, and classify scenes using Vision and Core ML.
  • Chapter 10: Natural Language Processing: Learn how to detect the language of a body of text, how to work with named entities, how sentiment analysis works, how to perform searches with NSLinguisticTagger, and more! In this chapter, you’ll build an app that analyzes movie reviews for salient information. It will identify the review’s language, any actors mentioned, calculate sentiment (whether the reviewer liked, or hated, the movie), and provide text-based search.
  • Chapter 11: Introduction to ARKit: Build your own augmented reality app as you learn how to set up ARKit, detect feature points and draw planes, how to create and locate 3D models in your scene, handle low lighting conditions and manage session interruptions. With all the amazing things happening in AR lately, you won’t want to miss this chapter!
  • Chapter 12: PDFKit: Finally — you can easily create and annotate PDFs using native Apple libraries on the iPhone with PDFKit. Learn how to create thumbnails, add text, UI controls and watermarks to your documents, and even create custom actions for the UI controls in your PDF documents.
  • Chapter 13: MusicKit: You’re getting a two-for-one deal in this chapter! The sample app for this chapter is a iMessage app with live views, which is new to iOS 11. You’ll build this into a working iMessage application that lets you send guess-that-song music quizzes back and forth with your friends, using your Apple Music library!
  • Chapter 14: Password AutoFill: A vast improvement on iOS 8’s Safari Autofill, the new password autofilling option in iOS 11 makes it easier for your users to log in to your app, while maintaining user confidentiality at all times. Learn how to auto-recognize username and password fields, set up associated domains, and create a seamless login experience for your users.
  • Chapter 15: Dynamic Type: Dynamic type is even better in iOS 11 — less truncation and clipping, improved titles on tab bars, and more intelligent scaling make using text onscreen a breeze. Learn how to think about Dynamic Type as you
    architect your app, and how to accommodate large typefaces in your app’s layout.

This is the third and final early access release for the book! We’ll be launching the final version of the book once iOS 11 hits the streets in early September.

Where to Go From Here?

Here’s how you can get your early access copy of iOS 11 by Tutorials:

  • If you’ve pre-ordered iOS 11 by Tutorials, you can log in to the store and download the early access edition of iOS 11 by Tutorials here.
  • If you haven’t yet pre-ordered iOS 11 by Tutorials

    , we’re offering a limited-time, pre-order sale price of $44.99.

    When you pre-order the book, you’ll get exclusive access to the upcoming early access releases of the book so you can get a jumpstart on learning all the new APIs. The full edition of the book will be released in Fall 2017.

Gone are the days when every third-party developer knew everything there is to know about iOS. The sheer size of iOS can make new releases seem daunting. That’s why the Tutorial Team has been working really hard to extract the important parts of the new APIs, and to present this information in an easy-to-understand tutorial format. This means you can focus on what you want to be doing — building amazing apps!

What are you most looking forward to learning about in iOS 11? Respond in the comments below and let us know!

The post iOS 11 by Tutorials: First 10 Chapters Now Available! appeared first on Ray Wenderlich.

Video Tutorial: Beginning Firebase Part 11: Querying Data


Video Tutorial: Beginning Firebase Part 12: Section Conclusion

Video Tutorial: Beginning Firebase Part 13: User Accounts

Video Tutorial: Beginning Firebase Part 14: User Authentication

Video Tutorial: Beginning Firebase Part 15: Keychain

Video Tutorial: Beginning Firebase Part 16: User Creation

MapKit Tutorial: Overlay Views

$
0
0
mapkit

Learn how to add an overlay views using MapKit!

Update note: This tutorial has been updated for Xcode 9, iOS 11 and Swift 4 by Owen Brown. The original tutorial was written by Ray Wenderlich.

Apple makes it very easy to add a map to your app using MapKit, but this alone isn’t very engaging. Fortunately, you can make maps much more appealing using custom overlay views.

In this MapKit tutorial, you’ll create an app to showcase Six Flags Magic Mountain. For you fast-ride thrill seekers out there, this app’s for you. ;]

By the time you’re done, you’ll have an interactive park map that shows attraction locations, ride routes and character locations.

Getting Started

Download the starter project here. This starter includes navigation, but it doesn’t have any maps yet.

Open the starter project in Xcode; build and run; and you’ll see a just blank view. You’ll soon add a map and selectable overlay types here.

mapkit

Adding a MapView with MapKit

Open Main.storyboard and select the Park Map View Controller scene. Search for map in the Object Library and then drag and drop a Map View onto this scene. Position it below the navigation bar and make it fill the rest of the view.

mapkit

Next, select the Add New Constraints button, add four constraints with constant 0 and click Add 4 Constraints.

mapkit

Wiring Up the MapView

To do anything useful with a MapView, you need to do two things: (1) set an outlet to it, and (2) set its delegate.

Open ParkMapViewController in the Assistant Editor by holding down the Option key and left-clicking on ParkMapViewController.swift in the file hierarchy.

Then, control-drag from the map view to right above the first method like this:

mapkit

In the popup that appears, name the outlet mapView, and click Connect.

To set the map view’s delegate, right-click on the map view object to open its context menu and then drag from the delegate outlet to Park Map View Controller like this:

mapkit

You also need to make ParkMapViewController conform to MKMapViewDelegate.

First, add this import to the top of ParkMapViewController.swift:

import MapKit

Then, add this extension after the closing class curly brace:

extension ParkMapViewController: MKMapViewDelegate {

}

Build and run to check out your snazzy new map!

mapkit

Wouldn’t it be cool if you could actually do something with the map? It’s time to add map interactions! :]

Interacting with the MapView

You’ll start by centering the map on the park. Inside the app’s Park Information folder, you’ll find a file named MagicMountain.plist. Open this file, and you’ll see it contains a coordinate for the park midpoint and boundary information.

You’ll now create a model for this plist to make it easy to use in the app.

Right-click on the Models group in the file navigation, and choose New File… Select the iOS\Source\Swift File template and name it Park.swift. Replace its contents with this:

import UIKit
import MapKit

class Park {
  var name: String?
  var boundary: [CLLocationCoordinate2D] = []

  var midCoordinate = CLLocationCoordinate2D()
  var overlayTopLeftCoordinate = CLLocationCoordinate2D()
  var overlayTopRightCoordinate = CLLocationCoordinate2D()
  var overlayBottomLeftCoordinate = CLLocationCoordinate2D()
  var overlayBottomRightCoordinate = CLLocationCoordinate2D()

  var overlayBoundingMapRect: MKMapRect?
}

You also need to be able to set the Park’s values to what’s defined in the plist.

First, add this convenience method to deserialize the property list:

class func plist(_ plist: String) -> Any? {
  let filePath = Bundle.main.path(forResource: plist, ofType: "plist")!
  let data = FileManager.default.contents(atPath: filePath)!
  return try! PropertyListSerialization.propertyList(from: data, options: [], format: nil)
}

Next, add this next method to parse a CLLocationCoordinate2D given a fieldName and dictionary:

static func parseCoord(dict: [String: Any], fieldName: String) -> CLLocationCoordinate2D {
  guard let coord = dict[fieldName] as? String else {
    return CLLocationCoordinate2D()
  }
  let point = CGPointFromString(coord)
  return CLLocationCoordinate2DMake(CLLocationDegrees(point.x), CLLocationDegrees(point.y))
}

MapKit’s APIs use CLLocationCoordinate2D to represent geographic locations.

You’re now finally ready to create an initializer for this class:

init(filename: String) {
  guard let properties = Park.plist(filename) as? [String : Any],
    let boundaryPoints = properties["boundary"] as? [String] else { return }

  midCoordinate = Park.parseCoord(dict: properties, fieldName: "midCoord")
  overlayTopLeftCoordinate = Park.parseCoord(dict: properties, fieldName: "overlayTopLeftCoord")
  overlayTopRightCoordinate = Park.parseCoord(dict: properties, fieldName: "overlayTopRightCoord")
  overlayBottomLeftCoordinate = Park.parseCoord(dict: properties, fieldName: "overlayBottomLeftCoord")

  let cgPoints = boundaryPoints.map { CGPointFromString($0) }
  boundary = cgPoints.map { CLLocationCoordinate2DMake(CLLocationDegrees($0.x), CLLocationDegrees($0.y)) }
}

First, the park’s coordinates are extracted from the plist file and assigned to properties. Then the boundary array is set, which you’ll use later to display the park outline.

You may be wondering, “Why wasn’t overlayBottomRightCoordinate set from the plist?” This isn’t provided in the plist because you can easily calculate it from the other three points.

Replace the current overlayBottomRightCoordinate with this computed property:

var overlayBottomRightCoordinate: CLLocationCoordinate2D {
  get {
    return CLLocationCoordinate2DMake(overlayBottomLeftCoordinate.latitude,
                                      overlayTopRightCoordinate.longitude)
  }
}

Finally, you need a method to create a bounding box based on the overlay coordinates.

Replace the definition of overlayBoundingMapRect with this:

var overlayBoundingMapRect: MKMapRect {
  get {
    let topLeft = MKMapPointForCoordinate(overlayTopLeftCoordinate)
    let topRight = MKMapPointForCoordinate(overlayTopRightCoordinate)
    let bottomLeft = MKMapPointForCoordinate(overlayBottomLeftCoordinate)

    return MKMapRectMake(
      topLeft.x,
      topLeft.y,
      fabs(topLeft.x - topRight.x),
      fabs(topLeft.y - bottomLeft.y))
  }
}

This getter generates an MKMapRect object for the park’s boundary. This is simply a rectangle that defines how big the park is, centered on the park’s midpoint.

Now it’s time to put this class to use. Open ParkMapViewController.swift and add the following property to it:

var park = Park(filename: "MagicMountain")

Then, replace viewDidLoad() with this:

override func viewDidLoad() {
  super.viewDidLoad()

  let latDelta = park.overlayTopLeftCoordinate.latitude -
    park.overlayBottomRightCoordinate.latitude

  // Think of a span as a tv size, measure from one corner to another
  let span = MKCoordinateSpanMake(fabs(latDelta), 0.0)
  let region = MKCoordinateRegionMake(park.midCoordinate, span)

  mapView.region = region
}

This creates a latitude delta, which is the distance from the park’s top left coordinate to the park’s bottom right coordinate. You use it to generate an MKCoordinateSpan, which defines the area spanned by a map region. You then use MKCoordinateSpan along with the park’s midCoordinate to create an MKCoordinateRegion, which positions the park on the map view.

Build and run your app, and you’ll see the map is now centered on Six Flags Magic Mountain! :]

mapkit

Okay! You’ve centered the map on the park, which is nice, but it’s not terribly exciting. Let’s spice things up by switching the map type to satellite!

Switching The Map Type

In ParkMapViewController.swift, you’ll notice this method:

@IBAction func mapTypeChanged(_ sender: UISegmentedControl) {
  // TODO
}

Hmm, that’s a pretty ominous-sounding comment in there! :]

Fortunately, the starter project has much of what you’ll need to flesh out this method. Did you note the segmented control sitting above the map view that seems to be doing a whole lot of nothing?

That segmented control is actually calling mapTypeChanged(_:), but as you can see above, this method does nothing — yet!

Add the following implementation to mapTypeChanged():

mapView.mapType = MKMapType.init(rawValue: UInt(sender.selectedSegmentIndex)) ?? .standard

Believe it or not, adding standard, satellite, and hybrid map types to your app is as simple as the code above! Wasn’t that easy?

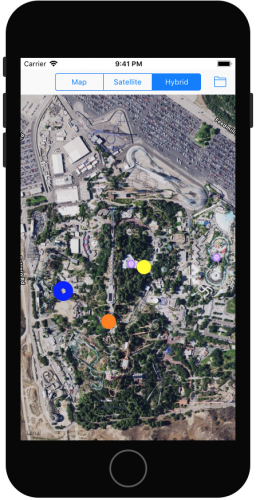
Build and run, and try out the segmented control to change the map type!

mapkit

Even though the satellite view still is much better than the standard map view, it’s still not very useful to your park visitors. There’s nothing labeled — how will your users find anything in the park?

One obvious way is to drop a UIView on top of the map view, but you can take it a step further and instead leverage the magic of MKOverlayRenderer to do a lot of the work for you!

All About Overlay Views

Before you start creating your own overlay views, you need to understand two key classes: MKOverlay and MKOverlayRenderer.

MKOverlay tells MapKit where you want the overlays drawn. There are three steps to using the class:

  1. Create your own custom class that implements the MKOverlay protocol, which has two required properties: coordinate and boundingMapRect. These properties define where the overlay resides on the map and the overlay’s size.
  2. Create an instance of your class for each area that you want to display an overlay. In this app, for example, you might create an instance for a rollercoaster overlay and another for a restaurant overlay.
  3. Finally, add the overlays to your Map View.

Now the Map View knows where it’s supposed to display overlays, but how does it know what to display in each region?

Enter MKOverlayRenderer. You subclass this to set up what you want to display in each spot. In this app, for example, you’ll draw an image of the rollercoaster or restaurant.

A MKOverlayRenderer is really just a special kind of UIView, as it inherits from UIView. However, you shouldn’t add an MKOverlayRenderer directly to a MKMapView. Instead, MapKit expects this to be an MKMapView.

Remember the map view delegate you set earlier? There’s a delegate method that allows you to return an overlay view:

func mapView(_ mapView: MKMapView, rendererFor overlay: MKOverlay) -> MKOverlayRenderer

MapKit will call this method when it realizes there is an MKOverlay object in the region that the map view is displaying.

To sum everything up, you don’t add MKOverlayRenderer objects directly to the map view; rather, you tell the map about MKOverlay objects to display and return them when the delegate method requests them.

Now that you’ve covered the theory, it’s time to put these concepts to use!

Adding Your Own Information

As you saw earlier, the satellite view still doesn’t provide enough information about the park. Your task is to create an object that represents an overlay for the entire park.

Select the Overlays group and create a new Swift file named ParkMapOverlay.swift. Replace its contents with this:

import UIKit
import MapKit

class ParkMapOverlay: NSObject, MKOverlay {
  var coordinate: CLLocationCoordinate2D
  var boundingMapRect: MKMapRect

  init(park: Park) {
    boundingMapRect = park.overlayBoundingMapRect
    coordinate = park.midCoordinate
  }
}

Conforming to the MKOverlay means you also have to inherit from NSObject. Finally, the initializer simply takes the properties from the passed Park object, and sets them to the corresponding MKOverlay properties.

Now you need to create a view class derived from the MKOverlayRenderer class.

Create a new Swift file in the Overlays group called ParkMapOverlayView.swift. Replace its contents with this:

import UIKit
import MapKit

class ParkMapOverlayView: MKOverlayRenderer {
  var overlayImage: UIImage

  init(overlay:MKOverlay, overlayImage:UIImage) {
    self.overlayImage = overlayImage
    super.init(overlay: overlay)
  }

  override func draw(_ mapRect: MKMapRect, zoomScale: MKZoomScale, in context: CGContext) {
    guard let imageReference = overlayImage.cgImage else { return }

    let rect = self.rect(for: overlay.boundingMapRect)
    context.scaleBy(x: 1.0, y: -1.0)
    context.translateBy(x: 0.0, y: -rect.size.height)
    context.draw(imageReference, in: rect)
  }
}

init(overlay:overlayImage:) effectively overrides the base method init(overlay:) by providing a second argument.

draw is the real meat of this class. It defines how MapKit should render this view when given a specific MKMapRect, MKZoomScale, and the CGContext of the graphic context, with the intent to draw the overlay image onto the context at the appropriate scale.

Details on Core Graphics drawing is quite far out of scope for this tutorial. However, you can see that the code above uses the passed MKMapRect to get a CGRect, in order to determine the location to draw the CGImage of the UIImage on the provided context. If you want to learn more about Core Graphics, check out our Core Graphics tutorial series.

Great! Now that you have both an MKOverlay and MKOverlayRenderer, you can add them to your map view.

In ParkMapViewController.swift, add the following method to the class:

func addOverlay() {
  let overlay = ParkMapOverlay(park: park)
  mapView.add(overlay)
}

This method will add an MKOverlay to the map view.

If the user should choose to show the map overlay, then loadSelectedOptions() should call addOverlay(). Replace loadSelectedOptions() with the following code:

func loadSelectedOptions() {
  mapView.removeAnnotations(mapView.annotations)
  mapView.removeOverlays(mapView.overlays)

  for option in selectedOptions {
    switch (option) {
    case .mapOverlay:
      addOverlay()
    default:
      break;
    }
  }
}

Whenever the user dismisses the options selection view, the app calls loadSelectedOptions(), which then determines the selected options, and calls the appropriate methods to render those selections on the map view.

loadSelectedOptions() also removes any annotations and overlays that may be present so that you don’t end up with duplicate renderings. This is not necessarily efficient, but it is a simple approach to clear previous items from the map.

To implement the delegate method, add the following method to the MKMapViewDelegate extension at the bottom of the file:

func mapView(_ mapView: MKMapView, rendererFor overlay: MKOverlay) -> MKOverlayRenderer {
  if overlay is ParkMapOverlay {
    return ParkMapOverlayView(overlay: overlay, overlayImage: #imageLiteral(resourceName: "overlay_park"))
  }

  return MKOverlayRenderer()
}

When the app determines that an MKOverlay is in view, the map view calls the above method as the delegate.

Here, you check to see if the overlay is of the class type ParkMapOverlay. If so, you load the overlay image, create a ParkMapOverlayView instance with the overlay image, and return this instance to the caller.

There’s one little piece missing, though – where does that suspicious little overlay_park image come from?

That’s a PNG file whose purpose is to overlay the map view for the defined boundary of the park. The overlay_park image (found in the image assets) looks like this:

mapkit

Build and run, choose the Map Overlay option, and voila! There’s the park overlay drawn on top of your map:

mapkit

Zoom in, zoom out, and move around as much as you want — the overlay scales and moves as you would expect. Cool!

Annotations

If you’ve ever searched for a location in the Maps app, then you’ve seen those colored pins that appear on the map. These are known as annotations, which are created with MKAnnotationView. You can use annotations in your own app — and you can use any image you want, not just pins!

Annotations will be useful in your app to help point out specific attractions to the park visitors. Annotation objects work similarly to MKOverlay and MKOverlayRenderer, but instead you will be working with MKAnnotation and MKAnnotationView.

Create a new Swift file in the Annotations group called AttractionAnnotation.swift. Replace its contents with this:

import UIKit
import MapKit

enum AttractionType: Int {
  case misc = 0
  case ride
  case food
  case firstAid

  func image() -> UIImage {
    switch self {
    case .misc:
      return #imageLiteral(resourceName: "star")
    case .ride:
      return #imageLiteral(resourceName: "ride")
    case .food:
      return #imageLiteral(resourceName: "food")
    case .firstAid:
      return #imageLiteral(resourceName: "firstaid")
    }
  }
}

class AttractionAnnotation: NSObject, MKAnnotation {
  var coordinate: CLLocationCoordinate2D
  var title: String?
  var subtitle: String?
  var type: AttractionType

  init(coordinate: CLLocationCoordinate2D, title: String, subtitle: String, type: AttractionType) {
    self.coordinate = coordinate
    self.title = title
    self.subtitle = subtitle
    self.type = type
  }
}

Here you first define an enum for AttractionType to help you categorize each attraction into a type. This enum lists four types of annotations: misc, rides, foods and first aid. Plus a handy function to grab the correct annotation image.

Next you declare that this class conforms to the MKAnnotation Protocol. Much like MKOverlay, MKAnnotation has a required coordinate property. You define a handful of properties specific to this implementation. Lastly, you define an initializer that allows you to assign values to each of the properties.

Now you need to create a specific instance of MKAnnotation to use for your annotations.

Create another Swift file called AttractionAnnotationView.swift under the Annotations group. Replace its contents with the following:

import UIKit
import MapKit

class AttractionAnnotationView: MKAnnotationView {
  // Required for MKAnnotationView
  required init?(coder aDecoder: NSCoder) {
    super.init(coder: aDecoder)
  }

  override init(annotation: MKAnnotation?, reuseIdentifier: String?) {
    super.init(annotation: annotation, reuseIdentifier: reuseIdentifier)
    guard let attractionAnnotation = self.annotation as? AttractionAnnotation else { return }

    image = attractionAnnotation.type.image()
  }
}

MKAnnotationView requires the init(coder:) initializer. Without its definition, an error will prevent you from building and running the app. To prevent this, simply define it and call its superclass initializer. Here, you also override init(annotation:reuseIdentifier:) based on the annotation’s type property, you set a different image on the image property of the annotation.

Now having created the annotation and its associated view, you can start adding them to your map view!

To determine the location of each annotation, you’ll use the info in the MagicMountainAttractions.plist file, which you can find under the Park Information group. The plist file contains coordinate information and other details about the attractions at the park.

Go back to ParkMapViewController.swift and insert the following method:

func addAttractionPins() {
  guard let attractions = Park.plist("MagicMountainAttractions") as? [[String : String]] else { return }

  for attraction in attractions {
    let coordinate = Park.parseCoord(dict: attraction, fieldName: "location")
    let title = attraction["name"] ?? ""
    let typeRawValue = Int(attraction["type"] ?? "0") ?? 0
    let type = AttractionType(rawValue: typeRawValue) ?? .misc
    let subtitle = attraction["subtitle"] ?? ""
    let annotation = AttractionAnnotation(coordinate: coordinate, title: title, subtitle: subtitle, type: type)
    mapView.addAnnotation(annotation)
  }
}

This method reads MagicMountainAttractions.plist and enumerates over the array of dictionaries. For each entry, it creates an instance of AttractionAnnotation with the attraction’s information, and then adds each annotation to the map view.

Now you need to update loadSelectedOptions() to accommodate this new option and execute your new method when the user selects it.

Update the switch statement in loadSelectedOptions() to include the following:

case .mapPins:
  addAttractionPins()

This calls your new addAttractionPins() method when required. Notes that the call to removeOverlays also hides the pins overlay.

You’re almost there! Last but not least, you need to implement another delegate method that provides the MKAnnotationView instances to the map view so that it can render them on itself.

Add the following method to the MKMapViewDelegate class extension at the bottom of the file:

func mapView(_ mapView: MKMapView, viewFor annotation: MKAnnotation) -> MKAnnotationView? {
  let annotationView = AttractionAnnotationView(annotation: annotation, reuseIdentifier: "Attraction")
  annotationView.canShowCallout = true
  return annotationView
}

This method receives the selected MKAnnotation and uses it to create the AttractionAnnotationView. Since the property canShowCallout is set to true, a call-out will appear when the user touches the annotation. Finally, the method returns the annotation view.

Build and run to see your annotations in action!

Turn on the Attraction Pins to see the result as in the screenshot below:

mapkit

The Attraction pins are looking rather “sharp” at this point! :]

So far you’ve covered a lot of complicated bits of MapKit, including overlays and annotations. But what if you need to use some drawing primitives, like lines, shapes, and circles?

The MapKit framework also gives you the ability to draw directly on a map view. MapKit provides MKPolyline, MKPolygon, and MKCircle for just this purpose.

I Walk The Line – MKPolyline

If you’ve ever been to Magic Mountain, you know that the Goliath hypercoaster is an incredible ride, and some riders like to make a beeline for it once they walk in the gate! :]

To help out these riders, you’ll plot a path from the entrance of the park to the Goliath.

MKPolyline is a great solution for drawing a path that connects multiple points, such as plotting a non-linear route from point A to point B.

To draw a polyline, you need a series of longitude and latitude coordinates in the order that the code should plot them.

The EntranceToGoliathRoute.plist (again found in the Park Information folder) contains the path information.

You need a way to read in that plist file and create the route for the riders to follow.

Open ParkMapViewController.swift and add the following method to the class:

func addRoute() {
  guard let points = Park.plist("EntranceToGoliathRoute") as? [String] else { return }

  let cgPoints = points.map { CGPointFromString($0) }
  let coords = cgPoints.map { CLLocationCoordinate2DMake(CLLocationDegrees($0.x), CLLocationDegrees($0.y)) }
  let myPolyline = MKPolyline(coordinates: coords, count: coords.count)

  mapView.add(myPolyline)
}

This method reads EntranceToGoliathRoute.plist, and converts the individual coordinate strings to CLLocationCoordinate2D structures.

It’s remarkable how simple it is to implement your polyline in your app; you simply create an array containing all of the points, and pass it to MKPolyline! It doesn’t get much easier than that.

Now you need to add an option to allow the user to turn the polyline path on or off.

Update loadSelectedOptions() to to include another case statement:

case .mapRoute:
  addRoute()

This calls the addRoute() method when required.

Finally, to tie it all together, you need to update the delegate method so that it returns the actual view you want to render on the map view.

Replace mapView(_:rendererForOverlay) with this:

func mapView(_ mapView: MKMapView, rendererFor overlay: MKOverlay) -> MKOverlayRenderer {
  if overlay is ParkMapOverlay {
    return ParkMapOverlayView(overlay: overlay, overlayImage: #imageLiteral(resourceName: "overlay_park"))
  } else if overlay is MKPolyline {
    let lineView = MKPolylineRenderer(overlay: overlay)
    lineView.strokeColor = UIColor.green
    return lineView
  }

  return MKOverlayRenderer()
}

The change here is the additional else if branch to look for MKPolyline objects. The process of displaying the polyline view is very similar to previous overlay views. However, in this case, you do not need to create any custom view objects. You simply use the MKPolyLineRenderer framework provided, and initialize a new instance with the overlay.

MKPolyLineRenderer also provides you with the ability to change certain attributes of the polyline. In this case, you’ve modified the stroke color to show as green.

Build and run your app, enable the Route option, and it’ll appear on the screen:

mapkit

Goliath fanatics will now be able to make it to the coaster in record time! :]

It would be nice to show the park patrons where the actual park boundaries are, as the park doesn’t actually occupy the entire space shown on the screen.

Although you could use MKPolyline to draw a shape around the park boundaries, MapKit provides another class that is specifically designed to draw closed polygons: MKPolygon.

Don’t Fence Me In – MKPolygon

MKPolygon is remarkably similar to MKPolyline, except that the first and last points in the set of coordinates are connected to each other to create a closed shape.

You’ll create an MKPolygon as an overlay that will show the park boundaries. The park boundary coordinates are already defined in MagicMountain.plist; go back and look at init(filename:) to see where the boundary points are read in from the plist file.

Add the following method to ParkMapViewController.swift:

func addBoundary() {
  mapView.add(MKPolygon(coordinates: park.boundary, count: park.boundary.count))
}

The implementation of addBoundary() above is pretty straightforward. Given the boundary array and point count from the park instance, you can quickly and easily create a new MKPolygon instance!

Can you guess the next step here? It’s very similar to what you did for MKPolyline above.

Yep, that’s right — insert another case in the switch in loadSelectedOptions to handle the new option of showing or hiding the park boundary:

case .mapBoundary:
  addBoundary()

MKPolygon conforms to MKOverlay just as MKPolyline does, so you need to update the delegate method again.

Update the delegate method in ParkMapViewController.swift as follows:

func mapView(_ mapView: MKMapView, rendererFor overlay: MKOverlay) -> MKOverlayRenderer {
  if overlay is ParkMapOverlay {
    return ParkMapOverlayView(overlay: overlay, overlayImage: #imageLiteral(resourceName: "overlay_park"))
  } else if overlay is MKPolyline {
    let lineView = MKPolylineRenderer(overlay: overlay)
    lineView.strokeColor = UIColor.green
    return lineView
  } else if overlay is MKPolygon {
    let polygonView = MKPolygonRenderer(overlay: overlay)
    polygonView.strokeColor = UIColor.magenta
    return polygonView
  }

  return MKOverlayRenderer()
}

The update to the delegate method is as straightforward as before. You create an MKOverlayView as an instance of MKPolygonRenderer, and set the stroke color to magenta.

Run the app to see your new boundary in action:

mapkit

That takes care of polylines and polygons. The last drawing method to cover is drawing circles as an overlay, which is neatly handled by MKCircle.

Circle In The Sand – MKCircle

MKCircle is again very similar to MKPolyline and MKPolygon, except that it draws a circle, given a coordinate point as the center of the circle, and a radius that determines the size of the circle.

It would be great to mark general locations where park characters are spotted. Draw some circles on the map to simulate the location of those characters!

The MKCircle overlay is a very easy way to implement this functionality.

The Park Information folder also contains the character location files. Each file is an array of a few coordinates where the user spotted characters.

Create a new Swift file under the Models group called Character.swift. Replace its contents with the following code:

import UIKit
import MapKit

class Character: MKCircle {

  var name: String?
  var color: UIColor?

  convenience init(filename: String, color: UIColor) {
    guard let points = Park.plist(filename) as? [String] else { self.init(); return }

    let cgPoints = points.map { CGPointFromString($0) }
    let coords = cgPoints.map { CLLocationCoordinate2DMake(CLLocationDegrees($0.x), CLLocationDegrees($0.y)) }

    let randomCenter = coords[Int(arc4random()%4)]
    let randomRadius = CLLocationDistance(max(5, Int(arc4random()%40)))

    self.init(center: randomCenter, radius: randomRadius)
    self.name = filename
    self.color = color
  }
}

The new class that you just added conforms to the MKCircle protocol, and defines two optional properties: name and color. The convenience initializer accepts a plist filename and color to draw the circle. Then it reads in the data from the plist file and selects a random location from the four locations in the file. Next, it choses a random radius to simulate the time variance. The MKCircle returned is set and ready to be put on the map!

Now you need a method to add each character. Open ParkMapViewController.swift and add the following method to the class:

func addCharacterLocation() {
  mapView.add(Character(filename: "BatmanLocations", color: .blue))
  mapView.add(Character(filename: "TazLocations", color: .orange))
  mapView.add(Character(filename: "TweetyBirdLocations", color: .yellow))
}

The method above performs pretty much performs the same operations for each character. It passes the plist filename for each one, decides on a color and adds it to the map as an overlay.

You’re almost done! Can you recall what the last few steps should be?

Right, you still need to provide the map view with an MKOverlayView, which is done through the delegate method.

Update the delegate method in ParkMapViewController.swift with this::

func mapView(_ mapView: MKMapView, rendererFor overlay: MKOverlay) -> MKOverlayRenderer {
  if overlay is ParkMapOverlay {
    return ParkMapOverlayView(overlay: overlay, overlayImage: #imageLiteral(resourceName: "overlay_park"))
  } else if overlay is MKPolyline {
    let lineView = MKPolylineRenderer(overlay: overlay)
    lineView.strokeColor = UIColor.green
    return lineView
  } else if overlay is MKPolygon {
    let polygonView = MKPolygonRenderer(overlay: overlay)
    polygonView.strokeColor = UIColor.magenta
    return polygonView
  } else if let character = overlay as? Character {
    let circleView = MKCircleRenderer(overlay: character)
    circleView.strokeColor = character.color
    return circleView
  }

  return MKOverlayRenderer()
}

And finally, update loadSelectedOptions() to give the user an option to turn the character locations on or off:

case .mapCharacterLocation:
  addCharacterLocation()

You can also remove the default: and break statements now since you’ve covered all the possible cases.

Build and run the app, and turn on the character overlay to see where everyone is hiding out!

mapkit

Where to Go From Here?

Congratulations! You’ve worked with some of the most important functionality that MapKit provides. With a few basic functions, you’ve implemented a full-blown and practical mapping application complete with annotations, satellite view, and custom overlays!

Here’s the final example project that you developed in the tutorial.

There are many different ways to generate overlays that range from very easy, to the very complex. The approach in this tutorial that was taken for the overlay_park image provided in this tutorial was the easy — yet tedious — route.

There are much more advanced — and perhaps more efficient — methods to create overlays. A few alternate methods are to use KML files, MapBox tiles, or other 3rd party provided resources.

I hope you enjoyed this tutorial, and I hope to see you use MapKit overlays in your own apps. If you have any questions or comments, please join the forum discussion below!

The post MapKit Tutorial: Overlay Views appeared first on Ray Wenderlich.

Video Tutorial: Beginning Firebase Part 17: Error Handling Challenge


Video Tutorial: Beginning Firebase Part 18: User Login

RWDevCon 2017 Inspiration Talk: Building Compassionate Software by Ash Furrow

$
0
0
Note from Ray: At our recent RWDevCon tutorial conference, in addition to hands-on tutorials, we also had a number of “inspiration talks” – non-technical talks with the goal of giving you a new idea or some battle-won advice, and leaving you excited and energized.

We recorded these talks so that you can enjoy them even if you didn’t get to attend the conference. Here’s one of the inspiration talks from RWDevCon 2017: “Building Compassionate Software” by Ash Furrow. I hope you enjoy it!

Transcript

If you made a mistake, you would want your colleague to tell you, right? Just like if your colleague had an interesting idea, even if it was a little unconventional, you’d want them to let you know. But chances are, you’ve been in a situation to speak up, and you haven’t.

Why? Why don’t we speak up? And what effect does that have on the team performance overall?

Today we’re going to be talking about psychological safety, what it is and how it can help your team perform better.

First, feelings matter. We’re going to talk about some of the evidence that shows that feelings matter and why they’re important. Second, we’re going to take a look at psychological safety and some of the cool things that you can do with that. And finally, we’re going to take a look at how to implement psychological safety on your team.

Let’s get started.

Feelings matter

This sounds obvious to some people. It sounds not-obvious to some other people, and that’s okay. It’s something I’ve talked a lot about at conferences. I’ve written about it on my blog. I think that feelings are really important. Why do I think that?

Because science says so. We’ve actually done a lot of research into empathy and feelings, and I want to share one study with you, a recent study out of New York.

High school students in a science class were divided into two groups and given two different curricula. The first group of students learned about the accomplishments, the lives and the struggles of some of history’s greatest scientists. The other group only learned about the accomplishments themselves and the actual theories that came out of them. What was interesting is that to the researcher’s surprise, but not really to mine, the students who learned about how scientists had struggled throughout history against sexism, against classism and against depression, when the students learned about those struggles, their test scores improved.

What’s really interesting is that the other group of students who didn’t learn about those struggles, who didn’t learn to empathize with history’s greatest scientists, their test scores went down. This suggests that only is empathy really helpful, but that a lack of empathy can actually be harmful.

What Is Empathy?

In the ’90s, an academic by the name of Theresa Wiseman came up with four necessary components to empathy:

  1. Seeing the world as others see it.
  2. Recognizing and understanding another’s feelings.
  3. Staying non-judgmental.
  4. Communicating to that person that you understand.

First, you need to understand someone’s point of view. Next is to understand what that person is feeling. Third and really importantly is to stay non-judgmental about what that person is thinking and feeling. Finally, really importantly, you need to communicate to that person that you understand. These are things that we can do. These are activities that we can practice and these are habits that we can form.

What does it look like when you work on a team that values feelings? Well, that’s psychological safety.

Teams with psychological safety perform better than teams without. Has anyone heard of the term “10x developer”? It’s this mythical idea that some developers are just intrinsically ten times as productive as others. It’s not true, but you could be a 10x developer if you made each of the five people you work closest with twice as productive. To me, that’s a 10x developer.

You can be a 10x developer if you take some of the evidence that we talk about today and bring it back to your team, and make your team more productive. You can be a 10x developer by implementing psychological safety.

What Is Psychological Safety?

Psychological safety is the belief that you won’t be punished or humiliated for asking a question, raising a concern, or admitting a mistake.

It’s a very simple concept, but it’s a really powerful one. We know that teams who exhibit psychological safety perform better than those who don’t, and we know this thanks to a somewhat unlikely source: Google.

Google Your Feelings

Google ran a five-year study called Project Aristotle. It’s a study performed on their own employees, which they have thousands of, and the goal of the study was to determine a leading indicator, something that would predict whether or not a team would perform well. By and far the biggest predictor of team performance was psychological safety.

This is Google we’re talking about. They AB test the shade of blue that they use on Gmail’s Send button. They’re incredibly data driven, and they came to the conclusion that feelings are important, which I think is pretty cool.

I’d like you to think back to an occasion when you were working on a team where you didn’t feel like you could ask a question or admit a mistake or propose an idea. Was the project that team worked on successful? Do you think it would have been more successful if you were working in a more psychologically safe environment?

Psychological safety is important so that we feel safe to ask questions and to admit mistakes. It’s important that we feel like our voice is heard. It’s especially important in small resource-constrained start-ups that a lot of us work at where small mistakes can cost the entire company.

So that’s what psychological safety is. How do we measure it?

Measuring Psychological Safety

Psychological safety is measurable in one of two activities that are exhibited by teams.

The first is called conversational turn-taking. Conversational turn-taking is how often a participant in a conversation switches from listening to speaking. That’s all. The more this happens the better, because everyone needs to be able to feel like they have a say in the conversation.

The second attribute is a little trickier. It’s called average emotional sensitivity. Emotional sensitivity is how likely anyone on your team is to empathize with someone else. If they’re having a really good day or a really bad day, how likely are they to reach out? How likely are they to understand what another person is thinking or feeling? How likely are they to stay non-judgmental and communicate that back to the person? That’s average emotional sensitivity.

Benefits of Psychological Safety

We’ve talked a little bit about the higher performance on teams, which is great for business. We’ve also alluded to how psychological safety makes people feel more welcome on your team, which is good for people. So it sounds like a win-win, right? I think that everyone in this room and everyone in our industry should expect psychologically safe work environments, whether you’re an individual contributor or the CEO.

How Do We Implement Psychological Safety?

So: feelings matter, and psychological safety is important for performing well, but how do you actually do psychological safety?

That’s a tough question, and before we get into the answer, we need to talk about one of two scenarios that you’re likely to find yourself in.

Maybe you’re a team lead. If you are a leader or manager of a team, then there is a ton that you can do in order to affect the psychological safety and team dynamics of your entire organization. We’re going to talk about the specific things you can do in just a minute.

The other scenario that you might find yourself in is that you’re an individual contributor. You report to a manager; you’re a developer, not a team lead. There is still a ton that you can do to positively affect the performance of your team, but you’re going to have the best luck if you approach your manager directly and get them to take on this responsibility. This is their job. This is their responsibility. They just might not know it yet. It’s really up to you all to approach your managers directly and say, “This is something that I think we should do.”

How do you do that? Well, this tweet went around awhile ago:

It says if you use the arguments on the left to justify refactoring, you’re screwed. The arguments on the left are things like:

  • Quality
  • Clean code
  • Professionalism

These are things that are important to programmers. They’re not things that are necessarily important to businesses.

What’s important to businesses are economics. Economics is not the study of money. It’s the study of how to spend scarce resources like, for instance, developer time. Luckily, the economics are on our side. Teams with psychological safety do perform better. They make better products faster, with fewer bugs.

So how do we actually implement and operationalize psychological safety? Well, it’s really important for the team leads to do some role modeling.

Three really important aspects of a team lead on a psychologically safe team are to:

  1. Admit fallibility
  2. Frame all work as a learning experience
  3. Model curiosity

Let’s talk about each one of these.

Admit Fallibility

Everybody struggles. Everybody. I struggle sometimes. Everyone in this room struggles sometimes. Your manager struggles. Everybody. And it’s important to normalize that fact.

People need to see managers admitting mistakes or asking questions. They need to see that managers are not infallible so that they feel when they mess up, it’s not the end of the world. Your team needs to feel safe in the worst of times, so make sure they feel safe in the best of times too.

Frame All Work As Learning Experiences

Next, you need to frame all work as primarily a learning experience—because that’s what it is. When we’re building a product as engineers and developers, we are learning how to build that product for the first time. At the end of it, we get the product, which is great from the business’ perspective, but from our perspective we’ve just learned how to build it.

Now it may seem counterintuitive for the business to place higher importance on individual contributors learning how to build the product rather than on the product itself, but remember: this is a way to increase psychological safety, which is going to increase team performance. Again, a win-win. Even though it’s counterintuitive for the business to focus on learning, you get a better product.

Model Curiosity

Finally, leaders need to model curiosity. Your team leads should be asking questions. They should be asking silly questions. They should be asking questions that they think they already know the answer to, because they might not. That’s really important. As a manager, you should be creating an environment where curiosity, and learning through curiosity, is praised and praiseworthy.

Other Tactics

There are some other really good ideas I want to share with you. Small talk at the beginning of meetings can be used to make everyone feel safe and like they’re having a say during the actual meeting. Again, it’s counterintuitive that small talk at the beginning would help the meeting’s productivity, but it’s what the research supports.

Watch out for people getting interrupted in meetings. If someone is interrupted, they’re very unlikely to feel safe offering their opinion or asking questions in the future.

Don’t push for immediate feedback. Programmers are really bad about this. If we submit a pull request, we want to know what someone else thinks about it right away, but that’s not the best solution. You’re going to get better feedback and create a more psychologically safe environment if you don’t push for immediate feedback. Instead, say, “Here’s my pull request. Let me know when you have time to review it,” or, “I need it reviewed by tomorrow afternoon.”

Allow space to revisit decisions. If the context around a decision or a discussion changes, then the team should feel comfortable revisiting that decision or that discussion.

Those are the cool ideas. Some of the more boring ideas: Schedule a recurring appointment to review your week or at least review your month. How are your colleagues feeling? What are they thinking? Make sure to stay non-judgmental and communicate your understanding back to them where appropriate.

After large meetings, block off five or ten minutes to reflect. How did the meeting go? What are people thinking? What are they feeling? How can I help?

Retrospectives and post-mortems are things our industry should probably be doing more of. I know my team could definitely be doing more retrospectives, and that’s the perfect opportunity to create an environment where everyone feels safe having their say and asking questions. If something went wrong, you want to find out what it is. It’s a learning experience.

Peer and performance reviews. If you have quarterly reviews, or whatever system you have in place to review your peers, make this a part of that. Evaluate yourself and others on how well you create a psychologically safe work environment.

This can be a hiring differentiator as well. Psychological safety isn’t something that’s standard in our industry yet. It will be soon, but show your potential hires how you structure meetings, tell them a time when you made a mistake and it wasn’t a big deal. Tell them a time where someone asked a silly question that had a big impact. That’ll really help you bring in those prospective hires.

Where to Go From Here?

To wrap up, we talked about feelings, why they matter and the evidence behind that. We talked about psychological safety and how it correlates with team performance. We talked about how to operationalize that psychological safety on your team, whether you’re an individual contributor or a team lead.

I’m not going to push for immediate feedback, so sleep on it. We have the evidence that shows how ideal teams work, but we see our industry and we see ourselves falling short of that ideal.

Thankfully, we have the tools to improve ourselves. We know what we can do, and we know what the next steps are. We’ve got a long way to go before we get there, but I really think that everyone in this room can play a role in changing our industry, and maybe even changing the world.

That’s a lot to take in, so what I’d like to ask you to do is this: set a reminder on your phone to review what we’ve talked about in a week. Google some of the terms that I discussed. Look up my blog post called “Building Compassionate Software” which has a lot more evidence and links to other resources on how to operationalize some of these ideas.

In a week, when it has seeped in, let’s change the world.

Thank you very much.

Note from Ray: If you enjoyed this talk, you should join us at the next RWDevCon! We’ve sold out in previous years, so don’t miss your chance.

The post RWDevCon 2017 Inspiration Talk: Building Compassionate Software by Ash Furrow appeared first on Ray Wenderlich.
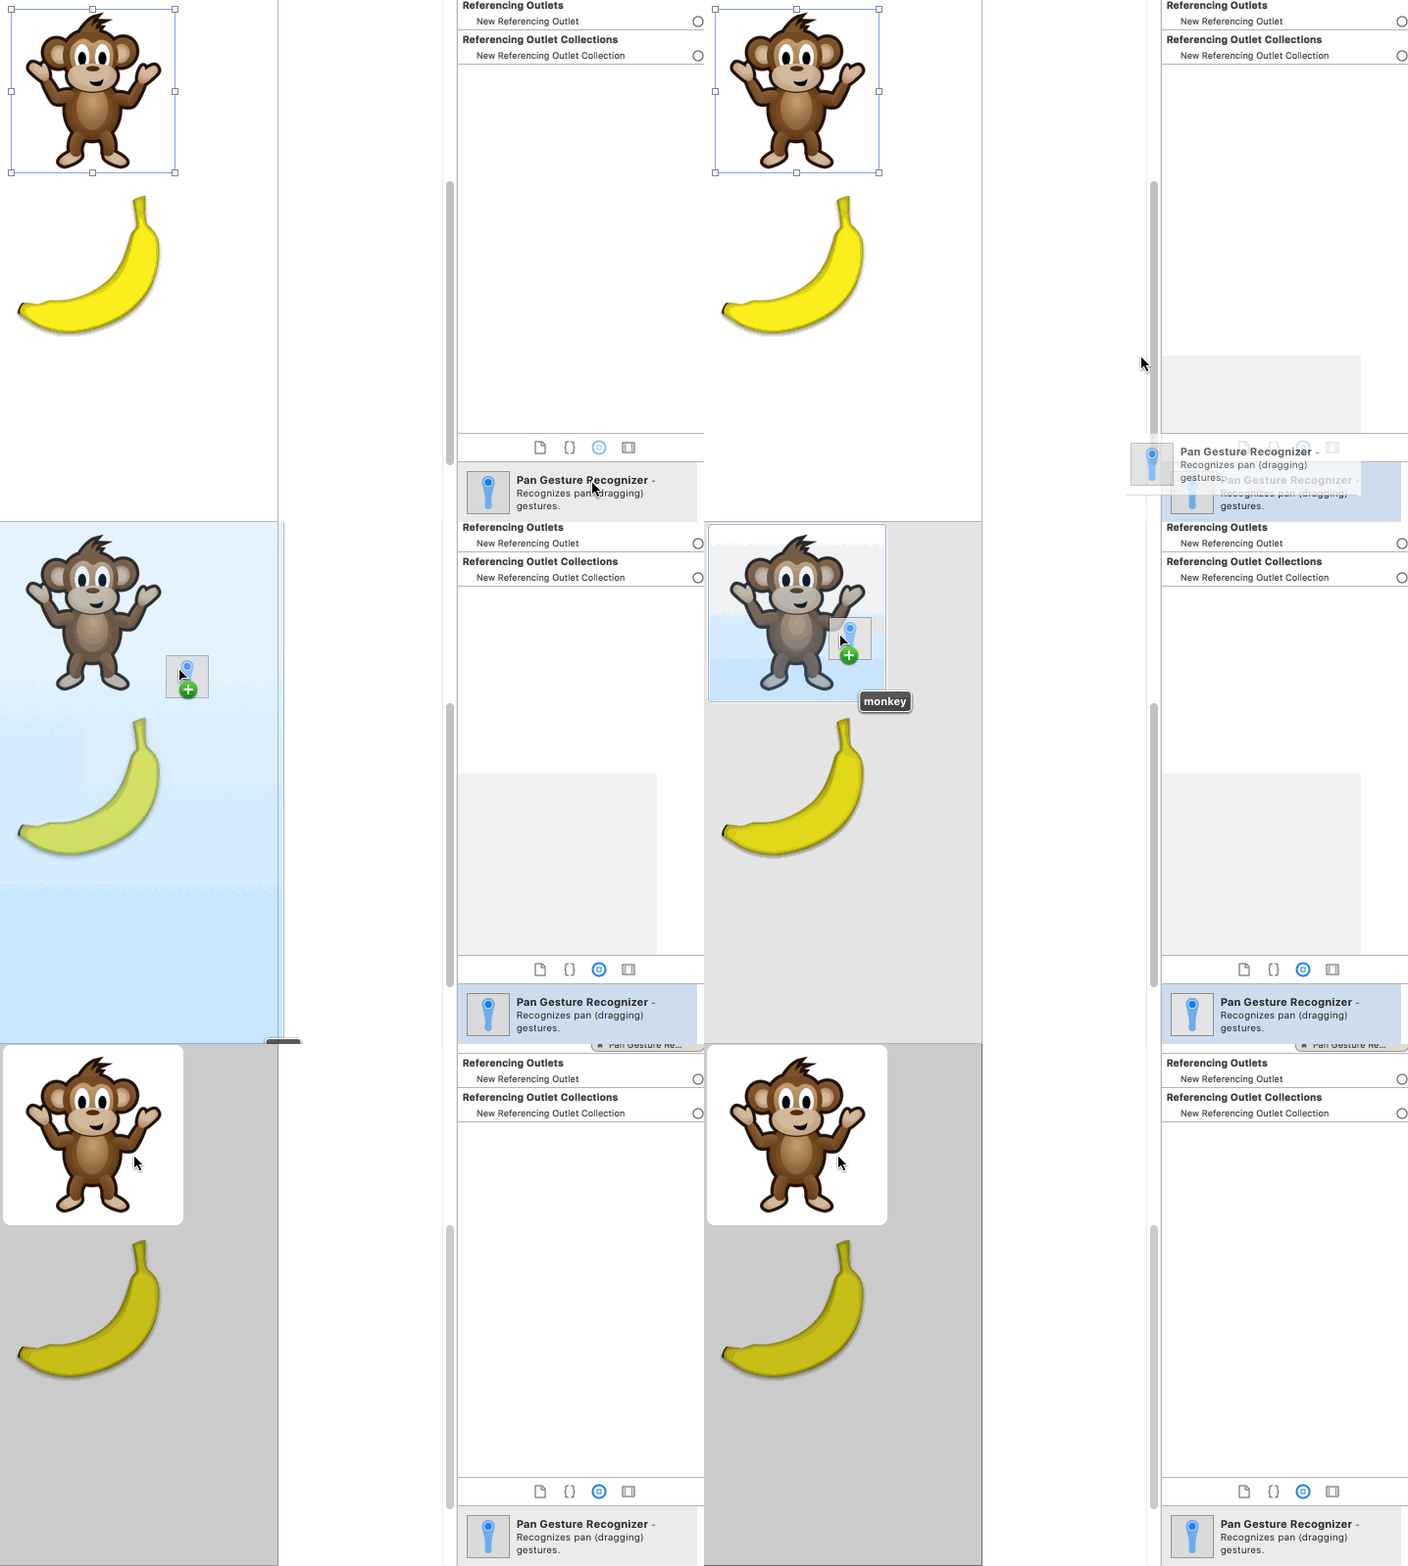
Video Tutorial: Beginning Firebase Part 19: User Login Challenge

Video Tutorial: Beginning Firebase Part 20: Online Users

How to Save and Load a Game in Unity

$
0
0

Save a game with Unity

Games are getting longer and longer, with some having over 100 hours of content. It would be impossible to expect players be able to complete all of what a game has to offer in just one sitting. That’s why letting the player save their game is one of the most essential features your game should have — even if it’s just to keep track of their high scores.

But how does one create a save file and what should be in it? Do you need to use a save file to keep track of player settings too? What about submitting saves to the web so they can be downloaded later on a different device?

In this tutorial you will learn:

  • What serialization and deserialization are.
  • What PlayerPrefs is and how to use it to save player settings.
  • How to create a save game file and save it to disk.
  • How to load a save game file.
  • What JSON is and how you would use it.

It is assumed that you have some basic working knowledge of how Unity works (such as being able to create and open scripts), but other than that everything has been prepared so this tutorial will be very easy to follow. Even if you are new to C#, you should have no trouble keeping up except for a few concepts that might require further reading.

Note: If you are new to Unity or looking to pick up more Unity skills, you should checkout out our other Unity tutorials where you can learn about lots of Unity topics from C# to how the UI works.

Getting Started

Download the starter project here. You will be implementing the code for saving and loading the game, as well as the logic for saving the players settings.

Important Save Concepts

There are four key concepts to saving in Unity:

PlayePrefs: This is a special caching system to keep track of simple settings for the player between game sessions. Many new programmers make the mistake of thinking they can use this as a save game system as well, but it is bad practice to do so. This should only be used for keeping track of simple things like graphics, sound settings, login info, or other basic user-related data.

Serialization: This is the magic that makes Unity work. Serialization is the conversion of an object into a stream of bytes. That might seem vague but take a quick look at this graphic:

Serialization illustration

What is an “object”? In this case an “object” is any script or file in Unity. In fact, whenever you create a MonoBehaviour script, Unity uses serialization & deserialization to convert that file down to C++ code and then back to the C# code that you see in the inspector window. If you’ve ever added [SerializeField] to get something to appear in the inspector, you now have an idea of what’s going on.

Note: If you’re a Java or web developer, you might be familiar with a concept known as marshalling. Serialization and marshalling are loosely synonymous, but in case you’re wondering what a strict difference would be, serialization is about converting an object from one form to another (e.g. an object into bytes), whereas marshalling is about getting parameters from one place to another.

Deserialization: This is exactly what it sounds like. It’s the opposite of serialization, namely the conversion of a stream of bytes into an object.

JSON: This stands for JavaScript Object Notation, which is a convenient format for sending and receiving data that is language agnostic. For example, you might have a web server running in Java or PHP. You couldn’t just send a C# object over, but you could send a JSON representation of that object and let the server recreate a localized version of it there. You’ll learn more about this format in the last section but for now just know that this simply a way of formatting data to make it multi-platform readable (like XML). When dealing with converting to and from JSON, the terms are JSON serialization and JSON deserialization respectively.

Player Prefs

This project has been set up so that all you will focus on is the logic for saving and loading games. However, if you are curious how it all works, don’t be afraid to open all the scripts and see whats going on, and feel free to ask a question here or in the forums if you need help.

Open the project, then open the Scene named Game and then click play.

Start menu

To start a game, click the New Game button. To play the game, you simply move your mouse, and the gun will follow your movement. Click the left mouse button to fire a bullet and hit the targets (which flip up and down at various time intervals) to get points. Try it out and see how high a score you can get in 30 seconds. To bring up the menu at any time, press the escape key.

game in progress

As fun as that game was, it might have been a little dry without music. You may have noticed that there is a music toggle, but it was switched off. Click play to start a new game, but this time click the Music toggle so it’s set to “On”, and you will hear music when you start your game. Make sure your speakers are on!

music toggle

Changing the music setting was simple, but click the play button again and you’ll notice a problem: the music is no longer checked. While you did change the music setting earlier, there was nothing keeping track of that change. This is the kind of thing that PlayerPrefs excels at.

Create a new script named PlayerSettings in the Scripts folder. Since you’ll be using some UI elements, add the following line at the top of the file with the other namespaces:

using UnityEngine.UI;

Next, add the following variables:

[SerializeField]
private Toggle toggle;
[SerializeField]
private AudioSource myAudio;

These will keep track of the Toggle and AudioSource objects.

Next add the following function:

  public void Awake ()
  {
    // 1
    if (!PlayerPrefs.HasKey("music"))
    {
      PlayerPrefs.SetInt("music", 1);
      toggle.isOn = true;
      myAudio.enabled = true;
      PlayerPrefs.Save ();
    }
    // 2
    else
    {
      if (PlayerPrefs.GetInt ("music") == 0)
      {
        myAudio.enabled = false;
        toggle.isOn = false;
      }
      else
      {
        myAudio.enabled = true;
        toggle.isOn = true;
      }
    }
  }

When set up, this will:

  1. Check if the PlayerPrefs has a cached setting for the “music” key. If there is no value there, it creates a key-value pair for the music key with a value of 1. It also sets the toggle to on and enables the AudioSource. This will be run the first time the player runs the game. The value of 1 is used because you cannot store a Boolean (but you can use 0 as false and 1 as true).
  2. This checks the “music” key saved in the PlayerPrefs. If the value is set to 1, the player had music on, so it enables the music and sets the toggle to on. Otherwise, it sets the music to off and disables the toggle.

Now Save the changes to your script and return to Unity.

Add the PlayerSettings script to the Game GameObject. Then expand the UI GameObject, followed by the Menu GameObject to reveal its children. Then drag the Music GameObject on to the Toggle field of the PlayerSettings script. Next, select the Game GameObject and drag the AudioSource over to the MyAudio field.

<Connect PlayerSettings script

The music is set up to work when the game runs (since there is code in the Awake function), but you still need to add the code if the player changes the setting during gameplay. Open the PlayerSettings script and add the following function:

  public void ToggleMusic()
  {
    if (toggle.isOn)
    {
      PlayerPrefs.SetInt ("music", 1);
      myAudio.enabled = true;
    }
    else
    {
      PlayerPrefs.SetInt ("music", 0);
      myAudio.enabled = false;
    }
    PlayerPrefs.Save ();
  }

This does almost the same as the code you wrote earlier, except it has one important difference. It checks the state of the music toggle and then updates the saved setting accordingly. In order for this method to be called, and thus for it to be able to do its work, you need to set the callback method on the Toggle GameObject. Select the Music GameObject and drag the Game GameObject over the object field in the OnValueChanged section:

Connecting the callback method

Select the dropdown which currently says No Function, and select PlayerSettings -> ToggleMusic(). When the toggle button in the menu is pressed, it will call the ToggleMusic function.

Selecting the right method

Now you’ve got things set up to keep track of the music setting. Click Play and try it out by setting the music toggle to on or off, then ending the play session and starting a new play session.

The game menu

The music setting is now properly saved! Great job — but you’re only getting started with the power of serialization.

Saving The Game

Using PlayerPrefs was pretty simple wasn’t it? With it, you will be able to easily store other settings in there such as the player’s graphic settings, or login info (perhaps Facebook or Twitter tokens), and whatever other configuration settings make sense to keep track of for the player. However, PlayerPrefs is not designed to keep track of game saves. For that, you will want to use serialization.

The first step to creating a save game file is creating the save file class. Create a script named Save and remove the MonoBehaviour inheritance. Remove the default Start() and Update() methods as well.

Next, add the following variables:

public List<int> livingTargetPositions = new List<int>();
public List<int> livingTargetsTypes = new List<int>();

public int hits = 0;
public int shots = 0;

In order to save the game you will need to keep track of where existing robots are and what types they are. The two lists accomplish this. For the number of hits and shots you are just going to store those as ints.

There is one more very important bit of code you need to add. Above the class declaration, add the following line:

[System.Serializable]

This is known as an attribute and it is metadata for your code. This tells Unity that this class can be serialized, which means you can turn it into a stream of bytes and save it to a file on disk.

Note: Attributes have a wide range of uses and let you attach data to a class, method, or variable (this data is known as metadata). You can even define your own attributes to use in your code. Serialization makes use of the [SerializeField] and [System.Serializable] attributes so that it knows what to write when serializing the object. Other uses for attributes include settings for unit tests and dependency injection, which are way beyond the scope of this tutorial but well worth investigating.

The entire Save script should look like this:

using System.Collections;
using System.Collections.Generic;
using UnityEngine;

[System.Serializable]
public class Save
{
  public List<int> livingTargetPositions = new List<int>();
  public List<int> livingTargetsTypes = new List<int>();

  public int hits = 0;
  public int shots = 0;
}

Next, open the Game script and add the following method:

private Save CreateSaveGameObject()
{
  Save save = new Save();
  int i = 0;
  foreach (GameObject targetGameObject in targets)
  {
    Target target = targetGameObject.GetComponent<Target>();
    if (target.activeRobot != null)
    {
      save.livingTargetPositions.Add(target.position);
      save.livingTargetsTypes.Add((int)target.activeRobot.GetComponent<Robot>().type);
      i++;
    }
  }

  save.hits = hits;
  save.shots = shots;

  return save;
}

This code creates an instance of the Save class you made earlier and then sets the values from the existing robots. It also saves the players shots and hits.

The Save button has been hooked up to the SaveGame method in the Game script, but there is no code in SaveGame yet. Replace the SaveGame function with the following code:

public void SaveGame()
{
  // 1
  Save save = CreateSaveGameObject();

  // 2
  BinaryFormatter bf = new BinaryFormatter();
  FileStream file = File.Create(Application.persistentDataPath + "/gamesave.save");
  bf.Serialize(file, save);
  file.Close();

  // 3
  hits = 0;
  shots = 0;
  shotsText.text = "Shots: " + shots;
  hitsText.text = "Hits: " + hits;

  ClearRobots();
  ClearBullets();
  Debug.Log("Game Saved");
}

Taking it comment-by-comment:

  1. Create a Save instance with all the data for the current session saved into it.
  2. Create a BinaryFormatter and a FileStream by passing a path for the Save instance to be saved to. It serializes the data (into bytes) and writes it to disk and closes the FileStream. There will now be a file named gamesave.save on your computer. The .save was just used as an example, and you could use any extension for the file save name.
  3. This just resets the game so that after the player saves, everything is in a default state.

To save the game, press Escape at any time during play and click the Save button. You should notice everything resets and the console output displays a note that the game has been saved.

Console output

LoadGame in the Game script is connected to the Load button. Open the Game script and locate the LoadGame function. Replace it with the following:

public void LoadGame()
{
  // 1
  if (File.Exists(Application.persistentDataPath + "/gamesave.save"))
  {
    ClearBullets();
    ClearRobots();
    RefreshRobots();

    // 2
    BinaryFormatter bf = new BinaryFormatter();
    FileStream file = File.Open(Application.persistentDataPath + "/gamesave.save", FileMode.Open);
    Save save = (Save)bf.Deserialize(file);
    file.Close();

    // 3
    for (int i = 0; i < save.livingTargetPositions.Count; i++)
    {
      int position = save.livingTargetPositions[i];
      Target target = targets[position].GetComponent<Target>();
      target.ActivateRobot((RobotTypes)save.livingTargetsTypes[i]);
      target.GetComponent<Target>().ResetDeathTimer();
    }

    // 4
    shotsText.text = "Shots: " + save.shots;
    hitsText.text = "Hits: " + save.hits;
    shots = save.shots;
    hits = save.hits;

    Debug.Log("Game Loaded");

    Unpause();
  }
  else
  {
    Debug.Log("No game saved!");
  }
}

Looking at this in detail:

  1. Checks to see that the save file exists. If it does, it clears the robots and the score. Otherwise it logs to the console that there is no saved game.
  2. Similar to what you did when saving the game, you again create a BinaryFormatter, only this time you are providing it with a stream of bytes to read instead of write. So you simply pass it the path to the save file. It creates the Save object and closes the FileStream.
  3. Even though you have the save information, you still need to convert that into the game state. This code loops through the saved robot positions (for living robots) and adds a robot at that position. It also sets it to the right type. For simplicity, the timers are reset, but you can remove this if you prefer. This prevents the robots from disappearing right away and gives the player a few seconds to get oriented in the world. Also, for simplicity, the animation of the robot moving up is set to finished, which is why robots partly moving up when you saved will be shown as fully up when a game is loaded.
  4. This updates the UI to have the right hits and shots set, and it sets the local variables so that when the player fires or hits a target it continues to count up on the value that was previously. If you didn’t do this step, the next time the player fires or hits a target the displayed values would get set to 1.

Click Play, play the game for a bit then save. Click the Load button and you will see it load the enemies as they were set up before when you saved the game. It also properly sets your score and the shots you’ve fired.

Game in progress

Saving Data With JSON

There’s one more trick you can use when you want to save data — and that is JSON. You could create a local JSON representation of your game save, send it to a server, then get that JSON (as a String) to another device and convert it from a string back to JSON. This tutorial won’t cover sending/receiving from the web, but it is very helpful to know how to use JSON — and it’s incredibly simple.

The format of JSON can be a little different than what you might be used from C# code, but it’s pretty straightforward. Here is a simple JSON example:

{
  "message":"hi",
  "age":22
  "items":
  [
    "Broadsword",
    "Bow"
  ]
}

The outer brackets represent the parent entity that is the JSON. If you are familiar with a Dictionary data structure, then JSON is similar. A JSON file is a mapping of key and value pairs. So the above example has 3 key-value pairs. With JSON, the keys are always strings, but the values can be objects (i.e. children JSON objects), arrays, numbers, or strings. The value set to the “message” key is “hi”, the value of the “age” key is the number 22, and the value of the “items” key is an array with two strings in it.

The JSON object itself is represented by a String type. By passing this data as a String, any language can easily re-create JSON object from the string as a constructor argument. Very convenient and very simple.

Each language has its own way of creating an object from this format. Since Unity 5.3, there exists a native method to create a JSON object from a JSON string. You will create a JSON representation of the high score of the player and then print it to the console. But you extend this logic by sending the JSON to a server.

The Game script has a method named SaveAsJSON that is hooked up to the Save As JSON button. Replace SaveAsJSON with the following code:

public void SaveAsJSON()
{
  Save save = CreateSaveGameObject();
  string json = JsonUtility.ToJson(save);

  Debug.Log("Saving as JSON: " + json);
}

This creates the Save instance like you did earlier. Then it creates a JSON string using the ToJSON method on the JsonUtility class. It then prints the output to console.

Start a game, hit a few targets, then press Escape to bring up the menu. Click the Save As JSON button, and you will see the JSON string you created:

Console output

If you want convert that JSON into a Save instance you would simply use:

Save save = JsonUtility.FromJson<Save>(json);

That is what you would do if you wanted to download a save file from the web and then load it into your game. But setting up a web server is a whole other process! For now, pat yourself on the back because you just learned a few techniques that will… save you some trouble in your next game (groan)!

Where to Go From Here?

You can download the final project files here.

You’ve now gained a powerful tool for creating great games by enabling your players to save and load their game through the magic of serialization. You’ve also learned what JSON is and how you could use it to implement cloud saving. You’ve also learned what PlayerPrefs is used for (settings!), and what it’s not used for (saving the game).

If you’re looking to get more rounded in Unity, we have a whole section of Unity tutorials over here, and you’re welcome to join us on the Unity forums. You can always leave a comment here if you have anything you’d like to say.

If you are a die-hard Unity fan and want to become a full fledged developer, then check out our book Unity Games by Tutorials where you will make 4 complete games from scratch. One of the chapters even goes over how to use JSON as a level loader!

If you have any questions or comments on this tutorial, please join the discussion below!

The post How to Save and Load a Game in Unity appeared first on Ray Wenderlich.
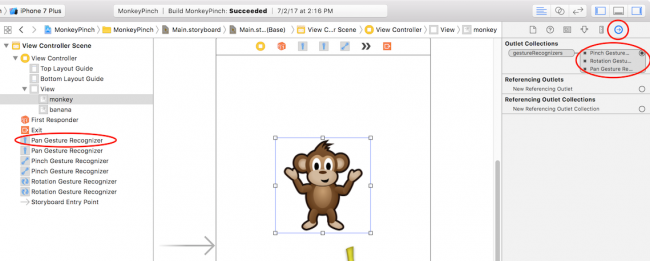
Viewing all 4374 articles
Browse latest View live


<script src="https://jsc.adskeeper.com/r/s/rssing.com.1596347.js" async> </script>