Quantcast
Channel: Kodeco | High quality programming tutorials: iOS, Android, Swift, Kotlin, Unity, and more
Viewing all 4396 articles
Browse latest View live

Video Tutorial: Beginning RxSwift Part 2: Introduction


Video Tutorial: Beginning RxSwift Part 2: Filtering Operators

Video Tutorial: Beginning RxSwift Part 2: Challenge: Create a Phone Number Lookup

Video Tutorial: Beginning RxSwift Part 2: Filtering and Sharing Operators in Practice

Swinject Tutorial for iOS: Getting Started

$
0
0
Dependency Injection with Swinject improves code testability and architecture.

Dependency Injection improves code testability and architecture.

In this tutorial, you’ll explore Dependency Injection (DI) through Swinject, a Dependency Injection framework written in Swift. You’ll do so by improving a small iOS application named Bitcoin Adventurer which displays the current price of Bitcoin. As you go through this tutorial, you’ll refactor the app and add unit tests along the way.

Dependency Injection is an approach to organizing code so that its dependencies are provided by a different object, instead of by itself. Arranging code like this leads to a codebase of loosely-coupled components that can be tested and refactored.

While you can implement Dependency Injection without a third-party library, Swinject uses a popular pattern among DI frameworks: a Dependency Injection (DI) Container. This type of pattern keeps the resolution of your dependencies simple, even as code complexity increases.

Injections with Swinject are the kind that don't hurt

Don’t worry, it’s gonna be less painful than this type of injection :]

Why Dependency Injection?

Dependency Injection relies on a principle called Inversion of Control. The main idea is that a piece of code that requires some dependencies won’t create them for itself, rather the control over providing these dependencies is deferred to some higher abstraction. These dependencies are typically passed into an object’s initializer. This is the opposite approach — an inverted approach — to the typical cascade of object creation: Object A creating Object B, creating Object C, and so on.

From a practical perspective, the main benefit of Inversion of Control is that code changes remain isolated. A Dependency Injection Container supports the Inversion of Control principal by providing an object that knows how to provide the dependencies for an object. All you need to do is ask the container for the object you need, and voilà… it’s ready!

Getting Started

Start by downloading the starter project; you can find a link at the top and bottom of this Swinject tutorial. Open Bitcoin Adventurer.xcworkspace. Press Command-R to build and run the app.

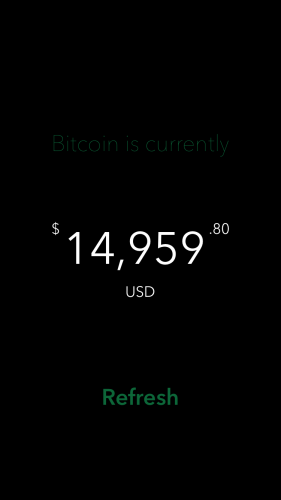
Bitcoin Adventurer on RayWenderlich

Bitcoin Adventurer – the application you will refactor in this tutorial.

When the app launches, you’ll see the current price of a Bitcoin displayed on the screen. Tapping Refresh makes an HTTP request to retrieve the latest data, which is logged to the Xcode console. Bitcoin is a volatile cryptocurrency whose value fluctuates frequently, therefore, the Coinbase API has a new Bitcoin price available about every 30 seconds.

You may have also noticed an error logged to the console. You can ignore this for now because you’ll address it later in the tutorial.

Go back to Xcode and inspect the project:

  • The app contains a single UIViewController, BitcoinViewController, that’s backed by the storyboard, Main.storyboard.
  • All of the networking and parsing logic lives in BitcoinViewController.swift. As the code stands now, it’s difficult to test the logic independently of the UIViewController lifecycle because the view layer is highly coupled to its underlying logic and dependencies.
  • We already took care of adding Swinject as a dependency for you, via CocoaPods. It’s currently not being used in any of your Swift files, but that’s about to change! :]

DI and Coupling – Oh my!

Earlier, a dependency was defined as a piece of code needed by another object to do its job, preferably one that can be supplied — or “injected” — by a separate object.

Explore further the dependencies in the Bitcoin Adventurer code.

The code in BitcoinViewController.swift has three main responsibilities: Networking, Parsing and Formatting.

Networking and Parsing

Most of the networking happens in a single method, requestPrice():

private func requestPrice()  {
  let bitcoin = Coinbase.bitcoin.path
  
  // 1. Make URL request
  guard let url = URL(string: bitcoin) else { return }
  var request = URLRequest(url: url)
  request.cachePolicy = .reloadIgnoringCacheData
  
  // 2. Make networking request
  let task = URLSession.shared.dataTask(with: request) { data, _, error in
    
    // 3. Check for errors
    if let error = error {
      print("Error received requesting Bitcoin price: \(error.localizedDescription)")
      return
    }
    
    // 4. Parse the returned information
    let decoder = JSONDecoder()

    guard let data = data,
          let response = try? decoder.decode(PriceResponse.self,
                                             from: data) else { return }
    
    print("Price returned: \(response.data.amount)")
    
    // 5. Update the UI with the parsed PriceResponse
    DispatchQueue.main.async { [weak self] in
      self?.updateLabel(price: response.data)
    }
  }

  task.resume()
}

Here’s the breakdown:

  1. Create a URLRequest with the Coinbase Bitcoin spot price URL.
  2. Create a URLSessionDataTask using this new request, then run it by calling task.resume(). This fires an HTTP request to retrieve the price of a Bitcoin.

    If the HTTP request is successful, it returns a JSON response in the following format:

    {
      "data": {
        "base": "BTC",
        "currency": "USD",
        "amount": "15840.01"
      }
    }
    
  3. When a response is returned, check for errors and print them out if they exist.
  4. If things are error free, use a JSONDecoder to map the JSON response to a PriceResponse model object.
  5. The model object is passed to updateLabel(price:), which is explicitly dispatched to the main thread because UI updates must be done on the main thread.

Formatting

updateLabel(price:) on BitcoinViewController uses multiple formatter objects to ensure the Bitcoin price returned from the API is correctly split into dollars and cents so it’s display-ready.

private func updateLabel(price: Price) {
  guard let dollars = price.components().dollars,
        let cents = price.components().cents,
        let dollarAmount = standardFormatter.number(from: dollars) else { return }
  
  primary.text = dollarsDisplayFormatter.string(from: dollarAmount)
  partial.text = ".\(cents)"
}

This is quite a lot of logic forced into a single UIViewController. The Networking, Parsing and Formatting functionality is tightly coupled here. It’s difficult to test any portion of it independently of the entire BitcoinViewController object, or reuse the same logic somewhere else.

That doesn’t sound good – can we fix this?

The alternative to tightly coupled components involves creating objects that can be easily linked and unlinked from one another — objects that are loosely coupled.

It’s time to refactor BitcoinViewController so it creates separate objects for the Networking and Parsing responsibilities. When that’s done, you’ll adjust their usage to achieve truly decoupled components, using Swinject.

Extracting Dependencies

Start by creating a new folder named Dependencies. This will hold all of the various logic pieces you’ll be extracting throughout the rest of this tutorial.

Right-click on the Bitcoin Adventurer folder and select New Group. Then set its name to Dependencies.

Are you ready to start extracting the different logic pieces and make the code testable, robust and beautiful? Thought so! :]

Extracting Networking Logic

While the Dependencies folder is selected, go to File\New\File and create a Swift file named HTTPNetworking.swift. Make sure the Bitcoin Adventurer target is selected.

Now, add the following code to the newly created file:

// 1.
protocol Networking {
  typealias CompletionHandler = (Data?, Swift.Error?) -> Void
  
  func request(from: Endpoint, completion: @escaping CompletionHandler)
}

// 2.
struct HTTPNetworking: Networking {
  // 3.
  func request(from: Endpoint, completion: @escaping CompletionHandler) {
    guard let url = URL(string: from.path) else { return }
    let request = createRequest(from: url)
    let task = createDataTask(from: request, completion: completion)
    task.resume()
  }
  
  // 4.
  private func createRequest(from url: URL) -> URLRequest {
    var request = URLRequest(url: url)
    request.cachePolicy = .reloadIgnoringCacheData
    return request
  }
  
  // 5.
  private func createDataTask(from request: URLRequest,
                              completion: @escaping CompletionHandler) -> URLSessionDataTask {
    return URLSession.shared.dataTask(with: request) { data, httpResponse, error in
      completion(data, error)
    }
  }
}

Time to review the code you just added:

  1. This defines a Networking protocol that has one method:
    request(from:completion:). Its completion block returns either a Data object representing the body of the response, or an Error object.
  2. You then create a concrete implementation of this protocol, named HTTPNetworking.
  3. request(from:completion:) creates a URL from the provided Endpoint. It uses this URL to create a URLRequest, which is then used to create a URLSessionDataTask (phew!). This task is then executed, firing an HTTP request and returning its result via the provided CompletionHandler.
  4. createRequest(from:) is called from within request(from:completion:). It takes a URL and returns a URLRequest.
  5. createDataTask(from:completion:) is called by createRequest(from:). It takes a URLRequest and returns a URLSessionDataTask.

Does this logic ring any bells?

If you said “yes” that’s because it’s similar to the first half of requestPrice() in BitcoinViewController.

OK, time to adjust that code so it uses the shiny new HTTPNetworking class instead. Add the following to the top of BitcoinViewController, below the three IBOutlets:

let networking = HTTPNetworking()

Finally, refactor requestPrice() by replacing its entire contents with:

networking.request(from: Coinbase.bitcoin) { data, error in
  // 1. Check for errors
  if let error = error {
    print("Error received requesting Bitcoin price: \(error.localizedDescription)")
    return
  }

  // 2. Parse the returned information
  let decoder = JSONDecoder()
  guard let data = data,
        let response = try? decoder.decode(PriceResponse.self, from: data)
  else { return }

  print("Price returned: \(response.data.amount)")

  // 3. Update the UI with the parsed PriceResponse
  DispatchQueue.main.async { [weak self] in
    self?.updateLabel(price: response.data)
  }
}

Press Command-R to build and run the app; things should work just as they did before, but now the networking is more contained and decoupled than it was before.

Excellent! You successfully moved logic out of BitcoinViewController and into a more cohesive HTTPNetworking object. However, to achieve proper Dependency Injection, more decoupling is required.

Extracting Parsing Logic

Under the same Dependencies folder, go to File\New\File and create a new Swift file named BitcoinPriceFetcher.swift. Give it the following implementation:

protocol PriceFetcher {
  func fetch(response: @escaping (PriceResponse?) -> Void)
}

struct BitcoinPriceFetcher: PriceFetcher {
  let networking: Networking

  // 1. Initialize the fetcher with a networking object
  init(networking: Networking) {
    self.networking = networking
  }

  // 2. Fetch data, returning a PriceResponse object if successful
  func fetch(response: @escaping (PriceResponse?) -> Void) {
    networking.request(from: Coinbase.bitcoin) { data, error in
      // Log errors if we receive any, and abort.
      if let error = error {
        print("Error received requesting Bitcoin price: \(error.localizedDescription)")
        response(nil)
      }

      // Parse data into a model object.
      let decoded = self.decodeJSON(type: PriceResponse.self, from: data)
      if let decoded = decoded {
        print("Price returned: \(decoded.data.amount)")
      }
      response(decoded)
    }
  }

  // 3. Decode JSON into an object of type 'T'
  private func decodeJSON<T: Decodable>(type: T.Type, from: Data?) -> T? {
    let decoder = JSONDecoder()
    guard let data = from,
          let response = try? decoder.decode(type.self, from: data) else { return nil }

    return response
  }
}
Note: The PriceFetcher protocol defines a single method: one that performs a fetch and returns a PriceResponse object. This “fetch” can occur from any data source, not necessarily an HTTP request. This will become an important characteristic of this protocol when you get to writing the unit tests. This fetcher makes use of the newly-created Networking protocol.

You now have an even more specific abstraction to fetch Bitcoin prices that, itself, uses the Networking protocol internally. It’s time to refactor BitcoinViewController once more to use it.

Replace:

let networking = HTTPNetworking()

With:

let fetcher = BitcoinPriceFetcher(networking: HTTPNetworking())

Then, completely replace requestPrice() with:

private func requestPrice() {
  fetcher.fetch { response in
    guard let response = response else { return }

    DispatchQueue.main.async { [weak self] in
      self?.updateLabel(price: response.data)
    }
  }
}

The code is now more readable and concise! It uses the bare minimum boilerplate code, while the external BitcoinPriceFetcher dependency does the “heavy lifting”.

Finally, build and run using Command-R to make sure the app continues to operate correctly.

Congratulations, you just improved the quality of your code! You now have it using Dependency Injection: the HTTPNetworking dependency is provided to BitcoinPriceFetcher upon initialization. Shorty, you’ll replace this with a Swinject-based approach.

Next, you’ll look at unit testing, and then you’ll return to Bitcoin Adventurer to further decouple the code.

Testing Bitcoin Adventurer

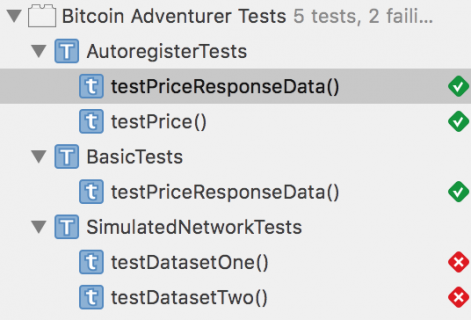
Some unit tests have already been set up for you in the Bitcoin Adventurer Tests target and are ready for you to fill in. Run them by pressing Command-U. Look at the Test navigator; all of the tests have failed:

Press Command-Shift-O and search for the file named BasicTests.swift. Note that Swinject was aleady imported at the top of this file.

Prior to Writing the Tests

Swinject relies on the use of a Container object, which maps all of the object’s dependencies when it’s tested. Prior to the test suite being run, dependencies will be registered within the container, and then resolved from the container as needed. This becomes especially useful where many different object types are required, or dependencies between objects are complex.

A container has been provided at the top of the BasicTests class, ready for use in this test suite.

At the end of setUp(), add the following lines to define the relationships between PriceResponse, Price, Currency and Cryptocurrency:

// 1
container.register(Currency.self) { _ in .USD }
container.register(CryptoCurrency.self) { _ in .BTC }

// 2
container.register(Price.self) { resolver in
  let crypto = resolver.resolve(CryptoCurrency.self)!
  let currency = resolver.resolve(Currency.self)!
  return Price(base: crypto, amount: "999456", currency: currency)
}

// 3
container.register(PriceResponse.self) { resolver in
  let price = resolver.resolve(Price.self)!
  return PriceResponse(data: price, warnings: nil)
}

This piece of code uses the container’s register() method to register how specific dependencies are created for this unit test. It accepts the expected type as an argument and a closure with a single argument — a resolver — that creates an instance of that type. Later, when your container is asked to “resolve” these dependencies, it will use these registrations to create them as needed.

Time to go through your first-ever Swinject code:

  1. You register the Currency type to always return USD
  2. You register the CryptoCurrency type to always return BTC
  3. This is where things get interesting: you register the Price type which in itself has two dependencies. To create these dependencies, ask the provided resolver to create them by using resolve(_:).
  4. Similarly to the previous registration, you register the PriceResponse type and resolve a Price dependency needed to create it.

At this point, your tests will still fail, but your testable dependencies are now correctly registered in the Swinject Container.

Writing Your First Swinject Test

To write your first Swinject test, replace the XCTFail() statement in testPriceResponseData() with the following:

let response = container.resolve(PriceResponse.self)!
XCTAssertEqual(response.data.amount, "999456")

This checks that the PriceResponse object is correctly created (i.e., resolved) by inspecting the amount on one of its corresponding sub-objects, Price. Build and run the tests again using Command-U:

Congratulations, you have successfully performed Dependency Injection using Swinject! One down, four to go.

Improving Tests with Autoregister

In the previous example, you required a lot of setup code before writing a single unit test. Swinject has a less verbose method for this called autoregister, which is provided by a separate library in the Swinject organization named SwinjectAutoregistration. In this section of the tutorial, you’ll use it to write a second set of tests for the PriceResponse object.

Note: you can read more about autoregister in the official Swinject autoregistration documentation.

Press Command-Shift-O within Xcode and search for AutoregisterTests.swift. Hit Return to open it.

At the top of the file there are two extensions:

extension PriceResponse {
  init(data: Price) {
    self.init(data: data, warnings: nil)
  }
}

extension Price {
  init(amount: String) {
    self.init(base: .BTC, amount: amount, currency: .USD)
  }
}

These extensions provide an initializer for each of the Price and PriceResponse objects. Although Swinject works nicely in most cases, autoregister does not currently work if a property uses a failable initializer. These extensions avoid this by always returning a non-optional result.

Prior to Writing the Tests

To use autoregister on the Price and PriceResponseData objects, completely replace setUp() with:

override func setUp() {
  super.setUp()
  container.autoregister(Price.self,
                         argument: String.self,
                         initializer: Price.init(amount:))

  container.autoregister(PriceResponse.self,
                         argument: Price.self,
                         initializer: PriceResponse.init(data:))
}

This code autoregisters the dependencies to use the provided initializer to create the correct dependency whenever you ask the container to resolve it.

Note that, unlike the previous example, you haven’t yet specified any property values. Soon, you’ll add them as part of the tests, which is much better than relying on ‘magic numbers’ in the registration code.

Autoregistered Tests

Add the following logic to testPriceResponseData(), in place of the XCTFail call:

let price = container ~> (Price.self, argument: "789654")
let response = container ~> (PriceResponse.self, argument: price)
XCTAssertEqual(response.data.amount, "789654")

Note the use of the ~> operator here; this is part of the SwinjectAutoregistration library and further simplifies your code.

let price = container ~> (Price.self, argument: "789654")

is equivalent to

let price = container.resolve(Price.self, argument: "789654")!

However, the former produces much tidier code and has the nice effect of removing the need for force-unwrapping.

Finish up your test suite by replacing the contents of testPrice() with the following:

let price = container ~> (Price.self, argument: "999456")
XCTAssertEqual(price.amount, "999456")

Once more, build and run the tests using Command-U. Make sure the Autoregister tests pass.

Almost there… :]

In this section, you saw how using autoregister(_:argument:initializer:) and the ~> operator can produce simpler and more readable code when using Swinject to resolve your dependencies. Use this approach wherever possible to improve the readability and maintainability of your code.

Clean and readable code will be a nice surprise to future-you :]

Simulating Networking in Tests

Next, you’ll write tests for a more complex test scenario where HTTP response mocking is required.

Press Command-Shift-O within Xcode and search for SimulatedNetworkTests.swift. Hit Return to open it.

Notice the DataSet enum at the top of the file. This enum represents two different JSON files that contain valid data returned by the Coinbase API: dataset-one.json and dataset-two.json. Open each and familiarize yourself with their contents.

Prior to Writing the Tests

Return to SimulatedNetworkTests.swift. To use the JSON files as simulated or mocked HTTP responses, you’ll need to use a new struct implementing the Networking protocol you defined earlier in this tutorial. Add the following code above the DataSet enumeration:

struct SimulatedNetworking: Networking {
  let filename: String

  func request(from: Endpoint, completion: @escaping CompletionHandler) {
    let data = readJSON(name: filename)
    completion(data, nil)
  }

  private func readJSON(name: String) -> Data? {
    let bundle = Bundle(for: SimulatedNetworkTests.self)
    guard let url = bundle.url(forResource: name, withExtension: "json") else { return nil }

    do {
      return try Data(contentsOf: url, options: .mappedIfSafe)
    }
    catch {
      XCTFail("Error occurred parsing test data")
      return nil
    }
  }
}

All this does is create a specific implementation of Networking that returns a response from disk instead of using an HTTP request.

Now, it’s time to register the mocked networking struct so its used by BitcoinPriceFetcher. Add the following to setUp(), after the call to super.setUp():

container.autoregister(Networking.self,
                       argument: String.self,
                       initializer: SimulatedNetworking.init)

DataSet.all.forEach { dataSet in
  container.register(BitcoinPriceFetcher.self, name: dataSet.name) { resolver in
    let networking = resolver ~> (Networking.self, argument: dataSet.filename)
    return BitcoinPriceFetcher(networking: networking)
  }
}

This code registers two instances of BitcoinPriceFetcher, one for each of the available data sets. Inside the registration closure, the Networking dependency for each BitcoinPriceFetcher is provided using the provided resolver and resolved using the ~> operator introduced earlier. The different instances are named so they can be retrieved independently. Each instance gets its mocked results from its relevant JSON file included in the project.

Writing Your First Complex Test

Finally, it’s time to write some tests for BitcoinPriceFetcher!

While still in SimulatedNetworkTests.swift, replace the contents of testDatasetOne() with the following:

let fetcher = container ~> (BitcoinPriceFetcher.self, name: DataSet.one.name)
let expectation = XCTestExpectation(description: "Fetch Bitcoin price from dataset one")
    
fetcher.fetch { response in
  XCTAssertEqual("100000.01", response!.data.amount)
  expectation.fulfill()
}

wait(for: [expectation], timeout: 1.0)

In this code, you resolve an instance of BitcoinPriceFetcher that uses the first JSON dataset; this works because you previously registered a named container. You then use its fetch method, and assert the results to ensure that the value of data.amount matches the data in the dataset-one.json file.

Because fetch is asynchronous, you use XCTestExpectation to wait for the response before ending the test.

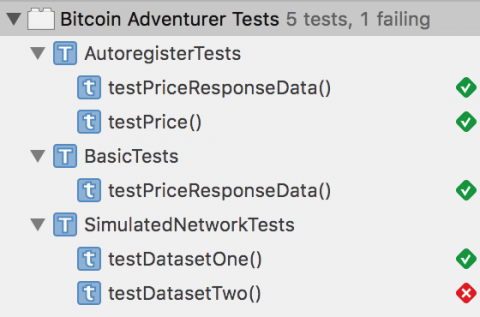
Press Command-U to build and run the Unit Tests. Confirm testDatasetOne() succeeds:

Only one more to go!

The Final Test

You’re finally at your final test for this tutorial that confirms you can retrieve and use the BitcoinPriceFetcher associated with the second JSON dataset.

Replace the contents of testDatasetTwo() with:

let fetcher = container ~> (BitcoinPriceFetcher.self, name: DataSet.two.name)
let expectation = XCTestExpectation(description: "Fetch Bitcoin price from dataset two")

fetcher.fetch { response in
  XCTAssertEqual("9999999.76", response!.data.amount)
  expectation.fulfill()
}

wait(for: [expectation], timeout: 1.0)

Getting a sense of déjà vu? Except for the name used to resolve the BitcoinPriceFetcher, and the different amount value you’re checking for, this code is practically identical to the code provided for testDatasetOne().

For the last time, press Command-U to build and run the Unit Tests. Confirm they all pass by waiting for the “Test Succeeded” message to appear.

Congratulations, you now have unit tests correctly using Dependency Injection, where the tests are getting their dependencies resolved by a DI Container while keeping concerns separated and modularized. Excellent work, kudos to you! :]

Dependency Injection Outside of Tests

You can also use Dependency injection outside of tests. In the final section of this tutorial, you will return to the main app to further decouple objects.

Go back to BitcoinViewController.swift using Command-Shift-O, and note that the BitcoinViewController is still providing its own instance of the PriceFetcher object. To become truly decoupled, you need to inject this into the view controller from a different object.

When Bitcoin Adventurer is launched, iOS looks into Info.plist to determine on which storyboard the app starts. Main.storyboard is listed and contains a reference to BitcoinViewController which indicates it should be the entry point for that storyboard.

To inject anything into BitcoinViewController, you’ll need to intercept this UIViewController prior to it being presented. This functionality is provided by a separate library alongside Swinject, called SwinjectStoryboard.

Extending SwinjectStoryboard

To use SwinjectStoryboard, you need to extend it within your own code. Create a new file for your extension by going to File\New\File. Name the file SwinjectStoryboard+Extension.swift. Before clicking Create, verify the Bitcoin Adventurer target is selected.

In the newly created file, add the following import statements so you can use Swinject and the other libraries:

import Swinject
import SwinjectStoryboard
import SwinjectAutoregistration

The next stepis to extend SwinjectStoryboard and provide a static setup() method to correctly register the required dependencies of BitcoinViewController. Add the following code:

extension SwinjectStoryboard {
   @objc class func setup() {
     defaultContainer.autoregister(Networking.self, initializer: HTTPNetworking.init)
     defaultContainer.autoregister(PriceFetcher.self, initializer: BitcoinPriceFetcher.init)
   }
}

This code uses autoregister(_:initializer:) so that every time a Networking protocol is requested, a resolved instance of HTTPNetworking is returned. The same goes for the PriceFetcher protocol and a resolved instance of BitcoinPriceFetcher.

Swinject & BitcoinViewController

By default, SwinjectStoryboard provides a defaultContainer variable that can be used for resolving dependencies.

Navigate to BitcoinViewController.swift and change:

let fetcher = BitcoinPriceFetcher(networking: HTTPNetworking())

to

var fetcher: PriceFetcher?

The reason you made fetcher an optional var is so that Swinject can properly inject the required dependency to it externally. Since storyboards don’t support custom initializers very well, this is the best practice of providing external dependencies using a storyboard.

If you try build the application now, you will get errors because fetcher is now an optional.

Return to SwinjectStoryboard+Extension.swift to provide this mapping, adding the following to setup():

defaultContainer.storyboardInitCompleted(BitcoinViewController.self) { resolver, controller in
  controller.fetcher = resolver ~> PriceFetcher.self
}

This code gets executed just before the BitcoinViewController is displayed and resolves the registered dependency conforming to PriceFetcher, i.e., a BitcoinPriceFetcher.

One final change before running the final project. Since your fetcher is now optional, add the following line of code at the beginning of requestPrice() in BitcoinViewController.swift:

guard let fetcher = fetcher else { fatalError("Missing dependencies") }

Build and run the project one final time by using the Command-R key combination. The app should correctly work as it did up until now, even though you have no instantiation of dependencies happening inside your BitcoinViewController; instead, those are injected externally by the Swinject setup you just worked on.

Doesn’t this all just seem like magic?

You may already have some ideas for how you can expand on these ideas by refactoring BitcoinViewController to be a more generic CryptoCurrencyViewController, while mapping other instances of PriceFetcher (e.g. EthereumPriceFetcher) to further enhance the functionality of your application.

While there’s been no change to the functionality provided by this application throughout this tutorial, your changes have significantly improved the quality of the code contained within it thanks to refactoring and decoupling objects with Swinject.

Coin-gratulations on a job well done!

Where to Go From Here?

You can download the finished project using the link and the top and bottom of this tutorial with all of the code you’ve adjusted to make use of Dependency Injection with Swinject.

There’s a lot more to Swinject then covered in this tutorial, so I recommend you check out Swinject’s Documentation on Github.

Below are some excellent resources to learn more about Dependency Injection with Swift:

You may also wish to look at Cleanse by Square, or Typhoon by AppsQuickly. Both libraries are alternatives to Swinject.

Thanks for reading! If you have any questions or comments about this tutorial, please join the forum discussion below!

The post Swinject Tutorial for iOS: Getting Started appeared first on Ray Wenderlich.

Video Tutorial: Beginning RxSwift Part 2: Creating a Custom Filtering Operator

Video Tutorial: Beginning RxSwift Part 2: Schedulers and Timing Operators

Screencast: Kotlin Android Extensions


Video Tutorial: Beginning RxSwift Part 2: Challenge: Optimize Combinestagram

Video Tutorial: Beginning RxSwift Part 2: Conclusion

Video Tutorial: Beginning RxSwift Part 3: Introduction

Video Tutorial: Beginning RxSwift Part 3: Transforming Operators

Video Tutorial: Beginning RxSwift Part 3: Challenge: Improve the Phone Number Lookup

Video Tutorial: Beginning RxSwift Part 3: Hello, RxCocoa!

Unreal Engine 4 Paint Filter Tutorial

$
0
0

Unreal Engine 4 Paint Filter Tutorial

As time passes, video games continue to look better and better. And in an era of video games with amazing visuals, it can be hard to make your game stand out. A way to make your game’s aesthetic more unique is to use non-photorealistic rendering.

Non-photorealistic rendering encompasses a wide range of rendering techniques. These include but are not limited to cel shading, toon outlines and cross hatching. You can even make your game look more like a painting! One of the techniques to accomplish this is Kuwahara filtering.

To implement Kuwahara filtering, you will learn how to:

  • Calculate mean and variance for multiple kernels
  • Output the mean of the kernel with lowest variance
  • Use Sobel to find a pixel’s local orientation
  • Rotate the sampling kernels based on the pixel’s local orientation
Note: This tutorial assumes you already know the basics of using Unreal Engine. If you are new to Unreal Engine, check out our 10-part Unreal Engine for Beginners tutorial series.

Since this tutorial uses HLSL, you should be familiar with it or a similar language such as C#.

Note: This tutorial is part of a 4-part tutorial series on shaders:

Getting Started

Start by downloading the materials for this tutorial (you can find a link at the top or bottom of this tutorial). Unzip it and navigate to PaintFilterStarter and open PaintFilter.uproject. You will see the following scene:

unreal engine paint

To save time, the scene already contains a Post Process Volume with PP_Kuwahara. This is the material (and its shader files) you will be editing.

unreal engine paint

To start, let’s go over what the Kuwahara filter is and how it works.

Kuwahara Filter

When taking photos, you may notice a grainy texture over the image. This is noise and just like the noise coming from your loud neighbors, you probably don’t want to see or hear it.

unreal engine paint

A common way to remove noise is to use a low-pass filter such as a blur. Below is the noise image after box blurring with a radius of 5.

unreal engine paint

Most of the noise is now gone but all the edges have lost their hardness. If only there was a filter that could smooth the image and preserve the edges!

As you might have guessed, the Kuwahara filter meets these requirements. Let’s look at how it works.

How Kuwahara Filtering Works

Like convolution, Kuwahara filtering uses kernels but instead of using one kernel, it uses four. The kernels are arranged so that they overlap by one pixel (the current pixel). Below is an example of the kernels for a 5×5 Kuwahara filter.

unreal engine paint

First, you calculate the mean (average color) for each kernel. This essentially blurs the kernel which has the effect of smoothing out noise.

For each kernel, you also calculate the variance. This is basically a measure of how much a kernel varies in color. For example, a kernel with similar colors will have low variance. If the colors are dissimilar, the kernel will have high variance.

Note: If you’re not familiar with variance or how to calculate it, check out Standard Deviation and Variance on Math is Fun.

Finally, you find the kernel with the lowest variance and output its mean. This selection based on variance is how the Kuwahara filter preserves edges. Let’s look at a few examples.

Kuwahara Filtering Examples

Below is a 10×10 grayscale image. You can see that there is an edge going from the bottom-left to the top-right. You can also see that some areas of the image have noise.

unreal engine paint

First, select a pixel and determine which kernel has the lowest variance. Here is a pixel near the edge and its associated kernels:

unreal engine paint

As you can see, kernels lying on the edge have varying colors. This indicates high variance and means the filter will not select them. By not selecting kernels lying on an edge, the filter avoids the problem of blurred edges.

For this pixel, the filter will select the green kernel since it is the most homogeneous. The output will then be the mean of the green kernel which is a color close to black.

Here’s another edge pixel and its kernels:

unreal engine paint

This time the yellow kernel has the least variance since it’s the only one not on the edge. So the output will be the mean of the yellow kernel which is a color close to white.

Below is a comparison between box blurring and Kuwahara filtering — each with a radius of 5.

unreal engine paint

As you can see, Kuwahara filtering does a great job at smoothing and edge preserving. In this case, the filter actually hardened the edge!

Incidentally, this edge-preserving smoothing feature can give an image a painterly look. Since brush strokes generally have hard edges and low noise, the Kuwahara filter is a great choice for converting realistic images to a painterly style.

Here is the result of running a photo through Kuwahara filters of varying size:

unreal engine paint

It looks pretty good, doesn’t it? Let’s go ahead and start creating the Kuwahara filter.

Creating the Kuwahara Filter

For this tutorial, the filter is split into two shader files: Global.usf and Kuwahara.usf. The first file will store a function to calculate a kernel’s mean and variance. The second file is the filter’s entry point and will call the aforementioned function for each kernel.

First, you will create the function to calculate mean and variance. Open the project folder in your OS and then go to the Shaders folder. Afterwards, open Global.usf. Inside, you will see the GetKernelMeanAndVariance() function.

Before you start building the function, you will need an extra parameter. Change the function’s signature to:

float4 GetKernelMeanAndVariance(float2 UV, float4 Range)

To sample in a grid, you need two for loops: one for horizontal offsets and another for vertical offsets. The first two channels of Range will contain the bounds for the horizontal loop. The second two will contain the bounds for the vertical loop. For example, if you are sampling the top-left kernel and the filter has a radius of 2, Range would be:

Range = float4(-2, 0, -2, 0);

Now it’s time to start sampling.

Sampling Pixels

First, you need to create the two for loops. Add the following inside GetKernelMeanAndVariance() (below the variables):

for (int x = Range.x; x <= Range.y; x++)
{
    for (int y = Range.z; y <= Range.w; y++)
    {
        
    }
}

This will give you all the offsets for the kernel. For example, if you are sampling the top-left kernel and the filter has a radius of 2, the offsets will range from (0, 0) to (-2, -2).

unreal engine paint

Now you need to get the color for the sample pixel. Add the following inside the inner for loop:

float2 Offset = float2(x, y) * TexelSize;
float3 PixelColor = SceneTextureLookup(UV + Offset, 14, false).rgb;

The first line will get the sample pixel’s offset and convert it to UV space. The second line will use the offset to get the sample pixel’s color.

Next, you need to calculate the mean and variance.

Calculating Mean and Variance

Figuring out the mean is easy enough. You just accumulate all the colors and then divide by the number of samples. For variance, you use the formula below where x is the sample pixel’s color:

unreal engine paint

The first thing you need to do is calculate the sums. For the mean, this is just adding the color to the Mean variable. For variance, you need to square the color before adding it to Variance. Add the following below the previous code:

Mean += PixelColor;
Variance += PixelColor * PixelColor;
Samples++;

Next, add the following below the for loops:

Mean /= Samples;
Variance = Variance / Samples - Mean * Mean;
float TotalVariance = Variance.r + Variance.g + Variance.b;
return float4(Mean.r, Mean.g, Mean.b, TotalVariance);

The first two lines will calculate the mean and variance. However, there is a problem: the variance is spread across the RGB channels. To fix this, the third line sums the channels up to give you the total variance.

Finally, the function returns the mean and variance as a float4. The mean is in the RGB channels and variance is in the A channel.

Now that you have a function to calculate the mean and variance, you need to call it for each kernel. Go back to the Shaders folder and open Kuwahara.usf. First, you need to create a few variables. Replace the code inside with the following:

float2 UV = GetDefaultSceneTextureUV(Parameters, 14);
float4 MeanAndVariance[4];
float4 Range;

Here is what each variable is for:

  • UV: UV coordinates for the current pixel
  • MeanAndVariance: An array to hold the mean and variance for each kernel
  • Range: Used to hold the for loop bounds for the current kernel

Now you need to call GetKernelMeanAndVariance() for each kernel. To do this, add the following:

Range = float4(-XRadius, 0, -YRadius, 0);
MeanAndVariance[0] = GetKernelMeanAndVariance(UV, Range);

Range = float4(0, XRadius, -YRadius, 0);
MeanAndVariance[1] = GetKernelMeanAndVariance(UV, Range);

Range = float4(-XRadius, 0, 0, YRadius);
MeanAndVariance[2] = GetKernelMeanAndVariance(UV, Range);

Range = float4(0, XRadius, 0, YRadius);
MeanAndVariance[3] = GetKernelMeanAndVariance(UV, Range);

This will get the mean and variance for each kernel in the following order: top-left, top-right, bottom-left and then bottom-right.

Next, you need to select the kernel with lowest variance and output its mean.

Selecting Kernel With Lowest Variance

To select the kernel with lowest variance, add the following:

// 1
float3 FinalColor = MeanAndVariance[0].rgb;
float MinimumVariance = MeanAndVariance[0].a;

// 2
for (int i = 1; i < 4; i++)
{
    if (MeanAndVariance[i].a < MinimumVariance)
    {
        FinalColor = MeanAndVariance[i].rgb;
        MinimumVariance = MeanAndVariance[i].a;
    }
}

return FinalColor;

Here is what each section does:

  1. Create two variables to hold the final color and minimum variance. Initialize both of these to the first kernel’s mean and variance.
  2. Loop over the remaining three kernels. If the current kernel’s variance is lower than the minimum, its mean and variance become the new FinalColor and MinimumVariance. After looping, the output is FinalColor which will be the mean of the lowest variance kernel.

Go back to Unreal and navigate to Materials\PostProcess. Open PP_Kuwahara, make a dummy change and then click Apply. Go back to the main editor to see the results!

unreal engine paint

It looks pretty good but if you look closer, you can see that the image has these strange block-like areas. Here’s a few of them highlighted:

unreal engine paint

This is a side effect of using axis-aligned kernels. A way to reduce this is to use an improved version of the filter which I call the Directional Kuwahara filter.

Directional Kuwahara Filter

This filter is like the original except the kernels are now aligned with the pixel’s local orientation. Here is an example of a 3×5 kernel in the Directional Kuwahara filter:

unreal engine paint

Note: Since you can represent a kernel as a matrix, you write the dimensions as Height x Width instead of the conventional Width x Height. More on matrices later.

Here, the filter determines the pixel’s orientation to be along the edge. It then rotates the entire kernel accordingly.

To calculate the local orientation, the filter does a convolution pass using Sobel. If Sobel sounds familiar to you, it’s probably because it is a popular edge detection technique. But if it’s an edge detection technique, how can you use it to get local orientation? To answer that, let’s look at how Sobel works.

How Sobel Works

Instead of one kernel, Sobel uses two.

unreal engine paint

Gx will give you the gradient in the horizontal direction. Gy will give you the gradient in the vertical direction. Let’s use the following 3×3 grayscale image as an example:

unreal engine paint

First, convolve the middle pixel with each kernel.

unreal engine paint

If you plot each value onto a 2D plane, you will see that the resulting vector points in the same direction as the edge.

unreal engine paint

To find the angle between the vector and the X-axis, you plug the gradient values into an arc tangent (atan) function. You can then use the resulting angle to rotate the kernel.

And that’s how you can use Sobel to give you a pixel’s local orientation. Let’s try it out.

Finding Local Orientation

Open Global.usf and add the following inside GetPixelAngle():

float GradientX = 0;
float GradientY = 0;
float SobelX[9] = {-1, -2, -1, 0, 0, 0, 1, 2, 1};
float SobelY[9] = {-1, 0, 1, -2, 0, 2, -1, 0, 1};
int i = 0;
Note: Notice that the final brace of GetPixelAngle() is missing. This is intentional! Check out our Custom Shaders in HLSL tutorial to see why you need to do this.

Here’s what each variable is for:

  • GradientX: Holds the gradient for the horizontal direction
  • GradientY: Holds the gradient for the vertical direction
  • SobelX: The horizontal Sobel kernel as an array
  • SobelY: The vertical Sobel kernel as an array
  • i: Used to access each element in SobelX and SobelY

Next, you need to perform convolution using the SobelX and SobelY kernels. Add the following:

for (int x = -1; x <= 1; x++)
{
    for (int y = -1; y <= 1; y++)
    {
        // 1
        float2 Offset = float2(x, y) * TexelSize;
        float3 PixelColor = SceneTextureLookup(UV + Offset, 14, false).rgb;
        float PixelValue = dot(PixelColor, float3(0.3,0.59,0.11));
        
        // 2
        GradientX += PixelValue * SobelX[i];
        GradientY += PixelValue * SobelY[i];
        i++;
    }
}

Here’s what each section does:

  1. The first two lines will get the sample pixel’s color. The third line will then desaturate the color to convert it into a single grayscale value. This makes it easier to calculate the gradients of the image as a whole instead of getting the gradients for each color channel.
  2. For both kernels, multiply the pixel’s grayscale value with the corresponding kernel element. Then add the result to the appropriate gradient variable. i will then increment to hold the index for the next kernel element.

To get the angle, you use the atan() function and plug in your gradient values. Add the following below the for loops:

return atan(GradientY / GradientX);

Now that you have a function to get a pixel’s angle, you need to somehow use it to rotate the kernel. A way to do this is to use a matrix.

What is a Matrix?

A matrix is a 2D array of numbers. For example, here is a 2×3 matrix (two rows and three columns):

unreal engine paint

By itself, a matrix doesn’t look very interesting. But the matrix’s true power reveals itself once you multiply a vector with a matrix. This will allow you to do things such as rotation and scaling (depending on the matrix). But how exactly do you create a matrix for rotation?

In a coordinate system, you will have a vector for every dimension. These are your basis vectors and they define the positive directions of your axes.

Below are a few examples of different basis vectors for a 2D coordinate system. The red arrow defines the positive X direction. The green arrow defines the positive Y direction.

unreal engine paint

To rotate a vector, you can use these basis vectors to build a rotation matrix. This is simply a matrix containing the positions of the basis vectors after rotation. For example, imagine you have a vector (orange arrow) at (1, 1).

unreal engine paint

Let’s say you want to rotate it 90 degrees clockwise. First, you rotate the basis vectors by the same amount.

unreal engine paint

Then you construct a 2×2 matrix using the new positions of the basis vectors. The first column is the red arrow’s position and the second column is the green arrow’s position. This is your rotation matrix.

unreal engine paint

Finally, you perform matrix multiplication using the orange vector and rotation matrix. The result is the new position for the orange vector.

unreal engine paint

Note: You don’t need to know how to do matrix multiplication since HLSL already has a built-in function for it. But if you’d like to learn, check out How to Multiply Matrices on Math is Fun.

Isn’t that cool? What’s even better is that you can use the matrix above to rotate any 2D vector 90 degrees clockwise. For the filter, this means you only need to construct the rotation matrix once for each pixel and then you can use it for the entire kernel.

Now it’s time to rotate the kernel using a rotation matrix.

Rotating the Kernel

First, you need to modify GetKernelMeanAndVariance() to accept a 2×2 matrix. This is because you will construct a rotation matrix within Kuwahara.usf and pass it in. Change the signature for GetKernelMeanAndVariance() to:

float4 GetKernelMeanAndVariance(float2 UV, float4 Range, float2x2 RotationMatrix)

Next, change the first line in the inner for loop to:

float2 Offset = mul(float2(x, y) * TexelSize, RotationMatrix);

mul() will perform matrix multiplication using the offset and RotationMatrix. This will rotate the offset around the current pixel.

Next, you need to construct the rotation matrix.

Constructing the Rotation Matrix

To construct a rotation matrix, you use the sine and cosine functions like so:

unreal engine paint

Close Global.usf and then open Kuwahara.usf. Afterwards, add the following at the bottom of the variable list:

float Angle = GetPixelAngle(UV);
float2x2 RotationMatrix = float2x2(cos(Angle), -sin(Angle), sin(Angle), cos(Angle));

The first line will calculate the angle for the current pixel. The second line will then create the rotation matrix using the angle.

Finally, you need to pass in the RotationMatrix for each kernel. Modify each call to GetKernelMeanAndVariance() like so:

GetKernelMeanAndVariance(UV, Range, RotationMatrix)

That’s all for the Directional Kuwahara! Close Kuwahara.usf and then go back to PP_Kuwahara. Make a dummy change, click Apply and then close it.

Below is a comparison between the original Kuwahara and Directional Kuwahara. Notice how the Directional Kuwahara does not have the blockiness of the original.

unreal engine paint

Note: You can use PPI_Kuwahara to change the dimensions of the filter. I recommend that you change the filter size so that the X radius is larger than the Y radius. This will increase the kernel’s size along the edge and helps with directionality.

Where to Go From Here?

You can download the completed project using the link at the top or bottom of this tutorial.

If you’d like to learn more about the Kuwahara filter, check out the paper on Anisotropic Kuwahara filtering. The Directional Kuwahara is actually a simplified version of the filter presented in the paper.

Using your new-found love of matrices, I encourage you to experiment with them to make new effects. For example, you can use a combination of rotation matrices and blurring to create a radial or circular blur. If you’d like to learn more about matrices and how they work, check out 3Blue1Brown’s Essence of Linear Algebra series.

If there are any effects you’d like to me cover, let me know in the comments below!

The post Unreal Engine 4 Paint Filter Tutorial appeared first on Ray Wenderlich.


Video Tutorial: Beginning RxSwift Part 3: Transforming Operators in Practice: Part 1

Video Tutorial: Beginning RxSwift Part 3: Transforming Operators in Practice: Part 2

Firebase Tutorial: Getting Started

$
0
0
Update note: This tutorial has been updated for iOS 11, Swift 41, and Xcode 9.3 by Mikael Konutgan. The original tutorial was written by David East.
Firebase tutorial

Learn the fundamentals in this Firebase tutorial.

Firebase is a mobile-backend-as-a-service that provides powerful features for building mobile apps. Firebase has three core services: a realtime database, user authentication and hosting. With the Firebase iOS SDK, you can use these services to create apps without writing any server code.

In this Firebase tutorial, you’ll learn the fundamentals of Firebase by making a collaborative grocery list app called Grocr. When items get added to the list, they’ll appear instantly on any user’s devices, but you’re not going to stop there. You’ll tweak Grocr to work offline, so the list stays in sync even with a spotty grocery store data connection.

As you work, you’ll learn about:

  • Saving data to a Firebase database.
  • Syncing data in realtime.
  • Authenticating users.
  • Monitoring online users.
  • Enabling offline support.

Get ready to realtime all the things!

Getting Started

Start by downloading the materials for this tutorial; you can find a link at the top or bottom of this page. This project uses CocoaPods to manage dependencies and they are included in the downloaded projects.

This project contains three view controllers:

  1. LoginViewController.swift: the login is currently using hard coded credentials, but you’ll fix that soon.
  2. GroceryListTableViewController.swift: this is a subclass of UITableViewController that adds items to a list of local data using a UIAlertController.
  3. OnlineUsersTableViewController.swift: this controller will use Firebase’s presence feature to display all of the users currently online.

In addition to the view controllers, there are two models, GroceryItem.swift and User.swift.

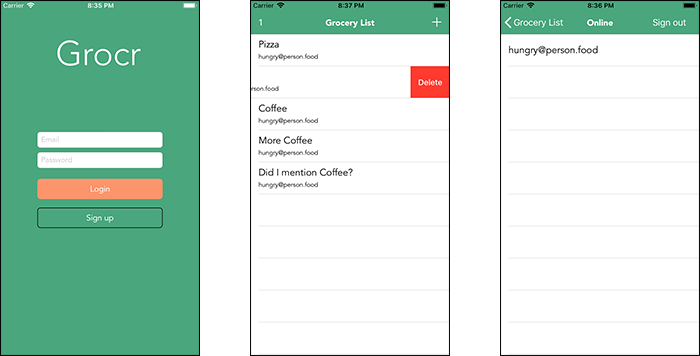
Build and run, and you’ll see the app looks like this:

You can log in just by tapping Login, which will use a hard-coded user. If you play around, you’ll see that the app currently only works with local data. Next, you’ll use Firebase to bring the app to life.

Setting up a Firebase Account

There are three main steps to setting up Firebase in an iOS project:

  1. Create a free Firebase account
  2. Download and add GoogleService-Info.plist to your app
  3. Tell Firebase to start when your app launches

To create a Firebase account, visit the Firebase homepage. Press GO TO CONSOLE in the top-right corner, and enter the credentials for your Google account, if you’re not signed in already. If you don’t have a Google account, you’ll need to create one first, which you can do here.

You’ll then have a clean Firebase console created for you. Don’t worry about forking over any money; everything in this Firebase tutorial can be done with the free plan.

Firebase Tutorial Firebase Console

It’s time to create your first project, so click the + Add project button.

In the dialog that appears, enter Grocr as the Project name and select your preferred Country/region:

Firebase Tutorial Add a Project

Click CREATE PROJECT, wait for it to create and then press Continue to be taken to your project’s dashboard:

Firebase Tutorial Firebase Dashboard

This is a container for your project’s Firebase services. You’ll use it to store data and authenticate users.

Select the circle iOS button above Add Firebase to your iOS app. Enter rw.firebase.gettingstarted in the iOS Bundle ID field:

Firebase Tutorial Enter Bundle ID

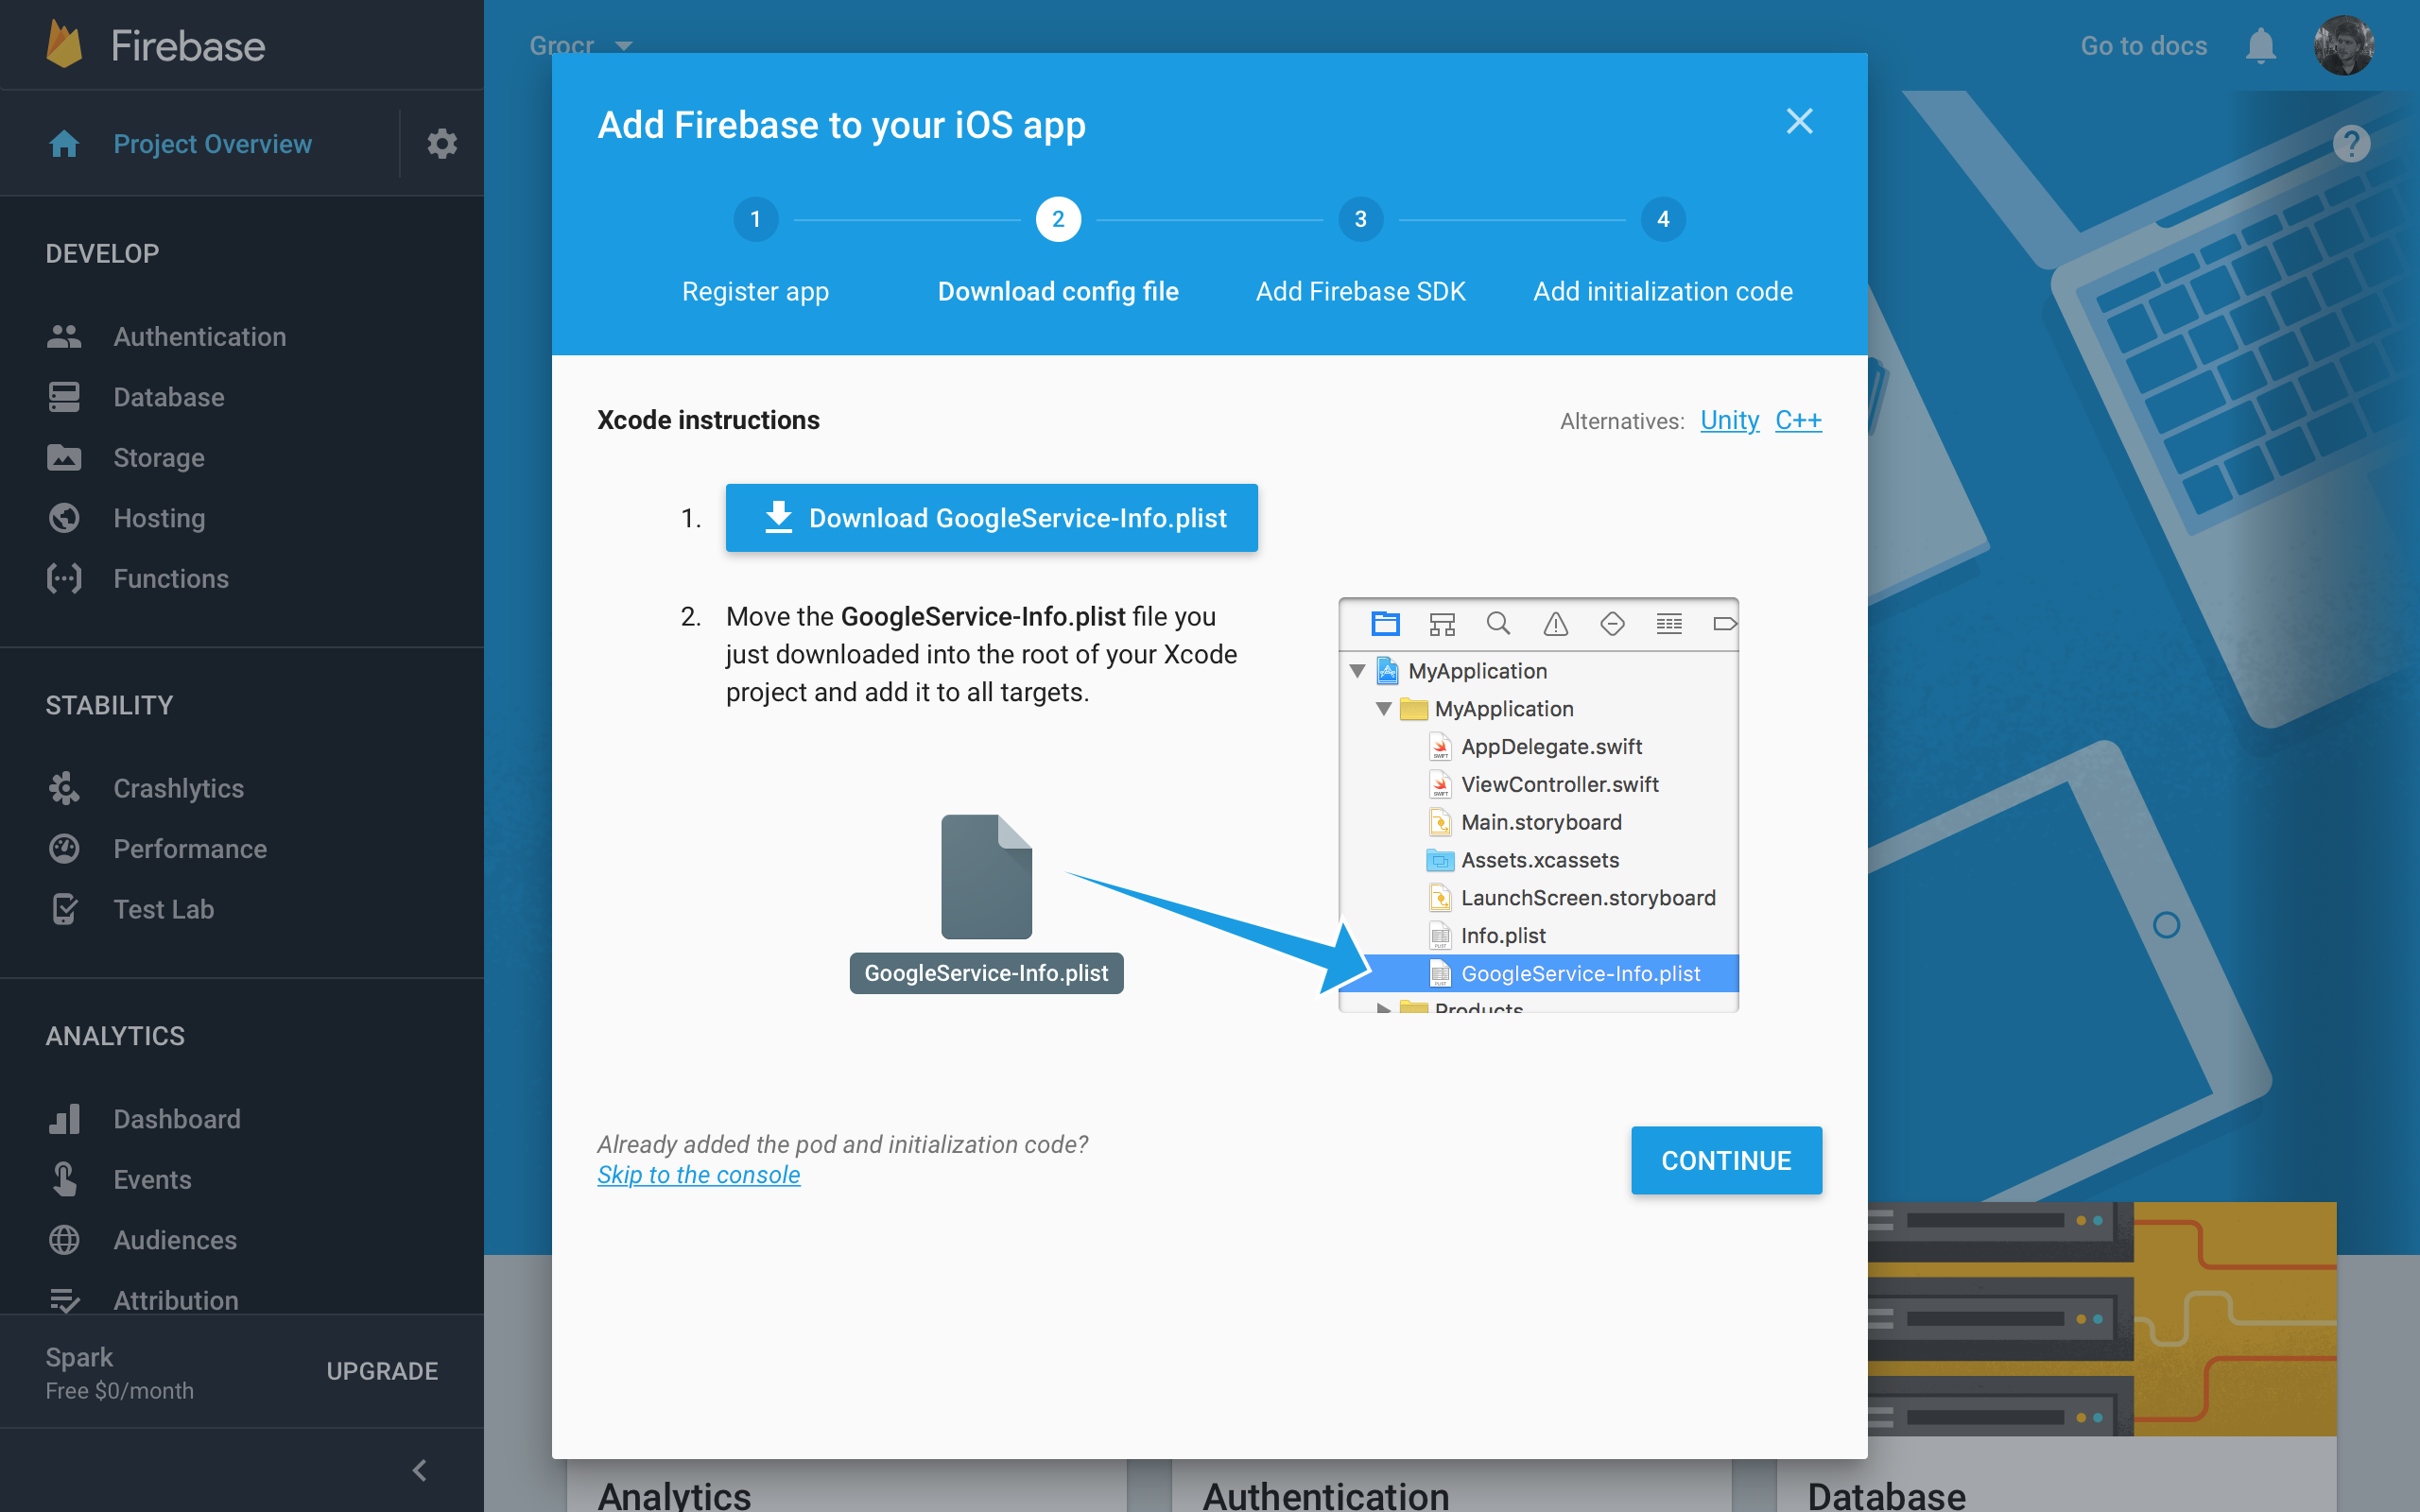
Click REGISTER APP and then click Download GoogleService-Info.plist. Follow the instructions and move it to the Grocr project in Xcode.

Firebase Tutorial Download GoogleService Info Plist

When prompted by Xcode, make sure Copy Items if needed is checked.

Return to your Firebase project’s webpage, and click CONTINUE. The next page describes how to install the Firebase SDK:

Firebase Tutorial Install SDK

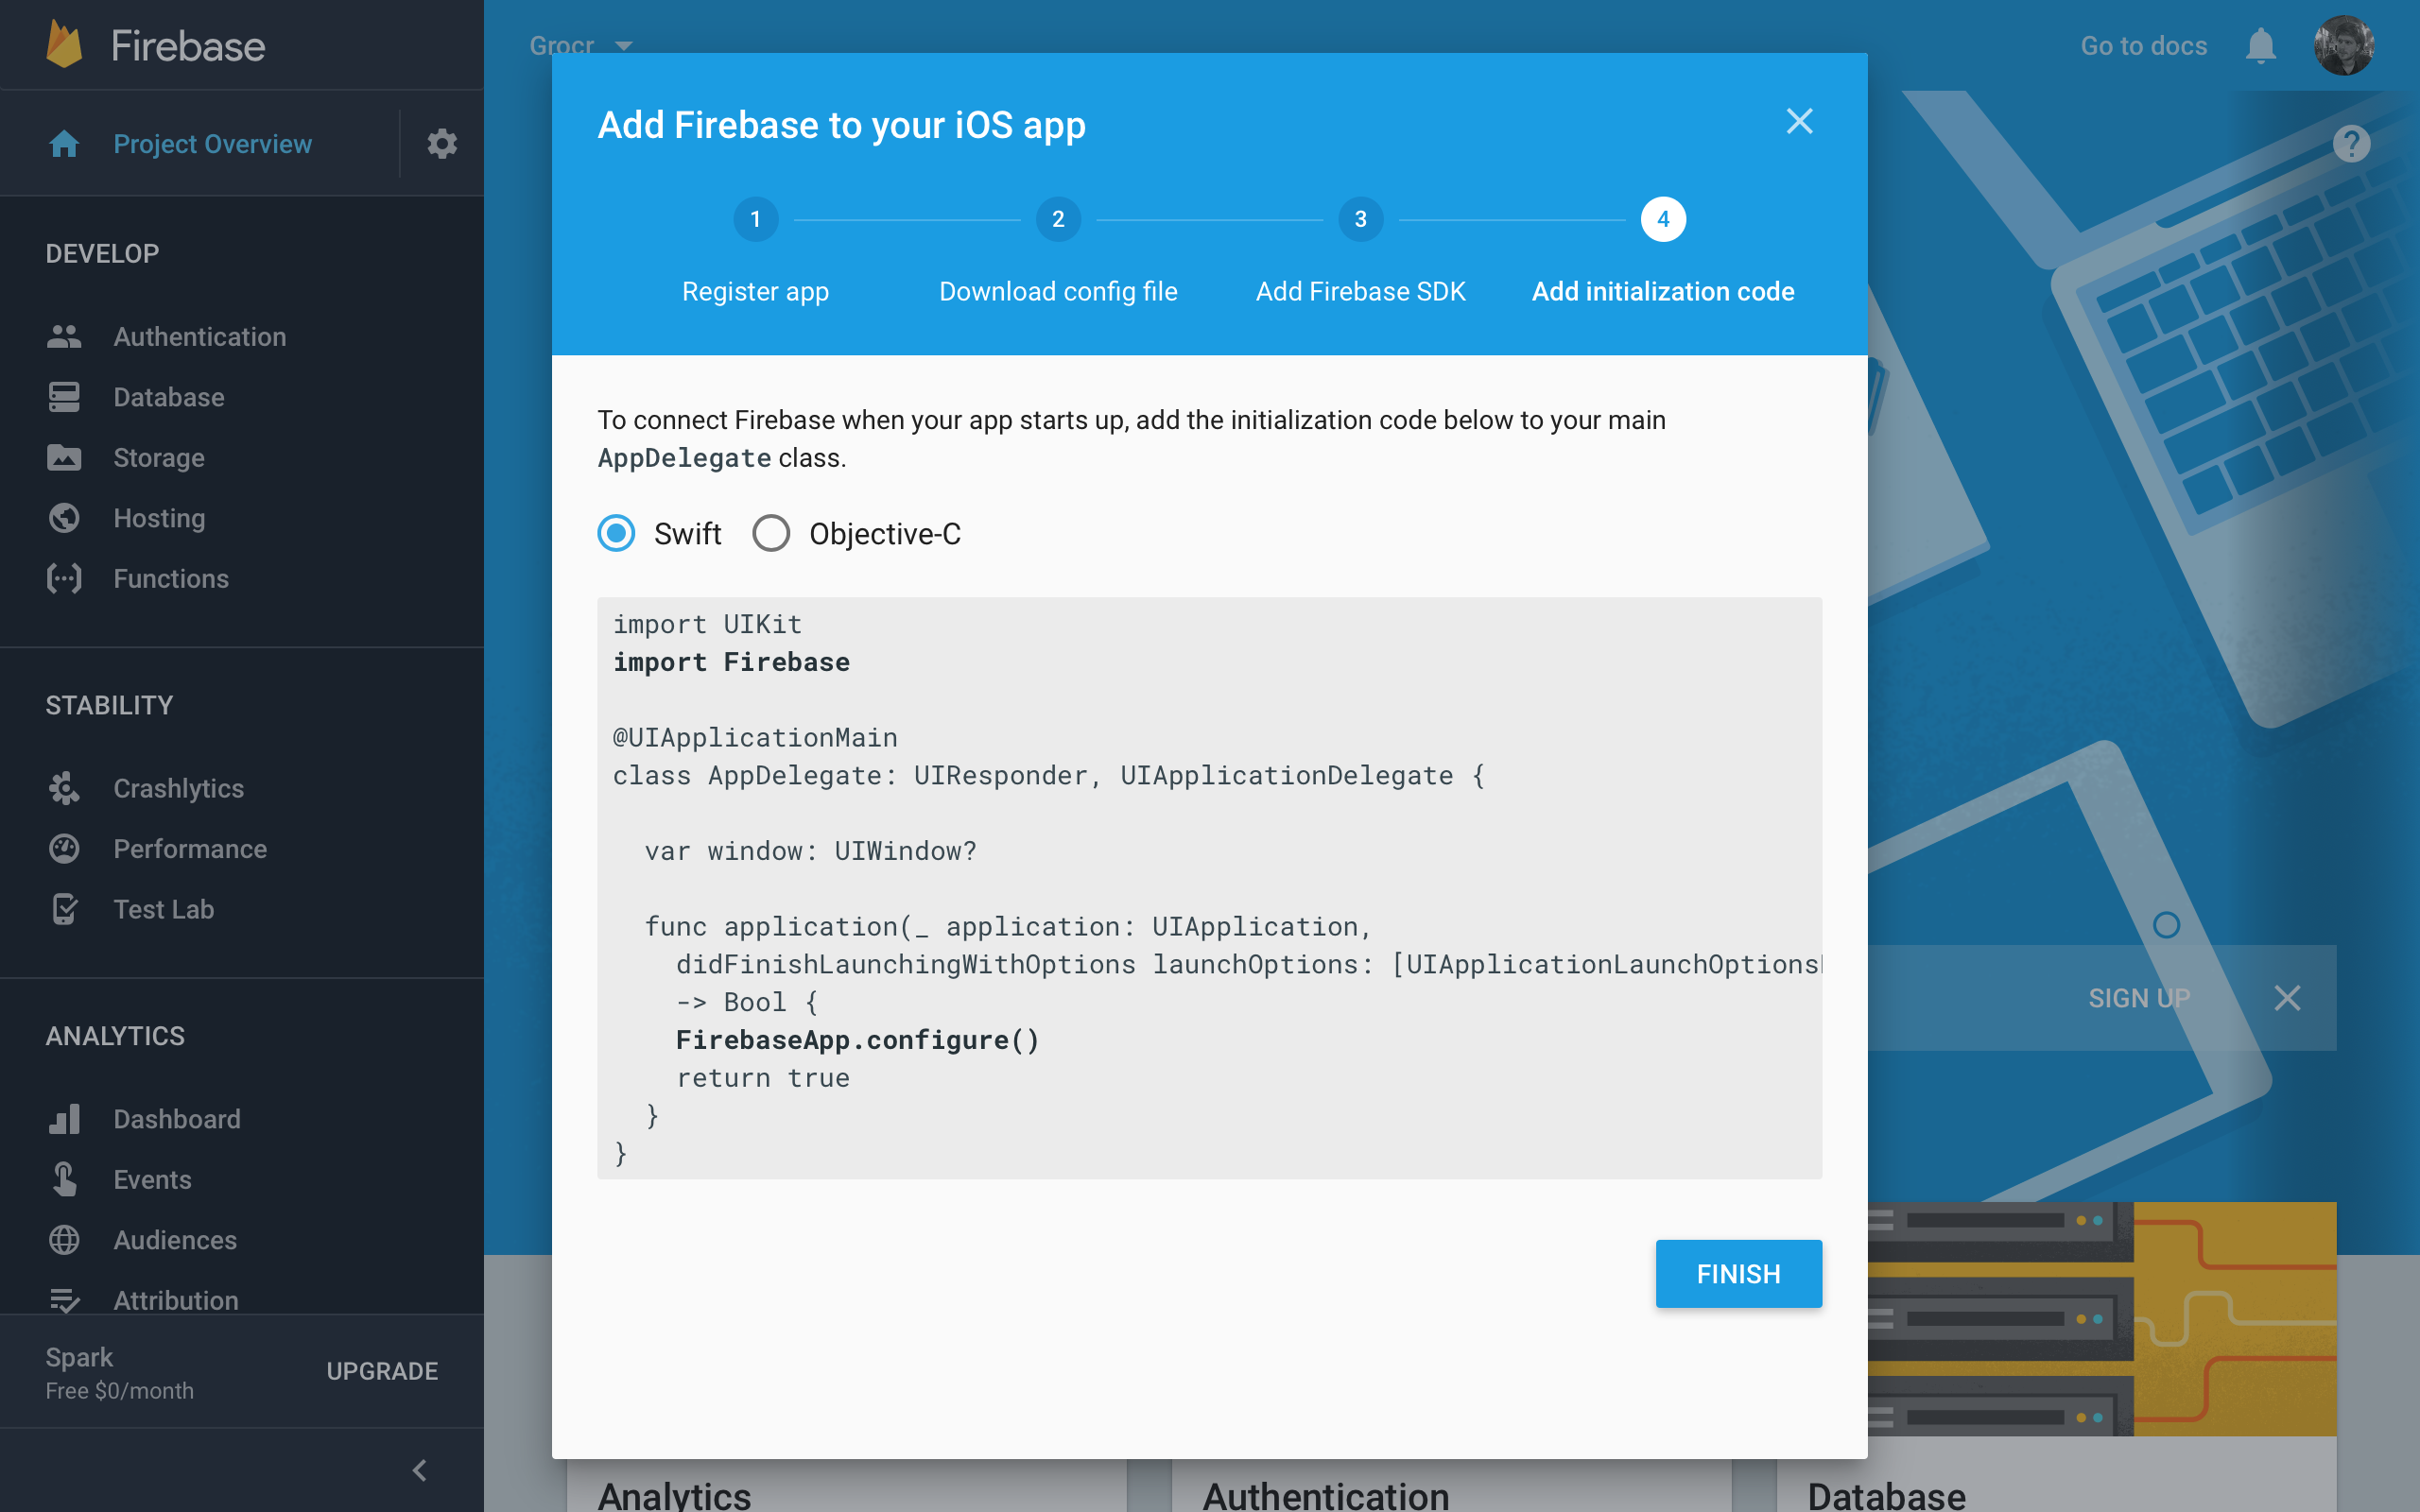
The starter project already includes the SDK, so just click CONTINUE. The last page explains how to connect Firebase when your app starts:

Firebase Tutorial Connect Firebase

You need to do this in the tutorial app. In Xcode, open AppDelegate.swift and add this code before the return statement within application(_:didFinishLaunchingWithOptions:):

FirebaseApp.configure()

Back on your Firebase project’s webpage, click FINISH to see your new project’s details:

Firebase Tutorial Project Details

That’s it!

Creating a Connection to Firebase

With your Firebase app set up, go to Xcode and open GroceryListTableViewController.swift. Where the properties are defined, add the following:

let ref = Database.database().reference(withPath: "grocery-items")

This establishes a connection to your Firebase database using the provided path. In the documentation, these Firebase properties are referred to as references because they refer to a location in your Firebase database.

In short, this property allows for saving and syncing of data to the given location.

You’ll notice the base URL is not used. Instead, it uses a child path of grocery-items. The Firebase database is a JSON NoSQL database, so all data is stored as JSON.

JSON is a hierarchical key-value data structure – keys refer to objects that can contain values pointing to other objects. JSON data is simply a tree of key value pairs.

With Firebase, the key is a URL and the value is arbitrary data that could be a number, string, boolean or object.

Structuring Data

No matter how it’s formatted on the client, all data stored in Firebase is JSON. Take a look at the following sample JSON data:

// The root of the tree
{
  // grocery-items
  "grocery-items": {

    // grocery-items/milk
    "milk": {

      // grocery-items/milk/name
      "name": "Milk",

      // grocery-items/milk/addedByUser
      "addedByUser": "David"
    },

    "pizza": {
      "name": "Pizza",
      "addedByUser": "Alice"
    },
  }
}

In the JSON tree above, you can see there’s a path mapped to every piece of data. You can continue to traverse down the tree and retrieve data at deeper locations.

In the case of the data above, you can retrieve all grocery items by using the path:

grocery-items

If you only want to get the first grocery item you can navigate its child path:

grocery-items/milk

Since all Firebase keys map to paths, the key names you choose are especially important.

Understanding Firebase References

A fundamental theme to grasp is that a Firebase reference points to a location in Firebase where data is stored. If you create multiple references, then they all share the same connection.

Have a look at this sample code:

// 1
let rootRef = Database.database().reference()

// 2
let childRef = Database.database().reference(withPath: "grocery-items")

// 3
let itemsRef = rootRef.child("grocery-items")

// 4
let milkRef = itemsRef.child("milk")

// 5
print(rootRef.key)   // prints: ""
print(childRef.key)  // prints: "grocery-items"
print(itemsRef.key)  // prints: "grocery-items"
print(milkRef.key)   // prints: "milk"

Here’s what’s going on:

  1. You create a reference to the root of the Firebase database.
  2. Using a URL, you can create a reference to a child location in your Firebase database.
  3. From the rootRef you can use child(_:) to create a child reference by passing the child path. This reference is the same as the one above.
  4. Using the itemsRef, you can create a child reference to the milk location.
  5. Every reference has a key property. This property tells you what the key name is in the Firebase database.

You don’t need to add this code anywhere in the sample project, it’s purely for illustrative purposes. :]

Adding New Items to the List

Near the bottom of GroceryListTableViewController.swift, find addButtonDidTouch(_:).

This is where you present the user with a UIAlertController to add a new item.

Inside the method, locate saveAction. Currently, it only saves the data to a local array, so saveAction won’t sync across multiple clients and disappears when you restart the app.

Nobody’s going to want to use an app that doesn’t remember or sync their grocery list! Replace saveAction with the following:

let saveAction = UIAlertAction(title: "Save",
                               style: .default) { _ in
    // 1
    guard let textField = alert.textFields?.first,
      let text = textField.text else { return }

    // 2
    let groceryItem = GroceryItem(name: text,
                           addedByUser: self.user.email,
                             completed: false)
    // 3
    let groceryItemRef = self.ref.child(text.lowercased())

    // 4
    groceryItemRef.setValue(groceryItem.toAnyObject())
}

Here’s what’s going on:

  1. Get the text field, and its text, from the alert controller.
  2. Using the current user’s data, create a new, uuncompleted GroceryItem.
  3. Create a child reference using child(_:). The key value of this reference is the item’s name in lowercase, so when users add duplicate items (even if they capitalize it, or use mixed case) the database saves only the latest entry.
  4. Use setValue(_:) to save data to the database. This method expects a Dictionary. GroceryItem has a helper function called toAnyObject() to turn it into a Dictionary.

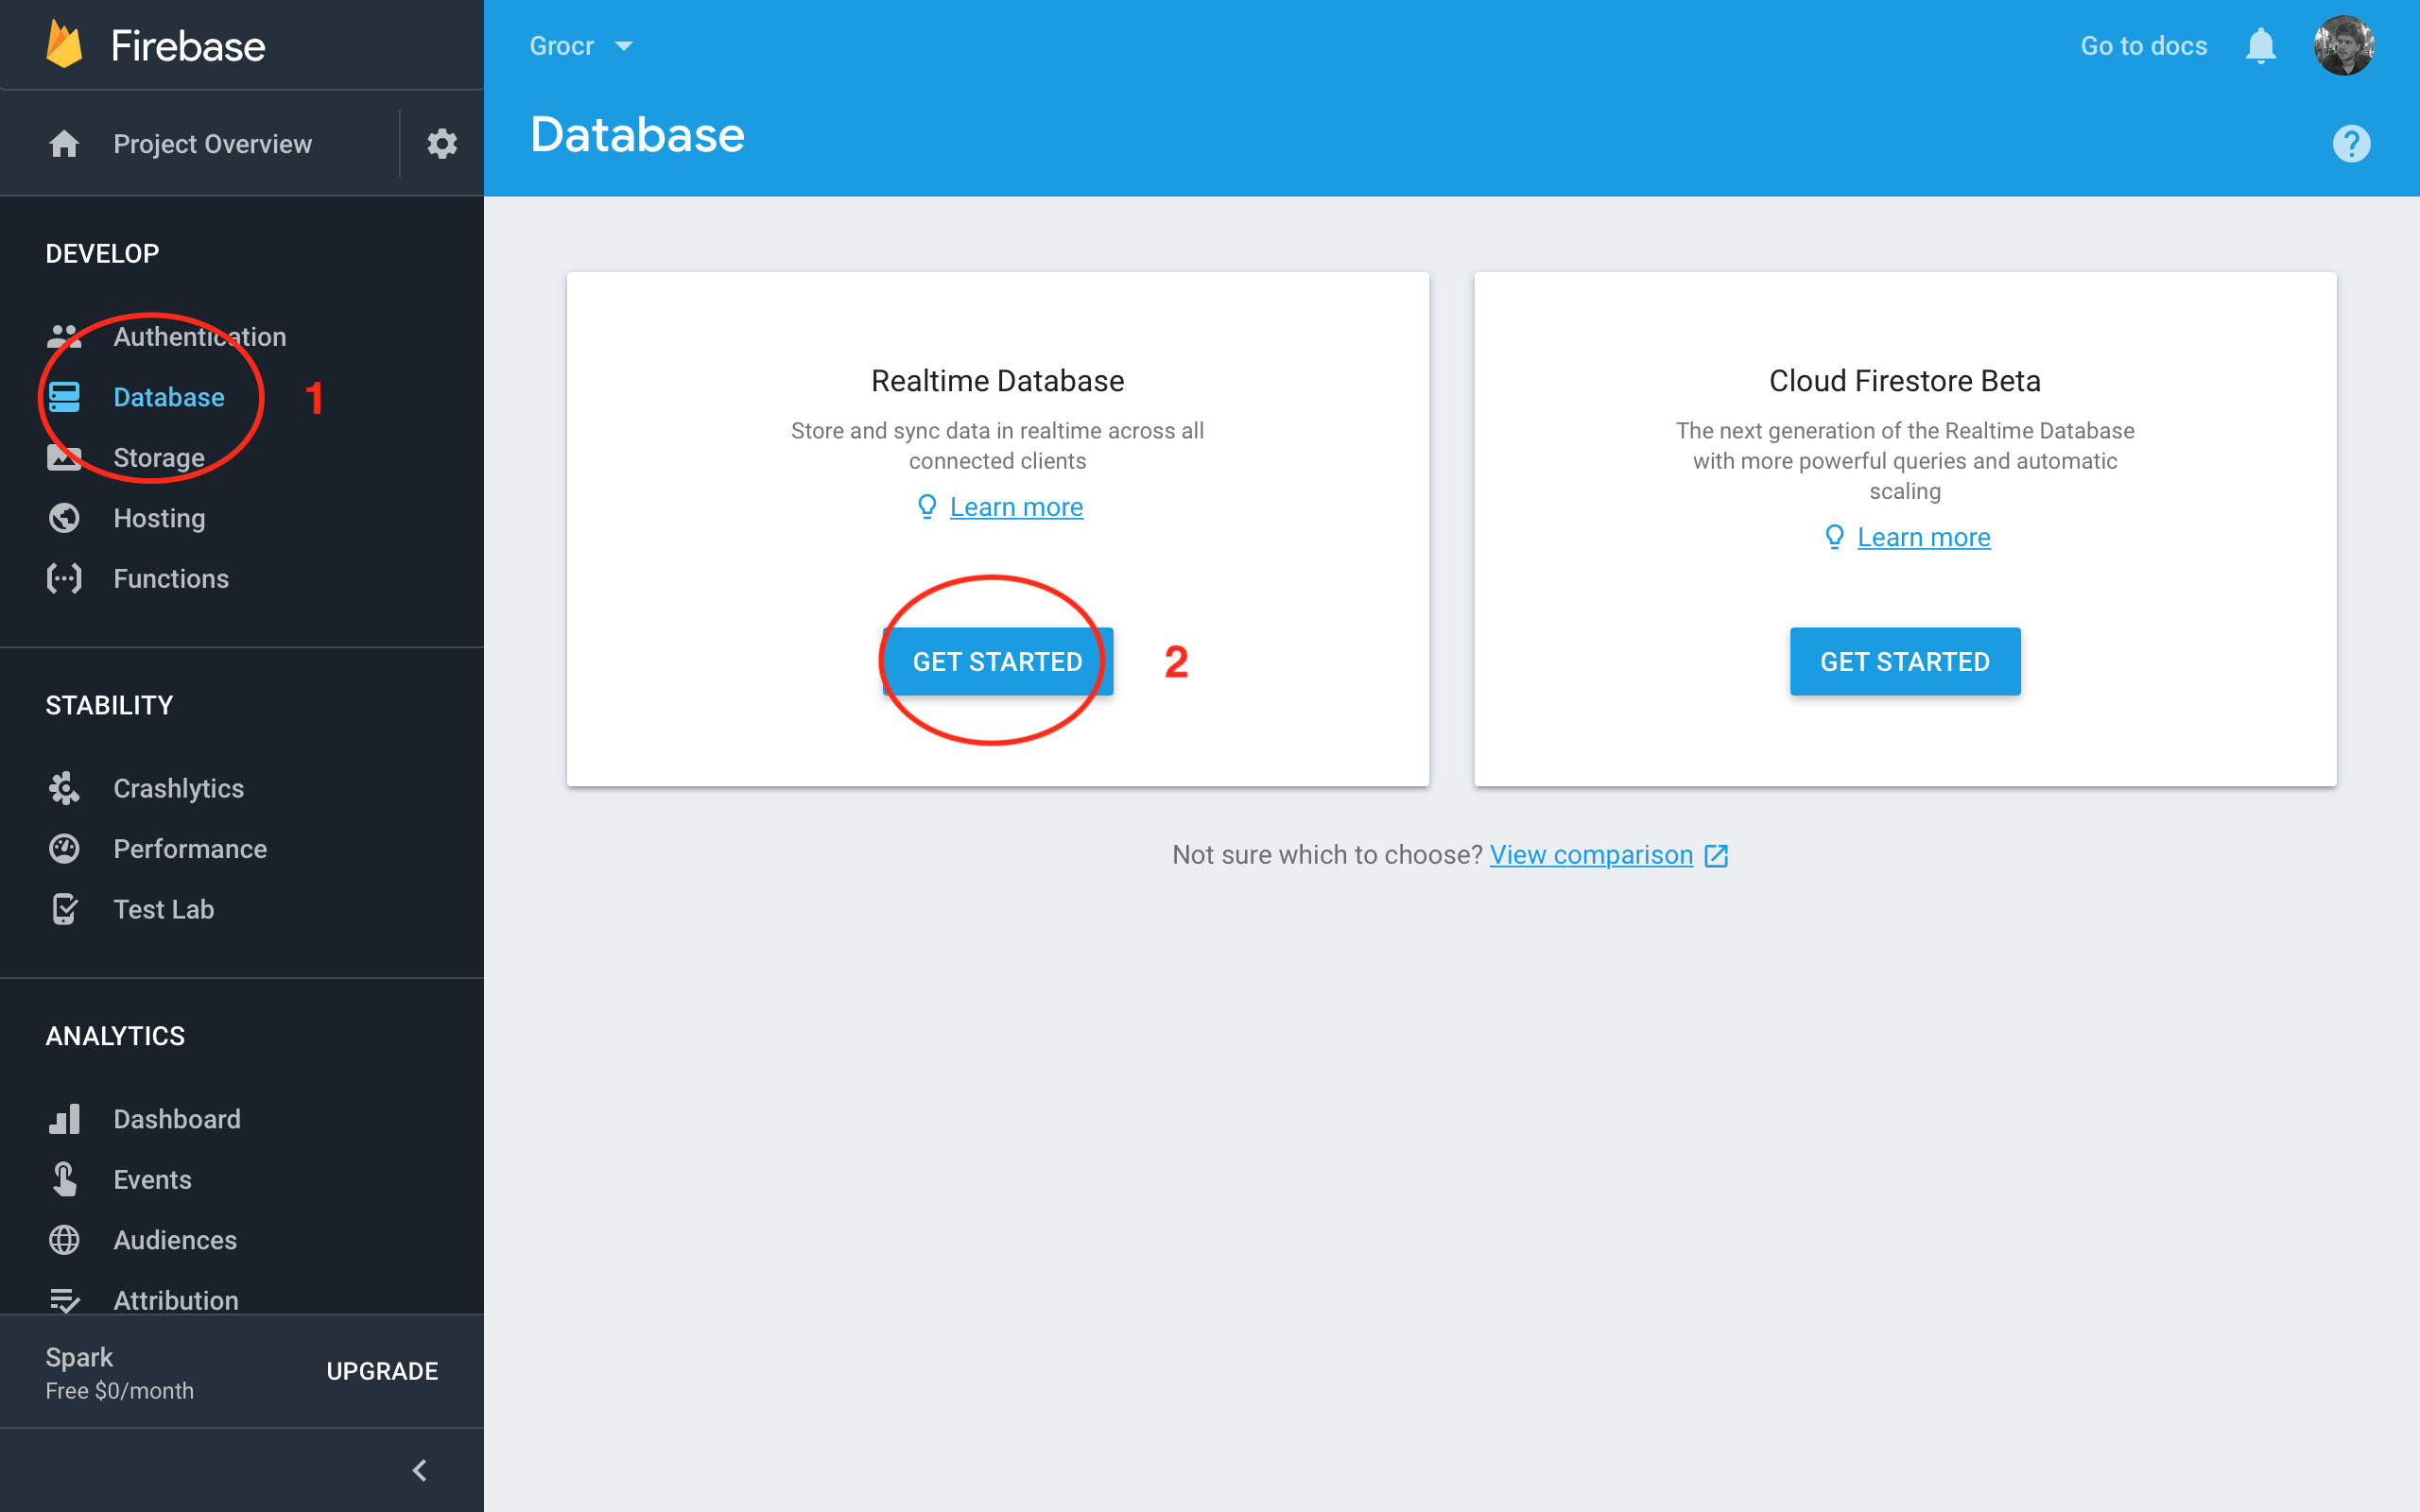
You next need to change database settings. Go to the Firebase dashboard in your browser and select the Database option on the left, followed by Get started for the Realtime Database section.

Firebase Tutorial Database Get Started

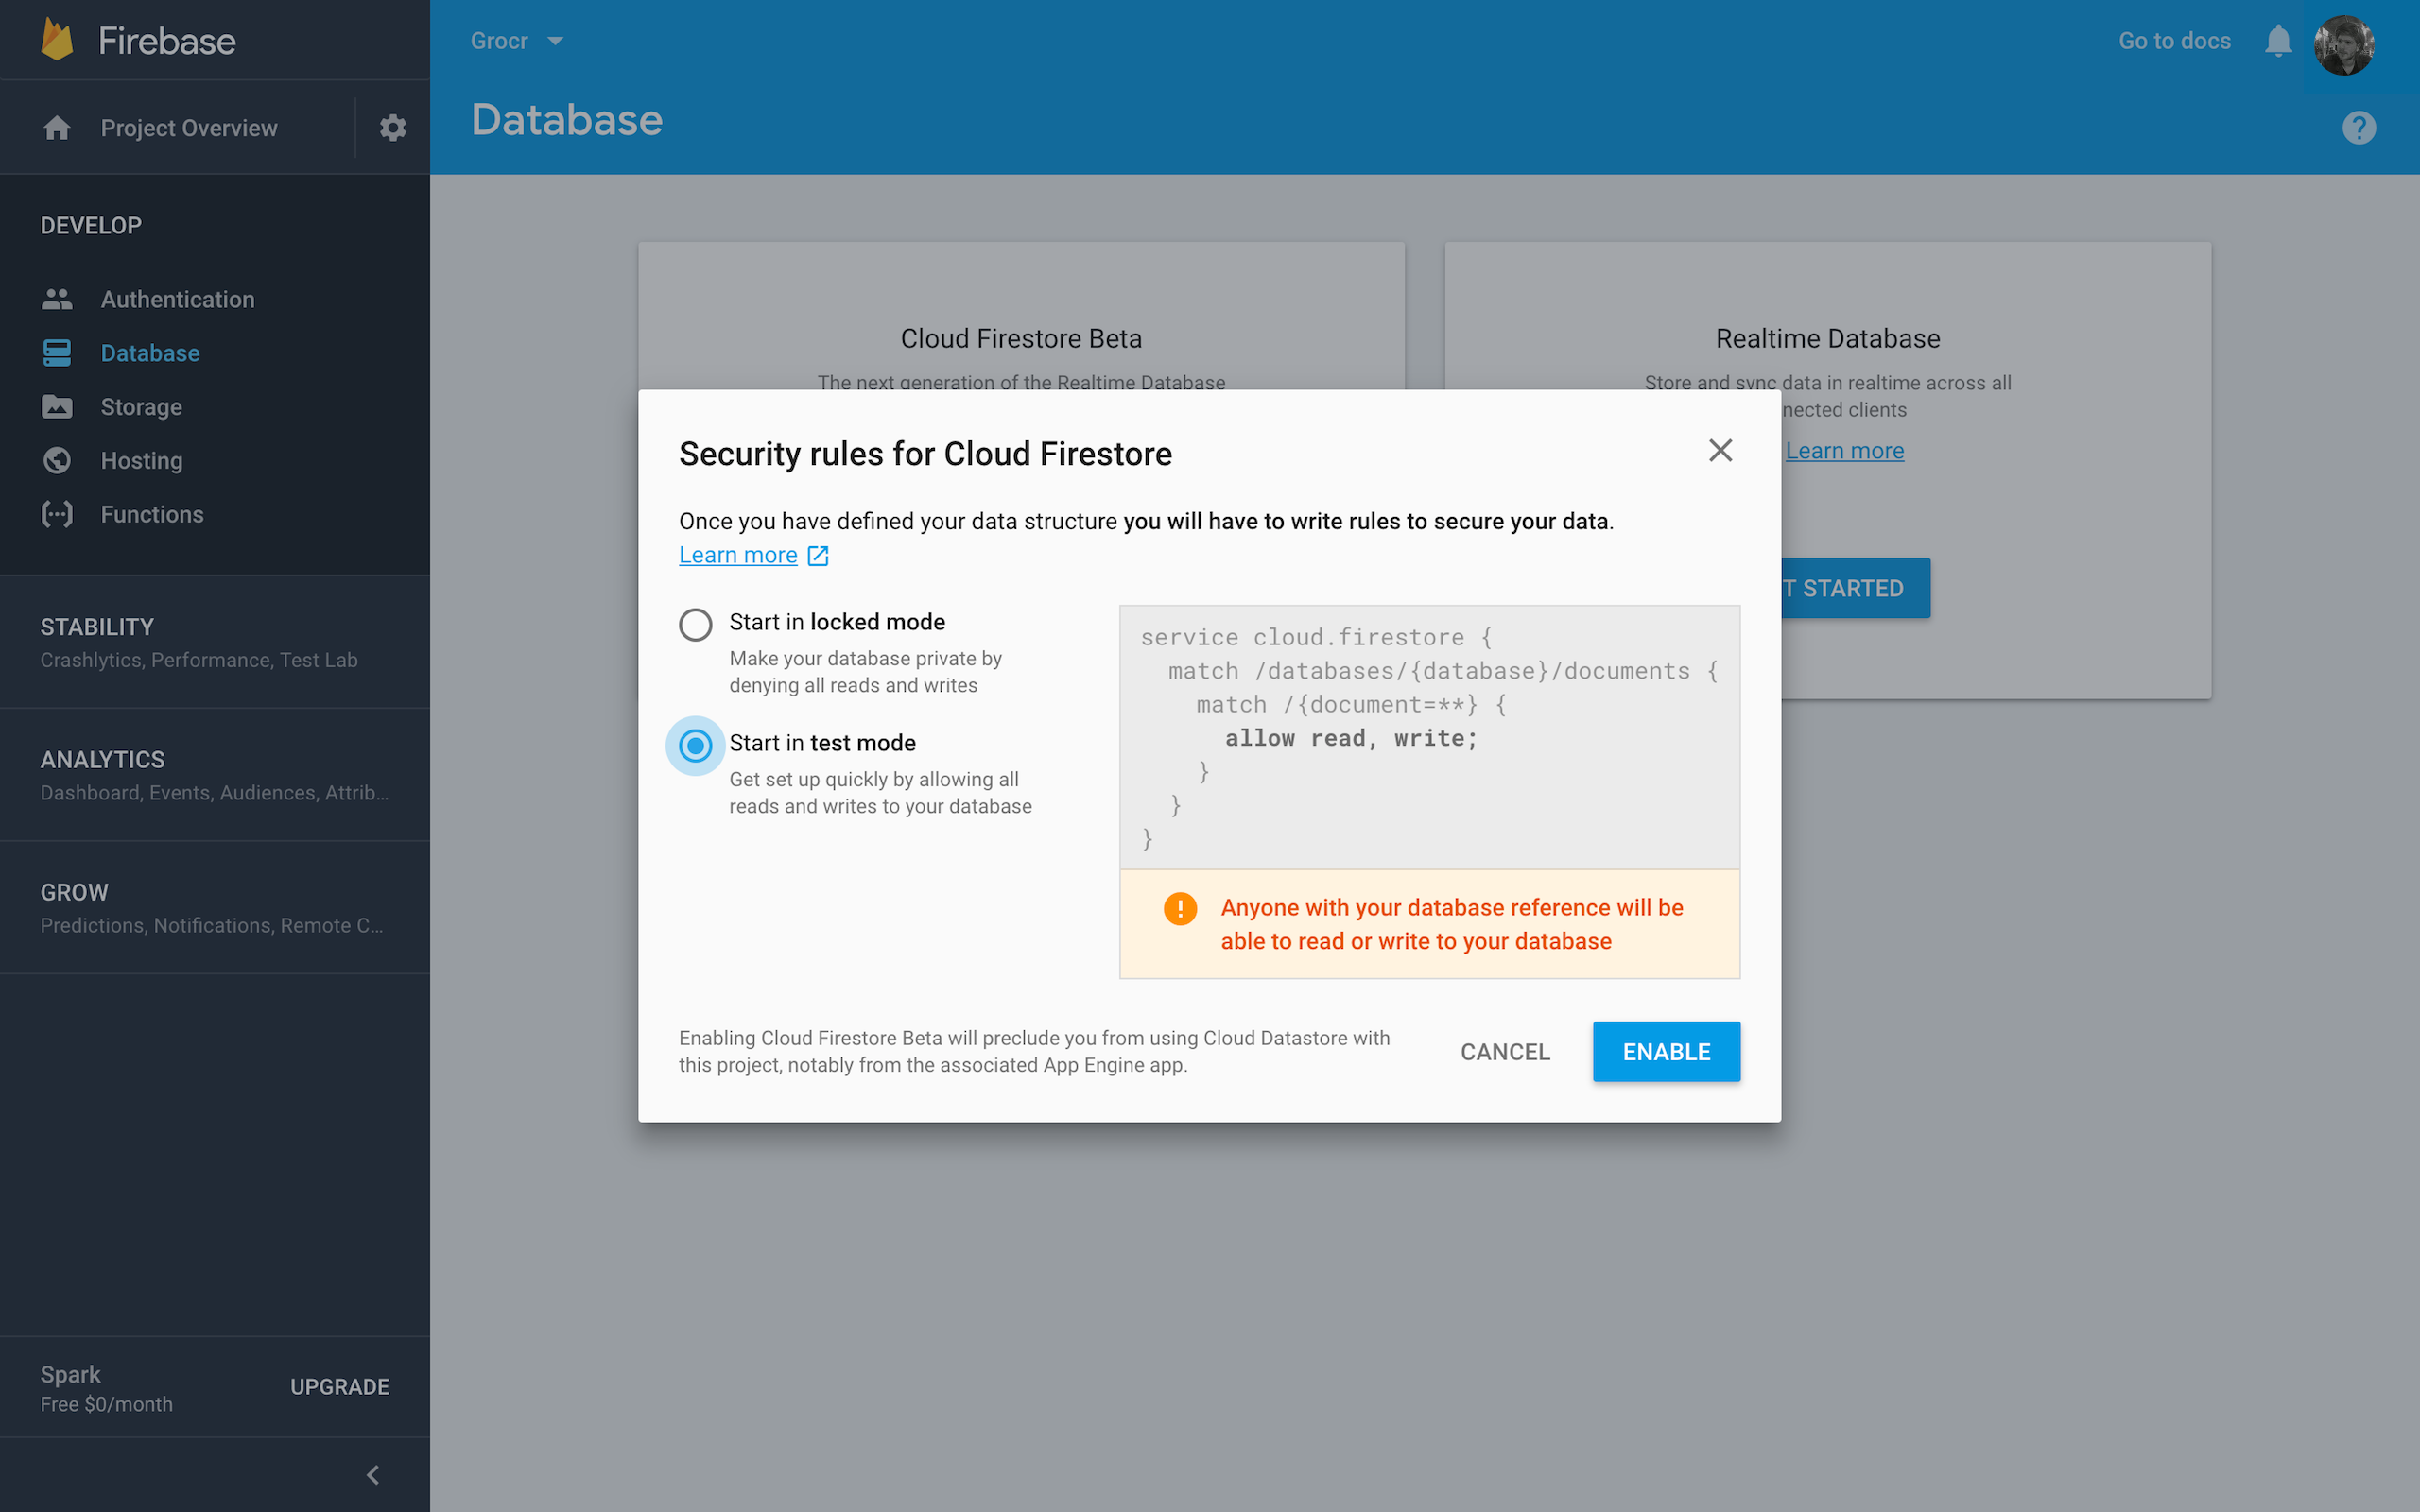
In the dialog for Security rules for Cloud Firestore, select Start in test mode and press ENABLE.

Firebase Tutorial Rules Test Mode

Cloud Firestore is an alternative to the Realtime Database and is currently in beta. If you’re curious, you can learn more about it here.

In this Firebase tutorial, you’ll use the Realtime Database instead of Cloud Firestore. Select the dropdown next to Database and pick Realtime Database.

Firebase Tutorial Change Database

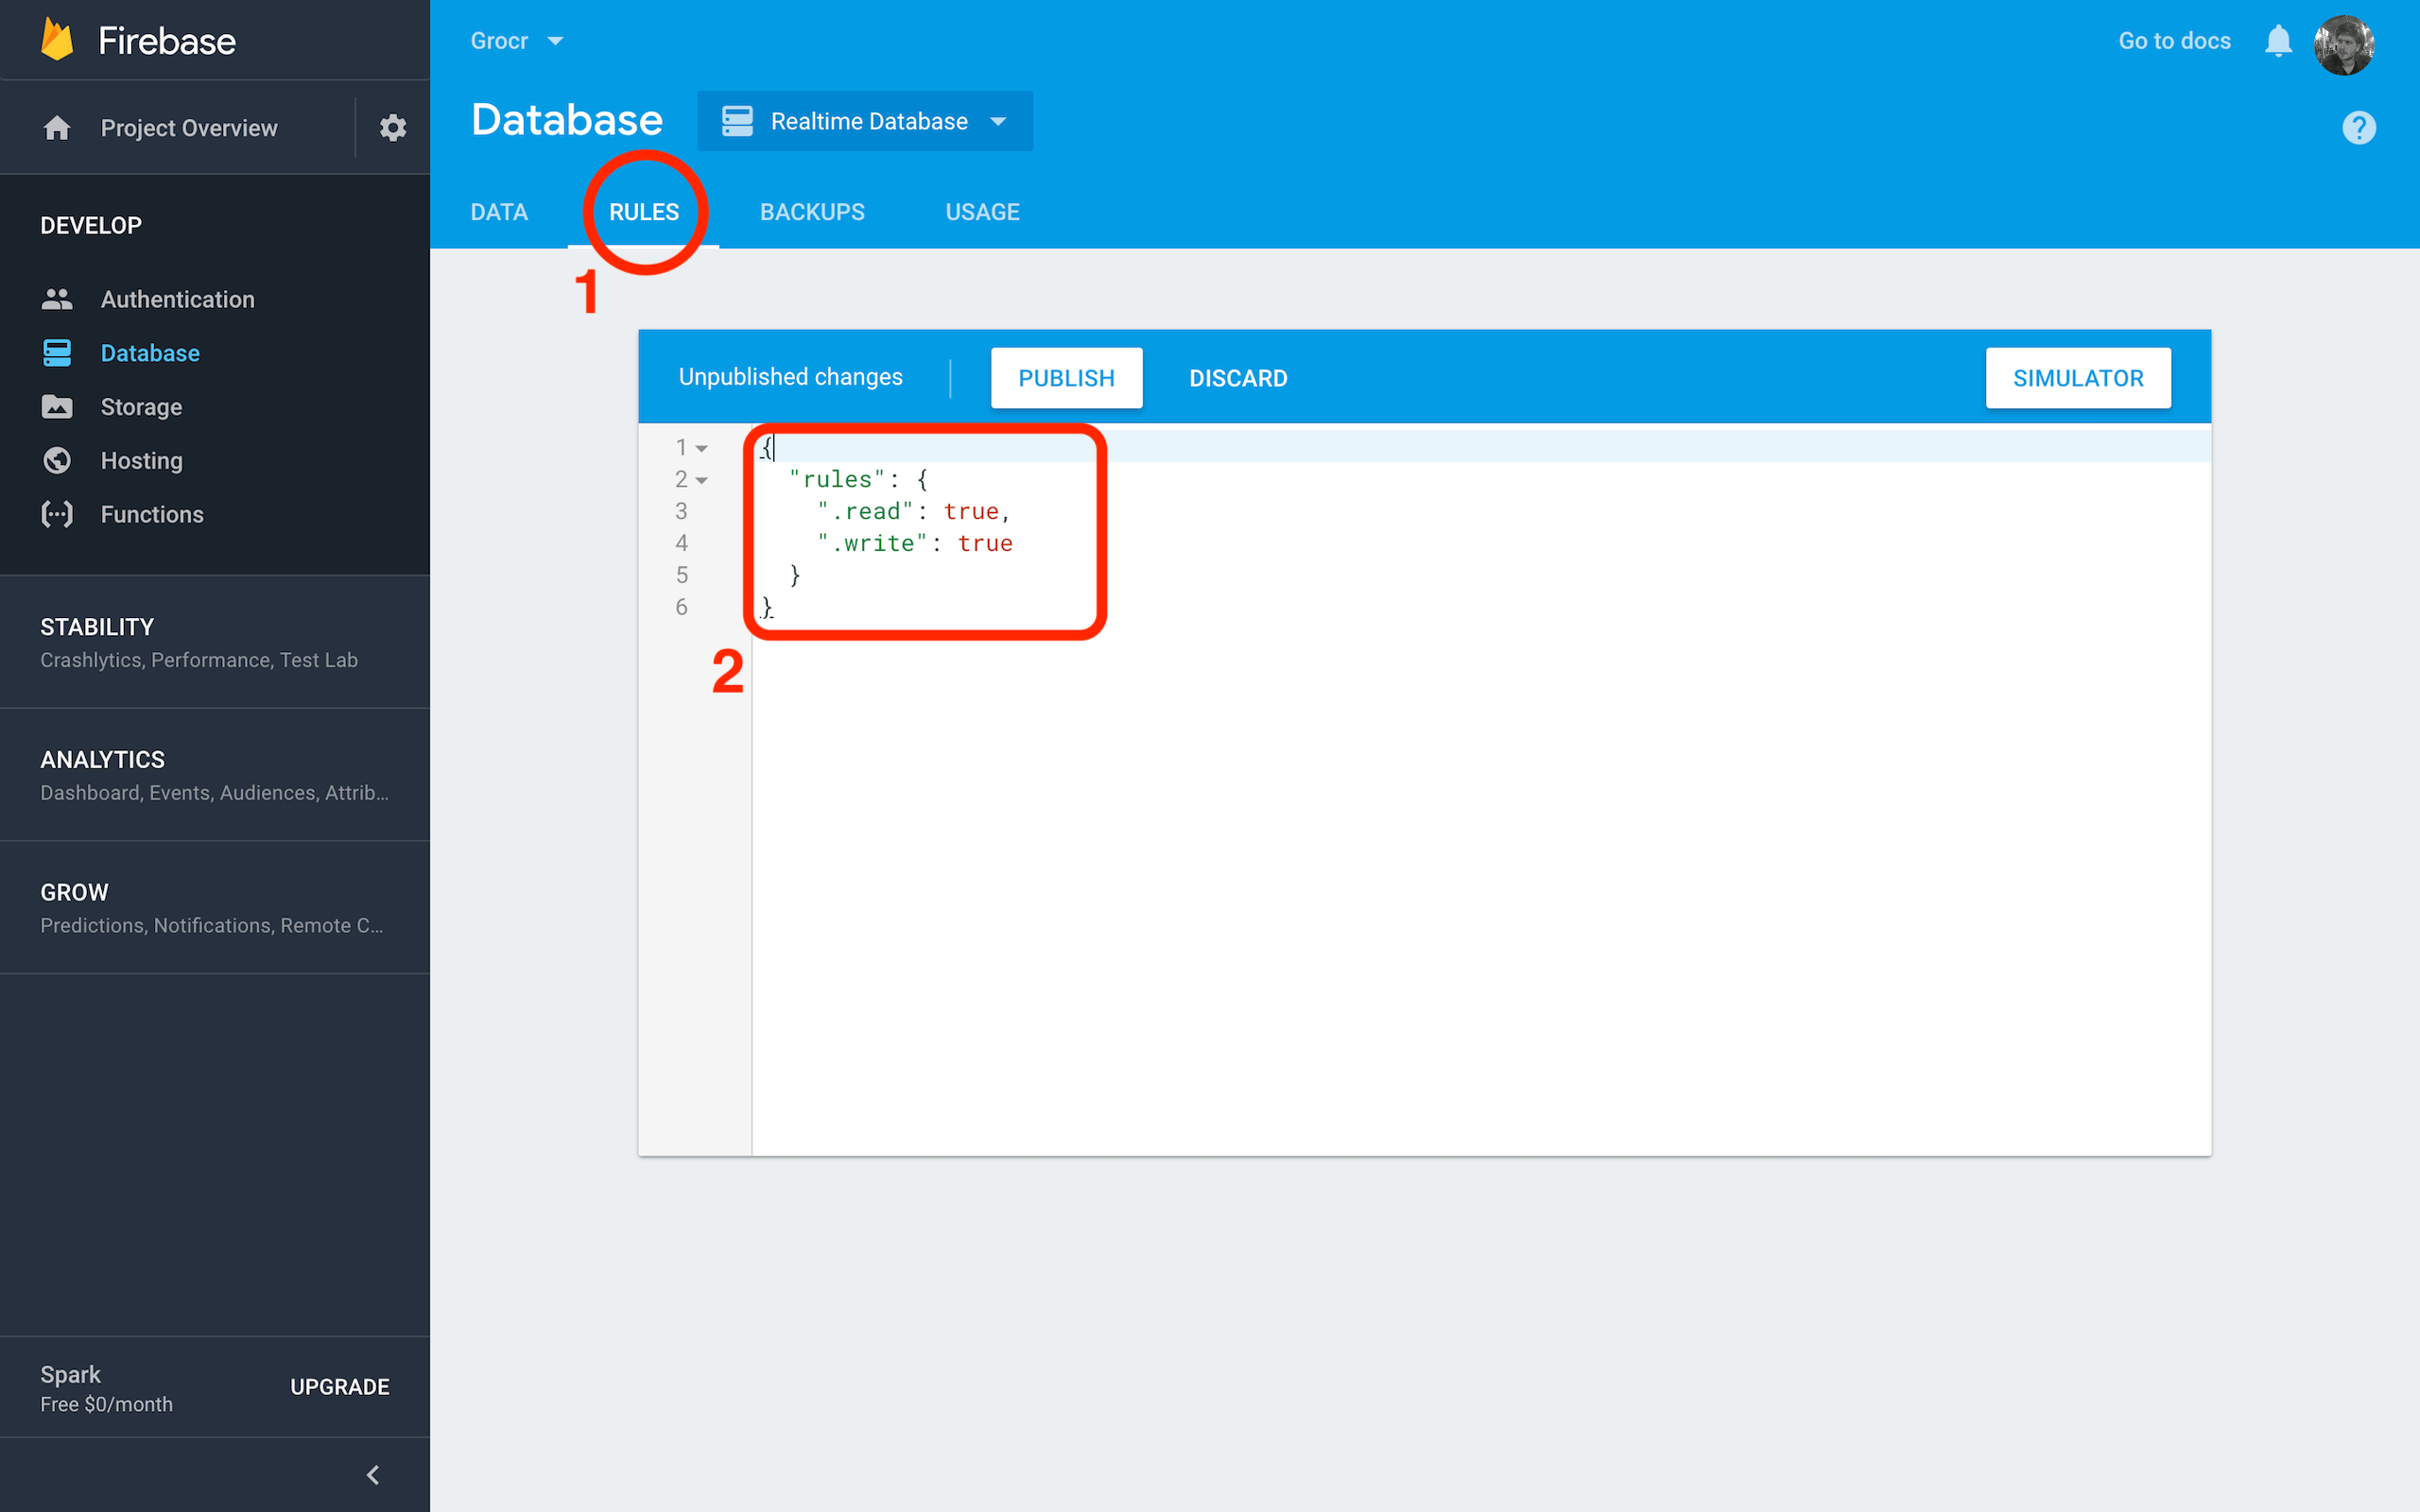
By default, the Realtime Database requires user authentication for reading and writing. When you selected test mode earlier, you set Firebase to always allow both, to make it easier during development. Select RULES and verify the following in the editor:

{
  "rules": {
    ".read": true,
    ".write": true
  }
}

Firebase Tutorial Add Rules

If they don’t match, replace them, then select the PUBLISH button to save your changes.

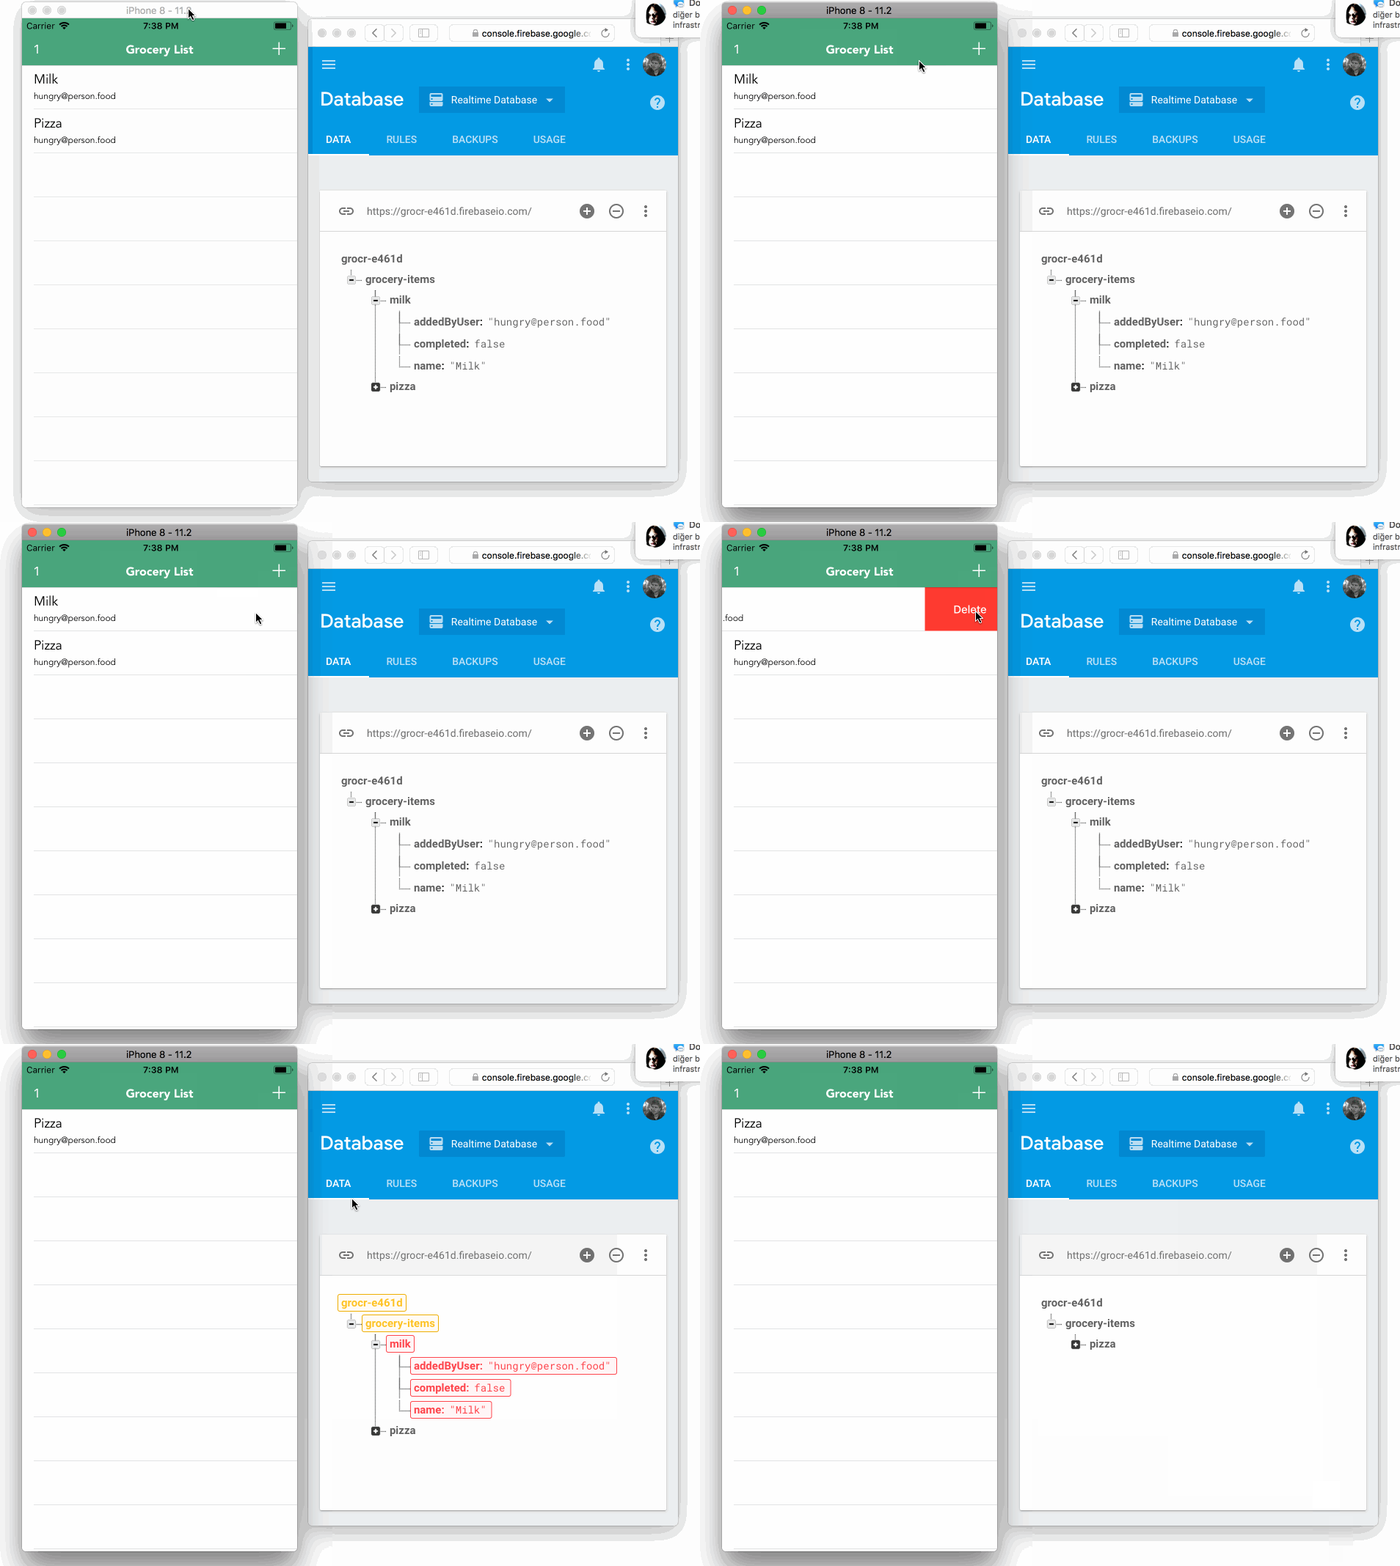
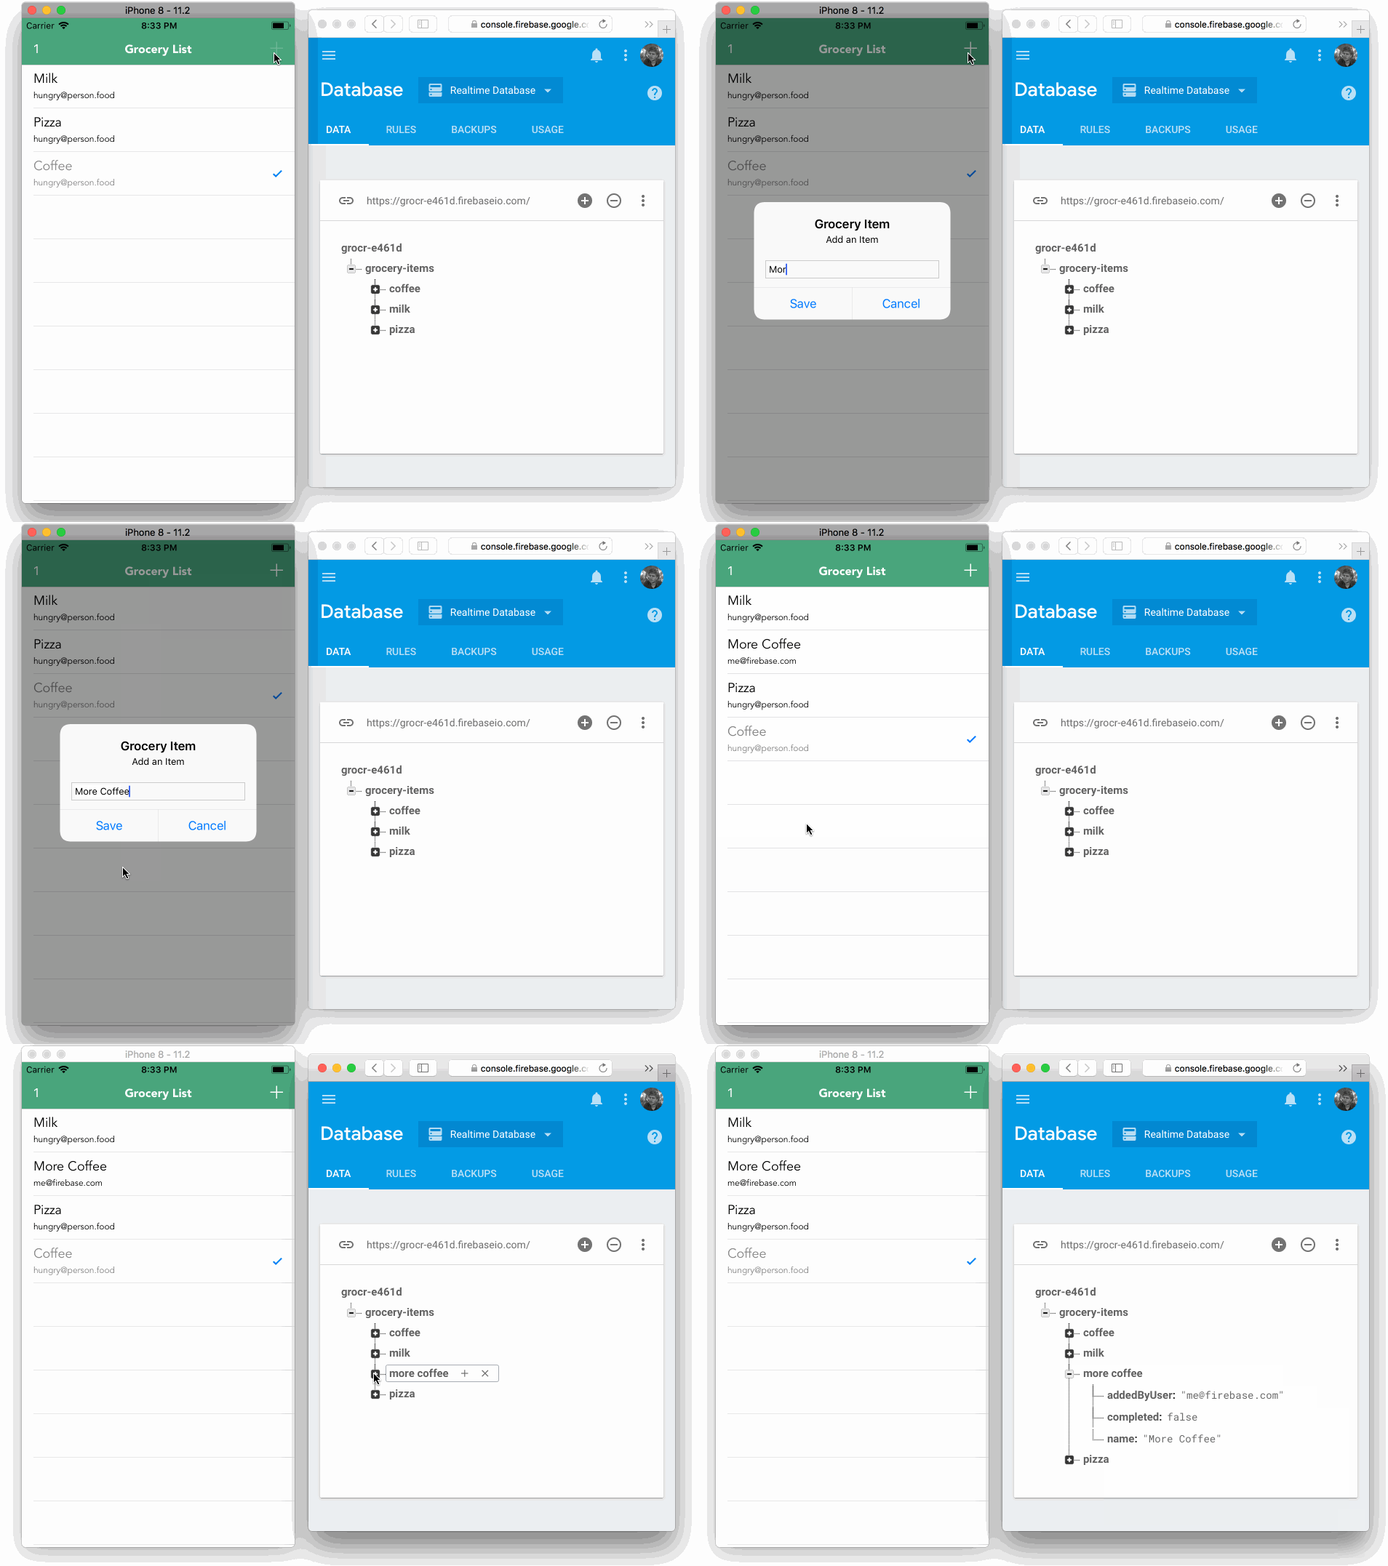
Build and run. In the Firebase dashboard, select the DATA tab and position the browser window next to the simulator. When you add an item in the simulator, you’ll see it appear in the dashboard:

Firebase Tutorial Add Item

Now you have a grocery list app that adds data to Firebase in realtime! So this key feature is working correctly, but none of the items are added to the table view.

So, how about you get that data synchronizing from the database to the table view?

Retrieving Data

You retrieve data in Firebase by attaching an asynchronous listener to a reference using observe(_:with:).

Add the following to the end of viewDidLoad() in GroceryListTableViewController.swift:

ref.observe(.value, with: { snapshot in
  print(snapshot.value as Any)
})

This method takes two parameters: an instance of DataEventType and a closure.

The event type specifies what event you want to listen for. The code listens for a .value event type, which in turn listens for all types of changes to the data in your Firebase database—add, removed, and changed.

When the change occurs, the database updates the app with the most recent data.

The app is notified of the change via the closure, which is passed an instance of DataSnapshot. The snapshot, as its name suggests, represents the data at that specific moment in time. To access the data in the snapshot, you use the value property.

Build and run and you’ll see list items logged to the console as they’re added:

Optional({
    pizza =     {
        addedByUser = "hungry@person.food";
        completed = 0;
        name = Pizza;
    };
})

Synchronizing Data to the Table View

Now it’s time to actually display the grocery list in your table view.

In GroceryListTableViewController.swift, replace the previous snippet with the following:

// 1
ref.observe(.value, with: { snapshot in
  // 2
  var newItems: [GroceryItem] = []

  // 3
  for child in snapshot.children {
    // 4
    if let snapshot = child as? DataSnapshot,
       let groceryItem = GroceryItem(snapshot: snapshot) {
      newItems.append(groceryItem)
    }
  }

  // 5
  self.items = newItems
  self.tableView.reloadData()
})

Here’s what happening:

  1. Attach a listener to receive updates whenever the grocery-items endpoint is modified.
  2. Store the latest version of the data in a local variable inside the listener’s closure.
  3. The listener’s closure returns a snapshot of the latest set of data. The snapshot contains the entire list of grocery items, not just the updates. Using children, you loop through the grocery items.
  4. The GroceryItem struct has an initializer that populates its properties using a DataSnapshot. A snapshot’s value is of type AnyObject, and can be a dictionary, array, number, or string. After creating an instance of GroceryItem, it’s added it to the array that contains the latest version of the data.
  5. Replace items with the latest version of the data, then reload the table view so it displays the latest version.

Build and run. Add an item — how about some milk? — and it will show up in the table view.

Firebase Tutorial Add Another Item

No pull-to-refresh required to get the list to update in real time!

Removing Items From the Table View

The table view will synchronize on any kind of change to your data, but right now there’s nothing to update Firebase when the user decides not to get that pizza.

To notify the database of a deletion, you need to set a Firebase reference to delete an item when the user swipes it away.

Locate tableView(_:commit:forRowAt:). Right now, this method removes a grocery item from the local array using the index path’s row. It works, but there’s a better way. Replace the existing implementation with the following:

if editingStyle == .delete {
  let groceryItem = items[indexPath.row]
  groceryItem.ref?.removeValue()
}

Firebase follows a unidirectional data flow model, so the listener in viewDidLoad() notifies the app of the latest value of the grocery list. A removal of an item triggers a value change.

The index path’s row is used to retrieve the corresponding grocery item. Each GroceryItem has a Firebase reference property named ref, and calling removeValue() on that reference causes the listener you defined in viewDidLoad() to fire. The listener has a closure attached that reloads the table view using the latest data.

Build and run. Swipe an item, tap delete and watch it vanish from both your app and in Firebase.

Firebase Tutorial Delete Item

Nice work! Your items now delete in realtime.

Checking Off Items

Now you know how to add, remove, and sync items, and that’s all pretty cool. But what about when you’re actually shopping? Should you just delete stuff that you’ve got, or would it be better to mark things off as you add them to your basket?

Back in the analog days of pens and paper, people used to cross stuff off the grocery list, so you’ll mimic that familiar behavior in this app, but with a modern twist!

When tapped, items should turn gray and show a checkmark to give the user some visual feedback that the item is no longer needed.

Firebase Tutorial Grocery List

Open GroceryListTableViewController.swift and find toggleCellCheckbox(_:isCompleted:). This method toggles the necessary view properties for UITableViewCell, depending on whether its associated item is complete.

It’s called from tableView(_:cellForRowAtIndexPath:) when the table view is first loaded, and from tableView(_:didSelectRowAt:) when the user taps on a row.

Replace the current implementation of tableView(_:didSelectRowAt:) with the following:

// 1
guard let cell = tableView.cellForRow(at: indexPath) else { return }
// 2
let groceryItem = items[indexPath.row]
// 3
let toggledCompletion = !groceryItem.completed
// 4
toggleCellCheckbox(cell, isCompleted: toggledCompletion)
// 5
groceryItem.ref?.updateChildValues([
  "completed": toggledCompletion
])

Here’s the play-by-play of what’s happening:

  1. Find the cell the user tapped using cellForRow(at:).
  2. Get the corresponding GroceryItem by using the index path’s row.
  3. Negate completed on the grocery item to toggle the status.
  4. Call toggleCellCheckbox(_:isCompleted:) to update the visual properties of the cell.
  5. Use updateChildValues(_:), passing a dictionary, to update Firebase. This method is different than setValue(_:) because it only applies updates, whereas setValue(_:) is destructive and replaces the entire value at that reference.

Build and run. Tap on an item and see that it toggles back and forth between the complete and incomplete statuses.

Firebase Tutorial Check Off Item

Congratulations, you’ve got yourself a pretty sweet grocery list app now!

Sorting the Grocery List

You know how sometimes you forget to pick up that ice cream because it’s nestled between a couple of things you’ve already marked off and your eyes played tricks on you? Well you, dear reader, can fix that.

The app would be 10x more awesome if checked items moved themselves to the bottom of the list automatically. Then the remaining items would be clear and easy for your eyes to see.

Using Firebase queries, you can sort the list by arbitrary properties. Still working in GroceryListTableViewController.swift, update the observer in viewDidLoad() as follows:

ref.queryOrdered(byChild: "completed").observe(.value, with: { snapshot in
  var newItems: [GroceryItem] = []
  for child in snapshot.children {
    if let snapshot = child as? DataSnapshot,
       let groceryItem = GroceryItem(snapshot: snapshot) {
      newItems.append(groceryItem)
    }
  }
  
  self.items = newItems
  self.tableView.reloadData()
})

To order the data by the completed value you call queryOrdered(byChild:) on the Firebase reference, which takes a key to order by.

Since the list needs to order by completed, the key completed is passed to the query. Then, queryOrdered(byChild:) returns a reference that informs the server to return data in an ordered fashion.

Build and run. Tap on a row to toggle its completion status. The completed items magically move to the bottom of the list.

Firebase Tutorial Sort By Checked Items

Wow! You’re really making grocery shopping easier here. Seems like it should be simple enough to sync the data across multiple users, for instance, with a significant other or housemate. This sounds like a job for…authentication!

Authenticating Users

Firebase has an authentication service that allows apps to authenticate through several providers. You can authenticate users with Google, Twitter, Facebook, Github, email & password, anonymous, and even custom backends. Here you’ll use email and password because it’s the easiest to set up.

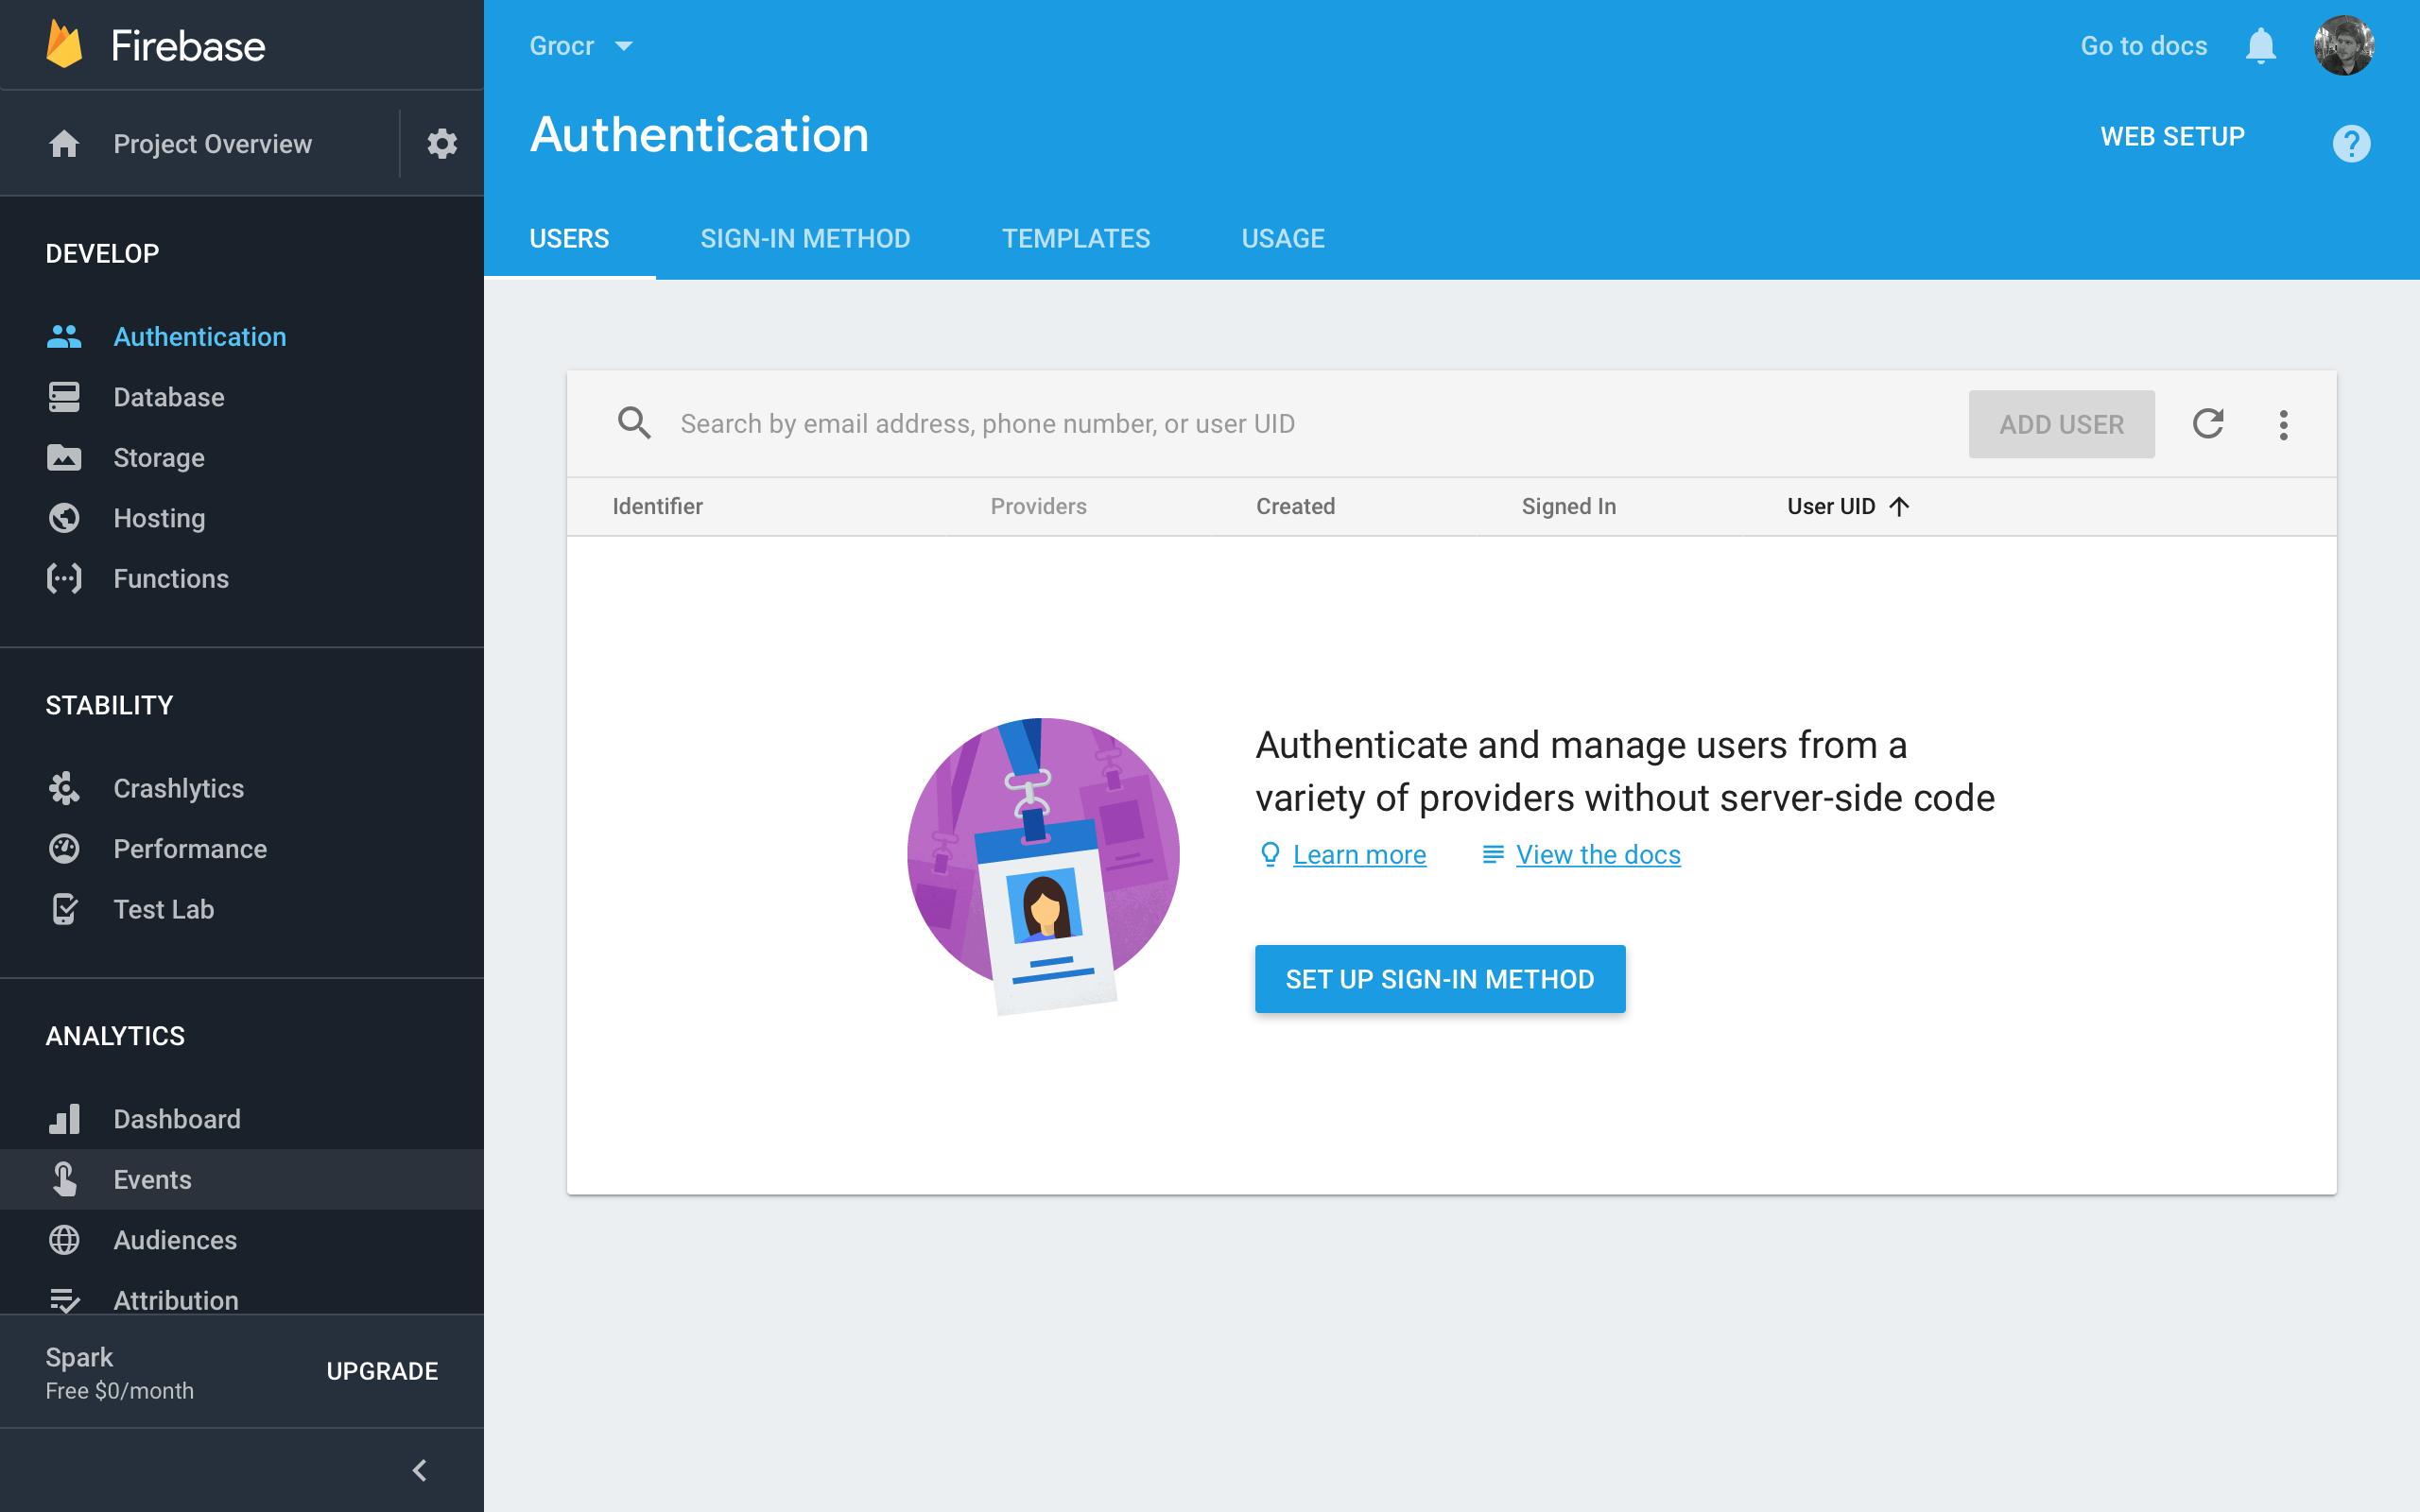
To enable email and password authentication go to the Firebase dashboard and click on Authentication.

Firebase Tutorial Authentication

Select the SIGN-IN METHOD tab and then, in the Sign-in providers section, select the Email/Password row. Click the Enable switch and click SAVE:

Firebase Tutorial Enable Email Authentication

Firebase stores credentials in the keychain, so as the last step enable Keychain Sharing in Xcode by navigating to your target’s Capabilities and toggling Keychain Sharing.

Firebase Tutorial Enable Keychain

When prompted by Xcode, select your development team. This is required so Xcode can manage signing for you and enable the capability for the App ID automatically.

Now you’re ready to authenticate users using their email and password!

Registering Users

In LoginViewController.swift, find signUpDidTouch(_:). This presents a UIAlertController that allows the user to register for an account. Locate saveAction and add the following to its closure:

// 1
let emailField = alert.textFields![0]
let passwordField = alert.textFields![1]

// 2
Auth.auth().createUser(withEmail: emailField.text!, password: passwordField.text!) { user, error in
  if error == nil {
    // 3
    Auth.auth().signIn(withEmail: self.textFieldLoginEmail.text!,
                       password: self.textFieldLoginPassword.text!)
  }
}

Here’s what’s going on in the above code:

  1. Get the email and password as supplied by the user from the alert controller.
  2. Call createUser(withEmail:password:) on the default Firebase auth object passing the email and password.
  3. If there are no errors, the user account has been created. However, you still need to authenticate this new user, so call signIn(withEmail:password:), again passing in the supplied email and password.

Build and run. Tap the Sign up button and enter an email and a password, then tap save. The view controller won’t navigate to anything on successful login just yet. If you refresh the Firebase Login & Auth tab you’ll see the newly created user.

Firebase Tutorial New User

W00T! The app now registers users and then lets them log in. Don’t celebrate yet though, you need to finish the process so people can actually use the app as intended.

Logging Users In

The Sign up button can register and log in users. However, the Login button effectively does nothing because no authentication is performed.

Still working in LoginViewController.swift, find loginDidTouch(_:) and replace its implementation with the following:

guard
  let email = textFieldLoginEmail.text,
  let password = textFieldLoginPassword.text,
  email.count > 0,
  password.count > 0
  else {
    return
}

Auth.auth().signIn(withEmail: email, password: password) { user, error in
  if let error = error, user == nil {
    let alert = UIAlertController(title: "Sign In Failed",
                                  message: error.localizedDescription,
                                  preferredStyle: .alert)
    
    alert.addAction(UIAlertAction(title: "OK", style: .default))
    
    self.present(alert, animated: true, completion: nil)
  }
}

This code will authenticate the user when they attempt to log in by tapping the Login button.

You now need to perform the segue to the next controller only when the user has logged in.

Observing Authentication State

Firebase has observers that allow you to monitor a user’s authentication state. This is a great place to perform a segue.

Add the following to LoginViewController:

override func viewDidLoad() {
  super.viewDidLoad()
  
  // 1
  Auth.auth().addStateDidChangeListener() { auth, user in
    // 2
    if user != nil {
      // 3
      self.performSegue(withIdentifier: self.loginToList, sender: nil)
      self.textFieldLoginEmail.text = nil
      self.textFieldLoginPassword.text = nil
    }
  }
}

Here’s a run-down of what’s happening:

  1. Create an authentication observer using addStateDidChangeListener(_:). The block is passed two parameters: auth and user.
  2. Test the value of user. Upon successful user authentication, user is populated with the user’s information. If authentication fails, the variable is nil.
  3. On successful authentication, perform the segue and clear the text fields’ text. It may seem strange that you don’t pass the user to the next controller, but you’ll see how to get this within GroceryListTableViewController.swift.

Setting the User in the Grocery List

Go to GroceryListTableViewController.swift, and add the following to the bottom of viewDidLoad():

Auth.auth().addStateDidChangeListener { auth, user in
  guard let user = user else { return }
  self.user = User(authData: user)
}

Here you attach an authentication observer to the Firebase auth object, which in turn assigns the user property when a user successfully signs in.

Build and run. If a user is logged in, they bypass LoginViewController and segue to the GroceryListTableViewController. When users add items, their email will show in the detail of the cell.

Firebase Tutorial Email in Cell

Logging Users Out

Since users can login in, it makes sense they should be able to log out too. Open OnlineUsersTableViewController.swift and replace the code inside signoutButtonPressed(_:) with this:

// 1
let user = Auth.auth().currentUser!
let onlineRef = Database.database().reference(withPath: "online/\(user.uid)")

// 2
onlineRef.removeValue { (error, _) in

  // 3
  if let error = error {
    print("Removing online failed: \(error)")
    return
  }

  // 4
  do {
    try Auth.auth().signOut()
    self.dismiss(animated: true, completion: nil)
  } catch (let error) {
    print("Auth sign out failed: \(error)")
  }
}

Here’s what this does:

  1. You first get the currentUser and create onlineRef using its uid, which is a unique identifier representing the user.
  2. You call removeValue to delete the value for onlineRef. While Firebase automatically adds the user to online upon sign in, it does not remove the user on sign out. Instead, it only removes users when they become disconnected. For this application, it doesn’t make sense to show users as “online” after they log out, so you manually remove them here.
  3. Within the completion closure, you first check if there’s an error and simply print it if so.
  4. You here call Auth.auth().signOut() to remove the user’s credentials from the keychain. If there isn’t an error, you dismiss the view controller. Otherwise, you print out the error.

Build and run, tap the left navigation item, press Sign Out, and you’ll be returned to the login page.

Firebase Tutorial Sign Out

Success! The app now has basic user authentication.

Monitoring Users’ Online Status

Now that the app has user authentication, its time to detect which users are online. Open GroceryListTableViewController.swift and add the following property:

let usersRef = Database.database().reference(withPath: "online")

This is a Firebase reference that points to an online location that stores a list of online users.

Next, add the following to the bottom of the addStateDidChangeListener(_:) closure inside viewDidLoad():

// 1
let currentUserRef = self.usersRef.child(self.user.uid)
// 2
currentUserRef.setValue(self.user.email)
// 3
currentUserRef.onDisconnectRemoveValue()

The code above follows these steps:

  1. Create a child reference using a user’s uid, which is generated when Firebase creates an account.
  2. Use this reference to save the current user’s email.
  3. Call onDisconnectRemoveValue() on currentUserRef. This removes the value at the reference’s location after the connection to Firebase closes, for instance when a user quits your app. This is perfect for monitoring users who have gone offline.

Build and run. When the view loads, the current user’s email is added as a child in the online location.

Firebase Tutorial Online User List

Great! Now it’s time to change the number of the bar button item as the user count grows.

Updating the Online User Count

Still working in GroceryListTableViewController.swift, add the following code to viewDidLoad():

usersRef.observe(.value, with: { snapshot in
  if snapshot.exists() {
    self.userCountBarButtonItem?.title = snapshot.childrenCount.description
  } else {
    self.userCountBarButtonItem?.title = "0"
  }
})

This creates an observer that is used to monitor online users. When users go online and offline, the title of userCountBarButtonItem updates with the current user count.

Displaying a List of Online Users

Open OnlineUsersTableViewController.swift and, just as you did before, add a local reference to Firebase’s online users record in the class’s property section:

let usersRef = Database.database().reference(withPath: "online")

Then, in viewDidLoad(), replace:

currentUsers.append("hungry@person.food")

with the following:

// 1
usersRef.observe(.childAdded, with: { snap in
  // 2
  guard let email = snap.value as? String else { return }
  self.currentUsers.append(email)
  // 3
  let row = self.currentUsers.count - 1
  // 4
  let indexPath = IndexPath(row: row, section: 0)
  // 5
  self.tableView.insertRows(at: [indexPath], with: .top)
})

Here’s what’s happening in the code:

  1. Create an observer that listens for children added to the location managed by usersRef. This is different than a value listener because only the added child is passed to the closure.
  2. Take the value from the snapshot, and then append it to the local array.
  3. The current row is always the count of the local array minus one because the indexes managed by the table view are zero-based.
  4. Create an instance NSIndexPath using the calculated row index.
  5. Insert the row using an animation that causes the cell to be inserted from the top.

This will only render items as they are added rather than reloading the entire list, and it also gives you the ability to specify a nice animation. :]

Since users can go offline, the table needs to react to users being removed as well. Add the following below the code you just added:

usersRef.observe(.childRemoved, with: { snap in
  guard let emailToFind = snap.value as? String else { return }
  for (index, email) in self.currentUsers.enumerated() {
    if email == emailToFind {
      let indexPath = IndexPath(row: index, section: 0)
      self.currentUsers.remove(at: index)
      self.tableView.deleteRows(at: [indexPath], with: .fade)
    }
  }
})

This simply adds an observer that listens for children of the usersRef reference being removed. It searches the local array for the email value to find the corresponding child item, and once located, it deletes the associated row from the table.

Build and run.

Tap Online in the Firebase users dashboard, and the current user’s email will appear in the table. Using a bit of trickery, it’s possible to add a user to Online, and once you do, it shows in the list. Click the Remove button in the Dashboard and the user fades from existence.

Firebase Tutorial Display Online User List

Booyah! The table updates when users are added and removed.

Enabling Offline

Grocery stores are notorious for spotty data connections. You’d think they’d all have Wi-Fi now, but no!

No problem, you’ll just set up your database to work offline. Open AppDelegate.swift and add the following to the end of application(_:didFinishLaunchingWithOptions:), before return true:

Database.database().isPersistenceEnabled = true

Yup, that’s it! Just like that your app works offline. Even offline updates that occur across app restarts will apply to your Firebase database once a connection is made. Oooh-ahhhh!

Where To Go From Here?

You can get the completed version of Grocr from the downloadable materials below.

Note: You still have to add your own GoogleService-Info.plist after downloading the final project.

Throughout this Firebase tutorial, you’ve learned the basics of Firebase by building a collaborative grocery list app. You’ve implemented saving data to a Firebase database, syncing data in realtime, authenticating users, monitoring online user status and enabling offline support. And you did all this without writing a single line of server code! :]

To learn more about Firebase, please check out the documentation and the examples provided by Firebase themselves.

If you have any comments or questions about this Firebase tutorial, Firebase, or the sample app, please join the forum discussion below!

The post Firebase Tutorial: Getting Started appeared first on Ray Wenderlich.

Video Tutorial: Beginning RxSwift Part 3: Challenge: Improve GitFeed

Video Tutorial: Beginning RxSwift Part 3: Conclusion

Viewing all 4396 articles
Browse latest View live


<script src="https://jsc.adskeeper.com/r/s/rssing.com.1596347.js" async> </script>