Quantcast
Channel: Kodeco | High quality programming tutorials: iOS, Android, Swift, Kotlin, Unity, and more
Viewing all 4396 articles
Browse latest View live

Android Networking Tutorial: Getting Started

$
0
0

Update Note: This tutorial is now up to date with the latest version of Android Studio version 3.1.2, and uses Kotlin for app development. Update by Fuad Kamal. Original tutorial by Eunice Obugyei.

android-networking-feature

Networking has played a critical role in Android apps since the very beginning of Android development. Most apps don’t work in isolation; rather, they connect to an online service to retrieve data or perform other networking functions.

In this Android networking tutorial, you will create a simple app which connects to the GitHub API to retrieve and display a list of repositories.

In the process, you will learn about the following:

  • How to check your network connection status.
  • How to perform network operations.
  • How to leverage open source libraries to perform network operations.
  • How to profile the network performance of your app.

By the end of this tutorial, you will have built the GitHubRepoList app that runs a search query against the GithHub API and displays the results:

Sample project

Note: This tutorial assumes you’re already familiar with the basics of Android development. If you are completely new to Android development, read through our
Beginning Android Development
tutorials to familiarize yourself with the basics.

Getting Started

Download the materials for this tutorial and unzip the projects. Open the starter project in Android Studio 3.1.2 or greater by selecting Open an existing Android Studio project from the Welcome to Android Studio window:

Welcome to Android Studio

You can also use File > Open in Android Studio. Navigate to and select the starter project folder.

Open MainActivity.kt from the ui.activities package and look inside; the app is using a simple RecyclerView named repoList and populating it with a hard-coded list of repository names.

Build and run the project to see what you have to work with:

Starter app

Required Permissions

To perform network operations in Android, your application must include certain permissions. Open manifests/AndroidManifest.xml, and add the following permissions before the application tag:

<uses-permission android:name="android.permission.ACCESS_NETWORK_STATE"/>
<uses-permission android:name="android.permission.INTERNET" />

The ACCESS_NETWORK_STATE permission is required for your application to check the network state of the device, while the INTERNET permission is required for your application to access the Internet.

Before adding any Kotlin code, you’ll need to configure Android Studio to automatically insert import statements to save you from having to add each one manually.

Go to Android Studio > Preferences on macOS or File > Settings on PC, then go to Editor > General > Auto Import, select the Add unambiguous imports on the fly and Optimize imports on the fly (for current project) checkboxes and click OK.

Making a Network Request

MainActivity.kt defines a value url that contains the first network request you will make, but up until now you haven’t used it. The url value is a search using the Github API, for repositories containing the term “mario” written in Kotlin. You want to start with a narrow search so you aren’t overwhelmed with too much data at a first. Add the following code to the end of onCreate():

doAsync {
  Request(url).run()
  uiThread { longToast("Request performed") }
}

Request is a placeholder class provided in the starter project, inside the data package.

Network requests are not allowed on the app main thread, also called the UI thread. Blocking the main thread would not only make for a bad user experience, but also the Android system would cause your app to throw an exception. doAsync() is part of a Domain Specfic Language or DSL provided by the Kotlin library Anko which provides a simple way to execute code on a thread other than the main thread, with the option to return to the main thread by calling uiThread().

Open Request.kt and replace the TODO comment in the run() function with the following two lines of code:

val repoListJsonStr = URL(url).readText()
Log.d(javaClass.simpleName, repoListJsonStr) 

That’s it! The readText() command makes the network request. The Log.d() call writes the network response to Logcat.

In one line of Kotlin you’ve managed to do what used to take a lot of complicated Java code. That’s one of the many benefits of Kotlin. It’s very concise and avoids a lot of the boilerplate code you used to have to write in Java.

readText() does have an internal limit of 2 GB file size. This should be fine in most cases, but if you are anticipating a huge response that will exceed that limit, there are many other extensions you can use, such as BufferedReader.forEachLine(), or you can use a third party networking library, as discussed later in this tutorial.

Build and run. The UI hasn’t changed at all in the emulator – it’s still showing the hard-coded list from before.

In Android Studio, click on the Logcat tab at the bottom of the screen, and you should see a bunch of JSON received in response to the network request you made. Tap the Use Soft Wraps button on the left toolbar to better see the JSON response.

JSON response in Logcat

Congratulations! You’ve already made your first network request with Android and Kotlin.

Checking the Network Connection

To provide a good user experience, you should be checking whether the user has a network connection before making the request. Add the following method to MainActivity:

private fun isNetworkConnected(): Boolean {
  val connectivityManager = getSystemService(Context.CONNECTIVITY_SERVICE) as ConnectivityManager //1
  val networkInfo = connectivityManager.activeNetworkInfo //2
  return networkInfo != null && networkInfo.isConnected //3
}

isNetworkConnected() checks that the device has an active Internet connection as follows:

  1. Retrieves an instance of the ConnectivityManager class from the current application context.
  2. Retrieves an instance of the NetworkInfo class that represents the current network connection. This will be null if no network is available.
  3. Check if there is an available network connection and the device is connected.

Now replace the doAsync{…} code in the onCreate() method with the following:

if (isNetworkConnected()) {
  doAsync {
    Request(url).run()
    uiThread { longToast("Request performed") }
  }
} else {
  AlertDialog.Builder(this).setTitle("No Internet Connection")
      .setMessage("Please check your internet connection and try again")
      .setPositiveButton(android.R.string.ok) { _, _ -> }
      .setIcon(android.R.drawable.ic_dialog_alert).show()
}

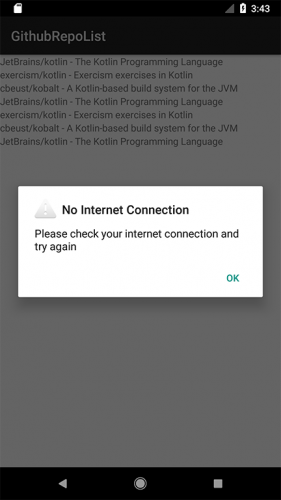
This code first checks to see if there is a network connection. If there is one, the app makes the network request, otherwise it displays an alert to the user instead.

Set a breakpoint on the if expression and be sure to debug (not just run) your app by pressing the icon in Android Studio that looks like a little bug with a play button on it.

Debug button

Android Studio will build and run your app, and then pause execution at the if statement. Now you can “step over” the code by pressing the step over button in the debug pane. If your emulator has a network connection, again the doAsync block should execute and you will see the resulting JSON response in the Logcat tab.

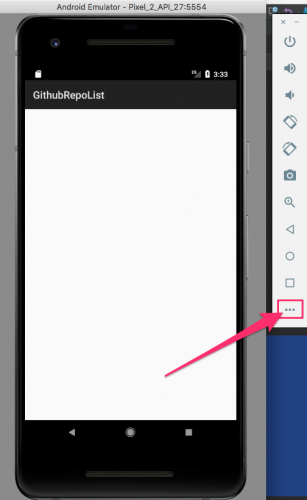
In the emulator, turn off WiFi if it’s on by swiping down from the top and toggling WiFi off. Then press the ... button at the bottom of the list of controls to open up the Extended controls window.

Extended controls

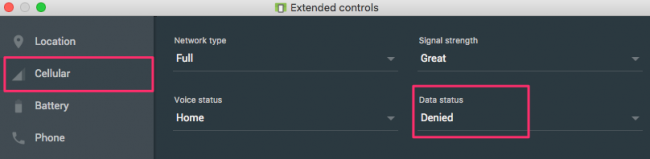
Click on the Cellular tab. To emulate no connection, set Data status to Denied. The Network Type and Signal Strength settings do not matter in this case.

Data status

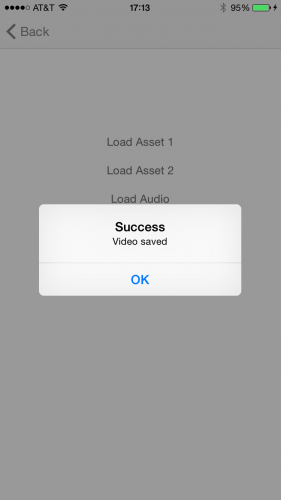
Debug your app again. This time, when you step over your code, it should go into the else clause and an alert should show up on the emulator:

No network

Be sure to set the Data status back to ‘Home’ for the rest of this tutorial. :]

Updating the UI

Now that you’re successfully making a network request when the user’s device has connectivity, you will update the UI so you can see the results on screen.

First, you need to define a data model that makes some sense of the JSON you are getting back from your response.

Right-click on the data package in the project, and from the context menu select New > Kotlin File/Class.

In the dialogue, name it Response and choose File for the type.

New file dialog

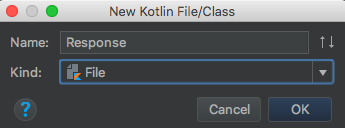
The file Response.kt will open. Enter the following code:

data class RepoResult(val items: List<Item>)

data class Item(
    val id: Long?,
    val name: String?,
    val full_name: String?,
    val owner: Owner,
    val private: Boolean,
    val html_url: String?,
    val description: String?)

data class Owner(val login: String?, val id: Long?, val avatar_url: String?)

In Kotlin, a data class is a convenient way to express a value object.

Now that you have a RepoResult, which in turn is a list of Item objects from your JSON response, you need to also modify the Adapter for your RecyclerView to accept this more complex object instead of the list of hard coded strings you were sending it before.

Open RepoListAdapter.kt and replace the contents below the package statement with the following:

import android.support.v7.widget.RecyclerView
import android.view.LayoutInflater
import android.view.View
import android.view.ViewGroup
import com.raywenderlich.githubrepolist.R
import com.raywenderlich.githubrepolist.data.Item
import com.raywenderlich.githubrepolist.data.RepoResult
import com.raywenderlich.githubrepolist.extensions.ctx
import kotlinx.android.synthetic.main.item_repo.view.* //1

class RepoListAdapter(private val repoList: RepoResult) : RecyclerView.Adapter<RepoListAdapter.ViewHolder>() {

  override fun onCreateViewHolder(parent: ViewGroup, viewType: Int): ViewHolder {
    val view = LayoutInflater.from(parent.ctx).inflate(R.layout.item_repo, parent, false) //2
    return ViewHolder(view)
  }


  override fun onBindViewHolder(holder: ViewHolder, position: Int) {
    holder.bindRepo(repoList.items[position]) //3
  }

  override fun getItemCount(): Int = repoList.items.size //4

  class ViewHolder(view: View) : RecyclerView.ViewHolder(view) {
    fun bindRepo(repo: Item) { //5
      with(repo) { 
        itemView.username.text = repo.owner.login.orEmpty() //6
        itemView.repoName.text = repo.full_name.orEmpty() //7
        itemView.repoDescription.text = repo.description.orEmpty()
      }
    }
  }
}

Here’s what’s going on in the updated class:

  1. You are able to reference view components from the XML layout directly from your Kotlin code. This is because you are making use of Kotlin Android Extensions with this import statement.
  2. R.layout.item_repo is the layout defined in item_repo.xml
  3. You reference your position in the list of Items rather than the the position in the hardcoded list.
  4. Likewise your list size is now set by the response rather than the hardcoded list.
  5. You are passing in the Item type you defined earlier in your data class.
  6. You populate the username text defined in item_repo.xml with the Owner.login defined in your data class definitions. An important best practice when dealing with JSON responses from an API is not to assume that every value will always be non-empty. So, if there is no value for the field, you just make it an empty string. This also illustrates some of the safety features of Kotlin; your app won’t be crashing because it tried to access a null value.
  7. Likewise, you populate the name of the repository and the repository description.

Next, open the build.gradle file of the app module and add the following to the list of dependencies:

implementation 'com.google.code.gson:gson:2.8.2'

This will let you use the GSON library in your code.

Click the Make Project button at the top of Android Studio.

Make project

Open Request.kt and replace the entire class definition of Request with the following:

class Request() {

  companion object { //1
    private val URL = "https://api.github.com/search/repositories"
    private val SEARCH = "q=mario+language:kotlin&sort=stars&order=desc"
    private val COMPLETE_URL = "$URL?$SEARCH"
  }
  
  fun run(): RepoResult { //2
    val repoListJsonStr = URL(COMPLETE_URL).readText() //3
    return Gson().fromJson(repoListJsonStr, RepoResult::class.java) //4
  }
}

Here:

  1. You define a companion object to hold the API endpoint (URL), a search term, and then the combined API endpoint + search term. You could populate these from user input fields in the UI later if you want to.
  2. The run() method now returns a data structure RepoResult which you defined in Response.kt.
  3. Again, you execute the actual request using readText().
  4. You use the GSON library to parse the JSON into your data structure.

Open MainActivity and in onCreate() remove setting the repoList.adapter near the top of the method. Then update the code inside the first block of the if expression with the following:

doAsync {
  val result = Request().run()
  uiThread {
    repoList.adapter = RepoListAdapter(result)
  }
}

You have replaced the toast message with a single line of code that updates the Recycler View with the response from your network call.

You can also delete the declaration for the items property, as you are no longer using the hard-coded list.

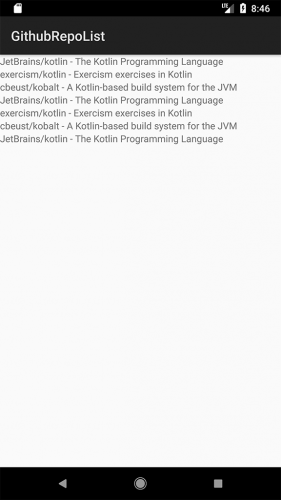
Build and run. You should now see a list of repositories from GitHub in your UI:

Repositories

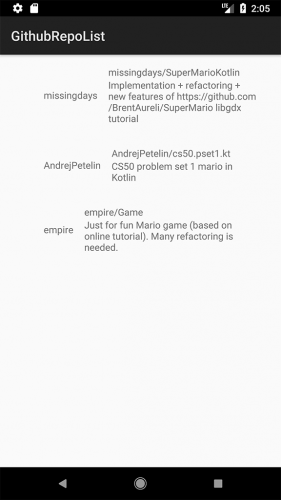
Cool – your app connected to the GitHub API and retrieved a list of repositories for your perusal!

A Longer Search Result

Long list

Logcat itself has a limit, so if you had a very big search result earlier, you wouldn’t have been able to see the entire JSON result there.

Now that you are populating the UI with your actual search result, you are no longer concerned with dealing with a huge JSON result. The longer the result, the more you can see and scroll in your UI. So, why not have a look at all the Kotlin repositories on Github!

Open the Request class and replace the search parameter with the following:

private val SEARCH = "q=language:kotlin&sort=stars&order=desc"

Build and run. You should now see a much longer search result:

Longer result

Go ahead and scroll the screen. Enjoy that silky smooth motion.

Smooth scrolling

Actually, at the time of this writing, there aren’t that many Kotlin repositories. Which is great news for you because it means you are learning a brand-new language that is still somewhat niche and can earn you big bucks.

Money!

Open Source To The Rescue

Back in the Java days, performing network operations on Android used to be tedious. But with Kotlin, it’s super simple.

Yet there are still occasions where you might want to use a third party networking library. Next up, you will update your app to use the most popular of these libraries, Retrofit from Square, and as a bonus pretty up the UI with some images.

Retrofit

Retrofit is an Android and Java library which is great at retrieving and uploading structured data such as JSON and XML. Retrofit makes HTTP requests using another library from Square, OkHttp.

OkHttp is an efficient HTTP client which supports synchronous and asynchronous calls. It handles the opening and closing of connections along with InputStream-to-string conversion. It’s compatible with Android 2.3 and above.

Retrofit also lets you specify any of the following libraries for the data conversion:

  1. Gson
  2. Jackson
  3. Moshi
  4. Protobuf
  5. Wire
  6. Simple XML
  7. Scalars (primitives, boxed, and String)

To use Retrofit, add the following dependencies to build.gradle of the app module and resync your Gradle files:

implementation 'com.squareup.retrofit2:retrofit:2.3.0'
implementation 'com.squareup.retrofit2:converter-gson:2.3.0'

Also, delete the GSON dependency you added earlier (implementation 'com.google.code.gson:gson:2.8.2'); you’ll no longer need it since the parsing will be handled by the libraries specified with Retrofit.

Finally, for all these dependencies, the version numbers above are what was available at the time this tutorial was written. You should check what the current versions are and use those in your build.gradle file.

Click the Make Project button at the top of Android Studio.

Next, create a new package in your app called api by right-clicking on the root package and picking New > Package.

Right-click on the api package and from the context menu select New > Kotlin File/Class. Give it the name GithubService and for Kind select Interface:

New file

Replace the contents of GithubService.kt below the package statement with the following:

import com.raywenderlich.githubrepolist.data.RepoResult
import retrofit2.Call
import retrofit2.http.GET

interface GithubService {
  @GET("/repositories")
  fun retrieveRepositories(): Call<RepoResult>

  @GET("/search/repositories?q=language:kotlin&sort=stars&order=desc") //sample search
  fun searchRepositories(): Call<RepoResult>
}

You’ve create an interface for use with Retrofit to connect to the GitHub api. You’ve added two methods to the interface with @GET annotations that specify the GitHub endpoints to make GET requests to.

Now make a second file in the api package, but for the Kind select Class, and name it RepositoryRetriever. Replace the empty class with the following:

class RepositoryRetriever {
  private val service: GithubService

  companion object {
    const val BASE_URL = "https://api.github.com/"  //1
  }

  init {
    // 2
    val retrofit = Retrofit.Builder()
        .baseUrl(BASE_URL) //1
        .addConverterFactory(GsonConverterFactory.create()) //3
        .build()
    service = retrofit.create(GithubService::class.java) //4
  }

  fun getRepositories(callback: Callback<RepoResult>) { //5
    val call = service.searchRepositories()
    call.enqueue(callback)
  }
}

Be sure to use the Retrofit import for the Callback:

import retrofit2.Callback

RepositoryRetriever does the following:

  1. Specifies the base URL
  2. Creates a Retrofit object
  3. Specifies GsonConverterFactory as the converter which uses Gson for its JSON deserialization.
  4. Generates an implementation of the GithubService interface using the Retrofit object
  5. Has a method to create a Retrofit Call object on which you enqueue() a network call, passing in a Retrofit callback. A successful response body type is set to RepoResult

The Retrofit enqueue() method will perform your network call off the main thread.

Finally, you need to modify MainActivity to use Retrofit for making the network request and handling the response.

First, add the following to properties at the top of MainActivity:

private val repoRetriever = RepositoryRetriever() // 1

// 2
private val callback = object : Callback<RepoResult> {
  override fun onFailure(call: Call<RepoResult>?, t: Throwable?) {
    Log.e("MainActivity", "Problem calling Github API", t)
  }

  override fun onResponse(call: Call<RepoResult>?, response: Response<RepoResult>?) {
    response?.isSuccessful.let {
      val resultList = RepoResult(response?.body()?.items ?: emptyList())
      repoList.adapter = RepoListAdapter(resultList)
    }
  }
}

Your two properties are:

  1. A RepositoryRetriever.
  2. A Retrofit Callback object that has two overrides,
    onFailure()
    and onResponse().

In the success callback method, you update the RecyclerView adapter with the items in the response.

Update onCreate() method to delete the doAsync{…} block and replace it with a call to the RepositoryRetriever:

override fun onCreate(savedInstanceState: Bundle?) {
  super.onCreate(savedInstanceState)
  setContentView(R.layout.activity_main)

  repoList.layoutManager = LinearLayoutManager(this)

  if (isNetworkConnected()) {
    repoRetriever.getRepositories(callback)
  } else {
    AlertDialog.Builder(this).setTitle("No Internet Connection")
        .setMessage("Please check your internet connection and try again")
        .setPositiveButton(android.R.string.ok) { _, _ -> }
        .setIcon(android.R.drawable.ic_dialog_alert).show()
  }
}

If Android Studio has trouble with generating the imports, add the following three imports get added to the class:

import retrofit2.Call
import retrofit2.Callback
import retrofit2.Response

Build and run to verify everything still works. Your app should look the same. But now you’re using Retrofit to handle networking under the hood.

Network Profiling

OkHttp contains a logging interceptor that you could use to log network requests and responses that you make with Retrofit, which can help wih debugging your network calls. However, Android Studio 3.0 introduced the Android Network Profiler, which replaces the need for the logging interceptor.

Instead of running or debugging your app, click the Android Profiler icon at the top right corner in Android Studio:

Profiler button

Your app will build and run like before, but now the Android Profiler tab will also open:

Android Profiler

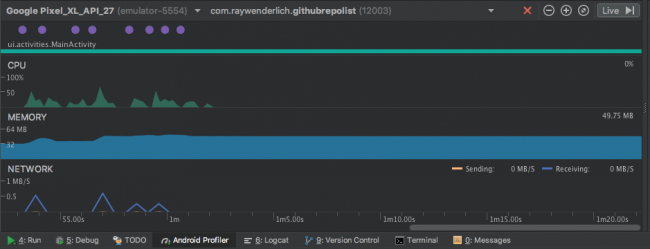
The profiler displays real time data of your app’s performance. You can toggle the real-time feedback by pressing the “Live” button in the Profiler. What you see here is a shared timeline which includes data for the CPU, memory, and network usage.

To access the detailed profiling tools, such as the Network Profiler, click on the corresponding graph. Click on the Network graph and you will see detailed performance information from when your app made the network request and received the response:

Network profiler

The profiler sometimes has trouble when a network call happens when your app first starts up. Let’s add a refresh button so we can refresh the data and make a second call after the app starts up.

Open the file res/layout/activity_main.xml and update the content as follows:

<?xml version="1.0" encoding="utf-8"?>
<LinearLayout xmlns:android="http://schemas.android.com/apk/res/android"
  android:layout_width="match_parent"
  android:layout_height="match_parent"
  android:orientation="vertical">

  <android.support.v7.widget.RecyclerView
    android:id="@+id/repoList"
    android:layout_width="match_parent"
    android:layout_height="0dp"
    android:layout_weight="1" />

  <Button
    android:id="@+id/refreshButton"
    android:layout_width="match_parent"
    android:layout_height="wrap_content"
    android:text="Refresh" />

</LinearLayout>

You’ve converted to a LinearLayout and added a button to refresh the screen.

Back in onCreate(), add the following button on click listener at the end of the method:

refreshButton.setOnClickListener {
  repoRetriever.getRepositories(callback)
}

Now build and run the app using the prfile button. After the app starts up, tap the refresh button, and you’ll get a second network call to the GitHub API.

Click inside the network profiler, and then drag to select the second network call. A panel will open with a Connection View tab for the selected network call. Select the network call in the list, and another panel will open with Overview, Response, Request, and Call Stack tabs:

The various tabs give you the information you need to debug any issues that occur when calling a back-end API.

Adding Images to the Mix

Time to spice things up! Complete your app by bringing in the icons for each repository as well.

You can do this using the Picasso library, also from Square. You need to modify the app build.gradle file to use Picasso by adding the following dependency:

implementation 'com.squareup.picasso:picasso:2.71828'

Now open ReposListAdapter and populate the icon using the following statement at the end of the with block inside the bindRepo() method of the view holder:

Picasso.get().load(repo.owner.avatar_url).into(itemView.icon)

Build and run and your app. It should look similar to this:

Final project

Where to Go From Here?

You’ve explored (and survived!) a crash-course on network operations in Android. :] You can download the final project using the button at the top or bottom of the tutorial.

For more details on the open source projects used in this Android networking tutorial, check out the Retrofit and Picasso pages on Square’s GitHub pages.

You can also check out the Android Profiler page on the Android developer site, and techniques for reducing device battery drain by optimizing your app’s network activity: Reducing Network Battery Drain.

For a deeper dive into Android networking and Retrofit, check out our
Android Networking
video course.

I hope you enjoyed this tutorial; if you have any questions or comments, please join the forum discussion below!

The post Android Networking Tutorial: Getting Started appeared first on Ray Wenderlich.


Video Tutorial: Beginning RxSwift Part 4: Introduction

Video Tutorial: Beginning RxSwift Part 4: Combining Operators: Part 1

Video Tutorial: Beginning RxSwift Part 4: Combining Operators: Part 2

Video Tutorial: Beginning RxSwift Part 4: Challenge: The Zip Case

Video Tutorial: Beginning RxSwift Part 4: Combining Operators in Practice: Part

Video Tutorial: Beginning RxSwift Part 4: Combining Operators in Practice: Part 2

Video Tutorial: Beginning RxSwift Part 4: Downloading in Parallel: Part 1


Video Tutorial: Beginning RxSwift Part 4: Downloading in Parallel: Part 2

Video Tutorial: Beginning RxSwift Part 4: Challenge: Indicate Download Activity

Video Tutorial: Beginning RxSwift Part 4: Conclusion

AVAudioEngine Tutorial for iOS: Getting Started

$
0
0

AVAudioEngine Tutorial for iOS: Getting Started

Mention audio processing to most iOS developers, and they’ll give you a look of fear and trepidation. That’s because, prior to iOS 8, it meant diving into the depths of the low-level Core Audio framework — a trip only a few brave souls dared to make. Thankfully, that all changed in 2014 with the release of iOS 8 and AVAudioEngine. This AVAudioEngine tutorial will show you how to use Apple’s new, higher level audio toolkit to make audio processing apps without needing to dive into Core Audio.

That’s right! No longer do you need to search through obscure pointer-based C/C++ structs and memory buffers to gather your raw audio data.

In this AVAudioEngine tutorial, you’ll use AVAudioEngine to build the next great podcasting app: Raycast. More specifically, you’ll add the audio functionality controlled by the UI: play/pause button, skip forward/back buttons, progress bar and playback rate selector. When you’re done, you’ll have a fantastic app for listening to Dru and Janie.

Getting Started

To get started, download the materials for this tutorial (you can find a link at the top or bottom of this tutorial). Build and run your project in Xcode, and you’ll see the basic UI.

The controls don’t do anything yet, but they’re all connected to IBOutlets and associated IBActions in the view controllers.

iOS Audio Framework Introduction

Before jumping into the project, here’s a quick overview of the iOS Audio frameworks:

  • CoreAudio and AudioToolbox are the low-level C frameworks.
  • AVFoundation is an Objective-C/Swift framework.
  • AVAudioEngine is a part of AVFoundation.
  • AVAudioEngine is a class that defines a group of connected audio nodes. You’ll be adding two nodes to the project: AVAudioPlayerNode and AVAudioUnitTimePitch.

Setup Audio

Open ViewController.swift and take a look inside. At the top, you’ll see all of the connected outlets and class variables. The actions are also connected to the appropriate outlets in the storyboard.

Add the following code to setupAudio():

// 1
audioFileURL = Bundle.main.url(forResource: "Intro", withExtension: "mp4")

// 2
engine.attach(player)
engine.connect(player, to: engine.mainMixerNode, format: audioFormat)
engine.prepare()

do {
  // 3
  try engine.start()
} catch let error {
  print(error.localizedDescription)
}

Take a closer look at what’s happening:

  1. This gets the URL of the bundle audio file. When set, it will instantiate audioFile in audioFileURL‘s didSet block in the variable declaration section above.
  2. Attach the player node to the engine, which you must do before connecting other nodes. These nodes will either produce, process or output audio. The audio engine provides a main mixer node that you connect to the player node. By default, the main mixer connects to the engine default output node (iOS device speaker). prepare() preallocates needed resources.

Next, add the following to scheduleAudioFile():

guard let audioFile = audioFile else { return }

skipFrame = 0
player.scheduleFile(audioFile, at: nil) { [weak self] in
  self?.needsFileScheduled = true
}

This schedules the playing of the entire audioFile. at: is the time (AVAudioTime) in the future you want the audio to play. Setting to nil starts playback immediately. The file is only scheduled to play once. Tapping the Play button again doesn’t restart it from the beginning. You’ll need to reschedule to play it again. When the audio file is done playing, the flag, needsFileScheduled, is set in the completion block.

There are other variants of scheduling audio for playback:

  • scheduleBuffer(AVAudioPCMBuffer, completionHandler: AVAudioNodeCompletionHandler? = nil): This provides a buffer preloaded with the audio data.
  • scheduleSegment(AVAudioFile, startingFrame: AVAudioFramePosition, frameCount: AVAudioFrameCount, at: AVAudioTime?, completionHandler: AVAudioNodeCompletionHandler? = nil): This is like scheduleFile except you specify which audio frame to start playing from and how many frames to play.

Then, add the following to playTapped(_:):

// 1
sender.isSelected = !sender.isSelected

// 2
if player.isPlaying {
  player.pause()
} else {
  if needsFileScheduled {
    needsFileScheduled = false
    scheduleAudioFile()
  }
  player.play()
}

Here’s the breakdown:

  1. Toggle the selection state of button, which changes the button image as set in storyboard.
  2. Use player.isPlaying to determine if the player currently playing. If so, pause it; if not, play. You also check needsFileScheduled and reschedule the file if required.

Build and run, then tap the playPauseButton. You should hear Ray’s lovely intro to The raywenderlich.com Podcast. :] But, there’s no UI feedback; you have no idea how long the file is or where you are in it.

Add Progress Feedback

Add the following to the end of viewDidLoad():

updater = CADisplayLink(target: self, selector: #selector(updateUI))
updater?.add(to: .current, forMode: .defaultRunLoopMode)
updater?.isPaused = true

CADisplayLink is a timer object that synchronizes with the display’s refresh rate. You instantiate it with the selector, updateUI . Then, you add it to a run loop — in this case, the default run loop. Finally, it doesn’t need to start running yet, so set isPaused to true.

Replace the implementation of playTapped(_:) with the following:

sender.isSelected = !sender.isSelected

if player.isPlaying {
  disconnectVolumeTap()
  updater?.isPaused = true
  player.pause()
} else {
  if needsFileScheduled {
    needsFileScheduled = false
    scheduleAudioFile()
  }
  connectVolumeTap()
  updater?.isPaused = false
  player.play()
}

The key thing here is to pause the UI with updater.isPaused = true when the player pauses. You’ll learn about connectVolumeTap() and disconnectVolumeTap() in the VU Meter section below.

Replace var currentFrame: AVAudioFramePosition = 0 with the following:

var currentFrame: AVAudioFramePosition {
  // 1
  guard
    let lastRenderTime = player.lastRenderTime,
    // 2
    let playerTime = player.playerTime(forNodeTime: lastRenderTime)
    else {
      return 0
  }
  
  // 3
  return playerTime.sampleTime
}

currentFrame returns the last audio sample rendered by player. Here’s a closer look:

  1. player.lastRenderTime returns the time in reference to engine start time. If engine is not running, lastRenderTime returns nil.
  2. player.playerTime(forNodeTime:) converts lastRenderTime to time relative to player start time. If player is not playing, then playerTime returns nil.
  3. sampleTime is time as a number of audio samples within the audio file.

Now for the UI updates. Add the following to updateUI():

// 1
currentPosition = currentFrame + skipFrame
currentPosition = max(currentPosition, 0)
currentPosition = min(currentPosition, audioLengthSamples)

// 2
progressBar.progress = Float(currentPosition) / Float(audioLengthSamples)
let time = Float(currentPosition) / audioSampleRate
countUpLabel.text = formatted(time: time)
countDownLabel.text = formatted(time: audioLengthSeconds - time)

// 3
if currentPosition >= audioLengthSamples {
  player.stop()
  updater?.isPaused = true
  playPauseButton.isSelected = false
  disconnectVolumeTap()
}

Let’s step through this:

  1. The property skipFrame is an offset added to or subtracted from currentFrame, initially set to zero. Make sure currentPosition doesn’t fall outside the range of the file.
  2. Update progressBar.progress to currentPosition within audioFile. Compute time by dividing currentPosition by sampleRate of audioFile. Update countUpLabel and countDownLabel text to current time within audioFile.
  3. If currentPosition is at the end of the file, then:
    • Stop the player.
    • Pause the timer.
    • Reset the playPauseButton selection state.
    • Disconnect the volume tap.

Build and run, then tap the playPauseButton. Once again, you’ll hear Ray’s intro, but this time the progressBar and timer labels supply the missing status information.

Implement the VU Meter

Now it’s time for you to add the VU Meter functionality. It’s a UIView positioned to fit between the pause icon’s bars. The height of the view determined by the average power of the playing audio. This is your first opportunity for some audio processing.

You’ll compute the average power on a 1k buffer of audio samples. A common way to determine the average power of a buffer of audio samples is to calculate the Root Mean Square (RMS) of the samples.

Average power is the representation, in decibels, of the average value of a range of audio sample data. There’s also peak power, which is the max value in a range of sample data.

Add the following helper method below connectVolumeTap():

func scaledPower(power: Float) -> Float {
  // 1
  guard power.isFinite else { return 0.0 }

  // 2
  if power < minDb {
    return 0.0
  } else if power >= 1.0 {
    return 1.0
  } else {
    // 3
    return (fabs(minDb) - fabs(power)) / fabs(minDb)
  }
}

scaledPower(power:) converts the negative power decibel value to a positive value that adjusts the volumeMeterHeight.constant value above. Here’s what it does:

  1. power.isFinite checks to make sure power is a valid value — i.e., not NaN — returning 0.0 if it isn’t.
  2. This sets the dynamic range of our vuMeter to 80db. For any value below -80.0, return 0.0. Decibel values on iOS have a range of -160db, near silent, to 0db, maximum power. minDb is set to -80.0, which provides a dynamic range of 80db. You can alter this value to see how it affects the vuMeter.
  3. Compute the scaled value between 0.0 and 1.0.

Now, add the following to connectVolumeTap():

// 1
let format = engine.mainMixerNode.outputFormat(forBus: 0)
// 2
engine.mainMixerNode.installTap(onBus: 0, bufferSize: 1024, format: format) { buffer, when in
  // 3
  guard 
    let channelData = buffer.floatChannelData,
    let updater = self.updater 
    else {
      return
  }

  let channelDataValue = channelData.pointee
  // 4
  let channelDataValueArray = stride(from: 0, 
                                     to: Int(buffer.frameLength),
                                     by: buffer.stride).map{ channelDataValue[$0] }
  // 5
  let rms = sqrt(channelDataValueArray.map{ $0 * $0 }.reduce(0, +) / Float(buffer.frameLength))
  // 6
  let avgPower = 20 * log10(rms)
  // 7
  let meterLevel = self.scaledPower(power: avgPower)

  DispatchQueue.main.async {
    self.volumeMeterHeight.constant = !updater.isPaused ? 
           CGFloat(min((meterLevel * self.pauseImageHeight), self.pauseImageHeight)) : 0.0
  }
}

There’s a lot going on here, so here’s the breakdown:

  1. Get the data format for the mainMixerNode‘s output.
  2. installTap(onBus: 0, bufferSize: 1024, format: format) gives you access to the audio data on the mainMixerNode‘s output bus. You request a buffer size of 1024 bytes, but the requested size isn’t guaranteed, especially if you request a buffer that’s too small or large. Apple’s documentation doesn’t specify what those limits are. The completion block receives an AVAudioPCMBuffer and a AVAudioTime as parameters. You can check buffer.frameLength to determine the actual buffer size. when provides the capture time of the buffer.
  3. buffer.floatChannelData gives you an array of pointers to each sample’s data. channelDataValue is an array of UnsafeMutablePointer<Float>
  4. Converting from an array of UnsafeMutablePointer<Float> to an array of Float makes later calculations easier. To do that, use stride(from:to:by:) to create an array of indexes into channelDataValue. Then map{ channelDataValue[$0] } to access and store the data values in channelDataValueArray.
  5. Computing the RMS involves a map/reduce/divide operation. First, the map operation squares all of the values in the array, which the reduce operation sums. Divide the sum of the squares by the buffer size, then take the square root, producing the RMS of the audio sample data in the buffer. This should be a value between 0.0 and 1.0, but there could be some edge cases where it’s a negative value.
  6. Convert the RMS to decibels (Acoustic Decibel reference). This should be a value between -160 and 0, but if rms is negative, this value would be NaN.
  7. Scale the decibels into a value suitable for your vuMeter.

Finally, add the following to disconnectVolumeTap():

engine.mainMixerNode.removeTap(onBus: 0)
volumeMeterHeight.constant = 0

AVAudioEngine allows only a single-tap per bus. It’s a good practice to remove it when not in use.

Build and run, then tap playPauseButton. The vuMeter is now active, providing average power feedback of the audio data.

Implementing Skip

Time to implement the skip forward and back buttons. skipForwardButton jumps ahead 10 seconds into the audio file, and skipBackwardButton jumps back 10 seconds.

Add the following to seek(to:):

guard 
  let audioFile = audioFile,
  let updater = updater 
  else {
    return
}

// 1
skipFrame = currentPosition + AVAudioFramePosition(time * audioSampleRate)
skipFrame = max(skipFrame, 0)
skipFrame = min(skipFrame, audioLengthSamples)
currentPosition = skipFrame

// 2
player.stop()

if currentPosition < audioLengthSamples {
  updateUI()
  needsFileScheduled = false

  // 3
  player.scheduleSegment(audioFile, 
                         startingFrame: skipFrame, 
                         frameCount: AVAudioFrameCount(audioLengthSamples - skipFrame), 
                         at: nil) { [weak self] in
    self?.needsFileScheduled = true
  }

  // 4
  if !updater.isPaused {
    player.play()
  }
}

Here's the play by play:

  1. Convert time, which is in seconds to frame position by multiplying by audioSampleRate, and add it to currentPosition. Then, make sure skipFrame is not before the start of the file and not past the end of the file.
  2. player.stop() not only stops playback, but it also clears all previously scheduled events. Call updateUI() to set the UI to the new currentPosition value.
  3. player.scheduleSegment(_:startingFrame:frameCount:at:) schedules playback starting at skipFrame position of audioFile. frameCount is the number of frames to play. You want to play to the end of file, so set it to audioLengthSamples - skipFrame. Finally, at: nil specifies to start playback immediately instead of at some time in the future.
  4. If player was playing before skip was called, then call player.play() to resume playback. updater.isPaused is convenient for determining this, because it is only true if player was previously paused.

Build and run, then tap the playPauseButton. Tap skipBackwardButton and skipForwardButton to skip forward and back. Watch as the progressBar and count labels change.

Implementing Rate Change

The last thing to implement is changing the rate of playback. Listening to podcasts at higher than 1x speeds is a popular feature these days.

In setupAudio(), replace the following:

engine.attach(player)
engine.connect(player, to: engine.mainMixerNode, format: audioFormat)

with:

engine.attach(player)
engine.attach(rateEffect)
engine.connect(player, to: rateEffect, format: audioFormat)
engine.connect(rateEffect, to: engine.mainMixerNode, format: audioFormat)

This attaches and connects rateEffect, a AVAudioUnitTimePitch node, to the audio graph. This node type is an effects node, specifically it can change the rate of playback and pitch shift the audio.

The didChangeRateValue() action handles changes to rateSlider. It computes an index into rateSliderValues array and sets rateValue, which sets rateEffect.rate. rateSlider has a value range of 0.5x to 3.0x

Build and run, then tap the playPauseButton. Adjust rateSlider to hear what Ray sounds like when he has had too much or too little coffee.

Where to Go From Here?

You can download the final project using the link at the top or bottom of this tutorial.

Look at the other effects you can add to audioSetup(). One option is to wire up a pitch shift slider to rateEffect.pitch and make Ray sound like a chipmunk. :]

To learn more about AVAudioEngine and related iOS audio topics, check out:

We hope you enjoyed this tutorial on AVAudioEngine. If you have any questions or comments, please join the forum discussion below!

The post AVAudioEngine Tutorial for iOS: Getting Started appeared first on Ray Wenderlich.

RWDevCon 2018 Vault Now Available!

$
0
0

It’s hard to believe, but it’s been a whole month since our fourth tutorial conference, RWDevCon 2018, which was our absolute best conference to date.

If you didn’t manage to grab a ticket this year, no worries — we’ve got you covered. You can enjoy all 18 tutorials and four intensive, half-day workshops through the RWDevCon 2018 Vault Video Bundle!

And best of all — it’s fully available today!

Keep reading to find out what’s inside the RWDevCon 2018 Video Vault Bundle, how to get the launch discount, and how to enter for a chance to win a free copy of the RWDevCon 2018 Vault Video Bundle.

What is the RWDevCon 2018 Vault Video Bundle?

The RWDevCon 2018 Vault Video Bundle contains:

  • Four intensive, half-day workshop videos
  • 18 hands-on tutorial session videos
  • Over 500 MB of complete sample project code for all tutorial sessions and workshops
  • Over 500 pages of conference instructional workbooks in PDF format

Let’s look at each in more detail.

1) Four Intensive, Half-Day Workshop Videos

Experience the hands-on, advanced half-day pre-conference workshops:

Workshop One: Swift Collection Protocols

Kelvin Lau and Vincent Ngo take you for a stroll down the alleyway of the Swift standard library. In this workshop, you’ll learn about the Swift collection protocols that power much of the standard library. You’ll walk away with advanced knowledge and techniques that will augment your daily Swift development and impress your interviewers.

Workshop Two: Machine Learning

Patrick Kwete and Audrey Tam take an advanced look at Apple’s new CoreML and Vision frameworks, and how you can add machine learning AI to your apps. In this hands-on workshop, you’ll learn what machine learning actually is, how to train a model, and integrate it into an app.

Workshop Three: Practical Instruments

Luke Parham guides you through some real-world scenarios of leveraging Instruments in your development workflow. Have you been working with iOS for a few years now but always been a little bit too nervous to jump into Instruments and try to track down some problems in your app? Or maybe you’re interested in trying to improve your app’s performance? Either way, by the end of this workshop you’ll have a good feel for how to use Instruments to dive deep into what’s happening while your app is working and see exactly where the bottlenecks are.

Workshop Four: ARKit

Joey deVilla covers a broad range of AR applications and concepts in this fast-paced workhop. From a paint program that takes Bob Ross into the third dimension, to a new take on everyone’s favorite semi-disposable Swedish furniture company app, to a museum app with a touch of “Black Mirror”, to a combined augmented reality and machine learning app, you’ll touch on a lot of augmented reality programming principles, techniques, and tricks along the way.

2) 18 Hands-On Tutorial Session Videos

Of course, you’ll also get access to all 18 tutorial sessions from the conference in video form.

Here’s a quick rundown of what each session is about:

  1. Living Style Guides: Learn how to make and manage a Living Style Guide for your application, which can show all of the building blocks for your application both in and out of context. With a Living Style Guide, you always have a quick way to view the building blocks of your application, the ability to build out new views quickly and consistently, and the power to make changes in one place which are reflected throughout your whole app.
  2. Swift 4 Serialization: Swift 4 introduced the Codable API and compiler support for simplifying how serialization is done and for supporting all Swift types including value types such as enums and structs. This session will cover strategies for using Codable to build models for real world RESTful JSON APIs. But that’s not all. Once your models are Codable, you can leverage this machinery to go beyond JSON. Find out how in this session.
  3. Architecting Modules: Modularity in code goes hand-in-hand with readability, testablity, reusability, scalability, and reliability, along with many other ilities. This session covers how to make modules, figure out what code goes in a module, and then how to use those modules for maximum success. You’ll learn best practices in code encapsulation and reuse, learn some programming buzz words, and level up your Xcode skills.
  4. Cloning Netflix: Netflix remains the leader in the binge-watching, evening-wasting habits of modern TV viewers. How hard could it be to copy this model? Quite hard, as it turns out. In this session, you’ll learn how to solve challenges unique to the architecture and construction of video streaming apps. You’ll discover some interesting iOS features you weren’t aware of before, and how to use these in your own apps.
  5. Auto Layout Best Practices:Auto Layout takes effort to learn, and can be notoriously painful to do so. But once you have the basics, how can you become efficient at applying, editing and debugging constraints? In this session we will examine some best practices for Auto Layout, looking at examples via Interface Builder and in code. The session will focus primarily on AutoLayout for iOS.
  6. Clean Architecture on iOS: Architecture is the design of functional, safe, sustainable and aesthetically pleasing software. There are many ways to architect your applications like the common MVC, MVP and MVVM patterns. This session will get you comfortable with clean architecture and show you how to transform a basic application.
  7. Android for iOS Developers: Learn the fundamentals of Android development through this tutorial. You’ll build an app from scratch that walks you through Android layout, resources, list views, navigation, networking and material design. Along the way, you’ll compare and contrast the concepts with those found in building iOS apps.
  8. The Art of the Chart: When you’re asked to include charts or graphs in an app, don’t panic and reach for a thirdparty library. In this session you’ll learn how to make your own fancy-looking data visualisations, with animations and color effects as a bonus!
  9. Spring Cleaning Your App: Have you ever run into a legacy app with a Massive View Controller or other architectural problems? In this session, you’ll learn how to give legacy apps a spring cleaning. You’ll learn how to iteratively split apart code, add testing, and prevent problems from happening again.
  10. Improving App Quality with TDD: Automated testing tools for iOS have come a long way since the initial release of the iPhone SDK. Learn how to improve your app’s quality by using TDD to build both the model and user interface layers of an application. You’ll learn what TDD is, how it can be used in unit tests to verify simple model objects, code that uses a remote API, and user interface code. Plus: some tricks for writing tests easier!
  11. Advanced WKWebView: In this session, you will learn how to use WKWebView to embed HTML that looks seamless with iOS native controls. This can save a lot of time by not having to build storyboards (or UI) for substantial areas of your apps, and you can even repurpose the same content in Android. Learn how to structure CSS/fonts, intercept hyperlink taps, integrate Javascript with Swift, and more!
  12. Clean Architecture on Android: In the past few years, a number of examples of Clean Architecture on Android have been presented within the Android community. This session will discuss some of the history and theory behind Clean Architecture, show an example app use case from the “outside-in”, and then demonstrate the development of a new app use case from the “inside-out”.
  13. Getting Started with ARKit: If you watched that stunning augmented reality (AR) demonstration at WWDC 2017 and thought “I’d like to make apps like that someday,” “someday” starts at this workshop. You’ll learn about the features of Apple’s ARKit augmented reality framework, harness data from the camera and your users’ motions, present information and draw images over real-world scenes, and make the world your View Controller!
  14. Custom Views: Learn three different ways of creating and manipulating custom views. First, learn how to supercharge your IB through code and create unique views using storyboards. Next, dive into creating flexible and reusable views. Finally, bring it all together with some CoreGraphics and CoreAnimation pizazz!
  15. App Development Workflow: Building an iOS app is easy. Building a successful one however needs more effort. This session will focus on automating your builds, using continuous integration to test and deploy them, and finally integrating analytics and tracking once your app is released to prepare for the next iteration. You will walk away with a toolset for building an efficient app development workflow.
  16. Integrating Metal Shaders with SceneKit: Metal is a low level framework that allows you to control your code down to the bit level. However, many common operations don’t require you to get down to that level because they are handled by Core Image and SceneKit. This session will show you what operations you get with SceneKit and how you can go deeper with Metal when you need to without losing the convenience of SceneKit.
  17. Xcode Tips and Tricks: As an iOS developer, the most important tool you use is Xcode. Learn how to supercharge your efficiency with various tips and tricks.
  18. Advanced Unidirectional Architecture: In this tutorial we will combine all the cutting edge architecture design techniques such as reactive programming, dependency injection, protocol oriented programming, unidirectional data flow, use cases, and more in order to master the art of designing codebases that can easily change over time. Learn what causes code to change, how to minimize the effort to deal with those changes, and how to apply this in your own apps (such as switching from RxSwift to ReactiveSwift, from Core Data to Realm, or from one view implementation to another!)

3) Over 500 MB of Project Code

You’ll also get the complete sample project code for all tutorial sessions and workshops from the conference!

Each tutorial has multiple parts, each with starter and final projects for your use. Working through the projects is great practice, and you can take the sample code and use it directly in your own apps.

4) Over 500 Pages of Instructional Workbook Material

Finally, you’ll get the full official RWDevCon 2018 conference workbook, which includes step-by-step instructions for all of the tutorial sessions and workshops.

Whether you want to follow along with the instructor in the video, or work at your own pace from the conference workbook, the choice is yours!

RWDevCon 2018 Vault Launch and Giveaway

To celebrate the launch of the RWDevCon 2018 Vault Video Bundle, we’re going to release some free tutorial session videos from the conference for you to enjoy!

Here’s the highlights of the event:

  • Today marks the release of the RWDevCon 2018 Vault Video Bundle!
  • On May 8, 10 and 15, we’ll release a select video from the tutorial sessions for free. This will give you a chance to check out the conference videos and see what the RWDevCon 2018 Vault is all about!
  • On Friday, May 18, we’ll round out the two weeks with a special giveaway, where three lucky readers will win a copy of the RWDevCon 2018 Vault Video Bundle, or a book of your choice if you already own the RWDevCon 2018 Vault Video Bundle.

To enter into the giveaway, simply leave a comment on this post. We’ll choose three winners at random and announce the winners on May 18, 2018!

Where to Go From Here?

For the next two weeks only, the RWDevCon 2018 Vault Video Bundle is available at a massive 50% off!

  • If you attended RWDevCon 2018, you’ll get free access to the entire collection of tutorial session and workshop videos. You should have already have access based on the email we have on file from the conference, but if you can’t access the videos please contact us at support@razeware.com and we’ll get it sorted.
  • If you haven’t bought the RWDevCon 2018 Vault yet, what are you waiting for? It has a ton of amazingly useful content that you just can’t get anywhere else. Plus you don’t want to miss the 50% discount on this year’s Vault, which ends Friday, May 18 2018!

The RWDevCon team and I hope you enjoy the RWDevCon 2018 Vault Video Bundle, and we hope you enjoy all the hands-on tutorials and workshop content!

The post RWDevCon 2018 Vault Now Available! appeared first on Ray Wenderlich.

Swift Algorithm Club: Looking for co-maintainer

$
0
0

SwiftAlgClub-Sept-Digest-feature

We are currently looking for a co-maintainer for the Swift Algorithm Club, our open source project to implement popular algorithms and data structures in Swift.

We already have 2 maintainers on the project (Kelvin Lau and Vincent Ngo), but could use one more – the project is quite popular (16K stars on GitHub!) and we could use the extra help.

This is a great way to be involved with a high profile open source project, give back to the community, and learn a ton along the way!

Why Join Our Team?

Here are the top 5 reasons to join the Swift Algorithm Club as a co-maintainer:

  1. Learning. This is probably the best way to become an expert on Swift data structures and algorithms, while increasing your Swift skills! You’ll also become a better developer, writer and person. The best part… you’ll make a lot of new friends in the community along the way.
  2. Money! The co-maintainer position is volunteer-only, but we do pay for the articles you write on our site about the Swift Algorithm Club, so effectively you get paid to learn!
  3. Special Opportunities. Members of the team get access to special opportunities such as contributing to our books and products, speaking at our conference, being a guest on our podcast, working on team projects and much more.
  4. You’ll Make a Difference. The Swift Algorithm Club has over 16,000 starts on GitHub, and is helping a generation of programmers learn about algorithms. This means a lot to us, and makes all the hard work worth it.
  5. Free Stuff! And as a final bonus, by joining the team you’ll get a lot of free stuff! You’ll get a free copy of all of the products we sell on the site — over $1,000 in value!

Responsibilities

As co-maintainer, you’d be responsible for the following:

  • Deal with issues, pull requests, edit and code review submissions
  • Write a tutorial on raywenderlich.com based on something from the Swift Algorithm Club every 3 months

Requirements and How to Apply

Here are the requirements:

  • You must be an experienced iOS developer.
  • You should be comfortable with Git and GitHub.
  • You should be comfortable with data structures and algorithms, and passionate in learning new and more advanced ones.
  • You should be a great writer with fluent English writing skills.
  • You are passionate in open source, and are willing to consistently spend 1-2 hours a week in reviewing incoming contributions.
  • This is an informal, part-time position. You will be responsible for writing a tutorial once every 3 months. You are expected to deliver the tutorial on-time

If you are interested in being a co-maintainer, please email me with answers to the following questions:

  • Why do you want to be a co-maintainer on the Swift Algorithm Club?
  • Please tell me a little about your experience with Swift.
  • Please tell me a little about your experience with algorithms.
  • Please link to any articles/tutorials you have written online.
  • Please link to your GitHub account page.
  • How much time can you commit to open source per week? This involves reviewing PRs and answering issues.

If your application looks promising, we’ll send you a tryout to gauge your writing and/or editing skills. If you pass the tryout, you’re in!

What Are You Waiting For?

Thanks all – and we hope to see you around at the Swift Algorithm Club!

The post Swift Algorithm Club: Looking for co-maintainer appeared first on Ray Wenderlich.

RWDevCon 2018 Vault Free Tutorial Session: Getting Started with ARKit

$
0
0

We recently released the RWDevCon 2018 Vault Video Bundle, a collection of four advanced workshop videos, 18 hands-on tutorial session videos, 500MB+ of sample projects, and 500+ pages of conference books.

To help celebrate its launch (and to give you a taste of what’s inside), we’re releasing a few sample videos from the RWDevCon 2018 Vault over the next two weeks.

Today’s free tutorial session video is Getting Started with ARKit by Joey deVilla. Enjoy!

The post RWDevCon 2018 Vault Free Tutorial Session: Getting Started with ARKit appeared first on Ray Wenderlich.


How to Play, Record, and Merge Videos in iOS and Swift

$
0
0
Update note: This tutorial has been updated to iOS 11 and Swift 4 by Owen Brown. The original tutorial was written by Abdul Azeem with fixes and clarifications made by Joseph Neuman.
Learn how to play, record, and merge videos on iOS!

Learn how to play, record, and merge videos on iOS!

Recording videos, and playing around with them programmatically, is one of the coolest things you can do with your phone, but not nearly enough apps make use of it. To do this requires the AV Foundation framework that has been a part of macOS since OS X Lion (10.7), and iOS since iOS 4 in 2010.

AV Foundation has grown considerably since then, with well over 100 classes now. This tutorial covers media playback and some light editing to get you started with AV Foundation. In particular, you’ll learn how to:

  • Select and play a video from the media library.
  • Record and save a video to the media library.
  • Merge multiple videos together into a combined video, complete with a custom soundtrack!

I don’t recommend running the code in this tutorial on the simulator, because you’ll have no way to capture video. Plus, you’ll need to figure out a way to add videos to the media library manually. In other words, you really need to test this code on a device! To do that you’ll need to be a registered Apple developer. A free account will work just fine for this tutorial.

Ready? Lights, cameras, action!

Getting Started

Start by downloading the materials for this tutorial (you can find a link at the top or bottom of this tutorial). This project contains a storyboard and several view controllers with the UI for a simple video playback and recording app.

The main screen contains the three buttons below that segue to other view controllers:

  • Select and Play Video
  • Record and Save Video
  • Merge Video

Build and run the project, and test out the buttons; only the three buttons on the initial scene do anything, but you will change that soon!

Select and Play Video

The “Select and Play Video” button on the main screen segues to PlayVideoController. In this section of the tutorial, you’ll add the code to select a video file and play it.

Start by opening PlayVideoViewController.swift, and add the following import statements at the top of the file:

import AVKit
import MobileCoreServices

Importing AVKit gives you access to the AVPlayer object that plays the selected video. MobileCoreServices contains predefined constants such as kUTTypeMovie, which you’ll need when selecting videos.

Next, scroll down to the end of the file and add the following class extensions. Make sure you add these to the very bottom of the file, outside the curly braces of the class declaration:

// MARK: - UIImagePickerControllerDelegate
extension PlayVideoViewController: UIImagePickerControllerDelegate {
}

// MARK: - UINavigationControllerDelegate
extension PlayVideoViewController: UINavigationControllerDelegate {
}

These extensions set up the PlayVideoViewController to adopt the UIImagePickerControllerDelegate and UINavigationControllerDelegate protocols. You’ll be using the system-provided UIImagePickerController to allow the user to to browse videos in the photo library, and that class communicates back to your app through these delegate protocols. Although the class is named “image picker”, rest assured it works with videos too!

Next, head back to PlayVideoViewController‘s main class definition and add a call to helper method from VideoHelper to open the image picker. Later, you’ll add helper tools of your own in VideoHelper. Add the following code to playVideo(_:):

VideoHelper.startMediaBrowser(delegate: self, sourceType: .savedPhotosAlbum)

In the code above, you ensure that tapping Play Video will open the UIImagePickerController, allowing the user to select a video file from the media library.

To see what’s under the hood of this method, open VideoHelper.swift. It does the following:

  1. Check if the .savedPhotosAlbum source is available on the device. Other sources are the camera itself and the photo library. This check is essential whenever you use a UIImagePickerController to pick media. If you don’t do it, you might try to pick media from a non-existent media library, resulting in crashes or other unexpected issues.
  2. If the source you want is available, it creates a UIImagePickerController object and set its source and media type.
  3. Finally, it presents the UIImagePickerController modally.

Now you’re ready to give your project another whirl! Build and run. Tap Select and Play Video on the first screen, and then tap Play Video on the second screen, you should see your videos presented similar to the following screenshot.

vpr_swift_5

Once you see the list of videos, select one. You’ll be taken to another screen that shows the video in detail, along with buttons to cancel, play and choose. If you tap the play button the video will play. However, if you tap the choose button, the app just returns to the Play Video screen! This is because you haven’t implemented any delegate methods to handle choosing a video from the picker.

Back in Xcode, scroll down to the UIImagePickerControllerDelegate class extension in PlayVideoViewController.swift and add the following delegate method implementation:

func imagePickerController(_ picker: UIImagePickerController, 
                           didFinishPickingMediaWithInfo info: [String : Any]) {
  // 1
  guard 
    let mediaType = info[UIImagePickerControllerMediaType] as? String,
    mediaType == (kUTTypeMovie as String),
    let url = info[UIImagePickerControllerMediaURL] as? URL
    else { 
      return 
  }
  
  // 2
  dismiss(animated: true) {
    //3
    let player = AVPlayer(url: url)
    let vcPlayer = AVPlayerViewController()
    vcPlayer.player = player
    self.present(vcPlayer, animated: true, completion: nil)
  }
}

Here’s what you’re doing in this method:

  1. You get the media type of the selected media and URL. You ensure it’s type movie.
  2. You dismiss the image picker.
  3. In the completion block, you create an AVPlayerViewController to play the media.

Build and run. Tap Select and Play Video, then Play Video, and choose a video from the list. You should be able to see the video playing in the media player.

vpr_swift_5

vpr_swift_6

Record and Save Video

Now that you have video playback working, it’s time to record a video using the device’s camera and save it to the media library.

Open RecordVideoViewController.swift, and add the following import:

import MobileCoreServices

You’ll also need to adopt the same protocols as PlayVideoViewController, by adding the following to the end of the file:

extension RecordVideoViewController: UIImagePickerControllerDelegate {
}

extension RecordVideoViewController: UINavigationControllerDelegate {
}

Add the following code to record(_:):

VideoHelper.startMediaBrowser(delegate: self, sourceType: .camera)

It uses the same helper method as in PlayVideoViewController, but it accesses the .camera instead to record video.

Build and run to see what you’ve got so far.

Go to the Record screen and tap Record Video. Instead of the Photo Gallery, the camera UI opens. When the alert dialogue asks for camera permissions and mic permissions, click OK. Start recording a video by tapping the red record button at the bottom of the screen, and tap it again when you’re done recording.

vpr_swift_8

Now you can opt to use the recorded video or do a retake. Tap Use Video. You’ll notice that it just dismisses the view controller. That’s because — you guessed it — you haven’t implemented an appropriate delegate method to save the recorded video to the media library.

Add the following method to the UIImagePickerControllerDelegate class extension at the bottom:

func imagePickerController(_ picker: UIImagePickerController, 
                           didFinishPickingMediaWithInfo info: [String : Any]) {
  dismiss(animated: true, completion: nil)
  
  guard 
    let mediaType = info[UIImagePickerControllerMediaType] as? String,
    mediaType == (kUTTypeMovie as String),
    let url = info[UIImagePickerControllerMediaURL] as? URL,
    UIVideoAtPathIsCompatibleWithSavedPhotosAlbum(url.path)
    else {
      return
  }
  
  // Handle a movie capture
  UISaveVideoAtPathToSavedPhotosAlbum(
    url.path, 
    self, 
    #selector(video(_:didFinishSavingWithError:contextInfo:)), 
    nil)
}

Don’t worry about the error on that last line of code, you’ll take care of that shortly.

As before, the delegate method gives you a URL pointing to the video. You verify that the app can save the file to the device’s photo album, and if so, save it.

UISaveVideoAtPathToSavedPhotosAlbum is the function provided by the SDK to save videos to the Photos Album. As parameters, you pass the path to the video you want to save as well as a target and action to call back, which will inform you of the status of the save operation.

Add the implementation of the callback to the main class definition next:

@objc func video(_ videoPath: String, didFinishSavingWithError error: Error?, contextInfo info: AnyObject) {
  let title = (error == nil) ? "Success" : "Error"
  let message = (error == nil) ? "Video was saved" : "Video failed to save"
  
  let alert = UIAlertController(title: title, message: message, preferredStyle: .alert)
  alert.addAction(UIAlertAction(title: "OK", style: UIAlertActionStyle.cancel, handler: nil))
  present(alert, animated: true, completion: nil)
}

The callback method simply displays an alert to the user, announcing whether the video file was saved or not, based on the error status.

Build and run. Record a video and select Use Video when you’re done recording. If you’re asked for permission to save to your video library, tap OK. If the “Video was saved” alert pops up, you just successfully saved your video to the photo library!

vpr_swift_9

Now that you can play videos and record videos, it’s time to take the next step and try some light video editing.

Merging Videos

The final piece of functionality for the app is to do a little editing. Your user will select two videos and a song from the music library, and the app will combine the two videos and mix in the music.

The project already has a starter implementation in MergeVideoViewController.swift. The code here is similar to the code you wrote to play a video. The big difference is when merging, the user needs to select two videos. That part is already set up, so the user can make two selections that will be stored in firstAsset and secondAsset.

The next step is to add the functionality to select the audio file.

The UIImagePickerController only provides functionality to select video and images from the media library. To select audio files from your music library, you will use the MPMediaPickerController. It works essentially the same as UIImagePickerController, but instead of images and video, it accesses audio files in the media library.

Open MergeVideoViewController.swift and add the following code to loadAudio(_:):

let mediaPickerController = MPMediaPickerController(mediaTypes: .any)
mediaPickerController.delegate = self
mediaPickerController.prompt = "Select Audio"
present(mediaPickerController, animated: true, completion: nil)

The above code creates a new MPMediaPickerController instance and displays it as a modal view controller.

Build and run. Now tap Merge Video, then Load Audio to access the audio library on your device. Of course, you’ll need some audio files on your device. Otherwise, the list will be empty. The songs will also have to be physically present on the device, so make sure you’re not trying to load a song from the cloud.

vpr_swift_12

If you select a song from the list, you’ll notice that nothing happens. That’s right! MPMediaPickerController needs delegate methods! Find the MPMediaPickerControllerDelegate class extension at the bottom of the file and add the following two methods to it:

func mediaPicker(_ mediaPicker: MPMediaPickerController, 
                 didPickMediaItems mediaItemCollection: MPMediaItemCollection) {
  
  dismiss(animated: true) {
    let selectedSongs = mediaItemCollection.items
    guard let song = selectedSongs.first else { return }
    
    let url = song.value(forProperty: MPMediaItemPropertyAssetURL) as? URL
    self.audioAsset = (url == nil) ? nil : AVAsset(url: url!)
    let title = (url == nil) ? "Asset Not Available" : "Asset Loaded"
    let message = (url == nil) ? "Audio Not Loaded" : "Audio Loaded"
    
    let alert = UIAlertController(title: title, message: message, preferredStyle: .alert)
    alert.addAction(UIAlertAction(title: "OK", style: .cancel, handler:nil))
    self.present(alert, animated: true, completion: nil)
  }
}

func mediaPickerDidCancel(_ mediaPicker: MPMediaPickerController) {
  dismiss(animated: true, completion: nil)
}

The code is very similar to the delegate methods for UIImagePickerController. You set the audio asset based on the media item selected via the MPMediaPickerController after ensuring it’s a valid media item. Note that it’s important to only present new view controllers after dismissing the current one, which is why you wrapped the code above inside the completion handler.

Build and run. Go to the Merge Videos screen. Select an audio file and if there are no errors, you should see the “Audio Loaded” message.

vpr_swift_13

You now have all your assets loading correctly. It’s time to merge the various media files into one file. But before you get into that code, you must do a little bit of set up.

Export and Merge

The code to merge your assets will require a completion handler to export the final video to the photos album.
Add the code below to MergeVideoViewController:

func exportDidFinish(_ session: AVAssetExportSession) {
  
  // Cleanup assets
  activityMonitor.stopAnimating()
  firstAsset = nil
  secondAsset = nil
  audioAsset = nil
  
  guard 
    session.status == AVAssetExportSessionStatus.completed,
    let outputURL = session.outputURL 
    else {
      return
  }
  
  let saveVideoToPhotos = {
    PHPhotoLibrary.shared().performChanges({ 
      PHAssetChangeRequest.creationRequestForAssetFromVideo(atFileURL: outputURL)
    }) { saved, error in
      let success = saved && (error == nil)
      let title = success ? "Success" : "Error"
      let message = success ? "Video saved" : "Failed to save video"
      
      let alert = UIAlertController(title: title, message: message, preferredStyle: .alert)
      alert.addAction(UIAlertAction(title: "OK", style: UIAlertActionStyle.cancel, handler: nil))
      self.present(alert, animated: true, completion: nil)
    }
  }
  
  // Ensure permission to access Photo Library
  if PHPhotoLibrary.authorizationStatus() != .authorized {
    PHPhotoLibrary.requestAuthorization { status in
      if status == .authorized {
        saveVideoToPhotos()
      }
    }
  } else {
    saveVideoToPhotos()
  }
}

Once the export completes successfully, the above code saves the newly exported video to the photo album. You could just display the output video in an AssetBrowser, but it’s easier to copy the output video to the photo album so you can see the final output.

Now, add the following code to merge(_:):

guard 
  let firstAsset = firstAsset, 
  let secondAsset = secondAsset 
  else {
    return
}

activityMonitor.startAnimating()

// 1 - Create AVMutableComposition object. This object will hold your AVMutableCompositionTrack instances.
let mixComposition = AVMutableComposition()

// 2 - Create two video tracks
guard 
  let firstTrack = mixComposition.addMutableTrack(withMediaType: AVMediaType.video, 
                                                  preferredTrackID: Int32(kCMPersistentTrackID_Invalid)) 
  else {
    return
}
do {
  try firstTrack.insertTimeRange(CMTimeRangeMake(kCMTimeZero, firstAsset.duration), 
                                 of: firstAsset.tracks(withMediaType: AVMediaType.video)[0], 
                                 at: kCMTimeZero)
} catch {
  print("Failed to load first track")
  return
}

guard 
  let secondTrack = mixComposition.addMutableTrack(withMediaType: AVMediaType.video, 
                                                   preferredTrackID: Int32(kCMPersistentTrackID_Invalid))
  else {
    return
}
do {
  try secondTrack.insertTimeRange(CMTimeRangeMake(kCMTimeZero, secondAsset.duration), 
                                  of: secondAsset.tracks(withMediaType: AVMediaType.video)[0], 
                                  at: firstAsset.duration)
} catch {
  print("Failed to load second track")
  return
}

// 3 - Audio track
if let loadedAudioAsset = audioAsset {
  let audioTrack = mixComposition.addMutableTrack(withMediaType: AVMediaType.audio, preferredTrackID: 0)
  do {
    try audioTrack?.insertTimeRange(CMTimeRangeMake(kCMTimeZero, 
                                                    CMTimeAdd(firstAsset.duration, 
                                                              secondAsset.duration)),
                                    of: loadedAudioAsset.tracks(withMediaType: AVMediaType.audio)[0] ,
                                    at: kCMTimeZero)
  } catch {
    print("Failed to load Audio track")
  }
}

// 4 - Get path
guard let documentDirectory = FileManager.default.urls(for: .documentDirectory, 
                                                       in: .userDomainMask).first else {
  return
}
let dateFormatter = DateFormatter()
dateFormatter.dateStyle = .long
dateFormatter.timeStyle = .short
let date = dateFormatter.string(from: Date())
let url = documentDirectory.appendingPathComponent("mergeVideo-\(date).mov")

// 5 - Create Exporter
guard let exporter = AVAssetExportSession(asset: mixComposition, 
                                          presetName: AVAssetExportPresetHighestQuality) else {
  return
}
exporter.outputURL = url
exporter.outputFileType = AVFileType.mov
exporter.shouldOptimizeForNetworkUse = true

// 6 - Perform the Export
exporter.exportAsynchronously() {
  DispatchQueue.main.async {
    self.exportDidFinish(exporter)
  }
}

Here’s a step-by-step breakdown of the above code:

  1. You create an AVMutableComposition object to hold your video and audio tracks and transform effects.
  2. Next, you create an AVMutableCompositionTrack for the video and add it to your AVMutableComposition object. Then you insert your two videos to the newly created AVMutableCompositionTrack.

    Note that insertTimeRange(_:ofTrack:atStartTime:) allows you to insert a part of a video into your main composition instead of the whole video. This way, you can trim the video to a time range of your choosing.

    In this instance, you want to insert the whole video, so you create a time range from kCMTimeZero to your video asset duration. The atStartTime parameter allows you to place your video/audio track wherever you want it in your composition. Notice how the code inserts firstAsset at time zero, and it inserts secondAsset at the end of the first video. This tutorial assumes you want your video assets one after the other. But you can also overlap the assets by playing with the time ranges.

    For working with time ranges, you use CMTime structs. CMTime structs are non-opaque mutable structs representing times, where the time could be a timestamp or a duration.

  3. Similarly, you create a new track for your audio and add it to the main composition. This time you set the audio time range to the sum of the duration of the first and second videos, since that will be the complete length of your video.
  4. Before you can save the final video, you need a path for the saved file. So create a unique file name (based upon the current date) that points to a file in the documents folder.
  5. Finally, render and export the merged video. To do this, you create an AVAssetExportSession object that transcodes the contents of an AVAsset source object to create an output of the form described by a specified export preset.
  6. After you’ve initialized an export session with the asset that contains the source media, the export preset name (presetName), and the output file type (outputFileType), you start the export running by invoking exportAsynchronously(). Because the code performs the export asynchronously, this method returns immediately. The code calls the completion handler you supply to exportAsynchronously() whether the export fails, completes, or the user canceled. Upon completion, the exporter’s status property indicates whether the export has completed successfully. If it has failed, the value of the exporter’s error property supplies additional information about the reason for the failure.

An AVComposition instance combines media data from multiple file-based sources. At its top level, an AVComposition is a collection of tracks, each presenting media of a specific type such as audio or video. An instance of AVCompositionTrack represents a single track.

Similarly, AVMutableComposition and AVMutableCompositionTrack also present a higher-level interface for constructing compositions. These objects offer insertion, removal, and scaling operations that you’ve seen already and will come up again.

Go ahead, build and run your project!

Select two videos and an audio files and merge the selected files. If the merge was successful, you should see a “Video Saved” message. At this point, your new video should be present in the photo album.

vpr_swift_14

Go to the photo album, or browse using the Select and Play Video screen within the app. You’ll might notice that although the app merged the videos, there are some orientation issues. Portrait video is in landscape mode, and sometimes videos are turned upside down.

vpr_swift_15

This is due to the default AVAsset orientation. All movie and image files recorded using the default iPhone camera application have the video frame set to landscape, and so the iPhone saves the media in landscape mode.

Video Orientation

AVAsset has a preferredTransform property that contains the media orientation information, and it applies this to a media file whenever you view it using the Photos app or QuickTime. In the code above, you haven’t applied a transform to your AVAsset objects, hence the orientation issue.

You can correct this easily by applying the necessary transforms to your AVAsset objects. But as your two video files can have different orientations, you’ll need to use two separate AVMutableCompositionTrack instances instead of one as you originally did.

Before you can do this, add the following helper method to VideoHelper:

static func orientationFromTransform(_ transform: CGAffineTransform) 
  -> (orientation: UIImageOrientation, isPortrait: Bool) {
  var assetOrientation = UIImageOrientation.up
  var isPortrait = false
  if transform.a == 0 && transform.b == 1.0 && transform.c == -1.0 && transform.d == 0 {
    assetOrientation = .right
    isPortrait = true
  } else if transform.a == 0 && transform.b == -1.0 && transform.c == 1.0 && transform.d == 0 {
    assetOrientation = .left
    isPortrait = true
  } else if transform.a == 1.0 && transform.b == 0 && transform.c == 0 && transform.d == 1.0 {
    assetOrientation = .up
  } else if transform.a == -1.0 && transform.b == 0 && transform.c == 0 && transform.d == -1.0 {
    assetOrientation = .down
  }
  return (assetOrientation, isPortrait)
}

This code analyzes an affine transform to determine the input video’s orientation.

Next, add one more helper method to the class:

static func videoCompositionInstruction(_ track: AVCompositionTrack, asset: AVAsset) 
  -> AVMutableVideoCompositionLayerInstruction {
  let instruction = AVMutableVideoCompositionLayerInstruction(assetTrack: track)
  let assetTrack = asset.tracks(withMediaType: .video)[0]
  
  let transform = assetTrack.preferredTransform
  let assetInfo = orientationFromTransform(transform)
  
  var scaleToFitRatio = UIScreen.main.bounds.width / assetTrack.naturalSize.width
  if assetInfo.isPortrait {
    scaleToFitRatio = UIScreen.main.bounds.width / assetTrack.naturalSize.height
    let scaleFactor = CGAffineTransform(scaleX: scaleToFitRatio, y: scaleToFitRatio)
    instruction.setTransform(assetTrack.preferredTransform.concatenating(scaleFactor), at: kCMTimeZero)
  } else {
    let scaleFactor = CGAffineTransform(scaleX: scaleToFitRatio, y: scaleToFitRatio)
    var concat = assetTrack.preferredTransform.concatenating(scaleFactor)
      .concatenating(CGAffineTransform(translationX: 0, y: UIScreen.main.bounds.width / 2))
    if assetInfo.orientation == .down {
      let fixUpsideDown = CGAffineTransform(rotationAngle: CGFloat(Double.pi))
      let windowBounds = UIScreen.main.bounds
      let yFix = assetTrack.naturalSize.height + windowBounds.height
      let centerFix = CGAffineTransform(translationX: assetTrack.naturalSize.width, y: yFix)
      concat = fixUpsideDown.concatenating(centerFix).concatenating(scaleFactor)
    }
    instruction.setTransform(concat, at: kCMTimeZero)
  }
  
  return instruction
}

This method takes a track and asset, and returns a AVMutableVideoCompositionLayerInstruction which wraps the affine transform needed to get the video right side up. Here’s what’s going on, step-by-step:

  • You create an AVMutableVideoCompositionLayerInstruction and associate it with your firstTrack.
  • Next, you create an AVAssetTrack object from your AVAsset. An AVAssetTrack object provides the track-level inspection interface for all assets. You need this object in order to access the preferredTransform and dimensions of the asset.
  • Then, you save the preferred transform and the amount of scale required to fit the video to the current screen. You’ll use these values in the following steps.
  • If the video is in portrait, you need to recalculate the scale factor, since the default calculation is for videos in landscape. Then all you need to do is apply the orientation rotation and scale transforms.
  • If the video is an landscape, there are a similar set of steps to apply the scale and transform. There’s one extra check since the video could have been produced in either landscape left or landscape right. Because there are “two landscapes” the aspect ratio will match but it’s possible the video will be rotated 180 degrees. The extra check for a video orientation of .Down will handle this case.

With the helper methods set up, find merge(_:) and insert the following between sections #2 and #3:

// 2.1
let mainInstruction = AVMutableVideoCompositionInstruction()
mainInstruction.timeRange = CMTimeRangeMake(kCMTimeZero, 
                                            CMTimeAdd(firstAsset.duration, secondAsset.duration))

// 2.2
let firstInstruction = VideoHelper.videoCompositionInstruction(firstTrack, asset: firstAsset)
firstInstruction.setOpacity(0.0, at: firstAsset.duration)
let secondInstruction = VideoHelper.videoCompositionInstruction(secondTrack, asset: secondAsset)

// 2.3
mainInstruction.layerInstructions = [firstInstruction, secondInstruction]
let mainComposition = AVMutableVideoComposition()
mainComposition.instructions = [mainInstruction]
mainComposition.frameDuration = CMTimeMake(1, 30)
mainComposition.renderSize = CGSize(width: UIScreen.main.bounds.width, height: UIScreen.main.bounds.height)

First, you set up two separate AVMutableCompositionTrack instances. That means you need to apply an AVMutableVideoCompositionLayerInstruction to each track in order to fix the orientation separately.

2.1: First, you set up mainInstruction to wrap the entire set of instructions. Note that the total time here is the sum of the first asset’s duration and the second asset’s duration.

2.2: Next, you set up the two instructions — one for each asset — using the helper method you defined earlier. The instruction for the first video needs one extra addition: you set its opacity to 0 at the end so it becomes invisible when the second video starts.

2.3: Now that you have your AVMutableVideoCompositionLayerInstruction instances for the first and second tracks, you simply add them to the main AVMutableVideoCompositionInstruction object. Next, you add your mainInstruction object to the instructions property of an instance of AVMutableVideoComposition. You also set the frame rate for the composition to 30 frames/second.

Now that you’ve got an AVMutableVideoComposition object configured, all you need to do is assign it to your exporter. Insert the following code at the end of of section #5 (just before exportAsynchronously()::

exporter.videoComposition = mainComposition

Whew – that’s it!

Build and run your project. If you create a new video by combining two videos (and optionally an audio file), you will see that the orientation issues disappear when you play back the new merged video.

vpr_swift_16

Where to Go From Here?

You can download the final project using the link at the top or bottom of this tutorial.

If you followed along, you should now have a good understanding of how to play video, record video, and merge multiple videos and audio in your apps.

AV Foundation gives you a lot of flexibility when playing around with videos. You can also apply any kind of CGAffineTransform to merge, scale, or position videos.

If you haven’t already done so, I would recommend that you have a look at the WWDC videos on AV Foundation, such as WWDC 2016 session 503 Advanced in AV Foundation Playback. Also, be sure to check out the Apple AV Foundation Framework documentation.

I hope this tutorial has been useful to get you started with video manipulation in iOS. If you have any questions, comments, or suggestions for improvement, please join the forum discussion below!

The post How to Play, Record, and Merge Videos in iOS and Swift appeared first on Ray Wenderlich.

Server Side Swift with Vapor – First 16 Chapters Now Available!

$
0
0

Great news everyone: The second early access release of our Server Side Swift with Vapor book is now available!

If you’re a beginner to web development, but have worked with Swift for some time, you’ll find it’s easy to create robust, fully featured web apps and web APIs with Vapor 3, and this book will teach you how to do it.

This release adds seven chapters:

  • Chapter 11: Testing: In this chapter, you’ll learn how to write tests for your Vapor applications. You’ll learn why testing is important and how it works with Swift Package Manager. Then, you’ll learn how to write tests for the TIL application from the previous chapters. Finally, you’ll see why testing matters on Linux and how to test your code on Linux using Docker.
  • Chapter 12: Creating a Simple iPhone App I: In the previous chapters, you created an API and interacted with it using RESTed. However, users expect something a bit nicer to use TIL! The next two chapters show you how to build a simple iOS app that interacts with the API. In this chapter, you’ll learn how to create different models and get models from the database.
  • Build a simple iPhone app to interact with your Vapor backend!

  • Chapter 13: Creating a Simple iPhone App II: In this chapter, you’ll expand the app to include viewing details about a single acronym. You’ll also learn how to perform the final CRUD operations: edit and delete. Finally, you’ll learn how to add acronyms to categories.
  • Chapter 14: Templating with Leaf: In a previous section of the book, you learned how to create an API using Vapor and Fluent. This section explains how to use Leaf to create dynamic websites in Vapor applications. Just like the previous section, you’ll deploy the website to Vapor Cloud.
  • Chapter 15: Beautifying Pages: In this chapter, you’ll learn how to use the Bootstrap framework to add styling to your pages. You’ll also learn how to embed templates so you only have to make changes in one place. Next, you’ll also see how to serve files with Vapor. Finally, like every chapter in this section, you’ll deploy the new website to Vapor Cloud.
  • Learn how to style your pages with the Bootstrap framework!

  • Chapter 16: Making a Simple Web App I: In the previous chapters, you learned how to display data in a website and how to make the pages look nice with Bootstrap. In this chapter, you’ll learn how to create different models and how to edit acronyms.
  • Chapter 17: Making a Simple Web App II: In this chapter, you’ll learn how to allow users to add categories to acronyms in a user-friendly way. Finally, you’ll deploy your completed web application to Vapor Cloud.

Chapters to come will show you how to deal with authentication, migrations, caching, deployment and more.

This is the second early access release for the book — keep an eye on the site for another early access release soon!

Where to Go From Here?

Here’s how you can get your early access copy of Server Side Swift with Vapor:

  • If you’ve pre-ordered Server Side Swift with Vapor, you can log in to the store and download the early access edition of Server Side Swift with Vapor here.
  • If you haven’t yet pre-ordered Server Side Swift with Vapor, you can get it at the limited-time, early access sale price of $44.99.

    When you order the book, you’ll get exclusive access to the upcoming early access releases of the book so you can get a jumpstart on learning all the new features of Vapor. The full edition of the book should be released late Spring 2018.

Not sure if this book is for you? Whether you’re looking to create a backend for your iOS app or want to create fully featured web apps, Vapor is the perfect platform for you.

This book starts with the basics of web development and introduces the basics of Vapor; it then walks you through creating APIs and web backends; it shows you how to create and configure databases; it explains deploying to Heroku, AWS, or Docker; it helps you test your creations and more!

Questions about the book? Ask them in the comments below!

The post Server Side Swift with Vapor – First 16 Chapters Now Available! appeared first on Ray Wenderlich.

Kotlin Apprentice — First 18 Chapters Now Available!

$
0
0

Great news everyone: The second early access release of our Kotlin Apprentice book is now available!

Heard of Kotlin, but haven’t yet started to learn the language? Or maybe you want to explore some more advanced aspects of the language? The Kotlin Apprentice is here to help you out!

This release adds six more chapters:

  • Chapter 7: Nullability: Many programming languages suffer from the “billion dollar mistake” of null values. You’ll learn about how Kotlin protects you from the dreaded null pointer exception.
  • Chapter 16: Interfaces: Classes are used when you want to create types that contain both state and behavior. When you need a type that allows primarily the specification of behavior, you’re better off using an interface. See how to create and use interfaces.
  • Chapter 17: Enum Classes: Enumerations are useful when you have a quantity that can take on a finite set of discrete values. See how to define and use enum classes and see some examples of working with enum classes and when expressions.
  • Chapter 20: Exceptions: No software is immune to error conditions. See how to use exceptions in Kotlin to provide some control over when and how errors are handled.
  • Chapter 21: Functional Programming: Kotlin goes beyond just being an object-oriented programming language, and provides many of the constructs found in the domain of functional programming. See how to treat functions as first-class citizens by learning how to use functions as parameters and return values from other functions.
  • Appendix A: Kotlin Platforms: Now that you’ve learned about how to use Kotlin, you may be asking yourself: Where can I apply all of this knowledge? There are many different platforms that allow you to use Kotlin as a programming language. Anything that runs Java can run Kotlin, and there are very few machines that can’t run Java. In this chapter, you’ll learn about the top platforms for Kotlin and what to watch out for.

Chapters to come will cover objects, generics, Kotin/Java interoperability, coroutines scripting and more.

This is the second early access release for the book — keep an eye out for another early access release soon!

Where to Go From Here?

Here’s how you can get your early access copy of Kotlin Apprentice:

The Kotlin Apprentice is a book geared toward complete beginners to Kotlin. It’s ideal for people with little to no prior programming experience, but it’s also excellent for people who have prior programming experience and are looking to get up-to-speed quickly with the Kotlin language.

The book focuses on the core Kotlin language itself — not building Android apps. If you’re brand-new to Kotlin, we recommend reading this book first, and then working through the our companion book Android Apprentice after that.

Here’s a sneak peek of what’s inside:

  • Coding Essentials and your IDE: We start you off right at the beginning so you can get up to speed with programming basics. Learn how to work with Intellij IDEA, which you will use throughout the rest of the book.
  • Nullability: Kotlin helps you avoid the “billion dollar mistake” by only allowing data to be null if you explicitly allow it.
  • Arrays, Lists, Maps, and Sets: Why have only one of a thing when you could have many? Learn about the Kotlin collection types — arrays, lists, maps, and sets — including what they’re good for, how to use them, and when to use each.
  • Lambdas: Put code into variables and pass code around to help avoid callback insanity!
  • Kotlin and Java Interoperability: Kotlin is designed to be 100% compatible with Java and the JVM. Seamlessly use Kotlin in your Java projects and call back and forth between the languages.
  • Kotlin Coroutines: Simplify your asynchronous programming using Kotlin coroutines, and discover the differences between coroutines and threads.
  • And much more!: We’ll take you through programming basics, object-oriented programming with classes, exceptions, generics, functional programming, and more!

Questions about the book? Ask them in the comments below!

The post Kotlin Apprentice — First 18 Chapters Now Available! appeared first on Ray Wenderlich.

Google I/O 2018 Keynote Reaction

$
0
0

Google I/O 2018 Keynote Reaction

Google I/O 2018 began this week at the Shoreline Amphitheater in Mountain View, California. The I/O conference is Google’s annual opportunity to set a direction for the developer community as well as share with us the technologies and development tools they’ve been working on in the past year. The conference features presentations on Google products and services such as Google Assistant, Google apps like Google Maps and Google News, Chrome and ChromeOS, Augmented Reality, and of course, lots of Android. :]

The conference starts each year with two keynote presentations, the first a feature-focused presentation led by company CEO Sundar Pichai, and the second a developer-focused keynote. One of the first sessions after the two keynotes is What’s New in Android, often called “the Android Keynote”.

  • The opening keynote focused primarily on Google’s Artificial Intelligence (AI) and Machine Learning (ML) advancements, and had recurring themes of responsibility and saving time. The Google Assistant was one of the main technologies discussed, and another recurring theme was using the Assistant to improve your Digital Wellbeing.
  • The Developer Keynote started with a review of new Android features such as App Bundles and Android Jetpack. It then moved on to developer-oriented discussions of Google Assistant, Web apps and running Linux on ChromeOS, an expansion of Material Design called Material Theming, and new Firebase and AR advancements.
  • The What’s New in Android session gave a brief introduction to each of the topics that were being announced or covered at the conference for Android, and along the way pointed you to the sessions you need to see to learn more.

The most exciting announcements from the keynotes were:

  • Google Duplex: Google demoed the Google Assistant literally making a phone call for you. Google said that they’re “still working” to perfect this capability, but the the sample calls they played were jaw dropping in their naturalness and possibilities. Google is planning on simple use cases in the near future. A use case I could imagine would be having the Assistant call a number to talk through an automated system and stay on hold for you, and then notify you when the person on the other end is ready while telling them you’ll be right back.
  • Computer Vision and Google Lens: A pretty sweet AR demo in Google Maps was shown. The demo overlayed digital content on the real world over your camera feed from within the Maps app, while still showing you directions at the bottom of the screen, making it much easier to find your way in unknown places.
  • Android Jetpack: The Jetpack incorporates a number of Google libraries for Android into one package, including the Support Library and Android Architecture Components. Having them all under one name should simplify discoverability of the features and encourage more developers to use them in their apps.
  • MLKit: MLKit is a library that is Firebase-hosted and makes it easier to incorporate Google’s advanced ML into your apps, including text recognition and image labeling. There was a pretty sweet demo of grabbing the name of an item off a menu, which you could then search for a description of. And its available for both iOS and Android. MLKit, CoreML, ARCore, ARKit: hey what’s in a name? :]
  • App Actions and Slices: These will increase engagement with your app by helping you embed pieces of the app into other parts of Android like Search and Google Assistant results. The options go far beyond a simple icon for your app on the system share sheet.
  • ARCore and Sceneform: The original ARCore API required either using a framework like Unity or working with lower level OpenGL code. Sceneform promises to make it easier to code AR interactions into your apps.
  • New Voices for Google Assistant: ML training has advanced to the point that less work is required to incorporate new voices, and Google’s working with John Legend to create a voice for him. In the future, you may be able to use your own voice or select from popular celebrity voices. Would love to have a Google Assistant voice for James Earl Jones! :]

The rest of this post summarizes the three keynotes, in case you may not have had a chance or had time to watch them. At the bottom of the post are links to the actual keynote videos on the Google Developers YouTube channel, and I encourage you to watch them for yourself. And then also dive into the session videos on YouTube, once they’re available.

Opening Keynote

The keynote began with a video of little multi-colored cube creatures with some type of glow inside them. Kind of like intelligent building blocks. The video ended with the banner “Make good things together”.

Google CEO Sundar Pichai then took the stage and announced that there were over 7,000 attendees and a live stream, as well as a lot to cover. He joked about a “major bug” in a key product, getting the cheese wrong in a cheese burger emoji and the foam wrong in a beer emoji. :]

He then discussed the recurring Google theme of AI being an important inflection point in computing. He said that the conference would discuss the impact of AI advances, and that these advances would have to be navigated “carefully and deliberately”.

AI

The AI portion of the keynote started by reviewing some key fields in which Google has made advancements:

  • In healthcare, not only can retina images be used to diagnose diabetic retinopathy in developing countries, but the same eye images can also non-invasively predict cardiovascular risk. And AI can now predict medical events like chance of readmission for a patient. The possibilities for AI in the healthcare world seem to be just scratching the surface of using big data to improve the medical industry.
  • Sundar showed two impressive demos of using AI to improve accessibility. In the first, those with hearing impairments can be helped in situations like people talking over each other on closed-captioning, as AI can now disambiguate voices. The second was using AI to add new languages like morse code to the Google keyboard Gboard, helping those that require alternative languages to communicate.
  • Gmail has been redesigned with an AI-based feature called smart compose, which uses ML to start suggesting phrases and then you hit tab and keep autocompleting. The short demo in the presentation was pretty impressive, with Gmail figuring out what you next want to write as you type.
  • Google Photos was built from the ground up with AI, and over 5 billion photos are viewed by users every day. It has a new feature Suggested Actions, which are smart actions for a photo in context, things like “Share with Lauren”, “Fix brightness”, “Fix document” to a PDF, “Color pop”, and “Colorize” for black and white photos. All in all a very practical example of the combination of computer vision and AI.

Google has also been investing in scale and hardware for AI and ML, introducing TPU 3.0, with liquid cooling introduced in data centers and giant pods that achieve 100 petaflops, or 8x last year’s performance, and allow for larger and more accurate models.

These AI advancements, especially in healthcare and accessibility, clearly demonstrate Google taking the AI responsibility in a serious way. And features like those added to Gmail and Google Photos are just two simple examples of using AI to save time.

Google Assistant

Google wants the Assistant to be natural and comfortable to talk to. Using the DeepMind WaveNet technology, they’re adding 6 new voices to Google Assistant. WaveNet shortens studio time needed for voice recording and the new models still capture the richness of a voice.

Scott Huffman came on stage to discuss Assistant being on 500M devices, with 40 auto brands and 5000 device manufacturers. Soon it will be in 30 languages and 80 countries. Scott discussed needing the Assistant to be naturally conversational and visually assistive and that it needs to understand social dynamics. He introduced Continued Conversation and Multiple Actions (called coordination reduction in linguistics) as features for the voice Assistant. He also discussed family improvements, introducing Pretty Please, which helps keep kids from being rude in their requests to the Assistant. Assistant responds to positive conversation with polite reinforcement.

Lillian Rincon then came on to discuss Smart Displays. She showed watching YouTube by voice and cooking and recipes by voice on the smart display devices. They’ll also have video calling, connect to smart home devices, and give access to Google Maps. Lillian then reviewed a reimagined Assistant experience on phones, which can now have a rich and immersive response to requests. These include smart home device requests with controls like adjusting temperature, and things like “order my usual from Starbucks”. There are many partners for Food pick-up and delivery via Google Assistant. The Assistant can also be swiped up to get a visual representation of your day, including reminders, notes, and lists. And in Google Maps, you can use voice to send your ETA to a recipient.

Google Duplex

Sundar came back on stage to discuss using Google Assistant to connect users to businesses “in a good way”. He noted that 60% of small businesses in the US do not have an online booking system. He then gave a pretty amazing demo of Google Assistant making a call for you in the background for an appointment such as a haircut. On a successful call, you get a notification that the appointment was successfully scheduled. Other examples are restaurant reservations and making a doctor appointment while caring for a sick child. Incredible!

The calls don’t often go as expected, and Google is still developing the technology. They want to “handle the interaction gracefully.” One thing they will do in the coming weeks is make such calls on they’re own from Google to do things like update holiday hours for a business, which will help all customers immediately with improved information.

Digital Wellbeing

At this point the keynote introduced the idea of Digital Wellbeing, which is Google turning their attention to keeping your digital life from making too negative an impact on your physical life. The principles are:

  • Understand your habits
  • Focus on what matters
  • Switch off and wind down
  • Find balance for your family

A good example is getting a reminder on your devices to do things like taking a break from YouTube. Another is an Android P feature called Android Dashboard, which give full visibility into how you are spending your time on your device.

Google News

Trystan Upstill came on stage to announce a number of new features for the Google News platform, and the focus was on:

  • Keep up with the news you care about
  • Understanding the full story
  • Enjoy and support the news sources you love

Reinforcement learning is used throughout the News app. Newscasts in the app are kind of like a preview of a story. There’s a Full Coverage button, an invitation to learn more from multiple sources and formats. Publishers are front and center throughout the app, and there’s a Subscribe with Google feature, a collaboration with over 60 publishers that lets you subscribe to their news across platforms all through Google. Pretty cool!

What’s going on with Android?

Dave Burke then came on stage to discuss Android P and how it’s an important first step for putting AI and ML at the core of the Android OS.

The ML features being brought to Android P are:

  • Adaptive Battery: using ML to optimize battery life by figuring out which apps you’re likely to use.
  • Adaptive Brightness: improving auto-brightness using ML.
  • App Actions: predicting actions you may wish to take depending on things like whether your headphones are plugged in.
  • Slices: interactive snippets of app UI, laying the groundwork with search and Google Assistant.
  • MLKit: a new set of APIs available through Firebase that include: image labeling, text recognition, face detection, barcode scanning, landmark recognition, and smart reply. MLKit is cross-platform on both Android and iOS.

Dave then introduced new gesture-based navigation and the new recent app UI in Android P, and new controls like the volume control.

Sameer Samat came on to discuss in more detail how Android fits into the idea of Digital Wellbeing. The new Android Dashboard helps you to understand habits. You can drill down within the dashboard to see what you’re doing when and how often. There is an App Timer with limits. And Do Not Disturb improvements like the new Shush mode: turn you phone over on a table and hear no sounds or vibrations except from Starred Contacts. There’s a Wind Down mode with Google Assistant, that puts your phone in gray-scale to help ease you into a restful sleep.

Lastly, an Android P beta was announced, for Pixel phones and devices from seven other manufacturers, and available today. Many of the new Android P features introduce ways to keep your mobile phone usage from taking over your entire life but still being meaningful and useful.

Google Maps

Jen Fitzpatrick gave demos of the new For You feature in Google Maps, which uses ML to see trending events around you, and also a matching score that uses ML to tell you how well a suggestion matches your interests.

Aparna Chennapragada then gave a pretty cool demo of combining the device camera and computer vision to reimagine navigation by showing digital content as AR overlays on the real world. You can instantly know where you are and still see the map and stay oriented. GPS alone is not enough, instead it’s a Visual Positioning System. She also showed new Google Lens features that are integrated right inside the camera app on many devices:

  • Smart Text Selection: Recognize and understand words and copy and paste from the real world into the phone.
  • Style Match: Give me things like this.
  • Real-time Results: Both on device and cloud compute.

Self-Driving Cars

The opening keynote wrapped up with a presentation by Waymo CEO John Krafcik. He discussed an Early Rider program taking place in Phoenix, AZ.

Dmitri Dolgov from Waymo then discussed how self-driving car ML touches Perception, Prediction, Decision-making, and Mapping. He discussed having trained for 6M miles driven on public roads and 5B miles in simulation. He noted that Waymo uses TensorFlow and Google TPUs, with learning 15x more efficient with TPUs. They’ve now moved to using simulations to train self-driving cars in difficult weather like snow.

Developer Keynote

The Developer Keynote shifts the conference from a consumer and product focus towards a discussion of how developers will create new applications using all the new technologies from Google. It’s a great event to get a sense for which of the new tools will be discussed at the conference.

Jason Titus took the stage to start the Developer Keynote. He first gave a shoutout to all the GDGs and GDEs around the world. He mentioned that one key goal for the Google developer support team is to make Google AI technology available to everyone. For example, with TensorFlow, dropping models into your apps.

Android

Stephanie Cuthbertson then came up to detail all the latest and greatest on developing for Android. The Android developer community is growing, with the number of developers using the Android IDE almost tripling in two years. She emphasized that developer feedback drives the new features, like Kotlin last year. 35% of pro developers are now using Kotlin. Google is committed to Kotlin for the long term. Stephanie walked though current focuses:

  • Innovative distribution with Android App Bundles that optimizes your application size for 99% of devices and are almost no work for developers.
  • Faster development with the Android Jetpack that includes Architecture, UI, Foundation, and Behavior components (see more below in “What’s New in Android”) with new features including WorkManager for asynchronous tasks and the Navigation Editor for visualizing app navigation flow.
  • Increased engagement with App Actions and Slices, interactive mini-snippets of your app.

Stephanie then mentioned that Android Things is now 1.0 for commercial devices, and that attendees would be receiving an Android Things developer kit!

Google Assistant

Brad Abrams discussed Google Assistant actions. There are over 1M actions available on lots of categories of devices. He described a new era of conversational computing, and mentioned the Dialogflow library that builds natural and rich conversational experiences. He said you can think of an Assistant action as a companion experience to the main features of your app.

Web and Chrome

Tal Oppenheimer came on stage to discuss the Web platform and new features in ChromeOS. She emphasized that Google’s focus is to make the platform more powerful, but at the same time make web development easier. She discussed Google’s push on Progressive Web Apps (PWAs) that have reliable performance, push notifications, and can be added to the home screen. She discussed other Web technologies like Service Worker, WebAssembly, Lighthouse 3.0, and AMP. Tal then wrapped up by announcing that ChromeOS is gaining the ability to run full Linux desktop apps, which will eventually also include Android Studio. So ChromeOS will be a one-stop platform for consuming and developing both Web and Android apps. Sweet!

Material Theming

There was a lot of discussion prior to I/O about a potential Material Design 2.0. The final name is Material Theming, as presented by Rich Fulcher. Material Theming adds flexibility to Material Design allowing you to distinguish your brand to provide customized experiences. You can create a unified and adaptable design system for your app, including color, typography, and shape across your products.

There’s a new redline viewer for dimensions, padding and hex color values as part of two new tools:

  • Material Theme editor, a plugin for Sketch.
  • Material Gallery, with which you can review and comment on design iterations.

There are also now the open source Material Components for Android, iOS, Web, and Flutter, all with Material Theming.

Progress in AI

Jia Li came on to give more developer announcements related to AI. She discussed TPU 3.0 and Google’s ongoing commitment to AI hardware. She walked through Cloud Text-to-Speech, DeepMind Wavenet, and Dialogflow Enterprise Edition. She discussed TensorFlow.js for web and TensorFlowLite for mobile and Raspberry Pi. She finished up by giving more information on two new libraries:

  • Cloud AutoML, which can automate the creation of ML models. For example, to recognize images unique to your application without writing any code.
  • MLKit, the SDK to provide Google ML to mobile developers through Firebase, including text recognition and smart reply.

Firebase

Francis Ma discussed the Firebase goals of helping mobile developers solve key problems across the lifecycle of an app to build better apps, improve app quality, and grow your business. He mentioned that there are 1.2M active Firebase apps every month. He discussed the following Firebase technologies:

  • Fabric + Firebase. Google has brought Crashlytics into Firebase and integrated it with Google Analytics. Firebase is not just a platform for app infrastructure, but also lets you understand and improve your app.
  • MLKit for text recognition, image labeling, face detection, barcode scanning, and landmark recognition.

He mentioned that the ML technology works both on device or in the cloud, and that you can bring in custom TensorFlow models too. You upload to Google cloud infrastructure, and you can then update your model without redeploying your entire app.

ARCore

Nathan Martz came on to discuss ARCore, which launched as 1.0 three months ago. There are amazing apps already, like building a floor-plan from walking around a home. He announced a major update today, with three incredible new features:

  • Sceneform, which makes it easy to create AR applications or add to apps you’ve already built. There’s a Sceneform SDK, an expressive API with a powerful renderer and seamless support for 3D assets.
  • Augmented Images, which allow you to attach AR content and experiences to physical content in the real world. You can compute 3D position in real time.
  • Cloud Anchors for ARCore, where multiple devices create a shared understanding of the world. Available on both Android and iOS.

What’s New in Android

As is tradition, the What’s New in Android session was run by Chet Haase, Dan Sandler, and Romain Guy. They describe the session as the “Android Keynote”. In the session, they summarized the long list of new features in Android and directed you to the sessions in which you can learn more.

The long list of new features in tooling and Android P is summarized here:

  • Android App Bundles to reduce app size.
  • Android JetPack includes Architecture, UI, Foundation and Behavior components. Mainly a repackaging and you’re already familiar with most of what’s in it, but they’re adding to it, and also refactoring the support library to be AndroidX. New features are Paging, Navigation, WorkManager, Slices, and Android KTX.
  • Android Test now has first class Kotlin support, with new APIs to reduce boilerplate and increase readability.
  • Battery Improvements include app standby buckets and background restrictions that a user can set.
  • Background Input & Privacy, where in background there is no access to the microphone or camera.
  • Many Kotlin performance improvements from ART, D8 & R8. Increased nullability annotation coverage in the support library and libcore, and easier to use platform APIs. Android KTX, to take advantage of Kotlin language features in Android APIs.
  • Mockable Framework, and Mockito can now mock final and static methods.
  • Background Text Measurement which offloads and pre-computes text measurement on a background thread so there is less work done on the UI thread.
  • Magnifier for text but also an API for other use cases.
  • Baseline Distance between text views for easier matching with design specs.
  • Smart Linkify to detect custom link entities using ML in the background.
  • Indoor Location using android.net.wifi.rtt.* for WiFi Round-Trip-Time APIs.
  • Accessibility app navigation improvements.
  • Security improvements via a unified biometric dialog, stronger protection for private keys, and a StrongBox backend.
  • Enterprise changes that include switching apps between profiles, locking any app to the device screen, ephemeral users, and a true kiosk mode to hide the navigation bar.
  • Display Cutout, aka the notch, using WindowInsets. There are modes for “never”, “default”, and “shortEdges” with variations
  • Slices are a new approach to app remote content, either within an app or between apps. They use structured data and flexible templates and are interactive and updatable. They’re addressable by a content URI and backwards-compatible in Android Jetpack all the way back to API 19.
  • App Actions are related to slices and act as deep links into your app. They are “shortcuts with parameters” and act as a “visible Intent”.
  • Notifications have a new messaging style and allow images stickers and a smart reply UI.
  • Deprecation Policy has been updated and apps will soon be required to target newer versions of Android, for security and performance. As of August 2018 new apps must target API 26 or above. November 2018 for app updates. And in August 2019, 64-bit ABI will be required.
  • App Compatibility means no more calls to private APIs.
  • NDK r17 includes the Neural Network API, JNI Shared Memory API, Rootless ASAN, and support for UBSAN. It removes support for ARMv5, MIPS, and MIPS64. NDK r18 will remove gcc support, instead you must use clang.
  • Graphics and Media changes include camera API improvements like OIS timestamps and display based flash, support for external USB cameras, and multi-camera support. There is an ImageDecoder, support for HDR VP9, HDR rendering on compatible hardware, and HEIF support the HEVC/H.265 codec, a container for multiple images.
  • Vulkan 1.1 has lots of improvements to the graphics API, including multi-GPU support and protected content.
  • Neural Network API 1.1 is a C API for ML and on-device inference. TensorFlow is built on top of it, and it’s hardware-accelerated on the Pixel 2.
  • ARCore additions such as Sceneform.
  • ChromeOS now allows Linux apps and soon Android Studio on ChromeOS, for a full-blown Android development environment.

Summary

Overall, the keynotes saw Google proudly representing their AI prowess. They are making incredible and futuristic advances while also attempting to ensure that the advances in AI are used in responsible ways for the benefit of all (except maybe certain competitors :] ).

Google is spreading their AI capabilities and expertise across the entire business, and at the same making it easier for developers to use in their own apps.

Google AI is clearly ahead of competitors in terms of performance and accuracy. By helping developers integrate the technology into more and more apps, Google and its platforms like Android will maintain their lead and keep bringing these futuristic features to more and more people around the world.

Where to go from here?

There was so much to digest in just these three sessions! You can see them for yourself at these links

Keynote: https://www.youtube.com/watch?v=ogfYd705cRs

Developer Keynote: https://www.youtube.com/watch?v=flU42CTF3MQ

What’s New in Android: https://www.youtube.com/watch?v=eMHsnvhcf78

There’s a nice short introduction to Android Jetpack here:

Introducing Jetpack: https://www.youtube.com/watch?v=r8U5Rtcr5UU

And here are some links given out during the keynotes to various new technologies:

Some condensed versions of the opening keynote are here:

Finally, you can see the full Google I/O 2018 schedule here, with descriptions of the various sessions that you may want to later check out on YouTube:

https://events.google.com/io/schedule/

Two which you definitely want to see if your an Android developer are:

What did you think of all the announcements made on the first day of Google I/O 2018? Share your thoughts in the forum below.

The post Google I/O 2018 Keynote Reaction appeared first on Ray Wenderlich.

Screencast: Dynamic Type

$
0
0

Dynamic Type allows for your app's text to increase or decrease size beased on your user's preference improving visibility, but more importantly, accessibility.

The post Screencast: Dynamic Type appeared first on Ray Wenderlich.

Viewing all 4396 articles
Browse latest View live


<script src="https://jsc.adskeeper.com/r/s/rssing.com.1596347.js" async> </script>