Quantcast
Channel: Kodeco | High quality programming tutorials: iOS, Android, Swift, Kotlin, Unity, and more
Viewing all 4396 articles
Browse latest View live

RWDevCon 2018 Vault Free Tutorial Session: Improving App Quality with TDD

$
0
0

We recently released the RWDevCon 2018 Vault Video Bundle, a collection of four advanced workshop videos, 18 hands-on tutorial session videos, 500MB+ of sample projects, and 500+ pages of conference books.

To help celebrate its launch (and to give you a taste of what’s inside), we’re releasing a few sample videos from the RWDevCon 2018 Vault over the next two weeks.

Today’s free tutorial session video is Improving App Quality with TDD by Andy Obusek. Enjoy!

The post RWDevCon 2018 Vault Free Tutorial Session: Improving App Quality with TDD appeared first on Ray Wenderlich.


From Spotify to Indie and Beyond: A Top Dev Interview With John Sundell

$
0
0

Founder of Swift by Sundell, John Sundell.

Welcome to another installment of our Top App Dev Interview series!

Each interview in this series focuses on a successful mobile app or developer and the path they took to get where they are today. Today’s special guest is John Sundell.

John Sundell, previously a lead iOS developer at Spotify, is now enjoying life as a freelance developer. John is now a respected member of the iOS community with his headline Swift by Sundell and various talks at conferences around the world. John is also a keen open-source fan and contributes to regular projects on Github.

Indie Developer

John, you were previously a lead iOS developer at Spotify. How and why did you make the decision to go freelance?

I worked at Spotify for 3.5 years, and it was an amazing experience. I learned so much, got to work on a really exciting product and met so many great developers. But after those years, I felt like I was ready for some new adventures.

In order to continue growing as a developer, and to get to work with an even broader set of technologies, I decided that my best option was to go freelance to be able to work with more people in more different contexts.

John Sundell was a lead iOS developer at Spotify.

What was the best thing about going freelance and why?

The freelance lifestyle has always appealed a lot to me (I was a freelancer before I joined Spotify too), since it gives you so much freedom as to how, where and who you’ll work with.

I love working remotely since it lets me set my own schedule in a more free-form way – which is super useful since I love to do things like travelling and working more flexible hours.

I’ve never been a huge fan of strict processes and office politics, and being a freelancer lets me get away from all of that and enables me to focus on coding and working directly with other developers and designers.

What do you miss (if anything) from working at a company like Spotify?

Only the free snacks in the office! No, just kidding ;]

One thing that was incredibly cool working for a company like Spotify was working on such a large-scale, popular product. You could be building a UI, and then two or three weeks later, you would see someone on the subway using that UI that you just built.

That was kind of amazing and surreal in many ways. So seeing your work have that kind of impact on people’s everyday life was an amazing feeling. Another thing I miss sometimes is being able to spend a lot of time focusing on architecture and designing systems.

I’ve always loved system design, and nothing beats designing a system that needs to be able to support millions and millions of users.

Most developers are worried about getting enough work as a freelancer, what advice would you give to said people and how did you manage this?

My top advice would be to establish a solid network of potential customers and partners before going freelance. Get in touch with people that you want to work with, and always be open to making new connections.

Most developers are not super interested in working with sales, so the best approach is usually to work with people and companies that you know since before going freelance. Conferences, social media, blogs and GitHub are great ways to build a network and get in touch with potential customers, and once you have a network established (which doesn’t have to be that large by the way), it shouldn’t be too hard to find new work – developers are really high in demand, as we all know!

Another key thing is building trust. Always under-promise and over-deliver, and go the extra mile in order to make your customers extra happy. That way, chances are those customers will refer you to even more customers, and that way you’ll keep building your network and get to work on even more cool projects.

Can you give me a full detailed breakdown of your average day to day schedule? E.g 9 AM start working, 10 AM have a coffee/break.

My dog usually wakes me up around 8 AM because she wants to go for a walk, so that’s how I start my day. We usually go for a 30-minute walk, and after that, I get ready for work.

I like to work in 2-3 hour periods, with a 15-minute break in between. That way, I can stay focused, I don’t waste time while working and I don’t feel stressed during the day.

I love coding, but I also love relaxing. Taking a quick 15-minute walk, or just relaxing on the couch for a while, is a great way for me to regain energy and re-focus for the next task. I don’t have a strict schedule (again, one of my favourite things about being a freelancer), so that 2-3 hour split is how I manage most of my time.

In The Spotlight

John, I would say in the last year or so, you have really become a key player in the iOS community. How did this happen and was it something you planned to happen?

Like you say, it’s only been in the last year or so that many people have started to notice my work – but I’ve actually been sharing things with the community for over 5 years.

This is something I spoke about in my talk “Sharing” at the App Builders conference this year, the fact that there’s a pretty big backstory behind what at first might look like something that “appeared out of thin air”.

Like everyone else, I started with an audience of 0, and with me being the only contributor to all of my open source projects – but over time things grew into what you see today. I love sharing my work since it lets me work together with so many people from around the community.

Whether it’s open source, blogging, podcasting, or something else, getting feedback and contributions from people around the world is incredibly motivating and has helped me grow so much as a developer. So I never set out to become a “key player” or to get a big audience (although I’m extremely thankful to everyone who follows me and likes my work), instead – I’ve always been driven by the idea that we can all make our lives as developers so much nicer by sharing parts of our work and solutions with each other.

You have spoken at many conferences around the world. What is it you love about conferences, and why do you attend them?

I love talking to other developers, to share ideas and to hear people’s stories. It’s easy to fall into the trap of thinking that the problems you face are unique to you and your team, but very often many other people are facing the exact same challenges.

So when I go to speak at a conference, it’s not only to share learnings and to do a talk but mainly to speak with other developers – it gives me so much inspiration, ideas and motivation to keep learning new things.

I also love travelling and experiencing new places and new cultures. Like how being exposed to new ideas helps me grow as a developer, I like to think that being exposed to new cultures helps me grow as a person.

Working as a freelancer and speaking at various conferences must be very time consuming. How do you manage your time to fit all this in?

That’s the number one question that I get asked (well, maybe tied with “What Xcode theme are you using?”) – how I manage to work on so many different things.

Just like with sharing my work, this is something I’ve practised and tried to improve over many years. I used to be extremely disorganized and had a large number of side projects that never went anywhere, but over time I’ve learned how to maximize my productivity without working too many hours.

For me, it’s really a mixture of productivity and time management. Like I mentioned, I split my day into 2-3 hour chunks, with each chunk being focused on a specific task. I also use a system called “Quick wins” – I keep a list of tasks that should take less than one hour to complete, and then I do a few such tasks each day – which helps give me a sense of accomplishment.

I wrote about a lot of these things (and more) in my Productivity blog post, but in general, I think to be mindful of what you spend your time on can really help you achieve a lot more things, without adding stress – at least that’s how it works for me.

Photo taken by MCE, John Sundell.

I really enjoy reading your weekly Swift by Sundell. How did this happen and how do you manage this on a weekly basis?

That’s great to hear :) I love writing the blog, and I’m happy to hear that people seem to enjoy it, learn new things from it and that it generates some interesting discussions around the community.

Like most of the things I do, it started out as an experiment/challenge. I had tried blogging before, in 2015, without it going anywhere – and I think a big reason that my previous attempt failed was due to lack of focus and goals. When I tried blogging again, at the beginning of 2017, I wanted to do things differently.

I set myself a challenge to see how many weeks in a row that I could write a new post each week, and I decided that no post can take more than 3-4 hours to write. That way, I end up with posts that are more focused – easier to read and easier to write.

Having the weekly challenge pushes me to produce something each week, and it doesn’t have to be revolutionary and amazing, just sharing some ideas from the work that I do every single day.

Can you share any statistics (or screenshots) for your weekly Swift by Sundell?

While I love to celebrate the occasional milestone, I don’t want to focus too much on statistics and numbers.

My goal is always to produce the best content I possibly can, regardless if my audience includes 100 people or 100,000. One thing that I am very excited about though, is the fact that Swift by Sundell is read by people in 177 different countries!

That’s more countries than I’ll probably ever visit in my entire lifetime, so being able to reach people in so many different places around the world is incredibly exciting!

Focus

What tools do you use on a daily basis to help keep you focussed and on track?

My primary productivity/focus tool is Apple’s Notes app.

I’ve tried lots of to-do apps, productivity tools, time measurement software, etc – but for me and the way I think & work, using Notes is perfect. I have a couple of notes pinned to the top of the list – three of which are “Quick wins”, “Upcoming blog posts” and “Podcast planning”, which I use to plan most of my work.

I create to-do lists, write down thoughts and use tables to structure things like podcast episodes. I love the free-form nature of using notes this way since it lets me create my own structure that maps to the way I like to think about things.

It may sound like an over-simplification, but the key for me is to focus on one thing at a time. Think about it, if you only do one thing per day, you can do 30 things in one month. Again, “Quick wins” and managing my time is really key here.

I am an aspiring conference speaker. What is your ultimate advice and can you go into details about the preparation involved?

My number one tip for new conference speakers is to not only prepare – over-prepare. I rehearse most of my talks 10-15 times and spend around 30-40 hours preparing a talk.

Since I never have a whole week I can just block out to preparing a talk, that means that I have to start really early. I like to start preparing my talks 2-3 months in advance, which gives me enough time to familiarize myself with how I want to present the topic and make many iterations of the content.

It also helps to remove stress. I’ve seen so many people sit and work on their slides the same day as the conference, which I honestly could never do. I usually say that “I’m not a good speaker, I’m a good rehearser”.

For me, knowing my slides in-and-out, forwards-and-backwards, really helps reduce nervousness and makes it much easier to have a good flow when presenting. To prepare the content of a presentation (before I make the actual slides in Keynote), I use one of my favourite apps – MindNode. It lets me organize all the content in a mind map, which makes it easy to get an overview of what I want the talk to include.

John speaking at ADDC.

What does the future look like for John Sundell? Any clues as to what you will be doing in the future?

I’d love to be able to spend even more time on Swift by Sundell. I think there’s so much more I could do – including writing a book, hosting workshops and live streams, doing videos, more open source projects, more podcasts and much more.

I’m currently working with some really awesome companies – this wonderful site included – to sponsor my work and to enable me to spend more time on it.

I love iOS development and will, of course, continue to do that as well, but I think where I can make the biggest contribution to the community is by continuing to expand my work with Swift by Sundell, the Stacktrace podcast (that I do with Gui Rambo), and other initiatives.

We’ll see what the future has in store, but I’m really excited about it :]

Where To Go From Here?

And that concludes our Top Dev Interview with John Sundell. Huge thanks to John for sharing his journey with the iOS community!

John is a great example of how dedication and perseverance can pave the way to success. He uses short bursts of productive time to help break his large goals into small, achievable targets.

If you’re interested in becoming a speaker or writer, John’s excellent suggestions on networking and over-preparation will definitely help you achieve these goals.

If you are an app developer with a hit app or game in the top 100 in the App store, we’d love to hear from you. Please drop us a line anytime. If you have a request for any particular developer you’d like to hear from, please join the discussion in the forum below!

The post From Spotify to Indie and Beyond: A Top Dev Interview With John Sundell appeared first on Ray Wenderlich.

Our 2000th Tutorial: Reflections and the Next 1000

$
0
0

raywenderlich.com quietly crossed a rather significant threshold this week: we published our 2000th tutorial!

By my calculations, it took just under six years to reach the first 1000 tutorial mark. To compare, we’ve reached the 2000 tutorial mark in a little less than a year and a half since then. Crazy!

And we have no plans to slow down either; we have a ton of great tutorial content coming your way that covers more of what you need to know in iOS, Android, Unity, and other great technologies.

How We Got To Here

This site has grown a lot since its beginnings; from the early days as a personal development blog, it’s grown to include publishing books, hosting conferences, creating great video courses and screencasts, and even embracing Android with open arms — despite our early reservations about Android as a platform!

But what we’re most proud of is watching you, the community, grow along with us. We’ve enjoyed hearing about your successes with using raywenderlich.com tutorials to land your first iOS development job; we’ve loved seeing the apps you’ve built and shared with the community; and we’ve really enjoyed seeing some of you move from positions as fledgling developers into building your own companies and running your own startups.

Just a small portion of the team saying “thanks” for helping us hit 2000 tutorials!

Truly, without you as our community, we would still be a one-person show, publishing blog posts for fun. We absolutely believe that teamwork lets you dream bigger, and we want to thank you all for helping us reach our 2000th tutorial.

As we reflect on how the industry has changed, where augmented reality, artificial intelligence and machine learning seem to be all anyone talks about these days, it’s interesting to imagine where raywenderlich.com will be be another thousand tutorials from now:

  • Will we be teaching you how to train your ML models to write apps for you?
  • Will we have ditched iOS entirely in favor of helping you design that next breakout VR app?
  • Will the idea of Zero UI have become a reality, and we can say goodbye to messing around with Auto Layout entirely?
  • Or will it be something that we can’t even dream of right now?

Where to Go From Here?

I’d love to know what you think raywenderlich.com should be covering 1000 tutorials from now. Web technologies? More machine learning? Learning how to protect yourself from your sentient iOS apps that run amok and become Skynet? Your feedback as a community has been invaluable to us over the years, and has helped shape the raywenderlich.com you know and love today.

Leave a comment below and let us know where you think the industry is heading, and what shiny new tech you think raywenderlich.com should cover. We look forward to reading about your ideas!

The post Our 2000th Tutorial: Reflections and the Next 1000 appeared first on Ray Wenderlich.

Natural Language Processing on iOS with Turi Create

$
0
0

Natural Language Processing on iOS with Turi Create

Natural Language Processing, or NLP, is the discipline of taking unstructured text and discerning some characteristics about it. To help you do this, Apple’s operating systems provide functions to understand text using the following techniques:

  • Language identification
  • Lemmatization (identification of the root form of a word)
  • Named entity recognition (proper names of people, places and organizations)
  • Parts of speech identification
  • Tokenization

In this tutorial, you’ll use tokenization and a custom machine learning model, or ML model, to identify the author of a given poem, or at least the poet the poem most closely emulates.

Note: This tutorial assumes you’re already familiar with the basics of iOS development and Swift. If you’re new to either of these topics, check out our iOS Development and Swift Language tutorials.

Getting Started

You may have already run into NLP in apps where sections of text are automatically turned into links or tags, or when text is automatically analyzed for emotional charge (called “sentiment” in the biz). NLP is widely used by Apple for data detectors, keyboard auto-suggest and Siri suggestions. Apps with search capabilities often use NLP to find related information and to efficiently transform input text into a canonical and, therefore indexable, form.

The app you’ll be building for this tutorial will take a poem and compare its text against a Core ML model that’s trained with the words from poems of famous, i.e. public-domain, authors. To build the Core ML model, you’ll be using Turi Create, an open-source Python project from Apple that creates and trains ML models.

Turi Create won’t make you a machine learning expert because it hides almost all the internal workings and mathematics involved. On the plus side, it means you don’t have to be a machine learning expert to use machine learning algorithms in your app!

App Overview

The first thing you need to do is download the starter app. You can find the Download Materials link at the top or bottom of this tutorial.

Inside the downloaded materials, you’ll find two project folders, a JSON file, and a Core ML model. Don’t worry about the JSON and ML model files; you’ll use those a bit later. Open the KeatsOrYeats-starter folder and fire up the KeatsOrYeats.xcodeproj inside.

Once running, copy and paste your favorite Yeats poem. Here is an example, “On Being Asked for a War Poem,” by William Butler Yeats:

I think it better that in times like these
A poet's mouth be silent, for in truth
We have no gift to set a statesman right;
He has had enough of meddling who can please
A young girl in the indolence of her youth,
Or an old man upon a winter’s night.

Press Return to run the analysis. At the top, you’ll see the app’s results, indicating “P. Laureate” wrote the poem! This prediction has a 50% confidence and a 10% confidence the poem matches the works of “P. Inglorious”.

This is obviously not correct, but that’s because the results are hard-coded and there’s no actual analysis.

Download Every Known Poem

Sometimes it’s useful to start developing an app using a simple, brute-force approach. The first-order solution to author identification is to get a copy of every known poem, or at least known poems by a set list of poets. That way, the app can do a simple string compare and see if the poem matches any of the authors. As Robert Burns once said, “Easy peasy.”

Nice try, but there are two major problems. First, poems (especially older ones) don’t always have canonical formatting (like line breaks, spacing and punctuation) so it’s hard to do a blind string compare. Second, your full-featured app should identify which author the entered poem most resembles, even if that isn’t a poem known to the app or not a work by that author.

There’s got to be a better way… And there is! Machine learning lets you create models of text you can then use to classify never-before-seen text into a known category.

Intro to Machine Learning: Text-Style

There are many different algorithms covered under the umbrella of machine learning. This CGPGrey video gives an excellent layman’s introduction.

The main takeaway is the resulting model is a mathematical black box that takes input text, transforms that input, and the result will be a decision or, in this a case, a probability that the text matches a given author. Inside that box is a series of weighted values that compute that probability. These weights are “discovered” (refined) over a series of epochs where the weights are adjusted to reduce the overall error.

The simplest model is a linear regression, which fits a line to a series of points. You may be familiar with the old equation y = mx + b. In this case, you have a series of known x & y’s, and the training of the model is to figure out the “m” (the weights) and “b”.

In a standard training scenario, there will be a guess for m & b, an error computed and, then over successive epochs, those get nudged closer and closer to find a value that minimizes the error. When presented with a never-before-seen “x”, the model can predict what the “y” value will be. Here is an in-depth article on how it works with Turi Create.

Of course, real-world models are far more complicated and take into account many different input variables.

Bag of Words

Machine learning inspects and analyzes an input’s features. Features in this context are the important or salient values about the input or, mathematically speaking, the independent variables in the computation. From the download materials, go ahead and open corpus.json, which will be the input file for training the model. Inside, you’ll see an array of JSON objects. Take a look at the first item:

{
    "title": "When You Are Old",
    "author": "William Butler Yeats",
    "text": "When you are old and grey and full of sleep,\nAnd nodding by the fire, take down this book,\nAnd slowly read, and dream of the soft look\nYour eyes had once, and of their shadows deep;\nHow many loved your moments of glad grace,\nAnd loved your beauty with love false or true,\nBut one man loved the pilgrim Soul in you,\nAnd loved the sorrows of your changing face;\nAnd bending down beside the glowing bars,\nMurmur, a little sadly, how Love fled\nAnd paced upon the mountains overhead\nAnd hid his face amid a crowd of stars."
}

In this case, a single “input” has three columns: title, author and text. The text column will be the only feature for the model, and title is not taken into account. The author is the class the model is tasked with computing, which is sometimes called the label or dependent variable.

If the whole text is used as the input, then the model basically becomes the naïve straight-up comparison discussed above. Instead, specific aspects of the text have to be fed into the model. The default way of handling text is as a bag of words, or BOW. Imagine breaking up all the text into its individual words and throwing them into a bag so they lose their context, ordering and sentence structure. This way, the only dimension that’s retained is the frequency of the collection of words.

In other words, the BOW is a map of words to word counts.

For this tutorial, each poem gets transformed into a BOW, with the assumption that one author will use similar words across different poems, and that other authors will tend toward different word choices.

Each word then becomes a dimension for optimizing the model. In this paltry example of 518 poems, there are 24,939 different words used.

The Logistic Classifier

Turi Create will make a logistic classifier for this type of analysis, which actually works a little differently than a linear regression.

To oversimplify a bit: instead of interpolating a single value, a logistic classifier will compute a probability (from 0 to 1) for each class by multiplying how much each word contributes to that class by the number of times that word appears, ultimately adding all of that up across all of the words.

Take the first line of that first Yeats poem: “When you are old and grey and full of sleep”
And the first line of the first Keats poem: “Happy is England! I could be content”

If these two lines were the total input, each of these words contribute wholly to their author. This is because there are no overlapping words. If the Keats line was, instead, “Happy are England”, then the word “are” would contribute 50/50 for each author.

Word    Keats Yeats
-------------------
And       0     1
Are       0     1
Be        1     0
Could     1     0
Content   1     0
England   1     0
Grey      0     1
Happy     1     0
I         1     0
Is        1     0
Full      0     1
Of        0     1
Old       0     1
Sleep     0     1
When      0     1
You       0     1

Now if you take the poem you saw earlier, “On Being Asked for a War Poem”, as the input, only one word — I — appears in the training list, so the model would predict that Keats wrote the poem at 100% and that Yeats wrote the poem at 0%.

Hopefully this illustrates why a large data set is required to accurately train models!

Using Turi Create

Core ML is iOS’s machine learning engine, supporting multiple types of models based on different machine learning SDKs like scikit and keras. Apple’s open-source library, Turi Create, reduces the overhead in learning how to use these libraries, and handles choosing the best type of model for a given task. This is done either by having a pre-chosen model type for the activity or by running several models against each other to see which performs best.

Turi Create is app-specific, rather than model-specific. This means you specify the type of problem you want to solve, rather than choosing the type of model you want to use. This way, it can choose the right model for the job.

Like most machine learning tools, the ones that are compatible with Core ML are written in Python. To get started, very little understanding of Python is necessary. Having said that, knowing Python is useful if you want to expand how you train models or customize the input data, or if you run into trouble.

Setting Up Python

The following instructions assume you already have Python installed, which is likely if you have a Mac running the latest Xcode.

Run the following command in Terminal to check if you have Python installed already:

python -V

If Python is installed, you’ll see its version number. If it isn’t, you’ll need to follow these instructions to download and install Python https://wiki.python.org/moin/BeginnersGuide/Download.

You’ll also need pip installed on your machine, which comes with the Python installation. Run the following command to make sure it’s installed:

which pip

If the result isn’t for a folder ending in /bin/pip, you’ll need to install it from https://pip.pypa.io/en/stable/installing/.

Finally, it’s suggested to use virutalenv to install Turi Create. This isn’t generally part of the default Mac setup, but it can be installed from the Terminal by using:

pip install virtualenv

If you get any permission errors, preface the command with the sudo command.

sudo pip install virtualenv

If you get any SSL errors, you’ll need to add the --trusted-host command line option.

pip install --trusted-host pypi.python.org virtualenv

Virtualenv is a tool for creating virtual Python environments. This means you can install a series of tools and libraries in isolation in a named environment. With virtual environments, you can build and run an app with a known set of dependencies, and then go and create a separate environment for a new app that has a different set of tools, possibly with versions that would otherwise conflict with the first environment.

From an iOS perspective, think of it as being able to have an environment with Xcode 8.2, Cocoapods 1.0 and Fastlane 2.4 to build one app, and then be able to launch another environment with Xcode 9.1, Cocoapods 1.2 and Fastlane 2.7 to build another app, without those two conflicting. This is just one more reminder of the sophistication of open-source developer tools with large communities.

Installing Turi Create

With Python in hand, for the first step, you’ll create a new virtual environment in which to install Turi Create.

Open a Terminal window, and cd into the directory where you downloaded this tutorial’s materials. For reference, corpus.json should be in the current folder before continuing.

From there, enter the following command:

virtualenv venv

This creates a new virtual environment named venv in your project directory.

When you have completed that, activate the environment:

source venv/bin/activate

When there is an active environment, you’ll see a (venv) prepended to the terminal prompt. If you need to get out of the virtual environment, run the deactivate command.

Finally, make sure the environment is still activated and install Turi Create:

pip install -U turicreate

If you have any issues with installation, you can run a more explicit install command:

python2.7 -m pip install turicreate 

This installs the latest version of the Turi Create library, along with all its dependencies. Now it’s time to actually start using Python!

Using Turi Create to train a model

First, in a new Terminal window with the virtual environment active and launch Python in the same directory as your corpus.json file:

python

You can also use a more interactive environment like iPython, which provides better history and tab-completion features, but that’s outside the scope of this tutorial.

Next, run the following command:

import turicreate as tc

This will import the Turi Create module and make it accessible from the symbol tc.

Next, load the JSON data:

data = tc.SFrame.read_json('corpus.json', orient='records')

This will load the data from the JSON file into a SFrame, which is the data container for Turi Create. Its data is organized in columns like a spreadsheet and has powerful functions for manipulation. This is important for massaging data to get the best input for training a model. It’s also optimized for loading from disk storage, which is important for large data sets that can easily overwhelm RAM.

Type in data to see what you pulled out. The generated output shows the size and data types contained within, as well as the first few rows of data.

<bound method SFrame.explore of Columns:
    author  str
    text    str
    title   str
Rows: 518
Data:
+----------------------+-------------------------------+
|        author        |              text             |
+----------------------+-------------------------------+
| William Butler Yeats | When you are old and grey ... |
| William Butler Yeats | Had I the heavens' embroid... |
| William Butler Yeats | Were you but lying cold an... |
| William Butler Yeats | Wine comes in at the mouth... |
| William Butler Yeats | That crazed girl improvisi... |
| William Butler Yeats | Turning and turning in the... |
| William Butler Yeats | I made my song a coat\nCov... |
| William Butler Yeats | I will arise and go now, a... |
| William Butler Yeats | I think it better that in ... |
|      John Keats      | Happy is England! I could ... |
+----------------------+-------------------------------+
+-------------------------------+
|             title             |
+-------------------------------+
|        When You Are Old       |
| He Wishes For The Cloths O... |
| He Wishes His Beloved Were... |
|        A Drinking Song        |
|         A Crazed Girl         |
|       The Second Coming       |
|             A coat            |
|   The Lake Isle Of Innisfree  |
| On being asked for a War Poem |
| Happy Is England! I Could ... |
+-------------------------------+
[518 rows x 3 columns]
Note: Only the head of the SFrame is printed.
You can use print_rows(num_rows=m, num_columns=n) to print more rows and columns.>
Note: If you get an error loading the data, make sure you launched Python in the same directory as the JSON file, or specify a full path to it.

Now that you have the data, for the next step, you’ll create a model by running:

model = tc.sentence_classifier.create(data, 'author', features=['text'])

This creates a sentence classifier given the loaded data, specifying the author to be the class labels, and the text column to be the input variable. To build a more accurate classifier, you can compute and then provide additional features such as meter, line length and rhyme scheme.

This command creates the model and trains it on data. It will reserve about 5% of the rows as a validation set. This means that 95% of the data is for training, and then the remaining data will be used to test the accuracy of the trained model.

Due to the poor quality of the training data (that is, there are a large number of words for a only a handful of examples per author), if the training fails or gets terminated before the maximum 10 iterations are complete, just re-run the command. The training is not deterministic, so trying again might lead to a different result, depending on the starting values for the coefficients.

Finally, run this command to export the model in the Core ML format:

model.export_coreml('Poets.mlmodel')

Voilà! With four lines of Python, you’ve built and trained an ML model ready to use from an iOS app.

Using Core ML

Now that you have a Core ML model, for the next step, you’ll use it in the app.

Import the Model

Core ML lets you use a pre-trained model in your app to make predictions or perform classifications on user input. To use the model, drag the generated Poets.mlmodel into the project navigator. If you skipped the model-generation section of this tutorial, or had trouble creating the model, you can use the one included at the root of the project zip (Download Materials link at top or bottom of the tutorial).

Xcode automatically parses the model file and shows you the important information in the editor panel.

The first section, Machine Learning Model, tells you about the model’s metadata, which Turi Create automatically created for you when generating the model.

The most important line here is the Type. This tells you what kind of model it is. In this case it’s a Pipeline Classifier. A classifier means that it takes the input and tries to assign a label to it. In this case, that is an “author best match”. The pipeline part means that the model is a series of mathematical transforms used on the input data to calculate the class probabilities.

The next section, Model Class shows the generated Swift class to be used inside the app. This class is the code wrapper to the model, and it’s covered in the next step of the tutorial.

The third section, Model Evaluation Parameters describes the inputs and outputs of the model.

Here, there is one input, text, which is a dictionary of string keys (individual words) to double values (the number of times that word appears in the input poem).

There are also two outputs. The first, author, is the most likely match for the poem’s author. The other output, authorProbability, is the percent confidence of a match for each known author.

You’ll see that, for some inputs, even though there is only one “best match”, that match itself might have a very small probability, or there might be two or three matches that are all reasonably close.

Now, click on the arrow next to Poets in the Model Class section. This will open Poets.swift, an automatically generated Swift file. This contains a series of classes that form a convenience wrapper for accessing the model. In particular, it has a simple initializer, a prediction(text:) function that does the actual evaluation by the model, and two classes that wrap the input and output so that you can use standard Swift values in the calling code, instead of worrying about the Core ML data types.

NSLinguisticTagger

Before you can use the model, you need the input text, which is from a free-form text box, which you’ll need to convert to something that’s compatible with PoetsInput. Even though Turi Create handles creating the BOW (Bag of Words) from the SFrame training input, Core ML does not yet have that capability built in. That means you need to transform the text into a dictionary of word counts manually.

You could write a function that takes the input text, splits it at the spaces, trims punctuation and then counts the remainder. Or, even better, use a context-aware text processing API: NSLinguisticTagger.

NSLinguisticTagger is the Cocoa SDK for processing natural language. As of iOS 11, its functionality is backed by its own Core ML model, which is much more complicated than the one shown here.

It’s hard making sure a character-parsing algorithm is smart enough to work around all the edge cases in a language — apostrophe and hyphen punctuation, for example. Even though this app just covers poets from America and the United Kingdom writing in English, there’s no reason the model couldn’t also have poems written in other languages. Introducing parsing for multiple languages, especially non-Roman character languages, can get very difficult very quickly. Fortunately, you can leverage NSLinguisticTagger to simplify this.

In PoemViewController.swift add the following helper function to the private extension:

func wordCounts(text: String) -> [String: Double] {
  // 1
  var bagOfWords: [String: Double] = [:]
  // 2
  let tagger = NSLinguisticTagger(tagSchemes: [.tokenType], options: 0)
  // 3
  let range = NSRange(text.startIndex..., in: text)
  // 4
  let options: NSLinguisticTagger.Options = [.omitPunctuation, .omitWhitespace]


  // 5
  tagger.string = text
  // 6
  tagger.enumerateTags(in: range, unit: .word, scheme: .tokenType, options: options) { _, tokenRange, _ in
    let word = (text as NSString).substring(with: tokenRange)
    bagOfWords[word, default: 0] += 1
  }

  return bagOfWords
}

The output of the function is a count of each word as it appears in the input string, but let’s break down each step:

  1. Initializes your bag of words dictionary.
  2. Creates a NSLinguisticTagger set up to tag all the tokens (words, punctuation, whitespace) in a string.
  3. The tagger operates over a NSRange, so you create a range for the whole string.
  4. Set the options to skip punctuation and whitespace when tagging the string.
  5. Set the tagger string to the text parameter.
  6. Applies the block to all the found tags in the string for each word. This parameter combination identifies all the words in the string, then increments a dictionary value for the word, which works as the dictionary key.

Using the model

With the word counts in hand, they can now be fed into the model. Replace the contents of analyze(text:) with the following:

func analyze(text: String) {
  // 1
  let counts = wordCounts(text: text)
  // 2
  let model = Poets()
  
  // 3
  do {
    // 4
    let prediction = try model.prediction(text: counts)
    updateWithPrediction(poet: prediction.author,
                         probabilities: prediction.authorProbability)
  } catch {
    // 5
    print(error)
  }
}

This function:

  1. Initializes a variable to hold the output of wordCounts(text:).
  2. Creates an instance of the Core ML model.
  3. Wraps the prediction logic in a do/catch block because it can throw an error.
  4. Passes the parsed text to the prediction(text:) function that runs the model.
  5. Logs an error if one exists.

Build and run, then enter a poem and let the model do its magic!

.

The result is great, but you can chalk that one up to good training! Another poem may not have the desired results. For example, this Joyce Kilmer classic does not.

In this case, the model leans heavily towards Emily Dickinson since there are far more of her poems in the training set than any other author. This is the downside to machine learning — the results are only as good as the data used to train the models.

Where To Go From Here?

You can get the KeatsOrYeats-final project from the Download Materials link at the top or bottom of this tutorial.

If you are feeling adventurous and want to take things further, you could easily build on this tutorial by designing your own text classifier. If you have a large data set with known labels, such as reviews and ratings, genres or filters, it would make a good fit. You can also build more accurate models by feeding them more data or providing multiple columns in the features input to classifier.create(). Good candidates would be a poem’s title or style.

Another way to get more accurate predictions is to clean up the input data. Unfortunately, there aren’t a lot of options available to the sentence_classifier, but you can use the logic classifier directly. That way, you can provide a massaged input that eliminates common words or uses an n-gram (pair of words rather than a single word) for a more accurate analysis. Turi Create also has a number of helper functions for this purpose available.

You can also learn more about Core ML and machine learning with these other tutorials: Beginning Machine Learning with scikit-learn and Beginning Machine Learning with Keras & Core ML.

Hopefully, you’re interest in all things NLP and machine learning has been piqued! If you’re looking to connect with other like-minded developers, or just want to share something cool, feel free to join the discussion in the forum below!

The post Natural Language Processing on iOS with Turi Create appeared first on Ray Wenderlich.

Screencast: Android Architecture Components: Paging Library

Screencast: Dynamic Type with Custom Fonts

RWDevCon 2018 Vault Free Tutorial Session: Advanced Unidirectional Architecture

$
0
0

We recently released the RWDevCon 2018 Vault Video Bundle, a collection of four advanced workshop videos, 18 hands-on tutorial session videos, 500MB+ of sample projects, and 500+ pages of conference books.

To help celebrate its launch (and to give you a taste of what’s inside), we’re releasing a few sample videos from the RWDevCon 2018 Vault over the next two weeks.

Today’s free tutorial session video is Advanced Unidirectional Architecture by René Cacheaux. Enjoy!

The post RWDevCon 2018 Vault Free Tutorial Session: Advanced Unidirectional Architecture appeared first on Ray Wenderlich.

Firebase Remote Config Tutorial for iOS

$
0
0
Update note: This tutorial has been updated to iOS 11, Swift 4, and Firebase 4.x by Todd Kerpelman. The original tutorial was also written by Todd Kerpelman.

With Remote Config, you can update the look of your app whenever you want!

With Remote Config, you can update the look of your app whenever you want!

Remember that time you published your app, and it was perfect in every way? You never had to touch another line of code because you managed to get everything just right the first time around?

Yeah, me neither.

Being a successful app developer usually means making frequent changes to your app. Sometimes, these changes are new features or bug fixes. But, sometimes, the most impactful updates are one-line changes to your code, like adjusting a line of text or nerfing a powerful unit in a tower defense game.

While these kinds of changes are easy to make, publishing them is still a multi-day process. Wouldn’t it be nice if you could make some of these tweaks without having to go through that whole process?

Firebase Remote Config gives you that power. Throughout the course of this Firebase Remote Config tutorial for iOS, you’ll use the Planet Tour sample app to learn how you can change text, colors and other behavior without having to publish new builds! Once mastered, you’ll cover the more powerful feature of delivering different sets of content to different users.

Prerequisites: This Firebase Remote Config tutorial for iOS assumes you have some familiarity with, and an installation of, CocoaPods. If you don’t, please check out our CocoaPods tutorial.

Getting Started

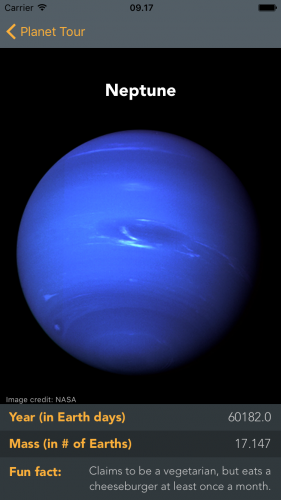
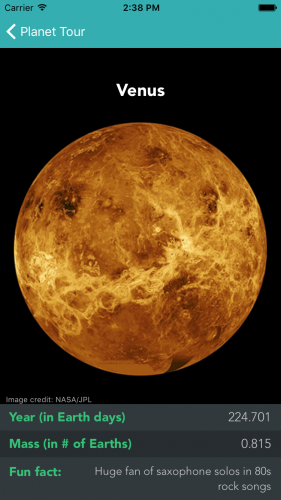
Get started in this Firebase Remote Config tutorial for iOS by downloading the materials via the Download Materials link at the top or bottom of this tutorial. Unzip and run the starter project app. You can scroll to view different planets, tapping on each to get some (mostly accurate) extra information.

The app you’ve just downloaded is made by Planet Tour Apps, Inc., where things are going great until, one day, Greg from marketing decides Planet Tour should switch to a green color scheme in celebration of Earth Day.

It’s an easy enough fix — if you look in AppConstants.swift, there’s an appPrimaryColor variable you can change, which will affect many of your text label colors. Pushing this change out to your users would involve publishing a new build, submitting it to the App Store, getting it approved and then hoping all of your users download it before Earth Day. You’d have to do the whole process again to revert the change once Earth Day was over.

Wouldn’t it be nice if you could just alter these values… from the cloud?

Installing the Remote Config Library

To get started using Remote Config instead of the hard-coded values currently in AppConstants, you’ll need to create a project in the Firebase Console, associate it with the Planet Tour app, and then install the Firebase Remote Config library.

One step at a time:

  1. Open firebase.google.com/console
  2. Click Create New Project.
  3. Name your project Planet Tour, make sure your region is selected, and then click Create Project.
    Firebase Remote Config Tutorial for iOS
  4. Next, click Add Firebase to your iOS app:
    Firebase Remote Config tutorial for iOS
  5. Add the bundle ID of your project — com.razeware.Planet-Tour — leave the App Store ID field blank, and then click Register App:
    Firebase Remote Config tutorial for iOS
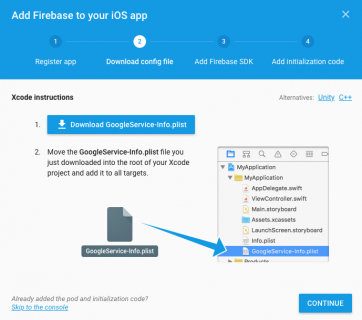
  6. Click the Download button to download a GoogleServices-info.plist file:
  7. Firebase Remote Config tutorial for iOS

  8. At this point, your browser will download a GoogleServices-info.plist file for you. Drag this file into your Xcode project. Be sure to select Copy Items if Needed.
  9. Click Continue through the remaining few steps in the setup wizard. Don’t worry; you’ll walk through those instructions next.
  10. Close Planet Tour in Xcode.
  11. Open a terminal window, navigate to your project and type pod init to create a basic Podfile.
  12. Edit your Podfile in your favorite text editor, replacing its contents with the following:
    # Uncomment the next line to define a global platform for your project
    platform :ios, '9.0'
    
    target 'Planet Tour' do
      # Comment the next line if you're not using Swift and don't want to use dynamic frameworks
      use_frameworks!
    
      # Pods for Planet Tour
      pod 'Firebase/Core'
      pod 'Firebase/RemoteConfig'
    end
    
  13. Run pod install, then open Planet Tour.xcworkspace in Xcode.
  14. Open AppDelegate.swift. Add the following below import UIKit:
    import Firebase
    

    Next, add the following to application(_:didFinishLaunchingWithOptions:) above the return statement:

    FirebaseApp.configure()
    

    This method reviews the libraries you already have installed and initializes them using the constants provided to your project when you added the GoogleServices-info.plist file. The Remote Config library now knows the proper place to look on the internet to find new values.

Build and run your app, again. The app should look as it did previously except that you’ll see debug information in your console output that you didn’t see before.

Congratulations! You’ve installed Remote Config! Now you can use it in the rest of this Firebase Remote Config tutorial for iOS.

How Remote Config Works

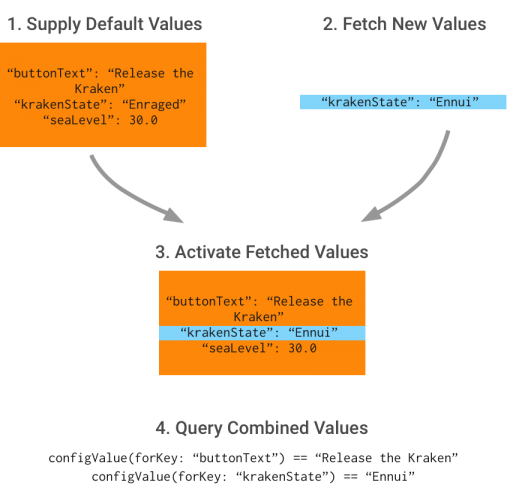
Oversimplified, Remote Config works similarly to a [String: Any?] dictionary living in the cloud. When your app starts, it grabs any new values it might need from the cloud, then applies them on top of any old values you may have specified as defaults.

The general process for using Remote Config looks like this:

  1. Provide Remote Config with defaults for any value you may possibly change in the future.
  2. Fetch any new values from the cloud. These are kept in a cached holding pattern on your device.
  3. “Activate” those fetched values. When this happens, this applies those fetched values on top of your existing default values.
  4. Query Remote Config for values. Remote Config will either give you a value from the cloud, if it found one, or a default value based on the provided key.

Firebase Remote Config Tutorial for iOS

One important thing to note is that these new values you fetch are generally a subset of the default values that you supply. You can take nearly any hard-coded string, number or Boolean in your app, and wire it up to use Remote Config. This gives you the flexibility to change many aspects of your app later, while still keeping your actual network calls nice and small.

Enough theory. Time to put this into practice!

Using Remote Config

First, open your Utilities folder in the Planet Tour Xcode project and right-click to create a new file. Select Swift file. Name it RCValues.swift, and create it in the default folder suggested by Xcode.

Add the following to the end of the file:

import Firebase

class RCValues {

  static let sharedInstance = RCValues()

  private init() {
    loadDefaultValues()
  }

  func loadDefaultValues() {
    let appDefaults: [String: Any?] = [
      "appPrimaryColor" : "#FBB03B"
    ]
    RemoteConfig.remoteConfig().setDefaults(appDefaults as? [String: NSObject])
  }
}

Here, you use the Singleton pattern for RCValues. Inside loadDefaultValues(), you’re passing along a set of keys and values to Remote Config as defaults. Right now, you’re only suppling one value but don’t worry, you’ll add more later.

Next, you need to ask Remote Config to fetch new values from the cloud. Add the following method below loadDefaultValues() to fetch these values:

func fetchCloudValues() {
  // 1
  // WARNING: Don't actually do this in production!
  let fetchDuration: TimeInterval = 0
  RemoteConfig.remoteConfig().fetch(withExpirationDuration: fetchDuration) { status, error in

    if let error = error {
      print("Uh-oh. Got an error fetching remote values \(error)")
      return
    }

    // 2
    RemoteConfig.remoteConfig().activateFetched()
    print("Retrieved values from the cloud!")
  }
}

Let’s go over what you did here:

1. By default, Remote Config will cache any values it retrieves from the cloud for about 12 hours. In a production app, this is probably just fine. But when you’re doing development — or following a Firebase Remote Config tutorial for iOS online — this can make it really tough to test out new values. So, instead, you’re specifying a fetchDuration of 0 to ensure you never use the cached data.

2. In the completion handler, you activate these fetched values immediately — i.e., you’re telling Remote Config to apply these newer values on top of any older ones it might have.

Add the following to the end of init() to call your new method:

fetchCloudValues()

Troubleshooting throttle

The code you added at the beginning has some issues. The Remote Config library has a client-side throttle to ensure that you don’t ping the service too frequently. By setting your fetchDuration to 0, you’ll hit this throttle and your library will stop fetching values.

You can get around this by enabling developer mode. Add the following method below fetchCloudValues():

func activateDebugMode() {
  if let debugSettings = RemoteConfigSettings(developerModeEnabled: true) {
    RemoteConfig.remoteConfig().configSettings = debugSettings
  }
}

By setting developer mode to true, you’re telling Remote Config to bypass the client-side throttle. For development purposes, or testing with your 10 person team, this is fine. But if you launch this app to the public with your millions of adoring fans, you’re going to hit the server-side throttle pretty quickly, and Remote Config will stop working. This is the whole reason you have a client-side throttle in the first place.

Before you launch this app for real, make sure you disable developer mode and set your fetchDuration to something a little more reasonable, like 43200> — that’s 12 hours to you and me.

Finally, add the following right after you declare fetchDuration:

activateDebugMode()

The above will activate debug mode and you’ll no longer hit the server-side throttling issue.

Running Your Code

Open AppDelegate.swift, add the following to application(_:didFinishLaunchingWithOptions:), below FirebaseApp.configure():

let _ = RCValues.sharedInstance

Build and run your app, and you should see the following line in your debug console:

Retrieved values from the cloud!

Using Remote Config Values

Now that you’re downloading these values, try printing them to the console. Open RCValues.swift. Then, add the following to fetchCloudValues(), right after the “Retrieved values from the cloud” line:

print("Our app's primary color is \(RemoteConfig.remoteConfig().configValue(forKey: "appPrimaryColor"))")

The above code will grab the appropriate value for your appPrimaryColor key.

Build and run your app. You’ll see a line like this:

Our app's primary color is <FIRRemoteConfigValue: 0x61000003ece0>

Well, that’s somewhat helpful, but you’re kind of hoping for a string value.

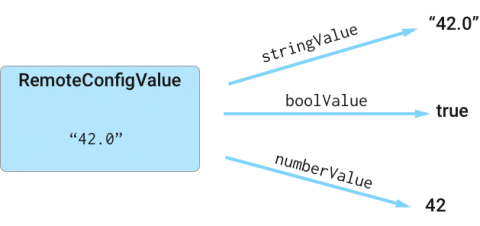
Remote Config retrieves values as RemoteConfigValue objects, which you can think of as wrappers around the underlying data, which is represented internally as a UTF8-encoded string. You’ll almost never use this object directly. Instead, you’ll call a helper method like numberValue or boolValue to retrieve the actual value you want.

Firebase Remote Config Tutorial for iOS

Replace the line you just added with:

let appPrimaryColorString = RemoteConfig.remoteConfig()
                                                 .configValue(forKey: "appPrimaryColor")
                                                 .stringValue ?? "undefined"
print("Our app's primary color is \(appPrimaryColorString)")

Build and run your app. This time you’ll see:

Our app's primary color is #FBB03B

That’s more like it. Remote Config provides you the default value that you supplied earlier.

Updating Values From the Cloud

Now that you’re getting proper values from Remote Config, try supplying new values from the cloud.

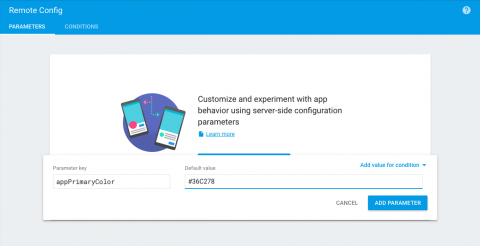
Open the Firebase Console and click on the Remote Config header on the left (under the Grow header). Click Add your first parameter. In the form, enter appPrimaryColor for the key and Greg from Marketing’s favorite new green — #36C278 — for the value.

Firebase Remote Config Tutorial for iOS

Click Add Parameter, then click Publish Changes (twice) to update the changes.

Build and run your app.

See what’s in the console now:

Our app’s primary color is #36C278

Hooray! You’re updating values from the cloud!

Changing Your App’s Look and Feel

Now, it’s time hook up your app to use this new value.

First, you’ll add an enum to represent your keys. Using raw strings for key names is a recipe for disaster — or at least you’ll spend an afternoon hunting down a mystery bug because you mistyped a key name. By using an enum, Xcode can catch errors at compile time instead of runtime.

Open RCValues.swift and add the following above the class definition:

enum ValueKey: String {
  case appPrimaryColor
}

Next, update loadDefaultValues() to use this enum instead of the raw string:

let appDefaults: [String: Any?] = [
  ValueKey.appPrimaryColor.rawValue : "#FBB03B"
]

Next, add the following helper method to RCValues, which takes in a ValueKey and returns a UIColor based on the string from Remote Config.

func color(forKey key: ValueKey) -> UIColor {
  let colorAsHexString = RemoteConfig.remoteConfig()[key.rawValue].stringValue ?? "#FFFFFF"
  let convertedColor = UIColor(colorAsHexString)
  return convertedColor
}

Finally, change the places in your app using the old AppConstants value to use this new RCValues helper method instead.

You’ll do this in three locations:

1. Open ContainerViewController.swift and change the following inside updateBanner():

bannerView.backgroundColor = AppConstants.appPrimaryColor

to this:

bannerView.backgroundColor = RCValues.sharedInstance.color(forKey: .appPrimaryColor)

2. Open GetNewsletterViewController.swift and change the following inside updateSubmitButton():

submitButton.backgroundColor = AppConstants.appPrimaryColor

to this:

submitButton.backgroundColor = RCValues.sharedInstance.color(forKey: .appPrimaryColor)

3. Open PlanetDetailViewController.swift and change the following inside updateLabelColors():

nextLabel.textColor = AppConstants.appPrimaryColor

to this:

nextLabel.textColor = RCValues.sharedInstance.color(forKey: .appPrimaryColor)

To be thorough, open AppConstants.swift and delete the following:

static let appPrimaryColor = UIColor(rgba: "#FBB03B")

See ya later, hard-coded value…

Now, build and run your app. You should see the new green throughout the app:

You don’t have a lot of control as to when these new values get applied. The first time you ran the app, you probably saw the default orange on the main menu but then the new green on the planet detail screens once your new values were loaded from the cloud.

This can be confusing to your users. In this case, you’re only changing some label colors, but it can be quite confusing if your app changes text or values affecting its behavior while your user is in the middle of using it.

There are numerous ways you can deal with this issue, but perhaps the easiest might be to create a loading screen. In this tutorial, there’s already one partially set up for you.

Firebase Remote Config Tutorial for iOS

Hooking Up a Loading Screen

First, make the loading screen the inital view controller of your app. Open Main.storyboard and Control-drag from your Navigation Controller to the Waiting View Controller — it’s the view controller with the black background, although it might be easier to do this Control-dragging in your storyboard outline. Select root view controller from the pop-up: this will make your loading screen the initial screen when your app loads.

Firebase Remote Config Tutorial for iOS

Now, you’ll add the logic to transition to the main menu when Remote Config is finished loading.

Open RCValues.swift, add the following below your sharedInstance property:

var loadingDoneCallback: (() -> Void)?
var fetchComplete = false

Next, replace fetchCloudValues() with the following:

func fetchCloudValues() {
  // WARNING: Don't actually do this in production!
  let fetchDuration: TimeInterval = 0
  activateDebugMode()

  RemoteConfig.remoteConfig().fetch(withExpirationDuration: fetchDuration) { [weak self] status, error in

    if let error = error {
      print ("Uh-oh. Got an error fetching remote values \(error)")
      return
    }

    RemoteConfig.remoteConfig().activateFetched()
    print ("Retrieved values from the cloud!")
    let appPrimaryColorString = RemoteConfig.remoteConfig()
                                            .configValue(forKey: "appPrimaryColor")
                                            .stringValue ?? "undefined"
    print("Our app's primary color is \(appPrimaryColorString)")

    self?.fetchComplete = true
    self?.loadingDoneCallback?()
  }
}

Here, you set fetchComplete to true indicating fetching is complete. Finally, you call the optional callback to inform the listener the Remote Config values have finished loading. This could be used to tell a loading screen to dismiss itself.

Open WaitingViewController.swift and add the following method:

func startAppForReal() {
  performSegue(withIdentifier: "loadingDoneSegue", sender: self)
}

Next, replace viewDidLoad() with the following:

override func viewDidLoad() {
  super.viewDidLoad()

  if RCValues.sharedInstance.fetchComplete {
    startAppForReal()
  }

  RCValues.sharedInstance.loadingDoneCallback = startAppForReal
}

Here, you’re making startAppForReal() the method RCValues calls when all of its values are done loading. You’re also adding a check just in case RCValues somehow manages to finish its network call before the waiting screen is done loading. This should never happen, but it never hurts to code defensively!

Todd’s rule of coding: Adding “This should never happen” to your code comments will guarantee that, at some point in the future, that thing will actually happen.

Build and run your app. You’ll see the waiting screen appear for a short while, depending on your network speed, before jumping into the rest of your app. If you change the value of your app’s primary color in the Firebase console and restart your app, the new color will properly appear everywhere in your app. Remember to click Publish Changes in the Firebase console.

Hook Up the Rest of Your App

Now that you’ve converted one value from AppConstants to RCValues, you can now convert the rest! Open RCValues.swift and replace ValueKey with the following:

enum ValueKey: String {
  case bigLabelColor
  case appPrimaryColor
  case navBarBackground
  case navTintColor
  case detailTitleColor
  case detailInfoColor
  case subscribeBannerText
  case subscribeBannerButton
  case subscribeVCText
  case subscribeVCButton
  case shouldWeIncludePluto
  case experimentGroup
  case planetImageScaleFactor
}

Next, replace loadDefaultValues() with the following:

func loadDefaultValues() {
  let appDefaults: [String: Any?] = [
    ValueKey.bigLabelColor.rawValue: "#FFFFFF66",
    ValueKey.appPrimaryColor.rawValue: "#FBB03B",
    ValueKey.navBarBackground.rawValue: "#535E66",
    ValueKey.navTintColor.rawValue: "#FBB03B",
    ValueKey.detailTitleColor.rawValue: "#FFFFFF",
    ValueKey.detailInfoColor.rawValue: "#CCCCCC",
    ValueKey.subscribeBannerText.rawValue: "Like Planet Tour?",
    ValueKey.subscribeBannerButton.rawValue: "Get our newsletter!",
    ValueKey.subscribeVCText.rawValue: "Want more astronomy facts? Sign up for our newsletter!",
    ValueKey.subscribeVCButton.rawValue: "Subscribe",
    ValueKey.shouldWeIncludePluto.rawValue: false,
    ValueKey.experimentGroup.rawValue: "default",
    ValueKey.planetImageScaleFactor.rawValue: 0.33
  ]
  RemoteConfig.remoteConfig().setDefaults(appDefaults as? [String: NSObject])
}

Next, add three helper methods at the end to allow retrieving values other than colors:

func bool(forKey key: ValueKey) -> Bool {
  return RemoteConfig.remoteConfig()[key.rawValue].boolValue
}

func string(forKey key: ValueKey) -> String {
  return RemoteConfig.remoteConfig()[key.rawValue].stringValue ?? ""
}

func double(forKey key: ValueKey) -> Double {
  if let numberValue = RemoteConfig.remoteConfig()[key.rawValue].numberValue {
    return numberValue.doubleValue
  } else {
    return 0.0
  }
}

Next, replace every part of your app that uses AppConstants with the corresponding call to RCValues.

You’ll make nine changes throughout your app:

1. Open ContainerViewController.swift and replace updateNavigationColors() with the following:

func updateNavigationColors() {
  navigationController?.navigationBar.tintColor = RCValues.sharedInstance.color(forKey: .navTintColor)
}

2. Replace updateBanner() with the following:

func updateBanner() {
  bannerView.backgroundColor = RCValues.sharedInstance.color(forKey: .appPrimaryColor)
  bannerLabel.text = RCValues.sharedInstance.string(forKey: .subscribeBannerText)
  getNewsletterButton.setTitle(RCValues.sharedInstance.string(forKey: .subscribeBannerButton), for: .normal)
}

3. Open GetNewsletterViewController.swift and replace updateText() with the following:

func updateText() {
  instructionLabel.text = RCValues.sharedInstance.string(forKey: .subscribeVCText)
  submitButton.setTitle(RCValues.sharedInstance.string(forKey: .subscribeVCButton), for: .normal)
}

4. Open PlanetDetailViewController.swift and in updateLabelColors(), replace the line:

nextLabel.textColor = AppConstants.detailInfoColor

with

nextLabel.textColor = RCValues.sharedInstance.color(forKey: .detailInfoColor)

5. Replace the line

planetNameLabel.textColor = AppConstants.detailTitleColor

with

planetNameLabel.textColor = RCValues.sharedInstance.color(forKey: .detailTitleColor)

6. Open PlanetsCollectionViewController.swift, and inside customizeNavigationBar(), replace the line:

navBar.barTintColor = AppConstants.navBarBackground

with

navBar.barTintColor = RCValues.sharedInstance.color(forKey: .navBarBackground)

7. Inside collectionView(_:cellForItemAt:), replace the line:

cell.nameLabel.textColor = AppConstants.bigLabelColor

with

cell.nameLabel.textColor = RCValues.sharedInstance.color(forKey: .bigLabelColor)

8. Open SolarSystem.swift and, inside init(), replace the line:

if AppConstants.shouldWeIncludePluto {

with

if RCValues.sharedInstance.bool(forKey: .shouldWeIncludePluto) {

9. Finally, inside calculatePlanetScales(), replace the line:

scaleFactors[i] = pow(ratio, AppConstants.planetImageScaleFactor)

with the line

scaleFactors[i] = pow(ratio, RCValues.sharedInstance.double(forKey: .planetImageScaleFactor))

Whew! That was a lot of changes, but now you should have your entire app switched over. If you want to be sure, do a search in your app for “AppConstants” — you should only have one result left, which is defining the struct itself:

Firebase Remote Config Tutorial for iOS

If you want to be really sure, delete your AppConstants file. Your app should continue to build and run without any errors.

Now that your app is fully wired up to Remote Config, you can make other changes in addition to the green color that Greg likes so much.

Additional Changes to Your App

Open the Firebase Console. Make sure you’re in the Remote Config section, then click Add Parameter. Choose navBarBackground for the key and #35AEB1 for the new value, then click Add Parameter. Then do the same thing to set navTintColor to #FFFFFF. Click Publish Changes to publish these changes to your app.

When you’re finished, your console should look like this:

Firebase Remote Config Tutorial for iOS

Publish the changes and then build and run the app.

Your app should look like this:

Firebase Remote Config Tutorial for iOS

Feel free to play around! Change some other values. Mess around with the text. See what kind of stylish… or gaudy… color combinations you can come up with.

But when you’re finished, come on back to this Firebase Remote Config tutorial for iOS because you have an international crisis to deal with!

Bringing Back Pluto

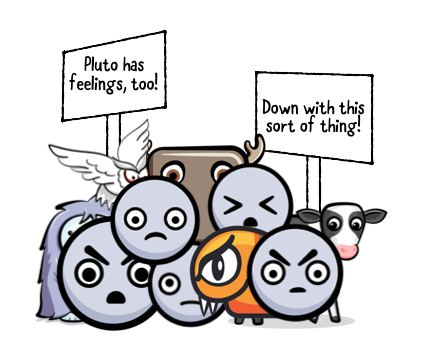
Things are rotten in the state of Denmark! While most of the world has begrudgingly accepted that Pluto isn’t a planet, the Scandinavian Society for Preserving Pluto, a totally not-made-up society of rabid Pluto fans, has lobbied hard for Pluto to be a planet and hence, worthy of inclusion in the Planet Tour app. The protests are mounting in the streets of Copenhagen! Whatever can be done?

Firebase Remote Config tutorial for iOS

Another app release, another angry mob…

This seems like a simple job for Remote Config! You could set shouldWeIncludePluto to true. But hang on — that will change this setting for all of your users, not just those in Scandinavia. How can you deliver different settings just to residents of different countries?

Conditions to the Rescue!

Remote Config’s ability to deliver different sets of data to different users is what makes it more sophisticated than just a simple dictionary in the cloud. You’ll take advantage of this feature in order to make Pluto a planet again for your Scandinavian users.

First, open the Firebase Console, make sure you’re in the Remote Config panel and click Add Parameter to add a new parameter.

Enter shouldWeIncludePluto as the parameter key.

Next, click the dropdown next to the value field labelled Add value for condition.

Next, select Define New Condition:

Firebase Remote Config Tutorial for iOS

If you’re intrigued by that “Experiment with this parameter” option, you can find out more in our A/B Testing tutorial, which continues from where this one leaves off.

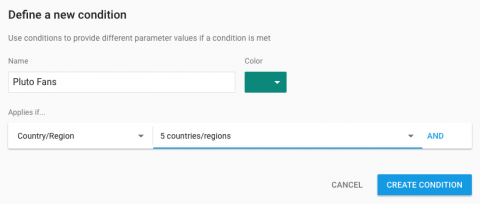
In the dialog, give the new condition a name of Pluto Fans.

In the drop-down underneath, select Country/Region.

From the countries list, select Denmark, Finland, Iceland, Norway and Sweden:

Firebase Remote Config Tutorial for iOS

Click Create Condition.

Next, add a value of true in the Value for Pluto Fans field, and a value of false as your default value:

Firebase Remote Config Tutorial for iOS

Finally, click Add Parameter and then click Publish Changes to push these changes to the world.

Build and run your app to see the results.

If you don’t live in one of these northernly countries, you won’t see Pluto in your list of planets. If you want to test the experience for your Scandinavian users, I recommend booking a flight to Copenhagen, getting yourself a new Danish iPhone and then running your app on it — perhaps while enjoying a smoked salmon, open-faced sandwich.

Firebase Remote Config Tutorial for iOS

A slightly more economical option (potentially involving less jet lag) is to open the Settings app on your device or simulator. Select General > Language & Region > Region > Denmark — or whatever your favorite Scandinavian country is:

It’s slightly cheaper than a trip to Copenhagen, but also less fun.

Now, build and run your app. This time, you should see Pluto back where it belongs, among the other planets. International crisis averted!

Welcome back, Pluto. We missed you!

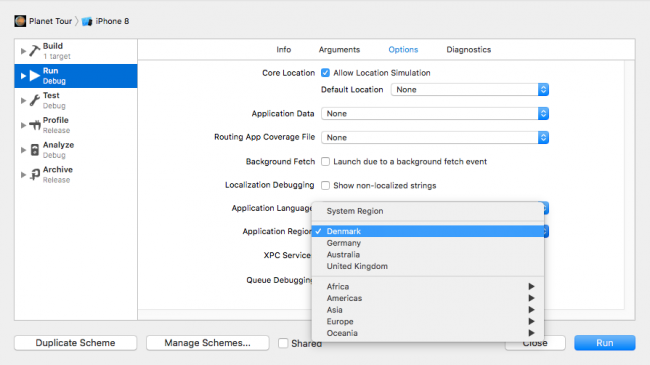
Another way to test without fiddling around in the simulator settings is to Option-Click the Run button in Xcode. In the resulting dialog, click the Options pane and choose an appropriate country in the Application Region menu.

Where to Go From Here?

You can download the completed project for this tutorial using the Download Materials link at the top or bottom of this tutorial. Please note, however, that you still need to create a project in the Firebase Console and drag in your GoogleServices-info.plist file for the project to work.

There are more features you haven’t touched on in this tutorial, too. For example, by delivering values to random groups of users, you can use Remote Config to run A/B tests, or gradually roll out new features. You can also deliver different data sets to specific groups of people you’ve identified in Firebase Analytics, which gives you some nice customization features. If you want to learn more than what you’ve covered, here, you can check out the documentation or the next tutorial on this topic!

Now that you have the foundations, there’s a lot more you can do with Remote Config. If you’re developing any kind of game, for example, it can be a great way to tweak your gameplay if your players are finding it too easy or too hard. It’s also an easy way to create a “Message of the Day” kind of feature. Or you might just use it to experiment with different button or label text to see what your users react to best. Try it out in your favorite app and see what you can change on the fly!

As always, if you have any questions or comments about this tutorial — or favorite Planet Tour color schemes — please join the forum discussion below!

The post Firebase Remote Config Tutorial for iOS appeared first on Ray Wenderlich.


Anko Commons Tutorial

$
0
0

Anko Commons Tutorial

Anko is a library for Android devs that want to achieve more while writing less. It simplifies common tasks that are tedious and generate a lot of boilerplate, making your code enjoyable to read, concise and clean. Neat and Tidy, just what the doctor ordered for my Java headaches. :]

The folks at JetBrains, makers of titles like Kotlin (A New Hope) and the IntelliJ Platform (the foundation of Android Studio), have created and maintain Anko.

Anko consists of a number of different components:

  • Anko Commons: helpers for intents, dialogs, logging;
  • Anko Layouts: lets you quickly and programattically create type-safe Android layouts;
  • Anko SQLite: helpers for working with Android SQLite;
  • Anko Coroutines: utilities for using Kotlin coroutins.

In this tutorial, we are going to be focused on Anko Commons. Future tutorials will cover other parts of Anko.

You’ll become an Anko Commons master by updating an existing app that doesn’t use Anko, and then comparing how to do the same things with and without Anko. This will help you be able to make a conscious decision about whether or not to use the library.

Note: This tutorial assumes you have previous experience with developing for Android in Kotlin. If you are unfamiliar with the language, have a look at this tutorial. If you’re just beginning with Android, check out some of our Getting Started and other Android tutorials.

Getting Started

Kanime is the app that we are going to use to showcase Anko’s power. It shows a list of my top 10 animes that you should watch. It’s built without using Anko, but not for long, along the way you’re going to update it.

Meet Kanime. :]

Download the Kanime source code using the download button at the top or bottom of the tutorial. Open the starter project up by starting Android Studio 3.1.2 or later and selecting Open an existing Android Studio project:

Open an existing Android Studio project

Before going on with the tutorial, take a look at the existing starter code.

Kanime Structure

The Kotlin source code packages in the starter project appear as follow:

  • Activities
    • MainActivity.kt
      Here is where you show the top 10 best anime list.
    • AnimeDetailActivity.kt
      When you tap an Anime, this activity opens up. It shows all the info about the selected anime.
    • AboutActivity.kt
      A screen to show information about the app.
  • Adapters
    • AnimeAdapter.kt
      Contains all the code to show each anime item on the list.
  • data
    • AnimeDataSource.kt
      Provides all the anime data.
  • model
    • Anime.kt
      Anime model data class.

Now you have a clear picture of how Kanime is structured. Let’s Rock!

Anko

Anko is a set of helpers functions (Kotlin extension functions) that help you to get something done with the least amount of boilerplate code. It’s subdivided into modules that help you to deal with Layouts, SQLite, and Coroutines. This modularization allows you to pick and choose only what you need.

Note: If you don’t have experience using Kotlin extension functions, then please take a look at the optional Extension Function Fundamentals section. It will help you to understand how Anko works under the hood. If you already have experience with extension functions, then feel free the skip this section.

Extension Function Fundamentals (Optional)

To understand how Anko works, you need to understand Kotlin Extension Functions. They allow you to add a function to an existing class without modifying the class.

For example, say you had a Dog class:

Dog.kt

class Dog(val name: String, val breed: String)

In another Kotlin file you could add a function to Dog without modifying the original file:

Extensions.kt

package com.raywenderlich.doggy

fun Dog.bark(): Unit{
  println("woof woof")
}

To create the extension function, after fun type the class, then a dot, then the name of the extension function.

You could test your extension function in another file as follows”

Main.kt


//Importing bark extension function :]
import com.raywenderlich.doggy.bark

fun main(args: Array<String>) {
  var myPuppy = Dog("Max", "Pug")
  myPuppy.bark()
}

To use the extension function, you only import bark, and then every Dog object will be able to use the bark() function.

Let’s see what happen if you don’t import the bark:

Main.kt


//import com.raywenderlich.doggy.bark
fun main(args: Array<String>) {
  var myPuppy = Dog("Max", "Pug")
  myPuppy.bark() // Compile error ¯\_(ツ)_/¯
}

Note: If you don’t import the extension function, you won’t be able to use it, because it won’t be visible in your code. For this reason, the dog isn’t able to bark. ¯\_(ツ)_/¯

After this small introduction to Kotlin extension functions, now you are ready to become an Anko rock star!

Setting Up Anko Commons

Let’s spice up Kanime by adding Anko Commons!

To set up Anko in your project you only need to include the Gradle dependency. The dependency comes in two flavors:

1.The full Anko artifacts

implementation "org.jetbrains.anko:anko:$anko_version"

This dependency contains all Anko components. If you are only going to use some of them then this is not the way to go, because it will add unnecesary size to your APK for code you are not going to use.

2. Specific Artifacts

Anko allows you to pick and choose only the dependencies that you need:

implementation "org.jetbrains.anko:anko-commons:$anko_version"

This only brings the specific classes for Anko Commons. We are going go with this one for Kanime because it is more lightweight.

Open the app module build.gradle file and add this line to your dependencies :

implementation "org.jetbrains.anko:anko-commons:0.10.5"
Note: As of this writing, the latest version of Anko is 0.10.5. You can find the last version of Anko here. Each new release comes with release notes for what has changed since the last version.

Click “Sync Now” to sync your Gradle files and wait a bit until it finishes.

Hooray!! Now you can use Anko Commons in your project.

Using Anko Commons

Let’s do a deep dive to see what Anko Commons can do for you.

Intents

Intents help you to send data from one Android Component to another. Code to use them can be cumbersome and long. Anko give you a more concise and pleasant way to use intents.

For example, in Kanime you show a list of animes in MainActivity, and when an anime is tapped, it will open AnimeDetailActivity with all the information about the anime.

For this reason, you need an Intent to open AnimeDetailActivity to pass it the information about the selected anime.

Lets see some code!

In the MainActivity.kt file find the function openDetailActivity() that opens the detail screen.

Here is what the code looks like without Anko. :[

private fun openDetailActivity(anime: Anime) {
  // 1 Create the intent and specify the target activity
  val intent = Intent(this, AnimeDetailActivity::class.java)

  // 2 Add anime details
  intent.putExtra("TITLE_KEY", anime.name)
  intent.putExtra("DESCRIPTION_KEY", anime.description)
  intent.putExtra("IMDB_LINK_KEY", anime.imdbLink)
  intent.putExtra("IMAGE_KEY", anime.imageDrawable)
  
  // 3. open the detail activity
  startActivity(intent)
    }

You create an Intent, then have a number of lines to add extras onto the Intent. There are a lot of steps and the end code is not pretty readable.

Replace the function with the equivalent code from Anko Commons:

private fun openDetailActivity(anime: Anime) {
  startActivity<AnimeDetailActivity>(
      "TITLE_KEY" to anime.name,
      "DESCRIPTION_KEY" to anime.description,
      "IMDB_LINK_KEY" to anime.imdbLink,
      "IMAGE_KEY" to anime.imageDrawable
    )
}

You need only one statement to achieve the same end and the code is completely readable!
You may need to hit Option+Return on Mac or Alt+Enter on PC to pull in the Anko extension function import.

To specify the target activity, you put the name of the class after the startActivity as <TargetActivity>. If you want to know more about how this works, read about Generics here.

To specify the additional data, you pass as arguments one or more Kotlin Pair objects to the function startActivity<TargetActivity>(). Each Pair is an extra that you are sending to the activity that you want to call.

Quick Intro to Kotlin Pairs (Optional)

A Pair is a class in Kotlin that helps you to store two values, and is similar to a Tuple in other languages.

If you got goosebumps, when you saw the to operator, don’t worry since it’s a shortcut infix function for creating Pair. The first parameter goes before the to and the second after to. For example:

val myPair  = "TITLE_KEY" to "Berserk"
println("${myPair.first} ${myPair.second}")
// prints TITLE_KEY Berserk

This is the same as if you were to write:

val myPair2  = Pair("TITLE_KEY","Berserk")
println("${myPair2.first} ${myPair2.second}")
// Prints TITLE_KEY Berserk

Now you are a pair master :]

Intent without passing data

When you tap the menu icon, Kanime opens AboutActivity.

In MainActivity, find the function openAboutActivity and replace it with the Anko version:

private fun openAboutActivity() {
  startActivity<AboutActivity>()
}

Here is the code prior to the switch to Anko:

private fun openAboutActivity() {
  val intent = Intent(this, AboutActivity::class.java)
  startActivity(intent)
}

Using Anko, with one line and a lot less code, you are able to open an activity without worrying about creating an Intent object.

Common Intents

Anko Commons offers a great set of “common” intents that are pretty easy to use. Take a look at the table below.

In AnimeDetailActivity, there are a lot of Intents like “share the anime with a friend” the anime and “open the IMDB profile of the anime in a web browser”.

share anime

Let’s see how you can improve AnimeDetailActivity using Anko Commons.

Share Anime

In AnimeDetailActivity, search for the function shareAnime() and update it with the Anko version:

private fun shareAnime() {
  share("$title \n $imdbLink", "Give a checkout to $title")
}

The non-Anko code looked like this:

private fun shareAnime() {
  val text = "$title \n $imdbLink"
  val subject = "Give a checkout to $title"
  
  //1. Creating the Intent
  val intent = Intent(android.content.Intent.ACTION_SEND)
  
  //2. Add extra data
  intent.type = "text/plain"
  intent.putExtra(android.content.Intent.EXTRA_SUBJECT, subject)
  intent.putExtra(android.content.Intent.EXTRA_TEXT, text)
  
  //3. open a list of possible apps that can handle this intent
  startActivity(Intent.createChooser(intent, null))
}

Nope, your eyes are not lying to you, this is for real!

With just one line, you are saving your self going off to search Google on the specific constants for the Intent for sharing with all the right parameters.

Open a Web browser

In AnimeDetailActivity, find the function openAnimeInTheBrowser() and update it to the Anko Version:

private fun openAnimeInTheBrowser(){
  browse(imdbLink)
}

Here is the code without Anko:

private fun openAnimeInTheBrowser(){
   val intent = Intent(Intent.ACTION_VIEW)
   intent.data = Uri.parse(imdbLink)
   startActivity(intent)
}

Again, a huge savings in code and improvement in readability!

Send an email

In AnimeDetailActivity, find the function sendAnimeByEmail() and modify it to the cool Anko version:

private fun sendAnimeByEmail(emailAddress: String, subject: String, body: String) {
  email(emailAddress, subject, body)
}

Here is the code without Anko:

private fun sendAnimeByEmail(emailAddress: String, subject: String, body: String) {
  //1. Creating the Intent
  val intent = Intent(Intent.ACTION_SENDTO)

  //2. Add extra data
  intent.data = Uri.parse("mailto:")
  intent.putExtra(Intent.EXTRA_EMAIL, arrayOf(emailAddress))
  intent.putExtra(Intent.EXTRA_SUBJECT, subject)
  intent.putExtra(Intent.EXTRA_TEXT, body)

  //3. Open the email app
  startActivity(intent)
}

You’ve again gone done to just one line of code with Anko!

Toasts, Snackbars and Dialogs

Dialogs are pretty important widgets when you want to communicate with your users, and Anko Commons make your life easier when working with them. It covers most of the more common widgets like Toast and SnackBars, and many flavors of Dialogs.

Toast

In AnimeDetailActivity, find the functions showShortToast and showLongToast and replace them with the Anko versions.

private fun showShortToast(message:String){
  toast(message)
}

private fun showLongToast(message: String) {
  longToast(message)
}

Here is the code without Anko:

private fun showShortToast(message: String) {
  Toast.makeText(this, message, Toast.LENGTH_SHORT).show()
}

private fun showLongToast(message: String) {
  Toast.makeText(this, message, Toast.LENGTH_LONG).show()
}

You’ve reduced a lot of the boilerplate by switching to Anko.

The best part of using toast() and longToast() is that you don’t have to call .show(), after creating the Toast, a million dollar mistake.

Also, toast() and longToast() offer helpful overloaded versions, accepting string resources and String objects, for example:

 
toast("message")
toast(R.string.message)
     
longToast("message")
longToast(R.string.message)

Alerts

Alerts in Anko Commons are a quick solution to show Alert Dialogs:

alerts

In AnimeDetailActivity, find the function showAlert and update it with the Anko version.

private fun showAlert(messageResource: Int, onYesTapped: () -> Unit, onNoTapped: () -> Unit) {
  alert(messageResource) {
    //1. Creating the alert
    yesButton {
      //2. Handling yes button (This is optional)
      onYesTapped()
    }
    noButton {
      //3. Handling no button (This is optional)
      onNoTapped()
    }
  }.show() //4. Showing the alert
}

alert is a pretty handy function, with which you can specify the title and the message of the alert with String objects or String resources.

Also, within the alert function you can specify handlers for yesButton and noButton. And if you want to have full control over the alert, it has an init function. Here are some examples:

   
alert("message").show()
alert("message", "title").show() //The title is optional
alert(R.string.message, R.string.title).show()

alert("message") {
  yesButton { } //Adds the default android.R.string.yes text to the button
  noButton { } //Adds the default android.R.string.no text to the button
}.show()

alert { //the init function where you can configure the alert as you please
  title = "title"
  message = "message"
            
  //Changing the default title
  positiveButton("Yes") {
    //Do something
  }
  //Changing the default title
  negativeButton("No") {
    //Do something
  }
}.show()

Selectors

A selector is a special type of Dialog that allows you to show a list of items.

When you tap either the thumbs up or thumbs down buttons, it shows a Dialog with a list of options in it.

In AnimeDetailActivity, search for the function showSelector() and update it with a shorter one (Anko :] ).

private fun showSelector(
    title: CharSequence, items: List<CharSequence>, onClick: (DialogInterface, Int) -> Unit) {
  selector(title,items,onClick)
}

Here is the code without Anko:

private fun showSelector(
    title: CharSequence, items: List<CharSequence>, onClick: (DialogInterface, Int) -> Unit) {
  val context = this
  
  //1. Creating the AlertDialog
  val alertBuilder = AlertDialog.Builder(context)
  
  //2. Setting the title
  alertBuilder.setTitle(title)
  
  //3. Setting click handlers for each item of the list
  alertBuilder.setItems(Array(items.size) { itemIndex -> items[itemIndex].toString() }) { dialog, which ->
    onClick(dialog, which)
  }.show()
}

As you can see, the Anko version is again much more condensed, reducing the noise in your code, and it also conveys the intention of the code just by simply reading it, instead of trying to infer the meaning of all the non-Anko lines needed to build the selector.

Progress dialogs

A ProgressDialog allows you to indicate to your users that you’re doing something that is going to take a bit to process.

share anime

In MainActivity, find the function showLoadingDialog() and update it to an Anko version:

private fun showLoadingDialog(message: String, title: String): ProgressDialog {
  val dialog = indeterminateProgressDialog(message, title) {
    //Do any customization to the dialog here
     show()
  }
  return dialog
}

Compare this with the non-Anko version:

private fun showLoadingDialog(message: String, title: String): ProgressDialog {
  val dialog = ProgressDialog(this)
  dialog.setMessage(message)
  dialog.setTitle(title)
  dialog.show()
  return dialog
}

You can create different types of progress dialogs switching between progressDialog and indeterminateProgressDialog.

Also, within the progressDialog you can specify the drawable to display the progress value, for example:

  
progressDialog("message","title").show() //The title is optional

progressDialog("message") {
  //configure the alert as you please
  val drawable = getDrawable(R.drawable.spinner)
  setTitle("title")
  // Set the drawable to be used to display the progress value.
  setProgressDrawable(drawable)
  show()
}

indeterminateProgressDialog("message","title").show()

AnkoLogger

Anko improves significantly on the Android Log class. One of the Anko advantages is that you don’t have to include a TAG name on each call to the logger, since by default it takes the name of the class as a tag.

Another positive aspect of Anko logging is that the name of the functions are nicer and more straightforward. The table below compares the Anko logger and the Android logger:

Let’s see some examples in Kanime.

In order to start using Anko Logger, first you must implement AnkoLogger in your class. In this case, have MainActivity implement AnkoLogger:

class MainActivity : AppCompatActivity(), OnAnimeClickListener, AnkoLogger {

In MainActivity, search for the functions logError() and logWTF() and update them with the Anko versions.

private fun logError() {
  error("Log Error") //Will log E/MainActivity: Log Error
}

private fun logWTF() {
  // What a Terrible Failure
  wtf("Log WTF" ) //  //Will log E/MainActivity: Log WTF
}

If you run into any trouble, make sure the imports for Anko are setup correctly:

import org.jetbrains.anko.AnkoLogger
import org.jetbrains.anko.startActivity
import org.jetbrains.anko.error
import org.jetbrains.anko.wtf

Here are the non-Anko versions for comparison:

private fun logError() {
  val tag = "MainActivity"
  val message = "Log Error"
 	
  if (Log.isLoggable(tag, Log.ERROR))
    Log.e(tag, message) //Will log I/MainActivity: Log Error
 }

private fun logWTF() {
  val tag = "MainActivity"
    
  // What a Terrible Failure
  Log.wtf(tag, message) //Will log I/MainActivity: Log WTF 
}

You’ve again reduced the boilerplate quite a bit.

An alternative to implement AnkoLogger is to have a reference to the AnkoLogger class for example:

   
val logger = AnkoLogger<YourActivity>()
logger.error("This is an error")  //Will Print E/YourActivity: This is an error

Also, you can change the tag name like this:

  
val logger = AnkoLogger("YourTag")
logger.error("This is an error") //Will Print E/YourTag: This is an error

In the same file MainActivity.kt, search for the functions
logInfo(),logVerbose(),logDebug() and logWarn(), and update them with the Anko versions.

private fun logInfo() {
  info("Log Info") //Will log I/MainActivity: Log Info

  info {
    "Log Info" //Will log I/MainActivity: Log Info
  }
}

private fun logVerbose() {
  verbose("Log Verbose") //Will log I/MainActivity: Log Verbose

  verbose {
    "Log Verbose" //Will log I/MainActivity: Log Verbose
  }
}

private fun logDebug() {
  debug("Log Debug") //Will log D/MainActivity: Log Debug

  debug {
    "Log Debug" //Will log D/MainActivity: Log Debug
  }
}

private fun logWarn() {
  warn("Log Warn") //Will log W/MainActivity: Log Warn

  warn {
    "Log Warn" //Will log W/MainActivity: Log Warn
  }
}

You see here that each of the logging functions in AnkoLogger have an alternative version that takes a Kotlin lambda as a parameter.

One important detail about AnkoLogger is that every call to the logger is checking if Log.isLoggable(yourTag, Log.SELECTED_LOG_LEVEL) is true. If not it won’t log the statement. Also, in the lambda versions, the lambda result will not be calculated if the particular log level is false.

Go ahead and build and run the final project with all the concise Anko code. You’ll see the app works just like before, but your app code is much more readablee! :]

Where to Go From Here?

You can download the final project with all the Anko changes using the download button at the top and bottom of the tutorial.

Now that you have become a master of using Anko Commons and added new items to your toolbox, you should check out the other parts of Anko: Layouts, SQLite, and Coroutines.

Remember that Anko is an open source project and you can contribute to it in many ways: proposing new features, reporting bugs or submitting a pull request.

If you have any comments or questions, please comment in the forum discussion below.

I hope this tutorial has been helpful for you. If it was remember to share it with your friends! :]

The post Anko Commons Tutorial appeared first on Ray Wenderlich.

Updated Course: Mastering Auto Layout

$
0
0

Mastering Auto Layout

Our most recent update to Beginning Auto Layout covered the basics of iOS app layout, including autoresizing, Stack Views, and constraints.

It was well-received, and some of you have been demanding an update to Mastering Auto Layout, for Swift 4, iOS 11, and Xcode 9. Today, we fulfill your wishes!

Mastering Auto Layout follows right on from Beginning Auto Layout, so if you worked through the Beginning course, you’ll be ready for this one! Mastering Auto Layout might also help you if you’re familiar with the basics of Auto Layout, but sometimes struggle with putting together a tricky layout.

In this course, you’ll learn advanced ways of working with constraints, such as inequalities, priorities, and creating layouts in code. You’ll also learn how to create adaptive layouts using size classes.

By the time you are done with this 18-video course, you’ll have the confidence to create even the trickiest of layouts. Let’s take a look at what’s inside!

Part 1: Constraints

Create more advanced systems of Auto Layout constraints in Interface Builder and in code.

  1. Introduction: Join us for a tour of the Auto Layout features that will allow you to create universal layouts that work great on all devices.

  2. Constraint Inequalities: Sometimes you’ll want a property to be constrained not equal to another, but greater than or equal or to it, or less than!

  3. Constraint Priorities: Satisfy ambiguous or conflicting constraints by defining priorities for them, to match your intended design.

  4. Challenge: Constraints in Scroll Views: Create an Auto Layout-based treasure map using scroll views, combined with what else you’ve learned in this course. [FREE]

  5. UILayoutGuide: Instead of using empty views to control the spacing of views, when you’re not using Stack Views, you can use UILayoutGuides!

  6. NSLayoutAnchor: Layout anchors are used for creating constraints on views, in code. They also work on layout guides!

  7. Challenge: Stack View Conversion: Use your Auto Layout coding skills along with your knowledge of Stack Views in order to simplify your layout code.

  8. Visual Format Language: The Visual Format Language allows you to create many Auto Layout constraints, without requiring many lines of code.

  9. Challenge: Visual Format Layout: Create the constraints necessary to achieve a simple three-view layout using the Visual Format Language.

  10. Conclusion: You’re well on your way to mastering constraints. It’s time to begin doing the same for adaptive layout!

Part 2: Adaptive Layout

Learn a variety of tools to help you adapt layouts to any screen size or orientation.

  1. Introduction: Adaptive layout is about dealing with different screen sizes, but it’s also a lot more than that! Let’s learn how deep this water is!

  2. Size Classes: Use size classes to create universal layouts: ones that take advantage of the smallest iPhone to the largest iPad!

  3. Challenge: Size Classes: Create an adaptive layout, combining your new knowledge of size classes with what you know about constraints.

  4. Images and Other Properties: Views and constraints aren’t the only things you might want to vary by size class. Learn how to adjust fonts, images, and more.

  5. Challenge: Add Variations: Use the techniques learned in the last video to add a layout variation to two buttons based on environment width.

  6. Adaptive Layout Environment: Learn about the types and protocols that form the basis for adaptive layout in iOS, for greater control in code.

  7. Adaptive Presentation: View controllers can adapt how they are presented based on the adaptive environment. Learn what the framework does for you and how to modify default behavior.

  8. Conclusion: Let’s have a recap of what you’ve learned in this course. Soon you’ll be telling your own Auto Layout tales!

Where To Go From Here?

Want to check out the course? You can watch the first video and the first challenge for free!

The rest of the course is for raywenderlich.com subscribers only. Here’s how you can get access:

  • If you are a raywenderlich.com subscriber: The entire course is ready for you today! You can check out the course here.
  • If you are not a subscriber yet: What are you waiting for? Subscribe now to get access to our updated Mastering Auto Layout course and our entire catalog of over 500 videos.

Stay tuned for more new and updated courses to come. I hope you enjoy the course! :]

The post Updated Course: Mastering Auto Layout appeared first on Ray Wenderlich.

RWDevCon 2018 Vault Video Bundle Winners — and Last Day for Discount!

$
0
0

Hopefully you’ve enjoyed a taste of the RWDevCon 2018 Vault videos over the last two weeks, with free video tutorial sessions from the conference covering ARKit, test-driven development, and unidirectional architecture.

And with the 50% discount, it’s a really amazing deal!

As part of the celebration, we’re giving away a few RWDevCon 2018 Vault Video Bundles to a few lucky readers. See below how to find out who’s won — and how to get the discounted bundle before time runs out!

RWDevCon 2018 Vault Video Bundle Giveaway Winners

To enter the giveaway, we asked you to comment on the announcement post. We’ve randomly selected three winners, and each will receive a free copy of our RWDevCon 2018 Vault Video Bundle.

The winners are:

1. cherry

2. francesco1988

3. bobdela

Congratulations! We’ll be in touch soon to deliver your prizes.

Last Day for Discount!

Today, May 18, 2018, is the absolute last day to grab the 50% discount on our RWDevCon 2018 Vault Video Bundle. If you love long-form, in-depth video learning on a variety of subjects, then today is the day to take advantage of this sale!

Thanks to everyone who entered the giveaway, bought the bundle, watched the sample videos, left comments in the forums, shared our posts on Twitter and sent us some great comments over the last two weeks. We truly appreciate you for helping make it possible for us to keep doing the things we love — to bring you the best learning resources anywhere!

The post RWDevCon 2018 Vault Video Bundle Winners — and Last Day for Discount! appeared first on Ray Wenderlich.

GraphQL Using the Apollo Framework: Getting Started

$
0
0

GraphQL Using the Apollo Framework: Getting Started

GraphQL is a data query language that simplifies client-server interactions over conventional REST or ad-hoc systems. It was opened to the community at large in 2015, and since then, has rapidly gained traction, standardizing the process of defining and delivering data to mobile and web apps alike.

The increasing popularity of GraphQL created a thriving, open-source community focused on everything from client libraries to IDE tools. One of the most popular of these projects is Apollo, a type-safe, caching GraphQL implementation available on a number of platforms.

The Apollo Framework makes it simple to consume a GraphQL schema, auto-generate data models, fetch and mutate data for any GraphQL endpoint, all on the client platform of your choice.

In this tutorial, you’ll learn how to use the Apollo framework for iOS to consume data from a GraphQL representation of SWAPI (the Star Wars API) and populate a simple reference app.

Along the way, you’ll learn about basic GraphQL concepts, such as data types, how to define queries, and how to simplify consuming repetitious code using fragments.

Strap in and get ready to go to a GraphQL galaxy far, far away!

Getting Started

To kick things off, start by downloading the materials for this tutorial (you can find a link at the top or bottom of this tutorial)

This project uses Cocopoads, so open the project by double-clicking JediArchives.xcworkspace in Finder.

Empty Screen

There’s a standard navigation structure, ready to be filled up with Wookies and Jedi. But first, you’re going to install and start the server that will power the app.

Running the SWAPI GraphQL Server

Before you start working on the Jedi Archives app, you’re going to need a GraphQL server for it to connect to. The starter project includes a pre-configured Node.js project that will serve SWAPI on your local machine.

Note: The next few steps assume you’ve installed the npm package manager. More info on Node.js and npm can be found in this tutorial.

Open Terminal and navigate to the bin directory of the starter project. Next, run the following command to install the dependencies and bootstrap the project:

./install_server.sh

Finally, run the following command to start up the server:

./start_server.sh &

After some initial Terminal output, you should see a message telling you the server is now running on port 8080. You now have a GraphQL endpoint for SWAPI running on your machine.

Note: The & on the end runs the server in the background so that you may continue to use your terminal session. To shut the server down, enter fg at the shell prompt, then press Control-C.

Xcode Configuration

One of Apollo’s best features is its ability to generate statically-typed Swift queries and models based on any GraphQL schema. To generate these, you use a tool called Apollo Codegen to consume the schema and generate the Swift output.

In Terminal, run the following command to install Apollo Codegen:

npm install -g apollo-codegen

Next you’re going to add a Run Build Script phase to your Xcode project that executes apollo-codegen whenever you build, to ensure you always have an updated set of Swift models and queries.

In Xcode, select JediArchives in the project navigator, then select the JediArchives target and click the Build Phases tab. Click the “+” button and select New Run Script Phase.

Run Script Phase

Expand the new run phase and insert the following script into the script text area below the Shell variable:

if which apollo-codegen >/dev/null; then

  APOLLO_FRAMEWORK_PATH="$(eval find $FRAMEWORK_SEARCH_PATHS -name "Apollo.framework" -maxdepth 1)"

  if [ -z "$APOLLO_FRAMEWORK_PATH" ]; then
    echo "warning: Couldn't find Apollo.framework in FRAMEWORK_SEARCH_PATHS; make sure to add the framework to your project."
    exit 0
  fi

  cd "${SRCROOT}/${TARGET_NAME}/GraphQL"
  $APOLLO_FRAMEWORK_PATH/check-and-run-apollo-codegen.sh generate \
    $(find . -name '*.graphql') \
    --schema schema.json \
    --output Generated/GraphQLAPI.swift
else
  echo "Skipping Apollo code generation"
fi

The bulk of the script ensures the tools you expect are present. The most important line is the one that executes check-and-run-apollo-codegen.sh.

Taking each parameter in turn:

  • generate $(find . -name '*.graphql'): Invokes the generate command and passes any files with the extension .graphql. These types of files contain the GraphQL queries and fragments you define. You’ll learn more about this later.
  • --schema schema.json: Indicates the location of the GraphQL schema file relative to the current directory. The GraphQL schema defines all the data types and their relationships for a given endpoint.
  • --output Generated/GraphQLAPI.swift: Indicates the Swift file that houses the generated code. This file is updated every time this script is run and contains the code you’ll use to interact with the GraphQL endpoint. You should never modify this file directly.

Now the script is ready, single-click the name of the Run Script Phase and change it to Apollo GraphQL so it’s clear what the phase is doing. Finally, since you’ll be writing code that consumes this generated code, this script needs to run prior to the rest of your code compiling.

Click and drag the phase so it appears right before the “Compile Sources” phase. When you’re done, the Build Phases screen should look similar to the following:

Completed Run Script Phase

Well done young Padawan! It’s time to become a fully-fledged Jedi Knight by writing some code.

Populating the Films Screen

The first screen you’re going to put together will show a list of all the Star Wars films. In a traditional REST-based app, this would be about the time when you’d have to create a web client of some sort, using something like Alamofire to wrap each API endpoint, define a series of structs or classes to represent result data, and configure a JSON mapping tool to glue it all together.

Instead, you’re going to use GraphQL and Apollo to achieve all of this — with far less effort on your part.

The first thing to do is create a wrapper around the Apollo client to house basic configuration and maintain a static instance to use across the various view controllers.

First, open Apollo.swift inside the GraphQL folder and import the Apollo framework:

import Apollo

Next, add the following class definition:

class Apollo {

  // 1
  static let shared = Apollo()
  // 2
  let client: ApolloClient

  init() {
    // 3
    client = ApolloClient(url: URL(string: "http://localhost:8080")!)
  }

}

Here’s a rundown of what you just added:

  1. You declare a static instance of the Apollo wrapper class to expose it as a singleton.
  2. Next, you declare a variable to house an instance of ApolloClient which is the class through which you’ll interact with GraphQL.
  3. Finally, you initialize the ApolloClient instance, supplying the URL of the GraphQL server you’re running on your local machine.

Now you’ve added the ability to interact with Apollo, it’s time to define your first GraphQL query.

GraphQL is, at its core, a data query language. A GraphQL server defines a schema, including all the objects, their fields and types, as well as relationships, in a standard JSON format. You configured Apollo to consume the schema in the last section. Any client can use this schema to construct queries for any subset of data, including primitive fields and nested object references and lists.

Allowing the client to determine exactly how to fetch the data is a key feature that makes GraphQL so powerful. Throughout the rest of this tutorial, you’re going to see this concept in action.

Open Queries.graphql and add the following:

query AllFilms {
  # 1
  allFilms {
    # 2
    films {
      # 3
      id
      title
      releaseDate
    }
  }
}

This is a very basic query. Here’s what each section means:

  1. This statement defines the top level query collection from which you’re requesting data. In this case, allFilms returns, unsurprisingly, all films.
  2. The allFilms collection returns a list of intermediate FilmConnection objects, so here you request the films attribute, which will include a list of actual Film objects.
  3. Finally, you define the attributes you want to request from each Film object.

At this point, build the project and then open GraphQLAPI.swift: the file where Apollo drops generated code. You should now see a class named AllFilmsQuery. This class contains the Swift representation of the query itself, as well as structs that represent the result data.

Now you’ve defined a query and have generated result models, you need to map the film results to view models that are consumed by your view controllers.

Open Models.swift and add the following initializer to the RefItem class:

init(film: AllFilmsQuery.Data.AllFilm.Film) {
  id = film.id
  label = film.title ?? ""
  value = film.releaseDate ?? ""
}

RefItem is a general-use model that will be used across the app to represent any data type that references other data. These items are rendered in table cells with a left-aligned label and right-aligned value. In the above code, you create an initializer that takes an instance of AllFilmsQuery.Data.AllFilm.Film, which is the type of the embedded Film result object returned by the AllFilms query.

The last thing to do here is to execute the query and populate the first screen of the app.

Open FilmsViewController.swift and replace loadFilms() with the following:

func loadFilms() {
  // 1
  let query = AllFilmsQuery()
  Apollo.shared.client.fetch(query: query) { results, error in
    // 2
    if let films = results?.data?.allFilms?.films?.compactMap({$0}) {
      // 3
      let models = films.map(RefItem.init)
      // 4
      let sections: [Section] = [
        .references(title: NSLocalizedString("Films", comment: ""), models: models)
      ]
      // 5
      self.dataSource.sections = sections
      self.tableView.reloadData()
    } else if let error = error {
      print("Error loading data \(error)")
    }
  }
}

There’s a lot going on here, so to explain line-by-line:

  1. First, you execute the AllFilms query by passing an instance of it to the shared Apollo client. ApolloClient translates the query to JSON, executes the HTTP call, maps the response to the generated structs, and invokes the provided completion handler with either result data or an error if there was a failure.
  2. Next, you unwrap a chain of optionals and compactMap to produce a list of film results. If you inspect the type of results?.data?.allFilms?.films, you’ll see it’s [Film?]?. Therefore compactMap is used to produce a list without optional objects.
  3. Here you map the film results to RefItem using the initializer you added previously.
  4. Now you create a list of Section enums that represent the sections displayed in the table view. In this case there is just one section of films.
  5. Finally, you set the list of sections on the table view’s data source and reload the table view to render the data to the screen.

Build and run; you should see a list of Star Wars films:

Films List

Excellent! Your app is starting to take shape. In the next section, you’ll flesh out a detail screen to show even more data about each film.

Note: The current SWAPI GraphQL data doesn’t include the most recent Star Wars films, so this app is confined to the pre-Disney era. Unfortunately (or fortunately, depending on your views), it does contain all three prequel films.

Populating the Film Detail Screen

Seeing a list of Star Wars movies is great, but seeing details for each film would be even better. GraphQL makes it a snap to retrieve extended info for each film. You’re going to define a new query for film details and use the results of that query to populate the film detail view controller.

Open Queries.graphql and add the following query:

# 1
query FilmDetail($id: ID) {
  # 2
  film(id: $id) {
    # 3
    title
    episodeID
    releaseDate
    director
    # 4
    characterConnection(first: 10) {
      # 5
      characters {
        id
        name
      }
    }
  }
}

This query is similar to the “All Films” query you defined in the previous section, but there are a few new concepts to note:

  1. In the query definition, unlike AllFilms, FilmDetail takes an argument for the film ID. This argument can be referenced anywhere within the query and will be automatically included as an argument of the initializer in the generated Swift query.
  2. Here you specify the film collection and pass the film ID to pull back a single Film object.
  3. As in the previous query, you specify the fields you’d like to fetch from the Film object as part of the query.
  4. Here you specify you want to include characterConnection, which is a list of related characters appearing in this film. You specify first: 10 to include a max of 10 characters.
  5. Finally, you specify the characters list to get the actual list of characters, as well as the fields you care about for each individual character.

Build the app to generate the appropriate Swift code that references the new query and objects. Now you have a query you can use to fetch film detail, you’re going to add some code to populate the film detail screen.

Open Models.swift and add the following initializer to RefItem:

init(character: FilmDetailQuery.Data.Film.CharacterConnection.Character) {
  id = character.id
  label = character.name ?? ""
  value = nil
}

This new initializer takes an instance of the Character object from the FilmDetail query. You’ll see FilmDetail used in the next step when you map the query results to UI models. When you render a character in the table view, the cell will only contain that character’s name; you supply nil for value.

Open FilmDetailViewController.swift and replace loadFilmData() with the following:

func loadFilmDetail() {
  // 1
  let query = FilmDetailQuery(id: filmID)
  Apollo.shared.client.fetch(query: query) { result, error in
    // 2
    if let film = result?.data?.film {
      // 3
      self.navigationItem.title = film.title ?? ""
      
      // 4
      let infoItems: [InfoItem] = [
        InfoItem(label: NSLocalizedString("Title", comment: ""), value: film.title ?? "NA"),
        InfoItem(label: NSLocalizedString("Episode", comment: ""), value: "\(film.episodeId ?? 0)"),
        InfoItem(label: NSLocalizedString("Released", comment: ""), value: film.releaseDate ?? "NA"),
        InfoItem(label: NSLocalizedString("Director", comment: ""), value: film.director ?? "NA")
      ]
      // 5
      var sections: [Section] = [
        .info(title: NSLocalizedString("Info", comment: ""), models: infoItems)
      ]
      
      // 6
      let characterItems = film.characterConnection?.characters?
        .compactMap({$0}).map({RefItem(character: $0)})
      // 7
      if let characterItems = characterItems, characterItems.count > 0 {
        sections.append(.references(title: NSLocalizedString("Characters", comment: ""),
                                    models: characterItems))
      }
      
      // 8
      self.dataSource.sections = sections
      self.tableView.reloadData()
    } else if let error = error {
      print("Error loading data \(error)")
    }
  }
}

You should see some similarities between this and loadFilms() you created above. Here’s what you’re doing in detail:

  1. First, you create an instance of FilmDetailQuery and pass the ID for the film this view controller should display. With that query object, you execute the fetch via the Apollo client.
  2. Next, you use optional binding to get the film from the query result.
  3. Then, you set the title of the screen to the name of the film.
  4. You create a list of InfoItem models to represent each attribute of the film you want to render to the UI. Each item has a title and value, and there is some nil coalescing to account for missing values.
  5. Next you define a Section for the film info section, providing the list of info items you just created.
  6. The second section of this detail screen is a list of characters that appear in this film. You map the character list from the film result to a list of RefItem objects.
  7. Again, you create a new Section, to show the character items.
  8. Finally, you update the data source and reload the table view to render the data.

Build and run, and tap on any of the films in the main list to see the details for that film. The resulting screen should look similar to the following:

You’ve taken your first step into a larger world. In the next section, you’ll wrap up the app by populating a character detail screen.

Populating the Character Detail Screen

Your Star Wars app is looking great! All that’s left is to add a screen for viewing character details and you’ll be a bona fide Jedi Master. Once again, you’re going to start by adding a query that fetches only the data you need to populate this screen. Open Queries.graphql and add the following text:

query CharacterDetail($id: ID) {
  person(id: $id) {
    name
    birthYear
    eyeColor
    gender
    hairColor
    skinColor
    homeworld {
      name
    }
    filmConnection(first: 10) {
      films {
        id
        title
        releaseDate
      }
    }
  }
}

This query is very similar to the film detail query you defined in the previous section. The data you’re requesting from each object in the films list is exactly the same data you’re requesting for films in the AllFilms query.

If you leave the queries as they are, you’ll end up with two different Film structs, each scoped to their parent query objects. It’s not awful; but code that consumes films in this form will need multiple paths for each parent object type. What’s more, it’s likely if you ever request more film data through one of these queries, you’ll probably want that same data in the other query. What you really want is a way to generalize this query section into something common.

GraphQL has just the tool to solve this problem: fragments.

Add the following to the top of Queries.graphql:

fragment ListFilmFragment on Film {
  id
  title
  releaseDate
}

Here you define the name of the fragment, ListFilmFragment, and the object to which it applies, Film. Then you simply specify the fields you’d like to request. Now you can replace those fields in any query with ... ListFilmFragment and those fields will be requested as if you had explicitly specified them.

Even better, instead of having Film structs specific to each query, each query result will now return this data as part of a globally scoped ListFilmFragment. This drastically simplifies code that consumes film objects.

Now you’ve defined ListFilmFragment, it’s time to use it to improve a few queries. Still in Queries.graphql, replace the AllFilms query with the following:

query AllFilms {
  allFilms {
    films {
      ...ListFilmFragment
    }
  }
}

Since the CharacterDetail query wants the same data for its film list, replace it with the following:

query CharacterDetail($id: ID) {
  person(id: $id) {
    name
    birthYear
    eyeColor
    gender
    hairColor
    skinColor
    homeworld {
      name
    }
    filmConnection(first: 10) {
      films {
        ...ListFilmFragment
      }
    }
  }
}

Build your project to update the generated code. You’ve cleaned up your queries, so you also need to change the consuming code to take advantage of the newly added ListFilmFragment.

Open Models.swift and change the first initializer of RefItem to this:

init(film: ListFilmFragment) {
  id = film.id
  label = film.title ?? ""
  value = film.releaseDate ?? ""
}

You’ve changed the film parameter type so it now consumes ListFilmFragment instead of the film type from the AllFilms query. This will let you use this same constructor for mapping results from both AllFilmsQuery and CharacterDetailQuery. Score one Republic credit for code reuse and a Bantha for simpler logic!

Since you changed the RefItem initializer, you’re going to need to adjust the code that uses it.

Open FilmsViewController.swift and find the following line in loadFilms():

if let films = results?.data?.allFilms?.films?.compactMap({$0}) {

Replace with the following:

if let films = results?.data?.allFilms?.films?.compactMap({$0}).map({$0.fragments.listFilmFragment}) {

Instead of mapping the film objects directly, you’re mapping listFilmFragment that lives on a property named fragments. Every Apollo result that includes fragments has a fragments property and it’s where you’ll find, er, the fragments.

Now your Jedi temple is in better order, the only thing left is to finish up the character detail screen. Open CharacterDetailViewController.swift and replace loadCharacter() with the following:

func loadCharacter() {
  // 1
  let query = CharacterDetailQuery(id: characterID)
  Apollo.shared.client.fetch(query: query) { (result, error) in
    // 2
    if let character = result?.data?.person {
      // 3
      self.navigationItem.title = character.name ?? ""
      
      // 4
      let infoItems: [InfoItem] = [
        InfoItem(label: NSLocalizedString("Name", comment: ""),
                 value: character.name ?? "NA"),
        InfoItem(label: NSLocalizedString("Birth Year", comment: ""),
                 value: character.birthYear ?? "NA"),
        InfoItem(label: NSLocalizedString("Eye Color", comment: ""),
                 value: character.eyeColor ?? "NA"),
        InfoItem(label: NSLocalizedString("Gender", comment: ""),
                 value: character.gender ?? "NA"),
        InfoItem(label: NSLocalizedString("Hair Color", comment: ""),
                 value: character.hairColor ?? "NA"),
        InfoItem(label: NSLocalizedString("Skin Color", comment: ""),
                 value: character.skinColor ?? "NA"),
        InfoItem(label: NSLocalizedString("Home World", comment: ""),
                 value: character.homeworld?.name ?? "NA")
      ]
      
      // 5
      var sections: [Section] = [
        .info(title: NSLocalizedString("Info", comment: ""), models: infoItems)
      ]
      
      // 6
      let filmItems = character.filmConnection?.films?.compactMap({$0})
        .map({RefItem(film: $0.fragments.listFilmFragment)})
      if let filmItems = filmItems, filmItems.count > 0 {
        sections.append(.references(title: NSLocalizedString("Appears In", comment: ""),
                                    models: filmItems))
      }
      
      // 7
      self.dataSource.sections = sections
      self.tableView.reloadData()
    } else if let error = error {
      print("Error loading data \(error)")
    }
  }
}

Again, this method is similar to the other data loading methods you’ve written. However for the sake of clarity, here’s what’s happening:

  1. First, you initialize and execute CharacterDetailQuery, providing the character ID.
  2. Next, you use optional binding to get the character from the result object.
  3. You set the title of the view controller to the character’s name.
  4. Then you create a list of InfoItem objects to represent the various character attributes you requested.
  5. Here you create the first table view section, passing the InfoItem objects as the contents.
  6. In this block, you make use of the films, again using the ListFilmFragment, to populate a table view section with films this character has appeared in.
  7. Finally, you update the data source’s section list and reload the table view to render the new data to the UI.

Build and run. Tap first on any film, then on any character in the second section. You should see a screen similar to the following:

Character Details

Because you’ve closed the loop by including a films list in the character screen, you can now dive endlessly through films and characters, exploring the entirety of the Star Wars universe. On behalf of the Rebellion, congratulations on a job well done!

Where to Go From Here?

You can download the final project using the link at the top or bottom of this tutorial.

GraphQL is an extremely powerful technology, and through this tutorial, you’ve seen how it can simplify the development of a data-driven app when paired with the Apollo framework.

There are more concepts to explore in GraphQL and Apollo, such as mutations, variables, and caching to name just a few. The official GraphQL and Apollo sites are both great places to continue learning.

If you have any comments or questions about this tutorial, please join the forum discussion below!

The post GraphQL Using the Apollo Framework: Getting Started appeared first on Ray Wenderlich.

Season 8 Kickoff – Podcast S08 E00

$
0
0

Welcome back to our Season 8 Kickoff. Dru has got a quick episode where he calls up our new co-host for you to meet and talks about some of the things you don’t want to miss in the next 4 weeks.

[Subscribe in iTunes] [RSS Feed]

Interested in sponsoring a podcast episode? We sell ads via Syndicate Ads, check it out!

Contact Us

Where To Go From Here?

We hope you enjoyed this episode of our podcast. Be sure to subscribe in iTunes to get notified when the next episode comes out.

We’d love to hear what you think about the podcast, and any suggestions on what you’d like to hear in future episodes. Feel free to drop a comment here, or email us anytime at podcast@raywenderlich.com.

The post Season 8 Kickoff – Podcast S08 E00 appeared first on Ray Wenderlich.

Screencast: Jetpack: Navigation Controller

New Course: Drawing in iOS

$
0
0

Are you familiar with the basics of creating iOS user interfaces, but want to take your skills up a notch? Today, we are releasing a brand new course for you: Drawing in iOS.

This 18-video course will teach you how to add custom drawing on views using two drawing frameworks: Core Graphics and Core Animation! You’ll learn to draw custom shapes, use gradients, incorporate animation, add user interaction to custom controls, and more!

Take a look at what’s inside:

Part 1: CALayers

In part one, use CALayers to style views, draw custom shapes, and add animation to controls.

  1. Introduction: Let’s review what you’ll be learning in this section. Have a preview of the controls you’ll draw using both CALayers and Core Graphics.
  2. Styling with Layers: Redesign your view with rounded corners, borders and shadows
  3. Challenge: Customize a Button: Style your own custom button through this hands-on challenge
  4. Paths and CAShapeLayers: Learn how to construct paths and position CALayers
  5. Custom Control: Create an adjustable thermometer control using CAShapeLayers.
  6. Basic Animation: Learn how to control CAShapeLayer animation.
  7. Challenge: Draw a Timer: Create a clock with an animated second hand in this hands-on challenge.
  8. Gradients: Design a login view with a subtle background gradient
  9. Conclusion: Let’s review what you learned about using CALayers and what’s coming up in the next section

Part 2: Core Graphics

In part two, tap into the power of Core Graphics to create three more controls.

  1. Introduction: Let’s review what you’ll be learning in this section, and find out about the three controls you’ll design.
  2. Core Graphics Drawing: So how do you draw into a view? Find out how to draw a cupcake.
  3. Challenge: Customize a Button: Complete your custom button in this hands-on challenge.
  4. Images and Contexts: Find out what a context is and how to create a reusable image.
  5. Transforms: Learn how to move your canvas before painting into it by using transforms.
  6. Challenge: Draw Clock Numbers: Put your transform knowledge to use by drawing numbers into your timer.
  7. Core Graphics Gradients: More powerful than CAGradientLayer – learn how to use Core Graphics gradients in a graph background.
  8. Challenge: Complete a graph: Complete a graph from dynamic data by “drawing” on everything you’ve learned in this hands-on challenge.
  9. Conclusion: Let’s review what you learned throughout the course and discuss where to go next.

Where To Go From Here?

Want to check out the course? You can watch the course Introduction and Custom Control for free!

The rest of the course is for raywenderlich.com subscribers only. Here’s how you can get access:

  • If you are a raywenderlich.com subscriber: The first part of this course is ready for you today! The rest of the will be released next week. You can check out the course here.
  • If you are not a subscriber yet: What are you waiting for? Subscribe now to get access to our new Drawing in iOS course and our entire catalog of over 500 videos.

Stay tuned for more new and updated courses to come. I hope you enjoy the course! :]

The post New Course: Drawing in iOS appeared first on Ray Wenderlich.


TestFlight Tutorial: iOS Beta Testing

$
0
0
Update note: Rony Rozen updated this tutorial. Dani Arnaout wrote the original post and Tom Elliott did the most recent update.
Learn how to use TestFlight to beta test your iOS apps!

Learn how to beta test your iOS apps!

TestFlight Beta Testing is an Apple product that makes it easy to invite users to test your iOS, watchOS and tvOS apps before you release them to the App Store. This TestFlight tutorial will walk you through using TestFlight as part of your app’s release process.

This is one of those rare tutorials where you don’t code — just follow the steps and you’ll be up and running with TestFlight in no time! :]

Getting Started

This tutorial uses Drop Charge, from 2D iOS & tvOS Games by Tutorials, as the example in this tutorial. Because you’ll be submitting test builds to Apple for Beta App Review, you should follow along with a project of your own.

This tutorial assumes that your app is set up for provisioning, and has an app ID created in both the Developer Portal and on iTunes Connect.

This setup is outside the scope of this tutorial, but you can get all of the information you need on submitting an app and getting it published on the App Store in our two part tutorial How to Submit An App to Apple: From No Account to App Store.

Submitting your Build to iTunes Connect

Open your project in Xcode, make sure you have a correct Bundle Identifier, and that your Team ID and Release Code Signing Identity are properly set. Choose Generic iOS Device in the scheme chooser:


Then choose Product > Archive:


If everything is okay with the build, Xcode will open the Organizer window with your app in the Archives tab. Click Upload to App Store….

Xcode then prompts you with App Store distribution options. Xcode selects all the check boxes by default. Leave them like this and click Next:


The next screen asks you for distribution signing options. You can select automatic signing, or manually select your distribution certificate and provisioning profile. Select the relevant ones, and click Next.

Once Xcode finishes doing some of its magic, it presents a summary page for the app you’re about to submit. Click Upload.

Your app will start uploading to iTunes Connect. Xcode displays various messages as it compiles, verifies and signs your app. When the upload finishes, you should see the following message:


Just smile and click Done :]

That’s all the work required for Xcode. Your beta build is now available on iTunes Connect, and that’s where you’ll be doing the rest of the work to set up TestFlight.

Adding Internal Testers

Your build is ready for testing, but who’s going to test it?

Apple defines two types of testers for TestFlight:

  • Internal Tester: This is an iTunes Connect user that has an Admin, App Manager, Legal, Developer, or Marketer role with access to your app. This is usually a team member or a client for whom you’re developing an app. You can add up to 25 internal testers.
  • External Tester: This is any user outside of your team that wants to test your app. An external tester has no access to your iTunes Connect account in any way, and can only download and install the app. You can add up to 10,000 external testers.

Before your external testers can test your app, you must submit your app to Apple for review, exactly as you would with a normal App Store submission. These reviews tend to go faster than normal app reviews, although you shouldn’t count on it, and once it’s approved, you can let external testers test your app.

Internal testers, on the other hand, are instantaneously notified about new builds as soon as they are uploaded and processed within iTunes Connect. If you want more control over the builds that are uploaded then you might want to consider multiple external test groups instead. You’ll learn more about external testers later, but for now, you’ll focus on internal testers.

To add an internal tester, head to the Users and Roles section in iTunes Connect:

Click the + button to add a new user:

Fill in your new user info, using an email address you have access to, and click Next:

Note: If the email address entered is not associated with an Apple ID, your tester will have to create an Apple ID to accept the invitation. This only applies to Internal Testers as they need to access iTunes Connect.

Now you need to assign a role for the new user. View the privileges for each role by clicking the ? button, and choose the appropriate one. You can also choose to limit access to a single app via the Apps dropdown, or leave the default All Apps access.

If you’re unsure which role to chose, use App Manager which allows beta testing management and the ability to download apps. Once you’re done setting up your new user, click Next.

Choose the type of notifications you want your new testers to receive, then click Save:

iTunes Connect now sends an invitation to the new user and, as the message indicates, that user first needs to verify his or her email address before the account will show in iTunes Connect. Go the inbox for the new user’s email address, find the email entitled Welcome New iTunes Connect User and click activate your account. Once you’re done with this process, the new user you added should be enabled on iTunes Connect and can be used as an internal tester.

Creating a new internal beta tester is only the first part of the process. The remaining step is to invite this particular tester to test your latest build.

It’s time to enable testing on your app — so the tester actually has something to test! :]

Starting Beta Testing

To start beta testing of your app, go to the My Apps section on the iTunes Connect home page and click on your app:

Select the Activity tab. This is where you’ll find the build you uploaded earlier. If it’s still marked “Processing”, go make yourself a cup of coffee and come back later. :]

Next, click the TestFlight tab. You may notice a yellow warning sign next to the build you’d like to send internal testers. If this is the case, click the warning sign and complete the required steps.

Once you’re done, the build status will change to Ready to Test:

Next, click Add iTunes Connect Users in the left side menu. You’ll then see a list of your internal testers. Select the ones you’d like to add as internal testers for this build and click Add.

All selected testers now receive an email with a link to download and install this build via the TestFlight app. You can find detailed instructions on the testers’ point of view in the last section of this tutorial.

Before you get into the user flow, you should learn how to add external testers.

External Testers

First, click Test Information in the left side menu, and fill in all of the necessary information. At a minimum, this includes:

  • Beta App Description
  • Feedback Email
  • Contact Information

As the message indicates, you must provide this information in order to submit a build for external testing. Once completed, click Save.

Now, click Add External Testers in the left side menu. iTunes Connect asks you to create a new testing group. It’s up to you how you choose to manage your groups. You can either have one group for all of your testers, different groups for different types of testers, or different groups for different apps. For this tutorial, you’ll create one group called Top-Testers.

Once you’ve created the group, you can start adding external testers to it. Click Add Testers in the pop-up:


At this point, you can choose between adding new testers manually, adding existing testers (people already testing another app or build), or importing testers from a CSV file. For this tutorial, you’ll add new testers manually. Choose Add New Testers and click Next.

Add the email addresses, first and last names of any external testers you want to add. Once you’re finished, click Add. You can always add more external testers by clicking the + button on the testing group page. All external testers count toward your 10,000 external testers limit:

You now need to select a build for your external testers. On the Builds tab, click the + button:

Then, select your build and click Next:

Note: Why do you select the build separately for your internal and external testers? Well you may want your internal and external testers to be testing different builds. For example, your external testers may be testing your next release candidate, but your internal testers are testing your master build. By making you select a build for internal and external testers separately, iTunes Connect allows this kind of separation. Similarly, you can select different builds for different testing groups.

iTunes Connect may ask additional questions, such as whether the app requires sign-in or not. Complete the remaining steps, including providing testing information to display to your external testers.

iTunes Connect checks the Automatically notify testers check box by default. If you don’t want it to notify your testers as soon as the build is ready for them to review, uncheck this box (you have to notify them for the build to become available). Once complete, click Submit for Review.

iTunes Connect adds your app to the review queue and changes its status to Waiting for Review. To obtain approval, your build must fully comply with the full App Store Review Guidelines. Approval usually takes no more than 48 hours. Once Apple approves your version of the app, subsequent builds won’t require a review until you change the version number.

Once the app has passed Beta App Review, you’ll receive an email with confirmation that your app can now begin external testing. If you checked the Automatically notify testers check box, your external testers will receive notification emails at this point. Otherwise, you’ll have to go back to iTunes Connect to start testing. Your external testers will then receive an invitation email similar to the one received by your internal testers as described above.

Note: A build is only valid for 90 days. If you want your testers to use the app beyond that, you’ll have to upload a new build before the expiration date.

That concludes the developer’s perspective of app testing, but what does it look like from the tester’s perspective?

Testers’ Point of View

This section will walk you through the steps required from your tester in order to access the build you have just made available. It’s wise to be familiar with this side of the process because questions will come up!

Installing TestFlight

The TestFlight app is available on the AppStore. If you haven’t already, open the AppStore and search for TestFlight:

Download the TestFlight app and launch it. When asked to login, sign in with any Apple ID that you wish to use. This could be the personal Apple ID on your test device and doesn’t have to match the email address you added into iTunes Connect.

Redeeming Your App

When a build becomes available, or when you add a new tester, the tester receives an invitation to test the build via TestFlight.

Note: If you’re following along in real-time, it’s unlikely your build is approved, and will only be available to internal testers at this point.

Open this email on your testing device, then click View in TestFlight. This will launch TestFlight and redeem the invitation using the Apple ID currently in use in the TestFlight app. You’ll then see the following app preview page for your app:

Note: The View in TestFlight link in the email works via Universal Links, so if for whatever reason it doesn’t open TestFlight, just copy the link and open it in Safari. You’ll see a redemption code you can manually copy and paste directly into the TestFlight app.

Tap install and the app will download and appear on your home screen! Now you can treat it just like any other app. It’ll have an orange dot near the name in Springboard to indicate it’s a TestFlight install.

From now on, whenever a new version of this app is available, you’ll see a notification from TestFlight. All you need to do is update your app and run the latest version.

Where to Go From Here?

In this TestFlight tutorial you learned how to upload your test build and invite internal and external testers to your app.

If you’re interested in learning more about iTunes Connect in general, and beta testing in particular, read through Apple’s TestFlight Beta Testing Documentation. Apple’s Developer site also has a summary page for TestFlight, which includes links to all the relevant documentation as well as a video outlining the TestFlight process.

If you want to learn more about the process of submitting apps to the App Store, and not just the beta testing aspect of it, check out our 2-part tutorial How to Submit An App to Apple: From No Account to App Store. You can also check out iOS 11 by Tutorials for everything you need to know about iOS development using the latest and greatest tools and techniques.

I hope you enjoyed this TestFlight tutorial, and if you have any questions or comments, please join the forum discussion below!

The post TestFlight Tutorial: iOS Beta Testing appeared first on Ray Wenderlich.

Introducing ARKit by Tutorials!

$
0
0

We’re happy to announce the latest addition to our lineup of books at raywenderlich.com: ARKit by Tutorials!

In this book, you’ll build a collection of great-looking augmented reality apps, including immersive sci-fi portals, tabletop poker dice, face-tracking apps, location-based billboards, and a monster truck sim.

Along the way, you’ll touch on building assets for ARKit, adding objects to your scenes, managing sessions, creating realistic game physics, and more!

And to help celebrate this book launch, we’re releasing this book at a special sale price.

Read on to find out what’s inside the book and how you can get your own copy!

What’s Inside ARKit by Tutorials?

ARKit is one of those interesting technologies that seems fairly easy to use on the surface, and it’s true; ARKit does a lot of the heavy lifting of the mechanics behind the scenes for augmented reality apps.

But when it comes to creating immersive apps that offer realistic, engaging experiences for the user, that’s where it gets tricky. Fortunately, ARKit by Tutorials is here to help you navigate through the ins and outs of creating really great-looking ARKit apps that users will truly enjoy.

Here’s what’s contained in ARKit by Tutorials:

  1. Hello ARKit!: With ARKit, it only takes a few lines of code to start creating AR apps. ARKit does most of the the heavy lifting for you, so you can focus on what’s important: creating an immersive and engaging AR experience. In this chapter, you’ll take a look at what ARKit can do for you.
  2. Creating Your First ARKit app: It’s time to create your first ARKit application using Xcode’s built-in ARKit application template. You’ll also learn how to modify your app to accommodate basic UI elements such as labels and buttons to provide user feedback and receive user input.
  3. Basic Session Management: In this chapter, you’ll learn what an AR session is and how to manage it; this includes starting, stopping, and resetting it. You’ll also learn how to handle session errors and tracking issues that may occur during a typical AR application’s lifecycle.
  4. Add realistic objects to your ARKit scenes!

  5. Adding 3D Objects: In this chapter, you’ll learn how to import, convert, texture and load 3D objects. Then you’ll learn how to place those 3D objects into augmented space. You’ll start with a 3D model materials overview by seeing how to create a virtual Earth, and then you’ll dive into building the poker dice game.
  6. Detecting Surfaces: In this chapter, you’ll learn how to detect real-world surfaces and how to manage updates to those surfaces properly. You’ll also learn how to create a focus cursor that will place itself on top of the detected surfaces through ray casting.
  7. Physics and Interaction: Physics adds another level of realism by making objects bounce off tables and the floor, just like they would in real life. In this chapter, you’ll learn all about physics, how to configure physics, and how to apply them to your virtual objects. You’ll also learn how to reach into the augmented world and interact with your virtual objects. The rest of the chapter will focus on finishing up the rest of the game itself.
  8. Building a Portal: Now that you’ve gone through the basics of ARKit and how to integrate it into your apps, you’ll put this knowledge to work. In this section, you’ll implement a portal app using ARKit and SceneKit. Portal apps can be used for educational purposes, like a virtual tour the solar system from space, or for more leisurely activities, like enjoying a virtual beach vacation.
  9. Create your own personal portal in augmented reality!

  10. Adding Objects to your Virtual World: In the previous chapter, you learned how to set up your iOS app to use ARKit sessions and detect horizontal planes. In this chapter, you’re going to build up your app and add 3D virtual content to the camera scene via SceneKit. By the end of this chapter, you’ll know how to handle session interruptions and place objects on a detected horizontal plane.
  11. Materials and Lighting: You learned how to add 3D objects to your portal scene with SceneKit. Now it’s time to put that knowledge to use and build a portal. In this chapter, you will learn how to create walls, a ceiling and roof for your portal and adjust their position and rotation; make the inside of the portal look more realistic with different textures; and add lighting to your scene.
  12. Detecting Placeholders: There is no doubt that ARKit is a technology whose natural primary target is entertainment. But it’s no surprise that ARKit is versatile enough to be useful for business-oriented applications. In the next four chapters, you’ll learn how to use ARKit, SpriteKit, SceneKit, Core Location and beacons to build an interactive billboard that can be put in a shop window to tease people with ads and promotions.
  13. Beginning User Interaction: In the previous chapter, you learned how to detect a rectangle, how to take advantage of the Vision framework and how to turn a detected surface into an ARKit plane. However, you left the plane generation chapter with one outstanding issue: it’s not oriented correctly. You’ll fix that in this chapter. You’ll also “upgrade” the rectangle detection with QR code detection and you’ll add some user interaction too.
  14. Create media-rich billboards and other dynamic content in ARKit!

  15. Advanced User Interaction: In the previous two chapters, you learned how to detect a rectangle, detect a QR code, display a plane over the detected rectangle and QR Code, and display content on that plane. In this chapter, you’ll learn how to improve the user interaction by using storyboards instead of standalone view controllers. You’ll also learn how to toggle fullscreen mode.
  16. Locations and Beacons: In the previous three chapters, you learned how to use ARKit to implement a virtual billboard that was first triggered by a scan on a rectangle, and then later, a QR code. In the final chapter of this section, you’ll learn how you can use location features to enrich the user experience by automatically enabling features when the user is near the place of interest.
  17. Getting Started with Face-Based AR: With the introduction of the iPhone X and its TrueDepth front-facing camera, developers can create new and exciting apps and games where the user’s face can take center stage. In this section, you’ll create an app that create an app where the user can apply different selfie effects, such as masks. Over the next five chapters, you’ll be creating a face-based AR app named RW FaceCase.
  18. Learn how to make face-based ARKit apps!

  19. Tracking the User’s Face: In the last chapter, you updated the starter project so that it includes a face-tracking session and a mechanism to handle session errors and interruptions. In this chapter, you’ll take things a step further by adding the necessary code to track a user’s face.
  20. Creating Assets for Face-Based AR: In the last chapter, you updated the starter project and added code for tracking the user’s face. You also worked with face geometry and materials. But there’s a lot more to do with this project! If you haven’t created 3D content before, don’t freak out. You’ve got this! With SceneKit, you can create 3D designs right inside the SceneKit Scene file.
  21. Using Blend Shapes: So you’ve added Woot Glasses and Pig to your app. Along the way, you learned how to make your own 3D assets inside of a SceneKit Scene file using only primitive shapes. If you thought that was cool, wait until you turn Pig into an Animoji — which is exactly what you’ll be doing in this chapter.
  22. Recording your Virtual Experience with ReplayKit: In the last chapter, you worked with blend shapes and added Pig to FaceCase. In this chapter, you’re going to add the ability to record and share your mask-wearing sessions using ReplayKit.
  23. Learn how to create realistic vehicle physics in ARKit!

  24. Beginning Game Physics: You pretty much know everything there is to know about ARKit by this point in the book. So it’s only fitting to flex your SceneKit muscles a bit, and create something really cool. SceneKit has got your back, because there’s some pretty decent Vehicle Physics already built-in. In the next two chapters, you’ll learn how to create an awesome remote controlled monster truck!
  25. Advanced Game Physics: This chapter continues where the previous one left off. Most of the vehicle physics side of things have been configured. What’s left to do is to spawn the truck into existence, then make it drive and steer, and add a bit of polish!

About the Authors

Of course, this book would be nothing without our team of talented authors:

Chris Language is a seasoned coder with 20+ years of experience, and the author of 3D Apple Games by Tutorials. He has fond memories of his childhood and his Commodore 64; more recently he started adding more good memories of life with all his Apple devices. By day, he fights for survival in the corporate jungle of Johannesburg, South Africa. By night he fights demons, dragons and zombies! For relaxation, he codes. You can find him on Twitter @ChrisLanguage.

Namrata Bandekar is a Software Engineer focusing on native iOS and Android development. When she’s not developing apps, she enjoys spending her time travelling the world with her husband, SCUBA diving and hiking with her dog. Say hi to Namrata on Twitter: @NamrataCodes.

Antonio Bello is still in love with software development, even after several decades spent writing code. Besides writing code that works and can be read by humans, his primary focus is learning; he’s actually obsessed by trying a bit of everything. When he’s not working, he’s probably sleeping (someone says he works too much), but from time to time he might be playing drums or composing music.

Tammy Coron is an independent creative professional and the host of Roundabout: Creative Chaos. She’s also the founder of Just Write Code. Find out more at tammycoron.com.

Free Upcoming Chapters from ARKit by Tutorials

To give you a taste of what the book’s all about, next week we’ll be releasing a series of free chapters that you can work through to create your own ARKit apps.

Stay tuned next week for details on the free chapters, where we’ll also launch a giveaway for this book!

Where to Go From Here?

ARKit by Tutorials is available now in PDF/ePub format, with all source code included.

To celebrate the launch of ARKit by Tutorials, we’re offering a special launch discount price of $44.99 for the book — that’s a full $10 off the regular price!

But don’t wait to take advantage of this deal, since it’s only good until the end of Friday, June 8th! You can get the book on our online store here:

We’ve had a lot of fun working on this book, and are extremely excited to share it with you!

If you make any of the projects from this book, or create your own sharp-looking ARKit apps, please share the details with us in the discussion below!

The post Introducing ARKit by Tutorials! appeared first on Ray Wenderlich.

Android VIPER Tutorial

$
0
0

Android VIPER Tutorial

If you have some experience with Android development, Architecture Patterns may sound like an old-fashioned concept, which some smart guy has brought to the table just to put you down mercilessly. If I add the word VIPER to the discussion, you might think this sounds like a scam or click-bait. However, I assure you that once you get in-the-loop, you will appreciate how valuable it is to have proper code structure and organization.

In this tutorial, you will get to know the VIPER architecture pattern. You will start by understanding the ideas behind VIPER and how it fits into the Android framework. You will then put it into practice, implementing a sample app that adopts this architecture pattern and illustrates its benefits.

Do not fear the VIPER, just enjoy the bite! :]

Why are you (probably) reading this?

If the above introduction has grabbed your attention, it means you may feel as I used to just a few months ago. To sum up, you may have been developing Android apps for quite some time, reaching a high-level of code complexity and a considerable amount of lines of code in some of your projects. Then, at some point, you have gone through any of the following situations:

  1. You get lost refactoring your own code when adding extra features.
  2. You realize that there are too many null checks of the same field in different parts of the code.
  3. Your classes and/or methods have increased their line length dramatically, largely exceeding the Rule of 30.
  4. Some parts of your code are difficult or even impossible to cover with Unit Tests.
  5. Your code becomes illegible to any other developer, since you are the only one able to “decipher” your business logic.
  6. All of the above. :]

In my case, I was lucky enough to have a colleague around who pushed me to adopt architecture patterns in my projects. Please let me be that colleague for you.

When Android I met Architecture Patterns…

Let me start this section making an announcement upfront: I do not aim to put the blame on Android/Google for the lack of architecture patterns in my early projects. That responsibility is only mine.

It wasn't me!

It wasn’t me!

On the other hand, my impression is that, until recently, architecture patterns were never a main focus of the official Android documentation. In the old days, app structure was based around the four Android main application components: Activity (most cases), Service, Broadcast Receiver, and/or Content Provider. Later, Fragments came on the stage and became mainstream in many applications.

It was only last year that Google introduced the Android Architecture Blueprints project, in an attempt to give Android developers some organization and structure guidelines. You should definitely have a look at the repo to get a feeling for what’s available as guidance. In addition, Google also released the Android Architecture Components, which is “a collection of libraries that help you design robust, testable, and maintainable apps”. The Architecture Components are now part of Android Jetpack.

VIPER at a glance

In this section you will start diving into VIPER, an architecture pattern related to the Clean Architecture Paradigm. VIPER stands for View, Interactor, Presenter, Entity, and Router. This five-layer organization aims to assign different tasks to each entity, following the Single Responsibility Principle. The basic idea behind VIPER and other Clean Architecture patterns is to create a cleaner and more modular structure to isolate your app’s dependencies and improve the flow of data within your app.

VIPER scheme

Within the framework of an Android app, the VIPER layers are assigned according to the following scheme:

  • The View corresponds to an Activity or Fragment in the app. A goal is to make the View as dumb as possible, so that it only takes care of showing the UI.
  • The Interactor takes care of performing any action, when the Presenter says to.
  • The Presenter acts as a “Head-of-Department”. In other words, it commands any action making use of the Interactor, tells the View to display content, and orders the navigation to other screens using the Router.
  • The Entity represents the app data. In short, it acts likes the Model in the MVP architecture pattern.
  • The Router handles navigating to other screens during the app lifecycle.

Further theoretical details on this architecture pattern can be found in the following excellent reference.

Getting started

Enough talk! From this section onwards you will be creating an app named Chucky Facts. The goal is to give you a taste of VIPER in a real app, so that you can see how to handle certain common scenarios under this architecture.

Begin by downloading the starter project using the download button at the top or bottom of the tutorial. The starter project contains the basic skeleton app and some assets.

Chucky Facts project structure

For didactic purposes, the code has been organized according to VIPER layer names (except for the Router). In a real application, it is common to structure the code in modules; in this particular example, they could be “SplashModule, “MainModule”, and “DetailModule”, for instance.

Build and run the starter project.

The starter app

As you can see, there’s not a whole lot going on in the app yet.

App definition and description

This app is just a simple viewer which displays information fetched from a REST API. The data source is the well-known Internet Chuck Norris Database, which provides a large list of “facts” about Chuck Norris and his superior status.

The starter AndroidManifest.xml file shows three Activity items, one being SplashActivity which includes the MAIN intent-filter. Both MainActivity and DetailActivity will later extend from BaseActivity, which lets them include a Toolbar.

The app skeleton also includes the Joke class, in the entity package, and JokesListAdapter in the view.adapters package. These implementations do not directly relate to the topic of this tutorial, but feel free to have a look at them and analyze their behavior.

You can take some time to inspect the rest of the starter project and all the features included out-of-the-box (for example, the resource files strings.xml, dimens.xml, and styles.xml).

App modules and entities

In this tutorial, every module consists of a contract and several associated classes which implement the various VIPER layers. The contract describes which VIPER layers must be implemented in the module and the actions the layers will perform.

Have a quick look at the contract corresponding to the Splash Module:

interface SplashContract {
  interface View {
    fun finishView()
  }

  interface Presenter {
    // Model updates
    fun onViewCreated()
    fun onDestroy()
  }
}

You can see there are two layers, defined as interfaces, that must be implemented: View and Presenter. Obviously, the functions declared inside the interfaces will be defined at some point in the code.

Main Module

View

Starting with MainActivity, make it extend BaseActivity() (instead of AppCompatActivity()), and implement the interface MainContract.View.

class MainActivity : BaseActivity(), MainContract.View {

After that, you will be required to implement some missing members. Hit Ctrl+I, and you will see that only one method corresponds to BaseActivity(), whereas the rest belong to MainContract.View.

MainActivity missing members

Before populating these methods, add a few properties:

private var presenter: MainContract.Presenter? = null 
private val toolbar: Toolbar by lazy { toolbar_toolbar_view } 
private val recyclerView: RecyclerView by lazy { rv_jokes_list_activity_main } 
private val progressBar: ProgressBar by lazy { prog_bar_loading_jokes_activity_main } 

You’ll need to hit Alt+Enter on PC or Option+Return on Mac to pull in the imports, and be sure to use the synthetic Kotlin Android Extensions for the view binding. Note that the presenter corresponds to the same module as the current view.

Now, you can fill the overridden functions in as follows:

override fun getToolbarInstance(): Toolbar? = toolbar

This simply returns the Toolbar instance present in the layout.

Add overrides for the loading functions:

override fun showLoading() {
  recyclerView.isEnabled = false
  progressBar.visibility = View.VISIBLE
}

override fun hideLoading() {
  recyclerView.isEnabled = true
  progressBar.visibility = View.GONE
}

The above two functions handle the data loading, showing and hiding the ProgressBar instance included in the layout.

Next, override showInfoMessage using the toast() method from Anko Commons.

override fun showInfoMessage(msg: String) {
  toast(msg)
}

This is a simple function to show some info to the user.

Add an override for publishDataList():

override fun publishDataList(data: List<Joke>) {
  (recyclerView.adapter as JokesListAdapter).updateData(data)
}

This last function updates the RecyclerView instance data.

Do not forget to initialize the presenter (you will define it shortly) and to configure the RecyclerView; add the following in onCreate():

presenter = MainPresenter(this)
recyclerView.layoutManager = LinearLayoutManager(this, LinearLayoutManager.VERTICAL, false)
recyclerView.adapter = JokesListAdapter({ joke -> presenter?.listItemClicked(joke) }, null)

Finally, it is common when doing VIPER, that you inform the presenter when the view is visible, and make the instance null when the Activity is being destroyed. Add the following two lifecycle method overrides:

override fun onResume() {
  super.onResume()
  presenter?.onViewCreated()
}

override fun onDestroy() {
  presenter?.onDestroy()
  presenter = null
    super.onDestroy()
}

Note: you can use a Dependency Injection approach, such as Dagger 2, Kodein, or Koin to avoid making instances null before finishing in order to prevent memory leaks.

Presenter

Now you can define MainPresenter as follows, and place it in the presenter folder:

class MainPresenter(private var view: MainContract.View?)
    : MainContract.Presenter, MainContract.InteractorOutput {   // 1

  private var interactor: MainContract.Interactor? = MainInteractor()   // 2

  override fun listItemClicked(joke: Joke?) {   // 3
  }

  override fun onViewCreated() {   // 4
  }

  override fun onQuerySuccess(data: List<Joke>) {   // 5
  }

  override fun onQueryError() {
  }

  override fun onDestroy() {   // 6
  }
}

To define the implementation, you have to take into account that:

  1. The class implements two interfaces declared in the MainContract: Presenter, which commands the whole module, and InteractorOutput, which allows you to define actions in response to what the Interactor returns.
  2. You will need an Interactor instance to perform actions of interest.
  3. When this function is called, the application will navigate to another screen (Detail Module) passing any data of interest; thus, it will be using the Router.
  4. This callback defines what will happen when the view is finally loaded. Normally, you define here anything which happens automatically, with no user interaction. In this case, you will try to fetch data from the datasource through the REST API.
  5. This function and the following will define what happens when the database query is addressed.
  6. As for the presenter in the view, you need to make the presenter properties null in order to avoid any trouble when the system kills the module.

Setting aside the Router for further implementation, you can actually fill in the rest of functions.

For onQuerySuccess(data: List), add

view?.hideLoading()
view?.publishDataList(data)

and for onQueryError(),

view?.hideLoading()
view?.showInfoMessage("Error when loading data")

You simply handle the success or the error of the data query.

In onDestroy(), add

view = null
interactor = null

You make the properties null, as you did in the view layer.

Interactor

For onViewCreated() in the presenter, you want to query data from the remote datasource once the view loads. You need to first create the MainInteractor class in the interactor package.

class MainInteractor : MainContract.Interactor {   // 1

  companion object {
    val icndbUrl = "https://api.icndb.com/jokes"
  }

  override fun loadJokesList(interactorOutput: (result: Result<Json, FuelError>) -> Unit) {   // 2
    icndbUrl.httpPost().responseJson { _, _, result ->   // 3
      interactorOutput(result)
    }
  }
}

Pull in dependencies via Alt+Enter on PC and Option+Return on Mac using import statements that begin with com.github.kittinunf. Of note in MainInteractor are the following:

  1. Do not forget to make the class implement the proper interface, from the module contract.
  2. loadJokesList() is a function which requires a lambda as input argument; this is technically the same as having a typical Java Callback.
  3. In order to query data, the application uses Fuel, which is a Kotlin/Android library that allows easy and asynchronous networking. Another alternative would be using the well-known Retrofit. The query result is directly used by the lambda as input argument.

Do you remember the onViewCreated() function in MainPresenter that you left empty in the previous section? It is time now to fill it in.

override fun onViewCreated() {
  view?.showLoading()
  interactor?.loadJokesList { result ->
    when (result) {
      is Result.Failure -> {
        this.onQueryError()
      }
      is Result.Success -> {
        val jokesJsonObject = result.get().obj()

        val type = object : TypeToken<List<Joke>>() {}.type
        val jokesList: List<Joke> =
            Gson().fromJson(jokesJsonObject.getJSONArray("value").toString(), type)

        this.onQuerySuccess(jokesList)
      }
    }
  }
}

As you see, you only have to handle the possible results of the query. Bear in mind that Result.Success returns a JSON object that has to be parsed somehow; in this case, you’re using Gson.

Note: remember that when parsing a JSON stream, you first need to know how data is organized. In this case, “value” is the root keyword of the array.

Build and run the app, and you’ll be greeted with a set of illuminating facts:

Detail Module

The detail module implementation is similar to the previous one: you only need each class to extend from the proper parent and implement the right interfaces according to the module contract.

View

Update the DetailActivity declaration to be:

class DetailActivity : BaseActivity(), DetailContract.View {
    // ...

Add the following properties and companion object:

companion object {
  val TAG = "DetailActivity"
}

private var presenter: DetailContract.Presenter? = null
private val toolbar: Toolbar by lazy { toolbar_toolbar_view }
private val tvId: TextView? by lazy { tv_joke_id_activity_detail }
private val tvJoke: TextView? by lazy { tv_joke_activity_detail }

Instantiate the presenter in onCreate():

presenter = DetailPresenter(this)

Override the view interface methods as follows:

override fun getToolbarInstance(): android.support.v7.widget.Toolbar? = toolbar

override fun showJokeData(id: String, joke: String) {
    tvId?.text = id
    tvJoke?.text = joke
}

override fun showInfoMessage(msg: String) {
   toast(msg)
}

Configure the toolbar back button by overriding onOptionsItemSelected():

override fun onOptionsItemSelected(item: MenuItem?): Boolean {
  return when (item?.itemId) {
    android.R.id.home -> {
      presenter?.backButtonClicked()
      true
    }
    else -> false
  }
}

The Router will bring arguments to this Activity from the previous module (remember listItemClicked(joke: Joke?) in the Main Module presenter), and they are retrieved and passed to the presenter once the view is ready. Add the following lifecycle overrides:

override fun onResume() {
  super.onResume()
  // add back arrow to toolbar
  supportActionBar?.let {
    supportActionBar?.setDisplayHomeAsUpEnabled(true)
  }
  // load invoking arguments
  val argument = intent.getParcelableExtra<Joke>("data")
  argument?.let { presenter?.onViewCreated(it) }
}

override fun onPause() {
  super.onPause()
}

We’ll finish these overrides in the next main section.

Presenter

To complete the classes in this module, add the following class to the presenter package:

class DetailPresenter(private var view: DetailContract.View?) : DetailContract.Presenter {

  override fun backButtonClicked() {
  
  }

  override fun onViewCreated(joke: Joke) {
    view?.showJokeData(joke.id.toString(), joke.text)
  }

  override fun onDestroy() {
    view = null
  }
}

You can see that the backButtonClicked function is not defined yet, since it needs the module Router, whose implementation is pending.

Shaping the router

In some parts of this tutorial the term Router has appeared. However, you have never addressed its implementation, but why? The reason relates to how Android is designed. As mentioned before, the Router is the VIPER layer in charge of the navigation across the app views. In other words, the router is aware of every view existing in the app, and possesses the tools and resources to navigate from one view to another and vice-versa.

Keeping this in mind for each module, it would make sense to create the Presenter (the brain of the module), and then the rest of entities (View, Interactor, and Entity). Finally, the Router should wrap the Views up and somehow let the Presenter command the navigation.

This sounds perfectly reasonable, but things are a bit more complicated on Android. Think of what is the entry point of any Android application (corresponding to the the “main” method in other applications).

Yes, you are right, the entry point is that Activity which is marked with the appropriate intent-filter in the Android Manifest. In fact, every module is always accessed through an Activity, i.e. a View. Once created, you can instantiate any class or entity from it.

Therefore, the way Android has been designed makes it much more difficult to implement VIPER. At the end of the day, you will need a startActivity() function call to move to a new screen. The question that follows would be: can this be done in effortless way for the developer?

It’s possible that the new Jetpack Navigation Controller will help in this regard. But Jetpack is still in alpha, so, in the meantime, we’ll turn to a different tool.

Guided by a Cicerone

Having reached this point, it is important that you get to know Cicerone. I came across this excellent library not long ago, when trying to improve a VIPER implementation on Android. Although it is not flawless, I believe it comprises a few tools and resources which help to keep things neat and clear. It helps you make VIPER layers as decoupled as possible.

In order to use this library, there are a few steps to accomplish:

  • Add the library dependency to the application build.gradle file.
    dependencies {
      // ...
      implementation 'ru.terrakok.cicerone:cicerone:2.1.0'
      // ...
    }
    
  • Create your own Application instance in the app root package and enable Cicerone:
    class BaseApplication : Application() {
    
      companion object {
        lateinit var INSTANCE: BaseApplication
      }
    
      init {
        INSTANCE = this
      }
    
      // Routing layer (VIPER)
      lateinit var cicerone: Cicerone<Router>
    
      override fun onCreate() {
        super.onCreate()
        INSTANCE = this
        this.initCicerone()
      }
    
      private fun BaseApplication.initCicerone() {
        this.cicerone = Cicerone.create()
      }
    }
    
  • Then in your Android Manifest, set the application name to your new class:
    ...
    <application
        android:name=".BaseApplication"
    ...
    

Now, we are ready to use Cicerone. You only need to make any View aware of this new partner.

The best option is to add this line to onResume():

BaseApplication.INSTANCE.cicerone.navigatorHolder.setNavigator(navigator)

and this other one to onPause()

BaseApplication.INSTANCE.cicerone.navigatorHolder.removeNavigator()

Go ahead and do so in MainActivity and DetailActivity now.

But, what is navigator? Well, according to the documentation, it is a class property that defines exactly what happens when the Router is invoked.

Let's see an example for MainActivity. Add both a companion object and the navigator property:

companion object {
  val TAG: String = "MainActivity"   // 1
}

private val navigator: Navigator? by lazy {
  object : Navigator {
    override fun applyCommand(command: Command) {   // 2
      if (command is Forward) {
        forward(command)
      }
   }

   private fun forward(command: Forward) {   // 3
     val data = (command.transitionData as Joke)

     when (command.screenKey) {
       DetailActivity.TAG -> startActivity(Intent(this@MainActivity, DetailActivity::class.java)
           .putExtra("data", data as Parcelable))   // 4
       else -> Log.e("Cicerone", "Unknown screen: " + command.screenKey)
       }
    }
  }
}

Here's what's going on:

  1. The View needs a TAG as identifier.
  2. By default, applyCommand() handles the navigation logic. In this case, only Forward commands are processed.
  3. forward is a custom function which undertakes navigation when command.screenKey matches.
  4. At the end of the day, and due to Android design, you are going to need a startActivity somewhere, so that the navigation actually takes place.

So, you may be thinking this is just a wrapper that adds boilerplate to your code to do exactly what you used to do before. No doubt on the boilerplate, but now in any presenter, you can have a class member like

private val router: Router? by lazy { BaseApplication.INSTANCE.cicerone.router }

and use it easily. Go ahead and add it to both MainPresenter and DetailPresenter.

Do you remember listItemClicked(joke: Joke?) in MainPresenter? Now you are in position to add this beautiful line:

router?.navigateTo(DetailActivity.TAG, joke)
Magic!

Magic!

It is time to implement the Router layer for every module, even for the Splash Module.

Try to do it yourself as an exercise, and check the final project if needed. As a hint, the navigator in SplashActivity looks a lot like the one in MainActivity. And the navigator in DetailActivity looks like:

private val navigator: Navigator? by lazy {
  object : Navigator {
    override fun applyCommand(command: Command) {
      if (command is Back) {
        back()
      }
    }

    private fun back() {
      finish()
    }
  }
}

App performance analysis

Once completed, you should have Chucky Facts up and running as in the video.

When started, the splash-screen appears for just a few seconds, and then it jumps directly to MainActivity. A ProgressBar appears while the list gets populated. You can gracefully scroll along the list, with no lag whatsoever. The Router works seamlessly allowing smooth transitions between screens, even handling the Toolbar "Back Arrow" events.

Testing the snake

One of the main benefits of using architecture patterns like VIPER is that it allows you to isolate the business logic in the Presenter. This entity ends up knowing nothing about Android. This is rather convenient since it makes unit testing much easier, reducing the amount of mocks you need to create.

Although there is not much business logic in this sample app, it is always a good practice to include some tests (both unit and UI tests). For that reason, the starter app comes with a pair of UI tests in MainActivityInstrumentedTest, in the androidTest folder:

class MainActivityInstrumentedTest {

  @Rule
  @JvmField
  val activityTestRule = ActivityTestRule<MainActivity>(MainActivity::class.java)

  @Test
  fun testRecyclerViewIsPopulated() {  // 1

    waitForSplashScreen()

    onView(withId(R.id.rv_jokes_list_activity_main))
        .check(matches(hasDescendant(withText("2"))))
  }

  @Test
  fun testRecyclerViewItemClickLaunchesDetailActivity() { // 2

    waitForSplashScreen() // 3

    onView(withId(R.id.rv_jokes_list_activity_main))
        .perform(RecyclerViewActions.scrollToPosition<JokesListAdapter.ViewHolder>(2))
        .perform(RecyclerViewActions.actionOnItemAtPosition<JokesListAdapter.ViewHolder>(2, click()))

    assert(onView(ViewMatchers.withId(R.id.rv_jokes_list_activity_main)) == null)
  }
}

Regarding the above snippet:

  1. The first test assesses that the RecyclerView gets populated, particularly checking that there is an item showing a "2" text message. In this particular case, it relates to the second item of the list.
  2. The second test checks whether DetailActivity launches when clicking on a list item. For that purposes, the function assesses that once clicked, the RecyclerView does not show anymore.
  3. In both test functions there is a call to waitForSplashScreen() from Utils.kt, which sleeps the thread for a few seconds to skip the splash-screen lapse.

Go ahead and click the green test arrow next to MainActivityInstrumentedTest. The Espresso UI tests will run on a device or emulator and you should see them both pass.

Where To Go From Here?

You can download the fully finished sample project using the download button at the top or bottom of the tutorial.

There are lots of good references to read about architecture patterns and VIPER in particular. I personally found rather solid foundations reading articles like this one, and this other.

Taking into account the latest novelties on Android, it would be interesting for you to get your hands on the Android Architecture Components, especially on components like Room, LiveData, and Navigation Controller. Give the official documentation a go, since as usual it is superb.

If you are interested in wrapping up the sample app you have just finished, it would be interesting to incorporate Dependency Injection using a library like Dagger. That will add completeness to the example, and will also help you to get consistency on your development projects by including one of the most popular frameworks for creating well-structured code.

We hope you enjoyed this tutorial on the VIPER architecture pattern, and if you have any questions or comments, please join the forum discussion below!

The post Android VIPER Tutorial appeared first on Ray Wenderlich.

Screencast: Dynamic Type: Scaling Sizes

How to Make a Chess Game with Unity

$
0
0

How to Make a Chess Game with Unity

Not every successful game involves shooting aliens or saving the world. Board games, and chess, in particular, have a history that spans thousands of years. Not only are they fun to play, but they’re also fun to port from a real-life board game to a video game.

In this tutorial, you’ll build a 3D chess game in Unity. Along the way, you’ll learn how to:

  • Choose which piece to move
  • Determine legal moves
  • Alternate players
  • Detect a win

By the time you’ve finished this tutorial, you’ll have created a feature-rich chess game that you can use as a starting point for other board games.

Note: You should have some familiarity with Unity and the C# language. If you want to skill up in C#, the Beginning C# with Unity Screencast series is a great place to start.

Getting Started

Download the project materials for this tutorial. You can find a link at the top and the bottom of this page. Open the starter project in Unity to get going.

Chess is often implemented as a simple 2D game. However, this version is 3D to mimic sitting at a table playing with your friend. Besides… 3D is cool. =]

Open the Main scene in the Scenes folder. You’ll see a Board object representing the game board and an object for the GameManager. These objects already have scripts attached.

  • Prefabs: Includes the board, the individual pieces and the indicator squares that will be used in the move selection process.
  • Materials: Includes materials for the chess board, the chess pieces and the tile overlays.
  • Scripts: Contains the components that have already been attached to objects in the Hierarchy.
  • Board: Keeps track of the visual representations of the pieces. This component also handles the highlighting of individual pieces.
  • Geometry.cs: Utility class that handles the conversion between row and column notation and Vector3 points.
  • Player.cs: Keeps track of the player’s pieces, as well as the pieces a player has captured. It also holds the direction of play for pieces where direction matters, such as pawns.
  • Piece.cs: The base class that defines enumerations for any instantiated pieces. It also contains logic to determine the valid moves in the game.
  • GameManager.cs: Stores game logic such as allowed moves, the initial arrangement of the pieces at the start of the game and more. It’s a singleton, so it’s easy for other classes to call it.

GameManager stores a 2D array named pieces that tracks where the pieces are located on the board. Take a look at AddPiece, PieceAtGrid and GridForPiece to see how this works.

Enter play mode to view the board and get the pieces set up and ready to go.

chess board and pieces

Moving Pieces

The first step is figuring out which piece to move.

Raycasting is a way to find out which tile the user is mousing over. If you aren’t familiar with raycasting in Unity, check out our Introduction to Unity Scripting tutorial or our popular Bomberman tutorial.

Once the player selects a piece, you need to generate valid tiles where the piece can move. Then, you need to pick one. You’ll add two new scripts to handle this functionality. TileSelector will help select which piece to move, and MoveSelector will help pick a destination.

Both components have the same basic methods:

  • Start: For one-time setup.
  • EnterState: Does the setup for this activation.
  • Update: Performs the raycast as the mouse moves.
  • ExitState: Cleans up the current state and calls EnterState of the next state.

This is a basic implementation of the State Machine pattern. If you need more states, you can make this more formal; however, you’ll add complexity.

Selecting a Tile

Select Board in the Hierarchy. Then, in the Inspector window, click the Add Component button. Now, type TileSelector in the box and click New Script. Finally, click Create and Add to attach the script.

Note: Whenever you create new scripts, take a moment to move them into the appropriate folder. This keeps your Assets folder organized.

Highlighting the Selected Tile

Double-click TileSelector.cs to open it and add the following variables inside the class definition:

public GameObject tileHighlightPrefab;

private GameObject tileHighlight;

These variables store the transparent overlay to help indicate which tile you’re pointing at. The prefab is assigned in edit mode and the component tracks and moves around the highlight.

Next, add the following lines to Start:

Vector2Int gridPoint = Geometry.GridPoint(0, 0);
Vector3 point = Geometry.PointFromGrid(gridPoint);
tileHighlight = Instantiate(tileHighlightPrefab, point, Quaternion.identity, gameObject.transform);
tileHighlight.SetActive(false);

Start gets an initial row and column for the highlight tile, turns it into a point and creates a game object from the prefab. This object is initially deactivated, so it won’t be visible until it’s needed.

Note: It’s helpful to refer to coordinates by column and row, which takes the form of a Vector2Int and is referred to as a GridPoint. Vector2Int has two integer values: x and y. When you need to place an object in the scene, you need the Vector3 point. Vector3 has three float values: x, y and z.

Geometry.cs has helper methods for these conversions:

  • GridPoint(int col, int row): gives you a GridPoint for a given column and row.
  • PointFromGrid(Vector2Int gridPoint): turns a GridPoint into a Vector3 actual point in the scene.
  • GridFromPoint(Vector3 point): gives the GridPoint for the x and z value of that 3D point, and the y value is ignored.

Next, add EnterState:

public void EnterState()
{
    enabled = true;
}

This re-enables the component when it’s time to select another piece.

Then, add the following to Update:

Ray ray = Camera.main.ScreenPointToRay(Input.mousePosition);

RaycastHit hit;
if (Physics.Raycast(ray, out hit))
{
    Vector3 point = hit.point;
    Vector2Int gridPoint = Geometry.GridFromPoint(point);

    tileHighlight.SetActive(true);
    tileHighlight.transform.position =
        Geometry.PointFromGrid(gridPoint);
}
else
{
    tileHighlight.SetActive(false);
}

Here, you create a Ray from the camera, through the mouse pointer, and off into infinity and beyond!

Physics.Raycast checks to see if this ray intersects any physics colliders in the system. Since the board is the only object with a collider, you don’t have to worry about pieces being hidden by each other.

If the ray intersects a collider, then RaycastHit has the details, including the point of intersection. You turn that intersection point into a GridPoint with the helper method, and then you use that method to set the position of the highlight tile.

Since the mouse pointer is over the board, you also enable the highlight tile, so it’s displayed.

Finally, select Board in the Hierarchy and click Prefabs in the Project window. Then, drag the Selection-Yellow prefab into the Tile Highlight Prefab slot in the Tile Selector component of the board.

Now when you enter play mode, there will be a yellow highlight tile that follows the mouse pointer around.

Selecting the Piece

To select a piece, you need to check if the mouse button is down. Add this check inside the if block, just after the point where you enable the tile highlight:

if (Input.GetMouseButtonDown(0))
{
    GameObject selectedPiece = 
        GameManager.instance.PieceAtGrid(gridPoint);
    if(GameManager.instance.DoesPieceBelongToCurrentPlayer(selectedPiece))
    {
        GameManager.instance.SelectPiece(selectedPiece);
    // Reference Point 1: add ExitState call here later
    }
}

If the mouse button is pressed, GameManager provides you the piece at that location. You also have to make sure this piece belongs to the current player since players can’t move their opponent’s pieces.

Note: In a complex game like this, it’s helpful to assign clear responsibilities to your components. Board deals only with displaying and highlighting pieces. GameManager keeps track of the GridPoint values of the piece locations. It also has helper methods to answer questions about where pieces are and to which player they belong.

Enter play mode and select a piece.

highlighted chess pieces

Now that you have a piece selected, it’s time to move it to a new tile.

Selecting a Move Target

At this point, TileSelector has done its job. It’s time to introduce the other component: MoveSelector.

This component is similar to TileSelector. Just like before, select the Board object in the Hierarchy, add a new component and name it MoveSelector.

Hand Off Control

The first thing you have to manage is how to hand off control from TileSelector to MoveSelector. You can use ExitState for this. In TileSelector.cs, add this method:

private void ExitState(GameObject movingPiece)
{
    this.enabled = false;
    tileHighlight.SetActive(false);
    MoveSelector move = GetComponent<MoveSelector>();
    move.EnterState(movingPiece);
}

This hides the tile overlay and disables the TileSelector component. In Unity, you can’t call the Update method of disabled components. Since you want to call the Update method of the new component now, disabling the old component prevents any interference.

Call this method by adding this line to Update, just after Reference Point 1:

ExitState(selectedPiece);

Now, open MoveSelector and add these instance variables at the top of the class:

public GameObject moveLocationPrefab;
public GameObject tileHighlightPrefab;
public GameObject attackLocationPrefab;

private GameObject tileHighlight;
private GameObject movingPiece;

These hold the mouse highlight, move locations and attack location tile overlays, as well as the instantiated highlight tile and the piece that was selected in the previous step.

Next, add the following set up code to Start:

this.enabled = false;
tileHighlight = Instantiate(tileHighlightPrefab, Geometry.PointFromGrid(new Vector2Int(0, 0)),
    Quaternion.identity, gameObject.transform);
tileHighlight.SetActive(false);

This component has to start in the disabled state, since you need TileSelector to run first. Then, you load the highlight overlay like before.

Move the Piece

Next, add the EnterState method:

public void EnterState(GameObject piece)
{
    movingPiece = piece;
    this.enabled = true;
}

When this method is called, it stores the piece being moved and enables itself.

Add these lines to the Update method of MoveSelector:

Ray ray = Camera.main.ScreenPointToRay(Input.mousePosition);

RaycastHit hit;
if (Physics.Raycast(ray, out hit))
{
    Vector3 point = hit.point;
    Vector2Int gridPoint = Geometry.GridFromPoint(point);

    tileHighlight.SetActive(true);
    tileHighlight.transform.position = Geometry.PointFromGrid(gridPoint);
    if (Input.GetMouseButtonDown(0))
    {
        // Reference Point 2: check for valid move location
        if (GameManager.instance.PieceAtGrid(gridPoint) == null)
        {
            GameManager.instance.Move(movingPiece, gridPoint);
        }
        // Reference Point 3: capture enemy piece here later
        ExitState();
    }
}
else
{
    tileHighlight.SetActive(false);
}

Update in this case is similar to TileSelector and uses the same Raycast check to see what tile the mouse is over. However, this time when the mouse button is clicked, you call GameManager to move the piece to the new tile.

Finally, add the ExitState method to clean up and prepare for the next move:

private void ExitState()
{
    this.enabled = false;
    tileHighlight.SetActive(false);
    GameManager.instance.DeselectPiece(movingPiece);
    movingPiece = null;
    TileSelector selector = GetComponent<TileSelector>();
    selector.EnterState();
}

You disable this component and hide the tile highlight overlay. Since the piece has moved, you can clear that value, and ask the GameManager to unhighlight the piece. Then, you call EnterState on TileSelector to start the process all over again.

Back in the editor, with Board selected, drag the tile overlay prefabs from the prefab folder to the slots in MoveSelector:

  • Move Location Prefab should be Selection-Blue
  • Tile Highlight Prefab should be Selection-Yellow.
  • Attack Location Prefab should be Selection-Red
  • .

assigning overlays to selections

You can tweak the colors by adjusting the materials.

Start play mode and move some pieces around.

chess board with pieces moved randomly

You’ll notice that you can move pieces to any unoccupied location. That can make for a very confusing game of chess! The next step is to make sure pieces move according to the rules of the game.

Finding Legal Moves

In Chess, each piece has different movements it can legally make. Some can move in any direction, some can move any number of spaces, and some can only move in one direction. How do you keep track of all the options?

One way is to have an abstract base class that represents all pieces, and then have concrete subclasses override a method to generate move locations.

Another question to answer is: “Where should you generate the list of moves?”

One place that makes sense is EnterState in MoveSelector. This is where you generate overlay tiles to show the player where they can move, so it makes the most sense.

Generate List of Valid Targets

The general strategy is to take the selected piece and ask GameManager for a list of valid targets (a.k.a. moves). GameManager will use the piece subclass to generate a list of possible targets. Then, it will filter out positions that are off the board or occupied.

This filtered list is passed back to MoveSelector, which highlights the legal moves and waits for the player’s selection.

The pawn has the most basic move, so it makes sense to start there.

Open Pawn.cs in Pieces, and modify MoveLocations so that it looks like this:

public override List MoveLocations(Vector2Int gridPoint) 
{
    var locations = new List<Vector2Int>();

    int forwardDirection = GameManager.instance.currentPlayer.forward;
    Vector2Int forward = new Vector2Int(gridPoint.x, gridPoint.y + forwardDirection);
    if (GameManager.instance.PieceAtGrid(forward) == false)
    {
        locations.Add(forward);
    }

    Vector2Int forwardRight = new Vector2Int(gridPoint.x + 1, gridPoint.y + forwardDirection);
    if (GameManager.instance.PieceAtGrid(forwardRight))
    {
        locations.Add(forwardRight);
    }

    Vector2Int forwardLeft = new Vector2Int(gridPoint.x - 1, gridPoint.y + forwardDirection);
    if (GameManager.instance.PieceAtGrid(forwardLeft))
    {
        locations.Add(forwardLeft);
    }

    return locations;
}

This does several things:

This code first creates an empty list to store locations. Next, it creates a location representing “forward” one square.

Since the white and black pawns move in different directions, the Player object stores a value representing which way the pawns can move. For one player this value is +1, while the value is -1 for the opponent.

Pawns have a peculiar movement profile and several special rules. Although they can move forward one square, they can’t capture an opposing piece in that square; they can only capture on the forward diagonals. Before adding the forward tile as a valid location, you have to check to see if there’s already another piece occupying that spot. If not, you can add the forward tile to the list.

For the capture spots, again, you have to check to see if there’s already a piece at that location. If there is, you can capture it.

You don’t need to worry just yet about checking if it’s the player’s or the opponent’s piece — you’ll work that out later.

In GameManager.cs, add this method just after the Move method:

public List MovesForPiece(GameObject pieceObject)
{
    Piece piece = pieceObject.GetComponent();
    Vector2Int gridPoint = GridForPiece(pieceObject);
    var locations = piece.MoveLocations(gridPoint);

    // filter out offboard locations
    locations.RemoveAll(tile => tile.x < 0 || tile.x > 7
        || tile.y < 0 || tile.y > 7);

    // filter out locations with friendly piece
    locations.RemoveAll(tile => FriendlyPieceAt(tile));

    return locations;
}

Here, you get the Piece component from the game piece, as well as its current location.

Next, you ask GameManager for a list of locations for this piece and filter out any invalid values.

RemoveAll is a useful function that uses a callback expression. This method looks at each value in the list, passing it into an expression as tile. If that expression evaluates to true, then the value is removed from the list.

This first expression removes locations with an x or y value that would place the piece off of the board. The second filter is similar, but it removes any locations that have a friendly piece.

In MoveSelector.cs, add these instance variables at the top of the class:

private List<Vector2Int> moveLocations;
private List<GameObject> locationHighlights;

The first stores a list of GridPoint values for move locations; the second stores a list of overlay tiles showing whether the player can move to that location.

Add the following to the bottom of the EnterState method:

moveLocations = GameManager.instance.MovesForPiece(movingPiece);
locationHighlights = new List<GameObject>();

foreach (Vector2Int loc in moveLocations)
{
    GameObject highlight;
    if (GameManager.instance.PieceAtGrid(loc))
    {
        highlight = Instantiate(attackLocationPrefab, Geometry.PointFromGrid(loc),
            Quaternion.identity, gameObject.transform);
    } 
    else 
    {
        highlight = Instantiate(moveLocationPrefab, Geometry.PointFromGrid(loc),
            Quaternion.identity, gameObject.transform);
    }
    locationHighlights.Add(highlight);
}

This section does several things:

First, it gets a list of valid locations from the GameManager and makes an empty list to store the tile overlay objects. Next, it loops over each location in the list. If there is already a piece at that location, then it must be an enemy piece, because the friendly ones were already filtered out.

Enemy locations get the attack overlay, and the remainder get the move overlay.

Execute the Move

Add this section below Reference Point 2, inside the if statement checking the mouse button:

if (!moveLocations.Contains(gridPoint))
{
    return;
}

If the player clicks on a tile that isn’t a valid move, exit from this function.

Finally, in MoveSelector.cs, add this code to the end of ExitState:

foreach (GameObject highlight in locationHighlights)
{
    Destroy(highlight);
}

At this point, the player has selected a move so you can remove the overlay objects.

pawn ready to capture a piece

Whew! Those were a lot of code changes just to get the pawns to move. Now that you’ve done all the hard work, it’ll be easy to move the other pieces.

Next Player

It’s not much of a game if only one side gets to move. It’s time to fix that!

To let both players play, you’ll have to figure out how to switch between players and where to add the code.

Since GameManager is responsible for all of the game rules, it makes the most sense to put the switching code there.

The actual switch is straightforward. There are variables for the current and other player in GameManager, so you just need to swap those values.

The trickier question is: where do you call the swap?

A player’s turn is over once they have moved a piece. ExitState in MoveSelector is called after the selected piece is moved, so that seems like the right place to do the switch.

In GameManager.cs, add the following method to the end of the class:

public void NextPlayer()
{
    Player tempPlayer = currentPlayer;
    currentPlayer = otherPlayer;
    otherPlayer = tempPlayer;
}

Swapping two values requires a third variable to act as a placeholder; otherwise, you’d overwrite one of the values before it can be copied.

Switch over to MoveSelector.cs and add the following line to ExitState, right before the call to EnterState:

GameManager.instance.NextPlayer();

That’s it! ExitState and EnterState already take care of their own cleanup.

Enter play mode, and you can now move pieces for both sides. You’re getting close to a real game at this point

Capturing Pieces

Capturing pieces is an important part of chess. As the saying goes, “It’s all fun and games until someone loses a Knight”.

Since the game rules go in GameManager, open that and add the following method:

public void CapturePieceAt(Vector2Int gridPoint)
{
    GameObject pieceToCapture = PieceAtGrid(gridPoint);
    currentPlayer.capturedPieces.Add(pieceToCapture);
    pieces[gridPoint.x, gridPoint.y] = null;
    Destroy(pieceToCapture);
}

Here, GameManager looks up which piece is at the target location. This piece is added to the list of captured pieces for the current player. Next, it’s cleared from GameManager‘s record of the board tiles and GameObject is destroyed, which removes it from the scene.

To capture a piece, you move on top of it. So the code to call this step should go in MoveSelector.cs.

In Update, find the Reference Point 3 comment and replace it with the following statement:

else
{
    GameManager.instance.CapturePieceAt(gridPoint);
    GameManager.instance.Move(movingPiece, gridPoint);
}

The previous if statement checked to see if there was a piece at the target location. Since the earlier move generation filtered out tiles with friendly pieces, a tile that contains a piece must be an enemy piece.

After the enemy piece is gone, the selected piece can move in.

Click on play and move the pawns around until you can capture one.

I am the Queen, you captured my pawn, prepare to die.

Ending the Game

A chess game ends when a player captures the opposing King. When you capture a piece, check to see if it’s a King. If so, the game is over.

But how do you stop the game? One way is to remove both the TileSelector and MoveSelector scripts on the board.

In GameManager.cs, in CapturePieceAt, add the following lines before you destroy the captured piece:

if (pieceToCapture.GetComponent<Piece>().type == PieceType.King)
{
    Debug.Log(currentPlayer.name + " wins!");
    Destroy(board.GetComponent<TileSelector>());
    Destroy(board.GetComponent<MoveSelector>());
}

It’s not enough to disable these components. The next ExitState and EnterState calls will only re-enable one of them, which will keep the game going.

Destroy is not just for GameObject classes; it can be used to remove a component attached to an object as well.

Hit play. Manouever a pawn and take the enemy king. You’ll see a win message printed to the Unity console.

As a personal challenge, you can add UI elements to display a “Game Over” message or transition back to a menu screen.

Checkmate

Now it’s time to bring out the big guns and move the more powerful pieces!

Special Movement

Piece and its specific subclasses are an excellent way to encapsulate the special movement rules.

You can use techniques from Pawn to add movement to some of the other pieces. Pieces that move a single space in different directions, such as the King and Knight, are set up in the same way. See if you can implement those movement rules.

Have a look at the finished project code if you need a hint.

Moving Multiple Spaces

Pieces that can move multiple spaces in one direction are more challenging. These are the Bishop, Rook and Queen pieces. The Bishop is easier to demonstrate, so let’s start with that one.

Piece has premade lists of the directions the Bishop and Rook can move as a starting point. These are all directions from the current tile location of the piece.

Open Bishop.cs, and replace MoveLocations with this:

public override List<Vector2Int> MoveLocations(Vector2Int gridPoint)
{
    List<Vector2Int> locations = new List<Vector2Int>();

    foreach (Vector2Int dir in BishopDirections)
    {
        for (int i = 1; i < 8; i++)
        {
            Vector2Int nextGridPoint = new Vector2Int(gridPoint.x + i * dir.x, gridPoint.y + i * dir.y);
            locations.Add(nextGridPoint);
            if (GameManager.instance.PieceAtGrid(nextGridPoint))
            {
                break;
            }
        }
    }

    return locations;
}

The foreach loops over each direction. For each direction, there is a second loop that generates enough new locations to move the piece off the board. Since the list of locations will be filtered for off-board locations, you just need enough to make sure you don't miss any tiles.

In each step, generate a GridPoint for the location and add it to the list. Then check to see if that location currently has a piece. If it does, break out of the inner loop to go to the next direction.

The break is included because an existing piece will block further movement. Again, later in the chain, you filter out locations with friendly pieces, so you don't have to worry about that here.

Note: If you need to distinguish the forward from the backward direction, or the left from the right, you need to take into account that the black and white pieces are moving in different directions.

For chess, this only matters for pawns, but other games might require that distinction.

That's it! Hit play mode and try it out.

Bishop about to move

Moving the Queen

The Queen is the most powerful piece, so that's an excellent place to finish.

The Queen's movement is a combination of the Bishop and Rook; the base class has an array of directions for each piece. It would be helpful if you could combine the two.

In Queen.cs, replace MoveLocations with the following:

public override List<Vector2Int> MoveLocations(Vector2Int gridPoint)
{
    List<Vector2Int> locations = new List<Vector2Int>();
    List<Vector2Int> directions = new List<Vector2Int>(BishopDirections);
    directions.AddRange(RookDirections);

    foreach (Vector2Int dir in directions)
    {
        for (int i = 1; i < 8; i++)
        {
            Vector2Int nextGridPoint = new Vector2Int(gridPoint.x + i * dir.x, gridPoint.y + i * dir.y);
            locations.Add(nextGridPoint);
            if (GameManager.instance.PieceAtGrid(nextGridPoint))
            {
                break;
            }
        }
    }

    return locations;
}

The only thing that's different here is that you're turning the direction array into a List.

The advantage of the List is that you can add the directions from the other array, making one List with all of the directions. The rest of the method is the same as the Bishop code.

Hit play again, and get the pawns out of the way to make sure everything works.

queen control of the board

Where to Go From Here?

There are several things you can do at this point, like finish the movement for the King, Knight and Rook. If you're stuck at any point, check out the final project code in the project materials download.

There are a few special rules that are not implemented here, such as allowing a Pawn's first move to be two spaces instead of just one, castling and a few others.

The general pattern is to add variables and methods to GameManager to keep track of those situations and check if they're available when the piece is moving. If available, then add the appropriate locations in MoveLocations for that piece.

There are also visual enhancements you can make. For example, the pieces can move smoothly to their target location or the camera can rotate to show the other player's view during their turn.

If you have any questions or comments, or just want to show off your cool 3D chess game, join the discussion below!

The post How to Make a Chess Game with Unity appeared first on Ray Wenderlich.

Viewing all 4396 articles
Browse latest View live