Quantcast
Channel: Kodeco | High quality programming tutorials: iOS, Android, Swift, Kotlin, Unity, and more
Viewing all 4373 articles
Browse latest View live

Getting Started with Core Data Tutorial

$
0
0

CDT-feature-1Welcome to Core Data! In this tutorial, you’ll write your very first Core Data app. You’ll see how easy it is to get started with all the resources provided in Xcode, from starter code templates to the Data Model editor.

You’re going to hit the ground running right from the start. By the end of the tutorial you’ll know how to:

  • Model data using Xcode’s model editor
  • Add new records to Core Data
  • Fetch a set of records from Core Data
  • Display the fetched records using a table view.

You’ll also get a sense of what Core Data is doing behind the scenes, and how you can interact with the various moving pieces.

Getting Started

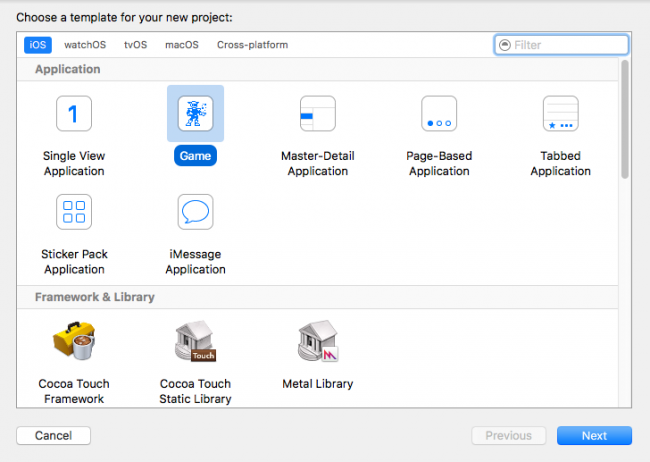
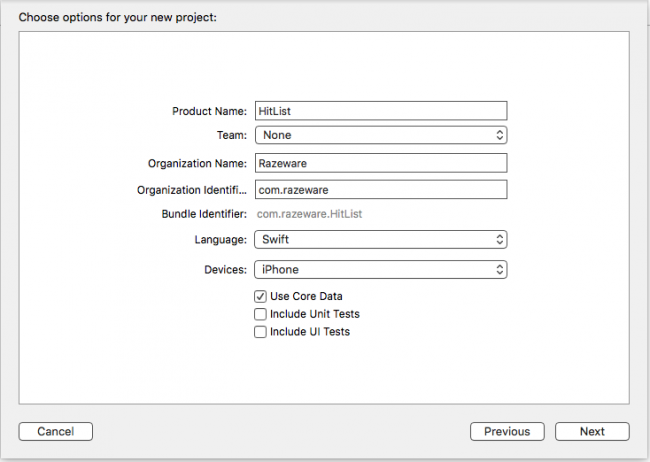
Open Xcode and create a new iPhone project based on the Single View Application template. Name the app HitList and make sure Use Core Data is checked:

image1

Checking the Use Core Data box will cause Xcode to generate boilerplate code for what’s known as an NSPersistentContainer in AppDelegate.swift.

The NSPersistentContainer consists of a set of objects that facilitate saving and retrieving information from Core Data. Inside this container is an object to manage the Core Data state as a whole, an object representing the Data Model, and so on.

The standard stack works well for most apps, but depending on your your app and its data requirements, you can customize the stack to be more efficient.

Note: Not all Xcode templates under iOS/Application have the option to start with Core Data. In Xcode 8, only the Master-Detail Application and Single View Application templates have the Use Core Data checkbox.

The idea for this sample app is simple: There will be a table view with a list of names for your very own “hit list”. You’ll be able to add names to this list and eventually, you’ll use Core Data to make sure the data is stored between sessions. We don’t condone violence, so you can think of this app as a favorites list to keep track of your friends too, of course! :]

Click on Main.storyboard to open it in Interface Builder. Select the view controller on the canvas and embed it inside a navigation controller. From Xcode’s Editor menu, select Embed In…\ Navigation Controller.

image2

Next, drag a Table View from the object library into the view controller, then resize it so it covers the entire view.

If not already open, use the icon located in the lower left corner of your canvas to open Interface Builder’s document outline.

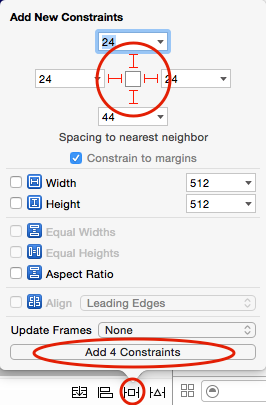
Ctrl-drag from the Table View in the document outline to its parent view and select the Leading Space to Container Margin constraint:

image3

Do this three more times, selecting the constraints Trailing Space to Container Margin, Vertical Spacing to Top Layout Guide and finally, Vertical Spacing to Bottom Layout Guide. Adding those four constraints makes the table view fill its parent view.

Next, drag a Bar Button Item and place it on the view controller’s navigation bar. Finally, select the bar button item and change its system item to Add. Your canvas should look similar to the following screenshot:

image4

Every time you tap the Add button, an alert controller containing a text field will appear. From there you’ll be able to type someone’s name into the text field. Tapping Save will save the name, dismiss the alert controller and refresh the table view, displaying all the names you’ve entered.

But first, you need to make the view controller the table view’s data source. In the canvas, Ctrl-drag from the table view to the yellow view controller icon above the navigation bar, as shown below, and click on dataSource:

image5

In case you were wondering, you don’t need to set up the table view’s delegate since tapping on the cells won’t trigger any action. It doesn’t get simpler than this!

Open the assistant editor by pressing Command-Option-Enter or by selecting the middle button on the Editor toolset on the Xcode bar. Delete the didReceiveMemoryWarning() method. Next, Ctrl-drag from the table view onto ViewController.swift, inside the class definition to create an IBOutlet:

image6

Next, name the new IBOutlet property tableView, resulting in the following line:

@IBOutlet weak var tableView: UITableView!

Next, Ctrl-drag from the Add button into ViewController.swift just below your viewDidLoad() definition. This time, create an action instead of an outlet, naming the method addName, with a type UIBarButtonItem:

@IBAction func addName(_ sender: UIBarButtonItem) {
 
}

You can now refer to the table view and the bar button item’s action in code.

Next, you’ll set up the model for the table view. Add the following property to ViewController.swift below the tableView IBOutlet:

var names: [String] = []

names is a mutable array holding string values displayed by the table view. Next, replace the implementation of viewDidLoad() with the following:

override func viewDidLoad() {
  super.viewDidLoad()
 
  title = "The List"
  tableView.register(UITableViewCell.self,
                     forCellReuseIdentifier: "Cell")
}

This will set a title on the navigation bar and register the UITableViewCell class with the table view.

Note: register(_:forCellReuseIdentifier:) guarantees your table view will return a cell of the correct type when the Cell reuseIdentifier is provided to the dequeue method.

Next, still in ViewController.swift, add the following UITableViewDataSource extension below your class definition for ViewController:

// MARK: - UITableViewDataSource
extension ViewController: UITableViewDataSource {
 
  func tableView(_ tableView: UITableView,
                 numberOfRowsInSection section: Int) -> Int {
    return names.count
  }
 
  func tableView(_ tableView: UITableView,
                 cellForRowAt indexPath: IndexPath)
                 -> UITableViewCell {
 
    let cell =
      tableView.dequeueReusableCell(withIdentifier: "Cell",
                                    for: indexPath)
    cell.textLabel?.text = names[indexPath.row]
    return cell
  }
}

If you’ve ever worked with UITableView, this code should look very familiar. First you return the number of rows in the table as the number of items in your names array.

Next, tableView(_:cellForRowAt:) dequeues table view cells and populates them with the corresponding string from the names array.

Next, you need a way to add new names so the table view can display them. Implement the addName IBAction method you Ctrl-dragged into your code earlier:

// Implement the addName IBAction
@IBAction func addName(_ sender: AnyObject) {
 
  let alert = UIAlertController(title: "New Name",
                                message: "Add a new name",
                                preferredStyle: .alert)
 
  let saveAction = UIAlertAction(title: "Save",
                                 style: .default) {
    [unowned self] action in
 
    guard let textField = alert.textFields?.first,
      let nameToSave = textField.text else {
        return
    }
 
    self.names.append(nameToSave)
    self.tableView.reloadData()
  }
 
  let cancelAction = UIAlertAction(title: "Cancel",
                                   style: .default)
 
  alert.addTextField()
 
  alert.addAction(saveAction)
  alert.addAction(cancelAction)
 
  present(alert, animated: true)
}

Every time you tap the Add button, this method presents a UIAlertController with a text field and two buttons, Save and Cancel.

Save inserts the text fields current text into the names array then reloads the table view. Since the names array is the model backing the table view, whatever you type into the text field will appear in the table view.

Finally, build and run your app for the first time. Next, tap the Add button. The alert controller will look like this:

image7

Add four or five names to the list. You should see something similar to below:

image8

Your table view will display the data and your array will store the names, but the big thing missing here is persistence. The array is in memory but if you force quit the app or reboot your device, your hit list will be wiped out.

Core Data provides persistence, meaning it can store data in a more durable state so it can outlive an app re-launch or a device reboot.

You haven’t added any Core Data yet, so nothing should persist after you navigate away from the app. Let’s test this out. Press the Home button if you’re using a physical device or the equivalent (Shift+⌘+H) if you’re using the Simulator. This will take you back to the familiar app grid on the home screen:

image9

From the home screen, tap the HitList icon to bring the app back to the foreground. The names are still on the screen. What happened?

When you tap the Home button, the app currently in the foreground goes to the background. When this happens, the operating system flash-freezes everything currently in memory, including the strings in the names array. Similarly, when it’s time to wake up and return to the foreground, the operating system restores what used to be in memory as if you’d never left.

Apple introduced these advances in multitasking back in iOS 4. They create a seamless experience for iOS users but add a wrinkle to the definition of persistence for iOS developers. Are the names really persisted?

No, not really. If you had completely killed the app in the fast app switcher or turned off your phone, those names would be gone. You can verify this, as well. With the app in the foreground, double tap the Home button to enter the fast app switcher, like so:

image10

From here, flick the HitList app snapshot upwards to terminate the app. There should be no trace of HitList in living memory (no pun intended). Verify the names are gone by returning to the home screen and tapping on the HitList icon to trigger a fresh launch.

The difference between flash-freezing and persistence may be obvious if you’ve worked with iOS for some time and are familiar with the way multitasking works. In a user’s mind, however, there is no difference. The user doesn’t care why the names are still there, whether the app went into the background and came back, or because the app saved and reloaded them.

All that matters is the names are still there when the app comes back!

So the real test of persistence, is whether your data is still there after a fresh app launch.

Modeling your Data

Now you know how to check for persistence, you can dive into Core Data. Your goal for the HitList app is simple: persist the names you enter so they’re available for viewing after a fresh app launch.

Up to this point, you’ve been using plain old Swift strings to store the names in memory. In this section, you’ll replace these strings with Core Data objects.

The first step is to create a managed object model, which describes the way Core Data represents data on disk.

By default, Core Data uses a SQLite database as the persistent store, so you can think of the Data Model as the database schema.

Note: You’ll come across the word managed quite a bit in Core Data. If you see “managed” in the name of a class, such as in NSManagedObjectContext, chances are you are dealing with a Core Data class. “Managed” refers to Core Data’s management of the life cycle of Core Data objects.

However, don’t assume all Core Data classes contain the word “managed”. Actually, most don’t. For a comprehensive list of Core Data classes, check out the Core Data framework reference in the documentation browser.

Since you’ve elected to use Core Data, Xcode automatically created a Data Model file for you and named it HitList.xcdatamodeld.

image11

Open HitList.xcdatamodeld. As you can see, Xcode has a powerful Data Model editor:

image12

For now, let’s focus on creating a single Core Data entity.

Click on Add Entity on the lower-left to create a new entity. Double-click the new entity and change its name to Person, like so:

image13

You may be wondering why the model editor uses the term Entity. Weren’t you simply defining a new class? As you’ll see shortly, Core Data comes with its own vocabulary. Here’s a quick rundown of some terms you’ll commonly encounter:

  • An entity is a class definition in Core Data. The classic example is an Employee or a Company. In a relational database, an entity corresponds to a table.
  • An attribute is a piece of information attached to a particular entity. For example, an Employee entity could have attributes for the employee’s name, position and salary. In a database, an attribute corresponds to a particular field in a table.
  • A relationship is a link between multiple entities. In Core Data, relationships between two entities are called to-one relationships, while those between one and many entities are called to-many relationships. For example, a Manager can have a to-many relationship with a set of employees, whereas an individual Employee will usually have a to-one relationship with his manager.
Note: You’ve probably noticed, entities sound a lot like a classes. Likewise, attributes and relationships sound a lot like properties. What’s the difference? You can think of a Core Data entity as a class definition and the managed object as an instance of that class.

Now you know what an attribute is, you can add an attribute to Person object created earlier. Open HitList.xcdatamodeld. Next, select Person on the left-hand side and click the plus sign (+) under Attributes.

In Core Data, an attribute can be of one of several data types. Set the new attribute’s name to, er, name and change its type to String:

image14

Saving to Core Data

Open ViewController.swift, add the following Core Data module import below the UIKit import:

import CoreData

This import is all you need to start using the Core Data API in your code.

Next, replace the names property definition with the following:

var people: [NSManagedObject] = []

You’ll store Person entities rather than string names, so you rename the array serving as the table view’s data model to people. It now holds instances of NSManagedObject rather than simple strings.

NSManagedObject represents a single object stored in Core Data; you must use it to create, edit, save and delete from your Core Data persistent store. As you’ll see shortly, NSManagedObject is a shape-shifter. It can take the form of any entity in your Data Model, appropriating whatever attributes and relationships you defined.

Since you’re changing the table view’s model, you must also replace both data source methods implemented earlier. Replace your UITableViewDataSource extension with the following:

// MARK: - UITableViewDataSource
extension ViewController: UITableViewDataSource {
  func tableView(_ tableView: UITableView,
                 numberOfRowsInSection section: Int) -> Int {
    return people.count
  }
 
  func tableView(_ tableView: UITableView,
                 cellForRowAt indexPath: IndexPath)
                 -> UITableViewCell {
 
    let person = people[indexPath.row]
    let cell =
      tableView.dequeueReusableCell(withIdentifier: "Cell",
                                    for: indexPath)
    cell.textLabel?.text =
      person.value(forKeyPath: "name") as? String
    return cell
  }
}

The most significant change to these methods occurs in tableView(_:cellForRowAt:). Instead of matching cells with the corresponding string in the model array, you now match cells with the corresponding NSManagedObject.

Note how you grab the name attribute from the NSManagedObject. It happens here:

cell.textLabel?.text =
  person.value(forKeyPath: "name") as? String

Why do you have to do this? As it turns out, NSManagedObject doesn’t know about the name attribute you defined in your Data Model, so there’s no way of accessing it directly with a property. The only way Core Data provides to read the value is key-value coding, commonly referred to as KVC.

Note: If you’re new to iOS development, you may not be familiar with KVC.

KVC is a mechanism in Foundation for accessing an object’s properties indirectly using strings. In this case, KVC makes NSMangedObject behave more or less like a dictionary at runtime.

Key-value coding is available to all classes inheriting from NSObject, including NSManagedObject. You can’t access properties using KVC on a Swift object that doesn’t descend from NSObject.

Next, find addName() and replace the save UIAlertAction with the following:

let saveAction = UIAlertAction(title: "Save", style: .default) {
  [unowned self] action in
 
  guard let textField = alert.textFields?.first,
    let nameToSave = textField.text else {
      return
  }
 
  self.save(name: nameToSave)
  self.tableView.reloadData()
}

This takes the text in the text field and passes it over to a new method named save(_:). Xcode complains because save(_:) doesn’t exist yet. Add it below addName(_:):

func save(name: String) {
 
  guard let appDelegate =
    UIApplication.shared.delegate as? AppDelegate else {
    return
  }
 
  // 1
  let managedContext =
    appDelegate.persistentContainer.viewContext
 
  // 2
  let entity =
    NSEntityDescription.entity(forEntityName: "Person",
                               in: managedContext)!
 
  let person = NSManagedObject(entity: entity,
                               insertInto: managedContext)
 
  // 3
  person.setValue(name, forKeyPath: "name")
 
  // 4
  do {
    try managedContext.save()
    people.append(person)
  } catch let error as NSError {
    print("Could not save. \(error), \(error.userInfo)")
  }
}

This is where Core Data kicks in! Here’s what the code does:

  1. Before you can save or retrieve anything from your Core Data store, you first need to get your hands on an NSManagedObjectContext. You can consider a managed object context as an in-memory “scratchpad” for working with managed objects.

    Think of saving a new managed object to Core Data as a two-step process: first, you insert a new managed object into a managed object context; then, after you’re happy with your shiny new managed object, you “commit” the changes in your managed object context to save it to disk.

    Xcode has already generated a managed object context as part of the new project’s template. Remember, this only happens if you check the Use Core Data checkbox at the beginning. This default managed object context lives as a property of the NSPersistentContainer in the application delegate. To access it, you first get a reference to the app delegate.

  2. You create a new managed object and insert it into the managed object context. You can do this in one step with NSManagedObject’s static method: entity(forEntityName:in:).

    You may be wondering what an NSEntityDescription is all about. Recall earlier, NSManagedObject was called a shape-shifter class because it can represent any entity. An entity description is the piece linking the entity definition from your Data Model with an instance of NSManagedObject at runtime.

  3. With an NSManagedObject in hand, you set the name attribute using key-value coding. You must spell the KVC key (name in this case) exactly as it appears in your Data Model, otherwise your app will crash at runtime.
  4. You commit your changes to person and save to disk by calling save on the managed object context. Note save can throw an error, which is why you call it using the try keyword within a do-catch block. Finally, insert the new managed object into the people array so it shows up when the table view reloads.

That’s a little more complicated than an array of strings, but not too bad. Some of the code here, such as getting the managed object context and entity, could be done just once in your own init() or viewDidLoad() then reused later. For simplicity, you’re doing it all in the same method.

Build and run the app, and add a few names to the table view:
image15

If the names are actually stored in Core Data, the HitList app should pass the persistence test. Double-tap the Home button to bring up the fast app switcher. Terminate the HitList app by flicking it upwards.

From Springboard, tap the HitList app to trigger a fresh launch. Wait, what happened? The table view is empty:

image16

You saved to Core Data, but after a fresh app launch, the people array is empty! That’s because the data is sitting on disk waiting for you, but you’re not showing it yet.

Fetching from Core Data

To get data from your persistent store into the managed object context, you have to fetch it. Open ViewController.swift and add this code below viewDidLoad():

override func viewWillAppear(_ animated: Bool) {
  super.viewWillAppear(animated)
 
  //1
  guard let appDelegate =
    UIApplication.shared.delegate as? AppDelegate else {
      return
  }
 
  let managedContext =
    appDelegate.persistentContainer.viewContext
 
  //2
  let fetchRequest =
    NSFetchRequest<NSManagedObject>(entityName: "Person")
 
  //3
  do {
    people = try managedContext.fetch(fetchRequest)
  } catch let error as NSError {
    print("Could not fetch. \(error), \(error.userInfo)")
  }
}

Step by step, this is what the code does:

  1. Before you can do anything with Core Data, you need a managed object context. Fetching is no different! Like before, you pull up the application delegate and grab a reference to its persistent container to get your hands on its NSManagedObjectContext.
  2. As the name suggests, NSFetchRequest is the class responsible for fetching from Core Data. Fetch requests are both powerful and flexible. You can use fetch requests to fetch a set of objects meeting the provided criteria (i.e. give me all employees living in Wisconsin and have been with the company at least three years), individual values (i.e. give me the longest name in the database) and more.

    Fetch requests have several qualifiers used to refine the set of results returned. For now, you should know NSEntityDescription is a required one of these qualifiers.

    Setting a fetch request’s entity property, or alternatively initializing it with init(entityName:), fetches all objects of a particular entity. This is what you do here to fetch all Person entities. Also note NSFetchRequest is a generic type. This use of generics specifies a fetch request’s expected return type, in this case NSManagedObject.

  3. You hand the fetch request over to the managed object context to do the heavy lifting. fetch(_:) returns an array of managed objects meeting the criteria specified by the fetch request.
Note: Like save(), fetch(_:) can also throw an error so you have to use it within a do block. If an error occurred during the fetch, you can inspect the error inside the catch block and respond appropriately.

Build and run the application. Immediately, you should see the list of names you added earlier:

image15

Great! They’re back from the dead (pun intended). Add a few more names to the list and restart the app to verify saving and fetching are working. Short of deleting the app, resetting the Simulator or throwing your phone off a tall building, the names will appear in the table view no matter what.

image17

Where To Go From Here?

You can download the completed project from this tutorial here.

In a short tutorial, you’ve already experienced several fundamental Core Data concepts: Data Models, entities, attributes, managed objects, managed object contexts and fetch requests.

CD@2xIf you enjoyed this tutorial, you’d definitely enjoy our book Core Data by Tutorials.

The book goes into further detail on Core Data and is written for intermediate iOS developers who already know the basics of iOS and Swift development but want to learn how to leverage Core Data to persist data in their apps.

It’s been fully updated for Swift 3, iOS 10 and Xcode 8 — get it on the raywenderlich.com store today!

The post Getting Started with Core Data Tutorial appeared first on Ray Wenderlich.

Screencast: Beginning C# Part 14: Foreach Loops

Lightweight Migrations in Core Data Tutorial

$
0
0

CDT-feature-2When you create a Core Data app, you design an initial data model for your app. However, after you ship your app inevitably you’ll want to make changes to your data model. What do you do then? You don’t want to break the app for existing users!

You can’t predict the future, but with Core Data, you can migrate toward the future with every new release of your app. The migration process will update data created with a previous version of the data model to match the current data model.

This Core Data migrations tutorial discusses the many aspects of Core Data migrations by walking you through the evolution of a note-taking app’s data model. You’ll start with a simple app with only a single entity in its data model.

Let the great migration begin!

Note: This tutorial assumes some basic knowledge of Core Data and Swift.

When to Migrate

When is a migration necessary? The easiest answer to this common question is “when you need to make changes to the data model.”

However, there are some cases in which you can avoid a migration. If an app is using Core Data merely as an offline cache, when you update the app, you can simply delete and rebuild the data store. This is only possible if the source of truth for your user’s data isn’t in the data store. In all other cases, you’ll need to safeguard your user’s data.

That said, any time it’s impossible to implement a design change or feature request without changing the data model, you’ll need to create a new version of the data model and provide a migration path.

The Migration Process

When you initialize a Core Data stack, one of the steps involved is adding a store to the persistent store coordinator. When you encounter this step, Core Data does a few things prior to adding the store to the coordinator.

First, Core Data analyzes the store’s model version. Next, it compares this version to the coordinator’s configured data model. If the store’s model version and the coordinator’s model version don’t match, Core Data will perform a migration, when enabled.

Note: If migrations aren’t enabled, and the store is incompatible with the model, Core Data will simply not attach the store to the coordinator and specify an error with an appropriate reason code.

To start the migration process, Core Data needs the original data model and the destination model. It uses these two versions to load or create a mapping model for the migration, which it uses to convert data in the original store to data that it can store in the new store. Once Core Data determines the mapping model, the migration process can start in earnest.

Migrations happen in three steps:

  1. First, Core Data copies over all the objects from one data store to the next.
  2. Next, Core Data connects and relates all the objects according to the relationship mapping.
  3. Finally, enforce any data validations in the destination model. Core Data disables destination model validations during the data copy.

You might ask, “If something goes wrong, what happens to the original source data store?” With nearly all types of Core Data migrations, nothing happens to the original store unless the migration completes without error. Only when a migration is successful, will Core Data remove the original data store.

Types of Migrations

In my own experience, I’ve found there are a few more migration variants than the simple distinction between lightweight and heavyweight. Below, I’ve provided the more subtle variants of migration names, but these names are not official categories by any means. You’ll start with the least complex form of migration and end with the most complex form.

Lightweight Migrations

Lightweight migration is Apple’s term for the migration with the least amount of work involved on your part. This happens automatically when you use NSPersistentContainer, or you have to set some flags when building your own Core Data stack. There are some limitations on how much you can change the data model, but because of the small amount of work required to enable this option, it’s the ideal setting.

Manual Migrations

Manual migrations involve a little more work on your part. You’ll need to specify how to map the old set of data onto the new set, but you get the benefit of a more explicit mapping model file to configure. Setting up a mapping model in Xcode is much like setting up a data model, with similar GUI tools and some automation.

Custom Manual Migrations

This is level 3 on the migration complexity index. You’ll still use a mapping model, but complement that with custom code to specify custom transformation logic on data. Custom entity transformation logic involves creating an NSEntityMigrationPolicy subclass and performing custom transformations there.

Fully Manual Migrations

Fully manual migrations are for those times when even specifying custom transformation logic isn’t enough to fully migrate data from one model version to another. Custom version detection logic and custom handling of the migration process are necessary.

Getting Started

Download the starter project for this tutorial here.

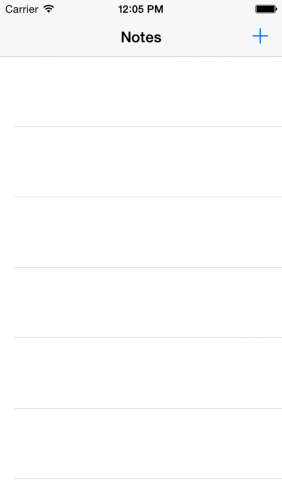
Build and run the app UnCloudNotes in the iPhone simulator. You’ll see an empty list of notes:

image1

Tap the plus (+) button in the top-right corner to add a new note. Add a title (there is default text in the note body to make the process faster) and tap Create to save the new note to the data store. Repeat this a few times so you have some sample data to migrate.

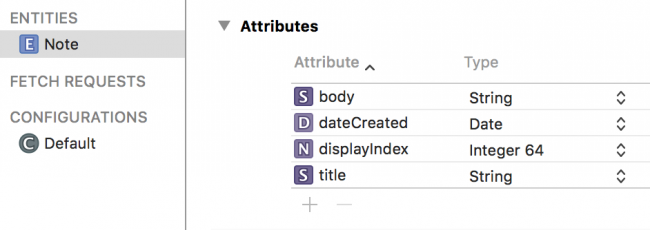
Back in Xcode, open the UnCloudNotesDatamodel.xcdatamodeld file to show the entity modeling tool in Xcode. The data model is simple — just one entity, a Note, with a few attributes.

image2

You’re going to add a new feature to the app; the ability to attach a photo to a note. The data model doesn’t have any place to persist this kind of information, so you’ll need to add a place in the data model to hold onto the photo. But you already added a few test notes in the app. How can you change the model without breaking the existing notes?

It’s time for your first migration!

Note: The Xcode 8 console logs contain far more information than in previous releases. The workaround to this issue is to add OS_ACTIVITY_MODE=disable to the current scheme environment variables.

A Lightweight Migration

In Xcode, select the UnCloudNotes data model file if you haven’t already selected it. This will show you the Entity Modeler in the main work area. Next, open the Editor menu and select Add Model Version…. Name the new version UnCloudNotesDataModel v2 and ensure UnCloudNotesDataModel is selected in the Based on model field. Xcode will now create a copy of the data model.

Note: You can give this file any name you want. The sequential v2, v3, v4, et cetera naming helps you easily tell the versions apart.

This step will create a second version of the data model, but you still need to tell Xcode to use the new version as the current model. If you forget this step, selecting the top level UnCloudNotesDataModel.xcdatamodeld file will perform any changes you make to the original model file. You can override this behavior by selecting an individual model version, but it’s still a good idea to make sure you don’t accidentally modify the original file.

In order to perform any migration, you want to keep the original model file as it is, and make changes to an entirely new model file.

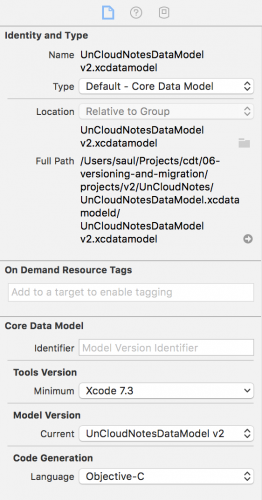
In the File Inspector pane on the right, there is a selection menu toward the bottom called Model Version. Change that selection to match the name of the new data model, UnCloudNotesDataModel v2:

image3

Once you’ve made that change, notice in the project navigator the little green check mark icon has moved from the previous data model to the v2 data model:

image4

Core Data will try to first connect the persistent store with the ticked model version when setting up the stack. If a store file was found, and it isn’t compatible with this model file, a migration will be triggered. The older version is there to support migration. The current model is the one Core Data will ensure is loaded prior to attaching the rest of the stack for your use.

Make sure you have the v2 data model selected and add an image attribute to the Note entity. Set the attribute’s name to image and the attribute’s type to Transformable.

Since this attribute is going to contain the actual binary bits of the image, you’ll use a custom NSValueTransformer to convert from binary bits to a UIImage and back again. Just such a transformer has been provided for you in ImageTransformer. In the Value Transformer Name field in the Data Model Inspector on the right of the screen, enter ImageTransformer and enter UnCloudNotes in the Module field.

image5

Note: When referencing code from your model files, just like in Xib and Storyboard files, you’ll need to specify a module (UnCloudNotes in this case) to allow the class loader to find the exact code you want to attach.

The new model is now ready for some code! Open Note.swift and add the following property below displayIndex:

@NSManaged var image: UIImage?

Build and run the app. You’ll see your notes are still magically displayed! It turns out lightweight migrations are enabled by default. This means every time you create a new data model version, and it can be auto migrated, it will be. What a time saver!

Inferred Mapping Models

It just so happens Core Data can infer a mapping model in many cases when you enable the shouldInferMappingModelAutomatically flag on the NSPersistentStoreDescription. Core Data can automatically look at the differences in two data models and create a mapping model between them.

For entities and attributes that are identical between model versions, this is a straightforward data pass through mapping. For other changes, just follow a few simple rules for Core Data to create a mapping model.

In the new model, changes must fit an obvious migration pattern, such as:

  • Deleting entities, attributes or relationships
  • Renaming entities, attributes or relationships using the renamingIdentifier
  • Adding a new, optional attribute
  • Adding a new, required attribute with a default value
  • Changing an optional attribute to non-optional and specifying a default value
  • Changing a non-optional attribute to optional
  • Changing the entity hierarchy
  • Adding a new parent entity and moving attributes up or down the hierarchy
  • Changing a relationship from to-one to to-many
  • Changing a relationship from non-ordered to-many to ordered to-many (and vice versa)
Note: Check out Apple’s documentation for more information on how Core Data infers a lightweight migration mapping:https://developer.apple.com/library/Mac/DOCUMENTATION/Cocoa/Conceptual/CoreDataVersioning/Articles/vmLightweightMigration.html

As you see from this list, Core Data can detect, and more importantly, automatically react to, a wide variety of common changes between data models. As a rule of thumb, all migrations, if necessary, should start as lightweight migrations and only move to more complex mappings when the need arises.

As for the migration from UnCloudNotes to UnCloudNotes v2, the image property has a default value of nil since it’s an optional property. This means Core Data can easily migrate the old data store to a new one, since this change follows item 3 in the list of lightweight migration patterns.

Image Attachments

Now the data is migrated, you need to update the UI to allow image attachments to new notes. Luckily, most of this work has been done for you. :]

Open Main.storyboard and find the Create Note scene. Underneath, you’ll see the Create Note With Images scene that includes the interface to attach an image.

The Create Note scene is attached to a navigation controller with a root view controller relationship. Control-drag from the navigation controller to the Create Note With Images scene and select the root view controller relationship segue.

This will disconnect the old Create Note scene and connect the new, image-powered one instead:

image6

Next, open AttachPhotoViewController.swift and add the following method to the UIImagePickerControllerDelegate extension:

func imagePickerController(_ picker: UIImagePickerController,
  didFinishPickingMediaWithInfo info: [String: Any]) {
 
  guard let note = note else { return }
 
  note.image =
    info[UIImagePickerControllerOriginalImage] as? UIImage
 
  _ = navigationController?.popViewController(animated: true)
}

This will populate the new image property of the note once the user selects an image from the standard image picker.

Next, open CreateNoteViewController.swift and replace viewDidAppear with the following:

override func viewDidAppear(_ animated: Bool) {
  super.viewDidAppear(animated)
 
  guard let image = note?.image else {
    titleField.becomeFirstResponder()
    return
  }
 
  attachedPhoto.image = image
  view.endEditing(true)
}

This will display the new image if the user has added one to the note.

Next, open NotesListViewController.swift and update tableView(_:cellForRowAt) with the following:

override func tableView(_ tableView: UITableView,
                        cellForRowAt indexPath: IndexPath)
                        -> UITableViewCell {
 
  let note = notes.object(at: indexPath)
  let cell: NoteTableViewCell
  if note.image == nil {
    cell = tableView.dequeueReusableCell(
      withIdentifier: "NoteCell",
      for: indexPath) as! NoteTableViewCell
  } else {
    cell = tableView.dequeueReusableCell(
      withIdentifier: "NoteCellWithImage",
      for: indexPath) as! NoteImageTableViewCell
  }
 
  cell.note = note
  return cell
}

This will dequeue the correct UITableViewCell subclass based on the note having an image present or not. Finally, open NoteImageTableViewCell.swift and add the following to updateNoteInfo(note:):

noteImage.image = note.image

This will update the UIImageView inside the NoteImageTableViewCell with the image from the note.

Build and run, and choose to add a new note:

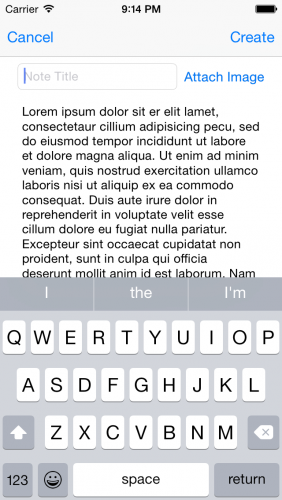
image8

Tap the Attach Image button to add an image to the note. Choose an image from your simulated photo library and you’ll see it in your new note:
image9

The app uses the standard UIImagePickerController to add photos as attachments to notes.

Note: To add your own images to the Simulator’s photo album, drag an image file onto the open Simulator window. Thankfully, the iOS 10 Simulator comes with a library of photos ready for your use. :]

If you’re using a device, open AttachPhotoViewController.swift and set the sourceType attribute on the image picker controller to .camera to take photos with the device camera. The existing code uses the photo album, since there is no camera in the Simulator.

Where To Go From Here?

Here is the final example project from the above tutorial.

The full chapter in the Core Data by Tutorials book follows up this Core Data migrations tutorial with a series of more complex migrations. In the full book chapter, you’ll walk through creating a mapping model with entity and attribute mappings from one version to the next. You’ll also learn about custom migration policies, and how to migrate non-sequential data models.

I hope you enjoyed this Core Data migrations tutorial, and if you have any questions or comments, please join the discussion thread below!

CD@2xIf you enjoyed this tutorial, you’d definitely enjoy our book Core Data by Tutorials.

The book goes into further detail on Core Data and is written for intermediate iOS developers who already know the basics of iOS and Swift development but want to learn how to leverage Core Data to persist data in their apps.

It’s been fully updated for Swift 3, iOS 10 and Xcode 8 — get it on the raywenderlich.com store today!

The post Lightweight Migrations in Core Data Tutorial appeared first on Ray Wenderlich.

Multiple Managed Object Contexts with Core Data Tutorial

$
0
0

CDT-feature-3A managed object context is an in-memory scratchpad for working with your managed objects.

Most apps need just a single managed object context. The default configuration in most Core Data apps is a single managed object context associated with the main queue. Multiple managed object contexts make your apps harder to debug; it’s not something you’d use in every app, in every situation.

That being said, certain situations do warrant the use of more than one managed object context. For example, long-running tasks, such as exporting data, will block the main thread of apps that use only a single main-queue managed object context and cause the UI to stutter.

In other situations, such as when edits are being made to user data, it’s helpful to treat a managed object context as a set of changes that the app can discard if it no longer needs them. Using child contexts makes this possible.

In this tutorial, you’ll learn about multiple managed object contexts by taking a journaling app for surfers and improving it in several ways by adding multiple contexts.

Note: This is an advanced tutorial, and assumes prior knowledge of Swift, Core Data, and iOS app development in general. If common Core Data phrases such as managed object subclass and persistent store coordinator don’t ring any bells, or if you’re unsure what a Core Data stack is supposed to do, you may want to read some of our other Core Data tutorials first.

Getting Started

This tutorial’s starter project is a simple journal app for surfers. After each surf session, a surfer can use the app to create a new journal entry that records marine parameters, such as swell height or period, and rate the session from 1 to 5. Dude, if you’re not fond of hanging ten and getting barreled, no worries, brah. Just replace the surfing terminology with your favorite hobby of choice!

Introducing SurfJournal

Download the starter project for this tutorial: SurfJournal. Open the project, then build and run the app.

On startup, the application lists all previous surf session journal entries. Tapping a row brings up the detail view of a surf session with the ability to make edits.

surf_journal_screenshots

As you can see, the sample app works and has data. Tapping the Export button on the top-left exports the data to a comma-separated values (CSV) file. Tapping the plus (+) button on the top-right adds a new journal entry. Tapping a row in the list opens the entry in edit mode, where you can change or view the details of a surf session.

Although the sample project appears simple, it actually does a lot and will serve as a good base to add multi-context support. First, let’s make sure you have a good understanding of the various classes in the project.

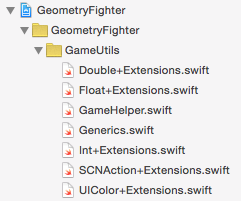
Open the project navigator and take a look at the full list of files in the starter project:

file_tree

Before jumping into the code, take a brief moment to go over what each class does for you out of the box.

  • AppDelegate: On first launch, the app delegate creates the Core Data stack and sets the coreDataStack property on the primary view controller JournalListViewController.
  • CoreDataStack: This object contains the cadre of Core Data objects known as the stack. The stack installs a database that already has data in it on first launch. No need to worry about this just yet; you’ll see how it works shortly.
  • JournalListViewController: The sample project is a one-page, table-based application. This file represents that table. If you’re curious about its UI elements, head over to Main.storyboard. There’s a table view controller embedded in a navigation controller and a single prototype cell of type SurfEntryTableViewCell.
  • JournalEntryViewController: This class handles creating and editing surf journal entries. You can see its UI in Main.storyboard.
  • JournalEntry: This class represents a surf journal entry. It’s an NSManagedObject subclass with six properties for attributes: date, height, location, period, rating and wind. If you’re curious about this class’s entity definition, check out SurfJournalModel.xcdatamodel.

image4

  • JournalEntry+Helper: This is an extension to the JournalEntry object. It includes the CSV export method csv() and the stringForDate() helper method. These methods are implemented in the extension to avoid being destroyed when you make changes to the Core Data model.

There was already a significant amount of data when you first launched the app, as this sample project comes with a seeded Core Data database.

The Core Data Stack

Open CoreDataStack.swift and find the following code in seedCoreDataContainerIfFirstLaunch():

// 1
let previouslyLaunched =
  UserDefaults.standard.bool(forKey: "previouslyLaunched")
if !previouslyLaunched {
  UserDefaults.standard.set(true, forKey: "previouslyLaunched")
 
  // Default directory where the CoreDataStack will store its files
  let directory = NSPersistentContainer.defaultDirectoryURL()
  let url =
    directory.appendingPathComponent(modelName + ".sqlite")
 
  // 2: Copying the SQLite file
  let seededDatabaseURL =
    Bundle.main.urlForResource(modelName,
      withExtension: "sqlite")!
  _ = try? FileManager.default.removeItem(at: url)
  do {
    try FileManager.default.copyItem(at: seededDatabaseURL,
                                     to: url)
  } catch let nserror as NSError {
    fatalError("Error: \(nserror.localizedDescription)")
  }

As you can see, this tutorial’s version of CoreDataStack.swift is a little different:

  1. You first check UserDefaults for the previouslyLaunched boolean value. If the current execution is indeed the app’s first launch, the Bool will be false, making the if statement true. On first launch, the first thing you do is set previouslyLaunched to true so the seeding operation never happens again.
  2. You then copy the SQLite seed file SurfJournalModel.sqlite, included with the app bundle, to the directory returned by the Core Data-provided method NSPersistentContainer.defaultDirectoryURL().

Now view the rest of seedCoreDataContainerIfFirstLaunch():

  // 3: Copying the SHM file
  let seededSHMURL = Bundle.main.urlForResource(modelName,
    withExtension: "sqlite-shm")!
  let shmURL = directory.appendingPathComponent(
    modelName + ".sqlite-shm")
  _ = try? FileManager.default.removeItem(at: shmURL)
  do {
    try FileManager.default.copyItem(at: seededSHMURL,
                                     to: shmURL)
  } catch let nserror as NSError {
    fatalError("Error: \(nserror.localizedDescription)")
  }
 
  // 4: Copying the WAL file
  let seededWALURL = Bundle.main.urlForResource(modelName,
    withExtension: "sqlite-wal")!
  let walURL = directory.appendingPathComponent(
    modelName + ".sqlite-wal")
  _ = try? FileManager.default.removeItem(at: walURL)
  do {
    try FileManager.default.copyItem(at: seededWALURL,
                                     to: walURL)
  } catch let nserror as NSError {
    fatalError("Error: \(nserror.localizedDescription)")
  }
 
  print("Seeded Core Data")
}
  1. Once the copy of SurfJournalModel.sqlite has succeeded, you then copy over the support file SurfJournalModel.sqlite-shm.
  2. Finally, you copy over the remaining support file SurfJournalModel.sqlite-wal.

The only reason SurfJournalModel.sqlite, SurfJournalModel.sqlite-shm or SurfJournalModel.sqlite-wal would fail to copy on first launch is if something really bad happened, such as disk corruption from cosmic radiation. In that case the device, including any apps, would likely also fail. If the files fail to copy, there’s no point in continuing, so the catch blocks call fatalError.

Note: Developers often frown upon using abort and fatalError, as it confuses users by causing the app to quit suddenly and without explanation. This is one scenario where fatalError is acceptable, since the app needs Core Data to work. If an app requires Core Data and Core Data isn’t working, there’s no point in letting the app continue on, only to fail sometime later in a non-deterministic way.

Calling fatalError, at the very least, generates a stack trace, which can be helpful when trying to fix the problem. If your app has support for remote logging or crash reporting, you should log any relevant information that might be helpful for debugging before calling fatalError.

To support concurrent reads and writes, the persistent SQLite store in this sample app uses SHM (shared memory file) and WAL (write-ahead logging) files. You don’t need to know how these extra files work, but you do need to be aware of their existence, and that you need to copy them over when seeding the database. If you fail to copy over these files, the app will work, but it might be missing data.

Now that you know something about beginning with a seeded database, you’ll start learning about multiple managed object contexts by working on a temporary private context.

Doing Work in the Background

If you haven’t done so already, tap the Export button at the top-left and then immediately try to scroll the list of surf session journal entries. Notice anything? The export operation takes several seconds, and it prevents the UI from responding to touch events such as scrolling.

The UI is blocked during the export operation because both the export operation and UI are using the main queue to perform their work. This is the default behavior.

The traditional way to fix this is to use Grand Central Dispatch to run the export operation on a background queue. However, Core Data managed object contexts are not thread-safe. That means you can’t just dispatch to a background queue and use the same Core Data stack.

The solution is simple: use a private background queue rather than the main queue for the export operation. This will keep the main queue free for the UI to use.

But before you jump in and fix the problem, you need to understand how the export operation works.

Exporting Data

Start by viewing how the app creates the CSV strings for the JournalEntry entity. Open JournalEntry+Helper.swift and find csv():

func csv() -> String {
  let coalescedHeight = height ?? ""
  let coalescedPeriod = period ?? ""
  let coalescedWind = wind ?? ""
  let coalescedLocation = location ?? ""
  let coalescedRating: String
  if let rating = rating?.int32Value {
    coalescedRating = String(rating)
  } else {
    coalescedRating = ""
  }
 
  return "\(stringForDate()),\(coalescedHeight),
    \(coalescedPeriod), \(coalescedWind),
    \(coalescedLocation),\(coalescedRating)\n"
}

As you can see, JournalEntry returns a comma-separated string of the entity’s attributes. Because the JournalEntry attributes are allowed to be nil, the function uses the nil coalescing operator (??) to export an empty string instead of an unhelpful debug message that the attribute is nil.

Note: The nil coalescing operator (??) unwraps an optional if it contains a value; otherwise it returns a default value. For example, the following: let coalescedHeight = height != nil ? height! : "" can be shortened using the nil coalescing operator to: let coalescedHeight = height ?? "".

That’s how the app creates the CSV strings for an individual journal entry, but how does the app save the CSV file to disk? Open JournalListViewController.swift and find the following code in exportCSVFile():

// 1
let context = coreDataStack.mainContext
var results: [JournalEntry] = []
do {
  results = try context.fetch(self.surfJournalFetchRequest())
} catch let error as NSError {
  print("ERROR: \(error.localizedDescription)")
}
 
// 2
let exportFilePath = NSTemporaryDirectory() + "export.csv"
let exportFileURL = URL(fileURLWithPath: exportFilePath)
FileManager.default.createFile(atPath: exportFilePath,
  contents: Data(), attributes: nil)

Going through the CSV export code step-by-step:

  1. First, retrieve all JournalEntry entities by executing a fetch request. The fetch request is the same one used by the fetched results controller. Therefore you reuse the surfJournalFetchRequest method to create the requst to avoid duplication.
  2. Next, create the URL for the exported CSV file by appending the file name (“export.csv”) to the output of the NSTemporaryDirectory method.

    The path returned by NSTemporaryDirectory is a unique directory for temporary file storage. This a good place for files that can easily be generated again and don’t need to be backed up by iTunes or to iCloud.

    After creating the export URL, call createFileAtPath(_:contents:attributes:) to create the empty file where you’ll store the exported data. If a file already exists at the specified file path, this method will remove it first.

Once the app has the empty file, it can write the CSV data to disk:

// 3
let fileHandle: FileHandle?
do {
  fileHandle = try FileHandle(forWritingTo: exportFileURL)
} catch let error as NSError {
  print("ERROR: \(error.localizedDescription)")
  fileHandle = nil
}
 
if let fileHandle = fileHandle {
  // 4
  for journalEntry in results {
    fileHandle.seekToEndOfFile()
    guard let csvData = journalEntry
      .csv()
      .data(using: .utf8, allowLossyConversion: false) else {
        continue
    }
 
    fileHandle.write(csvData)
  }
 
  // 5
  fileHandle.closeFile()
 
  print("Export Path: \(exportFilePath)")
  self.navigationItem.leftBarButtonItem =
    self.exportBarButtonItem()
  self.showExportFinishedAlertView(exportFilePath)
} else {
  self.navigationItem.leftBarButtonItem =
    self.exportBarButtonItem()
}

Here’s how the file-handling works:

  1. First, the app needs to create a file handler for writing, which is simply an object that handles the low-level disk operations necessary for writing data. To create a file handler for writing, use the FileHandle(forWritingTo:) initializer.
  1. Next, iterate over all JournalEntry entities. During each iteration, you attempt to create a UTF8-encoded string using csv() on JournalEntry and data(using:allowLossyConversion:) on String. If it’s successful, you write the UTF8 string to disk using the file handler write() method.
  2. Finally, close the export file-writing file handler, since it’s no longer needed.

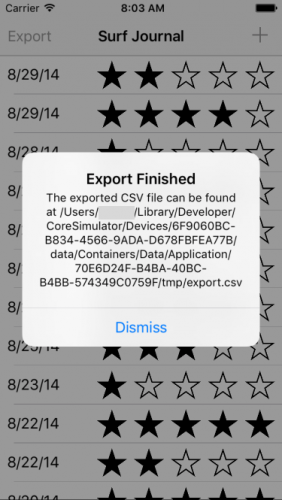
Once the app has written all the data to disk, it shows an alert dialog with the exported file path:

image5

Note: This alert view with the export path is fine for learning purposes, but for a real app, you’ll need to provide the user with a way to retrieve the exported CSV file, for example by using UIActivityViewController.

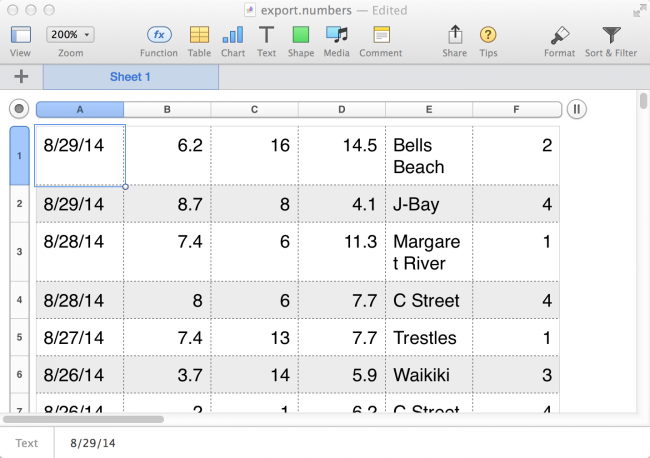
To open the exported CSV file, use Excel, Numbers or your favorite text editor to navigate to and open the file specified in the alert dialog. If you open the file in Numbers you will see the following:

image6

Now that you’ve seen how the app currently exports data, it’s time to make some improvements.

Exporting in the Background

You want the UI to continue working while the export is happening. To fix the UI problem, you’ll perform the export operation on a private background context instead of on the main context.

Open JournalListViewController.swift and find the following code in exportCSVFile():

// 1
let context = coreDataStack.mainContext
var results: [JournalEntry] = []
do {
  results = try context.fetch(self.surfJournalFetchRequest())
} catch let error as NSError {
  print("ERROR: \(error.localizedDescription)")
}

As you saw earlier, this code retrieves all of the journal entries by calling fetch() on the managed object context.

Next, replace the above code with the following:

// 1
coreDataStack.storeContainer.performBackgroundTask {
  (context) in
 
  var results: [JournalEntry] = []
  do {
    results = try context.fetch(self.surfJournalFetchRequest())
  } catch let error as NSError {
    print("ERROR: \(error.localizedDescription)")
  }

Instead of using the main managed object context also used by the UI, you’re now calling performBackgroundTask(_:) method. This creates and executes the code block on that private context.

The private context created by performBackgroundTask(_:) is on a private queue, which doesn’t block the main UI queue. You could also manually create a new temporary private context with a concurrency type of PrivateQueueConcurrencyType instead of using performBackgroundTask(_:).

Note: There are three concurrency types a managed object context can use:

ConfinementConcurrencyType specifies that the context will use the thread confinement pattern and that the developer will be responsible for managing all thread access. You should consider this type deprecated and never use it, as the next two types cover all use cases.

PrivateQueueConcurrencyType specifies the context will be associated with a private dispatch queue instead of the main queue. This is the type of queue you just used to move the export operation off of the main queue so it would no longer interfere with the UI.

MainQueueConcurrencyType, the default type, specifies that the context will be associated with the main queue. This type is what the main context (coreDataStack.mainContext) uses. Any UI operation, such as creating the fetched results controller for the table view, must use a context of this type.

Next, find the following code in the same method:

  print("Export Path: \(exportFilePath)")
  self.navigationItem.leftBarButtonItem =
    self.exportBarButtonItem()
  self.showExportFinishedAlertView(exportFilePath)
} else {
  self.navigationItem.leftBarButtonItem =
    self.exportBarButtonItem()
}

Replace the code with the following:

    print("Export Path: \(exportFilePath)")
    // 6
    DispatchQueue.main.async {
      self.navigationItem.leftBarButtonItem =
        self.exportBarButtonItem()
      self.showExportFinishedAlertView(exportFilePath)
    }
  } else {
    DispatchQueue.main.async {
      self.navigationItem.leftBarButtonItem =
        self.exportBarButtonItem()
    }
  }
} // 7 Closing brace for performBackgroundTask

To finish off the task:

  1. You should always perform all operations related to the UI on the main queue, such as showing an alert view when the export operation is finished; otherwise, unpredictable things might happen. Use DispatchQueue.main.async to show the final alert view message on the main queue.
  2. Finally, add a closing curly brace to close the block you opened earlier in step 1 via the performBackgroundTask(_:) call.

Now that you’ve moved the export operation to a new context with a private queue, build and run to see if it works!

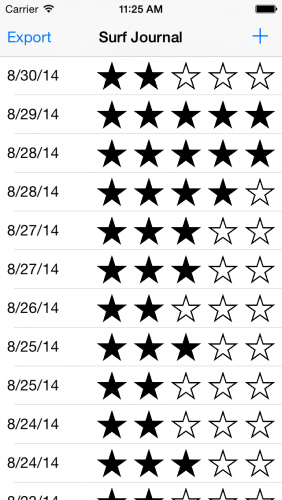
You should see exactly what you saw before:

image1

Tap the Export button in the top left, and immediately try to scroll the list of surf session journal entries. Notice anything different this time? The export operation still takes several seconds to complete, but the table view continues to scroll during this time. The export operation is no longer blocking the UI.

Cowabunga, dude! Gnarly job making the UI more responsive.

You’ve just witnessed how doing work on a private background queue can improve a user’s experience with your app. Now you’ll expand on the use of multiple contexts by examining a child context.

Editing on a Scratchpad

Right now, SurfJournal uses the main context (coreDataStack.mainContext) when creating a new journal entry or or viewing an existing one. There’s nothing wrong with this approach; the starter project works as-is.

For journaling-style apps like this one, you can simplify the app architecture by thinking of edits or new entries as a set of changes, like a scratch pad. As the user edits the journal entry, you update the attributes of the managed object. Once the changes are complete, you either save them or throw them away, depending on what the user wants to do.

You can think of child managed object contexts as temporary scratch pads that you can either discard completely, or save and send the changes to the parent context.

But what is a child context, technically?

All managed object contexts have a parent store from which you can retrieve and change data in the form of managed objects, such as the JournalEntry objects in this project. Typically, the parent store is a persistent store coordinator, which is the case for the main context provided by the CoreDataStack class. Alternatively, you can set the parent store for a given context to another managed object context, making it a child context.

image7

When you save a child context, the changes only go to the parent context. Changes to the parent context won’t be sent to the persistent store coordinator until the parent context is saved.

Before you jump in and add a child context, you need to understand how the current viewing and editing operation works.

Viewing and Editing

The first part of the operation requires segueing from the main list view to the journal detail view. Open JournalListViewController.swift and find prepareForSegue(for:sender:):

// 1
if segue.identifier == "SegueListToDetail" {
 
  // 2
  guard let navigationController =
    segue.destination as? UINavigationController,
    let detailViewController =
      navigationController.topViewController
        as? JournalEntryViewController,
    let indexPath = tableView.indexPathForSelectedRow else {
      fatalError("Application storyboard mis-configuration")
  }
 
  // 3
  let surfJournalEntry =
    fetchedResultsController.object(at: indexPath)
 
  //4
  detailViewController.journalEntry = surfJournalEntry
  detailViewController.context =
    surfJournalEntry.managedObjectContext
  detailViewController.delegate = self

Taking the segue code step-by-step:

  1. There are two segues: SegueListToDetail and SegueListToDetailAdd. The first, shown in the previous code block, runs when the user taps on a row in the table view to view or edit a previous journal entry.
  2. Next, you get a reference to the JournalEntryViewController that the user is going to end up seeing. It’s presented inside a navigation controller so there’s some unpacking to do. This code also verifies there’s a selected index path in the table view.
  3. Then you get the JournalEntry selected by the user, using the fetched results controller’s object(at:) method.
  4. Finally, you set all required variables on the JournalEntryViewController instance. The surfJournalEntry variable corresponds to the JournalEntry entity resolved in step 3. The context variable is the managed object context to be used for any operation; for now, it just uses the main context. The JournalListViewController sets itself as the delegate of the JournalEntryViewController so it can be informed when the user has completed the edit operation.

SegueListToDetailAdd is similar to SegueListToDetail, except the app creates a new JournalEntry entity instead of retrieving an existing one. The app executes SegueListToDetailAdd when the user taps the plus (+) button on the top-right to create a new journal entry.

Now you know how both segues work, switch to JournalEntryViewController.swift and look at the JournalEntryDelegate protocol at the top of the file:

protocol JournalEntryDelegate {
  func didFinish(viewController: JournalEntryViewController,
    didSave: Bool)
}

As you can see, the JournalEntryDelegate protocol is very short and consists of only one method: didFinish(viewController:didSave:). This method, which the protocol requires the delegate to implement, indicates if the user is done editing or viewing a journal entry and whether any changes should be saved.

To understand how didFinish(viewController:didSave:) works, switch back to JournalListViewController.swift and find that method:

func didFinish(viewController: JournalEntryViewController,
                      didSave: Bool) {
 
  // 1
  guard didSave,
    let context = viewController.context,
    context.hasChanges else {
      dismiss(animated: true)
      return
  }
 
  // 2
  context.perform {
    do {
      try context.save()
    } catch let error as NSError {
      fatalError("Error: \(error.localizedDescription)")
    }
 
    // 3
    self.coreDataStack.saveContext()
  }
 
  // 4
  dismiss(animated: true)
}

Taking each numbered comment in turn:

  1. First, use a guard statement to check the didSave parameter. This will be true if the user taps the Save button instead of the Cancel button, so the app should save the user’s data. The guard statement also uses the hasChanges property to check if anything’s changed; if nothing has changed, there’s no need to waste time doing more work.
  2. Next, save the JournalEntryViewController context inside of a perform(_:) closure. The code sets this context to the main context; in this case it’s a bit redundant since there’s only one context, but this doesn’t change the behavior. Once you add a child context to the workflow later on, the JournalEntryViewController context will be different from the main context, making this code necessary. If the save fails, call fatalError to abort the app with the relevant error information.
  3. Next, save the main context via saveContext, defined in CoreDataStack.swift, persisting any edits to disk.
  4. Finally, dismiss the JournalEntryViewController.
Note: If a managed object context is of type MainQueueConcurrencyType, you don’t have to wrap code in perform(_:), but it doesn’t hurt to use it.
If you don’t know what type the context will be, as is the case in didFinish(viewController:didSave:), it’s safest to use perform(_:) so it will work with both parent and child contexts.

There’s a problem with the above implementation — have you spotted it?

When the app adds a new journal entry, it creates a new object and adds it to the managed object context. If the user taps the Cancel button, the app won’t save the context, but the new object will still be present. If the user then adds and saves another entry, the canceled object will still be present! You won’t see it in the UI unless you’ve got the patience to scroll all the way to the end, but it will show up at the bottom of the CSV export.

You could solve this problem by deleting the object when the user cancels the view controller. But what if the changes were complex, involved multiple objects, or required you to alter properties of an object as part of the editing workflow? Using a child context will help you manage these complex situations with ease.

Using Child Contexts for Sets of Edits

Now that you know how the app currently edits and creates JournalEntry entities, you’ll modify the implementation to use a child managed object context as a temporary scratch pad.

It’s easy to do — you simply need to modify the segues. Open JournalListViewController.swift and find the following code for SegueListToDetail in prepareForSegue(for:sender:):

detailViewController.journalEntry = surfJournalEntry
detailViewController.context =
  surfJournalEntry.managedObjectContext
detailViewController.delegate = self

Next, replace that code with the following:

// 1
let childContext =
  NSManagedObjectContext(
    concurrencyType: .mainQueueConcurrencyType)
childContext.parent = coreDataStack.mainContext
 
// 2
let childEntry =
  childContext.object(with: surfJournalEntry.objectID)
    as? JournalEntry
 
// 3
detailViewController.journalEntry = childEntry
detailViewController.context = childContext
detailViewController.delegate = self

Here’s the play-by-play:

  1. First, you create a new managed object context named childContext with a MainQueueConcurrencyType. Here you set a parent context instead of a persistent store coordinator as you would normally do when creating a managed object context. Here, you set parent to mainContext of your CoreDataStack.
  2. Next, you retrieve the relevant journal entry using the child context’s object(with:) method. You must use object(with:) to retrieve the journal entry because managed objects are specific to the context that created them. However, objectID values are not specific to a single context, so you can use them when you need to access objects in multiple contexts.
  3. Finally, you set all required variables on the JournalEntryViewController instance. This time, you use childEntry and childContext instead of the original surfJournalEntry and surfJournalEntry.managedObjectContext.
Note: You might be wondering why you need to pass both the managed object and the managed object context to the detailViewController, since managed objects already have a context variable. This is because managed objects only have a weak reference to the context. If you don’t pass the context, ARC will remove the context from memory (since nothing else is retaining it) and the app will not behave as you expect.

Build and run your app; it should work exactly as before. In this case, no visible changes to the app are a good thing; the user can still tap on a row to view and edit a surf session journal entry.

image2

By using a child context as a container for the journal edits, you’ve reduced the complexity of your app’s architecture. With the edits on a separate context, canceling or saving managed object changes is trivial.

Nice work, dude! You’re no longer a kook when it comes to multiple managed object contexts. Bodacious!

Where to Go From Here?

You can download the finished project from this tutorial here.

If you followed this tutorial all the way through, you’ve turned an app with a single managed object context into an app with multiple contexts. You can find the final project from this tutorial here.

You improved UI responsiveness by performing the export operation on a private background managed object context, and you improved the app’s architecture by creating a child context and using it like a scratch pad.

But best of all, you learned how to talk like a surfer. That’s a good day’s work! :]

CD@2xIf you enjoyed this tutorial, you’d definitely enjoy our book Core Data by Tutorials.

The book goes into further detail on Core Data and is written for intermediate iOS developers who already know the basics of iOS and Swift development but want to learn how to leverage Core Data to persist data in their apps.

It’s been fully updated for Swift 3, iOS 10 and Xcode 8 — get it on the raywenderlich.com store today!

The post Multiple Managed Object Contexts with Core Data Tutorial appeared first on Ray Wenderlich.

2D Apple Games by Tutorials Updated for Swift 3 and iOS 10

$
0
0

igt1-update-featureHappy Monday – it’s another iOS 10 Feast book release!

Three years ago, we wrote a book named iOS Games by Tutorials, covering how to make 2D games with SpriteKit. One year later, we released a second edition fully ported to Swift, as a free update for existing customers. One year after that, we completely revamped it, renamed it and released it as 2D iOS & tvOS Games by Tutorials. This year, we’re doing it again with 2D Apple Games by Tutorials.

At WWDC 2016, Apple announced a lot of cool new features to both SpriteKit and Xcode, including built-in tile map support and the ability to run SpriteKit on watchOS.

These changes were so significant that we decided it would be better to completely revamp the book (again!) — we even included new games!

This will be a free update for existing 2D iOS & tvOS Games by Tutorials customers — our way to say “thanks” to our readers for their support.

Don’t own 2D Apple Games by Tutorials yet? Read on to see how you can get a copy!

What is 2D Apple Games by Tutorials?

The trailer below gives you a good, fast overview of what the book’s about:

There are two ways to use this book, depending on whether you are a complete beginner to Apple game development or an advanced developer with knowledge of other 2D game frameworks.

If you’re a complete beginner to Apple game development, the best way to read this book is from cover to cover. We have arranged the chapters to introduce the material in the most logical manner to build up your skills one layer at a time.

If you’re an advanced developer with knowledge of other 2D game frameworks, you’ll have an easier time adapting to SpriteKit, as the core concepts and syntax will look very familiar.

Our suggestion is to skim through the early chapters and focus more on the later, more advanced chapters, or where you have a particular interest.

Don’t worry — you can jump right into any chapter in the book, because we’ll always have a starter project waiting for you!

Here’s what’s new in 2D Apple Games by Tutorials:

  • Zombie Conga: Chapters 1-6 are mostly the same, with some minor updates to support Swift 3 and iOS 10. We also removed the chapter showing how to port the game to tvOS; that’s because we added a brand new section, “Section V: Other Platforms”, which covers this topic — and more — in greater detail.
  • Cat Nap: These chapters also remain the same, with some minor updates to support Swift 3 and iOS 10. Just like we did with Zombie Conga, we removed the chapter showing how to port the game to tvOS.
  • Pest Control: First introduced in iOS Games by Tutorials, this new and improved version shows you how to use the new tile maps features in SpriteKit (Chapters 12-13), as well as how to save and load game data (Chapter 14).
  • Drop Charge: In these chapters, you’ll review previous material in the book and learn about simple state machines, particle systems and juice, all updated for Swift 3 and iOS 10. Because Apple released so many new features for GameplayKit this year, we decided it would be too much to properly cover in this book. As such, the chapters dealing with GameplayKit have been removed, and will be covered elsewhere, at a later date.
  • Zombie Piranhas: These new chapters introduce you to a new game specifically designed to teach you how to work with other Apple platforms like macOS, tvOS and watchOS (Chapters 18-20).

2D Apple Games by Tutorials is 29 chapters and 671 pages – yeah, it’s pretty huge. :]

The book is split into six sections, moving from beginning to advanced topics. In each section, you will create a complete mini-game, from scratch! The book also includes a bonus chapter at the end that we think you’ll enjoy.

Here’s a quick look at what’s inside 2D Apple Games by Tutorials.

Section I: Getting Started

This section covers the basics of making 2D games with Sprite Kit. These are the most important techniques, the ones you’ll use in almost every game you make. By the time you reach the end of this section, you’ll be ready to make your own simple game.

Zombie Conga

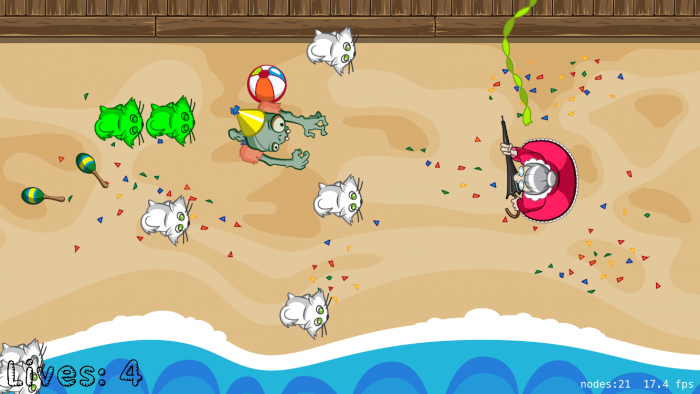
Throughout this section you will create an action game called Zombie Conga, where you take the role of a happy-go-lucky zombie who just wants to party!

You will build this game across seven chapters, in stages:

  • Chapter 1, Sprites: Get started by adding your first sprites to the game: the background and the zombie.
  • Chapter 2, Manual Movement: You’ll make the zombie follow your touches around the screen and get a crash-course in basic 2D vector math.
  • Chapter 3, Actions: You’ll add cats and crazy cat ladies to the game, as well as basic collision detection and gameplay.
  • Chapter 4, Scenes: You’ll add a main menu to the game, as well as win and lose scenes.
  • Chapter 5, Camera: You’ll make the game scroll from left to right, and finally, add the conga line itself.
  • Chapter 6, Labels: You’ll add a label to show the zombie’s lives and the number of cats in his conga line.
  • Chapter 7, Scene Editor: You’ll begin by creating the first level of the game. By the end, you’ll have a better understanding of Xcode’s level designer, better known as the scene editor.

Section II: Physics and Nodes

In this section, you will learn how to use the built-in 2D physics engine included with Sprite Kit to create movement as realistic as that in Angry Birds or Cut the Rope. You will also learn how to use special types of nodes that allow you to play videos or create shapes in your game.

Cat Nap

In the process, you will create a physics puzzle game called Cat Nap, where you take the role of a cat who has had a long day and just wants to go to bed.

You will build this game across five chapters, in stages:

  • Chapter 8, Beginning Physics: In this chapter, you’re going to make a little detour in order to learn the basics of creating physics simulations for your games. As a bonus, you’ll learn how to prototype games inside an Xcode playground.
  • Chapter 9, Intermediate Physics: You’ll learn about physics-based collision detection and create custom classes for your Sprite Kit nodes.
  • Chapter 10, Advanced Physics: You’ll add two more levels to the game as you learn about interactive bodies, joints between bodies, composed bodies and more.
  • Chapter 11, Crop, Video and Shape Nodes: You’ll add special new blocks to Cat Nap while learning about additional types of nodes that allow you to do amazing things—like play videos, crop images and create dynamic shapes.

Section III: Tile Maps

In this section, you’ll revisit the game “Pest Control”, first introduced in iOS Games by Tutorials. This new and improved version uses the new tile maps features in SpriteKit and covers saving and loading game data.

sim-tree-stump

  • Chapter 12, Beginning Tile Maps: You’ll learn the basics about tile maps in SpriteKit by creating a tile set and a background tile map.
  • Chapter 13, Intermediate Tile Maps: You’ll take things a step further by learning how to access tile maps in code and how to create a tile map with randomly placed tiles.
  • Chapter 14, Saving and Loading Games: You’ll finish up by adding a winning end state and a heads-up display. You’ll also learn how to automatically save the game when you leave it and then reload it from where you left off.

Section IV: Juice

In this section, you’ll also learn how to take a good game and make it great by adding a ton of special effects and excitement – a.k.a. “juice.”

Drop Charge

In the process, you will create a game called Drop Charge, where you’re a space hero with a mission to blow up an alien space ship – and escape with your life before it explodes. To do this, you must jump from platform to platform, collecting special boosts along the way. Just be careful not to fall into the red hot lava!

You will build this game across four chapters, in stages:

  • Chapter 15, Making Drop Charge: You’ll put together the basic gameplay using the scene editor and code, flexing the Sprite Kit muscles you’ve developed working through previous chapters.
  • Chapter 15, State Machines: You’ll learn what state machines are and how to use them.
  • Chapter 16, Particle Systems: You’ll learn how to use particle systems to create amazing special effects.
  • Chapter 17, Juice Up Your Game: You’ll trick out your game with music, sound, animation, more particles and other special effects, experiencing for yourself the benefits of mastering the details.

Section V: Other Platforms

In this section, you’ll learn how to leverage your iOS knowledge to build games for the other Apple Platforms: macOS, tvOS and watchOS.

007_tvOS_run

In the process, you’ll create a game named Zombie Piranhas. In this game, your goal is to catch as many fish as possible without hooking a zombie — because we all know what happens when zombies are around.

  • Chapter 18, macOS Games: You’ll take a complete iOS game and add a target for macOS. Along the way, you’ll learn some of the differences between the platforms, such as windows and mouse and keyboard events.
  • Chapter 19, tvOS Games: Building from Chapter 18, you’ll add another target for tvOS. You’ll learn concepts such as Focus and parallax icons, Top Shelf and working with the Apple TV Remote.
  • Chapter 20, watchOS Games: Lastly, you’ll add a target for watchOS, and you’ll learn about gestures, the Digital Crown and Haptic Feedback. You’ll also discover some of the design considerations when working with a small device.

Section VI: Advanced Topics

In this section, you’ll learn how to Game Center leaderboards and achievements into your game and use the ReplayKit API to share your gaming victories with the world.

In the process, you will integrate these APIs into a top-down racing game called Circuit Racer, where you take the role of an elite racecar driver out to set a world record. It would be no problem if it weren’t for the debris on the track!

Circuit Racer

  • Chapter 21, Game Center Achievements: Enable Game Center for your game and award the user achievements for accomplishing certain feats.
  • Chapter 22, Game Center Leaderboards: Set up various leaderboards for your game and track and report the player’s scores.
  • Chapter 23, ReplayKit: You’ll learn how to allow players to record and share videos of their games with ReplayKit.

Section VI: Bonus Graphics Chapter

We have also included a bonus chapter about making your own game art.

ai-v06-complex03

  • Chapter 24, Making Art for Programmers: If you liked the art in these mini-games and want to learn how to either hire an artist or make some art of your own, look no further than this chapter! This chapter guides you through drawing a cute cat in the style of this book with Illustrator.

About the Authors

Of course, our book would be nothing without our team of experienced and dedicated authors:

Caroline-BegbieCaroline Begbie is living the dream as an indie iOS developer, educator and explorer. She loves the graphics and animation side of iOS and watches Disney movies “for research.”

Mike-BergMike Berg is a full time game artist who is fortunate enough to work with many different indie game developers from all over the world. When he’s not manipulating pixel colors, he loves to eat good food, spend time with his family, play games and be happy.

Michael-BriscoeMichael Briscoe is an independent software developer with over 30 years of programming experience. Learning BASIC on a Commodore 64 way back in 1984, he’s been hooked on coding ever since. He enjoys creating simulations and games for all Apple platforms. You can visit his website at skyrocketsoftware.wordpress.com.

Ali-HafizjiKauserali Hafizji (a.k.a. Ali) is a freelance software developer. He is fortunate to have worked on several large projects. He loves creating software that people use everyday whether it’s on the web, watch, phone or tv. A good read, cool dip in the pool and a hot cheesy meal would be the perfect end to his weekend. You can find out more about Ali on his website at alihafizji.com.

Marin-TodorovMarin Todorov is a part of Realm and raywenderlich.com. He’s also the author of books and apps. You can find out more at www.underplot.com.

Ray-WenderlichRay Wenderlich is part of a great team — the raywenderlich.com team, a group of over 100 developers and editors from across the world. He and the rest of the team are passionate both about making apps and teaching others the techniques to make them. When Ray’s not programming, he’s probably playing video games, role playing games, or board games.

Where To Go From Here?

2D Apple Games by Tutorials is now 100% complete, fully updated for Swift 3, iOS 10 and Xcode 8 — and available today.

  • If you’ve already bought 2D Apple Games by Tutorials, you can download the new book immediately on your My Loot page.
  • If you don’t have 2D Apple Games by Tutorials yet, you can grab your own copy in our store.

You can get 10% off on this book — or anything else in our store — with the code IOS10FEAST.

Speaking of which, be sure to check out everything we’re offering this year in the iOS 10 Feast, including $40,000 in giveaways!

To enter, simply retweet this post with the #ios10feast hashtag using the button below:


We hope you enjoy this free update, and stay tuned for more book releases and updates coming soon!

The post 2D Apple Games by Tutorials Updated for Swift 3 and iOS 10 appeared first on Ray Wenderlich.
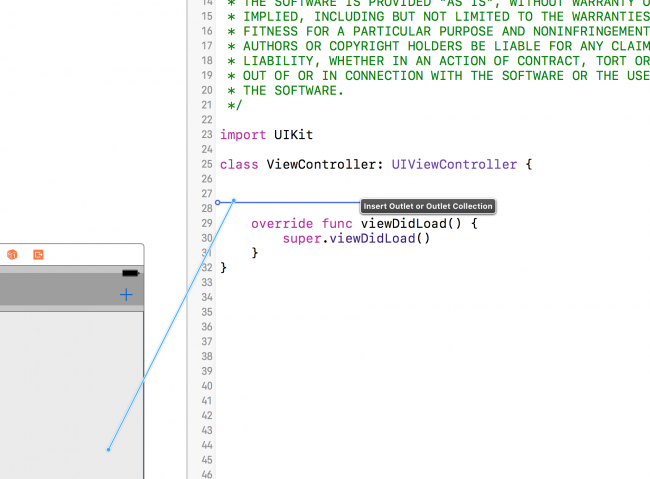
UIPresentationController Tutorial: Getting Started

$
0
0
Learn how to build custom presentations with UIPresentationController.

Learn how to build custom presentations with UIPresentationController.

View controller presentation has been an integral part of every iOS developer’s toolkit since the early days of iOS. You’ve probably used present(_:animated:completion:) before, but if you’re like a lot of developers, you’ve stayed with the default transition styles shipped with iOS. In this UIPresentationController tutorial you’ll learn how to present view controllers with custom transitions and custom presentation styles. No longer will you be limited to full-screen or popover presentations and the standard transition animations. You’ll start with some drab, lifeless view controller presentations and you’ll bring them to life. By the time you finish, you’ll learn:

  1. How to create a UIPresentationController subclass.
  2. How to use a UIPresentationController for slick custom presentations; the presented view controller doesn’t even have to know it’s there.
  3. How to reuse a UIPresentationController for various controllers where you’ve tweaked presentation parameters.
  4. How to make adaptive presentations that support any screen size your app might encounter.

Prequisites: This tutorial requires Xcode 8.0 or newer in order to be compatible with the latest Swift syntax.

This iOS tutorial also assumes you are familiar with Swift and the iOS SDK. If you’re new to these, try starting out with our written iOS tutorials and Swift tutorials. Make sure you catch some of the video tutorials too!

Getting Started

The scenario: With the 2016 summer games all done, a client hires you to create an app that tallies the medal count for international sporting events where athletes and nations earn various medals.

While the functional requirements are pretty simple, your sponsor asked for a rather cool looking slide-in transition to present the list of games.

At first, you feel a bit of panic but then realize you do have transition-building tools at your fingertips. You even put down the paper bag!

Download the starter project and open it.

Take a moment to familiarize your with the project and the following elements:

  • MainViewController.swift: the main controller of this project from which all presentations start. This will be the only existing file in the project that you’ll modify.
  • GamesTableViewController.swift: displays a list of Games the user can select.
  • MedalCountViewController.swift: displays the medal count for the selected sporting event.
  • GamesDataStore.swift: represents the model layer in the project. It’s responsible for creating and storing model objects.

Before you start changing things around, build and run the app to see what it does. You’ll see the following screen:

medal_count_01

First, tap the Summer button to bring up the GamesTableViewController summer menu.

medal_gif_01

Notice the menu is presented the default way, which is from the bottom; the client wants to see a sleek slide-in instead.

Next, select the London 2012 games to dismiss the menu and return to the main screen. This time, you’ll see an updated logo.

medal_count_02

Finally, tap the Medal Count button to bring up the MedalCountViewController for the 2012 games.

medal_count_03

As you see, the old bottom-up default is used to present this controller too. Tap the screen to dismiss it.

Now that you’ve seen the app you’ll upgrade, it’s time to turn your attention to some core concepts and theory for UIPresentationController.

Core Concepts for iOS Transition

When you call present(_:animated:completion:), iOS does two things.

First, it instantiates a UIPresentationController. Second, it attaches the presented view controller to itself then presents it using one of the built-in modal presentation styles.

You have the power to override this mechanism and provide your own UIPresentationController subclass for a custom presentation.

Understanding these key components is mandatory if you want to build sweet presentations in your apps:

  1. The presented view controller has a transitioning delegate that’s responsible for loading the UIPresentationController and the presentation/dismissal animation controllers. That delegate is an object that conforms to UIViewControllerTransitioningDelegate.
  2. The UIPresentationController subclass is an object that has many presentation-customizing methods, as you’ll see later in the tutorial.
  3. The animation controller object is responsible for the presentation and dismissal animations. It conforms to UIViewControllerAnimatedTransitioning. Note that some use cases warrant two controllers: one for presentation and one for dismissal.
  4. A presentation controller’s delegate tells the presentation controller what to do when its trait collection changes. For the sake of adaptivity, the delegate must be an object that conforms to UIAdaptivePresentationControllerDelegate.

That’s all you need to know before you dive in!

Creating the Transitioning Delegate

A transitioningDelegate object inherits from NSObject and conforms to UIViewControllerTransitioningDelegate.

UIViewControllerTransitioningDelegate protocol, as its name hints, declares five optional methods for managing transitions.

You’ll work with these three methods quite a bit in this tutorial.

Set up the Framework

Go to File\New\File…, choose iOS\Source\Cocoa Touch Class, and click Next. Set the name to SlideInPresentationManager, make it a subclass of NSObject and set the language to Swift.

Click Next and set the group to Presentation then click Create.

Note: You declare SlideInPresentationManager to be an NSObject subclass because UIViewController‘s transitioningDelegate must conform to the NSObjectProtocol.

Open SlideInPresentationManager and add the following extension:

// MARK: - UIViewControllerTransitioningDelegate
extension SlideInPresentationManager: UIViewControllerTransitioningDelegate {
}

Here you make SlideInPresentationManager conform to the UIViewControllerTransitioningDelegate protocol.

In MainViewController you have buttons for both seasons: Summer on the left and Winter on the right. There’s also a Medal Count button on the bottom.

To make the presentations fit each button’s context, you’ll add a direction property to SlideInPresentationManager. Later, you’ll pass this property to the presentation and animation controllers.

Add the following to the top of SlideInPresentationManager.swift:

enum PresentationDirection {
  case left
  case top
  case right
  case bottom
}

Here you declare a simple enum to represent the presentation’s direction.

Next, add the following property to SlideInPresentationManager:

var direction = PresentationDirection.left

Here you’re adding a direction property and giving it a default value of left.

Now to assign an instance of SlideInPresentationManager as the transitioningDelegate property for every controller you present.

Open MainViewController.swift and add the following above the dataStore property definition:

lazy var slideInTransitioningDelegate = SlideInPresentationManager()

You might ask yourself why you’re adding this as a property on MainViewController. There are two reasons:

  1. transitioningDelegate is a weak property, so you must keep a strong reference to the delegate somewhere.
  2. However, you don’t to keep this reference on the presented controller itself because you might want to re-use it on different presentation styles.
    1. Adding it to MainViewController keeps the strong reference on the presenting controller.
    2. Deciding the type of presentation to use is now the presenting controller’s task.

Next, locate prepare(for:sender:), and replace it with the following:

override func prepare(for segue: UIStoryboardSegue, sender: Any?) {
  if let controller = segue.destination as? GamesTableViewController {
    if segue.identifier == "SummerSegue" {
      controller.gamesArray = dataStore.summer
 
      //1
      slideInTransitioningDelegate.direction = .left
 
    } else if segue.identifier == "WinterSegue" {
      controller.gamesArray = dataStore.winter
 
      //2
      slideInTransitioningDelegate.direction = .right
    }
    controller.delegate = self
 
    //3
    controller.transitioningDelegate = slideInTransitioningDelegate
 
    //4
    controller.modalPresentationStyle = .custom
 
  } else if let controller = segue.destination as? MedalCountViewController {
    controller.medalCount = presentedGames?.medalCount
 
    //5
    slideInTransitioningDelegate.direction = .bottom
    controller.transitioningDelegate = slideInTransitioningDelegate
    controller.modalPresentationStyle = .custom
  }
}

Here’s a section-by-section explanation of what you’ve set up:

  1. Presentation direction of the summer games menu is .left.
  2. Presentation direction of the winter games menu is .right.
  3. The games controller’s transitioningDelegate is now the slideInTransitioningDelegate declared earlier.
  4. The modalPresentationStyle is .custom to make the presented controller expect a custom presentation instead of an iOS default presentation.
  5. Presentation direction of the MedalCountViewController is now .bottom and the transitioningDelegate and modalPresentationStyle are set as you did in Steps 3 and 4.

You’ve reached the end of the section and have set yourself up with the groundwork necessary for the next big thing coming at you: the UIPresentationController subclass.

Creating the UIPresentationController

Sit back and picture this for a moment: the presented controller will take up two-thirds of the screen and remaining third will show as dimmed. To dismiss the controller, you just tap on the dimmed portion. Can you picture it?

Okay, clear your head and come back to the project. In this part, you’ll take care of three critical pieces: subclass, dimming view and customizing the transition.

Creating and Initializing a UIPresentationController Subclass

Go to File\New\File…, choose iOS\Source\Cocoa Touch Class, and click Next. Set the name to SlideInPresentationController, make it a subclass of UIPresentationController and set the language to Swift.

Click Next and set the Group to Presentation.

Click Create to make your new file and add the following code to SlideInPresentationController.swift:

//1
// MARK: - Properties
private var direction: PresentationDirection
 
//2  
init(presentedViewController: UIViewController,
     presenting presentingViewController: UIViewController?,
     direction: PresentationDirection) {
  self.direction = direction
 
  //3
  super.init(presentedViewController: presentedViewController,
             presenting: presentingViewController)
}

Here’s what this does:

  1. Declares a direction property to represent the direction of the presentation.
  2. Declares an initializer that accepts the presented and presenting view controllers, as well as the presentation direction.
  3. Calls the designated initializer for UIPresentationController, and then passes it to the presented and presenting view controllers.

Setting up the Dimming View

As mentioned previously, the presentation controller will have a dimmed background. Add the following to SlideInPresentationController, just above the direction property:

fileprivate var dimmingView: UIView!

Next, add the following extension:

// MARK: - Private
private extension SlideInPresentationController {
  func setupDimmingView() {
    dimmingView = UIView()
    dimmingView.translatesAutoresizingMaskIntoConstraints = false
    dimmingView.backgroundColor = UIColor(white: 0.0, alpha: 0.5)
    dimmingView.alpha = 0.0
  }
}

Here you create the dimming view, prepare it for Auto Layout, and set its background color. Notice you don’t add it to a superview yet. You’ll do that when the presentation transition starts, as you’ll see later in this section.

That presented controller needs to make itself scarce when you tap the dimmed view. Add the following beneath setupDimmingView() to make that happen:

dynamic func handleTap(recognizer: UITapGestureRecognizer) {
  presentingViewController.dismiss(animated: true)
}

Here you create a UITapGestureRecognizer handler that dismisses the controller.

Of course, you’ll need to write that UITapGestureRecognizer, so add the following to the bottom of setupDimmingView():

let recognizer = UITapGestureRecognizer(target: self, action: #selector(handleTap(recognizer:)))
dimmingView.addGestureRecognizer(recognizer)

This adds a tap gesture to the dimming view and links it to the action method you just added.
Finally, add a call to setupDimmingView() at the end of init(presentedViewController:presenting:direction:):

setupDimmingView()

Override Presentation Controller Methods

Before you can start customizing the transition, you have to override four methods and a property from UIPresentationController. The default methods don’t do anything, so there’s no need to call super.

First, for a smooth transition, override presentationTransitionWillBegin() to make the dimming view fade in along with the presentation. Add the following code to the main class definition inside of SlideInPresentationController.swift:

override func presentationTransitionWillBegin() {
 
  // 1
  containerView?.insertSubview(dimmingView, at: 0)
 
  // 2
  NSLayoutConstraint.activate(
    NSLayoutConstraint.constraints(withVisualFormat: "V:|[dimmingView]|",
      options: [], metrics: nil, views: ["dimmingView": dimmingView]))
  NSLayoutConstraint.activate(
    NSLayoutConstraint.constraints(withVisualFormat: "H:|[dimmingView]|",
      options: [], metrics: nil, views: ["dimmingView": dimmingView]))
 
  //3
  guard let coordinator = presentedViewController.transitionCoordinator else {
    dimmingView.alpha = 1.0
    return
  }
 
  coordinator.animate(alongsideTransition: { _ in
    self.dimmingView.alpha = 1.0
  })
}

Let’s go over this code:

  1. UIPresentationController has a property named containerView. It holds the view hierarchy of the presentation and presented controllers. This section is where you insert the dimmingView into the back of the view hierarchy.
  2. Next, you constrain the dimming view to the edges of the container view so that it fills the entire screen.
  3. UIPresentationController‘s transitionCoordinator has a very cool method to animate things during the transition. In this section, you set the dimming view’s alpha property to 1.0 along the presentation transition.

Now you’ll hide the dimming view when the presented controller is dismissed, which requires an override of dismissalTransitionWillBegin(). Add this code after the previous overridden method:

override func dismissalTransitionWillBegin() {
  guard let coordinator = presentedViewController.transitionCoordinator else {
    dimmingView.alpha = 0.0
    return
  }
 
  coordinator.animate(alongsideTransition: { _ in
    self.dimmingView.alpha = 0.0
  })
}

Similar to presentationTransitionWillBegin(), you set the dimming view’s alpha property to 0.0 alongside the dismissal transition, which has the effect of fading the dimming view.

This next override will respond to layout changes in the presentation controller’s containerView. Add this code after the previous overridden method:

override func containerViewWillLayoutSubviews() {
  presentedView?.frame = frameOfPresentedViewInContainerView
}

Here you reset the presented view’s frame to fit any changes to the containerView frame.

Next, you’ll give the size of the presented view controller’s content to the presentation controller. Add this code after the previous overridden method:

override func size(forChildContentContainer container: UIContentContainer,
                   withParentContainerSize parentSize: CGSize) -> CGSize {
  switch direction {
  case .left, .right:
    return CGSize(width: parentSize.width*(2.0/3.0), height: parentSize.height)
  case .bottom, .top:
    return CGSize(width: parentSize.width, height: parentSize.height*(2.0/3.0))
  }
}

This method receives the content container and parent view’s size, and then it calculates the size for the presented content. In this code, you restrict the presented view to 2/3 of the screen by returning 2/3 the width for horizontal and 2/3 the height for vertical presentations.

In addition to calculating the size of the presented view, you need to return its full frame. To do this you’ll override the frameOfPresentedViewInContainerView property. Below the properties at the top of the class definition, add the following:

override var frameOfPresentedViewInContainerView: CGRect {
 
  //1
  var frame: CGRect = .zero
  frame.size = size(forChildContentContainer: presentedViewController, 
                    withParentContainerSize: containerView!.bounds.size)
 
  //2
  switch direction {
  case .right:
    frame.origin.x = containerView!.frame.width*(1.0/3.0)
  case .bottom:
    frame.origin.y = containerView!.frame.height*(1.0/3.0)
  default:
    frame.origin = .zero
  }
  return frame
}

Have a look at this code section-by-section:

  1. You declare a frame and give it the size calculated in size(forChildContentContainer:withParentContainerSize:).
  2. For .right and .bottom directions, you adjust the origin by moving the x origin (.right) and y origin (.bottom) 1/3 of the width or height.

With all the overrides done, you’re ready to put finishing touches on the transitions!

Implement the Presentation Styles

Remember in the previous section how you created the transitioningDelegate? Well, it’s there but not doing much at the moment. It’s badly in need of some additional implementation.

Open SlideInPresentationManager.swift, locate the UIViewControllerTransitioningDelegate extension and add the following to it:

func presentationController(forPresented presented: UIViewController,
                            presenting: UIViewController?,
                            source: UIViewController) -> UIPresentationController? {
  let presentationController = SlideInPresentationController(presentedViewController: presented,
                                                             presenting: presenting,
                                                             direction: direction)
  return presentationController
}

Here you instantiate a SlideInPresentationController with the direction from SlideInPresentationManager, and then you return it to use for the presentation.

Now you’re making things happen! Build and run the app. Tap the Summer, Winter and Medal Count buttons to see your fancy new presentation styles in action.

medal_count_11

Quite a difference, don’t you think? The new presentation styles look sharp, but all the presented views still slide in from the bottom.

medal_gif_02

The client wants the Summer and Winter menus to slide in from the side. You’ll need to flex your animation muscles to make this happen.

Creating the Animation Controller

To add a custom animation transition, you’ll create an NSObject subclass that conforms to UIViewControllerAnimatedTransitioning.

For complex animations where presentation is remarkably different than dismissal, you’d usually create two controllers: one for presentation and one for dismissal. In the case of this app, dismissal mirrors presentation, so you only need one animation controller.

Go to File\New\File…, choose iOS\Source\Cocoa Touch Class, and click Next. Set the name to SlideInPresentationAnimator, make it a subclass of NSObject and set the language to Swift.

Click Next and set the Group to Presentation, and then click Create to make your new file. Open SlideInPresentationAnimator.swift and replace its contents with the following:

import UIKit
 
final class SlideInPresentationAnimator: NSObject {
 
  // 1
  // MARK: - Properties
  let direction: PresentationDirection
 
  //2
  let isPresentation: Bool
 
  //3
  // MARK: - Initializers
  init(direction: PresentationDirection, isPresentation: Bool) {
    self.direction = direction
    self.isPresentation = isPresentation
    super.init()
  }
}

Here’s what you do in there:

  1. Declare a direction property that tells the animation controller the direction from which it should animate the view controller’s view.
  2. Declare an isPresentation property to tell the animation controller whether to present or dismiss the view controller.
  3. Declare an initializer that accepts the two declared values above.

Next, add conformance to the UIViewControllerAnimatedTransitioning protocol by adding the following extension:

// MARK: - UIViewControllerAnimatedTransitioning
extension SlideInPresentationAnimator: UIViewControllerAnimatedTransitioning {
  func transitionDuration(
    using transitionContext: UIViewControllerContextTransitioning?) -> TimeInterval {
    return 0.3
  }
 
  func animateTransition(using transitionContext: UIViewControllerContextTransitioning) {
  }
}

The protocol has two required methods – one to define how long the transition takes (0.3 seconds in this case), and one to perform the animations. The animation method is a stub to keep the compiler happy.

Replace the animateTransition(using:) stub with the following:

func animateTransition(using transitionContext: UIViewControllerContextTransitioning) {
 
  // 1
  let key = isPresentation ? UITransitionContextViewControllerKey.to
    : UITransitionContextViewControllerKey.from
 
  let controller = transitionContext.viewController(forKey: key)!
 
  // 2
  if isPresentation {
    transitionContext.containerView.addSubview(controller.view)
  }
 
  // 3
  let presentedFrame = transitionContext.finalFrame(for: controller)
  var dismissedFrame = presentedFrame
  switch direction {
  case .left:
    dismissedFrame.origin.x = -presentedFrame.width
  case .right:
    dismissedFrame.origin.x = transitionContext.containerView.frame.size.width
  case .top:
    dismissedFrame.origin.y = -presentedFrame.height
  case .bottom:
    dismissedFrame.origin.y = transitionContext.containerView.frame.size.height
  }
 
  // 4
  let initialFrame = isPresentation ? dismissedFrame : presentedFrame
  let finalFrame = isPresentation ? presentedFrame : dismissedFrame
 
  // 5
  let animationDuration = transitionDuration(using: transitionContext)
  controller.view.frame = initialFrame
  UIView.animate(withDuration: animationDuration, animations: {
    controller.view.frame = finalFrame
  }) { finished in
    transitionContext.completeTransition(finished)
  }
}

I did say this one does the heavy lifting! Here’s what each section does:

  1. If this is a presentation, the method asks the transitionContext for the view controller associated with the .to key, aka the view controller you’re moving to. If dismissal, it asks the transitionContext for the view controller associated with the .from, aka the view controller you’re moving from.
  2. If the action is a presentation, your code adds the view controller’s view to the view hierarchy; this code uses the transitionContext to get the container view.
  3. Calculate the frames you’re animating from and to. The first line asks the transitionContext for the view’s frame when it’s presented. The rest of the section tackles the trickier task of calculating the view’s frame when it’s dismissed. This section sets the frame’s origin so it’s just outside the visible area based on the presentation direction.
  4. Determine the transition’s initial and final frames. When presenting the view controller, it moves from the dismissed frame to the presented frame — vice versa when dismissing.
  5. Lastly, this method animates the view from initial to final frame. Note that it calls completeTransition(_:) on the transitionContext to show the transition has finished.

Wire Up the Animation Controller

You’re at the last step of building the transition: hooking up the animation controller!

Open SlideInPresentationManager.swift and add the following two methods to the end of the UIViewControllerTransitioningDelegate extension:

func animationController(forPresented presented: UIViewController,
                         presenting: UIViewController,
                         source: UIViewController) -> UIViewControllerAnimatedTransitioning? {
  return SlideInPresentationAnimator(direction: direction, isPresentation: true)
}
 
func animationController(forDismissed dismissed: UIViewController)
  -> UIViewControllerAnimatedTransitioning? {
    return SlideInPresentationAnimator(direction: direction, isPresentation: false)
}

The first method returns the animation controller for presenting the view controller; the second returns the animation controller for dismissing the view controller. Both are instances of SlideInPresentationAnimator, but they have different isPresentation values.

Build and run the app. Check out those transitions! You should see a smooth slide-in animation from the left when you tap Summer. For Winter, it comes from the right, and Medal Count comes from the bottom.

medal_gif_03

Your result is exactly what you set out to do!

It works great…as long as the device is on Portrait mode. Try rotating to Landscape.

Why U Need Landscape?

Adaptivity

The good news is that you’ve done the hardest part! The transitions work perfectly. In this section, you’ll make the effect work beautifully on all devices and both orientations.

Build and run the app again, but this time run it on an iPhone 5/5s/SE — you can use the simulator if you don’t have the actual device. Try opening the Summer menu in Landscape. See anything wrong here?
medal_count_07
Well, no. This actually looks great! Take a victory lap around your desk.

But what happens when you try to bring up the medal count? Select a year from the menu and tap the Medal Count button. You should see the following screen:
medal_count_08
SlideInPresentationController restricts the view to 2/3 of the screen, leaving little space to show the medal count view. If you ship the app like this, you’re sure to hear complaints.

Luckily for you, Adaptivity is a thing. The iPhone has a Regular height size class in Portrait, and a Compact height size class in Landscape. All you have to do is make a few alterations to the presentation to make use of this feature!

UIPresentationController has a delegate property that conforms to UIAdaptivePresentationControllerDelegate, and it defines several methods to support adaptivity. You’ll use two of them in a moment.

First, you’ll make SlideInPresentationManager the delegate of SlideInPresentationController. This is the best option because the controller you choose to present determines whether the app should support compact height or not.

For example, GamesTableViewController looks correct in compact height, so there’s no need to limit its presentation. However, you do want to adjust the presentation for MedalCountViewController.

Open SlideInPresentationManager.swift and add the following below the direction property:

var disableCompactHeight = false

Here you add the disableCompactHeight property to indicate if the presentation supports compact height.

Next, you need an extension that conforms to UIAdaptivePresentationControllerDelegate and implements adaptivePresentationStyle(for:traitCollection:) as follows:

// MARK: - UIAdaptivePresentationControllerDelegate
extension SlideInPresentationManager: UIAdaptivePresentationControllerDelegate {
 
  func adaptivePresentationStyle(for controller: UIPresentationController,
                                 traitCollection: UITraitCollection) -> UIModalPresentationStyle {
    if traitCollection.verticalSizeClass == .compact && disableCompactHeight {
      return .overFullScreen
    } else {
      return .none
    }
  }
}

This method accepts a UIPresentationController and a UITraitCollection, and then returns the desired UIModalPresentationStyle.

Next, it checks if verticalSizeClass equals .compact and if compact height is disabled for this presentation.

  • If yes, it returns a presentation style of .overFullScreen so the presented view will cover the entire screen — not just 2/3 as defined in SlideInPresentationController.
  • If no, it returns .none, to stay with the implementation of UIPresentationController.

Find presentationController(forPresented:presenting:source:).
Set SlideInPresentationManager as the presentation controller’s delegate by adding the following line above the return statement:

presentationController.delegate = self

Finally, you’ll tell SlideInPresentationManager when to disable compact height.

Open MainViewController.swift and locate prepare(for:sender:). Find where the segue’s destination view controller is GamesTableViewController, and then add the following line to the if block:

slideInTransitioningDelegate.disableCompactHeight = false

Find where the segue’s destination view controller is MedalCountViewController and add the following to the if block:

slideInTransitioningDelegate.disableCompactHeight = true

Build and run the app, bring up a medal count and rotate the device to Landscape. The view should now take the entire screen, as shown below:
medal_count_09

This works great!

There’s still a niggly bit for the use case where you’d have a view that can only show in regular height. Maybe there’s something on there that’s just too tall to fit in a compact height.UIAdaptivePresentationControllerDelegate can help you.

Set it up by opening SlideInPresentationManager.swift and adding the following method to the UIAdaptivePresentationControllerDelegate extension:

func presentationController(_ controller: UIPresentationController,
  viewControllerForAdaptivePresentationStyle style: UIModalPresentationStyle)
  -> UIViewController? {
    guard style == .overFullScreen else { return nil }
 
    return UIStoryboard(name: "Main", bundle: nil)
      .instantiateViewController(withIdentifier: "RotateViewController")
}

This method accepts a UIPresentationController and a UIModalPresentationStyle. It returns a view controller that overrides the original controller to present, or nil if the original view controller should be presented.

If the presentation style is .overFullScreen it creates and returns a different view controller controller. This new controller is just a simple UIViewController with an image that tells the user to rotate the screen to Portrait.

Build and run the app, bring up the medal count, and rotate the device to Landscape. You should see the message:
medal_count_10

Rotate the device back to Portrait to view the medal count again.

Where To Go From Here?

Congratulations! You made it through a world-class athletic journey (for your brain) and built a custom UIPresentationController.

You can download the completed project here.

You’ve covered quite a bit! You learned how to customize and reuse a UIPresentationController to create neat slide-in effects from any direction.

You also learned how to adapt presentations for various devices and both orientations, as well as how to handle cases where the device can’t handle landscape orientation.

I’m sure you can come up with many more creative ideas for presentations in your app, and I encourage you to try them out based on what you’ve learned in this tutorial.

To delve deeper into custom transitions, check out this UIViewController Transitions tutorial by József Vesza. You’ll find some interesting videos about Beginning with iOS Animation by Marin Todorov.

For more on Adaptive Layouts, check out this adaptive layout in iOS tutorial by Sam Davies, or these adaptive layout video tutorials by Jerry Beers.

For more information on UIPresentationController, check out Apple’s documentation.

This iOS tutorial was a lot of fun to put together, and I’m keen to hear how it went for you. Bring your questions, blockers and discoveries to the forums below and let’s talk presentations! :]

The post UIPresentationController Tutorial: Getting Started appeared first on Ray Wenderlich.
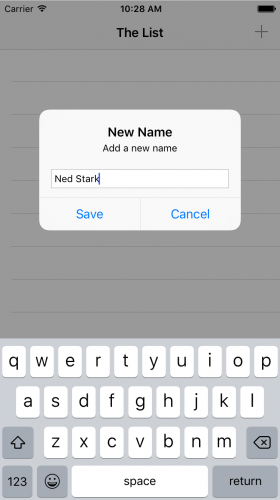
SpriteKit Swift 3 Tutorial for Beginners

$
0
0

SpriteKit Swift 3 Tutorial for Beginners
Note from Ray: This is a Swift 3 and iOS 10 update to a popular tutorial on our site, released as part of the iOS 10 Feast.

Like Batman and Robin or Superman and Lois Lane, SpriteKit and Swift are an amazing combination:

  • SpriteKit is one of the best ways to make games on iOS. It’s easy to learn, powerful, and is fully-supported by Apple.
  • Swift is an easy language to get started with, especially if you are a beginner to the iOS platform.

In this tutorial, you will learn how to create a simple 2D game using Apple’s 2D game framework, SpriteKit – using Swift!

You can either follow along with this tutorial, or just jump straight to the sample project at the end. And yes. There will be ninjas.

Note: This tutorial has a special place in my heart, as the original version was one of the first tutorials ever released on our site. It was written in a completely different language (Objective-C) and a completely different game framework (Cocos2D). My, how times have changed! :]

SpriteKit vs. Unity

The most popular alternative to SpriteKit at the moment is a game framework called Unity. Unity was originally developed as a 3D engine, but it recently got full built-in 2D support too.

So before you get started, I recommend you put some thought into whether SpriteKit or Unity is the best choice for your game.

Advantages of SpriteKit

  • It’s built right into iOS. There is no need to download extra libraries or have external dependencies. You can also seamlessly use other iOS APIs like iAd, In-App Purchases, etc. without having to rely on extra plugins.
  • It leverages your existing skills. If you already know Swift and iOS development, you can pick up SpriteKit extremely quickly.
  • It’s written by Apple. This gives you some confidence that it will be well supported moving forward on all of Apple’s new products. For example, you can use the same SpriteKit code to make your game work on iOS, OS X, and tvOS without a hitch.
  • It’s free. Maybe one of the best reasons for small indies! You get all of SpriteKit’s functionality at no cost. Unity does have a free version but does not have all of the features of the Pro version (you’ll need to upgrade if you want to avoid the Unity splash screen, for example).

Advantages of Unity

  • Cross-platform. This is one of the big ones. If you use SpriteKit, you’re locked into the Apple ecosystem. With Unity, you can easily port your games to Android, Windows, and more.
  • Visual scene designer. Unity makes it extremely easy to lay out your levels and test your game in realtime with the click of a button. SpriteKit does have a very basic scene editor, but it is very basic compared to what Unity offers.
  • Asset store. Unity comes with a built-in asset store where you can buy various components for your game. Some of these components can save you a good bit of development time!
  • More powerful. In general, Unity just has more features and functionality than the SpriteKit / Scene Kit combination.

Which Should I Choose?

After this a lot of you may be thinking, “Well, which 2D framework should I choose?”

The answer that depends on what your goals are. Here’s my 2c:

  • If you are a complete beginner, or solely focused on the Apple ecosystem: Use SpriteKit – it’s built in, easy to learn, and will get the job done.
  • If you’re want to be cross-platform, or have a more complicated game: Use Unity – it’s more powerful and flexible.

If you think Unity is for you, check out some of our our brand new book Unity Games by Tutorials.

Otherwise, keep reading on to get started with SpriteKit!

Hello, SpriteKit!

Let’s start by getting a simple Hello World project up and running by using the SpriteKit Game template that comes built in to Xcode 8.

Start up Xcode, select File\New\Project, choose the iOS\Application\Game template, and click Next:

NewGame

Enter SpriteKitSimpleGame for the Product Name, Swift for Language, SpriteKit for Game Technology, iPhone for Devices, and click Next:

NewGame2

Choose somewhere on your drive to save the project, and click Create. Select your iPhone 7 simulator, then click the play button to run the project as-is. After a brief splash screen, a Hello World screen should appear – try dragging your mouse to make some spinning rectangles appear:

HelloWorld2

SpriteKit is organized into the concept of scenes, which are kind of like “levels’ or “screens” for a game. For example, you might have a scene for the main gameplay area, and another scene for the world map between levels.

If you take a look at your project, you’ll see the template has already created a scene for you by default – GameScene. Open GameScene.swift and you’ll see that it contains some code to make the rectangles spin.

In this tutorial, you’ll mainly be working within GameScene. But before you begin, you have to make a few tweaks because this game needs to run in landscape instead of portrait.

Initial Setup

The template provided to you has two issues. First, it’s set up the game to be Portrait, but you want landscape. Second, it is currently using SpriteKit’s scene editor, which you don’t need for this tutorial. Let’s fix these issues.

First, open your target setting by clicking your SpriteKitSimpleGame project in the Project Navigator, selecting the SpriteKitSimpleGame target. Then, in the Deployment Info section, uncheck Portrait so only Landscape Left and Landscape Right are checked. Also click the Requires full screen checkbox, as shown below:

TargetSettings

Second, delete GameScene.sks and Actions.sks and choose Move to Trash when prompted. These files allows you to lay out sprites and other components of a scene visually, however for this game it’s just easier to create things programmatically, so you don’t need it.

Next, open GameViewController.swift and replace the contents with the following:

import UIKit
import SpriteKit
 
class GameViewController: UIViewController {
 
  override func viewDidLoad() {
    super.viewDidLoad()
    let scene = GameScene(size: view.bounds.size)
    let skView = view as! SKView
    skView.showsFPS = true
    skView.showsNodeCount = true
    skView.ignoresSiblingOrder = true
    scene.scaleMode = .resizeFill
    skView.presentScene(scene)
  }
 
  override var prefersStatusBarHidden: Bool {
    return true
  }
 
}

GameViewController is a normal UIViewController, except that its root view is a SKView, which is a view that contains a SpriteKit scene.

Here, you’ve implemented viewDidLoad() to create a new instance of the GameScene on startup, with the same size of the view itself.

That’s it for the initial setup – now let’s get something on the screen!

Adding a Sprite

First, download the resources for this project.

Open Assets.xcassets and drag in the images from the sprites.atlas folder from the resources:

DraggingImages

Then drag the Sounds folder from the resources into your project navigator. Make sure that “Copy items into destination group’s folder (if needed)” is checked, and that your SpriteKitSimpleGame target is selected.

Files

Next, open GameScene.swift and replace the contents with the following:

import SpriteKit
 
class GameScene: SKScene {
 
  // 1
  let player = SKSpriteNode(imageNamed: "player")
 
  override func didMove(to view: SKView) {
    // 2
    backgroundColor = SKColor.white
    // 3
    player.position = CGPoint(x: size.width * 0.1, y: size.height * 0.5)
    // 4
    addChild(player)
  }
}

Let’s go over this step-by-step.

  1. Here you declare a private constant for the player (i.e. the ninja), which is an example of a sprite. As you can see, creating a sprite is easy – simply pass in the name of the image to use.
  2. Setting the background color of a scene in SpriteKit is as simple as setting the backgroundColor property. Here you set it to white.
  3. You position the sprite to be 10% across vertically, and centered horizontally.
  4. To make the sprite appear on the scene, you must add it as a child of the scene. This is similar to how you make views children of other views.

Build and run, and voila – ladies and gentlemen, the ninja has entered the building!

005_Ninja

Moving Monsters

Next you want to add some monsters into your scene for your ninja to combat. To make things more interesting, you want the monsters to be moving – otherwise there wouldn’t be much of a challenge! So let’s create the monsters slightly off screen to the right, and set up an action for them telling them to move to the left.

Add the following methods to GameScene.swift:

func random() -> CGFloat {
  return CGFloat(Float(arc4random()) / 0xFFFFFFFF)
}
 
func random(min: CGFloat, max: CGFloat) -> CGFloat {
  return random() * (max - min) + min
}
 
func addMonster() {
 
  // Create sprite
  let monster = SKSpriteNode(imageNamed: "monster")
 
  // Determine where to spawn the monster along the Y axis
  let actualY = random(min: monster.size.height/2, max: size.height - monster.size.height/2)
 
  // Position the monster slightly off-screen along the right edge,
  // and along a random position along the Y axis as calculated above
  monster.position = CGPoint(x: size.width + monster.size.width/2, y: actualY)
 
  // Add the monster to the scene
  addChild(monster)
 
  // Determine speed of the monster
  let actualDuration = random(min: CGFloat(2.0), max: CGFloat(4.0))
 
  // Create the actions
  let actionMove = SKAction.move(to: CGPoint(x: -monster.size.width/2, y: actualY), duration: TimeInterval(actualDuration))
  let actionMoveDone = SKAction.removeFromParent()
  monster.run(SKAction.sequence([actionMove, actionMoveDone]))
 
}

I’ve spelled out things in a verbose manner here to make things as easy to understand as possible. The first part should make sense based on what we’ve discussed so far: you do some simple calculations to determine where you want to create the object, set the position of the object, and add it to the scene the same way you did for the player sprite.

The new element here is adding actions. SpriteKit provides a lot of extremely handy built-in actions that help you easily change the state of sprites over time, such as move actions, rotate actions, fade actions, animation actions, and more. Here you use three actions on the monster:

  • SKAction.move(to::duration:): You use this action to direct the object to move off-screen to the left. Note that you can specify the duration for how long the movement should take, and here you vary the speed randomly from 2-4 seconds.
  • SKAction.removeFromParent(): SpriteKit comes with a handy action that removes a node from its parent, effectively “deleting it” from the scene. Here you use this action to remove the monster from the scene when it is no longer visible. This is important because otherwise you’d have an endless supply of monsters and would eventually consume all device resources.
  • SKAction.sequence(_:): The sequence action allows you to chain together a sequence of actions that are performed in order, one at a time. This way, you can have the “move to” action perform first, and once it is complete perform the “remove from parent” action.
Note: This code block includes some helper methods to generate a random number within a range using arc4random(). This suffices for our simple random number generation needs in this game, but if you want more advanced functionality, check out the random number APIs in iOS 9’s new GameplayKit.

One last thing before you go. You need to actually call the method to create monsters! And to make things fun, let’s have monsters continuously spawning over time.

Simply add the following code to the end of didMove(to:):

run(SKAction.repeatForever(
  SKAction.sequence([
    SKAction.run(addMonster),
    SKAction.wait(forDuration: 1.0)
  ])
))

Here you run a sequence of actions to call a block of code (you can seamlessly pass in your addMonster() method here thanks to the power of Swift), and then wait for 1 second. You then repeat this sequence of actions endlessly.

That’s it! Build and run the project, now you should see monsters happily moving across the screen:

006_Monsters

Shooting Projectiles

At this point, the ninja is just begging for some action – so let’s add shooting! There are many ways you could implement shooting, but for this game you are going to make it so when the user taps the screen, it shoots a projectile from the player in the direction of the tap.

I want to use a “move to” action to implement this to keep things at a beginner level, but in order to use this you have to do a little math.

This is because the “move to” action requires you to give a destination for the projectile, but you can’t just use the touch point because the touch point represents just the direction to shoot relative to the player. You actually want to keep the bullet moving through the touch point until the bullet goes off-screen.

Here’s a picture that illustrates the matter:

Projectile Triangle

So as you can see, you have a small triangle created by the x and y offset from the origin point to the touch point. You just need to make a big triangle with the same ratio – and you know you want one of the endpoints to be off the screen.

To run these calculations, it really helps if you have some basic vector math routines you can call (like methods to add and subtract vectors). However, SpriteKit doesn’t have any by default so you’ll have to write your own.

Luckily they are very easy to write thanks to the power of Swift operator overloading. Add these functions to the top of your file, right before the GameScene class:

func + (left: CGPoint, right: CGPoint) -> CGPoint {
  return CGPoint(x: left.x + right.x, y: left.y + right.y)
}
 
func - (left: CGPoint, right: CGPoint) -> CGPoint {
  return CGPoint(x: left.x - right.x, y: left.y - right.y)
}
 
func * (point: CGPoint, scalar: CGFloat) -> CGPoint {
  return CGPoint(x: point.x * scalar, y: point.y * scalar)
}
 
func / (point: CGPoint, scalar: CGFloat) -> CGPoint {
  return CGPoint(x: point.x / scalar, y: point.y / scalar)
}
 
#if !(arch(x86_64) || arch(arm64))
func sqrt(a: CGFloat) -> CGFloat {
  return CGFloat(sqrtf(Float(a)))
}
#endif
 
extension CGPoint {
  func length() -> CGFloat {
    return sqrt(x*x + y*y)
  }
 
  func normalized() -> CGPoint {
    return self / length()
  }
}

These are standard implementations of some vector math functions. If you’re confused about what’s going on here or are new to vector math, check out this quick vector math explanation.

Next, add a new method to the file:

override func touchesEnded(_ touches: Set<UITouch>, with event: UIEvent?) {
 
  // 1 - Choose one of the touches to work with
  guard let touch = touches.first else {
    return
  }
  let touchLocation = touch.location(in: self)
 
  // 2 - Set up initial location of projectile
  let projectile = SKSpriteNode(imageNamed: "projectile")
  projectile.position = player.position
 
  // 3 - Determine offset of location to projectile
  let offset = touchLocation - projectile.position
 
  // 4 - Bail out if you are shooting down or backwards
  if (offset.x < 0) { return }
 
  // 5 - OK to add now - you've double checked position
  addChild(projectile)
 
  // 6 - Get the direction of where to shoot
  let direction = offset.normalized()
 
  // 7 - Make it shoot far enough to be guaranteed off screen
  let shootAmount = direction * 1000
 
  // 8 - Add the shoot amount to the current position
  let realDest = shootAmount + projectile.position
 
  // 9 - Create the actions
  let actionMove = SKAction.move(to: realDest, duration: 2.0)
  let actionMoveDone = SKAction.removeFromParent()
  projectile.run(SKAction.sequence([actionMove, actionMoveDone]))
 
}

There’s a lot going on here, so let’s review it step by step.

  1. One of the cool things about SpriteKit is that it includes a category on UITouch with location(in:) and previousLocation(in:) methods. These let you find the coordinate of a touch within a SKNode’s coordinate system. In this case, you use it to find out where the touch is within the scene’s coordinate system.
  2. You then create a projectile and place it where the player is to start. Note you don’t add it to the scene yet, because you have to do some sanity checking first – this game does not allow the ninja to shoot backwards.
  3. You then subtract the projectile’s current position from the touch location to get a vector from the current position to the touch location.
  4. If the X value is less than 0, this means the player is trying to shoot backwards. This is is not allowed in this game (real ninjas don’t look back!), so just return.
  5. Otherwise, it’s OK to add the projectile to the scene.
  6. Convert the offset into a unit vector (of length 1) by calling normalized(). This will make it easy to make a vector with a fixed length in the same direction, because 1 * length = length.
  7. Multiply the unit vector in the direction you want to shoot in by 1000. Why 1000? It will definitely be long enough to go past the edge of the screen :]
  8. Add the shoot amount to the current position to get where it should end up on the screen.
  9. Finally, create move(to:, duration:) and removeFromParent() actions like you did earlier for the monster.

Build and run, and now your ninja should be able to fire away at the oncoming hordes!

007_Shoot

Collision Detection and Physics: Overview

So now you have shurikens flying everywhere – but what your ninja really wants to do is to lay some smack down. So let’s add in some code to detect when your projectiles intersect your targets.

One of the nice things about SpriteKit is it comes with a physics engine built right in! Not only are physics engines great for simulating realistic movement, but they are also great for collision detection purposes.

Let’s set up the game to use SpriteKit’s physics engine to determine when monsters and projectiles collide. At a high level, here’s what you’re going to do:

  • Set up the physics world. A physics world is the simulation space for running physics calculations. One is set up on the scene by default, and you might want to configure a few properties on it, like gravity.
  • Create physics bodies for each sprite. In SpriteKit, you can associate a shape to each sprite for collision detection purposes, and set certain properties on it. This is called a physics body. Note that the physics body does not have to be the exact same shape as the sprite. Usually it’s a simpler, approximate shape rather than pixel-perfect, since that is good enough for most games and performant.
  • Set a category for each type of sprite. One of the properties you can set on a physics body is a category, which is a bitmask indicating the group (or groups) it belongs to. In this game, you’re going to have two categories – one for projectiles, and one for monsters. Then later when two physics bodies collide, you can easily tell what kind of sprite you’re dealing with by looking at its category.
  • Set a contact delegate. Remember that physics world from earlier? Well, you can set a contact delegate on it to be notified when two physics bodies collide. There you’ll write some code to examine the categories of the objects, and if they’re the monster and projectile, you’ll make them go boom!

Now that you understand the battle plan, it’s time to put it into action!

Collision Detection and Physics: Implementation

Start by adding this struct to the top of GameScene.swift:

struct PhysicsCategory {
  static let None      : UInt32 = 0
  static let All       : UInt32 = UInt32.max
  static let Monster   : UInt32 = 0b1       // 1
  static let Projectile: UInt32 = 0b10      // 2
}

This is setting up the constants for the physics categories you’ll need in a bit – no pun intended! :]

Note: You may be wondering what the fancy syntax is here. Note that the category on SpriteKit is just a single 32-bit integer, and acts as a bitmask. This is a fancy way of saying each of the 32-bits in the integer represents a single category (and hence you can have 32 categories max). Here you’re setting the first bit to indicate a monster, the next bit over to represent a projectile, and so on.

Next, mark GameScene as implementing the SKPhysicsContactDelegate protocol:

class GameScene: SKScene, SKPhysicsContactDelegate {

Then inside didMoveToView(_:) add these lines after adding the player to the scene:

physicsWorld.gravity = CGVector.zero
physicsWorld.contactDelegate = self

This sets up the physics world to have no gravity, and sets the scene as the delegate to be notified when two physics bodies collide.

Inside the addMonster() method, add these lines right after creating the monster sprite:

monster.physicsBody = SKPhysicsBody(rectangleOf: monster.size) // 1
monster.physicsBody?.isDynamic = true // 2
monster.physicsBody?.categoryBitMask = PhysicsCategory.Monster // 3
monster.physicsBody?.contactTestBitMask = PhysicsCategory.Projectile // 4
monster.physicsBody?.collisionBitMask = PhysicsCategory.None // 5

Let’s go over what this does line by line.

  1. Creates a physics body for the sprite. In this case, the body is defined as a rectangle of the same size of the sprite, because that’s a decent approximation for the monster.
  2. Sets the sprite to be dynamic. This means that the physics engine will not control the movement of the monster – you will through the code you’ve already written (using move actions).
  3. Sets the category bit mask to be the monsterCategory you defined earlier.
  4. The contactTestBitMask indicates what categories of objects this object should notify the contact listener when they intersect. You choose projectiles here.
  5. The collisionBitMask indicates what categories of objects this object that the physics engine handle contact responses to (i.e. bounce off of). You don’t want the monster and projectile to bounce off each other – it’s OK for them to go right through each other in this game – so you set this to 0.

Next add some similar code to touchesEnded(_:withEvent:), right after the line setting the projectile’s position:

projectile.physicsBody = SKPhysicsBody(circleOfRadius: projectile.size.width/2)
projectile.physicsBody?.isDynamic = true
projectile.physicsBody?.categoryBitMask = PhysicsCategory.Projectile
projectile.physicsBody?.contactTestBitMask = PhysicsCategory.Monster
projectile.physicsBody?.collisionBitMask = PhysicsCategory.None
projectile.physicsBody?.usesPreciseCollisionDetection = true

As a test, see if you can understand each line here and what it does. If not, just refer back to the points explained above!

As a second test, see if you can spot two differences. Answer below!

Solution Inside: What Are the Differences? SelectShow>

Next, add a method that will be called when the projectile collides with the monster. Note that nothing calls this automatically, you will be calling this later.

func projectileDidCollideWithMonster(projectile: SKSpriteNode, monster: SKSpriteNode) {
  print("Hit")
  projectile.removeFromParent()
  monster.removeFromParent()
}

All you do here is remove the projectile and monster from the scene when they collide. Pretty simple, eh?

Now it’s time to implement the contact delegate method. Add the following new method to the file:

func didBegin(_ contact: SKPhysicsContact) {
 
  // 1
  var firstBody: SKPhysicsBody
  var secondBody: SKPhysicsBody
  if contact.bodyA.categoryBitMask < contact.bodyB.categoryBitMask {
    firstBody = contact.bodyA
    secondBody = contact.bodyB
  } else {
    firstBody = contact.bodyB
    secondBody = contact.bodyA
  }
 
  // 2
  if ((firstBody.categoryBitMask & PhysicsCategory.Monster != 0) &&
      (secondBody.categoryBitMask & PhysicsCategory.Projectile != 0)) {
    projectileDidCollideWithMonster(projectile: firstBody.node as! SKSpriteNode, monster: secondBody.node as! SKSpriteNode)
  }
 
}

Since you set the scene as the contactDelegate of the physics world earlier, this method will be called whenever two physics bodies collide (and their contactTestBitMasks are set appropriately).

There are two parts to this method:

  1. This method passes you the two bodies that collide, but does not guarantee that they are passed in any particular order. So this bit of code just arranges them so they are sorted by their category bit masks so you can make some assumptions later.
  2. Finally, it checks to see if the two bodies that collide are the projectile and monster, and if so calls the method you wrote earlier.

Give it a build and run, and now when your projectiles intersect targets they should disappear!

Finishing Touches

You’re pretty close to having a workable (but extremely simple) game now. You just need to add some sound effects and music (since what kind of game doesn’t have sound!) and some simple game logic.

You already have some cool background music I made and an awesome pew-pew sound effect in your project, from the resources for this tutorial you added to your project earlier. You just need to play them!

To do this, add these line to the end of didMove(to:):

let backgroundMusic = SKAudioNode(fileNamed: "background-music-aac.caf")
backgroundMusic.autoplayLooped = true
addChild(backgroundMusic)

This uses SKAudioNode, a new class introduced in iOS 9, to play and loop the background music for your game.

As for the sound effect, add this line to the top of touchesEnded(_:withEvent:):

run(SKAction.playSoundFileNamed("pew-pew-lei.caf", waitForCompletion: false))

Pretty handy, eh? You can play a sound effect with one line!

Build and run, and enjoy your groovy tunes!

Note: If you don’t hear the background music, try running on a device instead of the simulator.

Game Over, Man!

Now, let’s create a new scene that will serve as your “You Win” or “You Lose” indicator. Create a new file with the iOS\Source\Swift File template, name the file GameOverScene and click Create.

Then replace GameOverScene.swift with the following:

import Foundation
import SpriteKit
 
class GameOverScene: SKScene {
 
  init(size: CGSize, won:Bool) {
 
    super.init(size: size)
 
    // 1
    backgroundColor = SKColor.white
 
    // 2
    let message = won ? "You Won!" : "You Lose :["
 
    // 3
    let label = SKLabelNode(fontNamed: "Chalkduster")
    label.text = message
    label.fontSize = 40
    label.fontColor = SKColor.black
    label.position = CGPoint(x: size.width/2, y: size.height/2)
    addChild(label)
 
    // 4
    run(SKAction.sequence([
      SKAction.wait(forDuration: 3.0),
      SKAction.run() {
        // 5
        let reveal = SKTransition.flipHorizontal(withDuration: 0.5)
        let scene = GameScene(size: size)
        self.view?.presentScene(scene, transition:reveal)
      }
    ]))
 
  }
 
  // 6
  required init(coder aDecoder: NSCoder) {
    fatalError("init(coder:) has not been implemented")
  }
}

There are five parts to point out here

  1. Sets the background color to white, same as you did for the main scene.
  2. Based on the won parameter, sets the message to either “You Won” or “You Lose”.
  3. This is how you display a label of text to the screen with SpriteKit. As you can see, it’s pretty easy – you just choose your font and set a few parameters.
  4. Finally, this sets up and runs a sequence of two actions. I’ve included them all inline here to show you how handy that is (instead of having to make separate variables for each action). First it waits for 3 seconds, then it uses the runBlock action to run some arbitrary code.
  5. This is how you transition to a new scene in SpriteKit. First you can pick from a variety of different animated transitions for how you want the scenes to display – you choose a flip transition here that takes 0.5 seconds. Then you create the scene you want to display, and use the presentScene(_:transition:) method on the self.view property.
  6. If you override an initializer on a scene, you must implement the required init(coder:) initializer as well. However this initializer will never be called, so you just add a dummy implementation with a fatalError(_:) for now.

So far so good, now you just need to set up your main scene to load the game over scene when appropriate.

Switch back to GameScene.swift, and inside addMonster(), replace the last line that runs the actions on the monster with the following:

let loseAction = SKAction.run() {
  let reveal = SKTransition.flipHorizontal(withDuration: 0.5)
  let gameOverScene = GameOverScene(size: self.size, won: false)
  self.view?.presentScene(gameOverScene, transition: reveal)
}
monster.run(SKAction.sequence([actionMove, loseAction, actionMoveDone]))

This creates a new “lose action” that displays the game over scene when a monster goes off-screen. See if you understand each line here, if not refer to the explanation for the previous code block.

Also, another pop-quiz for you: why do you run the loseAction before actionMoveDone? Try reversing them to see what happens if you don’t know.

Solution Inside: Why is Lose Action First? SelectShow>

Now you should handle the win case too – don’t be cruel to your players! :] Add a new property to the top of GameScene, right after the declaration of player:

var monstersDestroyed = 0

And add this to the bottom of projectile(_:didCollideWithMonster:):

monstersDestroyed += 1
if (monstersDestroyed > 30) {
  let reveal = SKTransition.flipHorizontal(withDuration: 0.5)
  let gameOverScene = GameOverScene(size: self.size, won: true)
  self.view?.presentScene(gameOverScene, transition: reveal)
}

Go ahead and give it a build and run, and you should now have win and lose conditions and see a game over scene when appropriate!

008_YouWin

Where To Go From Here?

And that’s a wrap! Here is the full source code for this SpriteKit Swift Tutorial for beginners.

I hope you enjoyed learning about SpriteKit and are inspired to make your own game. If you have any questions or comments about this tutorial, please join the discussion below!

If you want to learn more about SpriteKit, you should check out our book 2D Apple Games by Tutorials:

In this book we’ll teach you everything you need to know to make great games for iOS, tvOS, watchOS and macOS – from physics, to tile maps, to particle systems, and even how to make your games “juicy” with polish and special effects!

The post SpriteKit Swift 3 Tutorial for Beginners appeared first on Ray Wenderlich.

Intermediate Swift 3 Course Now Available

$
0
0

Slides-Image-Swift-Int@2x

Good news: my new Intermediate Swift 3 course is now available!

This course picks up where my Beginning Swift 3 course left off, and assumes that you have a basic understanding of Swift (variables, if statements, arrays, and dictionaries).

Specifically, Intermediate Swift 3 covers the following topics:

  • Closures: Learn the basics of closures, how to define them, and pass them into your code.
  • Structures: Introduces your first named object type: the structure.
  • Properties: Covers the various property options that you can add to your objects.
  • Classes: Learn about classes and the differences between reference types and value types.
  • Inheritance: Introduces the idea of class relationships and builds on existing types through the use of inheritance.
  • Initializers: Covers the process of initializing your objects.
  • Protocols: Learn the process of applying behavior to unrelated objects.
  • Enumerations: Introduces a construct to make your code safer and easier to read.

The entire course is built around Swift playgrounds, so you can follow along as you watch – and practice what you learned with some hands-on exercises at the end.

Here’s how you can get access to this course:

  • If you are a raywenderlich.com subscriber: You can immediately access the entire Intermediate Swift 3 course today.
  • If you are not subscribed yet: Now’s a good time to subscribe! You can get 10% off a subscription — or anything else in our store — with the code IOS10FEAST.

We hope you enjoy, and stay tuned for more new Swift 3 courses and updates to come! :]

The post Intermediate Swift 3 Course Now Available appeared first on Ray Wenderlich.


iOS 10 Screencast: Taking Photos

3D Apple Games by Tutorials Updated for Swift 3 and iOS 10

$
0
0

igt2-update-featureHappy Wednesday – it’s another iOS 10 Feast book release!

In 3D Apple Games by Tutorials, you’ll learn how to make 3D games in Swift, using Apple’s built-in game framework: SceneKit. You’ll learn how to make games similar to Fruit Ninja, Breakout, Marble Madness, and Crossy Road.

To celebrate the book launch, this week we’ll be posting a few chapters to give you a taste of what’s in the book.

Keep reading to watch a video trailer for the book, learn how to enter the giveaway, and how to get your launch discount!

This will be a free update for existing 3D iOS Games by Tutorials customers — our way to say “thanks” to our readers for their support.

Don’t own 3D Apple Games by Tutorials yet? Read on to see how you can get a copy!

What is 3D Apple Games by Tutorials?

The trailer below gives you a good, fast overview of what the book’s about:

You’d be forgiven for thinking that making 3D games is far more complicated than creating a classic 2D game. 3D games have a reputation for being notoriously difficult to program, usually involving a lot of complicated math.

However, that is no longer the case, thanks to the advent of SceneKit. The simplicity of SceneKit lets beginners create simple and stylish games in a short amount of time. Yet it’s also powerful enough to satisfy the needs of advanced developers who want to create the next FPS killer.

  • Why SceneKit? Apple’s built-in framework for making 3D games is easy to learn, especially if you already have some SpriteKit and Swift experience.
  • Why Swift? Swift is an easy language to get started with, especially if you are a beginner to Apple development. In addition, we believe Swift is the way of the future for Apple development, so take this as an opportunity to develop your Swift skills early!
  • Why 3D? As awesome as 2D games may be, 3D games have a greater appeal in the look and feel department. Creating modern artwork such as popular voxel-style graphics is easier than ever. With SceneKit, even the programming is far less complicated than ever before, and you don’t need an advanced math or physics degree! :]

With 3D games and SceneKit, you’re making great choices!

Don’t worry — you can jump right into any chapter in the book, because we’ll always have a starter project waiting for you!

What’s New in 3D Apple Games by Tutorials?

Here’s what’s new in 3D Apple Games by Tutorials:

  • Swift 3 and iOS 10: We’ve completely updated the book for Swift 3, iOS 10, and Xcode8.
  • Other Platforms: We’ve added an entirely new section showing you how to port your 3D SceneKit games to watchOS, tvOS and macOS.
  • Designing your own 3D Art: We’ve even added a brand-new bonus chapter showing you how to create your own voxel art in the style of Mr. Pig!

3D Apple Games by Tutorials is 24 chapters and 466 pages – yeah, it’s pretty huge. :]

Let’s take a look at what’s ahead.

Section I: Hello, SceneKit!

This section covers the basics of making 3D games with SceneKit. You’ll look at the most important techniques used in almost every 3D SceneKit game created, and by the end of this section you’ll know enough to make your very own little 3D game: Geometry Fighter.

This is a Fruit Ninja style game, with colorful geometric shapes thrown up into the air for your pure destructive indulgence. Seek out your inner Darth Vader and use the force to destroy the colorful shapes with a single touch of death! :]

00_ScreenShot

  • Chapter 1, Scenes: Start off by creating your very first SceneKit game project, and get to know the basics.
  • Chapter 2, Nodes: Learn how to use nodes, primitive geometry shapes and cameras to construct a basic 3D scene from the ground up.
  • Chapter 3, Physics: Unleash the power of the built-in physics engine, and learn how to add basic physics to the elements in your game.
  • Chapter 4, Render Loop: Learn all about the render loop within SceneKit, and how you can leverage it to update the elements in your game.
  • Chapter 5, Particle Systems: Create massive explosions for your game, by learning how to create and use the 3D particle system.

Section II: The SceneKit Editor

Xcode include a variety of standard built-in tools; in this section, you’ll take an in-depth look at them. These tools will make building your 3D games with SceneKit easier, faster and even more fun.

Throughout this section you’ll be making a game called Breaker, which is based on Breakout, but it adds a nice new 3D look and feel. Keep your paddle and ball close by, so you can go bust up some bricks! :]

06_ScreenShot

  • Chapter 6, SceneKit Editor: Get a hands-on introduction on how to use Xcode’s awesome built-in SceneKit Editor.
  • Chapter 7, Cameras: Learn about the different types of cameras SceneKit has to offer.
  • Chapter 8, Lights: Learn all about the different types of lights, and how to properly set them up for your game.
  • Chapter 9, Geometric Shapes: Get your hands dirty and construct the entire game scene with just using the built-in SceneKit primitive shapes.
  • Chapter 10, Basic Collision Detection: Add physics to your game and learn how to handle basic collision detection.

Section III: Intermediate SceneKit

In this section you will create stunning a make belief world, with a shiny wooden relic awaits brave warriors with exceptional balancing skills to guide it through a maze high up in the sky. The game is called Marble Maze, and is somewhat based on the Labyrinth-styled games with a twist.

11_Screenshot

  • Chapter 11, Materials: Learn about the different lighting models and the various material types supported by SceneKit.
  • Chapter 12, Reference Nodes: Learn how to start using reference nodes in your game.
  • Chapter 13, Shadows: Learn how to use and configure the darker element of light, known as shadows.
  • Chapter 14, Intermediate Collision Detection: Learn all about bit masks and how to make use of them for more intermediate collision detection scenarios.
  • Chapter 15, Motion Control: Add motion control to your game, and learn how to use the motion data to move the elements in your game.

Section IV: Other Platforms

In this section, you’ll learn how to leverage your iOS knowledge to build games for the other Apple Platforms: macOS, tvOS and watchOS.

  • Chapter 16, macOS Games (new!): You’ll take a complete iOS game and add a target for macOS. Along the way, you’ll learn some of the differences between the platforms, such as windows and mouse and keyboard events.
  • Chapter 17, tvOS Games (new!): Building from Chapter 18, you’ll add another target for tvOS. You’ll learn concepts such as Focus and parallax icons, Top Shelf and working with the Apple TV Remote.
  • Chapter 18, watchOS Games (new!): Lastly, you’ll add a target for watchOS, and you’ll learn about gestures, the Digital Crown and Haptic Feedback. You’ll also discover some of the design considerations when working with a small device.

Section V: Advanced SceneKit

“The SceneKit Force is quite strong within you, young apprentice.” (Read in a deep, heavy, asthmatic breathing voice. :] )

In this section, you’ll learn few more advanced techniques, as well as apply all the skills you’ve learned up to this point, to creating an awesome little voxel style game. By the end of this section, you’ll know enough to take on the big Hipster Whales out there with your very own game: Mr. Pig.

16_Screenshot

This is a Crossy Road style game with stunning voxel graphics, a catchy tune and some cool sound effects.

The premise: Mr. Pig is out-and-about scouting for lost coins in a nearby park while waiting for his late afternoon tea to heat up on the stove. Unfortunately, some big bad wolf decided to build a massive mall nearby, resulting in a very busy highway straight through his lovely park.

Mr. Pig better watch his step, or he’ll end up as pulled pork in the road. :] Our hero can carry quite a few coins with him, but to score, he has to deposit them at his little house.

No need to get your tail in a twist or ham it up — we’ll walk you through every step of building the game!

  • Chapter 19, Transitions: Create multiple scenes and learn how to transition from one to the other.
  • Chapter 20, Advanced Reference Nodes: Start building more complex scenes by leveraging the power of reference nodes to make scene-building child’s play.
  • Chapter 21, Actions: Learn how to add basic animation to the elements in your game by using Xcode’s built-in action editor.
  • Chapter 22, Advanced Collision Detection: Learn how to use more advanced collision techniques to solve certain scenarios.
  • Chapter 23, Audio: Harness SceneKit’s built-in sound capabilities to play music, sound effects and ambient sounds.

Section VI: 3D Game Art

We’ve also included a bonus chapter, all about creating your own voxel-style art, à la Mr. Pig!

MagicaVoxelExport00

  • Chapter 24, 3D Art for Programmers (new!): Learn how to build your own 3D voxel art made famous by Crossy Road and other retro-styled games, and how to export it for use in your SceneKit games.

About the Author

This book would be nothing without our experienced author at the helm:

Chris-LanguageChris Language is a seasoned coder with 20+ years of experience. He has fond memories of his childhood and his Commodore 64; more recently he started adding more good memories of life with all his iOS devices. By day, he fights for survival in the corporate jungle of Johannesburg, South Africa. By night he fights demons, dragons and angry little potty-mouth kids online. For relaxation he codes. You can find him on Twitter at @ChrisLanguage. Forever Coder, Artist, Musician, Gamer and Dreamer.

Where To Go From Here?

3D Apple Games by Tutorials is now 100% complete, fully updated for Swift 3, iOS 10 and Xcode 8 — and available today.

  • If you’ve already bought 3D iOS Games by Tutorials, you can download the new book immediately on your My Loot page.
  • If you don’t have 3D Apple Games by Tutorials yet, you can grab your own copy in our store.

You can get 10% off on this book — or anything else in our store — with the code IOS10FEAST.

Speaking of which, be sure to check out everything we’re offering this year in the iOS 10 Feast, including $40,000 in giveaways!

To enter, simply retweet this post with the #ios10feast hashtag using the button below:


We hope you enjoy this free update, and stay tuned for more book releases and updates coming soon!

The post 3D Apple Games by Tutorials Updated for Swift 3 and iOS 10 appeared first on Ray Wenderlich.

Scene Kit Tutorial with Swift Part 1: Getting Started

$
0
0

Thumb

This tutorial series will show you how to create your first game with Scene Kit, Apple’s built-in 3D game framework.

You’d be forgiven for thinking that making 3D games is far more complicated than creating a classic 2D game. 3D games have a reputation for being notoriously difficult to program, usually involving a lot of complicated math.

However, that is no longer the case, thanks to the advent of Apple’s Scene Kit! The simplicity of Scene Kit lets beginners create simple and stylish games in a short amount of time.

In this 5-part Scene Kit tutorial series, you’ll create your first Scene Kit game: Geometry Fighter. This is a Fruit Ninja style game, with colorful geometric shapes thrown up into the air for your pure destructive indulgence.

In this first part of the series, you’ll simply create a blank project to have a good starting point, which is good for people who like to understand every step. If you’d prefer to dive right into coding, skip to Part 2 of this series, where we’ll have a starter project ready for you.

Getting Started

Download the starter package for this tutorial; it has some resources you’ll need later on.

Open Xcode and select File > New > Project from the main menu. If you want to become an Xcode ninja, use the shortcut command: ⇧⌘N.

Select the iOS/Application/Game template and click Next to continue:

CreateProject00

Now you need to provide some basic details about your project. Enter GeometryFighter for the Product Name, select Swift for Language, SceneKit for Game Technology, Universal for Devices, uncheck the unit tests and click Next:

CreateProject01

The final step is to choose a location to save your project. Pick a directory and select Create; Xcode will work its magic and generate your project.

Building the SceneKit Game Project

Now that you’ve generated your SceneKit game project from the template, it’s time to see it in action! :]

First, choose the iPhone 6 simulator from the toolbar, then press the Play button at the top to build and run your project. Xcode ninjas can simply press ⌘R:

CreateProject02

You’ll see the simulator launch, and your first 3D SceneKit game will appear. You can rotate the view of your 3D spaceship in the game by simply draging around the screen in different directions to change the camera angle:

BuildAndRun00

Cool, right? It’s okay if you want to take a moment and do a little happy dance in your seat. When you’re done, continue on with the rest of the tutorial.

Challenge

It’s time for your first mini-challenge! Before you move on, browse through the game template project. Pay close attention to the following key files and folders in the project navigator:

  • art.scnassets
  • ship.scn
  • GameViewController.swift
  • Assets.xcassets
  • LaunchScreen.storyboard

You may not understand how everything works yet, but try to figure out what you think each file might do. Because you’ll be cleaning up the project in the next section, take a look at the files and folders while they’re still around. :]

Cleaning up the Game Project

There are a few components you need to remove in order to start with a clean SceneKit game project. Don’t worry; you’ll re-create all of the content from scratch so you can get a better idea of how it works and from where it came.

Removing Unwanted Folders

The first thing to remove is the art.scnassets folder. Right-click the folder, select Delete and then click Move to Trash:

DeleteSCNAssetsFolder00

Note: For now, don’t worry too much about the purpose of the art.scnassets folder. Just know that the Xcode SceneKit game template generated art.scnassets for you automatically.

Cleaning up Main Project Files

The GameViewController.swift file is a key component of your game; it’s where all of your game logic and code will live. Before you start coding, it’s a good idea to purge all of the code the Xcode SceneKit game template created for you.

Replace the contents of GameViewController.swift with the following:

import UIKit
import SceneKit
 
class GameViewController: UIViewController {
 
  override func viewDidLoad() {
    super.viewDidLoad()
  }
 
  override var shouldAutorotate: Bool {
    return true
  }
 
  override var prefersStatusBarHidden: Bool {
    return true
  }
}

The boilerplate code generated the spaceship; you’ve replaced that code with an empty slate. shouldAutorotate() handles device rotation and prefersStatusBarHidden() hides the status bar.

Setting up SceneKit

Earlier, you learned how SceneKit uses the scene graph to display content on the screen. The SCNScene class represents a scene; you display the scene onscreen inside an instance of SCNView. Your next task is to set up a scene and its corresponding view in your project.

Setting up the Project View

Add the following property to GameViewController.swift, just above viewDidLoad():

var scnView: SCNView!

Here, you declare a property for the SCNView that renders the content of the SCNScene on the display.

Next, add the following function just below prefersStatusBarHidden():

func setupView() {
  scnView = self.view as! SCNView
}

Here, you cast self.view to a SCNView and store it in the scnView property so you don’t have to re-cast it every time you need to reference the view. Note the view is already configured as an SCNView in Main.storyboard.

Note: SCNView is a subclass of NSView in macOS, and a subclass of UIView in iOS. So whether you’re working with macOS or iOS, the same SCNView provides a view specifically for SceneKit content.

Setting up the Project Scene

It’s time to set up your scene. Add the following property to GameViewController.swift, just below the scnView property:

var scnScene: SCNScene!

Here, you declare a property for the SCNScene in your game. You’ll add components like lights, camera, geometry and particle emitters as children of this scene.

Now, add the following method below setupView():

func setupScene() {
  scnScene = SCNScene()
  scnView.scene = scnScene
}

This code creates a new blank instance of SCNScene and stores it in scnScene; it then sets this blank scene as the one for scnView to use.

Adding Finishing Touches

Now that you’ve created methods to set up instances of SCNView and SCNScene, you’ll need to call them from somewhere during the initialization step. A good place for that is just after the view finishes loading.

Add the following lines to viewDidLoad(), just after the call to super:

setupView()
setupScene()

Now it’s time to add an app icon to your game. Take a look in the Resources folder; you’ll find app icons of various sizes which you can use for this project.

To set an image as the icon for your game, open the Assets.xcassets folder, select the AppIcon entry and drag each file from the Resources folder to the appropriate spot. Your AppIcon panel should look like the following when you’re done:

AddAppIcon

Build and run your project. Behold — the blank screen of opportunity! :]

BuildAndRun01

Where to Go From Here?

Here is the completed project from this part of the tutorial series.

At this point, you should keep reading to the second part of this tutorial series, where you’ll get started making your game, learning about Scene Kit nodes along the way.

If you’d like to learn more, you should check out our book, 3D Apple Games by Tutorials. The book teaches you everything you need to know to make 3D iOS games, by making a series of mini-games like this one, including a games like Breakout, Marble Madness, and even Crossy Road.

In the meantime, if you have any questions or comments about this tutorial, please join the forum discussion below!

The post Scene Kit Tutorial with Swift Part 1: Getting Started appeared first on Ray Wenderlich.

Availability Attributes in Swift

$
0
0

Availability-featureWith every release of iOS, Apple introduces new frameworks and technologies and gets rid of others. These changes are always exciting to users — but they can be a real headache for developers. Availability attributes in Swift help give developers relief from these headaches.

Although most users adopt new versions of iOS quite quickly, it is still important to make sure your apps work on previous versions. Apple recommends supporting one system version back, meaning that when iOS 10 is released this fall, you should still support iOS 9.3.

But what if you want to add a feature that is only available in the newest version, or you need to use a deprecated API on older versions?

That is where Swift availability attributes come in. These attributes make it easy for you to ensure your code works on every system version you support.

The best way to understand availability is to get your hands dirty with some code. Let’s dive in!

Note: You will need Xcode 8 or above to work through this tutorial.

Getting Started

Download the starter project and open Persona.xcodeproj. Persona is an app that shows random famous people from history, from ancient emperors to musical artists.

Persona is built using the Contacts framework, which was first introduced in iOS 9. This means that Persona only works on iOS 9 or greater. Your task is to add support for iOS 8.4. Talk about #throwbackthursday! :]

First, examine the project. In the Project navigator, there are two groups, vCards and Images. For each person in the app, there is a .vcf and .jpg image to match.

Open PersonPopulator.swift. PersonPopulator has a class method generateContactInfo(), which chooses a random person and returns the contact and image data.

Next, open the Persona group and move to ViewController.swift. Each time the user taps the “Random” button, getNewData() is called and repopulates the data with the new person.

Supporting iOS 8.4 with Availability Attributes

This app currently supports only iOS 9.3 and above. However, supporting iOS 8.4, the most recent version of iOS 8, would be ideal.

Setting the oldest compatible version of iOS is simple. Go to the General pane in Persona’s iOS target settings. Find the Deployment Info section and set Deployment Target to 8.4:

Set the iOS deployment target to 8.4

After making this change, build the project; it looks like things are broken already.

Xcode shows two errors in PersonPopulator:

Contacts was not introduced until iOS 9

In order to fix this error, you need to restrict generateContactInfo() to certain iOS versions — specifically, iOS 9 and greater.

Adding Attributes

Open PersonPopulator.swift and add the following attribute right above generateContactInfo():

@available(iOS 9.0, *)

This attribute specifies that generateContactInfo() is only available in iOS 9 and greater.

Checking the Current Version

Now that you’ve made this change, build the project and notice the new error in ViewController.swift.

The new error states that generateContactInfo() is only available on iOS 9.0 or newer, which makes sense because you just specified this condition.

To fix this error, you need to tell the Swift compiler that this method will only be called in iOS 9 and above. You do this using availability conditions.

Open ViewController.swift and replace the contents of getNewData() with the following:

if #available(iOS 9.0, *) {
  print("iOS 9.0 and greater")
 
  let (contact, imageData) = PersonPopulator.generateContactInfo()
  profileImageView.image = UIImage(data: imageData)
  titleLabel.text = contact.jobTitle
  nameLabel.text = "\(contact.givenName) \(contact.familyName)"
} else {
  print("iOS 8.4")
}

#available(iOS 9.0, *) is the availability condition evaluated at compile time to ensure the code that follows can run on this iOS version.

The else block is where you must write fallback code to run on older versions. In this case, the else block will execute when the device is running iOS 8.4.

Build and run this code on the iPhone simulator running iOS 9.0 or greater. Each time you click “Random”, you’ll see iOS 9.0 and greater printed to the console:

The availability switch causes iOS 9.0 to be printed

Adding Fallback Code

The Contacts framework introduced in iOS 9 replaced the older Address Book framework. This means that for iOS 8.4, you need to fall back to the Address Book to handle the contact information.

Open PersonPopulator.swift and add the following line to the top of the file:

import AddressBook

Next, add the following method to PersonPopulator:

class func generateRecordInfo() -> (record: ABRecord, imageData: Data) {
  let randomName = names[Int(arc4random_uniform(UInt32(names.count)))]
 
  guard let path = Bundle.main.path(forResource: randomName, ofType: "vcf") else { fatalError() }
  guard let data = try? Data(contentsOf: URL(fileURLWithPath: path)) as CFData else { fatalError() }
 
  let person = ABPersonCreate().takeRetainedValue()
  let people = ABPersonCreatePeopleInSourceWithVCardRepresentation(person, data).takeRetainedValue()
  let record = NSArray(array: people)[0] as ABRecord
 
  guard let imagePath = Bundle.main.path(forResource: randomName, ofType: "jpg"),
        let imageData = try? Data(contentsOf: URL(fileURLWithPath: imagePath)) else {
      fatalError()
  }
  return (record, imageData)
}

This code does the same thing as generateContactInfo(), but using the Address Book instead. As a result, it returns an ABRecord instead of a CNContact.

Because the Address Book was deprecated in iOS 9, you need to mark this method as deprecated as well.

Add the following attribute directly above generateRecordInfo():

@available(iOS, deprecated:9.0, message:"Use generateContactInfo()")

This attribute lets the compiler know that this code is deprecated in iOS 9.0, and provides a message to warn you or another developer if you try to use the method in iOS 9 or greater.

Now it’s time to use this method.

Open ViewController.swift and add the following import statement to the top of the file:

import AddressBook

Also, add the following to the else block in getNewData():

print("iOS 8.4")
 
let (record, imageData) = PersonPopulator.generateRecordInfo()
 
let firstName = ABRecordCopyValue(record, kABPersonFirstNameProperty).takeRetainedValue() as! String
let lastName = ABRecordCopyValue(record, kABPersonLastNameProperty).takeRetainedValue() as! String
 
profileImageView.image = UIImage(data: imageData)
titleLabel.text = ABRecordCopyValue(record, kABPersonJobTitleProperty).takeRetainedValue() as? String
nameLabel.text = "\(firstName) \(lastName)"

This code gets the random record info and sets the labels and the image the same way you have it in generateContactInfo(). The only difference is instead of accessing a CNContact, you access an ABRecord.

Build and run the app on the simulator for iOS 9 or above, and everything will work as it did before. You will also notice that your app prints iOS 9.0 and greater to the console:

E=MC²

However, the goal of everything you have done so far is to make Persona work on iOS 8.4. To make sure that this all worked, you need to try it out in the iOS 8.4 Simulator.

Go to Xcode/Preferences/Components, and download the iOS 8.4 Simulator.

Download the iOS 8.4 simulator

When the simulator is finished downloading, select the iPhone 5 iOS 8.4 Simulator and click Run.

Select the iPhone 5 simulator

Persona runs the exact same way that it used to, but now it’s using the Address Book API. You can verify this in the console which says iOS 8.4, which is from your code in the else block of the availability conditional.

Availability for Cross-Platform Development

As if availability attributes weren’t cool enough already, what if I told you that they could make it much easier to reuse your code on multiple platforms?

Availability attributes let you specify the platforms you want to support along with the versions of those platforms you want to use. To demonstrate this, you’re going to port Persona to macOS.

First things first: you have to set up this new macOS target. Select File/New/Target, and under macOS choose Application/Cocoa Application.

New macOS target

Set the Product Name to Persona-macOS, make sure Language is set to Swift and Use Storyboards is selected. Click Finish.

Just like you added support for iOS 8.4, you need to support older versions of macOS as well. Select the macOS target and change the Deployment Target to 10.10.

Set the deployment target to 10.10

Next, delete AppDelegate.swift, ViewController.swift, and Main.storyboard in the macOS target. In order to avoid some boilerplate work, download these replacement files and drag them into the project.

Note: When adding these files to the Xcode project, make sure the files are added to the Persona-macOS target, not the iOS target.

Drag in the new files

If Xcode asks if you want to set up an Objective C Bridging Header, click Don’t create.

So far, this target has the image view and two labels set up similar to the Persona iOS app, with a button to get a new random person.

One problem right now is that the images and vCards only belong to the iOS target — which means that your macOS target does not have access to them. This can be fixed easily.

In the Project navigator, select all the files in the Images and vCards folder. Open the File Inspector in the Utilities menu, and under Target Membership, check the box next to Persona-macOS:

Add vCards to the macOS target

You need to repeat this step again for PersonPopulator.swift, since your macOS app needs this file as well.

Now that you’ve completed the setup, you can start digging into the code.

Multi-Platform Attributes

Open PersonPopulator.swift. You may notice that the attributes all specify iOS, but there’s nothing about macOS — yet.

iOS 9.0 was released alongside with OS X version 10.11, which means that the new Contacts framework was also introduced on OS X in 10.11.

In PersonPopulator above generateContactInfo(), replace @available(iOS 9.0, *) with the following:

@available(iOS 9.0, OSX 10.11, *)

This specifies that generateContactInfo() is first available on OS X 10.11, to match the introduction of the Contacts framework.

Note: Because OS X was renamed macOS in macOS 10.12 Sierra, Swift recently added macOS as an alias for OSX. As a result, both OSX and macOS can be used interchangeably.

Next, you need to change the availability of generateRecordInfo() so it also works on macOS.

In the previous change, you combined iOS and OS X in a single attribute. However, that can only be done in attributes using that shorthand syntax; for any other @available attribute, you need to add multiple attributes for different platforms.

Directly after the deprecation attribute, add the following:

@available(OSX, deprecated:10.11, message:"Use generateContactInfo()")

This is the same thing as the line above it, but specifies for OS X instead of iOS.

Switch to the Persona-macOS target scheme, select My Mac as the build device, and build the project. There is one error in generateRecordInfo(), at the following code block:

let person = ABPersonCreate().takeRetainedValue()
let people = ABPersonCreatePeopleInSourceWithVCardRepresentation(person, data).takeRetainedValue()
let record = NSArray(array: people)[0]

The Contacts framework is a little different between iOS and macOS, which is why this error popped up. To fix this, you want to execute different code on iOS and macOS. This can be done using a preprocessor command.

Replace the previous code with the following:

#if os(iOS)
  let person = ABPersonCreate().takeRetainedValue()
  let people = ABPersonCreatePeopleInSourceWithVCardRepresentation(person, data).takeRetainedValue()
  let record = NSArray(array: people)[0] as ABRecord
#elseif os(OSX)
  let person = ABPersonCreateWithVCardRepresentation(data).takeRetainedValue() as AnyObject
  guard let record = person as? ABRecord else {
    fatalError()
  }
#else
  fatalError()
#endif

This makes the code work the same way on both platforms.

Linking Up the UI

Now that you finished updating PersonPopulator, setting up ViewController will be a breeze.

Open Persona-macOS’s ViewController.swift and add the following line to awakeFromNib():

getNewData(nil)

Next, add the following to getNewData(_:):

let firstName: String, lastName: String, title: String, profileImage: NSImage
 
if #available(OSX 10.11, *) {
  let (contact, imageData) = PersonPopulator.generateContactInfo()
  firstName = contact.givenName
  lastName = contact.familyName
  title = contact.jobTitle
  profileImage = NSImage(data: imageData)!
} else {
  let (record, imageData) = PersonPopulator.generateRecordInfo()
  firstName = record.value(forProperty: kABFirstNameProperty) as! String
  lastName = record.value(forProperty: kABLastNameProperty) as! String
  title = record.value(forProperty: kABTitleProperty) as! String
  profileImage = NSImage(data: imageData)!
}
 
profileImageView.image = profileImage
titleField.stringValue = title
nameField.stringValue = "\(firstName) \(lastName)"

Other than some small differences between iOS and macOS APIs, this code looks very familiar.

Now it’s time to test the macOS app. Change the target to Persona-macOS and select My Mac as the build device. Run the app to make sure it works properly.

Sir Isaac Newton is impressed.

Newton seems impressed! By making just those small changes to PersonPopulator, you were able to easily port your iOS app to another platform.

More Info About @available

Availability attributes can be a little confusing to format and to use. This section should help clear up any questions you may have about them.

These attributes may be placed directly above any declaration in your code, other than a stored variable. This means that all of the following can be preceded by an attribute:

  • Classes
  • Structs
  • Enums
  • Enum cases
  • Methods
  • Functions

To indicate the first version of an operating system that a declaration is available, use the following code:

@available(iOS, introduced: 9.0)

The shorthand, and preferred syntax, for marking the first version available is shown below:

@available(iOS 9.0, *)

This shorthand syntax allows you to include multiple “introduced” attributes in a single attribute:

@available(iOS, introduced: 9.0)
@available(OSX, introduced: 10.11)
// is replaced by
@available(iOS 9.0, OSX 10.11, *)

Other attributes specify that a certain declaration no longer works:

@available(watchOS, unavailable)
@available(watchOS, deprecated: 3.0)
@available(watchOS, obsoleted: 3.0)

These arguments act in similar ways. unavailable signifies that the declaration is not available on any version of the specified platform, while deprecated and obsoleted mean that the declaration is only relevant on older platforms.

These arguments also let you provide a message to show when the wrong declaration is used, as you used before with the following line:

@available(OSX, deprecated:10.11, message: "Use generateContactInfo()")

You can also combine a renamed argument with an unavailable argument that helps Xcode provide autocomplete support when used incorrectly.

@available(iOS, unavailable, renamed: "NewName")

Finally, the following is a list of the platforms you can specify availability for:

  • iOS
  • OSX
  • tvOS
  • watchOS
  • iOSApplicationExtension
  • OSXApplicationExtension
  • tvOSApplicationExtension
  • watchOSApplicationExtension

The platforms that end with ApplicationExtension are extensions like custom keyboards, Notification Center widgets, and document providers.

Note: The asterisk in the shorthand syntax tells the compiler that the declaration is available on the minimum deployment target on any other platform.

For example, @available(iOS 9.0, *) states that the declaration is available on iOS 9.0 or greater, as well as on the deployment target of any other platform you support in the project.

On the other hand, @available(*, unavailable) states that the declaration is unavailable on every platform supported in your project.

Where to Go From Here?

Here is the final project to compare with your own.

Availability Attributes make the task of supporting various platforms and versions in your applications extremely easy. Designed directly into the Swift language, they work with the compiler and with you to streamline the process of adding cross-platform and version compatibility to your project.

If you have any questions or comments about how I’ve used Availability Attributes in this tutorial, let me know in the comments below!

The post Availability Attributes in Swift appeared first on Ray Wenderlich.

Material Design, and Core Data – Podcast S06 E08

$
0
0
core data

Learn all about Material Design, and changes to Core Data in this episode!

Join Mic, Jake, and Huyen as they first discuss Material Design and it’s impact on Android since its release, and then delve into the big changes to Core Data in iOS 10 and macOS Sierra.

[Subscribe in iTunes] [RSS Feed]

Our Sponsor

Tired of your dead-end job? Ever thought about changing your career? DevMountain makes it easier than ever to land your perfect job in tech.

DevMountain is Utah’s number one coding school teaching modern technical skills for today’s fast-paced, high-tech industries. They offer both full-time and part-time coding courses in web development, iOS development, and UX design.

DevMountain’s expert faculty are passionate about sharing their craft and empowering the next wave of programmers, entrepreneurs and designers.

Visit http://devmountain.com and start your new career today!

Interested in sponsoring a podcast episode? We sell ads via Syndicate Ads, check it out!

Show Notes

Contact Us

Where To Go From Here?

We hope you enjoyed this episode of our podcast. Be sure to subscribe in iTunes to get notified when the next episode comes out.

We’d love to hear what you think about the podcast, and any suggestions on what you’d like to hear in future episodes. Feel free to drop a comment here, or email us anytime at podcast@raywenderlich.com.

The post Material Design, and Core Data – Podcast S06 E08 appeared first on Ray Wenderlich.

Scene Kit Tutorial with Swift Part 2: Nodes

$
0
0

Thumb

Welcome back to our Scene Kit Tutorial with Swift series!

This tutorial series will show you how to create your first game with Scene Kit, Apple’s built-in 3D game framework.

In the first part of the series, you learned how to make an empty Scene Kit project as a good starting point.

In this second part of the series, you’ll get started making your game, learning about Scene Kit nodes along the way.

Let’s dive back in!

Note: This tutorial begins where the previous tutorial left off. If you didn’t follow along, no sweat – you can simply use the starter project for this tutorial.

Getting Started

In the previous tutorial, you learned that SceneKit organizes the components of your game into a hierarchy known as the scene graph.

Each element of your game — such as lights, cameras, geometry and particle emitters — are called nodes, and nodes are stored in this tree-like structure.

To illustrate how this works, think back to a childhood nursery rhyme you might have heard…

🎵 The hip bone’s connected to the back bone 🎵 The back bone’s connected to the shoulder bone… 🎵

You’re right! It’s the classic song Dem Dry Bones. Bonus points if you know a classic video game that makes particularly good use of this concept. ;]

With those lyrics in mind, take a look at the following anatomically-correct structure of a rare four-fingered skeleton:

Skeletons

To help illustrate how you can construct a node-based hierarchy from this skeleton, think of each bone in the skeleton as a node.

As the song points out, the shoulder bone’s connected to the back bone. So consider the back bone as the parent node of the shoulder bone, and the shoulder bone as the child node of the back bone.

To add the shoulder bone to the scene, you add it as a child of the back bone. You can continue to construct the whole arm in this way, adding child bones to parent bones, right up to the little pinky.

To position a bone, you position it relative to its parent. For example, to wave the skeleton’s left arm, you simply rotate the shoulder node back and forth as indicated by the little blue arrow. All child nodes of the shoulder node will rotate along with their parent.

Congratulations! You just passed skeleton anatomy 101! :]

From a technical perspective, a single node is represented by the SCNNode class and represents a position in 3D space relative to its parent node. A node on its own has no visible content, therefore, it’s invisible when rendered as part of a scene. To create visible content, you have to add other components such as lights, cameras or geometries (like bones) to the node.

The scene graph contains a special node which forms the foundation of your node-based hierarchy: the root node. To construct your scene, you add your nodes either as child nodes of the root node or as a child of one of the root node’s descendants.

In this tutorial, you’ll start to work with a few simple nodes in SceneKit, such as camera and geometry nodes. By the end of the tutorial, you’ll have rendered a simple 3D cube to the screen!

Asset Catalogs

Once you’re a successful and rich 3D game designer, you’ll have enough money to hire your very own graphics artist and sound engineer, which will free you up to focus on the game code alone. :] The SceneKit asset catalog has been designed specifically to help you manage your game assets separately from the code.

An asset catalog lets you manage your game assets in a single folder. To use it, simply add a folder with the .scnassets extension to your project and save all your game assets in that folder. Xcode will copy everything in your catalog to your app bundle at build time. Xcode preserves your assets folder hierarchy; this gives you full control over the folder structure.

By sharing your assets folder with your artists, they can quickly fix any issues, such as a not-quite-so-scary cross-eyed monster and have it ready for the next build, without having to copy the changed assets back into the project.

Adding an Asset Catalog

Now that you understand what the asset catalog is all about, you’ll add one to Geometry Fighter.

Drag and drop the GeometryFighter.scnassets folder from the resources folder into your game project in Xcode. In the popup that appears, make sure that Copy items if needed, Create Groups and your GeometryFighter target are all checked, then click Finish.

CopySCNAssetsFolder0

Select the GeometryFighter.scnassets folder in the project navigator. Notice the additional settings unique to the asset catalog in the right hand panel. Expand the GeometryFighter.scnassets folder and sub-folders to see more detail about your assets:

CopySCNAssetsFolder1

There are two folders inside the asset catalog:

  • Sounds: Contains all of the sound assets you’ll need for your game.
  • Textures: Contains all of the images you’ll need.

Feel free to take a sneak peek at what’s inside each folder.

Adding a Launch Screen

Now that you’ve imported the asset catalog, you’ll take care of some basic housekeeping steps, including adding a proper image to the launch screen.

First, click Assets.xcassets in the project navigator. Drag and drop GeometryFighter.scnassets/Textures/Logo_Diffuse.png into the assets, below the AppIcon.

AddLogoToXCAssets

Next, click LaunchScreen.storyboard in the project navigator. Select the main view and set the Background property to a dark blue:

SetViewBackgroundColor

Next, drag the Logo_Diffuse image from the Media Library into the center of the view. Set the Content Mode property of your new image to Aspect Fit:

AddLogoToView

You’re almost done with your launch screen. All you need to do is add some constraints so the splash image works on all devices. Click the Pin button at the bottom, toggle the constraints on for all four edges and click Add 4 Constraints as shown below:

AddConstraints0

You’re done setting up your launch screen! Build and run your app; you’ll see your shiny new launch screen appear:

BuildAndRun0

Adding a Background Image

Once your splash screen disappears, you’re dumped back to the blank screen of opportunity. Time to add a nice clean background so you don’t feel like you’re staring into a black hole.

To do this, add the following line of code to the bottom of setupScene() in GameViewController.swift:

scnScene.background.contents = "GeometryFighter.scnassets/Textures/Background_Diffuse.png"

This line of code instructs the scene to load the Background_Diffuse.png image from the asset catalog and use it as the material property of the scene’s background.

Build and run; you should now see a blue background image once the game starts:

BuildAndRun1

That’s it! You’ve finished all the basic housekeeping tasks for your project. Your game now has a flashy app icon, a splash screen and a pretty background that’s all ready to display the nodes you’re about to add to the scene.

The SceneKit Coordinate System

Before you can start adding nodes to the scene, you first need to understand how SceneKit’s coordinate system works so you can position your nodes where you want them.

In a 2D system such as UIKit or SpriteKit, you use a point to describe the position of a view or a sprite on the x and y axes. To place an object in 3D space, you also need to describe the depth of the object’s position on the z-axis.

Consider the following simple illustration:

CoordinateSystem

SceneKit uses this three-axis system to represent position in 3D space. The red blocks are placed along the x-axis, the green blocks along the y-axis and the blue blocks along the z-axis. The grey cube in the very center of the axis indicates the origin, which has coordinates of (x:0, y:0, z:0).

SceneKit uses the SCNVector3 data type to represent coordinates in three dimensions as a three-component vector. Here’s how you create a vector in code:

let position = SCNVector3(x: 0, y: 5, z: 10)

This declares the variable position with a vector of (x:0, y:5, z:10). You can easily access individual properties of the vector like so:

let x = position.x
let y = position.y
let z = position.z

If you’ve worked with CGPoint before, you can easily draw comparisons between it and SCNVector3.

Note: Nodes added to the scene have have a default position of (x:0, y:0, z:0), which is always relative to the parent node. To place a node at the desired location, you need to adjust the position of the node relative to its parent (local coordinates) — not the origin (world coordinates).

Cameras

Now that you understand how to position nodes in SceneKit, you’re probably wondering how to actually display something onscreen. Think back to the analogy of the movie set from Part 1 of this tutorial series. To shoot a scene, you’d position a camera looking at the scene and the resulting image of that scene would be from the camera’s perspective.

SceneKit works in a similar fashion; the position of the node that contains the camera determines the point of view from which you view the scene.

The following illustration demonstrates how a camera works in SceneKit:

CameraNode

There are a few key points in the previous diagram:

  • The camera’s direction of view is always along the negative z-axis of the node that contains the camera.
  • The field of view is the limiting angle of the viewable area of your camera. A tight angle provides a narrow view, while a wide angle provides a wide view.
  • The viewing frustum determines the visible depth of your camera. Anything outside this area — that is, too close or too far from the camera — will be clipped and won’t appear on the screen.

A SceneKit camera is represented by SCNCamera, whose xPov and yPov properties let you adjust the field of view, while zNear and zFar let you adjust the viewing frustum.

One key point to remember is that a camera by itself won’t do anything unless it’s a part of the node hierarchy.

Adding a Camera

Time to try this out. Open GameViewController.swift and add the following property below scnScene:

var cameraNode: SCNNode!

Next, add the following method below setupScene():

func setupCamera() {
  // 1
  cameraNode = SCNNode()
  // 2
  cameraNode.camera = SCNCamera()
  // 3
  cameraNode.position = SCNVector3(x: 0, y: 0, z: 10)
  // 4
  scnScene.rootNode.addChildNode(cameraNode)
}

Taking a closer look at the code:

  1. First, you create an empty SCNNode and assign it to cameraNode.
  2. Next, you create a new SCNCamera object and assign it to the camera property of cameraNode.
  3. Then, you set the position of the camera at (x:0, y:0, z:10).
  4. Finally, you add cameraNode to the scene as a child node of the scene’s root node.

Finish things off by calling the method you just added in viewDidLoad(), right below setupScene():

setupCamera()

There is no need to build and run. Even though you just added a camera to the scene, there’s still nothing to look at, which means you won’t see anything different. But that’s about to change!

Geometry

In order to create visible content, you need to add a geometry object to a node. A geometry object represents a three-dimensional shape and is created out of many points known as vertices that defines polygons.

Additionally, a geometry object can contain material objects that modify the appearance of a geometry’s surface. Materials let you specify information such as the color and texture of the geometry’s surface, and how the geometry should respond to light along with other visual effects. A collection of vertices and materials is known as a model or a mesh.

SceneKit includes the following built-in geometric shapes:

PrimitiveGeometry

In the front row, starting from the left, you have a cone, a torus, a capsule and a tube. In the back row, again starting from the left, you have a pyramid, a box, a sphere and a cylinder.

Adding ShapeTypes

Before you start adding geometric shapes to the scene, create a new Swift file to define a ShapeType enum for the different shapes you’ll use in the game.

Right-click on the GeometryFighter group and select New File…. Select the iOS/Source/Swift File template and click Next:

AddNewSwiftFile0

Name the file ShapeType.swift, make sure it’s included in your project, then click Create.

Once the file’s been created, open ShapeType.swift and replace its contents with the following:

import Foundation
 
// 1
enum ShapeType:Int {
 
  case box = 0
  case sphere
  case pyramid
  case torus
  case capsule
  case cylinder
  case cone  case tube
 
  // 2
  static func random() -> ShapeType {
    let maxValue = tube.rawValue
    let rand = arc4random_uniform(UInt32(maxValue+1))
    return ShapeType(rawValue: Int(rand))!
  }
}

The code above is relatively straightforward:

  1. You create a new enum named ShapeType that enumerates the various shapes.
  2. You also define a static method named random() that generates a random ShapeType. This feature will come in handy later on in your game.

Adding a Geometry Node

Your next task is to create a method that spawns the various random shapes defined in ShapeType.

Add the following method to GameViewController.swift, right below setupCamera():

func spawnShape() {
  // 1
  var geometry:SCNGeometry
  // 2
  switch ShapeType.random() {
  default:
    // 3
    geometry = SCNBox(width: 1.0, height: 1.0, length: 1.0,
      chamferRadius: 0.0)
  }  
  // 4
  let geometryNode = SCNNode(geometry: geometry)
  // 5
  scnScene.rootNode.addChildNode(geometryNode)
}

Taking each numbered comment in turn:

  1. First, you create a placeholder geometry variable for use a bit later on.
  2. Next, you define a switch statement to handle the returned shape from ShapeType.random(). It’s incomplete at the moment, and only creates a box shape; you’ll add more to it in the challenge at the end of this tutorial.
  3. Then, you create an SCNBox object and store it in geometry. You specify the width, height and length, along with the chamfer radius (which is a fancy way of saying rounded corners).
  4. Here, you create an instance of SCNNode named geometryNode. This time, you make use of the SCNNode initializer which takes a geometry parameter to create a node and automatically attach the supplied geometry.
  5. Finally, you add the node as a child of the scene’s root node.

Now you need to call this method. Add the following line to viewDidLoad() below setupCamera():

spawnShape()

Build and run; you’ll see a white square displayed onscreen:

BuildAndRun2

There are a few things to observe here:

  • The box node is the default shape from spawnShape(), and it sits at (x:0, y:0, z:0) in the scene.
  • You’re viewing the scene through your cameraNode. Since the camera node lives at (x:0, y:0: z:10), the box is smack dab in the center of the camera’s viewable area.

OK, it’s not very exciting, and it’s hardly three-dimensional — but fear not… the next section changes all of that!

Built-in View Features

SCNView comes with a few out-of-the-box features to help make your life easier.

Add the following lines to setupView() in GameViewController.swift, just below the current implementation:

// 1
scnView.showsStatistics = true
// 2
scnView.allowsCameraControl = true
// 3
scnView.autoenablesDefaultLighting = true

Here’s an explanation of the code above:

  1. showStatistics enables a real-time statistics panel at the bottom of your scene.
  2. allowsCameraControl lets you manually control the active camera through simple gestures.
  3. autoenablesDefaultLighting creates a generic omnidirectional light in your scene so you don’t have to worry about adding your own light sources.

Build and run; things should look a little more exciting this time around!

BuildAndRun3

You can use the following gestures to control the active camera in your scene:

  • Single finger swipe: Rotates your active camera around the contents of the scene.
  • Two finger swipe: Moves, or pans your camera left, right, up or down in the scene.
  • Two finger pinch: Zooms the camera in and out of the scene.
  • Double-tap: If you have more than one camera, this switches between the cameras in your scene. Of course, since you have only one camera in the scene, this doesn’t do that. However, it also has the effect of resetting the camera to its original position and settings.

Working with Scene Statistics

Find the statistics panel at the bottom of the screen:

Statistics0

Here’s a quick breakdown of what each element means:

  • fps: Stands for frames per second. This a measurement of the total amount of consecutive frame redraws done in one-second. The lower this amount, the more poorly your game is performing. You typically want your game to run at 60fps, which will make your game look and feel smooth.
  • : Stands for total draw calls per frame. This is typically the total amount of visible objects drawn per single frame. Lights affecting objects can also increase the amount of draw calls of an object. The lower this amount, the better.
  • : Stands for total polygons per frame. This the total amount of polygons used to draw a single frame for all the visible geometry. The lower this amount, the better.
  • : Stands for total visible light sources. This is the total amount of light sources currently affecting visible objects. The SceneKit guidelines recommend not using more than 3 light sources at a time.

Click on the + button to expand the panel and reveal more detail:

Statistics1

This panel provides you with the following information:

  • Frame time: This is the total amount of time it took to draw a single frame. A frame time of 16.7ms is required to achieve a frame rate of 60fps.
  • The color chart: This provides you with a rough frame time percentage breakdown per component within the SceneKit rendering pipeline.

From this example, you now know that it took 22.3ms to draw a single frame of which ±75% was used for Rendering, and ±25% was used for GL Flush.

Note: The SceneKit rendering pipeline will be discussed in more detail later on.

You can click the button to minimize the panel again.

Isn’t it great that all these features are built-in? :]

Challenges

It’s important for you to practice what you’ve learned, on your own, so many parts of this series have one or more challenges associated with them.

I highly recommend trying all of the challenges. While following a step-by-step tutorial is educational, you’ll learn a lot more by solving a problem by yourself.

If you get stuck, you can find solutions in the resources for the tutorial — but to get the most from this series, give it your best shot before you look!

Your First Challenge

There’s only one challenge in this tutorial, but it’s a fun one.

Your challenge is to improve the switch statement inside spawnShape() to handle the remaining shapes in the enumerator.

Use Apple’s official SceneKit documentation (http://apple.co/2aDBgtH) as a guide to the various geometric shapes. Also, take a look at the ShapeType enum to see which shapes are left to create; their names should give you a good idea of where to start.

Don’t worry too much about the sizes to use; just try to make them about the same relative size as the box you made earlier.

After this challenge, you’ll have a firm grasp on some of the most fundamental concepts in SceneKit! :]

Where to Go From Here?

Here is the completed project from this part of the tutorial series.

At this point, you should keep reading to the third part of this tutorial series, where you’ll learn how to make the geometry move via Scene Kit physics.

If you’d like to learn more, you should check out our book, 3D Apple Games by Tutorials. The book teaches you everything you need to know to make 3D iOS games, by making a series of mini-games like this one, including a games like Breakout, Marble Madness, and even Crossy Road.

In the meantime, if you have any questions or comments about this tutorial, please join the forum discussion below!

The post Scene Kit Tutorial with Swift Part 2: Nodes appeared first on Ray Wenderlich.

iOS 10 Screencast: Providing Haptic Feedback


Scene Kit Tutorial with Swift Part 3: Physics

$
0
0

Thumb

Welcome back to our Scene Kit Tutorial with Swift series!

This tutorial series will show you how to create your first game with Scene Kit, Apple’s built-in 3D game framework.

In the first part of the series, you learned how to make an empty Scene Kit project as a good starting point.

In the second part of the series, you started making your game, learning about Scene Kit nodes along the way.

In this third part of the series, you’ll learn how to make your geometry move through the power of Scene Kit physics.

Let’s dive back in!

Note: This tutorial begins where the previous tutorial left off. If you didn’t follow along, no sweat – you can simply use the starter project for this tutorial.

Getting Started

In this tutorial, you’ll use SceneKit’s physics engine to add physics to your game.

SceneKit’s physics engine is powerful, yet easy to use. You simply tell SceneKit on which objects you want to apply physics, and the engine will take over from that point, simulating things such as gravity and collisions.

Before you dive into integrating physics into your game, you’ll first need to add some game utilities to your project.

Introducing the Game Utilities

The game utilities were created especially for you. They include helper methods which handle the complicated bits in your game. This lets you focus on the gameplay rather than those pesky bits.

Download the SceneKit_Part3_resources here.

Adding the Game Utilities

To add the game utilities, simply drag and drop the GameUtils folder into your project under the GeometryFighter group folder:

AddGameUtils0

Leave all the settings at their defaults and click Finish:

AddGameUtils1

This imports the entire GameUtils folder into your project as a group. Expand this group folder and have a quick look at some of the helper methods. Don’t worry too much if some of the code doesn’t make sense to you yet.

Physics

Time for a quick status check of the current state of your game. Build and run the game; a cool random geometric object spawns out of thin air like some kind of dark magic. This might not seem like much right now, but things will definitely start to shape up soon! :]

The freshly spawned object just hangs there in an empty space and doesn’t do much. Sure, you can rotate the camera around it and zoom in and out, but that’s about it. It’s not much of a fun game. To pump up the excitement level, it would be nice if the object at least moved around a little.

Now, you could take the long way around and manipulate the object’s position and rotation over time so that it spins and moves around. You’d soon realize that although it’s possible to animate objects in this manner, it requires a lot of coding effort — especially when you add into the mix other features like realistic collisions and interactions between objects.

Thankfully, the developers at Apple have already thought about this; to this end, they integrated a very powerful 3D physics engine into SceneKit. To make use of this built-in physics engine, you simply need to make the engine aware of your object.

In the same way you attach geometry information to your node, you can attach a physics body to your node. The physics body describes all the physical properties of your node, which includes things such as shape, mass, friction, damping and restitution. The physics engine takes all this information into account when it simulates the real-world physics interactions of your objects. This includes things such as gravity, friction and collisions with other bodies within the physics world.

The next section details some of the important characteristics of a physics body.

Physics Body Types

One of the key properties you must specify when creating a physics body is its type. The physics body type defines how the body interacts with forces and other bodies in the simulation.

There are three types used in SceneKit:

  • Static bodies don’t move: while other objects can collide with these bodies, the static bodies themselves are unaffected by any forces and collisions in the simulation. You can use this type for things like walls and massive immobile boulders.
  • Dynamic bodies are automatically moved by the physics engine in response to forces and collisions. You can use this type for things such as movable chairs, tables and cups.
  • Kinematic bodies are not automatically moved by the physics engine in response to forces and collisions. In other words, if a kinematic body collides with a dynamic body, the dynamic body will move, but the kinematic body won’t. However, you can move kinematic bodies around manually in code. You can use this type for things you want to control manually, such as moving elevators or a door that can open and close.

Physics Shapes

In addition to the type of the body, another import property you must specify when creating a physics body is its shape. The physics shape defines the 3D shape used by the physics engine during collision detections. While the geometry defines the visuals of the node, the physics body defines how the node interacts with other objects in a physics simulation.

You can make the shape exactly the same as the visual geometry, but this is often more computationally expensive than you need (hence causing your game to run slower). Instead, you should usually work with a simplified version of the geometry for your shape, such as a simple bounding box, sphere or one of the provided primitive shapes that roughly matches the node’s visible appearance like so:

PhysicsShapes

Adding Physics

Now that you’ve learned the theory behind the physics, it’s time to start using these concepts to move things around in your game.

In SceneKit, all the physics bodies are SCNPhysicsBody objects. Once you create the physics body, you can assign it to the physicsBody property of the SCNNode instance. Once you assign the physics body to the appropriate node, the physics engine can simulate the physics for you. It’s that simple! :]

Open GameViewController.swift and add the following after the line of code that creates geometryNode in spawnShape():

geometryNode.physicsBody =
  SCNPhysicsBody(type: .dynamic, shape: nil)

This line of code creates a new instance of SCNPhysicsBody and assigns it to the physicsBody property of geometryNode. When you create a physics body, you specify the type and shape of the body. If you pass in nil for the physics shape, SceneKit will automatically generate a shape based on the visual geometry of the node. Neat, huh?

If you want to add more detail to the physics shape, you can create a SCNPhysicsShape and use that for the shape instead of passing in nil.

Build and run your game; a random shape spawns into the scene, and then drops out of the air with all the grace of a dead bird, falling out of sight:

BuildAndRun0

You can even pan the camera to watch the object fall into oblivion. What you’re witnessing here is the effect of gravity acting on the object. A scene in SceneKit has gravity turned on by default. Now that the spawned object has a physics body, the physics simulation will apply simulated forces — such as gravity — to the object.

Forces

Think about objects in real life for a moment: to make something move — such as a spoon on top of a table — you have to apply some type of physical force on it. Unless you’re living inside the Matrix, your name is Neo and there isn’t even an actual spoon to begin with. :]

The SceneKit physics engine does a pretty good job mimicking real-life physics, so just as you’d apply a force to move an object in real life, you’ll need to apply a force on your physics body to move it around.

When you apply a force to a physics body, you use applyForce(direction: at: asImpulse:) and pass in an instance of SCNVector3 for both the force and the position where you want to apply that force, along with whether the force should be applied as an impulse. The force you apply affects both the linear and angular acceleration of the physics body.

An impulse applies the force only once to the physics body, such as when you kick a ball. Forces that aren’t impulses are applied at each step in the physics simulation. SceneKit will add up all applied forces on the object and accelerate the physics body according to the net result of those forces. This can simulate something like a booster rocket, where the force is continuous.

Earlier, you learned that a force is a vector with an x, y and z component. But what does that mean? Take a look at the diagram below:

ForceVector

A force has both magnitude and direction, so the vector determines the magnitude of the force for each individual axis. In the example above, applying a force with a vector of (x:0, y:10, z:0) moves the body upwards with a vertical force.

To apply a horizontal force, you would only specify the magnitude of the force on the x axis using a vector of (x:10, y:0, z:0). To move the body left instead of right, you would apply a negative magnitude of force on the x axis. When you combine various vectors together like (x:10, y:10, z:0), you can control exactly how you want the body to move — in this case, diagonally.

Forces can also be applied at a specific position on a physics body to produce different movements:

ForceAtLocation

Again, it helps to think of real-life examples. If you had a block in front of you and pushed it, the block would move differently depending on the spot you applied the push. Applying the same force to the left or right of the body’s center of mass, for example, at (x:1, y:0, z:0) would cause it to spin. Applying the force directly in line with the center of mass at (x:0, y:0, z:0) wouldn’t produce a spin.

Applying Force

Roll up your sleeves — it’s time to apply some force! :]

Add the following code after the line where you create the physics body for geometryNode inside spawnShape():

// 1
let randomX = Float.random(min: -2, max: 2)
let randomY = Float.random(min: 10, max: 18)
// 2
let force = SCNVector3(x: randomX, y: randomY , z: 0)
// 3
let position = SCNVector3(x: 0.05, y: 0.05, z: 0.05)
// 4
geometryNode.physicsBody?.applyForce(force,
  at: position, asImpulse: true)

Taking each commented line in turn:

  1. This creates two random float values that represent the x- and y-components of the force. It uses an extension on Float from the utilities you added earlier in this tutorial.
  2. Next, you use those random components to create a vector to represent this force.
  3. This creates another vector that represents the position to which the force will be applied. The position is slightly off-center so as to create a spin on the object.
  4. Finally, using all those components, you apply the force to geometryNode’s physics body using applyForce(direction: at: asImpulse:).

Build and run; as the object spawns out of thin air, some magical force kicks it up into the air instead of dropping like a dead bird:

BuildAndRun1

As gravity takes its toll, the object eventually falls back down.

Torque

Torque is another rotational force you can apply to a body using applyTorque(torque: asImpulse:). Torque only affects the angular momentum (spin) of the physics body, not the linear momentum (x, y, z). Applying torque causes an object to spin around its center of mass.

To see how torque affects a physics body, take a look at the following illustration:

TorqueAngles

When applying a torque force, you specify a four-component vector using SCNVector4 rather than a three-component vector as you do with forces. The x-, y- and z-components determine the rotation axis, while the w-component determines the rotation angle, that is, the magnitude of the torque.

Just as you do with applyForce(direction: at: asImpulse:), you can choose whether or not to apply the torque as an impulse, which affects how the physics engine treats the vector.

If the torque is an impulse, the directional vector is treated as an instantaneous change in the angular momentum. Think of spinning a basketball on your finger; to keep the ball spinning, you have to quickly flick the side of the ball with you hand, which applies an a impulse with each flick that instantaneously increases the angular momentum of the ball.

When a torque is not applied as an impulse, it’s applied after each physics simulation step. SceneKit will sum all applied forces and torques, and accelerate the angular force of the physics body according to the net effect of those forces. Think of this as a planet spinning at a constant speed around its own axis.

Note: The SceneKit physics simulation uses the International System of Units (SI) for measurements: Kilograms for units of mass, Newtons for units of force, Newton-second for units of impulse, and Newton-meter for units of torque.

Adding Flair

Now that you’ve got your geometric object moving, you may have noticed it spawns out of thin air right in the middle of the screen, which looks a bit awkward. To fix that, you’ll shift the camera on the y-axis a bit so that the object spawns off-screen.

Positioning the Camera

To move the camera position up, replace the line where you set the camera’s position in setupCamera() with the following:

cameraNode.position = SCNVector3(x: 0, y: 5, z: 10)

Build and run, and you’ll see that the object appears to spawn off-screen!

Offscreen

Adding some Color

As a final touch, you’ll add a bit of variety to your randomly generated shapes.

Add the following lines inside spawnShape(), after the spot where you randomly create geometry, but just before you create geometryNode:

geometry.materials.first?.diffuse.contents = UIColor.random()

To color your random object, you modify materials on geometry; this line gets the first available material of geometry and sets the diffuse property’s contents to a random UIColor. The random() method on UIColor is another helper defined as an extension inside the game utilities.

Note: The takeaway here is that you can assign a UIColor to the diffuse property’s content in order to change the object’s color.

Finally, build and run your game to see a beautifully colored object:

BuildAndRun2

Wouldn’t it be neat if you could spawn more than one object? You’ll fix this…in the next part of this series! :]

Where to Go From Here?

You’re making excellent progress, and you’re more than halfway through your first SceneKit game! If you’re flexible (unlike me), give yourself a pat on the back.

Here is the finished project from this part of the tutorial.

At this point, you should keep reading on to the fourth part of this tutorial series, where you’ll learn how to make geometry spawn over time using the Scene Kit render loop.

If you’d like to learn more, you should check out our book 3D iOS Games by Tutorials. The book teaches you everything you need to know to make 3D iOS games, by making a series of mini-games like this one, including a games like Breakout, Marble Madness, and even Crossy Road.

In the meantime, if you have any questions or comments about this tutorial, please join the forum discussion below!

The post Scene Kit Tutorial with Swift Part 3: Physics appeared first on Ray Wenderlich.

Getting Started with Mobile Analytics

$
0
0

Analytics-featureMobile analytics is one of those buzzwords that everyone seems to be talking about, but the definition of that can be kind of nebulous. What is mobile analytics, anyway?

Essentially, mobile analytics is a three-step process:

  1. Collecting data from your app.
  2. Analyzing the data to find out how users work with your app.
  3. Using that data to make business decisions about your app and its future development.

In this article, I’ll cover why you should add mobile analytics into to your app, and share some real-world, surprising insights I’ve gained from using analytics over the years.

Once you’re convinced of the benefits of mobile analytics, I’ll help you get started by sharing my three favorite mobile analytics platforms (and one honorable mention) and show you the pros and cons of each.

Let’s get analyzing!

Why Mobile Analytics?

Not using analytics in your app? You’re really putting yourself at a disadvantage.

Analytics can help you make data-driven decisions based on numbers — instead of making qualitative judgments based on speculation and best guesses. A scientific approach to planning your app’s future will helps you focus your limited development resources on the conversion strategies and features that resonate most with your users.

Specifically, analytics can help you discover which parts of your app people use, and more importantly, which parts they don’t. They can also tell you which features drive conversions, and can even tell you if people even use your app — something straight download stats can’t tell you.

Let me illustrate the usefulness of analytics with a few examples from my own work.

Analytics Example 1: Venmo

At Venmo, we used mobile analytics with the primary goal of growing our user base. We were hoping to improve signup conversion after users had downloaded the app. We tested two different landing pages:

  1. A feed view that displayed a social feed, but didn’t explain the app
  2. A static page that displayed an explanation of how the app worked
On the left, the feed view; on the right, the static page.

On the left, the feed view; on the right, the static page.

Which version is better? Without analytics, your guess is as good as mine.

However, by adding analytics into the app, we had definitive proof. The feed view on the left actually performed 20% better!

Not exact data, but illustrates the point!

Not exact data, but illustrates the point!

We found this a bit odd, considering the new page didn’t explain the app at all. That’s the magic of analytics, though: sometimes your insights can be counterintuitive.

Analytics Example 2: Steps

In my own app Steps, I developed a social feature that let users compete with friends:

Steps Social

I was inclined to further build out the social features, but once I looked at the data, I realized that most users weren’t engaging with the newly-built features:

Only 153 out of 12,517 (1.22%) of users logged in.

Only 153 out of 12,517 (1.22%) of users logged in.

I realized I was working on a feature that people weren’t really using. Instead of spending time and resources developing the social features, I figured it was more important to introduce the social feature to users first, and focus on developing the feature later.

In general, analytics can help you make the right decision, as opposed to what merely “feels right”.

Conclusions from Examples

I could bombard you with examples, but a super-simple answer to “Why mobile analytics?” is: “Why not?”

Adding mobile analytics to your app is incredibly easy to do. There are many platforms that make it easy to collect and analyze your data; I’ve recommended a few at the end of this article.

Generally, all that’s needed to implement analytics in your app is a few lines of code, like so:

Amplitude.instance().trackingSessionEvents = true
Amplitude.instance().initializeApiKey(API_KEY)
Amplitude.instance().logEvent(EVENT_NAME, withEventProperties: PROPERTIES)

It doesn’t take much time, and offers huge benefits. It’s hard to think of a reason why you wouldn’t use analytics.

Note: It’s important to remember that collecting data by integrating the analytics API is only the first step of the process. Just collecting the data without doing anything with it is a waste of time!

If you want to get the benefits of analytics, remember to set time aside on your schedule to complete the second two steps: analyzing the data, and using that data, like the above examples demonstrated.

Which Analytics to Collect?

There are two main types of data you should collect: basic usage data and custom events.

Basic Data

First off, there are some valuable, high-level pieces of data every app should collect, such as OS version, device information and language:

  • OS Version: If you can measure that 98% of your users are on iOS 9, and you want to adopt newer iOS features, or simply make your life easier and drop support for iOS 8, then you can feel confident in your decision. The opposite is also true: If most of your users are still on iOS 8, then it probably makes sense to continue to support for older iOS versions.

OS Statistics

  • Language: This tells you the language of the device as set in Settings. This, along with device location, can help you decide which languages you should target for localization.

Language Statistics

  • Device Information: This can help you determine what hardware features are available. If a lot of your users are on an iPhone 5 without a Co-Motion processor, it may be difficult to implement some Core Motion features.

Device Statistics

Custom Events

Custom events are probably where you’ll spend your most time. By adding custom events, you can gain valuable insights particular to your app.

For example, a shopping app like Amazon may have an “Item Added to Cart” event and a “Checkout Completed” event triggered through code like the following:

Amplitude.instance().logEvent("Item Added to Cart")

You can also attach key-value attributes to these events through event properties. If a user has selected “Electronics” as his or her favorite shopping category, you might want to add a "favorite category": "electronics" property to the “Item Added To Cart” event with code similar to this:

Amplitude.instance().logEvent("Item Added To Cart", withEventProperties: ["favorite category": "electronics"])

You might think you should add a custom event for every feature and action in your app, then sift through the data to find actionable insights. After all, the more data the better, right?

But the issue is that too many data points and events can cloud the insights of your app, since you’re spreading your focus across too many disparate statistics.

Instead, focus on core actions of your app or funnels you would like to optimize.

A funnel is a series of events you can analyze to determine the percentage of users that go on to complete the series. For instance, you may want to determine how many users that reach the “Item Added to Cart” event eventually get to the “Checkout Completed” event. Though this is a simple two-step funnel, you can create funnels that contain many events.

Sales Funnel

One of the best starting points for custom events is to identify your optimization goals. Take the above example of the shopping cart. One way to improve this goal is to test the hypothesis that higher-rated products yield to a higher checkout rating. For this, you would create a funnel from “Item Added to Cart” to “Checkout Completed”.

You’d then add a “Number of Stars” event property to the “Item Added to Cart” event and filter the funnel by “Number of Stars”. This would let you analyze the difference in conversion rate between adding 3 star items vs. 5 star items to the cart.

Conversion rate of adding 3 star items vs 5 star items to the cart.

Conversion rate of adding 3 star items vs 5 star items to the cart.

You might find that items with 5 stars are three times more likely to checkout than products with other ratings — perhaps because users have confidence in the product. Knowing this, think about what you could change in your checkout process. For example, you may want to give more weight to higher product ratings when surfacing the product search results.

Custom Events Example 1: Venmo

At Venmo, referral invites was one of the key drivers of growth. In our original app design, we had a screen that let users select whether they wanted to send email or SMS invites prior to showing the user a list of contacts to invite.

Screen Shot 2016-08-11 at 2.30.03 PM

After adding custom events for each part of the invite flow to the app, we quickly realized that most users skipped invitations altogether because of this intermediary screen. So we tried removing the screen and taking the users straight to a list of contacts, and saw the following results (green being before, orange being after):

You can clearly see the bump in invites!

You can clearly see the bump in invites!

With the help of custom events, we ultimately increased invites significantly by deleting code!

Adding analytics around key areas that you want to optimize in your app is definitely the correct approach, as opposed to adding analytics everywhere and trying to figure things out as you go along.

Custom Events Example 2: Calm

Another great analytics success story is from the team behind the meditation app Calm, who had a goal of improving user retention.

In other words, they wanted to increase active users, which is the number of distinct users your app has within a specific timeframe.

One feature in Calm an opt-in daily notification to remind users to perform their meditation session. The team wondered if users who opted-in to the daily notification enabled were more likely to return to the app.

So the team added a custom event around the daily reminder feature and created a cohort — a specific subset of users based on some criteria — for users who enabled the daily reminder.

They found that users who had enabled the reminder were at least three times more likely to return to the app!

The blue line shows users with the reminder enabled and the red users without the reminder. These are not exact numbers.

The blue line shows users with the reminder enabled and the red users without the reminder. These are not exact numbers.

However, the reminder feature was buried deep in the app, so only a small fraction of users actually used this feature:

Buried features seldom get used.

Buried features seldom get used.

To fix this, the team then added features including a prompt to encourage users to set the reminder, and displayed the prompt after a user had completed their first meditation session. 40% of users who saw the prompt enabled daily reminders.

The prompt that increased retention by 3x.

The prompt that increased retention by 3x.

This led to massive growth in active users – another example of custom events for the win.

Top 3 Mobile Analytic Providers

Now that you’ve hopefully been convinced of the benefits of mobile analytics, let’s discuss which analytic provider to use.

Note that there are many mobile analytics providers that make it easy to collect, aggregate, and analyze data. I would highly recommend using one of these platforms instead of building your own, as in-house analytics tracking can quickly become difficult to manage. In fact, some companies try to do it in-house and later realize it ends up being more cost-effective to go with a third-party solution.

I’ve narrowed my choices down to three options based on the following four factors:

  1. Features: Features are most important because you want to make sure you’re not losing out on valuable insights.
  2. Dashboard UI: An easy to use, intuitive dashboard UI not only makes it easy to explore your data, but fun as well. It’s easy to forget about analytics when you are caught up with other aspects of your app.
  3. Price: The price of some analytics packages can quickly soar with increased usage, which is why it’s important to be mindful of what you track.
  4. Longevity: Finding an analytics provider with some amount of longevity will pay off in the long run. Choosing an analytics provider that has a big team, with lots of funding and established customers can help protect you against your analytics provider disappearing tomorrow — and losing all your analytic data.

Below are three options I recommend most often — plus one honorable mention!

1. Firebase

Demographics & Interests data from Firebase

Demographics and Interests data from Firebase

The recent re-launch of Firebase makes it seem like Google is trying to merge Google Analytics for Mobile and Firebase. Google has ported most of the core features of GA to Firebase in a more mobile-focused suite.

For example, in-app-purchases are prominent in the default Firebase dashboard. Demographics data is presented in a consolidated, easier to understand manner.

Firebase also has a suite of other features, from a realtime database, to user authentication, to push notifications. Firebase is a great choice, especially if you decide to use the other features it has to offer.

Firebase offers a lot of different analytics out of the box. It gives you high-level demographics data, like gender, location, and even different interest categories for users. It can also tell you the percentage of users on various operating systems or devices. It’s also easy to create segments, track retention, build funnels, and much more.

Overall, Firebase Analytics has many features and is still fairly new. I’m excited to see how it develops further! Firebase Analytics is free, which is a huge plus.

Pros

  • Free
  • Demographics and Interests Data
  • Lots of useful features

Cons

  • Can feel feature-bloated
  • Fewer enterprise level-features

2. Amplitude

Amplitude screenshot

Amplitude is a great mobile analytics package that provides many high-level analytics, but doesn’t have any gender or interests demographics data. Amplitude’s analytics are also real-time, which I like.

Immediately after releasing a new app version in the App Store, it’s possible to see how new features are performing or how various tweaks have improved the app. It’s also great to get a pulse on how many users are using the app on any given day.

Amplitude’s free tier offers 10 million monthly events, which is quite generous. But pricing goes up quickly to $2,000/month, which is definitely a major downside. However, the analytics feature set and generous free package outweigh that.

Pros

  • Intuitive user interface
  • Robust; analytics is the focus
  • Generous free tier

Cons

  • Paid tiers can be pricey
  • Fewer features beyond mobile analytics

3. Mixpanel

Mixpanel Screenshot

Mixpanel is used by tens of thousands of companies — and for good reason. They provide a full-suite user engagement platform that not only provides analytics, but also offers things like a push notification dashboard, user surveys, and A/B testing.

The data dashboard is fairly easy to use as well, which makes surfacing ideas a breeze However, Mixpanel is quite pricey and the free tier is not as generous as that of Amplitude. If you’re looking for a full-fledged growth platform with a lot of bells and whistles and are willing to pay for it, Mixpanel is a fantastic option.

Pros

  • Engagement features such as notifications and user surveys
  • Built-in A/B testing

Cons

  • Expensive
  • Collects less high-level data out of the box

Honorable Mention: AWS Mobile Analytics

I love AWS Mobile Hub, but its mobile analytics offering is a bit bare-bones. The user interface is not as intuitive as the three options above and there aren’t many additional features like demographics or notifications.

That said, Amazon provides a generous free tier — 100 million monthly events — and beyond that the price is almost negligible. If you are familiar with Amazon’s ecosystem or are using AWS Mobile Hub, I would definitely recommend AWS Mobile Analytics.

What About iTunes Connect?

True, iTunes Connect provides some data about your app. There are four components to iTunes Connect App Analytics: Overview, Metrics, Sources, and Retention. Overview gives you a high-level summary of app store statistics like impressions, product page views, downloads, IAP, sales, and so on.

iTunes Connect Analytics "Overview" tab

iTunes Connect Analytics “Overview” tab

Metrics lets you compare the various collected statistics. Sources shows you the conversion rate between the different websites and ad campaigns driving traffic to your app in the App Store. Finally, Retention shows the percentage of users that downloaded the app on one day and used the app again at a later date.

Gathering data such as device information and installation base by country can definitely help you better understand your users, and it seems like the new Analytics feature in iTunes Connect may suffice for that purpose.

However, iTunes Connect is quite limited in the kind of data it collects, and since it’s opt-in only it probably doesn’t represent the entire picture. You can check how many users opt-in by clicking the question mark next to About App Analytics Data on the top-right of the Overview tab in App Analytics. I have a measly 28% opt-in rate for my Steps app.

Also, iTunes Connect App Analytics doesn’t allow for custom events, segments, or other advanced features that can give you deep insight into your usage statistics. However, iTunes Connect Analytics is good for determining App Store conversion rate, since no other platform gives you this data.

Where to Go From Here?

At this point, you’ve seen some real-world success stories, and hopefully you’re pumped to add analytics into your apps.

So what are you waiting for? Choose one of the providers above and follow the three simple steps:

  1. Collect data from your app.
  2. Analyze the data to find out how users work with your app.
  3. Use that data to make business decisions about your app and its future development.

If you’re looking for somewhere to start, focus on signup and onboarding to begin. Optimizing either of these can lead to increased retention, since each is at the top of the funnel.

I wish you all the best! If you have any comments or questions, come join the discussion below.

The post Getting Started with Mobile Analytics appeared first on Ray Wenderlich.

iOS 10 Screencast: Capturing Photo Thumbnails

Screencast: Beginning C# Part 15: Do While Loops

Swift Algorithm Club: Swift Trie Data Structure

$
0
0

Swift trie data structure

The Swift Algorithm Club is an open source project to implement popular algorithms and data structures in Swift.

Every month, Chris Pilcher and I feature a cool data structure or algorithm from the club in a tutorial on this site. If your want to learn more about algorithms and data structures, follow along with us!

In this tutorial, you’ll learn how to implement a Swift Trie data structure. No, this is not “Tree” spelled wrong; this is actually a different data structure!

This algorithm was first implemented by Christian Encarnacion, and is now refactored for tutorial format.

Note: New to the Swift Algorithm Club? Check out our getting started post first.

Getting Started

Tries are n-ary trees in which characters are stored at each node. In addition to being a popular topic amongst interview questions, Tries are also a key data structure that facilitates efficient prefix matching for the English language:

SwiftAlgClub_TrieData-trie-1

Example of “Cat”, “Cut”, “Cute”, “To”, “B” strings stored in a Trie.

Why a Trie?

Tries are very useful for certain situations. In addition to be great for storing the English language, a Trie can also be a substitute for a hash table, with the following advantages:

  • Looking up values typically have a better worst-case time complexity.
  • Unlike a hash table, a Trie does not need to worry about key collisions.
  • Doesn’t require a hashing algorithm to guarantee a unique path to elements.
  • Trie structures can be alphabetically ordered.

In this tutorial, you’ll focus on Trie’s application for storing the English language.

Trie Implementation

Just like other trees, a Trie is made up of nodes. Your implementation will consist of a TrieNode class and a Trie class. Each TrieNode will represent a character of a word. For instance, the word “cute” will be represented by the following series of nodes: c -> u -> t -> e. The Trie class will manage the insertion logic and keep a hold of the nodes.

Open up a Swift playground to begin!

TrieNode

You’ll start off by implementing a simple TrieNode class. Write the following into the playground:

class TrieNode<T: Hashable> {
  var value: T?
  weak var parent: TrieNode?
  var children: [T: TrieNode] = [:]
 
  init(value: T? = nil, parent: TrieNode? = nil) {
    self.value = value
    self.parent = parent
  }
}

This is a generic TrieNode class. It stores a value (i.e. the character) and has a reference to its parent and children. There are two things to point out:

  • The parent property is weak to prevent reference cycles. Having a reference to the parent is necessary for remove operations on the Trie.
  • The value stored in TrieNode must conform to the Hashable protocol. This is because you will be using the value as a key in the children dictionary – and anything that is a key in a Swift dictionary must conform to Hashable. You will be using Character for the value, which conforms to Hashable, so you are set.

To facilitate the adding of new nodes, add the following method inside the Node class:

func add(child: T) {
  // 1
  guard children[child] == nil else { return }
 
  // 2
  children[child] = TrieNode(value: child, parent: self)
}

Adding a child is a 2-stage process:

  1. Make sure the child does not already exist in the dictionary of children. If it does, return.
  2. Create a new node for the new value, and add it to the children dictionary of the current node.

With that, you’ve got a fairly familiar node object common to many trees. It’s still missing a component to be useful for a Trie, but you’ll handle that later :]

Trie

Your Trie class will be managing the nodes. Write the following at the bottom of your playground file:

class Trie {
  fileprivate let root: TrieNode<Character>
 
  init() {
    root = TrieNode<Character>()
  }
}

This sets the foundation for your Trie. You declare a root property that keeps a hold of the root node of your Trie. Since you’re implementing a Trie for the English language, you’ll use nodes of type Character. The init method simply initializes the root property with an empty TrieNode.

Typealiasing

Before continuing on with implementing the rest of the Trie, update the Trie class to the following:

class Trie {
  typealias Node = TrieNode<Character>
  fileprivate let root: Node
 
  init() {
    root = Node()
  }
}

You’ve added a Node typealias. While this is functionally identical to your previous version, this allows you to refer to the TrieNode types as Node. In additional shortening the syntax, you also make the code more robust; If you ever wanted the node to represent something else other than a Character, changing just the typealias would propagate the type to everything else!

With that done, it’s time to implement the methods that make up the Trie.

Insertion

The Trie class manages the operations on the Trie. When implementing the insertion method, remember that a Trie is efficient because it always tries (pun intended) to reuse existing nodes to complete a sequence.

SwiftAlgClub_TrieData-trie-5-yoda

As an example, the two words “Cut” and “Cute” should be represented using 4 nodes, since both words share the same “Cut” prefix.

Add the following code below the Trie class:

extension Trie {
  func insert(word: String) {
    // 1 
    guard !word.isEmpty else { return }
 
    // 2 
    var currentNode = root
 
    // 3
    let characters = Array(word.lowercased().characters)
    var currentIndex = 0
 
    // ... more to come!
  }
}

You’ve implemented the insert method in an extension. Here’s what you’ve written so far:

  1. Check if the string is empty. If it is, there’s nothing to insert!
  2. Create a reference to the root node. You’ll use this to iterate through the Trie nodes.
  3. A word in the Trie is represented by a chain of nodes, where each node represents a character of the word (Ex: c -> u -> t -> e for “cute”). Since you’ll be inserting character by character, turning the word into an array will easily allow you to keep track of the characters during insertion.

Now that you’ve got the pieces ready, you’re ready to perform some pointer arithmetic! Add the following to the end of the insert method:

while currentIndex < characters.count {
  // 1
  let character = characters[currentIndex]
 
  // 2
  if let child = currentNode.children[character] {
    currentNode = child
  } else {
    // 3
    currentNode.add(child: character)
    currentNode = currentNode.children[character]!
  }
 
  // 4
  currentIndex += 1
 
  // more to come!
}

This code is relatively straight forward:

  1. Get ahold of the character you need to insert into the Trie.
  2. Check if the character you’re trying to insert exists within the current node’s children dictionary. If it exists, you’ll simply move the currentNode reference to the next node. There’s no need to insert the character because it’s already there!
  3. If execution proceeds to the else block, it means the character needs to be inserted. You’ll add the character into the current children dictionary. Afterwards, you’ll move the currentNode reference to the new node.
  4. Add 1 to the currentIndex property to keep track of the next character you need to insert.

Terminating Nodes

At this point, the insert method will correctly go through the word you want to insert and create new nodes as necessary. You might have noticed something though. For example, if you inserted the word “cute”, how do can you tell if “cut” has been inserted or not?

Swift trie data structure with a single word

Without some sort of indicator, you can’t be sure. Head back to your TrieNode class. Update the class with a new property:

var isTerminating = false

The isTerminating property will be responsible for indicating the end of a word. Back to the previous example, if you insert the word “cute” into the Trie, you’ll want to use isTerminating like this:

Swift trie data structure with a terminated word.

The last letter of “cute” is marked, indicating it’s the end of the word. If you insert “cut” into the Trie, all you want to do is mark the “t” with as a terminating node:

Swift trie data structure with two words.

Pretty easy? Try it out!

Challenge

At the end of the method, implement the logic to mark the last node as the terminating node.

Solution Inside: Solution SelectShow>

Contains

Now that you’ve got insertion set up, it’s time to deal with the contains method. This method is responsible for checking if a word exists. Write the following into the extension:

func contains(word: String) -> Bool {
  guard !word.isEmpty else { return false }
  var currentNode = root
 
  let characters = Array(word.lowercased().characters)
  var currentIndex = 0
 
  // more to come
}

So far, the code you’ve just written is nearly identical to the insert method. Add the following to the bottom of the contains method:

// 1
while currentIndex < characters.count, let child = currentNode.children[characters[currentIndex]] {
 
  // 2
  currentIndex += 1
  currentNode = child
}

This part will try to iterate through the nodes of the Trie based on the word you’re trying to find:

  1. You create a while loop with the condition that the currentIndex hasn’t reached the end of the word. You also try to bind the children dictionary’s value into a child property.
  2. If the while loop succeeds, you move currentIndex and currentNode to look for the next matching letter.

Iterating through the word is now taken care of. Finally, it’s time to implement the logic that either returns true or false, depending on whether the word is inside the Trie. Write the following at the bottom of the contains method:

if currentIndex == characters.count && currentNode.isTerminating {
  return true
} else {
  return false
}

If the currentIndex variable reaches to the end of the characters array, it means the while loop has successfully gone through all the letters and the corresponding nodes. You’ll also check if this last node is the terminating node. If both these conditions are true, then the word is in the Trie. If one of these conditions is false, then the word is not in the Trie.

Try it Out!

Write the following at the end of the playground:

let trie = Trie()
 
trie.insert(word: "cute") 
trie.contains(word: "cute") // true
 
trie.contains(word: "cut") // false
trie.insert(word: "cut") 
trie.contains(word: "cut") // true

With that, you’re well on your way to mastering the art of the Trie!

I'm so cute!

Where To Go From Here?

I hope you enjoyed this tutorial on making a Swift Trie data structure!

Here is a Swift Playground with the above code. You can also find the original implementation and further discussion in the Swift Trie section of the Swift Algorithm Club repository.

This was just one of the many algorithm clubs focused on the Swift Algorithm Club repository. If you’re interested in more, check out the repo.

It’s in your best interest to know about algorithms and data structures – they’re solutions to many real world problems, and are frequently asked as interview questions. Plus it’s fun!

So stay tuned for many more tutorials from the Swift Algorithm club in the future. In the meantime, if you have any questions on implementing trees in Swift, please join the forum discussion below!

Note: The Swift Algorithm Club is always looking for more contributors. If you’ve got an interesting data structure, algorithm, or even an interview question to share, don’t hesitate to contribute! To learn more about the contribution process, check out our Join the Swift Algorithm Club article.

The post Swift Algorithm Club: Swift Trie Data Structure appeared first on Ray Wenderlich.

Viewing all 4373 articles
Browse latest View live


<script src="https://jsc.adskeeper.com/r/s/rssing.com.1596347.js" async> </script>