Quantcast
Channel: Kodeco | High quality programming tutorials: iOS, Android, Swift, Kotlin, Unity, and more
Viewing all 4374 articles
Browse latest View live

raywenderlich.com iOS 11 and Swift 4 for Beginners Course Now on Udemy!

$
0
0

The tutorial team and I are happy to announce that we’ve released our very first video course on Udemy: iOS 11 and Swift 4 for Beginners!

This course is intended for complete beginners to iOS 11 and Swift 4 development and represents a collection of some of the best tutorials from our site.

Keep reading to find out who this course is for, what’s inside, and how to get the entire course with 350+ videos for only $15!

Who Is This Course For?

This course is for absolute beginners to iOS 11 or Swift 4 development — or even for absolute beginners to programming in general.

  • Already a raywenderlich.com subscriber? Then you don’t need this course, since it only contains a small portion of what’s already included in your subscription. Therefore, you already have access to all the same great stuff in this course and much more.
  • Not subscribed yet, but want a “taste” of what the full subscription is like? Then this is the course for you!
Psst! Know someone in your office or school who’s a beginner to iOS development? We know they’d really like this course! :]

What’s Inside the Course?

This is a massive course, containing over 350 videos in a whopping 36 sections:

Sections 1–6: Your First Swift 4 and iOS 11 App: You’ll start the course with a bang by creating your first app, an entertaining game called Bulls-Eye.

Sections 7–12: Programming in Swift: You’ll then take a deep dive into the Swift language itself and cover fundamental programming concepts such as variables, loops, collections, structures, classes, optionals, closures, and more.

Sections 13–16: Your Second Swift 4 and iOS 11 App: Once you have a solid understanding of the Swift language, you’ll switch back to app development and create your second app, called Checklists, where you’ll learn about table views and navigation controllers.

Sections 17–18: Saving Data in iOS: We’ll then show you how to save your app’s data. We’ll cover all the methods, from raw file access to property lists to NSCoding to Core Data — and you’ll learn when to use each.

Sections 19–20: Beginning Auto Layout: Next, we’ll demystify the magic of Auto Layout, which you can use to make your app look great on a variety of device sizes.

Sections 21–22: Beginning Collection Views: Learn all about using collection views in iOS, starting with the basics, such as setting up a collection view in Interface Builder, and then move right through to some more advanced topics, like creating and manipulating custom cells and layouts.

Sections 23–25: Scroll View School: Take a deep dive into the scroll view — one of the most important, yet misunderstood controls in iOS development — and learn how to harness its power!

Sections 26–28: Beginning iOS Animations: Get started with iOS Animations! Watch this series to learn about animating Auto Layout constraints, views, and view controller transitions. Give your app the cool effects that will set it apart from all the others!

Sections 29–30: Beginning Core Data: Learn the basics of using Core Data in this beginning series! You’ll learn how to model your data with attributes and relationships, add and update records, and then fetch your data with sorting and filtering options.

Section 31: Networking with URLSession: Learn how to connect your apps to web services by leveraging the power of URLSession.

Sections 32–33: Beginning Firebase: Learn how to get started with Firebase, a popular mobile-backend-as-a-service that provides several features for building powerful mobile apps.

Section 34: Beginning Git: In this introduction to using Git for source control, you’ll learn everything from cloning and creating repos, through committing and ignoring files, to managing remotes and pull requests.

Section 35: Mastering Git: Take the solid foundation laid by Beginning Git and build upon it. Focus on fixing real-world problems, as you take a multi-user Git repository and work through the final steps of releasing a software product.

Section 36: Xcode Tips & Tricks: Learn how to use Xcode like a pro, including common keyboard shortcuts, composing Markdown, and working with frameworks and targets.

Get the Special Launch Discount!

To celebrate the launch of the course, select raywenderlich.com readers can receive the entire course for just $15!

This represents a discount of 92% off the normal price of $200 — and considering the massive amount of content in the course, it’s a pretty epic deal.

To get the discount, simply go to the course page and use the coupon code RWREADER.

This launch discount is only available for the first 200 readers who purchase the course, and it expires this Friday, October 20. Don’t miss out!

And once you take advantage of the discount, make sure you leave a review for us. We read all your comments, and they really help us out!

We hope you really enjoy this new course — and if you like this “taste” of our video courses, you can get complete access to all our video course content with a full raywenderlich.com subscription!

The post raywenderlich.com iOS 11 and Swift 4 for Beginners Course Now on Udemy! appeared first on Ray Wenderlich.


Core Data by Tutorials Updated for Swift 4 and iOS 11

$
0
0

Happy Monday – it’s another iOS 11 Launch Party book release!

Today, we’re excited to announce that Core Data by Tutorials, Fourth Edition has been fully updated for Swift 4, iOS 11 and Xcode 9.

Core Data by Tutorials teaches you everything you need to know to take control of your data in iOS apps using Core Data, Apple’s powerful object graph and persistence framework.

This will be a free update for existing Core Data by Tutorials PDF customers — our way to say “thanks” to our readers for their support.

Don’t own Core Data by Tutorials yet? Read on to see how you can get a copy!

What is Core Data by Tutorials?

This book is for intermediate iOS developers who already know the basics of iOS and Swift development but want to learn how to leverage Core Data to persist data in their apps.

Here’s a quick look at what’s inside Core Data by Tutorials:

  • Chapter 1, Your First Core Data App: You’ll click File\New Project and write a Core Data app from scratch! This chapter covers the basics of setting up your data model and then adding and fetching records.
  • Chapter 2, NSManagedObject Subclasses: NSManagedObject is the base data storage class of your Core Data object graphs. This chapter will teach you how you customize your own managed object subclasses to store and validate data.
  • Chapter 3, The Core Data Stack: Under the hood, Core Data is made up of many parts working together. In this chapter, you’ll learn about how these parts fit together, and move away from the starter Xcode template to build your own customizable system.
  • Chapter 4, Intermediate Fetching: Your apps will fetch data all the time, and Core Data offers many options for getting the data to you efficiently. This chapter covers more advanced fetch requests, predicates, sorting and asynchronous fetching.
  • Chapter 5, NSFetchedResultsController: Table views are at the core of many iOS apps, and Apple wants to make Core Data play nicely with them! In this chapter, you’ll learn how NSFetchedResultsController can save you time and code when your table views are backed by data from Core Data.
  • Chapter 6, Versioning and Migration: As you update and enhance your app, its data model will almost certainly need to change. In this chapter, you’ll learn how to create multiple versions of your data model and then migrate your users forward so they can keep their existing data as they upgrade.
  • Chapter 7, Unit Tests: Testing is an important part of the development process, and you shouldn’t leave Core Data out of those tests! In this chapter, you’ll learn how to set up a separate test environment for Core Data and see examples of how to test your models.
  • Chapter 8, Measuring and Boosting Performance: No one ever complained that an app was too fast, so it’s important to be vigilant about tracking performance. In this chapter, you’ll learn how to measure your app’s performance with various Xcode tools and then pick up some tips for dealing with slow spots in your code.
  • Chapter 9, Multiple Managed Object Contexts: In this final chapter, you’ll expand the usual Core Data stack to include multiple managed object contexts. You’ll learn how this can improve perceived performance and help make your app architecture less monolithic and more compartmentalized.

About the Authors

Of course, our book would be nothing without our team of experienced and dedicated authors:

AaronAaron Douglas was that kid taking apart the mechanical and electrical appliances at five years of age to see how they worked. He never grew out of that core interest – to know how things work. He took an early interest in computer programming, figuring out how to get past security to be able to play games on his dad’s computer. He’s still that feisty nerd, but at least now he gets paid to do it. Aaron works for Automattic (WordPress.com, Akismet, Simplenote) as a Mobile Maker primarily on the WordPress for iOS app. Find Aaron on Twitter as @astralbodies.

SaulSaul Mora is trained in the mystical and ancient arts of manual memory management, compiler macros and separate header files. Saul is a developer who honors his programming ancestors by using Optional variables in swift on all UIs created from Nib files. Despite being an Objective C neckbeard, Saul has embraced the Swift programming language. Currently, Saul resides in Shanghai, China working at 流利说 (Liulishuo) helping Chinese learn English while he is learning 普通话 (mandarin).

MatthewMatthew Morey is an engineer, author, hacker, creator and tinkerer. As an active member of the iOS community and Director of Mobile Engineering at MJD Interactive he has led numerous successful mobile projects worldwide. When not developing apps he enjoys traveling, snowboarding, and surfing. He blogs about technology and business at matthewmorey.com.

PietroPietro Rea is a software engineer at Upside Travel in Washington D.C. Pietro’s work has been featured in Apple’s App Stores across several different categories: media, e-commerce, lifestyle and more. From Fortune 500 companies to venture-backed startups, Pietro has a passion for mobile software development done right. You can find Pietro on Twitter as @pietrorea.

Free Core Data Chapters this Week

To help celebrate the launch, we’re going to open up the book and share three free chapters with you this week! This will give you a chance to check out the book — we’re confident you’ll love it!

Now Available in ePub!

And as another exciting announcement, by popular request, Core Data by Tutorials is now available in ePub format. Take it on the go with you on your iPad, iPhone or other digital reader and enjoy all the mobile reading benefits that ePub has to offer!

Where To Go From Here?

Core Data by Tutorials, Fourth Edition is now 100% complete, fully updated for Swift 4, iOS 11 and Xcode 9 — and available today.

  • If you’ve already bought the Core Data by Tutorials PDF, you can download the new book immediately on the store page for the book.
  • If you don’t have Core Data by Tutorials yet, you can grab your own copy in our online store.

And to help sweeten the deal, the digital edition of the book is on sale for $49.99! But don’t wait — this sale price is only available for a limited time.

Speaking of sweet deals, be sure to check out the great prizes we’re giving away this year with the iOS 11 Launch Party, including over $9,000 in giveaways!

To enter, simply retweet this post using the #ios11launchparty hashtag by using the button below:


We hope you enjoy this free update, and stay tuned for more book releases and updates coming soon!

The post Core Data by Tutorials Updated for Swift 4 and iOS 11 appeared first on Ray Wenderlich.

Getting Started with Core Data Tutorial

$
0
0

This is an abridged chapter from our book Core Data by Tutorials, which has been completely updated for Swift 4 and iOS 11. This tutorial is presented as part of our iOS 11 Launch Party — enjoy!

Welcome to Core Data! In this tutorial, you’ll write your very first Core Data app. You’ll see how easy it is to get started with all the resources provided in Xcode, from starter code templates to the Data Model editor.

You’re going to hit the ground running right from the start. By the end of the tutorial you’ll know how to:

  • Model data using Xcode’s model editor
  • Add new records to Core Data
  • Fetch a set of records from Core Data
  • Display the fetched records using a table view.

You’ll also get a sense of what Core Data is doing behind the scenes, and how you can interact with the various moving pieces.

Getting Started

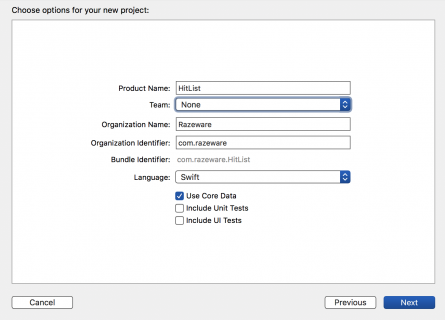
Open Xcode and create a new iOS project based on the Single View App template. Name the app HitList and make sure Use Core Data is checked.

Checking the Use Core Data box will cause Xcode to generate boilerplate code for what’s known as an NSPersistentContainer in AppDelegate.swift.

The NSPersistentContainer consists of a set of objects that facilitate saving and retrieving information from Core Data. Inside this container is an object to manage the Core Data state as a whole, an object representing the Data Model, and so on.

The standard stack works well for most apps, but depending on your your app and its data requirements, you can customize the stack to be more efficient.

Note: Not all Xcode templates under iOS/Application have the option to start with Core Data. In Xcode 9, only the Master-Detail App and Single View App templates have the Use Core Data checkbox.

The idea for this sample app is simple: There will be a table view with a list of names for your very own “hit list”. You’ll be able to add names to this list and eventually, you’ll use Core Data to make sure the data is stored between sessions. We don’t condone violence in the book, so you can think of this app as a favorites list to keep track of your friends too, of course!

Click on Main.storyboard to open it in Interface Builder. Select the view controller on the canvas and embed it inside a navigation controller. From Xcode’s Editor menu, select Embed In…\ Navigation Controller.

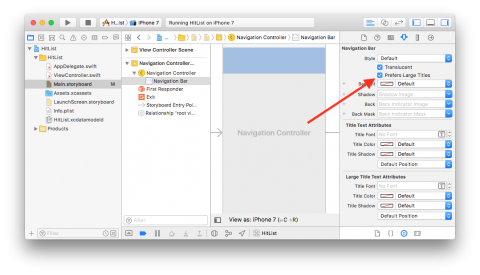
Click on the navigation controller’s navigation bar to select it, then click on Prefers Large Titles in the Attributes Inspector. This will give the sample app a fresh iOS 11 style.

Next, drag a Table View from the object library into the view controller, then resize it so it covers the entire view.

If not already open, use the icon located in the lower left corner of your canvas to open Interface Builder’s document outline.

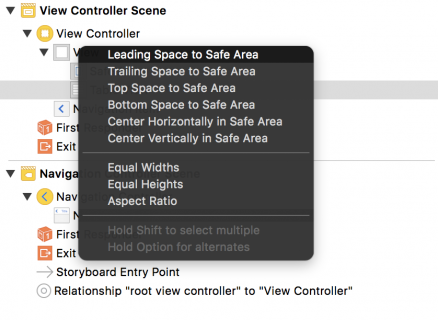
Ctrl-drag from the Table View in the document outline to its parent view and select the Leading Space to Safe Area constraint:

Do this three more times, selecting the constraints Trailing Space to Safe Area, Top Space to Safe Area and finally, Bottom Space to Safe Area. Adding those four constraints makes the table view fill its parent view.

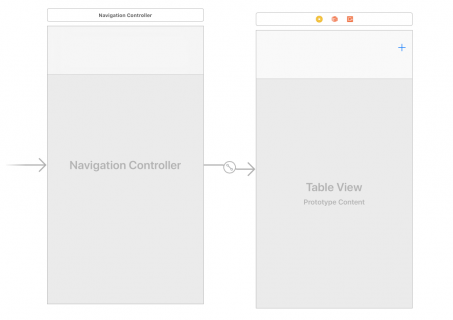
Next, drag a Bar Button Item and place it on the view controller’s navigation bar. Finally, select the bar button item and change its system item to Add. Your canvas should look similar to the following screenshot:

Every time you tap the Add button, an alert controller containing a text field will appear. From there you’ll be able to type someone’s name into the text field. Tapping Save will save the name, dismiss the alert controller and refresh the table view, displaying all the names you’ve entered.

But first, you need to make the view controller the table view’s data source. In the canvas, Ctrl-drag from the table view to the yellow view controller icon above the navigation bar, as shown below, and click on dataSource:

In case you’re wondering, you don’t need to set up the table view’s delegate since tapping on the cells won’t trigger any action. It doesn’t get simpler than this!

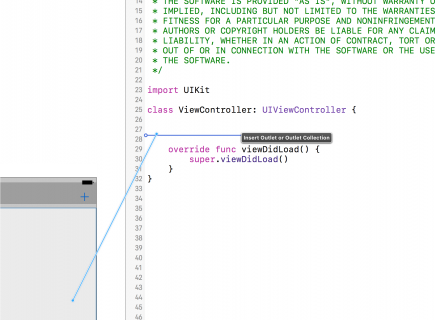
Open the assistant editor by pressing Command-Option-Enter or by selecting the middle button on the Editor toolset on the Xcode bar. Delete the didReceiveMemoryWarning() method. Next, Ctrl-drag from the table view onto ViewController.swift, inside the class definition to create an IBOutlet.

Next, name the new IBOutlet property tableView, resulting in the following line:

@IBOutlet weak var tableView: UITableView!

Next, Ctrl-drag from the Add button into ViewController.swift just below your viewDidLoad() definition. This time, create an action instead of an outlet, naming the method addName, with a type UIBarButtonItem:

@IBAction func addName(_ sender: UIBarButtonItem) {

}

You can now refer to the table view and the bar button item’s action in code.

Next, you’ll set up the model for the table view. Add the following property to ViewController.swift below the tableView IBOutlet:

var names: [String] = []

names is a mutable array holding string values displayed by the table view. Next, replace the implementation of viewDidLoad() with the following:

override func viewDidLoad() {
  super.viewDidLoad()

  title = "The List"
  tableView.register(UITableViewCell.self,
                     forCellReuseIdentifier: "Cell")
}

This will set a title on the navigation bar and register the UITableViewCell class with the table view.

Note: register(_:forCellReuseIdentifier:) guarantees your table view will return a cell of the correct type when the Cell reuseIdentifier is provided to the dequeue method.

Next, still in ViewController.swift, add the following UITableViewDataSource extension below your class definition for ViewController:

// MARK: - UITableViewDataSource
extension ViewController: UITableViewDataSource {

  func tableView(_ tableView: UITableView,
                 numberOfRowsInSection section: Int) -> Int {
    return names.count
  }

  func tableView(_ tableView: UITableView,
                 cellForRowAt indexPath: IndexPath)
                 -> UITableViewCell {

    let cell =
      tableView.dequeueReusableCell(withIdentifier: "Cell",
                                    for: indexPath)
    cell.textLabel?.text = names[indexPath.row]
    return cell
  }
}

If you’ve ever worked with UITableView, this code should look very familiar. First you return the number of rows in the table as the number of items in your names array.

Next, tableView(_:cellForRowAt:) dequeues table view cells and populates them with the corresponding string from the names array.

Next, you need a way to add new names so the table view can display them. Implement the addName IBAction method you Ctrl-dragged into your code earlier:

// Implement the addName IBAction
@IBAction func addName(_ sender: UIBarButtonItem) {

  let alert = UIAlertController(title: "New Name",
                                message: "Add a new name",
                                preferredStyle: .alert)

  let saveAction = UIAlertAction(title: "Save",
                                 style: .default) {
    [unowned self] action in

    guard let textField = alert.textFields?.first,
      let nameToSave = textField.text else {
        return
    }

    self.names.append(nameToSave)
    self.tableView.reloadData()
  }

  let cancelAction = UIAlertAction(title: "Cancel",
                                   style: .default)

  alert.addTextField()

  alert.addAction(saveAction)
  alert.addAction(cancelAction)

  present(alert, animated: true)
}

Every time you tap the Add button, this method presents a UIAlertController with a text field and two buttons, Save and Cancel.

Save inserts the text fields current text into the names array then reloads the table view. Since the names array is the model backing the table view, whatever you type into the text field will appear in the table view.

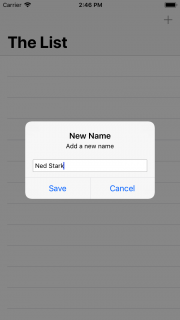
Finally, build and run your app for the first time. Next, tap the Add button. The alert controller will look like this:

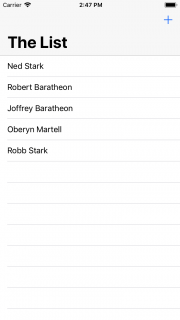
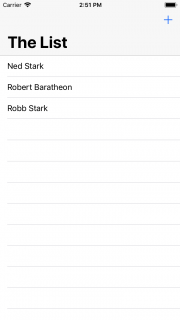
Add four or five names to the list. You should see something similar to below:

Your table view will display the data and your array will store the names, but the big thing missing here is persistence. The array is in memory but if you force quit the app or reboot your device, your hit list will be wiped out.

Core Data provides persistence, meaning it can store data in a more durable state so it can outlive an app re-launch or a device reboot.

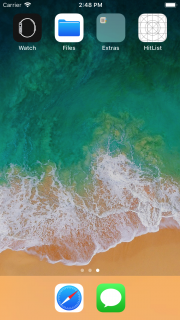
You haven’t added any Core Data yet, so nothing should persist after you navigate away from the app. Let’s test this out. Press the Home button if you’re using a physical device or the equivalent (Shift+⌘+H) if you’re using the Simulator. This will take you back to the familiar app grid on the home screen:

From the home screen, tap the HitList icon to bring the app back to the foreground. The names are still on the screen. What happened?

When you tap the Home button, the app currently in the foreground goes to the background. When this happens, the operating system flash-freezes everything currently in memory, including the strings in the names array. Similarly, when it’s time to wake up and return to the foreground, the operating system restores what used to be in memory as if you’d never left.

Apple introduced these advances in multitasking back in iOS 4. They create a seamless experience for iOS users but add a wrinkle to the definition of persistence for iOS developers. Are the names really persisted?

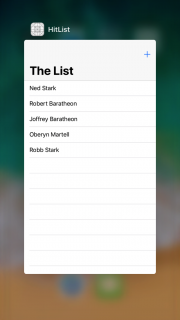
No, not really. If you had completely killed the app in the fast app switcher or turned off your phone, those names would be gone. You can verify this, as well. With the app in the foreground, double tap the Home button to enter the fast app switcher, like so:

From here, flick the HitList app snapshot upwards to terminate the app. There should be no trace of HitList in living memory (no pun intended). Verify the names are gone by returning to the home screen and tapping on the HitList icon to trigger a fresh launch.

The difference between flash-freezing and persistence may be obvious if you’ve worked with iOS for some time and are familiar with the way multitasking works. In a user’s mind, however, there is no difference. The user doesn’t care why the names are still there, whether the app went into the background and came back, or because the app saved and reloaded them.

All that matters is the names are still there when the app comes back!

So the real test of persistence, is whether your data is still there after a fresh app launch.

Modeling your Data

Now that you know how to check for persistence, you can dive into Core Data. Your goal for the HitList app is simple: persist the names you enter so they’re available for viewing after a fresh app launch.

Up to this point, you’ve been using plain old Swift strings to store the names in memory. In this section, you’ll replace these strings with Core Data objects.

The first step is to create a managed object model, which describes the way Core Data represents data on disk.

By default, Core Data uses a SQLite database as the persistent store, so you can think of the Data Model as the database schema.

Note: You’ll come across the word managed quite a bit in the book. If you see “managed” in the name of a class, such as in NSManagedObjectContext, chances are you are dealing with a Core Data class. “Managed” refers to Core Data’s management of the life cycle of Core Data objects.

However, don’t assume all Core Data classes contain the word “managed”. Actually, most don’t. For a comprehensive list of Core Data classes, check out the Core Data framework reference in the documentation browser.

Since you’ve elected to use Core Data, Xcode automatically created a Data Model file for you and named it HitList.xcdatamodeld.

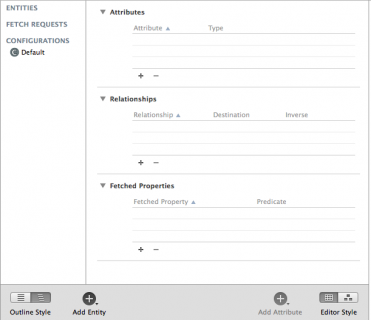
Open HitList.xcdatamodeld. As you can see, Xcode has a powerful Data Model editor:

The Data Model editor has a lot of features, but for now, let’s focus on creating a single Core Data entity.

Click on Add Entity on the lower-left to create a new entity. Double-click the new entity and change its name to Person, like so:

You may be wondering why the model editor uses the term Entity. Weren’t you simply defining a new class? As you’ll see shortly, Core Data comes with its own vocabulary. Here’s a quick rundown of some terms you’ll commonly encounter:

  • An entity is a class definition in Core Data. The classic example is an Employee or a Company. In a relational database, an entity corresponds to a table.
  • An attribute is a piece of information attached to a particular entity. For example, an Employee entity could have attributes for the employee’s name, position and salary. In a database, an attribute corresponds to a particular field in a table.
  • A relationship is a link between multiple entities. In Core Data, relationships between two entities are called to-one relationships, while those between one and many entities are called to-many relationships. For example, a Manager can have a to-many relationship with a set of employees, whereas an individual Employee will usually have a to-one relationship with his manager.
Note: You’ve probably noticed that entities sound a lot like classes. Likewise, attributes and relationships sound a lot like properties. What’s the difference? You can think of a Core Data entity as a class definition and the managed object as an instance of that class.

Now that you know what an attribute is, you can add an attribute to Person object created earlier. Open HitList.xcdatamodeld. Next, select Person on the left-hand side and click the plus sign (+) under Attributes.

Set the new attribute’s name to, er, name and change its type to String:

Saving to Core Data

Open ViewController.swift, add the following Core Data module import below the UIKit import:

import CoreData

This import is all you need to start using the Core Data API in your code.

Next, replace the names property definition with the following:

var people: [NSManagedObject] = []

You’ll store Person entities rather than string names, so you rename the array serving as the table view’s data model to people. It now holds instances of NSManagedObject rather than simple strings.

NSManagedObject represents a single object stored in Core Data; you must use it to create, edit, save and delete from your Core Data persistent store. As you’ll see shortly, NSManagedObject is a shape-shifter. It can take the form of any entity in your Data Model, appropriating whatever attributes and relationships you defined.

Since you’re changing the table view’s model, you must also replace both data source methods implemented earlier. Replace your UITableViewDataSource extension with the following:

// MARK: - UITableViewDataSource
extension ViewController: UITableViewDataSource {
  func tableView(_ tableView: UITableView,
                 numberOfRowsInSection section: Int) -> Int {
    return people.count
  }

  func tableView(_ tableView: UITableView,
                 cellForRowAt indexPath: IndexPath)
                 -> UITableViewCell {

    let person = people[indexPath.row]
    let cell =
      tableView.dequeueReusableCell(withIdentifier: "Cell",
                                    for: indexPath)
    cell.textLabel?.text =
      person.value(forKeyPath: "name") as? String
    return cell
  }
}

The most significant change to these methods occurs in tableView(_:cellForRowAt:). Instead of matching cells with the corresponding string in the model array, you now match cells with the corresponding NSManagedObject.

Note how you grab the name attribute from the NSManagedObject. It happens here:

cell.textLabel?.text =
  person.value(forKeyPath: "name") as? String

Why do you have to do this? As it turns out, NSManagedObject doesn’t know about the name attribute you defined in your Data Model, so there’s no way of accessing it directly with a property. The only way Core Data provides to read the value is key-value coding, commonly referred to as KVC.

Note: KVC is a mechanism in Foundation for accessing an object’s properties indirectly using strings. In this case, KVC makes NSMangedObject behave more or less like a dictionary at runtime.

Key-value coding is available to all classes inheriting from NSObject, including NSManagedObject. You can’t access properties using KVC on a Swift object that doesn’t descend from NSObject.

Next, find addName(_:) and replace the save UIAlertAction with the following:

let saveAction = UIAlertAction(title: "Save", style: .default) {
  [unowned self] action in

  guard let textField = alert.textFields?.first,
    let nameToSave = textField.text else {
      return
  }

  self.save(name: nameToSave)
  self.tableView.reloadData()
}

This takes the text in the text field and passes it over to a new method named save(name:). Xcode complains because save(name:) doesn’t exist yet. Add it below addName(_:):

func save(name: String) {

  guard let appDelegate =
    UIApplication.shared.delegate as? AppDelegate else {
    return
  }

  // 1
  let managedContext =
    appDelegate.persistentContainer.viewContext

  // 2
  let entity =
    NSEntityDescription.entity(forEntityName: "Person",
                               in: managedContext)!

  let person = NSManagedObject(entity: entity,
                               insertInto: managedContext)

  // 3
  person.setValue(name, forKeyPath: "name")

  // 4
  do {
    try managedContext.save()
    people.append(person)
  } catch let error as NSError {
    print("Could not save. \(error), \(error.userInfo)")
  }
}

This is where Core Data kicks in! Here’s what the code does:

  1. Before you can save or retrieve anything from your Core Data store, you first need to get your hands on an NSManagedObjectContext. You can consider a managed object context as an in-memory “scratchpad” for working with managed objects.

    Think of saving a new managed object to Core Data as a two-step process: first, you insert a new managed object into a managed object context; then, after you’re happy with your shiny new managed object, you “commit” the changes in your managed object context to save it to disk.

    Xcode has already generated a managed object context as part of the new project’s template. Remember, this only happens if you check the Use Core Data checkbox at the beginning. This default managed object context lives as a property of the NSPersistentContainer in the application delegate. To access it, you first get a reference to the app delegate.

  2. You create a new managed object and insert it into the managed object context. You can do this in one step with NSManagedObject’s static method: entity(forEntityName:in:).

    You may be wondering what an NSEntityDescription is all about. Recall earlier, NSManagedObject was called a shape-shifter class because it can represent any entity. An entity description is the piece linking the entity definition from your Data Model with an instance of NSManagedObject at runtime.

  3. With an NSManagedObject in hand, you set the name attribute using key-value coding. You must spell the KVC key (name in this case) exactly as it appears in your Data Model, otherwise your app will crash at runtime.
  4. You commit your changes to person and save to disk by calling save on the managed object context. Note save can throw an error, which is why you call it using the try keyword within a do-catch block. Finally, insert the new managed object into the people array so it shows up when the table view reloads.

That’s a little more complicated than an array of strings, but not too bad. Some of the code here, such as getting the managed object context and entity, could be done just once in your own init() or viewDidLoad() then reused later. For simplicity, you’re doing it all in the same method.

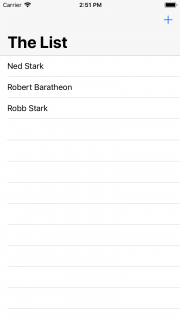
Build and run the app, and add a few names to the table view:

If the names are actually stored in Core Data, the HitList app should pass the persistence test. Double-tap the Home button to bring up the fast app switcher. Terminate the HitList app by flicking it upwards.

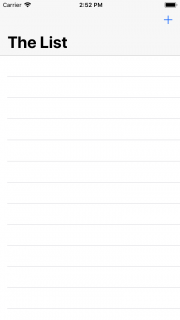
From Springboard, tap the HitList app to trigger a fresh launch. Wait, what happened? The table view is empty:

You saved to Core Data, but after a fresh app launch, the people array is empty! That’s because the data is sitting on disk waiting for you, but you’re not showing it yet.

Fetching from Core Data

To get data from your persistent store into the managed object context, you have to fetch it. Open ViewController.swift and add this code below viewDidLoad():

override func viewWillAppear(_ animated: Bool) {
  super.viewWillAppear(animated)

  //1
  guard let appDelegate =
    UIApplication.shared.delegate as? AppDelegate else {
      return
  }

  let managedContext =
    appDelegate.persistentContainer.viewContext

  //2
  let fetchRequest =
    NSFetchRequest<NSManagedObject>(entityName: "Person")

  //3
  do {
    people = try managedContext.fetch(fetchRequest)
  } catch let error as NSError {
    print("Could not fetch. \(error), \(error.userInfo)")
  }
}

Step by step, this is what the code does:

  1. Before you can do anything with Core Data, you need a managed object context. Fetching is no different! Like before, you pull up the application delegate and grab a reference to its persistent container to get your hands on its NSManagedObjectContext.
  2. As the name suggests, NSFetchRequest is the class responsible for fetching from Core Data. Fetch requests are both powerful and flexible. You can use fetch requests to fetch a set of objects meeting the provided criteria (i.e. give me all employees living in Wisconsin and have been with the company at least three years), individual values (i.e. give me the longest name in the database) and more.

    Fetch requests have several qualifiers used to refine the set of results returned. You’ll learn more about these qualifiers in Chapter 4, “Intermediate Fetching”; for now, you should know NSEntityDescription is a required one of these qualifiers.

    Setting a fetch request’s entity property, or alternatively initializing it with init(entityName:), fetches all objects of a particular entity. This is what you do here to fetch all Person entities. Also note NSFetchRequest is a generic type. This use of generics specifies a fetch request’s expected return type, in this case NSManagedObject.

  3. You hand the fetch request over to the managed object context to do the heavy lifting. fetch(_:) returns an array of managed objects meeting the criteria specified by the fetch request.
Note: Like save(), fetch(_:) can also throw an error so you have to use it within a do block. If an error occurred during the fetch, you can inspect the error inside the catch block and respond appropriately.

Build and run the application. Immediately, you should see the list of names you added earlier:

Great! They’re back from the dead (pun intended). Add a few more names to the list and restart the app to verify saving and fetching are working. Short of deleting the app, resetting the Simulator or throwing your phone off a tall building, the names will appear in the table view no matter what.

Where to Go From Here?

You can download the completed project for this tutorial here.

In just a few pages, you’ve already experienced several fundamental Core Data concepts: Data Models, entities, attributes, managed objects, managed object contexts and fetch requests.

If you enjoyed what you learned in this tutorial, why not check out the complete Core Data by Tutorials book, available in our store?

Here’s a taste of what’s in the book:

1. Chapter 1, Your First Core Data App: You’ll click File\New Project and write a Core Data app from scratch! This chapter covers the basics of setting up your data model and then adding and fetching records.

2. Chapter 2, NSManagedObject Subclasses: NSManagedObject is the base data storage class of your Core Data object graphs. This chapter will teach you how you customize your own managed object subclasses to store and validate data.

3. Chapter 3, The Core Data Stack: Under the hood, Core Data is made up of many parts working together. In this chapter, you’ll learn about how these parts fit together, and move away from the starter Xcode template to build your own customizable system.

4. Chapter 4, Intermediate Fetching: Your apps will fetch data all the time, and Core Data offers many options for getting the data to you efficiently. This chapter covers more advanced fetch requests, predicates, sorting and asynchronous fetching.

5. Chapter 5, NSFetchedResultsController: Table views are at the core of many iOS apps, and Apple wants to make Core Data play nicely with them! In this chapter, you’ll learn how NSFetchedResultsController can save you time and code when your table views are backed by data from Core Data.

6. Chapter 6, Versioning and Migration: As you update and enhance your app, its data model will almost certainly need to change. In this chapter, you’ll learn how to create multiple versions of your data model and then migrate your users forward so they can keep their existing data as they upgrade.

7. Chapter 7, Unit Tests: Testing is an important part of the development process, and you shouldn’t leave Core Data out of that! In this chapter, you’ll learn how to set up a separate test environment for Core Data and see examples of how to test your models.

8. Chapter 8, Measuring and Boosting Performance: No one ever complained that an app was too fast, so it’s important to be vigilant about tracking performance. In this chapter, you’ll learn how to measure your app’s performance with various Xcode tools and then pick up some tips for dealing with slow spots in your code.

9. Chapter 9, Multiple Managed Object Contexts: In this final chapter, you’ll expand the usual Core Data stack to include multiple managed object contexts. You’ll learn how this can improve perceived performance and help make your app architecture less monolithic and more compartmentalized.

And to help sweeten the deal, the digital edition of the book is on sale for $49.99! But don’t wait — this sale price is only available for a limited time.

Speaking of sweet deals, be sure to check out the great prizes we’re giving away this year with the iOS 11 Launch Party, including over $9,000 in giveaways!

To enter, simply retweet this post using the #ios11launchparty hashtag by using the button below:


We hope you enjoy this update, and stay tuned for more book releases and updates!

The post Getting Started with Core Data Tutorial appeared first on Ray Wenderlich.

Updated Course: Beginning Auto Layout

$
0
0

Beginning Auto Layout

As part of our iOS 11 Launch Party, we are releasing a ton of new and updated courses for raywenderlich.com subscribers.

Last week, we released an update to Saving Data in iOS. Today, we’re switching gears and offering you an update to our Beginning Auto Layout course.

This 16-video course will take you through the basics of using Auto Layout. You’ll find an introduction to using stack views, autoresizing, and Auto Layout constraints in Interface Builder.

Let’s have a look at what’s inside.

Part 1: Stack Views

Start off by learning how stack views can help you lay out multiple views in both simple and complex arrangements.

Part 1 - Stack Views

This section contains 9 videos:

  1. Introduction: An introduction to what Auto Layout is and why you need to use it in your apps.
  2. Autoresizing: Autoresizing is the predecessor to Auto Layout. It’s simpler, and sometimes, effective! Dive into the “mask of flexibilities”!
  3. Stack Views: Create your first stack view and learn about some basic properties to adjust the layout.
  4. Challenge: Create Layouts with Stack Views: Use everything you’ve learned about Stack Views so far to recreate a few simple view layouts from reference images.
  5. Intrinsic Content Size: What is Intrinsic Content Size? Find out how Auto Layout uses the intrinsic size of a view to determine layout.
  6. Nesting Stack Views: Stack views inside of stack views! Unlock more power of stack views by nesting them to create complex layouts.
  7. Stack View Alignment and Distribution: Learn about the options for stack view alignment and distribution and how they work to arrange your views.
  8. Challenge: Nesting Stack Views: Practice everything you’ve learned so far about stack views by implementing a complex, nested layout.
  9. Conclusion: Review what you’ve learned in this section and find out what’s coming up next.

Part 2: Constraints

Learn about the basic building block of Auto Layout, the constraint!

Part 2 - Constraints

This section contains 7 videos:

  1. Introduction:  Get a solid introduction to Auto Layout constraints, and find out what you’ll learn in this section.
  2. Adding New Constraints: The Add New Constraints UI in Interface Builder packs a whole lot of Auto Layout power into a compact popup.
  3. Dragging Constraints: Right- or control-click dragging between two views is another great option for creating Auto Layout constraints.
  4. Challenge: Constraints: Convert the type of your stack view constraints, getting practice with Auto Layout while gaining more control over the stack view’s width.
  5. Editing Constraints: This is an overview of the UI that Xcode offers for editing constraints that have already been created.
  6. Troubleshooting: Just like with Swift, you’ll get into temporary, problematic states when working in Interface Builder, before your constraints are ready. Let’s solve a few!
  7. Conclusion: Review what you’ve learned in this section, and pick up some parting tips for using Auto Layout in your apps.

Where To Go From Here?

Want to check out the course? You can watch the first three videos for free! The rest of the course is for raywenderlich.com subscribers only. Here’s how you can get access:

  • If you are a raywenderlich.com subscriber: The entire 16-part course is complete and available today. You can check out the course here.
  • If you are not a subscriber yet: What are you waiting for? Subscribe now to get access to our updated Beginning Auto Layout course and our entire catalog of over 500 videos.

We’ve still got more planned for the iOS 11 Launch Party, so stay tuned for more new and updated courses to come. I hope you enjoy our course! :]

The post Updated Course: Beginning Auto Layout appeared first on Ray Wenderlich.

Lightweight Migrations in Core Data Tutorial

$
0
0

This is an abridged from our book Core Data by Tutorials, which has been completely updated for Swift 4 and iOS 11. This tutorial is presented as part of our iOS 11 Launch Party — enjoy!

When you create a Core Data app, you design an initial data model for your app. However, after you ship your app inevitably you’ll want to make changes to your data model. What do you do then? You don’t want to break the app for existing users!

You can’t predict the future, but with Core Data, you can migrate toward the future with every new release of your app. The migration process will update data created with a previous version of the data model to match the current data model.

This Core Data migrations tutorial discusses the many aspects of Core Data migrations by walking you through the evolution of a note-taking app’s data model. You’ll start with a simple app with only a single entity in its data model.

Let the great migration begin!

When to Migrate

When is a migration necessary? The easiest answer to this common question is “when you need to make changes to the data model.”

However, there are some cases in which you can avoid a migration. If an app is using Core Data merely as an offline cache, when you update the app, you can simply delete and rebuild the data store. This is only possible if the source of truth for your user’s data isn’t in the data store. In all other cases, you’ll need to safeguard your user’s data.

That said, any time it’s impossible to implement a design change or feature request without changing the data model, you’ll need to create a new version of the data model and provide a migration path.

The Migration Process

When you initialize a Core Data stack, one of the steps involved is adding a store to the persistent store coordinator. When you encounter this step, Core Data does a few things prior to adding the store to the coordinator. First, Core Data analyzes the store’s model version. Next, it compares this version to the coordinator’s configured data model. If the store’s model version and the coordinator’s model version don’t match, Core Data will perform a migration, when enabled.

Note: If migrations aren’t enabled, and the store is incompatible with the model, Core Data will simply not attach the store to the coordinator and specify an error with an appropriate reason code.

To start the migration process, Core Data needs the original data model and the destination model. It uses these two versions to load or create a mapping model for the migration, which it uses to convert data in the original store to data that it can store in the new store. Once Core Data determines the mapping model, the migration process can start in earnest.

Migrations happen in three steps:

  1. First, Core Data copies over all the objects from one data store to the next.
  2. Next, Core Data connects and relates all the objects according to the relationship mapping.
  1. Finally, enforce any data validations in the destination model. Core Data disables destination model validations during the data copy.

You might ask, “If something goes wrong, what happens to the original source data store?” With nearly all types of Core Data migrations, nothing happens to the original store unless the migration completes without error. Only when a migration is successful, will Core Data remove the original data store.

Types of Migrations

In my own experience, I’ve found there are a few more migration variants than the simple distinction between lightweight and heavyweight. Below, I’ve provided the more subtle variants of migration names, but these names are not official categories by any means. You’ll start with the least complex form of migration and end with the most complex form.

Lightweight Migrations

Lightweight migration is Apple’s term for the migration with the least amount of work involved on your part. This happens automatically when you use NSPersistentContainer, or you have to set some flags when building your own Core Data stack. There are some limitations on how much you can change the data model, but because of the small amount of work required to enable this option, it’s the ideal setting.

Manual Migrations

Manual migrations involve a little more work on your part. You’ll need to specify how to map the old set of data onto the new set, but you get the benefit of a more explicit mapping model file to configure. Setting up a mapping model in Xcode is much like setting up a data model, with similar GUI tools and some automation.

Custom Manual Migrations

This is level 3 on the migration complexity index. You’ll still use a mapping model, but complement that with custom code to specify custom transformation logic on data. Custom entity transformation logic involves creating an NSEntityMigrationPolicy subclass and performing custom transformations there.

Fully Manual Migrations

Fully manual migrations are for those times when even specifying custom transformation logic isn’t enough to fully migrate data from one model version to another. Custom version detection logic and custom handling of the migration process are necessary. In this tutorial, you’ll set up a fully manual migration to update data across non-sequential versions, such as jumping from version 1 to 4.

Throughout this tutorial, you’ll learn about each of these migration types and when to use them. Let’s get started!

Getting Started

Download the starter project for this tutorialUnCloudNotes. Unzip it and open it in Xcode.

Build and run the app in the iPhone simulator. You’ll see an empty list of notes:

Tap the plus (+) button in the top-right corner to add a new note. Add a title (there is default text in the note body to make the process faster) and tap Create to save the new note to the data store. Repeat this a few times so you have some sample data to migrate.

Back in Xcode, open the UnCloudNotesDatamodel.xcdatamodeld file to show the entity modeling tool in Xcode. The data model is simple — just one entity, a Note, with a few attributes.

You’re going to add a new feature to the app: the ability to attach a photo to a note. The data model doesn’t have any place to persist this kind of information, so you’ll need to add a place in the data model to hold onto the photo. But you already added a few test notes in the app. How can you change the model without breaking the existing notes?

It’s time for your first migration!

A Lightweight Migration

In Xcode, select the UnCloudNotes data model file if you haven’t already selected it. This will show you the Entity Modeler in the main work area. Next, open the Editor menu and select Add Model Version…. Name the new version UnCloudNotesDataModel v2 and ensure UnCloudNotesDataModel is selected in the Based on model field. Xcode will now create a copy of the data model.

Note: You can give this file any name you want. The sequential v2, v3, v4, et cetera naming helps you easily tell the versions apart.

This step will create a second version of the data model, but you still need to tell Xcode to use the new version as the current model. If you forget this step, selecting the top level UnCloudNotesDataModel.xcdatamodeld file will perform any changes you make to the original model file. You can override this behavior by selecting an individual model version, but it’s still a good idea to make sure you don’t accidentally modify the original file.

In order to perform any migration, you want to keep the original model file as it is, and make changes to an entirely new model file.

In the File Inspector pane on the right, there is a selection menu toward the bottom called Model Version. Change that selection to match the name of the new data model, UnCloudNotesDataModel v2:

Once you’ve made that change, notice in the project navigator the little green check mark icon has moved from the previous data model to the v2 data model:

Core Data will try to first connect the persistent store with the ticked model version when setting up the stack. If a store file was found, and it isn’t compatible with this model file, a migration will be triggered. The older version is there to support migration. The current model is the one Core Data will ensure is loaded prior to attaching the rest of the stack for your use.

Make sure you have the v2 data model selected and add an image attribute to the Note entity. Set the attribute’s name to image and the attribute’s type to Transformable.

Since this attribute is going to contain the actual binary bits of the image, you’ll use a custom NSValueTransformer to convert from binary bits to a UIImage and back again. Just such a transformer has been provided for you in ImageTransformer. In the Data Model Inspector on the right of the screen, look for the Custom Class Name field, and enter ImageTransformer. Next, in the Module field, choose Current Product Module.

Note: When referencing code from your model files, just like in Xib and Storyboard files, you’ll need to specify a module (UnCloudNotes or Current Product Module depending on what your drop down provides) to allow the class loader to find the exact code you want to attach.

The new model is now ready for some code! Open Note.swift and add the following property below displayIndex:

@NSManaged var image: UIImage?

Build and run the app. You’ll see your notes are still magically displayed! It turns out lightweight migrations are enabled by default. This means every time you create a new data model version, and it can be auto migrated, it will be. What a time saver!

Inferred Mapping Models

It just so happens Core Data can infer a mapping model in many cases when you enable the shouldInferMappingModelAutomatically flag on the NSPersistentStoreDescription. Core Data can automatically look at the differences in two data models and create a mapping model between them.

For entities and attributes that are identical between model versions, this is a straightforward data pass through mapping. For other changes, just follow a few simple rules for Core Data to create a mapping model.

In the new model, changes must fit an obvious migration pattern, such as:

  • Deleting entities, attributes or relationships
  • Renaming entities, attributes or relationships using the renamingIdentifier
  • Adding a new, optional attribute
  • Adding a new, required attribute with a default value
  • Changing an optional attribute to non-optional and specifying a default value
  • Changing a non-optional attribute to optional
  • Changing the entity hierarchy
  • Adding a new parent entity and moving attributes up or down the hierarchy
  • Changing a relationship from to-one to to-many
  • Changing a relationship from non-ordered to-many to ordered to-many (and vice versa)
Note: Check out Apple’s documentation for more information on how Core Data infers a lightweight migration mapping: https://developer.apple.com/library/Mac/DOCUMENTATION/Cocoa/Conceptual/CoreDataVersioning/Articles/vmLightweightMigration.html

As you see from this list, Core Data can detect, and more importantly, automatically react to, a wide variety of common changes between data models. As a rule of thumb, all migrations, if necessary, should start as lightweight migrations and only move to more complex mappings when the need arises.

As for the migration from UnCloudNotes to UnCloudNotes v2, the image property has a default value of nil since it’s an optional property. This means Core Data can easily migrate the old data store to a new one, since this change follows item 3 in the list of lightweight migration patterns.

Image Attachments

Now the data is migrated, you need to update the UI to allow image attachments to new notes. Luckily, most of this work has been done for you.

Open Main.storyboard and find the Create Note scene. Underneath, you’ll see the Create Note With Images scene that includes the interface to attach an image.

The Create Note scene is attached to a navigation controller with a root view controller relationship. Control-drag from the navigation controller to the Create Note With Images scene and select the root view controller relationship segue.

This will disconnect the old Create Note scene and connect the new, image-powered one instead:

Next, open AttachPhotoViewController.swift and add the following method to the UIImagePickerControllerDelegate extension:

func imagePickerController(_ picker: UIImagePickerController,
  didFinishPickingMediaWithInfo info: [String: Any]) {

  guard let note = note else { return }

  note.image =
    info[UIImagePickerControllerOriginalImage] as? UIImage

  _ = navigationController?.popViewController(animated: true)
}

This will populate the new image property of the note once the user selects an image from the standard image picker.

Next, open CreateNoteViewController.swift and replace viewDidAppear(_:) with the following:

override func viewDidAppear(_ animated: Bool) {
  super.viewDidAppear(animated)

  guard let image = note?.image else {
    titleField.becomeFirstResponder()
    return
  }

  attachedPhoto.image = image
  view.endEditing(true)
}

This will display the new image if the user has added one to the note.

Next, open NotesListViewController.swift and update tableView(_:cellForRowAt): with the following:

override func tableView(_ tableView: UITableView,
                        cellForRowAt indexPath: IndexPath)
                        -> UITableViewCell {

  let note = notes.object(at: indexPath)
  let cell: NoteTableViewCell
  if note.image == nil {
    cell = tableView.dequeueReusableCell(
      withIdentifier: "NoteCell",
      for: indexPath) as! NoteTableViewCell
  } else {
    cell = tableView.dequeueReusableCell(
      withIdentifier: "NoteCellWithImage",
      for: indexPath) as! NoteImageTableViewCell
  }

  cell.note = note
  return cell
}

This will dequeue the correct UITableViewCell subclass based on the note having an image present or not. Finally, open NoteImageTableViewCell.swift and add the following to updateNoteInfo(note:):

noteImage.image = note.image

This will update the UIImageView inside the NoteImageTableViewCell with the image from the note.

Build and run, and choose to add a new note:

Tap the Attach Image button to add an image to the note. Choose an image from your simulated photo library and you’ll see it in your new note:

The app uses the standard UIImagePickerController to add photos as attachments to notes.

Note: To add your own images to the Simulator’s photo album, drag an image file onto the open Simulator window. Thankfully, the iOS 11 Simulator comes with a library of photos ready for your use.

If you’re using a device, open AttachPhotoViewController.swift and set the sourceType attribute on the image picker controller to .camera to take photos with the device camera. The existing code uses the photo album, since there is no camera in the Simulator.

Where to Go From Here?

You can download the final project from this tutorial here.

The full chapter in the Core Data by Tutorials book follows up this Core Data migrations tutorial with a series of more complex migrations. In the full book chapter, you’ll walk through creating a mapping model with entity and attribute mappings from one version to the next. You’ll also learn about custom migration policies, and how to migrate non-sequential data models.

Here’s a taste of what’s in the book:

1. Chapter 1, Your First Core Data App: You’ll click File\New Project and write a Core Data app from scratch! This chapter covers the basics of setting up your data model and then adding and fetching records.

2. Chapter 2, NSManagedObject Subclasses: NSManagedObject is the base data storage class of your Core Data object graphs. This chapter will teach you how you customize your own managed object subclasses to store and validate data.

3. Chapter 3, The Core Data Stack: Under the hood, Core Data is made up of many parts working together. In this chapter, you’ll learn about how these parts fit together, and move away from the starter Xcode template to build your own customizable system.

4. Chapter 4, Intermediate Fetching: Your apps will fetch data all the time, and Core Data offers many options for getting the data to you efficiently. This chapter covers more advanced fetch requests, predicates, sorting and asynchronous fetching.

5. Chapter 5, NSFetchedResultsController: Table views are at the core of many iOS apps, and Apple wants to make Core Data play nicely with them! In this chapter, you’ll learn how NSFetchedResultsController can save you time and code when your table views are backed by data from Core Data.

6. Chapter 6, Versioning and Migration: As you update and enhance your app, its data model will almost certainly need to change. In this chapter, you’ll learn how to create multiple versions of your data model and then migrate your users forward so they can keep their existing data as they upgrade.

7. Chapter 7, Unit Tests: Testing is an important part of the development process, and you shouldn’t leave Core Data out of that! In this chapter, you’ll learn how to set up a separate test environment for Core Data and see examples of how to test your models.

8. Chapter 8, Measuring and Boosting Performance: No one ever complained that an app was too fast, so it’s important to be vigilant about tracking performance. In this chapter, you’ll learn how to measure your app’s performance with various Xcode tools and then pick up some tips for dealing with slow spots in your code.

9. Chapter 9, Multiple Managed Object Contexts: In this final chapter, you’ll expand the usual Core Data stack to include multiple managed object contexts. You’ll learn how this can improve perceived performance and help make your app architecture less monolithic and more compartmentalized.

And to help sweeten the deal, the digital edition of the book is on sale for $49.99! But don’t wait — this sale price is only available for a limited time.

Speaking of sweet deals, be sure to check out the great prizes we’re giving away this year with the iOS 11 Launch Party, including over $9,000 in giveaways!

To enter, simply retweet this post using the #ios11launchparty hashtag by using the button below:


We hope you enjoy this update, and stay tuned for more book releases and updates!

The post Lightweight Migrations in Core Data Tutorial appeared first on Ray Wenderlich.

Android Animation Tutorial with Kotlin

$
0
0
Update note: This tutorial has been updated to Kotlin and Android Studio 3.0 by Lisa Luo. The original tutorial was written by Artem Kholodnyi.

Android animation

It’s hard to imagine the mobile experience without animated elements–they’re fun, beautiful and hold the power of not only guiding users gracefully through an app, but also bringing screens to life.

Building animations that make on-screen objects seem alive may look like aerospace engineering at first, but fear not! Android has quite a few tools to help you create animations with relative ease.

You’ll learn to get comfortable with some essential animation tools in this tutorial as you work through launching Doge on a rocket into space (maybe even to the moon) and hopefully get it back safely on the ground :]

By creating these Doge animations, you’ll learn how to:

  • Create property animations — the most useful and simple Android animations
  • Move and fade Android Views
  • Combine animations in a sequence or start them simultaneously
  • Repeat and reverse animations
  • Adjust the animations’ timing
  • Become a bit of a rocket scientist. :]

Prerequisites: This Android tutorial is all about animation, so you need basic knowledge of Android programming and familiarity with Kotlin, Android Studio and XML layouts.

If you’re completely new to Android, you might want to first check out Beginning Android Development Part One.

Many animation. Such code. Fast rocket.

Getting Started

Animations are such a fun topic to explore! The best way to master building animations is by getting your hands dirty in code. :]

First, download the Rocket Launcher Starter. Import it into Android Studio 3.0 Beta 7 or later, then run it on your device. You’ll find everything you need to get going quickly.

Your device will display a list of all the animations you’ll implement.

list

Click any item on the list.

doge_rocket

You should see two static images: Doge and the rocket, and Doge is ready to take a ride. For now, all the screens are the same and none are yet animated.

How do Property Animations Work?

Before you work with the first animation, let’s take a walk down theory road so that you’re clear on the logic behind the magic. :]

Imagine that you need to animate a rocket launch from the bottom edge to the top edge of the screen and that the rocket should make it exactly in 50 ms.

Here’s a plotted graph that shows how the rocket’s position changes over time:

linear-interpolator

The animation above appears to be smooth and continuous. However, smartphones are digital and work with discrete values. Time does not flow continuously for them; it advances by tiny steps.

Animation consists of many still images, also known as frames, that are displayed one by one over a specified time period. The concept today is the same as it was for the first cartoons, but the rendering is a little different.

Elapsed time between frames is named frame refresh delay — it’s 10 ms by default for property animations.

Here’s where animation is different than it was in the early days of film: when you know the rocket moves at a constant speed, you can calculate the position of the rocket at any given time.

You see six animation frames shown below. Notice that:

  • In the beginning of the animation, the rocket is at the bottom edge of the screen.
  • The rocket’s position moves upward by the same fraction of its path with every frame.
  • By the end of the animation, the rocket is at the top edge of the screen.

frames

TL/DR: When drawing a given frame, you calculate the rocket’s position based on the duration and frame refresh rate.

Fortunately, you don’t have to do all the calculations manually because ValueAnimator is happy to do it for you. :]

To set up an animation, you simply specify the start and end values of the property being animated, as well as the duration. You’ll also need to add a listener to call, which will set a new position for your rocket for each frame.

Time Interpolators

You probably noticed that your rocket moves with constant speed during the entire animation — not terribly realistic. Material Design encourages you to create vivid animations that catch the user’s attention while behaving in a more natural way.

Android’s animation framework makes use of time interpolators. ValueAnimator incorporates a time interpolator – it has an object that implements TimeInterpolator interface. Time interpolators determine how the animated value changes over time.

Have a look again at the graph of position changes over time in the simplest case — a Linear Interpolator:

linear-interpolator

Here is how this LinearInterpolator responds to time change:

table_linear

Depending on the time, the rocket position changes at a constant speed, or linearly.

AccelerateInterpolator

Animations can also have non-linear interpolators. One such example is the AccelerateInterpolator, which looks much more interesting:

table_acc

It squares the input value, making the rocket start slowly and accelerate quickly — just like a real rocket does!

That’s pretty much all the theory you need to know to get started, so now it’s time for…

Your First Animation

Take some time to familiarize yourself with the project before you move on. The package com.raywenderlich.rocketlauncher.animationactivities contains BaseAnimationActivity and all other activities that extend this class.

Open activity_base_animation.xml file in the res/layout folder.

In the root, you’ll find a FrameLayout that contains two instances of ImageView with images: one has rocket.png and the other has doge.png. Both have android:layout_gravity set to bottom|center_horizontal to render the images at the bottom-center of the screen.

Note: You’ll do a lot of file navigation in this tutorial. Use these handy shortcuts in Android Studio to move between things easily:

  • Navigate to any file with command + shift + O on Mac / Ctrl + Shift + N on Linux and Windows

  • Navigate to a Kotlin class with command + O on Mac / Ctrl + N on Linux and Windows

BaseAnimationActivity is a super class of all other animation activities in this app.

Open BaseAnimationActivity.kt and have a look inside. At the top are View member variables that are accessible from all animation activities:

  • rocket is the view with the image of the rocket
  • doge is the view that contains the Doge image
  • frameLayout is the FrameLayout that contains both rocket and doge
  • screenHeight will equal the screen height for the sake of convenience

Note that rocket and doge are both a type of ImageView, but you declare each as a View since property animations work with all Android Views. Views are also declared as lateinit values since they are null until the layout is inflated and bound in the appropriate lifecycle event, e.g. onCreate() in an Activity.

Take a look at onCreate() to observe the code:

// 1
super.onCreate(savedInstanceState)
setContentView(R.layout.activity_base_animation)

// 2
rocket = findViewById(R.id.rocket)
doge = findViewById(R.id.doge)
frameLayout = findViewById(R.id.container)

// 3
frameLayout.setOnClickListener { onStartAnimation() }

Here is what you’ve got going on with this code:

  1. Call onCreate() on the superclass and then setContentView(...) with the layout file.
  2. Apply XML layout and bind FrameLayout, rocket and doge to their corresponding views
  3. Set onClickListener on FrameLayout.
  4. Call onStartAnimation() whenever the user taps the screen. This is an abstract method defined by each of the activities that extend BaseAnimationActivity.

This basic code is shared by all of the Activities you will be editing in this tutorial. Now that you’re familiar with it, it’s time to start customizing!

Launch the Rocket

Doge isn’t going anywhere unless you initiate the rocket launch, and it’s the best animation to start with because it’s pretty easy. Who’d have thought that rocket science is so simple?

Open LaunchRocketValueAnimatorAnimationActivity.kt, and add the following code to the body of onStartAnimation():

//1
val valueAnimator = ValueAnimator.ofFloat(0f, -screenHeight)

//2
valueAnimator.addUpdateListener {
  val value = it.animatedValue as Float
  rocket.translationY = value
}

//5
valueAnimator.interpolator = LinearInterpolator()
valueAnimator.duration = BaseAnimationActivity.Companion.DEFAULT_ANIMATION_DURATION

//6
valueAnimator.start()
  1. Create an instance of ValueAnimator by calling the static method ofFloat. It accepts the floating point numbers that’ll apply to the specified property of the animated object over time. In this case, the values start at 0f and end with -screenHeight. Android starts screen coordinates at the top-left corner, so the rocket’s Y translation changes from 0 to the negative of the screen height — it moves bottom to top.
  2. Call addUpdateListener() and pass in a listener. ValueAnimator calls this listener with every update to the animated value — remember the default delay of 10 ms.
  3. Get the current value from the animator and cast it to float; current value type is float because you created the ValueAnimator with ofFloat.
  4. Change the rocket’s position by setting its translationY value
  5. Set up the animator’s duration and interpolator.
  6. Start the animation.

Build and run. Select Launch a Rocket in the list. You’ll get a new screen. Tap it!

linear-launch

That was fun, right? :] Don’t worry about Doge getting left behind — he’ll catch his rocketship to the moon a bit later.

Put a Spin on It

How about giving the rocket a little spin action? Open RotateRocketAnimationActivity.kt and add the following to onStartAnimation():

// 1
val valueAnimator = ValueAnimator.ofFloat(0f, 360f)

valueAnimator.addUpdateListener {
  val value = it.animatedValue as Float
  // 2
  rocket.rotation = value
}

valueAnimator.interpolator = LinearInterpolator()
valueAnimator.duration = BaseAnimationActivity.Companion.DEFAULT_ANIMATION_DURATION
valueAnimator.start()

Can you spot the difference?

  1. Changing the valueAnimator values to go from 0f to 360f causes the rocket to make a full turn. Note that you could create a U-turn effect with 0f to 180f.
  2. Instead of setting translationY, you set the rocket’s rotation because that’s what needs to change.

Build, run and select Spin a rocket. Tap on the new screen:

Accelerate the Launch

Open AccelerateRocketAnimationActivity.kt and add the following code to your old friend onStartAnimation():

// 1
val valueAnimator = ValueAnimator.ofFloat(0f, -screenHeight)
valueAnimator.addUpdateListener {
  val value = it.animatedValue as Float
  rocket.translationY = value
}

// 2 - Here set your favorite interpolator
valueAnimator.interpolator = AccelerateInterpolator(1.5f)
valueAnimator.duration = BaseAnimationActivity.DEFAULT_ANIMATION_DURATION

// 3
valueAnimator.start()

The above code is identical to onStartAnimation() in LaunchRocketValueAnimationActivity.kt except for one line: the interpolator used to set valueAnimator.interpolator.

Build, run and select Accelerate a rocket in the list. Tap on the new screen to see how your rocket behaves.

Again, we see that poor Doge doesn’t catch the rocket to the moon…poor fella. Hang in there, buddy!

accelerate

Since you used AccelerateInterpolator, you should see your rocket accelerating after liftoff. Feel free to play around with interpolators if you’d like. I’ll sit here and wait. I promise :]

Which Properties Can You Animate?

Until now, you’ve only animated position and rotation for View, but ValueAnimator doesn’t care what you do with the value that it supplies.

You can tell ValueAnimator to animate the value using any of the following types:

  • float if you create ValueAnimator instance with ofFloat
  • int if you do it with ofInt
  • ofObject is for the cases when float or int is not enough — it’s often used to animate colors

You can also animate any property of View. Some examples are:

  • scaleX and scaleY – these allow you to scale the view by x-axis or y-axis independently, or you can call both with the same value to animate the view’s size.
  • translationX and translationY – these allow you to change the view’s on-screen position.
  • alpha – animate view’s transparency; 0 stands for completely transparent and 1 for completely opaque.
  • rotation – rotates the view on screen; the argument is in degrees, so 360 means a full clockwise turn. You may specify negative values as well, for instance, -90 means a counterclockwise quarter-turn.
  • rotationX and rotationY – the same as rotation but along the x-axis and y-axis. These properties allow you to rotate in 3D.
  • backgroundColor – lets you set a color. The integer argument must specify a color as Android constants Color.YELLOW, Color.BLUE do.

ObjectAnimator

Meet ObjectAnimator, a subclass of ValueAnimator. If you only need to animate a single property of a single object, ObjectAnimator may just be your new best friend.

Unlike ValueAnimator, where you must set a listener and do something with a value, ObjectAnimator can handle those bits for you almost automagically. :]

Go to LaunchRocketObjectAnimatorAnimationActivity.kt class and enter the following code:

// 1
val objectAnimator = ObjectAnimator.ofFloat(rocket, "translationY", 0f, -screenHeight)

// 2
objectAnimator.duration = BaseAnimationActivity.Companion.DEFAULT_ANIMATION_DURATION
objectAnimator.start()

Here’s what you’re doing:

  1. Creating an instance of ObjectAnimator (like you did with ValueAnimator) except that the former takes two more parameters:
    • rocket is the object to animate
    • The object must have a property corresponding to the name of the property you wish to change, which in this example is “translationY”. You’re able to do this because rocket is an object of class View, which, in its base Java class, has an accessible setter with setTranslationY().
  2. You set the duration for the animation and start it.

Run your project. Select Launch a rocket (ObjectAnimator) in the list. Tap on the screen.

linear-launch

The rocket behaves the same as it did with ValueAnimator, but with less code. :]

Note: There’s a limitation to ObjectAnimator — it can’t animate two objects simultaneously. To work around it, you create two instances of ObjectAnimator.

Consider your use cases and the amount of coding required when you decide to use ObjectAnimator or ValueAnimator.

Animating Color

Speaking of use cases, there’s animating colors to consider. Neither ofFloat() nor ofInt() can construct your animator and get good results with colors. You’re better off using ArgbEvaluator.

Open ColorAnimationActivity.kt and put this code into onStartAnimation():

//1
val objectAnimator = ObjectAnimator.ofObject(
  frameLayout,
  "backgroundColor",
  ArgbEvaluator(),
  ContextCompat.getColor(this, R.color.background_from),
  ContextCompat.getColor(this, R.color.background_to)
)

// 2
objectAnimator.repeatCount = 1
objectAnimator.repeatMode = ValueAnimator.REVERSE

// 3
objectAnimator.duration = BaseAnimationActivity.Companion.DEFAULT_ANIMATION_DURATION
objectAnimator.start()

In the code above, you:

  1. Call ObjectAnimator.ofObject() and give it the following arguments:
    • frameLayout — the object with the property to be animated
    • "backgroundColor" — the property you want to animate
    • ArgbEvaluator() — an additional argument that specifies how to interpolate between two different ARGB (alpha, red, green, blue) color values
    • Start and end color values — here you make use of ComtextCompat.getColor() to get the color resource id of a custom color specified in your colors.xml.
  2. Set the number of times the animation will repeat by setting the object’s repeatCount value. Then you set its repeatMode to define what the animation does when it reaches the end. More on this soon!
  3. Set duration and start the animation.

Build and run. Pick the Background color item and tap on the screen.

bg-color

That’s amazing! Hey, you’re getting the hang of this pretty quickly. That’s a buttery-smooth background color change :]

Combining Animations

Animating a view is pretty awesome, but so far you’ve changed only one property and one object at a time. Animations need not be so restrictive.

It’s time to send Doge to the moon! :]

AnimatorSet allows you to play several animations together or in sequence. You pass your first animator to play(), which accepts an Animator object as an argument and returns a builder.

Then you can call the following methods on that builder, all of which accept Animator as an argument:

  • with() — to play the Animator passed as the argument simultaneously with the first one you specified in play()
  • before() — to play it before
  • after() — to play it after

You can create chains of calls such as these.

Open LaunchAndSpinAnimatorSetAnimatorActivity.kt in your editor, and put the following code into onStartAnimation():

// 1
val positionAnimator = ValueAnimator.ofFloat(0f, -screenHeight)

// 2
positionAnimator.addUpdateListener {
  val value = it.animatedValue as Float
  rocket.translationY = value
}

// 3
val rotationAnimator = ObjectAnimator.ofFloat(rocket, "rotation", 0f, 180f)
// 4
val animatorSet = AnimatorSet()
// 5
animatorSet.play(positionAnimator).with(rotationAnimator)
// 6
animatorSet.duration = BaseAnimationActivity.Companion.DEFAULT_ANIMATION_DURATION
animatorSet.start()

Here’s what you’re doing in this block:

  1. Create a new ValueAnimator.
  2. Attach an AnimatorUpdateListener to the ValueAnimator that updates the rocket’s position.
  3. Create an ObjectAnimator, a second animator that updates the rocket’s rotation.
  4. Create a new instance of AnimatorSet.
  5. Specify that you’d like to execute positionAnimator together with rotationAnimator.
  6. Just as with a typical animator, you set a duration and call start().

Build and run again. Select the Launch and spin (AnimatorSet). Tap the screen.

launch-n-spin

Doge defies the laws of physics with this one.

There’s a nifty tool to simplify animating several properties of the same object. The tool is called…

ViewPropertyAnimator

One of the greatest things about animation code that uses ViewPropertyAnimator is that it’s easy to write and read — you’ll see.

Open LaunchAndSpinViewPropertyAnimatorAnimationActivity.kt and add the following call to onStartAnimation():

rocket.animate()
    .translationY(-screenHeight)
    .rotationBy(360f)
    .setDuration(BaseAnimationActivity.Companion.DEFAULT_ANIMATION_DURATION)
    .start()

In here, animate() returns an instance of ViewPropertyAnimator so you can chain the calls.

Build and run, select Launch and spin (ViewPropertyAnimator), and you’ll see the same animation as in the previous section.

Compare your code for this section to the AnimatorSet code snippet that you implemented in the previous section:

val positionAnimator = ValueAnimator.ofFloat(0f, -screenHeight)

positionAnimator.addUpdateListener {
  val value = it.animatedValue as Float
  rocket?.translationY = value
}

val rotationAnimator = ObjectAnimator.ofFloat(rocket, "rotation", 0f, 180f)

val animatorSet = AnimatorSet()
animatorSet.play(positionAnimator).with(rotationAnimator)
animatorSet.duration = BaseAnimationActivity.Companion.DEFAULT_ANIMATION_DURATION
animatorSet.start()

ViewPropertyAnimator may provide better performance for multiple simultaneous animations. It optimizes invalidated calls, so they only take place once for several properties — in contrast to each animated property causing its own invalidation independently.

Animating the Same Property of Two Objects

A nice feature of ValueAnimator is that you can reuse its animated value and apply it to as many objects as you like.

Test it out by opening FlyWithDogeAnimationActivity.kt and putting the following code in onStartAnimation():

//1
val positionAnimator = ValueAnimator.ofFloat(0f, -screenHeight)
positionAnimator.addUpdateListener {
  val value = it.animatedValue as Float
  rocket.translationY = value
  doge.translationY = value
}

//2
val rotationAnimator = ValueAnimator.ofFloat(0f, 360f)
rotationAnimator.addUpdateListener {
  val value = it.animatedValue as Float
  doge.rotation = value
}

//3
val animatorSet = AnimatorSet()
animatorSet.play(positionAnimator).with(rotationAnimator)
animatorSet.duration = BaseAnimationActivity.Companion.DEFAULT_ANIMATION_DURATION
animatorSet.start()

In the above code you just created three animators:

  1. positionAnimator — for changing positions of both rocket and doge
  2. rotationAnimator — for rotating Doge
  3. animatorSet — to combine the first two animators

Notice that you set translation for two objects at once in the first animator.

Run the app and select Don’t leave Doge behind (Animating two objects). You know what to do now. To the moon!

Animation Listeners

Animation typically implies that a certain action has occurred or will take place. Typically, whatever happens usually comes at the end of your fancy animation.

You don’t get to observe it, but know that the rocket stops and stays off screen when the animation ends. If you don’t plan to land it or finish the activity, you could remove this particular view to conserve resources.

AnimatorListener — receives a notification from the animator when the following events occur:

  • onAnimationStart() — called when the animation starts
  • onAnimationEnd() — called when the animation ends
  • onAnimationRepeat() — called if the animation repeats
  • onAnimationCancel() — called if the animation is canceled

Open WithListenerAnimationActivity.kt and add the following code to onStartAnimation():

//1
val animator = ValueAnimator.ofFloat(0f, -screenHeight)

animator.addUpdateListener {
  val value = it.animatedValue as Float
  rocket.translationY = value
  doge.translationY = value
}

// 2
animator.addListener(object : Animator.AnimatorListener {
  override fun onAnimationStart(animation: Animator) {
    // 3
    Toast.makeText(applicationContext, "Doge took off", Toast.LENGTH_SHORT)
        .show()
  }

  override fun onAnimationEnd(animation: Animator) {
    // 4
    Toast.makeText(applicationContext, "Doge is on the moon", Toast.LENGTH_SHORT)
        .show()
    finish()
  }

  override fun onAnimationCancel(animation: Animator) {}

  override fun onAnimationRepeat(animation: Animator) {}
})

// 5
animator.duration = 5000L
animator.start()

The structure of the code above, with the exception of the listener part, should look the same as the previous section. Here’s what you’re doing in there:

  1. Create and set up an animator. You use ValueAnimator to change the position of two objects simultaneously — you can’t do the same thing with a single ObjectAnimator.
  2. Add the AnimatorListener.
  3. Show a toast message when the animation starts
  4. And another toast when it ends
  5. Start the animation as usual

Run the app. Select Animation events. Tap on the screen. Look at the messages!

events

Note: You also can add a listener to ViewPropertyAnimator by adding a setListener to a call chain before calling start():
rocket.animate().setListener(object : Animator.AnimatorListener {
  // Your action
})

Alternatively, you can set start and end actions on your View by calling withStartAction(Runnable) and withEndAction(Runnable) after animate(). It’s the equivalent to an AnimatorListener with these actions.

Animation Options

Animations are not one-trick ponies that simply stop and go. They can loop, reverse, run for a specific duration, etc.

In Android, you can use the following methods to adjust an animation:

  • repeatCount — specifies the number of times the animation should repeat after the initial run.
  • repeatMode — defines what this animation should do when it reaches the end
  • duration — specifies the animation’s total duration

Open up FlyThereAndBackAnimationActivity.kt, and add the following to onStartAnimation().

// 1
val animator = ValueAnimator.ofFloat(0f, -screenHeight)

animator.addUpdateListener {
  val value = it.animatedValue as Float
  rocket.translationY = value
  doge.translationY = value
}

// 2
animator.repeatMode = ValueAnimator.REVERSE
// 3
animator.repeatCount = 3

// 4
animator.duration = 500L
animator.start()

In here, you:

  1. Create an animator, as usual
  2. You can set the repeatMode to either of the following:
    • RESTART — restarts the animation from the beginning.
    • REVERSE — reverses the animation’s direction with every iteration.

    In this case, you set it to REVERSE because you want the rocket to take off and then go back to the same position where it started. Just like SpaceX! :]

  3. …Except you’ll do it twice.
  4. Set a duration and start the animation, as usual.

Note: So why does the third section specify the repeat count at three? Each up-and-down motion consumes two repetitions, so you need three to bring Doge back to earth twice: one to land the first time, and two to launch and land again. How many times would you like to see Doge bounce? Play around with it!

Run the app. Select Fly there and back (Animation options) in the list. A new screen is opened. Tap on the screen.

there-and-back

You should see your rocket jumping like a grasshopper! Take that, Elon Musk. :]

Declaring Animations in XML

You’ve made it to the best part of this tutorial. In this final section, you’ll learn how to declare once and use everywhere — yes, that’s right, you’ll be able to reuse your animations with impunity.

By defining animations in XML, you allow reuse of animations throughout your code base.

Defining animations in XML bears some resemblance to composing view layouts.

The starter project has an animation XML in res/animator named jump_and_blink.xml. Open the file in the editor, you should see this:

<?xml version="1.0" encoding="utf-8"?>
<set xmlns:android="http://schemas.android.com/apk/res/android"
     android:ordering="together">
</set>

The following XML tags are available to you:

  • set — the same as AnimatorSet
  • animator — the same as ValueAnimator
  • objectAnimator — you guessed correctly; it stands for ObjectAnimator

When using an AnimatorSet in XML, you nest the ValueAnimator and ObjectAnimator objects inside it, similar to how you nest View objects inside ViewGroup objects (RelativeLayout, LinearLayout, etc.) in layout XML files.

Replace the contents of jump_and_blink.xml with the following code:

<?xml version="1.0" encoding="utf-8"?>
<set xmlns:android="http://schemas.android.com/apk/res/android"
  android:ordering="together">

  <objectAnimator
    android:propertyName="alpha"
    android:duration="1000"
    android:repeatCount="1"
    android:repeatMode="reverse"
    android:interpolator="@android:interpolator/linear"
    android:valueFrom="1.0"
    android:valueTo="0.0"
    android:valueType="floatType"/>

  <objectAnimator
    android:propertyName="translationY"
    android:duration="1000"
    android:repeatCount="1"
    android:repeatMode="reverse"
    android:interpolator="@android:interpolator/bounce"
    android:valueFrom="0"
    android:valueTo="-500"
    android:valueType="floatType"/>
</set>

Here you declare a root element, set tag. Its ordering attribute can be either together or sequential. It’s together by default, but you may prefer to specify it for clarity. The set tag has two child XML tags, each of which is an objectAnimator.

Take a look at the following attributes of objectAnimator:

  • android:valueFrom and android:valueTo — specify start and end values like you did when you created an instance of ObjectAnimator
  • android:valueType — value type; either floatType or intType
  • android:propertyName — the property you want to animate without the set part
  • android:duration — duration of the animation
  • android:repeatCount — the same as with setRepeatCount
  • android:repeatMode — the same as with setRepeatMode
  • android:interpolator — specify interpolator; it usually starts with @android:interpolator/. Start typing this and Android Studio will show all available interpolators under autocomplete options
  • You can’t specify your target object here, but you can do it later in Kotlin

In the last block, you added two instances of objectAnimator to the AnimatorSet, and they will play together. Now, it’s time to use them.

Go to XmlAnimationActivity.kt and add the following code to onStartAnimation():

  // 1
  val rocketAnimatorSet = AnimatorInflater.loadAnimator(this, R.animator.jump_and_blink) as AnimatorSet
  // 2
  rocketAnimatorSet.setTarget(rocket)

  // 3
  val dogeAnimatorSet = AnimatorInflater.loadAnimator(this, R.animator.jump_and_blink) as AnimatorSet
  // 4
  dogeAnimatorSet.setTarget(doge)

  // 5
  val bothAnimatorSet = AnimatorSet()
  bothAnimatorSet.playTogether(rocketAnimatorSet, dogeAnimatorSet)
  // 6
  bothAnimatorSet.duration = BaseAnimationActivity.Companion.DEFAULT_ANIMATION_DURATION
  bothAnimatorSet.start()

In the above code, you’re doing a few things:

  1. First, you load AnimatorSet from R.animator.jump_and_blink file, just like you normally would to inflate a view layout
  2. Then you set rocket as the target for just-loaded animator
  3. Load the animator from the same file once again
  4. Rinse and repeat for doge object
  5. Now you create a third AnimatorSet and set it up to play the first two simultaneously
  6. Set the duration for the root animator and start
  7. Whew! Rest just a little bit :]

Build and run. Select Jump and blink (Animations in XML) in the list. Tap to see your handiwork.

jump-n-blink

You should see Doge jumping, disappearing and then returning back to the ground safely :]

Where To Go From Here

You can grab the final project here.

During this tutorial you:

  • Created and used property animations with ValueAnimator and ObjectAnimator
  • Set up time interpolator of your choice for your animation
  • Animated position, rotation and color for View
  • Combined animations together
  • Used the spectacular ViewPropertyAnimator with the help of animate()
  • Repeated your animation
  • Defined the animation in XML for reuse across the project

Basically, you just gained Android animation super-powers.

If you’re hungry for more, check out the available time interpolators in Android’s documentation (see Known Indirect Subclasses). If you’re not happy with either of them, you can create your own. You can also set Keyframes for your animation to make them very sophisticated.

Android has other animations systems like View animations and Drawable Animations. You can also make use of Canvas and OpenGL ES APIs to create animations. Stay tuned :]

I hope you enjoyed the Introduction to Android Animations tutorial. Chime in with your questions, ideas and feedback in the forums below!

The post Android Animation Tutorial with Kotlin appeared first on Ray Wenderlich.

Multiple Managed Object Contexts with Core Data Tutorial

$
0
0

This is an abridged from our book Core Data by Tutorials, which has been completely updated for Swift 4 and iOS 11. This tutorial is presented as part of our iOS 11 Launch Party — enjoy!

A managed object context is an in-memory scratchpad for working with your managed objects.

Most apps need just a single managed object context. The default configuration in most Core Data apps is a single managed object context associated with the main queue. Multiple managed object contexts make your apps harder to debug; it’s not something you’d use in every app, in every situation.

That being said, certain situations do warrant the use of more than one managed object context. For example, long-running tasks, such as exporting data, will block the main thread of apps that use only a single main-queue managed object context and cause the UI to stutter.

In other situations, such as when edits are being made to user data, it’s helpful to treat a managed object context as a set of changes that the app can discard if it no longer needs them. Using child contexts makes this possible.

In this tutorial, you’ll learn about multiple managed object contexts by taking a journaling app for surfers and improving it in several ways by adding multiple contexts.

Note: This is an advanced tutorial, and assumes prior knowledge of Swift, Core Data, and iOS app development in general. If common Core Data phrases such as managed object subclass and persistent store coordinator don’t ring any bells, or if you’re unsure what a Core Data stack is supposed to do, you may want to read some of our other Core Data tutorials first.

Getting Started

This tutorial’s starter project is a simple journal app for surfers. After each surf session, a surfer can use the app to create a new journal entry that records marine parameters, such as swell height or period, and rate the session from 1 to 5. Dude, if you’re not fond of hanging ten and getting barreled, no worries, brah. Just replace the surfing terminology with your favorite hobby of choice!

Introducing SurfJournal

Download the SurfJournal starter project here. Open the project, then build and run the app.

On startup, the application lists all previous surf session journal entries. Tapping a row brings up the detail view of a surf session with the ability to make edits.

As you can see, the sample app works and has data. Tapping the Export button on the top-left exports the data to a comma-separated values (CSV) file. Tapping the plus (+) button on the top-right adds a new journal entry. Tapping a row in the list opens the entry in edit mode, where you can change or view the details of a surf session.

Although the sample project appears simple, it actually does a lot and will serve as a good base to add multi-context support. First, let’s make sure you have a good understanding of the various classes in the project.

Open the project navigator and take a look at the full list of files in the starter project:

bela

Before jumping into the code, take a brief moment to go over what each class does for you out of the box.

  • AppDelegate: On first launch, the app delegate creates the Core Data stack and sets the coreDataStack property on the primary view controller JournalListViewController.
  • CoreDataStack: This object contains the cadre of Core Data objects known as the stack. Here, the stack installs a database that already has data in it on first launch. No need to worry about this just yet; you’ll see how it works shortly.
  • JournalListViewController: The sample project is a one-page, table-based application. This file represents that table. If you’re curious about its UI elements, head over to Main.storyboard. There’s a table view controller embedded in a navigation controller and a single prototype cell of type SurfEntryTableViewCell.
  • JournalEntryViewController: This class handles creating and editing surf journal entries. You can see its UI in Main.storyboard.
  • JournalEntry: This class represents a surf journal entry. It’s an NSManagedObject subclass with six properties for attributes: date, height, location, period, rating and wind. If you’re curious about this class’s entity definition, check out SurfJournalModel.xcdatamodel.

  • JournalEntry+Helper: This is an extension to the JournalEntry object. It includes the CSV export method csv() and the stringForDate() helper method. These methods are implemented in the extension to avoid being destroyed when you make changes to the Core Data model.

There was already a significant amount of data when you first launched the app.This sample project comes with a seeded Core Data database.

The Core Data Stack

Open CoreDataStack.swift and find the following code in seedCoreDataContainerIfFirstLaunch():

// 1
let previouslyLaunched =
  UserDefaults.standard.bool(forKey: "previouslyLaunched")
if !previouslyLaunched {
  UserDefaults.standard.set(true, forKey: "previouslyLaunched")

  // Default directory where the CoreDataStack will store its files
  let directory = NSPersistentContainer.defaultDirectoryURL()
  let url = directory.appendingPathComponent(
    modelName + ".sqlite")

  // 2: Copying the SQLite file
  let seededDatabaseURL = Bundle.main.url(
    forResource: modelName,
    withExtension: "sqlite")!

  _ = try? FileManager.default.removeItem(at: url)

  do {
    try FileManager.default.copyItem(at: seededDatabaseURL,
                                     to: url)
  } catch let nserror as NSError {
    fatalError("Error: \(nserror.localizedDescription)")
  }

Here’s what this version of CoreDataStack.swift contains:

  1. You first check UserDefaults for the previouslyLaunched boolean value. If the current execution is indeed the app’s first launch, the Bool will be false, making the if statement true. On first launch, the first thing you do is set previouslyLaunched to true so the seeding operation never happens again.
  2. You then copy the SQLite seed file SurfJournalModel.sqlite, included with the app bundle, to the directory returned by the Core Data-provided method NSPersistentContainer.defaultDirectoryURL().

Now view the rest of seedCoreDataContainerIfFirstLaunch():

  // 3: Copying the SHM file
  let seededSHMURL = Bundle.main.url(forResource: modelName,
    withExtension: "sqlite-shm")!
  let shmURL = directory.appendingPathComponent(
    modelName + ".sqlite-shm")

  _ = try? FileManager.default.removeItem(at: shmURL)

  do {
    try FileManager.default.copyItem(at: seededSHMURL,
                                     to: shmURL)
  } catch let nserror as NSError {
    fatalError("Error: \(nserror.localizedDescription)")
  }

  // 4: Copying the WAL file
  let seededWALURL = Bundle.main.url(forResource: modelName,
    withExtension: "sqlite-wal")!
  let walURL = directory.appendingPathComponent(
    modelName + ".sqlite-wal")

  _ = try? FileManager.default.removeItem(at: walURL)

  do {
    try FileManager.default.copyItem(at: seededWALURL,
                                     to: walURL)
  } catch let nserror as NSError {
    fatalError("Error: \(nserror.localizedDescription)")
  }

  print("Seeded Core Data")
}
  1. Once the copy of SurfJournalModel.sqlite has succeeded, you then copy over the support file SurfJournalModel.sqlite-shm.
  2. Finally, you copy over the remaining support file SurfJournalModel.sqlite-wal.

The only reason SurfJournalModel.sqlite, SurfJournalModel.sqlite-shm or SurfJournalModel.sqlite-wal would fail to copy on first launch is if something really bad happened, such as disk corruption from cosmic radiation. In that case, the device, including any apps, would likely also fail. If the files fail to copy, there’s no point in continuing, so the catch blocks call fatalError.

Note: Developers often frown upon using abort and fatalError, as it confuses users by causing the app to quit suddenly and without explanation. This is one scenario where fatalError is acceptable, since the app needs Core Data to work. If an app requires Core Data and Core Data isn’t working, there’s no point in letting the app continue on, only to fail sometime later in a non-deterministic way.

Calling fatalError, at the very least, generates a stack trace, which can be helpful when trying to fix the problem. If your app has support for remote logging or crash reporting, you should log any relevant information that might be helpful for debugging before calling fatalError.

To support concurrent reads and writes, the persistent SQLite store in this sample app uses SHM (shared memory file) and WAL (write-ahead logging) files. You don’t need to know how these extra files work, but you do need to be aware of their existence, and that you need to copy them over when seeding the database. If you fail to copy over these files, the app will work, but it might be missing data.

Now that you know something about beginning with a seeded database, you’ll start learning about multiple managed object contexts by working on a temporary private context.

Doing Work In the Background

If you haven’t done so already, tap the Export button at the top-left and then immediately try to scroll the list of surf session journal entries. Notice anything? The export operation takes several seconds, and it prevents the UI from responding to touch events such as scrolling.

The UI is blocked during the export operation because both the export operation and UI are using the main queue to perform their work. This is the default behavior.

The traditional way to fix this is to use Grand Central Dispatch to run the export operation on a background queue. However, Core Data managed object contexts are not thread-safe. That means you can’t just dispatch to a background queue and use the same Core Data stack.

The solution is simple: use a private background queue rather than the main queue for the export operation. This will keep the main queue free for the UI to use.

But before you jump in and fix the problem, you need to understand how the export operation works.

Exporting Data

Start by viewing how the app creates the CSV strings for the JournalEntry entity. Open JournalEntry+Helper.swift and find csv():

func csv() -> String {
  let coalescedHeight = height ?? ""
  let coalescedPeriod = period ?? ""
  let coalescedWind = wind ?? ""
  let coalescedLocation = location ?? ""
  let coalescedRating: String
  if let rating = rating?.int32Value {
    coalescedRating = String(rating)
  } else {
    coalescedRating = ""
  }

  return "\(stringForDate()),\(coalescedHeight),\(coalescedPeriod),\(coalescedWind),\(coalescedLocation),\(coalescedRating)\n"
}

As you can see, JournalEntry returns a comma-separated string of the entity’s attributes. Because the JournalEntry attributes are allowed to be nil, the function uses the nil coalescing operator (??) to export an empty string instead of an unhelpful debug message that the attribute is nil.

Note: The nil coalescing operator (??) unwraps an optional if it contains a value; otherwise it returns a default value. For example, the following: let coalescedHeight = height != nil ? height! : "" can be shortened using the nil coalescing operator to: let coalescedHeight = height ?? "".

That’s how the app creates the CSV strings for an individual journal entry, but how does the app save the CSV file to disk? Open JournalListViewController.swift and find the following code in exportCSVFile():

// 1
let context = coreDataStack.mainContext
var results: [JournalEntry] = []
do {
  results = try context.fetch(self.surfJournalFetchRequest())
} catch let error as NSError {
  print("ERROR: \(error.localizedDescription)")
}

// 2
let exportFilePath = NSTemporaryDirectory() + "export.csv"
let exportFileURL = URL(fileURLWithPath: exportFilePath)
FileManager.default.createFile(atPath: exportFilePath,
  contents: Data(), attributes: nil)

Going through the CSV export code step-by-step:

  1. First, retrieve all JournalEntry entities by executing a fetch request.

    The fetch request is the same one used by the fetched results controller. Therefore, you reuse the surfJournalFetchRequest method to create the request to avoid duplication.

  2. Next, create the URL for the exported CSV file by appending the file name (“export.csv”) to the output of the NSTemporaryDirectory method.

    The path returned by NSTemporaryDirectory is a unique directory for temporary file storage. This a good place for files that can easily be generated again and don’t need to be backed up by iTunes or to iCloud.

    After creating the export URL, call createFile(atPath:contents:attributes:) to create the empty file where you’ll store the exported data. If a file already exists at the specified file path, this method will remove it first.

Once the app has the empty file, it can write the CSV data to disk:

// 3
let fileHandle: FileHandle?
do {
  fileHandle = try FileHandle(forWritingTo: exportFileURL)
} catch let error as NSError {
  print("ERROR: \(error.localizedDescription)")
  fileHandle = nil
}

if let fileHandle = fileHandle {
  // 4
  for journalEntry in results {
    fileHandle.seekToEndOfFile()
    guard let csvData = journalEntry
      .csv()
      .data(using: .utf8, allowLossyConversion: false) else {
        continue
    }

    fileHandle.write(csvData)
  }

  // 5
  fileHandle.closeFile()

  print("Export Path: \(exportFilePath)")
  self.navigationItem.leftBarButtonItem =
    self.exportBarButtonItem()
  self.showExportFinishedAlertView(exportFilePath)

} else {
  self.navigationItem.leftBarButtonItem =
    self.exportBarButtonItem()
}

Here’s how the file-handling works:

  1. First, the app needs to create a file handler for writing, which is simply an object that handles the low-level disk operations necessary for writing data. To create a file handler for writing, use the FileHandle(forWritingTo:) initializer.
  1. Next, iterate over all JournalEntry entities.

    During each iteration, you attempt to create a UTF8-encoded string using csv() on JournalEntry and data(using:allowLossyConversion:) on String.

    If it’s successful, you write the UTF8 string to disk using the file handler write() method.

  2. Finally, close the export file-writing file handler, since it’s no longer needed.

Once the app has written all the data to disk, it shows an alert dialog with the exported file path.

Note: This alert controller with the export path is fine for learning purposes, but for a real app, you’ll need to provide the user with a way to retrieve the exported CSV file, for example using UIActivityViewController.

To open the exported CSV file, use Excel, Numbers or your favorite text editor to navigate to and open the file specified in the alert dialog. If you open the file in Numbers you will see the following:

Now that you’ve seen how the app currently exports data, it’s time to make some improvements.

Exporting In the Background

You want the UI to continue working while the export is happening. To fix the UI problem, you’ll perform the export operation on a private background context instead of on the main context.

Open JournalListViewController.swift and find the following code in exportCSVFile():

// 1
let context = coreDataStack.mainContext
var results: [JournalEntry] = []
do {
  results = try context.fetch(self.surfJournalFetchRequest())
} catch let error as NSError {
  print("ERROR: \(error.localizedDescription)")
}

As you saw earlier, this code retrieves all of the journal entries by calling fetch() on the managed object context.

Next, replace the above code with the following:

// 1
coreDataStack.storeContainer.performBackgroundTask { context in
  var results: [JournalEntry] = []
  do {
    results = try context.fetch(self.surfJournalFetchRequest())
  } catch let error as NSError {
    print("ERROR: \(error.localizedDescription)")
  }

Instead of using the main managed object context also used by the UI, you’re now calling performBackgroundTask(_:) method. This creates and executes the code block on that private context.

The private context created by performBackgroundTask(_:) is on a private queue, which doesn’t block the main UI queue. You could also manually create a new temporary private context with a concurrency type of .privateQueueConcurrencyType instead of using performBackgroundTask(_:).

Note: There are two concurrency types a managed object context can use:

Private Queue specifies the context that will be associated with a private dispatch queue instead of the main queue. This is the type of queue you just used to move the export operation off of the main queue so it would no longer interfere with the UI.

Main Queue, the default type, specifies that the context will be associated with the main queue. This type is what the main context (coreDataStack.mainContext) uses. Any UI operation, such as creating the fetched results controller for the table view, must use a context of this type.

Next, find the following code in the same method:

  print("Export Path: \(exportFilePath)")
  self.navigationItem.leftBarButtonItem =
    self.exportBarButtonItem()
  self.showExportFinishedAlertView(exportFilePath)
} else {
  self.navigationItem.leftBarButtonItem =
    self.exportBarButtonItem()
}

Replace the code with the following:

    print("Export Path: \(exportFilePath)")
    // 6
    DispatchQueue.main.async {
      self.navigationItem.leftBarButtonItem =
        self.exportBarButtonItem()
      self.showExportFinishedAlertView(exportFilePath)
    }
  } else {
    DispatchQueue.main.async {
      self.navigationItem.leftBarButtonItem =
        self.exportBarButtonItem()
    }
  }
} // 7 Closing brace for performBackgroundTask

To finish off the task:

  1. You should always perform all operations related to the UI on the main queue, such as showing an alert view when the export operation is finished; otherwise, unpredictable things might happen. Use DispatchQueue.main.async to show the final alert view message on the main queue.
  2. Finally, add a closing curly brace to close the block you opened earlier in step 1 via the performBackgroundTask(_:) call.

surf

Now that you’ve moved the export operation to a new context with a private queue, build and run to see if it works!

You should see exactly what you saw before:

Tap the Export button in the top left, and immediately try to scroll the list of surf session journal entries. Notice anything different this time? The export operation still takes several seconds to complete, but the table view continues to scroll during this time. The export operation is no longer blocking the UI.

Cowabunga, dude! Gnarly job making the UI more responsive.

You’ve just witnessed how doing work on a private background queue can improve a user’s experience with your app. Now you’ll expand on the use of multiple contexts by examining a child context.

Editing On a Scratchpad

Right now, SurfJournal uses the main context (coreDataStack.mainContext) when creating a new journal entry or viewing an existing one. There’s nothing wrong with this approach; the starter project works as-is.

For journaling-style apps like this one, you can simplify the app architecture by thinking of edits or new entries as a set of changes, like a scratch pad. As the user edits the journal entry, you update the attributes of the managed object. Once the changes are complete, you either save them or throw them away, depending on what the user wants to do.

You can think of child managed object contexts as temporary scratch pads that you can either discard completely, or save and send the changes to the parent context.

But what is a child context, technically?

All managed object contexts have a parent store from which you can retrieve and change data in the form of managed objects, such as the JournalEntry objects in this project. Typically, the parent store is a persistent store coordinator, which is the case for the main context provided by the CoreDataStack class. Alternatively, you can set the parent store for a given context to another managed object context, making it a child context.

When you save a child context, the changes only go to the parent context. Changes to the parent context won’t be sent to the persistent store coordinator until the parent context is saved.

Before you jump in and add a child context, you need to understand how the current viewing and editing operation works.

Viewing and Editing

The first part of the operation requires segueing from the main list view to the journal detail view. Open JournalListViewController.swift and find prepare(for:sender:):

// 1
if segue.identifier == "SegueListToDetail" {
  // 2
  guard let navigationController =
    segue.destination as? UINavigationController,
    let detailViewController =
      navigationController.topViewController
        as? JournalEntryViewController,
    let indexPath = tableView.indexPathForSelectedRow else {
      fatalError("Application storyboard mis-configuration")
  }
  // 3
  let surfJournalEntry =
    fetchedResultsController.object(at: indexPath)
  // 4
  detailViewController.journalEntry = surfJournalEntry
  detailViewController.context =
    surfJournalEntry.managedObjectContext
  detailViewController.delegate = self

Taking the segue code step-by-step:

  1. There’s two segues: SegueListToDetail and SegueListToDetailAdd. The first, shown in the previous code block, runs when the user taps on a row in the table view to view or edit a previous journal entry.
  2. Next, you get a reference to the JournalEntryViewController the user is going to end up seeing. It’s presented inside a navigation controller so there’s some unpacking to do. This code also verifies that there’s a selected index path in the table view.
  3. Next, you get the JournalEntry selected by the user, using the fetched results controller’s object(at:) method.
  4. Finally, you set all required variables on the JournalEntryViewController instance. The surfJournalEntry variable corresponds to the JournalEntry entity resolved in step 3. The context variable is the managed object context to be used for any operation; for now, it just uses the main context. The JournalListViewController sets itself as the delegate of the JournalEntryViewController so it can be informed when the user has completed the edit operation.

SegueListToDetailAdd is similar to SegueListToDetail, except the app creates a new JournalEntry entity instead of retrieving an existing one. The app executes SegueListToDetailAdd when the user taps the plus (+) button on the top-right to create a new journal entry.

Now that you know how both segues work, switch to JournalEntryViewController.swift and look at the JournalEntryDelegate protocol at the top of the file:

protocol JournalEntryDelegate {
  func didFinish(viewController: JournalEntryViewController,
                 didSave: Bool)
}

The JournalEntryDelegate protocol is very short and consists of only one method: didFinish(viewController:didSave:). This method, which the protocol requires the delegate to implement, indicates if the user is done editing or viewing a journal entry and whether any changes should be saved.

To understand how didFinish(viewController:didSave:) works, switch back to JournalListViewController.swift and find that method:

func didFinish(viewController: JournalEntryViewController,
               didSave: Bool) {
  // 1
  guard didSave,
    let context = viewController.context,
    context.hasChanges else {
      dismiss(animated: true)
      return
  }
  // 2
  context.perform {
    do {
      try context.save()
    } catch let error as NSError {
      fatalError("Error: \(error.localizedDescription)")
    }
    // 3
    self.coreDataStack.saveContext()
  }
  // 4
  dismiss(animated: true)
}

Taking each numbered comment in turn:

  1. First, use a guard statement to check the didSave parameter. This will be true if the user taps the Save button instead of the Cancel button, so the app should save the user’s data. The guard statement also uses the hasChanges property to check if anything’s changed; if nothing has changed, there’s no need to waste time doing more work.
  2. Next, save the JournalEntryViewController context inside of a perform(_:) closure. The code sets this context to the main context; in this case it’s a bit redundant since there’s only one context, but this doesn’t change the behavior.

    Once you add a child context to the workflow later on, the JournalEntryViewController context will be different from the main context, making this code necessary.

    If the save fails, call fatalError to abort the app with the relevant error information.

  3. Next, save the main context via saveContext, defined in CoreDataStack.swift, persisting any edits to disk.
  4. Finally, dismiss the JournalEntryViewController.
Note: If a managed object context is of type MainQueueConcurrencyType, you don’t have to wrap code in perform(_:), but it doesn’t hurt to use it.

If you don’t know what type the context will be, as is the case in didFinish(viewController:didSave:), it’s safest to use perform(_:) so it will work with both parent and child contexts.

There’s a problem with the above implementation — have you spotted it?

When the app adds a new journal entry, it creates a new object and adds it to the managed object context. If the user taps the Cancel button, the app won’t save the context, but the new object will still be present. If the user then adds and saves another entry, the canceled object will still be present! You won’t see it in the UI unless you’ve got the patience to scroll all the way to the end, but it will show up at the bottom of the CSV export.

You could solve this problem by deleting the object when the user cancels the view controller. But what if the changes were complex, involved multiple objects, or required you to alter properties of an object as part of the editing workflow? Using a child context will help you manage these complex situations with ease.

Using Child Contexts for Sets of Edits

Now that you know how the app currently edits and creates JournalEntry entities, you’ll modify the implementation to use a child managed object context as a temporary scratch pad.

It’s easy to do — you simply need to modify the segues. Open JournalListViewController.swift and find the following code for SegueListToDetail in prepare(for:sender:):

detailViewController.journalEntry = surfJournalEntry
detailViewController.context =
  surfJournalEntry.managedObjectContext
detailViewController.delegate = self

Next, replace that code with the following:

// 1
let childContext = NSManagedObjectContext(
  concurrencyType: .mainQueueConcurrencyType)
childContext.parent = coreDataStack.mainContext

// 2
let childEntry = childContext.object(
  with: surfJournalEntry.objectID) as? JournalEntry

// 3
detailViewController.journalEntry = childEntry
detailViewController.context = childContext
detailViewController.delegate = self

Here’s the play-by-play:

  1. First, you create a new managed object context named childContext with a .mainQueueConcurrencyType. Here you set a parent context instead of a persistent store coordinator as you would normally do when creating a managed object context. Here, you set parent to mainContext of your CoreDataStack.
  2. Next, you retrieve the relevant journal entry using the child context’s object(with:) method. You must use object(with:) to retrieve the journal entry because managed objects are specific to the context that created them. However, objectID values are not specific to a single context, so you can use them when you need to access objects in multiple contexts.
  3. Finally, you set all required variables on the JournalEntryViewController instance. This time, you use childEntry and childContext instead of the original surfJournalEntry and surfJournalEntry.managedObjectContext.
Note: You might be wondering why you need to pass both the managed object and the managed object context to the detailViewController, since managed objects already have a context variable. This is because managed objects only have a weak reference to the context. If you don’t pass the context, ARC will remove the context from memory (since nothing else is retaining it) and the app will not behave as you expect.

Build and run your app; it should work exactly as before. In this case, no visible changes to the app are a good thing; the user can still tap on a row to view and edit a surf session journal entry.

By using a child context as a container for the journal edits, you’ve reduced the complexity of your app’s architecture. With the edits on a separate context, canceling or saving managed object changes is trivial.

Nice work, dude! You’re no longer a kook when it comes to multiple managed object contexts. Bodacious!

Where to Go From Here?

You can download the finished project from this tutorial here.

If you followed this tutorial all the way through, you’ve turned an app with a single managed object context into an app with multiple contexts.

You improved UI responsiveness by performing the export operation on a private background managed object context, and you improved the app’s architecture by creating a child context and using it like a scratch pad.

But best of all, you learned how to talk like a surfer. That’s a good day’s work!

If you enjoyed what you learned in this tutorial, why not check out the complete Core Data by Tutorials book, available in our store?

Here’s a taste of what’s in the book:

1. Chapter 1, Your First Core Data App: You’ll click File\New Project and write a Core Data app from scratch! This chapter covers the basics of setting up your data model and then adding and fetching records.

2. Chapter 2, NSManagedObject Subclasses: NSManagedObject is the base data storage class of your Core Data object graphs. This chapter will teach you how you customize your own managed object subclasses to store and validate data.

3. Chapter 3, The Core Data Stack: Under the hood, Core Data is made up of many parts working together. In this chapter, you’ll learn about how these parts fit together, and move away from the starter Xcode template to build your own customizable system.

4. Chapter 4, Intermediate Fetching: Your apps will fetch data all the time, and Core Data offers many options for getting the data to you efficiently. This chapter covers more advanced fetch requests, predicates, sorting and asynchronous fetching.

5. Chapter 5, NSFetchedResultsController: Table views are at the core of many iOS apps, and Apple wants to make Core Data play nicely with them! In this chapter, you’ll learn how NSFetchedResultsController can save you time and code when your table views are backed by data from Core Data.

6. Chapter 6, Versioning and Migration: As you update and enhance your app, its data model will almost certainly need to change. In this chapter, you’ll learn how to create multiple versions of your data model and then migrate your users forward so they can keep their existing data as they upgrade.

7. Chapter 7, Unit Tests: Testing is an important part of the development process, and you shouldn’t leave Core Data out of that! In this chapter, you’ll learn how to set up a separate test environment for Core Data and see examples of how to test your models.

8. Chapter 8, Measuring and Boosting Performance: No one ever complained that an app was too fast, so it’s important to be vigilant about tracking performance. In this chapter, you’ll learn how to measure your app’s performance with various Xcode tools and then pick up some tips for dealing with slow spots in your code.

9. Chapter 9, Multiple Managed Object Contexts: In this final chapter, you’ll expand the usual Core Data stack to include multiple managed object contexts. You’ll learn how this can improve perceived performance and help make your app architecture less monolithic and more compartmentalized.

And to help sweeten the deal, the digital edition of the book is on sale for $49.99! But don’t wait — this sale price is only available for a limited time.

Speaking of sweet deals, be sure to check out the great prizes we’re giving away this year with the iOS 11 Launch Party, including over $9,000 in giveaways!

To enter, simply retweet this post using the #ios11launchparty hashtag by using the button below:


We hope you enjoy this update, and stay tuned for more book releases and updates!

The post Multiple Managed Object Contexts with Core Data Tutorial appeared first on Ray Wenderlich.

Unreal Engine 4 Audio Tutorial

$
0
0

Unreal Engine 4 Audio Tutorial

In video games, the term audio is used to refer to things such as music, dialogue and sound effects. In this era of gaming, if your project does not have audio, it can seem unpolished and incomplete.

Audio also helps increase the immersion between the player and the game. Music provokes an emotional response. Dialogue develops characters and the story. Sound effects provide feedback and believability. All of these can turn a good game into a great game.

In this tutorial, you will learn how to:

  • Play music and loop it
  • Play a sound effect at specific points in an animation
  • Modulate the pitch of a sound every time it plays
  • Pan and adjust the volume of a sound depending on its location in 3D space
  • Control the volume of music and sound effects independently using the UI

Please note, you will be using Blueprints in this tutorial. If you haven’t already, please go through the previous tutorials as they cover different areas of Blueprints.

It is also recommended to use headphones for this tutorial as you will learn how to spatialize audio.

Note: This tutorial is part of a 7-part tutorial series on Unreal Engine:

Getting Started

Download the starter project and unzip it. Open the project by navigating to the project folder and opening SkywardMuffin.uproject.

Press Play to start the game. The goal of the game is to touch as many clouds as possible without falling. Click the left-mouse button to jump up to the first cloud.

Unreal Engine 4 Audio Tutorial

The game is relaxing, isn’t it? To emphasize the feeling of relaxation, the first thing you will do is play some calm piano music.

Playing Music

Go to the Content Browser and navigate to the Audio folder. Here, you will find all the sounds you will use in this tutorial. You can listen to them by hovering over their icon and then clicking the play icon that appears.

Unreal Engine 4 Audio Tutorial

Playing music is as simple as dragging and dropping the sound asset into the Viewport. However, the music will only play once. This is because you need to manually enable looping within the asset. Double-click on S_Music to open it.

Unreal Engine 4 Audio Tutorial

A new window with a single Details panel will appear. Go to the Sound Wave section and enable Looping.

Unreal Engine 4 Audio Tutorial

Next, go back to the main editor and then drag-click the S_Music asset into the Viewport.

Unreal Engine 4 Audio Tutorial

This will create an AmbientSound actor with S_Music as the sound source. This actor will automatically play S_Music when the game starts.

Press Play to listen to the music. After 17 seconds (the length of the music), it will loop and play again.

Unreal Engine 4 Audio Tutorial

Next, you will add a sound effect whenever the muffin takes a step. To do this, you will use an Animation Notify.

What is an Animation Notify?

An Animation Notify allows you to trigger an event at a specific point in an animation. You can use them in many different ways. For example, you could create a Notify to spawn a particle effect.

Unreal Engine 4 Audio Tutorial

In this game, the restart button appears as soon as the muffin touches the ground. However, using a Notify, you could make it appear at the end of the death animation.

Unreal Engine 4 Audio Tutorial

In this tutorial, you will Animation Notifies to play a sound when each foot hits the ground.

Creating an Animation Notify

Navigate to the Characters\Muffin folder and then open SK_Muffin_Walk. This will open the Animation editor.

In the panel below the Viewport, you will see an area called Notifies. The light grey area is a Notify Track. This is where you will create and manage your Notifies.

Unreal Engine 4 Audio Tutorial

Frame 10 and frame 22 are when each foot hits the ground so you will need to create a Notify at both of these points. To create a Notify, right-click on the Notify Track and select Add Notify\Play Sound. This will create a Notify called PlaySound.

Unreal Engine 4 Audio Tutorial

Next, you need to position the Notify so that it occurs on frame 10.

Moving an Animation Notify

It’s a bit hard to know where to move the Notify to because the Notify Track doesn’t indicate where frame 10 is. However, you can display a marker by using the Timeline.

First, go to the Timeline located at the bottom of the panel. Drag-click the red playhead and release when Current Frame is 10. Make sure to pause it first!

Unreal Engine 4 Audio Tutorial

Now, the Notify Track will have a red line indicating where the playhead is.

Unreal Engine 4 Audio Tutorial

Drag-click the PlaySound Notify and release when it aligns with the red line.

Unreal Engine 4 Audio Tutorial

Next, you need to tell the Notify to play the footstep sound.

Playing the Footstep Sound

Left-click on PlaySound to select it and then go to the Details panel. In the Anim Notify section, set Sound to S_Footstep.

Unreal Engine 4 Audio Tutorial

Next, repeat the process for the other foot. Do the following:

  • Create another Play Sound Notify
  • Move the Notify to frame 21
  • Set the Notify’s sound to S_Footstep

Unreal Engine 4 Audio Tutorial

Now, whenever the walk animation reaches frame 10 and frame 21, the Notifies will trigger and play the S_Footstep sound.

Close SK_Muffin_Walk and then go back to the main editor. Press Play and start walking around to hear the footsteps.

Unreal Engine 4 Audio Tutorial

After listening to the footsteps repeatedly, players may notice something. It’s the same sound effect each time! If only there were some way to vary the sound each time.

In the next section, you will play a sound effect when the player touches a cloud. But this time, you will vary the sound each time using a Sound Cue.

What is a Sound Cue?

A Sound Cue is an asset that allows you to manipulate multiple sounds and combine them. You can then treat the Sound Cue as its own sound. Anywhere you can use a regular sound, you can use a Sound Cue instead.

Here is an example of a Sound Cue using a Concatenator to play three sounds in succession:

Unreal Engine 4 Audio Tutorial

If you use a Random node instead, you can select a random sound every time you play the Sound Cue.

Unreal Engine 4 Audio Tutorial

In this tutorial, you will create and use a Sound Cue to change the pitch of a sound.

Creating a Sound Cue

First, navigate back to the Audio folder. You will use S_Pop as the sound effect so you will need to create a Sound Cue for it. To do this, right-click on S_Pop and select Create Cue.

Unreal Engine 4 Audio Tutorial

This will create a new Sound Cue asset named S_Pop_Cue. Double-click on S_Pop_Cue to open it in the Sound Cue editor.

Unreal Engine 4 Audio Tutorial

Note: This editor is very similar to the material editor so I won’t cover it. If you are not familiar with the material editor, you can learn about it in the Getting Started tutorial.

In the graph, you will see two nodes: Wave Player: S_Pop and Output. The Sound Cue will play whatever you connect to the Output node (in this case, it will play the S_Pop sound). You can listen to the Sound Cue by going to the Toolbar and clicking Play Cue.

Unreal Engine 4 Audio Tutorial

Next, you will learn how to change the pitch of a sound.

Changing the Pitch of a Sound

To change the pitch of a sound, you need to use a Modulator node. Create one and connect it like so:

Unreal Engine 4 Audio Tutorial

Now, you need to define how much the pitch can change. Select the Modulator node and then go to the Details panel. You will see two fields relating to pitch: Pitch Min and Pitch Max. Values less than 1 indicate the pitch can be lowered and vice versa. A value of 1 indicates the pitch will stay the same.

For this tutorial, the pitch should only be able to be raised. Set Pitch Min to 1.0 and Pitch Max to 2.0.

Unreal Engine 4 Audio Tutorial

Now, every time you play the Sound Cue, the sound will have a pitch between the original pitch and double the original pitch.

Next, you need to play the Sound Cue when the player touches a cloud.

Playing a Sound Cue

Go back to the main editor and navigate to the Blueprints folder. Open BP_Cloud and then open the CloudTouched function. This function executes whenever the player touches a cloud so it is the perfect place to play the Sound Cue.

There are two nodes you can use to play a sound:

  • Play Sound 2D: Plays a sound without any attenuation or spatialization (you will learn about these later in the tutorial). Use this node for sounds that don’t "exist" in the game world such as music and UI sounds.
  • Play Sound at Location: Plays a sound at a location in 3D space. Use this node if you want the sound to change depending on the player’s location and orientation.

Since the cloud exists in the game world, the sound should also exist within the game world. Add a Play Sound at Location node to the end of the node chain.

Unreal Engine 4 Audio Tutorial

Afterwards, set Sound to S_Pop_Cue.

Unreal Engine 4 Audio Tutorial

Now, whenever the player touches a cloud, S_Pop_Cue will play.

Click Compile and then go back to the main editor. Press Play and start playing the game. Every time you touch a cloud, you should hear the same sound but at different pitches.

Unreal Engine 4 Audio Tutorial

The sound’s pitch changes but it doesn’t sound like it is in 3D space. To enable this you need to spatialize the sound.

What is Spatialization?

Spatialization is a process performed to give the impression that the audio exists in 3D space. Sounds coming from the left will be heard in the left ear and vice versa.

Unreal Engine 4 Audio Tutorial

In addition to increasing immersion, spatialization can also help aid gameplay. In competitive games like Overwatch and Counter-Strike, spatialized audio can help players discern the location of other players.

In this tutorial, you will use spatialization to pan the cloud’s sound based on its location.

Enabling Spatialization

There are two ways to enable spatialization for a Sound Cue:

  • Sound Attenuation asset: This asset contains settings relating to attenuation and spatialization. You can assign this asset to different sounds to make sure they all have the same settings.
  • Override Attenuation: Instead of using a Sound Attenuation asset, you can specify the settings within the Sound Cue. This allows you to create settings for individual sound cues.

For this tutorial, you will use the second method. Open S_Pop_Cue and then go to the Details panel. Locate the Attenuation section and enable Override Attenuation. This will enable the Attenuation Overrides section.

Unreal Engine 4 Audio Tutorial

To check if spatialization is enabled, click the arrow next to Attenuation Overrides. The Spatialize setting will indicate if your sound is spatialized.

Unreal Engine 4 Audio Tutorial

That’s it for the settings so go ahead and close S_Pop_Cue. Next, you need to specify where the sound is in 3D space.

Playing a Sound in 3D Space

Open BP_Cloud and then create a GetActorLocation node. Afterwards, connect it to the Location pin of the Play Sound at Location node.

Unreal Engine 4 Audio Tutorial

Now, the sound will play at the same location as the cloud.

Click Compile and then go back to the main editor. Press Play and start touching clouds. You should hear sounds seemingly coming from different locations.

Unreal Engine 4 Audio Tutorial

Note: By default, the camera is the audio listener. This means you will hear sounds from the camera’s perspective. If you would like to change which actor is the listener, you can use the Set Audio Listener Override node.

You may have noticed that some of the clouds have rain. But it’s not really a rain cloud if it doesn’t sound like it’s raining! Next, you will add a rain sound and use attenuation to change its volume depending on how far away it is.

Adding the Rain Sound

Instead of using a node to play the rain sound, you can use an Audio component instead. One of the advantages to using a component is that it will automatically play at the cloud’s location.

Open BP_Cloud and then go to the Components panel. Add a new Audio component and name it RainAudio.

Go to the Details panel and locate the Sound section. Change Sound to S_Rain.

Unreal Engine 4 Audio Tutorial

The rain sound should not play for normal clouds. This means you need to deactivate RainAudio for normal clouds. To do this, scroll down to the Activation section and disable Auto Activate.

Unreal Engine 4 Audio Tutorial

Now, you need to activate RainAudio for rain clouds. A good place to do this is the EnableRain function. This function executes if the cloud should be a rain cloud. Open the EnableRain function and add the highlighted nodes:

Unreal Engine 4 Audio Tutorial

Next, you need to enable attenuation and define the attenuation settings

Setting Up Attenuation

Go to the Components panel and select RainAudio. Go to the Details panel and go to the Attenuation section. Enable the Override Attenuation setting.

The attenuation settings replicate how a sound loses its volume over distance. Under the Attenuation Overrides area, there are two settings you will use:

  • Radius: The maximum distance the player can be before the volume begins to fade
  • Falloff Distance: The distance the player needs to be before the sound becomes silent. This distance is in addition to the radius.

Take a look at the example below:

Unreal Engine 4 Audio Tutorial

When the player is within the inner circle (defined by Radius), the volume is at 100%. As the player moves from the inner circle to the edge of the outer circle (defined by Falloff Distance), the volume fades to 0%.

For this tutorial, set Radius to 300 and Falloff Distance to 400.

Unreal Engine 4 Audio Tutorial

This means the sound’s volume will be 100% when the player is less than 300 units away from the sound. As the player’s distance approaches 700 (300 + 400) units, the volume will fade to 0%.

If the player hasn’t moved out of the attenuation range when the cloud disappears, the sound will cut out. To fix this, you can fade out the sound.

Fading Out a Sound

Switch to the Event Graph and locate the FadeOut event. You can do this by going to the My Blueprint panel and going to the Graphs section. Double-click on FadeOut listed under EventGraph.

Add the highlighted nodes to the end of the node chain:

Unreal Engine 4 Audio Tutorial

FadeOut executes when a player touches the cloud. The Timeline (FadeTimeline) node outputs a value (Alpha) that goes from 1 to 0 over a specified duration. By using this value, the volume of RainAudio will fade.

Note: You can double-click on a Timeline node to open it and see how it works. If you’d like to learn more about Timelines, check out the official documentation.

There’s one setting you need to change in S_Rain before you can hear it in action. When a sound’s volume is 0%, it will stop playing. Since you are beyond listening range when the audio starts, the volume of S_Rain will be 0%. When you move into listening range, you won’t hear anything.

Unreal Engine 4 Audio Tutorial

You can fix this by using the Virtualize when Silent setting. This setting will always play the sound, regardless of its volume.

Click Compile and then close BP_Cloud. Navigate to the Audio folder and open S_Rain. Go to the Sound section and enable Virtualize when Silent.

Unreal Engine 4 Audio Tutorial

Now, S_Rain will play even if it is silent. Close S_Rain and then go back to the main editor. Press Play and then move into range of the rain clouds to hear the rain sound.

Unreal Engine 4 Audio Tutorial

In the final section, you will control the volume of the sounds using Sound Classes and Sound Mixes.

Sound Classes and Sound Mixes

A Sound Class is an easy way to group multiple sounds. For example, you can group all the music in one class and sound effects into another.

Unreal Engine 4 Audio Tutorial

To adjust properties of a Sound Class (volume, pitch etc.) during gameplay, you need to use a Sound Mix. A Sound Mix is basically a table and each entry in the table is a Sound Class. Each entry contains the adjustments the Sound Class should have.

Here is an example of what a Sound Mix could contain:

Unreal Engine 4 Audio Tutorial

By using the Sound Mix above, every sound in the Music class would play at half volume. Every sound in the Effects class would have its pitch doubled.

First, you will create the Sound Classes.

Creating the Sound Classes

In this tutorial, you will adjust the volume of the music and effects independently. This means you will need two Sound Classes. In the Content Browser, click Add New and select Sounds\Sound Class. Rename the Sound Class to S_Music_Class.

Create another Sound Class and name it S_Effects_Class.

Unreal Engine 4 Audio Tutorial

Next, you need to assign each sound to a Sound Class. First, you will do it for the music. Open S_Music and then locate the Sound section. Change Sound Class to S_Music_Class.

Unreal Engine 4 Audio Tutorial

Once you have done that, close S_Music.

Next up are the sound effects. Instead of opening each sound up and assigning a Sound Class, you can do it all at once. First, select the following assets:

  • S_Footstep
  • S_Pop_Cue
  • S_Rain

Afterwards, right-click on one of the selected assets. Select Asset Actions\Bulk Edit via Property Matrix. This will open the assets in the property matrix editor.

Unreal Engine 4 Audio Tutorial

The property matrix editor allows you to edit common properties at the same time.

Go to the Details panel and expand the Sound branch. To select a Sound Class, click the grid icon to the right of Sound Class.

Unreal Engine 4 Audio Tutorial

Select S_Effects_Class and then close the property matrix editor.

All the sounds are now in their appropriate Sound Class. Next, you will create a Sound Mix and adjust it using Blueprints.

Creating and Adjusting a Sound Mix

In the Content Browser, click Add New and select Sounds\Sound Mix. Rename the Sound Mix to S_Volume_Mix.

To control the volume of each Sound Class, you will use sliders. I’ve already created a widget with two sliders for you to use. Navigate to the UI folder and open WBP_Options.

Unreal Engine 4 Audio Tutorial

To adjust the volume, you need to use the value from these sliders and feed it into the Sound Mix. You will do this for the music first.

Switch to the Graph mode and then go to the My Blueprints panel. Under the Variables section, select MusicSlider. Go to the Details panel and click the button next to On Value Changed.

Unreal Engine 4 Audio Tutorial

This will create the On Value Changed (MusicSlider) event. This event fires whenever you move the slider handle.

Unreal Engine 4 Audio Tutorial

Now, you need to set the volume of S_Music_Class within S_Volume_Mix. To do this, you need to use a Set Sound Mix Class Override node. This node allows you to specify a Sound Mix and a Sound Class. If the Sound Class is not in the Sound Mix, it will be added. If it is already in the Sound Mix, it will update.

Add a Set Sound Mix Class Override node and set the following options:

  • In Sound Mix Modifier: S_Volume_Mix
  • In Sound Class: S_Music_Class
  • Fade in Time: 0 (This will make sure the volume adjustments are instantenous)

Unreal Engine 4 Audio Tutorial

Next, connect your nodes like so:

Unreal Engine 4 Audio Tutorial

Repeat the steps for EffectsSlider. Change the In Sound Class pin to S_Effects_Class.

Unreal Engine 4 Audio Tutorial

Now, whenever the value of a slider changes, S_Volume_Mix will adjust the volume of the relevant Sound Class.

Before any of this will work, you need to activate the Sound Mix.

Activating a Sound Mix

For a case like this (volume control using the UI), it’s best to activate the Sound Mix when the game starts. This is so the Sound Class will automatically use the volume adjustments from the Sound Mix. However, for the sake of simplicity, you will activate the Sound Mix within the widget.

Create an Event Pre Construct node. This is similar to the Event BeginPlay node found in Blueprints.

Unreal Engine 4 Audio Tutorial

To activate a Sound Mix, you need to use the Push Sound Mix Modifier node. Create one and connect it to Event Pre Construct. Afterwards, set In Sound Mix Modifier to S_Volume_Mix.

Unreal Engine 4 Audio Tutorial

This will activate S_Volume_Mix when WBP_Options spawns.

Click Compile and then close WBP_Options. Press Play and then press the M key to bring up the sliders. Adjust the sliders to affect the volume of each Sound Class.

Unreal Engine 4 Audio Tutorial

Where to Go From Here?

You can download the completed project here.

As you can see, it’s pretty easy to get your audio running in Unreal Engine 4. If you’d like to learn more about the audio system, check out the official documentation. You can do other cool things like adding reverb and EQ. Also, be sure to check out the features of the new audio engine when it arrives!

If there’s a topic you’d like me to cover, let me know in the comments below!

The post Unreal Engine 4 Audio Tutorial appeared first on Ray Wenderlich.


Make a 2D Grappling Hook Game in Unity – Part 1

$
0
0

How to Make a 2D Grappling Hooks Game in Unity

Grappling hooks add a fun and interesting mechanic to your games. You can use them to traverse levels, fight in arenas, or even retrieve items. But despite looking easy, the physics of handling ropes and making them behave realistically can put you at the end of your rope!

In part one of this two-part tutorial series, you’ll implement your own 2D grappling hook system and learn the following:

  • Create an aiming system.
  • Use a line renderer and distance joint to create a rope.
  • Make the rope wrap around objects in your game.
  • Calculate an angle for swinging on a rope and add force in that direction.

Note: This tutorial is intended for an intermediate to advanced audience, and won’t cover things such as adding components, creating new GameObjects scripts or the syntax of C#. If you need to level up your Unity skills, work through our tutorials on Getting Started with Unity and Introduction to Unity Scripting first. As this tutorial is also based around the DistanceJoint2D you might want to review Physics Joints in Unity 2D as well and then return to this tutorial.

Getting Started

Download the starter project for this tutorial and open it up in the Unity editor. Make sure you’re running Unity 2017.1 or newer.

Open the Game scene from the Scenes folder and take a look at what you’ll soon begin “hooking” up:

a 2D Grappling Hooks Game

Right now, there is a basic player character (the slug) and some rocks floating about.

The notable components the Player GameObject has right now are a capsule collider and a rigidbody which allow it to interact with physical objects in the level. There’s also a simple movement script (PlayerMovement) attached that lets your slippery character slide along the ground and perform basic jumps.

Click the Play button in the editor to start the game and try out the controls to see how they feel. A or D will move you left or right, and space will perform jumps. Be careful not to slip and fall off the rocks or you’ll die!

Goodbye cruel world!

The basic controls are implemented, but the biggest concern right now is the lack of grappling hooks.

Creating the Hooks and Rope

A grappling hooks system sounds fairly simple at first, but there are a number of things you’ll need in order to make it work well. Here are some of the main requirements for a 2D grappling hook mechanic:

  • A Line Renderer which will show the rope. When the rope wraps around things, you can add more segments to the line renderer and position the vertices appropriately around the edges the rope wraps.
  • A DistanceJoint2D. This can be used to attach to the grappling hook’s current anchor point, and lets the slug swing. It’ll also allow for configuration of the distance, which can be used to rappel up and down the rope.
  • A child GameObject with a RigidBody2D that can be moved around depending on the current location of the hook’s anchor point. This will essentially be the rope hinge / anchor point.
  • A raycast for firing the hook and attaching to objects.

Select Player in the Hierarchy and add a new child GameObject to the Player named RopeHingeAnchor. This GameObject will be used to position the hinge / anchor point of the grappling hook wherever it should be during gameplay.

Add a SpriteRenderer and RigidBody2D component to RopeHingeAnchor.

On the SpriteRenderer, set the Sprite property to use UISprite and change the Order in Layer to 2. Disable the component by unchecking the box next to its name.

On the RigidBody2D component, set the Body Type property to Kinematic. This point will not move around with the physics engine but by code.

Set the layer to Rope and set the X and Y scale values to 4 on the Transform component.

Select Player again and attach a new DistanceJoint2D component.

Drag and drop the RopeHingeAnchor from the Hierarchy onto the Connected Rigid Body property on the DistanceJoint2D component and disable Auto Configure Distance.

Create a new C# script called RopeSystem in the Scripts project folder and open it with your code editor.

Remove the Update method.
At the top of the script, inside the RopeSystem class declaration, add the following variables as well as an Awake() method, and a new Update method:

// 1
public GameObject ropeHingeAnchor;
public DistanceJoint2D ropeJoint;
public Transform crosshair;
public SpriteRenderer crosshairSprite;
public PlayerMovement playerMovement;
private bool ropeAttached;
private Vector2 playerPosition;
private Rigidbody2D ropeHingeAnchorRb;
private SpriteRenderer ropeHingeAnchorSprite;

void Awake()
{
    // 2
    ropeJoint.enabled = false;
    playerPosition = transform.position;
    ropeHingeAnchorRb = ropeHingeAnchor.GetComponent<Rigidbody2D>();
    ropeHingeAnchorSprite = ropeHingeAnchor.GetComponent<SpriteRenderer>();
}

void Update()
{
    // 3
    var worldMousePosition =
        Camera.main.ScreenToWorldPoint(new Vector3(Input.mousePosition.x, Input.mousePosition.y, 0f));
    var facingDirection = worldMousePosition - transform.position;
    var aimAngle = Mathf.Atan2(facingDirection.y, facingDirection.x);
    if (aimAngle < 0f)
    {
        aimAngle = Mathf.PI * 2 + aimAngle;
    }

    // 4
    var aimDirection = Quaternion.Euler(0, 0, aimAngle * Mathf.Rad2Deg) * Vector2.right;
    // 5
    playerPosition = transform.position;

    // 6
    if (!ropeAttached)
    {
    }
    else
    {
    }
}

Taking each section in turn:

  1. You’ll use these variables to keep track of the different components the RopeSystem script will interact with.
  2. The Awake method will run when the game starts and disables the ropeJoint (DistanceJoint2D component). It'll also set playerPosition to the current position of the Player.
  3. This is the most important part of your main Update() loop. First, you capture the world position of the mouse cursor using the camera's ScreenToWorldPoint method. You then calculate the facing direction by subtracting the player's position from the mouse position in the world. You then use this to create aimAngle, which is a representation of the aiming angle of the mouse cursor. The value is kept positive in the if-statement.
  4. The aimDirection is a rotation for later use. You're only interested in the Z value, as you're using a 2D camera, and this is the only relevant axis. You pass in the aimAngle * Mathf.Rad2Deg which converts the radian angle to an angle in degrees.
  5. The player position is tracked using a convenient variable to save you from referring to transform.Position all the time.
  6. Lastly, this is an if..else statement you'll soon use to determine if the rope is attached to an anchor point.

Save the script and return to the editor.

Attach a RopeSystem component to the Player and hook up the various components to the public fields you created in the RopeSystem script. Drag the Player, Crosshair and RopeHingeAnchor to the various fields like this:

  • Rope Hinge Anchor: RopeHingeAnchor
  • Rope Joint: Player
  • Crosshair: Crosshair
  • Crosshair Sprite: Crosshair
  • Player Movement: Player

Right now, you're doing all those fancy calculations for aiming, but there’s no visual candy to show off all that work. Not to worry though, you'll tackle that next.

Open the RopeSystem script and add a new method to it:

private void SetCrosshairPosition(float aimAngle)
{
    if (!crosshairSprite.enabled)
    {
        crosshairSprite.enabled = true;
    }

    var x = transform.position.x + 1f * Mathf.Cos(aimAngle);
    var y = transform.position.y + 1f * Mathf.Sin(aimAngle);

    var crossHairPosition = new Vector3(x, y, 0);
    crosshair.transform.position = crossHairPosition;
}

This method will position the crosshair based on the aimAngle that you pass in (a float value you calculated in Update()) in a way that it circles around you in a radius of 1 unit. It'll also ensure the crosshair sprite is enabled if it isn’t already.

In Update(), change the if..else statement that checks for !ropeAttached to look like this:

if (!ropeAttached)
{
	SetCrosshairPosition(aimAngle);
}
else
{
	crosshairSprite.enabled = false;
}

Save your script, and run the game. Your slug should now have the ability to aim with a crosshair.

2d aiming

The next bit of logic you'll need to implement is a way to fire the grappling hook. You already have your aiming direction worked out, so you'll need a method to take this in as a parameter.

Add the following variables below the others in the RopeSystem script:

public LineRenderer ropeRenderer;
public LayerMask ropeLayerMask;
private float ropeMaxCastDistance = 20f;
private List<Vector2> ropePositions = new List<Vector2>();

The LineRenderer will hold a reference to the line renderer that will display the rope. The LayerMask will allow you to customize which physics layers the grappling hook's raycast will be able to interact with and potentially hit. The ropeMaxCastDistance value will set a maximum distance the raycast can fire.

Finally, the list of Vector2 positions will be used to track the rope wrapping points when you get a little further in this tutorial.

Add the following new methods:

// 1
private void HandleInput(Vector2 aimDirection)
{
    if (Input.GetMouseButton(0))
    {
        // 2
        if (ropeAttached) return;
        ropeRenderer.enabled = true;

        var hit = Physics2D.Raycast(playerPosition, aimDirection, ropeMaxCastDistance, ropeLayerMask);

        // 3
        if (hit.collider != null)
        {
            ropeAttached = true;
            if (!ropePositions.Contains(hit.point))
            {
            	// 4
                // Jump slightly to distance the player a little from the ground after grappling to something.
                transform.GetComponent<Rigidbody2D>().AddForce(new Vector2(0f, 2f), ForceMode2D.Impulse);
                ropePositions.Add(hit.point);
                ropeJoint.distance = Vector2.Distance(playerPosition, hit.point);
                ropeJoint.enabled = true;
                ropeHingeAnchorSprite.enabled = true;
            }
        }
        // 5
        else
        {
            ropeRenderer.enabled = false;
            ropeAttached = false;
            ropeJoint.enabled = false;
        }
    }

    if (Input.GetMouseButton(1))
    {
        ResetRope();
    }
}

// 6
private void ResetRope()
{
    ropeJoint.enabled = false;
    ropeAttached = false;
    playerMovement.isSwinging = false;
    ropeRenderer.positionCount = 2;
    ropeRenderer.SetPosition(0, transform.position);
    ropeRenderer.SetPosition(1, transform.position);
    ropePositions.Clear();
    ropeHingeAnchorSprite.enabled = false;
}

Here is an explanation of what the above code does:

  1. HandleInput is called from the Update() loop, and simply polls for input from the left and right mouse buttons.
  2. When a left mouse click is registered, the rope line renderer is enabled and a 2D raycast is fired out from the player position in the aiming direction. A maximum distance is specified so that the grappling hook can't be fired in infinite distance, and a custom mask is applied so that you can specify which physics layers the raycast is able to hit.
  3. If a valid raycast hit is found, ropeAttached is set to true, and a check is done on the list of rope vertex positions to make sure the point hit isn't in there already.
  4. Provided the above check is true, then a small impulse force is added to the slug to hop him up off the ground, and the ropeJoint (DistanceJoint2D) is enabled, and set with a distance equal to the distance between the slug and the raycast hitpoint. The anchor sprite is also enabled.
  5. If the raycast doesn't hit anything, then the rope line renderer and rope joint are disabled, and the ropeAttached flag is set to false.
  6. If the right mouse button is clicked, the ResetRope() method is called, which will disable and reset all rope/grappling hook related parameters to what they should be when the grappling hook is not being used.

At the very bottom of your existing Update method, add a call to the new HandleInput() method, and pass in the aimDirection value:

HandleInput(aimDirection);

Save your changes to RopeSystem.cs and switch back to the editor.

Adding Rope

That slug isn't going to get airborne without a rope, so now would be a good time to give him something that visually represents a rope, and also has the ability to “wrap” around angles.

A line renderer is perfect for this, because it allows you to provide the amount of points and their positions in world space.

The idea here is that you'll always keep the rope's first vertex (0) on the player's position, and all other vertices will be positioned dynamically wherever the rope needs to wrap around, including the current pivot position that is the next point down the rope from the player.

Select Player and add a LineRenderer component to it. Set the Width to 0.075. Expand the Materials rollout and for Element 0, choose the RopeMaterial material, included in the project's Materials folder. Lastly for the Line Renderer, select Distribute Per Segment under the Texture Mode selection.

Drag the Line Renderer component to Rope System's Rope Renderer field.

Click the Rope Layer Mask drop down, and choose Default, Rope, and Pivot as the layers that the raycast can interact with. This will ensure that when the raycast is made, it'll only collide with these layers, and not with other things such as the player.

If you run the game now, you may notice some strange behavior. Aiming above the slug at the rock overhead and firing the grappling hook results in a small hop upwards, followed by our slippery fellow acting rather erratically.

The distance joint's distance is not being set, and the line renderer vertices are not being configured either. Therefore, you don't see a rope and because the distance joint is sitting right on top of the slug's position, the current distance joint distance value pushes him down into the rocks below.

Not to worry though, you'll sort that out now.

In the RopeSystem.cs script, add a new using statement at the top of the class:

using System.Linq;

This enables you to use LINQ queries, which in your case will simply allow you to easily find the first or last item in the ropePositions list.

Note: Language-Integrated Query (LINQ) is the name for a set of technologies based on the integration of query capabilities directly into the C# language. More information can be found here.

Add a new private bool variable called distanceSet below the other variables:

private bool distanceSet;

You'll use this as a flag to let the script know that the rope's distance (for the point between the player and the current pivot where the grappling hook is attached) has been set correctly.

Now add a new method that you'll use to set the rope vertex positions on the line renderer, and configure the distance joint's distance based on the stored list of rope positions you'll be maintaining (ropePositions):

private void UpdateRopePositions()
{
    // 1
    if (!ropeAttached)
    {
        return;
    }

    // 2
    ropeRenderer.positionCount = ropePositions.Count + 1;

    // 3
    for (var i = ropeRenderer.positionCount - 1; i >= 0; i--)
    {
        if (i != ropeRenderer.positionCount - 1) // if not the Last point of line renderer
        {
            ropeRenderer.SetPosition(i, ropePositions[i]);

            // 4
            if (i == ropePositions.Count - 1 || ropePositions.Count == 1)
            {
                var ropePosition = ropePositions[ropePositions.Count - 1];
                if (ropePositions.Count == 1)
                {
                    ropeHingeAnchorRb.transform.position = ropePosition;
                    if (!distanceSet)
                    {
                        ropeJoint.distance = Vector2.Distance(transform.position, ropePosition);
                        distanceSet = true;
                    }
                }
                else
                {
                    ropeHingeAnchorRb.transform.position = ropePosition;
                    if (!distanceSet)
                    {
                        ropeJoint.distance = Vector2.Distance(transform.position, ropePosition);
                        distanceSet = true;
                    }
                }
            }
            // 5
            else if (i - 1 == ropePositions.IndexOf(ropePositions.Last()))
            {
                var ropePosition = ropePositions.Last();
                ropeHingeAnchorRb.transform.position = ropePosition;
                if (!distanceSet)
                {
                    ropeJoint.distance = Vector2.Distance(transform.position, ropePosition);
                    distanceSet = true;
                }
            }
        }
        else
        {
            // 6
            ropeRenderer.SetPosition(i, transform.position);
        }
    }
}

Explaining the above code:

  1. Return out of this method if the rope isn't actually attached.
  2. Set the rope's line renderer vertex count (positions) to whatever number of positions are stored in ropePositions, plus 1 more (for the player's position).
  3. Loop backwards through the ropePositions list, and for every position (except the last position), set the line renderer vertex position to the Vector2 position stored at the current index being looped through in ropePositions.
  4. Set the rope anchor to the second-to-last rope position where the current hinge/anchor should be, or if there is only one rope position, then set that one to be the anchor point. This configures the ropeJoint distance to the distance between the player and the current rope position being looped over.
  5. This if-statement handles the case where the rope position being looped over is the second-to-last one; that is, the point at which the rope connects to an object, a.k.a. the current hinge/anchor point.
  6. This else block handles setting the rope's last vertex position to the player's current position.

Don't forget to add a call to UpdateRopePositions() at the bottom of Update():

UpdateRopePositions();

Save the changes to your script and run the game again. Make a little jump with space bar, while aiming and firing at the rock above you. You can now admire the fruits of your labor as you watch the slug dangle peacefully above the rocks.

grappling hook attached

You can also switch to the scene view, select the Player, use the move tool (W by default) to move him around and watch how the rope line renderer's two vertices follows the grapple position and the player's position to draw the rope. Letting go of the player while moving him will result in the DistanceJoint2D re-configuring the distance correctly, and the slug will continue swinging by the connected joint.

grappling hook from scene view

Handling Wrap Points

A dangling slug game is about as useful as a waterproof towel, so you'll definitely need to build on what you've got so far.

The good news is that the method you just added to handle rope positions is future proof. You're currently only using two rope positions. One connected to the player's position, and one to the current grapple pivot position when you fire the grappling hook out.

The only problem is you're not yet tracking all rope potential rope positions, and you'll need to do a little bit of work to get there.

In order to detect positions on the rocks where the rope should wrap around and add a new vertex position to the line renderer, you'll need a system to determine if a collider vertex point lies in between a straight line between the slug's current position, and the current rope hinge/anchor point.

Sounds like a job for the good old raycast once again!

First, you'll need to build a method that can find the closest point in a collider based on the hit location of a raycast and the edges of the collider.

In your RopeSystem.cs script, add this new method:

// 1
private Vector2 GetClosestColliderPointFromRaycastHit(RaycastHit2D hit, PolygonCollider2D polyCollider)
{
    // 2
    var distanceDictionary = polyCollider.points.ToDictionary<Vector2, float, Vector2>(
        position => Vector2.Distance(hit.point, polyCollider.transform.TransformPoint(position)),
        position => polyCollider.transform.TransformPoint(position));

    // 3
    var orderedDictionary = distanceDictionary.OrderBy(e => e.Key);
    return orderedDictionary.Any() ? orderedDictionary.First().Value : Vector2.zero;
}

If you’re not a LINQ query whiz, this may look like some whimsical magical C# wizardry to you.

If that's the case, don't be too scared. LINQ is doing a lot of stuff under the hood for you:

  1. This method takes in two parameters, a RaycastHit2D object, and a PolygonCollider2D. All the rocks in the level have PolygonCollider2D colliders, so this will work well as long as you're always using PolygonCollider2D shapes.
  2. Here be LINQ query magic! This converts the polygon collider's collection of points, into a dictionary of Vector2 positions (the value of each dictionary entry is the position itself), and the key of each entry, is set to the distance that this point is to the player's position (float value). Something else happens here: the resulting position is transformed into world space (by default a collider's vertex positions are stored in local space - i.e. local to the object the collider sits on, and we want the world space positions).
  3. The dictionary is ordered by key. In other words, the distance closest to the player's current position, and the closest one is returned, meaning that whichever point is returned from this method, is the point on the collider between the player and the current hinge point on the rope!

Back in your RopeSystem.cs script, add a new private field variable to the top:

private Dictionary<Vector2, int> wrapPointsLookup = new Dictionary<Vector2, int>();

You'll use this to track the positions that the rope should be wrapping around.

In Update(), locate the else statement you left near the bottom containing the crosshairSprite.enabled = false; statement and add the following:

// 1
if (ropePositions.Count > 0)
{
    // 2
    var lastRopePoint = ropePositions.Last();
    var playerToCurrentNextHit = Physics2D.Raycast(playerPosition, (lastRopePoint - playerPosition).normalized, Vector2.Distance(playerPosition, lastRopePoint) - 0.1f, ropeLayerMask);

    // 3
    if (playerToCurrentNextHit)
    {
        var colliderWithVertices = playerToCurrentNextHit.collider as PolygonCollider2D;
        if (colliderWithVertices != null)
        {
            var closestPointToHit = GetClosestColliderPointFromRaycastHit(playerToCurrentNextHit, colliderWithVertices);

            // 4
            if (wrapPointsLookup.ContainsKey(closestPointToHit))
            {
                ResetRope();
                return;
            }

            // 5
            ropePositions.Add(closestPointToHit);
            wrapPointsLookup.Add(closestPointToHit, 0);
            distanceSet = false;
        }
    }
}

Explaining the above chunk of code:

  1. If the ropePositions list has any positions stored, then...
  2. Fire a raycast out from the player's position, in the direction of the player looking at the last rope position in the list — the pivot point where the grappling hook is hooked into the rock — with a raycast distance set to the distance between the player and rope pivot position.
  3. If the raycast hits something, then that hit object's collider is safe cast to a PolygonCollider2D. As long as it's a real PolygonCollider2D, then the closest vertex position on that collider is returned as a Vector2, using that handy-dandy method you wrote earlier.
  4. The wrapPointsLookup is checked to make sure the same position is not being wrapped again. If it is, then it'll reset the rope and cut it, dropping the player.
  5. The ropePositions list is now updated, adding the position the rope should wrap around, and the wrapPointsLookup dictionary is also updated. Lastly the distanceSet flag is disabled, so that UpdateRopePositions() method can re-configure the rope's distances to take into account the new rope length and segments.

In ResetRope(), add this to clear the wrapPointsLookup dictionary each time the player disconnects the rope:

wrapPointsLookup.Clear();

Save and run the game. Fire the grappling hook at the rock above, and use the Move tool in the Scene view to move the slug past a few rocky outcrops.

And that is how you get a slug and a rope to wrap!

Adding the Swing Ability

That slug is still pretty static on the rope. To fix it, you can add the ability to swing when on the rope.

To do this, you'll want to work out a position perpendicular to the slug's forward (side) swinging position, no matter what angle he is facing.

Open PlayerMovement.cs and add the following two public variables to the top of the script:

public Vector2 ropeHook;
public float swingForce = 4f;

The ropeHook variable will be set to whichever position the rope grappling anchor is currently at, and swingForce is a value to be used to add to the swing motion.

Replace the FixedUpdate() method with this new one:

void FixedUpdate()
{
    if (horizontalInput < 0f || horizontalInput > 0f)
    {
        animator.SetFloat("Speed", Mathf.Abs(horizontalInput));
        playerSprite.flipX = horizontalInput < 0f;
        if (isSwinging)
        {
            animator.SetBool("IsSwinging", true);

            // 1 - Get a normalized direction vector from the player to the hook point
            var playerToHookDirection = (ropeHook - (Vector2)transform.position).normalized;

            // 2 - Inverse the direction to get a perpendicular direction
            Vector2 perpendicularDirection;
            if (horizontalInput < 0)
            {
                perpendicularDirection = new Vector2(-playerToHookDirection.y, playerToHookDirection.x);
                var leftPerpPos = (Vector2)transform.position - perpendicularDirection * -2f;
                Debug.DrawLine(transform.position, leftPerpPos, Color.green, 0f);
            }
            else
            {
                perpendicularDirection = new Vector2(playerToHookDirection.y, -playerToHookDirection.x);
                var rightPerpPos = (Vector2)transform.position + perpendicularDirection * 2f;
                Debug.DrawLine(transform.position, rightPerpPos, Color.green, 0f);
            }

            var force = perpendicularDirection * swingForce;
            rBody.AddForce(force, ForceMode2D.Force);
        }
        else
        {
            animator.SetBool("IsSwinging", false);
            if (groundCheck)
            {
                var groundForce = speed * 2f;
                rBody.AddForce(new Vector2((horizontalInput * groundForce - rBody.velocity.x) * groundForce, 0));
                rBody.velocity = new Vector2(rBody.velocity.x, rBody.velocity.y);
            }
        }
    }
    else
    {
        animator.SetBool("IsSwinging", false);
        animator.SetFloat("Speed", 0f);
    }

    if (!isSwinging)
    {
        if (!groundCheck) return;

        isJumping = jumpInput > 0f;
        if (isJumping)
        {
            rBody.velocity = new Vector2(rBody.velocity.x, jumpSpeed);
        }
    }
}

The main changes here are that an isSwinging flag is checked first for actions that should only happen while on the rope, and that you are now adding for perpendicular to the slug's angle pointing up to his current pivot/anchor point at the top of the rope, but perpendicular in the direction he is swinging.

  1. Get a normalized direction vector from the player to the grappling anchor point.
  2. Depending on whether the slug is swinging left or right, a perpendicular direction is calculated using the playerToHookDirection. A debug draw call is also added so you can see this in the editor if you like.

Open RopeSystem.cs and in Update(), at the top of the else block for the if(!ropeAttached) statement, add:

playerMovement.isSwinging = true;
playerMovement.ropeHook = ropePositions.Last();

For the if block of the same if(!ropeAttached) statement above, add:

playerMovement.isSwinging = false;

This just tells the PlayerMovement script when the player is swinging, and what the last (excluding the player position) rope position is — in other words, the anchor rope position. This is required for the perpendicular angle calculation you just added to the PlayerMovement script.

Here's how this looks if you enable gizmos with the game running and press A or D to swing left or right while hooked:

calculating the swing angle and force direction

Adding Rappeling

Right now there is no way to move up and down the rope. While it's true that a slug would never be able to pull himself up or down a rope this easily, this is a game, and that means anything can happen right?

In the RopeSystem script, add two new field variables to the top of the script:

public float climbSpeed = 3f;
private bool isColliding;

The climbSpeed will set the speed at which the slug can go up and down the rope and isColliding will be used as a flag to determine whether or not the rope's distance joint distance property can be increased or decreased.

Add this new method:

private void HandleRopeLength()
{
	// 1
    if (Input.GetAxis("Vertical") >= 1f && ropeAttached && !isColliding)
    {
        ropeJoint.distance -= Time.deltaTime * climbSpeed;
    }
    else if (Input.GetAxis("Vertical") < 0f && ropeAttached)
    {
        ropeJoint.distance += Time.deltaTime * climbSpeed;
    }
}

This if..elseif block looks for vertical axis input (up/down or W/S on the keyboard), and depending on the ropeAttached iscColliding flags will either increase or decrease the ropeJoint distance, having the effect of lengthening or shortening the rope.

Hook this method up by adding a call to it at the bottom of Update():

HandleRopeLength();

You'll also need a way of setting the isColliding flag.

Add these two methods to the bottom of the script:

void OnTriggerStay2D(Collider2D colliderStay)
{
    isColliding = true;
}

private void OnTriggerExit2D(Collider2D colliderOnExit)
{
    isColliding = false;
}

These two methods are native to the MonoBehaviour base script class.

If a Collider is currently touching another physics object in the game, the OnTriggerStay2D method will continuously fire, setting the isColliding flag to true. This means whenever the slug is touching a rock, the isColliding flag is being set to true.

The OnTriggerExit2D method will fire when one collider leaves another's collider area, setting the flag to false.

Just be warned: the OnTriggerStay2D method can be very performance-intensive, so be careful with its use.

Where to Go From Here?

Run the game again, and this time use your arrow or W/S keys to move up or down on the rope.

Here's a link to the completed project for this tutorial.

You've come a long way from having a sluggish slug with no swing, to an acrobatic shell-less gastropod mollusk!

You've learned how to create an aiming system that can fire a grappling hook at any object covered by a collider, attach to it, and swing about on it, wrapping a dynamic rope around the edges at the same time! Great job.

swinging slug

There is a missing piece though, the rope does not 'unwind' or 'unwrap' when it should.
Stay tuned for part two of this tutorial series, where you'll tackle that next.

If you're feeling adventurous, why not give it a go yourself? You can use the Dictionary wrapPointsLookup to help you along.

The Unity team has created a book, Unity Games By Tutorials. Have you checked it out yet? The book will teach you to create four complete games from scratch:

  • A twin-stick shooter
  • A first-person shooter
  • A tower defense game (with VR support!)
  • A 2D platformer

By the end of this book, you’ll be ready to make your own games for Windows, macOS, iOS, and more!

This book is for complete beginners to Unity, as well as for those who’d like to bring their Unity skills to a professional level. The book assumes you have some prior programming experience (in a language of your choice).

If you have any questions or comments on this tutorial, please join the discussion below!

The post Make a 2D Grappling Hook Game in Unity – Part 1 appeared first on Ray Wenderlich.

Open Call for Applications on the Unity Team

$
0
0

OpenCall-Unity-feature

Since we set up the Unity team, we’ve made over 35 free Unity tutorials for everyone to enjoy and learn from.

We’ve also released our first book – Unity Games by Tutorials – that teaches you how to create 4 complete Unity games from scratch!

We want to offer our readers more awesome Unity tutorials, so we’re currently recruiting new Unity developers to join the tutorial team.

Specifically, we’re looking for the following:

  • 3 writers: Writers focus on writing new high quality tutorials, and updating existing tutorials. If you love learning new things and teaching people about them, this is perfect for you. Time commitment: Write 1 tutorial every 3 months.
  • 4 tech editors: As a tech editor you make sure that everything that gets released is of superior quality and you help the writers grow through your improvements and comments. Time commitment: Tech edit 1 tutorial every month.

Here are some skillsets that would greatly complement the team (not required but helpful):

  • Shaders
  • Networking
  • 3D modelling
  • XR development

Joining our team is a great way to learn and improve – not to mention, getting paid for it!

If this sounds interesting, keep reading to find out what’s involved and how to apply.

Why Join Our Team?

Here are the top 5 reasons to join the Unity team:

  1. Learning. You’ll always be learning something new — and will have fun doing it! You’ll become a better developer, writer and person. The best part… you’ll make a lot of new friends along the way.
  2. Money! Get paid to learn! We offer the highest rates in the industry.
  3. Special Opportunities. Members of the team get access to special opportunities such as contributing to our books and products, speaking at our conference, being a guest on our podcast, working on team projects and much more.
  4. You’ll Make a Difference. We get emails every day about how our tutorials help our readers make their first game, improve their skills and achieve their dreams. This means a lot to us, and makes all the hard work worth it!
  5. Free Stuff! And as a final bonus, by joining the team you’ll get a lot of free stuff! You’ll get a free copy of all of the products we sell on the site — over $1,000 in value!

Requirements and How to Apply

Here are the requirements:

  • You must be an experienced Unity developer.
  • You should be a great technical writer with fluent English writing skills.
  • You should be comfortable learning brand new topics that you’ve never touched on before.
  • You should have a strong work ethic — this will be a significant time commitment and is not easy.

To apply, send us an e-mail. Be sure to include the following information:

  • Please tell us a little bit about yourself and your experience with Unity and game development in general.
  • What is the best game you’ve ever worked on in Unity? [Please include link]
  • Please link to any examples of technical writing you’ve done in the past.
  • Please include links to: your GitHub account, your Twitter account and your Unity Answers/Unity Forums account (if you have one).

If your application looks promising, we’ll send you a tryout to gauge your writing and/or editing skills.

If you pass the tryout, you’re in!

What Are You Waiting For?

If this opportunity interests you, go on and send us an e-mail! We look forward to creating some great tutorials with you. :]

The post Open Call for Applications on the Unity Team appeared first on Ray Wenderlich.

watchOS by Tutorials Updated for Swift 4 and watchOS 4

$
0
0

Happy Monday – it’s another iOS 11 Launch Party book release!

watchOS by Tutorials, Third Edition teaches you everything you need to know to develop your own apps for watchOS 4, including new features such as streamlined audio recording, direct Bluetooth communications, a unified process runtime, increased memory limits, and more.

This will be a free update for existing watchOS by Tutorials PDF customers — our way to say “thanks” to our readers for their support.

Don’t own watchOS by Tutorials yet? Read on to see how you can get a copy!

What is watchOS by Tutorials?

This book is for intermediate iOS developers who already know the basics of iOS and Swift development but want to learn how to make Apple Watch apps for watchOS 4.

We’ve added a few new chapters in this edition:

Recording Audio: Now that you can perform inline audio recording in watchOS 4, we’ve created a dedicated chapter to showing you how to interact with this functionality in your own apps. This replaces the “Playing Audio and Video” chapter from the previous edition.

Handoff Video Playback: We’ve expanded the original “Handoff” chapter and migrated some of the video portion from the previous edition’s “Playing Audio and Video” chapter.

Core Bluetooth: In watchOS 4, you can pair and interact directly with Bluetooth LE devices. Learn how to send data and control instructions directly from the Watch to a BLE device! This chapter replaces the Haptic Feedback” chapter from the previous edition.

watchOS by Tutorials is a whopping 27 chapters and 535 pages. Let’s take a quick look at what’s inside:

  • Chapter 1, Hello, Apple Watch!: Dive straight in and build your first watchOS app–a very modern twist on the age-old “Hello, world!” app.

bezelHello

  • Chapter 2, Designing Great Watch Apps: Apple has repeatedly emphasized glanceable, actionable, and responsive as the design goal of watchOS apps. From icon design to the new interactivity APIs, make your apps stand out from the rest.
  • Chapter 3, Architecture: watchOS might support native apps, but they still have an unusual architecture. This chapter will teach you everything you need to know about this unique aspect of watch apps.
  • Chapter 4, UI Controls: There’s not a UIView to be found! In this chapter you’ll dig into the suite of interface objects that ship with WatchKit–watchOS’ user interface framework.

image32

  • Chapter 5, Pickers: WKInterfacePicker is the only programmatic way to work with the Digital Crown. You’ll learn how to set one up, what the different visual modes are, and how to respond to the user interacting with the Digital Crown via the picker.

finished

  • Chapter 6, Layout: Auto Layout? Nope. Springs and Struts then? Nope. Guess again. Get an overview of the layout system you’ll use to build the interfaces for your watchOS apps.

finished

  • Chapter 7, Tables: Tables are the staple ingredient of almost any watchOS app. Learn how to set them up, how to populate them with data, and just how much they differ from UITableView.
  • Chapter 8, Navigation: You’ll learn about the different modes of navigation available on watchOS, as well as how to combine them.

b6

  • Chapter 9, Digital Crown and Gesture Recognition: Explore the rich set of physical interactions with the Watch, including the Digital Crown, pan gestures, and force touch!
  • Chapter 10, Snapshot API: Glances are out, snapshots are in. Learn how to make your app appear in the new Dock — and update the icon dynamically!

new-display-name

  • Chapter 11, Networking: NSURLSession, meet Apple Watch. That’s right, you can now make network calls directly from the watch, and this chapter will show you the ins and outs of doing just that.

  • Chapter 12, Animation: The way you animate your interfaces has changed in watchOS. You’ll learn everything you need to know about both animated image sequences and the new API in this chapter.
  • Chapter 13, CloudKit: Learn how to persist and retrieve data with CloudKit and keep your Watch and iPhone synchronized — even when they’re not in range of each other.

phone_to_watch_side_by_side

  • Chapter 14, Notifications: watchOS offers support for several different types of notifications, and allows you to customize them to the individual needs of your watch app. In this chapter, you’ll get the complete overview.

custom_dynamic_long_look_notification_bezel

  • Chapter 15, Complications: Complications are small elements that appear on the user’s selected watch face and provide quick access to frequently used data from within your app. This chapter will walk you through the process of setting up your first complication, along with introducing each of the complication families and their corresponding layout templates.

familyTypes

  • Chapter 16, Watch Connectivity: With the introduction of native apps, the way the watch app and companion iOS app share data has fundamentally changed. Out are App Groups, and in is the Watch Connectivity framework. In this chapter you’ll learn the basics of setting up device-to-device communication between the Apple Watch and the paired iPhone.

watch_to_phone_side_by_side

  • Chapter 17, Audio Recording: You can now record audio directly on the Apple Watch inline in your apps, without relying on the old-style system form sheets. In this chapter, you’ll gain a solid understanding of how to implement this, as well as learn about some of the idiosyncrasies of the APIs, which are related to the unique architecture of a watch app

  • Chapter 18, Interactive Animations: Build a simple game that you can control with just your wrist — using SpriteKit and SceneKit.

final-notification

  • Chapter 19, Advanced Watch Connectivity: In earlier chapters, you learned how to set up a Watch Connectivity session and update the application context. In this chapter, you’ll take a look at some of the other features of the framework, such as background transfers and real-time messaging.

qr_phone_and_watch

  • Chapter 20, Advanced Complications: Now that you know how to create a basic complication, this chapter will walk you through adding Time Travel support, as well giving you the lowdown on how to efficiently update the data presented by your complication.

timeTravelAnimation

  • Chapter 21, Handoff Video Playback: Want to allow your watch app users to begin a task on their watch and then continue it on their iPhone? Sure you do, and this chapter will show exactly how to do that through the use of Handoff.

handoff02

  • Chapter 22, Core Motion: The Apple Watch doesn’t have every sensor the iPhone does, but you can access what is available via the Core Motion framework. In this chapter, you’ll learn how to set up Core Motion, how to request authorization, and how to use the framework to track the user’s steps.

bezelDreamWalker

  • Chapter 23, HealthKit: The HealthKit framework allows you to access much of the data stored in user’s health store, including their heart rate! This chapter will walk you through incorporating HealthKit into your watch app, from managing authorization to recording a workout session.

Watch_ActiveWorkout_bez

  • Chapter 24, Core Location: A lot of apps are now location aware, but in order to provide this functionality you need access to the user’s location. With watchOS, developers have exactly that via the Core Location framework. Learn everything you need to know about using the framework on the watch in this chapter.

bezel-01

  • Chapter 25, Core Bluetooth: In watchOS 4, you can pair and interact with BLE devices directly. Learn how to send control instructions and other data directly over Bluetooth.

  • Chapter 26, Localization: Learn how to expand your reach and grow a truly international audience by localizing your watch app using the tools and APIs provided by Apple.

bezel-4

  • Chapter 27, Accessibility: You want as many people as possible to enjoy your watch app, right? Learn all about the assistive technologies available in watchOS, such as VoiceOver and Dynamic Type, so you can make your app just as enjoyable for those with disabilities as it is for those without.

bezel

One thing you can count on: after reading this book you’ll have all the experience necessary to build rich and engaging apps for the Apple Watch platform.

About the Authors

Of course, our book would be nothing without our team of experienced and dedicated authors:

Ehab Amer is a software developer in Cairo, Egypt. In the day, he leads mobile development teams create cool apps, In his spare time he spends dozens of hours improving his imagination and finger reflexes playing computer games… or at the gym!

ScottScott Atkinson lives in Alexandria, VA with his wife, Kerri, and daughter, Evelyn. In his day job, he is a software developer at Capital One. When not writing software, he spends time rowing on the Potomac river or exploring new restaurants and cooking great food.

SoheilSoheil Azarpour is an engineer, developer, author, creator, husband and father. He enjoys bicycling, boating and playing the piano. He lives in Merrimack, NH, and creates iOS apps both professionally and independently.

MatthewMatthew Morey is an engineer, author, hacker, creator and tinkerer. As an active member of the iOS community and CTO at MJD Interactive he has led numerous successful mobile projects worldwide. When not developing apps he enjoys traveling, snowboarding, and surfing. He blogs about technology and business at matthewmorey.com.

BenBen Morrow delights in discovering the unspoken nature of the world. He’ll tell you the surprising bits while on a walk. He produces beauty by drawing out the raw wisdom that exists within each of us.

AudreyAudrey Tam retired in 2012 from a 25yr career as a computer science academic. Her teaching included many programming languages, as well as UI design and evaluation. Before moving to Australia, she worked on Fortran and PL/1 simulation software at IBM. Audrey now teaches iOS app development to non-programmers.

JackJack Wu has built dozens of iOS apps and enjoys it very much. Outside of work, Jack enjoys coding on the beach, coding by the pool, and sometimes just having a quick code in the park.

Free watchOS Chapters this Week

To help celebrate the launch, we’re going to open up the book and share some free chapters with you this week! This will give you a chance to check out the book — we’re confident you’ll love it!

Now Available in ePub!

And as another exciting announcement, by popular request, watchOS by Tutorials is now available in ePub format. Take it on the go with you on your iPad, iPhone or other digital reader and enjoy all the mobile reading benefits that ePub has to offer!

Where To Go From Here?

watchOS by Tutorials, Third Edition is now 100% complete, fully updated for Swift 4, watchOS 4 and Xcode 9 — and available today.

  • If you’ve already bought the watchOS by Tutorials PDF, you can download the new book immediately on the the store page for the book page.
  • If you don’t have watchOS by Tutorials yet, you can grab your own copy in our online store.

And to help sweeten the deal, the digital edition of the book is on sale for $49.99! But don’t wait — this sale price is only available for a limited time.

Speaking of sweet deals, be sure to check out the great prizes we’re giving away this year with the iOS 11 Launch Party, including over $9,000 in giveaways!

To enter, simply retweet this post using the #ios11launchparty hashtag by using the button below:


We hope you enjoy this free update, and stay tuned for more book releases and updates coming soon!

The post watchOS by Tutorials Updated for Swift 4 and watchOS 4 appeared first on Ray Wenderlich.

Audio Recording in watchOS Tutorial

$
0
0

This is an abridged chapter from our book watchOS by Tutorials, which has been completely updated for Swift 4 and watchOS 4. This tutorial is presented as part of our iOS 11 Launch Party — enjoy!

In watchOS 2, Apple introduced a new API to play and record multimedia files on the Apple Watch. In watchOS 4, Apple greatly improved the multimedia API and created great opportunities to build innovative apps and enhance the user experience.

In this tutorial, you’ll learn about watchOS 4’s audio recording and playback APIs and how to use them in your apps. You’ll add audio recording to a memo app so that users can record and review their thoughts and experiences right from their wrists. Let’s get started!

Getting Started

Download the starter project for the tutorial here.

The starter project you’ll use in this tutorial is called TurboMemo. Open TurboMemo.xcodeproj in Xcode and make sure the TurboMemo scheme for iPhone is selected. Build and run in the iPhone simulator, and you’ll see the following screen:

Users can record audio diaries by simply tapping the plus (+) button. The app sorts the entries by date, and users can play back an entry by tapping it.

Try adding some entries to create some initial data.

Now, stop the app and change the scheme to TurboMemoWatch. Build and run in the Watch Simulator, and you’ll see the following screen:

The Watch app syncs with the iPhone app to display the same entries, but it doesn’t do anything else yet. You’re about to change that.

Note: TurboMemo uses Watch Connectivity, which is covered in depth in Chapter 16 and Chapter 19.

Audio Playback

There are two ways you can play an audio file in watchOS. You can either use the built-in media player, or build your own. You’ll start with the built-in media player as it’s simpler and more straightforward. In the next section, you’ll build your own media player.

The easiest way to play a media file is to present the built-in media player controller using the presentMediaPlayerController(with:options:completion:) method of WKInterfaceController. All you have to do is to pass in a file URL that corresponds to the index of the row selected by the user in WKInterfaceTable.

Open TurboMemoWatchExtension/InterfaceController.swift, find the implementation of table(_:, didSelectRowAt:) and update it as follows:

// 1
let memo = memos[rowIndex]
// 2
presentMediaPlayerController(
  with: memo.url,
  options: nil,
  completion: {_,_,_ in })

Going through this step-by-step:

  1. You get the selected memo by passing the selected row index to the array of memos.
  2. You present a media player controller by calling presentMediaPlayerController(with:options:completion:) and passing in the URL of the selected memo. You can optionally pass in a dictionary of playback options. Since you don’t want any particular customization at this point, you pass nil. In the completion block, you can check playback results based on your specific needs. Because the API requires a non-nil completion block, you simply provide an empty block.

That’s it! Build and run the app. Tap on a row in the table and you can now listen to the memos!

Note: To learn more about playback options and playing video files, check out Chapter 21: Handoff Video Playback.

Building an Audio Player

The media player controller in watchOS is great for playing short media files but it comes with limitations: As soon as the user dismisses the player, playback stops. This can be a problem if the user is listening to a long audio memo, and you want to continue playing the file even when the user closes the media player.

The built-in media interface can’t be customized either. So if you want more control over the playback and appearance of the media player, you need to build your own.

You’ll use WKAudioFilePlayer to play long audio files. WKAudioFilePlayer gives you more control over playback and the rate of playback. However, you’re responsible for providing an interface and building your own UI.

Note: Apps can play audio content using WKAudioFilePlayer only through a connected Bluetooth headphone or speaker on a real device. You won’t be able to hear the audio using WKAudioFilePlayer either in watchOS simulator or via Apple Watch speaker. Therefore, to follow along with this section, you’ll need an Apple Watch that’s paired with Bluetooth headphones.

The starter project includes AudioPlayerInterfaceController. You’ll use AudioPlayerInterfaceController as a basis for your custom audio player. But before you go there, while you’re still in InterfaceController, you can rewire the code to call the AudioPlayerInterfaceController instead.

Once again, find the implementation of table(_:didSelectRowAtIndex:) in InterfaceController.swift, and update it as follows:

override func table(
  _ table: WKInterfaceTable,
  didSelectRowAt rowIndex: Int) {

    let memo = memos[rowIndex]
    presentController(
      withName: "AudioPlayerInterfaceController",
      context: memo)
}

Make sure you place the existing code entirely. Here, instead of using the built-in media player, you call your soon-to-be-made custom media player. If you build and run at this point, and select a memo entry from the table, you’ll see the new media player that does … nothing! Time to fix that.

Open AudioPlayerInterfaceController scene in TurboMemoWatch/Interface.storyboard. AudioPlayerInterfaceController provides a basic UI for audio playback.

This has:

  • titleLabel which is blank by default
  • playButton that’s hooked up to playButtonTapped().
  • a static label that says Time lapsed:.
  • interfaceTimer that is set to 0 by default.

Now, open AudioPlayerInterfaceController.swift and add the following properties at the beginning of AudioPlayerInterfaceController:

// 1
private var player: WKAudioFilePlayer!
// 2
private var asset: WKAudioFileAsset!
// 3
private var statusObserver: NSKeyValueObservation?
// 4
private var timer: Timer!

Taking this line-by-line:

  1. player is an instance of WKAudioFilePlayer. You’ll use it to play back an audio file.
  2. asset is a representation of the voice memo. You’ll use this to create a new WKAudioFilePlayerItem to play the audio file.
  3. statusObserver is your key-value observer for the player’s status. You’ll need to observer the status of the player and start playing only if the audio file is ready to play.
  4. timer that you use to update the UI. You kick off the timer at the same time you start playing. You do this because currently there’s no other way to know when you’re finished playing the audio file. You’ll have to maintain your own timer with the same duration as your audio file.

You’ll see all these in action in a moment.

Now, add the implementation of awakeWithContext(_:) to AudioPlayerInterfaceController as follows:

override func awake(withContext context: Any?) {
  super.awake(withContext: context)
  // 1
  let memo = context as! VoiceMemo
  // 2
  asset = WKAudioFileAsset(url: memo.url)
  // 3
  titleLabel.setText(memo.filename)
  // 4
  playButton.setEnabled(false)
}

Again, taking this line-by-line:

  1. After calling super as ordinary, you know for sure the context that’s being passed to the controller is a VoiceMemo. This is Design by Contract!
  2. Create a WKAudioFileAsset object with the voice memo and store it in asset. You’ll reuse the asset to replay the same memo when user taps on the play button.
  3. Set the titleLabel with the filename of the memo.
  4. Disable the playButton until the file is ready to be played.

You prepared the interface to playback an audio file, but you haven’t done anything to actually play it. You’ll kick off the playback in didAppear() so that playback starts when the interface is fully presented to the user.

Speaking of didAppear(), add the following to AudioPlayerInterfaceController:

override func didAppear() {
  super.didAppear()
  prepareToPlay()
}

Here, you simply call a convenient method, prepareToPlay(). So let’s add that next:

private func prepareToPlay() {
  // 1
  let playerItem = WKAudioFilePlayerItem(asset: asset)
  // 2
  player = WKAudioFilePlayer(playerItem: playerItem)
  // 3
  statusObserver = player.observe(
    \.status,
    changeHandler: { [weak self] (player, change) in
      // 4
      guard
        player.status == .readyToPlay,
        let duration = self?.asset.duration
        else { return }
      // 5
      let date = Date(timeIntervalSinceNow: duration)
      self?.interfaceTimer.setDate(date)
      // 6
      self?.playButton.setEnabled(false)
      // 7
      player.play()
      self?.interfaceTimer.start()
      // 8
      self?.timer = Timer.scheduledTimer(
        withTimeInterval: duration,
        repeats: false, block: { _ in

        self?.playButton.setEnabled(true)
      })
  })
}

There’s a lot going on here:

  1. Create a WKAudioFilePlayerItem object from the asset you set earlier in awake(withContext:). You have to do this each time you want to play a media file, since WKAudioFilePlayerItem can’t be reused.
  2. Initialize the player with the WKAudioFilePlayerItem you just created. You’ll have to do this even if you’re playing the same file again.
  3. The player may not be ready to play the audio file immediately. You need to observe the status of the WKAudioFilePlayer object, and whenever it’s set to .readyToPlay, you can start the playback. You use the new Swift 4 key-value observation (KVO) API to listen to changes in player.status.
  4. In the observer block, you check for the player’s status and if it’s .readyToPlay, you safely unwrap duration of the asset and continue. Otherwise, you simply ignore the change notification.
  5. Once the item is ready to play, you create a Date object with the duration of the memo, and update interfaceTimer to show the lapsed time.
  6. Disable the playButton while you’re playing the file.
  7. Start playing by calling player.play(), and at the same time, start the countdown in the interface.
  8. Kick off an internal timer to re-enable the playButton after the playback is finished so the user can start it again if they wish.

That was a big chunk of code, but as you see, it’s mostly about maintaining the state of the WKAudioFilePlayer and keeping the interface in sync.

Note: Unfortunately, at the time of writing this tutorial, currentTime of WKAudioFilePlayerItem is not KVO-complaint so you can’t add an observer. Ideally, you would want to observe currentTime instead of maintaining a separate timer on your own.

Before you build and run, there’s one more thing to add!

When the timer is up and playButton is enabled, the user should be able to tap on Play to restart playing the same file. To implement this, find the implementation of playButtonTapped() in AudioPlayerInterfaceController.swift and update it as follows:

@IBAction func playButtonTapped() {
  prepareToPlay()
}

It’s that simple! Merely call the convenient method, prepareToPlay(), to restart the playback.

Next, build and run, and select a voice memo from the list. The app will present your custom interface. The interface will automatically start playing the audio file, and once it’s stopped, the Play button will be re-enabled and you can play it again.

If you have more than one item to play, such as in a playlist, you’ll want to use WKAudioFileQueuePlayer instead of WKAudioFilePlayer and queue your items. The system will play queued items back-to-back and provide a seamless transition between files.

Background Audio Playback

In watchOS, very much like in iOS, you can specify that your app should use background audio. This lets the system prepare to take over and continue playing the audio file if a user dismisses your media player.

To declare support for background audio, you’ll update the Info.plist for the Watch app. Open TurboMemoWatch\Info.plist, select the Information Property List entry and tap the + button:

Change the value of the new key to UIBackgroundModes. Make sure its type is Array and then expand the key and add a new value named audio. Xcode will most likely change the values to more readable versions:

Adding this key lets the Watch app continue running for the purpose of playing audio. If the key is not present, playback ends when the user stops interacting with your app.

Recording Audio

One of the most exciting features of watchOS is its access to the microphone. Being able to add a voice memo to Turbo Memo on the Apple Watch is definitely something users will appreciate — so let’s do it!

When you start recording, it’s the Watch app that does the recording and has access to the microphone. Prior to watchOS 4, the WatchKit extension had to provide a shared container using App Groups to which both could read and write, allowing the Watch app to write the audio and the WatchKit extension to grab it.

Even though the WatchKit extension code was bundled and copied to the Apple Watch along with the Watch app itself, from the system’s standpoint, they were still two separate processes that were sandboxed within their own containers. In other words, the Watch app and the WatchKit extension didn’t share the same sandbox!

New in watchOS 4, thanks to Unified Process Runtime, both the Watch app and the WatchKit extension run in the same process so they both have access to the same sandbox.

Note: The good news is that if you’re dropping support for watchOS versions prior to watchOS 4, you can simplify your code by removing the code related to communication between App Groups and your app’s container. The bad news is that if you want to have a backward-compatible watchOS app, you need to enable App Groups. To learn more about App Groups, check out the “Sharing Data with Your Containing App” section of Apple’s App Extension Programming Guide: apple.co/1I5YBtZ

The starter project includes a menu item called + Voice that’s accessible in the app’s main interface by force-touching the screen:

In code, it’s hooked up to addVoiceMemoMenuItemTapped() in InterfaceController.swift, and currently does … (surprise) nothing.

It’s time to tune up this code and do some recording.

Open InterfaceController.swift, find the empty implementation of addVoiceMemoMenuItemTapped() and update it as follows:

// 1
let outputURL = MemoFileNameHelper.newOutputURL()
// 2
let preset = WKAudioRecorderPreset.narrowBandSpeech
// 3
let options: [String : Any] =
  [WKAudioRecorderControllerOptionsMaximumDurationKey: 30]
// 4
presentAudioRecorderController(
  withOutputURL: outputURL,
  preset: preset,
  options: options) {
    [weak self] (didSave: Bool, error: Error?) in

    // 5
    guard didSave else { return }
    self?.processRecordedAudio(at: outputURL)
}

This is the action method you’ll call when a user wants to add a new voice memo. Here’s what you’re doing:

  1. Create a new URL by calling MemoFileNameHelper.newOutputURL() which is a convenient helper module. All it does is that it generates a unique file name based on the current date and time, appends .m4a as the file extension to it, and creates a URL based on user’s documentDirectory on the current device — it’s a shared code between the iPhone and the Watch app. This is basically where you’ll save the audio file.
  2. Configure presets for the recorder. See below for more information on the presets you can use.
  3. Create an options dictionary to specify the maximum duration of the recording session. Here, it’s 30 seconds.
  4. Present the system-provided audio recording controller.
  5. In the completion block, if the audio file is successfully saved, you pass it on to a helper method, processRecordedAudio(at:) which will then broadcast it to the iPhone app and update your data source for the interface table.

When you present an audio recording controller, there are a number of things you can specify. First, the preset you select determines the sample and bit rates at which the audio will record:

  • NarrowBandSpeech: As its name implies, this is a good preset for voice memos and voice messages. It has a sample rate of 8 kHz, and it records at a bit rate of 24 kbps with an AAC codec and 128 kbps with an LPCM codec.
  • WideBandSpeech: This preset has a higher sample rate of 16 kHz, and it records at a bit rate of 32 kbps with an AAC codec and 256 kbps with an LPCM codec.
  • HighQualityAudio: This preset has the highest sample rate at 44.1 kHz, and it records at a bit rate of 96 kbps with an AAC codec and 705.6 kbps with an LPCM codec.

You can also specify various recording options:

  • WKAudioRecorderControllerOptionsMaximumDurationKey: You can set the maximum duration of recorded audio clips by passing in a TimeInterval value in seconds. There’s no maximum recording time if you don’t set a value for this key.
  • WKAudioRecorderControllerOptionsAlwaysShowActionTitleKey: You can use this key to pass either true or false to modify the behavior for showing the action button. If you specify false, the audio recorder controller shows the button only after the user has recorded some audio. By default, the action button is always visible.
  • WKAudioRecorderControllerOptionsActionTitleKey: You can use this key to pass in a String to customize the display title of the button that the user taps to accept a recording. By default, the button’s title is Save.
  • WKAudioRecorderControllerOptionsAutorecordKey: By passing a Boolean value for this key, you can change the automatic recording behavior of the audio recorder controller. If you set it to true, once the controller is presented, it automatically starts recording; otherwise, the user has to tap on the record button to start recording. The default value is true.

That’s it! Build and run. Bring up the contextual menu using the force touch gesture and tap on the + Voice button. The app will present you with an audio recording controller. Tap the Save button, and you’ll have recorded your first voice memo on an Apple Watch, using your own code!

If you try recording on a real device, the very first time you present the system-provided audio recording controller, watchOS will ask for the user’s permission.

Very much like in iOS, the user should grant access to the microphone on the Watch. However, unlike iOS, you don’t explicitly ask for user’s permission as there’s no API for that. Instead, the watchOS uses the NSMicrophoneUsageDescription key in the iPhone’s app to present the appropriate UI and ask the user for their permission. If user doesn’t grant access, the audio recorder will still work, but it will only record silence!

Note: At the time of writing this tutorial, the watchOS simulator doesn’t present the dialog asking for the user’s permission. The iPhone simulator, on the other hand, does present the permission dialog.

Where to Go From Here?

You can download the completed project for the tutorial here.

The audio recording and playback API of watchOS 4 makes it possible to deliver a smooth multimedia experience on the Apple Watch even when the paired iPhone isn’t in proximity. This is a technology with endless possibilities.

If you enjoyed what you learned in this tutorial, why not check out the complete watchOS by Tutorials book, available in our store?

Here’s a taste of what’s in the book:

Chapter 1, Hello, Apple Watch!: Dive straight in and build your first watchOS 4 app — a very modern twist on the age-old “Hello, world!” app.

Chapter 2, Designing Great Watch Apps: Talks about the best practices based on Apple recommendations in WWDC this year, and how to design a Watch app that meets these criteria.

Chapter 3, Architecture: watchOS 4 might support native apps, but they still have an unusual architecture. This chapter will teach you everything you need to know about this unique aspect of watch apps.

Chapter 4, UI Controls: There’s not a `UIView` to be found! In this chapter you’ll dig into the suite of interface objects that ship with WatchKit–watchOS’ user interface framework.

Chapter 5, Pickers: `WKInterfacePicker` is one of the programmatic ways to work with the Digital Crown. You’ll learn how to set one up, what the different visual modes are, and how to respond to the user interacting with the Digital Crown via the picker.

Chapter 6, Layout: Auto Layout? Nope. Springs and Struts then? Nope. Guess again. Get an overview of the layout system you’ll use to build the interfaces for your watchOS apps.

Chapter 7, Tables: Tables are the staple ingredient of almost any watchOS app. Learn how to set them up, how to populate them with data, and just how much they differ from `UITableView`.

Chapter 8, Navigation: You’ll learn about the different modes of navigation available on watchOS, as well as how to combine them.

Chapter 9, Digital Crown and Gesture Recognizers: You’ll learn about accessing Digital Crown raw data, and adding various gesture recognizers to your watchOS app interface.

Chapter 10, Snapshot API: Glances are out, and the Dock is in! You’ll learn about the Snapshot API to make sure that the content displayed is always up-to-date.

Chapter 11, Networking: `NSURLSession`, meet Apple Watch. That’s right, you can now make network calls directly from the watch, and this chapter will show you the ins and outs of doing just that.

Chapter 12, Animation: The way you animate your interfaces has changed with watchOS 3, with the introduction of a single, `UIView`-like animation method. You’ll learn everything you need to know about both animated image sequences and the new API in this chapter.

Chapter 13, CloudKit: You’ll learn how to keep the watch and phone data in sync even when the phone isn’t around, as long as user is on a known WiFi network.

Chapter 14, Notifications: watchOS offers support for several different types of notifications, and allows you to customize them to the individual needs of your watch app. In this chapter, you’ll get the complete overview.

Chapter 15, Complications: Complications are small elements that appear on the user’s selected watch face and provide quick access to frequently used data from within your app. This chapter will walk you through the process of setting up your first complication, along with introducing each of the complication families and their corresponding layout templates.

Chapter 16, Watch Connectivity: With the introduction of native apps, the way the watch app and companion iOS app share data has fundamentally changed. Out are App Groups, and in is the Watch Connectivity framework. In this chapter you’ll learn the basics of setting up device-to-device communication between the Apple Watch and the paired iPhone.

Chapter 17, Audio Recording: As a developer, you can now record audio directly on the Apple Watch inline in your apps, without relying on the old-style system form sheets. In this chapter, you’ll gain a solid understanding of how to implement this, as well as learn about some of the idiosyncrasies of the APIs, which are related to the unique architecture of a watch app.

Chapter 18, Interactive Animations with SpriteKit and SceneKit: You’ll learn how to apply SpriteKit and SceneKit in your Watch apps, and how to create interactive animations of your own.

Chapter 19, Advanced Watch Connectivity: In Chapter 15, you learned how to set up a Watch Connectivity session and update the application context. In this chapter, you’ll take a look at some of the other features of the framework, such as background transfers and real-time messaging.

Chapter 20, Advanced Complications: Now that you know how to create a basic complication, this chapter will walk you through adding Time Travel support, as well giving you the lowdown on how to efficiently update the data presented by your complication.

Chapter 21, Handoff Video Playback: Want to allow your watch app users to begin a task on their watch and then continue it on their iPhone? Sure you do, and this chapter will show exactly how to do that through the use of Handoff.

Chapter 22, Core Motion: The Apple Watch doesn’t have every sensor the iPhone does, but you can access what is available via the Core Motion framework. In this chapter, you’ll learn how to set up Core Motion, how to request authorization, and how to use the framework to track the user’s steps.

Chapter 23, HealthKit: The HealthKit framework allows you to access much of the data stored in user’s health store, including their heart rate! This chapter will walk you through incorporating HealthKit into your watch app, from managing authorization to recording a workout session.

Chapter 24, Core Location: A lot of apps are now location aware, but in order to provide this functionality you need access to the user’s location. Developers now have exactly that via the Core Location framework. Learn everything you need to know about using the framework on the watch in this chapter.

Chapter 25, Core Bluetooth: In watchOS 4, you can pair and interact with BLE devices directly. Learn how to send control instructions and other data directly over Bluetooth.

Chapter 26, Localization: Learn how to expand your reach and grow a truly international audience by localizing your watch app using the tools and APIs provided by Apple.

Chapter 27, Accessibility: You want as many people as possible to enjoy your watch app, right? Learn all about the assistive technologies available in watchOS, such as VoiceOver and Dynamic Type, so you can make your app just as enjoyable for those with disabilities as it is for those without.

One thing you can count on: after reading this book you’ll have all the experience necessary to build rich and engaging apps for the Apple Watch platform.

And to help sweeten the deal, the digital edition of the book is on sale for $49.99! But don’t wait — this sale price is only available for a limited time.

Speaking of sweet deals, be sure to check out the great prizes we’re giving away this year with the iOS 11 Launch Party, including over $9,000 in giveaways!

To enter, simply retweet this post using the #ios11launchparty hashtag by using the button below:


We hope you enjoy this update, and stay tuned for more book releases and updates!

The post Audio Recording in watchOS Tutorial appeared first on Ray Wenderlich.

Updated Course: Beginning Collection Views

$
0
0

Beginning Collection Views

As part of our iOS 11 Launch Party, we are releasing a ton of new and updated courses for raywenderlich.com subscribers.

Last week, we released an update to our Beginning Auto Layout course. Today, we’ll put some of those Auto Layout skills to work in another course, updated for Swift 4 and iOS 11: Beginning Collection Views

In this 20-video course, you’ll learn everything you need to know to get started with Collection Views. Learn about Collection View layouts, adding and deleting cells, customizing cells, adding sections, and more!

Let’s have a look at what’s inside.

Part 1: The Basics

In this first part, you’ll build an app from scratch using a collection view and implement basic functionality like adding, deleting, and selecting cells.

Part 1 - Introduction

This section contains 10 videos:

  1. Introduction: What are Collection Views? Find out how Collection Views compare to their close relative, the Table View, in this introductory video.
  2. Getting Started: Start building a new Collection View-focused app from scratch! Use the UICollectionView Delegate and Data Source protocols to set up your first Collection View.
  3. Customize Collection Views: Start customizing the appearance and functionality of your Collection View with column numbers, cell size, spacing, and scroll direction.
  4. Challenge: Selecting Cells: What happens when you tap on a cell? In this challenge, implement basic cell selection using your knowledge of Table Views.
  5. Handling Segues: Add a detail view to your app. Find out how to navigate to a new view when a cell is tapped using Segues in Interface Builder.
  6. Challenge: Segues in Code: In this challenge, combine the two approaches you’ve already learned to wrap up the cell selection functionality.
  7. Inserting Cells: Find out how to add items to a data model and update a Collection View to display new cells. Bonus: Batch addition and pull-to-refresh controls!
  8. Deleting Cells: Begin the process of creating an editing mode for your Collection View to allow users to remove multiple cells at once.
  9. Challenge: Deleting Cells: It turns out deleting cells can be quite involved! Try your hand at implementing the remaining functionality for deleting cells.
  10. Cleaning up the UI: Take some time to clean up the user interface for your collection view for a more polished experience.
  11. Conclusion: Wrap up this section by reviewing what you’ve learned about Collection Views, and find out what’s coming up in Part 2.

Part 2: Customization

Customize your collection view with section headers, custom cells, and layout subclassing!

Part 2 - Introduction

This section contains 9 videos:

  1. Introduction: In this video, get some ideas about collection view customization, and find out how we cleaned up our app from Part 1.
  2. Custom Cells: Build up a custom Collection View Cell class in an updated collction view featuring images of National Parks.
  3. Challenge: Add a Label: Add a label to a custom collection view cell and populate it with Park data.
  4. Multiple Sections: Add multiple sections to the app using Section Headers to separate parks by state.
  5. Challenge: Enhance Section Headers: Customize your section headers to display more information about each section and better organize your collection view.
  6. Subclassing Collection View Layout Subclass UICollectionViewFlowLayout to get custom functionality such as animating cells that are added.
  7. Challenge: Cell Deletion Animation: Animate the deletion of cells on your own and get a peek at view animations, while you’re here.
  8. Moving Cells: In this short video you’ll learn about a property which will to enable you to longpress on a collection view and move cells around.
  9. Conclusion: Review what you’ve learned in this section, and get some advice about where to go next.

Where To Go From Here?

Want to check out the course? You can watch the first three videos for free! The rest of the course is for raywenderlich.com subscribers only. Here’s how you can get access:

  • If you are a raywenderlich.com subscriber: The entire 20-part course is complete and available today. You can check out the course here.
  • If you are not a subscriber yet: What are you waiting for? Subscribe now to get access to our updated Beginning Collection Views course and our entire catalog of over 500 videos.

The iOS 11 Launch Party isn’t over, so stay tuned for more new and updated courses to come. I hope you enjoy our course! :]

The post Updated Course: Beginning Collection Views appeared first on Ray Wenderlich.

Universal Problem Solving and Random Numbers – Podcast S07 E03

$
0
0

In this episode Mark Dalrymple from The Big Nerd Ranch joins Dru and Janie to discuss The Universal Problem Solving methodology and then Janie gives better options for random numbers in GameplayKit than arc4random.

[Subscribe in iTunes] [RSS Feed]

Interested in sponsoring a podcast episode? We sell ads via Syndicate Ads, check it out!

Episode Links

Universal Problem Solving

Random Numbers

Contact Us

Where To Go From Here?

We hope you enjoyed this episode of our podcast. Be sure to subscribe in iTunes to get notified when the next episode comes out.

We’d love to hear what you think about the podcast, and any suggestions on what you’d like to hear in future episodes. Feel free to drop a comment here, or email us anytime at podcast@raywenderlich.com.

The post Universal Problem Solving and Random Numbers – Podcast S07 E03 appeared first on Ray Wenderlich.

Core Bluetooth in watchOS Tutorial

$
0
0

This is an abridged chapter from our book watchOS by Tutorials, which has been completely updated for Swift 4 and watchOS 4. This tutorial is presented as part of our iOS 11 Launch Party — enjoy!

Core Bluetooth has been around since 2011 on macOS and iOS, since 2016 on tvOS, and now it’s available on watchOS, with an Apple Watch Series 2.

What’s Core Bluetooth? It’s Apple’s framework for communicating with devices that support Bluetooth 4.0 low-energy, often abbreviated as BLE. And it opened up standard communication protocols to read and/or write from external devices.

Back in 2011, there weren’t many BLE devices, but now? Well, this is from the Bluetooth site (bit.ly/2j1DqpU):

“More than 31,000 Bluetooth member companies introducing over 17,000 thousand new products per year and shipping more than 3.4 billion units each year.”

BLE is everywhere: in health monitors, home appliances, fitness equipment, Arduino and toys. In July 2017, Apple announced its collaboration with hearing-aid implant manufacturer Cochlear, to create the first “Made for iPhone” implant. (bit.ly/2vZahUU)

Note: Cochlear is an Australian company, and the app was built here in Australia! (bit.ly/2uztOHX)

But you don’t have to acquire a specific gadget to work through this tutorial: the sample project uses an iPhone as the BLE device. In the app you’ll build, the iOS device provides a two-part service: it transfers text to the Watch, or the Watch can open Maps at the user’s location on the iOS device.

The first part is a Swift translation of Apple’s BLE_Transfer sample app. It’s a very useful example, because it shows how to send 20-byte chunks of data. I added the Maps part to show you how to send a control instruction to the BLE device, and I thought it’s something you’d want to do from the Watch Maps app: open Maps on a larger display so you can find what you need more easily!

Getting Started

Note: The simulator does not support Core Bluetooth. To run the starter app, you need two iOS 11 devices. To run the finished app, you need an Apple Watch Series 2 and an iOS 11 device.

Download the starter app for this tutorial here.

Open the starter app. Build and run on two iOS devices. Go into Settings to trust the developer, then build and run again.

Select Peripheral Mode on one device, and Central Mode on the other. Tap the peripheral’s Advertising switch to start advertising.

PeripheralViewController has a textView, prepopulated with some text. When the central manager subscribes to textCharacteristic, the peripheral sends this text in 20-byte chunks to the central, where it appears in a textView:

Modify the peripheral’s text, and tap Done. The peripheral sends the updated value to the central:

Note: I deleted “sample” from the first sentence.

When the central has discovered mapCharacteristic, CentralViewController bar button’s title changes to Map Me. Tap this bar button, allow the app to use your location, then tap Map Me again: the peripheral device opens the Maps app, at your location:

Stop the app on both devices. It’s time to learn about Core Bluetooth, and look at some code!

Note: You can tap TextMeMapMe to go back to the peripheral view, but sometimes, Maps keeps re-opening.

What is Core Bluetooth?

Lets’s start with some vocabulary.

A Generic Attributes (GATT) profile describes how to bundle, present and transfer data using Bluetooth Low Energy. It describes a use case, roles and general behaviors. A device’s GATT database can describe a hierarchy of services, characteristics and attributes.

The classic server/client roles are the central app and the peripheral or accessory. In the starter app, either iOS device can be central or peripheral. When you build the Watch app, it can only be the central device:

A peripheral offers services. For example, Blood Pressure monitor is a pre-defined GATT service (bit.ly/2lfpqwB). In the starter app, the service is TextOrMap.

A service has characteristics. The Blood Pressure service has pre-defined GATT characteristics (bit.ly/2vOhGqa): Blood Pressure Feature, which blood pressure monitor features this sensor supports, and Blood Pressure Measurement. A characteristic has a value, properties to indicate operations the characteristic supports, and security permissions.

A central app can read or write a service’s characteristics, such as reading the user’s heart rate from a heart-rate monitor, or writing the user’s preferred temperature to a room heater/cooler. In the starter app, the TextOrMap service has two characteristics: the peripheral sends updates of the textCharacteristic value to the central; when the central writes the mapCharacteristic value, the peripheral opens the Maps app at the user’s location.

Services and characteristics have UUIDs: universally unique identifiers. There are predefined UUIDs for standard peripheral devices, like heart monitors or home appliances. You can use the command line utility uuidgen to create custom UUID strings, then use these to initialize CBUUID objects.

The Maximum Transmission Unit (MTU) is 27 bytes, but really 20 bytes, because each packet uses 7 bytes as it travels through three protocol layers. You can improve throughput using write without response, if the characteristic allows this, because you don’t have to wait for the peripheral’s response. If your central app and peripheral are running on iPhone 7, the new iPad Pro, or Apple Watch Series 2, you get the Extended Data Length of 251 bytes! I’m testing the sample app on an iPhone SE, so I’m stuck with 20-byte chunks.

Overview

The most interesting classes in the Core Bluetooth framework are CBCentralManager and CBPeripheralManager. Each has methods and a comprehensive delegate protocol, to monitor activity between central and peripheral devices. There’s also a peripheral delegate protocol. Everything comes together in an intricate dance!

Think about what the devices need to do:

  • Central devices need to scan for and connect to peripherals. Peripherals need to advertise their services.
  • Once connected, the central device needs to discover the peripheral’s services and characteristics, using peripheral delegate methods. Often at this point, an app might present a list of these for the user to select from.
  • If the central app is interested in a characteristic, it can subscribe to notifications of updates to the characteristic’s value, or send a read/write request to the peripheral. The peripheral then responds by sending data to the central device, or doing something with the write request’s value. The central app receives updated data from another peripheral delegate method, and usually uses this to update its UI.
  • Eventually, the central device might disable a notification, triggering delegate methods of the peripheral and the peripheral manager. Or the central device disconnects the peripheral, which triggers a central manager delegate method, usually used to clean up.

Now look at what each participant does.

Central Manager

A central manager’s main jobs are:

  • If Bluetooth LE is available and turned on, the central manager scans for peripherals.
  • If a peripheral’s signal is in range, it connects to the peripheral. It also discovers services and characteristics, which it may display to the user to select from, subscribes to characteristics, or requests to read or write a characteristic’s value.

Central Manager Methods & Properties:

  • Initialize with delegate, queue and optional options.
  • Connect to a peripheral, with options,
  • Retrieve known peripherals (array of UUIDs) or connected peripherals (array of service UUIDs).
  • Scan for peripherals with services and options, or stop scanning.
  • Properties: delegate, isScanning

Peripheral Manager

A peripheral manager’s main jobs are to manage and advertise the services in the GATT database of the peripheral device. You would implement this for an Apple device acting as a peripheral. Non-Apple accessories have their own manager APIs. Most of the sample BLE apps you can find online use non-Apple accessories like Arduino.

If Bluetooth LE is available and turned on, the peripheral manager sets up characteristics and services. And it can respond when a central device subscribes to a characteristic, requests to read or write a characteristic value, or unsubscribes from a characteristic.

Peripheral Manager Methods & Properties:

  • Initialize with delegate, queue and optional options.
  • Start or stop advertising peripheral manager data.
  • updateValue(_:for:onSubscribedCentrals:)
  • respond(_:withResult:)
  • Add or remove services.
  • setDesiredConnectionLatency(_:for:)
  • Properties: delegate, isAdvertising

Central Manager Delegate Protocol

Methods in this protocol indicate availability of the central manager, and monitor discovering and connecting to peripherals. Follow along in the CBCentralManagerDelegate extension of CentralViewController.swift, as you work through this list:

  • centralManagerDidUpdateState(_:) is the only required method. If the central is poweredOn — Bluetooth LE is available and turned on — you should start scanning for peripherals. You can also handle the cases poweredOff, resetting, unauthorized, unknown and unsupported, but you must not issue commands to the central manager when it isn’t powered on.
  • When the central manager discovers a peripheral, centralManager(_:didDiscover:advertisementData:rssi:) should save a local copy of the peripheral. Check the received signal strength indicator (RSSI) to see if the peripheral’s signal is strong enough: -22dB is good, but two iOS devices placed right next to each other produce a much lower RSSI, often below -35dB. If the peripheral’s RSSI is acceptable, try to connect to it with the central manager’s connect(_:options:) method.
  • If the connection attempt fails, you can check the error in the delegate method centralManager(_:didFailToConnect:error:). If the error is something transient, you can call connect(_:options:) again.
  • When the connection attempt succeeds, implement centralManager(_:didConnect:) to stop scanning, reset characteristic values, set the peripheral’s delegate property, then call the peripheral’s discoverServices(_:) method. The argument is an array of service UUIDs that your app is interested in. After this, it’s up to the peripheral delegate protocol to discover characteristics of the services.
  • In centralManager(_:didDisconnectPeripheral:error:), you can clean up, then start scanning again.

Peripheral Manager Delegate Protocol

Methods in this protocol indicate availability of the peripheral manager, verify advertising, and monitor read, write and subcription requests from central devices. Follow along in the CBPeripheralManagerDelegate extension of PeripheralViewController.swift, as you work through this list:

  • peripheralManagerDidUpdateState(_:) is the only required method. You handle the same cases as the corresponding centralManagerDidUpdateState(_:). If the peripheral is poweredOn, you should create the peripheral’s services, and their characteristics.
  • peripheralManagerDidStartAdvertising(_:error:) is called when the peripheral manager starts advertising the peripheral’s data.
  • When the central subscribes to a characteristic, by enabling notifications, peripheralManager(_:central:didSubscribeTo:) should start sending the characteristic’s value.
  • When the central disables notifications for a characteristic, you can implement peripheralManager(_:central:didUnsubscribeFrom:) to stop sending updates of the characteristic’s value.
  • To send a characteristic’s value, sendData() uses the peripheral manager method updateValue(_:for:onSubscribedCentrals:). This method returns false if the transmit queue is full. When the transmit queue has space, the peripheral manager calls peripheralManagerIsReady(toUpdateSubscribers:). You should implement this delegate method to resend the value.
  • The central can send read or write requests, which the peripheral handles with peripheralManager(_:didReceiveRead:) or peripheralManager(_:didReceiveWrite:). When implementing these methods, you should call the peripheral manager method peripheral.respond(to:withResult:) exactly once. The sample app implements only peripheralManager(_:didReceiveWrite:); reading the text data is accomplished by subscribing to textCharacteristic.

Peripheral Delegate Protocol

A peripheral delegate can respond when a central device discovers its services or characteristics, or requests to read a characteristic, or when a characteristic’s value is updated. It can also respond when a central device writes a characteristic’s value, or disconnects a peripheral. Follow along in the CBPeripheralDelegate extension of CentralViewController.swift, as you work through this list:

  • The sample app just checks the error in peripheral(_:didDiscoverServices:), but some apps might present a list of peripheral.services for the user to select from.
  • And similarly for peripheral(_:didDiscoverCharacteristicsFor:error:).
  • When the peripheral manager updates a value that the central subscribed to, or requested to read, implement peripheral(_:didUpdateValueFor:error:) to use that value in your app. The sample app collects the chunks, then displays the complete text in the view controller’s text view.
  • Implement peripheral(_:didUpdateNotificationStateFor:error:) to handle the central device enabling or disabling notifications for a characteristic. The sample app just logs the information.
  • There’s a runtime warning if you don’t implement peripheral(_:didModifyServices:), so I added this stub.

watchOS vs iOS

iOS apps can be central or peripheral, and can continue using CoreBluetooth in the background.

watchOS and tvOS both rely on Bluetooth as their main system input, so Core Bluetooth has restrictions, to ensure system activities can run. Both can be only the central device, and can use at most two peripherals at a time. Peripherals are disconnected when the app is suspended.And the minimum interval between connections is 30ms, instead of 15ms for iOS and macOS.

Now finally, you’re going to build the Watch app!

Building the Watch App

As you’ve done many times already, select Xcode\File\New\Target… and choose watchOS\WatchKit App:

Name the product BT_WatchKit_App, uncheck Include Notification Scene, and select Finish:

There are now three targets: TextMeMapMe, BT_WatchKit_App and BT_WatchKit_App Extension. Check that all three have the same team.

Creating the Interface

Open BT_WatchKit_App/Interface.storyboard, and drag two buttons, two labels, and a menu onto the scene. Set the background color of the buttons to different colors, and set their titles to wait…:

Select the two buttons, then select Editor\Embed in\Horizontal Group. Set each button’s width to 0.5 Relative to Container, and leave Height Size To Fit Content:

Set each label’s Font to Footnote, and Lines to 0, and set the second label’s Text to Transferred text appears here:

Set the Menu Item‘s Title to Reset, with Image Repeat:

Open the assistant editor, and create outlets (textButton, mapButton, statusLabel, textLabel) and actions (textMe, mapMe, resetCentral) in InterfaceController.swift.

Reduce the Amount of Text to Send

Data transfer to the Watch is slower than to an iOS device, so open the iOS app’s Main.storyboard, and delete the second sentence from PeripheralViewController‘s textView, leaving only Lorem ipsum dolor sit er elit lamet sample text.

Copy-Pasting and Editing CentralViewController code

First, select SharedConstants.swift, and open the file inspector to add BT_WatchKit_App Extension to its target membership:

Now you’ll mostly copy code from CentralViewController.swift, paste it into InterfaceController.swift, and do a small amount of editing.

First, import CoreBluetooth:

import CoreBluetooth

Below the outlets, copy and paste the central manager, peripheral, characteristic and data properties, then edit mapCharacteristic to set the title of mapButton, and add a similar observer to textCharacteristic:

var centralManager: CBCentralManager!
var discoveredPeripheral: CBPeripheral?
var textCharacteristic: CBCharacteristic? {
  didSet {
    if let _ = self.textCharacteristic {
      textButton.setTitle("Text Me")
    }
  }
}
var data = Data()
var mapCharacteristic: CBCharacteristic? {
  didSet {
    if let _ = self.mapCharacteristic {
      mapButton.setTitle("Map Me")
    }
  }
}

This lets the user know that the Watch app has discovered the text and map characteristics, so it’s now safe to read or write them.

Copy and paste the helper methods scan() and cleanup(), then copy and paste the two delegate extensions. Change the two occurrences of extension CentralViewController to extension InterfaceController:

// MARK: - Central Manager delegate
extension InterfaceController: CBCentralManagerDelegate {

and

// MARK: - Peripheral Delegate
extension InterfaceController: CBPeripheralDelegate {

In peripheral(_:didDiscoverCharacteristicsFor:error:), delete the line that subscribes to textCharacteristic:

peripheral.setNotifyValue(true, for: characteristic)

Subscribing causes the peripheral to send the text data, so you’ll move this to the Text Me button’s action, giving the user more control over how the Watch app spends its restricted BLE allowance.

In peripheral(_:didUpdateValueFor:error:), replace the textView.text line (where the error is) with these two lines:

statusLabel.setHidden(true)
textLabel.setText(String(data: data, encoding: .utf8))

And add this line just below the line that creates stringFromData:

statusLabel.setText("received \(stringFromData ?? "nothing")")

Everything happens more slowly on the Watch, so you’ll use statusLabel to tell the user what’s happening while they wait. Just before the transferred text appears, you hide statusLabel, to make room for the text.

Use statusLabel in other places: add this line to scan():

statusLabel.setText("scanning")

And this line to centralManager(_:didDiscover:advertisementData:rssi:):

statusLabel.setText("discovered peripheral")

And to centralManager(_:didConnect:):

statusLabel.setText("connected to peripheral")

Add similar log statements to peripheral delegate methods, when services and characteristics are discovered.

Next, scroll up to awake(withContext:), and copy-paste this line from viewDidLoad():

centralManager = CBCentralManager(delegate: self, queue: nil)

Delete the methods willActivate() and didDeactivate().

Now fill in the actions. Add these lines to textMe():

guard let characteristic = textCharacteristic else { return }
discoveredPeripheral?.setNotifyValue(true, for: characteristic)

Tapping the Text Me button subscribes to textCharacteristic, which triggers peripheralManager(_:central:didSubscribeTo:) to send data.

Next, copy these lines from mapUserLocation() into mapMe():

guard let characteristic = mapCharacteristic else { return }
discoveredPeripheral?.writeValue(Data(bytes: [1]), for: characteristic, type: .withoutResponse)

mapUserLocation() and mapMe() do the same thing: write the value of mapCharacteristic, which triggers peripheralManager(_:didReceiveWrite:) to open the Maps app.

Before you implement resetCentral(), add this helper method:

fileprivate func resetUI() {
  statusLabel.setText("")
  statusLabel.setHidden(false)
  textLabel.setText("Transferred text appears here")
  textButton.setTitle("wait")
  mapButton.setTitle("wait")
}

You’re just setting the label and button titles back to what they were, and unhiding statusLabel.

Now add these two lines to resetCentral():

cleanup()
resetUI()

Build and run on your Apple Watch + iPhone. You’ll probably have to do this a couple of times, to “trust this developer” on the iPhone and on the Watch. At the time of writing, instead of telling you what to do, the Watch displays this error message:

Press the digital crown to manually open the app on your Watch, and trust this developer. The app will then start, but stop it, then build and run again. Select Peripheral mode on the iPhone, and turn on Advertising.

And wait. Scanning, connection and discovery take longer when the central is a Watch instead of an iPhone. When the Watch app discovers the TextOrMap characteristics, it updates the button titles:

Tap Text Me, and wait. You’ll see the text appear on the Watch, and statusLabel disappears:

Tap Map Me, and allow use of your location. Tap Map Me again, and the iPhone opens the Maps app at your location.

Stop the Watch app in Xcode, and close the iPhone app.

Congratulations! You’ve built a Watch app that uses an iPhone as a Bluetooth LE peripheral! Now you can connect all the things!

Where to Go From Here?

You can download the completed project for the tutorial here.

The audio recording and playback API of watchOS 4 makes it possible to deliver a smooth multimedia experience on the Apple Watch even when the paired iPhone isn’t in proximity. This is a technology with endless possibilities.

If you enjoyed what you learned in this tutorial, why not check out the complete watchOS by Tutorials book, available in our store?

Here’s a taste of what’s in the book:

Chapter 1, Hello, Apple Watch!: Dive straight in and build your first watchOS 4 app — a very modern twist on the age-old “Hello, world!” app.

Chapter 2, Designing Great Watch Apps: Talks about the best practices based on Apple recommendations in WWDC this year, and how to design a Watch app that meets these criteria.

Chapter 3, Architecture: watchOS 4 might support native apps, but they still have an unusual architecture. This chapter will teach you everything you need to know about this unique aspect of watch apps.

Chapter 4, UI Controls: There’s not a `UIView` to be found! In this chapter you’ll dig into the suite of interface objects that ship with WatchKit–watchOS’ user interface framework.

Chapter 5, Pickers: `WKInterfacePicker` is one of the programmatic ways to work with the Digital Crown. You’ll learn how to set one up, what the different visual modes are, and how to respond to the user interacting with the Digital Crown via the picker.

Chapter 6, Layout: Auto Layout? Nope. Springs and Struts then? Nope. Guess again. Get an overview of the layout system you’ll use to build the interfaces for your watchOS apps.

Chapter 7, Tables: Tables are the staple ingredient of almost any watchOS app. Learn how to set them up, how to populate them with data, and just how much they differ from `UITableView`.

Chapter 8, Navigation: You’ll learn about the different modes of navigation available on watchOS, as well as how to combine them.

Chapter 9, Digital Crown and Gesture Recognizers: You’ll learn about accessing Digital Crown raw data, and adding various gesture recognizers to your watchOS app interface.

Chapter 10, Snapshot API: Glances are out, and the Dock is in! You’ll learn about the Snapshot API to make sure that the content displayed is always up-to-date.

Chapter 11, Networking: `NSURLSession`, meet Apple Watch. That’s right, you can now make network calls directly from the watch, and this chapter will show you the ins and outs of doing just that.

Chapter 12, Animation: The way you animate your interfaces has changed with watchOS 3, with the introduction of a single, `UIView`-like animation method. You’ll learn everything you need to know about both animated image sequences and the new API in this chapter.

Chapter 13, CloudKit: You’ll learn how to keep the watch and phone data in sync even when the phone isn’t around, as long as user is on a known WiFi network.

Chapter 14, Notifications: watchOS offers support for several different types of notifications, and allows you to customize them to the individual needs of your watch app. In this chapter, you’ll get the complete overview.

Chapter 15, Complications: Complications are small elements that appear on the user’s selected watch face and provide quick access to frequently used data from within your app. This chapter will walk you through the process of setting up your first complication, along with introducing each of the complication families and their corresponding layout templates.

Chapter 16, Watch Connectivity: With the introduction of native apps, the way the watch app and companion iOS app share data has fundamentally changed. Out are App Groups, and in is the Watch Connectivity framework. In this chapter you’ll learn the basics of setting up device-to-device communication between the Apple Watch and the paired iPhone.

Chapter 17, Audio Recording: As a developer, you can now record audio directly on the Apple Watch inline in your apps, without relying on the old-style system form sheets. In this chapter, you’ll gain a solid understanding of how to implement this, as well as learn about some of the idiosyncrasies of the APIs, which are related to the unique architecture of a watch app.

Chapter 18, Interactive Animations with SpriteKit and SceneKit: You’ll learn how to apply SpriteKit and SceneKit in your Watch apps, and how to create interactive animations of your own.

Chapter 19, Advanced Watch Connectivity: In Chapter 15, you learned how to set up a Watch Connectivity session and update the application context. In this chapter, you’ll take a look at some of the other features of the framework, such as background transfers and real-time messaging.

Chapter 20, Advanced Complications: Now that you know how to create a basic complication, this chapter will walk you through adding Time Travel support, as well giving you the lowdown on how to efficiently update the data presented by your complication.

Chapter 21, Handoff Video Playback: Want to allow your watch app users to begin a task on their watch and then continue it on their iPhone? Sure you do, and this chapter will show exactly how to do that through the use of Handoff.

Chapter 22, Core Motion: The Apple Watch doesn’t have every sensor the iPhone does, but you can access what is available via the Core Motion framework. In this chapter, you’ll learn how to set up Core Motion, how to request authorization, and how to use the framework to track the user’s steps.

Chapter 23, HealthKit: The HealthKit framework allows you to access much of the data stored in user’s health store, including their heart rate! This chapter will walk you through incorporating HealthKit into your watch app, from managing authorization to recording a workout session.

Chapter 24, Core Location: A lot of apps are now location aware, but in order to provide this functionality you need access to the user’s location. Developers now have exactly that via the Core Location framework. Learn everything you need to know about using the framework on the watch in this chapter.

Chapter 25, Core Bluetooth: In watchOS 4, you can pair and interact with BLE devices directly. Learn how to send control instructions and other data directly over Bluetooth.

Chapter 26, Localization: Learn how to expand your reach and grow a truly international audience by localizing your watch app using the tools and APIs provided by Apple.

Chapter 27, Accessibility: You want as many people as possible to enjoy your watch app, right? Learn all about the assistive technologies available in watchOS, such as VoiceOver and Dynamic Type, so you can make your app just as enjoyable for those with disabilities as it is for those without.

One thing you can count on: after reading this book you’ll have all the experience necessary to build rich and engaging apps for the Apple Watch platform.

And to help sweeten the deal, the digital edition of the book is on sale for $49.99! But don’t wait — this sale price is only available for a limited time.

Speaking of sweet deals, be sure to check out the great prizes we’re giving away this year with the iOS 11 Launch Party, including over $9,000 in giveaways!

To enter, simply retweet this post using the #ios11launchparty hashtag by using the button below:


We hope you enjoy this update, and stay tuned for more book releases and updates!

The post Core Bluetooth in watchOS Tutorial appeared first on Ray Wenderlich.


Kotlin For Android: An Introduction

$
0
0

Update Note: This tutorial has been updated to Android Studio 3.0 by Joe Howard. The original tutorial was written by Eunice Obugyei.

Kotlin-feature

Until recently, app development on Android was almost exclusively done using the Java programming language, and Java 6 at that. Java 6 was introduced in 2006, two years before the release of Android devices.

JetBrains, known for IntelliJ IDEA (Android Studio is based on IntelliJ IDEA), introduced the Kotlin language in 2011. Kotlin reached 1.0 status early in 2016.

At Google I/O 2017 in April, Google announced that Kotlin would forever more be supported as a first class programming language Android. And the soon to be released Android Studio 3.0 will support Kotlin out of the box! :]

While Java 8 is now supported on recent Android releases and will continue to be supported on Android by Google, recent developer surveys indicate that Kotlin will soon dominate as an Android app development language.

Kotlin is a statically-typed programming language that runs on the JVM. It can also be compiled to JavaScript source code and to native executables. Kotlin has some amazingly cool features!

In this Kotlin for Android tutorial, you’ll learn:

  • Setup your Kotlin environment.
  • How to work with both Java and Kotlin in the same project.
  • What makes Kotlin so exciting as a new language.
Note: This tutorial assumes you’re experienced in Android development with Java. If you’re new to the Android world, have big questions about the starter project or are not familiar with Android Studio, please have a look at our Android tutorials. Also, this tutorial assumes that you’re using Android Studio 3.0 RC2 or later.

Why Kotlin For Android?

Since Android took the world by storm, developers have had few alternatives to Java for app development. Although its usage is widespread, Java comes with a lot of historical baggage.

Java 8 solved some language issues and even more were corrected with Java 9 and 10. But you have to set the minimum SDK to Android 24 just to use Java 8, which isn’t an option for many developers. For almost everybody, Java 9 and 10 aren’t even on the radar. :]

Kotlin aims to fill that gap of a missing modern language for the Android platform. There are a few core tenets that Kotlin lives by; it strives to be:

  1. Concise to reduce the amount of boilerplate code you need to write.
  2. Expressive to make your code more readable and understandable.
  3. Safe to avoid entire classes of errors such as null pointer exceptions.
  4. Versatile for building server-side applications, Android apps or frontend code running in the browser.
  5. Interoperable to leverage existing frameworks and libraries of the JVM with 100 percent Java interoperability.

Above all, it’s a new language! What could be more exciting? iOS developers can’t have all the fun. :]

Getting Started

Download the starter project. Extract and open the starter project in Android Studio 3.0 or later.

You’ll be working with this simple app that allows users to search for books, see book covers, and share books with friends to explore Kotlin.

It contains three source code files; take a moment to get familiar with them:

  • MainActivity.java: an Activity that displays the screen for searching and displaying a list of books.
  • DetailActivity.java: an Activity that displays the book cover for the ID passed to it.
  • JSONAdapter.java: a custom BaseAdapter that transforms a JSON object into a list view item.

Build and run the project to see what you’re working with.

Setting up Your Environment

Android Studio 3.0 and later support Kotlin right out of the box. Any new projects you create will be configured to use Kotlin, as long as you’ve checked the “Include Kotlin support” checkbox when creating the project (you won’t need to create a project for this tutorial since it’s provided as a starter project above):

You’ll occasionally be prompted to update your Kotlin plugin in Android Studio 3.0, when the application first opens. You can always check your Kotlin plugin version on the Plugins screen by hitting command+shift+a and typing “Plugins”, then typing Kotlin into the search box:

Working with Java and Kotlin in the Same Project

One of the most amazing qualities of Kotlin is how it can coexist with Java on a project. Java code can be called from Kotlin and vice versa.

From this point of the tutorial forward, you’ll be translating the DetailActivity class into Kotlin.

Single click the com.raywenderlich.android.omgandroid package in the Project panel on the left-hand side. With the package selected, go to File\New\Kotlin File/Class to create a new Kotlin class. (Without the package selected, you won’t see the Kotlin file option).

On the New Kotlin File/Class popup, select Class in the Kind field and enter DetailActivityKotlin as the class name. Click OK.

intro_to_kotlin_17

Your new class should look like this:

package com.raywenderlich.android.omgandroid

class DetailActivityKotlin {
}

A few things to note here:

  1. As you may have noticed in the above code, classes in Kotlin are declared using the keyword class — just like in Java.
  2. By default, if no visibility modifier is present in Kotlin, then the item is public.
  3. Classes and methods are final by default. You can declare them open if you want extensibility.

Since Kotlin is Java interoperable, you can use existing Java frameworks and libraries in your Kotlin code files.

Make the class a subclass of AppCompatActivity.

class DetailActivityKotlin : AppCompatActivity() {

}

If needed, hit Option+Return to import necessary classes such as AppCompatActivity. Android Studio will usually add the import statements for you if there are no conflicts.

Note that you do this in Kotlin a little differently from how you do it in Java. In Kotlin, you append : NameOfParentClass() to the subclass declaration. The trailing parentheses are for the constructor on the parent class.

Now override Activity‘s onCreate() method. It will look something like this.

import android.app.Activity
import android.os.Bundle

class DetailActivityKotlin: Activity() {

  override fun onCreate(savedInstanceState: Bundle?) {
    super.onCreate(savedInstanceState)
  }
}
Note: You can use Android Studio’s code generation functionality to generate the onCreate method signature with control + O. Press control + O to see a popup with all overridable methods for the class you’re in.

intro_to_kotlin_18

Open MainActivity.java and replace the DetailActivity reference in onItemClick() with DetailActivityKotlin.

Your intent creation line should change from:

Intent detailIntent = new Intent(this, DetailActivity.class);

To this:

Intent detailIntent = new Intent(this, DetailActivityKotlin.class);

Just like you would do for a Java Activity, you need to declare your Kotlin Activity in AndroidManifest.xml. Add the following code under the DetailActivity declaration:

<activity
    android:name=".DetailActivityKotlin"
    android:label="@string/activity_details_kotlin"
    android:parentActivityName=".MainActivity">
  <meta-data
      android:name="android.support.PARENT_ACTIVITY"
      android:value=".MainActivity"/>
</activity>

Build and run. Select a book from the list so you can see that empty screen with the title Kotlin Book Details.

How Cool is Kotlin?

Before you dive deeper into Kotlin’s features, go back to DetailActivityKotlin.kt and replace the contents of the file with the following:

package com.raywenderlich.android.omgandroid

import android.content.Intent
import android.os.Bundle
import android.support.v4.view.MenuItemCompat
import android.support.v7.app.AppCompatActivity
import android.view.Menu
import android.widget.ImageView
import android.support.v7.widget.ShareActionProvider
import com.squareup.picasso.Picasso

class DetailActivityKotlin : AppCompatActivity() {

  private val imageUrlBase = "http://covers.openlibrary.org/b/id/"
  private var imageURL = ""
  private var shareActionProvider: ShareActionProvider? = null

  override fun onCreate(savedInstanceState: Bundle?) {
    super.onCreate(savedInstanceState)

    setContentView(R.layout.activity_detail)

    actionBar?.setDisplayHomeAsUpEnabled(true)

    val imageView = findViewById<ImageView>(R.id.img_cover)

    val coverId = this.intent.extras.getString("coverID")

    val len = coverId?.length ?: 0

    if (len > 0) {
      imageURL = imageUrlBase + coverId + "-L.jpg"
      Picasso.with(this).load(imageURL).placeholder(R.drawable.img_books_loading).into(imageView)
    }
  }

  private fun setShareIntent() {

    val shareIntent = Intent(Intent.ACTION_SEND)
    shareIntent.type = "text/plain"
    shareIntent.putExtra(Intent.EXTRA_SUBJECT, "Book Recommendation!")
    shareIntent.putExtra(Intent.EXTRA_TEXT, imageURL)

    shareActionProvider?.setShareIntent(shareIntent)
  }

  override fun onCreateOptionsMenu(menu: Menu): Boolean {

    menuInflater.inflate(R.menu.main, menu)

    val shareItem = menu.findItem(R.id.menu_item_share)

    shareActionProvider = MenuItemCompat.getActionProvider(shareItem) as ShareActionProvider

    setShareIntent()

    return true
  }
}

On the surface, the code resembles Java, but there are some Kotlin language specifics that you’ll get into in the next section.

Build and run, select a book and see if you get a cover this time. Oh, look, you do!

Null Safety

One of the leading points of frustration with most programming languages, including Java, is accessing a member of a null reference. A null reference occurs when you declare an object variable but haven’t given it a value. When the program runs and tries to access that variable it doesn’t know where to look for it memory because it doesn’t exist.

The most common result of this is your application coming to an abrupt halt and crashing! You might be familiar with Java’s “almighty” NullPointerException. Apologies in advance for any flashbacks! :]

null_pointer_exception

One of Kotlin’s greatest features is that its type system aims to eliminate the NullPointerException (a goal known as void safety).

In Kotlin, the only possible causes of a NullPointerException are:

  • External Java code did it
  • An explicit call to throw NullPointerException()
  • Usage of the !! operator (which will be explained shortly)
  • Some data inconsistency in regards to initialization

Nullable Types and Non-Null Types

Kotlin has nullable and non-null types. If you don’t declare a variable as nullable, then you cannot assign it a null value. This is enforced by the compiler, so it’s much harder to unintentionally crash your app.

In contrast to Java, all variables must be initialized at the point of declaration.

To declare a variable as nullable, you have to append a ? to its type at the point of declaration, as you see in this shareActionProvider declaration:

private var shareActionProvider: ShareActionProvider? = null

Safe Calls

To access a property or method on a nullable variable in Java, you would first do a null check. You can see this in DetailActivity.java:

if (shareActionProvider != null) {
  shareActionProvider.setShareIntent(shareIntent);
}

With Kotlin, you can simplify the above expression with the use of a safe call operator (?.). The property or method is only called when the nullable variable is not null.

shareActionProvider?.setShareIntent(shareIntent)

Here, setShareIntent is only called when the shareActionProvider property is not null.

The !! Operator

As stated earlier, this is one of possible causes of the dreaded NullPointerException. If you’re absolutely sure a nullable object is not null, feel free to use the !! operator to dereference your object.

You can see an example of this in setShareIntent():

shareActionProvider = MenuItemCompat.getActionProvider(shareItem!!) as ShareActionProvider

In here, a NullPointerException is thrown if the shareItem variable is null.

The Elvis Operator

The Elvis Operator (?:) looks like the ternary conditional operator in Java, but works differently. You can see an example of this when trying to get the length of the cover ID:

val len = coverId?.length ?: 0

If the expression to the left of the Elvis operator is not null, the results of the expression are returned. Otherwise, the it returns the expression to the right.

Similarly to an if-else statement, Elvis only evaluates the expression on the right if the one on the left side is null.

Type Inference

Kotlin also supports type inference, meaning the compiler can assume its type from the initializer when a variable is declared and initialized. For example, the types of the imageUrlBase and imageURL variables are inferred from their initializers.

private val imageUrlBase = "http://covers.openlibrary.org/b/id/"
private var imageURL = ""

The compiler tracks the inferred type of each variable (each is a String), and any subsequent values assigned to the variable must also be of that type (String).

The Coolest of Them All

Already thinking of rewriting your Java project in Kotlin? Don’t stress — the Android Studio Kotlin plugin has you covered.

Since Kotlin is a programming language made by developers for developers, it’s designed to make your life as easy as possible. The Kotlin plugin even has a handy tool that allows you to convert a Java source file to Kotlin.

Take this sanity-saving feature for a test drive by converting the DetailActivity.java file to Kolin.

Open the DetailActivity.java class and go to Code\Convert Java File to Kotlin File.

Click OK on the Convert Java to Kotlin screen. This will replace the Java file with a Kotlin one!

intro_to_kotlin_14

That’s it. You’ve converted a Java class into a Kotlin class. :]

Compare the converted DetailActivity with the DetailActivityKotlin class you made manually to see some of the choices the converter made.

You can reset MainActivity to refer to the newly converted code:

Intent detailIntent = new Intent(this, DetailActivity.class);

Build and run and go to the detail screen, and you’ll see the converted code works just as well as the code you typed in. :]

Where To Go From Here?

Congratulations! You just learned about the Kotlin programming language and some of it’s amazing features, re-coded a Java Activity in Kotlin, and used the Kotlin plugin to convert a Java source file into a Kotlin source file.

Download the final project for this tutorial here.

I suggest reading up further on Null Safety in Kotlin in the documentation.

You can also use the Kotlin online compiler to try out code samples and improve your knowledge of the language.

You’ve only scratched the surface of the amazing possibilities with Kotlin. If you’re excited by what you’ve read here, you can checkout topics such as Data Classes, Extensions, Lambdas, or String Templates if you need to satisfy your appetite for knowledge.

I hope you enjoyed this Kotlin for Android tutorial, and if you have any questions or comments, please join the forum discussion below!

The post Kotlin For Android: An Introduction appeared first on Ray Wenderlich.

Readers’ App Reviews – October 2017

$
0
0

Halloween is on its way, and apps by raywenderlich.com readers are spookier than ever!

OK, maybe they’re not that spooky. But they are still awesome! :]

Every month, readers like you release great apps built with a little help from our tutorials, books, and videos. I want to highlight a few today to give just a peek at what our fantastic readers are creating.

This month we have:

  • A compilation creation app
  • A Pirate Match 3 game
  • A Machine Learning camera app
  • And of course, much more!

Keep reading to see the latest apps released by raywenderlich.com readers just like you.

SnapThread


Sharing self-made video compilations with your friends and family has never been easier thanks to SnapThread.

SnapThread is an app that lets you select videos and live photos from your photo library, rearrange them into any order you’d like, and then share them across many platforms including Facebook and Snapchat!

Don’t worry, you will also be able to preview your creation before you send it to make sure it’s perfect. The app is very user friendly and you’ll be able to make the most out of it the second you launch it.

Honestly, this is one of the best apps I’ve seen for simple compilation creation. Download SnapThread and turn all your small clips into one awesome compilation of fun and enjoyment!

Pirates! – The Match 3


Match Three games have seen many iterations, but not many take on the stylistic qualities of everyone’s favorite scallywags, the pirates!

Pirates! – The Match 3, succeeds at stylizing the match three genre into a pirate theme. The art and music complement each other very well and set the tone for treasure hunting via the game’s match three mechanic.

There are over 130 levels to play, each with different goals to achieve. Some levels have you break open certain objects by making matches around them, while others have you clearing a background of sand in order to find buried coins. After you’ve completed those levels, keep a sharp eye on the horizon because more are coming soon!

Overall, Pirates! – The Match 3 is a fun game that I will definitely be playing more of. You should download it and play too!

Conjugar


Learning the Spanish language can be difficult, especially when it comes to verb conjugations. That’s where Conjugar has your back!

Conjugar was made with verb conjugations in mind as it has a huge database of many Spanish verbs, some that follow the normal rules and some that don’t. This database shows you every conjugation of that verb and shows you the places where they don’t follow the normal conjugation rules.

Once you’ve familiarized yourself with the verbs, head into quiz mode and challenge yourself with a series of questions.

Download Conjugar today and see how high you can get your score. You will also learn a lot of Spanish along the way!

Sky Mice


We will never get tired of the run ’em and gun ’em style games and I know I won’t get tired of this one. SkyMice is an awesome game where you have to save your mouse friends from and evil crocodile commander in his sky castle.

You play as a mouse pilot named Wisk who must fight and conquer crocodile bosses through many different stages in order to reach the crocodile commander. There are over 50 levels for you to play through, each with a variety of enemies to fight.

Every ten levels unlocks a new area with new scenery to spice things up a bit. Along the way, look out for power-up drop boxes that will help you defeat your enemies quicker or maybe stop you from taking too much damage.

Your mouse friends need you! Download SkyMice and free your friends from the crocodile commander’s clutches.

ML Camera


Machine Learning is one of the hot new topics in today’s tech world and this app aims to show some of the capabilities of those systems through your phone’s camera.

ML Camera tries to classify whatever object is in its view using a list of over one thousand categories. The app also displays what the object is as well as how correct it’s prediction is. There are options for different types of classifications like whole scenes or just specific objects.

While the app itself doesn’t do anything more that that, it is a fantastic demonstration of how far machine learning has come and where it may be headed in the future.

See how many things ML Camera can classify correctly by downloading it and pointing your camera at everything you own. It’s fun to do, especially when it thinks your headset is a space shuttle!

JQuest


JQuest is a fun twin-stick shooter with a fantasy or medieval art style, plus some role-playing aspects.

You can pick from three different character styles and delve into dungeons in search of gold. Watch out for the guardians of the gold though. They are pretty unforgiving and will take you out as soon as they get the chance.

There are twenty levels for you to play through, each getting increasingly difficult as you move forward. But there are upgrades that you can purchase with your gold to help you complete the more challenging ones.

JQuest is simple, fun, and a great way to entertain yourself. Download it and try to complete all 20 levels today!

Coinski


Everyone knows the game show like game Plinko, where you drop a ball into a board filled with pins and it randomly reaches the bottom. Coinski is similar to that game but with the ability to shift the odds in your favor.

Coinski is set up like a vertical maze. There are vertical lines with gaps in between them for your coins to fall through. There are also platforms that stop the coins from reaching the bottom. If a coin falls past the platforms on its opposite side, it switches to that side instead.

It sounds complicated, but it is very easy to understand once you’ve played a game or two. Each player drops coins into whichever lane they want in an attempt to create a chain reaction that sends as many coins as possible to the bottom on their turn. The person who gets the most coins to the bottom wins!

Coinski is a fun game to play alone, with a friend, or even with two friends. Give it a try and shift the odds in your favor.

Where To Go From Here?

Each month, I really enjoy seeing what our community of readers comes up with. The apps you build are the reason we keep writing tutorials. Make sure you tell me about your next one, submit here.

If you saw an app you liked, hop to the App Store and leave a review! A good review always makes a dev’s day. And make sure you tell them you’re from raywenderlich.com; this is a community of makers.

If you’ve never made an app, this is the month! Check out our free tutorials to become an iOS star. What are you waiting for – I want to see your app next month.

The post Readers’ App Reviews – October 2017 appeared first on Ray Wenderlich.

Swift Algorithm Club: October 2017 Digest

$
0
0

SwiftAlgClub-Sept-Digest-feature

The Swift Algorithm Club is a popular open source project to implement popular algorithms and data structures in Swift, with over 14,000 stars on GitHub.

We periodically give status updates with how things are going with the project.

2 New Submissions

We’re happy to announce 2 new submissions to the Swift Algorithm Club project!

1) 3Sum 4Sum

The 3Sum and 4Sum are popular interview questions. Given a bunch of integers and a target number, can you find all the possibilities where 3 numbers add up to the target number?

Thanks to Kai Chen for adding this problem.

2) Octrees

The Octree is a tree in which each internal (not leaf) node has eight children. Often used for collision detection in games for example.

Thanks to Jaap Wijnen for this contribution.

Where To Go From Here?

The Swift Algorithm Club is always looking for new members. Whether you’re here to learn or here to contribute, we’re happy to have you around.

To learn more about the SAC, check out our introductory article. We hope to see you at the club! :]

The post Swift Algorithm Club: October 2017 Digest appeared first on Ray Wenderlich.

Development Tutorial for iPhone X

$
0
0

How to develop and design for the iPhone X

Everyone’s excited about the iPhone X, the “iPhone that is entirely screen” — and what a screen! Plus Face ID, TrueDepth selfie/animoji camera, 12-megapixel wide-angle and telephoto rear cameras, A11 Bionic neural engine chip, and wireless charging. But the amazing new screen requires a few changes to your app design. In this tutorial, you’ll explore the new aspect ratio, and build an app with a search controller integrated into the navigation bar. Then you’ll explore how to fix an app that was created shortly before the iPhone X announcement: is it enough to just turn on safe area? Read on to find out.

What’s Different?

First, a quick rundown on what’s different about the iPhone X screen:

  • Screen size is 375 x 812 points, so the aspect ratio is 9:19.5 instead of 9:16. That’s 145 pts more than the iPhone 6/7/8’s 4.7″ screen but the status bar uses 44 pts, and the home indicator almost doubles the height of the toolbar.
  • Screen resolution is 3x: 1125 x 2436 pixels.
  • Screen design must take into account the sensor housing, home indicator and rounded corners.

  • In portrait, the navigation bar is 88 pts, or 140 pts for large titles. The toolbar is 83 pts instead of 44 pts. In landscape, the toolbar is 53 pts, and layout margins are 64 pts instead of 20 pts.
  • In portrait, the status bar is taller — 44 pts, not 20 pts — and uses space not used by the app, either side of the sensor housing. And it doesn’t change size to indicate phone, location-tracking, and other background tasks.

Geoff Hackworth’s Medium article has super-helpful diagrams of the new screen anatomy, courtesy of his Adaptivity app.

Getting Started

Download the starter package, and unzip it.

First, see for yourself what happens when you load a 9:16 image into an iPhone X screen. Open AspectRatioSample, then open Main.storyboard. Set View as to iPhone X, and select the image view. In the Attributes Inspector, switch Content Mode between Aspect Fit and Aspect Fill:

The 8Plus image were created by stacking two image views, building and running in the iPhone 8 Plus simulator, then taking a screenshot. So the image’s aspect ratio is 9:16.

The image view’s constraints are set to fill the safe area, so its aspect ratio is 9:19.5.

In Aspect Fit, the black view background shows above and below the image (letter-boxing). Aspect Fill covers the view, but crops the sides of the image.

In landscape orientation, Aspect Fit would pillar-box the image (show the background view on the sides), and Aspect Fill would crop the top and bottom.

Assuming you don’t want to create different images just for iPhone X, and you want to cover the view, then you’re going to get cropping.

Rule: Compose your images so you don’t lose important visual information when Aspect Fill crops them.

Designing a New App

Close AspectRatioSample, and open NewCandySearch. Build and run on the iPhone X simulator:

This is a master-detail app with a list of candies. The detail view shows an image of the selected candy.

I’ll wait while you get your favorite snack! ;]

Scroll the table view, to see that it makes no attempt to avoid the home indicator. This is perfectly OK for vertically scrollable views and background images.

Rules:
  • Avoid the sensor housing and home indicator, except for background image and vertically scrollable views.
  • Avoid placing controls where the home indicator overlaps, or corners crop.
  • Don’t hide or draw attention to sensor housing, corners or home indicator.

Use Auto Layout

Open Main.storyboard, select either view controller, and show the Identity Inspector:

New projects created in Xcode 9 default to using Auto Layout and Safe Area Layout Guides. This is the simplest way to reduce the work needed for iPhone X design.

Rules:
  • Use safe area layout guides.
  • Use margin layout guides.
  • Center content or inset it symmetrically.

Use Standard UI Elements

Now you’re going to add a search bar with scope bar. And you might as well opt for the new large title, too.

Select Master Scene/Navigation Bar, show the Attributes Inspector, and check the box for Prefers Large Titles:

While you’re here, select the table view’s cell, and set its background color to light gray:

Next, open MasterViewController.swift: it already has most of the search controller code. You just have to replace the TODO comment in setupSearchController() with this:

// In iOS 11, integrate search controller into navigation bar
if #available(iOS 11.0, *) {
  self.navigationItem.searchController = searchController
  // Search bar is always visible
  self.navigationItem.hidesSearchBarWhenScrolling = false
} else {
  tableView.tableHeaderView = searchController.searchBar
}

If the device is running iOS 11, you set the navigation item’s searchController property; otherwise, you put the search bar in the table view’s table header view.

Build and run on the iPhone X simulator. Admire the large title, then rotate the simulator to landscape, and tap the search field to show the scope bar:

The search field, cancel button and scope bar are all nicely inset from the rounded corners and sensor housing. The cell background color extends all the way across, and the table view scrolls under the home indicator. You get all these behaviors free, just for using standard UI elements.

Recommendation: Use standard UI elements.
Note: If you rotate back to portrait while the scope bar is showing, it collapses messily onto the search field. Fortunately, you can still tap the cancel button to get rid of the scope bar. This seems to be an iOS 11 bug: the same thing happens when the search bar is in the table header view, but doesn’t happen in the same app running in iOS 10.

Build and run the app on the iPhone 8 simulator, to see that it looks fine there, too:

Note: The iPhone X is compact width in landscape orientation, so it behaves like the iPhone 8, not the 8 Plus.

Here are some other recommendations:

Status Bar

  • The iPhone X status bar is higher, so dynamically position content based on the device type, instead of assuming a fixed 20-pt height.
  • Always show the status bar unless hiding it adds real value to your app.

3x Screen Resolution

  • Use PDF for flat vector artwork; provide @3x and @2x of rasterized artwork.
  • An app doesn’t use 3x if it doesn’t have a LaunchScreen.storyboard.

Home Indicator Special Cases

  • If your app uses the swipe-up-from-bottom gesture, turn on edge protect with preferredScreenEdgesDeferringSystemGestures(): the user must swipe up twice to access the home indicator.
  • If your app includes passive viewing experiences, turn on auto-hiding with prefersHomeIndicatorAutoHidden(): the home indicator fades out if the user hasn’t touched the screen for a few seconds, and reappears when the user touches the screen.

iPhone X Simulator vs Device

  • Use the simulator to check portrait and landscape layout.
  • Use an iPhone X device to test wide color imagery, Metal, front-facing camera.

Other Stuff

  • Don’t reference Touch ID on iPhone X. Don’t reference Face ID on devices that support Touch ID.
  • Don’t duplicate system-provided keyboard features like Emoji/Globe and Dictation buttons.

Updating an Existing App

What if you want to update an existing app for iPhone X? First, update its assets, including background images, to PDF or add @3x images. Then make sure it has a LaunchScreen.storyboard, and turn on Safe Area. Safe area layout guides change top, bottom and edge constraints, so check these, and fix them if necessary.

Check for any layout that depends on a 20-pt status bar or 44-pt tool bar, and modify it to allow for different heights. Or, if your app hides the status bar, consider unhiding it for iPhone X.

Next, set View as to iPhone X, and check every layout configuration. Move controls away from the edges, corners, sensor housing and home indicator.

Consider integrating search view controllers into the navigation bar.

Build and run the app on the iPhone X simulator, and check every layout configuration. In landscape, check that table view cell and section header content is inset, but the background extends to the edges.

Here’s a simple example to work through. Download the (original) finished sample app from UISearchController Tutorial. This app was built with Xcode 9 beta, before Apple announced the iPhone X, so Tom Elliott couldn’t test it on the iPhone X simulator.

Build and run it on the iPhone X simulator. In portrait, it looks like NewCandySearch, plus the navigation bar has a candy-green background color and a fancy title image instead of a large title:

But there’s a line between the navigation bar and the search bar, because the search bar is in the table header view. It gets worse: tap in the search field to show the scope bar:

The search bar replaces the navigation bar, removing the background color from the status bar. The search bar is still candy-green, so it just doesn’t look right.

To see more problems, cancel the scope bar, then rotate to landscape:

The title image is slightly clipped, and the sensor housing cuts a bit off the lower left corner of the search bar. But the table view isn’t customized, so its cell contents are well clear of the sensor housing.

Again, tap in the search field to show the scope bar:

Now the rounded corners clip the search bar.

Note: You probably noticed that showing the scope bar hides the first table view cell Chocolate Bar. Although this didn’t happen in NewCandySearch, it’s not a reason to move the search bar into the navigation bar. This is an iOS 11 bug that Tom Elliott reported to Apple on August 2, 2017. At the time of writing this tutorial, its status was still Open.

Turning on Safe Area

Open Main.storyboard, select one of the view controllers, and show the File Inspector:

This app doesn’t use safe area layout guides! So check that checkbox, then check the constraints now refer to Safe Area:

Build and run, and see how it looks in landscape, with the scope bar:

It’s even worse! The table header view extends far beyond its superview, although the table footer view is fine. This is possibly another iOS 11 bug, which might be fixed by the time you read this tutorial.

Even if Safe Area prevented the corner clipping, it’s not a good look for the status bar to lose its background color when the search bar replaces the navigation bar. You can fix that by moving the search bar into the navigation bar, so that’s what you’ll do next.

Integrating the Search Bar

Well, this is easy — just copy the NewCandySearch code that sets the navigation bar’s searchController into CandySearch. Open MasterViewController.swift in both projects, and copy these lines from NewCandySearch:

// replace tableHeaderView assignment with this
if #available(iOS 11.0, *) {
  self.navigationItem.searchController = searchController
  // Search bar is always visible
  self.navigationItem.hidesSearchBarWhenScrolling = false
} else {
  tableView.tableHeaderView = searchController.searchBar
}

In MasterViewController.swift of CandySearch, paste these lines in viewDidLoad(), and comment out this line:

tableView.tableHeaderView = searchController.searchBar

Now open AppDelegate.swift, and find these lines:

UISearchBar.appearance().barTintColor = .candyGreen
UISearchBar.appearance().tintColor = .white
UITextField.appearance(whenContainedInInstancesOf: [UISearchBar.self]).tintColor = .candyGreen

Delete or comment out the first line: the search bar will get its tint color from the navigation bar.

Build and run, and tap in the search field to show the scope bar:

So that’s fixed the status bar background color, but now the text field is also green, making it hard to see the search field prompt text and icon. The insertion bar is also green, but you can fix that — change the third appearance setting in AppDelegate.swift to:

UITextField.appearance(whenContainedInInstancesOf: [UISearchBar.self]).tintColor = .white

Below this, add the following line:

UITextField.appearance(whenContainedInInstancesOf: [UISearchBar.self]).backgroundColor = .white

This should make the text field background white but, at the time of writing this tutorial, it doesn’t work, which suggests another iOS 11 bug. As an interim fix, you could change the color of the search field prompt text and icons. For example, to make the prompt text white, add the following code to AppDelegate.swift in application(_:didFinishLaunchingWithOptions:):

let placeholderAttributes: [NSAttributedStringKey : Any] = [NSAttributedStringKey(rawValue: NSAttributedStringKey.foregroundColor.rawValue): UIColor.white, NSAttributedStringKey(rawValue: NSAttributedStringKey.font.rawValue): UIFont.systemFont(ofSize: UIFont.systemFontSize)]
let attributedPlaceholder: NSAttributedString = NSAttributedString(string: "Search", attributes: placeholderAttributes)
UITextField.appearance(whenContainedInInstancesOf: [UISearchBar.self]).attributedPlaceholder = attributedPlaceholder

To make the search icon and clear button white, add the following code to viewDidLoad() in MasterViewController.swift:

let textField = searchController.searchBar.value(forKey: "searchField") as! UITextField
let glassIconView = textField.leftView as! UIImageView
glassIconView.image = glassIconView.image?.withRenderingMode(.alwaysTemplate)
glassIconView.tintColor = .white
let clearButton = textField.value(forKey: "clearButton") as! UIButton
clearButton.setImage(clearButton.imageView?.image?.withRenderingMode(.alwaysTemplate), for: .normal)
clearButton.tintColor = .white

Again, this doesn’t work at the time of writing this tutorial, but it might be fixed by the time you read this.

Where To Go From Here?

You now have a good idea of how to design apps that look great on the iPhone X, as well as the other iPhones. Here is a bundle of the two sample projects, with all the code from this tutorial. If you want to dig deeper, check out these resources:

Apple

raywenderlich.com

If you’re new to auto layout, or just need to brush up, check out our tutorial and video course:

I hope you’ll soon have your apps running beautifully on the iPhone X. If you have any questions or comments, please join the forum discussion below!

The post Development Tutorial for iPhone X appeared first on Ray Wenderlich.

Advanced Apple Debugging & Reverse Engineering Update: Coming Soon!

$
0
0

Hey everyone! I wanted to give you a quick update on the progress of the Swift 4 version of the Advanced Apple Debugging & Reverse Engineering book.

The author, Derek Selander, has been digging deep into the lowest layers of Swift 4 and iOS 11 to update the book with the latest and greatest information on low-level debugging and code swizzling.

We’ve given Derek some extra time to ferret out the best pieces of the newest frameworks from Apple, so the Swift 4 edition of the book should be out November 20.

This will be a free update for existing Advanced Apple Debugging & Reverse Engineering PDF customers — our way to say “thanks” to our readers for their support.

Don’t own Advanced Apple Debugging & Reverse Engineering yet? Read on to see how you can get a copy!

What is Advanced Apple Debugging & Reverse Engineering?

Debugging has a rather bad reputation. If the developer had a complete understanding of the program, there wouldn’t be any bugs and they wouldn’t be debugging in the first place, right?

There are always going to be bugs in your software — or any software, for that matter. No amount of test coverage imposed by your product manager is going to fix that. In fact, viewing debugging as just a process of fixing something that’s broken is actually a poisonous way of thinking that will mentally hinder your analytical abilities.

The same thing applies to reverse engineering. Images of masked hackers stealing bank accounts and credit cards may come to mind, but for this book, reverse engineering really is just debugging without source code — which in turn helps you gain a better understanding of a program or system.

In this book, you’ll come to realize debugging is an enjoyable process to help you better understand software. Not only will you learn to find bugs faster, but you’ll see how other developers have solved problems similar to yours. You’ll also learn how to create custom, powerful debugging scripts that will help you quickly find answers to any item that piques your interest, whether it’s in your code — or someone else’s.

Where To Go From Here?

The Swift 4 and iOS 11 edition of Advanced Apple Debugging & Reverse Engineering should be out on November 20.

But since the iOS 11 Launch Party is still going on, you can grab the Swift 3 PDF edition of the book in our store — and enjoy a free upgrade when the Swift 4 and iOS 11 edition is released!

To help sweeten the deal, the digital edition of the book is on sale for $49.99! But don’t wait — this sale price is only available for a limited time.

Speaking of sweet deals, be sure to check out the great prizes we’re giving away this year with the iOS 11 Launch Party, including over $9,000 in giveaways!

The post Advanced Apple Debugging & Reverse Engineering Update: Coming Soon! appeared first on Ray Wenderlich.

Viewing all 4374 articles
Browse latest View live


<script src="https://jsc.adskeeper.com/r/s/rssing.com.1596347.js" async> </script>